Having overcome Club Brugge in the Europa League round of 32, RB Salzburg are looking forward to a last-16 tie against Napoli this coming Thursday. However, their domestic campaign took focus over the weekend as Wolsfberger arrived at the Red Bull Arena hoping to cause an upset.
The visitors sat in fifth place heading into this game, 20 points off Salzburg in top spot. A comfortable 3-0 win for the home side saw that gap stretch to 23, with their respective league positions remaining unchanged. This analysis will look at how Marco Rose’s team came out on top.
Lineups
Rose went with his regular 4-diamond-2 formation for this game, with Moanes Dabour and Smail Prevljak playing as split strikers. Hannes Wolf supported from behind but had freedom to roam between the lines. Talented young Malian midfielder Diadie Samassekou screened in front of the centre backs, while Darko Todorovic and Andreas Ulmer arrived in the final third to provide width.
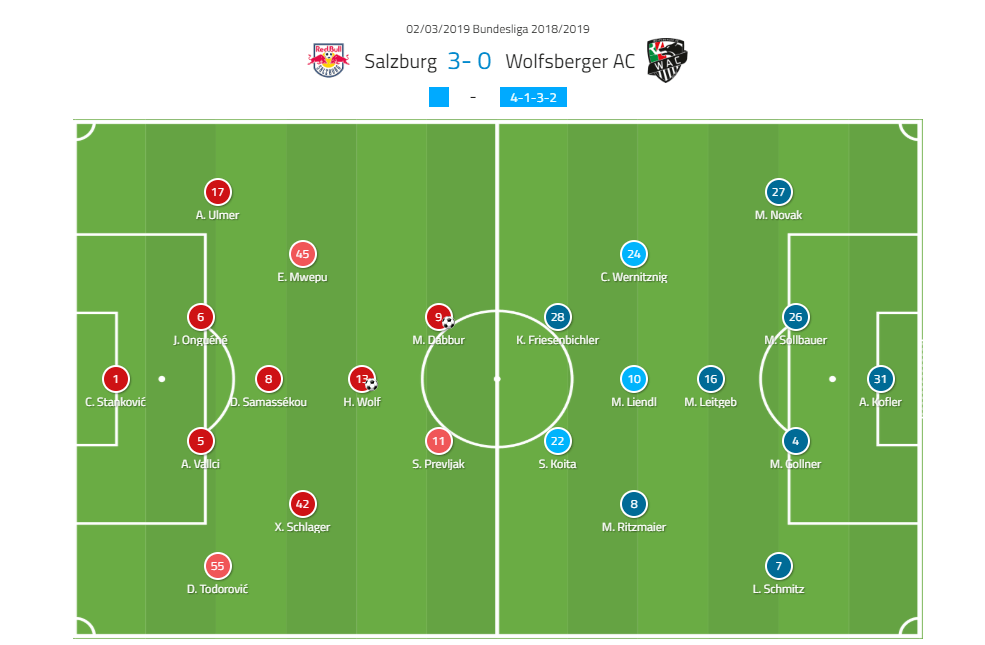
Wolsberger varied between a 4-2-3-1 and a 4-1-3-2 with Sekou Koita supporting Kevin Freisenbichler in attack. Whenever they pressed from the front, however, they tended to focus on applying pressure in numbers where access to the ball existed. This often resulted in a disjointed shape and large spaces opening up for Salzburg to exploit provided they could break the press. Marcel Ritzmaier and Christopher Wernitznig occupied the wide berths, but frequently moved infield in an attempt to lessen Salzburg’s numerical advantages in central areas.
The Salzburg press
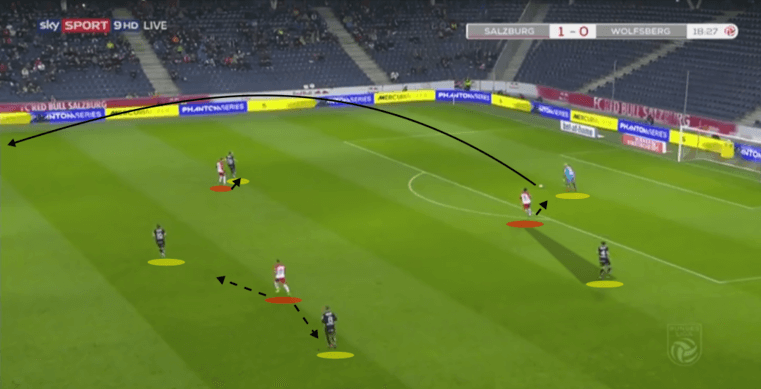
RB Salzburg played their usual high-intensity pressing game on Saturday, forcing Wolfsberger to play it long on most occasions. Whenever the ball was with the keeper, Salzburg’s most advanced three set up to eradicate all the short passing options. Dabour and Prevljak occupied the central defenders, while Wolf positioned himself between the away team’s holding midfielders.
With access to press the keeper, one of the strikers would often close him down while closing off the passing lane to their respective centre-backs using a cover shadow. The image below illustrates this, with Dabour angling his approach so as to prevent the pass to his marker and apply pressure to the keeper in an attempt to force a poor long pass or a mistake.
On the occasions when Wolfsberg managed to establish possession further forward, we saw Salzburg’s diagonal press. With Rose’s team attempting to close off the centre and force progressions down the side, they then looked to force turnovers using diagonal pressure towards the touchline.
The near-side striker and outside midfielder would join up with the player at the tip of the diamond to form the first line of pressure. The far-side striker and outside midfielder teamed up with the pivot to form the second line directly behind them. The image below illustrates this technique. Salzburg’s first line of pressure closes out the space and forces a turnover.
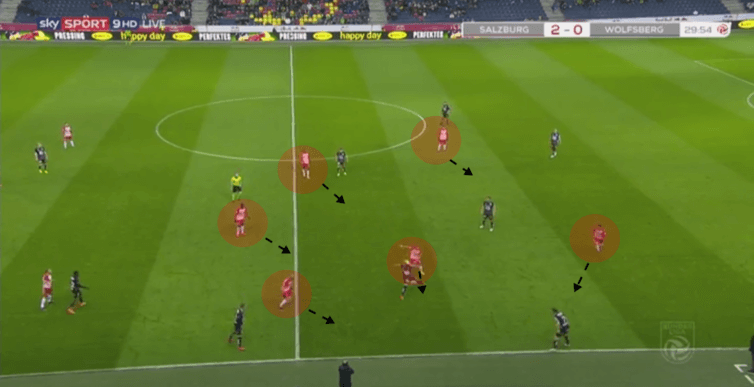
They also applied their usual counter-pressing methods to recover possession quickly following losses of possession. With a compact horizontal shape, Salzburg were able to press in packs when the ball was lost in central areas. Their counter-pressure was generally space-oriented, closing off the zone around the ball occupant while blocking off passing lanes with their angle of approach.
The pressure often arrived from players ahead of the ball before completing ‘blind-side’ dispossessions. The image below shows Schlager, Wolf, and Prevljak collapsing onto a Wolfsberg midfielder following a turnover. They recover possession through Prevljak before attempting to link-up and exploit the space down the sides.
As mentioned previously, Wolfsberger were forced long for much of the game and failed to settle into a sustainable attacking pattern. Following the long balls, Salzburg were well placed to win the first ball with Samassekou, Vallci and Onguene dominating the aerial battles through the middle. The surrounding players also positioned themselves well to recover the knock-downs.
The image below shows Salzburg forcing Manfred Gollner to play a long, hopeful ball towards the strikers. All passing lanes are shut off with a combination of marking and cover shadows, Dabour is ready to press the goalkeeper should he receive, and the ball occupant is pressured into the long pass.
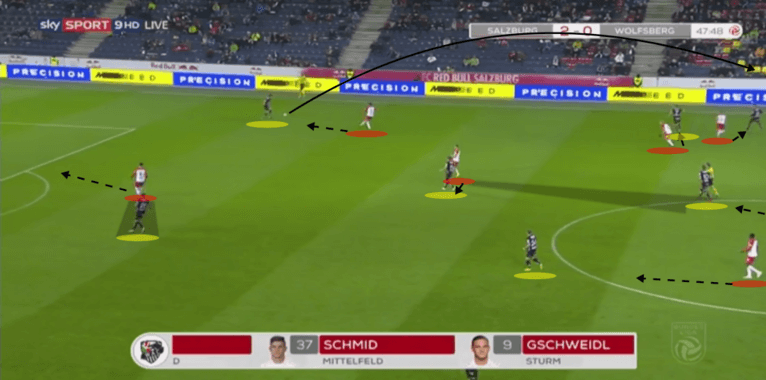
During their defensive rest phase, Salzburg lined up with a flat three in front of the back four, although Samassekou usually remained slightly deeper than the other two. Wolf was positioned just in front, while one of the front two would drop deeper to support in closing the spaces. During transitions from defence to attack, this shape began spreading out again, and if the counter was unsuccessful, Wolfsberg were sometimes able to exploit the space.
The image below shows the aftermath of an unsuccessful break-away from Salzburg, The far-side left-back is out of position, meaning Enock Mwepu has to slot into a covering position to follow Friesenbichler. This narrows the midfield line into a two, and with Schlager pushing out to the right wing to close down the opposing full-back, space opens up centrally for Wolfsberger to play through.
Wolf tries to get back into the midfield line to cover but is too late, and the away side can break progress into the attacking third. The move doesn’t result in anything significant, however.
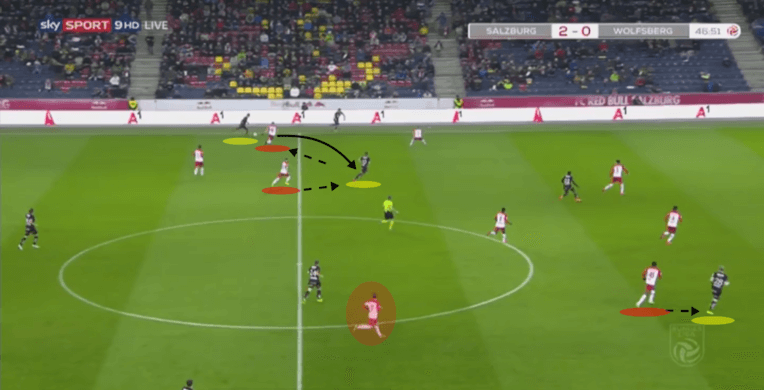
Exploiting Wolfsberger’s defensive strategies
Although they managed to enjoy 61% percent of possession and register 22 shots on goal, Salzburg didn’t have it all their own way. During build-up play deep in their half, pressure was applied in the hope of stifling their attempts to play through the thirds. They were often forced into playing long to the strikers, a method that generally proved ineffective due to their height disadvantage against the Wolsfberger centre-backs.
With good ring-fencing positioning, however, they did sometimes get on the end of second balls before attacking the space behind their opponent’s pressure. Another technique they used to bypass pressing and cover shadows in the first phase of possession involved wall passes and third-man runs.
With central passing lanes closed off, Albert Vallci and Jerome Onguene would sometimes play more direct passes behind Wolfsberger’s midfield towards one of the dropping strikers. They would then make lay-offs to the midfielders, allowing them to receive possession behind pressure and facing the play. Attempts to progress via lofted passes out to the full-backs were generally thwarted by the pressure arriving from the opposing full-backs.
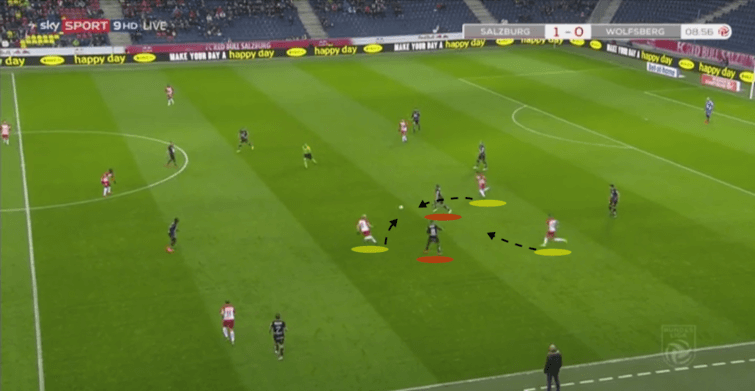
Confident in their ability on the ball, they also regularly elected to play through pressure with brave passing in deep areas. On the occasions where they did manage to play through, space existed to exploit with Wolfsberg disjointed. The images below illustrate this with Wolfsberg trying to box Salzburg into a corner to force a mistake or a long pass. Xaver Schlager makes an audacious pass around one of the defending players to find Samassekou in the pivot space.
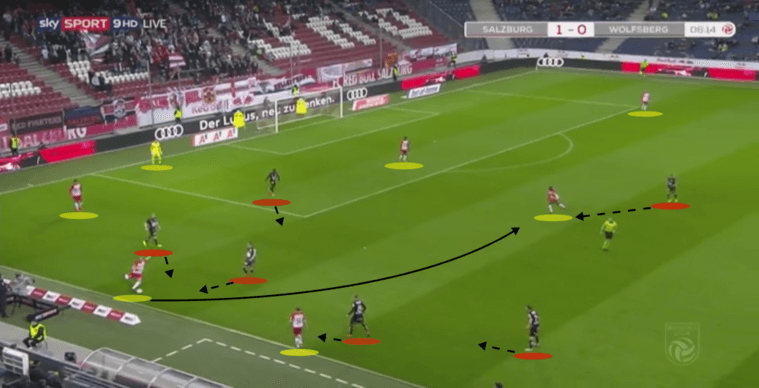
After Samassekou passes to Vallci, the centre-back is pressed aggressively with his passing options cut off by cover shadows. However, he is also brave enough to play through tight gaps in spite of the risks attached. His pass finds Mwepu, who turns before feeding the open channel down the left.
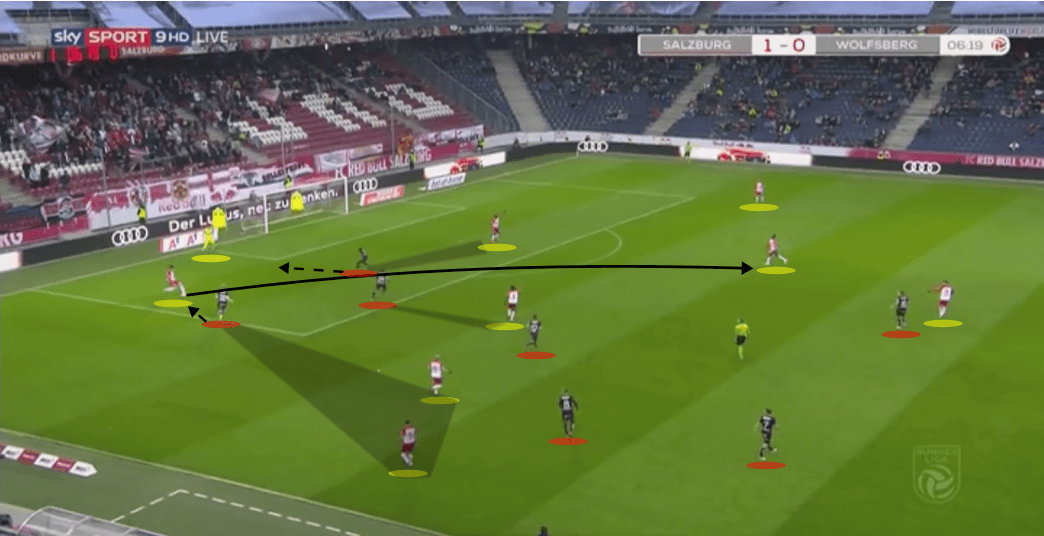
In an attempt to cancel out Salzburg’s numerical superiority in central areas, Wolfsberger’s wide midfielders would often invert to support the centre. Furthermore, the fact that the two strikers played between the centre-backs and full-backs meant that the latter faced constant dilemmas over when to support centrally and when to defend the space out wide. This consistently lead to space opening up in the wide channels for any one of Salzburg’s full-backs, strikers, number 10, or outside midfielders to exploit.
The image below shows an occasion when Hannes Wolf was able to make a late run into the space behind the full-back. The young attacker moves into the space on the defender’s blind-side before receiving from Todorovic.
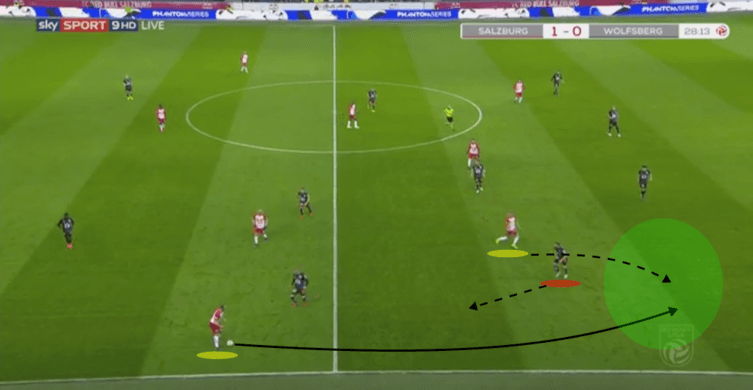
With Wolf now in a threatening attacking position and having lost the full-back, the left-sided central defender is forced to vacate his position to cover the immediate danger. Wolf is able to beat the second defender with a dribble before carrying through the open space and slotting past Alexander Kofler for Salzburg’s second.
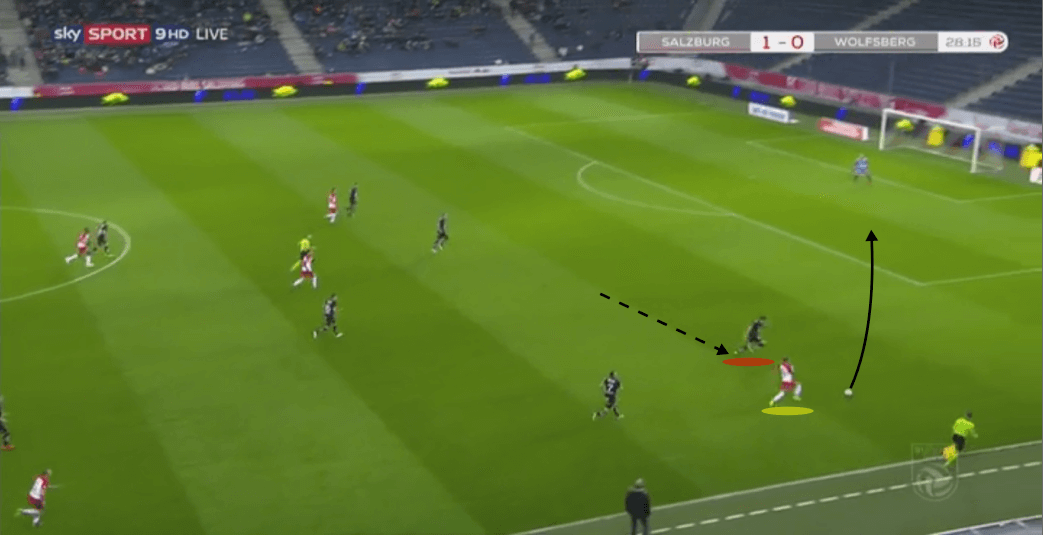
When Salzburg managed to progress through the centre with vertical one and two-touch passing, the ball could then be fed out to the arriving full-backs to cross. Equally, one of the strikers would often split into wide areas to receive in these instances.
The image below shows an occasion when RB progressed through the middle. The centre is congested as Wolfsberg attempt to kill the numerical advantages. The full-backs are forced to stay narrow to support the centre-backs in defending their opposing strikers. Salzburg feed Ulmer in open space on the left before he crosses to the box.
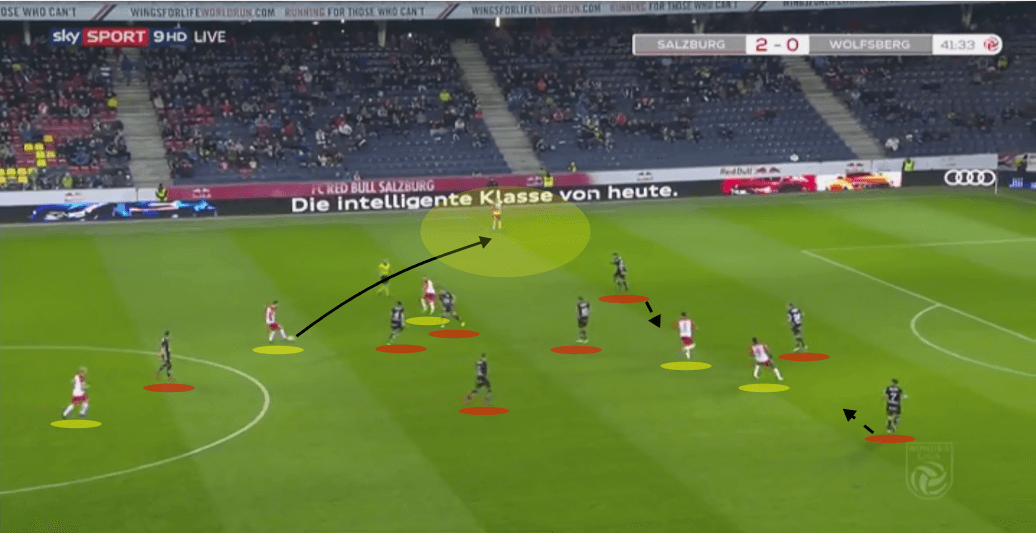
Red Bull’s diamond midfield and front two continue to cause positional and numerical superiorities, making it extremely difficult for opponents to stifle their attacking play. If the opposition try to match up centrally, they can play through with vertical one and two-touch combinations before feeding the free men on the outside. If the opponents choose not to match up centrally, Salzburg can break into the final third at ease using their spare men, before combining to create chances via the centre.
Set-piece second phase
An interesting feature of their performance on Saturday was how frequently they managed to exploit the second phase on attacking set-pieces. While they were generally unthreatening directly from corners, they were well positioned to recover possession outside the box before feeding the wide areas. The defence naturally pushes out in these instances and often becomes more disorganised or open than they normally would be in an established defensive phase.
The images below provide examples of this, with the ball being recovered outside the box before being fed back into the wide areas. The attackers are now goal-side and with the low-cross being played in line with them, they remain onside.
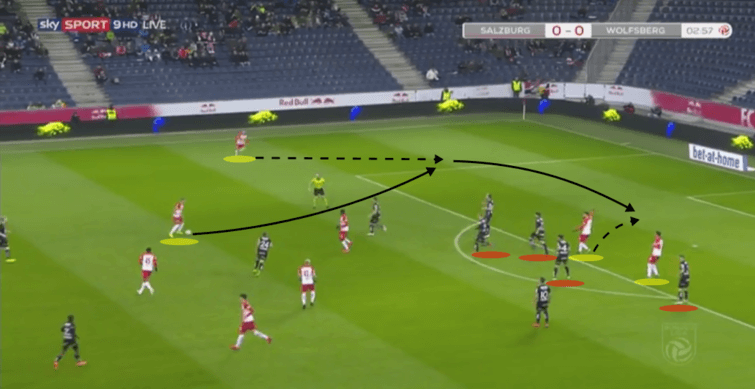
The second image is a re-occurrence of this type of scenario for Red Bull’s third goal. Following an unsuccessful corner, the ball is recovered outside the area by Takumi Minamino before he plays a one-two with Samassekou. Minamino then crosses for Dabour, who is goal-side of the defender and can head home to clinch three points.
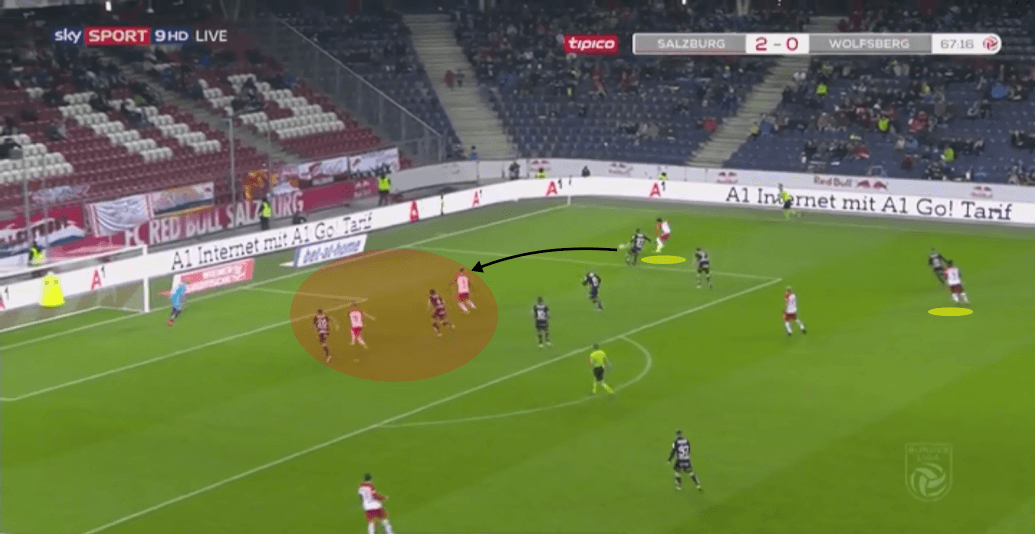
Salzburg created a couple more quality opportunities from the second phase of their corners. The tactic holds similar principles to counter-pressing in general: ring-fence behind possession to prevent counter-attacks, recover possession, and exploit the opponent’s disorganisation as they open up and push out.
Conclusion
An overall impressive performance saw RB Salzburg comfortable winners as they increase their lead at the top to 11 points. They can now look ahead with confidence to their Europa League round of 16 tie against Napoli. It represents a tough test, but if last season’s European exploits are anything to go by, it would be unwise to bet against Marco Rose and his team.
If you love tactical analysis, then you’ll love the digital magazines from totalfootballanalysis.com – a guaranteed 100+ pages of pure tactical analysis covering topics from the Premier League, Serie A, La Liga, Bundesliga and many, many more. Buy your copy of the February issue for just ₤4.99 here, or even better sign up for a ₤50 annual membership (12 monthly issues plus the annual review) right here.



Comments