The 2019/20 season has been a tale of two halves for Benfica. They started the season looking supreme and impervious to the opposition, picking up 55 out of a potential 57 points. This saw them lead the league with a comfortable six-point gap to Porto in second. However, fast forward to the present day, and they have not looked like the same side at all. Since losing to Porto at the start of February, they have managed one win in nine and have fallen two points behind Porto. One area which Benfica have particularly struggled, has been in covering counter-attacks, which this analysis will aim to convey.
Throughout this tactical analysis, we will be looking at Benfica’s approach to covering counter attacks including how they set up before a defensive transition, how they recover, patterns within their recovery, the strengths of their covering, and finally, where they need to improve.
Setup before defensive transitions
One key area to covering an opposition counter-attack is how much/little a team commits to their attacks. For example, if a team heavily commits to their attacks by deploying their fullbacks exceptionally high up the pitch, and simply leaving the two centre backs to cover transitions, it is less likely that the defenders will be able to stop them, compared to having three or four more cautious players in possession. This section will be relatively short, as we will only be looking at the immediate positions of players before, and momentarily after the ball has been lost.
For Benfica, there are usually three players, if not four who are more conservative in their offensive commitment. This includes the two centre backs, the full-back on the opposite side to possession (in the scenario that the ball is on the right, this will be the left-back), and sometimes the deeper midfielder in the pivot. This is down to the asymmetrical tactics employed by Lage, in which the full-back and the midfielder on his side push very high up and are heavily involved in the final third, whilst the other midfielder and fullback stay in more open space, just outside the final third, to provide alternative options.
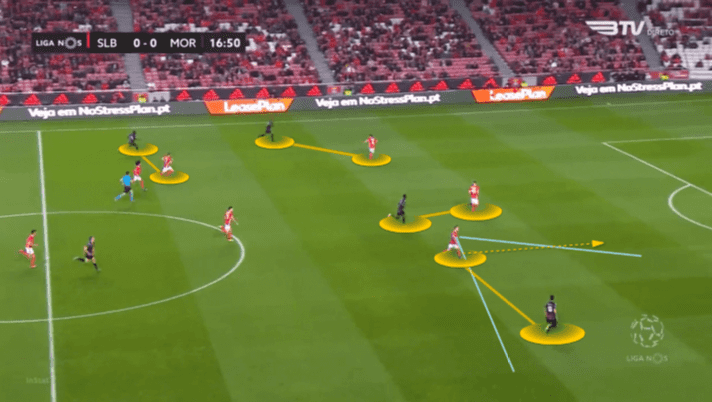
In the example image below, we see the ball being progressed on the right-hand side. Tomas Tavares at right-back has pushed higher as he looks to overlap when Pizzi comes inside. On the opposite side, Grimaldo tucks in to make a three at the back, whilst Pires stays ahead of the middle centre back.
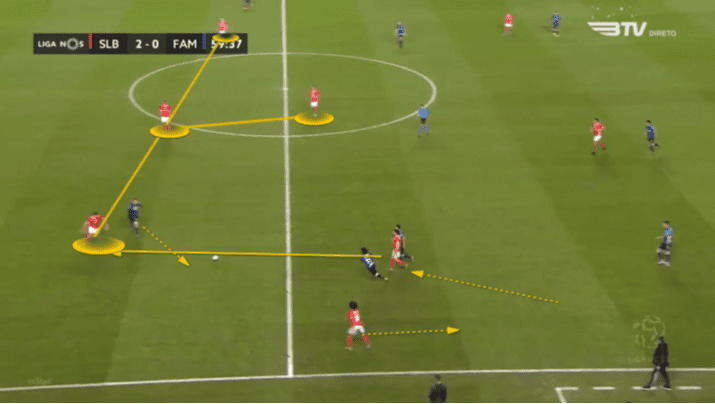
Pizzi misplaces his pass back to Ruben Dias, leaving the opportunity for Famalicao to counter. Looking at numerical advantages, Benfica out-number Famalicao attackers five to three, showing they are well placed to handle a mistake such as the one from Pizzi in this example.
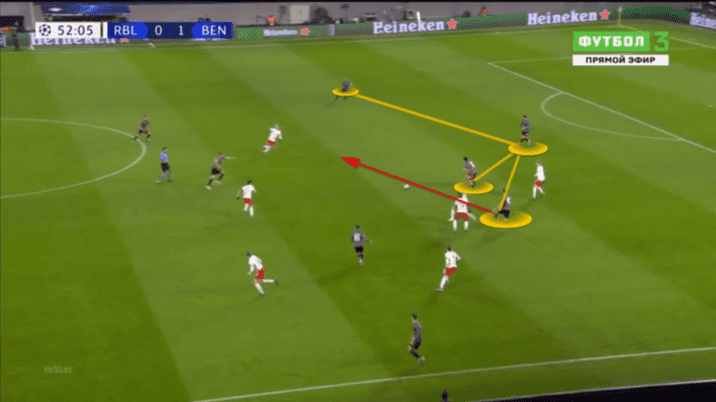
Similarly, in the example below against RB Leipzig in the Champions League, Benfica lose the ball when trying to build out from the back. Whilst left centre back Ferro is slightly higher due to his build-up role, the usual shape remains. Grimaldo has pushed much higher, Almeida this time at right-back has dropped deeper alongside the centre backs, and the defensive midfielder completes the shape. This means that although Leipzig have committed plenty of players to an aggressive press, the situation is still a four against three at best for Leipzig.
Deep full-back and zonal marking
Moving onto the defensive transitions themselves, a key note, similar to what we looked at in the previous section, is the deployment of the full-backs, but also how they recover. Firstly looking at the turnover positions, it is as we discussed earlier with Grimaldo deeper and Tavares much more advanced in the final third. Initially when the ball is played out, Grimaldo looks to press the most obvious passing option based on where the man in possession is looking. Grimaldo, however, then backs out of this when the man in possession decides to dribble forward instead of progressing by passing. Grimaldo then has to get back into his left-back position to ensure the space he left by pressing is not exploited.
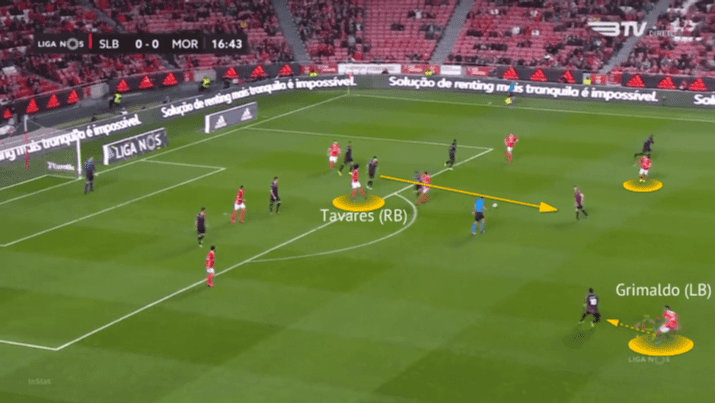
Following the eventual pass out wide, we see that a three against three has emerged, with the defensive midfielder for Benfica getting back to cover late runs from advancing deeper players. From this scenario, Benfica look to go man-to-man with the outside centre back and the man in possession, as would be expected. However, the other two defenders (Ferro and Grimaldo), cover the space, as opposed to a specific player. This is an attempt to limit the options on a fast-paced break in which momentum can be built easily, and slow slowing the play down by covering the open space means the man in possession will have to wait for another teammate, or beat Ruben Dias one-on-one.
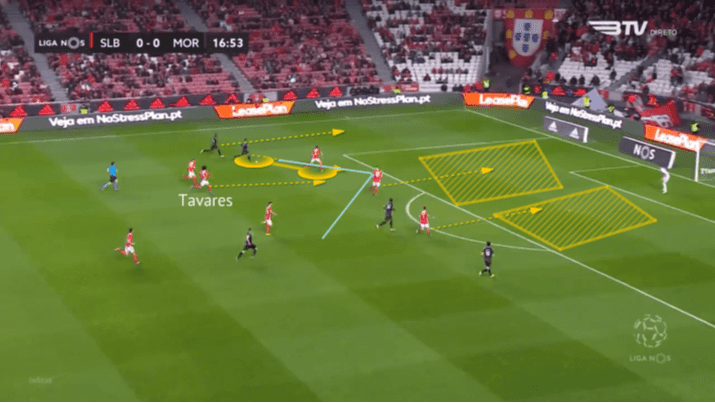
Again, this next image shows this scenario transpiring. There is one unique aspect worth mentioning though, which is consistent throughout the rest of the situations in this section. Grimaldo does not look to cover the wide area which the winger on his side seems to be exploiting. Rather, he checks him, as is shown below, but does not move towards him. This reinforces the thesis that the defenders recovering will look to cover important space, rather than the man.
Looking at the last frame of the attack before the cross is blocked and Benfica settle back into shape, we see Grimaldo and Ferro maintaining an offside trap whilst moving back, based on Dias. This also limits the space available for the winger. However, one potential issue by staying zonal as opposed to going man-to-man is that, as seen below, if two players stay on one defender (especially one with the physique of Grimaldo), a successful cross could be quite problematic as there will be an instant two against one which the opposition can fashion a good chance out of.
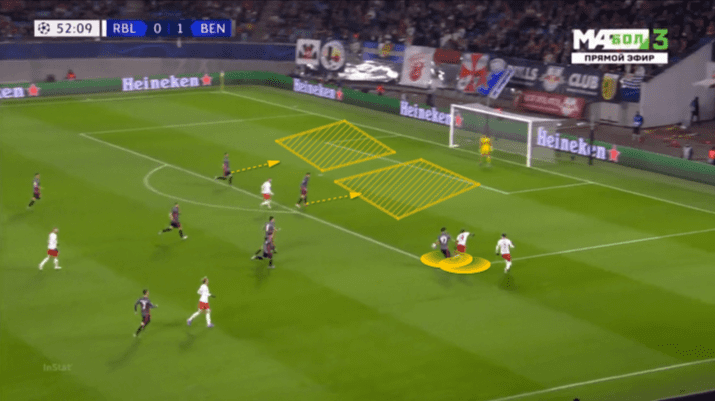
Going back to the situation with Bundesliga side RB Leipzig we looked at earlier and applying the previous example, we expect Almeida to cover the far post area, whilst Dias covers the central area, and Ferro goes man-to-man with the man who eventually receives the ball on the right for Leipzig.

Werner, through the middle, looks to get between the two defenders, a somewhat trademark move for the new Chelsea signing. However, there is only one pass that can see him receiving the ball, which is a chipped one which narrowly evades both defenders. Again, this was not the case, as Ferro pressured Nkunku on the ball into a hurried cross which was easily dealt with by Dias covering the area closer to the near post. Again, this portrays a risky strategy, because had the cross been accurate, Werner has a great chance to score. However, had they gone man-to-man, Werner could have manipulated the space left by erratic movements by the defenders, again leading to a good opportunity, and so in this scenario at least, zonal marking on the transition is preferable.
The key tactical aspect to note in this area linking to the zonal marking is how the deeper full-back acts, in both scenarios we have covered. The full-back always looks to tuck in closer to the centre back, as opposed to covering a wider area, which portrays the zonal approach taken.
Aggressive solo press
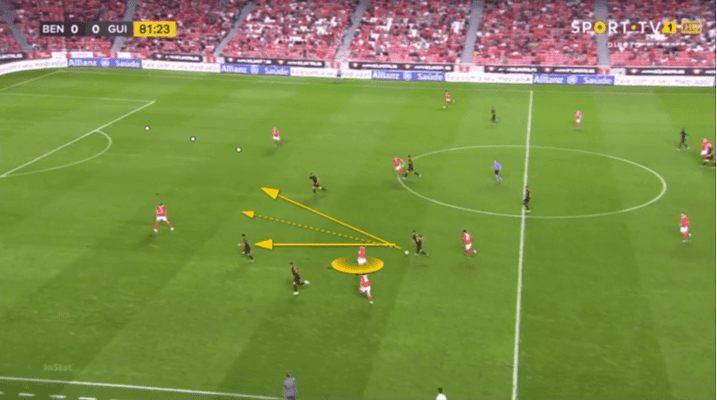
Next, we will look at a phase which we briefly touched upon in the last section, which is the initial aggressive press from one player to close down space and options whilst the other defenders get into more preferable positions. Whilst we saw that from Grimaldo before, it is not limited to a certain player, but rather the one best placed to handle the press. Obviously, though this can lead to misunderstandings in which nobody presses or two players press, which is why it is not consistently done on every transition, but rather in mostly ones which are under-supported when the ball is won by the opposition. Below we see a misplaced pass from Dias leading to the opposition full-back progressing immediately. Tomas Tavares at right-back is not near to any other players, and neither are any other players apart from former Dortmund midfielder Julian Weigl who is sat deeper. Therefore, Weigl aggressively pressed the passing lane whilst closing down on the man in possession.
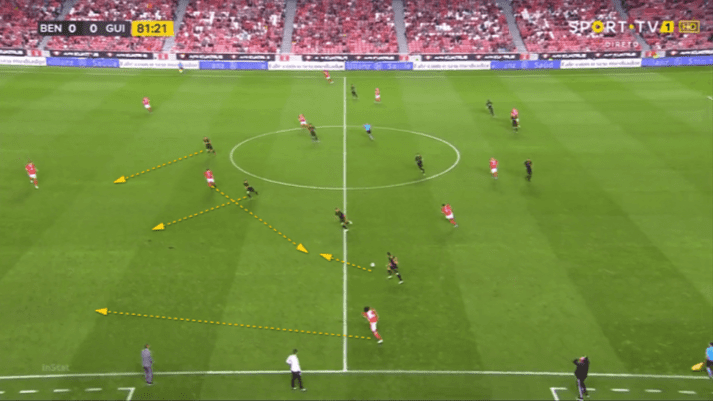
Whilst this can often be effective, it simply leaves a one against one in which the defending player has little time to react and the attacking player has a lot of space. In this instance, Weigl is side-stepped, leading to two, if not three passing lanes being opened up in a scenario including three Benfica players now.
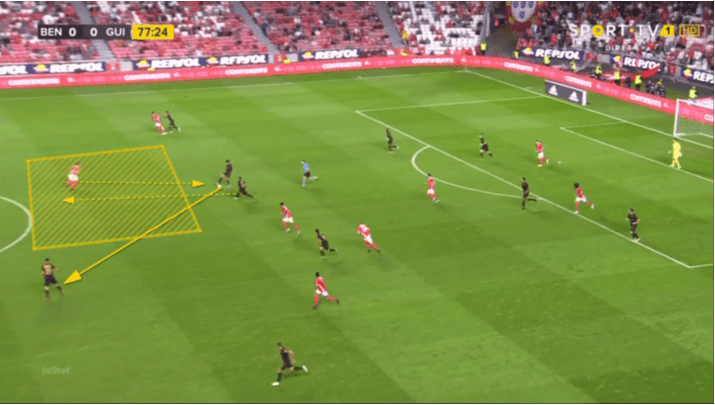
This next situation shows a counter-attack from a deeper position, in which there is a greater emphasis on pressing to regain the ball back high, In this scenario, two separate players press in two scenarios. Firstly, the ball is played out into the midfield. Taarabt looks to instantly win the ball back. However, he is bypassed by a first touch pass as he was ill-positioned to cover the main passing lane. This then instigates another press from the deeper Weigl.
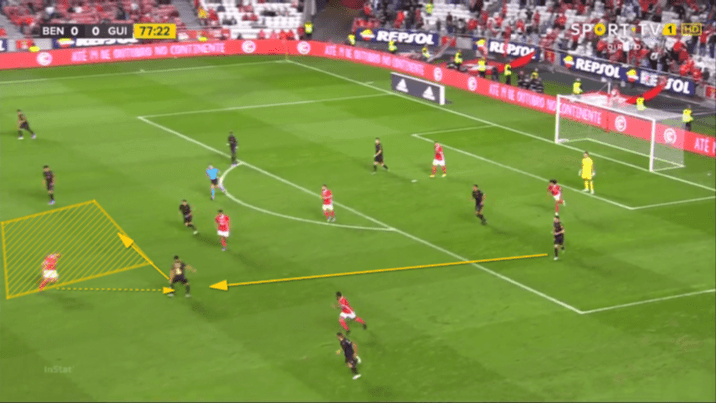
Weigl is then forced to come out of his deeper role and press the an in possession. However, by the time he has realised that he should press, Edwards who has the ball has already begun controlling the ball. This meant Weigl could not cover the space to stop the primary progressive pass, leaving Benfica exposed, with only their two centre backs sitting deep in this scenario, again showing the risky nature of adopting such a strategy.
Diamond initial recovery
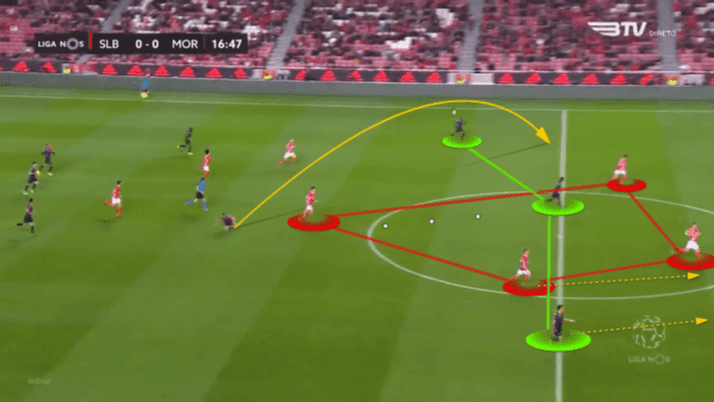
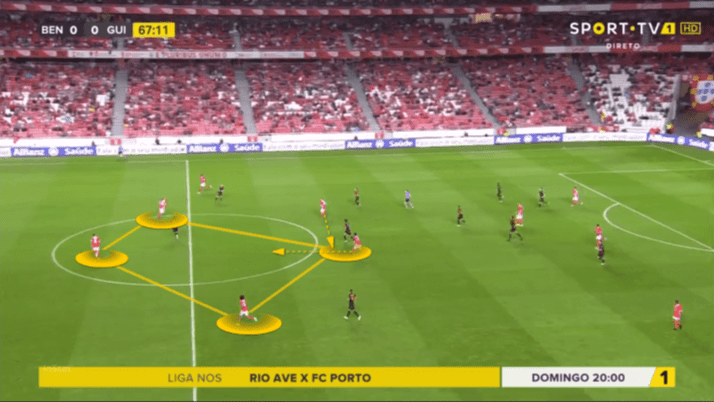
The final unique tactic during defensive transitions from Benfica which we will discuss is their diamond in defensive transitions. Often occurring and disbanding between one and seven seconds after losing the ball, a diamond between the four more conservative players would be formed, in which the aim would be to prevent runners from having free space on both sides. This would often occur when the counter-attacks were central, as opposed to the wide one which we looked at earlier. Below, we can see this diamond , and how the player on the right (Dias) looks to prevent the ball from going to the right, which is opened up due to Tavares being the higher full-back.
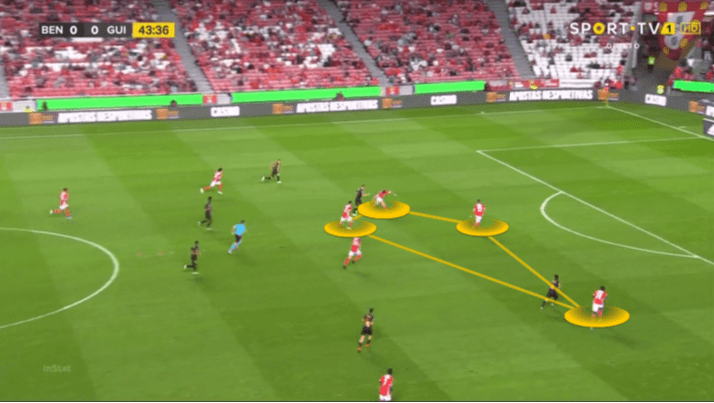
Additionally, a quick goal kick looking to launch the opposition into action saw a similar diamond being formed, as Benfica staggered their midfield to look to win second balls and prevent deep runners. This was not always done, similar to the aggressive pressing, however, it was certainly done enough to catch the eye of an analyst. A drawback of this setup though, which has been managed by the quality of the centre back, is that if the ball is progressed beyond the two middle players, the attacker is one on one with the last defender. Again, this displays the risk vs reward element of Benfica’s more experimental tactics to stop counter-attacks.
Conclusion
To conclude, across this scout report we have looked in detail at how Benfica look to neutralize their opposition during defensive transitions. It has also been pointed out that Benfica struggle at times, due to what some may refer to as their naivety in pressing and failure to cover wide areas. On the whole though, Benfica have still conceded the least goals from counter-attacks out of any team in the Liga NOS, showing that their risky strategy has been paying off so far, and might provide inspiration for other smaller teams who want to control possession more, such as Rio Ave and Famalicao.


Comments