Bournemouth have been producing outstanding performances lately, putting them in seventh place in the Premier League, just three points below Chelsea in fourth place.
Given that the competition is intense and closely contested, the details may determine the outcome, and among these details, set pieces are undoubtedly crucial.
Recently, Bournemouth have started to establish themselves among the elite teams in set pieces, as they are currently the third-highest scoring team from set plays in the Premier League, with seven goals.
This puts them at the level of Aston Villa, Nottingham Forest, and West Ham United, following Arsenal and Crystal Palace, who have scored nine and eight goals, respectively.
In this tactical analysis, we will highlight one aspect of their excellence in set pieces under manager Andoni Iraola and set-piece coach Shaun Cooper: their distinctive tactics in short corners.
Starting Near The Goalkeeper
The first idea we will discuss is starting without any short options, with the player who comes to receive the pass starting next to the goalkeeper, as in the case below.
— Footie Clips (@FootieClips) January 6, 2025
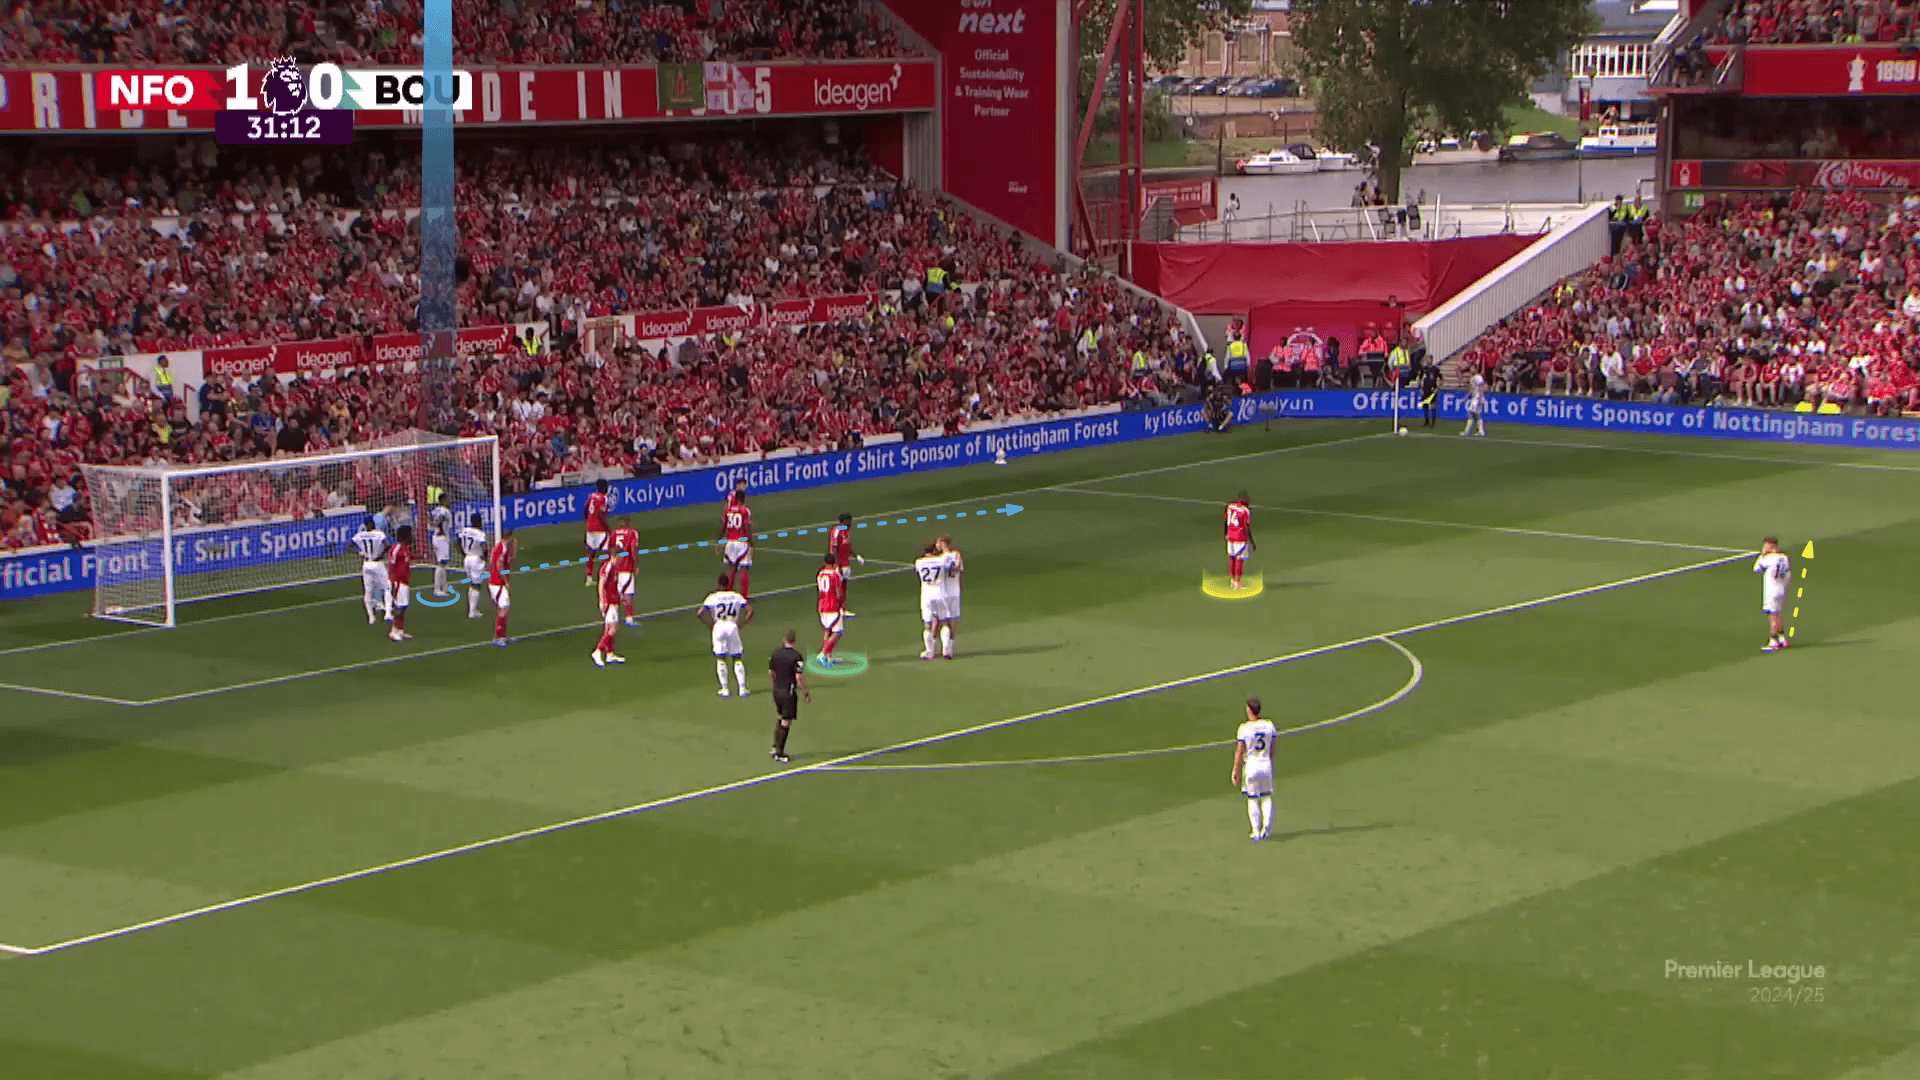
Here, Nottingham Forest defend zonally with a player (yellow) ready to defend the short corner and another (green) on the edge of the box for the rebound.
Three Bournemouth players start behind the defenders near the goalkeeper.
The blue player suddenly moves to receive the short pass, while an edge-of-the-box player (yellow arrow) moves to take the attention of the short-option defender.
This trick gives them ample space to receive the short pass in a dangerous position inside the box instead of starting with short-option players dragging defenders, making the short area crowded from the beginning.
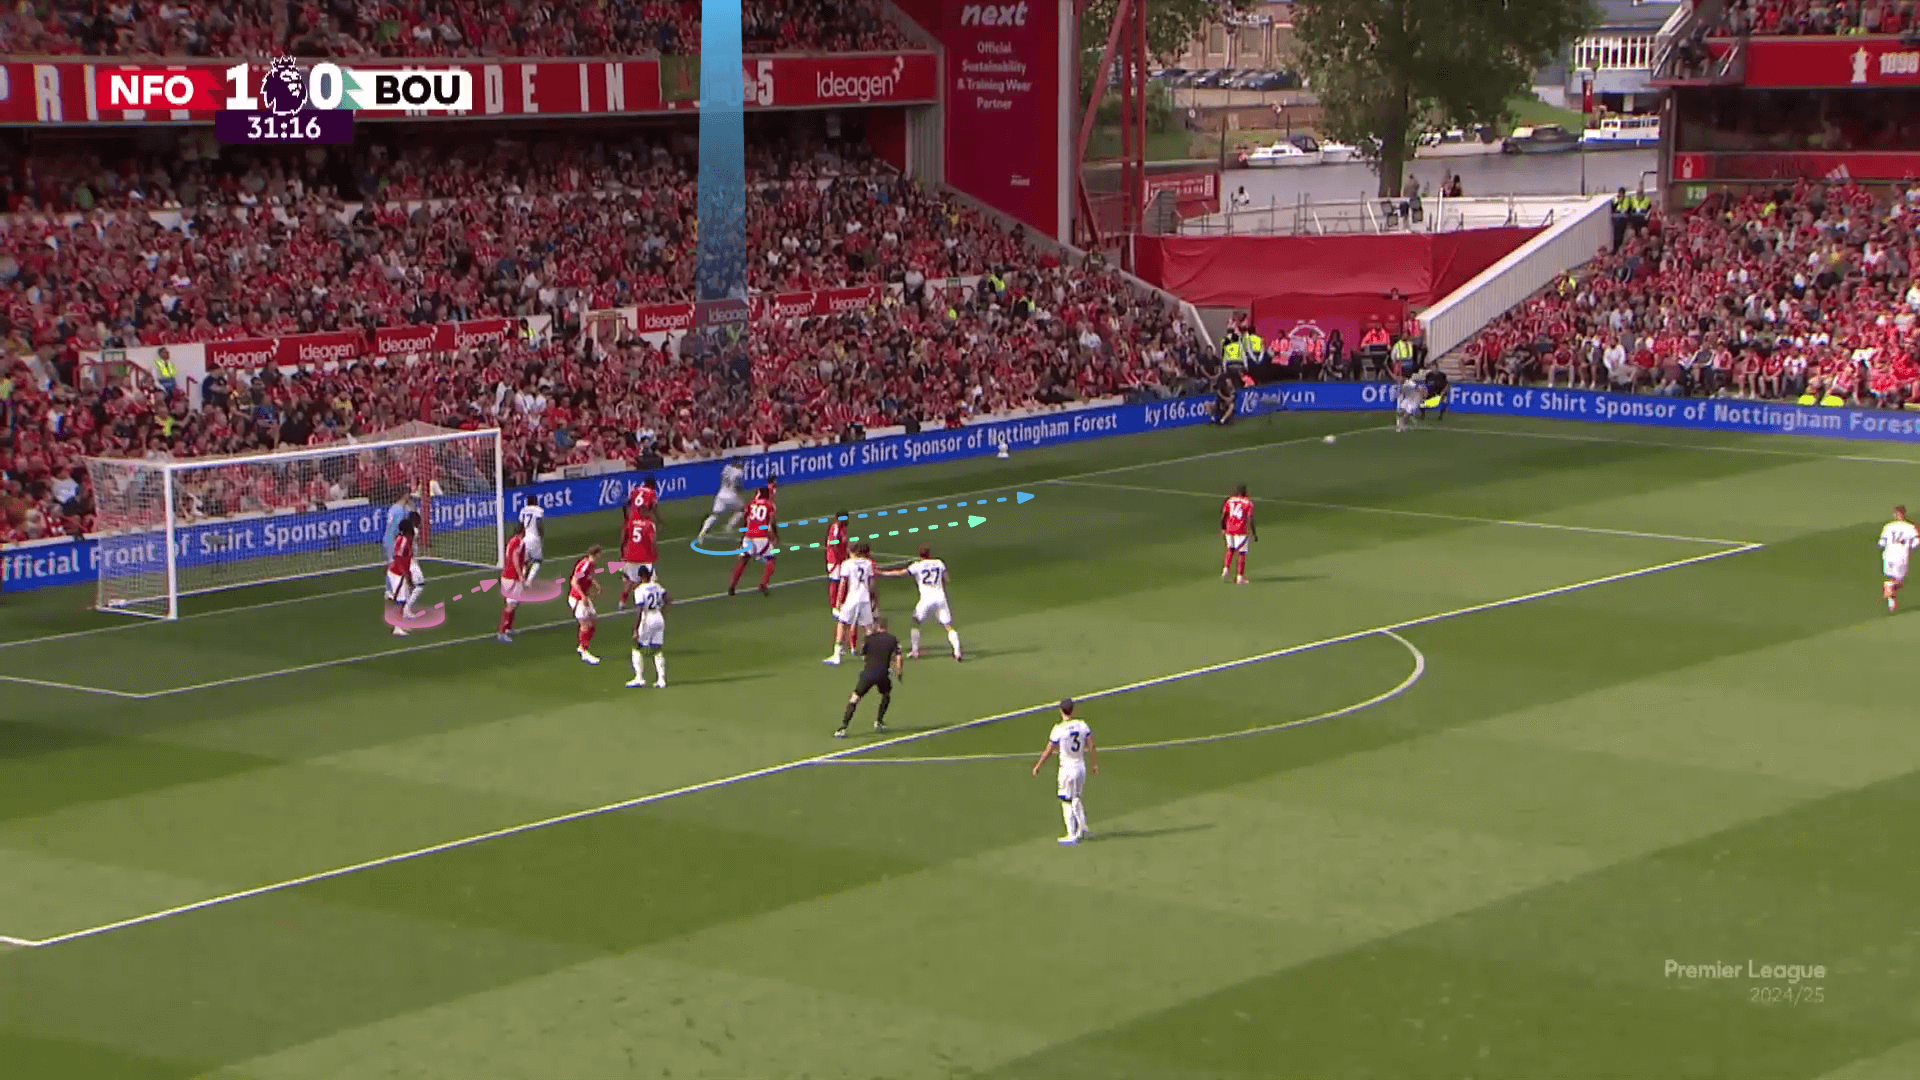
In the photo below, the first zonal defender is forced to accompany him, while the other two attackers (pink) have different roles.
The first one goes ahead of the first remaining zonal defender (#6) to take his attention, while the other one moves to the near post.
Their starting position also may delay the moving upward of the zonal line,e trying to keep the taker onside (when he receives the ball again, as we will show).
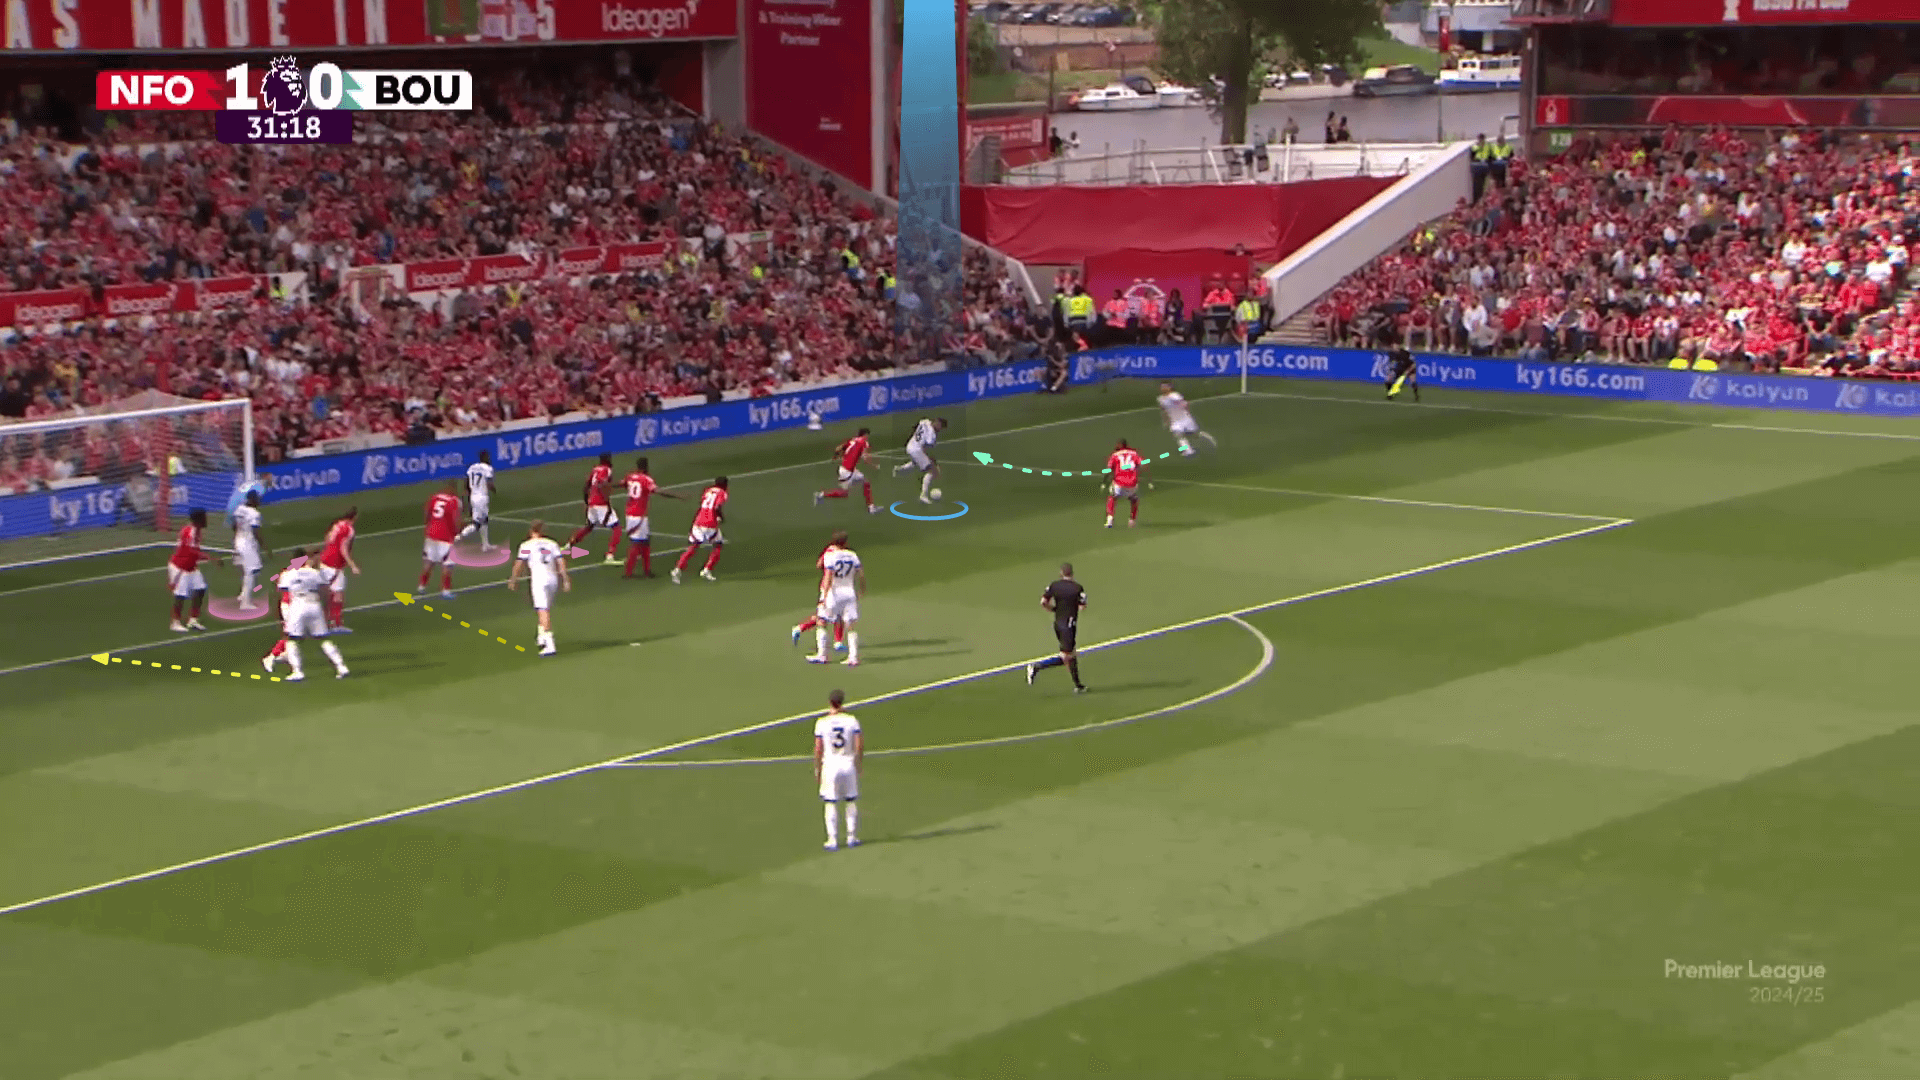
As shown below, the taker moves in a curved way when he receives the back-heel pass, trying to avoid the offside.
Meanwhile, another two runners (yellow) frame the goal, ready for the grounded cross.
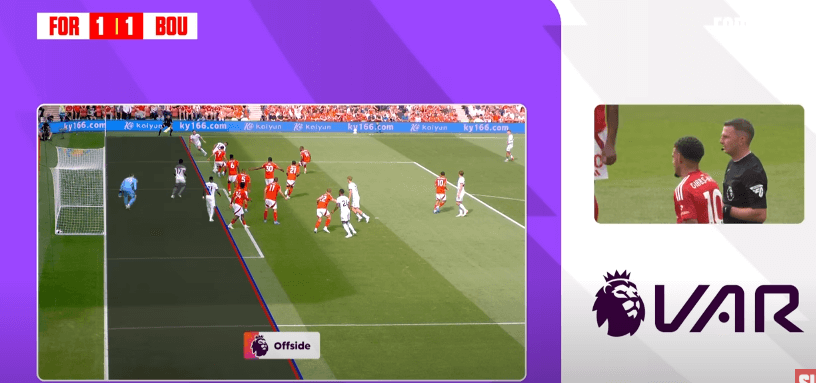
Everything is carried out perfectly with a cut-back option (orange arrow), as shown below.
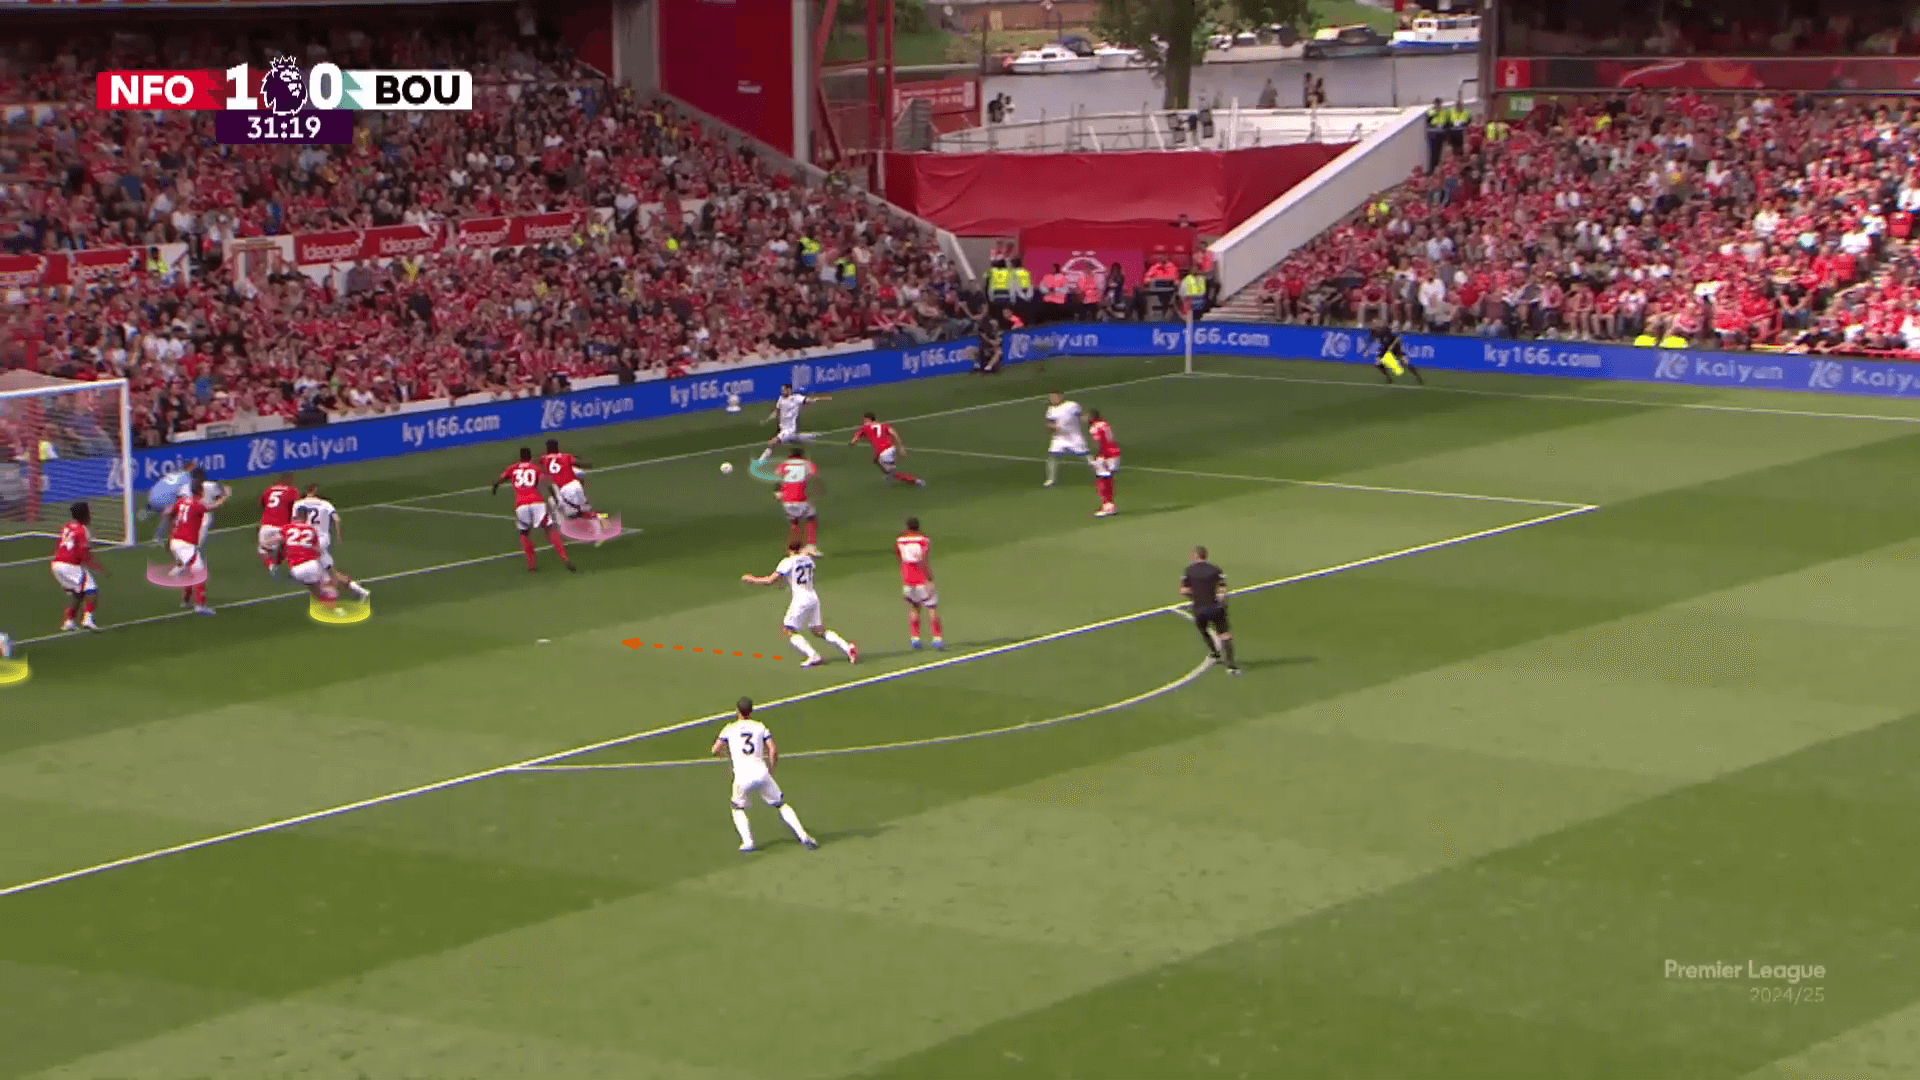
The plan worked, but the goal was cancelled because the taker's position was millimetres offside.
Hence, we may suggest someone blocks the last zonal defender, pushing him inside to delay his progress.
2v1 & Cross To The Far Post
Their second idea is to try to achieve a quick 2v1 in the short area and then send a cross to the far post.
They do this in two forms, depending on the opponent's ability to send another one to help from the box quickly.
Let's start with the first one.
— Footie Clips (@FootieClips) January 6, 2025
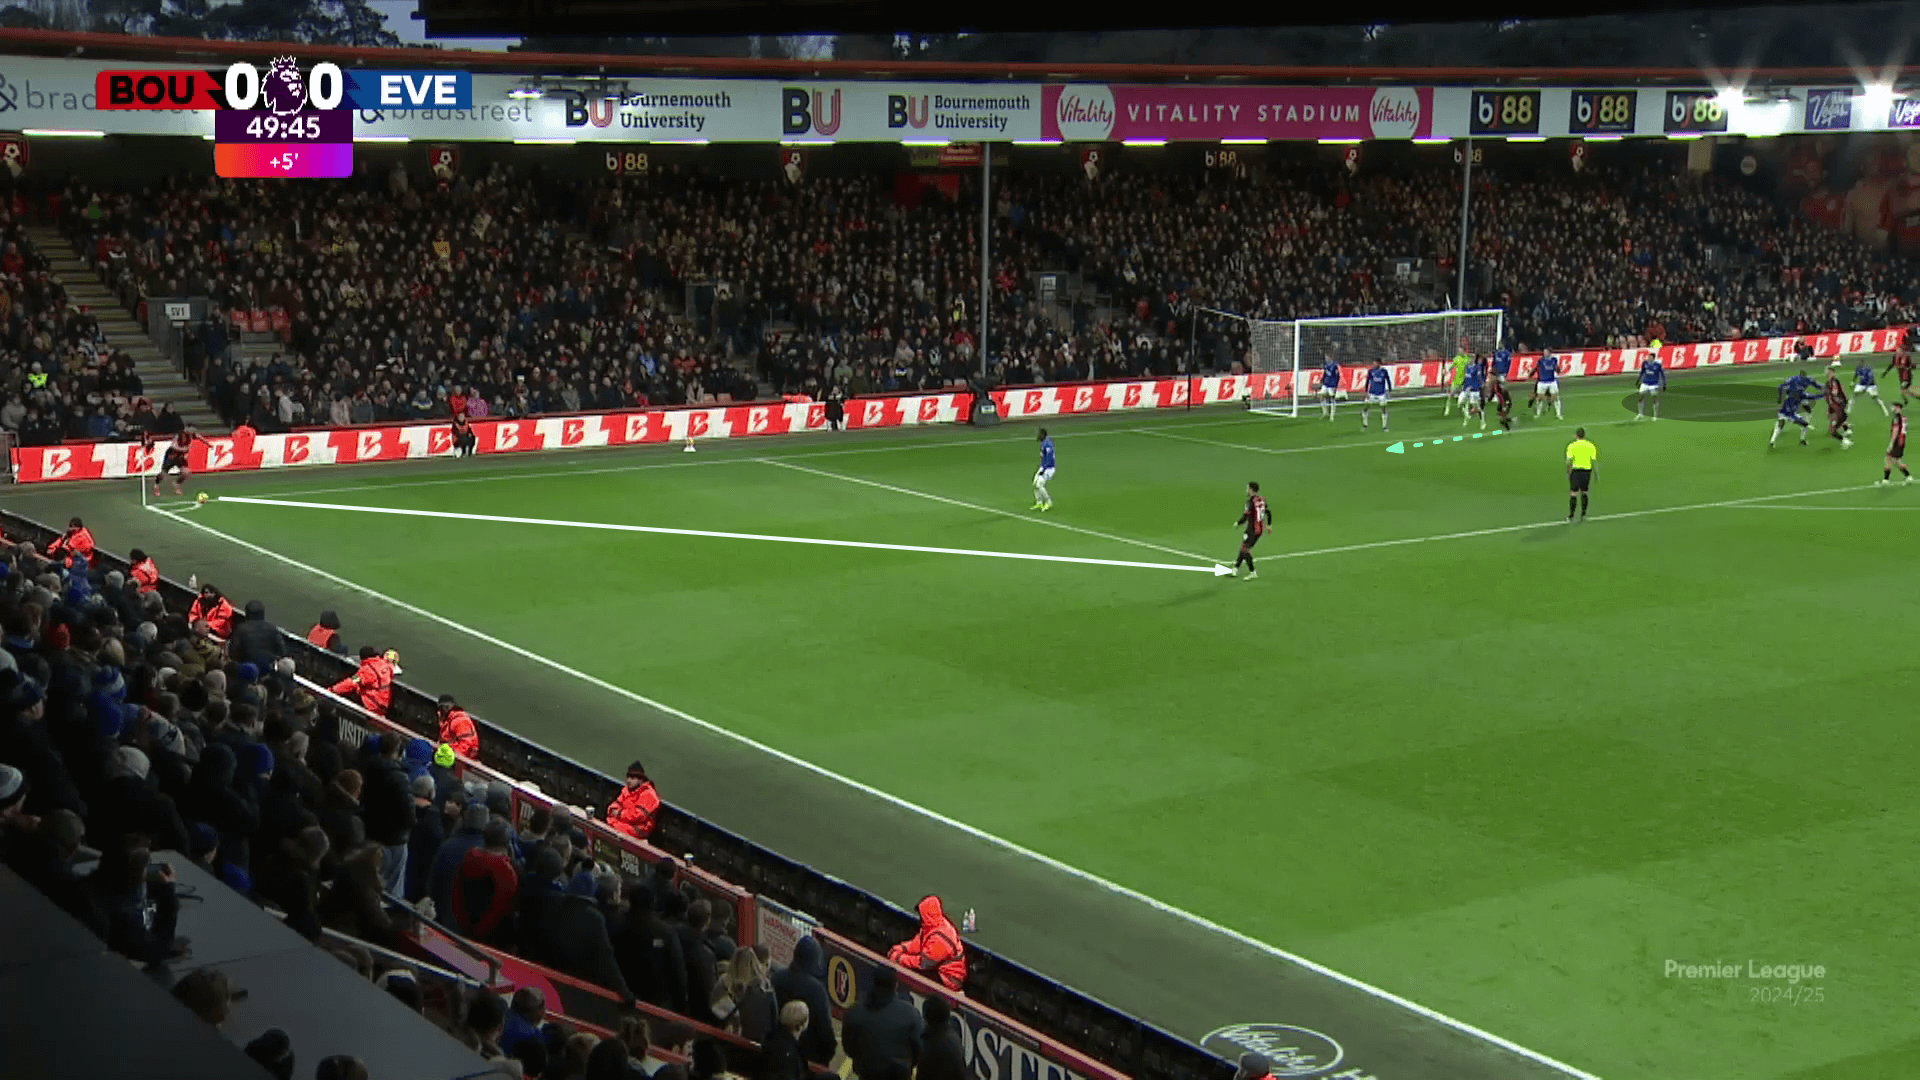
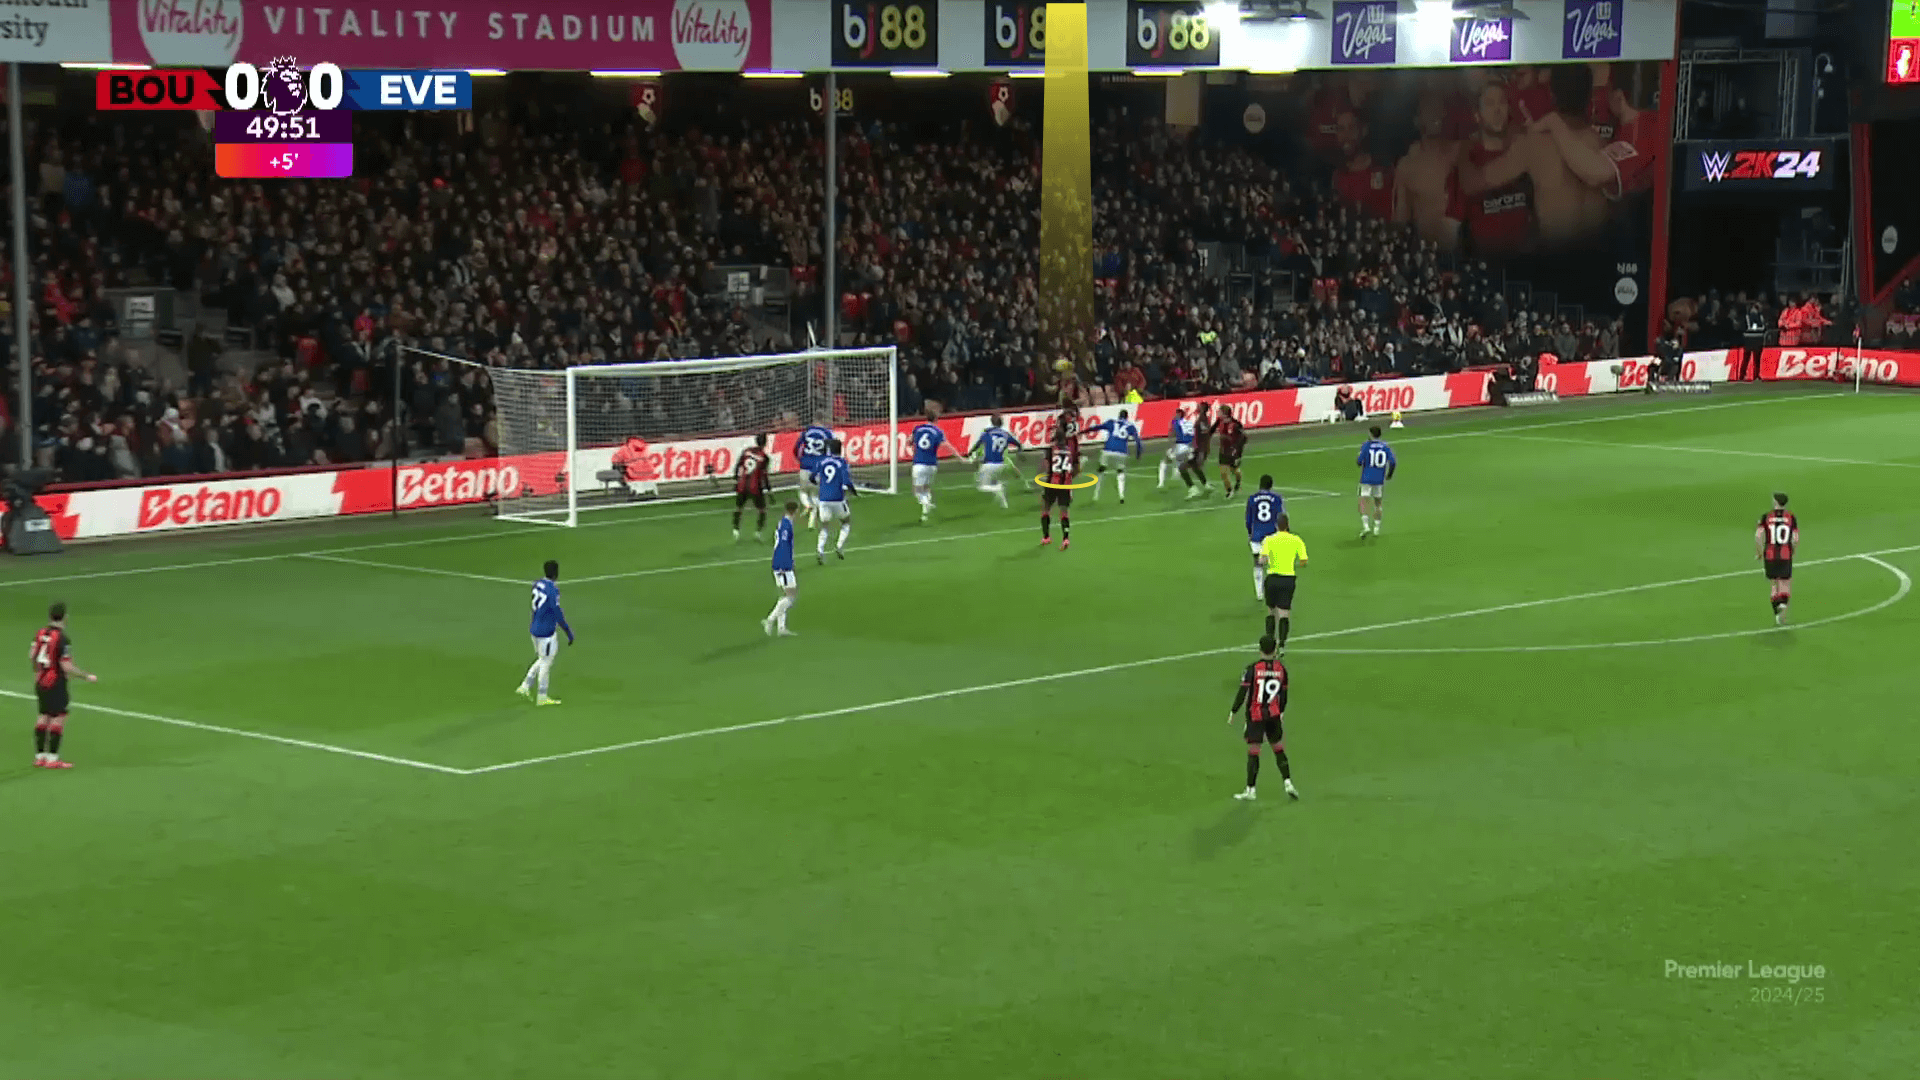
In the photo below, Everton defend with six defenders inside the six-yard box, three man markers near the penalty spot and a short-option defender.
Bournemouth don't start with a clear near short-option attacker.
Instead, they stand near the corner of the box to receive the pass and play it back to the taker, who then sends a cross to the area beyond the far post on the zonal defenders' blind side.
To fix the first two zonal defenders, preventing any of them from helping in this short 2v1 situation, a free player (green arrow) moves horizontally to take their attention.
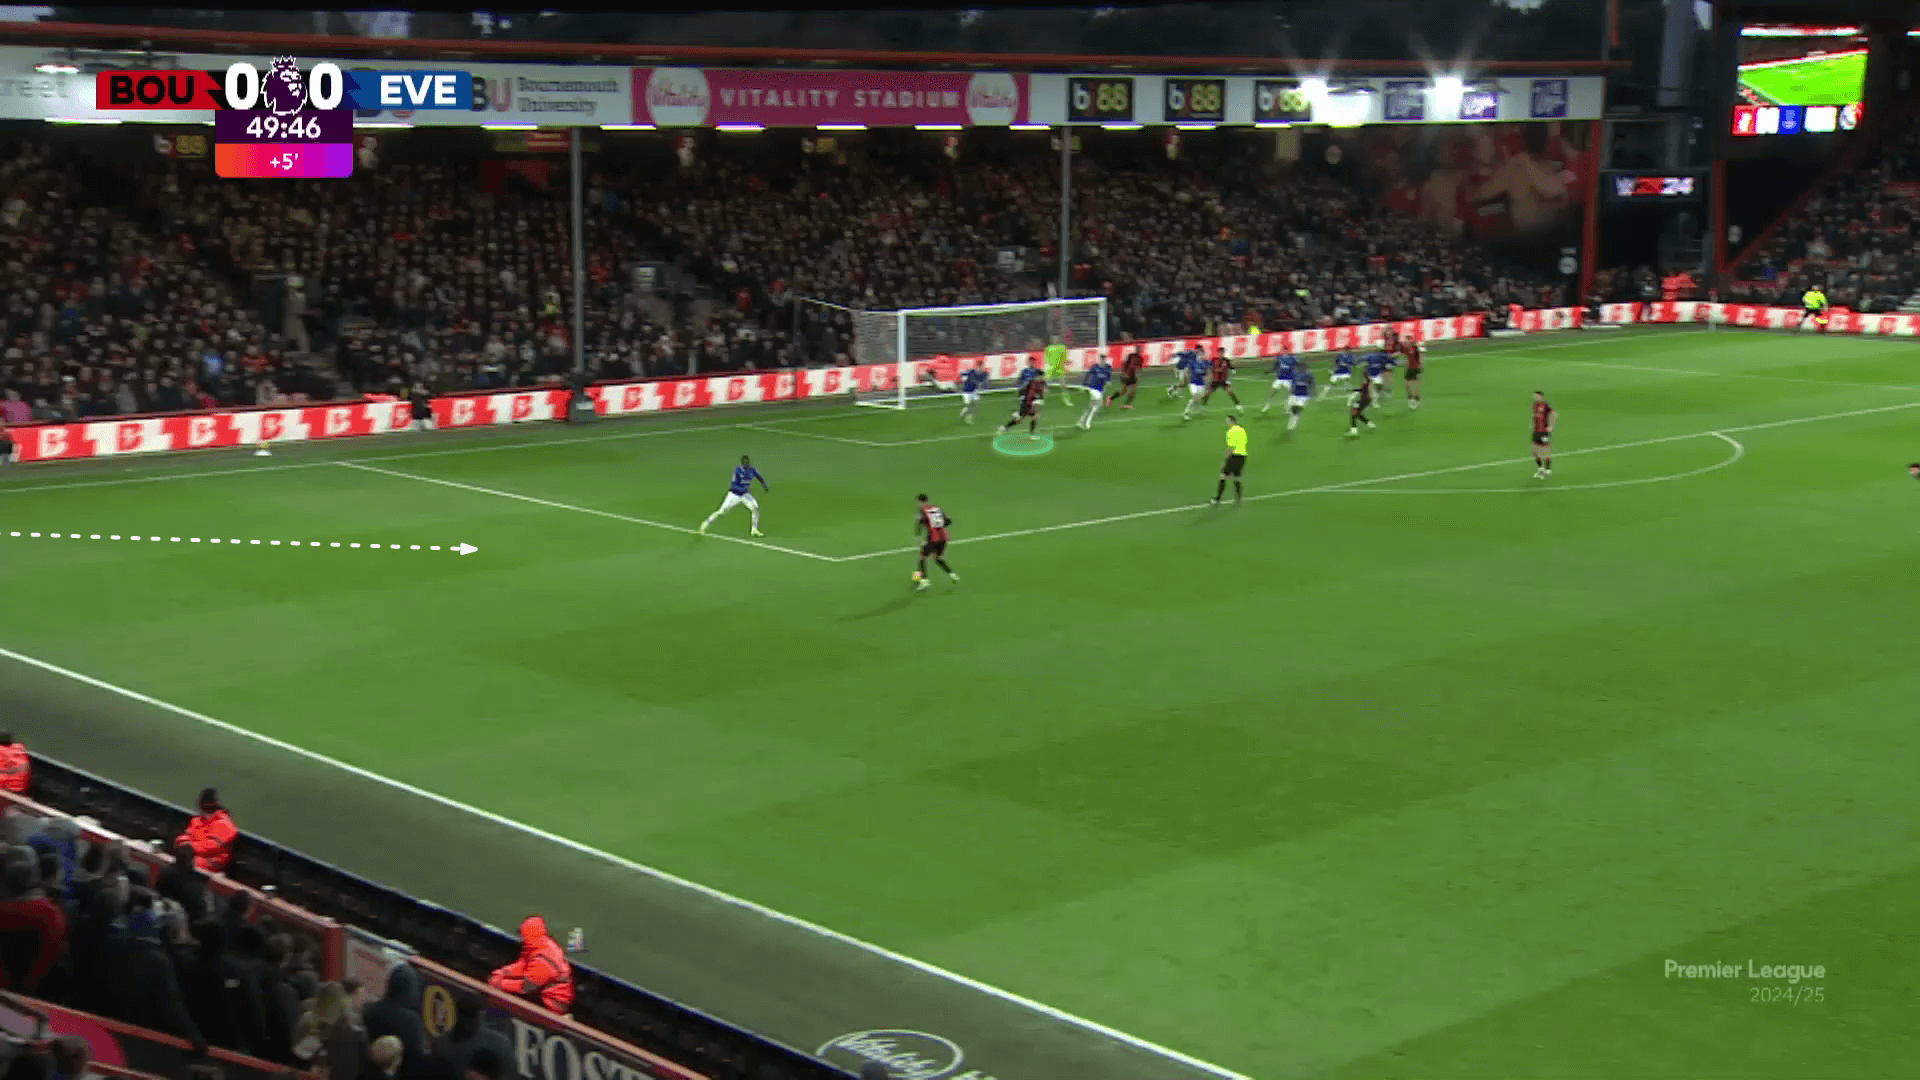
As shown below, the fixing plan works while the taker moves quickly to avoid the offside being ready to receive the short pass again.
Hence, we can note that they don't start with a clear near short-option player in case the opponent isn't determined to send a second player to help quickly.
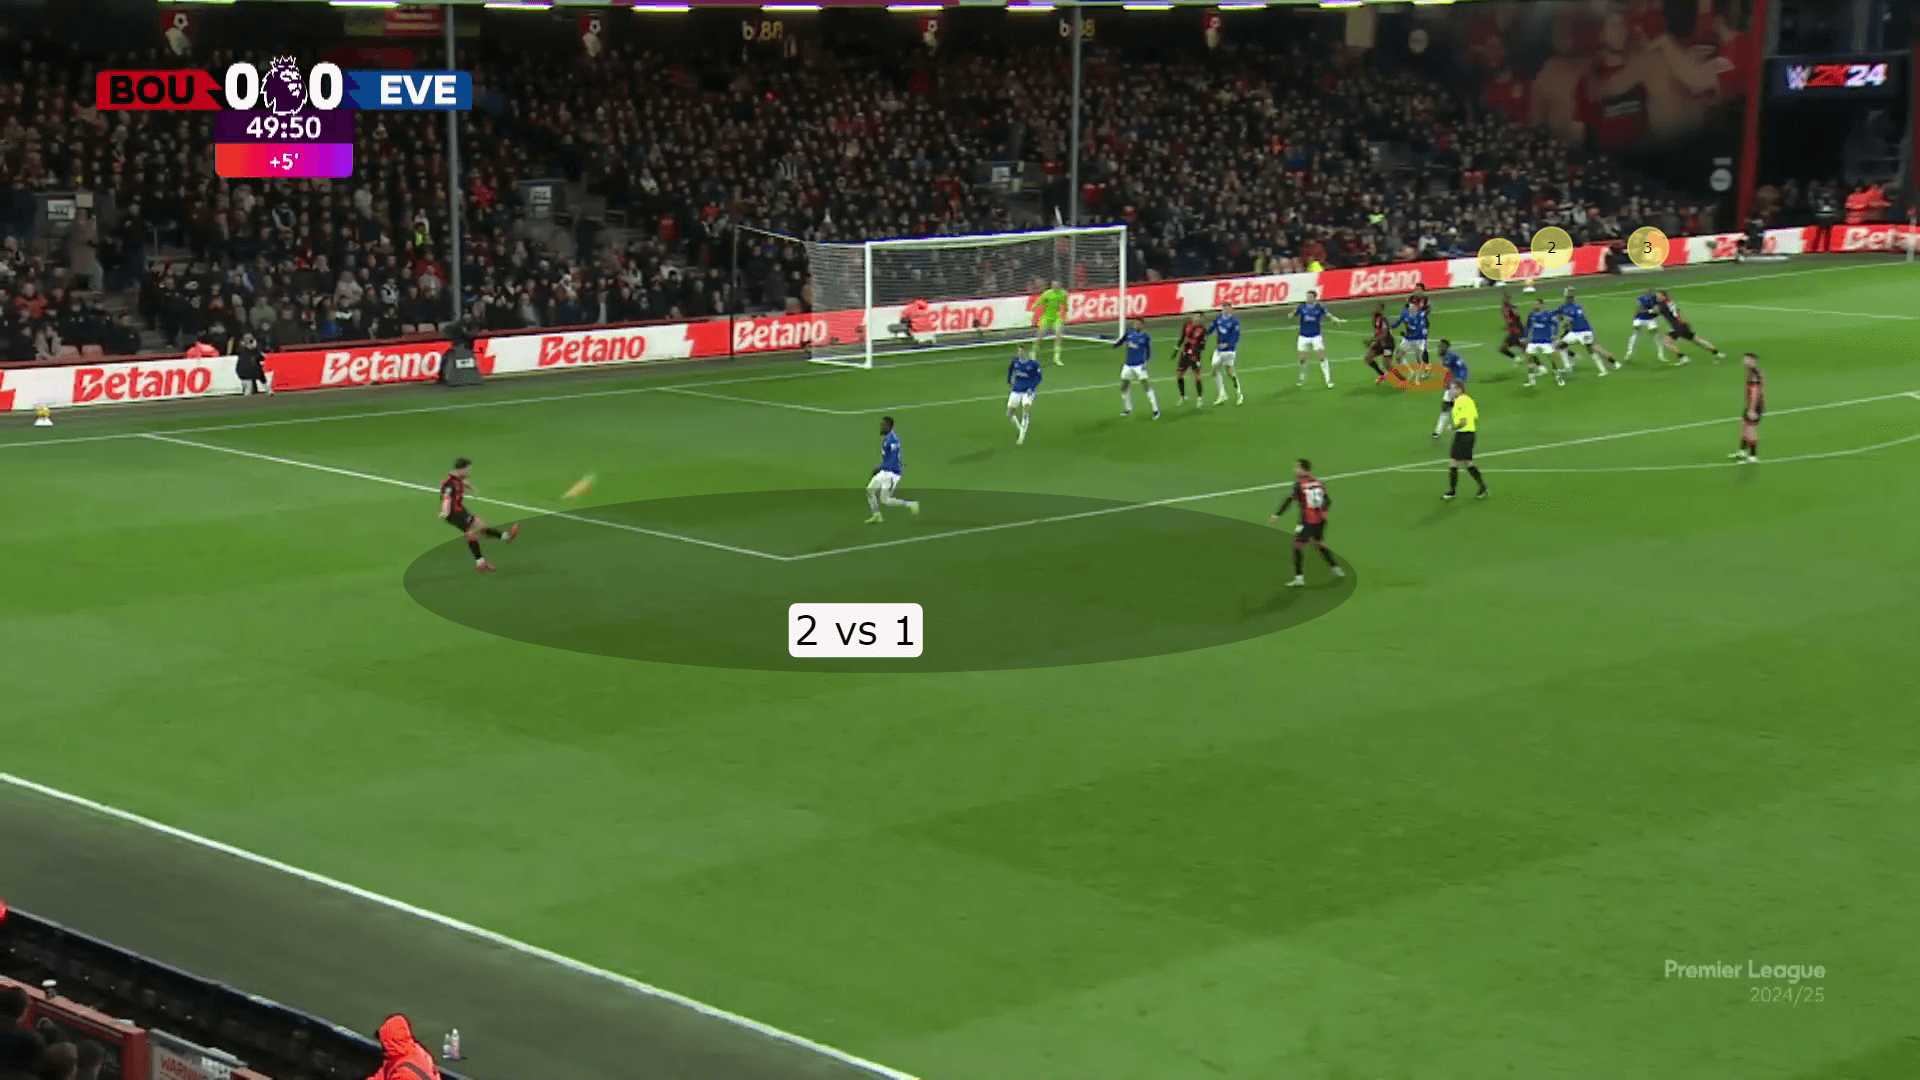
In the photo below, the first part of the plan works, but we want to focus on the second part of the plan.
In these cases, it is common to target the far post to target the blind side of zonal defenders.
These defenders have to focus on many things, such as the ball and reorganising the offside line, which makes it difficult for them to be aware of the movements on their blind side.
The second is that the three runners' movements from the middle to the far post make it difficult for the man markers to keep tracking the ball in the air in front of them and their assigned attackers, who move to their backs, as happens to the three runners in the photo below.
The orange block to the last standing zonal defender is crucial, as shown in orange below.
The plan works, and it leads to a chance while the player has so many options to send a headed pass, as shown below.
The second case happens when the opponent is more ready to send a second player to help.
— Footie Clips (@FootieClips) January 7, 2025
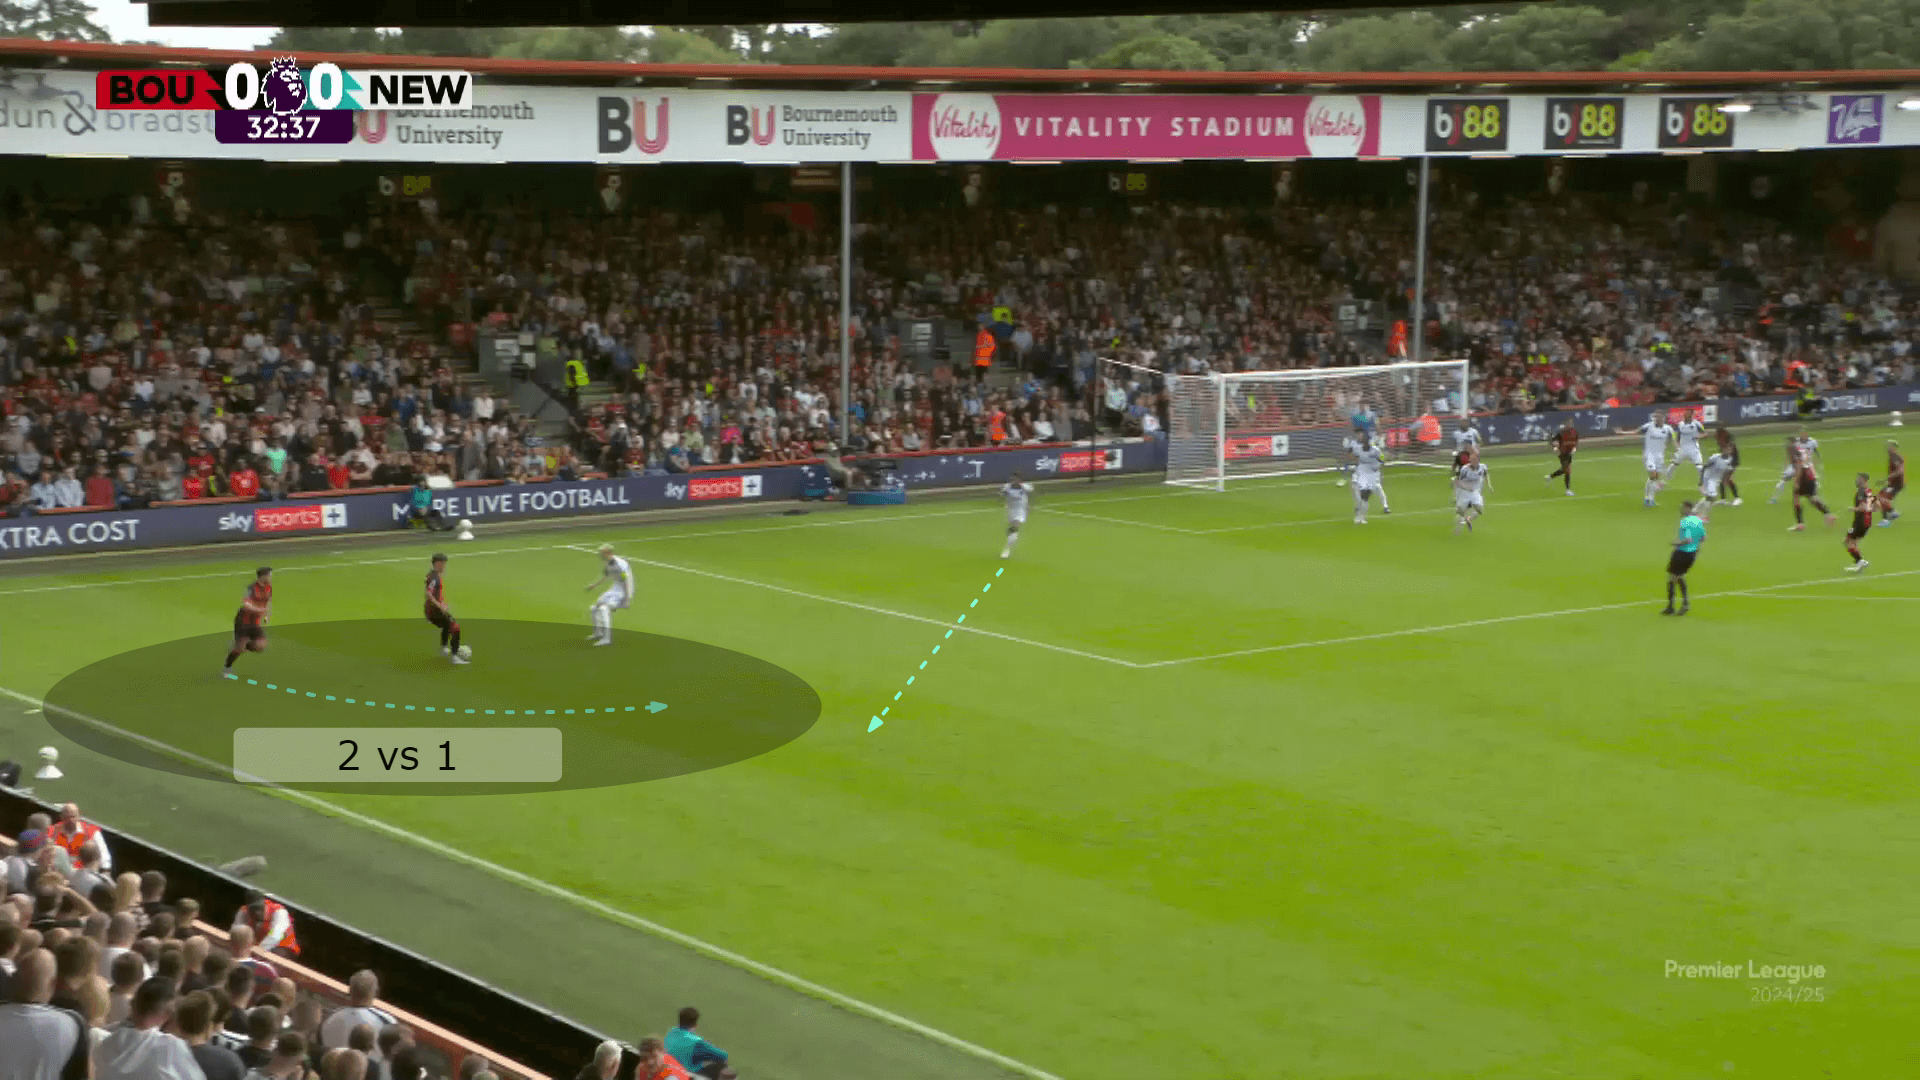
In the photo below, they start with a nearer short-option attacker to receive the short pass while the taker overlaps quickly to receive the ball again.
He gets the ball before the zonal defender, who has to cut a longer distance toward the ball.
4v3 Creative Superiority
They need to be more complex against teams that defend short corners well, with two or three players with determined roles.
— Footie Clips (@FootieClips) January 7, 2025
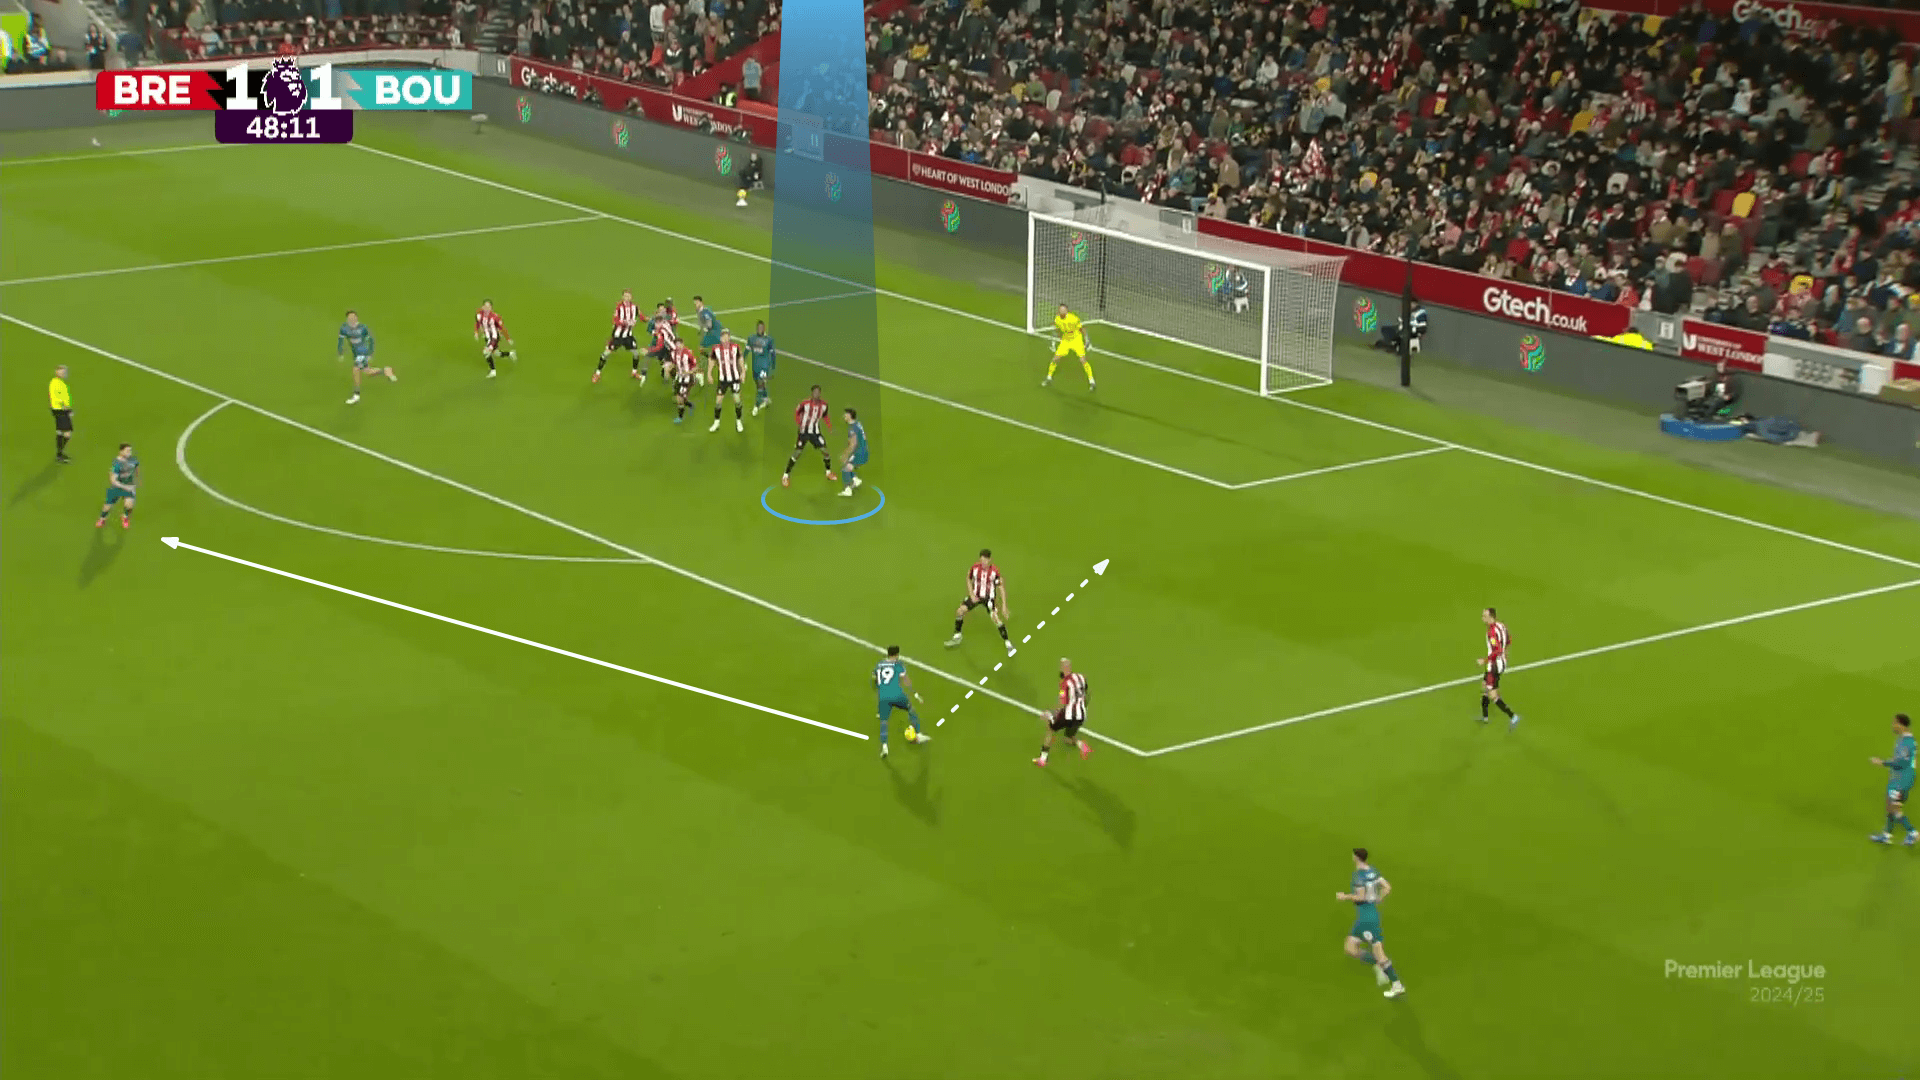
In the photo below, Brentford defend with four zonal defenders (green), four-man markers, and two short-option defenders.
One is near the ball, while the other is more inside (yellow).
The yellow defender stands near Bournemouth's edge-of-the-box player, but after overlapping, he is ready to go to the taker.
In contrast, the first zonal defender has time to go outside to the edge-of-the-box player.
Let's see what Bournemouth will do, but I want you to note the free player inside the six-yard box.
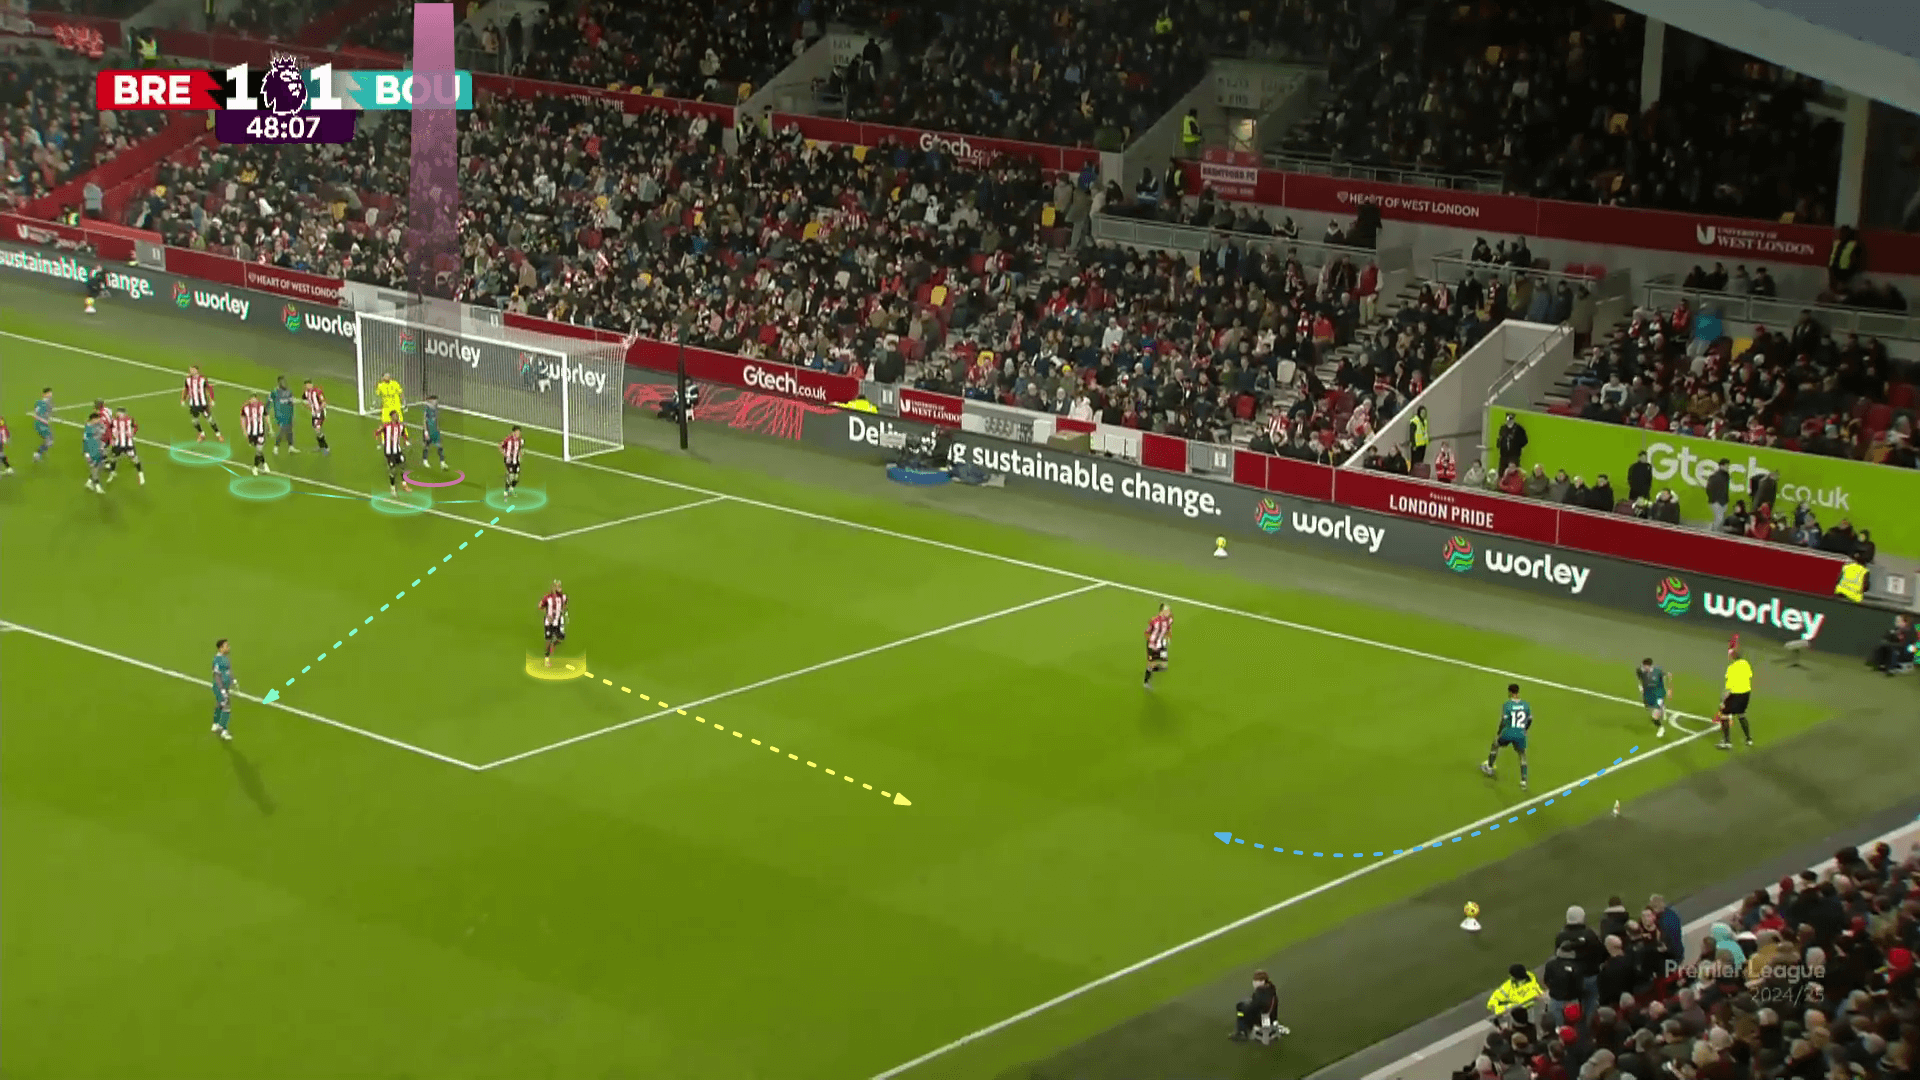
Bournemouth will use a good trick by using the second edge-of-the-box player (out of the shot) to achieve a 4v3 advantage.
However, this ball rotation takes time, making it difficult for him to shoot the ball directly despite the attackers' blocks inside the box to prevent anyone from reaching him.
Hence, the free player's role comes.
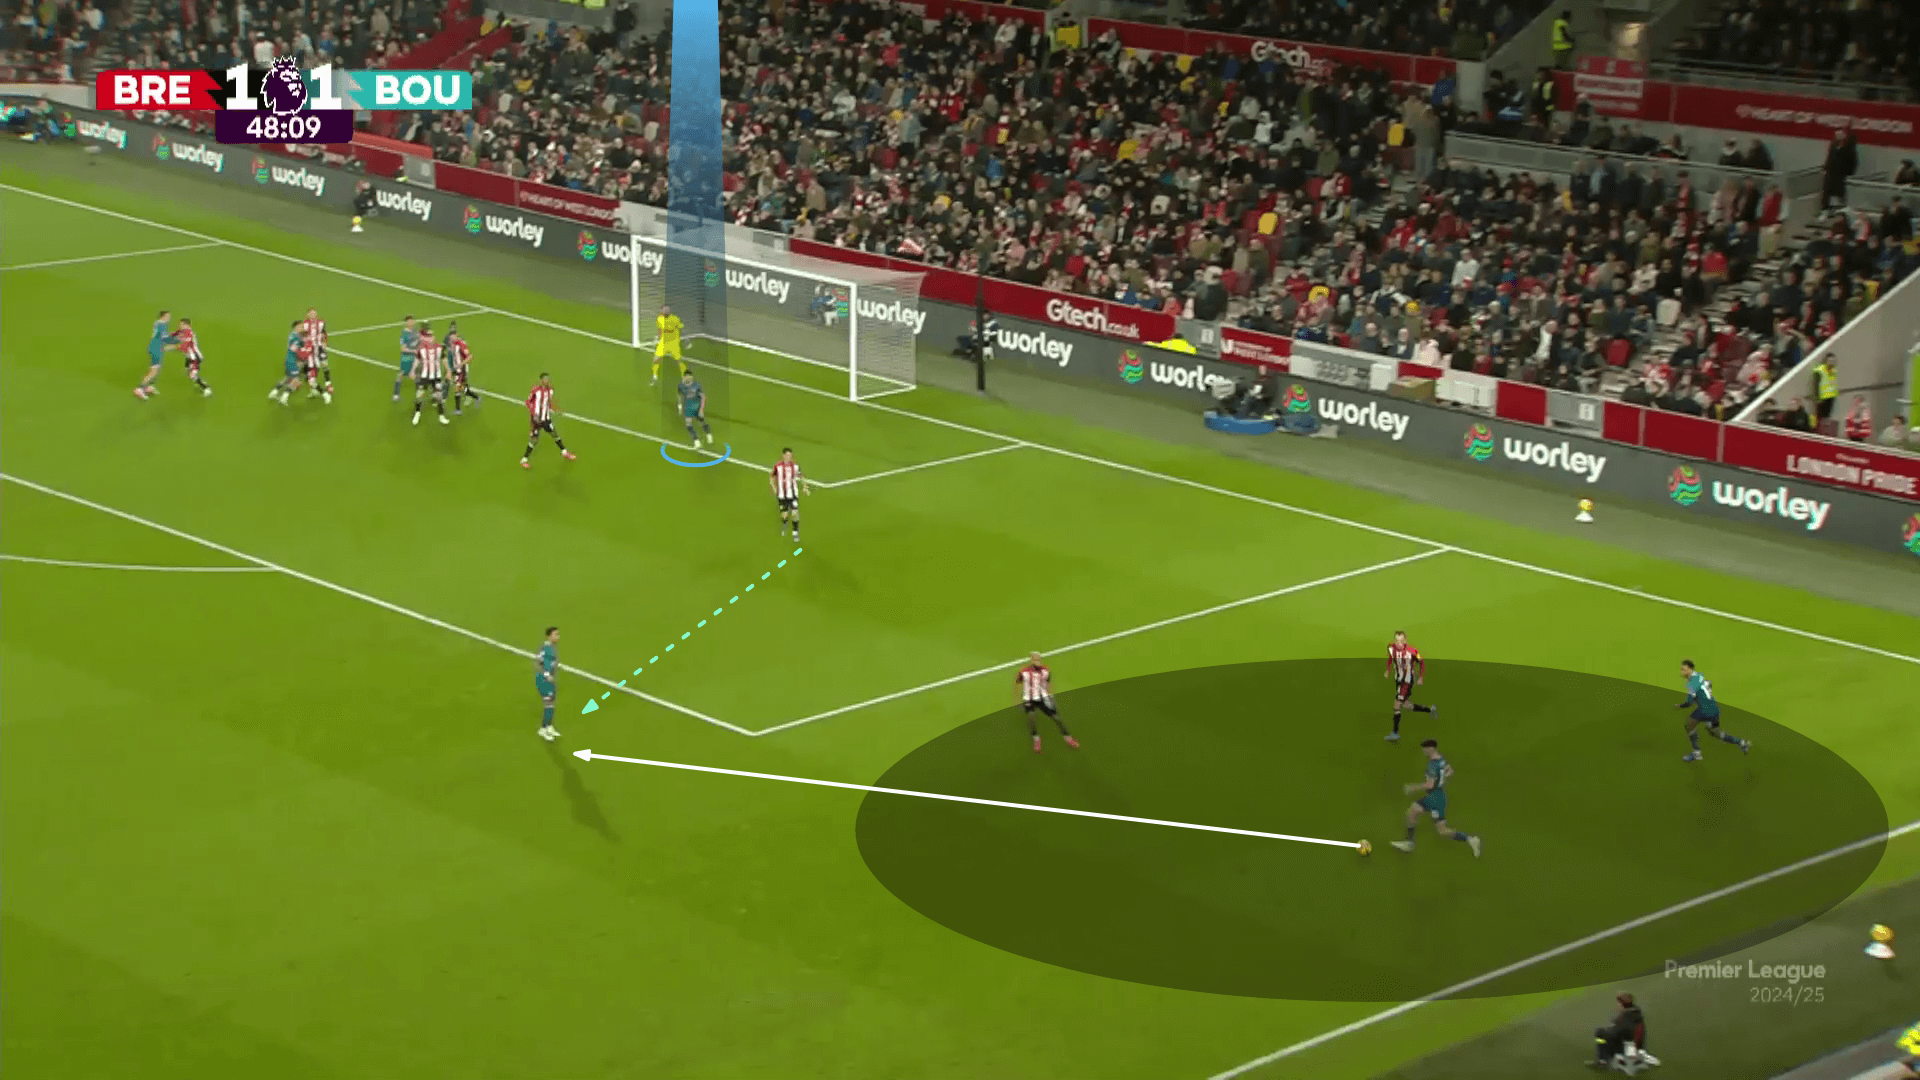
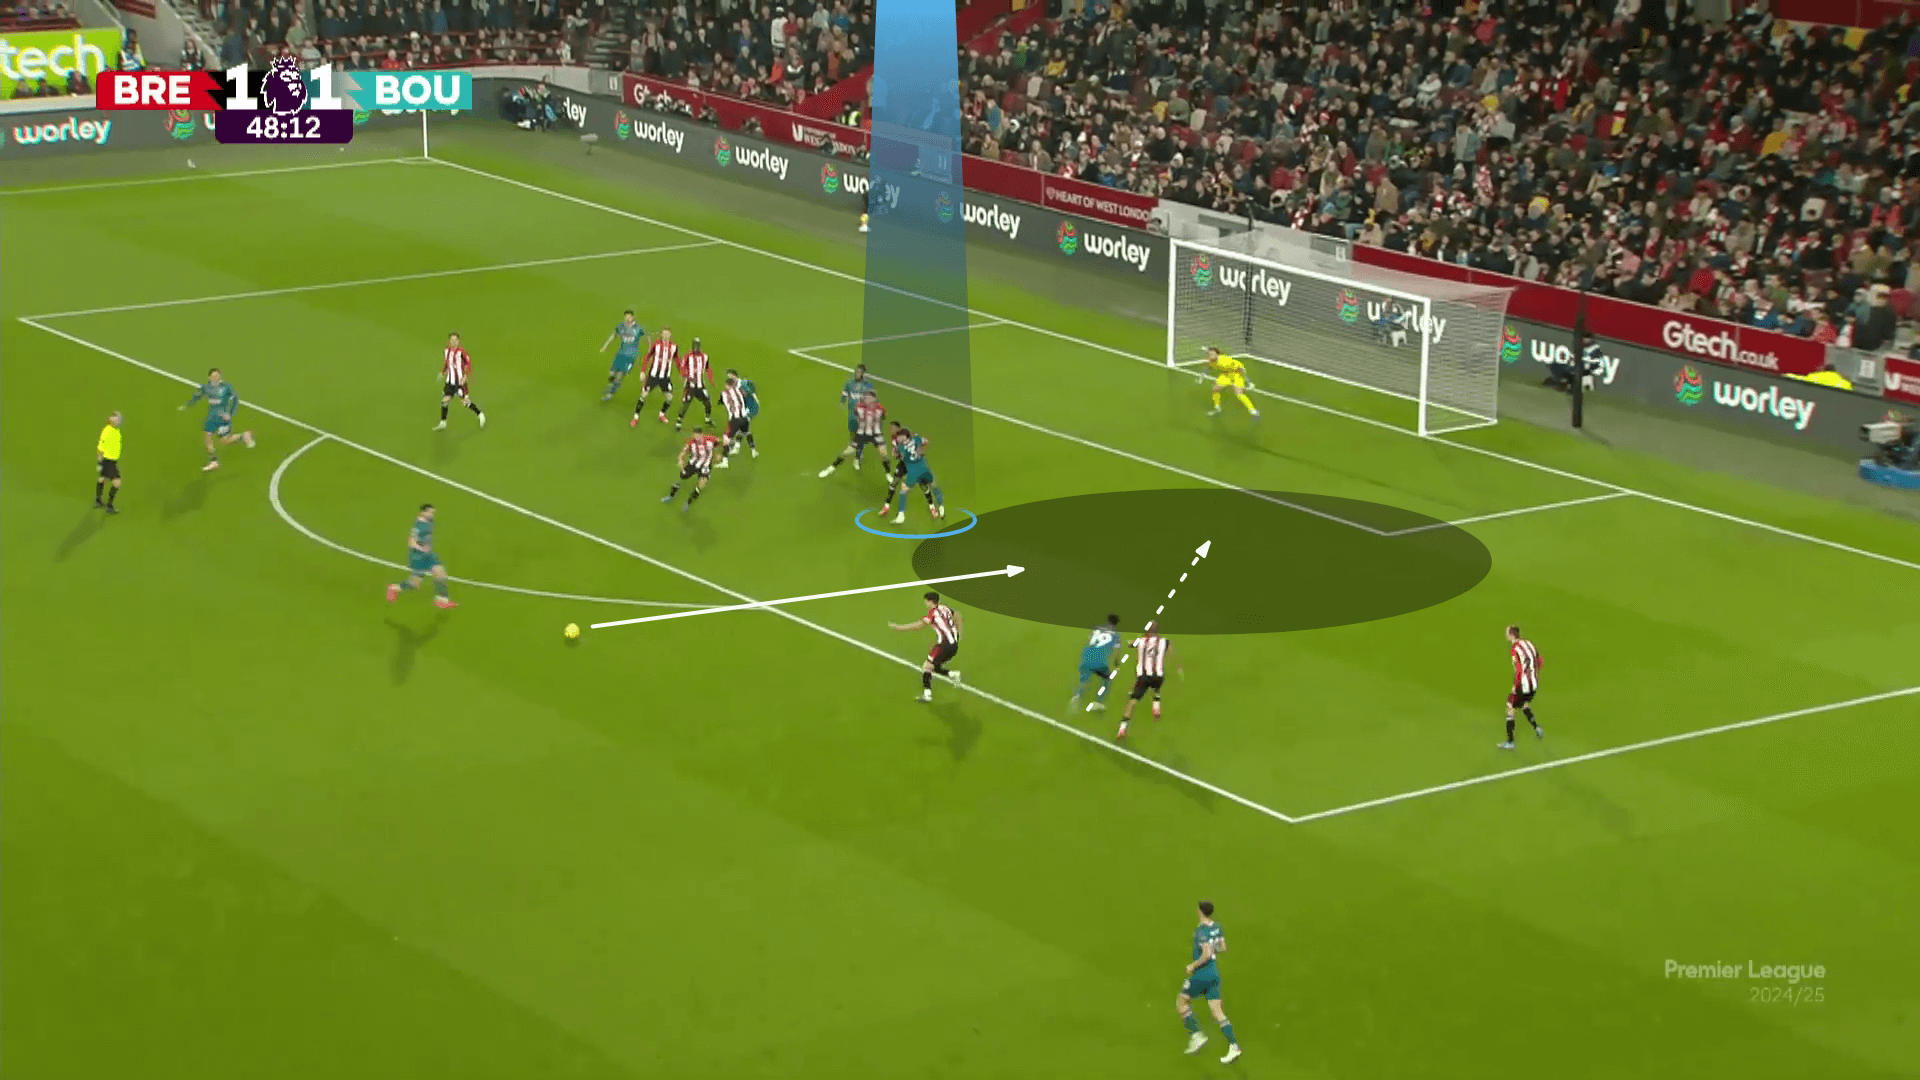
As shown below, a gap exists between the three players who went short and the rest of the defence.
This free player blocks the first remaining zonal defender to keep this gap empty.
Hence, the second edge-of-the-box player is just asked to send a thorough pass there to the first edge-of-the-box player after receiving the pass from him, as in the two following photos below.
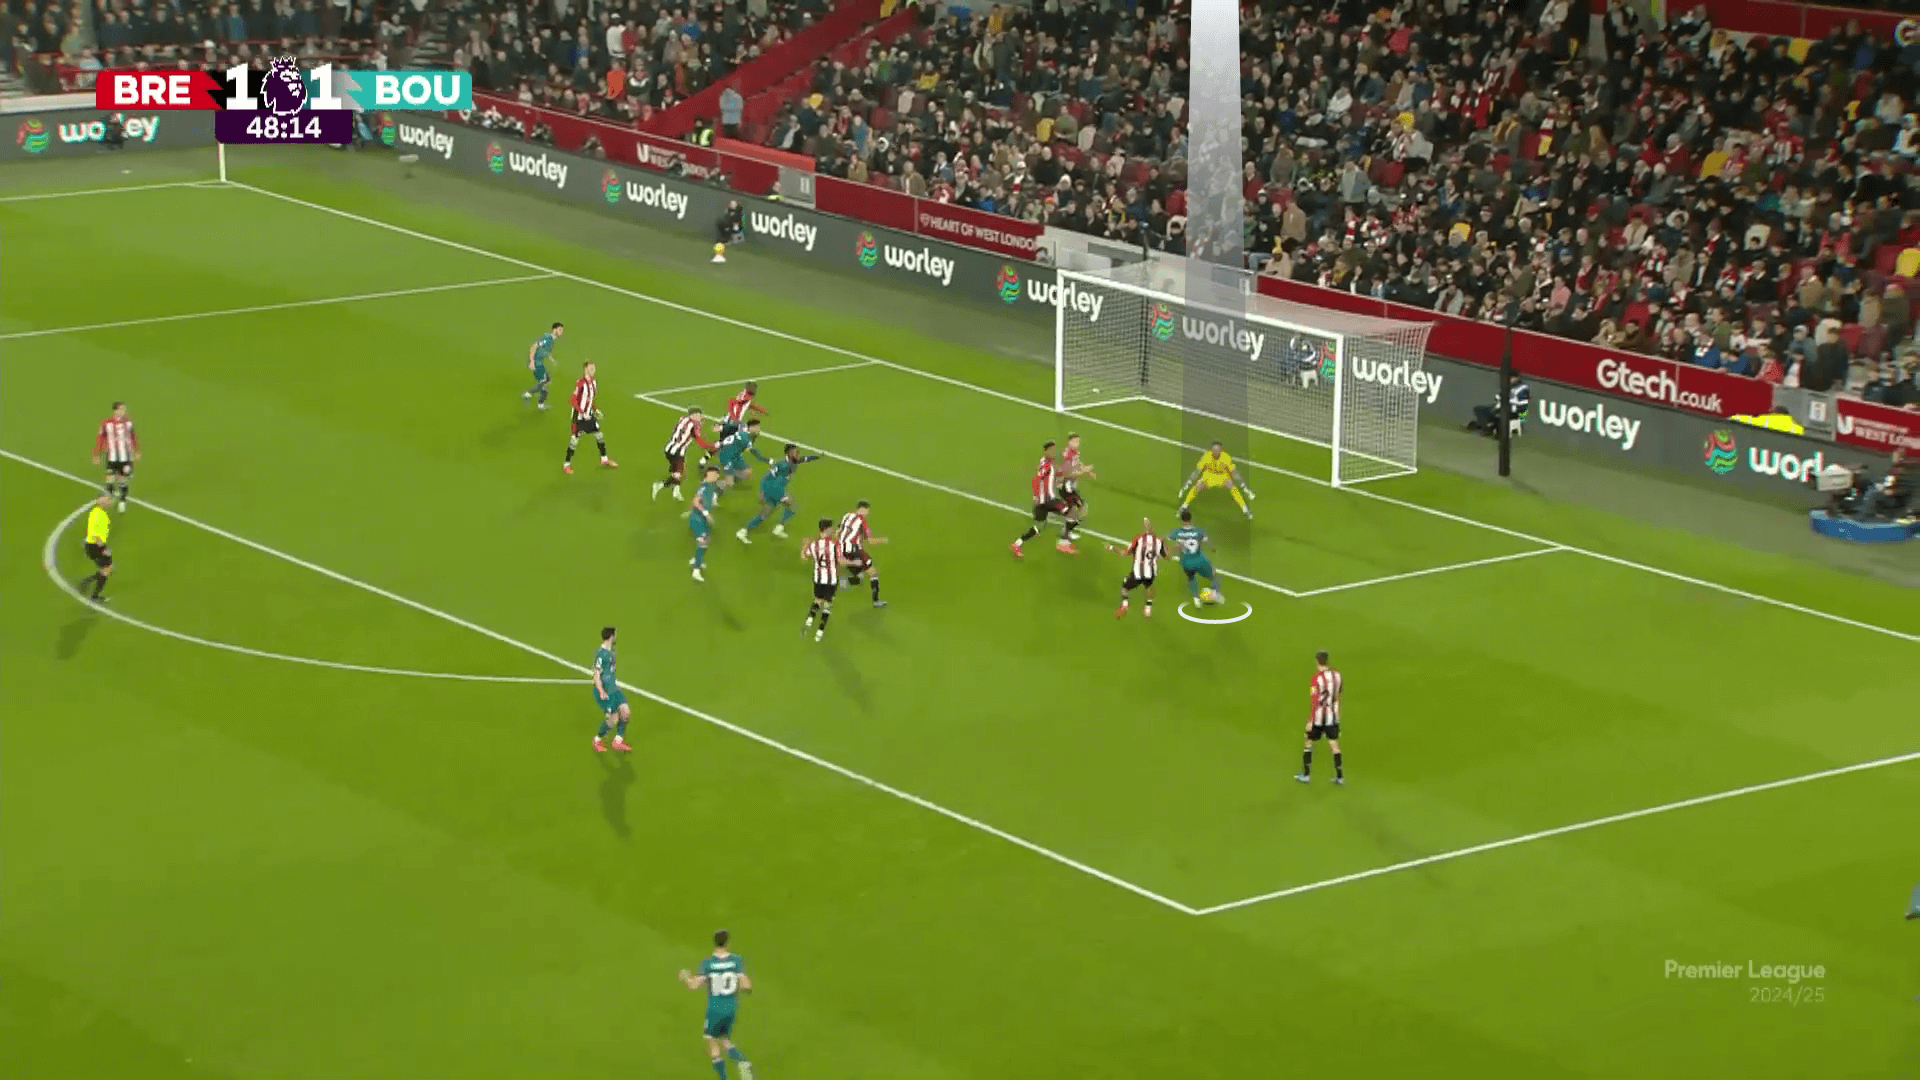
The plan works, and the result is a goal, as shown below.
As a variation, they have a plan against teams who mark the first edge-of-the-box player well.
— Footie Clips (@FootieClips) January 7, 2025
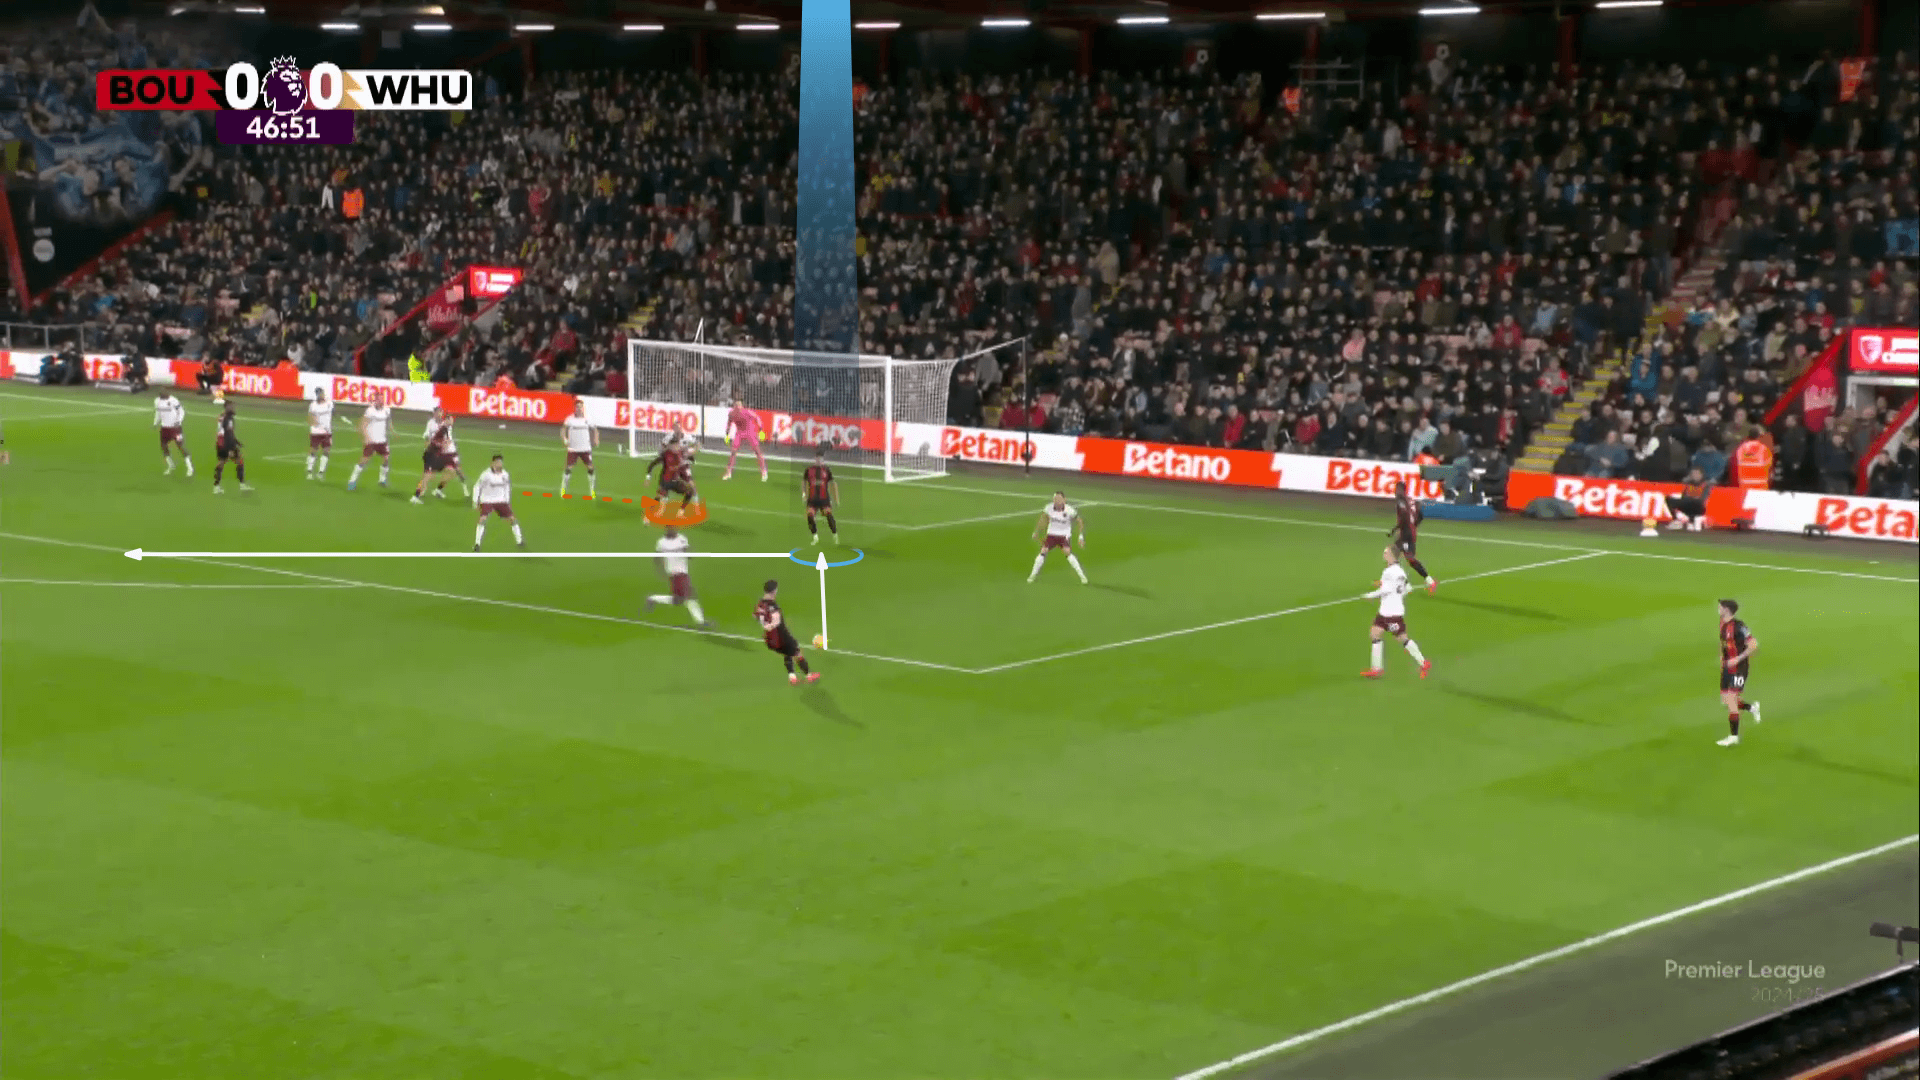
In the photo below, the Hammers defend the short corner with a short-option defender and a player fixed to the edge of the box (yellow), while the first zonal defender is the one who goes to the taker.
The taker is instructed to run parallel to the line to drag the first zonal defender, while the free player (blue) is the one who receives the ball from the first edge-of-the-box player this time.
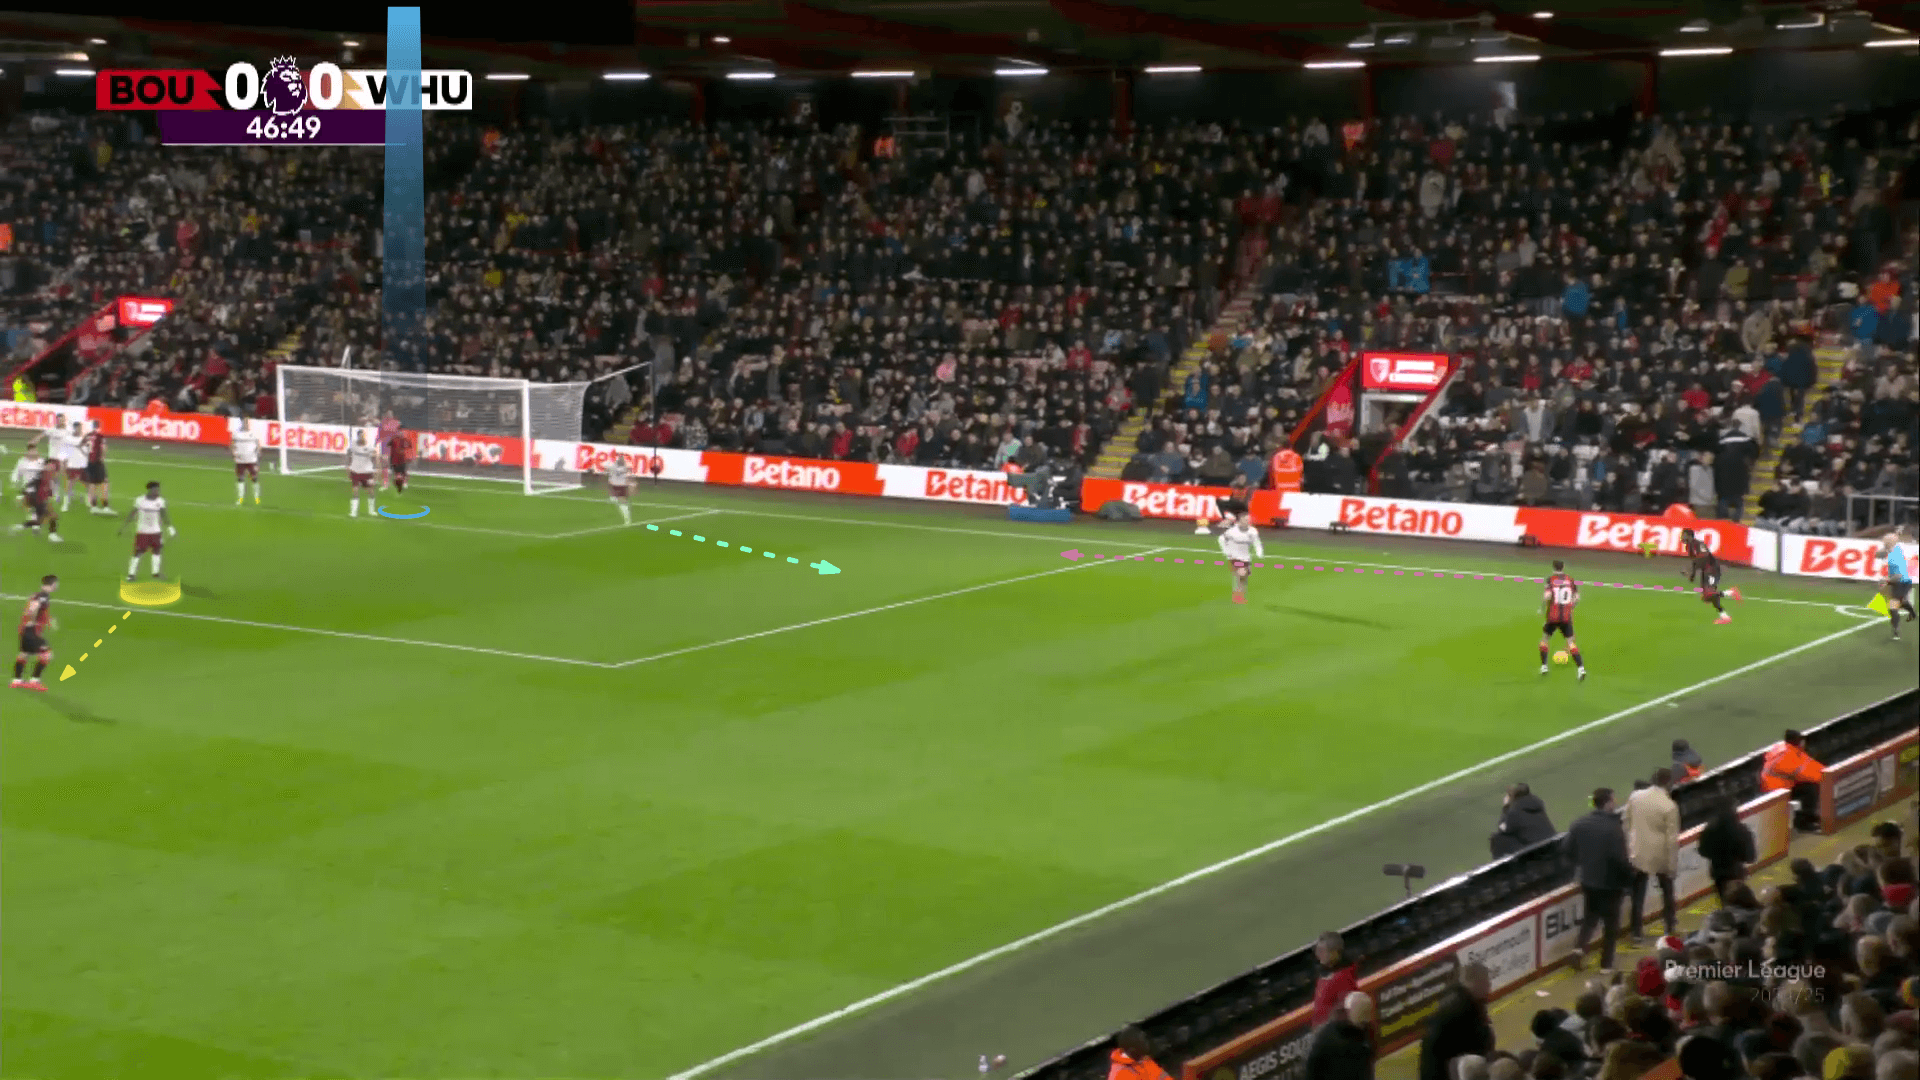
As shown below, another runner (orange) is needed to block the first remaining zonal defender.
Our free player passes the ball to the second edge-of-the-box player, who can shoot without any attention.
Playing Against One Defending The Short Corner & Rebound
In conclusion, we should mention some tricky ideas they sometimes implement to target the rebound player directly against teams that use only one player to defend the short and rebound areas.
Initially, they tried to send a direct low-level cross to the rebound player, as in the case below.
— Footie Clips (@FootieClips) January 7, 2025
In the photo below, Everton defend with five zonal defenders (green), five man markers and a player on both short and rebound.
This player is dragged a little out because of the position of the green player (on the left of the shot).
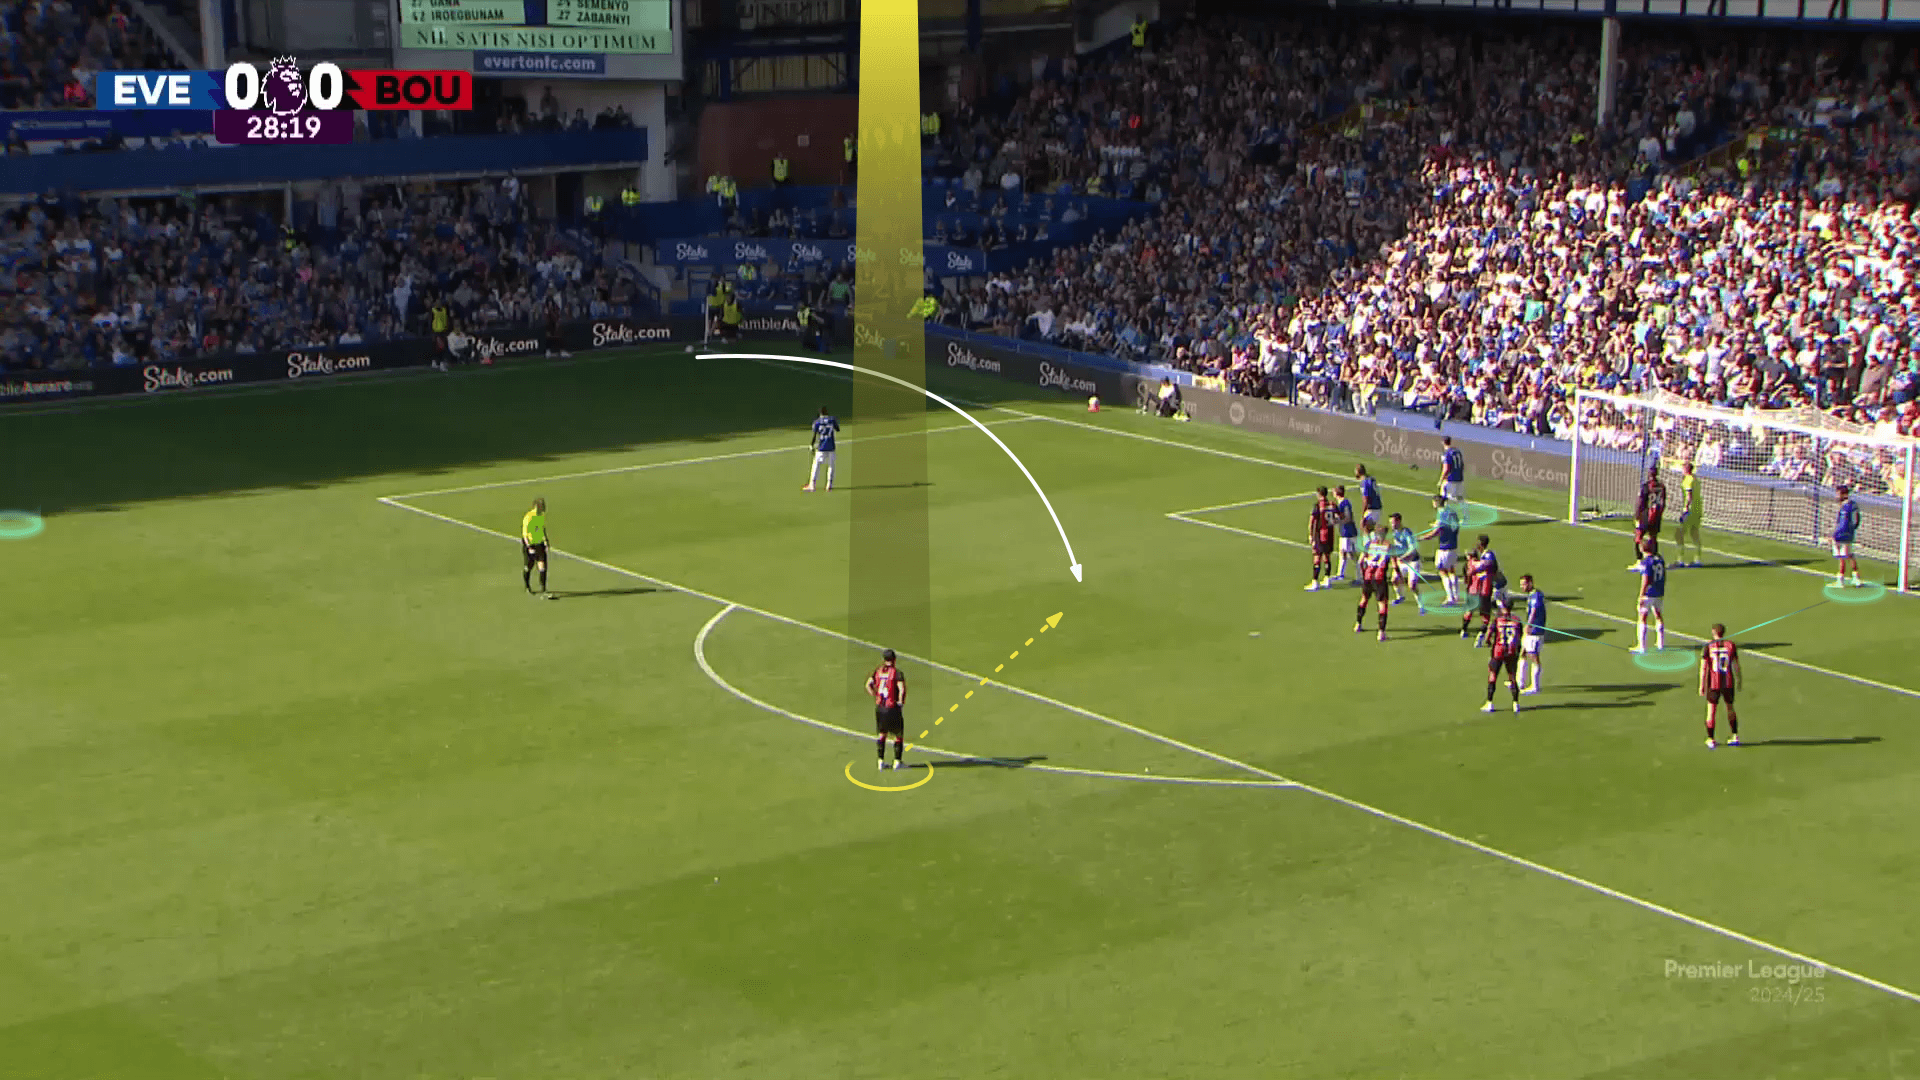
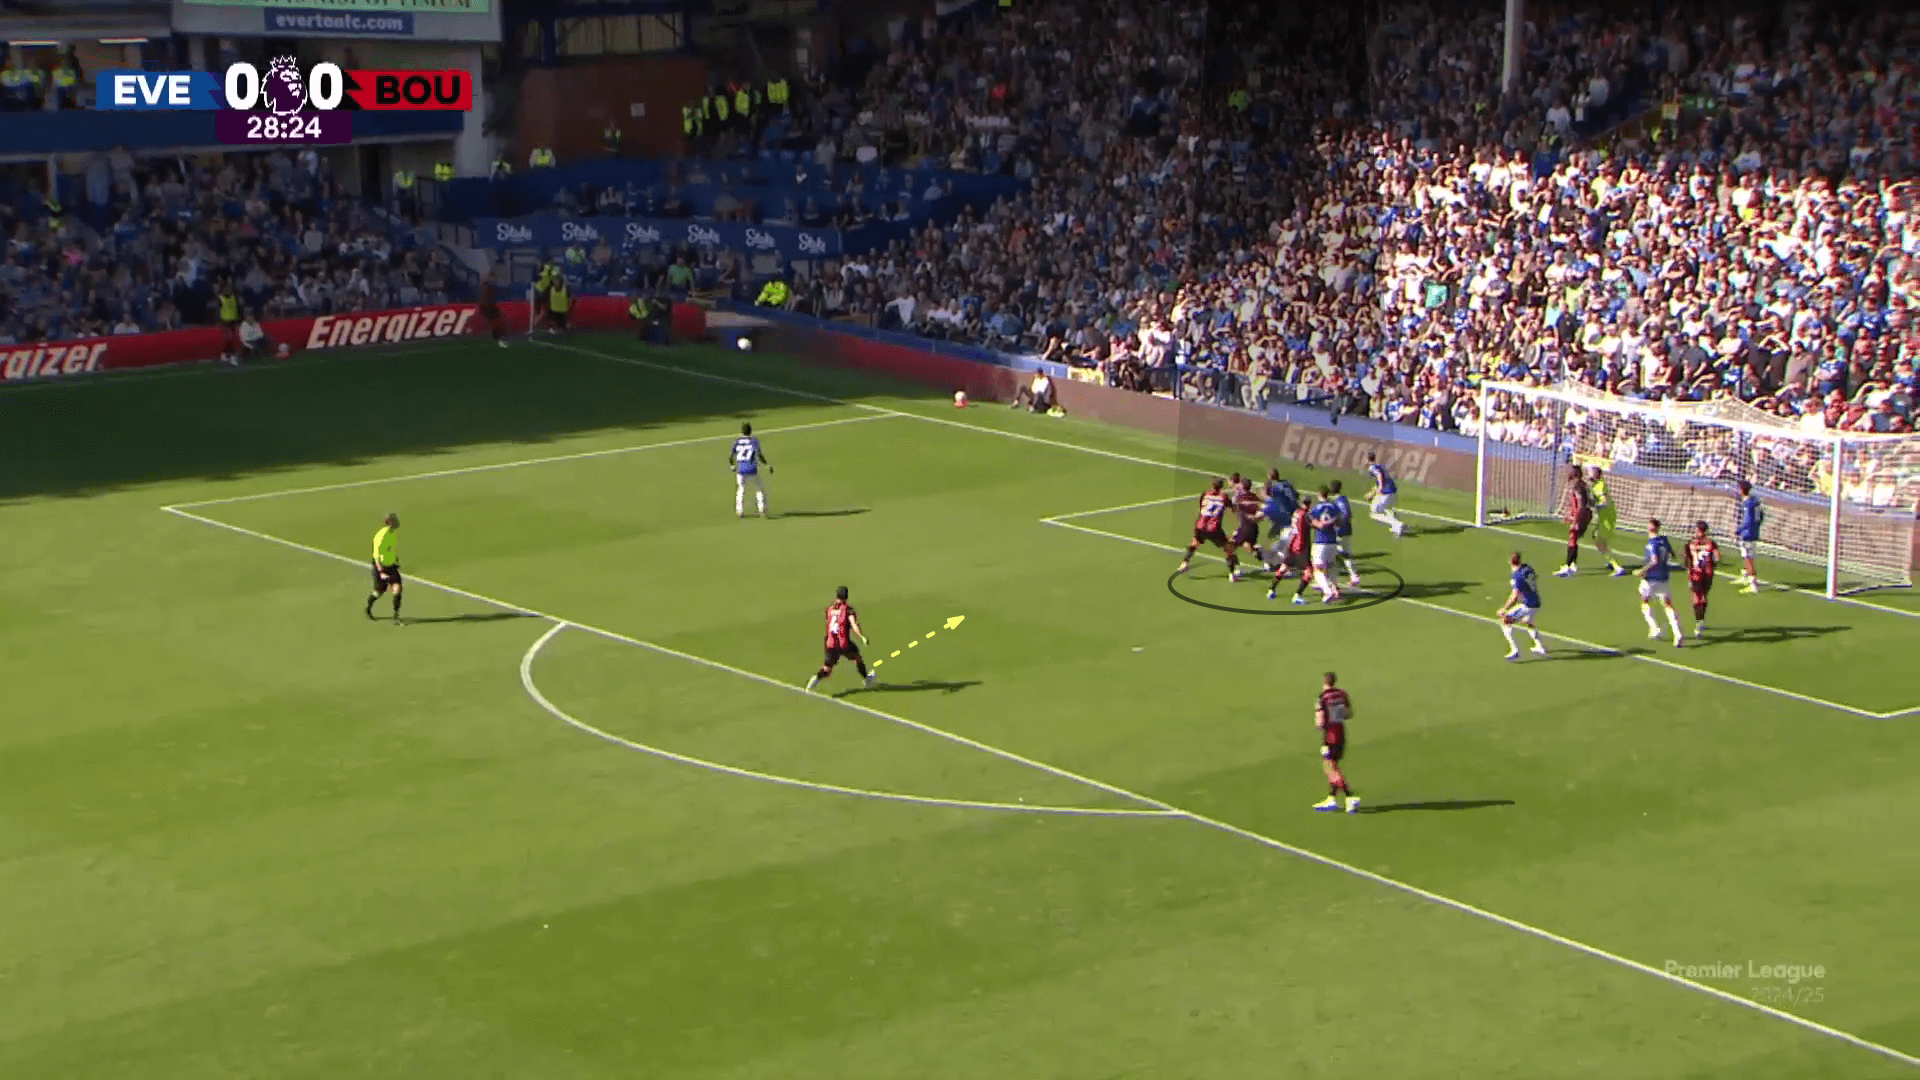
This demands blocks to the zonal defenders shown below for a long time to prevent them from going to the ball, which fails, as shown in the photo below.
Blocking for a long time is difficult, but we recommend following the right techniques and strategies, as in this analysis.
To avoid this problem, they implemented a variation after that.
— Footie Clips (@FootieClips) January 7, 2025
In the away match, Everton defend with six zonal defenders inside the six-yard box, three man markers (orange) and a player for both short and rebound.
They send a normal cross for a free attacker inside the box, who passes it to the edge-of-the-box player, as shown below.
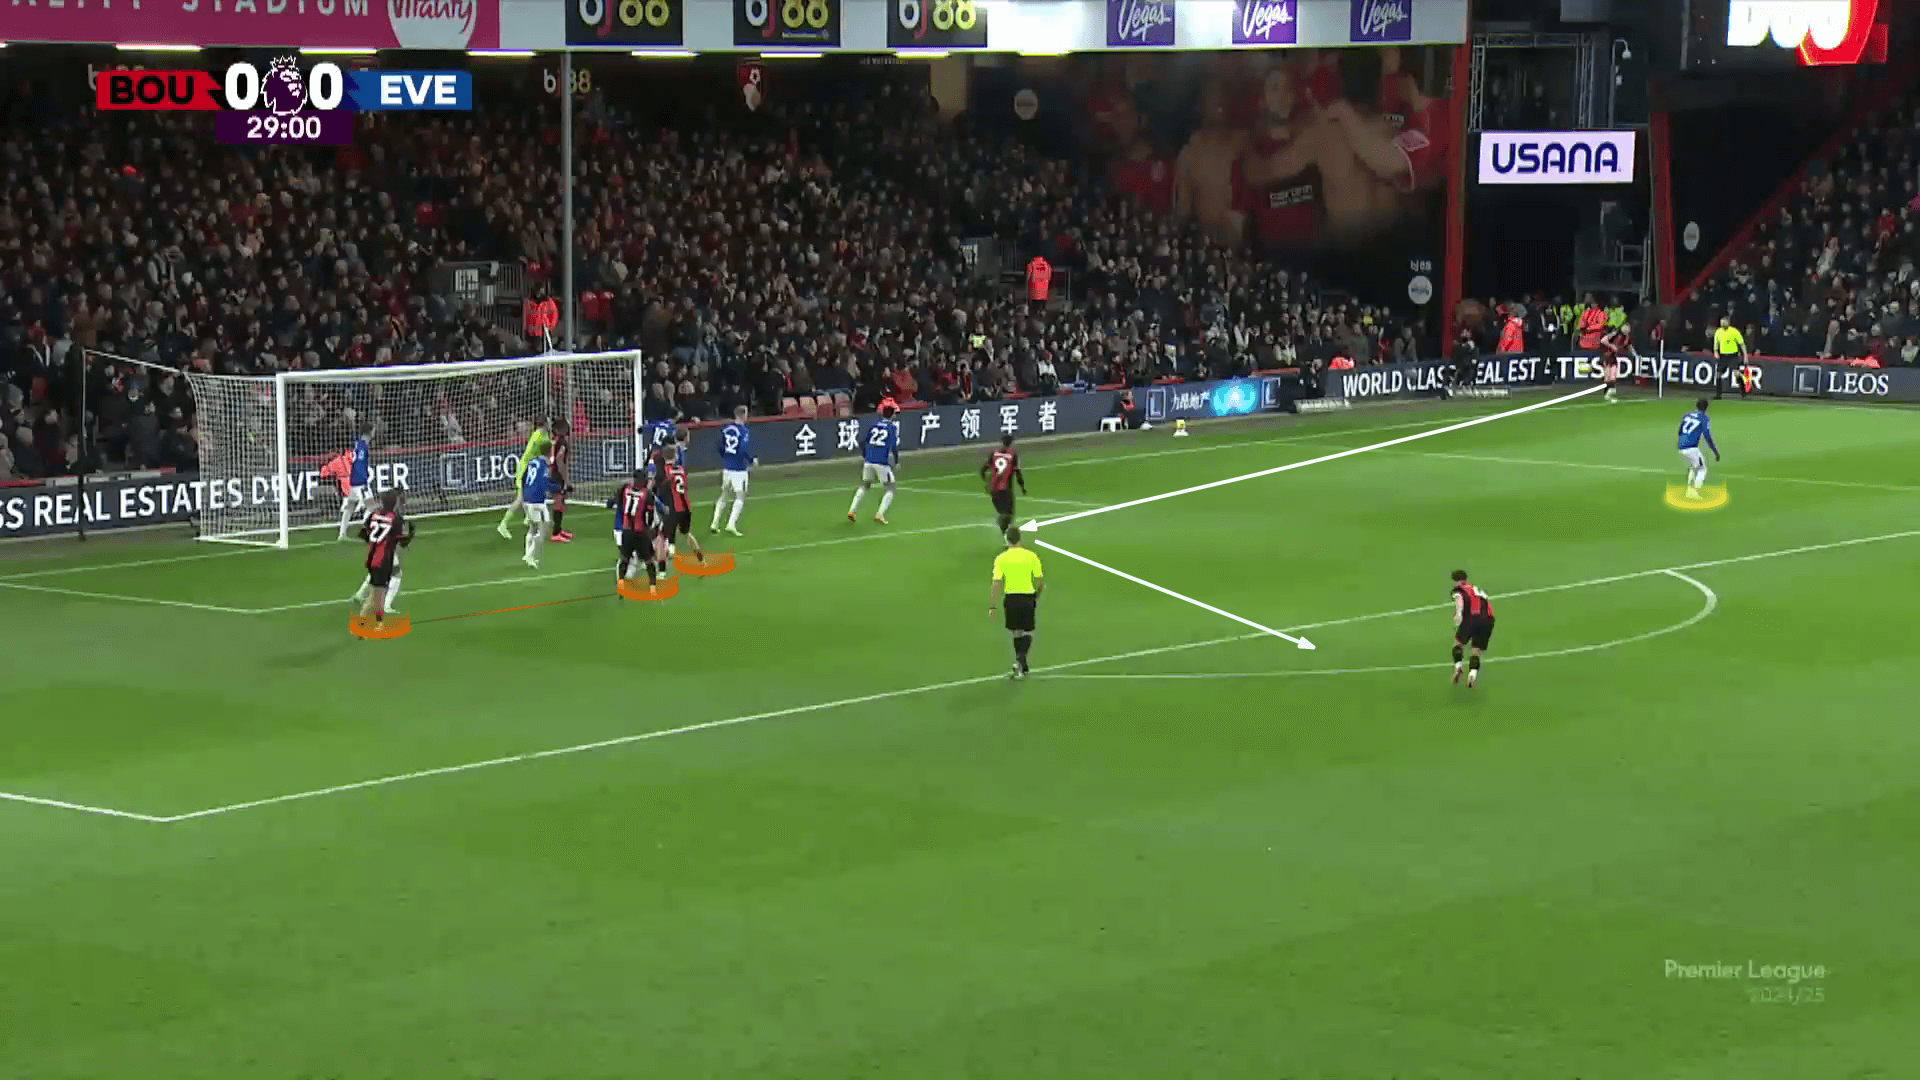
The plan works.
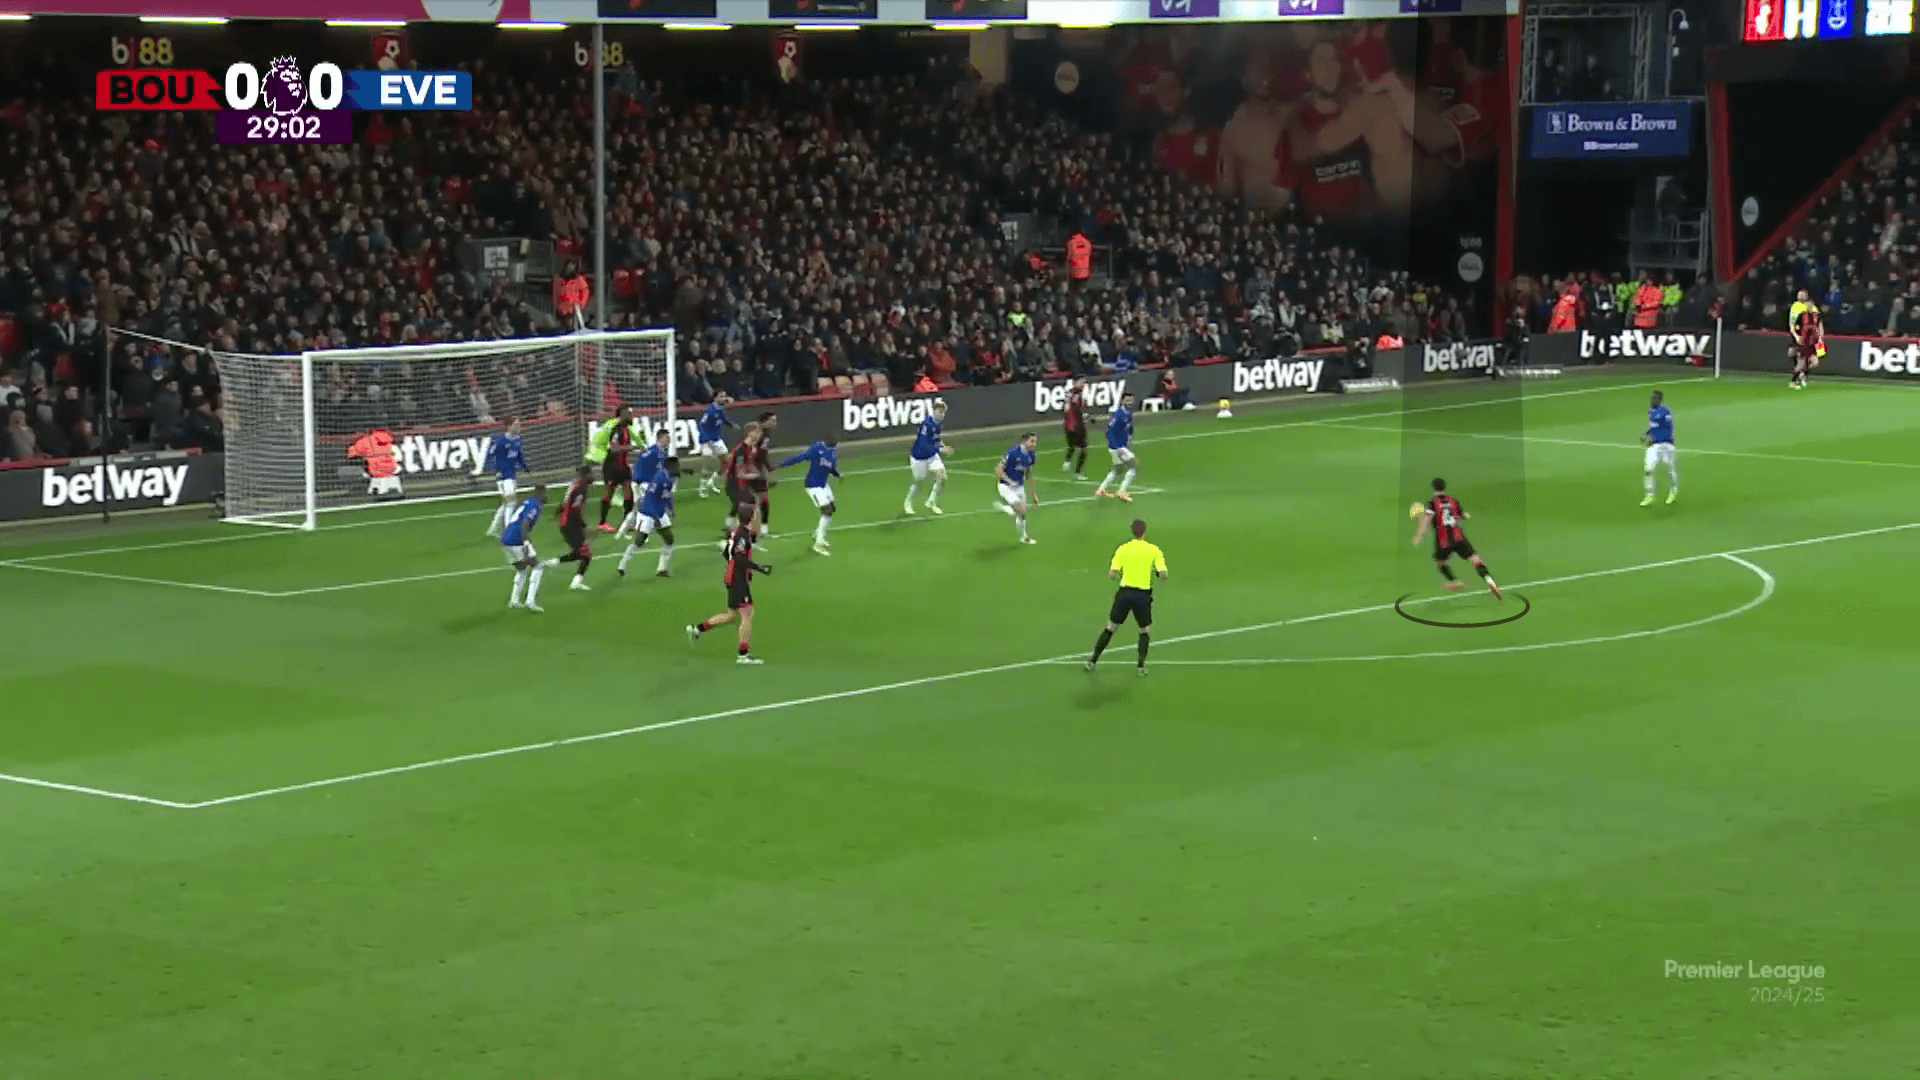
This idea is so effective, especially when the opponent has a red card and is forced to defend the rebound and the short corner with just one player, as in the case below.
— Footie Clips (@FootieClips) January 7, 2025
Conclusion
In this analysis, we have shown how Bournemouth have been excellent at set-pieces, especially short corners.
This set-piece analysis has also shown how they have varied ideas to adapt to different defending schemes while also keeping their ideas effective and well-planned.



Comments