The 2021-22 EFL Championship season ended with the last day drama where the relegation battle went down the wire with three teams battling for safety. Derby County emerged victorious in that battle as Wayne Rooney’s men managed to stay alive. The action did not end there with playoffs taking over from where it left also with the return of fans.
In one of the two ties, Brentford hosted Bournemouth in the second leg after losing 1-0 to their opponents away from home. Brentford were unlucky to not have come out of the game with a goal and Bournemouth were ruthless under counter. This tactical analysis will discuss how Brentford’s tactics helped them to triumph over their opponents and book their place at Wembley. Let’s get into the analysis.
Lineups
Bournemouth came into the clash unchanged as Woodgate decided to retain the same lineup that won them the first leg.
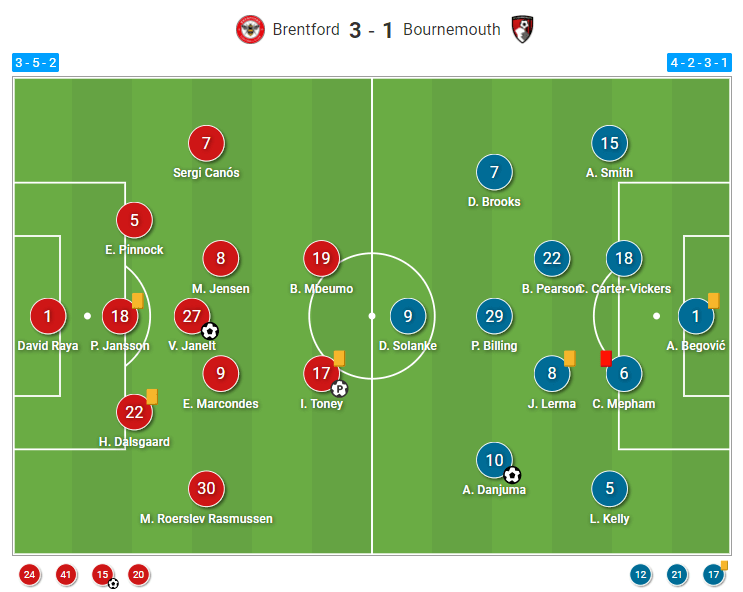
Brentford, on the other hand, made 3 changes to the lineup from the first leg. Centre-back Dalsgaard, central midfielder Marcondes and striker Mbeumo came in for Norgaard, Tarique Fosu and Marcus Forss. They retained the same system, 3-5-2, that they have been using for a long time under Thomas Frank.
Brentford’s high pressing carry on to the second leg
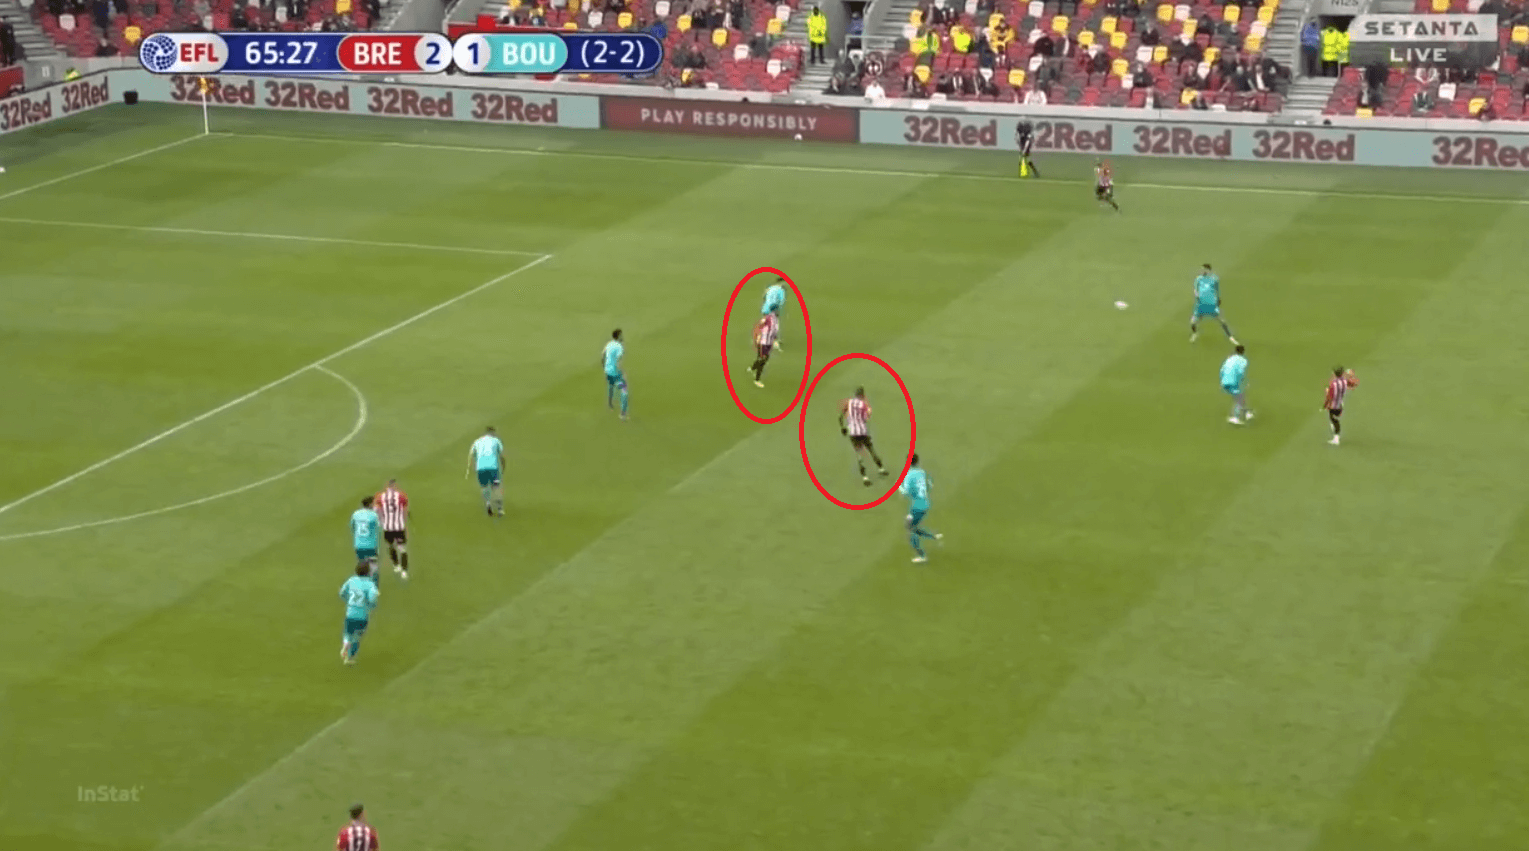
Brentford dominated the ball in the previous game and with the tie to be chased it was obvious that they would be wanting to have more possession in the game. So it was nicely set for both teams to play the game. Like in the first leg, Brentford continued to press high and looked to win the ball immediately. We can see an example of their high press in the image below where they have man-marked the entire Bournemouth defence and midfield.
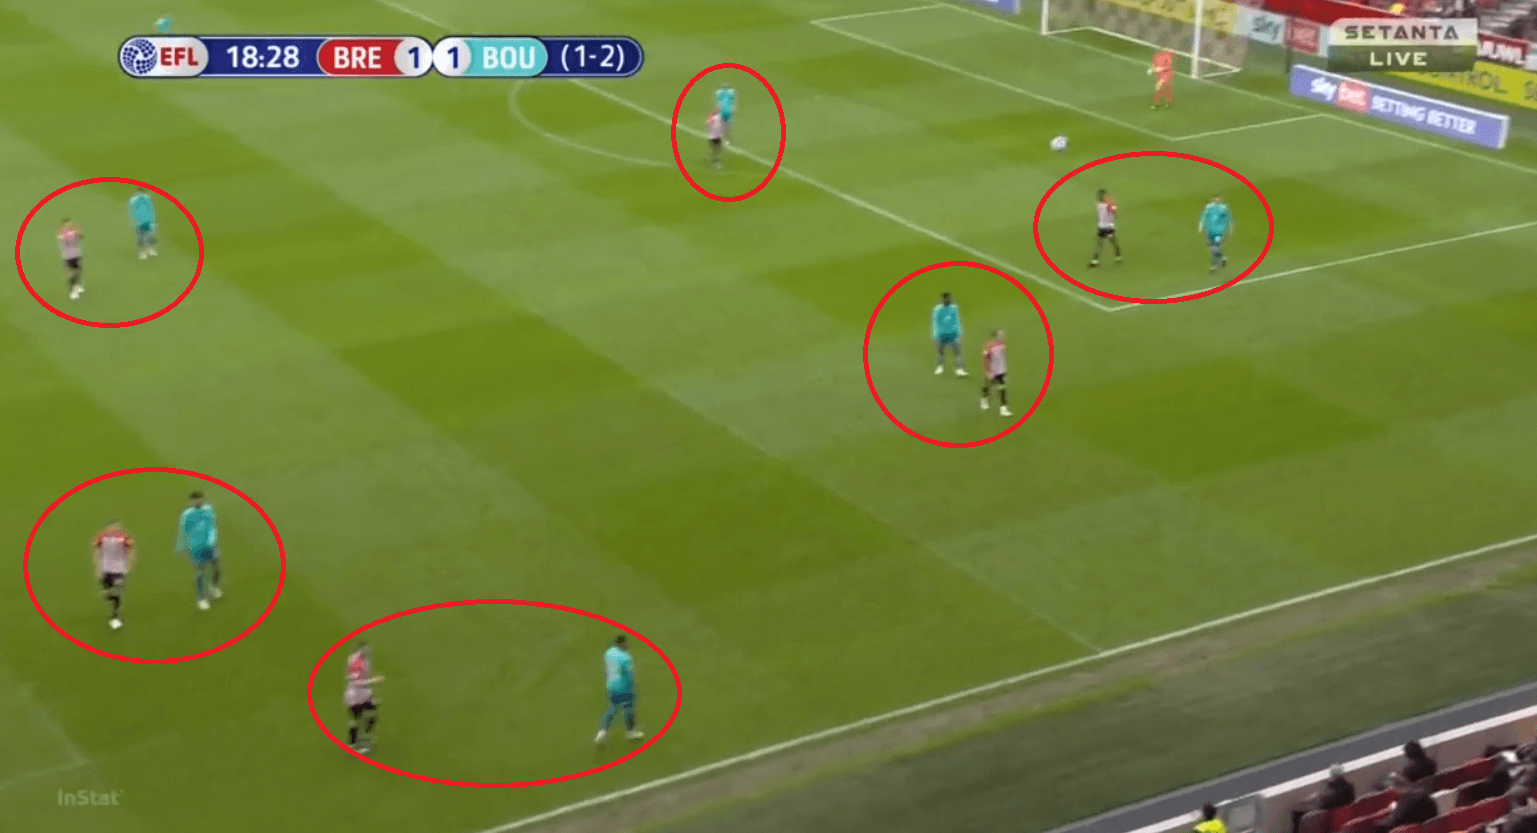
They would start pressing centrally where their centre-forwards would intensely look to press the Bournemouth centre-back. They would initially keep the full-back out wide free to have a pressing trigger. When the ball immediately goes to the full-back they would commit another player to intensely press the full-back now. With the presence of the touchline, acting as a virtual defender, beside the full-back when he receives the ball with the byline to his side, his options would be marked out of the play like in the above example. So this means that he would have to play the ball over the defence and turnover the ball to escape from pressure.
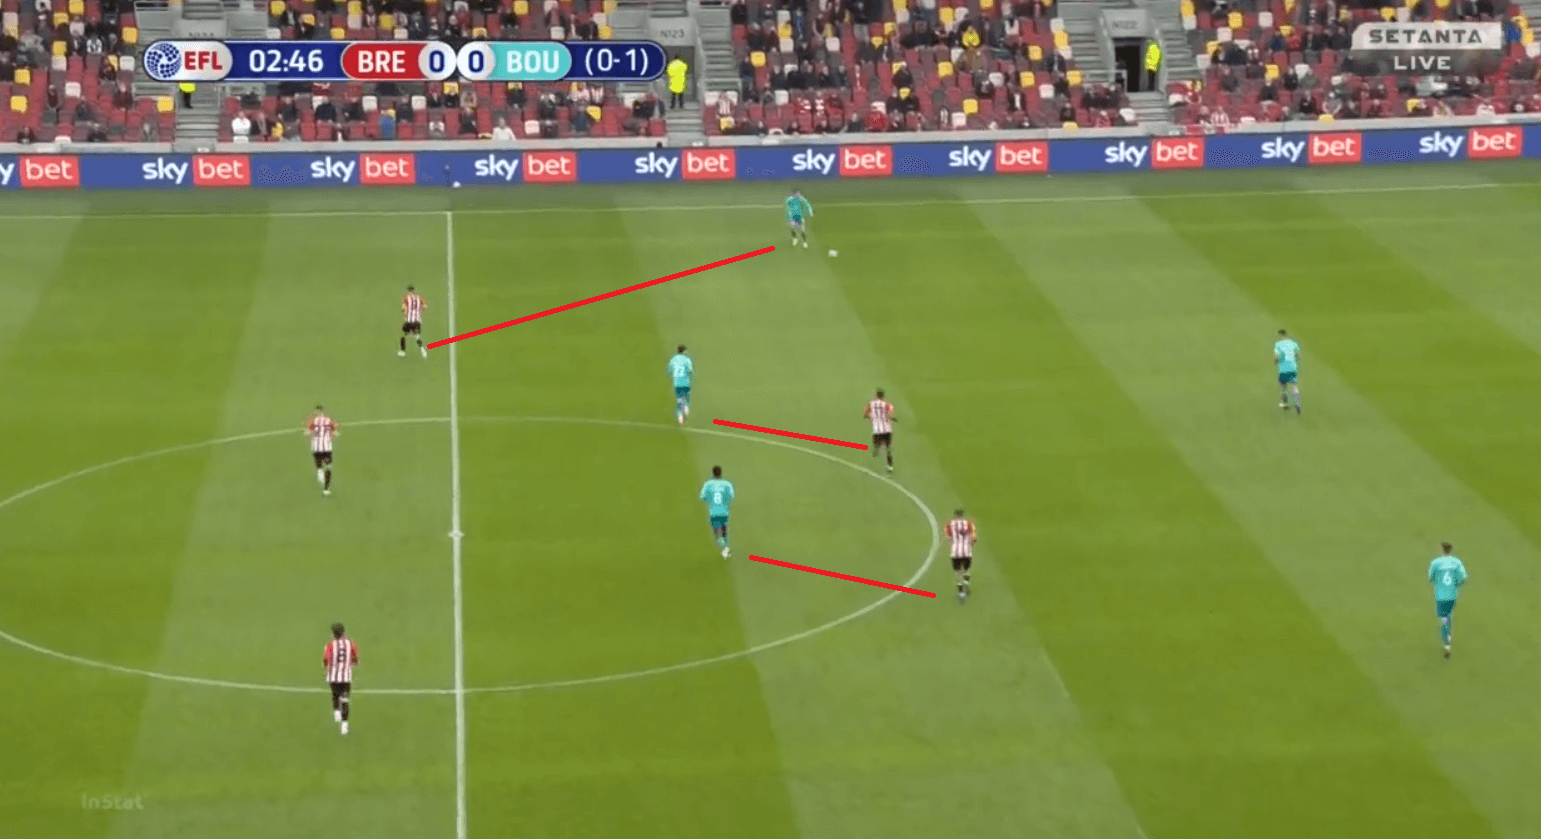
In a mid-block, they would look to be in a steady 3-5-2 shape where their forwards would not go very high to press the centre-back but would stay slightly deeper to cover-shadow the double pivots. This means that the pass from the centre-backs to the CDMs would be off due to the cutting of passing lanes. When the ball goes to the full-back, the near-sided CM would press the full-back, like how Inter Milan unde Conte press, while the other two midfielders would keep close tabs on the pivots with the strikers just ahead of the pivots. An example of this whole process can be seen in the image below.
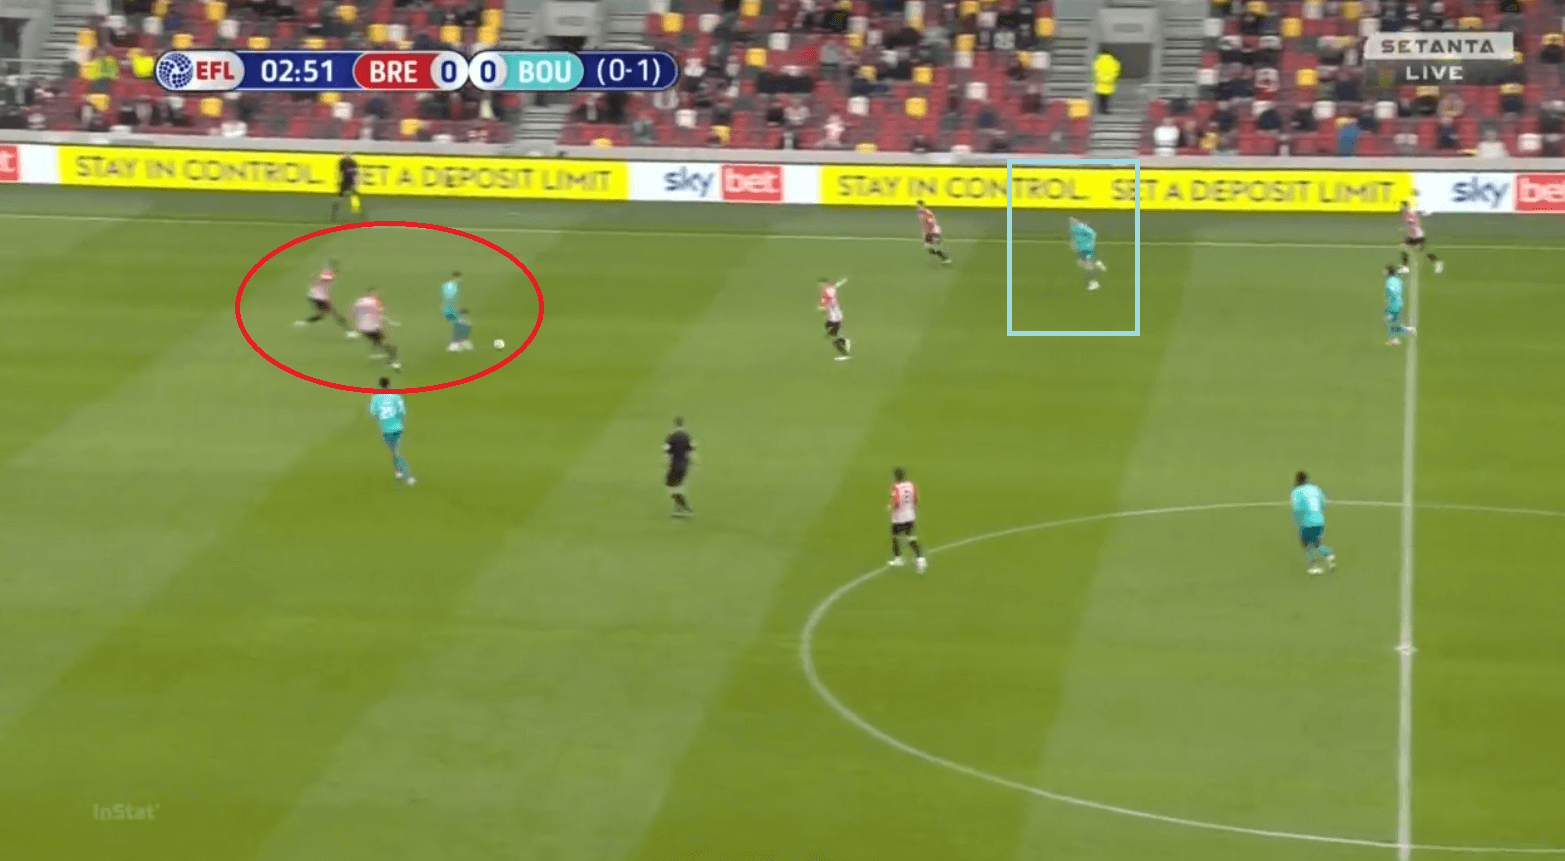
The press however looked to be broken at times especially at the start when Bournemouth had 11 men and were looking to have at least some amount of time on the ball. When the ball went wide and the wing-back pressed the winger when he went wide, one of Solanke or Billing would look to drop into the wings and drag the centre-back with them. Though Brentford did have another CB’s presence to stop the outnumbering, Bournemouth could have still created some dangerous situations when they had a chance to do so.
In the example below, we can see Brooks dropping deeper in the wings that dragged the wing-back with him. Immediately later, Solanke dropped into the wings and now he dragged another two players with him which Brentford shouldn’t have done as one of them should be staying deep and the Jansson who played as a central CB should have handed him over to LCB. Bournemouth could have used this very well if Brooks could have immediately made a sudden overlapping run in the wings for Solanke to lay off the ball to him. Another way could have been when one of the midfielders could have pushed closer to Solanke and to receive a wall pass from him and play it to Billings in the centre. Both of these could have certainly cut-open the Brentford defence but they failed to do so.
The likes of Billings was finding good spaces in between the lines especially when the wingers and Solanke dragged players with them. Bournemouth should have used these minimal opportunities to good effect. But overall, the Brentford pressing was good and intense especially when the players were in good communication with each other and decided whom to press.
Brentford’s horizontal stretching expose Bournemouth
Bournemouth deployed a ball-oriented pressing where the reference for them was the ball and the whole team shifted from one flank to other whenever the ball went to that flank. When the ball is at the central regions, they would look to cover the central regions by closing gaps centrally like in the image below.
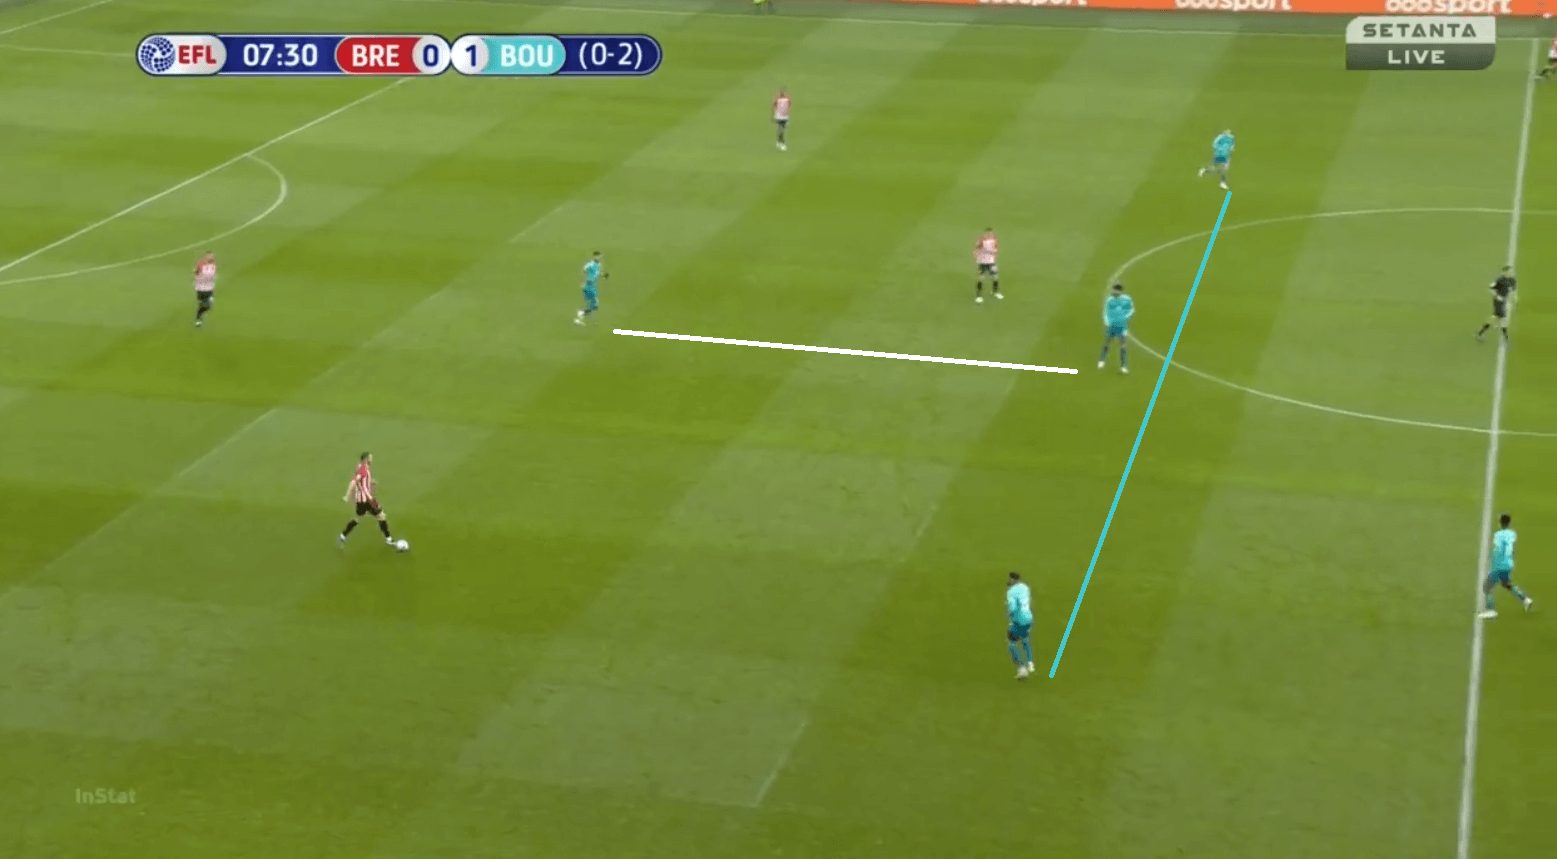
This is again to bait them to move to the flank where they would compress the space around the ball and disrupt Brentford‘s ability to play short passes around the ball in the flank. The idea was also to create numerical superiority while defending the ball near the flank. An example of how they pressed can be seen in the image below where they have a 3v2 situation around the ball and if it moved further to the flank then the team would shift accordingly.
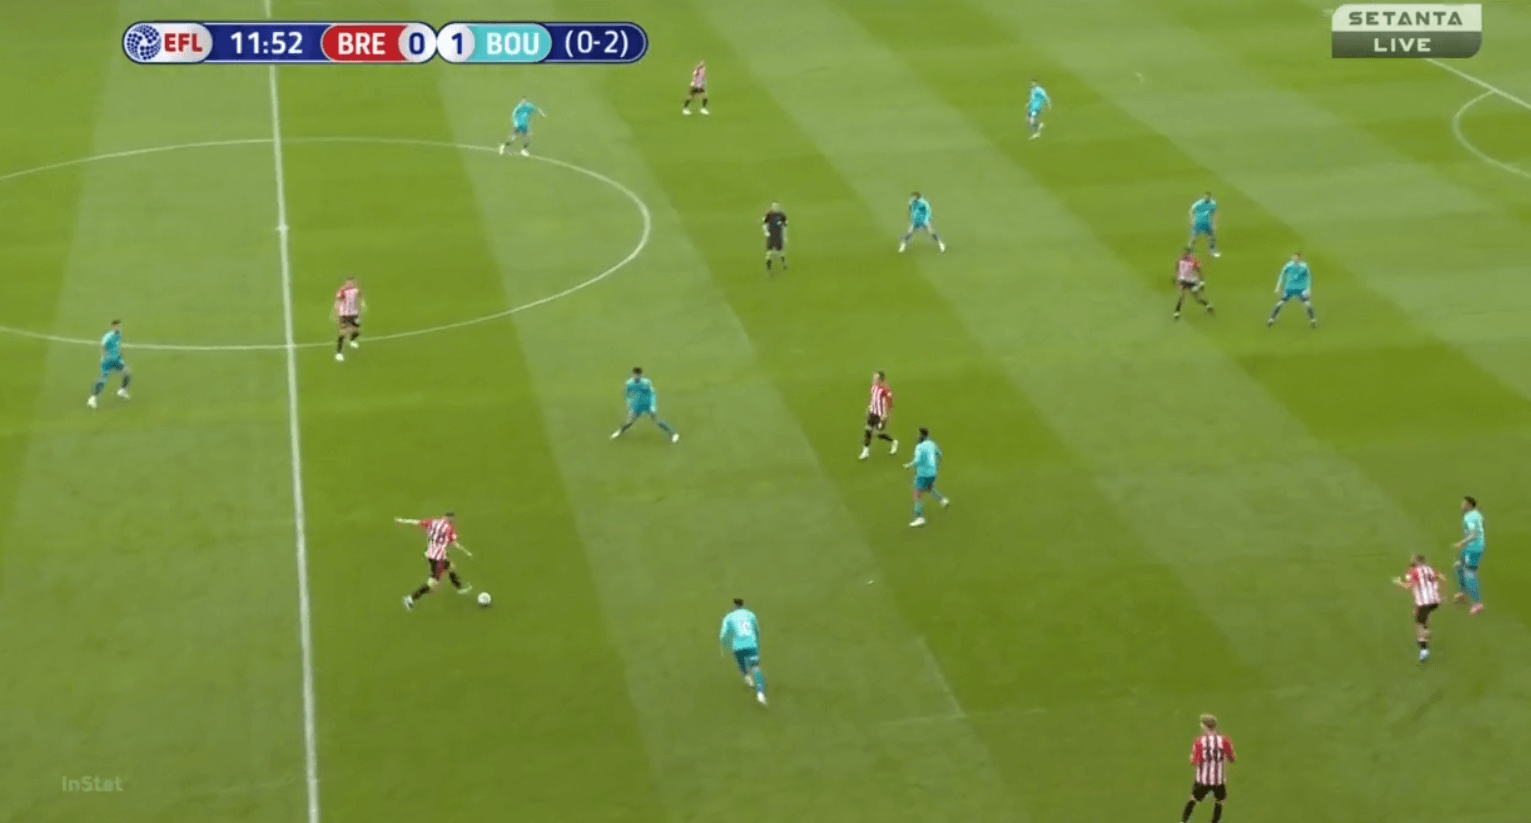
The issue for Bournemouth was this approach could have succeeded if they played a team that used 2 centre-backs in their system. But with Brentford using 3 of them, the CBs stretched and took positions very wide. This proved to be very difficult for Bournemouth to defend as their forwards weren’t able to cover the centre-backs wide. If they decide to move wide then that would have opened the passing lane to players present centrally.
Another efficient pressing that forwards uses is to press the centre-backs with a curved run by cutting the passing lane to the full-backs. This is usually done by teams to take out maximum number of players with the fewer players defensively. But due to the wide presence of the CBs, the Cherries’ wingers weren’t able to pick up a curved run to block lanes.
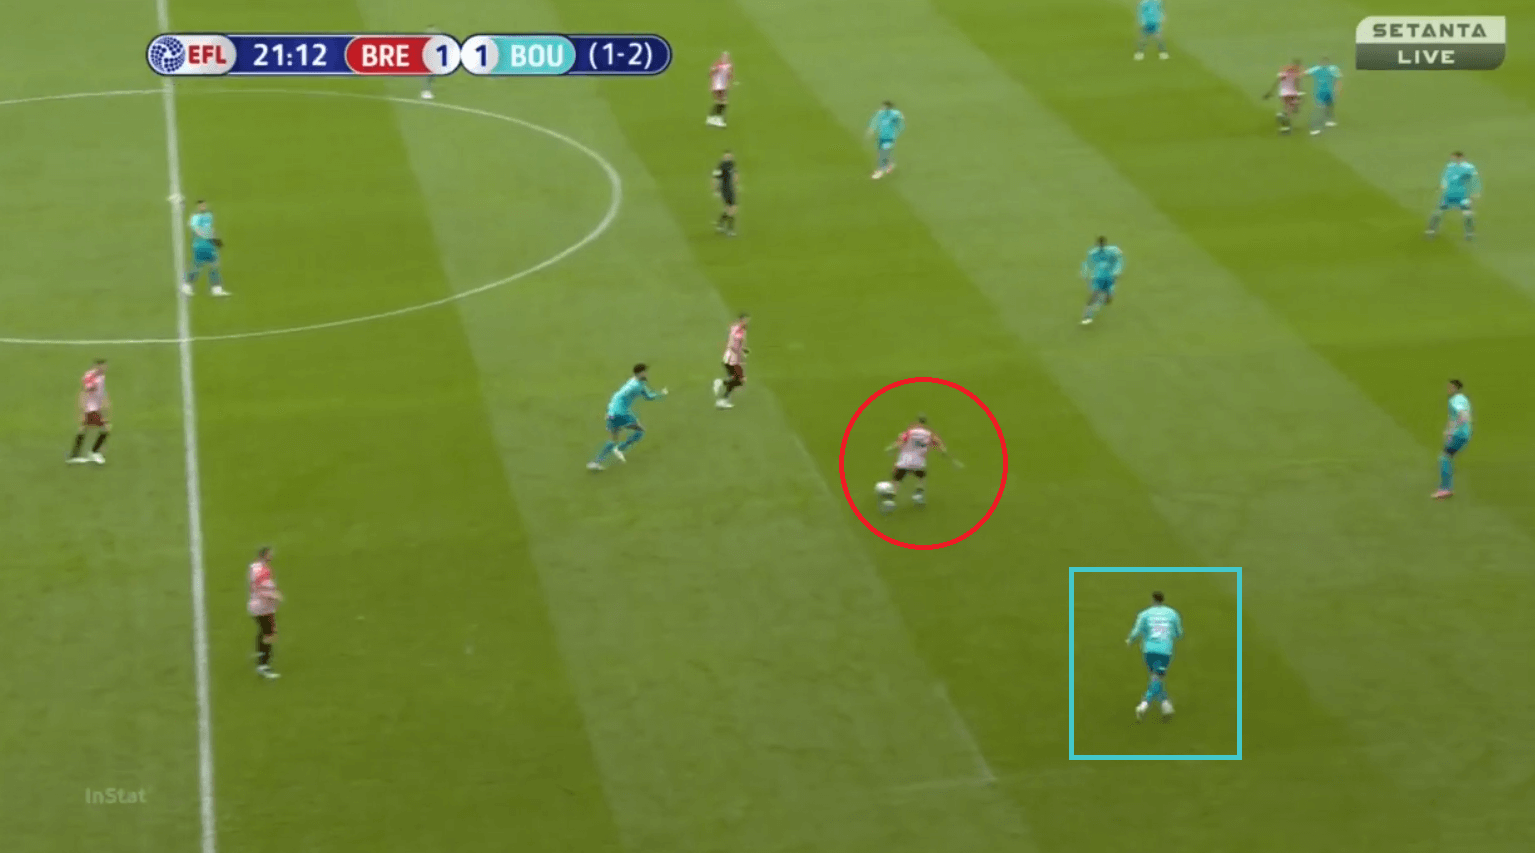
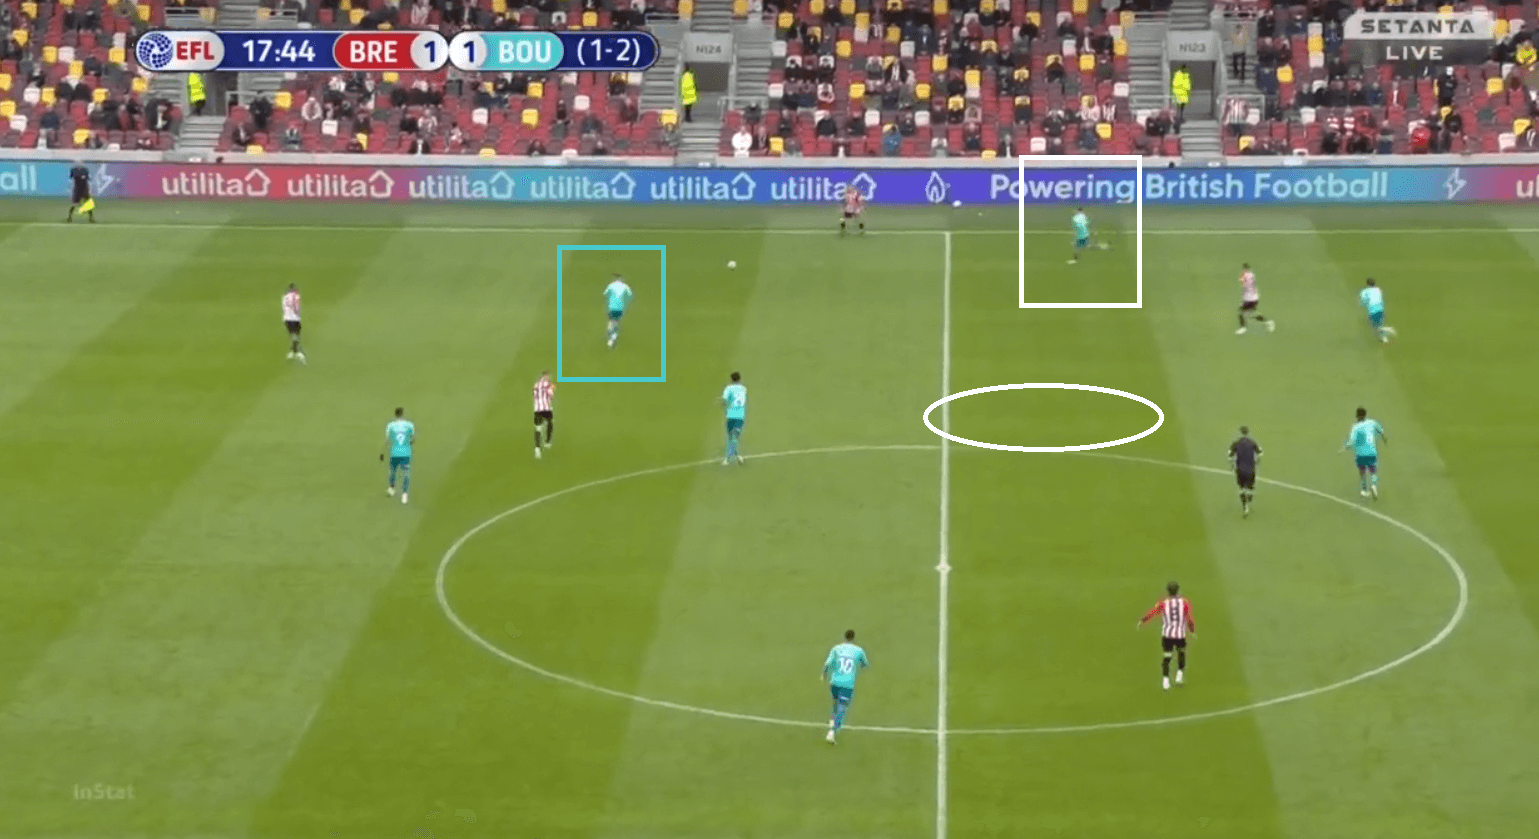
This means that the passing lane from the centre-back to the wing-back was open and to ensure the wing-back doesn’t bombard forward, either one of Bournemouth’s double pivots or the full-back had to move forward to press the Brentford wing-back. If the full-back pushed forward then that would leave space behind for Brentford’s forwards or midfielders to run into. So they also used the likes of Lerma or Pearson to press like in the below image where Lerma (whit rectangle presses Canos) while Brooks (blue rectangle cannot press the CB with a curved run to protect the centre).

This again created a tradeoff as now Lerma had to vacate the central regions to press which opened space now in the centre for one of the Brentford players to drop. Whenever the winger decided to make a curved run from the wing, it opened spaces centrally like in the example below where Groeneveld tries to make a move wide to mark out the WB but instead opens space for Mbeumo to drop into and receive the ball.
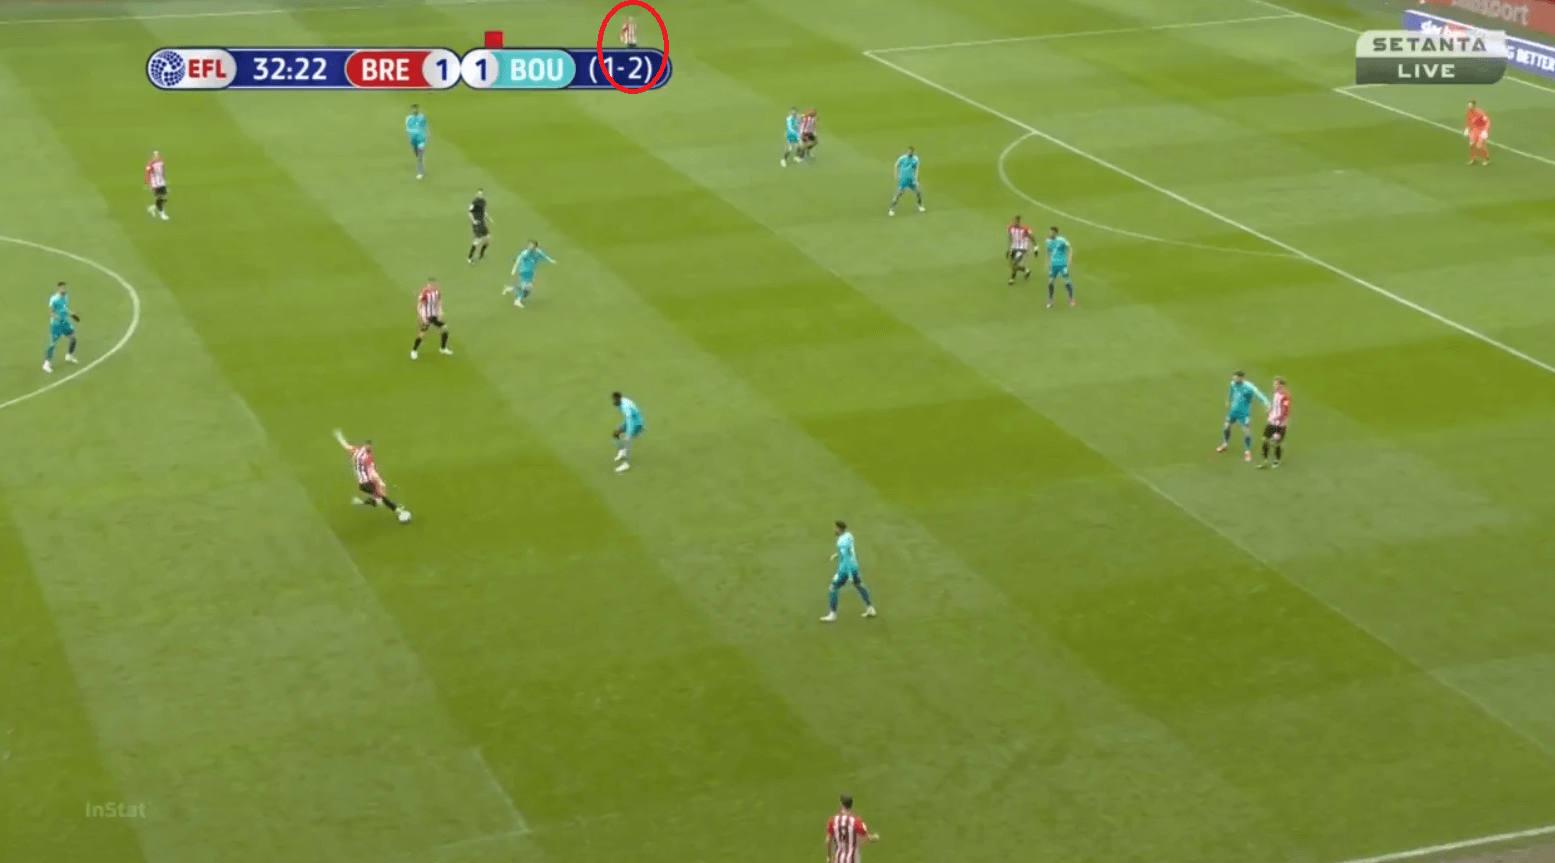
The stretching didn’t stop here as they also looked to stretch Bournemouth’s defensive line to find passes. The far sided wing-back would position high and wide and a switch from the CBs or CMs would be very tiring for the Cherries when they had to move from flank to flank. We can see an example below where this happens.
Things went even worse when Bournemouth went down to 10 men as they now had a man less in the midfield with their shift into a 4-4-1 system. This allowed Brentford to focus more on the wide regions attack down the wings even more as Bournemouth cannot afford to leave the central regions. We see Bournemouth very narrow and Brentford have decided to switch the ball to the flank and use the width to their advantage.
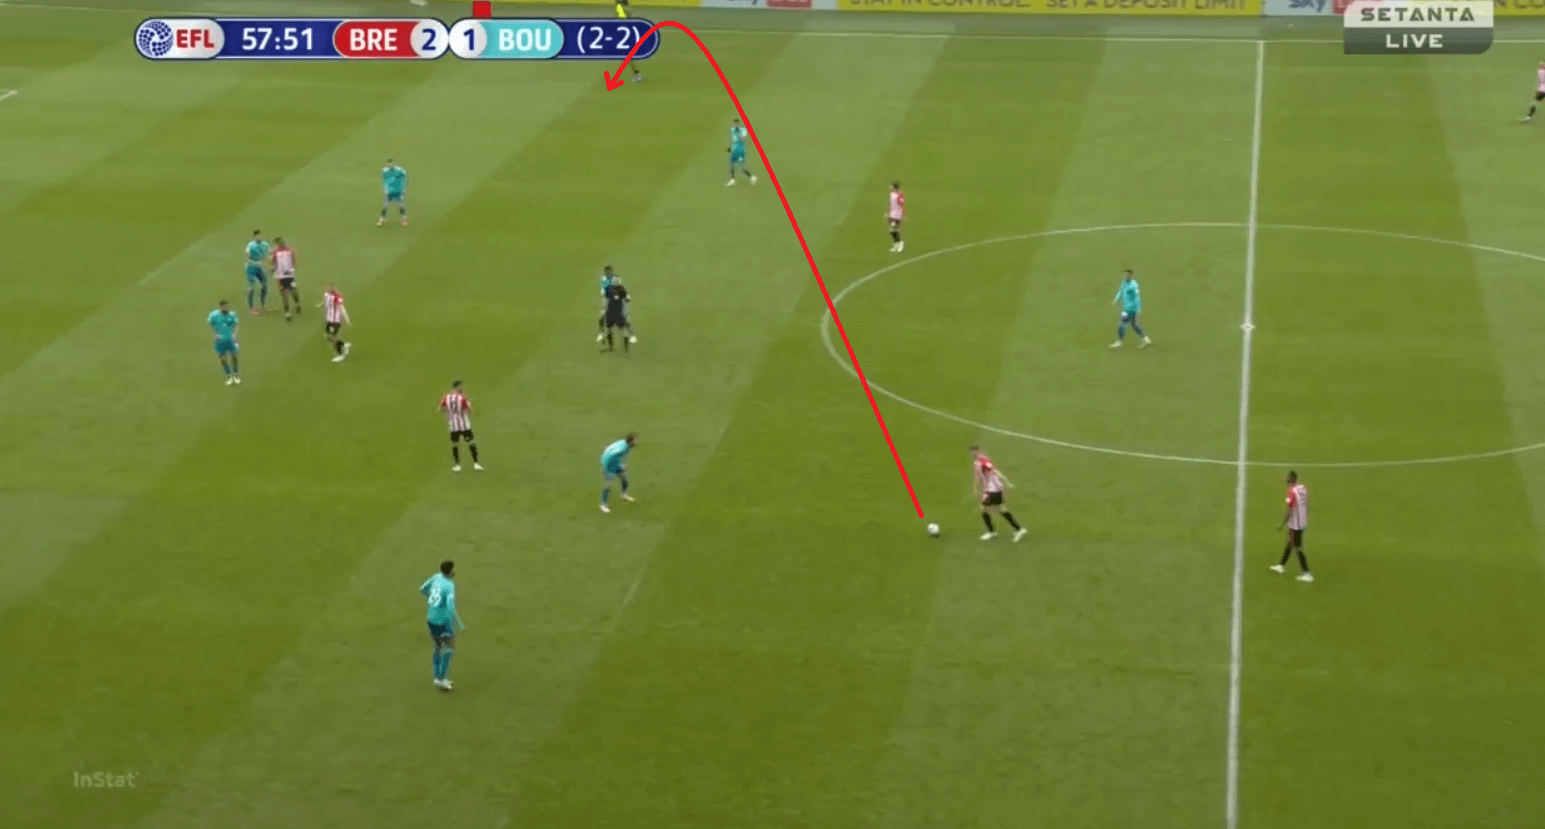
At times, Bournemouth were tempted to press and apply pressure especially when the scores were level and Bournemouth were in need of a goal to win the match. Their midfielders were tempted now to press the ball carrier and leave their line. This opened space behind and Brentford were able to play around the defenders and use these spaces.
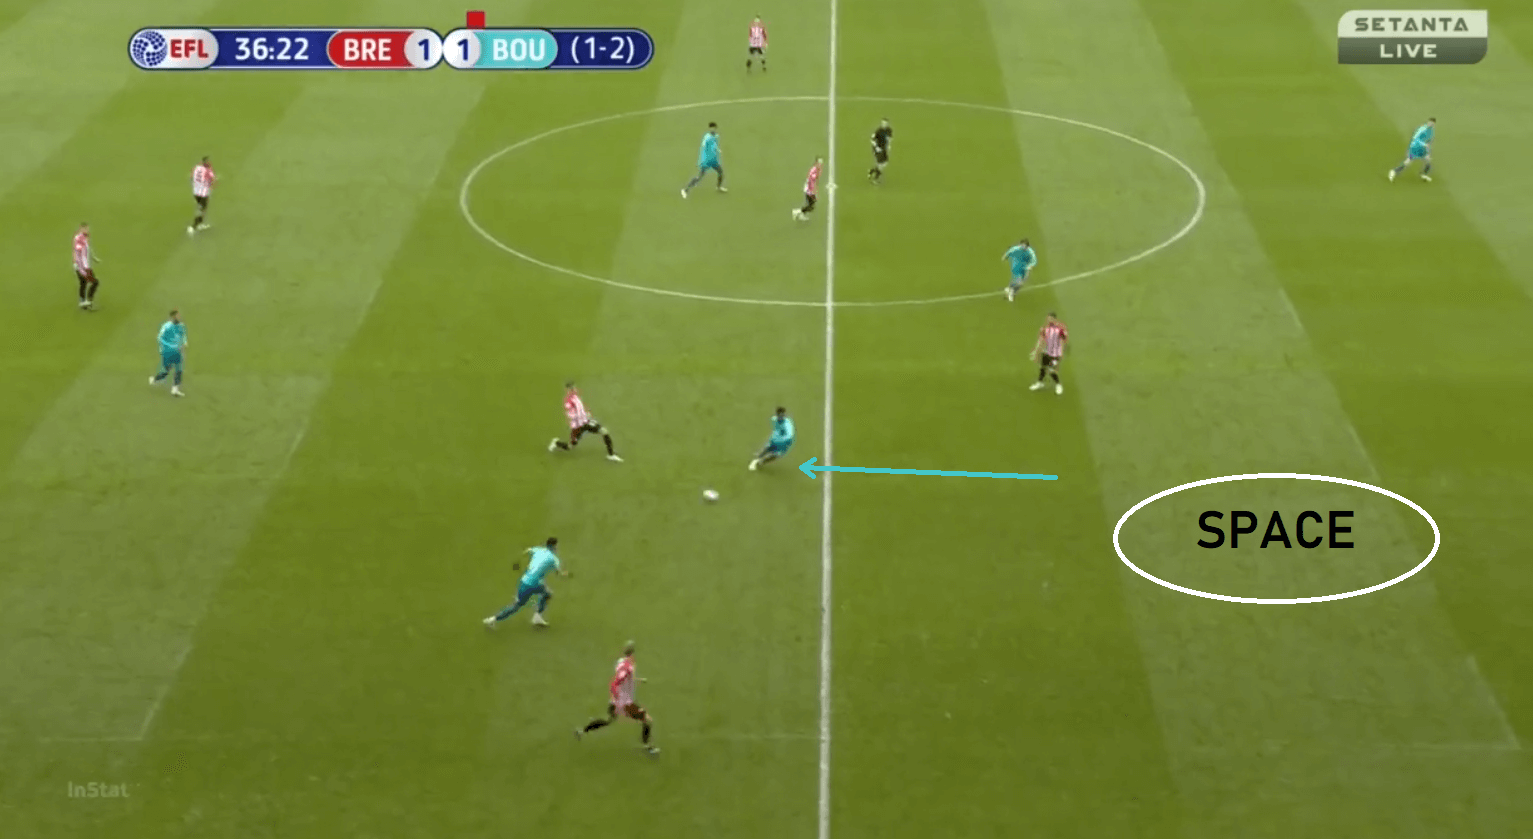
They also deployed constant counter-movements and rotations around the pitch to confuse the Bournemouth backline and drag them out of their position. This often released Brentford players to drive into spaces and deliver passes in the final third. The example of that can be seen in the image below where Marcondes’ interior movement keeps the full-back engaged and Brentford’s wing-back can now overlap.
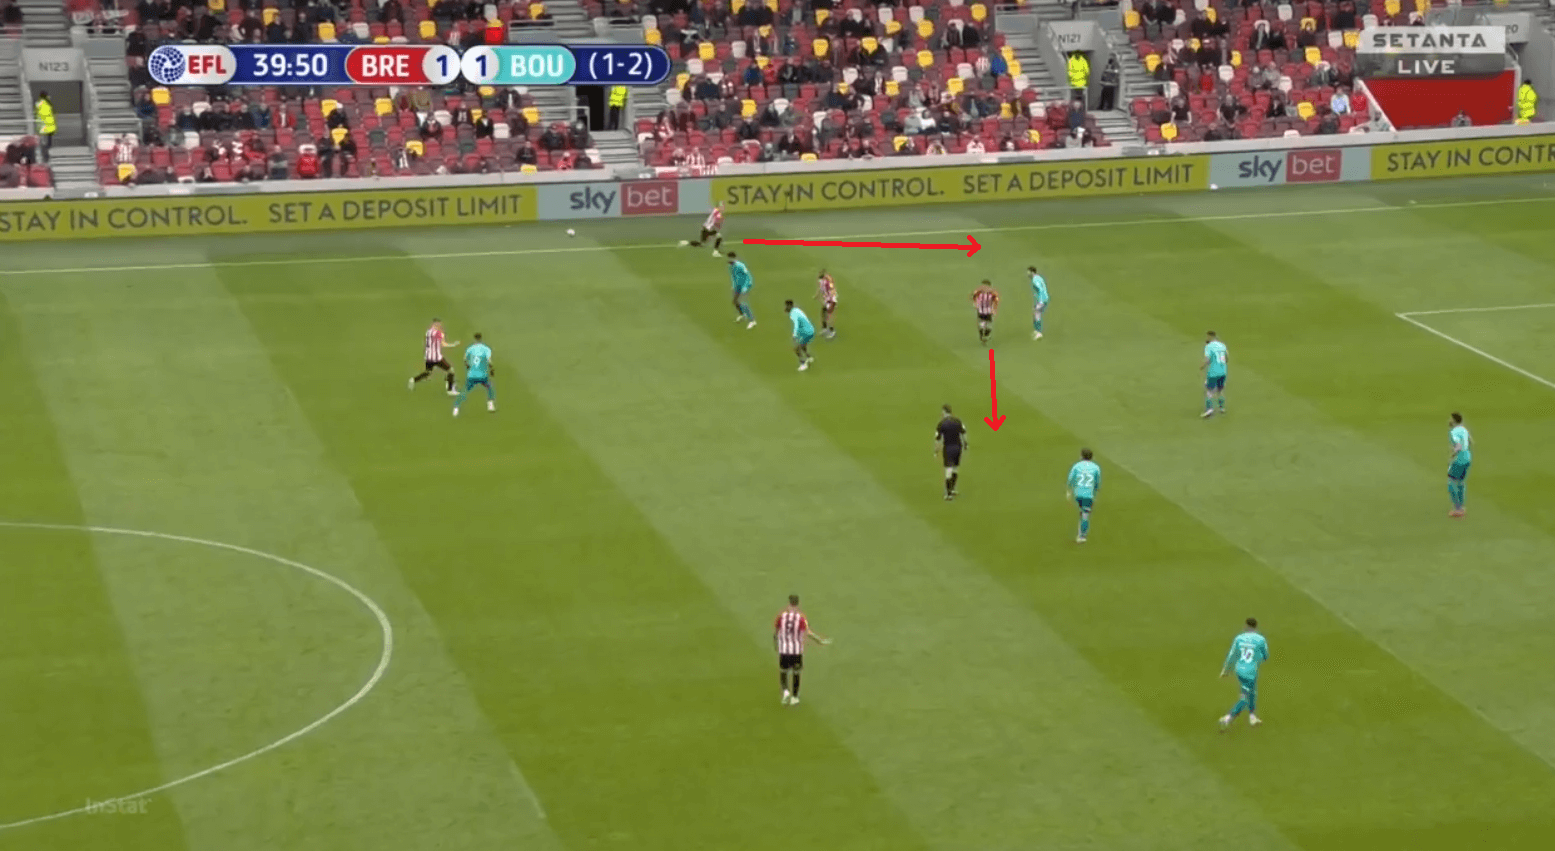
Bournemouth soon shifted into a 5-3-1 / 5-4-0 system to ensure that they did not get outnumbered in their final line with a 5v4 situation. We can see an example of that in the image below where Diego Rico joins the backline.
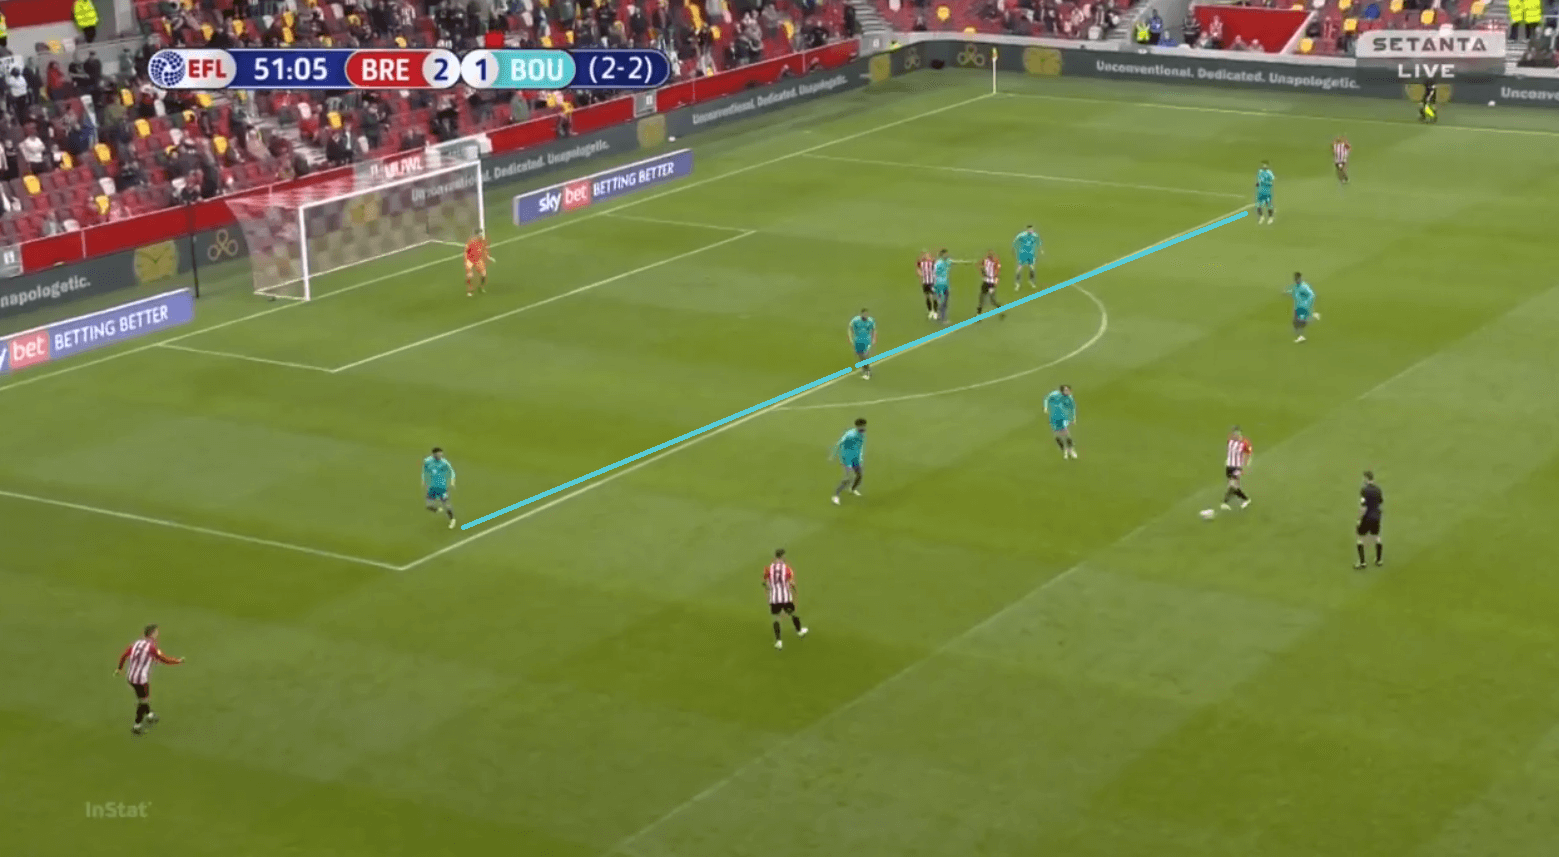
With a shift in shape, they lost a man in the midfield and the likes of Toney or Mbeumo kept dropping deep or making counter-movements to engage the entire Bournemouth backline. An example of this can be seen below as the forwards move in opposite directions and keep the Bournemouth backline pinned while the pass out wide to the wing-backs remains open.
Conclusion
Brentford deservingly qualified for the playoffs final with their performances over the two legs as their missed chances in the first leg luckily did not come back to haunt them. Bournemouth, on the other hand, despite having a 2-0 lead would be beating themselves for bottling it after going 10 men down. The result means Brentford will appear in their second consecutive playoff finals and will be heading to Wembley to play against Swansea City for a place in the next season’s Premier League.




Comments