Can anyone stop this Brighton attack?
Chelsea tried over the weekend and we’re handed a 2-1 loss at Stamford Bridge. There was no slowing De Zerbi’s side down.
That got us at Total Football Analysis thinking…how do you stop this explosive attacking side?
Their brilliant direct possession tactics set up quick moves toward goal in a calm, calculated manner. They take on risk early to spring quick, vertical attacks to goal. This tactical analysis will look at how Brighton attacked Chelsea over the weekend, and then give concrete examples of clubs that have contained this brilliant attacking team. We’ll give examples of successful high press and mid-block tactics, serving as a scout report on engaging the early phases of the Seagull’s attack.
Buckle up because we’re on a mission to stop Brighton.
Breaking down Chelsea
As we flesh out ideas on how to defend against the first two phases of Brighton’s attack, the first thing to establish is exactly how they progress the ball. There’s no better place to start than their match over the weekend against Chelsea. De Zerbi’s men struggled against the Chelsea high press early in the first half, but grew into the game, systematically picking apart the London side.
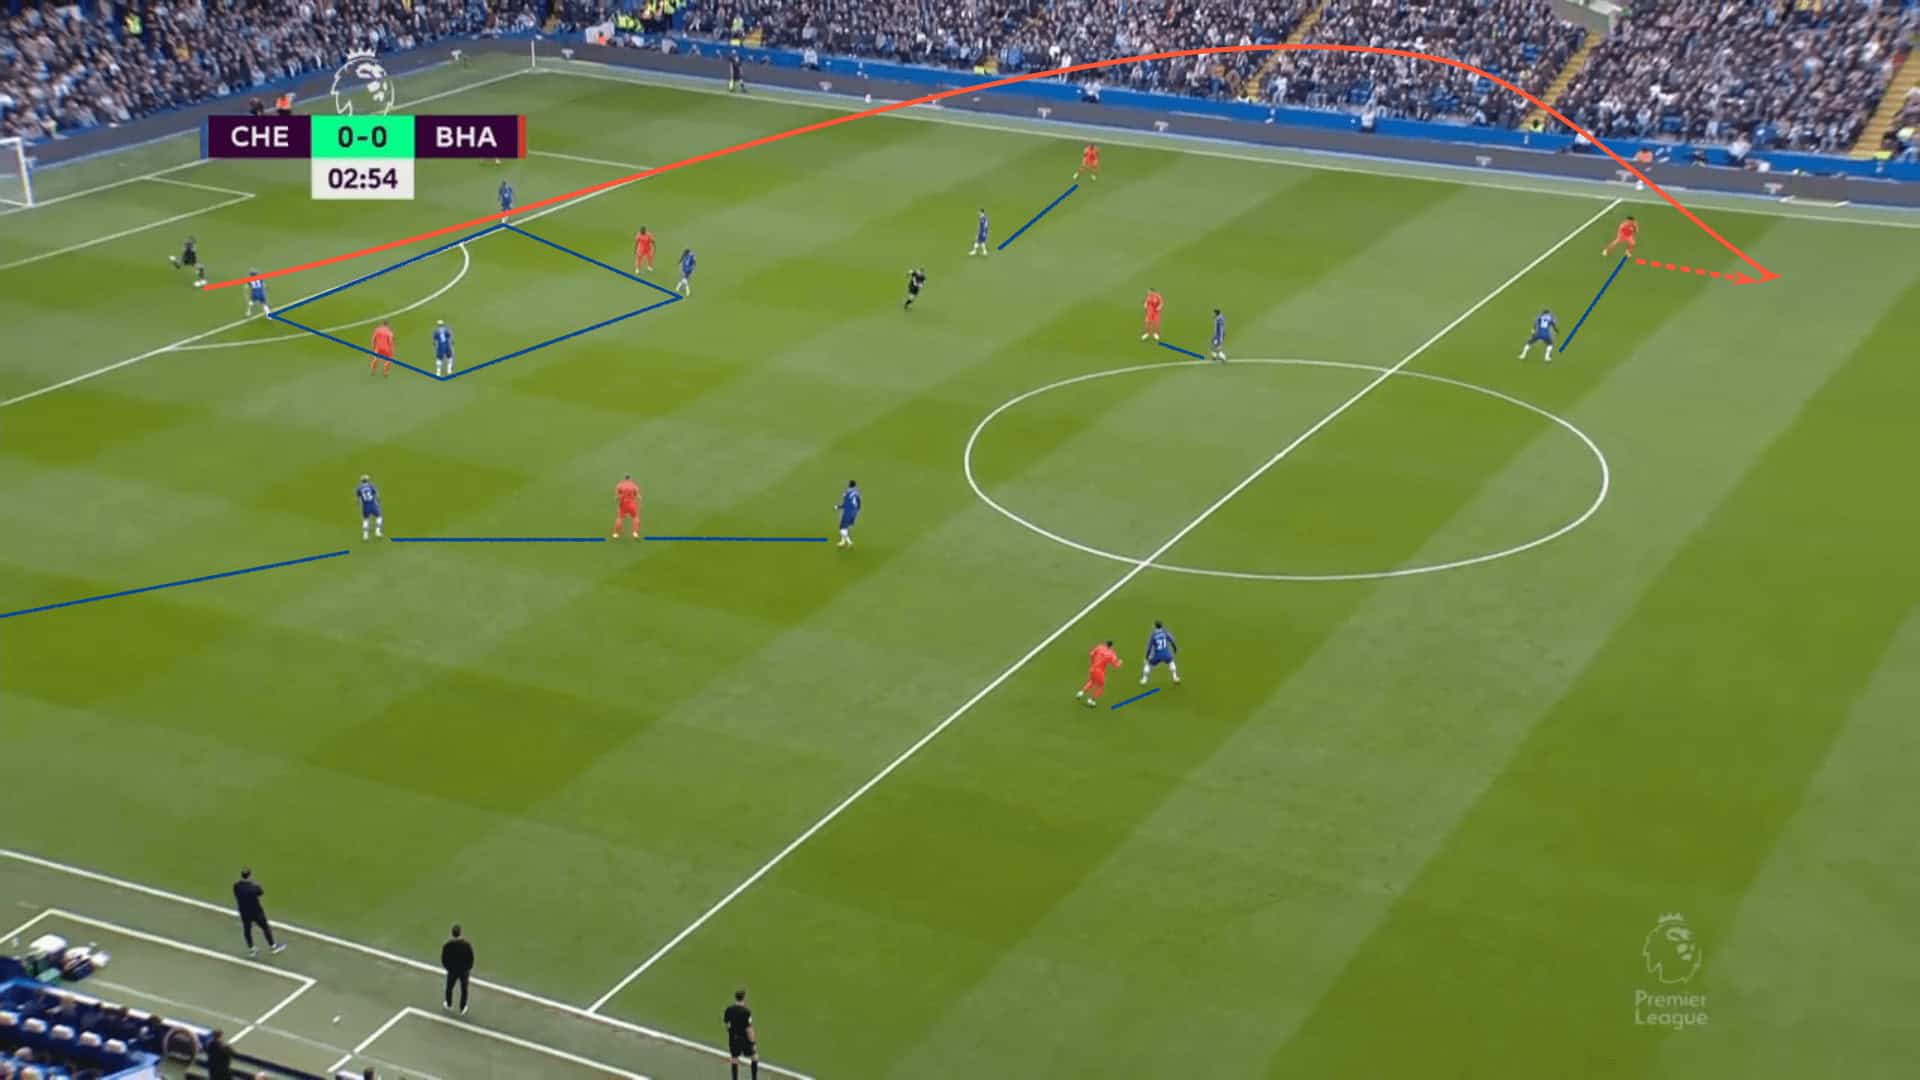
The first image gives a really good tactical overview of Brighton’s asymmetric build-out. The centre-backs offer two deep options while two midfielders drop in centrally to offer protection against the counterattack in case of a loss in possession. The outside-backs push high and wide, two players offer a presence in each of the half-spaces and the two highest players engage Chelsea’s outside centre-backs. In this instance, Chelsea’s aggressive high press, which includes that high central square that we’ll talk about later in the analysis, forces Brighton to play long into the left wing.
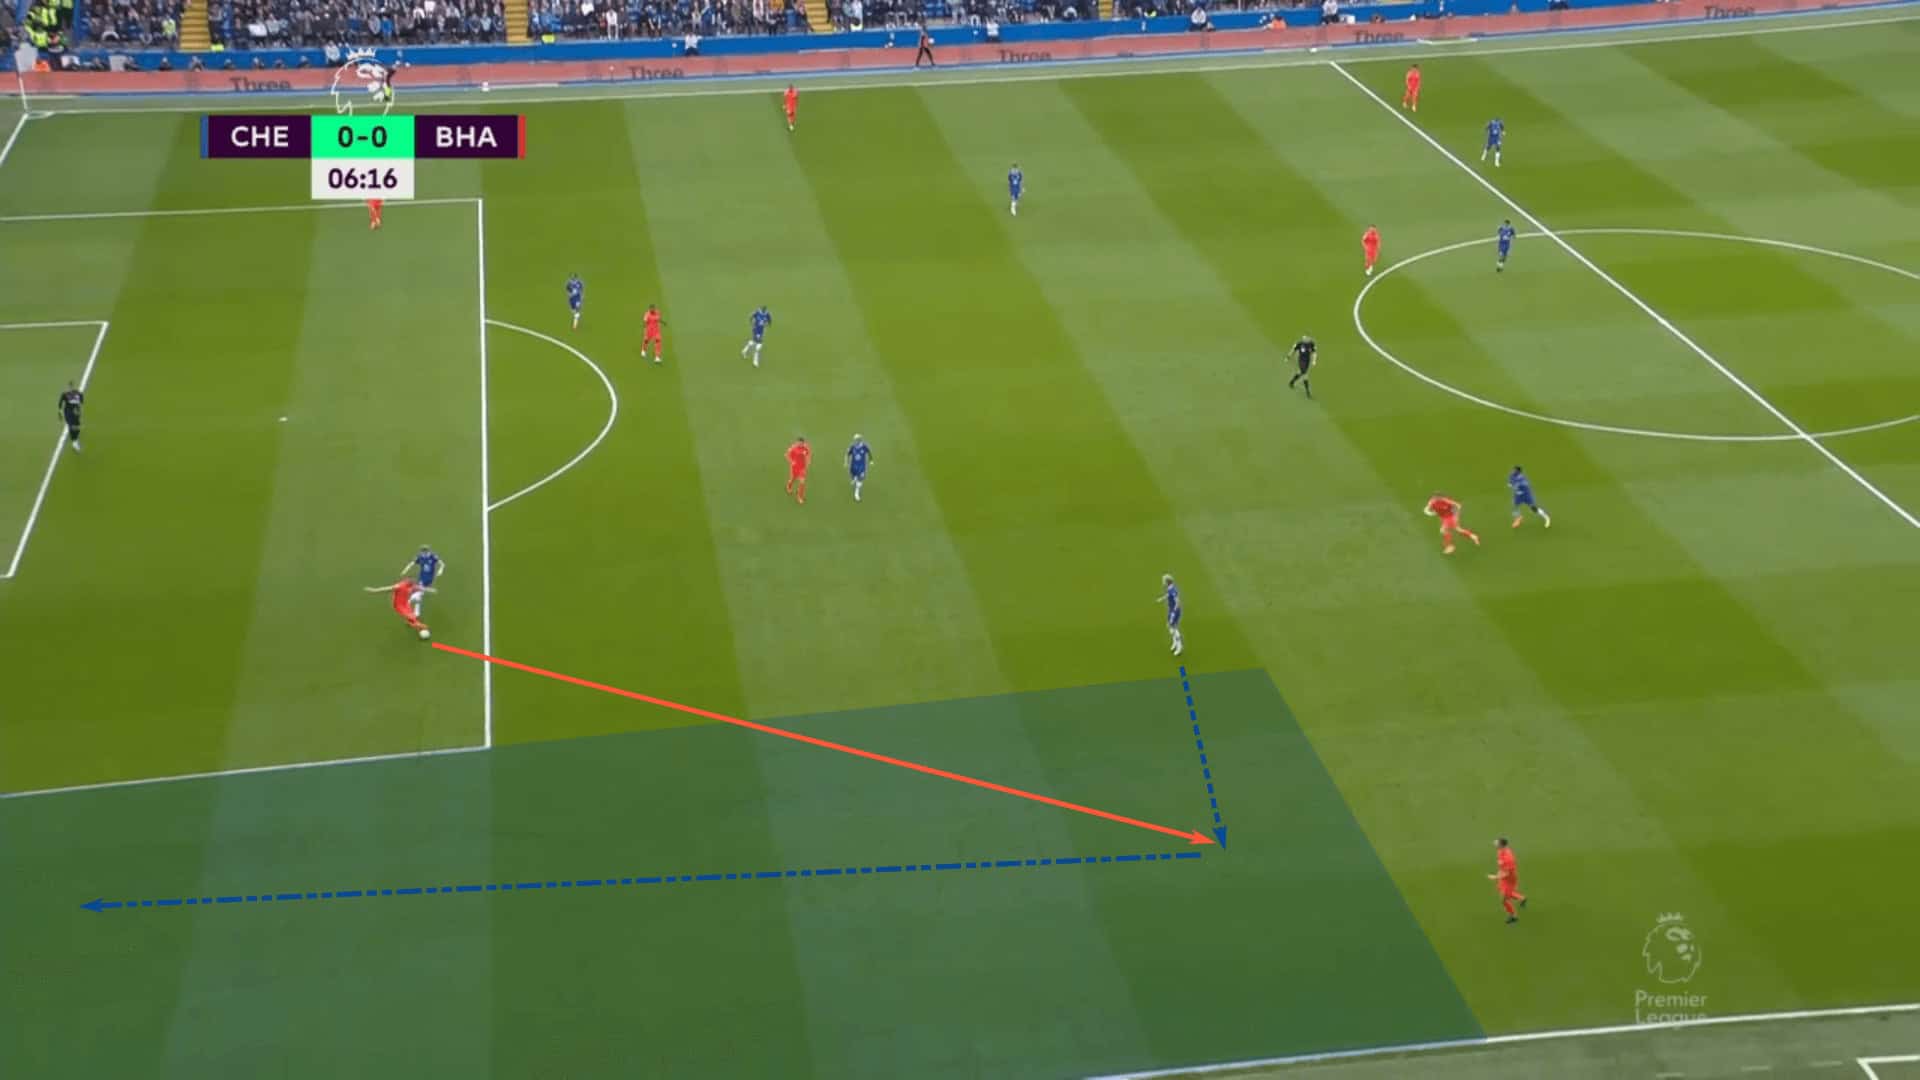
Chelsea’s high press was designed to either force Brighton to play long into 1v1 battles or risk playing out on the ground against a well-positioned press. One of the triggers Chelsea was looking for was the pass into the outside-backs as Brighton played around the press. That’s exactly what we find in the image below as Mykhailo Mudryk intercepts the pass and dribbles into the open space in the wing before crossing.
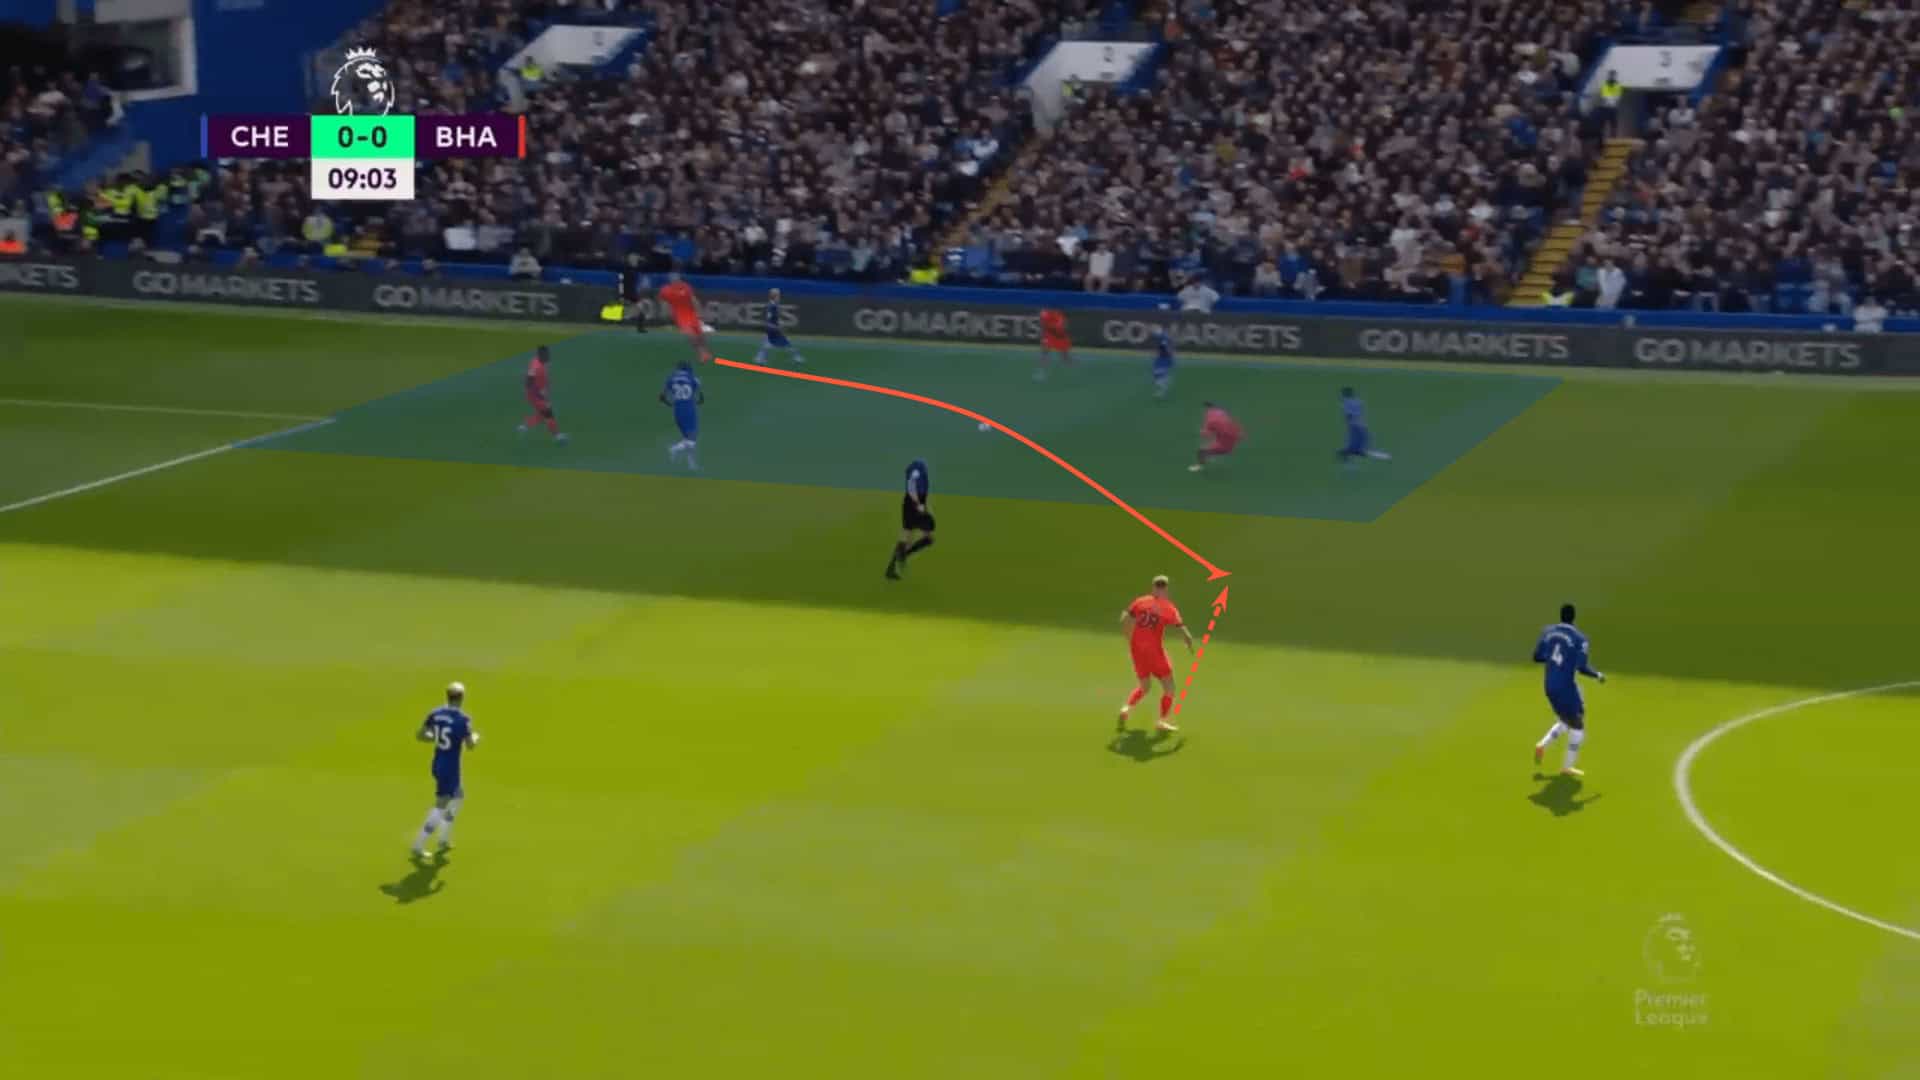
If Chelsea was unable to intercept the pass, they made an aggressive shift into the wings to lock Brighton in. Knowing that the Seagulls would take on some risk and look to play out on the ground, Chelsea could aggressively push numbers near the ball.
Here, we see the two sides locked in a 4v4 battle in a tight space in the wings. Once Brighton is locked into the wings, getting pressure on the first attacker and limiting his short options are critical. Chelsea failed to do that. Brighton found their way into the centre of the pitch and completed the switch of play, breaking Chelsea’s press.
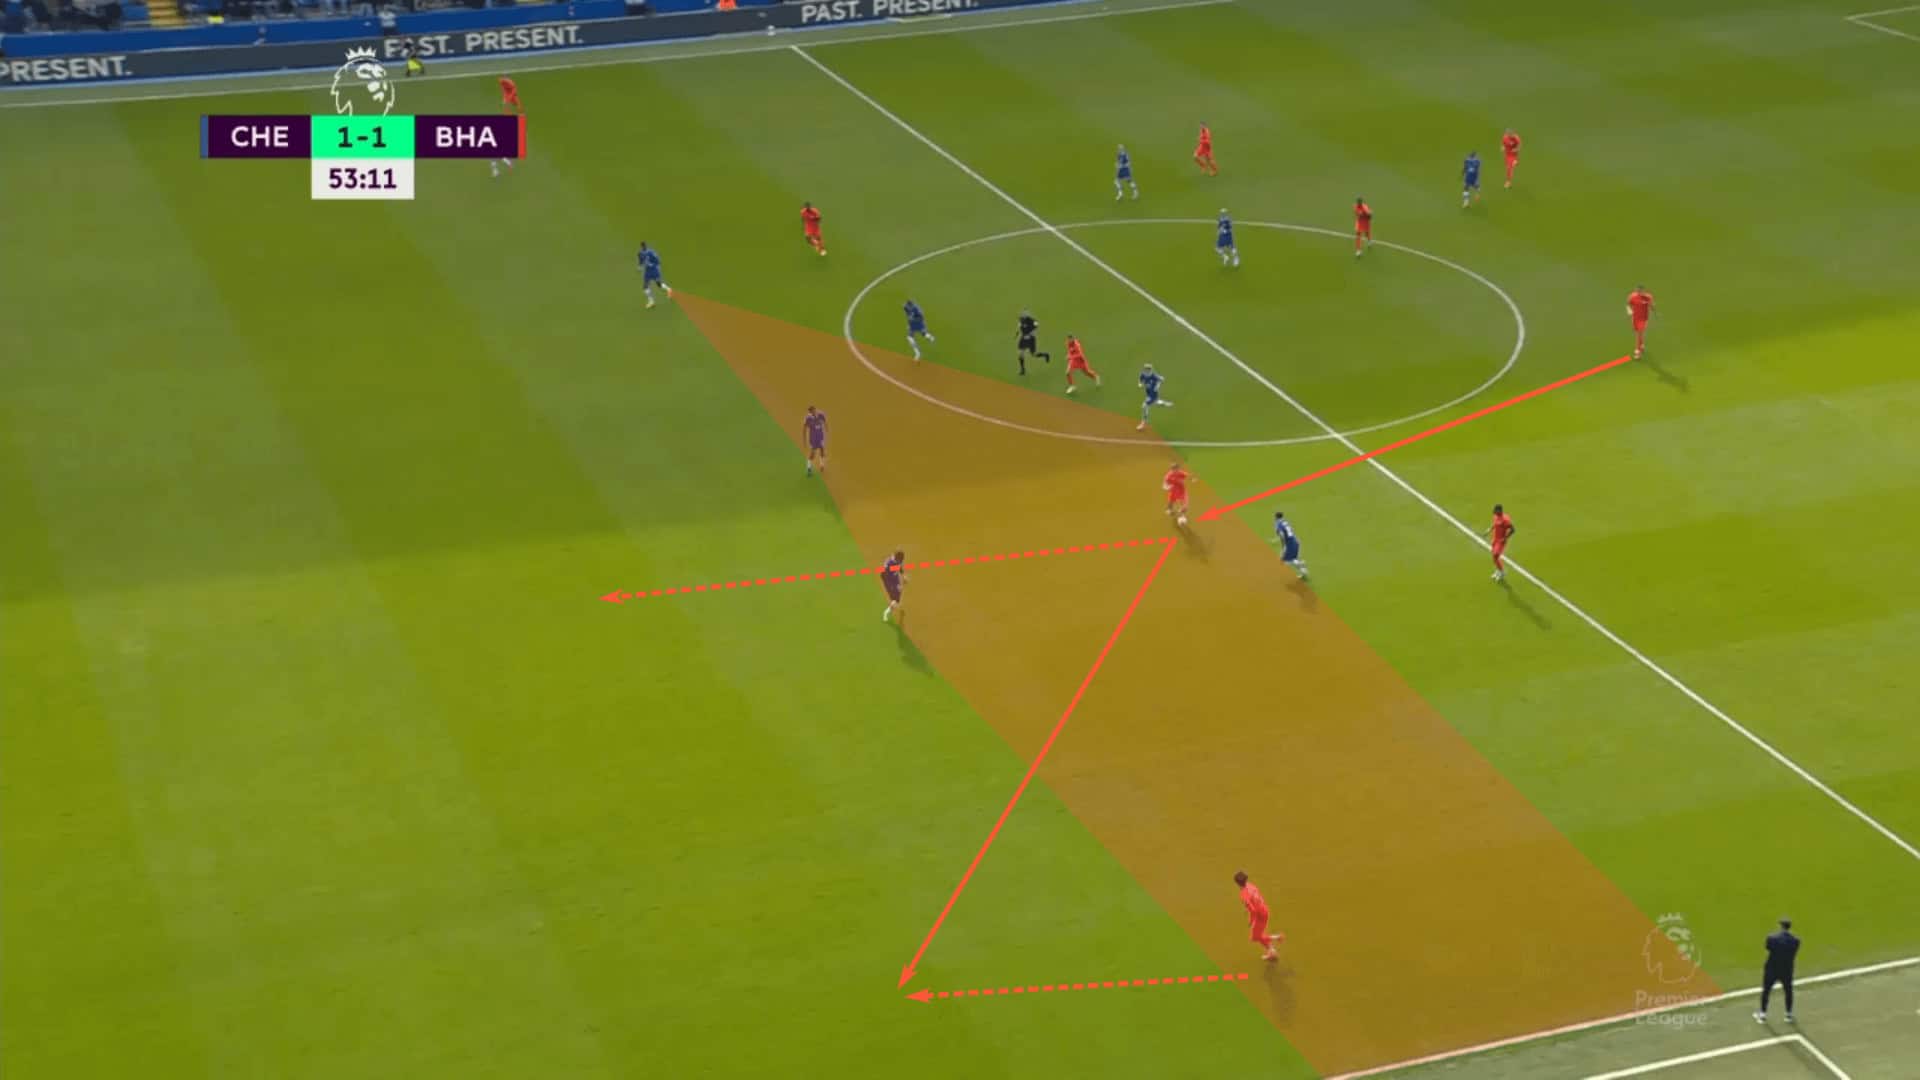
Much of Brighton’s progressive actions come from the centre of the pitch. Quick combination play allows them to bypass the opposition’s first two lines. These passes are often completed with one touch, so the angles of support are critical.
We saw this early in the second half against Chelsea. When you watch Brighton play, it’s the up/back/through pattern that’s so difficult for opponents to defend against. Chelsea had the same issue. Enzo Fernández was initially marking Adam Webster, then left him to pressure Robert Sánchez. A simple pass forward into Pascal Groß got the ball to the free man, Webster, who beat Chelsea’s first two lines with an incisive pass into the central channel.

Once Brighton can enter the central channel in the middle third of the pitch in a forward-facing position, the opposition has to scramble back. At this point, lines are broken and Brighton typically has favourable matchups to attack the box. It’s a race into the penalty area.
Against Chelsea, it was the constant threat of Kaoru Mitoma’s 1v1 dribbling that was decisive. Once a ball was at his feet and he had momentum moving forward, Chelsea struggled to contain him, leaving them exposed centrally. As additional defenders moved from cover to pressure and balance to cover roles, Brighton’s advancing central runners moved into dangerous positions unmarked.
Brighton put on a clinic against Chelsea, but the Blues are far from the first victim. Albion has systematically picked opponents apart all season and De Zerbi’s side is playing some of the most fluid football the global game has to offer right now. They have deservedly received praise for their play and aspects of their attacking tactics have been the topics of tactical analysis articles and social media posts.
But our question is…how do you stop them?
Defending against Brighton in a high press
Success leaves clues.
At least that’s how the saying goes.
For this analysis, we’ve identified specific matches in which the opponents have best performed in high and middle recoveries. Their tactics are the blueprint to engage Brighton.
Let’s start with the now departed Patrick Vieira’s Crystal Palace. This was one of the more distinct approaches in the high press. Set up in a 4-1-4-1, the lone striker’s job was simple, chase. Any pass into the centre-backs was his responsibility. Given their close proximity in the build-up, he covered the ground well and put a definitive time restriction on the two players. But he didn’t apply pressure alone. Help arrived from midfield.
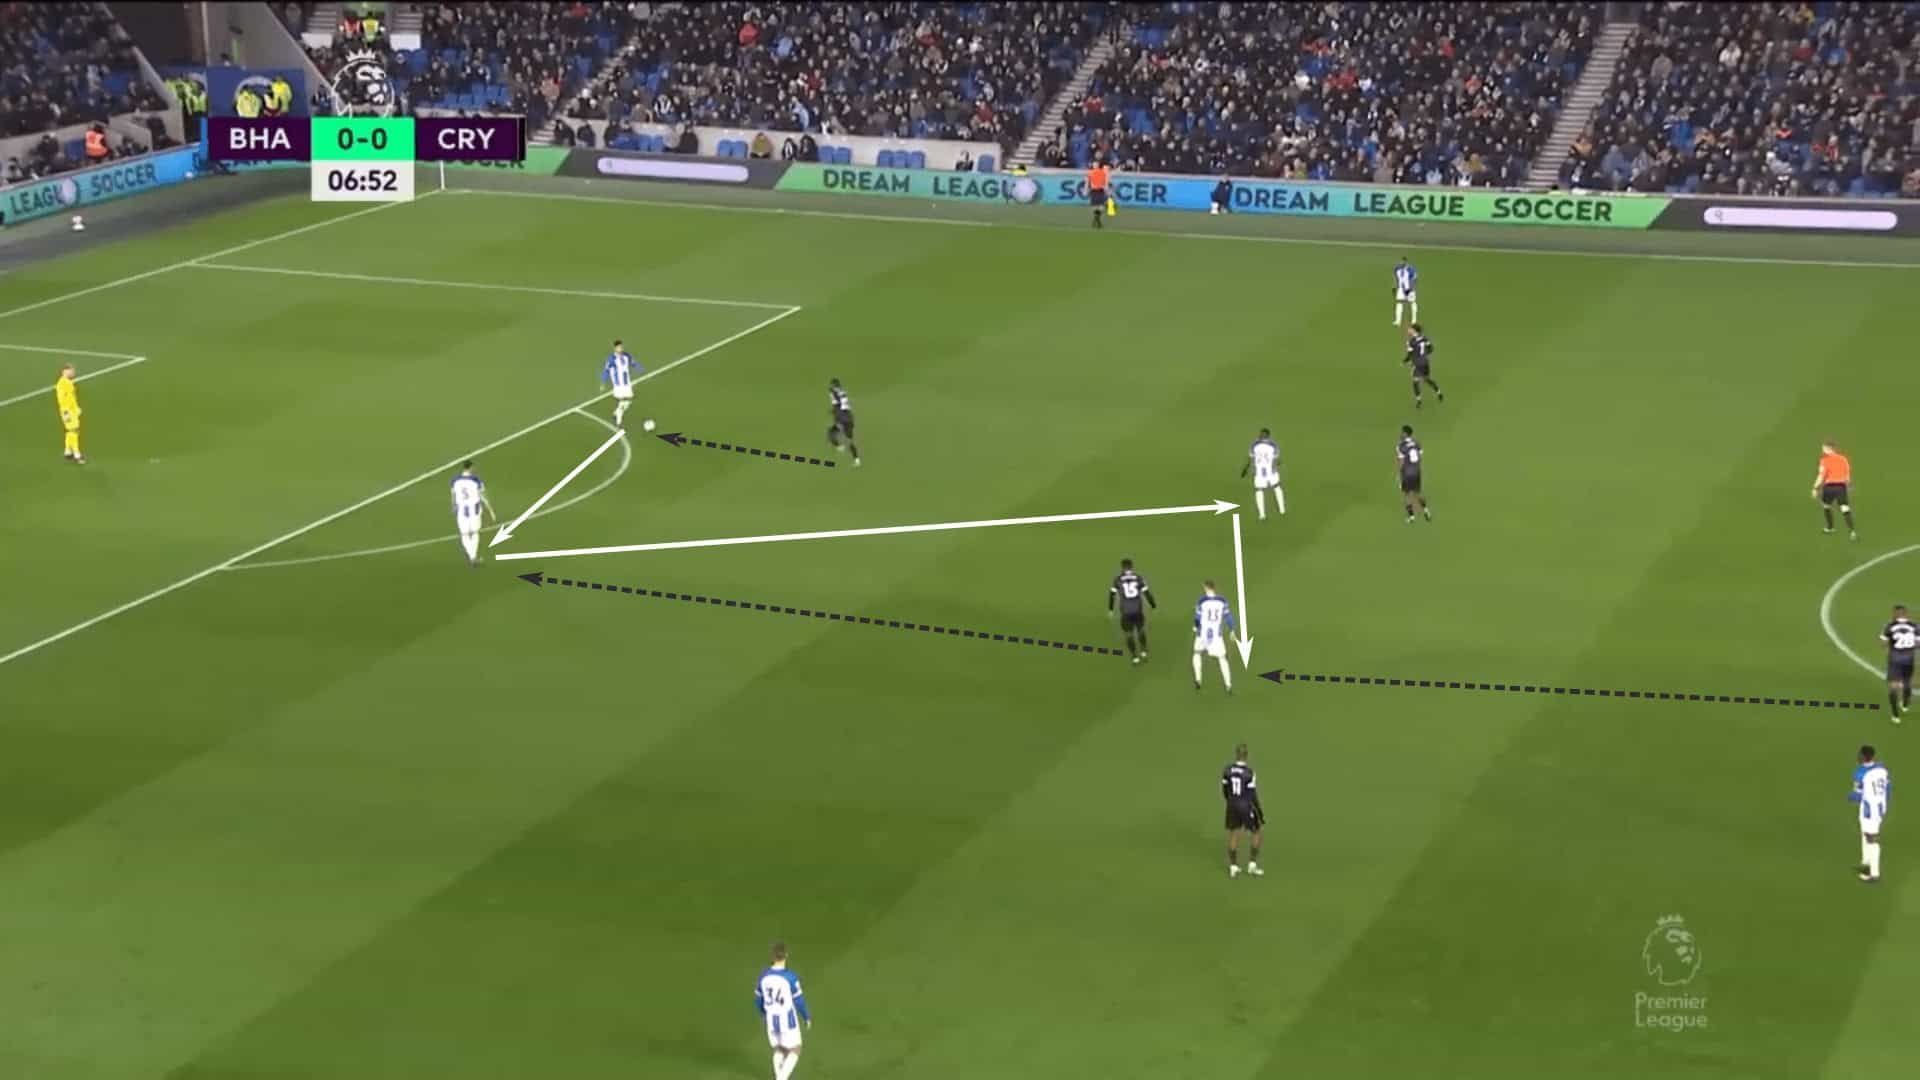
Looking at that midfield line, Crystal Palace is for are essentially man-for-man against the two deep central midfielders and outside-backs. Centrally, Vieira chose to mark tightly, restricting access to the central channel. The two wide attacking midfielders are positioned in the left and right half spaces to restrict Brighton’s access to their highest line while also remaining close enough to apply pressure on the outside-backs should they receive the ball.
As the lone striker chased, if a square ball was played from one centreback to the other, the nearest Brighton midfielder would step up and apply pressure. Palace seemed to target Lewis Dunk, the right-centre-back, pushing their right-central midfielder, Jeffrey Schlupp, forward. Quick combination play from Brighton allowed them to play into the double pivot through the up/back/through pattern.

This is where the next-man concept comes into play. With the holding mid, Cheick Doucouré, stepping forward to apply pressure on Groß, Wilfried Zaha pinched in from the left to take his teammate’s place. Once the sequence was in motion, Crystal Palace was targeting the pass through the lines. Notice Marc Guéhi, the right centre-back, stepping up to win the ball. As he wins it, he plays into the high central overload, igniting the Crystal Palace counterattack.
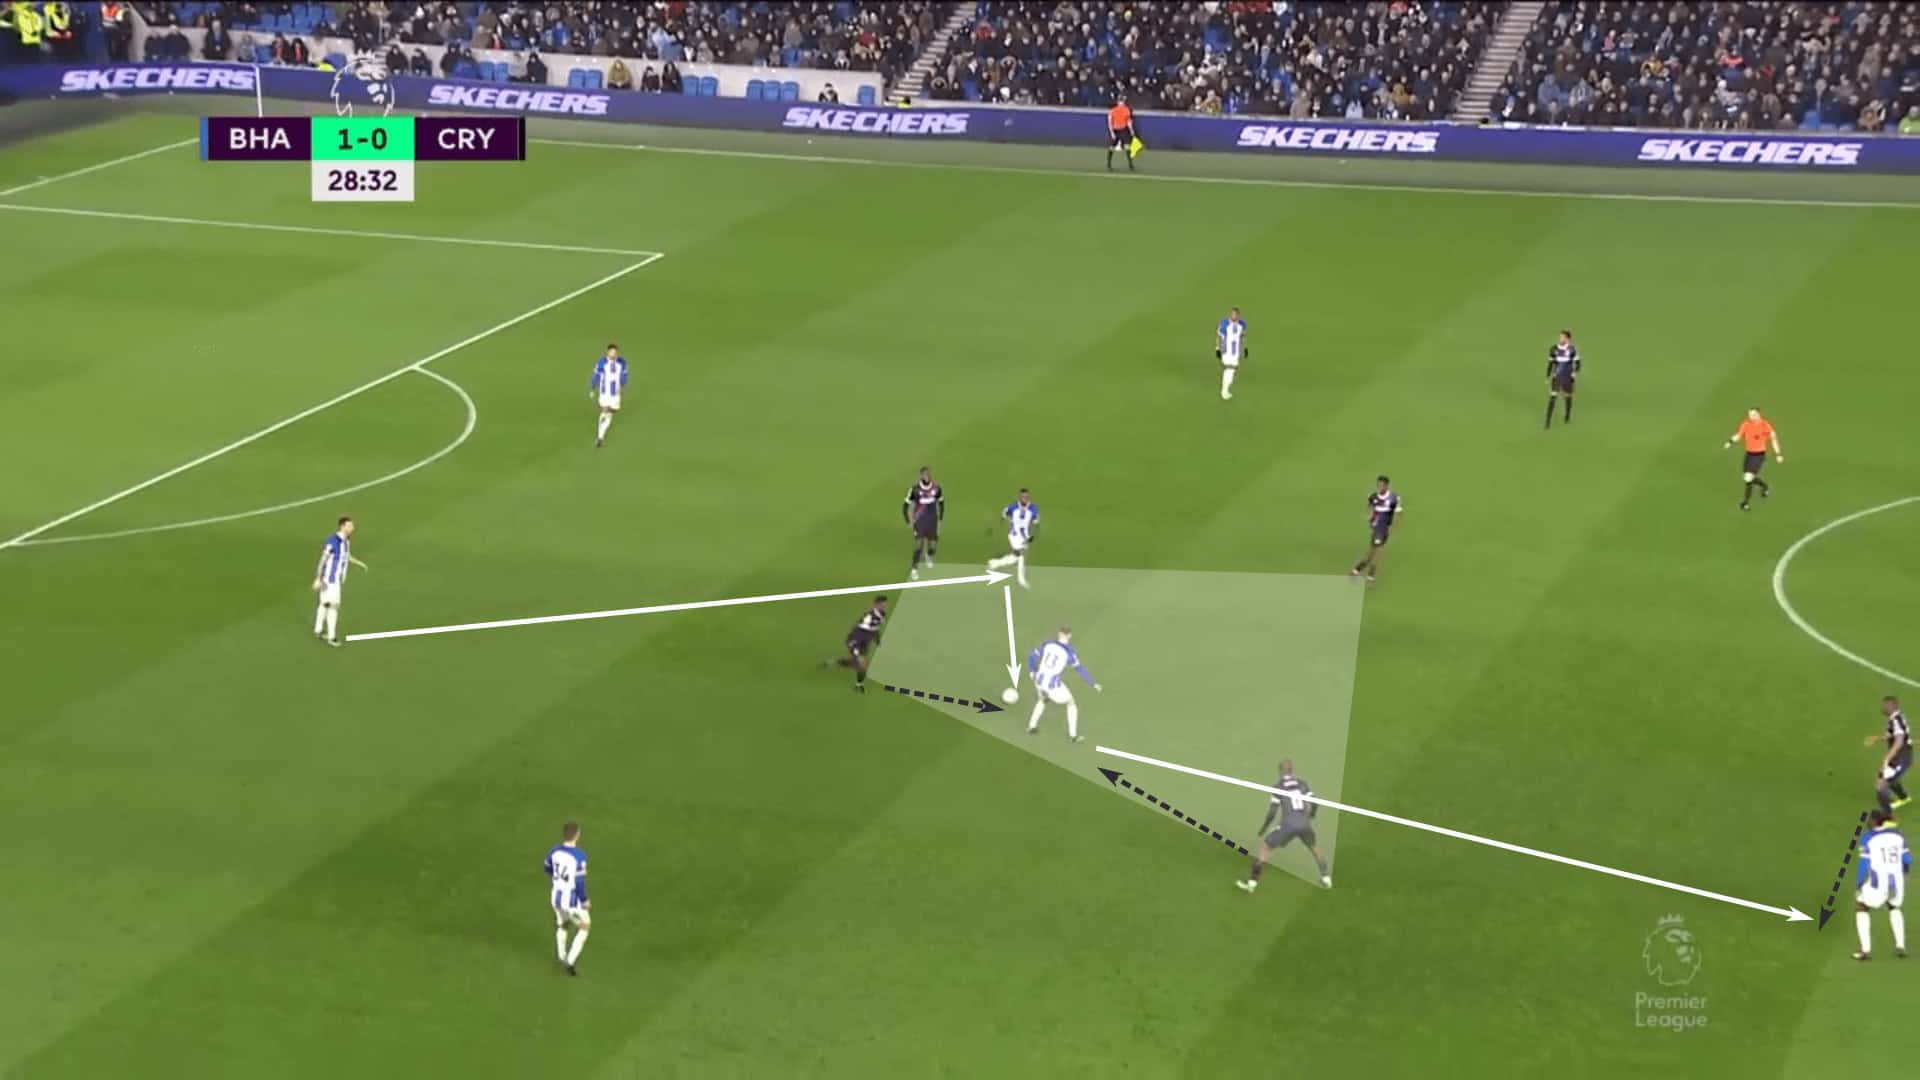
Even when they were more passive in the high press, the key ideas were to force quick actions from the Brighton double pivot and intercept their forward pass. The sequence below is up, then a lateral pass followed by a forward action, so a slight deviation in the pattern, but the objective is the same. It’s not necessarily the pass into the two holding midfielders that they want to win. It’s that line-breaking pass to the high central target that Palace is focused on. Keeping the Brighton attacking midfielders from receiving on the half turn and facing forward limited their opportunities to break the Palace press.
Brighton’s low central square in the build-out is often met with a high central square by the opposition. Leeds United did the same thing. The two highest players shadow-marked the two pivots while the two central midfielders, Tyler Adams and Marc Roca, were right on the pivots’ back while also shadow-marking the central channel. Adams and Roca are man-oriented on the pivots, but their positioning has a dual purpose as their shadow-marking of the central channel has its own function.

Even as Brighton abandoned the 2-4 build-out in favour of a 2-3, Leeds continued with the man-oriented marking in midfield and narrow forward line. They did well to take the centre of the pitch out of the equation. With limited options locally, Brighton took their chances playing over the top of the press, leading to a turnover.
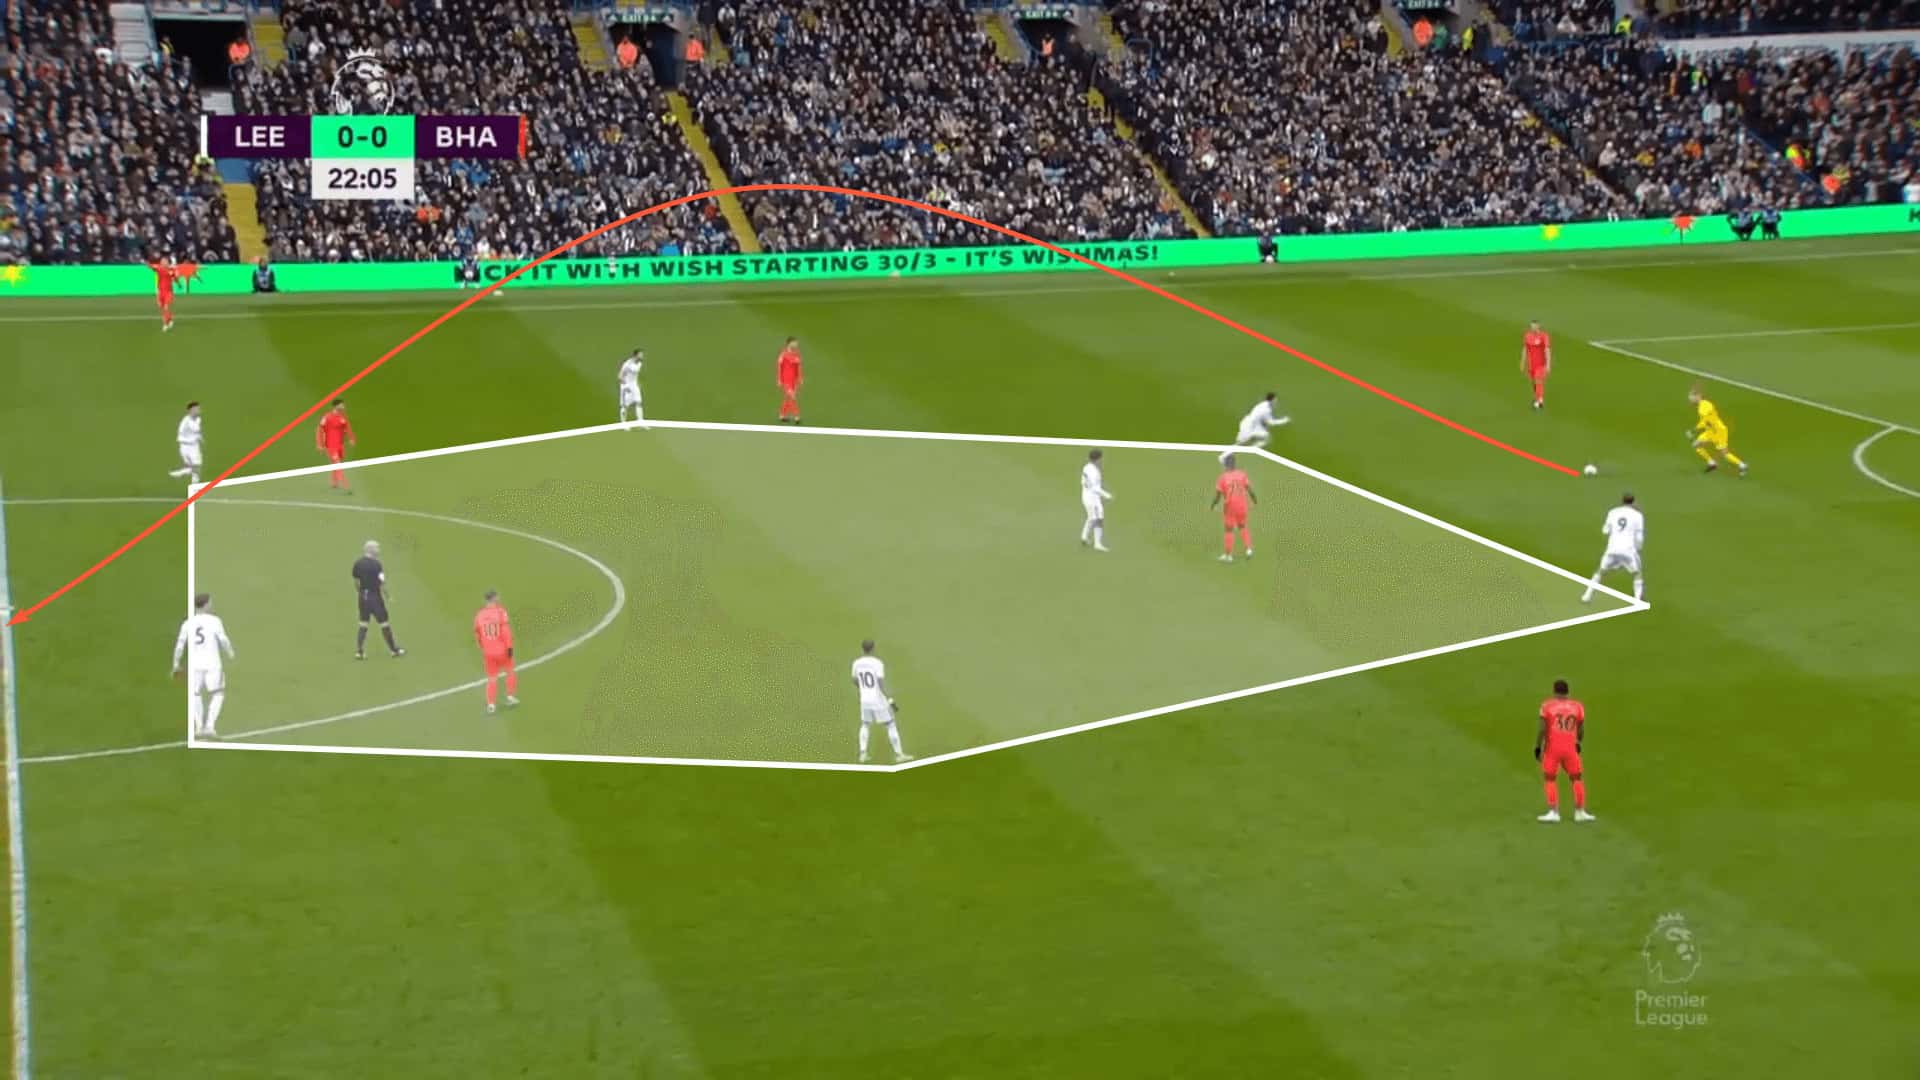
The advantage gained from this last image is that Leeds is well-positioned to defend against the long pass. It’s predictable and they’ll deal with it more often than not. That said, baiting opponents to play through a highly congested central area can produce quality opportunities through the counterattack.
Unai Emery’s Aston Villa did very well in this regard. With Brighton in a 2-3-2-3 build-up shape, the Villans shadow-marked the inverted outside-backs and invited the central pass by initially giving Brighton space to play into. There was still tight marking centrally, but Brighton’s midfielders also know how to create space they want to attack. By starting higher up the pitch, they can then sprint into a deeper area to receive.
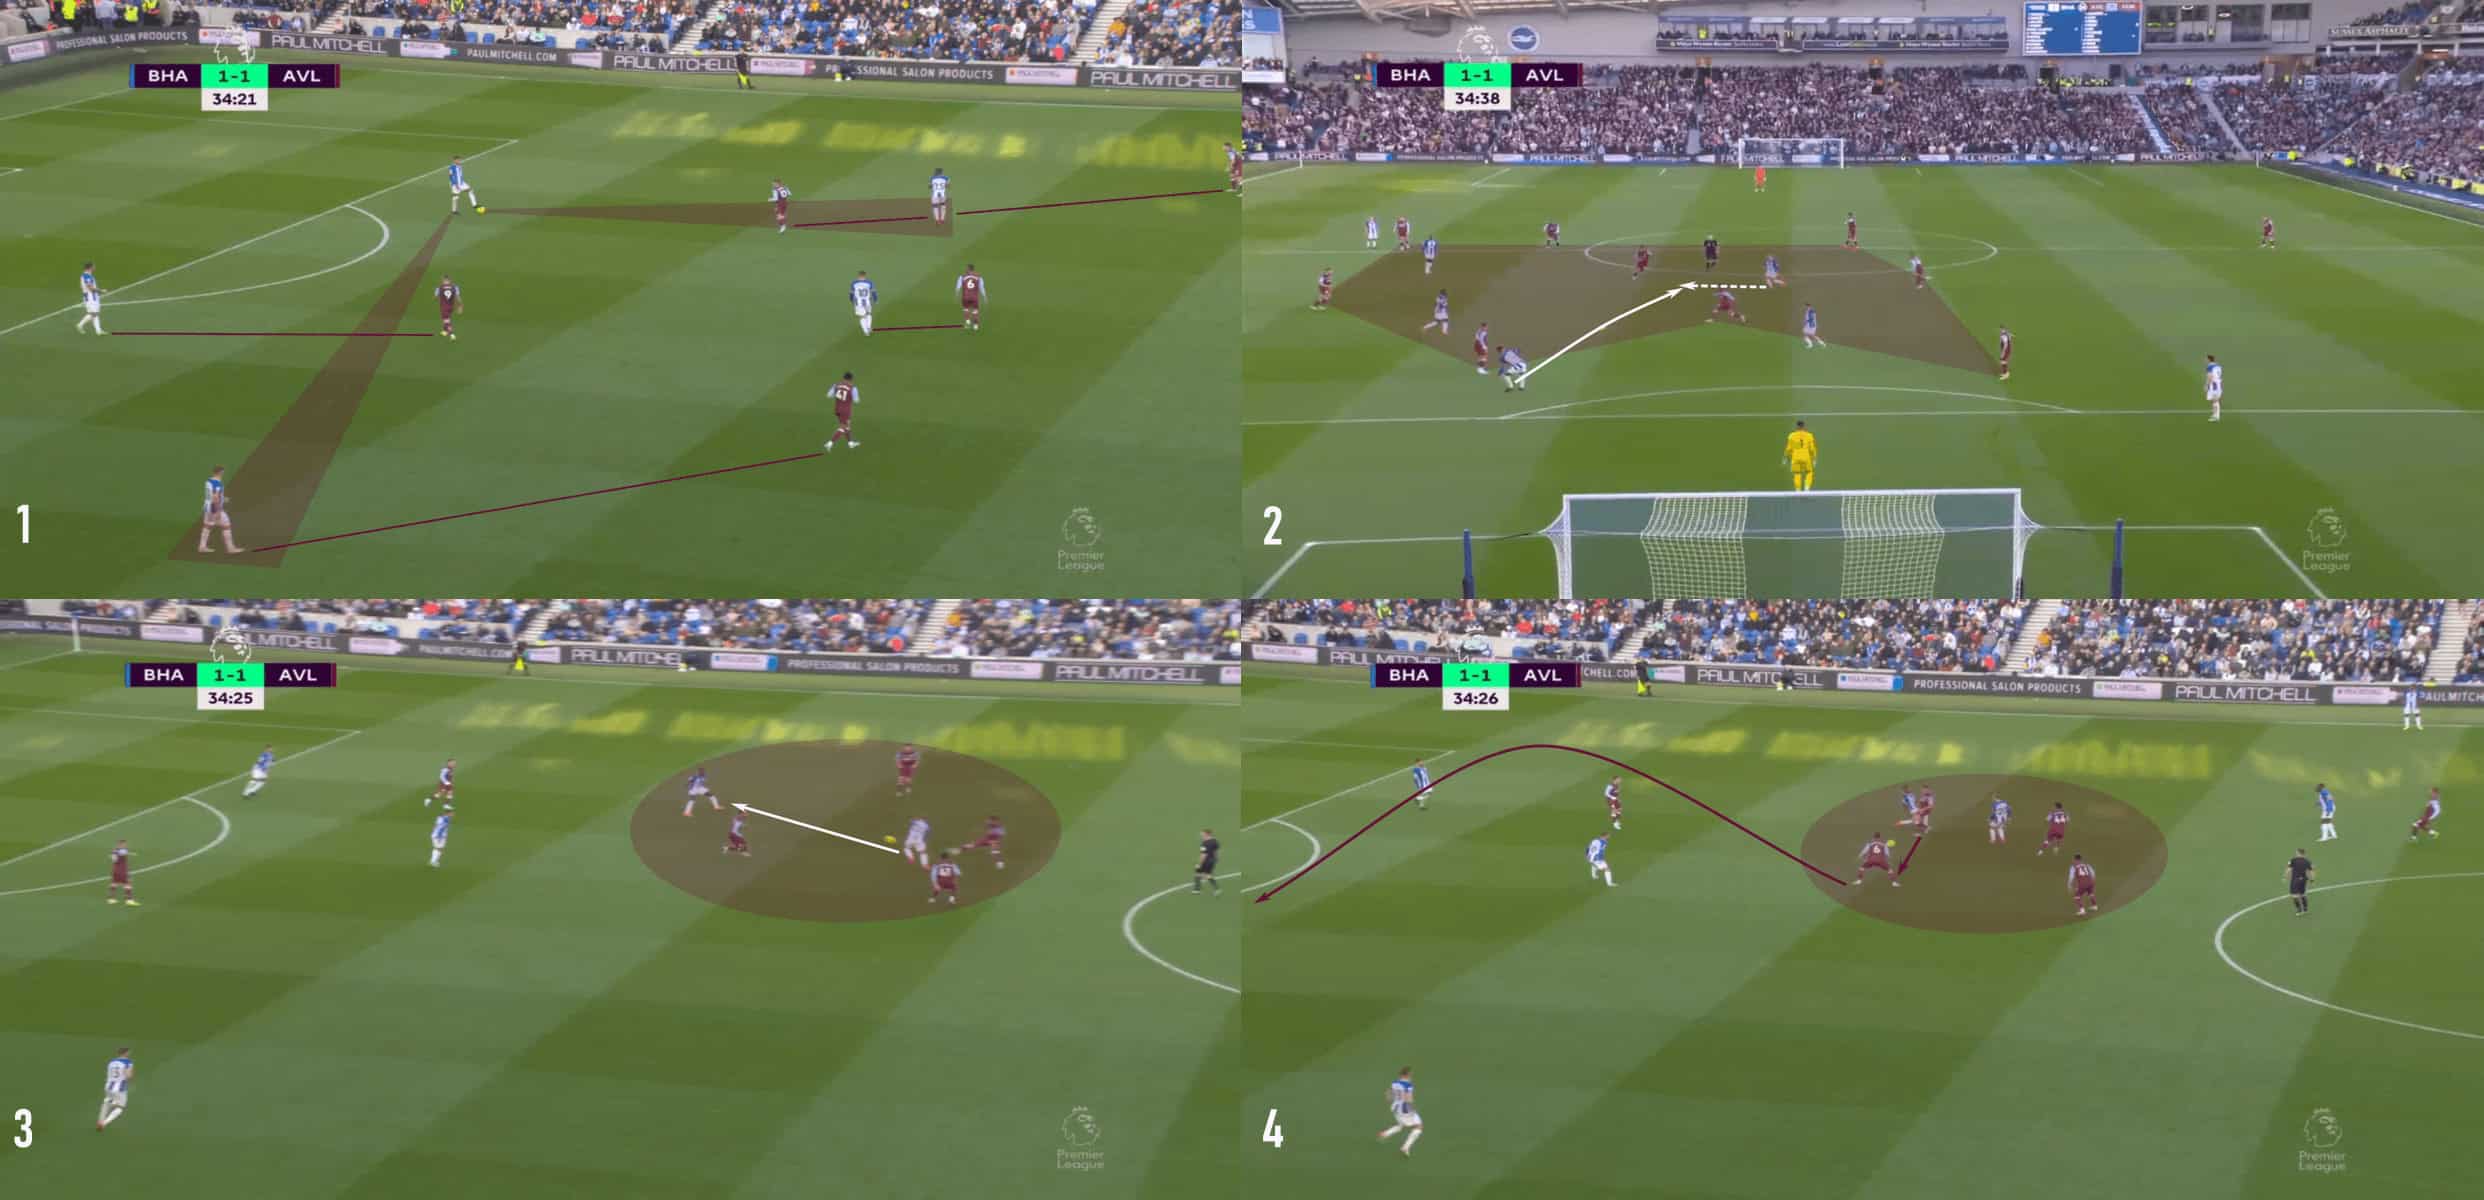
As Brighton played into midfield, the up/back/through sequences were set up. The number ‘6’ was supported by the left-back whose body orientation showed he was prepared to play forward. But the pass into midfield was a difficult one and the Seagulls failed to secure it. The negative pass was intercepted and Aston Villa immediately played forward and created a shooting opportunity.
When teams aren’t baiting the central pass, they’re more than willing to funnel Brighton into the wings and then pin them there. Here, Southampton pushed seven players into that tight space against five from Brighton. That numeric overload in the wings positions them to take away all outlets and ramp up the pressure on the first attacker. This is a tactic seen in the mid-block too, though not as common as the central battle. When teams have success with this approach, it typically comes from a numerical advantage. Even in numerical equalities, Brighton can generally play out of pressure. Numbers near the ball are key.
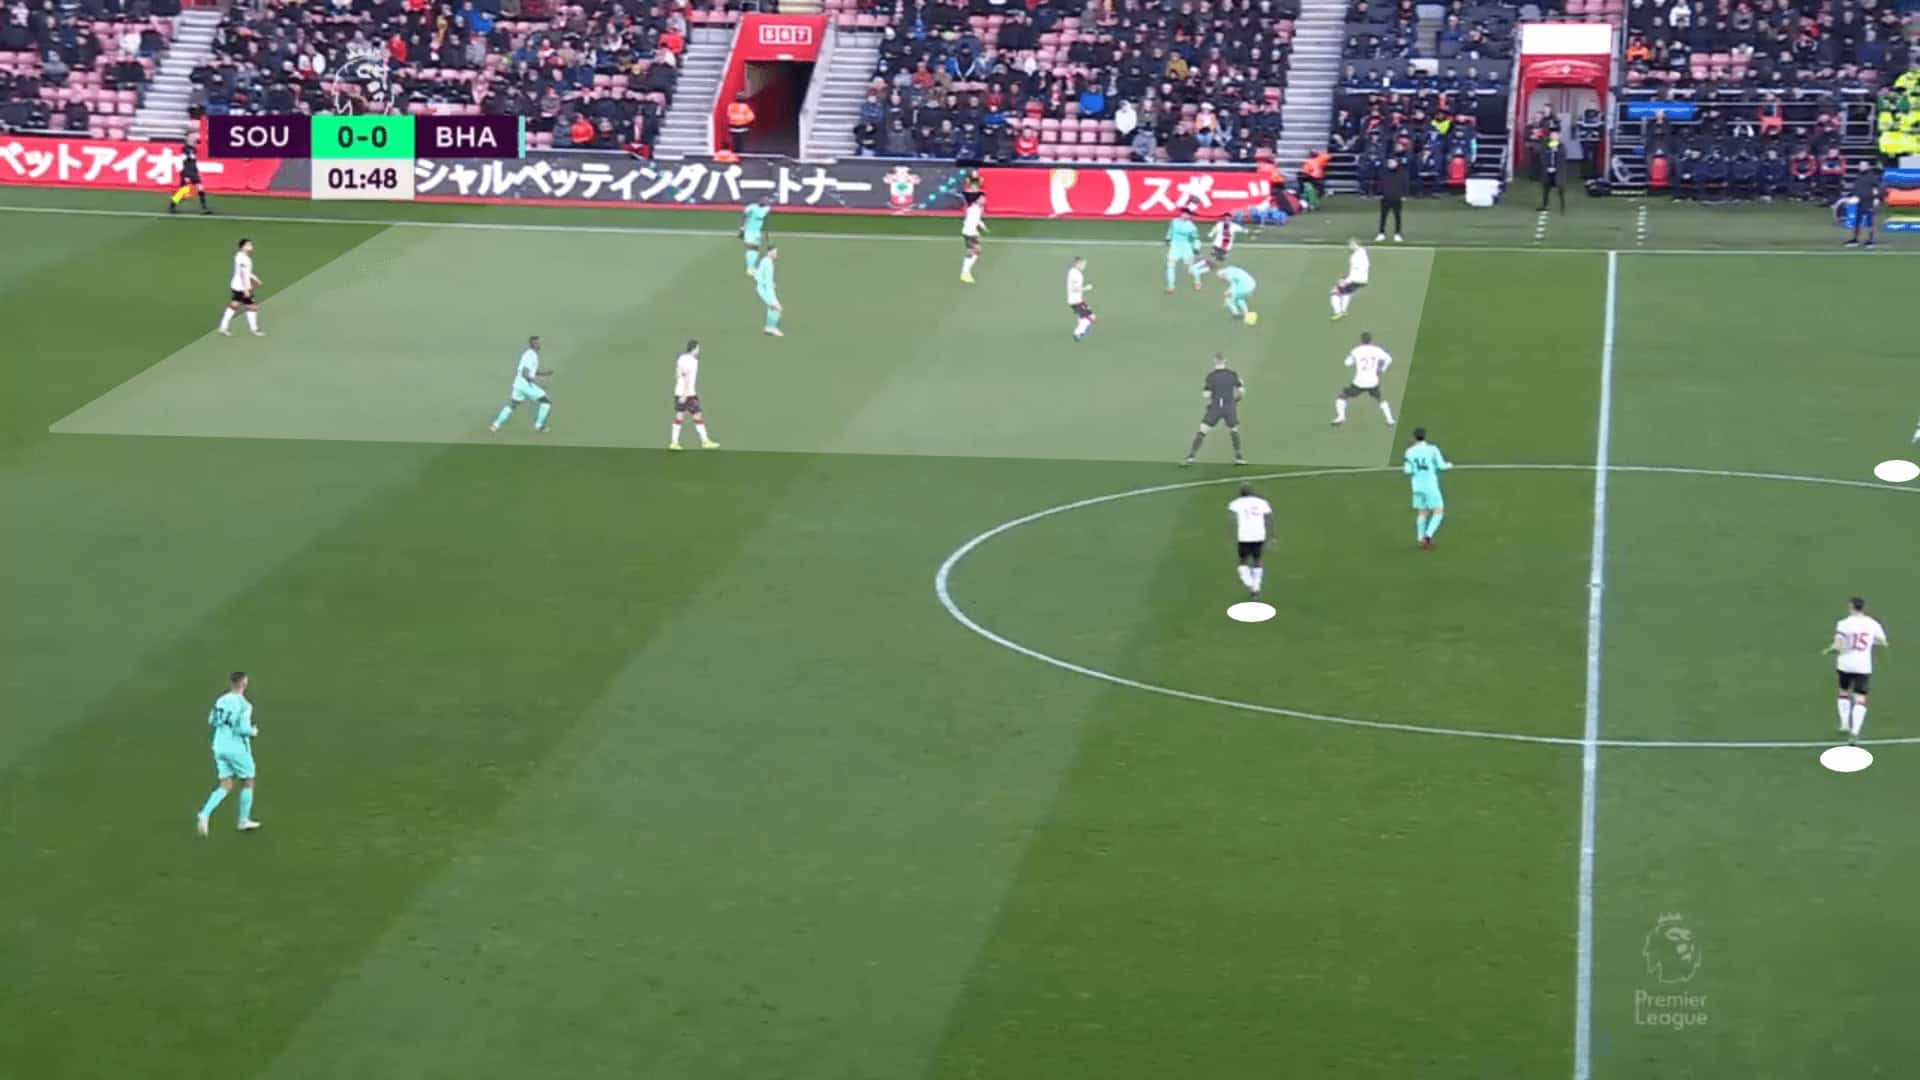
From the high press, the clubs that have had the greatest success at taking high and middle recoveries off of Brighton have made it difficult for them to play into the central midfielders.
Blocking access to the second line, be it a single holding mid and inverted outside-backs or a double pivot with the two outside-backs staying wide, has been key for the opposition’s defensive tactics. In congesting the centre of the pitch, they build in a plan for Brighton’s high central targets. Shadow marking is generally effective but the backline and defensive midfielder must be ready to step forward to contest entry passes. Taking away the middle and containing this dynamic Brighton attack becomes more manageable.
Sitting in a mid-block vs De Zerbi’s men
Moving deeper down the pitch, let’s look at successful approaches in the mid-block. We’ll still look at the same opponents. They entered a mid-block, typically after driving Brighton out of the attacking third. Often, a result of a negative pass from Albion to reset play or a clearance from the defending team, the mid-block wasn’t necessarily the default.
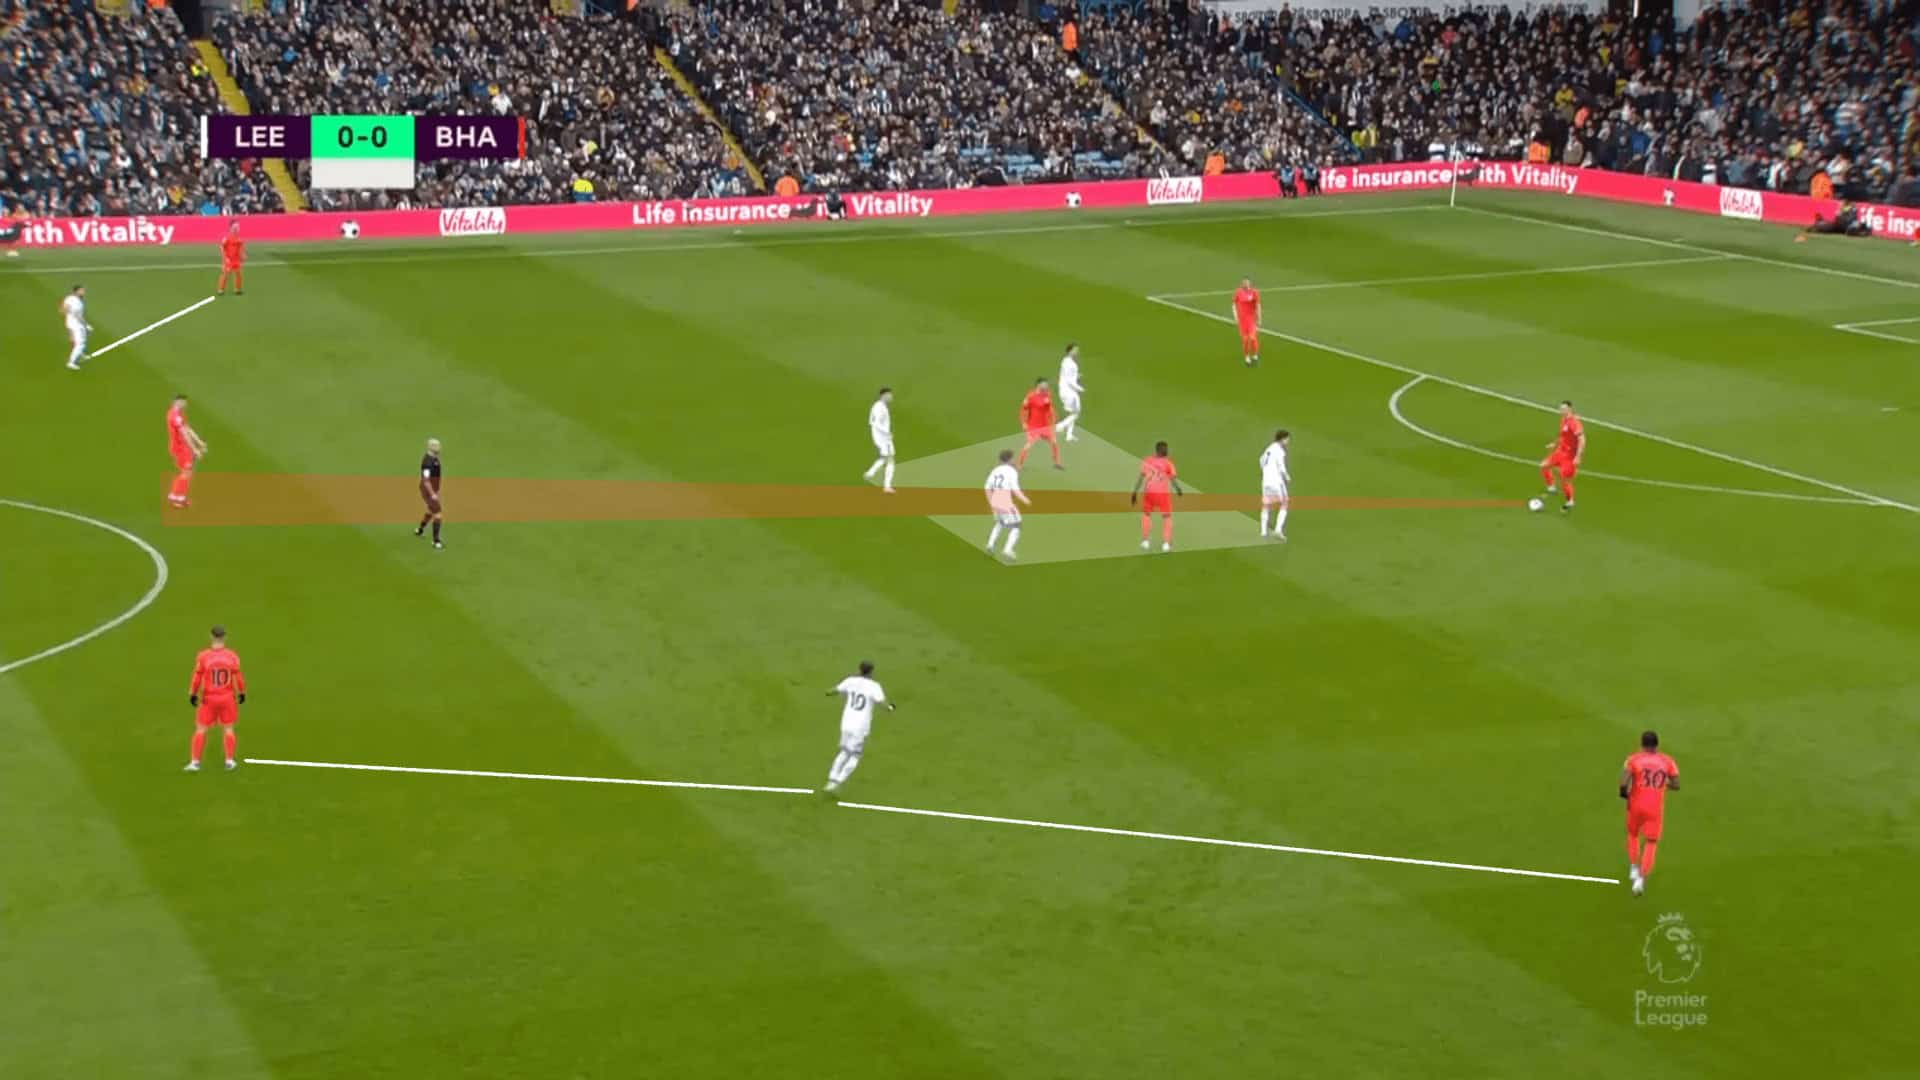
One of the standout features was the compactness of the forward and midfield lines. A 4-4-2 was Aston Villa’s preferred setup, but notice that the midfield line is defending in two of the five vertical channels while the backline covers three. Ultimately, they force Brighton to play around the press with the right-back back-tracking to receive.
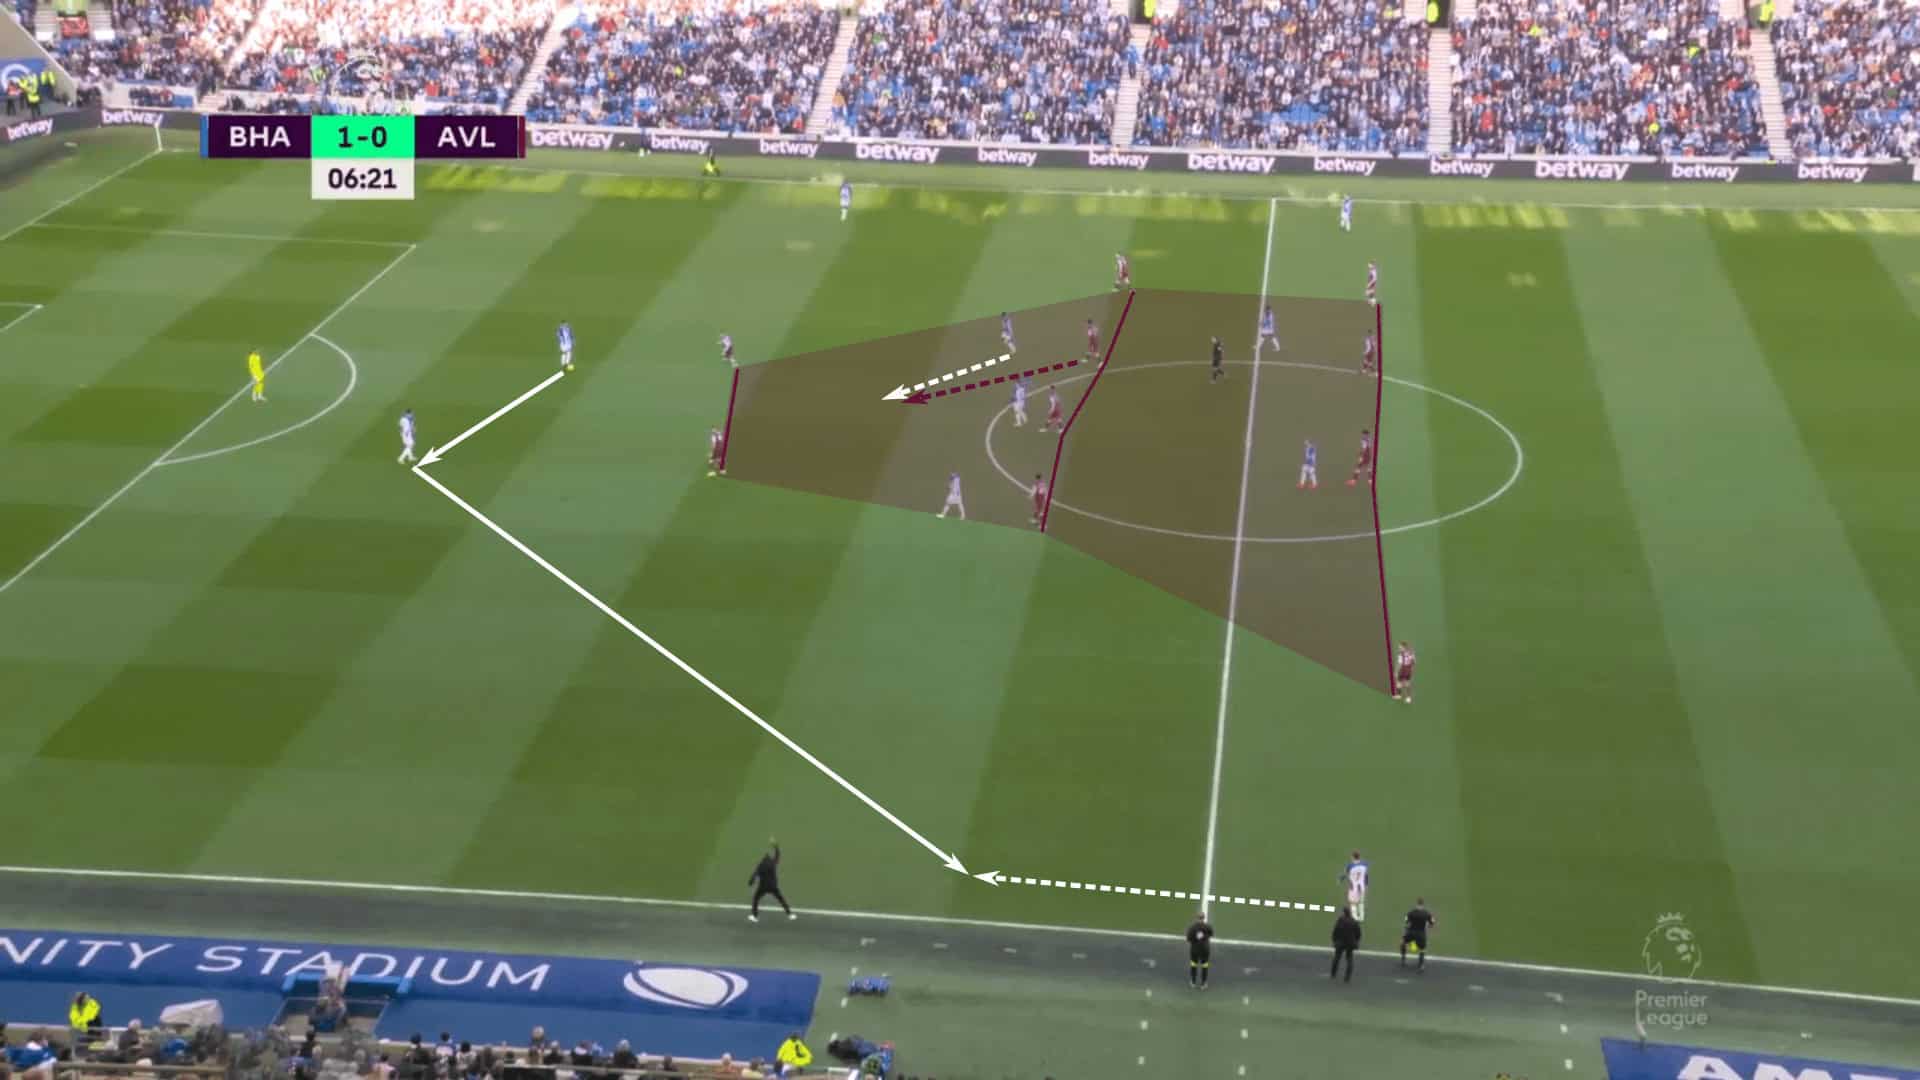
Leeds kept the same narrow shape as Villa but added an additional emphasis on man-marking centrally. Brighton recognised the defensive tactics and sought to create more space between the lines for the high players to receive. As you can see with the shaded areas, they did achieve their mission, but Leeds’ backline is well prepared to step into midfield, intercepting this pass.
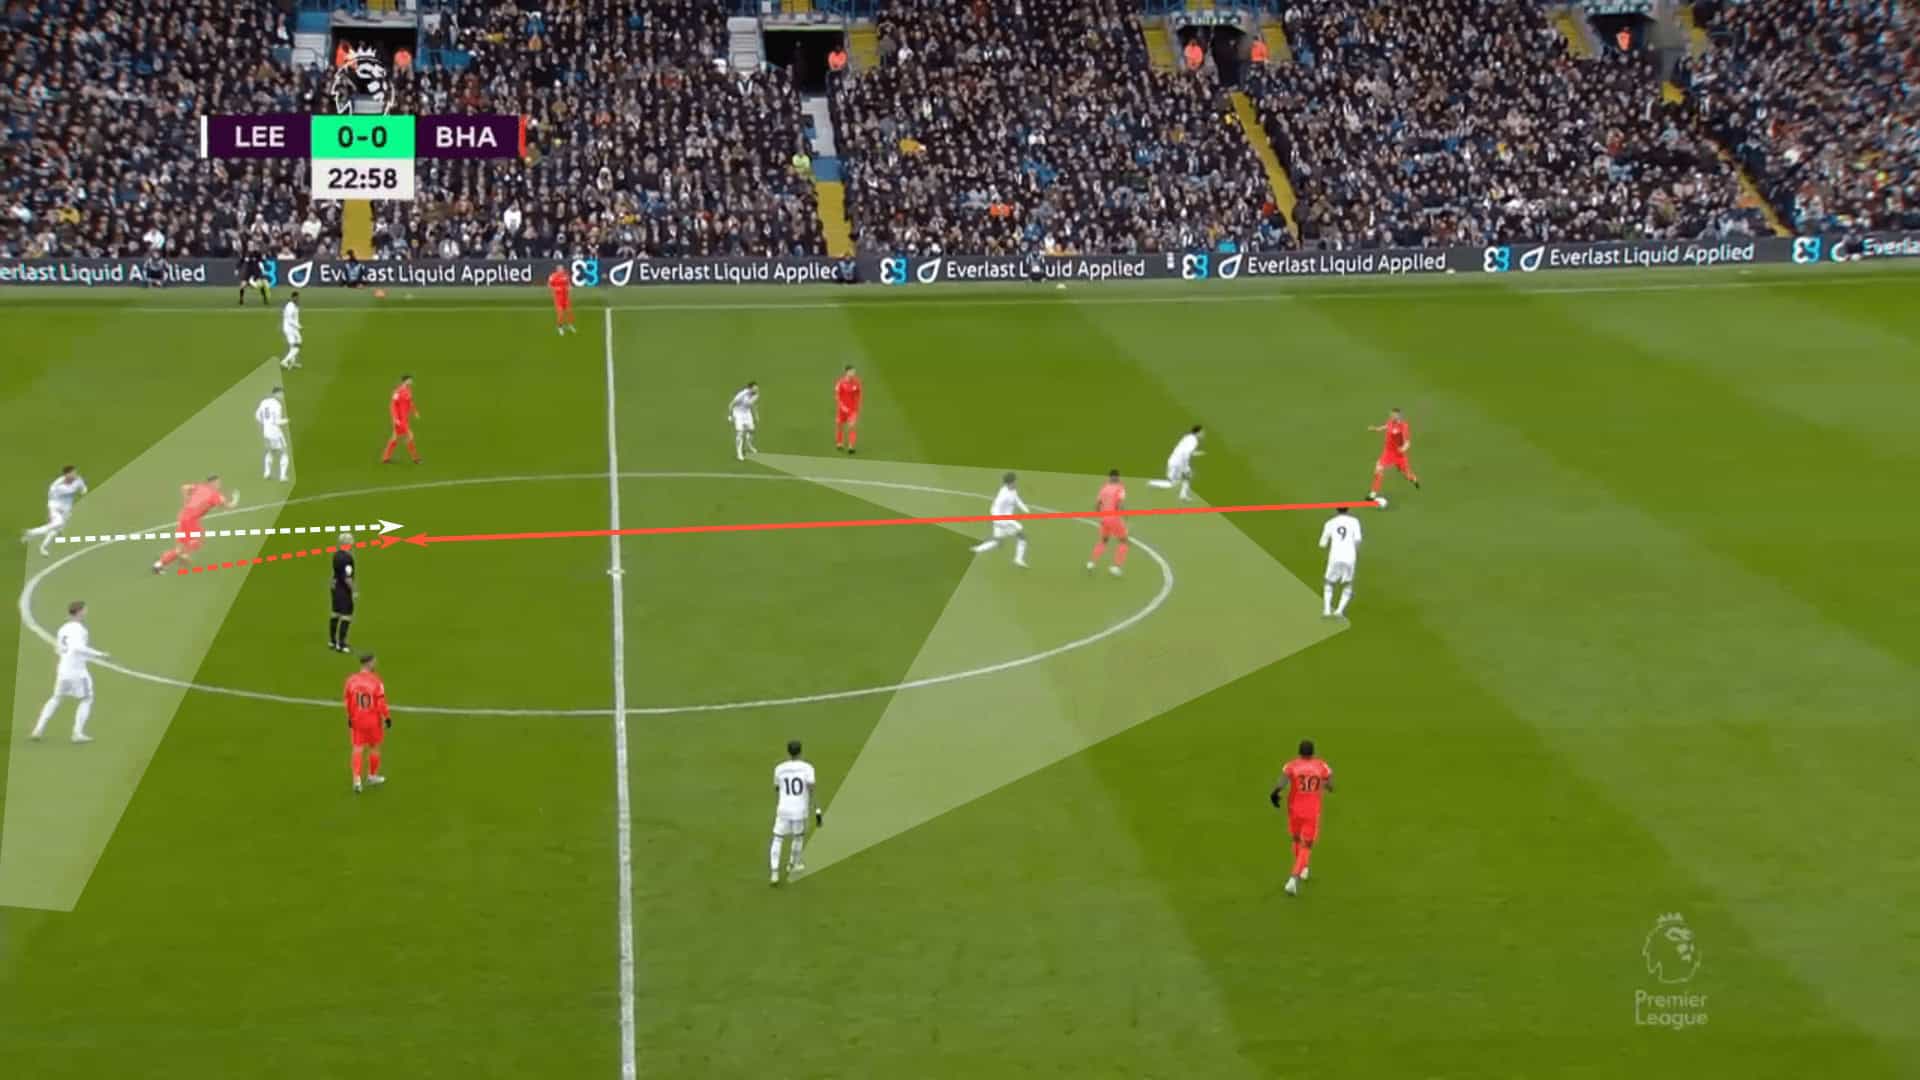
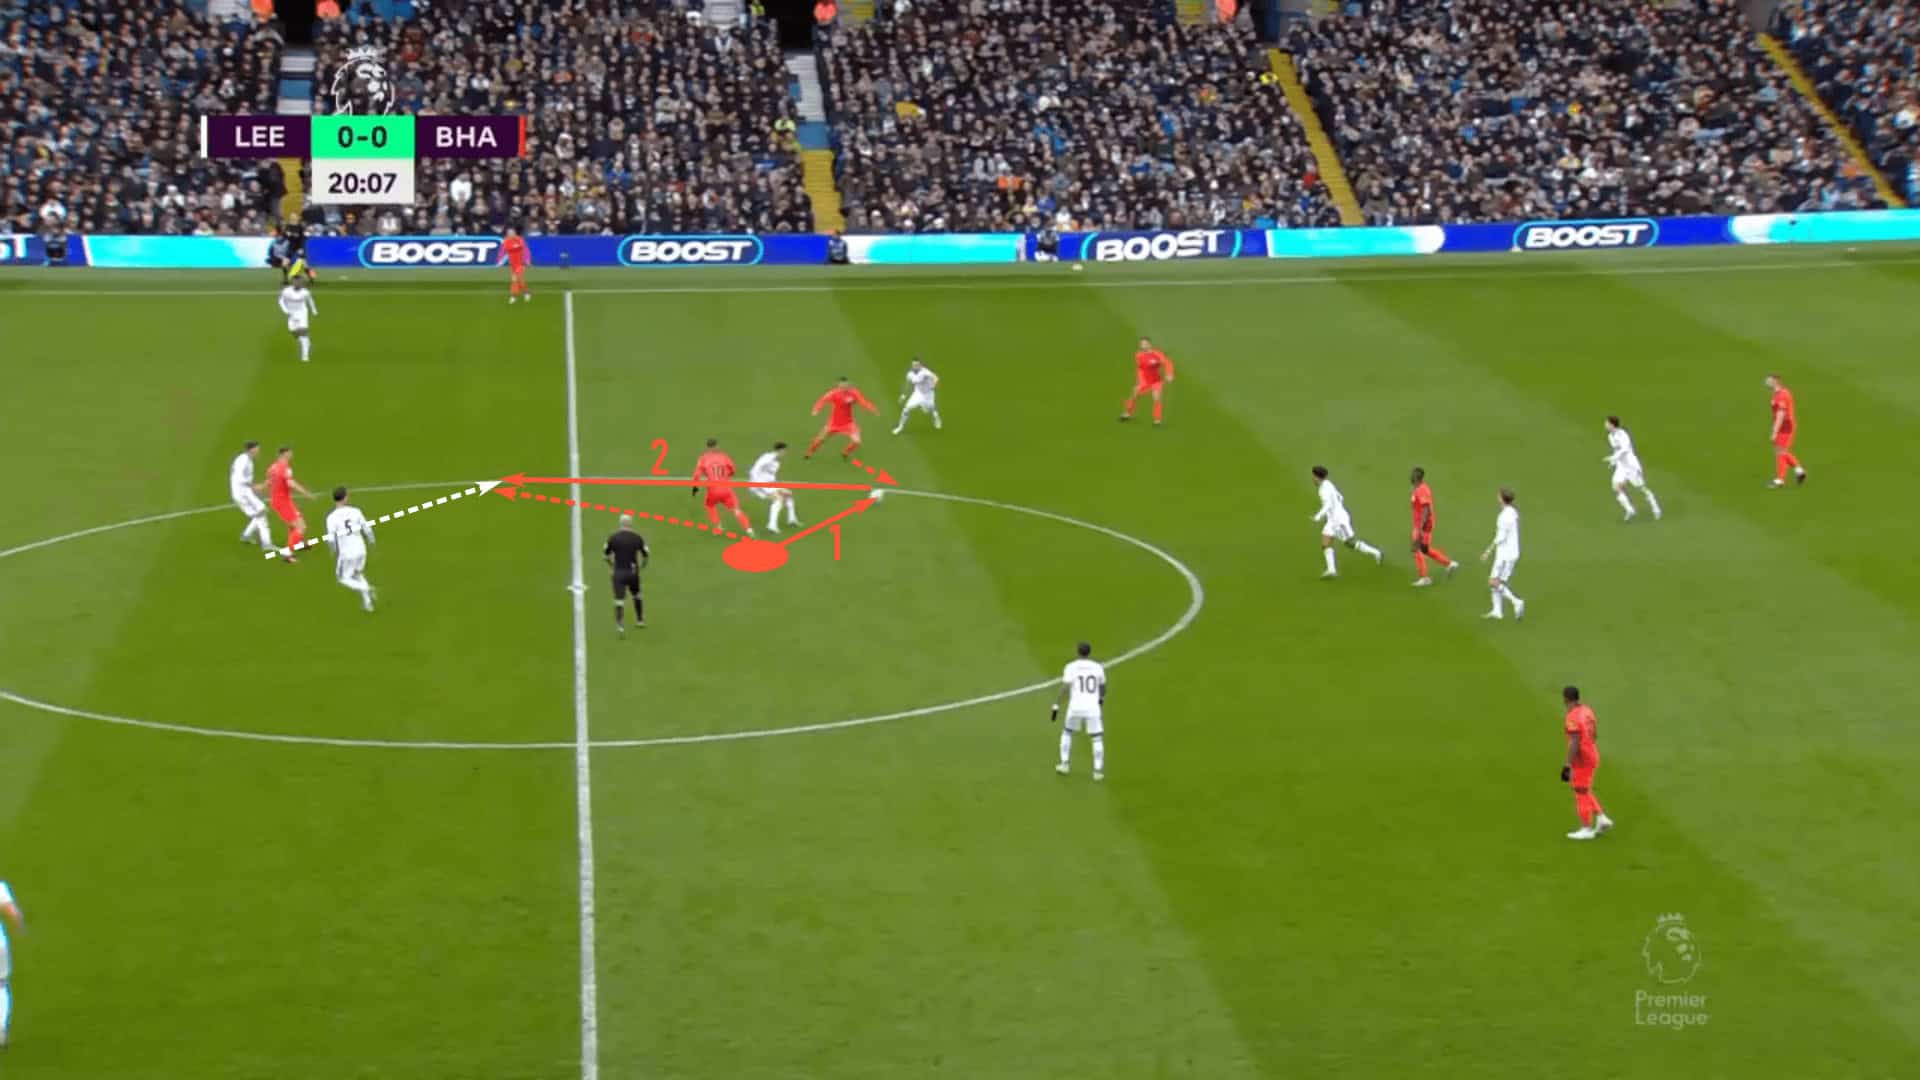
Leeds gave Brighton this space between the lines fairly consistently. To make the press work, the Whites always had members of the backline ready to step forward and the midfield line nearby to move laterally and quickly close space. One important factor to notice in the image below is the lack of supporting options underneath. A blind turn is ruled out given the pressure from the backline and the up/back/through pattern is not readily available. Brighton was able to receive between the lines, but that space closed quickly and passing options were limited.
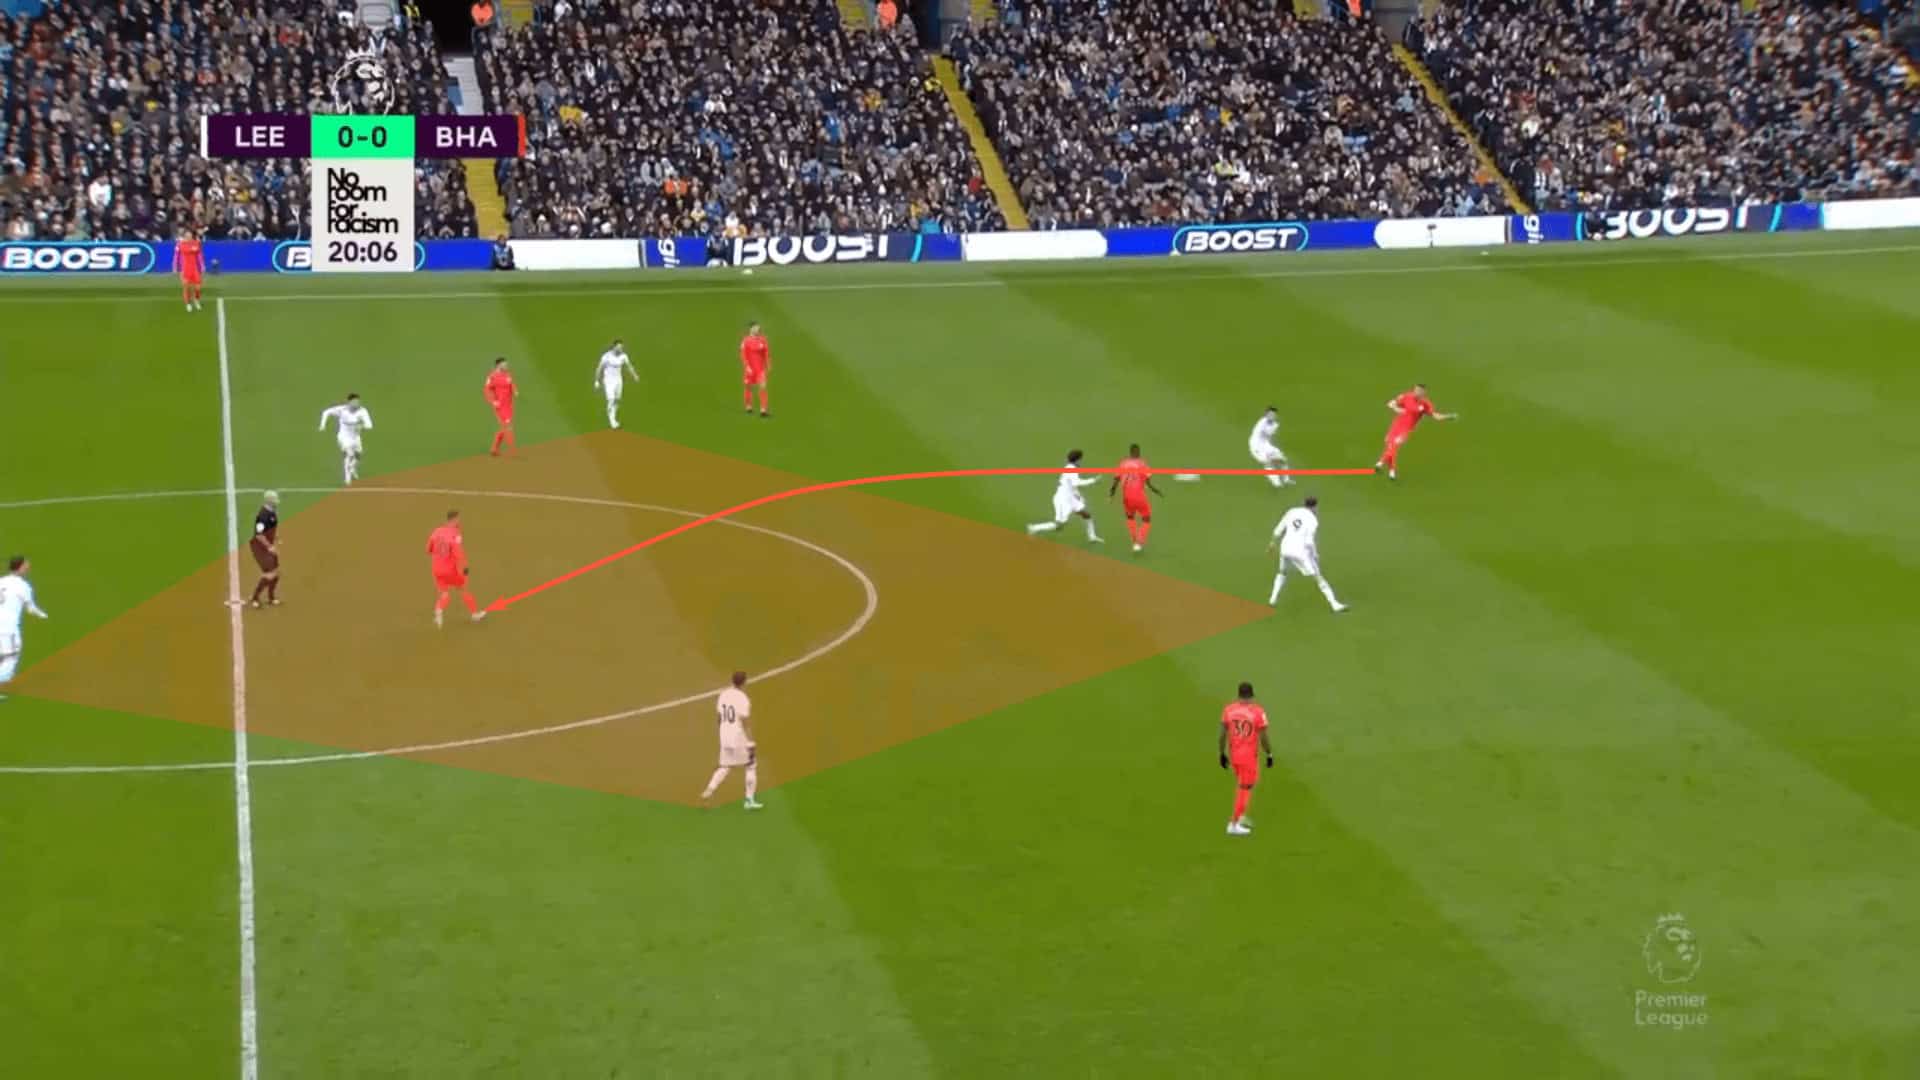
A little flick around the defender set the up/back/through pattern in motion, but Leeds was well prepared to deal with the final pass in the sequence, making the middle-third recovery.
At its best, the Leeds mid-block forced hopeful central passes that were easily intercepted, as seen below.
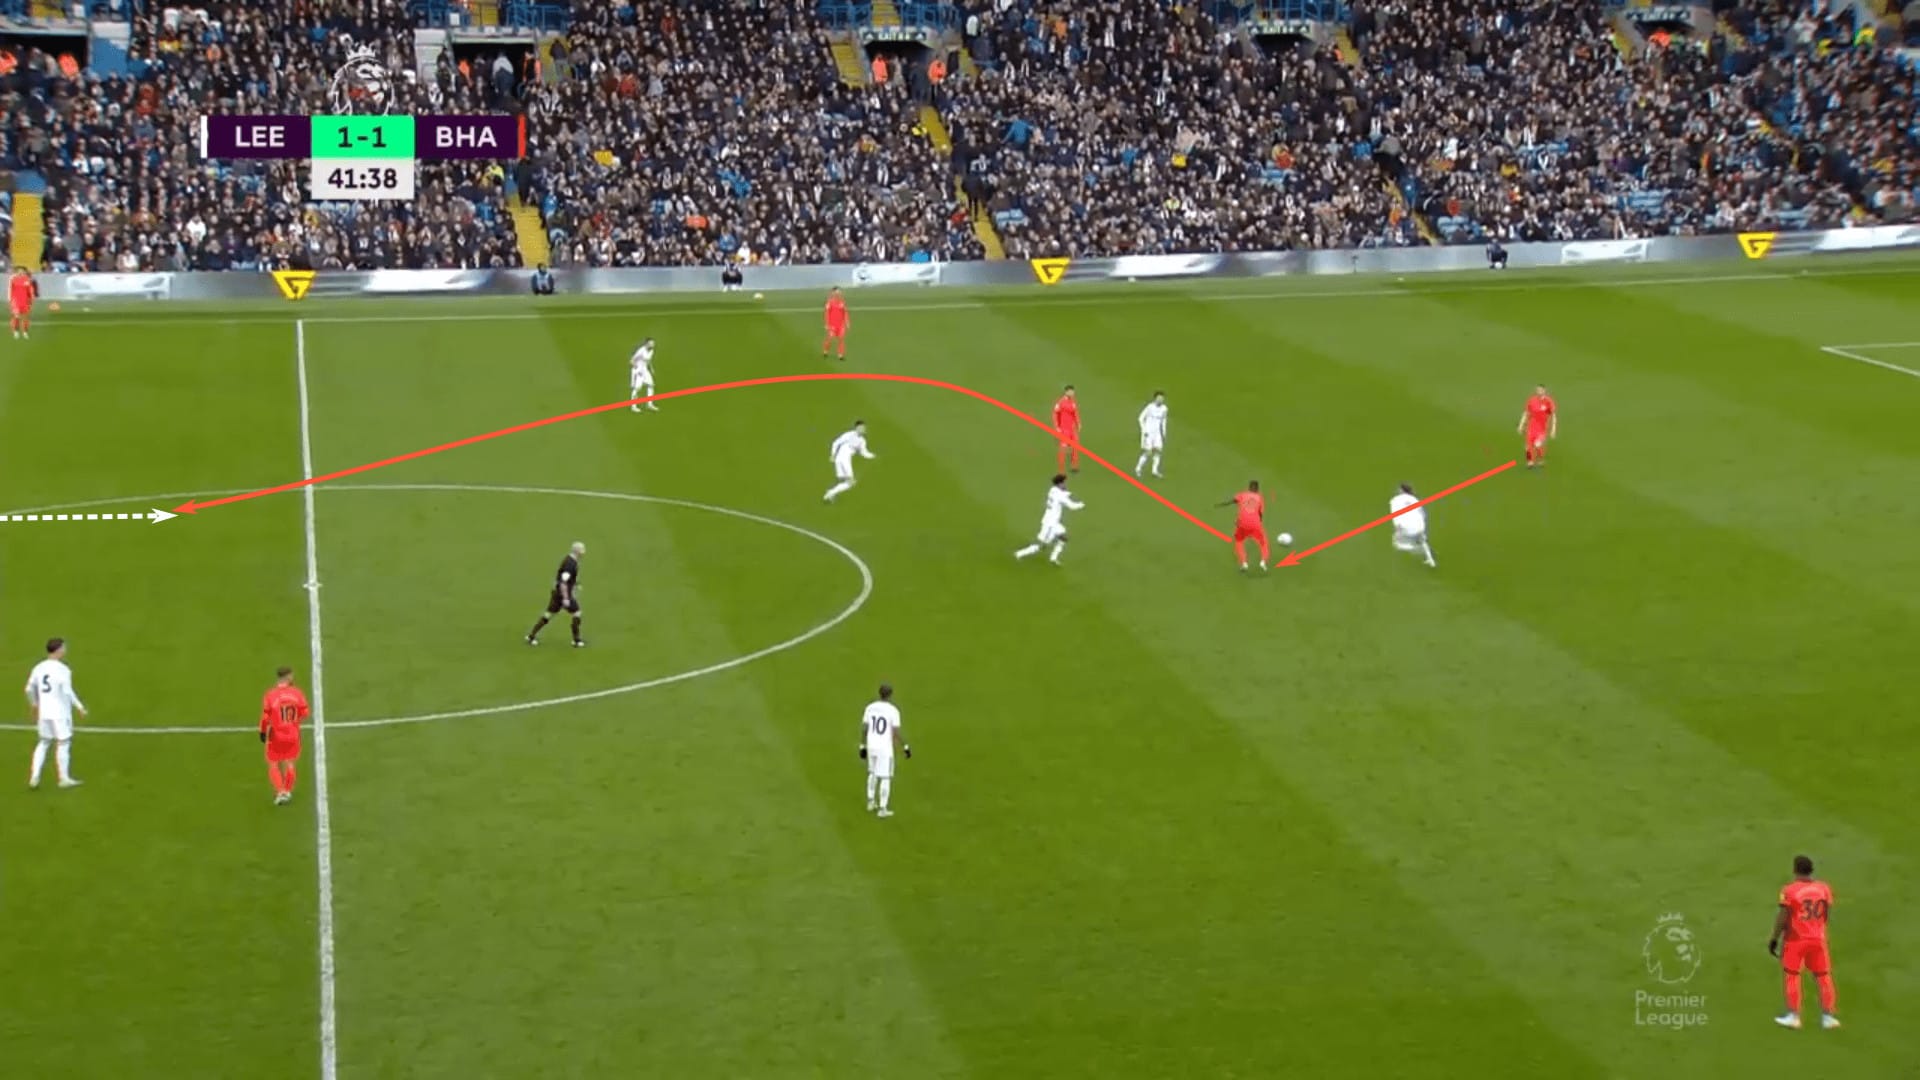
Knowing that Brighton likes to attack through their high central targets in the middle third, this is a “fight fire with fire” approach with loads of risk, but Leeds managed it well.
Limiting the up/back/through pattern is key. You can give space to Brighton centrally, but the window has to be tight to force a hard-hit pass and supporting options laterally and underneath must be accounted for. The backline and deepest midfielders must be ready to step forward to contest the initial pass forward, either getting a foot on the pass or complicating the backpass. When this is done, teams can recover the ball centrally and counterattack with numbers in dangerous positions.
Conclusion
Stopping Brighton may be too big of an ask, but it is possible to contain them. That’s a compliment of the highest order given the same is said about the likes of Arsenal, Manchester City and other top clubs.
The teams featured in this analysis have provided successful models. Controlling access to the central midfielders is key. If Brighton can play out through them and get into forward-facing positions, you might as well start the long recovery run toward goal. Your only chance of stopping them at that point is in the low block, provided you catch them.
But we wanted to see how you stopped them before emergency defending was required. Looking at previous results and targeting matches with above-average high and middle losses from Brighton gave us some answers.



Comments