The Bundesliga returned with a Revier Derby between Borussia Dortmund and Schalke, which turned out to be a very one-sided affair. This weekend’s games were shrouded in some uncertainty, with question marks around the fitness of the players, the sharpness of the players, and just how playing in an empty stadium in the current conditions would work. In the end, the tactics of each team collectively seemed unchanged due to the break, but the way in which, and also the quality in which they were executed did affect the game, particularly in Schalke’s case. In this tactical analysis, we will look at how Dortmund were able to exploit Schalke’s defensive system and dominate the game.
Lineups
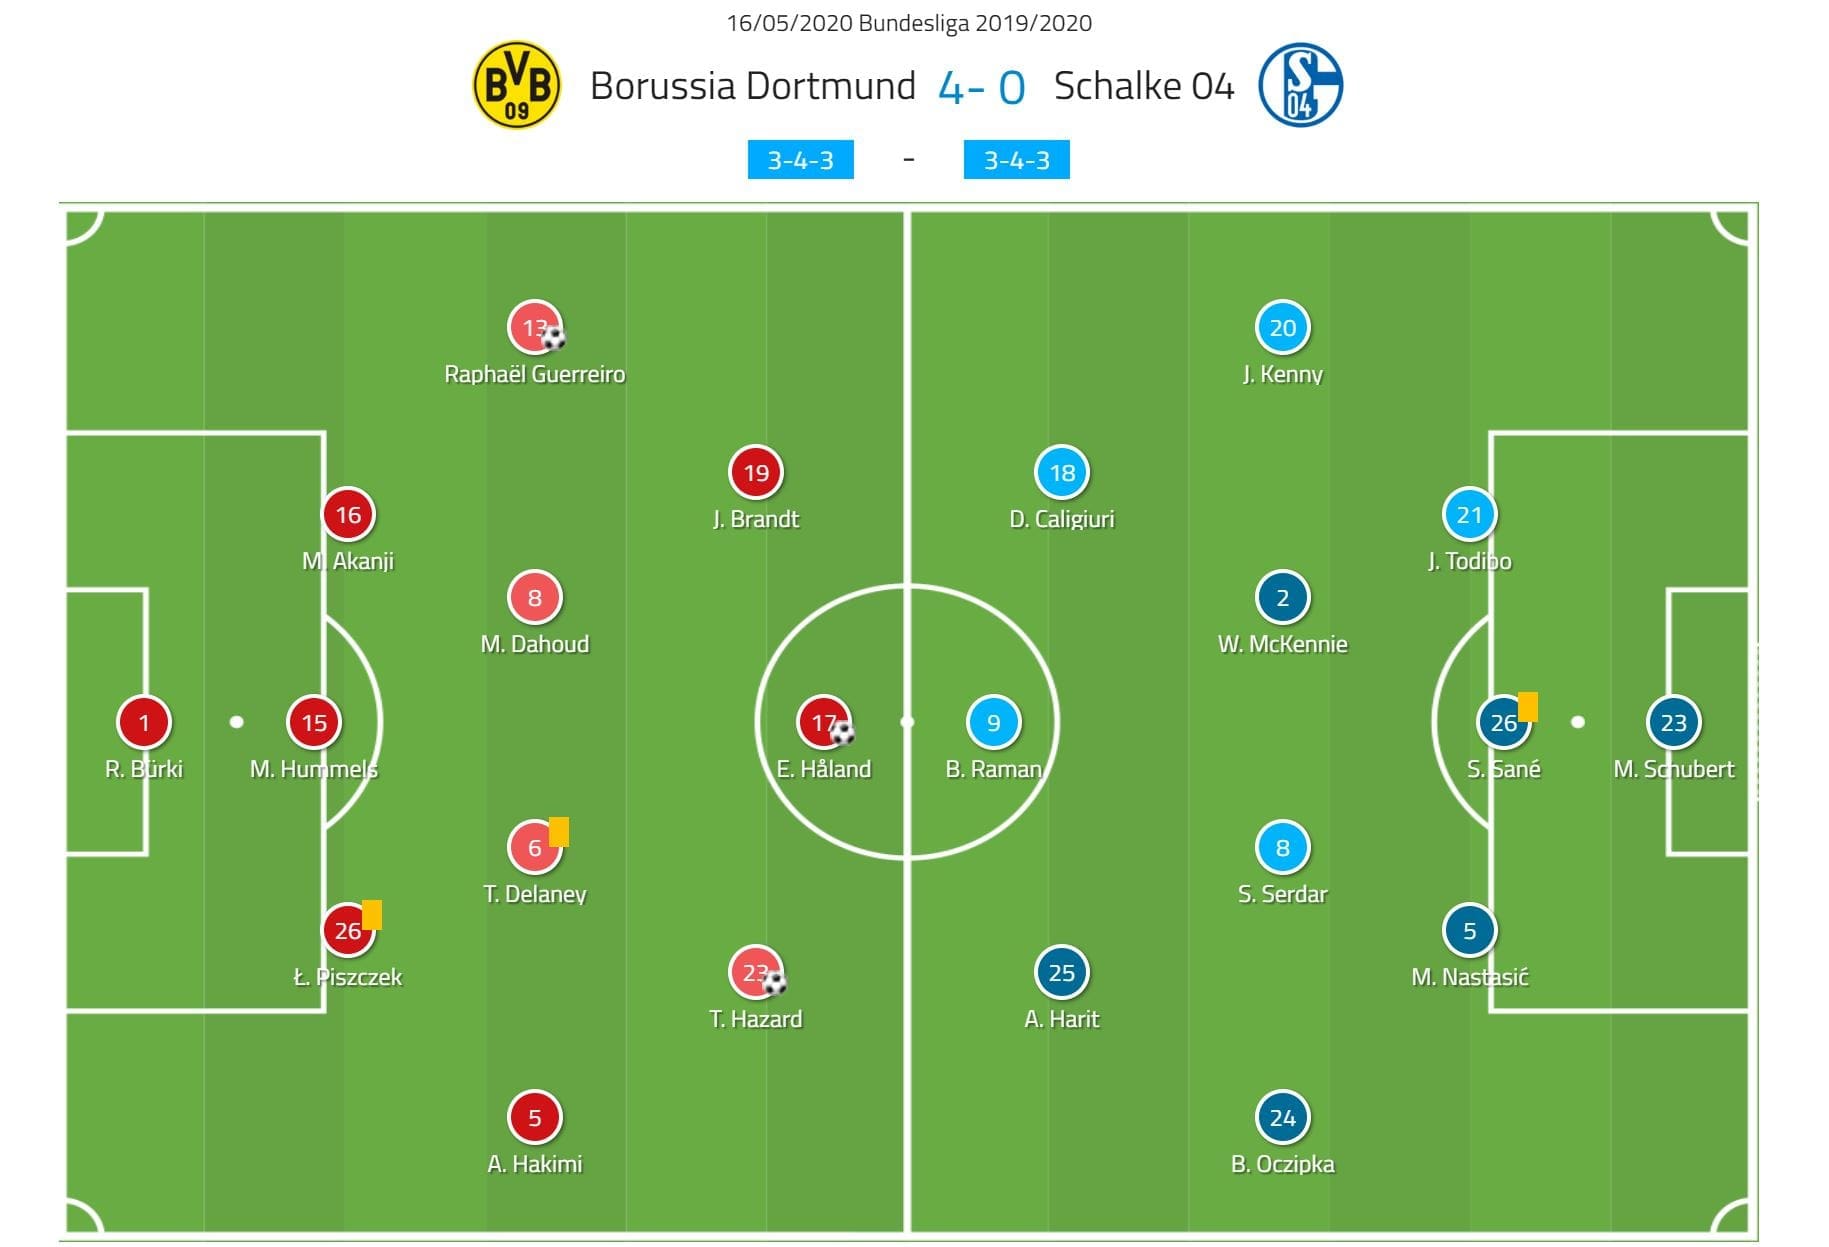
Both sides lined up as predicted in my preview of the game, with some fitness issues meaning Dortmund weren’t at full strength. Schalke, who had recently dropped their 4-diamond-2 in favour of a back five against the opposition’s who build with a back three, and so it was no surprise to see them utilise this system against Dortmund. Dortmund meanwhile used their 3-4-3 system which they have used largely since late last year, with a midfield box being used at times to create space. Mo Dahoud was the surprise inclusion due to Axel Witsel’s injury, while Dortmund used Julian Brandt as a part of the front three to replace Jadon Sancho, who was struggling for fitness.
Dortmund break the Schalke press
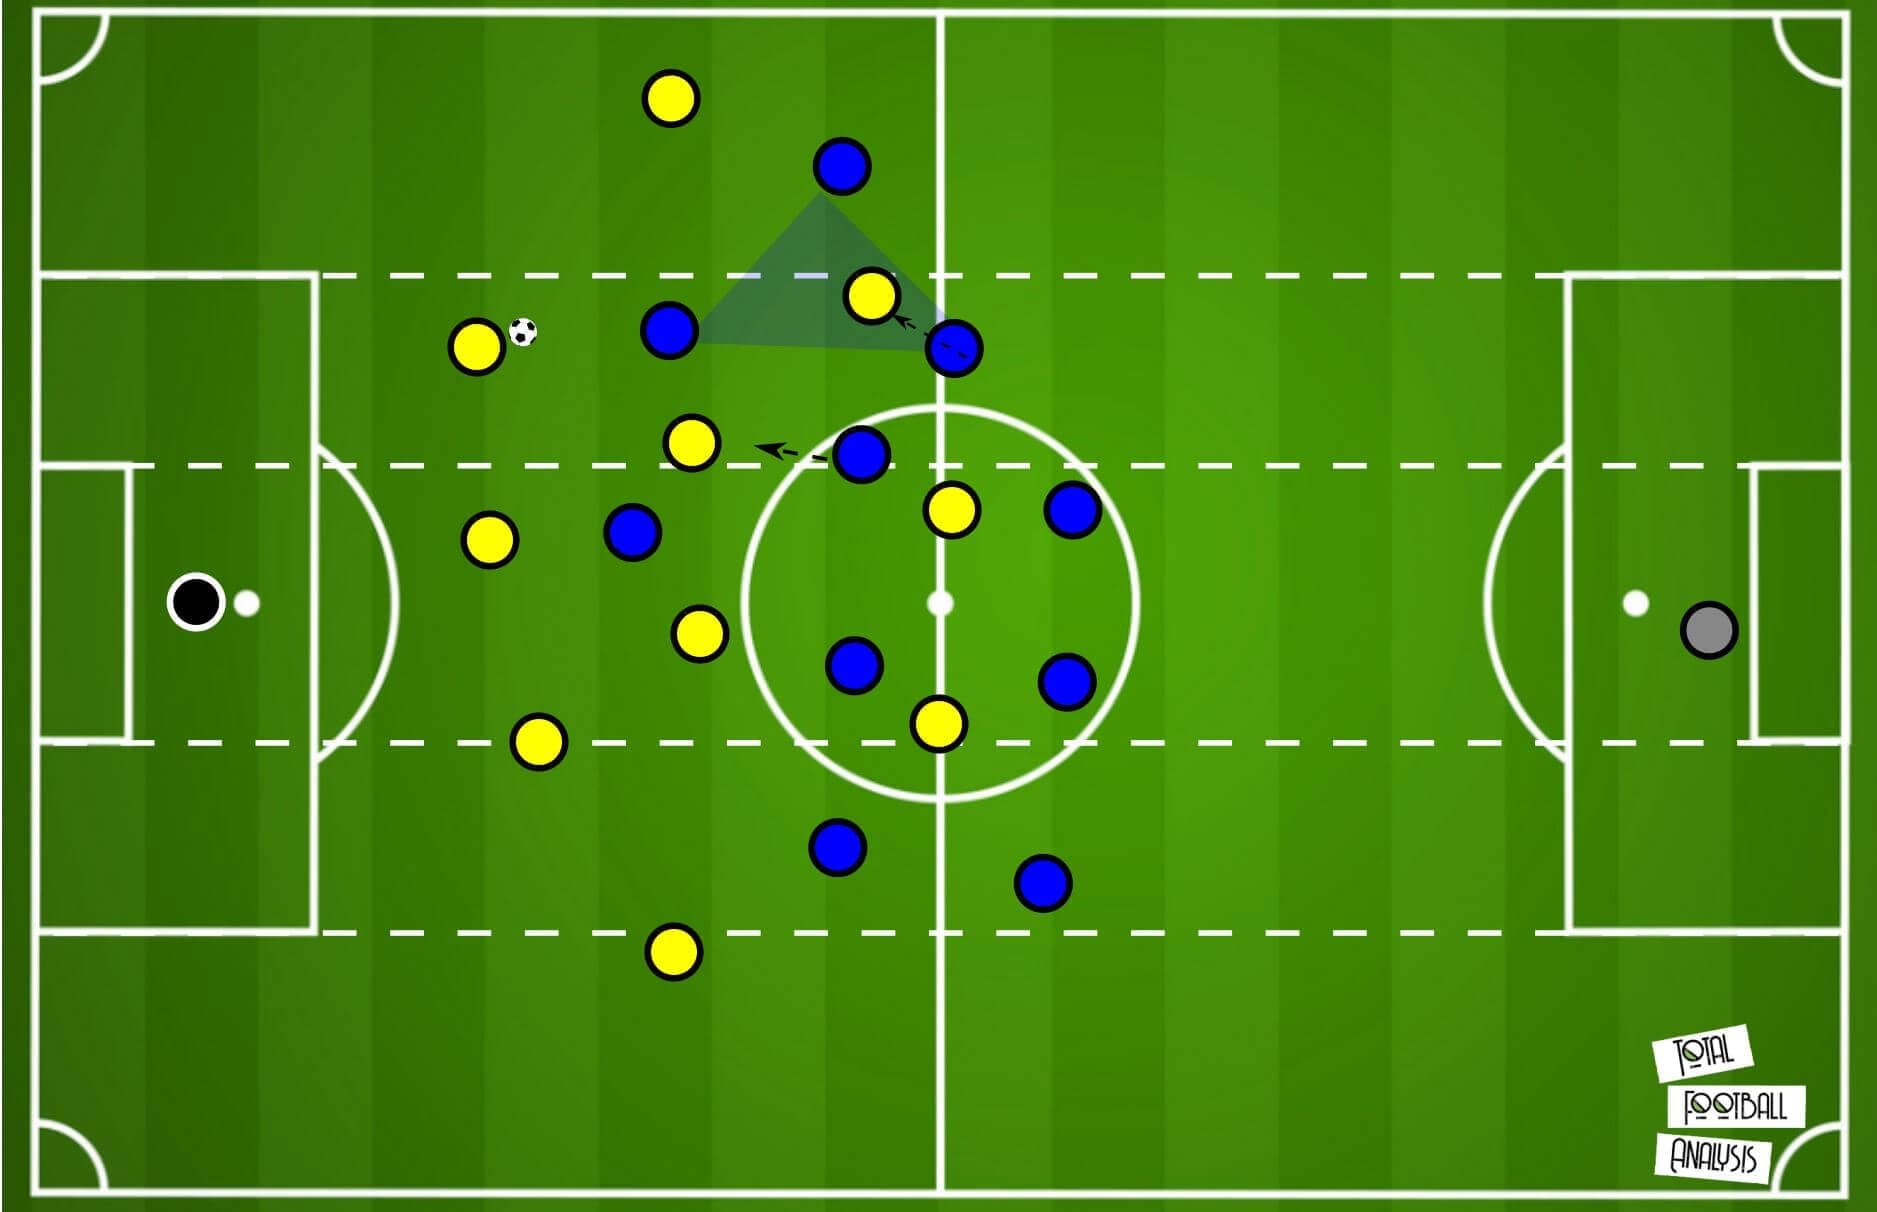
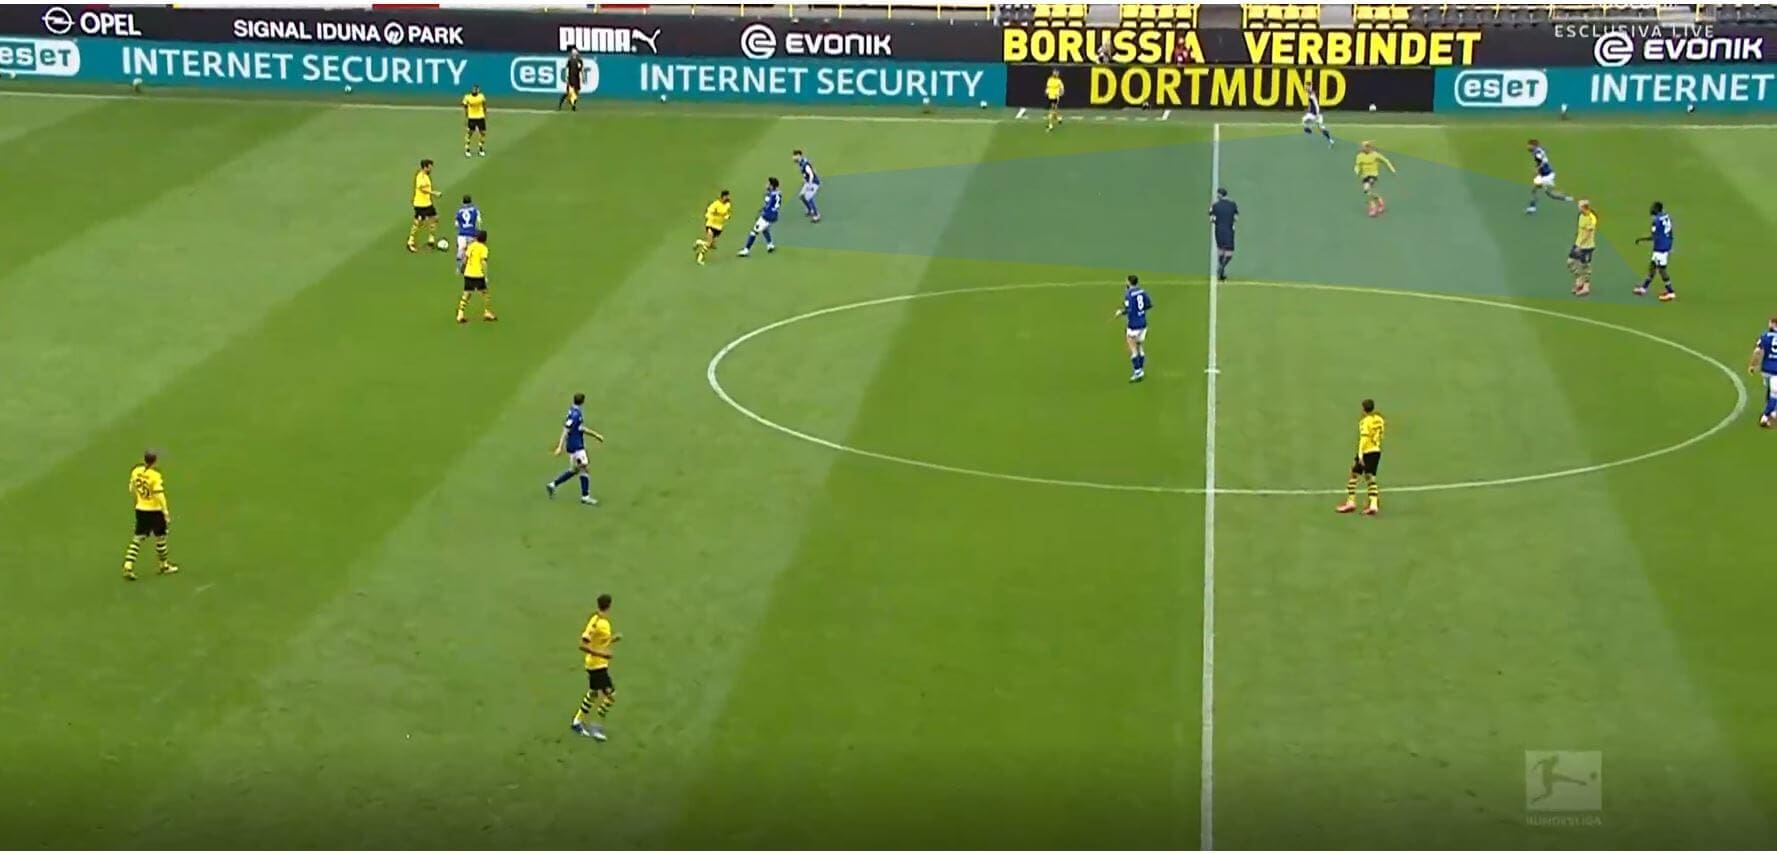
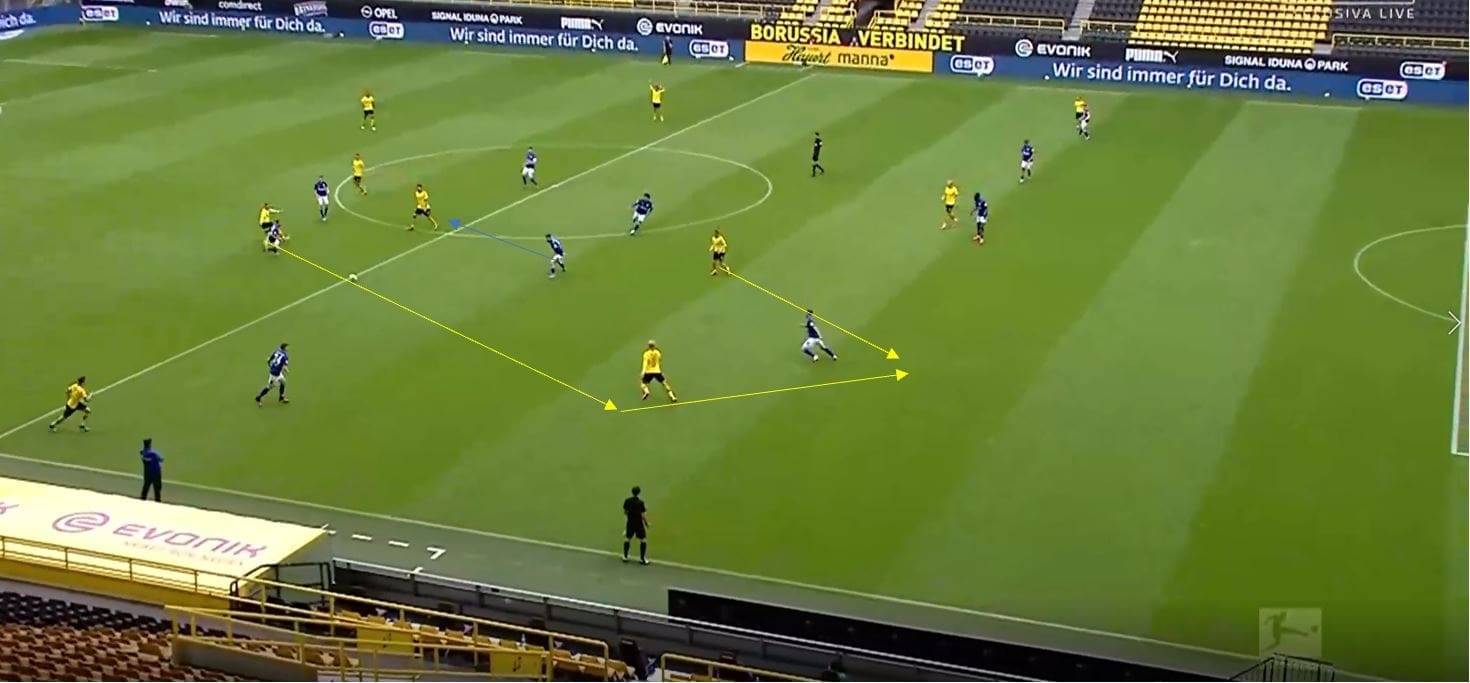
Schalke pressed in a 5-4-1 formation in the first half, which is outlined below. The central striker would press the central defender and goalkeeper, while if the ball was played to the wide centre backs, the winger in the 5-4-1 would jump to press. This pass to the wide centre back was usually Schalke’s trigger to press. Dortmund meanwhile built in a 3-4-3, with the central midfielders staying both deep and narrow often, for reasons I will explain shortly. Dortmund’s wing-backs provided width in a fairly deep area again, forcing the Schalke wing-back to prepare to press the Dortmund wing-back, as we can see below. As a result, with width provided the half-space opened, which is where Dortmund’s inside forwards of Julian Brandt and Thorgan Hazard would operate. It was then the responsibility of the nearest central defender to jump from the back line to occupy the half-space.
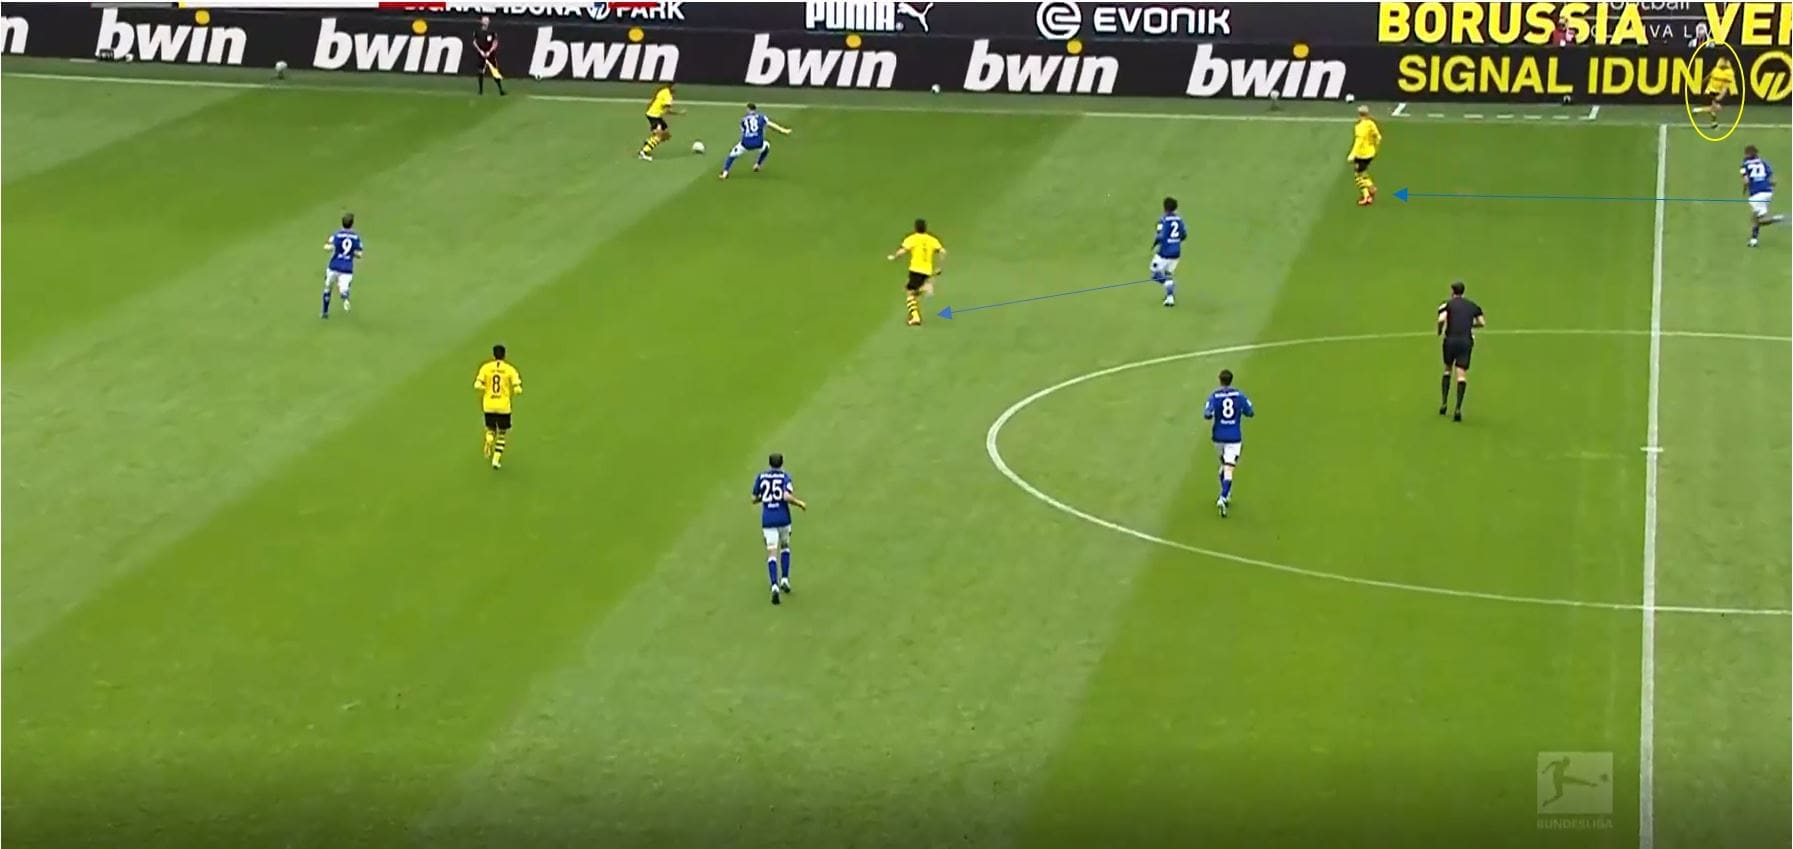
We can see an example of this pressing scheme below in a wider area, where Manuel Akanji the left centre back has possession. Dortmund’s central midfield pairing remain deep, and Weston McKennie stays fairly tight to his player. Dortmund’s left wing-back provides width and moves higher, with inside-forward Brandt dropping deeper into the half-space. He is then pressed from behind by Jean-Clair Todibo, which isn’t an ideal pressing situation as you are sacrificing a deeper player, meaning firstly you have fewer players in deeper areas, and also that this player has larger pressing distances to cover the deeper the play gets.
These deep central midfielders simply create a dilemma for the marking central midfielder. If they stay tighter and mark the central midfielder, they leave more space behind them, and are also positioned more centrally, leaving greater space in the half-space and improving the player’s access to the striker or access to the centre. If they stay too deep, the central midfielder can receive and turn with little pressure applied by the striker. If the central midfielder moves to cover the half-space more, they increase the forward space for this central midfielder. When Schalke’s centre back was slow to, or didn’t press the half-space occupier, this dilemma was very apparent.
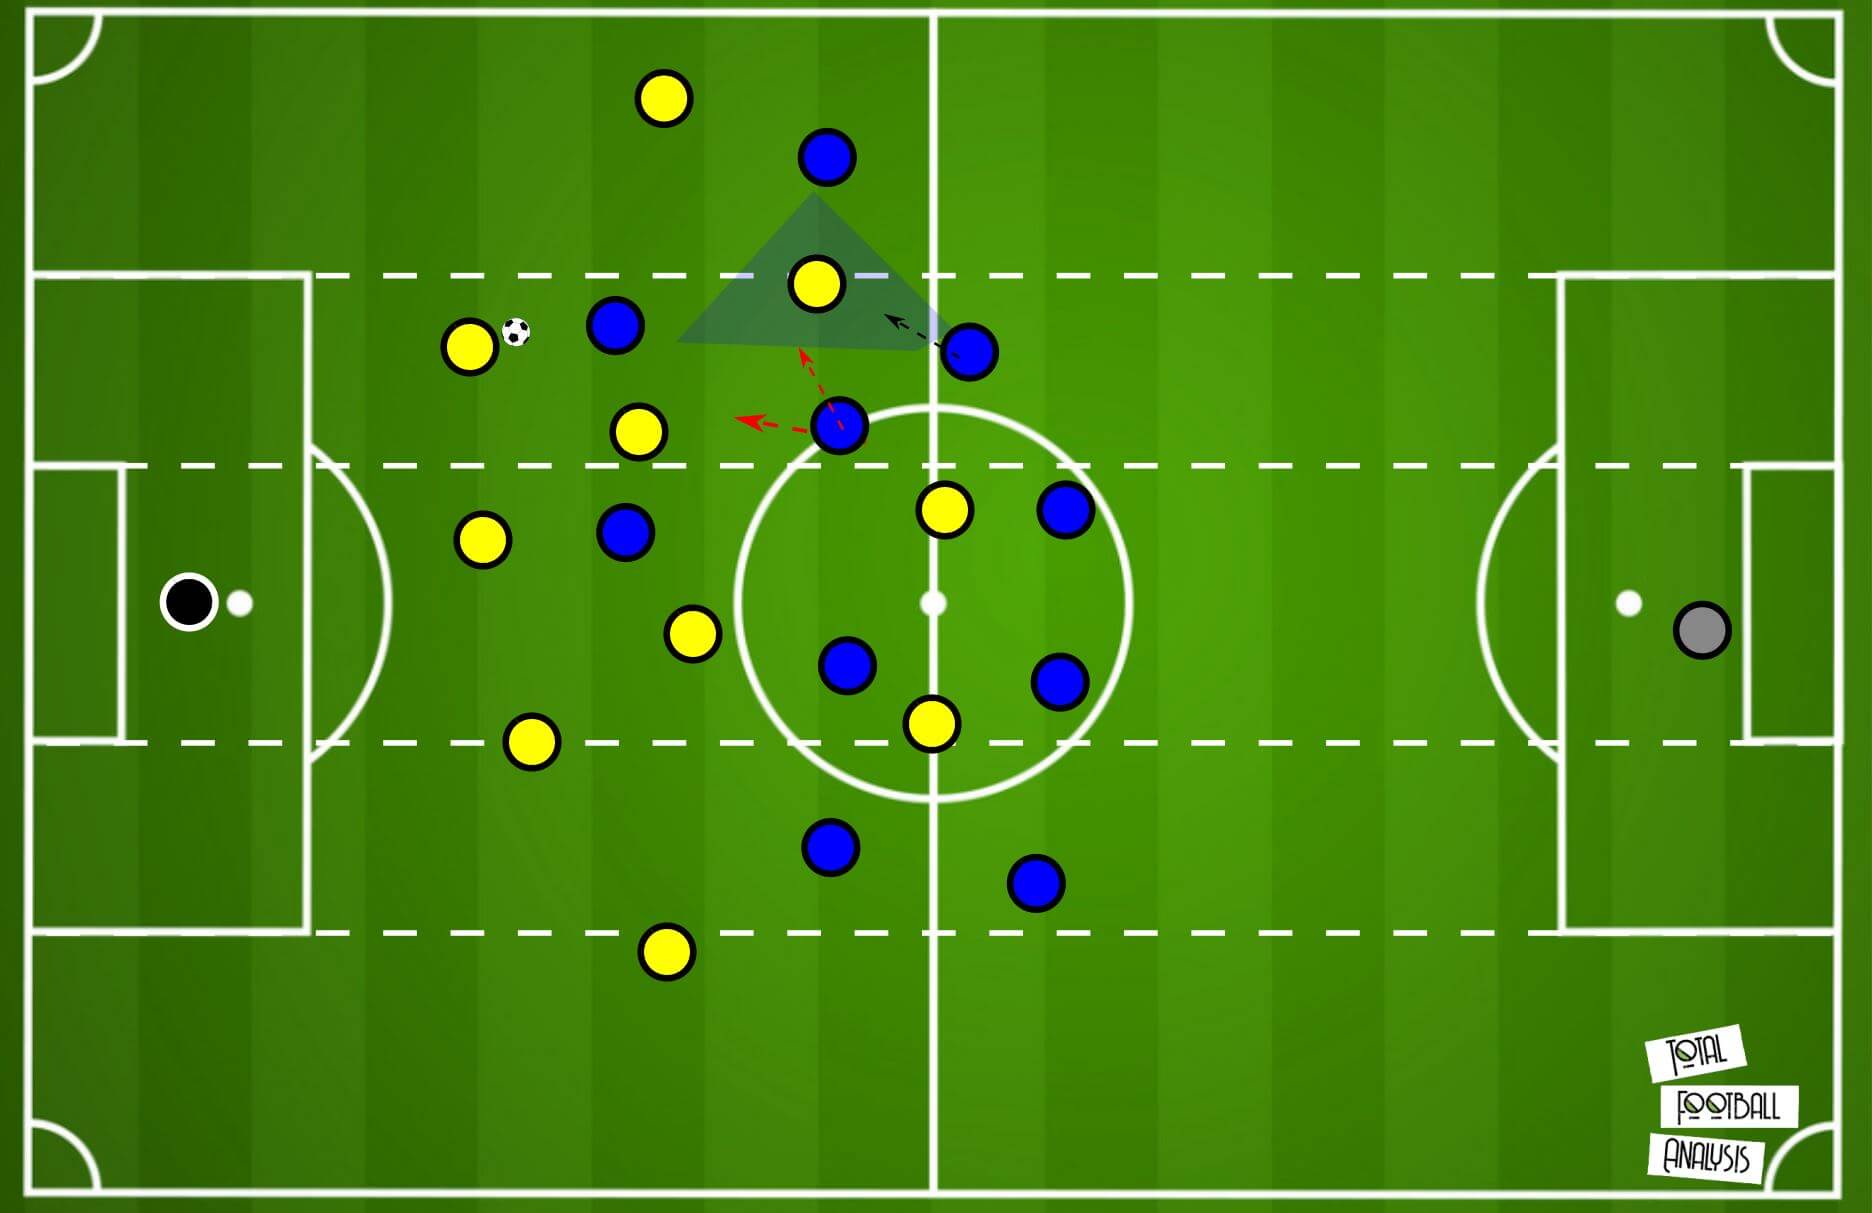
We can see here McKennie commits across to cover the half-space more, and as a result, leaves lots of space between the lines for the central midfielders to receive and play through with ease to the front line.

Here when McKennie pushes higher and marks his counterpart, the space is increased between the second and third lines, meaning Brandt can drop deeper to receive, helping him to both escape his marker but to also drag him further out of position, which then allows Haaland and Hazard to cause problems. This central midfield dilemma helped to create the first goal, as I’ll point out in this next section.
Dortmund’s use of rotations and overloads
One of the takeaways from the game was Julian Brandt’s excellent performance, and he and Hazard were given freedom in terms of movement, dropping deep occasionally as shown (usually Brandt), creating overloads in the same half-space and using dismarking methods to progress play, which is something Dortmund’s central midfielders did too.
We can see a good example of Brandt looking to use his movement to create space. Here we see the same situation discussed already, with a wide centre back on the ball and the Schalke centre back covering Brandt in the half-space. Brandt deliberately drops deep, knowing he is followed, and then quickly darts into the space behind his marker.
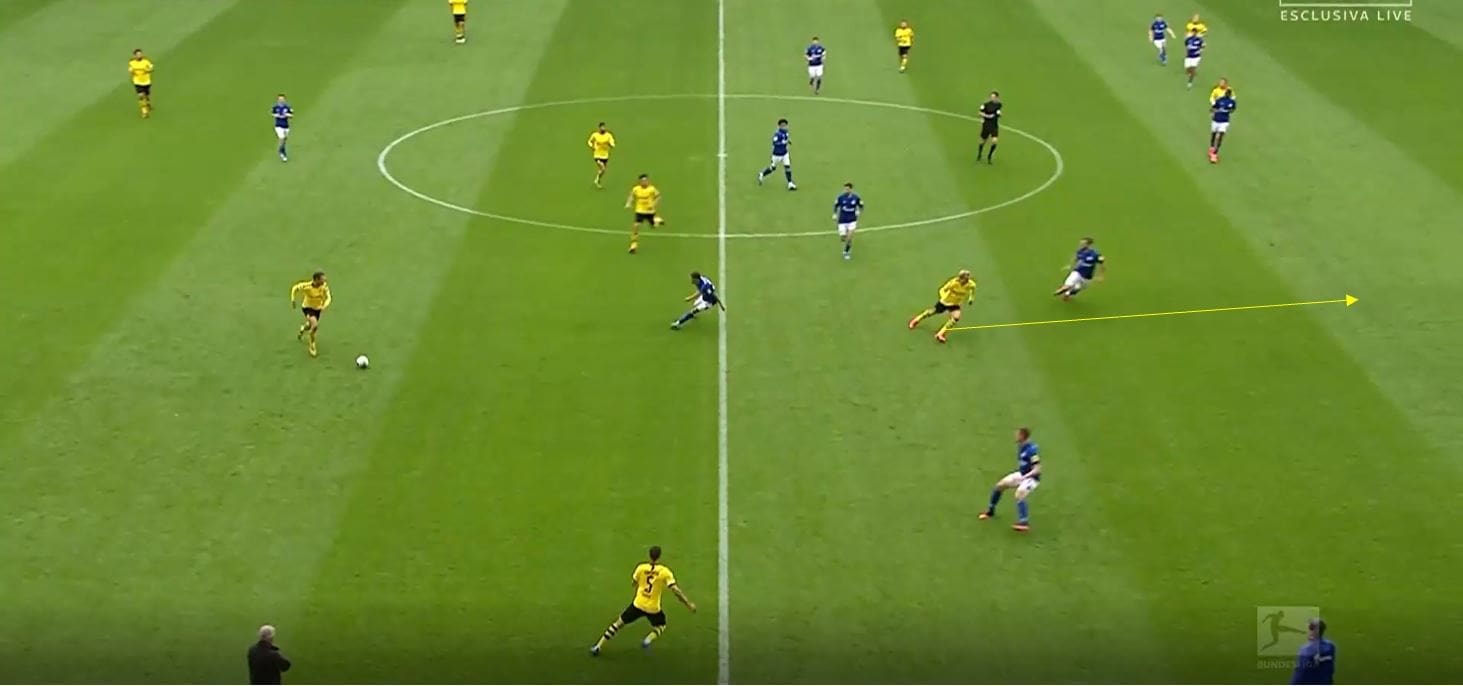
In a similar example here, Brandt again is pressed by the centre back, and right wing-back Hakimi moves into the space created, carrying on his run behind his marker’s back. This is a common movement Borussia Dortmund use, and is something I used as an example in my preview in a PSG example. Notice also the positions of the front three, with Haaland the furthest of the three.
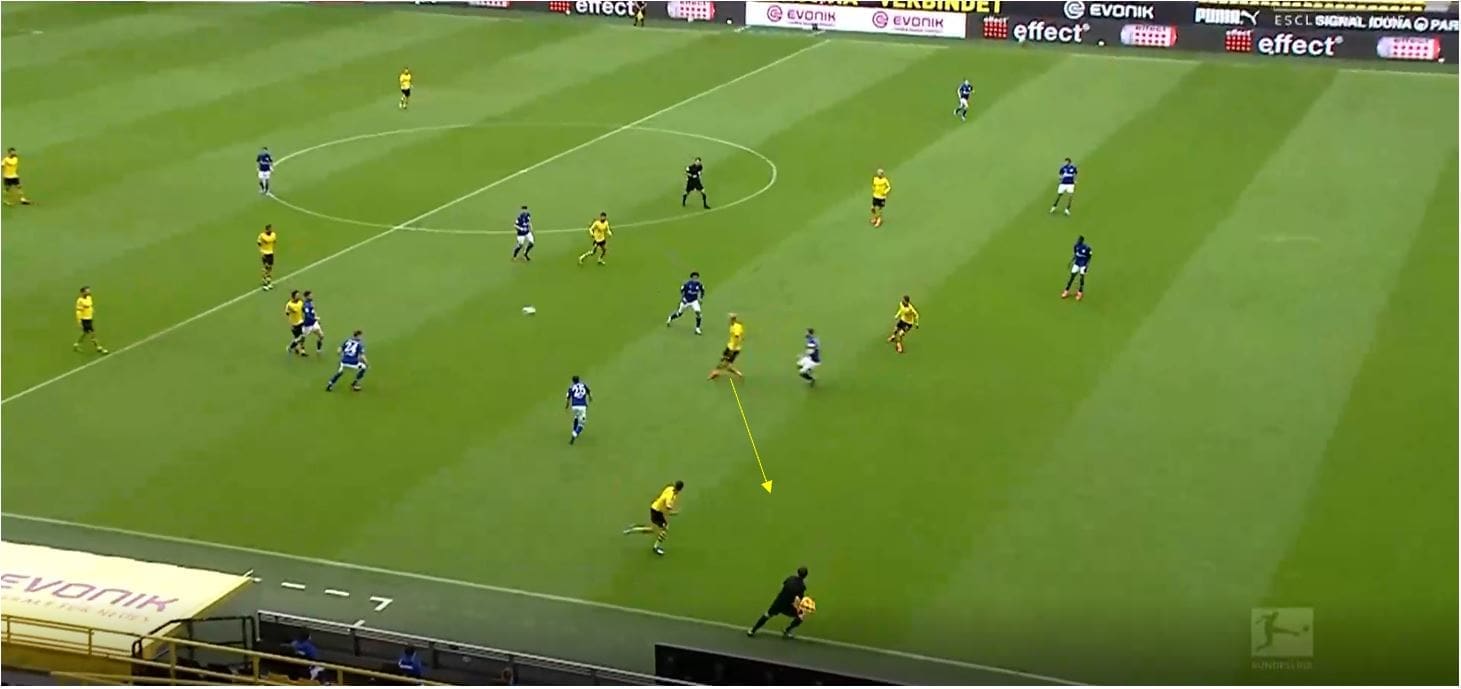
We see a lovely rotation here which helps Dortmund to progress the ball and break the press. Here Brandt rotates with Thomas Delaney, meaning Brandt now acts as one of the central midfielders while Delaney occupies the half-space. This might not look much on the face of it, but it’s an extremely effective rotation.
When Brandt drops in the half-space, he is moving from high to low, a higher position to a deeper one. He moves from close to his opponent, meaning it is much easier for the marker to track him and cover the space, as he can see it more clearly and it is closer to him. Here, Delaney moves from low to high, and so the separation between him and the Schalke centre back is much larger, and it also isn’t as clear a movement as a player making a straight dropping run. Delaney is too deep for the centre back to react and cover the pressing distance, and Schalke’s midfield refuses to drop off, so it is a simple progression.
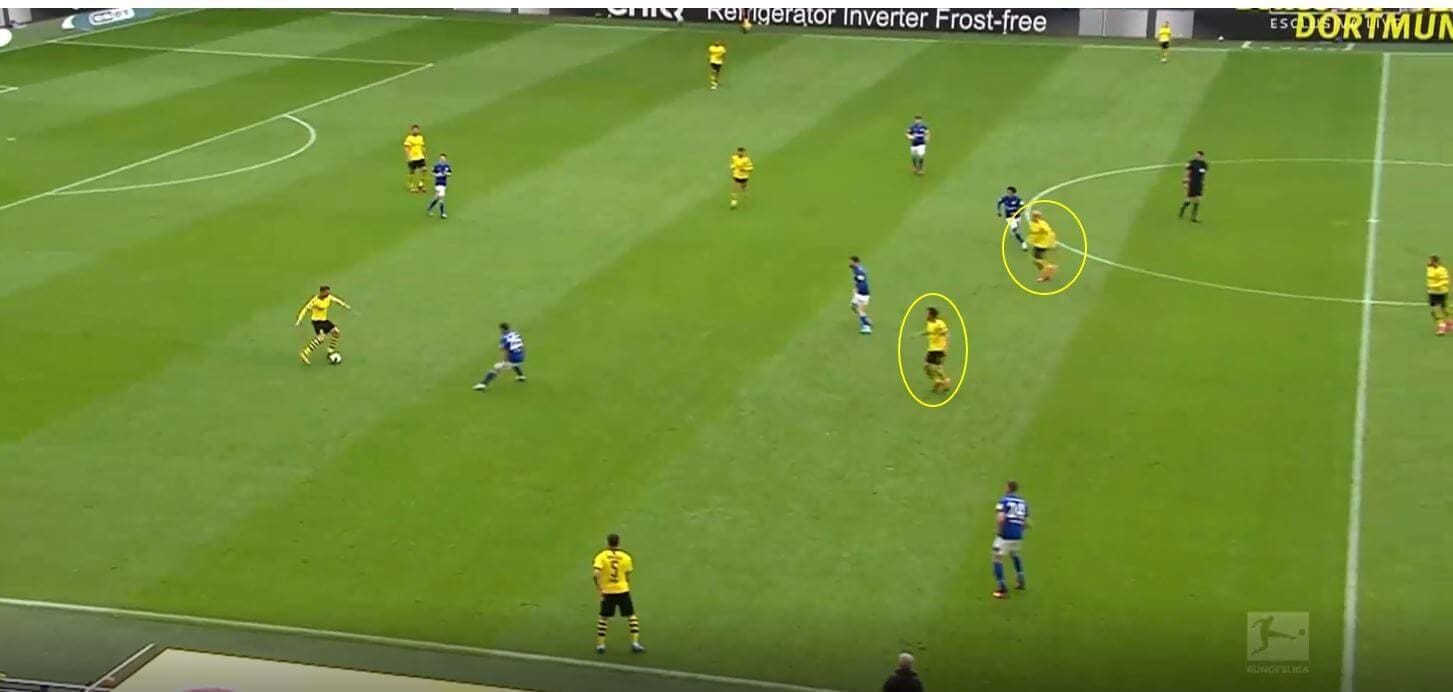
We can see some good movement from the central midfielders again this time with Dahoud, where he stays deep and is marked by McKennie. The ball is played into Brandt and Dahoud immediately spins and looks to exploit the space behind McKinnie.
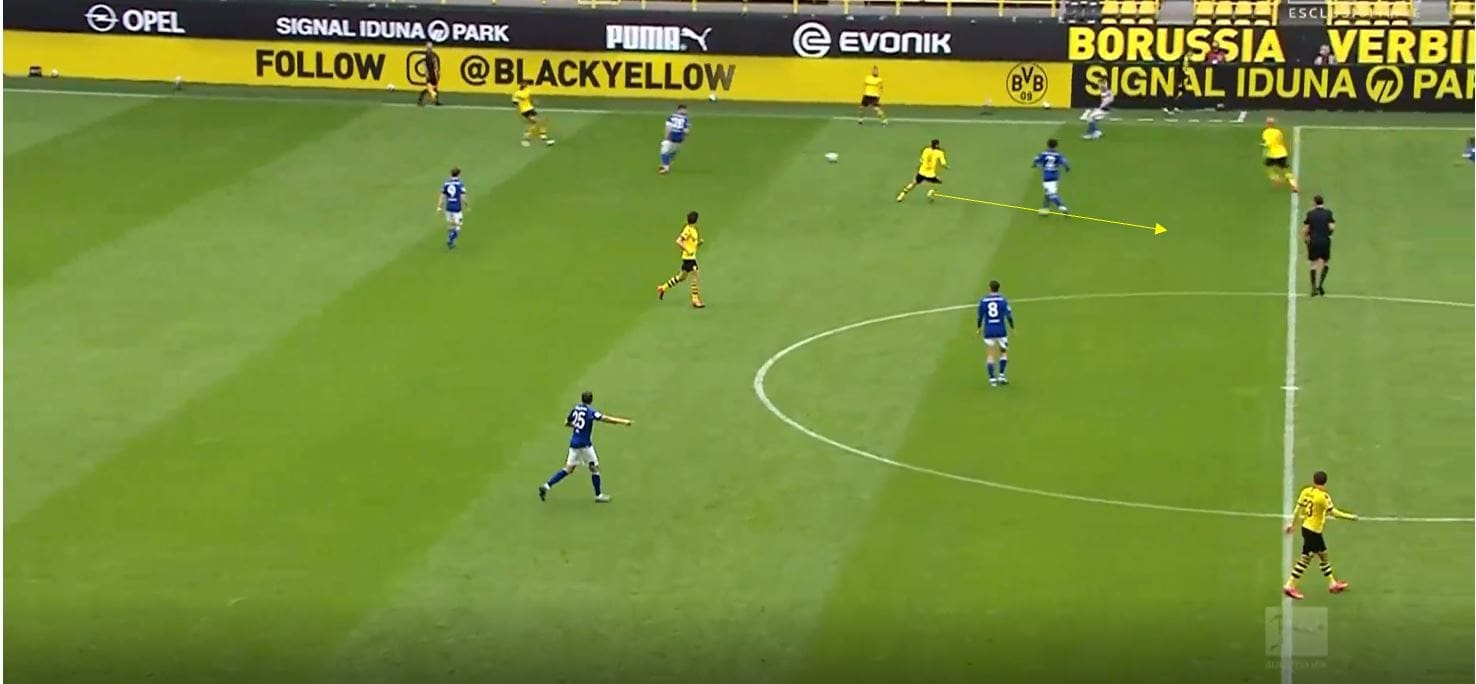
This example above shows Dortmund looking to overload this half-space, something which they did often and with success as we can see in these next examples.
This example combines rotations and decoy movements to use the half-space. As usual, Brandt occupies a centre back, this time looking to make a run in behind. This movement is in fact a decoy movement, which creates space in front of this centre back.
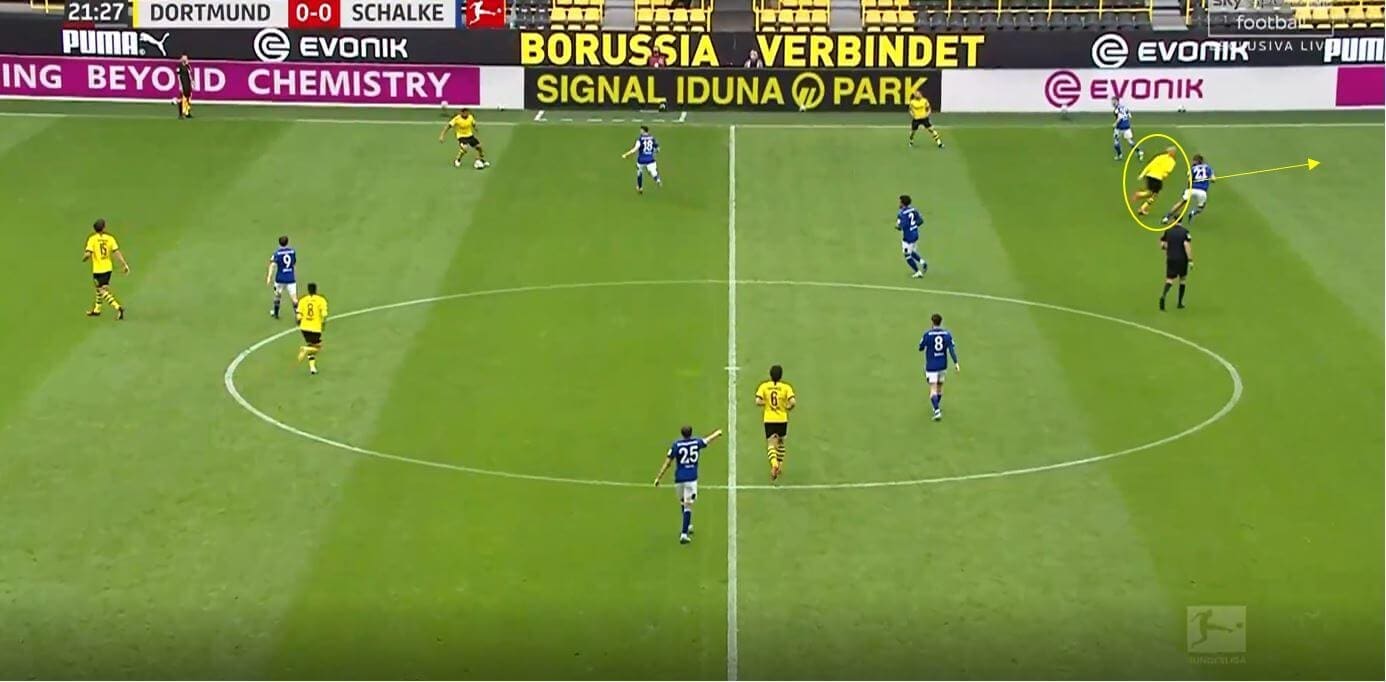
We can then see the fluid positioning of Dortmund’s front three, with Hazard moving across to occupy the half-space, where he is not pressed due to Brandt pinning the centre back with his forward run. Both Brandt and Haaland are then in higher positions and can immediately run at Schalke’s back line.
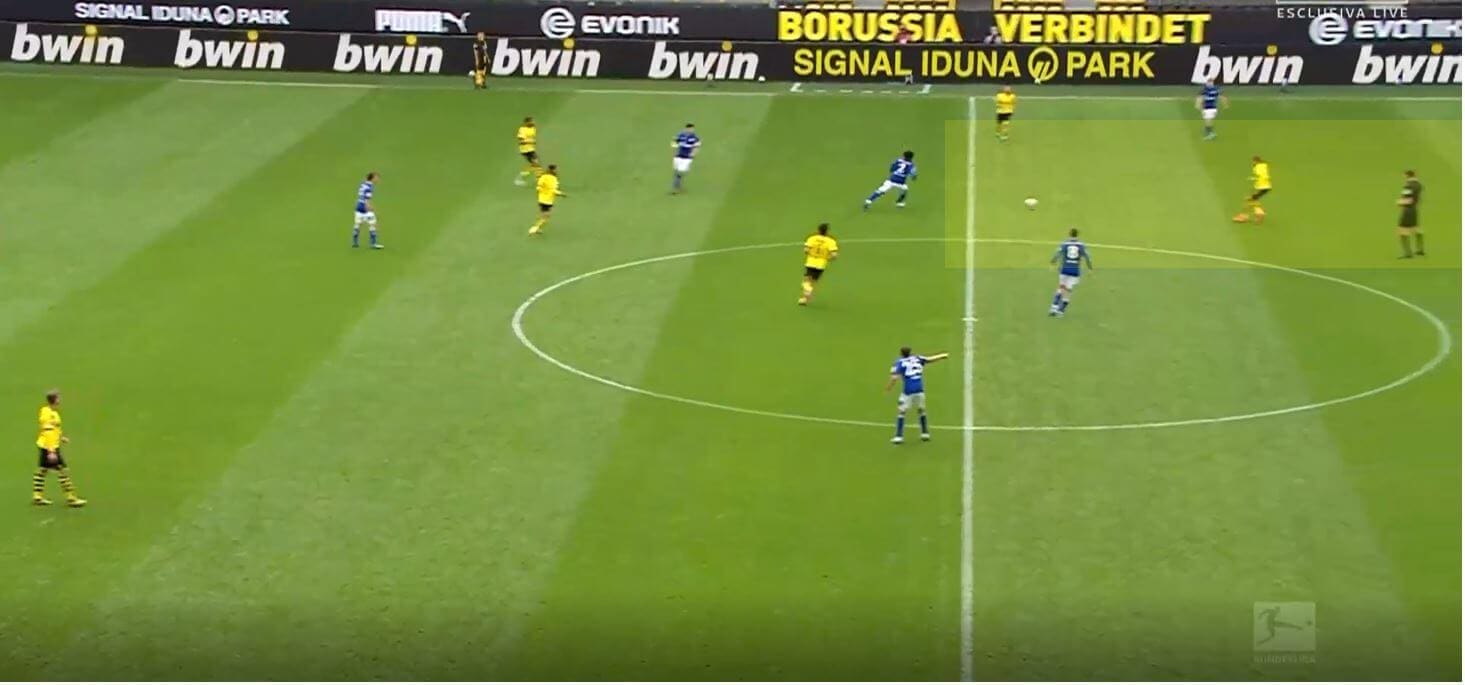
Here Dortmund place two players around the centre back, creating a decisional problem for the centre back (Matija Nastasić) as they can’t cover both players. Dortmund can then pick out the pass to the full-back and then play inside and inside again, with Schalke not able to get across to mark this player. The fact these two players are Hazard and Raphaël Guerreiro showcases how fluid Dortmund were at times.
This same concept created their first goal, where Brandt occupies the half-space and is pressed by the centre back, while Hazard remains close and runs into the space behind the centre back. Brandt flicks the ball along, and Hazard is free to deliver a cross which Haaland pokes in excellently. Schalke’s spacing along their back line here is questionable, as is Suat Serdar’s positioning, but again here I think he is manipulated by the positioning of his opposite central midfielder and doesn’t want to concede space.
Schalke’s switch to a diamond
At the beginning of the second half, Schalke switched to their 4-diamond-2, and found slightly more success in terms of pressing, however with them 3-0 down in the 47th minute it is difficult to compare and say they should have played like this from the start. We can see this pressing shape below, where Schalke now could occupy the central midfielders at times, but as a result, left the wing-backs open.
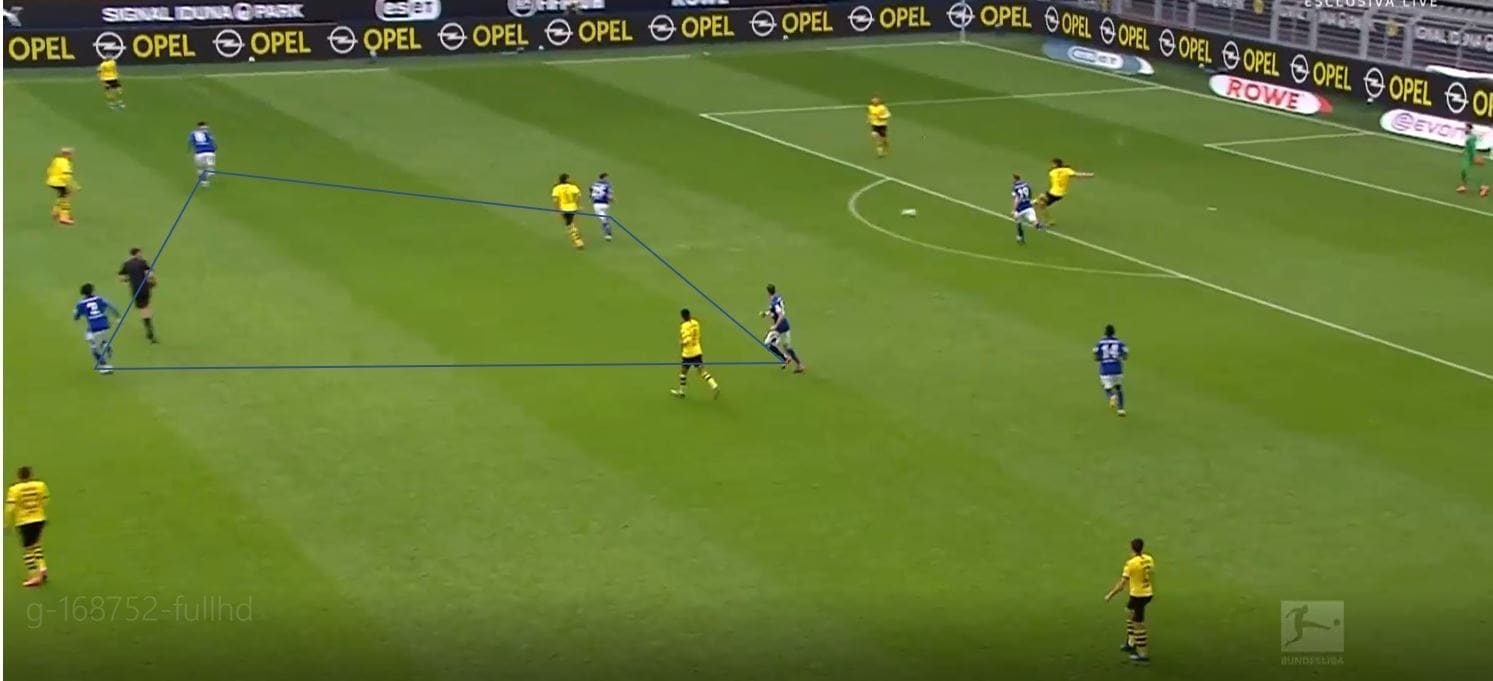
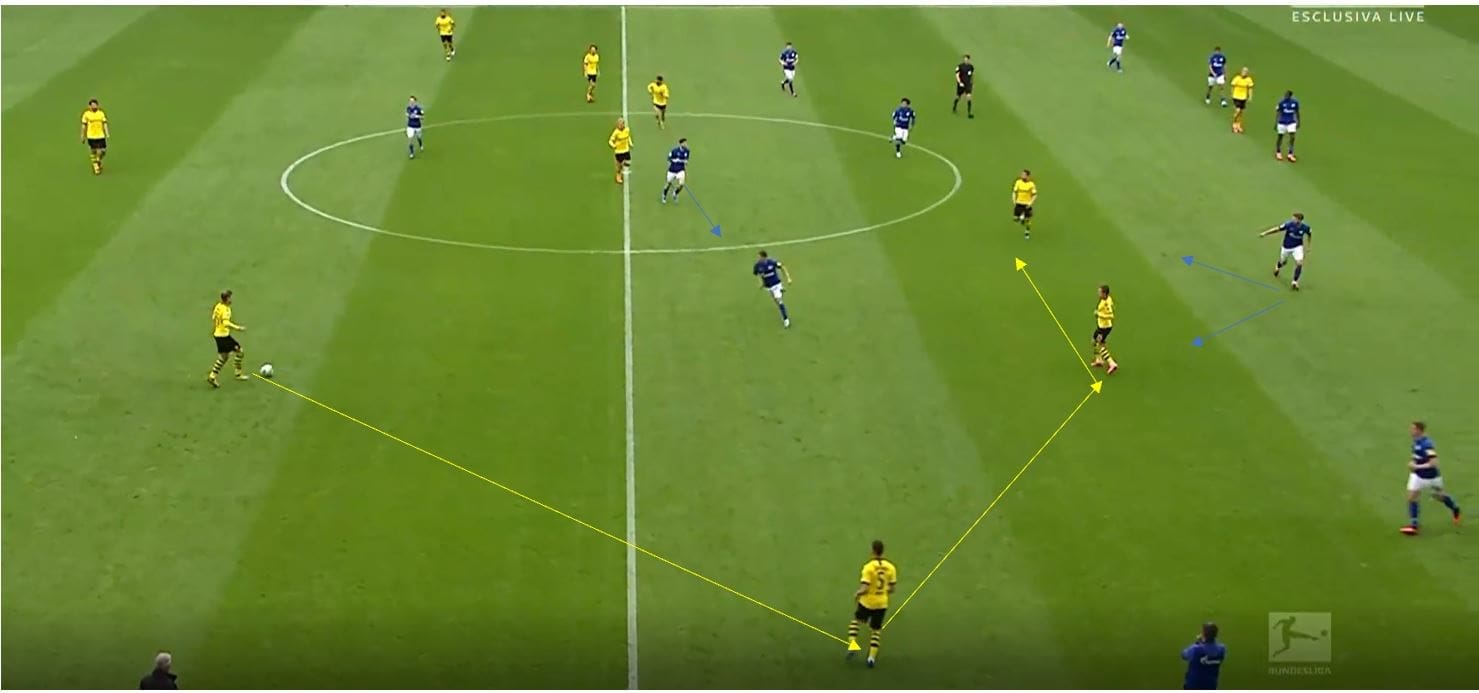
Consequently, it would often fall on the full-back to press the wing-back, and if Dortmund circulated the ball quickly, they could stretch Schalke’s front two and allow a centre back time on the ball, as they do here. The central midfielder then looked to cut off the lane to the half-space, with the six also available to press this area if needed. This isn’t an easy lane to cut off and space is left in behind for the Dortmund players to attack if possible, and it is unclear if Schalke would have been able to sustain this and execute it effectively for any sustained period of time with the scores close. Furthermore if the wide centre back drives forward and takes more risks in possession, they will engage the wide eight, and therefore improve their ability to progress using the half-space. But with Dortmund 3-0 up, they sensibly became less creative.
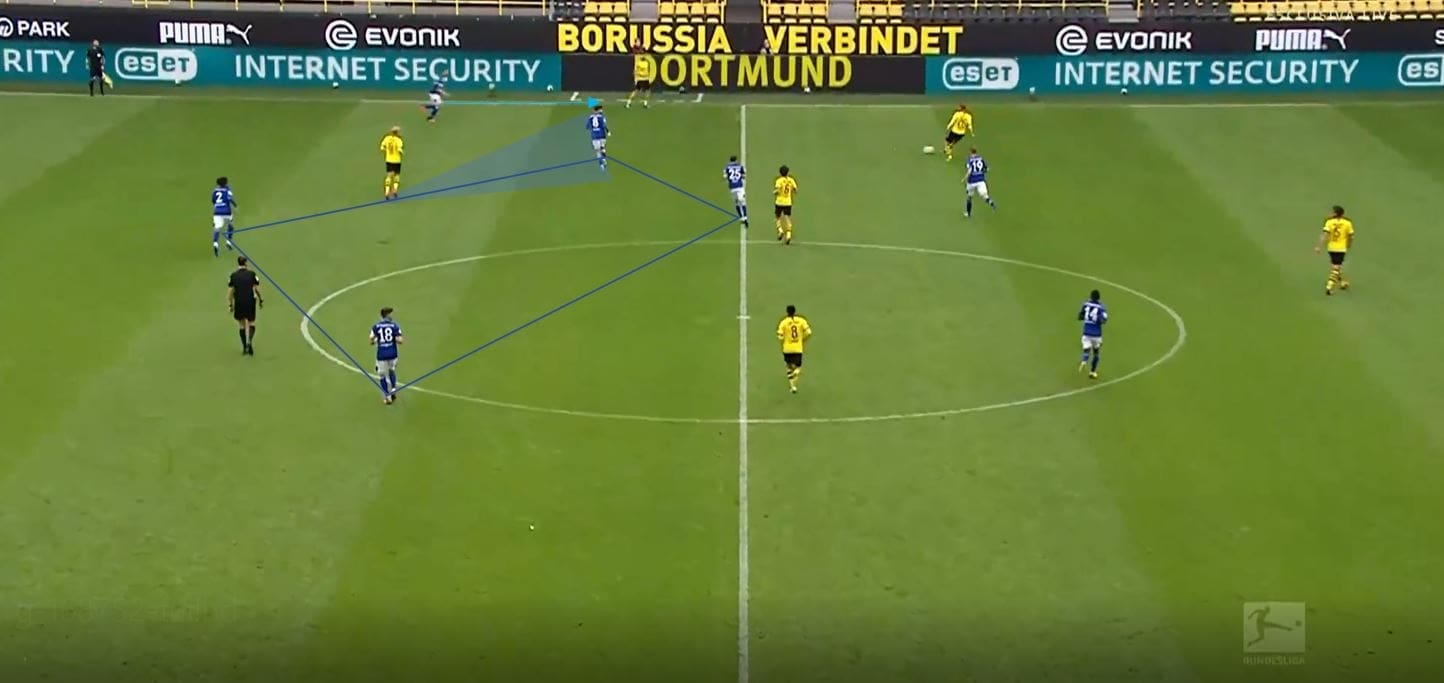
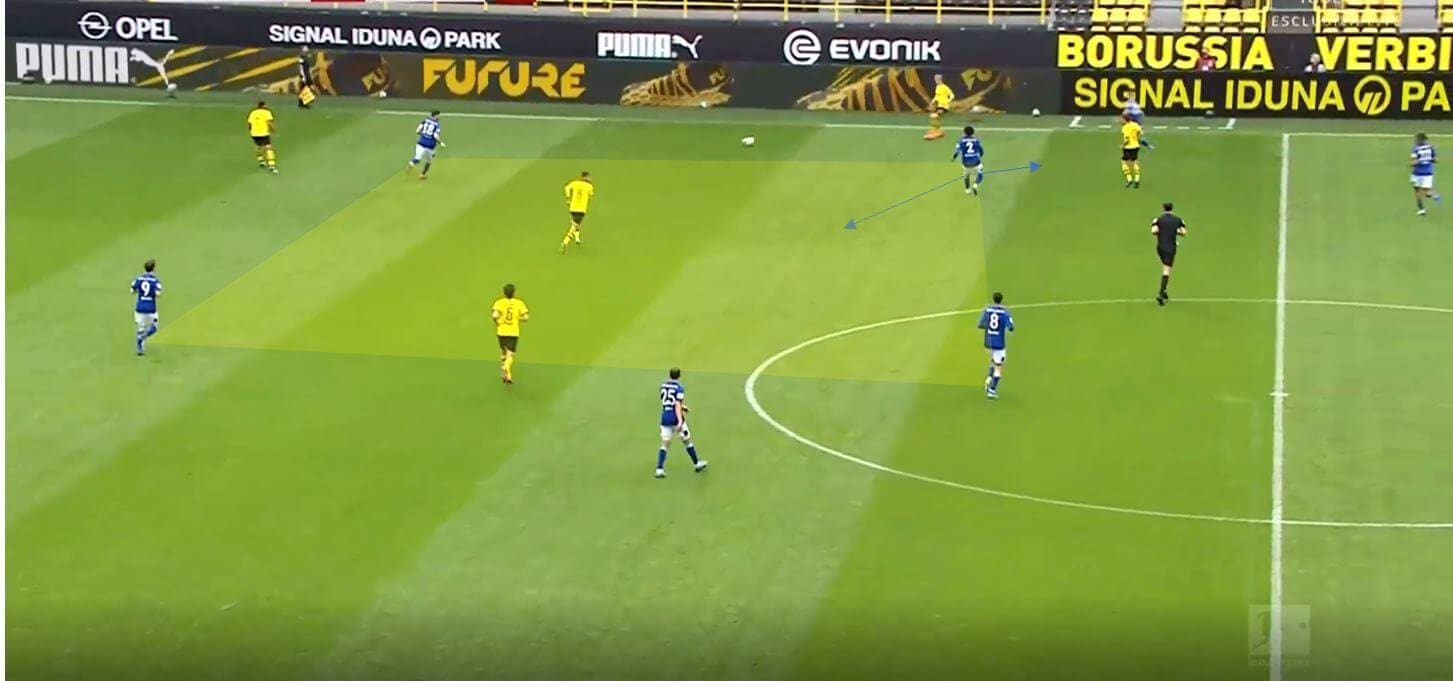
We can see some of the difficulties which came about at times here, with the pressing distance between wing-back and full-back highlighted, and with Dahoud dropping deeper while the ten is occupied, he engages Suat Serdar and creates a positional problem for him, with the wing and inside both needing protecting.
Schalke’s build-up
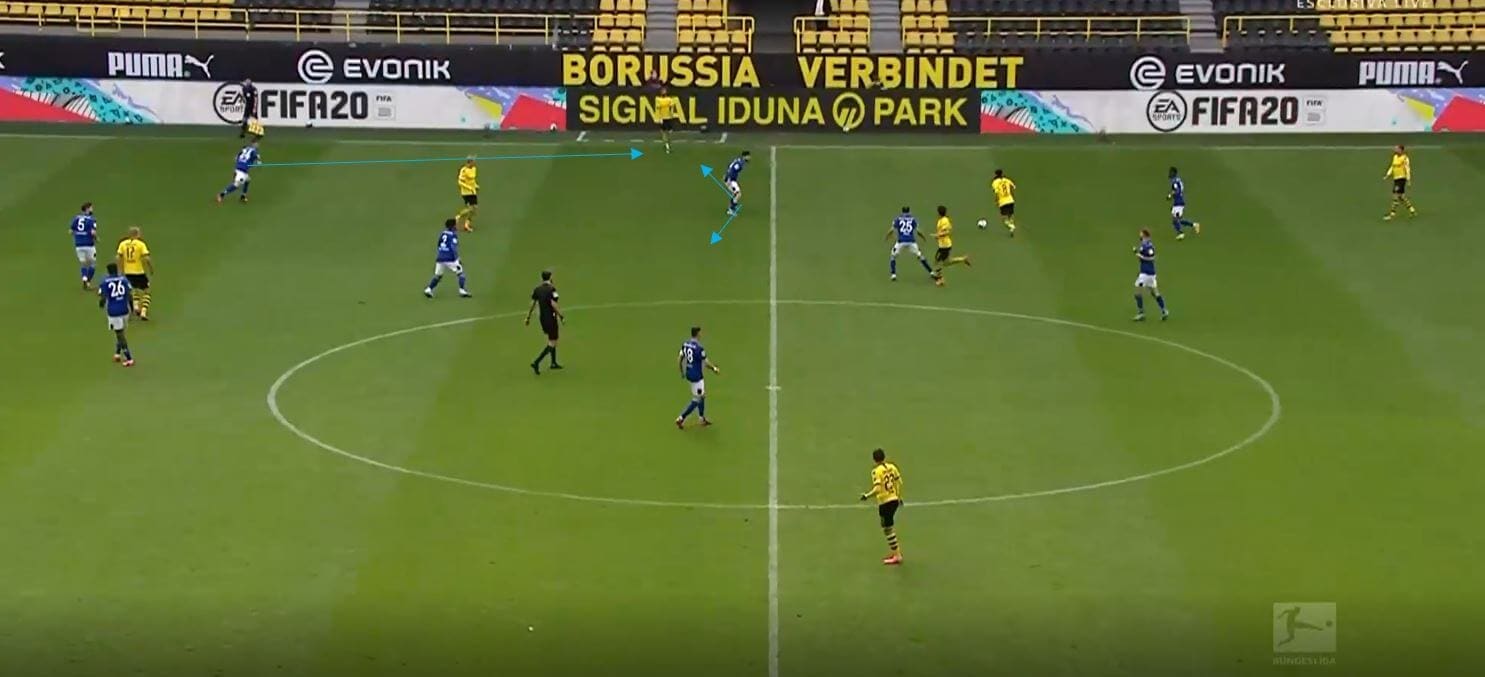
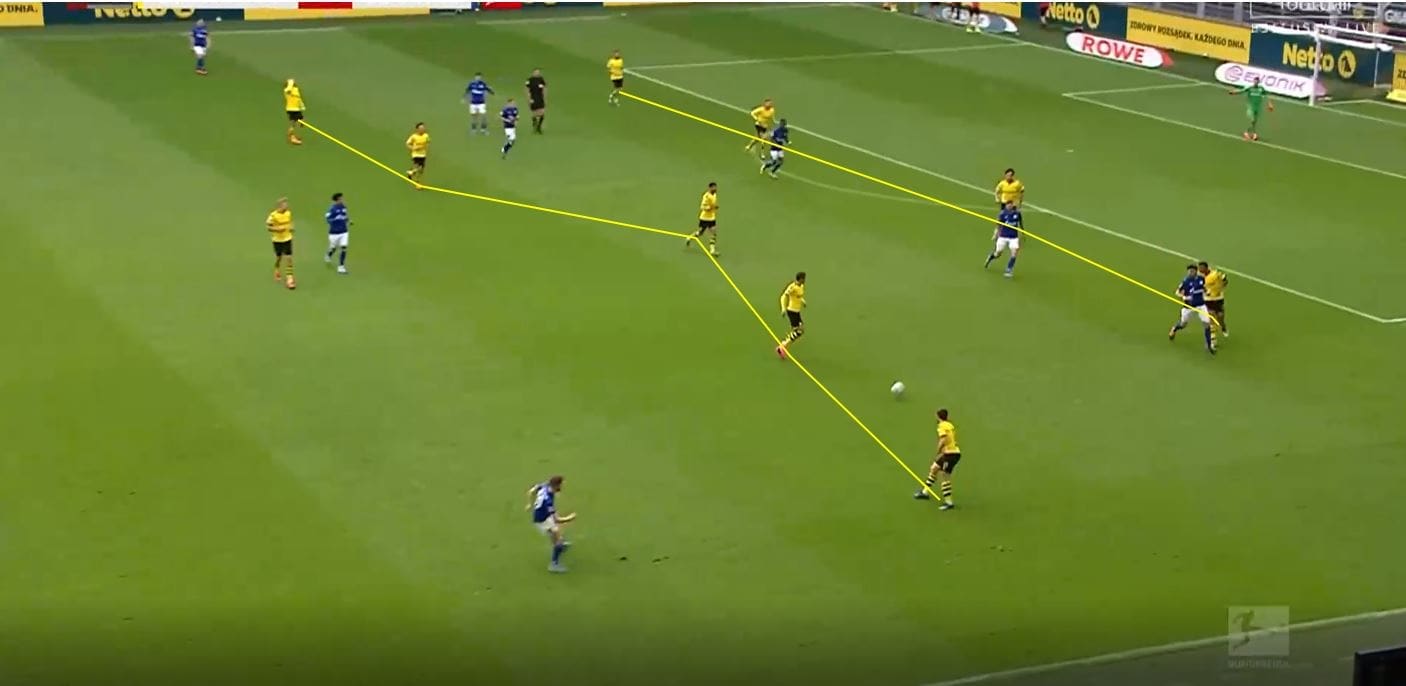
Dortmund generally didn’t press high throughout the game, and certainly in the second half looked to sit deep in their own 5-4-1. Schalke’s build-up however isn’t comparable with Dortmund’s as we can see below in an example from the first half. Schalke built with one central midfielder making them much easier to press, and didn’t drop players back often to help.
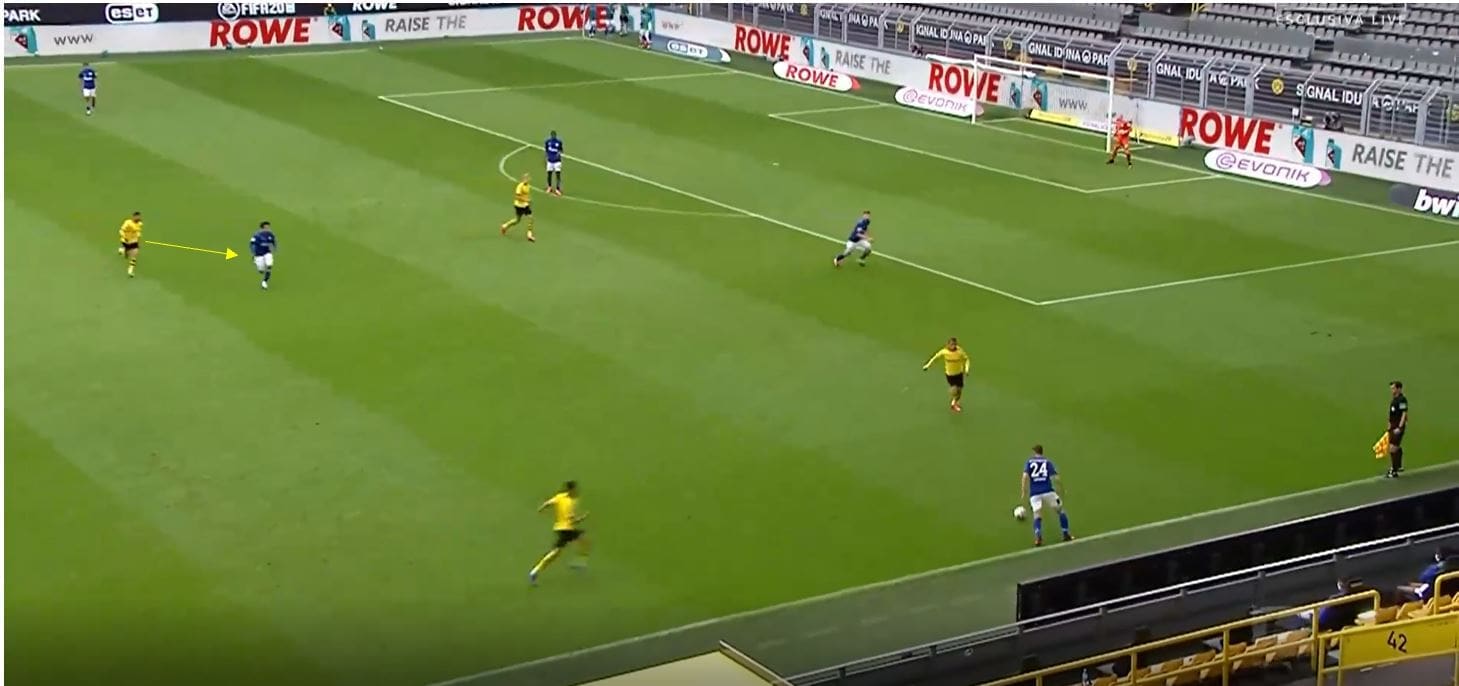
When Dortmund sat deeper in the second half, although Schalke could occasionally create situations where they could penetrate, there was no intelligent movement once they got in the right areas. Here, Dortmund push to a 4-5-1 with the wing-back moving higher to press, and a passing lane to Guido Bursgtaller is open. However what options does he have when he receives? No overload is created and no movement is made from players around him to support.
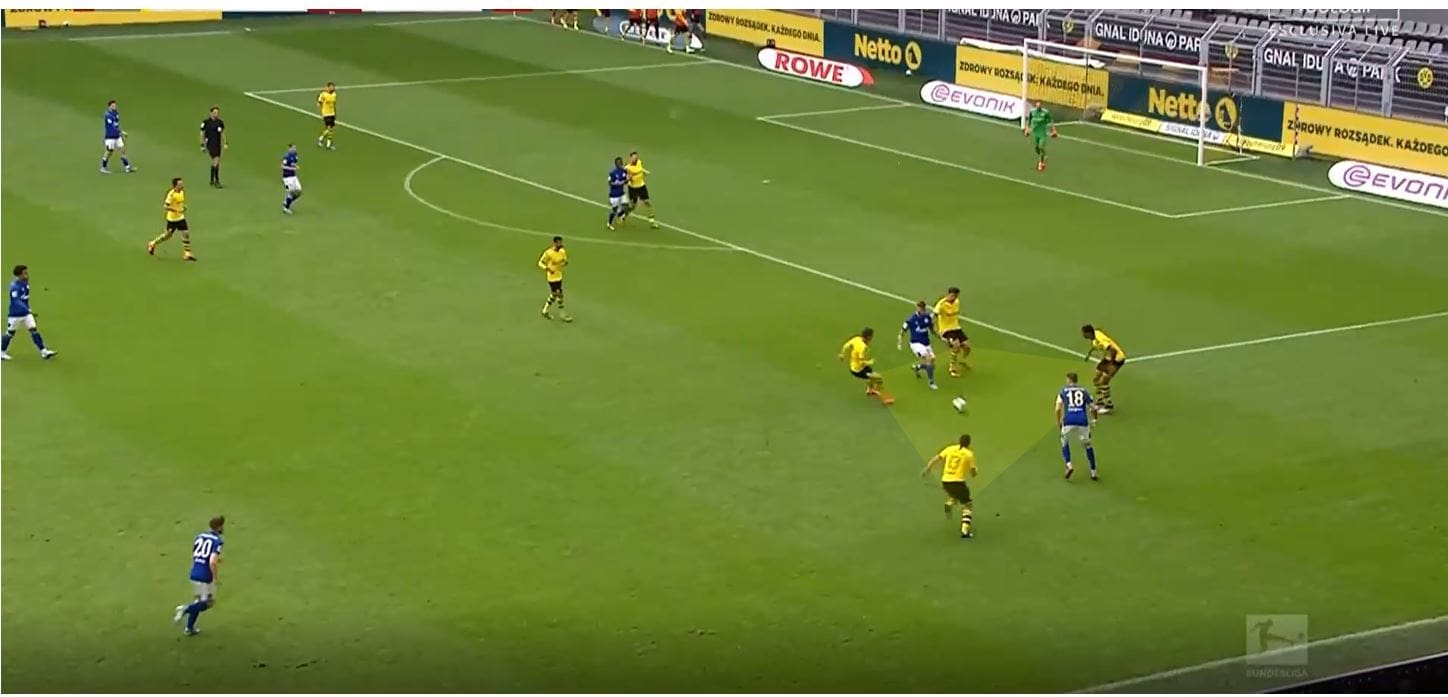
Dortmund generally did a good job at closing space if the ball was played through, as we can see below where they quickly constrict the space Schalke look to play in, where again they have limited options to actually cause Dortmund damage.
Conclusion
Dortmund outclassed Schalke in the first half, generating 1.05 xG and limiting Schalke to just 0.17. Schalke’s press was uncoordinated and poorly executed, and was relatively simple to overcome, and as this analysis shows Dortmund certainly had players capable of performing or creating these solutions to the press. Both teams picked up where they left off, and although it is less to do with form and more to do with both personnel and tactics, both sides certainly look as though they will have contrasting ends to this season.
You are going to love what Total Football Analysis are bringing you this weekend.
Total Football Analysis will be bringing you live match commentary and analysis of Union Berlin vs Bayern Munich, kicking off at 17:00 UK.



Comments