The 23rd round of this Bundesliga season took us to the Borussia-Park for an interesting encounter between Borussia Mönchengladbach and Hoffenheim. Borussia Mönchengladbach won their last game against Fortuna Düsseldorf, while Hoffenheim lost at home against Wolfsburg. Despite that, Borussia Mönchengladbach had the better chances as the game ended in a draw, especially as Alassane Pléa had the chance to give Borussia Mönchengladbach the win. However, his penalty was stopped by Oliver Baumann.
In this tactical analysis, we will look at the defensive tactics used by both Borussia Mönchengladbach and Hoffenheim. Furthermore, the article includes an analysis of why Gladbach mainly attacked the flanks during the first half. Also, we take a closer look at Hoffenheim’s build-up play. Lastly, we analyse Gladbach’s counter opportunities.
Lineups
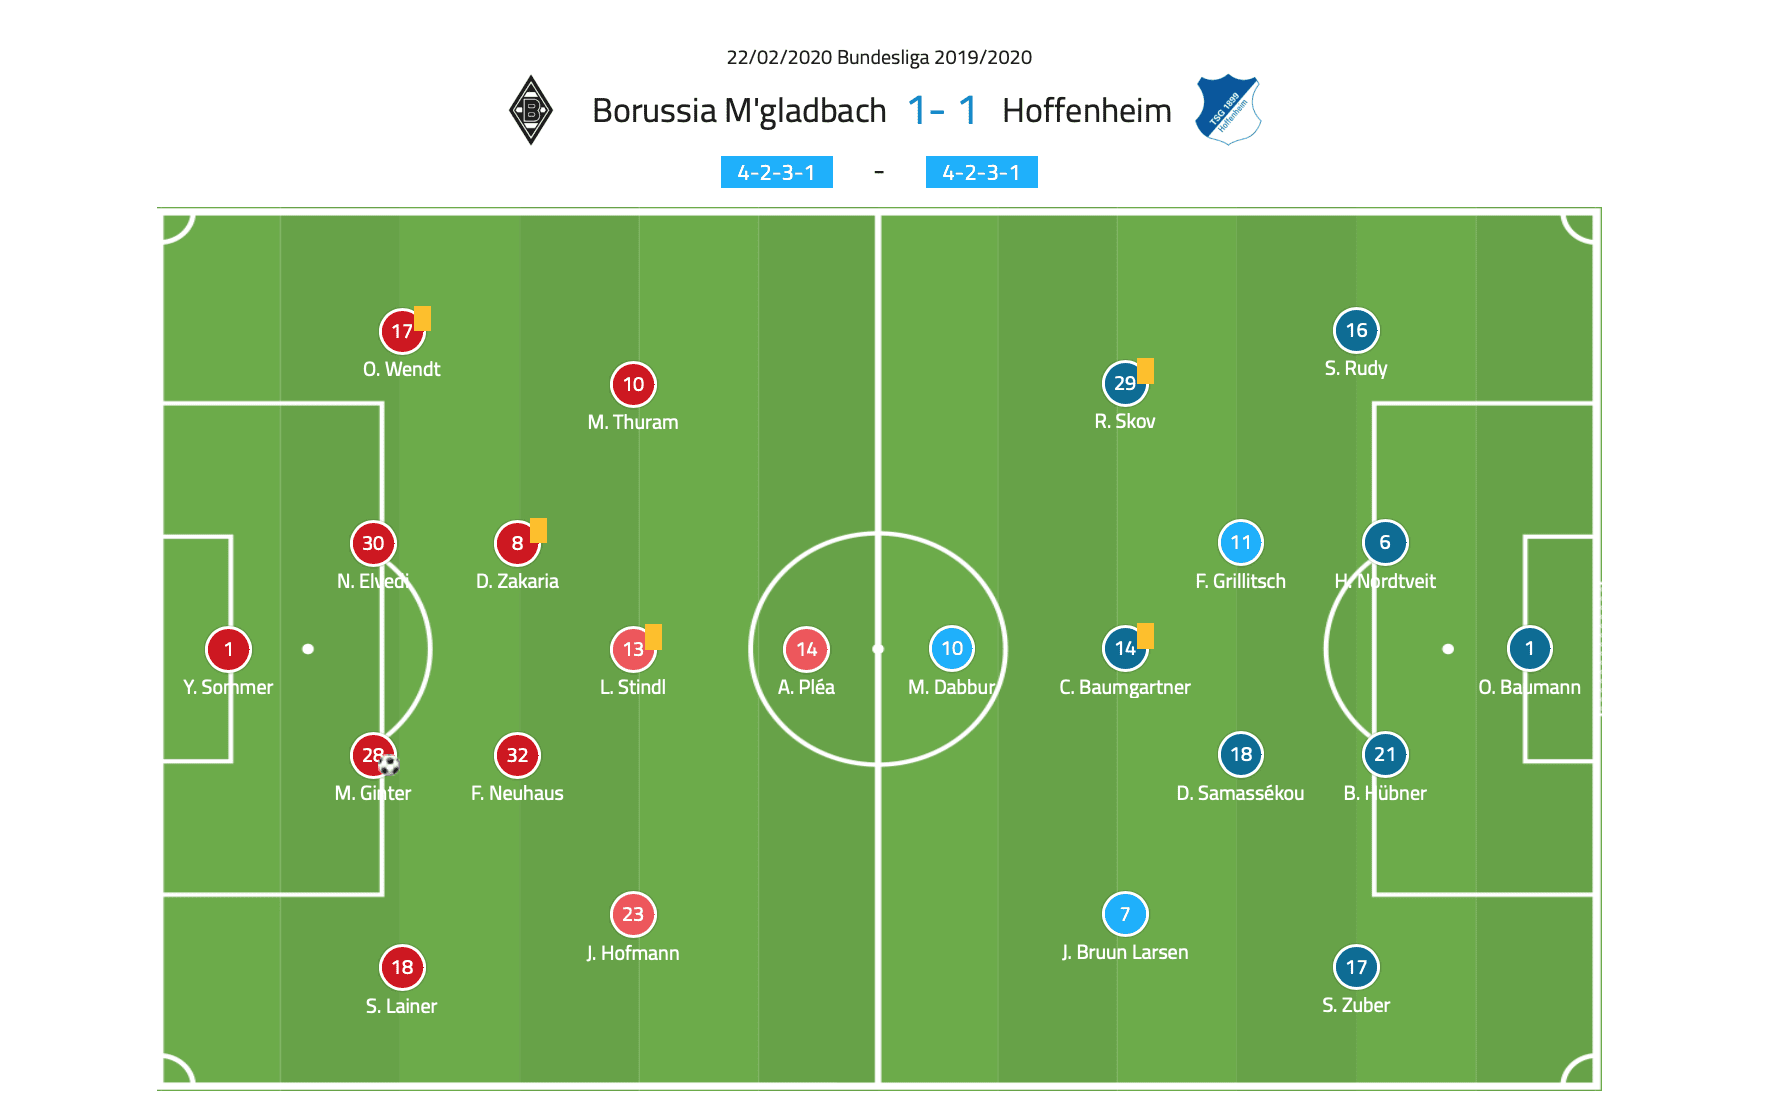
Marco Rose decided to change his formation for the game against Hoffenheim. The head coach had used a 3-4-2-1 formation in the last game against Fortuna Düsseldorf but this time around, Gladbach started in a 4-2-3-1 formation. As we have seen plenty of times this season, Rose decided to adjust his formation based on the opponent they are playing.
Alfred Schreuder also decided to change his formation for this game. Hoffenheim used a 3-1-4-2 formation in their last game against Wolfsburg but for this game, the head coach switched back to his preferred four-man defence.
Mönchengladbach’s different ways of defending
As proven many times before, formations aren’t fixed set-ups. In fact, formations are fluid. They change constantly, based on the things that happen on the pitch and the place where they happen. Borussia Mönchengladbach showed this during the game against Hoffenheim as Rose’s team constantly switched between different schemes during their defensive play. Let’s take a closer look at how Mönchengladbach did this.
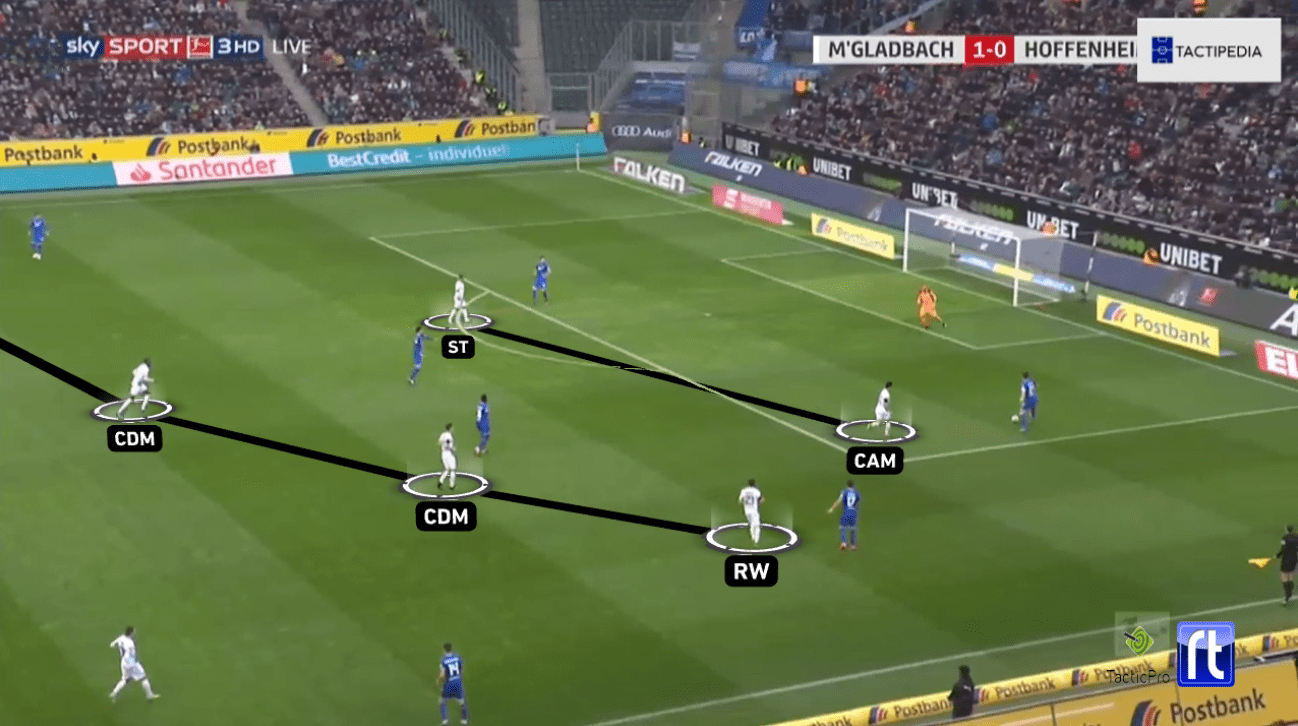
Mönchengladbach wanted to press immediately after the first ball was played from a goal kick. They used two ways to do this: in the first method, Gladbach lined-up in a 4-2-3-1 formation. After the first ball was played, the striker started to press Hoffenheim’s centre back. The team then moved to the side of the ball and tried to create a numerical superiority. In the second method, Gladbach positioned themselves in a 4-4-2 formation. On those occasions, Mönchengladbach’s attacking midfielder Lars Stindl positioned himself besides Pléa. In this way, Gladbach could easily press both centre-backs.
The analysis beneath is an example of the second method. Hoffenheim had a goal kick after which the ball was played to their left centre-back. Stindl started to press the left centre-back after the ball was played while at the same time, the two central defensive midfielders moved close towards the two strikers. They did this to prevent Hoffenheim from using their pivots to play through Gladbach’s press. At the other end of the box, Pléa positioned himself in front of the other centre-back.
Rose’s side also changed formations in open play when defending at the opposition’s half. At those moments it became clear that Borussia Mönchengladbach used a pressing trigger. The team started to press aggressively when Hoffenheim played the ball to one of their midfielders. They only stopped when they got the ball, the ball got out of play, or when Hoffenheim found the free player in Gladbach’s half.
In the picture below, we can see how Gladbach applied this pressing tactic. Benjamin Hübner had the ball and recognised that Florian Grillitsch was enjoying space. Therefore, the centre-back decided to play the ball to his central midfielder.
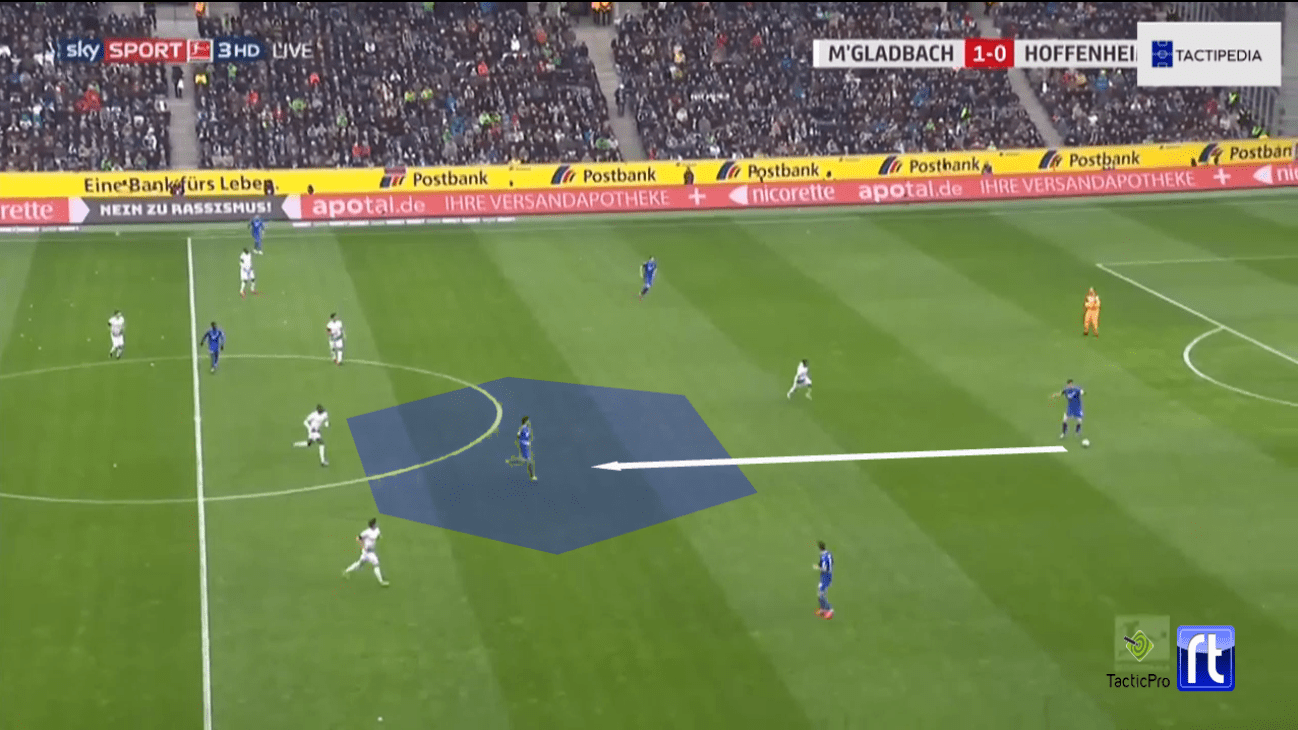
However, Mönchengladbach gave Grillitsch the space to create a pressing trap. The team immediately started pressing after Hübner passed the ball. In the picture beneath, we can see the situation just a few seconds later. The team forced Hoffenheim back, which resulted in a ball back to the keeper. The keeper kicked the ball long, after which Gladbach won the second ball and were in possession again.
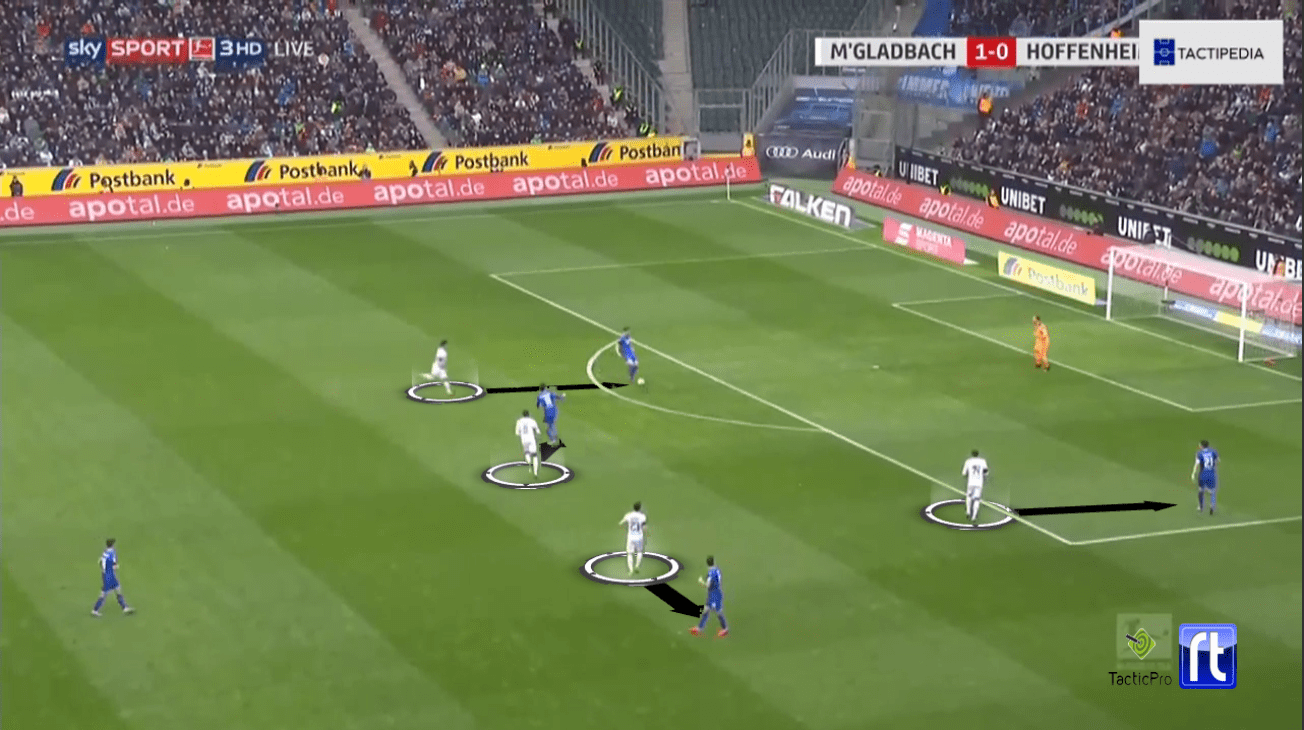
The two pictures above prove the fluidity of formations. In the first picture, the formation looks somewhat like 4-1-4-1, while it is hard to speak of any formation in the second picture. This shows us that the principles are the main thing in football. The formation is a good starting point, but this set-up can change due to the events on the pitch. This is exactly what happened when Gladbach defended.
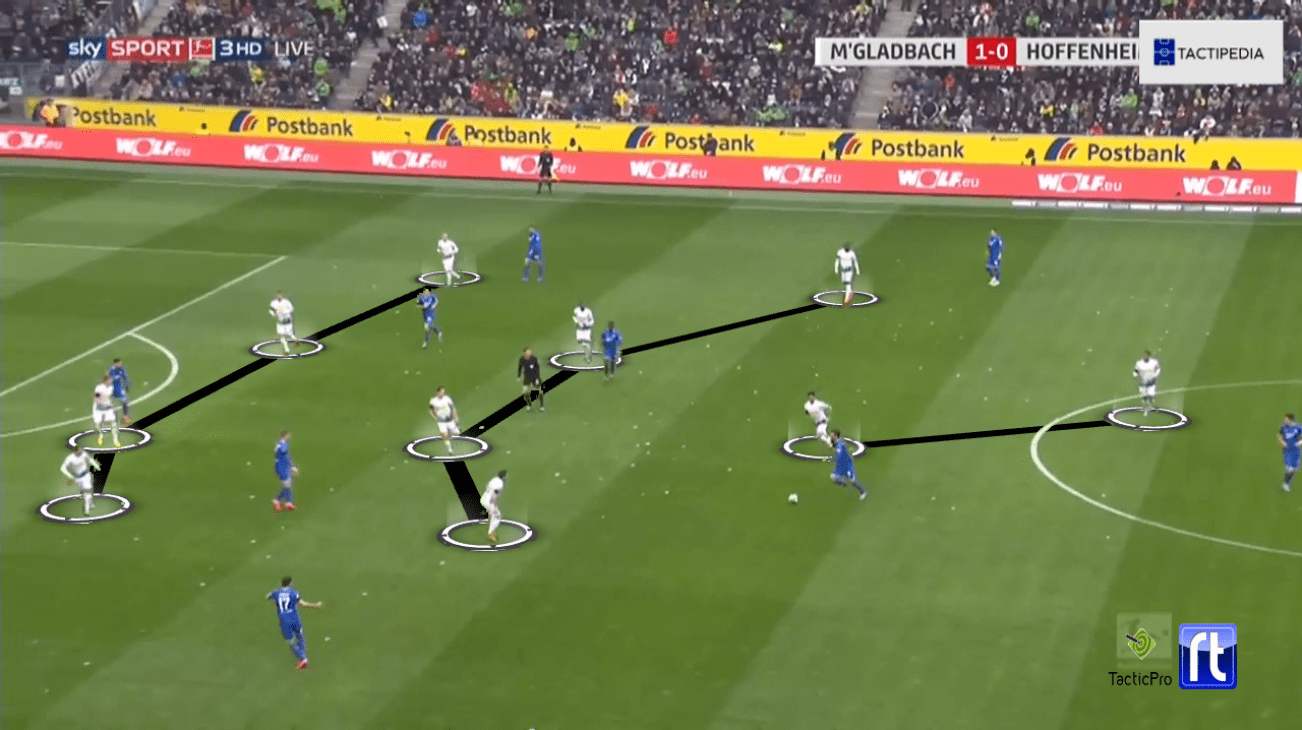
When forced back, Mönchengladbach used a 4-4-1-1 formation as a starting point. The analysis below shows that the two wingers dropped back to position themselves at the line of the two defensive midfielders. Pléa positioned himself around the midway line while attacking midfielder Stindl positioned himself just in front of the four midfielders.
Hoffenheim’s pressing tactics
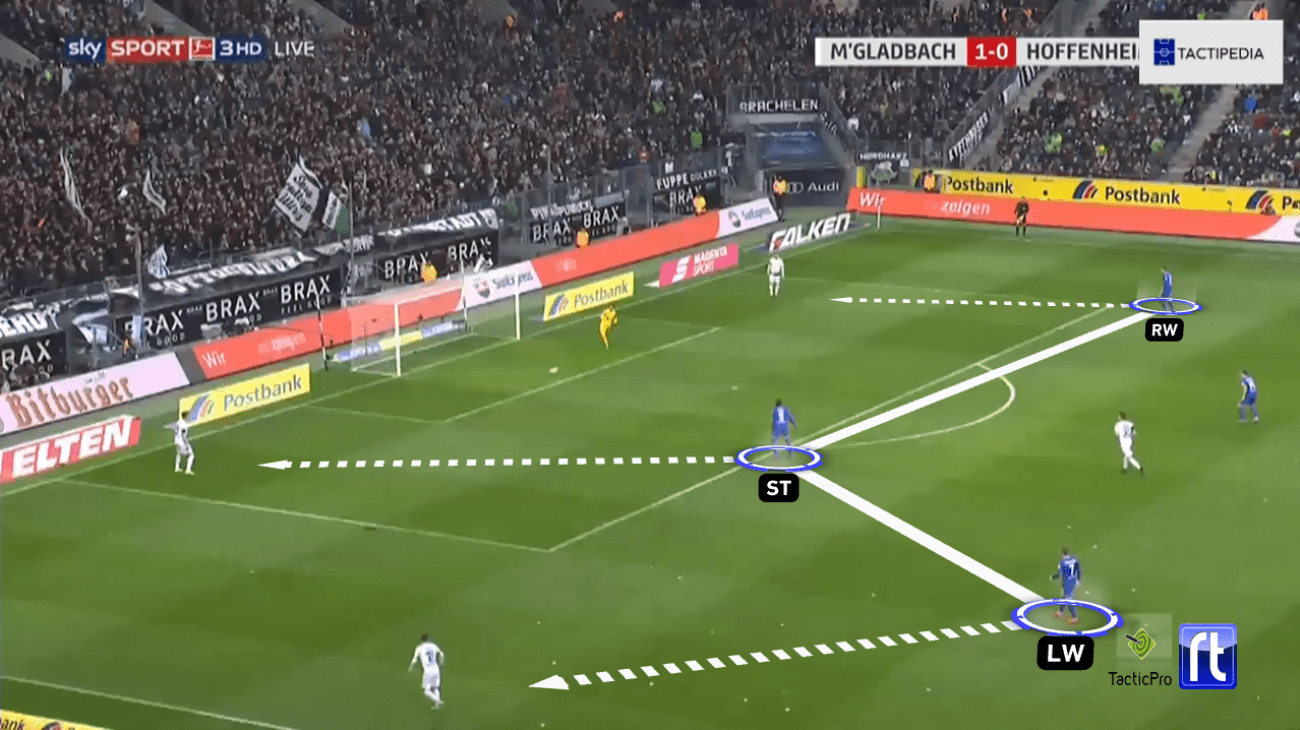
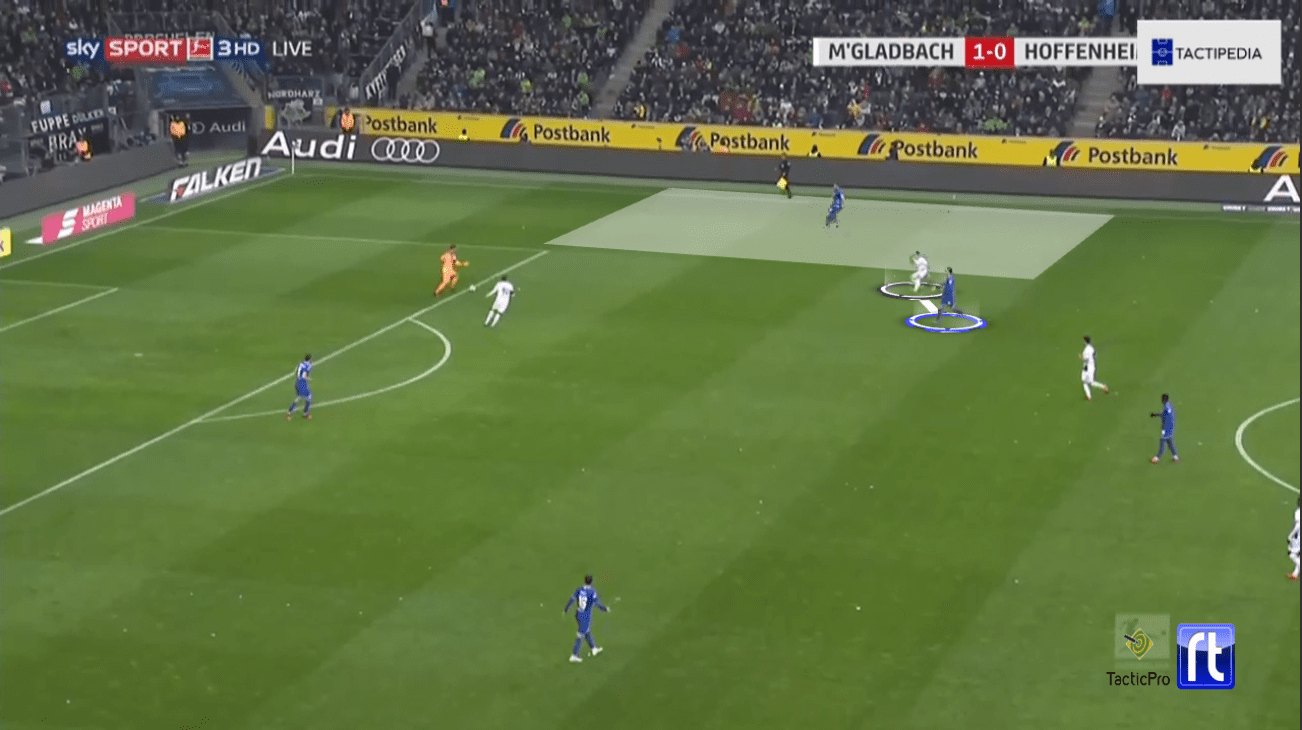
Hoffenheim also wanted to press the opposition early on. They especially pressed aggressively when Borussia Mönchengladbach had a goal kick and in those occasions, Hoffenheim forced the opponent to build up through one side. Schreuder’s team tried to achieve this by positioning one winger in front of one of the centre-backs. The other winger stayed close to Gladbach’s full-back, while the striker stayed in the centre of the pitch.
In the picture beneath, we can see how Hoffenheim applied these tactics. In this example, Hoffenheim positioned themselves in such a way, that Mönchengladbach was forced to build up through their right centre-back. Hoffenheim achieved this through positioning their right-winger Robert Skov in front of the left centre-back, while the striker Ihlas Bebou positioned himself in the centre. This positioning attracted Gladbach to build up through their right centre-back. Due to the positioning, Hoffenheim already were moved to the side of the ball, which made it hard for Rose his side to play through the press. As a result, Gladbach played a long ball.
In the next analysis, we can see that Hoffenheim used the same pressing tactics in the second half. However, this time around, they forced Mönchengladbach to play the ball out through their left centre-back. Thus, Hoffenheim sometimes changed the centre-back they wanted to press.
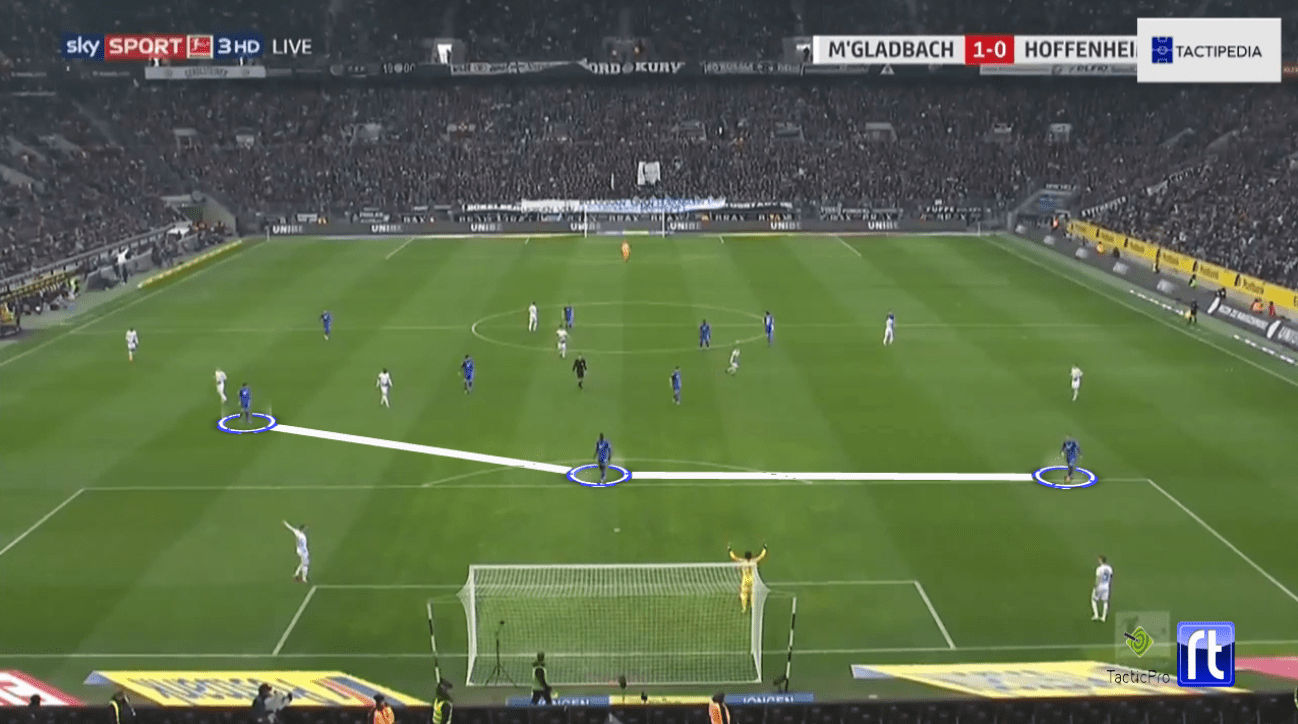
When Borussia Mönchengladbach played through this press, Hoffenheim dropped back and positioned themselves around the midway line. From there, they forced the opposition to play through the flanks by overloading the centre of the pitch.
Mönchengladbach forced to play through the flanks
During the first half, Hoffenheim successfully forced Mönchengladbach to play through the flanks. As mentioned in the section above, Hoffenheim did this by creating a numerical superiority in the centre of the pitch. These tactics made it hard for Gladbach to play through the centre of the pitch.
The picture beneath shows how Hoffenheim achieved this. As we see in the picture, Mönchengladbach were attacking at Hoffenheim’s half. On those occasions, Hoffenheim dropped back and positioned themselves in the centre of the pitch. From that position, Hoffenheim minimised the space for the opponent to attack.
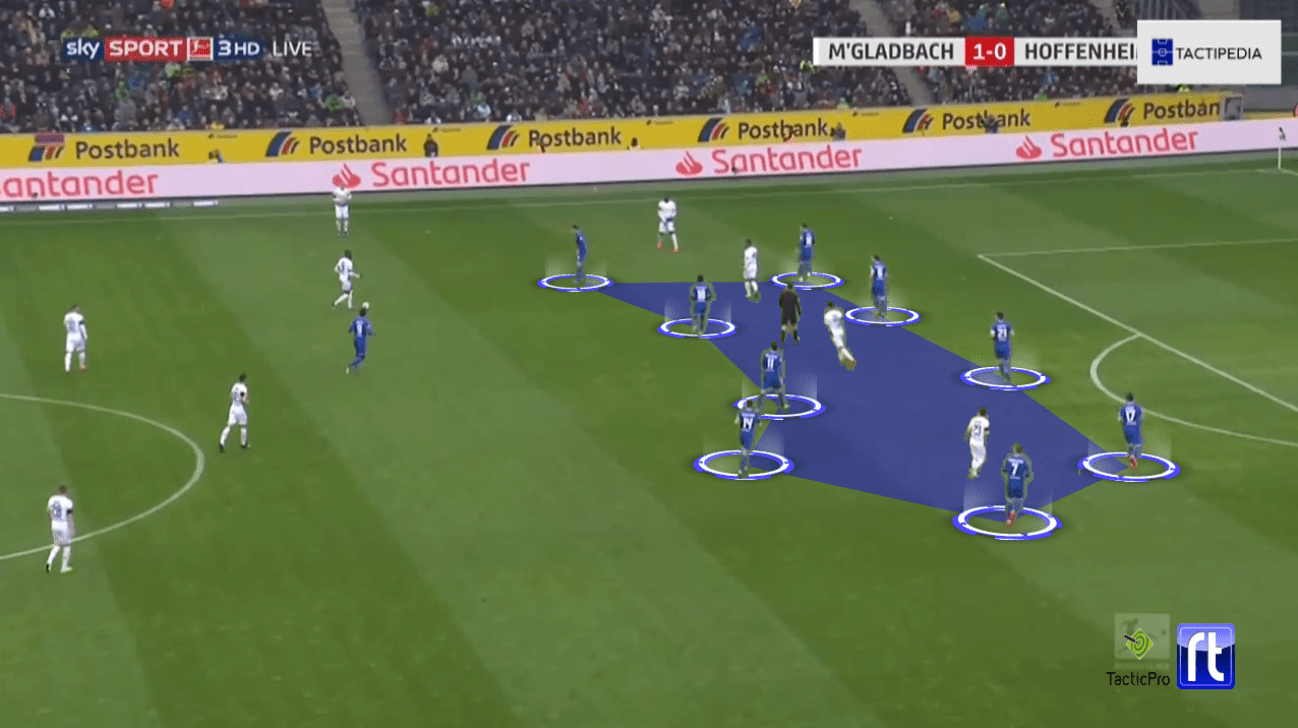
As a result, Borussia Mönchengladbach were mainly attacking the flanks. The team was constantly switching sides and searching for an opening on the flanks. However, the team struggled to create big chances from open play – the main danger came when the side had a corner.
Playing through Mönchengladbach’s press
Despite Mönchengladbach’s aggressive style of pressing, Hoffenheim often tried to play out from the back. The support of the two central midfielders was crucial to build-up successfully. They had to lure the opposition away to give the centre-backs more time and space, while at the same time open up passing lanes to the more attacking players.
In the example below, we can see that Hoffenheim’s goalkeeper had the ball. Pléa decided to press the goalkeeper and was supported by his right-winger Jonas Hofmann. Hoffenheim’s central midfielder Grillitsch recognised that Hofmann wanted to press the left centre-back. Therefore, the midfielder dropped back and offered support to his goalkeeper. Because of that, Hofmann was lured to the centre of the pitch as the winger wanted to prevent Hoffenheim from building up through the centre of the pitch. As a result, the goalkeeper played the ball to the free centre-back and Hofmann then started to press the centre-back after that pass, which resulted in a lot of space for Grillitsch. Hoffenheim found Grillitsch through their left-back, after which Hoffenheim could attack the opposition’s half.
The opposition’s half, however, was where Hoffenheim’s problems arose. They struggled to find the free players and as a result, struggled to create chances. Due to the lack of passing options, Schreuder’s team tried to play the ball in behind too quickly, which often resulted in a loss of possession.
Borussia Mönchengladbach’s counter opportunities
Especially in the second half, Mönchengladbach had a lot of opportunities to hit the opponent on the counter-attack. However, the team failed to make the right decisions in those moments. As a result, they gave Hoffenheim the chance to make recovery runs and stop the danger.
The analysis shows this problem: Gladbach recovered the ball on the opposition’s half, which allowed them to place a dangerous counter-attack. Because Hoffenheim were out of position, there was a lot of space in the centre of the pitch. Instead of playing the ball to the centre, the Gladbach player dribbled to the right flank. As a result, Hoffenheim got the chance to make recovery runs and stop Gladbach from attacking the centre of the pitch.
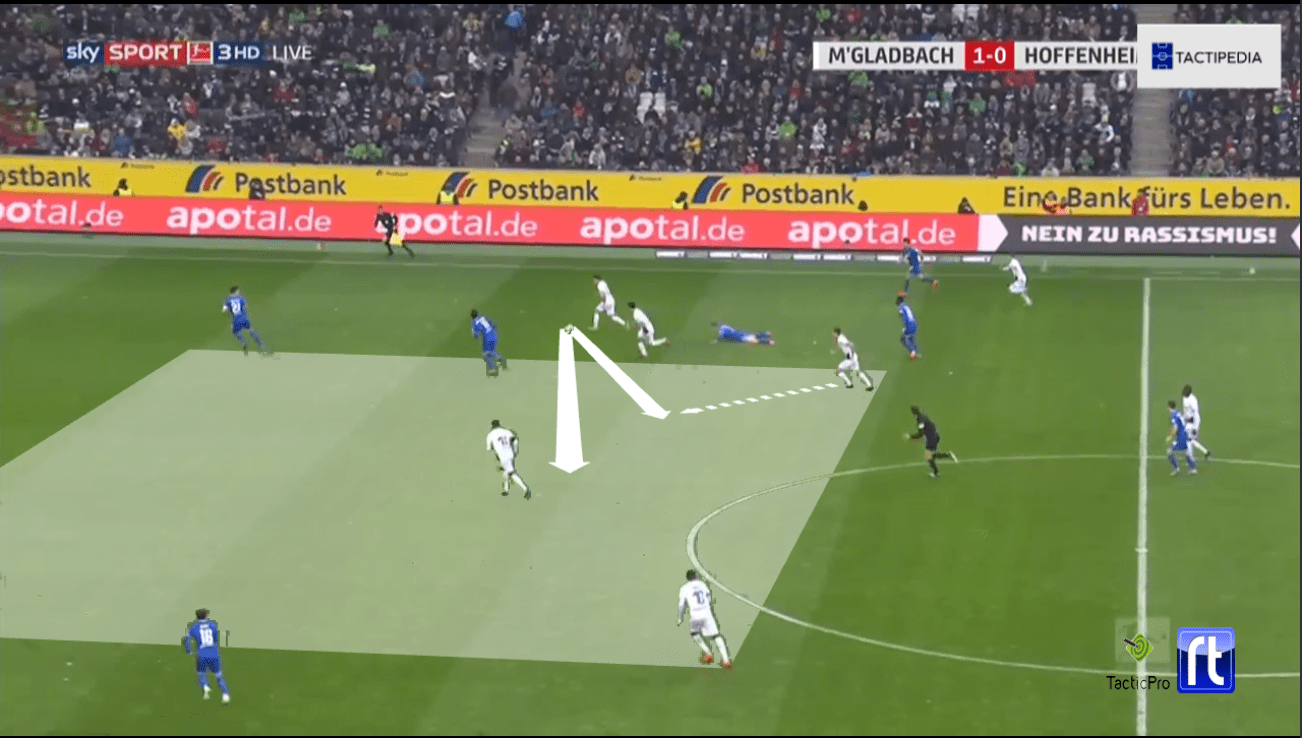
The next picture is another example: Denis Zakaria intercepted the ball, after which Gladbach could play on the break. Due to the loss of possession, Hoffenheim gave some space away at their left side. Instead of utilising this space and play a through ball towards Hofmann, Zakaria decided to play the ball to his left. As a result, Hoffenheim’s left-back got the chance to make a recovery run and close the space.
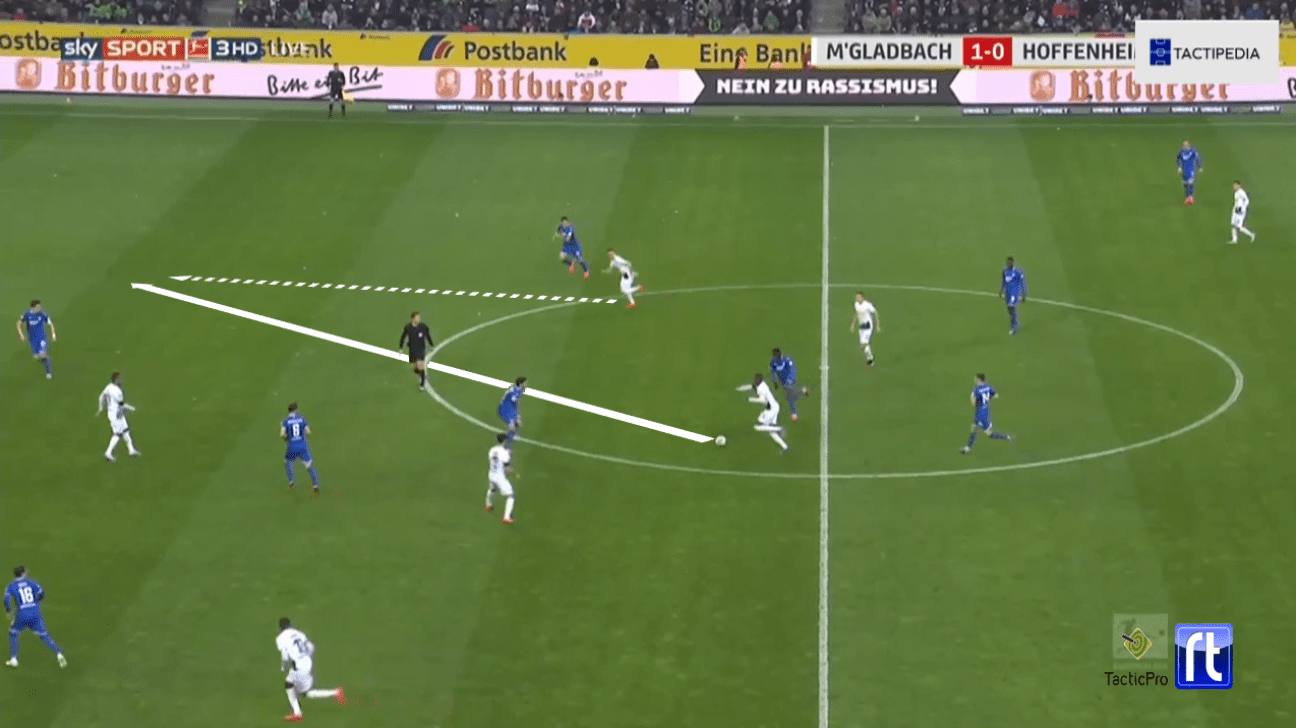
Sadly for Borussia Mönchengladbach, the one time they played well on the break, the goal was ruled out by the VAR due to a handball.
Conclusion
Borussia Mönchengladbach will be disappointed with the result – the team had the better chances and were unable to strengthen their lead. Even more frustrating is the fact that they could have hurt Hoffenheim more if they made the right decisions on the break. Due to the draw, the gap with Bayern increased to six points while it’s two with Dortmund – both with one game in hand for Gladbach.
Hoffenheim will be satisfied with the result. Again, Schreuder’s side can get a result against a top team in the Bundesliga. Especially since their defensive tactics on their half were very successful.


Comments