The away-match against Freiburg seemed somewhat like the last chance for Florian Kohfeldt’s Werder Bremen who are stuck in the relegation battle of the Bundesliga campaign 2019/20. Freiburg, on the other hand, are in a stable midfield position thanks to a great start into the season. One could, therefore, claim that Bremen simply needed the points more than Freiburg did, but the latter side will for sure not be satisfied with the 0-1 result.
In our tactical analysis, we are going to explain why Christian Streich’s Freiburg would have deserved to get more out of this game. Moreover, we take a closer look at Werder Bremen’s build-up and pressing tactics and how they enabled them to gain such important three points.
Lineups and formations
Streich decided to start into the game with a 4-4-2 system instead of his recently utilised 3-4-3 system. Attacker Lucas Höler benefitted from this change of formations and joined the starting eleven to form a striking duo together with former Bayern player Nils Petersen. Moreover, in Janik Haberer Streich lined up another central midfielder while Robin Koch, who lately played in this position, moved back into a centre-back position.
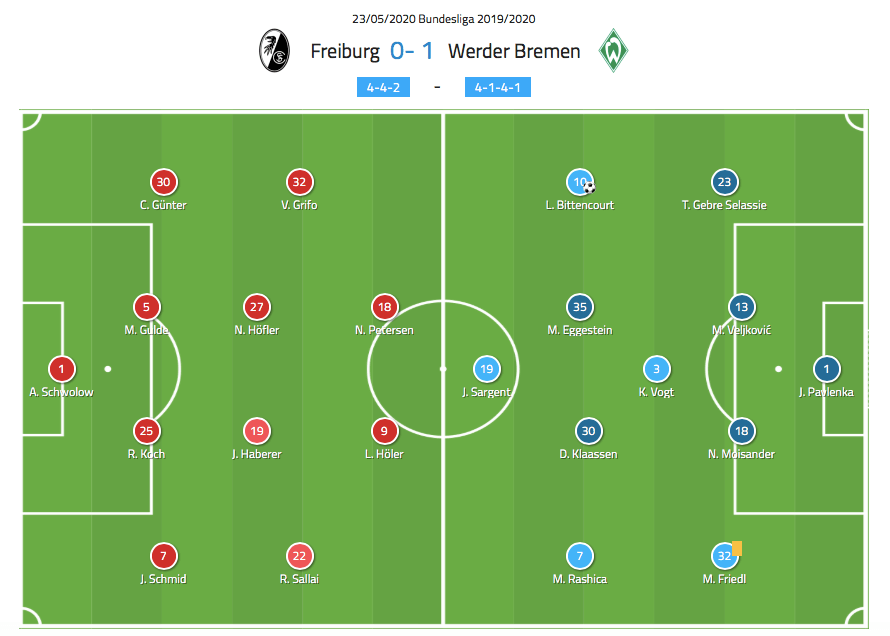
Kohfeldt, on the other hand, undertook two changes compared to the latest defeat against Bayer Leverkusen. He lined up the American striking talent Josh Sargent instead of Davie Selke and midfielder Davy Klaassen, who missed the last game due to his fifth yellow card, as a replacement for Philipp Bargfrede. In terms of the formation, Werder did not change much though, they still lined up in a 4-1-4-1 with Kevin Vogt in front of their back four. However, with Klaassen in midfield, Kohfeldt’s side regularly pushed forward into a 4-2-3-1 or 4-2-2 with the Dutch next to or behind attacker Sargent to press higher up the pitch.
Werder Bremen’s back three build-up
Whereas Werder Bremen’s build-up play was often nipped by Leverkusen in the bud in their latest match, against Freiburg’s press, Kohfeldt’s build-up strategy worked better.
In order to create numerical superiority in the first build-up line against Freiburg’s attacking duo, Bremen’s pivot Vogt dropped into the backline forming a back three. This both created a 3v2 and also opened up passing lanes for Bremen’s centre-backs to play into the half-spaces where Freiburg’s 4-4-2 shape seemed vulnerable at times.
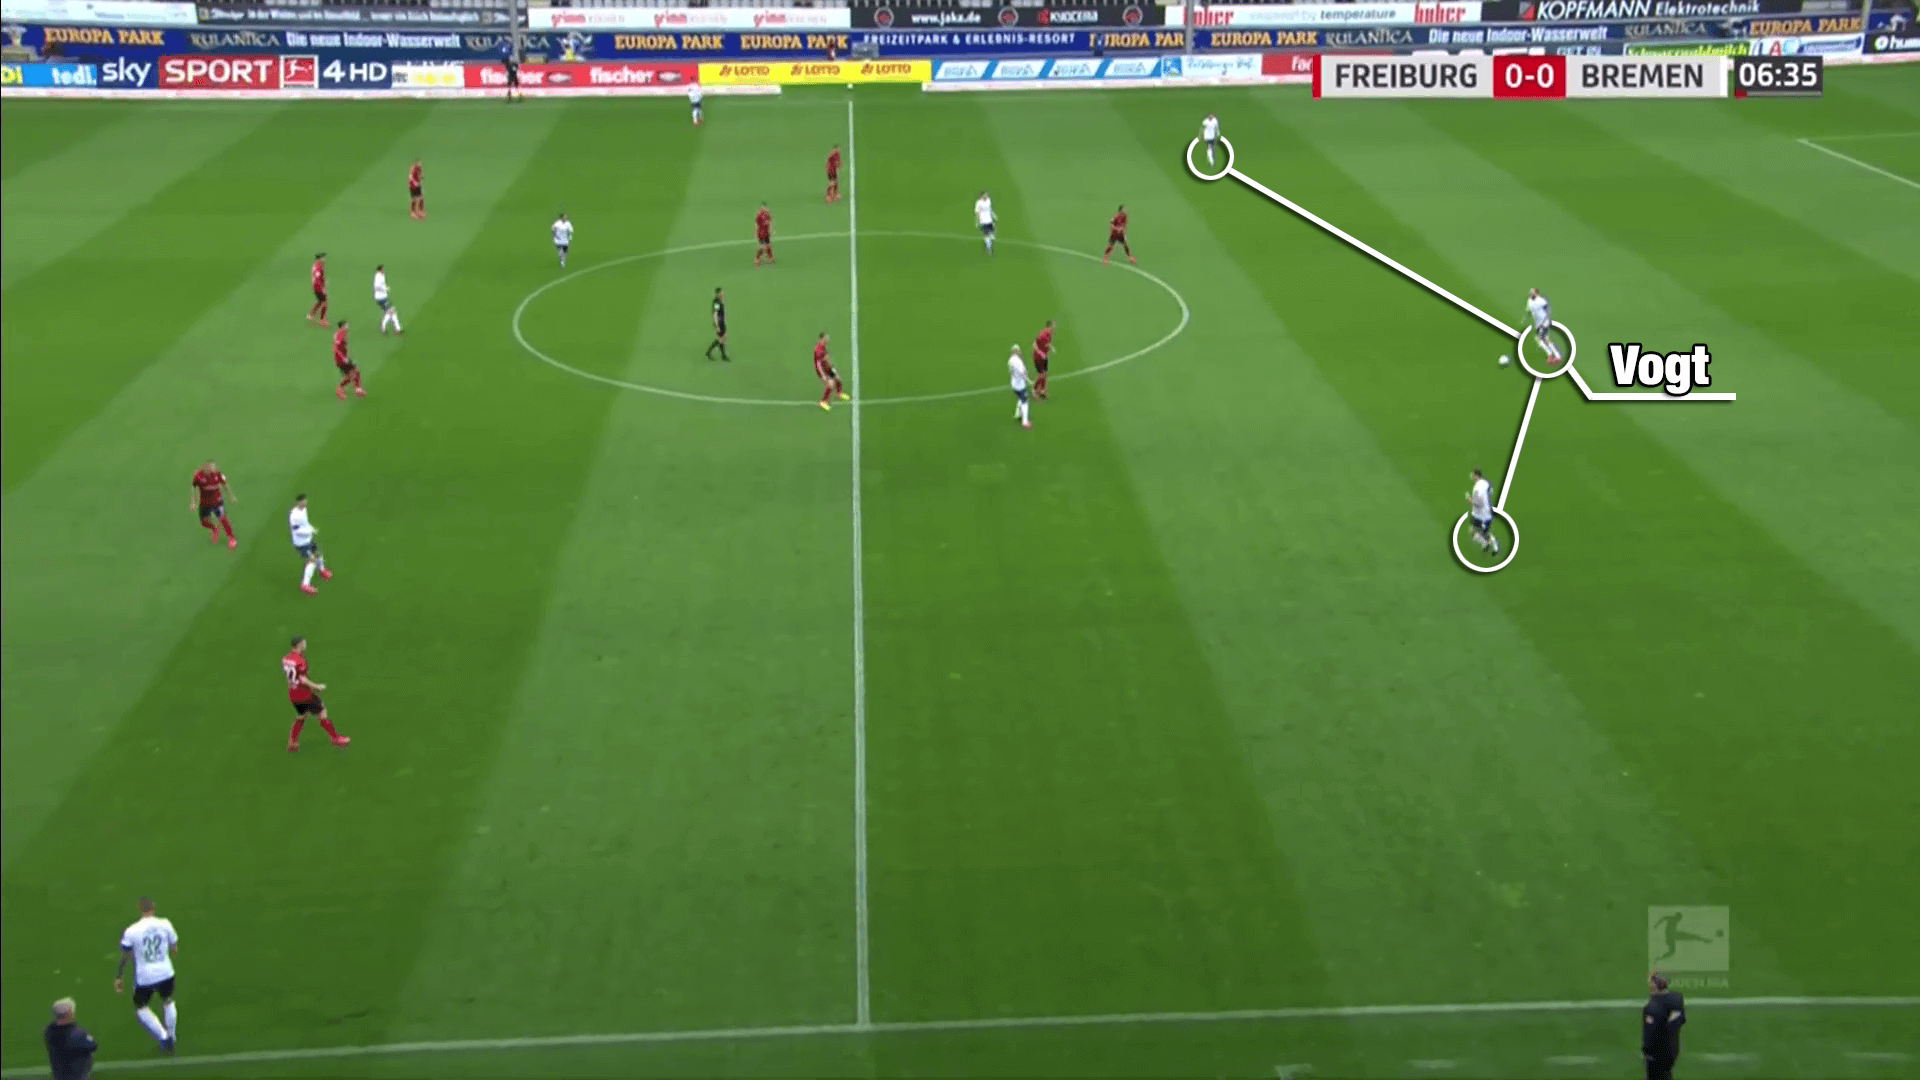
As Bremen’s full-backs pushed higher, Freiburg’s wingers were pinned deep which disabled them to support the press on the ball side. And since Streich’s team pressed from the front despite their numerical disadvantage, their striking duo often pressed two of the three centre-backs on one side leaving the ball far one free.
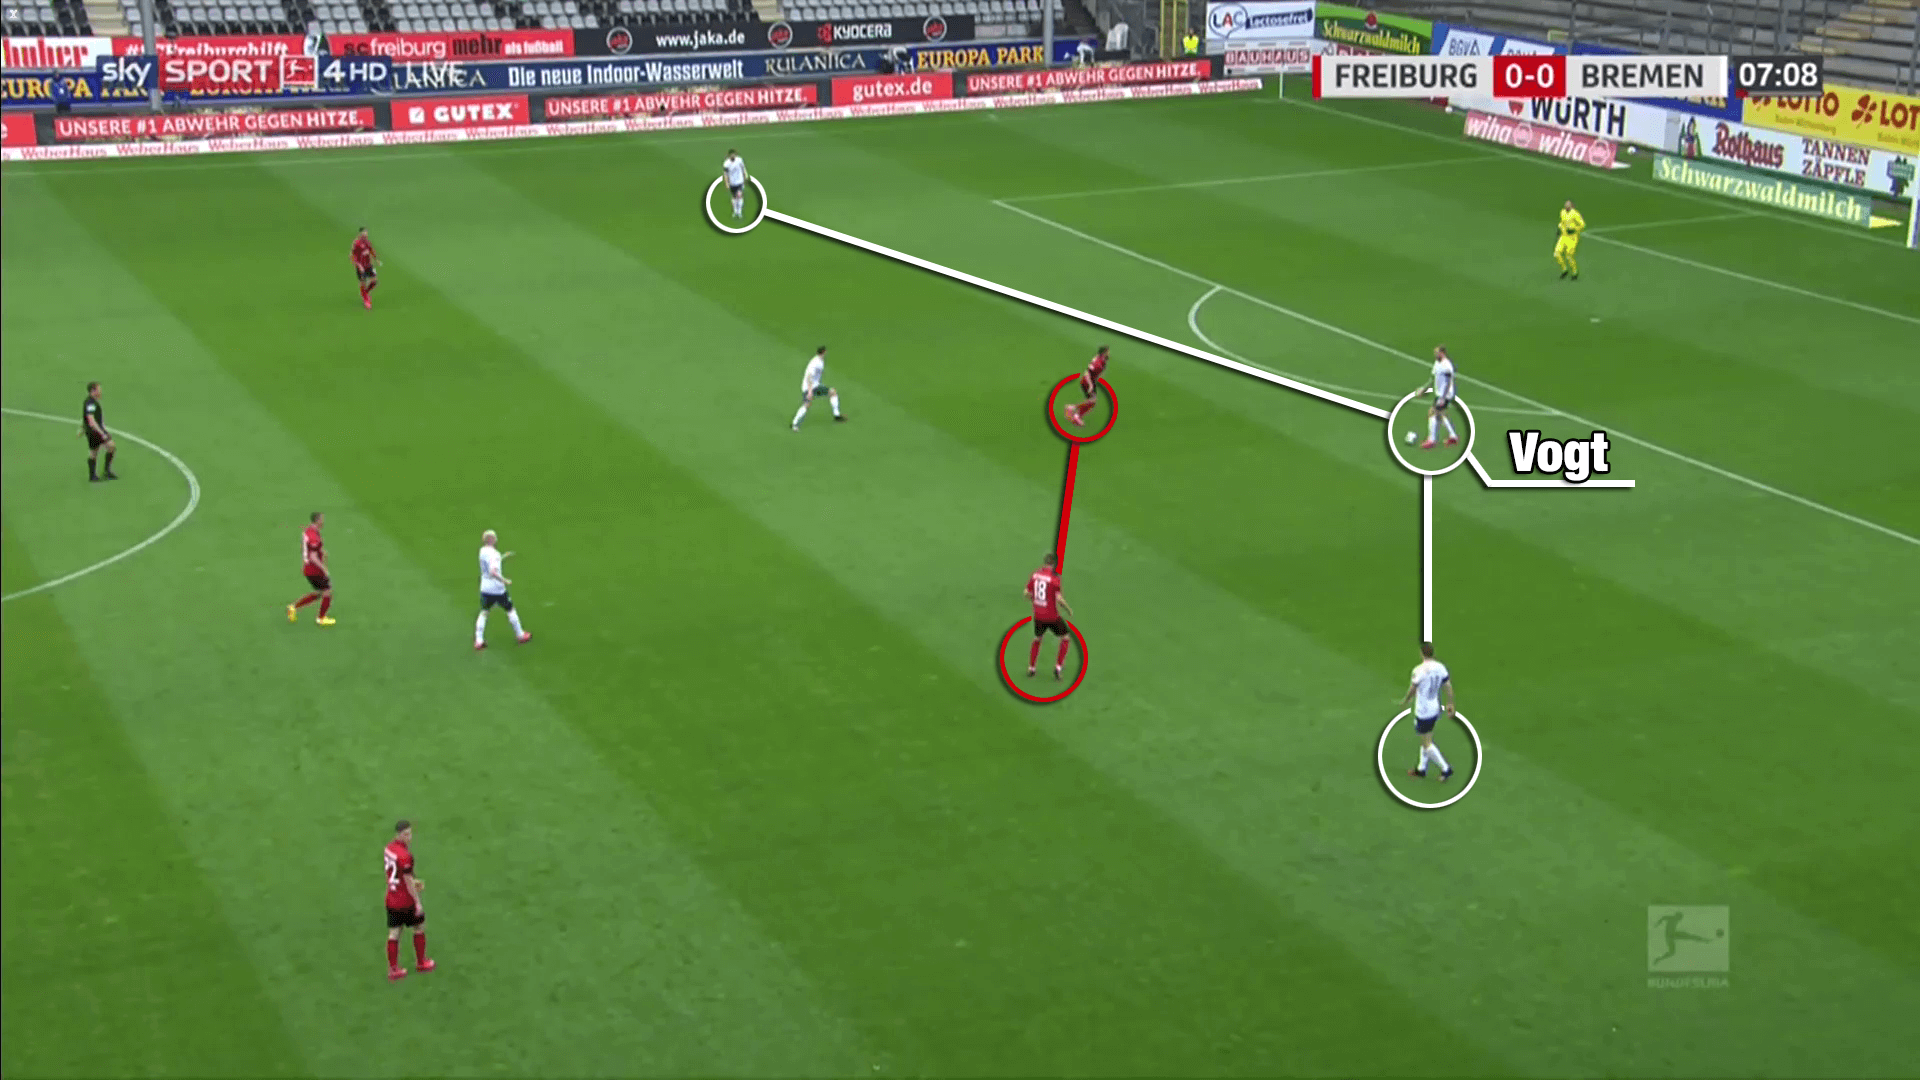
When Freiburg’s winger moved up to press, Bremen overplayed the press with the help of their full-back while Freiburg’s full-back was occupied by Bremen’s winger.
But Vogt who took over the central role within the back three during Bremen’s build-up was also important to provide passing options in midfield on occasion.
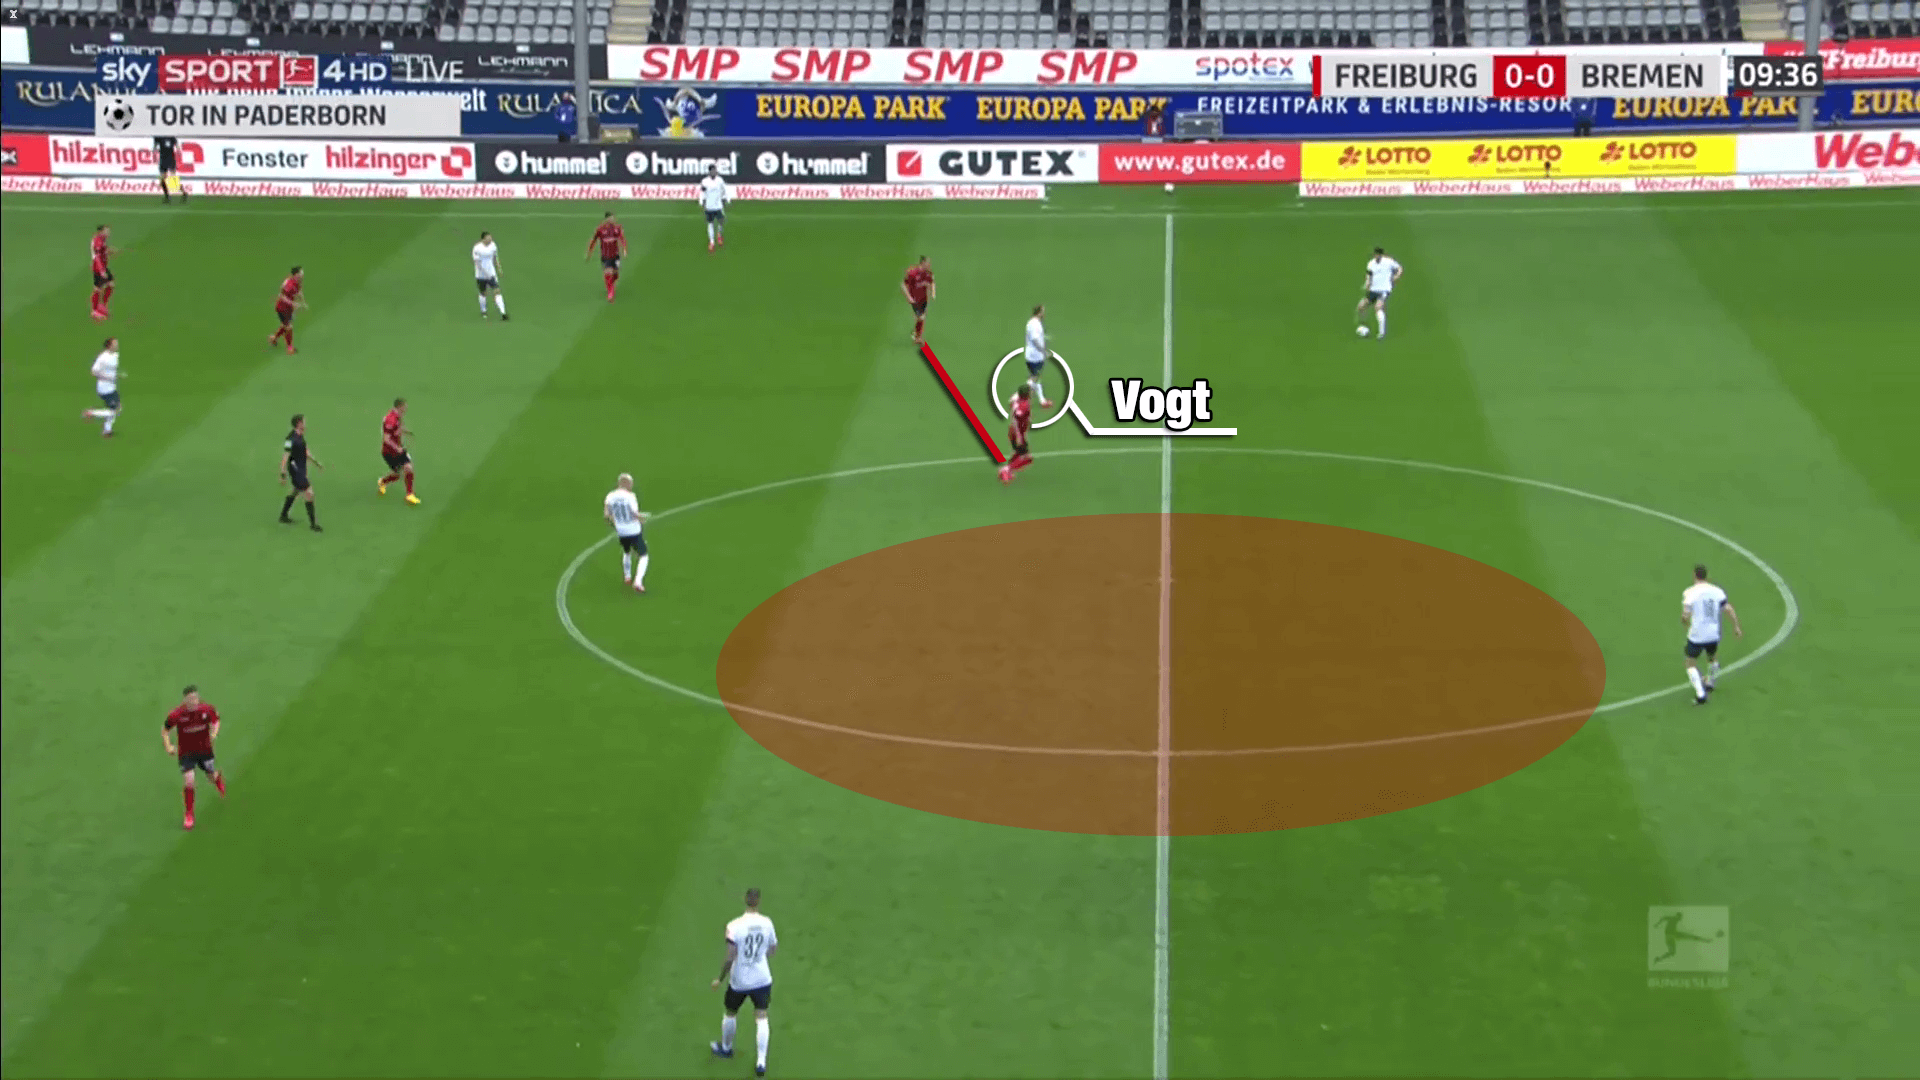
With his off-ball movement, he took pressure from Bremen’s defenders and midfielders. His substitution due to injury with Bargfrede as a replacement can be seen as a turning point for Bremen’s play. Before, Werder’s build-up ensured them a decent amount of possession without allowing too many Freiburg attacks. But throughout the game their possession value decreased.
Werder Bremen’s early press
An aspect of Bremen’s approach that was at least equally important as the build-up structure was the press of Kohfeldt’s side.
In order to apply early pressure on Freiburg’s central defenders, Bremen often formed a 4-4-2 shape with midfielder Klaassen pushing up into the forward line.
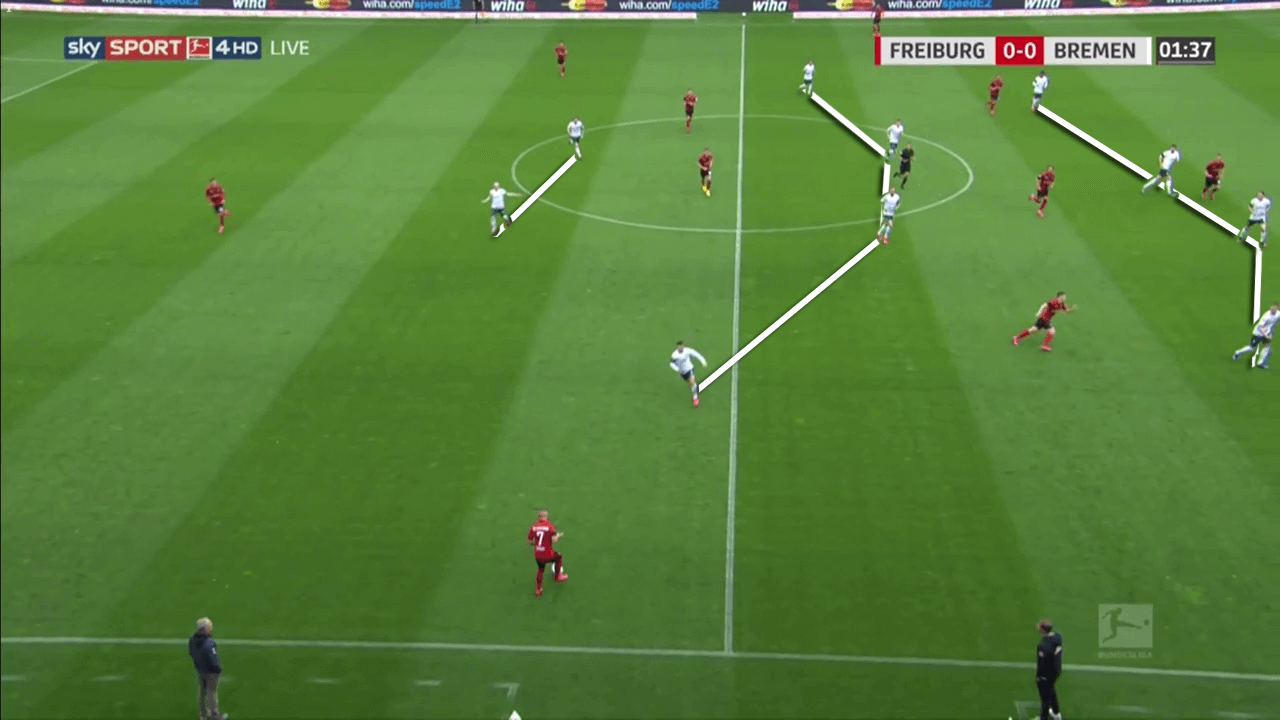
With Maximilian Eggestein and Kevin Vogt forming a double pivot, they mirrored Freiburg’s 4-4-2 structure and left the ball-carrier with only few options. As a result, Streich’s team were often forced to play long balls in the beginning phase of the match.
Due to a good pressing by the front players guiding the opposition build-up into wide areas, Bremen’s could focus rather on winning second balls than on pushing forward to press the opposition pivots as they rarely received the ball.
Moreover, Klaassen’s initial positioning before their pressing triggers was the one of an attacking midfielder in a 4-2-3-1. This even increased Bremen’s stability in central areas and forced Freiburg towards the flanks. Werder then used the pass to the full-back as a pressing trigger to shut down all passing lanes into the centre and provoke a misplaced pass or directly win the ball with a pressing winger.
This setup enabled Werder to disrupt many of Freiburg’s build-up attempts in the beginning of the game.
The rest defence as a key factor
One of the key aspects of this game for Freiburg was their rest defence. And it was also decisive for the games’ result.
Werder Bremen had most of their ball recoveries within their own half with Freiburg high up the pitch. As a consequence, there was free space behind Freiburg’s remaining backline. With Freiburg’s full-backs often caught high up the pitch, Bremen’s wide forwards were offered room to exploit during transition moments.
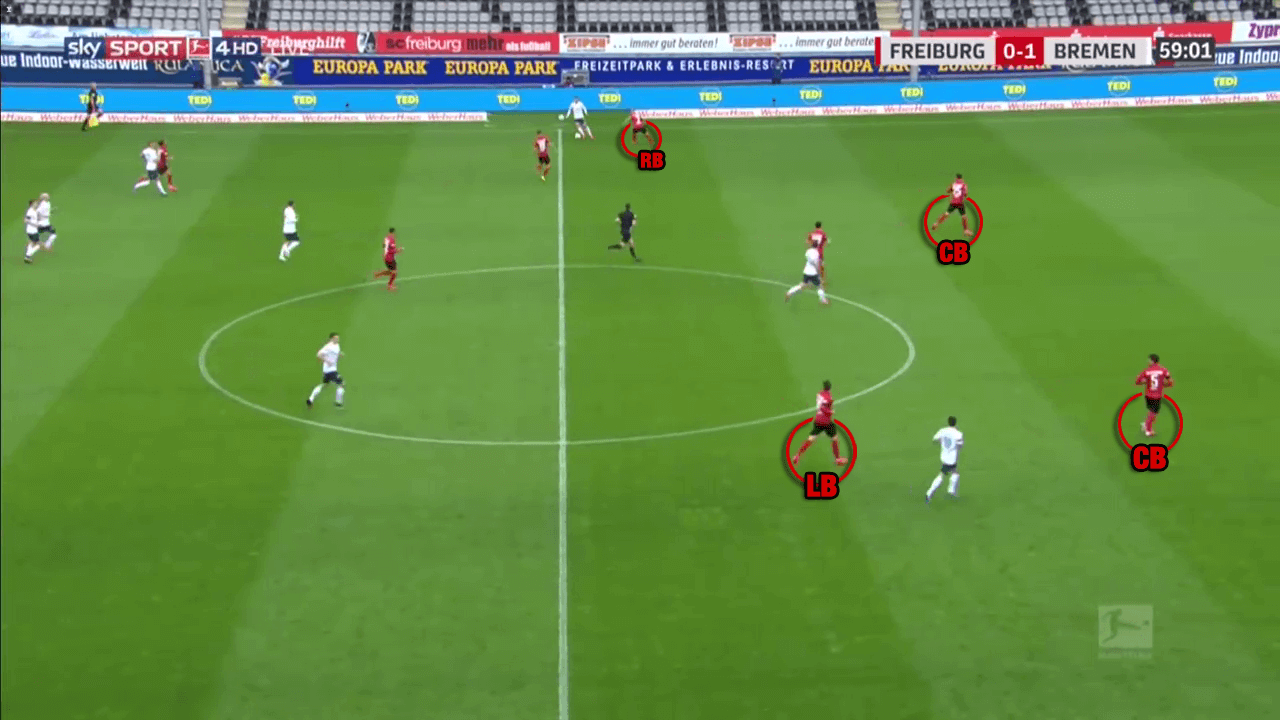
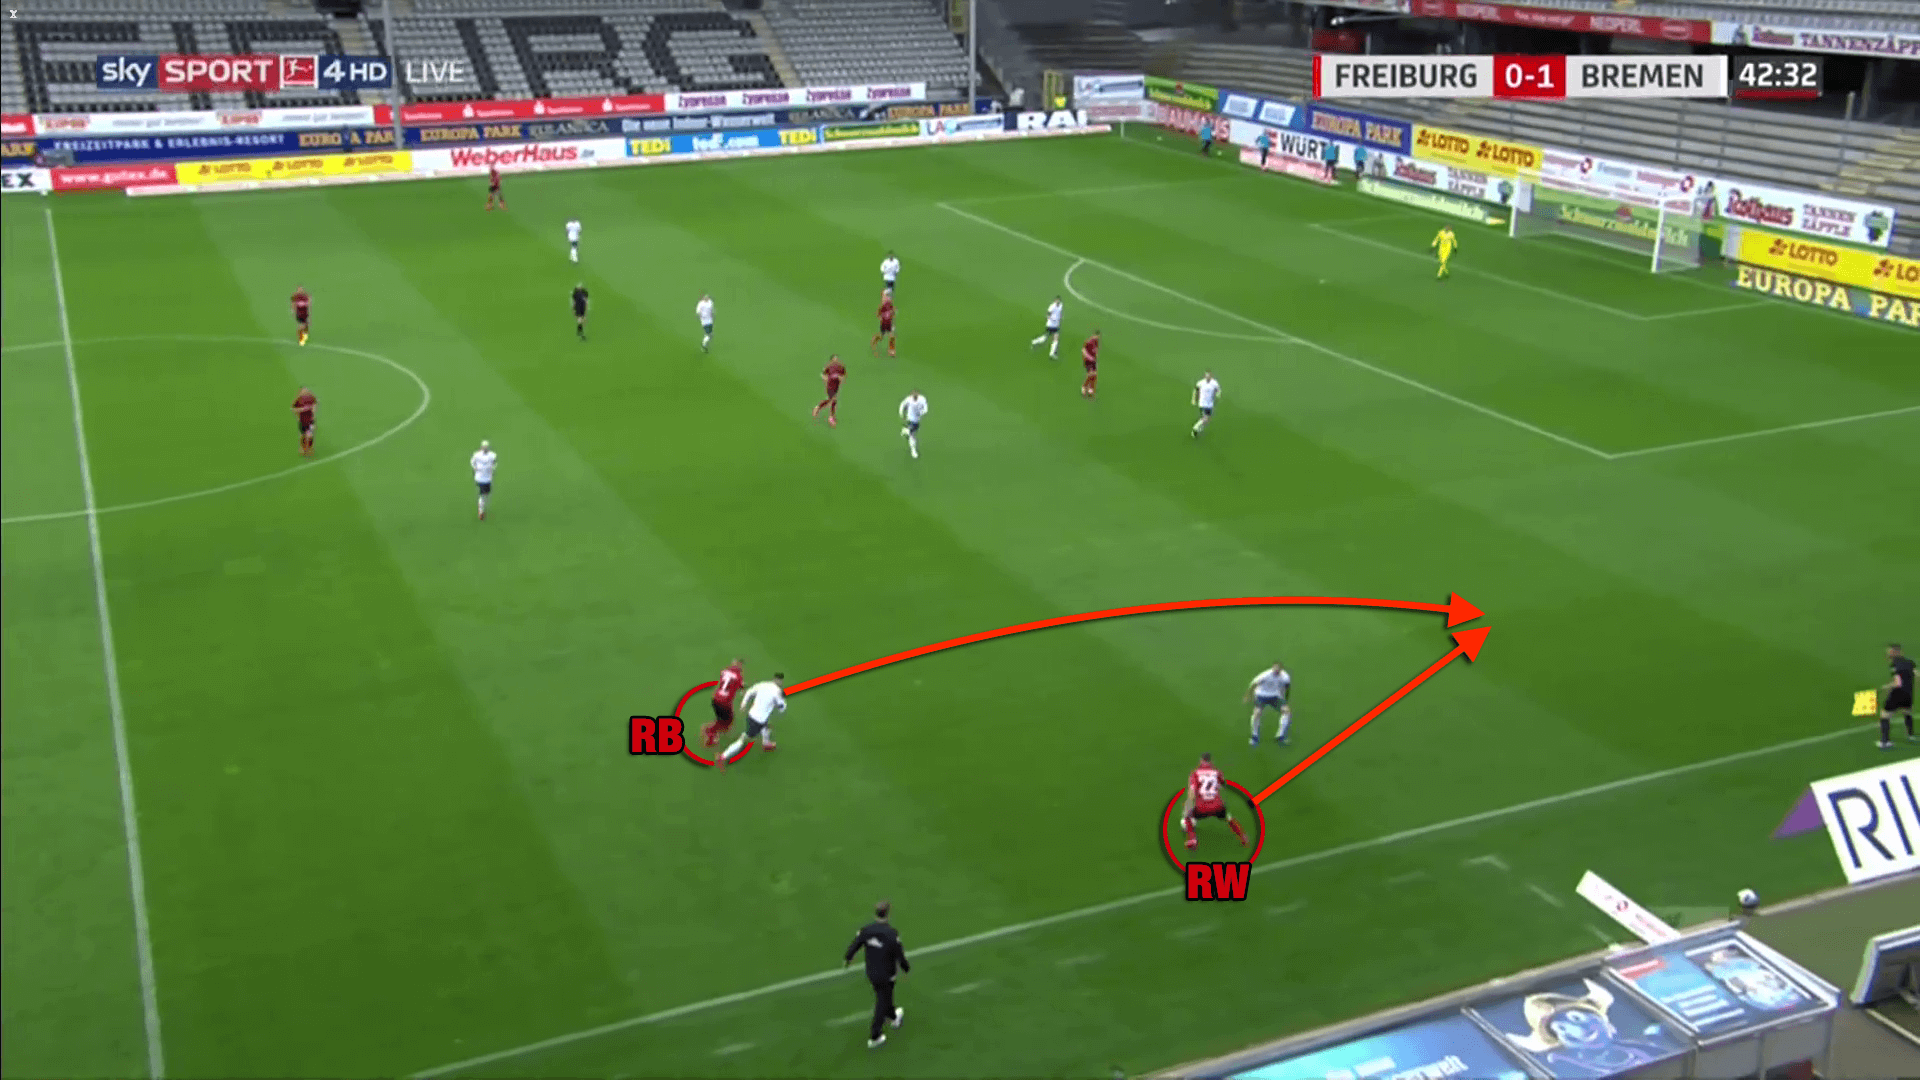
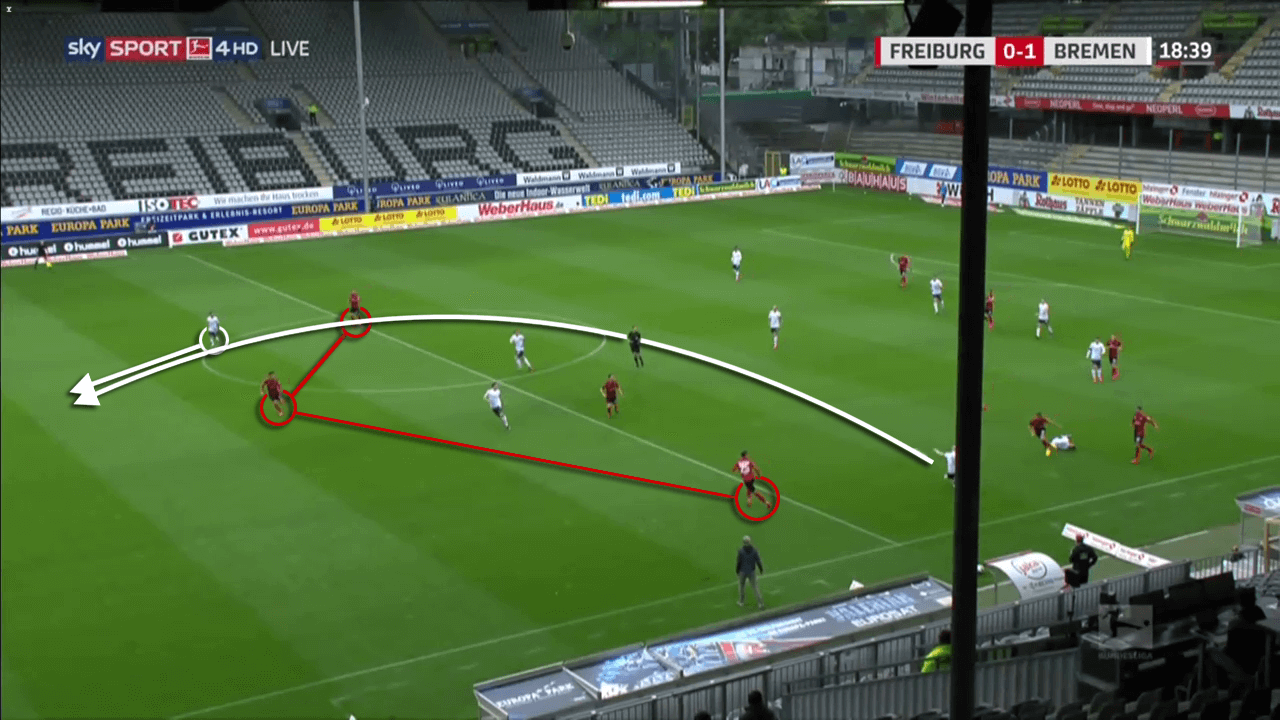
Bremen’s winning goal resulted from an unsuccessful counter-pressing by Freiburg. The scenario is displayed in the image below.

Bremen’s right-winger Leonardo Bittencourt utilised the space that opened up as the opposition centre-backs shifted towards the ball side. With the full-back not being back yet, former Ajax midfielder Klaassen could play the ball diagonally into the path of Bittencourt who scored the only goal of the day.
Nevertheless, the rest defence structure of Freiburg clearly improved in the second half. With longer possession phases, Freiburg solved one of their main issues from the first half. This forced Bremen’s wingers to track back Freiburg’s full-backs what meant that they were pinned deep down in their own half. The long way towards Freiburg’s goal prevented them from creating danger in transition moments as the full-backs of Freiburg had enough time to get back.
Freiburg’s wing attacks
While Freiburg needed some time to optimise their rest defence and their pressing, their positional attacks posed threat throughout the whole game. Against Bremen’s flat defensive shape, they often progressed up the pitch through the wide areas. Their full-backs pushed high up the line while their wingers tucked inside. The average positioning and passing network shown below highlights the connections to their full-backs in high positions.
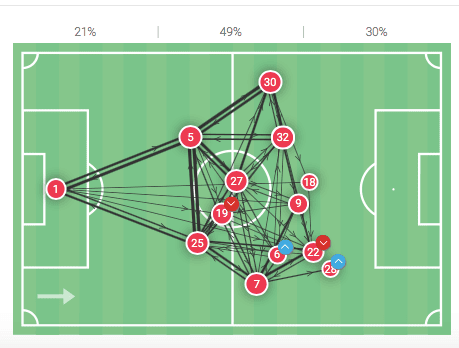
With the wingers occupying Bremen’s full-backs inside, Freiburg’s full-backs were often left free. Therefore, they could receive the ball on their way up the pitch.
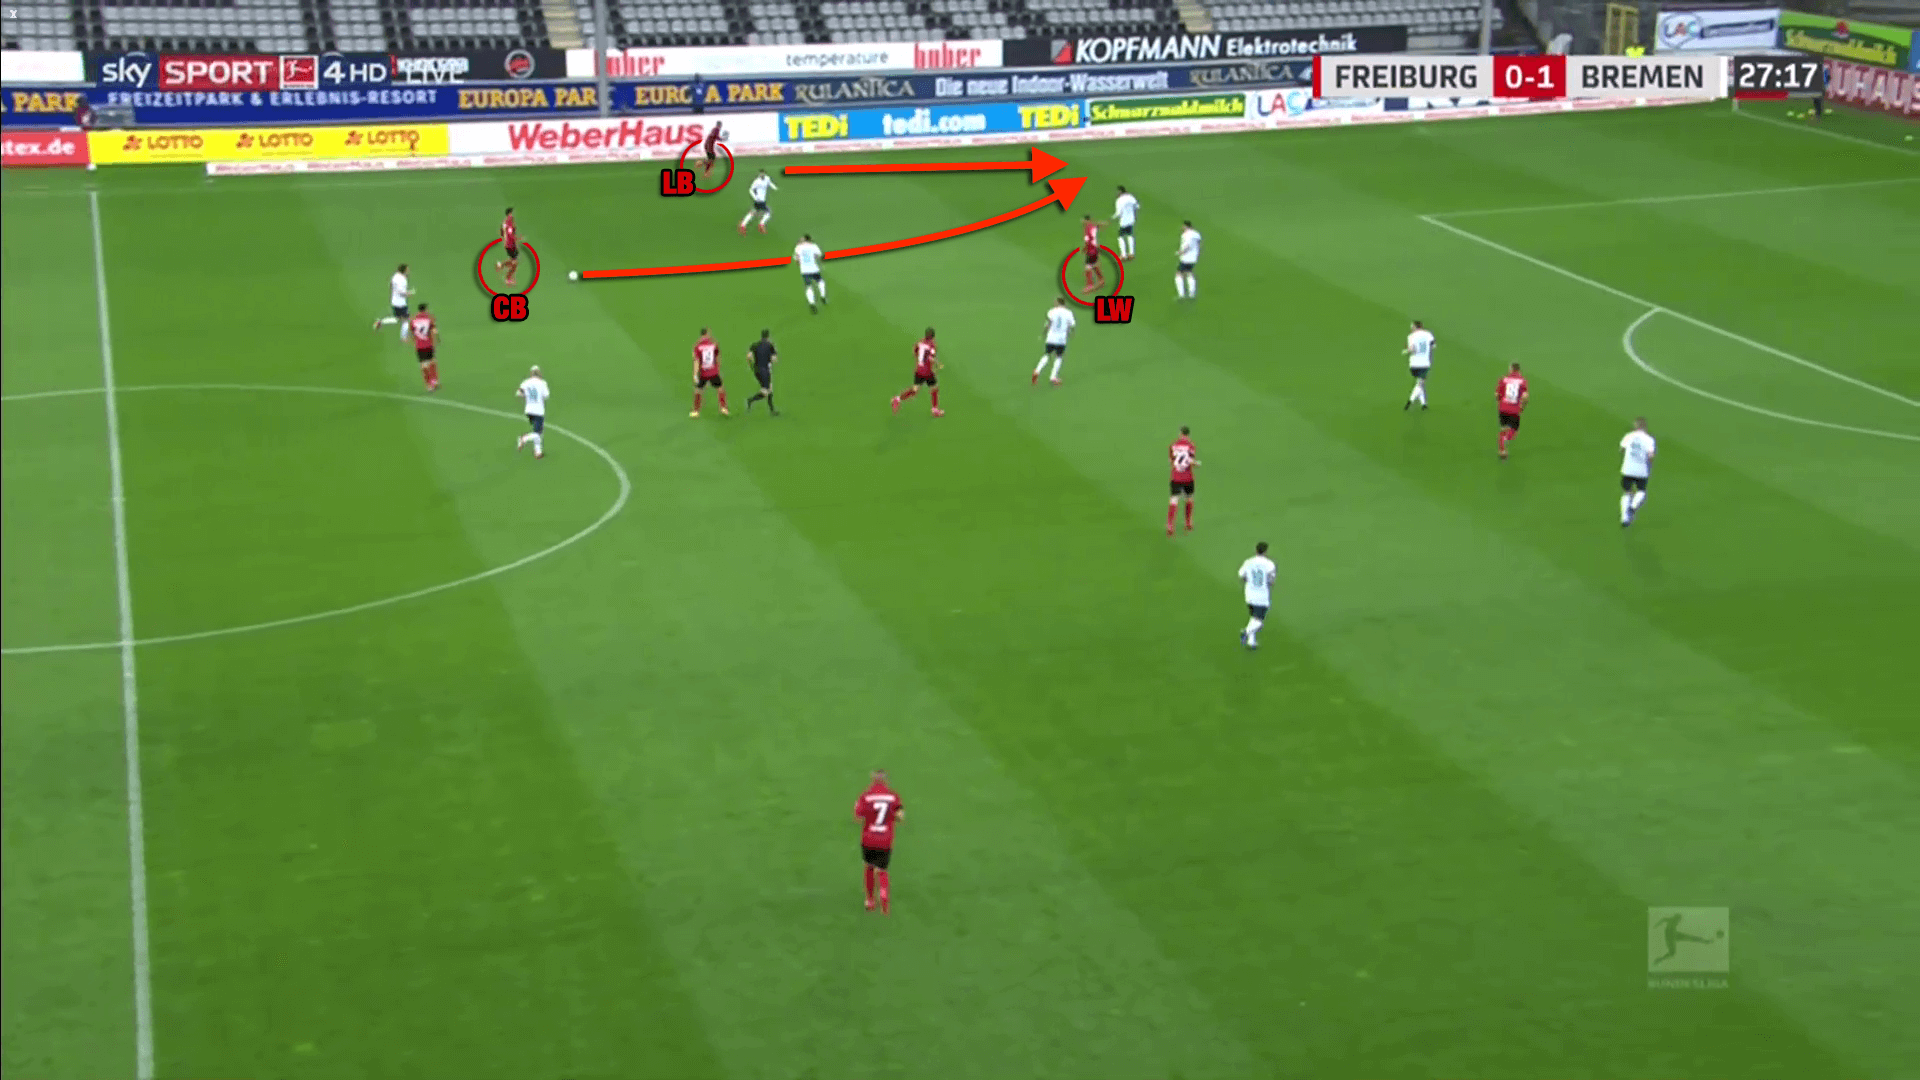
Freiburg’s main method was then to put in crosses. And with their narrow wingers plus the striking duo they would be able to occupy the box with three to four players in most of the cases.
After switches of play, Freiburg’s wingers sometimes also moved wide to support the full-back. That created a 2v2 situations as Bremen defended with their full-back and their winger in a wide area. Overlapping and underlapping runs, like shown below, enabled Streich’s men to get into the final third.
These wing attacks were Freiburg’s main strategy to break Bremen’s defence and create goal-scoring opportunities with their crosses.
Increasing Freiburg dominance without an outcome
Throughout the second half, Freiburg constantly increased their dominance in all phases of the game.
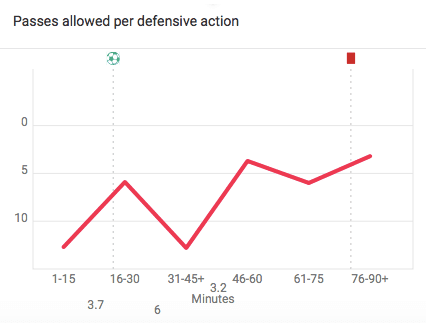
While the PPDA value (passes per defensive actions allowed) decreased, like shown above, meaning that they pressed more intense, Freiburg’s possession rate increased as displayed below.
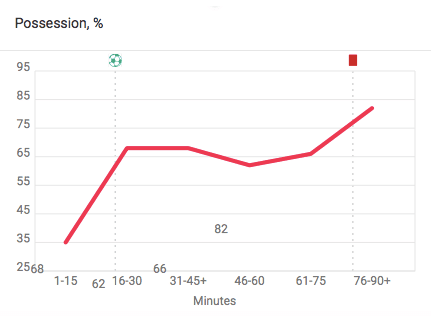
And with this dominance in possession, Streich’s side were able to get deeper into the opposition half as the flat defensive shape of Werder Bremen disabled them to press Freiburg. Werder coach Kohfeldt even switched to a flat 5-4-1 formation in the 64th minute.
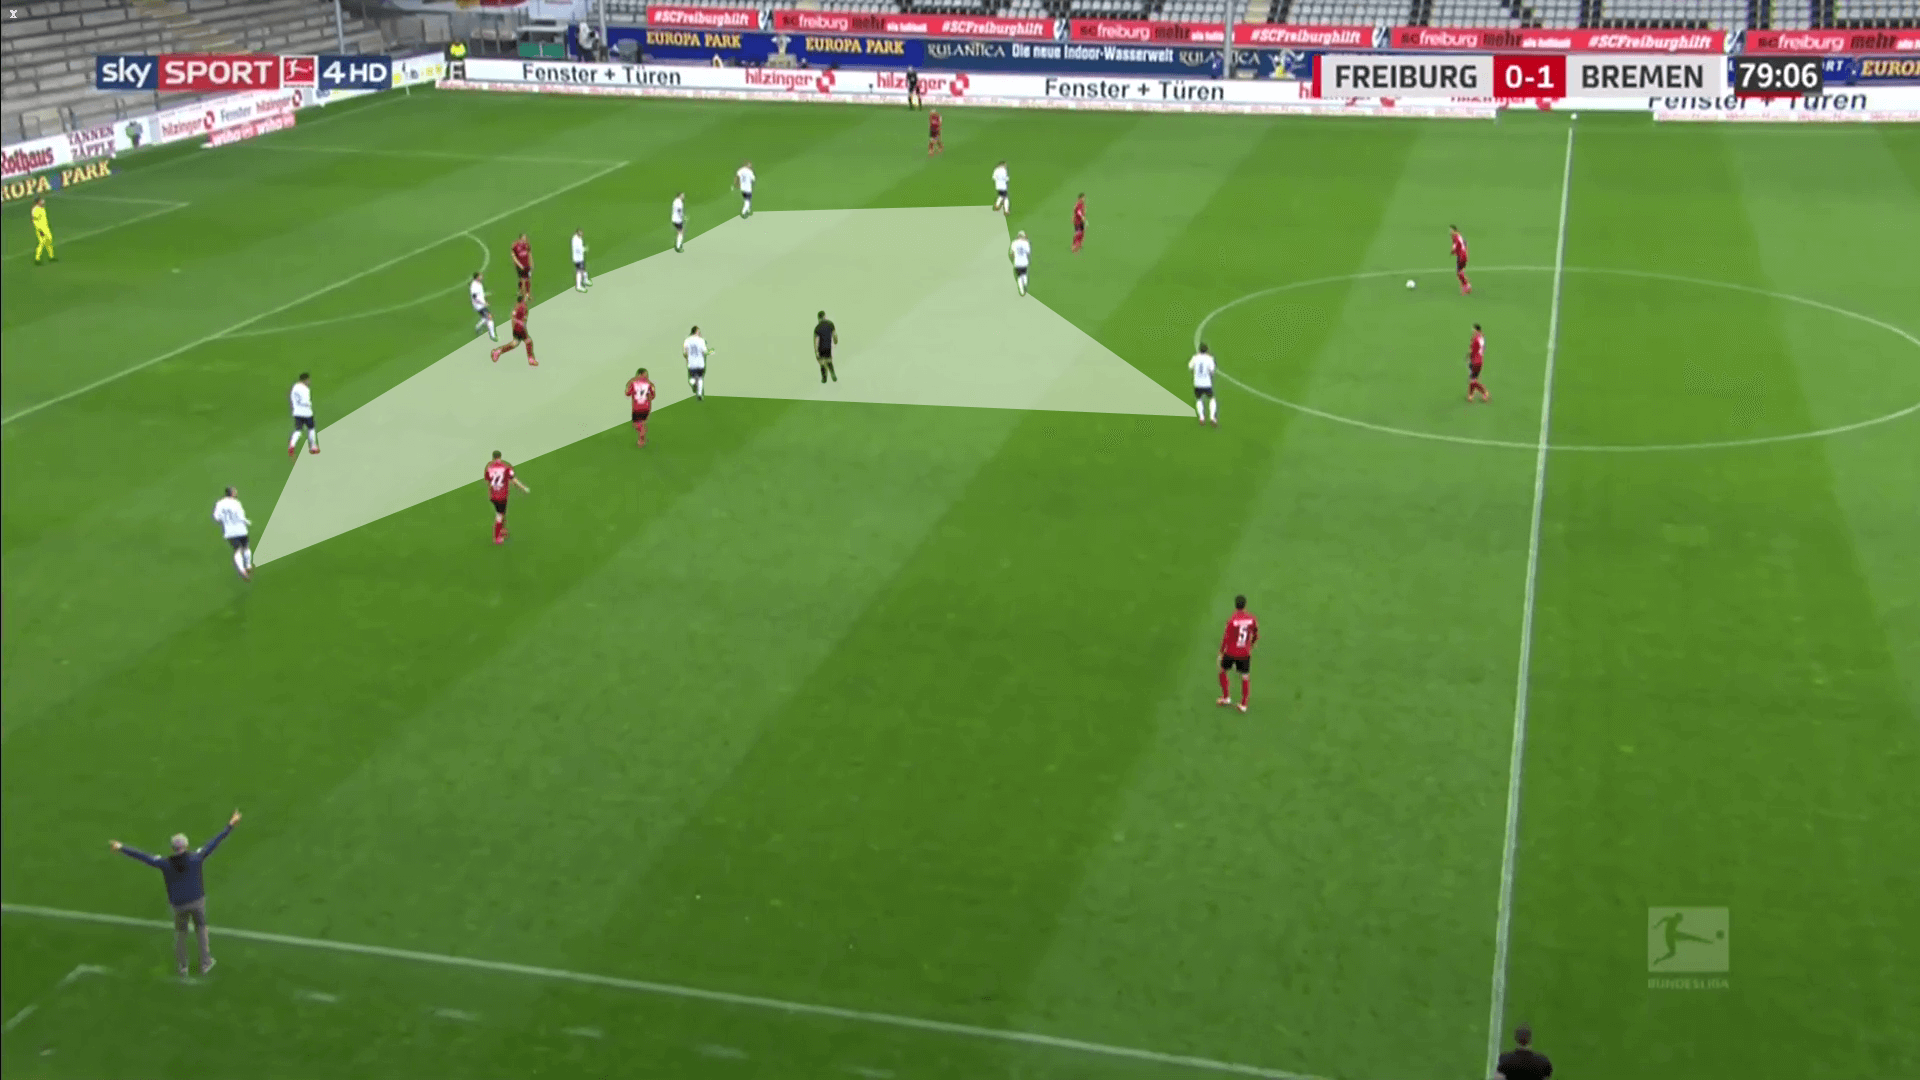
With this shape, Bremen were not capable of applying pressure on the build-up players anymore and therefore dropped back into a deep block.
All they would do was to prevent Freiburg from playing through the central areas. As a consequence, Freiburg put in 32 crosses from wide areas. But even though 46.88 % of them were accurate, which is a fairly decent rate, Freiburg were unable to score.
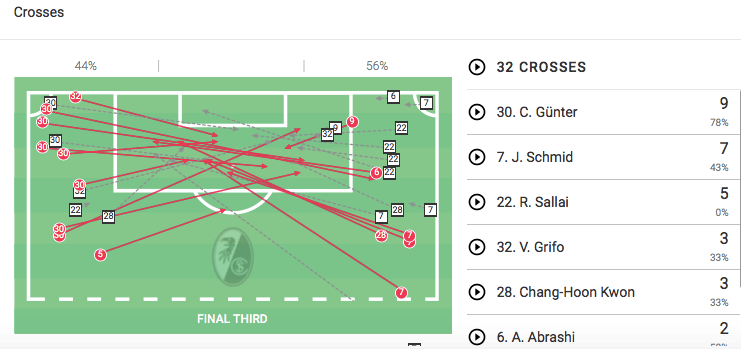
The only negative aspect that can be depicted when taking a look at their crossing map are the crossing positions. As they often sent in their crosses from very wide areas, Bremen’s defenders were offered a lot of time in the box to take in positions to disturb Freiburg’s attackers when finishing.
The total xG values speak a clear language and indicate that Freiburg’s dominance would have deserved the equaliser. Whereas Bremen only created 0.59 xG throughout the match, Streich’s side created an xG value of 1.14. The inability to score was mainly due to poor finishing or Bremen’s defensive department including goalkeeper Jiri Pavlenka defending the goal with everything they had. And even a late red card for Bremen midfielder Bargfrede and an offside goal for Freiburg did not change anything about the final result.
Conclusion
All in all, Werder will be more than happy with this win over Freiburg. As shown in our analysis, their performance in the opening stages of the game justified their lead while they were lucky not to concede the equaliser in the second half of the game.
While Bremen will need to gain more consistency throughout a whole match in order to gain more points in the upcoming weeks, Freiburg need to build on their second-half performance.



Comments