After their 0-0 draw in the first leg of the promotion playoff, Werder Bremen went to Voith-Arena to take on 1. FC Heidenheim to fight for the final spot in next season’s Bundesliga. Despite only scoring one of the actual goals of their own accord, Werder were able to secure their spot in the Bundesliga for next season with a 2-2 draw against Heidenheim.
This tactical analysis will examine the tactics used by both Florian Kohfeldt and Frank Schmidt. The analysis will look at what both clubs did in order to secure promotion, with Werder ultimately holding Heidenheim off due to the away-goals rule.
Lineups
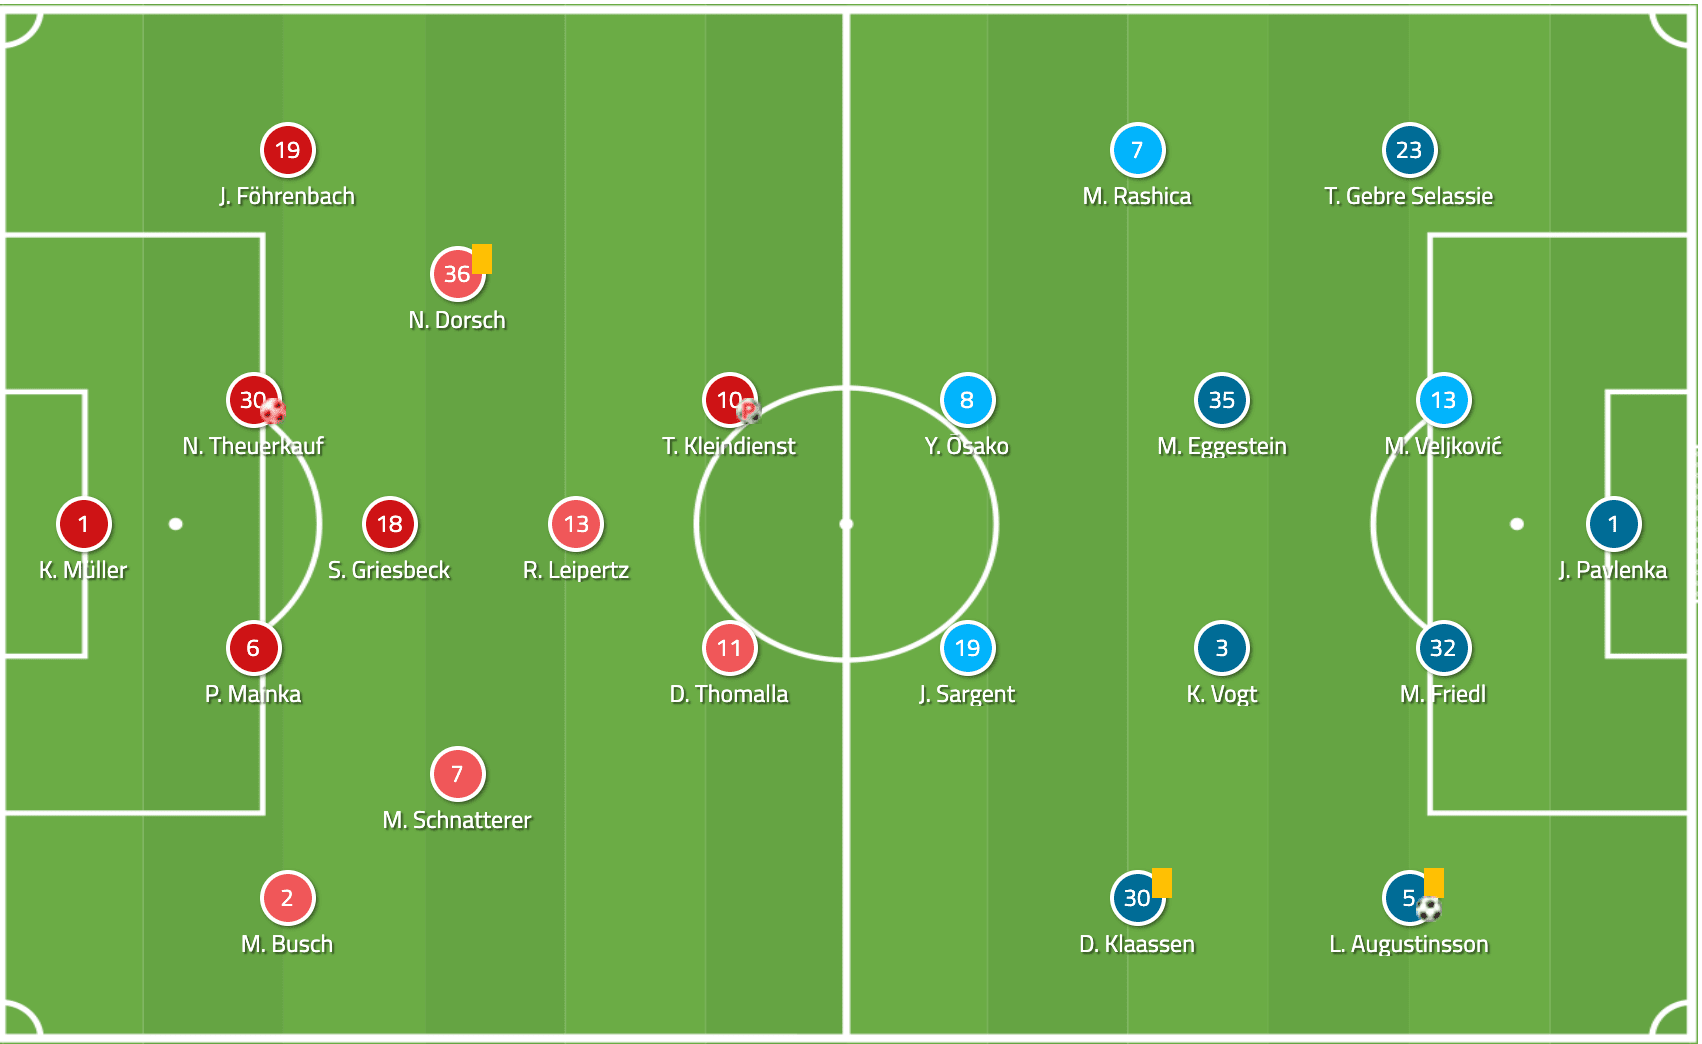
Heidenheim started in a 4-3-1-2 formation with Kevin Müller in goal. In front of him were Norman Theuerkauf and Patrick Mainka as the centre-backs, with Jonas Föhrenbach as the left-back and Marnon-Thomas Busch as the right back. Sebastian Griesbeck played as the holding midfielder with Niklas Dorsch and Marc Schnatterer as the two midfielders in front of him. Their attacking midfielder, who was in charge of supporting Tim Kleindienst and Denis Thomalla up top, was Robert Leipertz.
Florian Kohfeldt sent his men out in a 4-4-2 with Jiří Pavlenka in goal. The centre-back pairing in front of Pavlenka consisted of Marco Friedl and Miloš Veljković. Ludwig Augustinsson played as the left-back while Theodor Gebre Selassie started as the right-back. The two central midfielders were Kevin Vogt and Maximilian Eggestein, who were supported by Davy Klaassen on the left-wing and Milot Rashica on the right-wing. Werder’s two forwards to start the match were Yuya Osako and Josh Sargent.
Werder’s compact structure creates space on wings
Werder Bremen, to their credit, came out attacking Heidenheim’s goal. They looked to secure an early lead, as an away goal would require Heidenheim to score two, due to the team’s 0-0 draw in Bremen last week. Werder looked to create space on the wings by being a bit more compact in terms of team structure. This compactness would force Heidenheim to also become more compact, thus creating space on the wings. The first example of this comes within the first minute of the match.
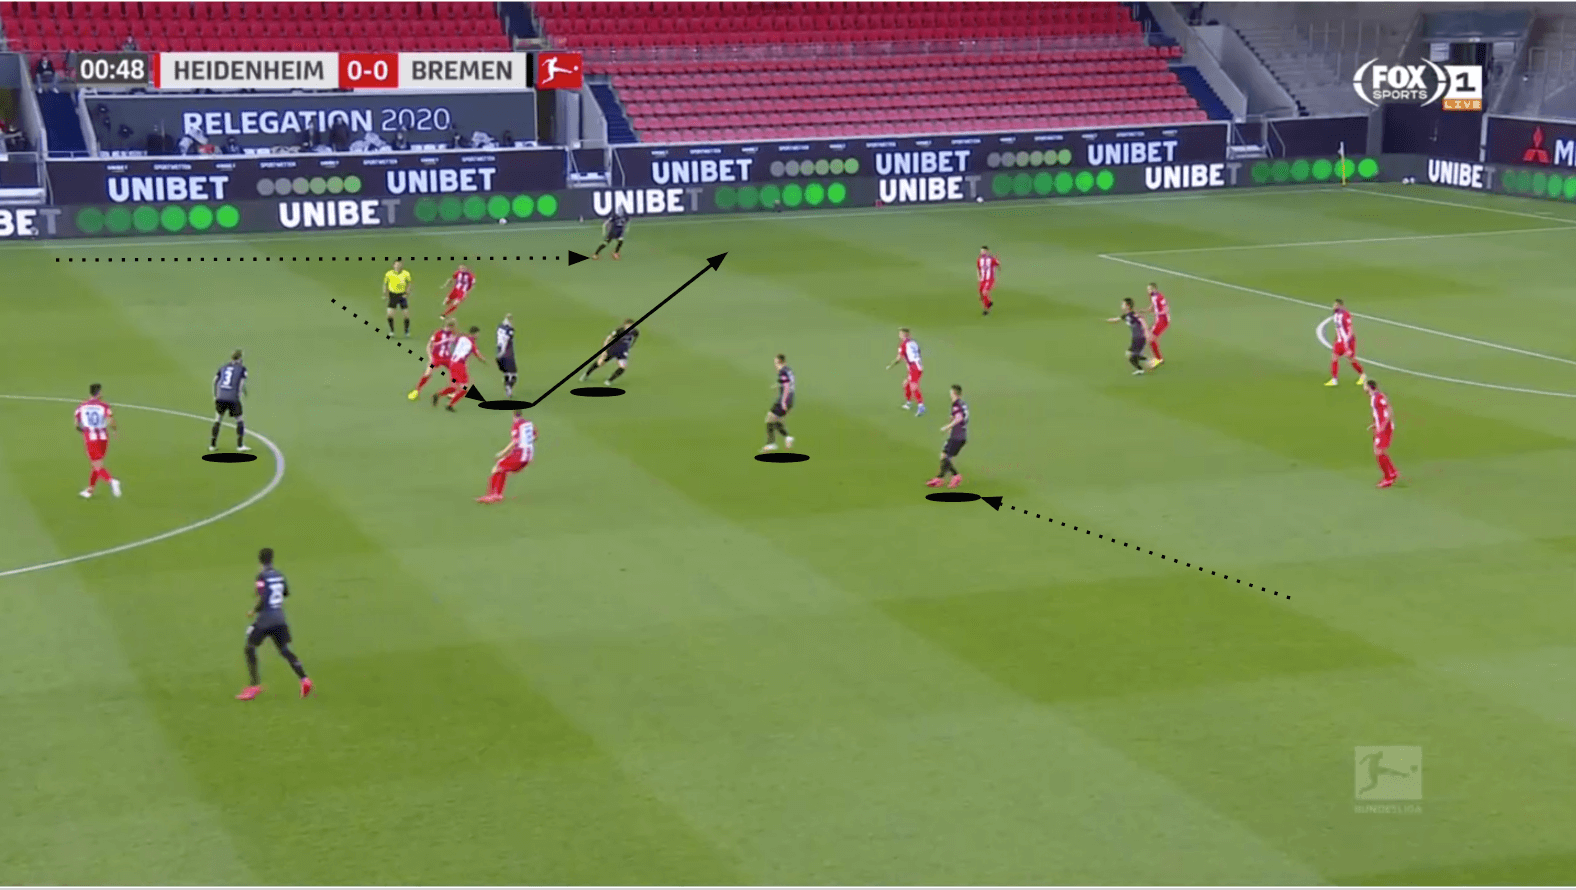
In the image above, both Davy Klaassen and Milot Rashica tuck into the centre of the pitch. This forced a more compact structure from Heidenheim, with both their midfield and defensive lines well within the width of the penalty area. This meant that there was a large amount of space to exploit on the wings, with Ludwig Augustinsson taking advantage of it in this instance. With plenty of time on the ball, Augustinsson delivered a wonderful cross into the box, but Josh Sargent was unable to get his foot on the ball.
Rashica’s movement throughout the match and his positioning suggests that Werder were looking to overwhelm Heidenheim in the centre of the pitch. Despite being listed as a winger, Rashica’s average positioning was actually located in the half-space channel, highlighting the idea that Werder looked to create a numerical advantage in the centre of the pitch.
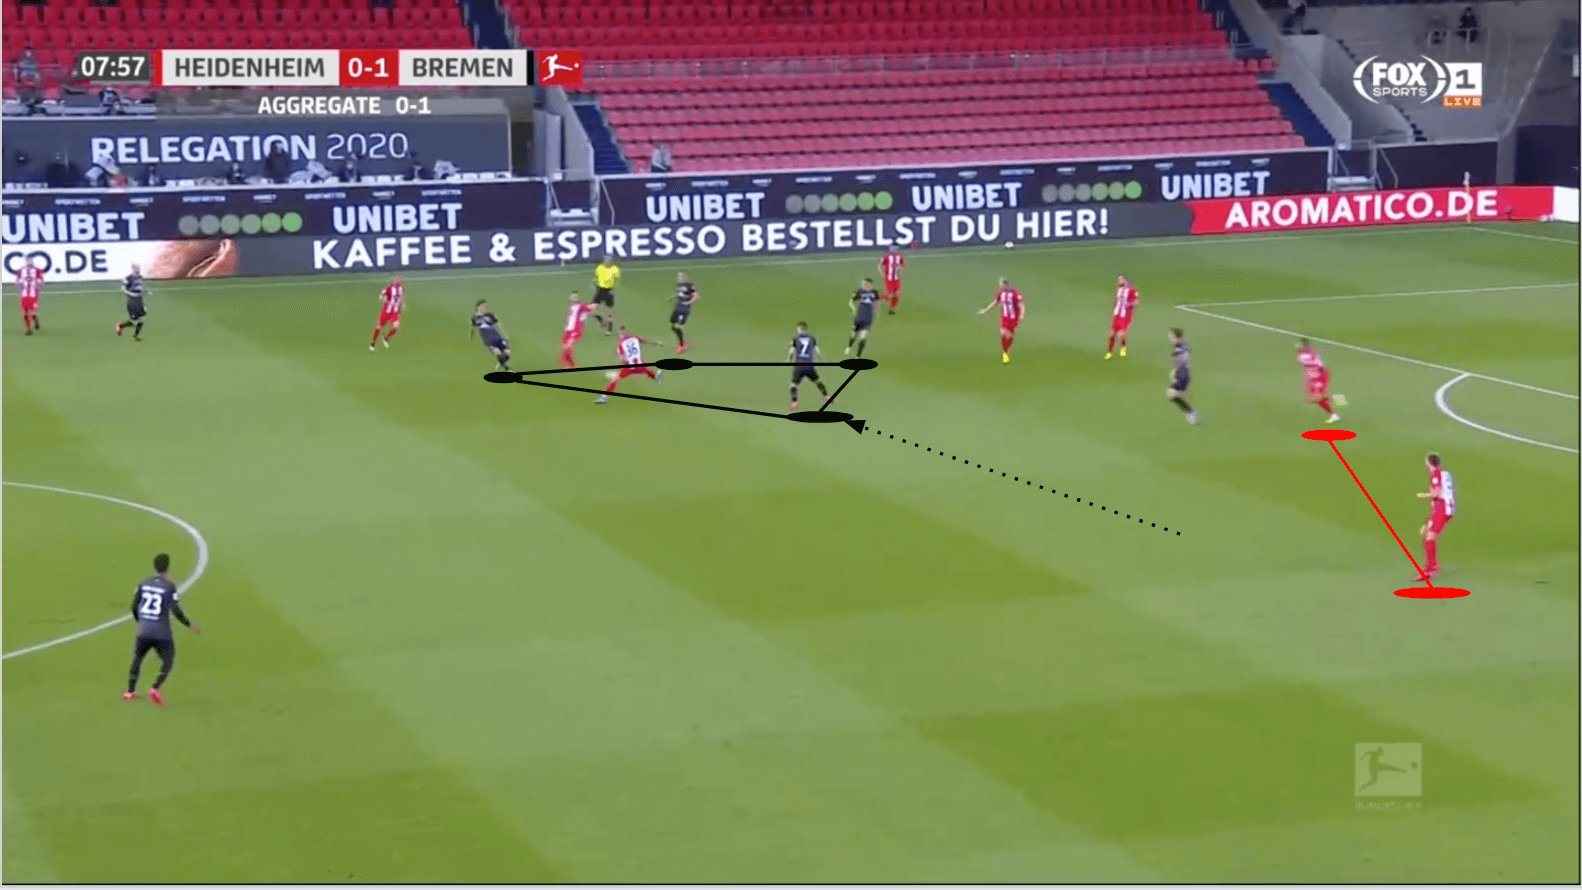
In this image, Rashica is much more central than his positioning on the right-wing suggests. This allowed Werder to outnumber Heidenheim in the midfield, allowing a pass to be played through to Rashica, who turned and took a shot from about 30 yards out, forcing a save from Kevin Müller. Rashica’s positioning also caused problems for Jonas Föhrenbach, who was Heidenheim’s left-back. He was clearly unsure of who to mark in this instance, as Werder’s right-back, Theodor Gebre Selassie, was quite far away. Föhrenbach still stepped up slightly, creating a large amount of space between himself and his closest centre-back. When his closest centre-back stepped up to block Rashica’s shot, Föhrenbach had to race back to mark a wide-open Sargent. This meant that if he wanted to, Gebre Selassie would have had the time and space on the wing to receive a pass and deliver a devastating cross.
If Rashica wasn’t tucking into the centre of the pitch, then Davy Klaassen would do so, which led to space still becoming available on the wings.
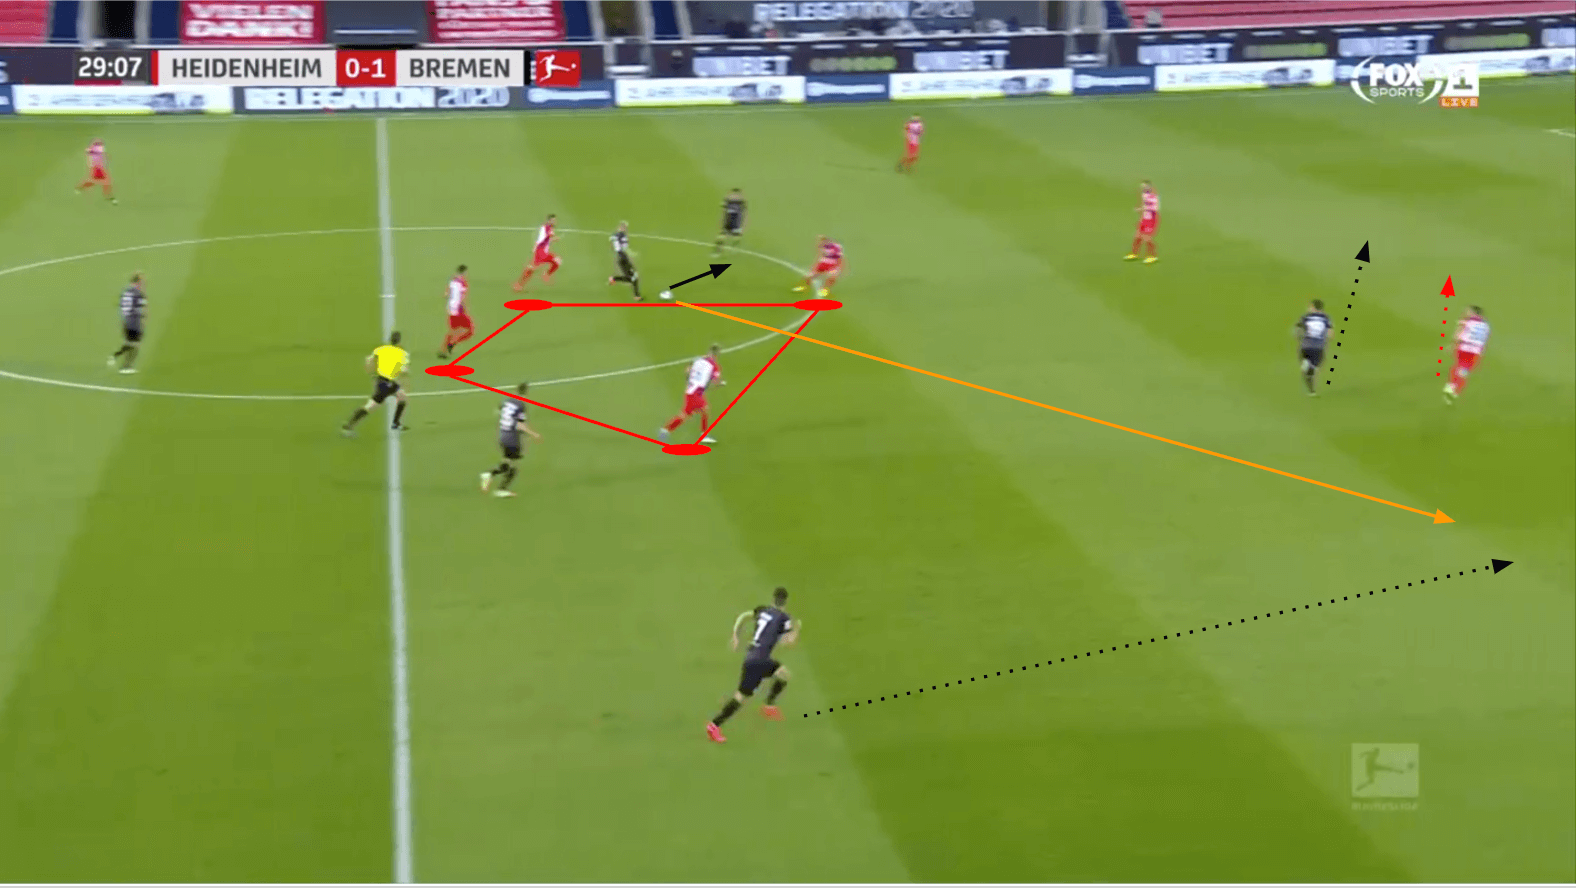
In this instance, Klaassen was the man in possession after Heidenheim turned the ball over. The four Heidenheim players in the centre are drawn there because of the ball as well as the number of Werder players. Heidenheim’s left-back, the aforementioned Föhrenbach who was a large part of their attacking plan, was way too far up the pitch to help out defensively. All Klaassen needed to do was pick out the right pass (in orange) and Rashica would have been in on goal. Instead, he chose to play Yuya Osako (black pass), who was promptly tackled and dispossessed. While they weren’t able to take full advantage of their width, Werder were able to create those opportunities on the flanks by drawing Heidenheim’s players into a more central position.
Heidenheim creates from wide positions
Heidenheim spent the majority of the first half defending; they struggled to create anything in terms of scoring opportunities. In fact, Heidenheim didn’t even register any shots until the second minute of extra time at the end of the first half. However, the second half began with an onslaught of attack from Heidenheim, with them gaining confidence after finding David Otto in the box (who was unable to get a proper foot on the ball). Most of these chances came from wide positions and usually came in the form of a cross.
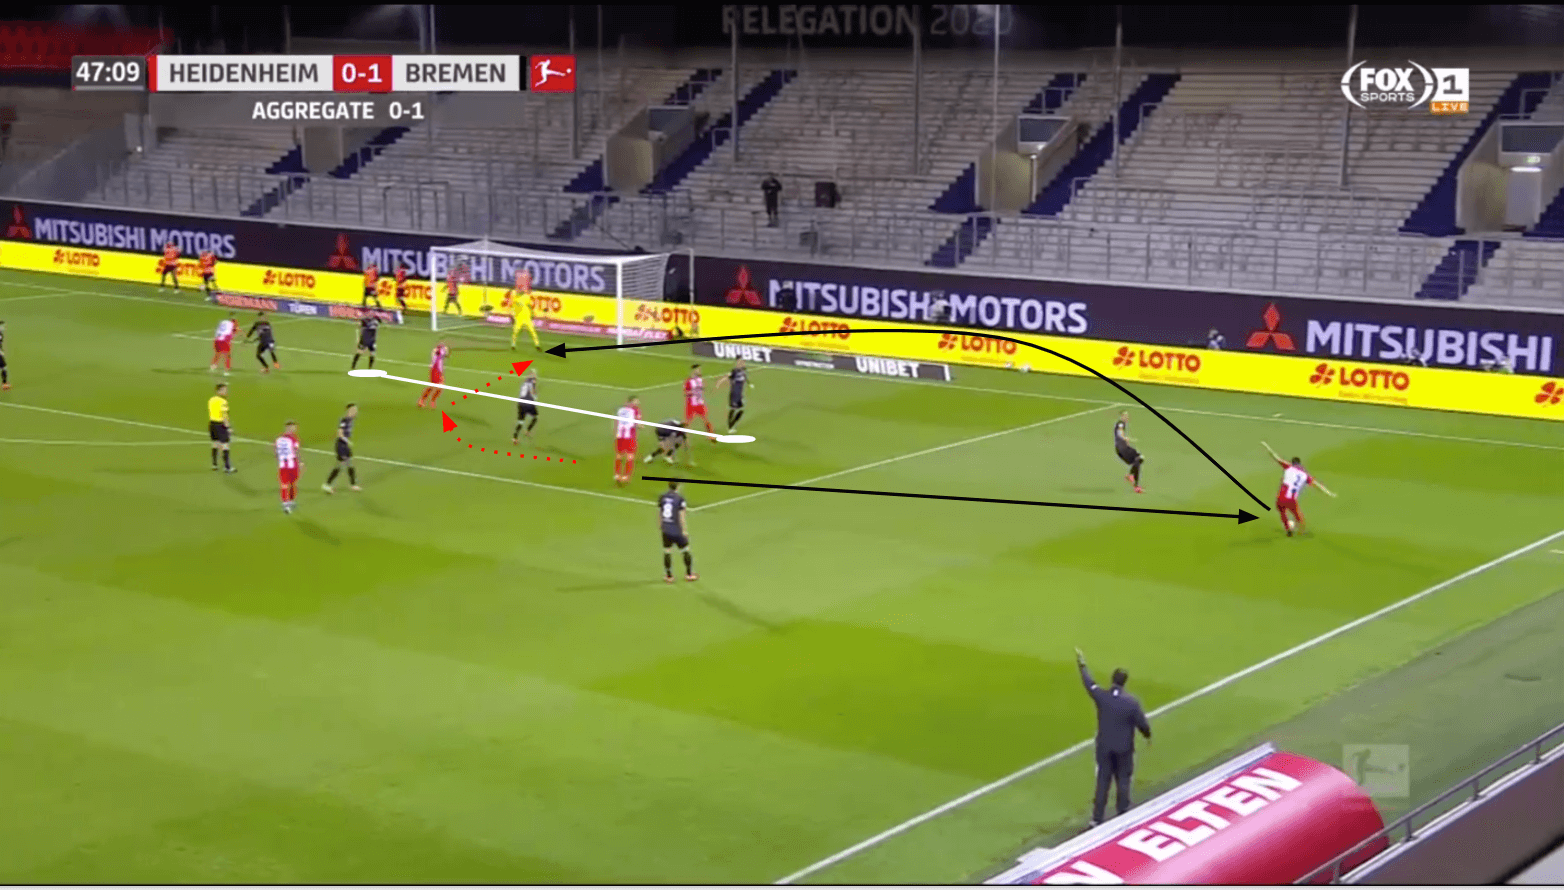
The first example came early in the second half. Off a throw-in, the ball moved inside before being played back out wide to Marnon-Thomas Busch. The space between Werder’s two centre-backs is absolutely massive. Otto, who was previously unable to get his foot on an excellent chance at the top of the 6-yard-box, had made a great run into that space. He was completely unmarked as he made the move, and Busch was able to curl in a cross to Otto’s head; unfortunately, Otto was again unable to properly connect with the ball, sending it past the near post and out of touch for a goal kick.
Their next good opportunity came from Heidenheim using a similar move that Werder had used in the first half: they became more compact to create room on the wing. In this instance, Busch, their right-back, was shown the inside of the pitch by Augustinsson.
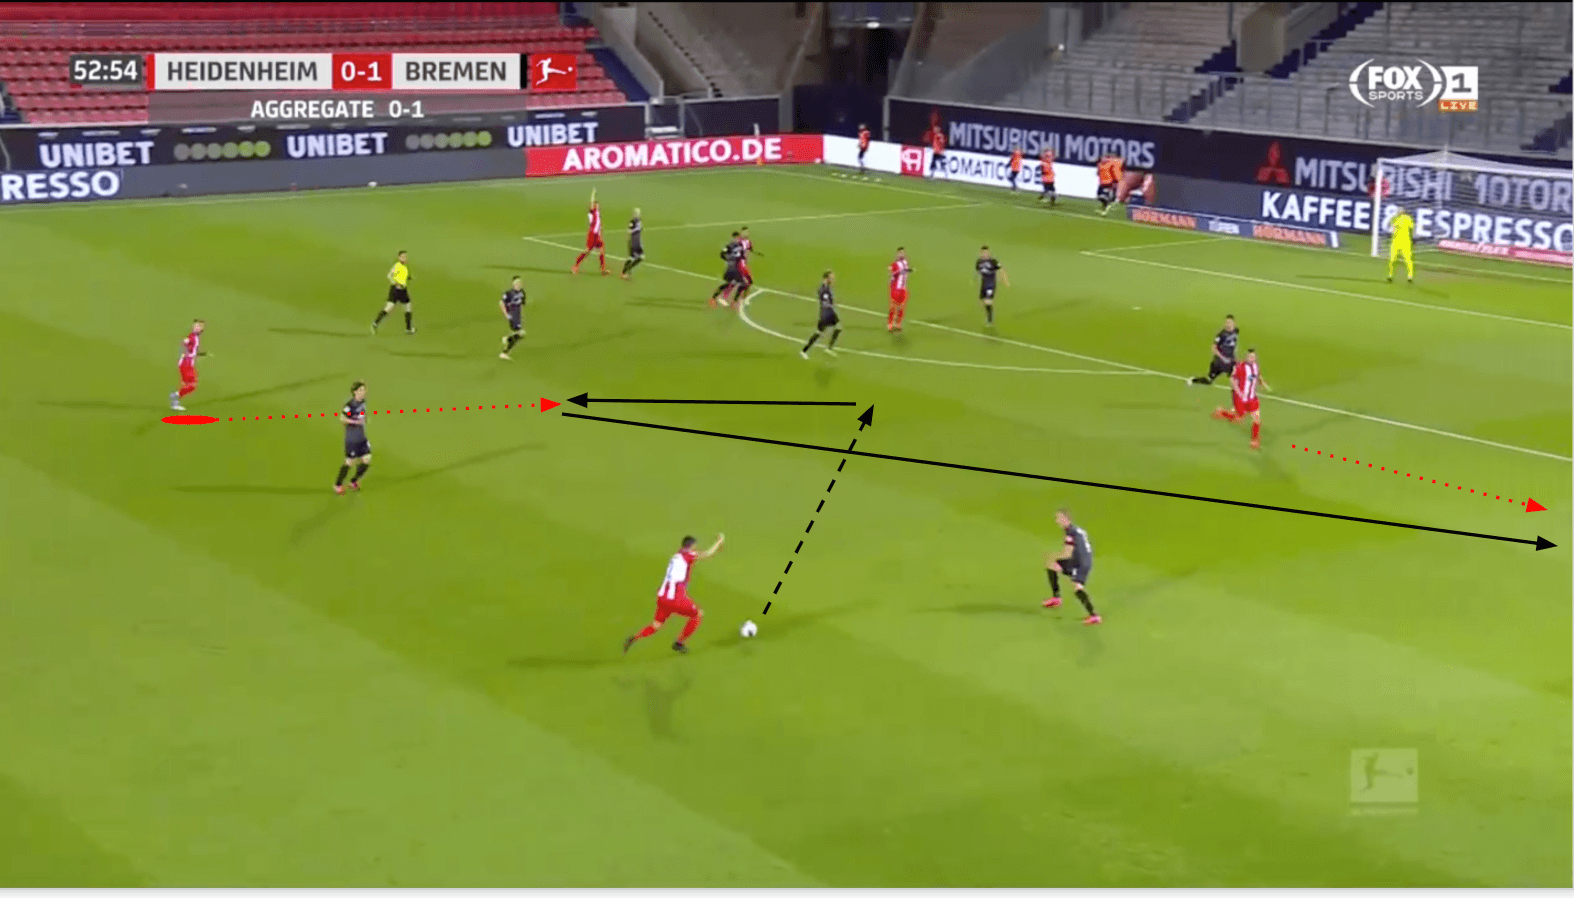
Busch took his space as Robert Leipertz, their attacking midfielder, essentially switched positions with him. Busch laid the ball off to a teammate who sent a long diagonal pass to Leipertz. Heidenheim had four attackers in the box, and even though they were outnumbered, Leipertz was not being pressured and could therefore wait for an opening to deliver the cross. However, his teammates in the box mostly stood still, waiting to react to a cross, which Leipertz delivered in the form of hitting the feet of the first Werder defender.
Heidenheim came close again with another cross from the right flank. Again, off a throw-in, Heidenheim were able to play a ball into the centre of the pitch in order to attract pressure before playing a pass out wide.
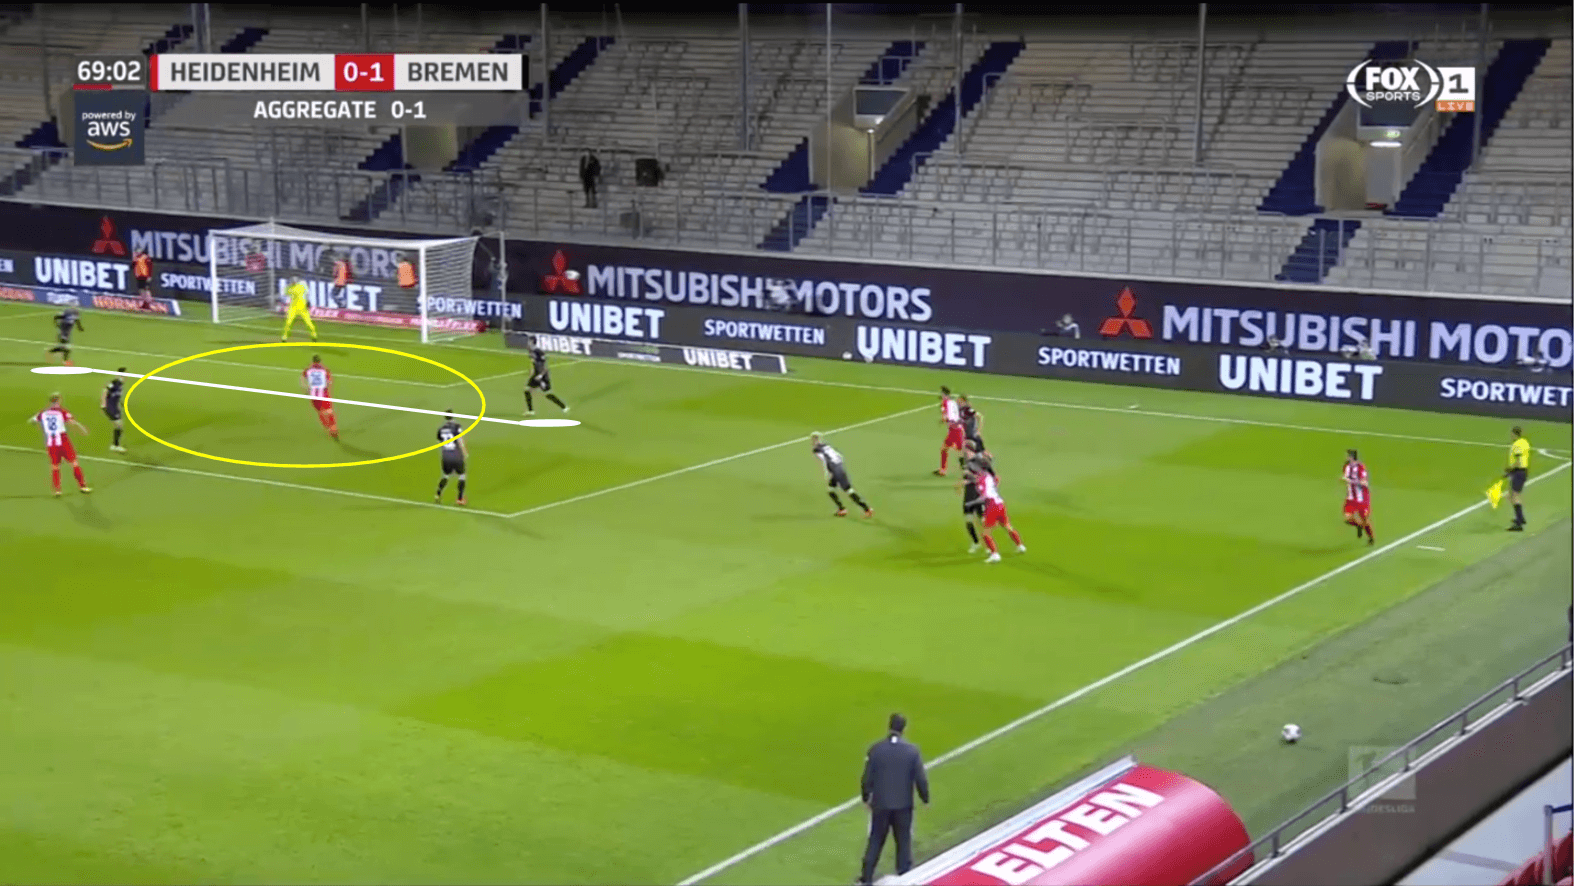
This again led to the Werder centre-backs allowing too much space to open up in between them. This meant that Otto could again find a large amount of space between them to exploit. Unluckily for them, Otto was unable to get to the cross in time, and Werder, despite some less-than-stellar decision-making, was able to clear the ball. While Heidenheim weren’t able to score from any of these chances, their first goal of the match was created by a stellar 1v1 move from Tobias Mohr, who dribbled past his defender on the wing and then cut in before blasting the ball off of the crossbar, where it deflected off of the feet of Tim Kleindienst and into the back of the net.
Werder take advantage of transitions
Werder Bremen knew that Heidenheim were going to throw everything at them in the second half, and so they set up more defensively, only seeing 36% of the possession in the second half. Consequently, Werder looked to take advantage of Heidenheim during the transitional stage of the game, and they almost punished them on multiple occasions.
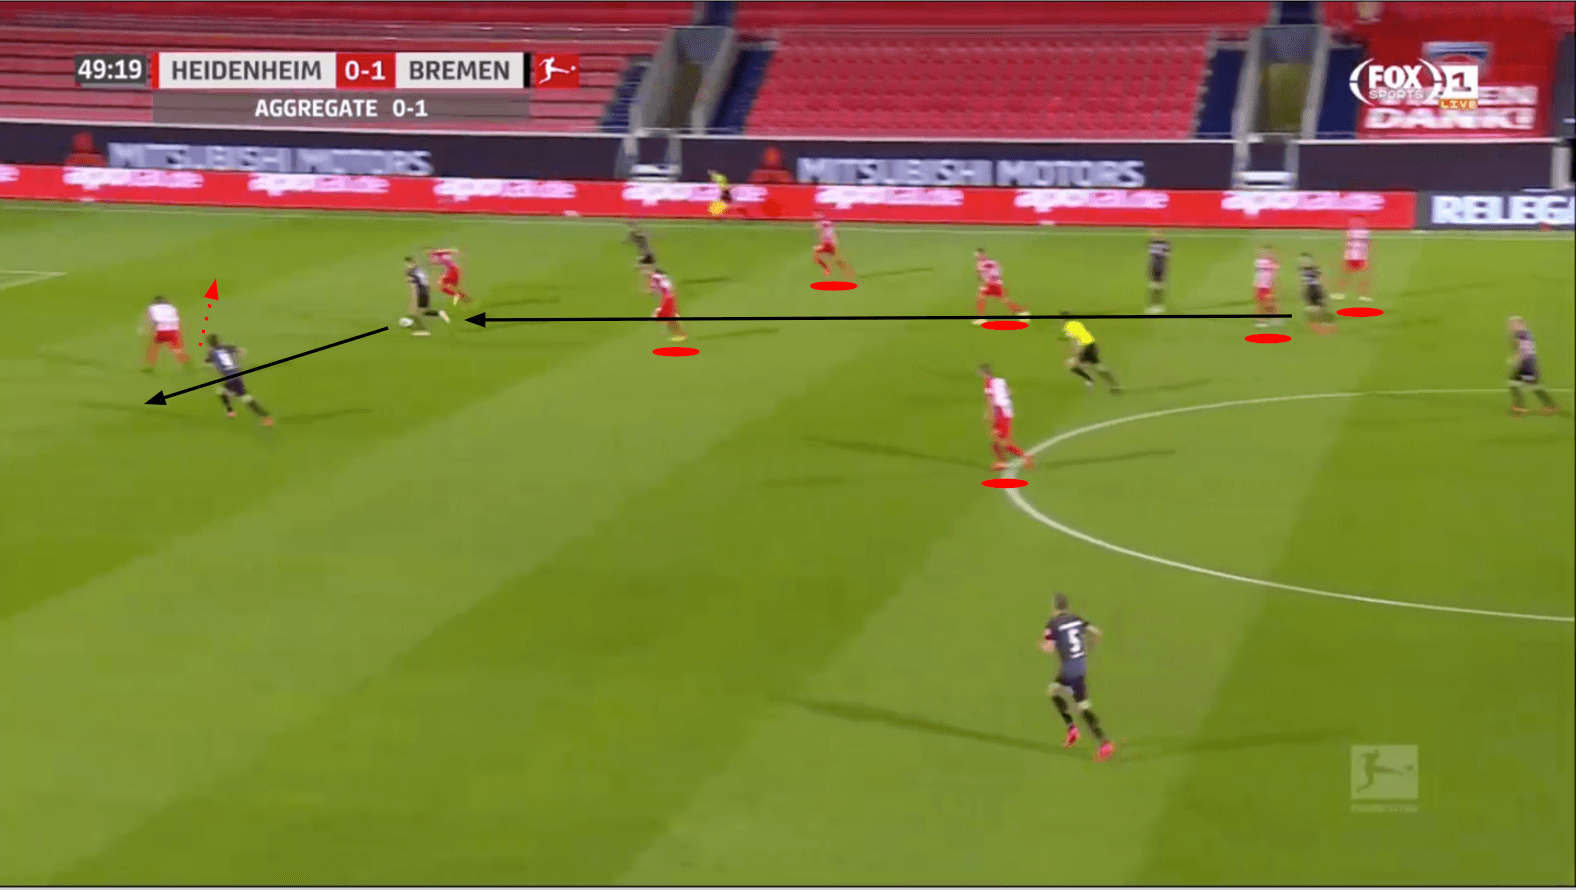
In the image above, Heidenheim were not able to organise quickly enough after Werder had won possession in their own half. After a quick two passes up the pitch, Rashica was able to play a pass that eliminated six Heidenheim players from the play. Busch, the last defender back, was forced to slide over and defend, leaving Yuya Osako with a clear shot on goal. Unluckily for Osako, he was forced to wait for the pass, and Busch had time to scramble and recover and block Osako’s shot. While it was technically defended, the opportunities for Werder were still there.
Off of a corner kick, Heidenheim were trying to play out of the back when Werder were able to dispossess them in the centre of the park. Heidenheim were in the midst of their own transition when they lost possession, causing even more defensive chaos.
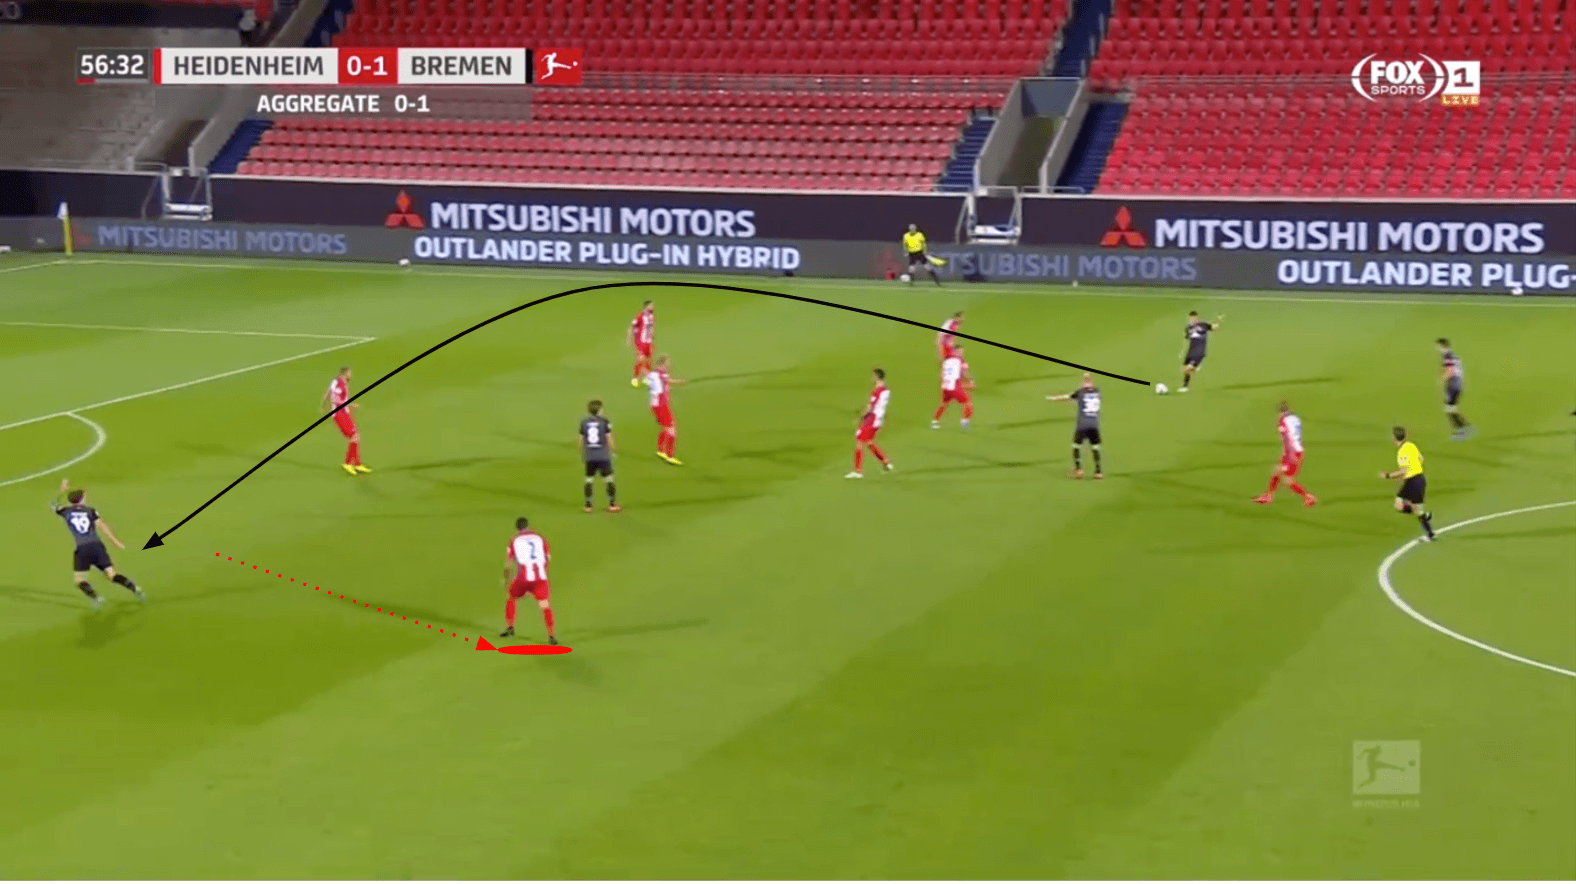
Busch was in the midst of pressing up the pitch when Werder found themselves in possession. As shown by his run marked in red, he was no longer connected with his back-line. Once Maximilian Eggestein had the ball at his feet, all he needed to do was play a proper pass in front of Sargent so that Sargent could have a shot on goal. While clearly open with plenty of space in front of him, Sargent had to wait on the pass from Eggestein, which was played behind him, and he was unable to have a decent shot on target.
Conclusion
Ultimately, Werder were able to secure their spot in the Bundesliga in what will be their 40th consecutive season. While they will certainly need to make some changes within the team to remain there next season and compete against the likes of Bayern Munich and Borussia Dortmund, they’ve done enough to be there at the moment. While Heidenheim will certainly be disappointed, the historical data shows that they were unlikely to be promoted, with only three teams from the lower level able to beat their Bundesliga rivals in the past 12 years.


Comments