There were a number of interesting results in last weekend’s Bundesliga fixtures, and perhaps the pick of these was between last year’s champions and runners up, with both Bayern Munich and Borussia Dortmund picking up losses. Borussia Dortmund travelled to Bavaria to take on Augsburg, with both teams coming off the back of good opening day wins, but it was Augsburg who came away with the three points this game week. Augsburg put in a superb defensive performance against an albeit stale Dortmund side to win the game 2-0, but the most interesting stat that jumped out of the game was the possession stats, with Dortmund dominating the ball as expected with 76% possession compared to Augsburg’s 24%. This then begs the question of how do you win a game with such little possession , and within this tactical analysis, I will seek to answer that question by examining both Augsburg’s defensive system and the positional play of Dortmund.
Lineups
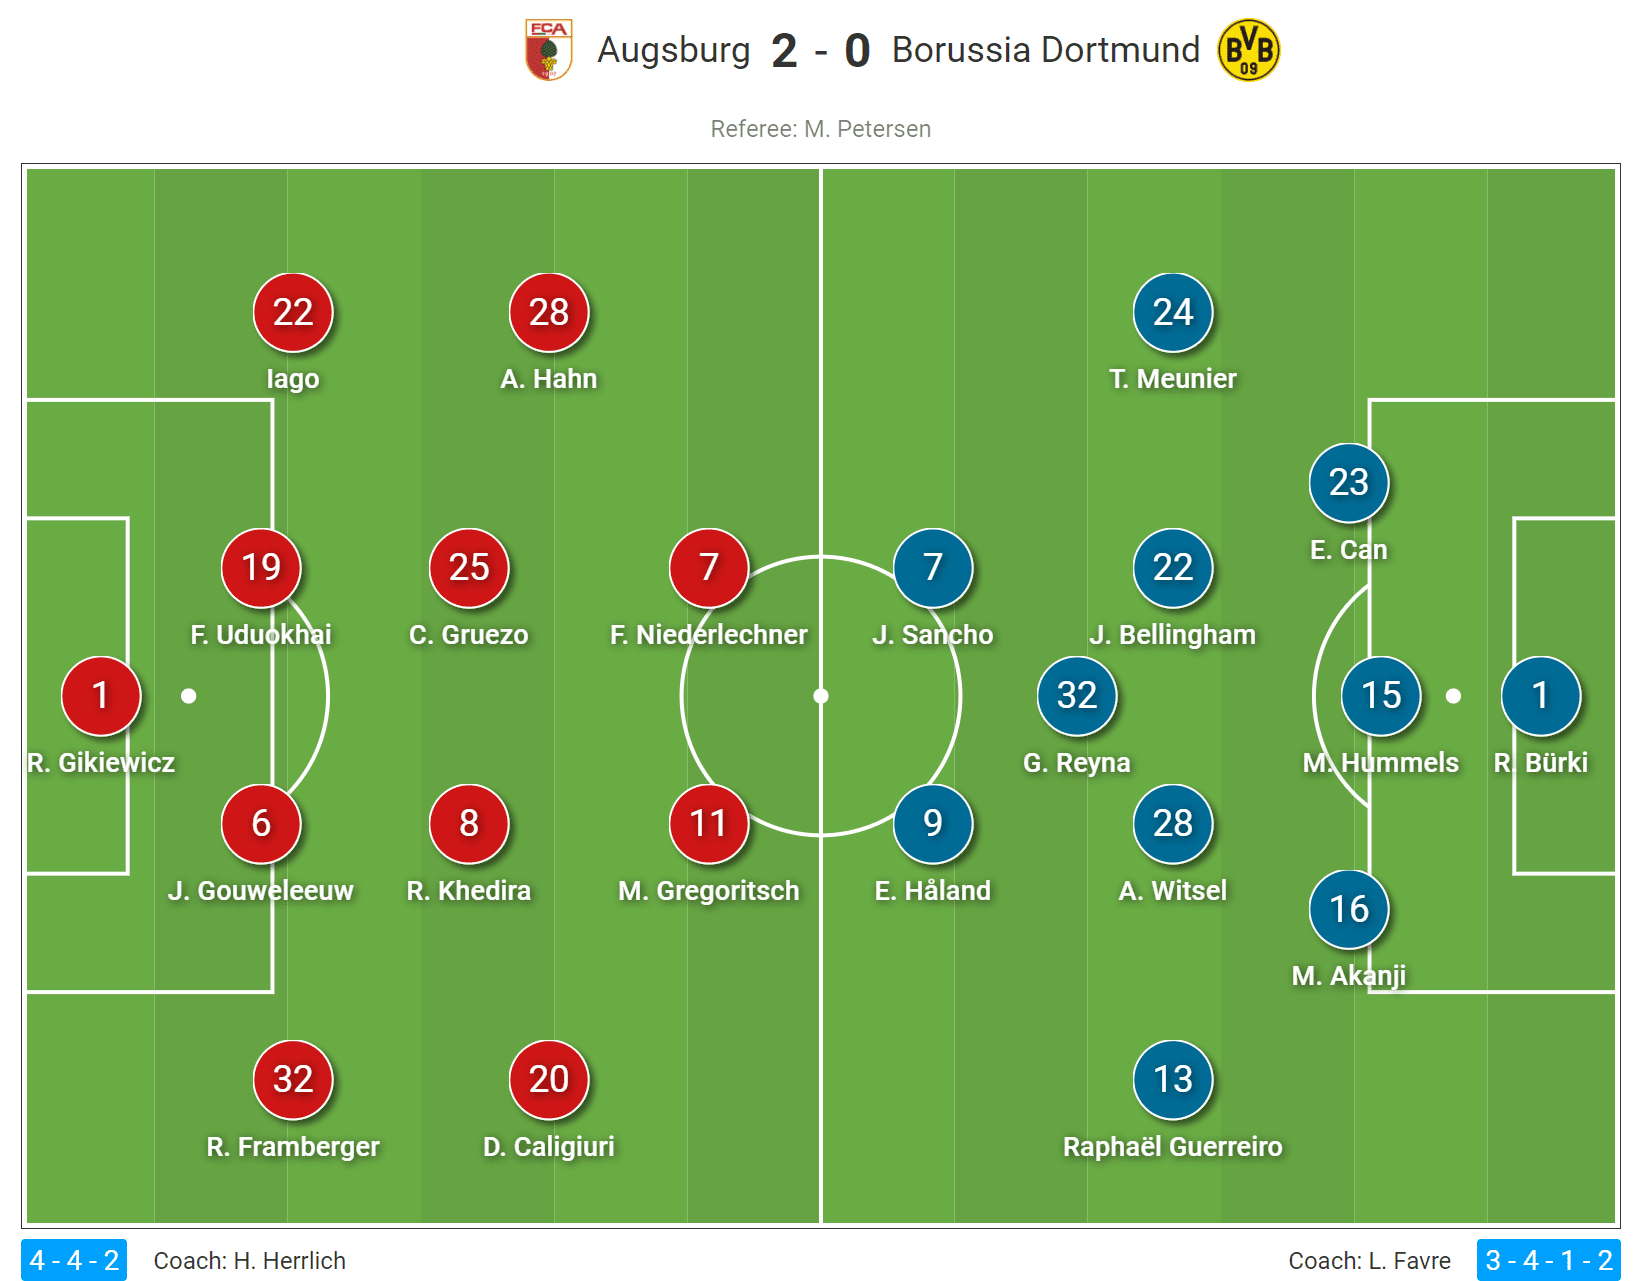
Heiko Herrlich’s Augsburg lined up in a 4-4-2, while Borussia Dortmund played a slight variation on their usual 3-4-3, with them this time opting for more of a 3-4-1-2, with Gio Reyna playing as a ten fluidly. Dortmund would adopt the more traditional 3-4-3 situationally, but certainly in central build-up Reyna acted as a ten.
Augsburg’s defensive system
As possession stats would suggest, Augsburg operated within a very passive 4-4-2, with Dortmund’s centre backs rarely pressured when in possession. Augsburg remained compact both vertically and horizontally, and the main focus of their play seemed to be to limit access to the central areas and central midfielders/pivot.
In a conventional 4-4-2 press, we would often see the strikers press the opposition centre backs at a certain line of engagement, however Augsburg were very disciplined in rarely pressing the Dortmund back line, and instead they stayed deeper and looked to cover the Dortmund pivot (Axel Witsel). We can see an example here where the ball near striker remains close to Witsel to prevent him from receiving, while his partner also remains compact to the central area. The wingers would remain narrow and cut access to the half-space, while the central midfielders would mark the Dortmund central midfielders.

The wingers would remain narrow and so passes outside to the Dortmund wing-backs were allowed, where the Augsburg full-back would push higher and press here. The covering of the pivot by the two strikers meant that Augsburg looked to limit any overloads in midfield, and so they rarely had to push higher to mark central midfielders.
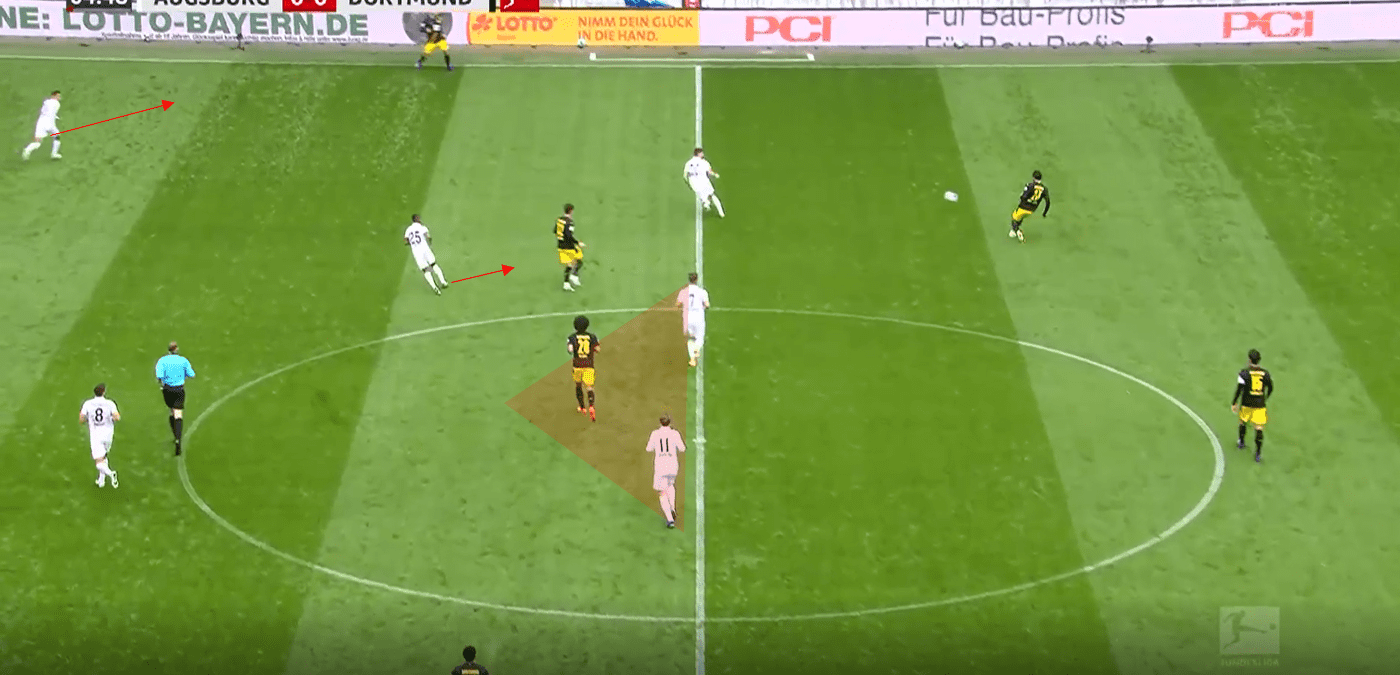
As a result, when the ball went wide, the central midfielders could simply follow their markers and not be overloaded by a pivot also being able to receive. We see here the left central midfielder drops with his player, while Witsel makes no attempt to receive and is also covered by the two strikers. Dortmund eventually then get forced back to their centre back and reset the play.
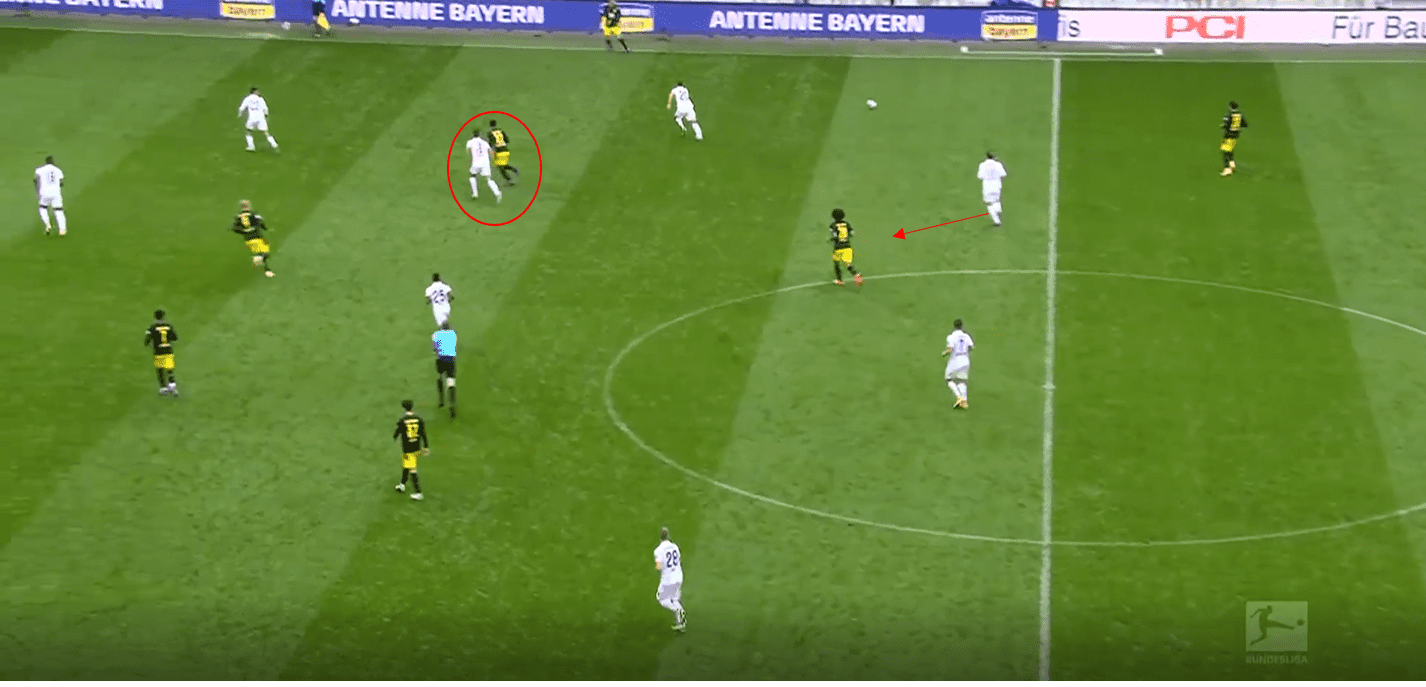
We can see another example here where the positioning of the strikers benefits the team. We can see again the strikers cut access to the Dortmund pivot, while the left central midfielder marks the other deeper central midfielder. Gio Reyna occupies the half-space slightly higher, but the narrow positioning of the Augsburg winger means access to here is also cut. We see Augsburg’s right central midfielder doesn’t actually need to cover anyone here, as the strikers cover Witsel, and so this player is free to pick up any player who may drop in to receive.
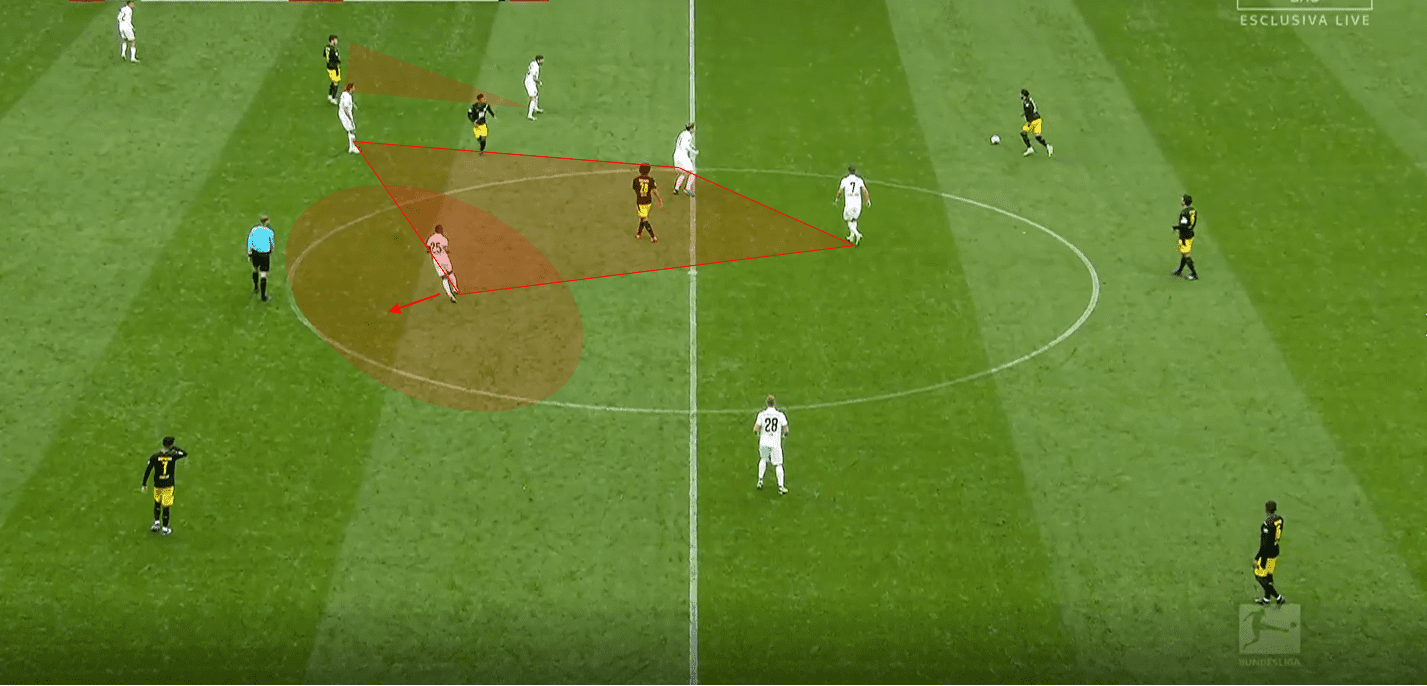
We can see this explained further through a theoretical standpoint below. Here, the defending team operates in a much less passive and compact 4-4-2, with the strikers here pressing the nearest centre backs when they receive the ball. As a result, access to the central midfielders or pivot isn’t cut, and so the Augsburg midfielders mark the nearest players and engage in a 2v2 situation. However, with Dortmund using a ten, they can create overloads around this area by having this player drop in. This creates a 3v2 and would allow Dortmund a chance to progress.
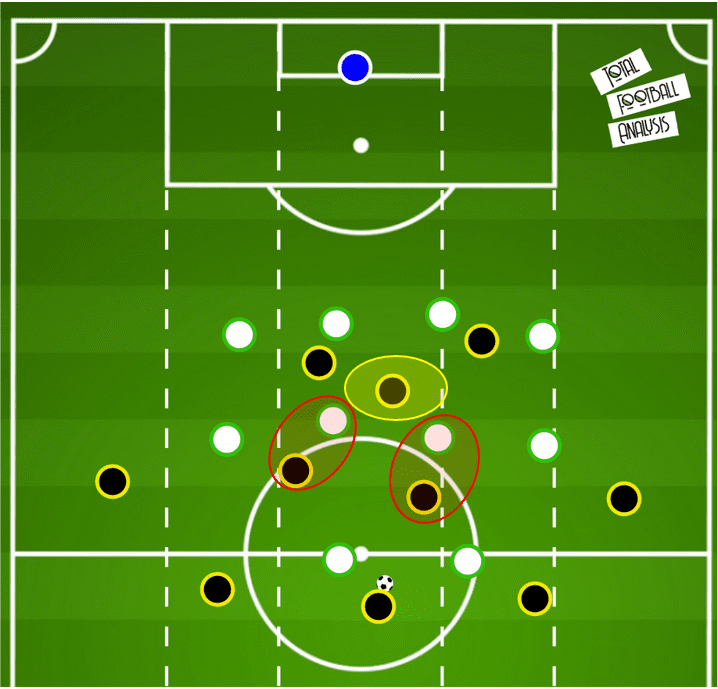
Here though, looking at Augsburg’s system again, we see now that the ball near midfielder is eliminated by the strikers, and so when that ten drops to create the overload, a midfielder can cover him, Augsburg can maintain a 3v3 therefore and Dortmund struggle to overload.
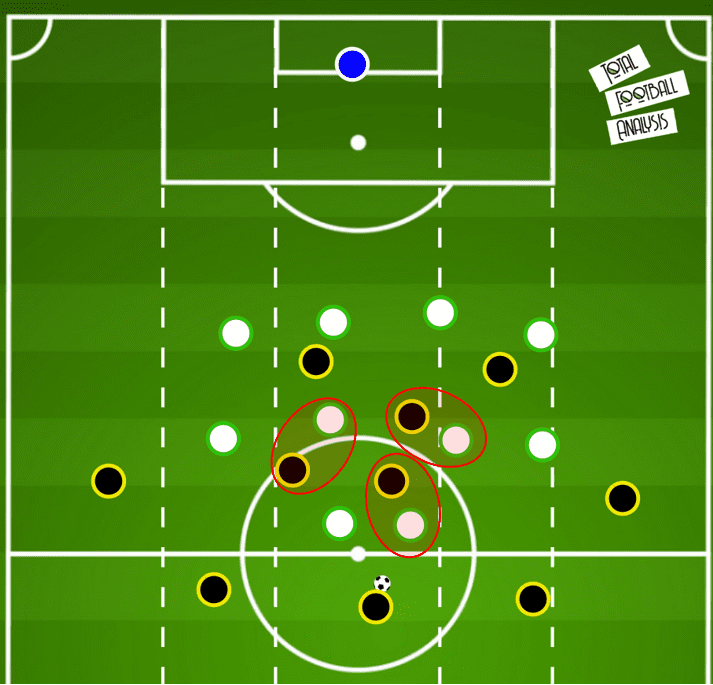
From wider angles, the positioning of the strikers not only cut lanes to the pivot, but also generally cut off the centre of the pitch, which meant that the Augsburg central midifelders could be more compact around the half-space.
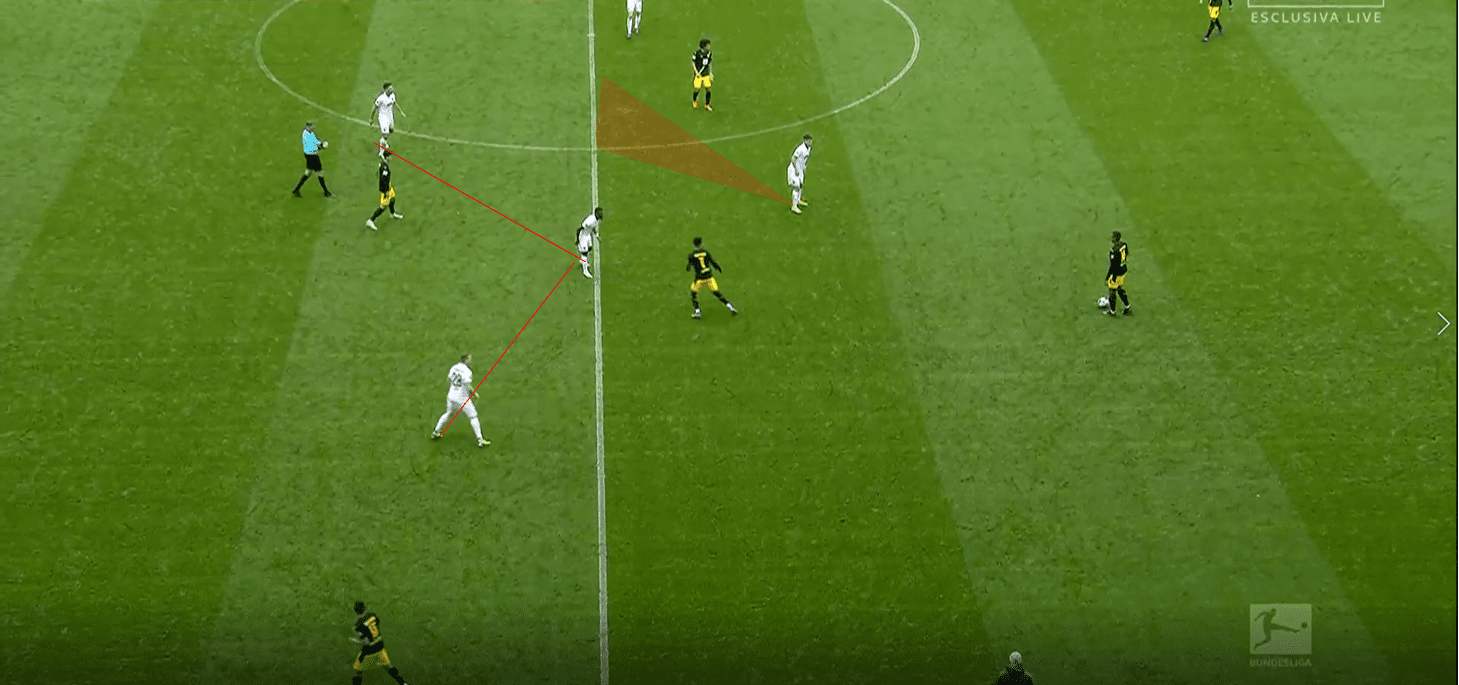
This therefore prevented Augsburg from being influenced if Dortmund adjusted into a 3-4-3 midfield box, as the central lane could be left less covered due to the positioning of the striker, as we see below. The ball near central midfielder can divert his attention to the half-space instead.
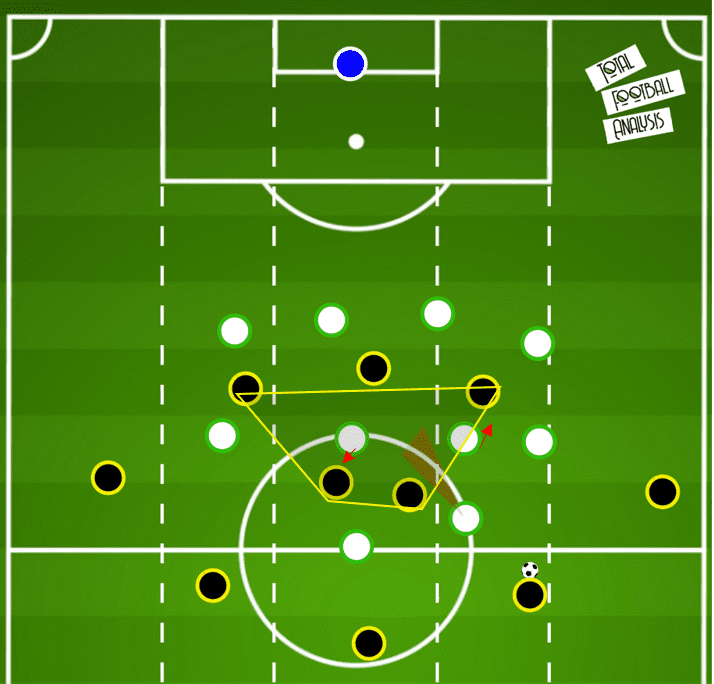
Dortmund’s poor half-space occupation
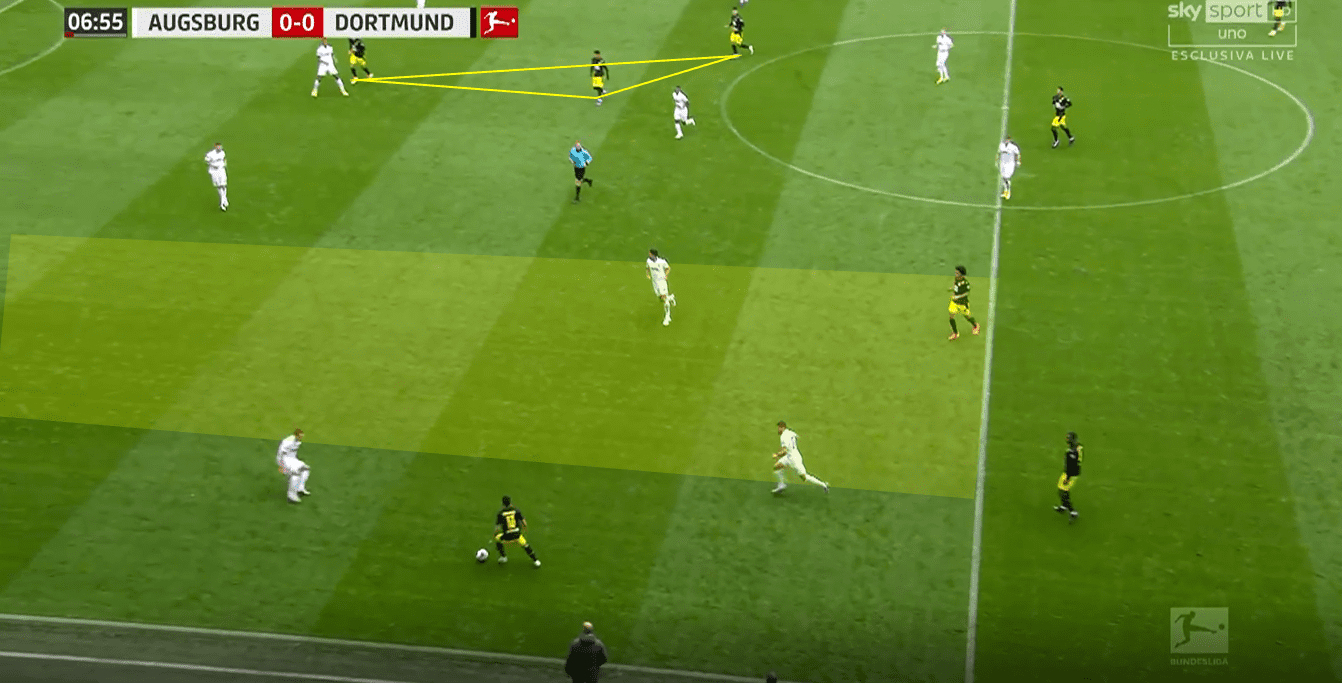
One of the common trends in Dortmund’s poor positional play was their lack of occupation of the half-space. Dortmund often struggled to create any kind of overloads in this area, and generally their spacing was not optimal in order to open the half-space up enough. A common theme for Dortmund in this regard was that following quick switches in play across the back line, Dortmund were unable to get into a structure to progress the ball. We can see a perfect example below where the ball is played across the back line and reaches the left wing-back, but no players offer themselves in the half-space to receive. In fact, we can see that the front three, who have the role of being those half-space occupiers, are all taking up central positions. Of course it is not possible to get set immediately after every switch in play, but Dortmund failed to do this consistently.
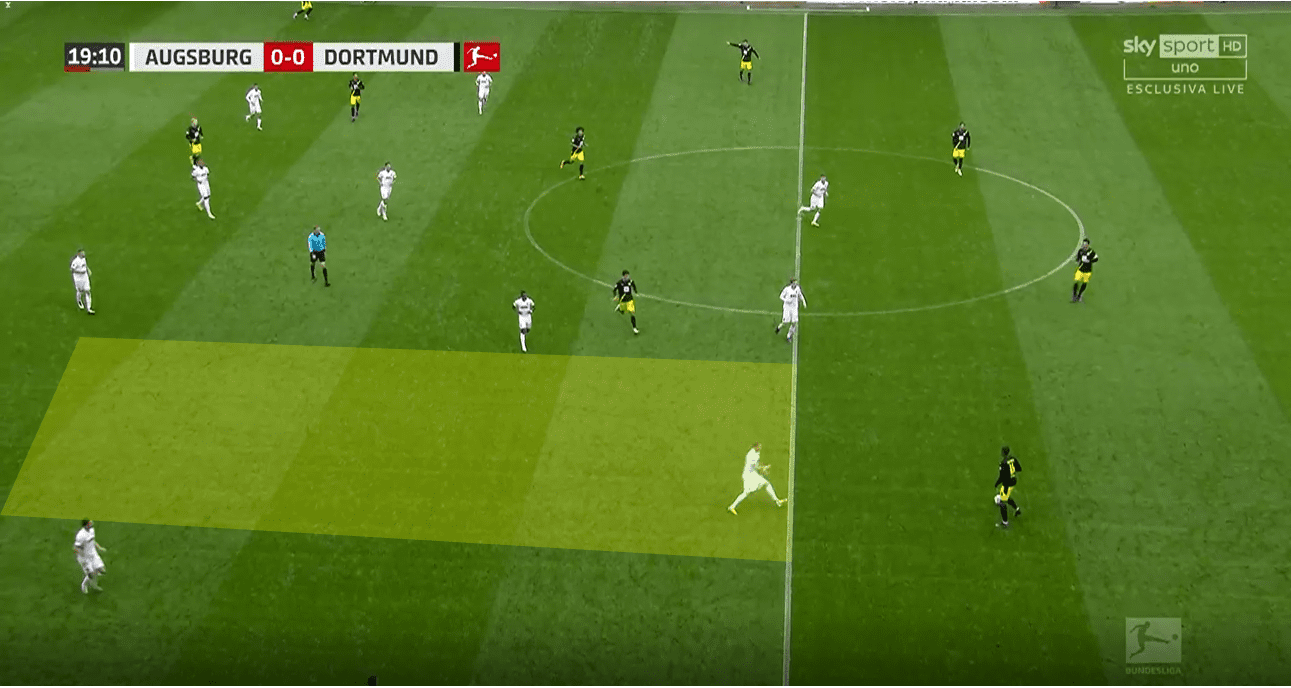
We can see another example below where Dortmund position themselves too wide on the right hand side, so when the ball is switched, their space occupation on the left suffers.
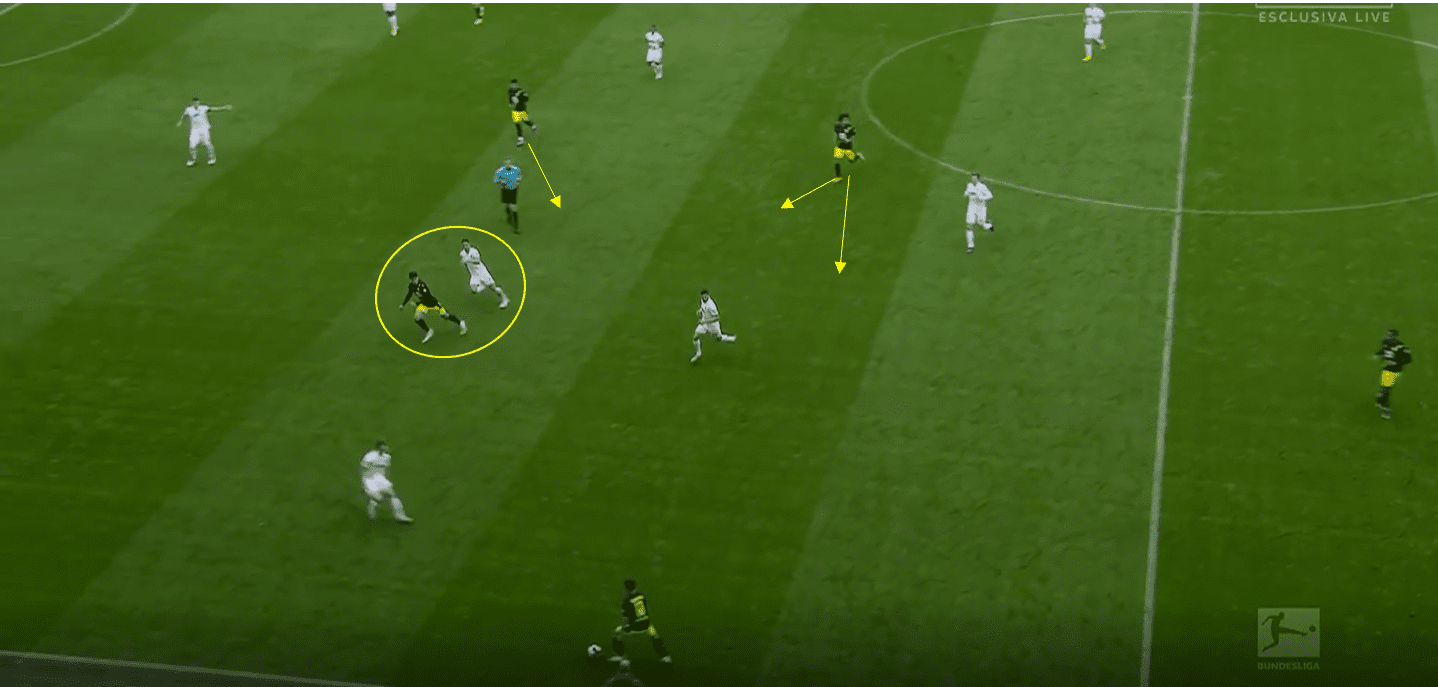
The main problem for Dortmund in terms of ball progression was creating a free player in the half-space. As we’ve mentioned previously, Augsburg’s central midfielders were often able to track their Dortmund counterparts, and so Dortmund struggled to access the half-space in any meaningful way, as they would often be marked as they are below. Dortmund had to try to find a way to occupy the centre back of Augsburg or overload the midfield area. Dortmund are usually excellent at overloading the half-space, but in this game struggled. We see a good example of this here where Reyna makes a movement forward in the half-space, but no Dortmund player then makes a complementary movement to receive in the half-space. Sancho could come wider to receive in the lane created by Reyna, or Axel Witsel could drop deeper, but neither players offer themselves and so Dortmund go backwards.
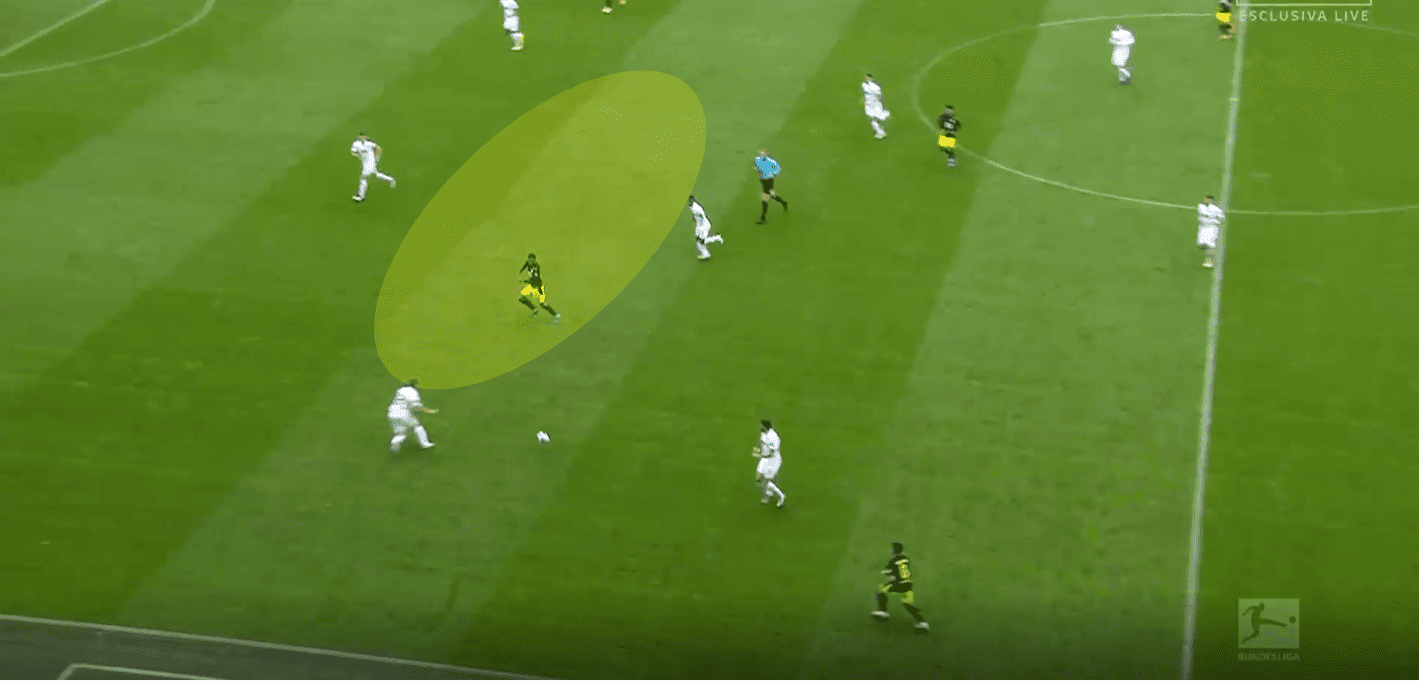
In this example here Dortmund do well to access the half-space, but the player on the ball is isolated and has very few options. He is able to create separation from the midfielder, but the Augsburg centre back is unoccupied and Dortmund don’t threaten a run in behind or come short.
Dortmund often had problems with width too, and we see here Sancho moves wider than needed when trying to receive the ball. The Augsburg central midfielder here concedes space in front of him allowing the Dortmund central midfielder to receive, however when he does receive, there is no occupation of the half-space due to Sancho’s wide positioning. Dortmund needed to occupy the centre back here to allow for a potential run in behind.
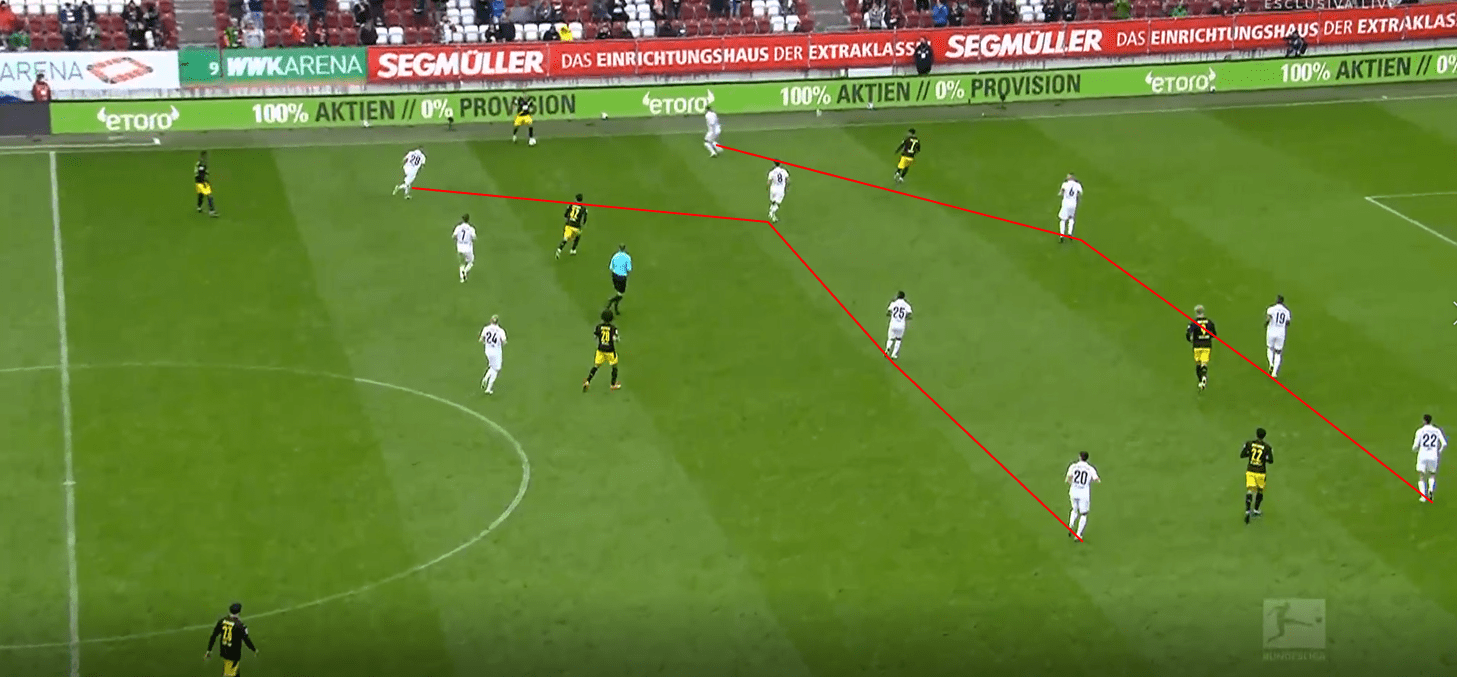
In this example again, Dortmund’s general positional play principles are let down, as they rely on Reyna here to receive ahead of the central midfielder. Because of this, Dortmund find it difficult to create an overload in the half-space or behind the central midfielder. Ideally, we would see one of the central midfielders receive the ball in this position, allowing the number ten to overload an area. Sancho again here pulls wide in an attempt to stretch play, but nobody uses the space in behind.
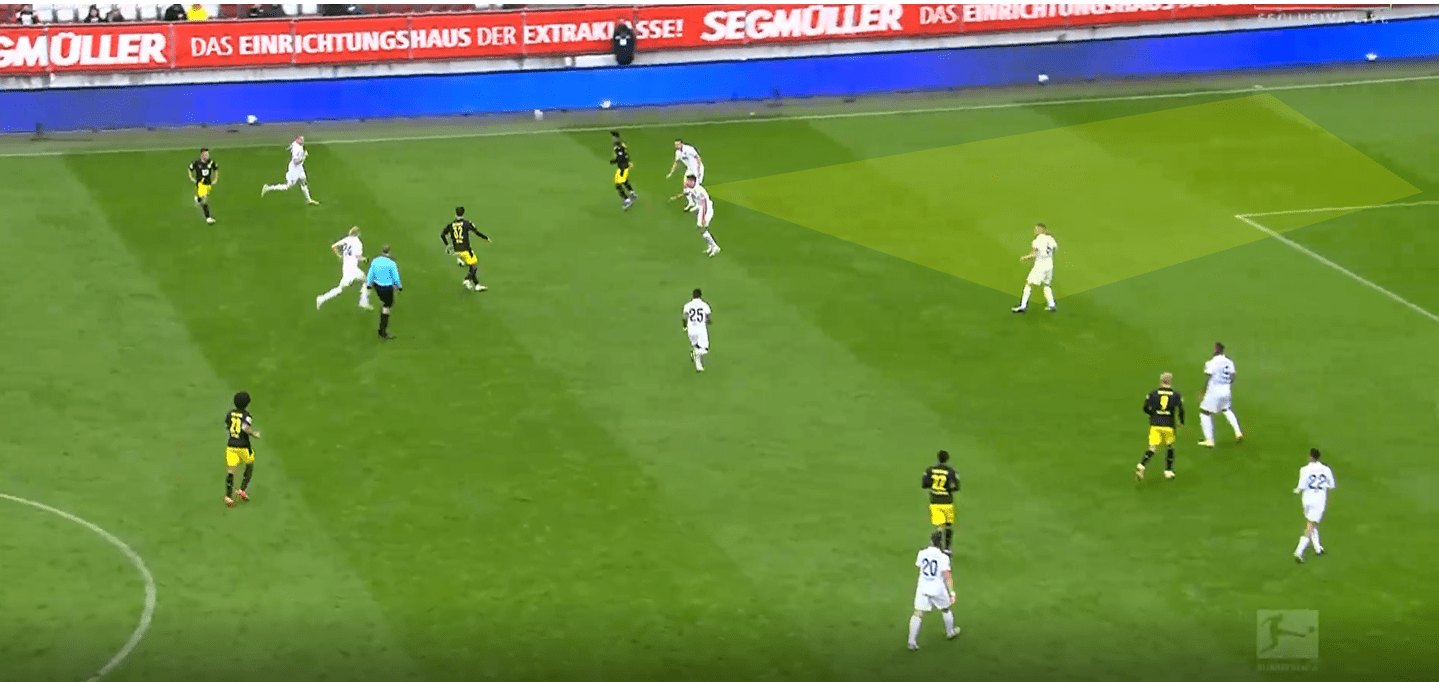
Of course within the game there were examples of Dortmund’s structure being optimal, but more even when the structure was correct Dortmund weren’t always able to make the right movements. We can see an example here where the full-back is occupied well in the half-space, which opens up an opportunity for a run from deep from the wing-back. Thomas Meunier stops his run though, and so Dortmund slow play and struggle to progress.
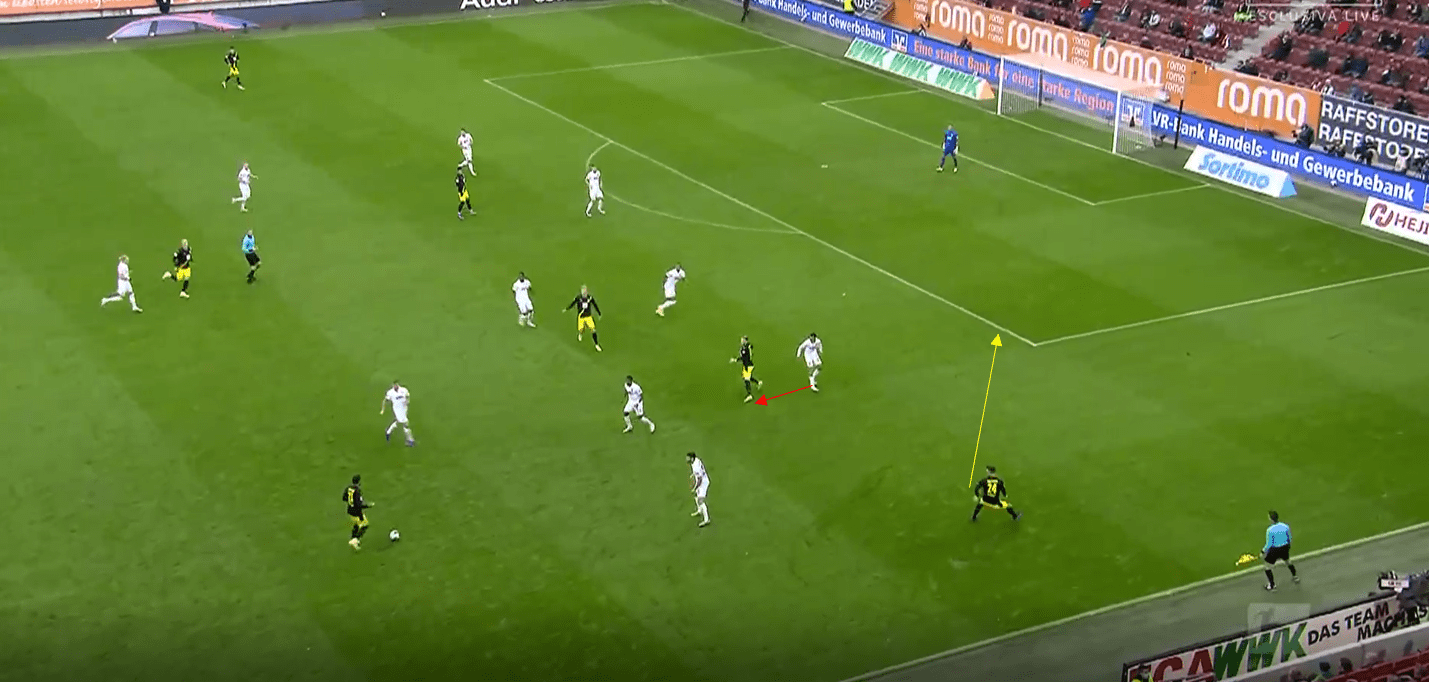
We can see a good example below of an overload around the centre back here, with Haaland occupying the centre back while another player arrives from deeper. This allows for a 2v1 on this player, and also opens the possibility of a 2v1 on the far centre back.
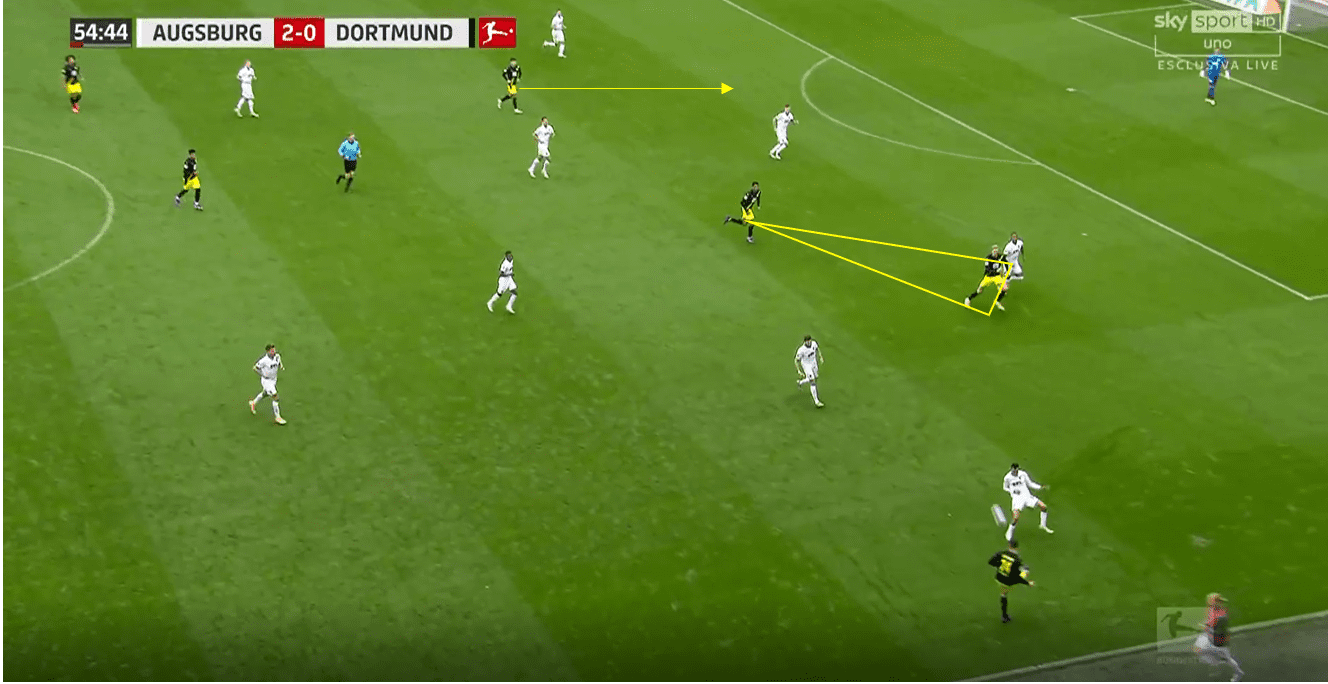
Gio Reyna here has a nice idea in order to penetrate through the half-space, as he moves deeper at first in order to engage his player, before then looking to turn and run in behind. The wing-back struggles to create a direct angle for the pass though due to Augsburg’s narrow structure, and so Dortmund here need to engage the Augsburg central midfielder and create a better angle to use the half-space. Axel Witsel didn’t do enough for me in the game to escape the coverage of the Augsburg strikers, and here is a good example where he should offer himself for the pass.
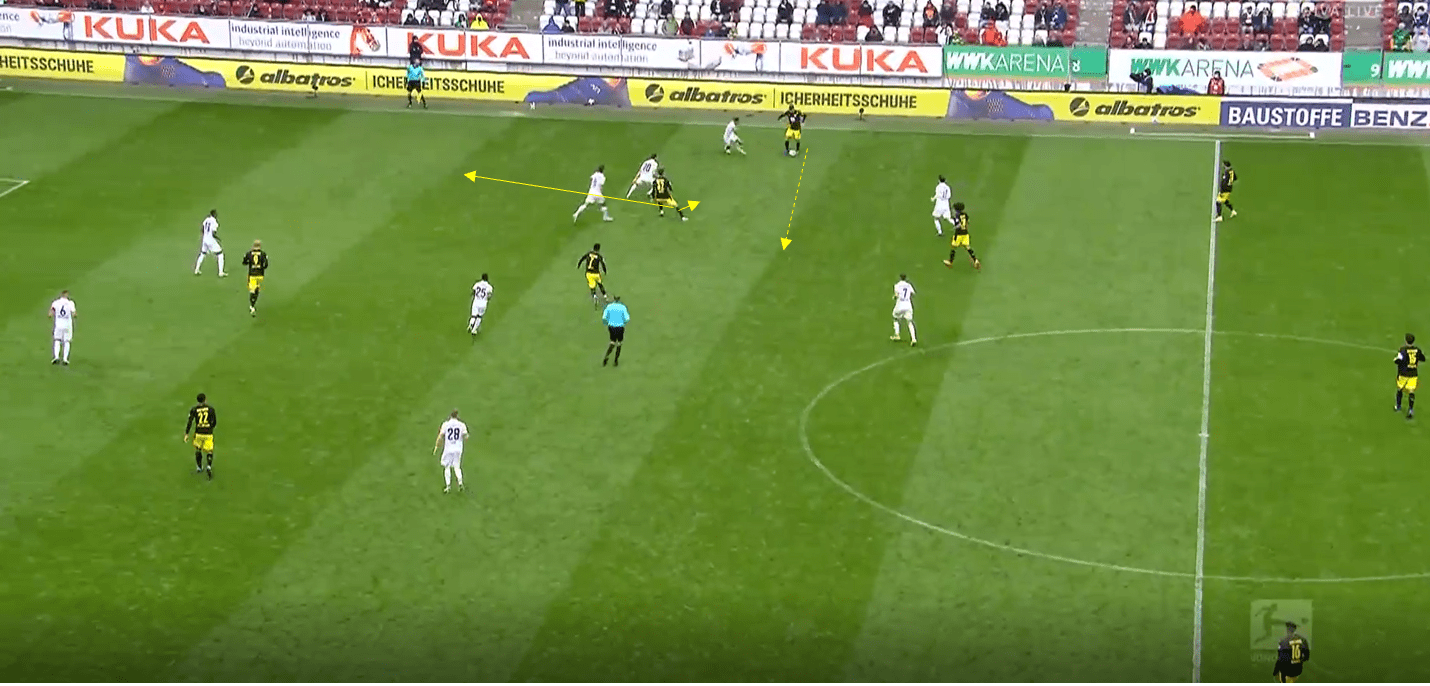
In this final quick example here, Dortmund get the correct structure, but their staggering is poor. By that, I mean the height of the players isn’t optimal, as all players are on the same line. This means that when a player receives the ball, it is difficult to generate any passing angles to progress the ball. Ideally, the central player of the three (Julian Brandt) should be arriving into this space facing the goal, as this improved body orientation would allow him to play the ball forwards and evade markers.
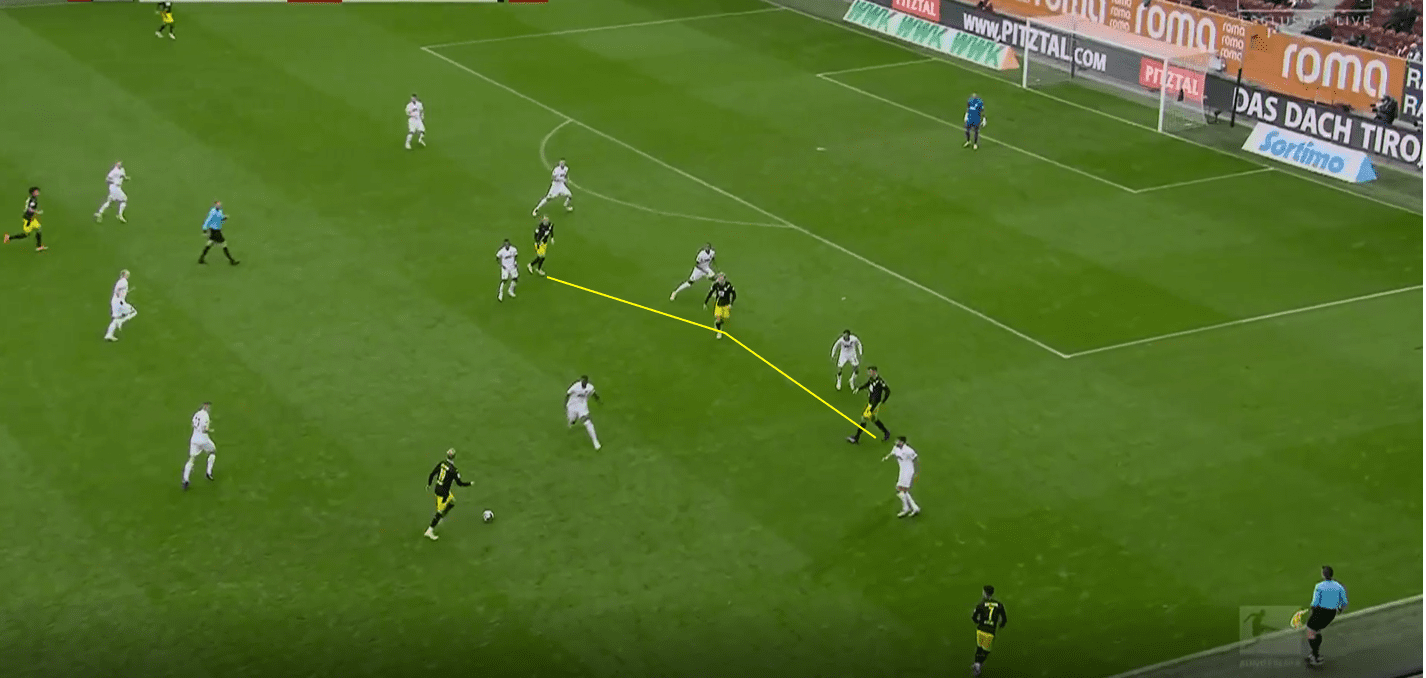
Dortmund’s diamond positional play
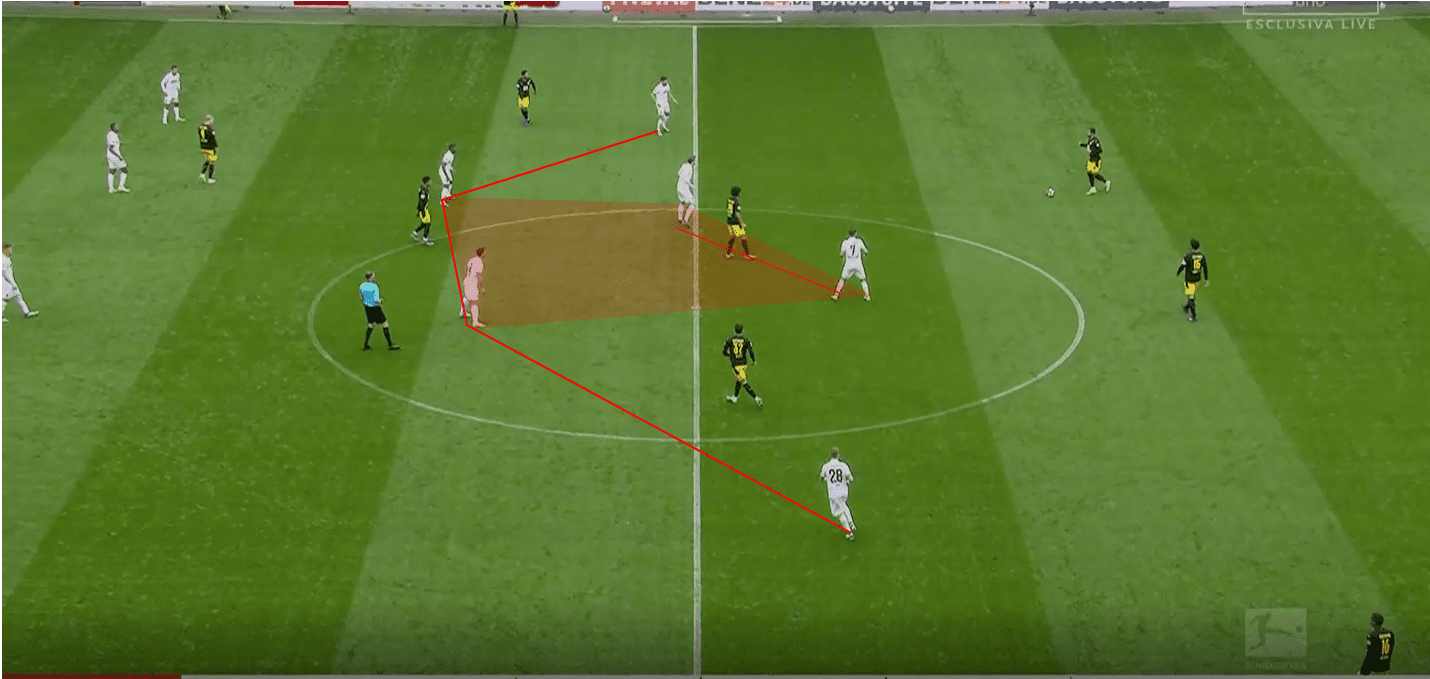
We covered briefly the fact that Dortmund struggled to create midfield overloads as a result of Augsburg’s structure, however Dortmund did come up with one nice variation of this when they dropped into a 5-4-1 diamond. We can see an example of this diamond below, with Gio Reyna and Jude Bellingham as the two ‘eights’ while Jadon Sancho acted as the ten in the diamond. This created effectively a 4v3 overload in Dortmund’s favour when we consider the role of Augsburg’s strikers, and so it allowed some central progression thanks to some superb passing by Mats Hummels. We see the two Augsburg central midfielders are occupied on either side and are attracted to their usual player, and so Sancho can drop into space unmarked.
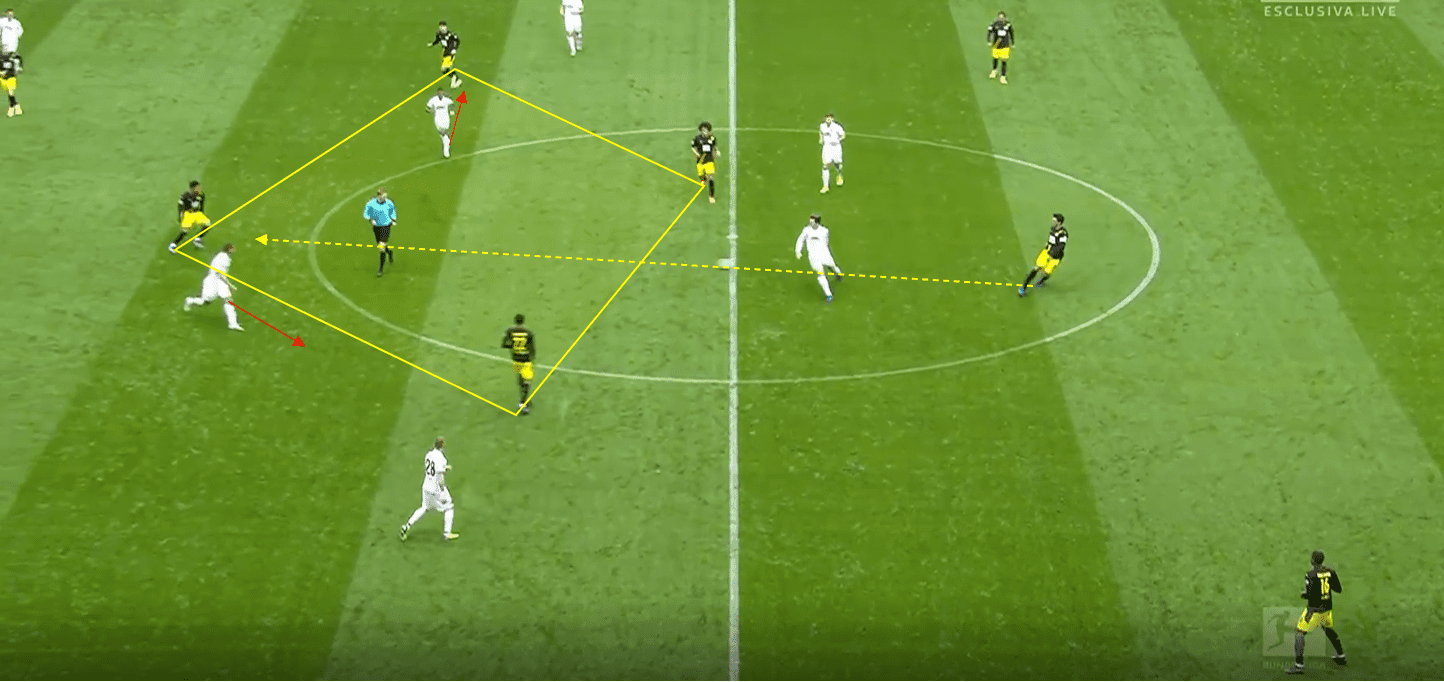
In this example below we see the same concept again, where Augsburg’s central midfielders are occupied and overloaded, with Augsburg this time being more oriented towards that central ten rather than the two eights. As a result, left central midfielder Jude Bellingham can receive in more space and play forwards.
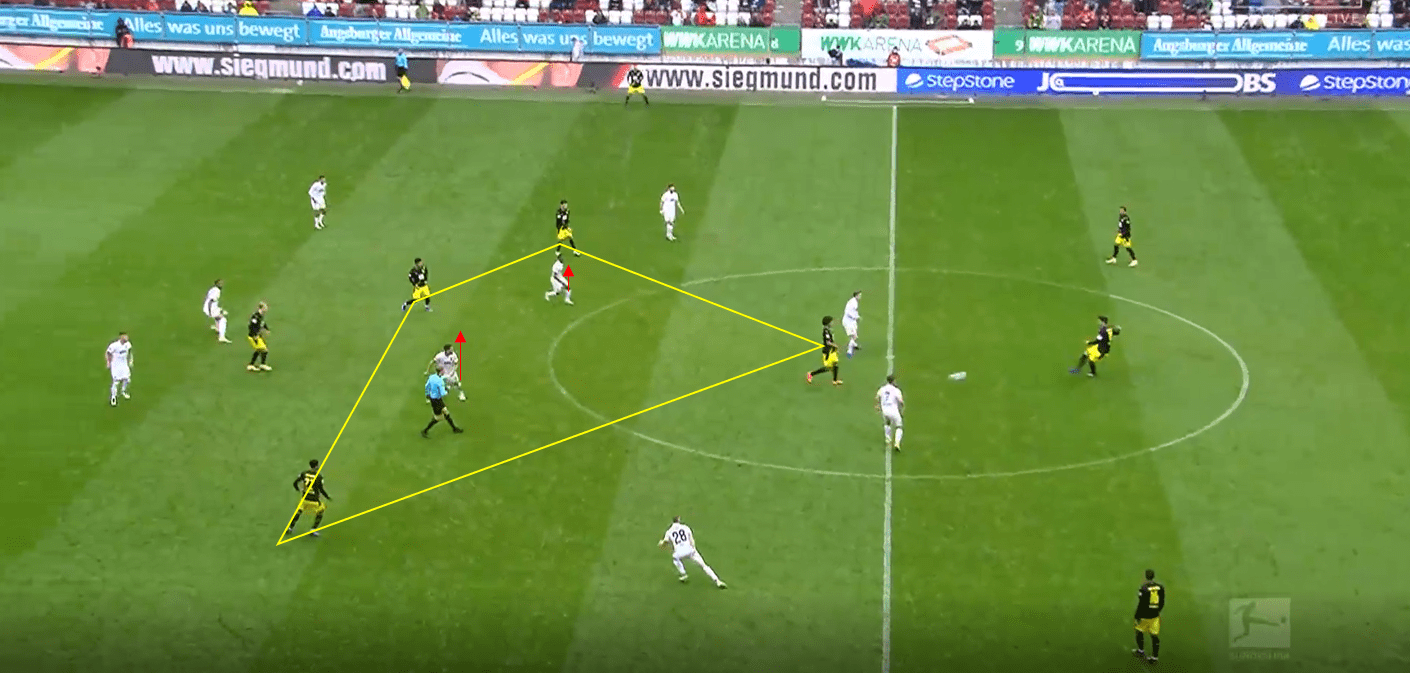
In this example again here, we see Hummels is able to squeeze an excellent pass past the Augsburg strikers and into that number ten. The Augbsurg midfielders are this time again occupied by the two wider central midfielders.
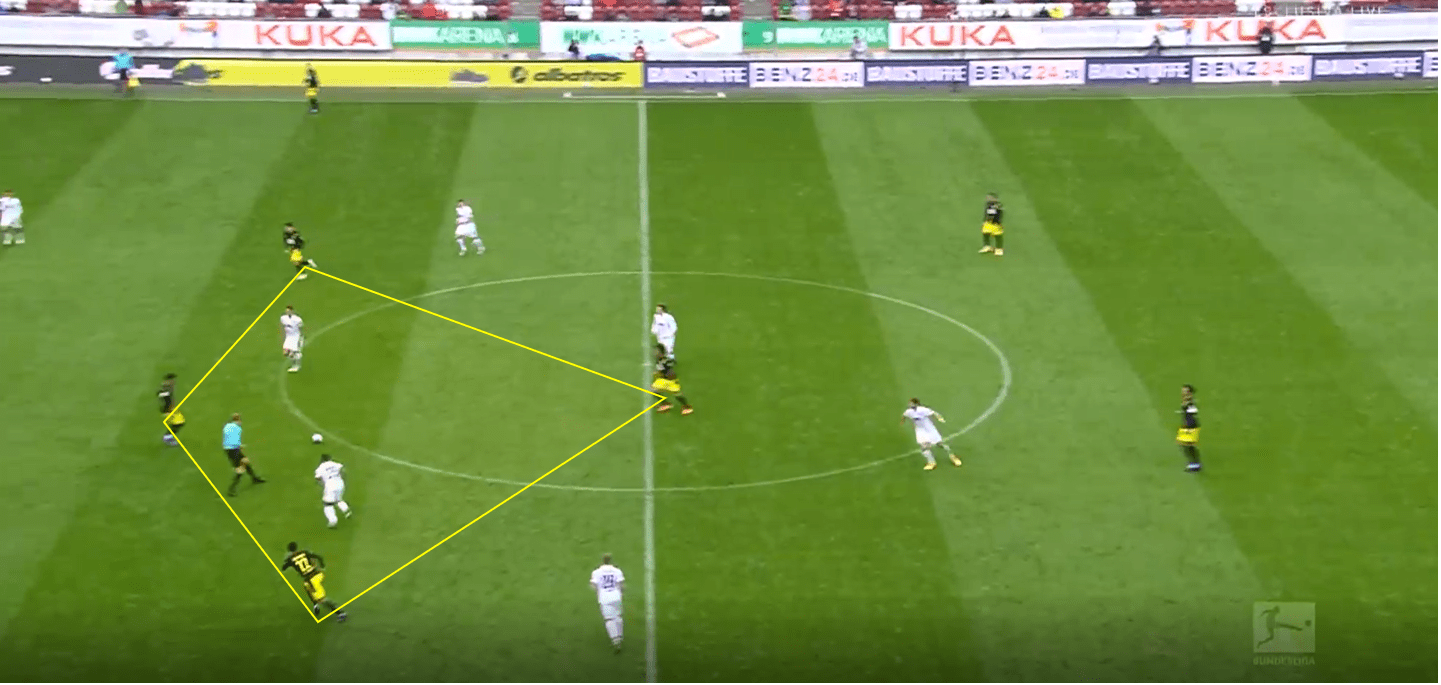
There were however a few downsides to this being one of Dortmund’s main ways of progressing the ball. The first and most obvious is that having this diamond midfield meant that they had to commit four players into this area just to get behind the second line, and so Dortmund would often only have one player in Haaland to play the ball to after progressing play. A less obvious but equally annoying downside is that the attacking midfielder receiving the ball would often have poor body orientation and would receive with his back to goal, and so it became difficult to progress the ball once this player had received the ball. I would have liked to see Dortmund try to utilise this tactic but with the ten arriving into the space rather than receiving to feet every time.
Dortmund fail to capitalise on a potential problem solver
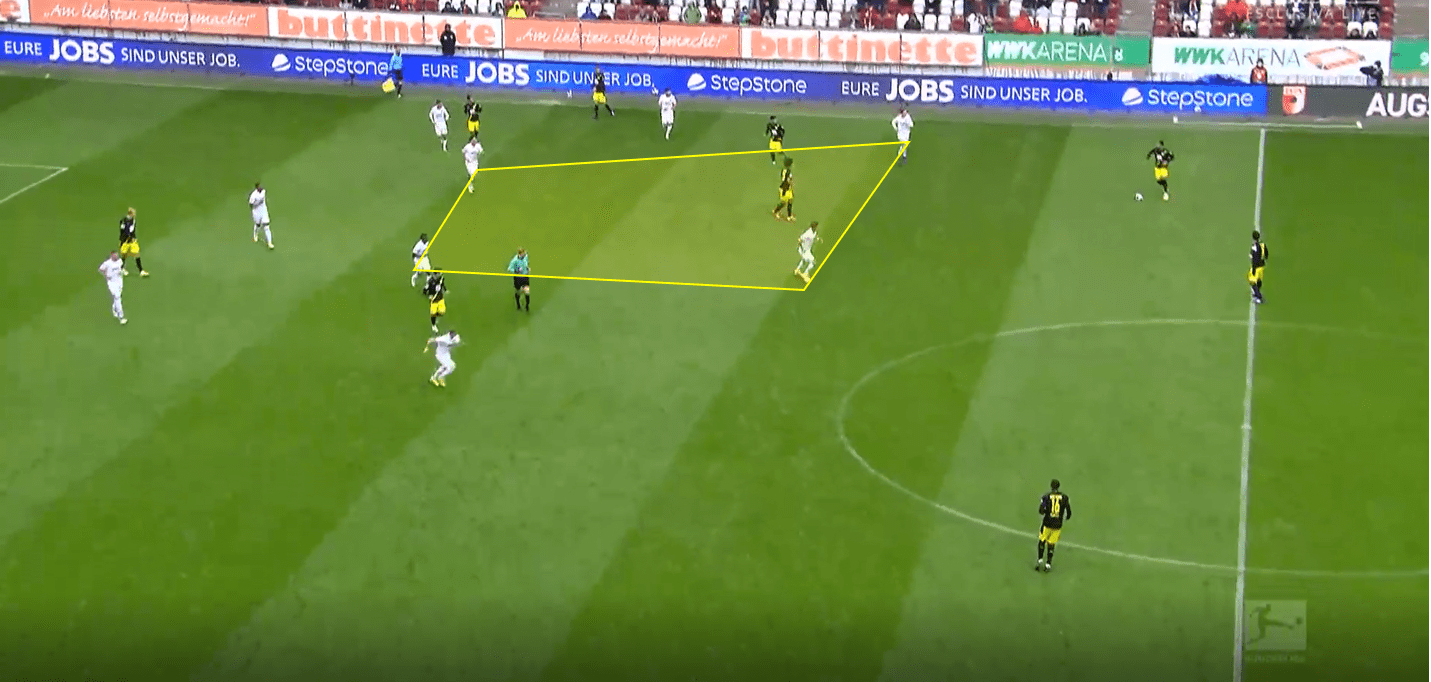
As I’ve touched on already, one of the main areas of difficulty for Dortmund was freeing their pivot, as Augsburg’s defensive system relied heavily on shutting this position down. A common trend within Augsburg’s defensive system was that when Dortmund worked the ball out to the wing-back, the Augsburg strikers would drop backwards and tuck wider in order to put pressure on the ball and cut some access to the pivot. We can see an example of this below.
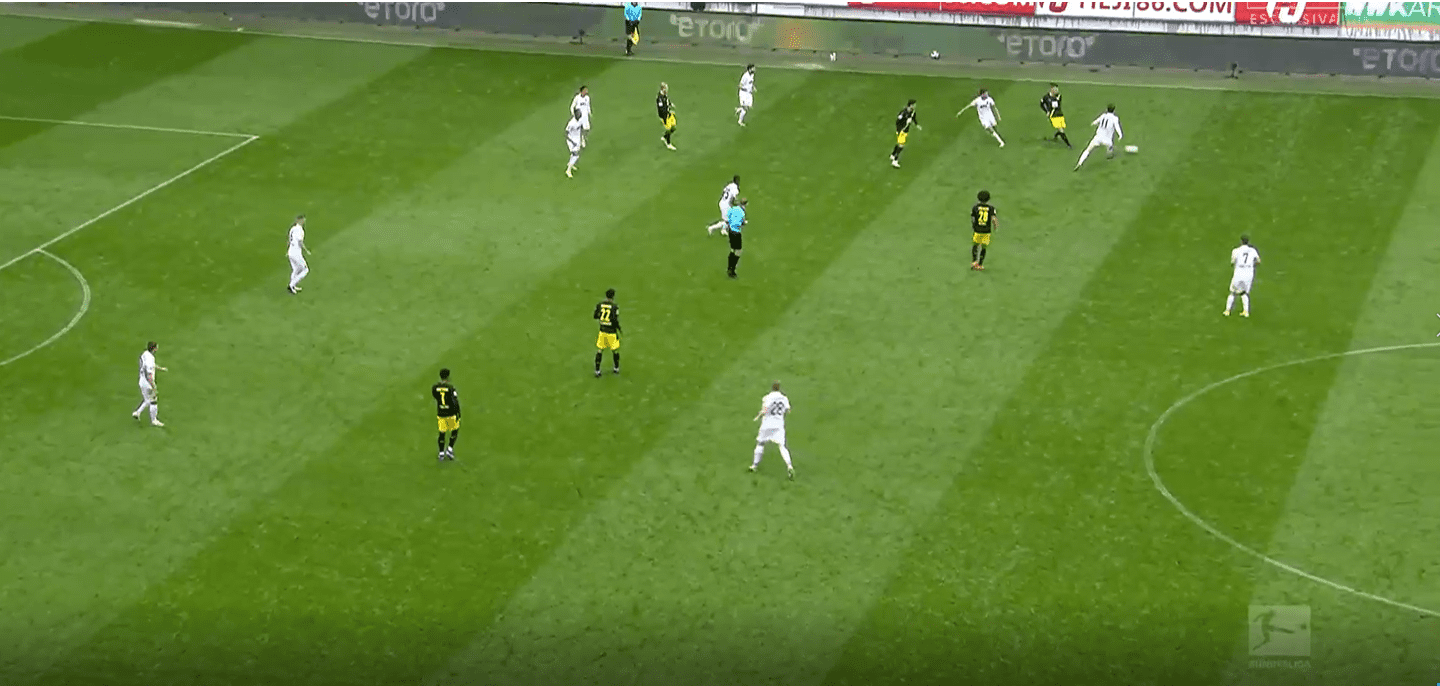
As a result of this wide movement by one of the strikers, when Dortmund worked the ball back to a wide centre back, the space between the two strikers was fairly large, and was certainly large enough to play a pass through to the pivot. Working this advantage would have allowed Dortmund to create that overload in midfield and progress play cleanly.
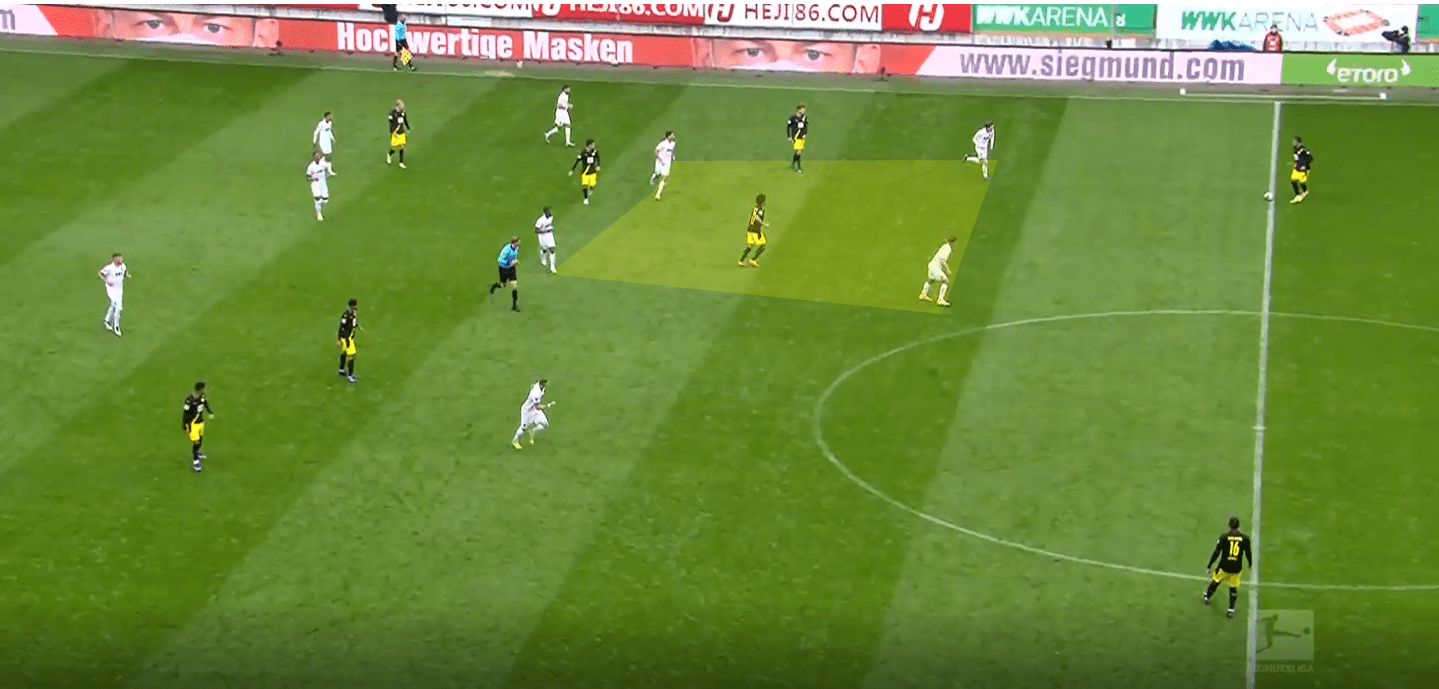
We can see another example of this trend below, where if Axel Witsel drops a tiny amount he is in a position to receive the ball. If the ball goes to the central centre back, Witsel may also be able to receive so long as the ball is moved quickly enough, which is something that didn’t happen often for Dortmund on the day.
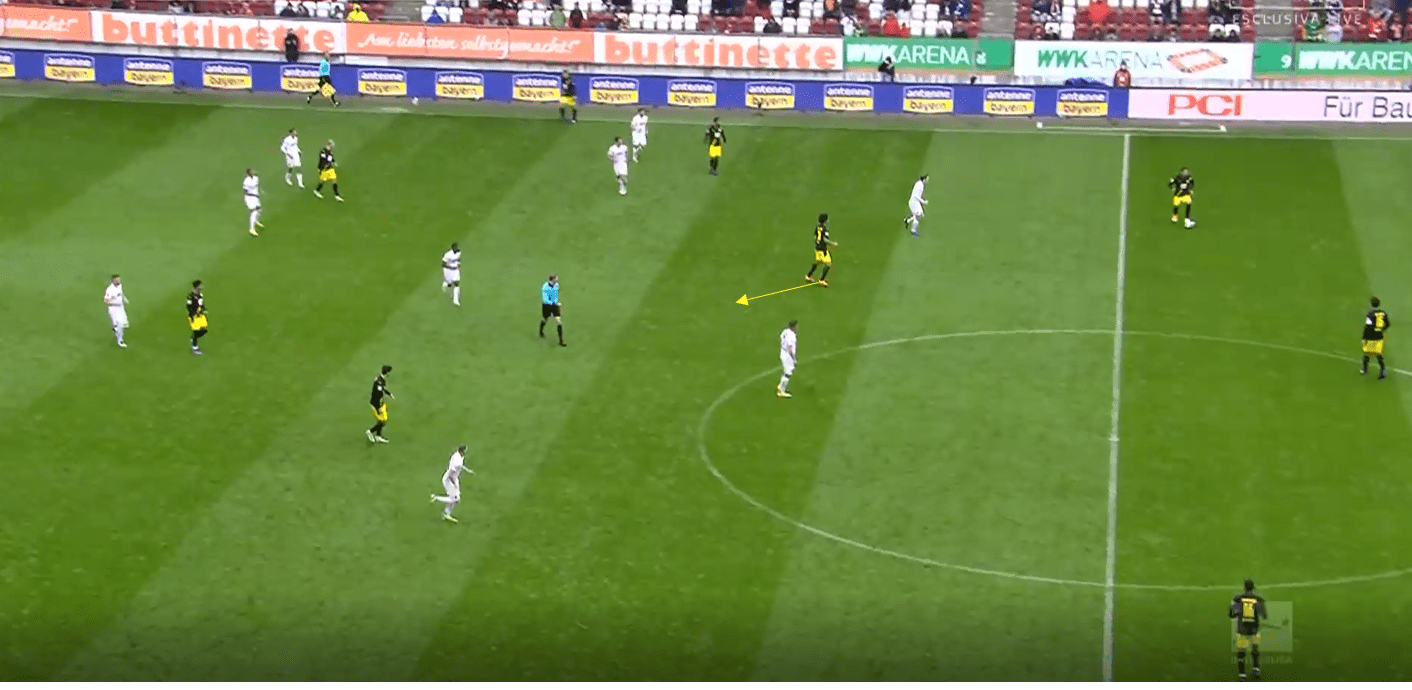
The same trend shows itself again here when Dortmund work the ball from wing-back to centre back, but again Witsel’s spacing is poor and he doesn’t create enough distance to allow himself to receive the pass. Witsel was often too static in the game and didn’t look to move out of coverage enough, as dynamic space occupation in situations like this and others would have benefitted Dortmund on the whole.
Conclusion
As this analysis has shown, Augsburg put in a sensational defensive display and deserved their three points, with their defensive system and tactics stifling, frustrating and at times confusing Dortmund. Dortmund meanwhile were uncharacteristically poor in their positional play and lacked any real ideas, with few variations on their usual style of play making the game very one dimensional. For me, if you have 76% possession of the ball in the game, there is a responsibility and expectancy for you to be able to break the opposition down with that amount of possession, regardless of the opposition system. Dortmund didn’t live up to this, and Augsburg punished them from a set-piece and counter-attack.



Comments