Werder Bremen welcomed Hoffenheim to Weser Stadium on Sunday for Match Day 5 in the Bundesliga. While Hoffenheim have been performing well recently, it was unclear whether or not they would miss Andrej Kramaric, who was unable to play due to coronavirus. In the end, both teams settled for a 1-1 draw that saw both of them remain in the top half of the table.
This tactical analysis will examine the tactics used by both Werder and Hoffenheim in their match. The analysis will examine Werder’s targeting of Hoffenheim’s outside centre-backs, Hoffenheim’s overload on Werder’s backline, and Hoffenheim’s switch to a back four in order to get more men forward in possession.
Lineups
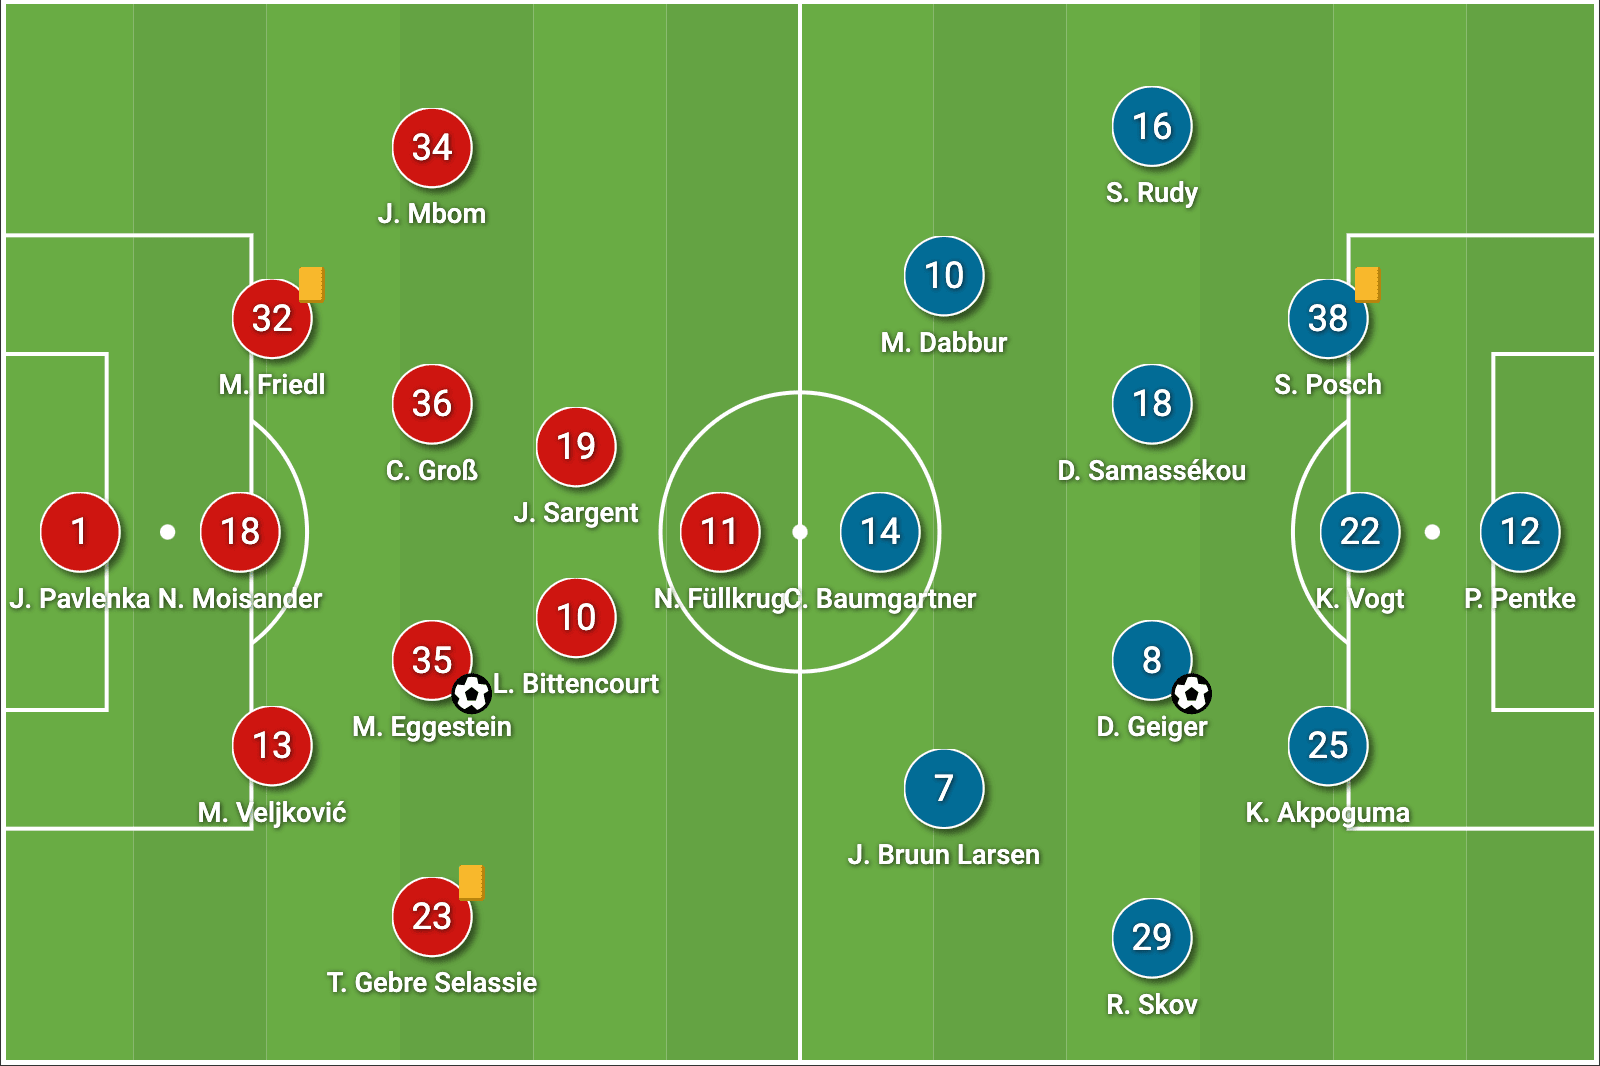
Florian Kohfeldt sent Werder out in a 3-4-2-1 formation with Jiří Pavlenka in goal. His centre-backs were Marco Friedl, Niklas Moisander, and Miloš Veljković. The two midfielders were Maximilian Eggestein and Christian Groß with Leonardo Bittencourt and Josh Sargent in front of them. Jean Manuel Mbom started on the left flank, and Theodor Gebre Selassie started on the right. Their striker was Niclas Füllkrug.
Sebastian Hoeneß, who was recently in charge of Bayern Munich’s second team, sent his squad out in a 3-4-3 with Philipp Pentke in goal. Stefan Posch, Kevin Vogt, and Kevin Akpoguma started as the three centre-backs. Hoffenheim’s two midfielders were Diadié Samassékou and Dennis Geiger. Robert Skov provided width on the left side of the pitch while Sebastian Rudy did so on the right. Christoph Baumgartner started up top for Hoffenheim with Munas Dabbur to his right and Jacob Bruun Larsen to his left.
Werder Bremen target outside centre-backs
Both Werder Bremen and Hoffenheim looked to target their opponent’s backline of five to varying degrees of success. For Werder, this looked like them targeting the two outside centre-backs and the space between them and their corresponding outside backs. Werder’s attempt at manipulating the outside centre-backs relied on Sargent and Füllkrug making intelligent movements that could be supported by the midfield.
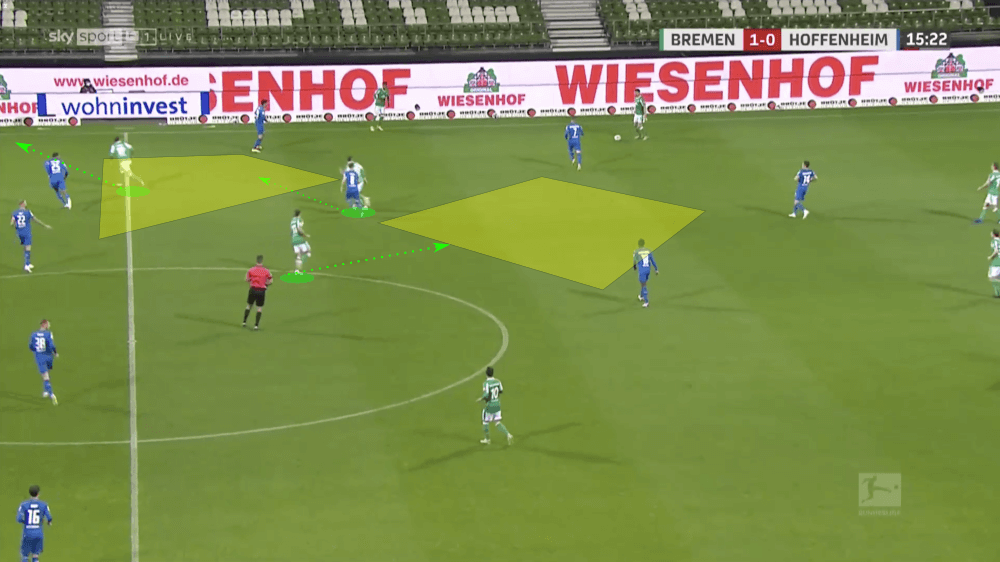
One example of those movements is highlighted above. Sargent started the move as the ball arrived at Miloš Veljković’s feet. As Veljković received the ball, Sargent made a diagonal run, taking his defender with him. This created a pocket of space which Eggestein could run into to receive. As Eggestein made his run, his defender followed him. The result of this was a large amount of space available in the centre of the pitch. In this instance, it was occupied by Füllkrug, but Bittencourt was also available at times to receive the ball here. The only chance Hoffenheim had to defend it was with their winger’s cover shadow, which could have been easily beaten with a smart third-man pass.
Sargent and Füllkrug also looked to drop down and manipulate their opponents’ positioning by either having them follow or having them stay still.
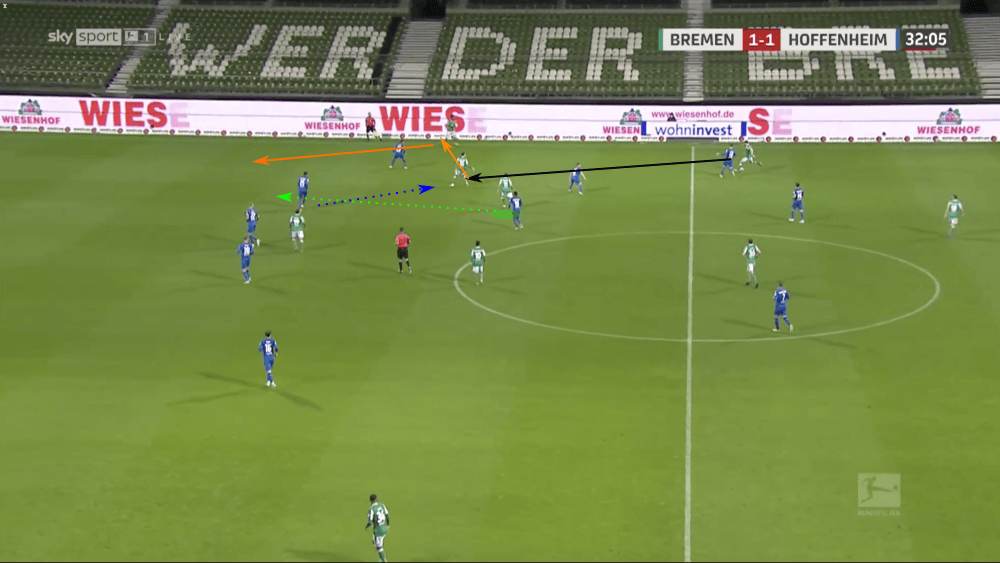
In the image above, Füllkrug (marked in green) had dropped down from his defender, Posch. In this instance, Posch didn’t follow him, as Sargent was pinning Akpoguma and could have easily run in behind Posch. This movement, combined with a run from Eggestein, created a numerical overload. Eggestein was able to receive a pass in the half-space. As he did, Posch stepped forward, and Füllkrug ran through the area, attacking a wide-open space in behind. Eggestein’s first touch didn’t allow him to turn all the way, so the pressure from Posch was enough. Ideally, he would have followed the orange passing pattern, putting Füllkrug in on goal in the process.
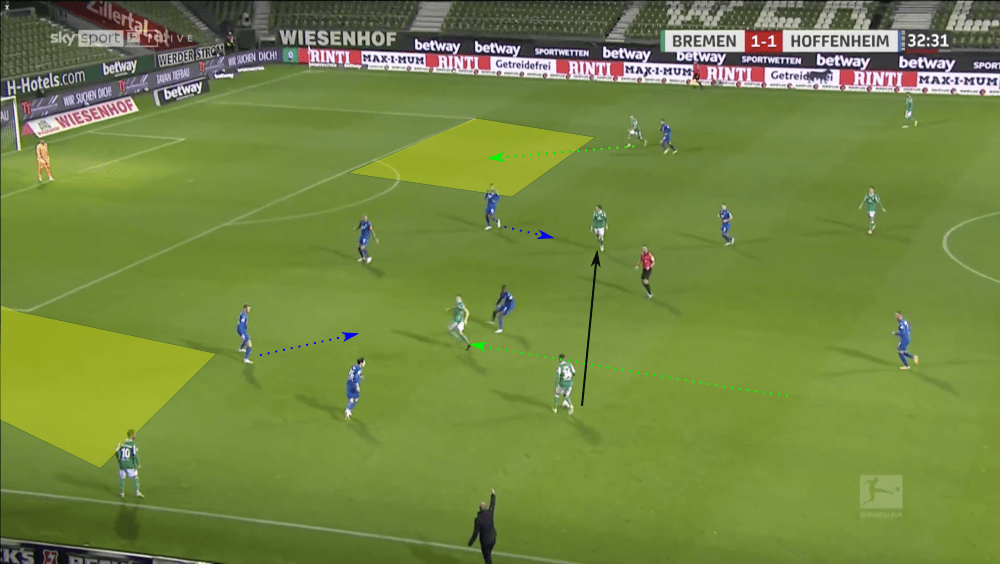
Later in the possession, Sargent dropped this time as he attempted to bring his defender with him. Again, Akpoguma was targeted, and he was again patient in waiting to follow Sargent until the ball was played to him. When he did, the space behind him opened up, and Füllkrug again looked to attack it. Sargent’s body profile upon receiving the ball didn’t allow him to play Füllkrug, but Werder was organised and had Christian Groß running into the half-space. This required some pressure from Vogt and opened up space on the wing. Sargent’s pass didn’t have enough pace on it, and he was unable to connect with an open Leonardo Bittencourt.
At times, the forwards themselves would drop into the half-space, again attempting to engage the outside centre-backs. Hoffenheim did stay compact as a defensive unit. This meant they could wait until the pass was played to close down the attacker without too much trouble.
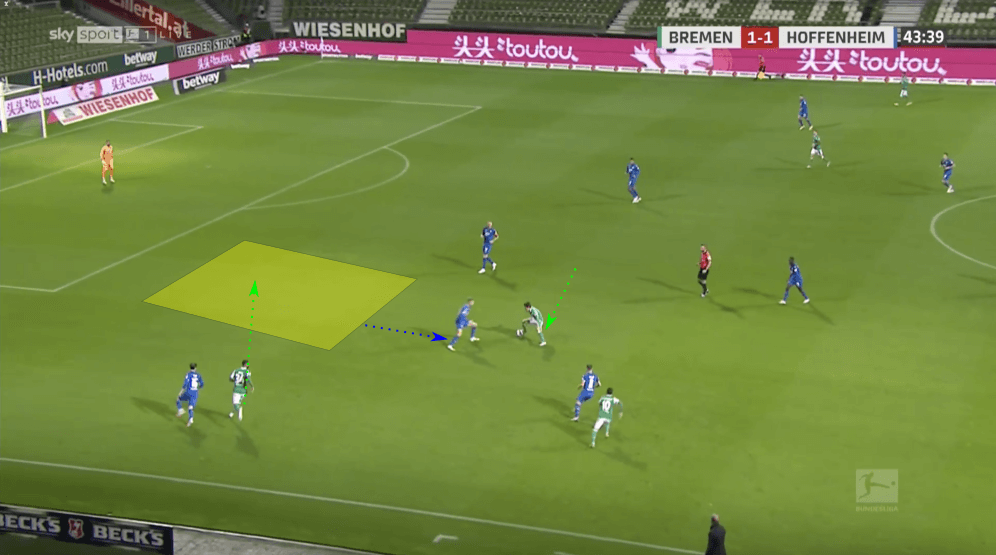
Above, Sargent received the ball from the wing in the half-space. Upon the pass being played, Vogt stepped forward to close Sargent down. Even though Sargent did well to open his body and be able to play a pass into the space behind Vogt, he simply didn’t have enough time to do so. Instead, he had to step past Vogt, which allowed enough time for Hoffenheim to become more compact, slowing Werder down with a well-timed foul.
Hoffenheim create space by overloading backline
Hoffenheim also looked to manipulate their opponent’s backline when in possession, although they did so by using more players. Hoffenheim looked to manipulate Werder’s defence by creating numerical equality. The result of this was that Werder’s defenders were more likely to follow the Hoffenheim attackers when they would drop down, meaning that there was more room to be exploited behind them.
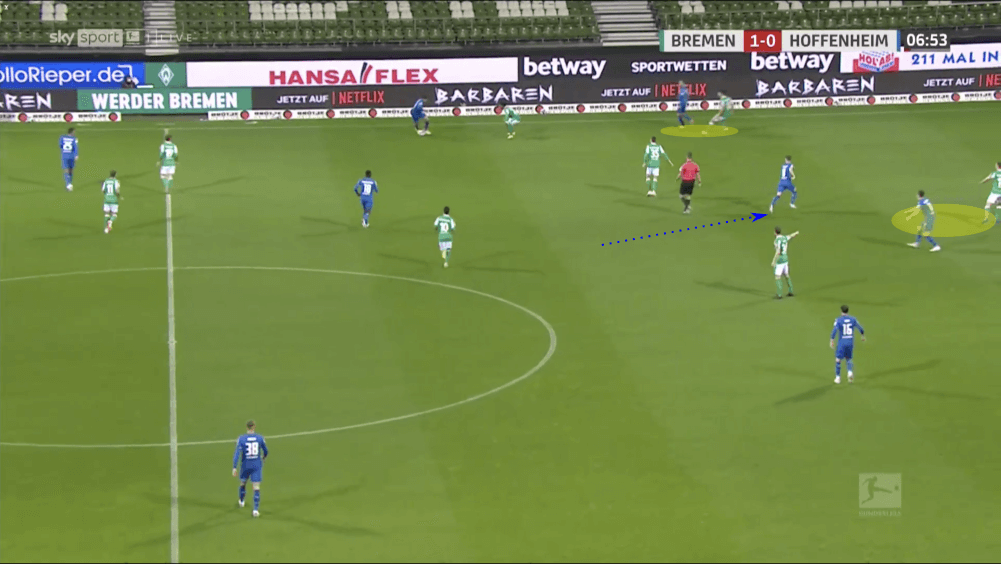
Hoffenheim began by pinning defenders and dragging them about to create space for runs from midfield in behind. In the image above, Jacob Bruun Larsen, at the top of the image, checked to the ball, bringing his defender with him. Christoph Baumgartner was between Veljković and Friedl, drawing both of their attention. When Dennis Geiger made his run into the space between them, Veljković was forced to pause for a second to figure out if he needed to follow him or not. This small amount of time was enough to create separation for Geiger, who was unlucky not to receive the ball.
Hoffenheim continued to do this as Werder continued to follow them. This time, Baumgartner checked to the ball when it was once again on the left flank. And once again, Baumgartner was followed closely by the Werder defender.
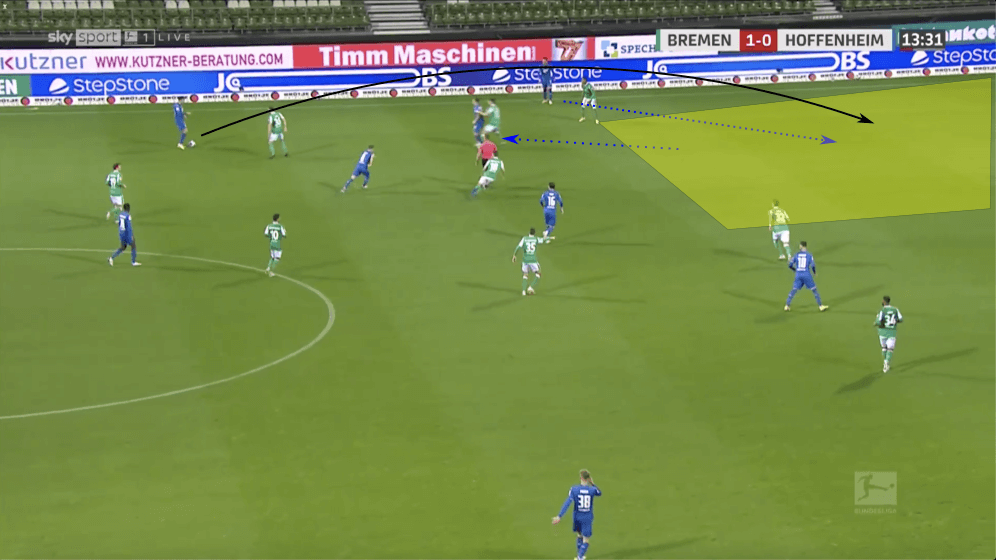
While Geiger made a similar run, Bruun Larsen also looked to get in behind. A lofted pass from Skov found Bruun Larsen in the area. He was ultimately able to control the ball and lay it off for a streaking Baumgartner, who was unable to keep his shot on target. That being said, it was becoming clear that Hoffenheim could pretty easily create space for themselves with their movement. This is how they were able to score their only goal of the match.
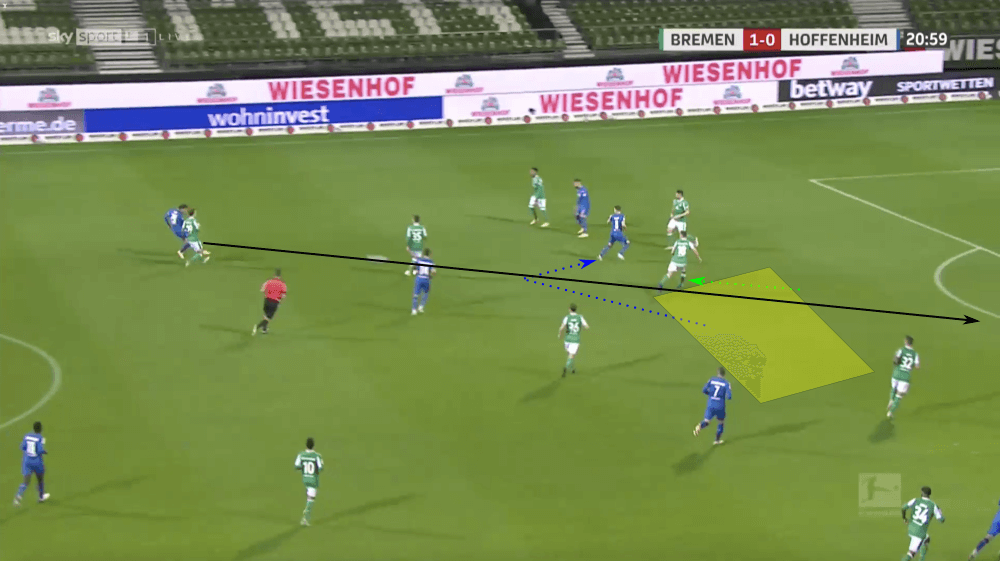
The move started with Baumgartner checking to the ball and then heading back up the pitch. As he did this, his defender (Moisander) followed him accordingly. This created a large amount of space right in the centre of Werder’s defence. Skov played a beautiful pass through that space to a sprinting Sebastian Rudy, who was able to cross the ball backwards to Baumgartner, who had created enough space between himself and Moisander to finish off the chance with his first touch.
This continued in the second half where Werder were lucky to not get punished. Their continued over-commitment continued to cause problems for themselves, as shown below.
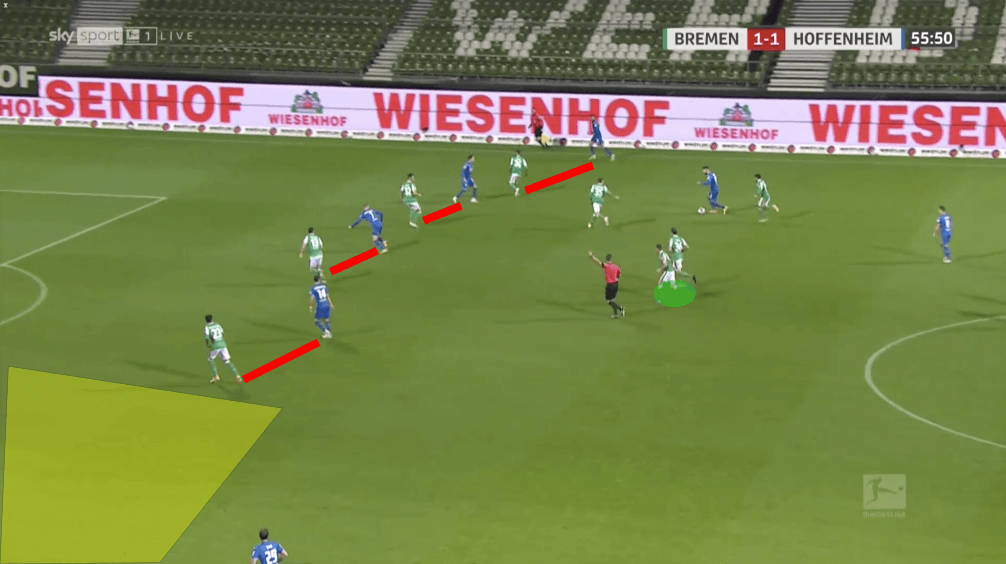
Again, Moisander over-persued his man, who in this instance was Diadié Samassékou. Samassékou had dropped to receive the ball and Moisander, highlighted in green, followed. The man on the ball in the image is Samassékou. This left the backline of four to defend four attackers close to the ball. A large amount of space opened up on the backside that could have been exploited, but Hoffenheim was unable to find Skov on the play. Even if that space wasn’t available, there was still room behind the defensive line for the ball to be played into. Samassékou’s pass in was blocked, but he had runners who would have been in a 1v1 situation if it wasn’t.
Hoffenheim switch to back four
Towards the end of the match, Hoffenheim switched to a back four in order to allow for better entry into the middle and final third by being able to push even more men forward to receive the ball, attempting to create a numerical overload. While they were successful in the initial stages of this, they were unable to consistently find the free men that they were creating.
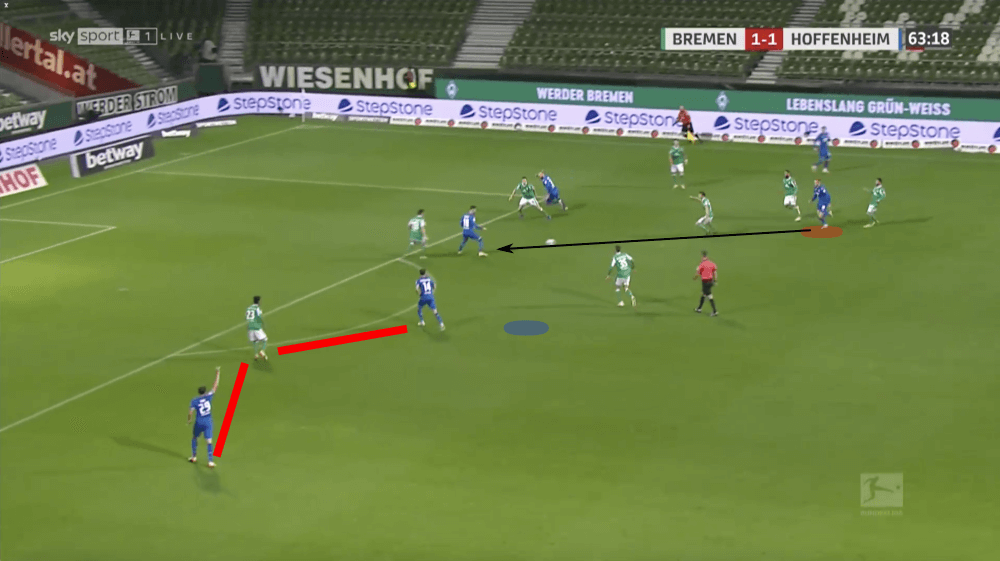
The image above was the result of the switch to a back four. The man passing the ball was Stefan Posch, who had now assumed the role of right back. He cut in towards the centre of the pitch, dragging Jean Manuel Mbom with him. Mbom should have been the left wing-back in Werder’s back five. Instead, they now had a back four with five attackers present. This created a free man on the far side. Hoffenheim created an ideal 2v1 situation on the left side, but they were unable to get the ball there. Baumgarnter would have done well to hold off on his run, staying in that blue marker as his teammate received in the pass inside. Instead, he went forward, and Hoffenheim was unable to switch the field of play.

Minutes later, Hoffenheim again progressed down the right side. This time, Baumgartner checked back into the half-space in order to receive the pass. He was able to do this because of the number of men Hoffenheim had committed forward. As each player pinned his defender, Baumgartner was able to receive the ball in one of the most dangerous areas on the pitch without pressure. This should have been a great opportunity, but Klauss, who had subbed on for Bruun Larsen, stepped towards Baumgartner and stopped occupying his defender, who was then able to stop Baumgartner’s progress.
Conclusion
In the end, the draw seemed relatively fair as both teams had chances that they were unable to convert. In the short term, Werder will likely be the happier side as they look to avoid a repeat of last year’s season, which saw them just barely escape relegation to the second division. Their next match will be against Eintracht Frankfurt on Saturday while Hoffenheim, who were unable to qualify for the UEFA Champions League last year, play Gent in the Europa League on Thursday.


Comments