Back to February, Burnley acquired a remarkable result in the Premier League, won two, drew two and conceded one only. The strong performance of the team also helped Sean Dyche to win the Premier League manager of the month.
When we further look at the statistics, their xGA against was 1.58 but they conceded one in four games de facto. So, how did they manage to produce such results? In this tactical analysis scout report, we will show you the defensive performance of Burnley in February.
Defensive scheme and the press
The analysis begins with introducing the basic setups of Dyche’s tactics. The Clarets played in a 4-4-2, defended in the same shape. No matter what their opponent was, Burnley maintained a high intensity of press and partially achieve a man-marking system. Of course, the details depended on the contexts, playing against Arsenal required tighter marking but facing against Newcastle United, Steve Bruce’s team was more likely to play a long ball. When the oppositions tried to play out from the back, Burnley defended very high to engage the defenders. In February, the PPDA of Burnley was 9.86, this hinted the team retained a certain level of press throughout the games.
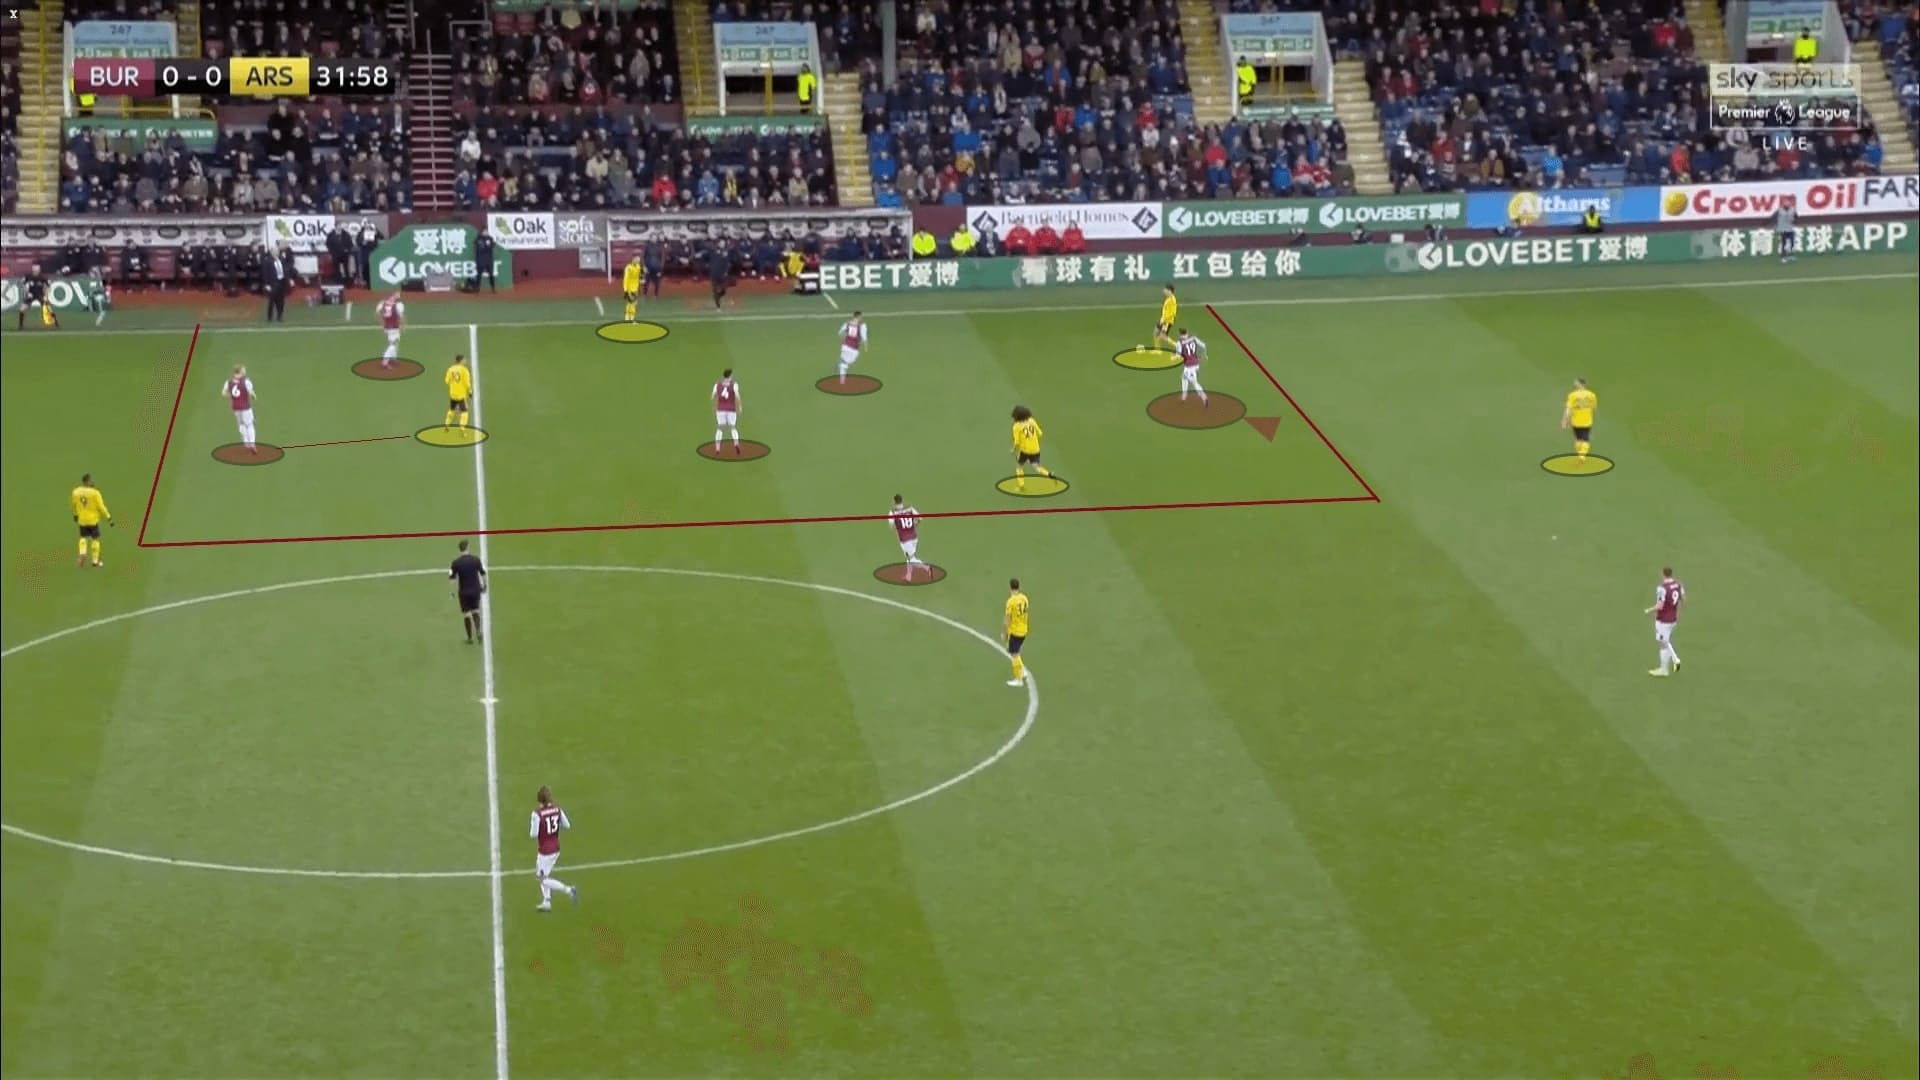
We all know Mikel Arteta’s Arsenal had been a possession-based team, and we used the scenario to illustrate the press. In the first half, the Gunners kept a 4-2 shape in the build-up phase, with the full-backs providing the width on both sides. Theoretically, the formation of Burnley matched the build-up shape of Arsenal, so the Clarets were man-marking the build-up players correspondingly to the positions. As the following image tells.
However, the tricky part was the presence of Mesut Özil, who was a dangerous passer, utilizing spaces between the lines. With the German behind the press, Arsenal in fact had a “+1” numerical advantage. Dyche placed a defender behind Özil. By a pressing trap which we will explain in the coming section, Burnley forced the ball wide, hence, also dragged Özil wide. In such a case, a full-back stepped up early to approach the German, while the rest of the defence slightly adjusted the positions, leaning to the ball side. These were illustrated with the following image.
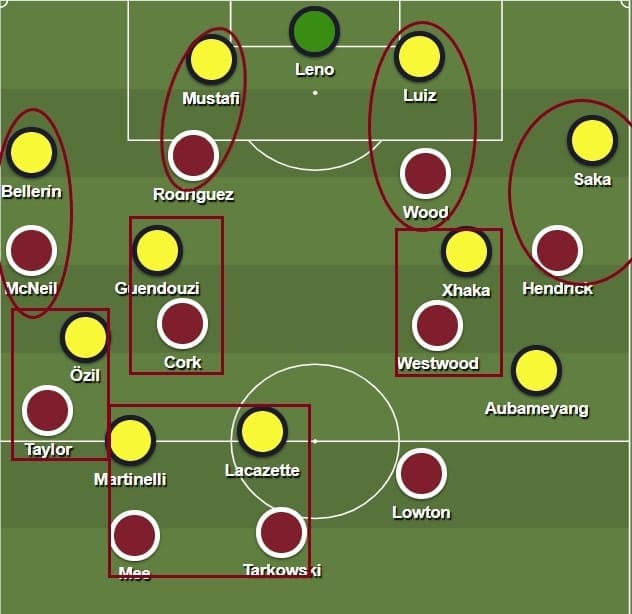
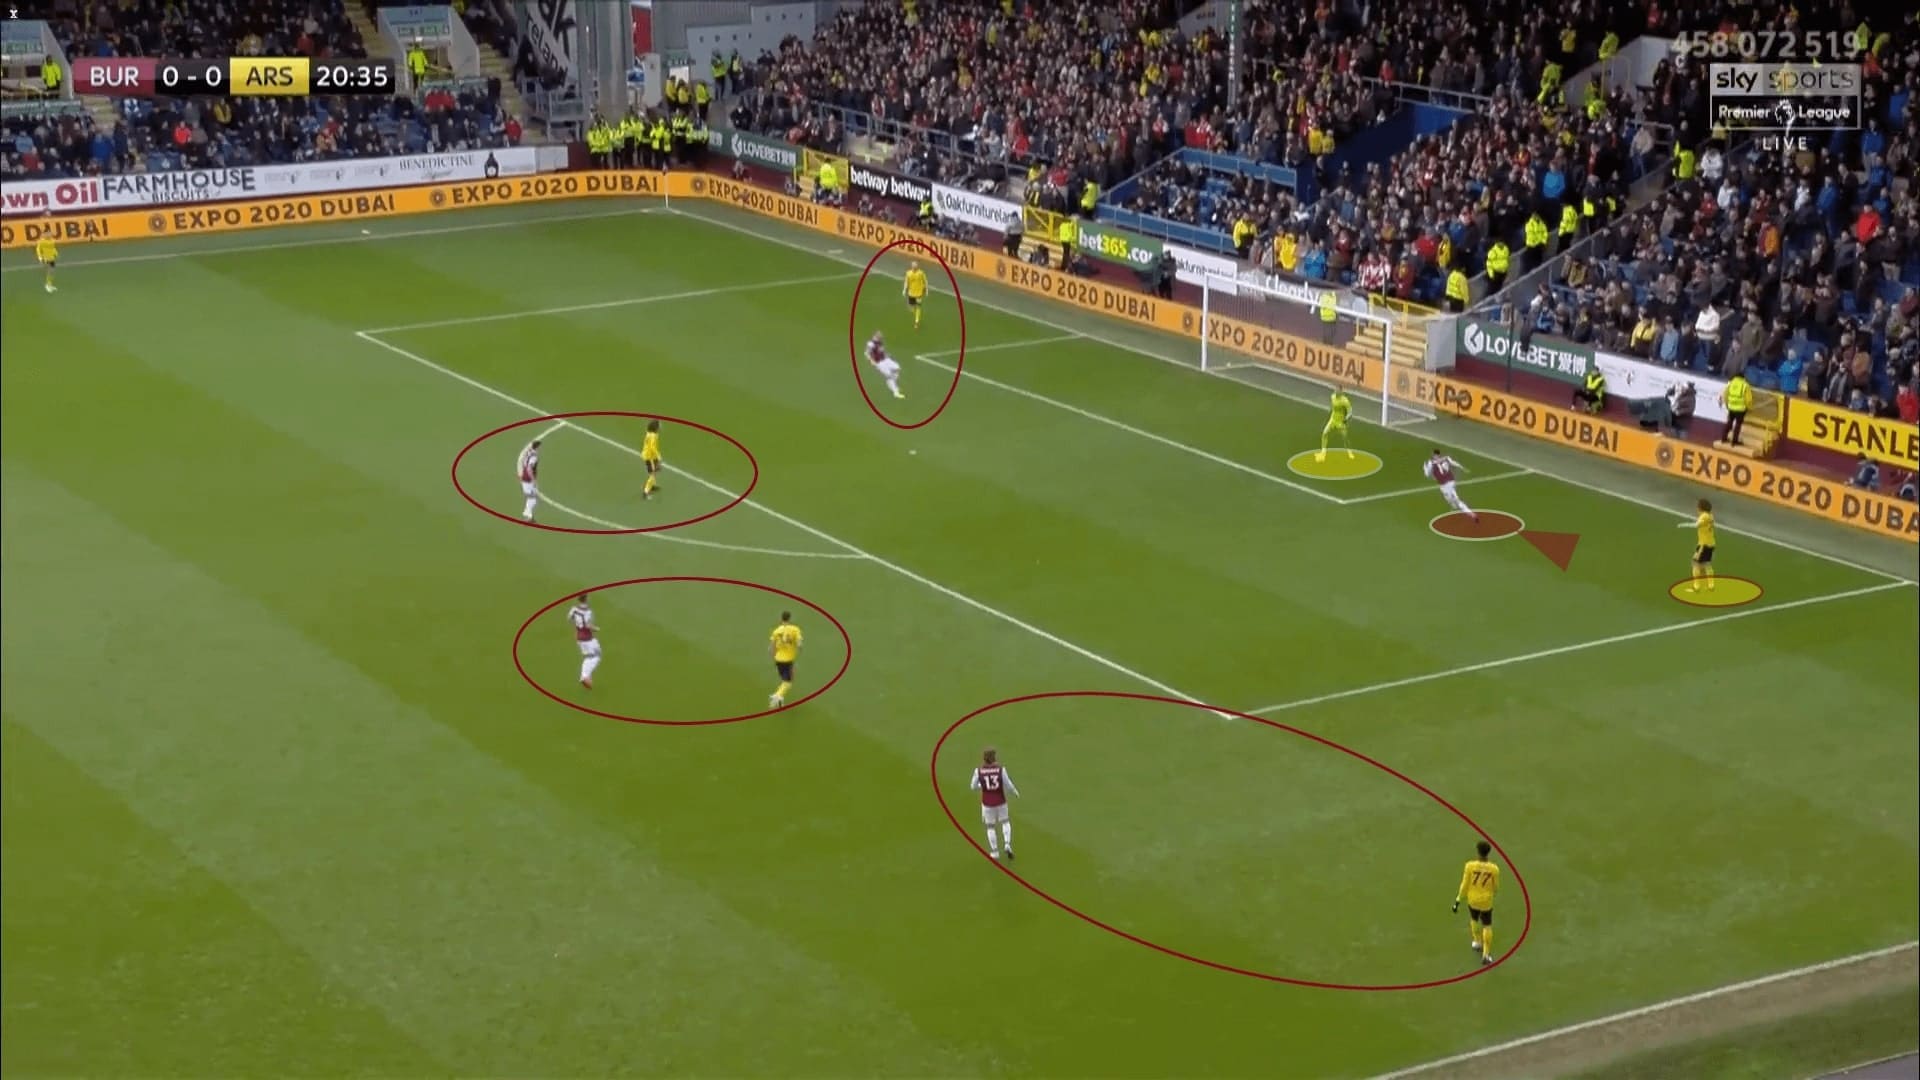
For the execution of the press, Burnley relied on the efforts of the strikers, especially Jay Rodriguez. The following image demonstrates the man-marking press of Burnley, midfielders on midfielders; wingers on the full-backs; strikers on the centre-backs. However, they still had to nullify Bernd Leno as the free man, or else Arsenal still had a “+1” advantage.
The solution was the curve run of the striker, Rodriguez was good at those runs. The runner covered the target behind him and approach the ball, controlling two oppositions by one player. Also, the defending striker(s) also shut the potential return passing lanes. As you can see in this image, Rodriguez’s run covered David Luiz while he was pressuring Leno. The Arsenal keeper lacked short option, so they went long.
It was beneficial for Burnley to force aerial duels, as their defenders possessed physical qualities, such as James Tarkowski or Ben Mee.
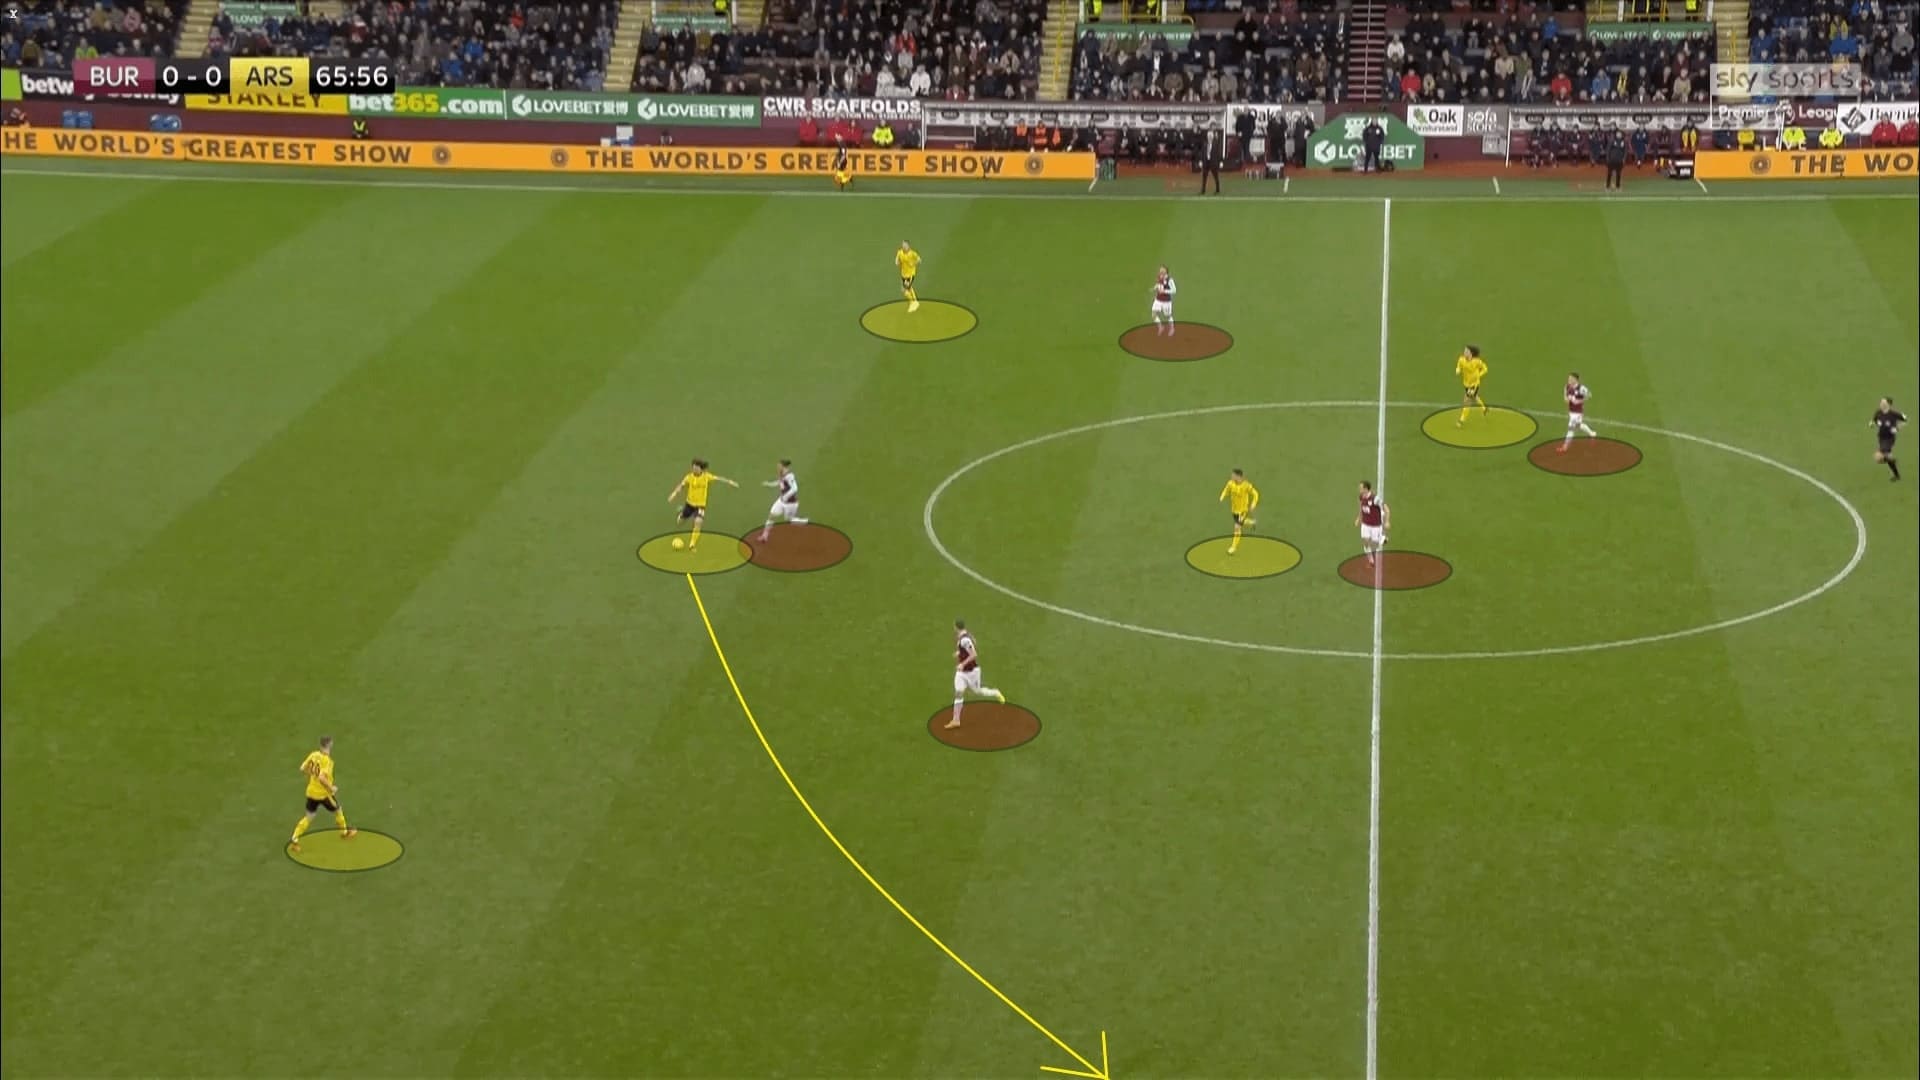
Arteta’s team tried another shape to play out from the back, a 3-2 shape after Lucas Torreira replaced Bukayo Saka. Burnley stuck to their system, continued to control the midfielders by midfielders while keeping the pressure at the centre. It was simple as Jeff Hendrick just had to position himself higher, closer to Granit Xhaka (the left-back), this shut a side and forced the ball to another side.
The situation in the following image was the above case. The pressure from Rodriguez easily forced Luiz to play the ball wide. The position of his partner, Chris Wood was also important, as he covered the half-spaces to deny a potential vertical pass.
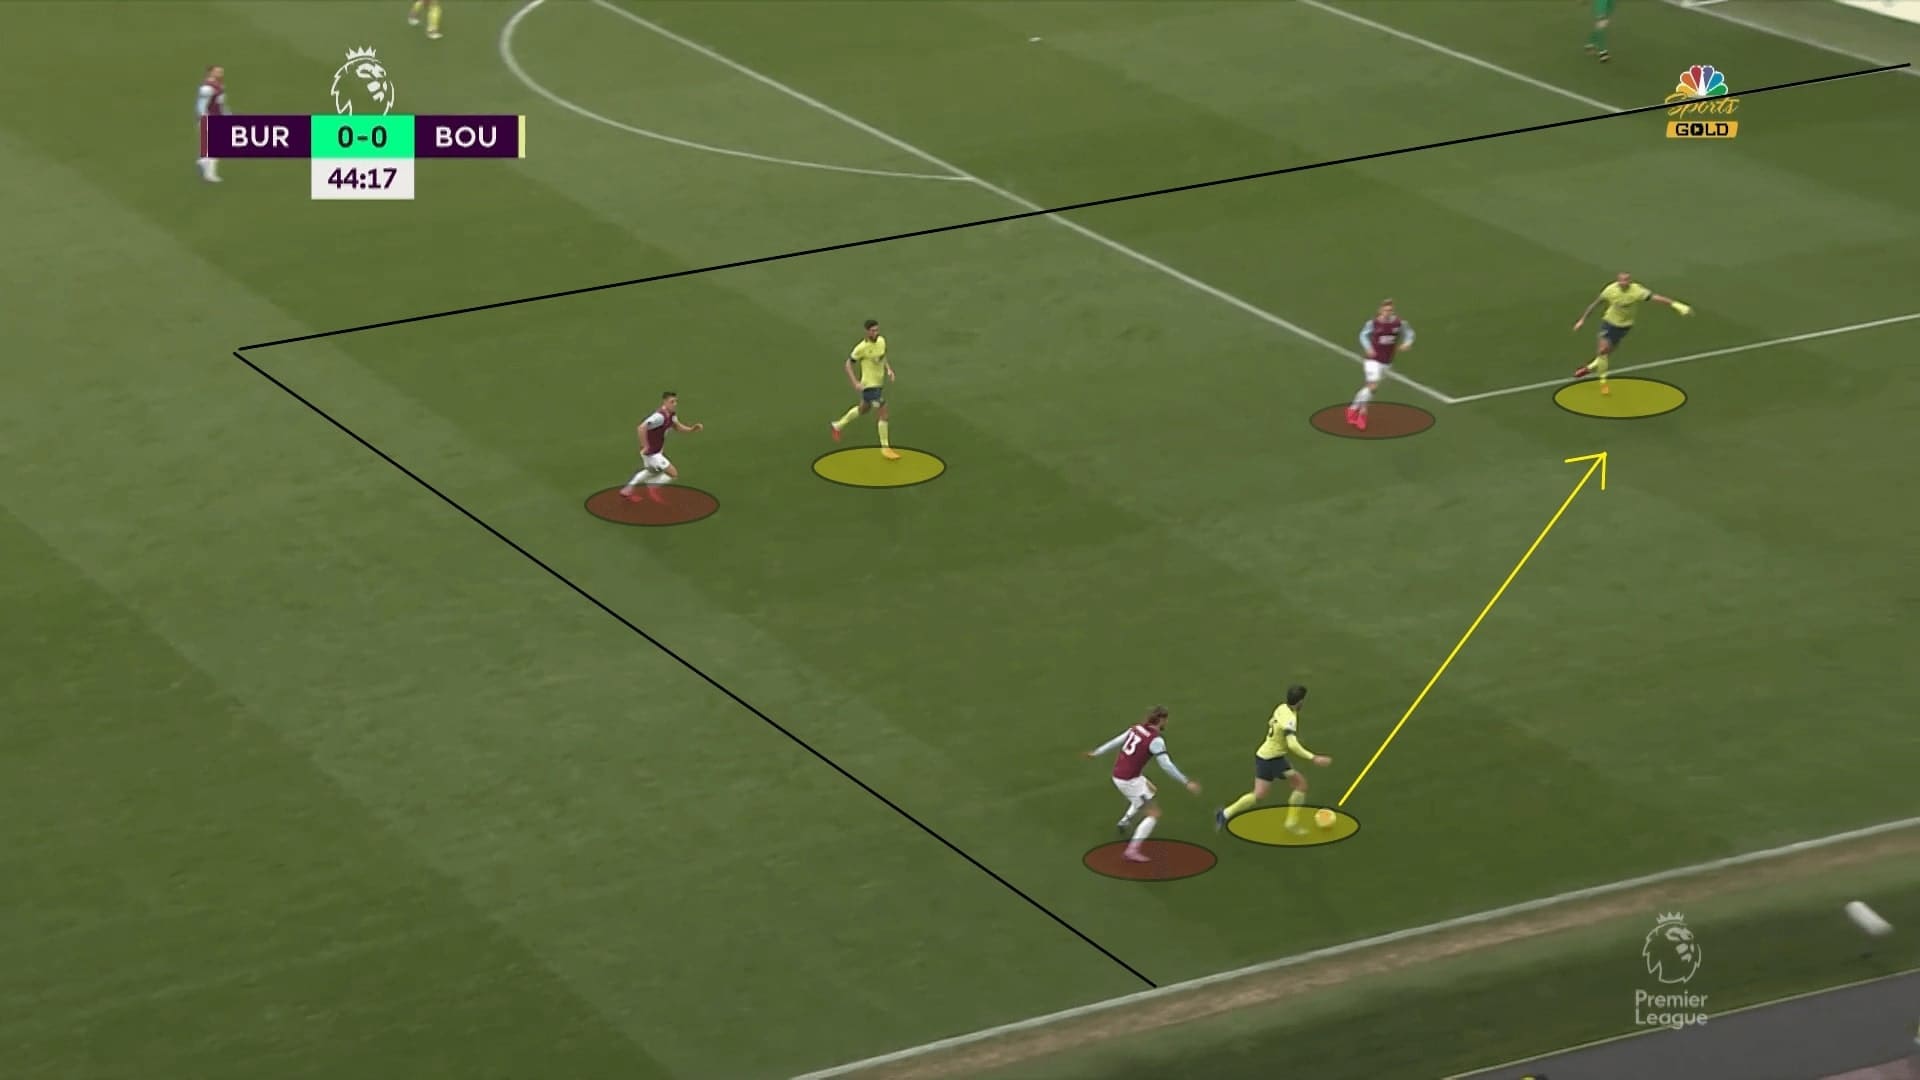
Playing against Bournemouth was slightly different from Arsenal. The rhythm of Eddie Howe’s team in the first phase was slower, and they were more prone to play long under pressure. The press of Burnley dropped deeper to commit more man for the second balls. Therefore, the distance between the markers and the targets increased.
However, passing at the first phase always triggered Burnley’s press. Either striker who was closer to the ball will signal his teammates to follow up. Despite a larger distance, the pressure never vanished. By marking the central players, the Clarets forced a lateral pass, which triggered Hendrick or Dwight McNeil to press.
This is a pressing trap! As the receiver would have forced to receive the ball in a closed body orientation if he was dropping, he’s might not know the situation behind him, especially the marker. Adam Smith in the below scenario was conservative but safely return the pass.
The pressing traps
The pressing trap of Burnley worked well in these games. We can briefly divide them into two categories. We explained the press of Burnley in the above section. With the tight markings of Ashley Westwood and Jack Cork, they forced the ball went wide, also went to the pressing trap on the strong side.
First, with the curved run of the striker, the passing lanes of a return ball were shut. As you could see from Rodriguez’s run in the following image. Better than that, the striker helped Burnley to gain a “+1” numerical advantage in tight areas, as he was pressuring a full-back. With Mee or Charlie Taylor leaving their position early, Burnley closely controlled the ball side by a man-marking system. This helped the Clarets to win the ball as they forced the opposition in such a tight area.

Another pressing trap was set because of the energetic coverage of the midfielders: Cork and Westwood. With the tactics as mentioned above, Burnley successfully lured the opposition play the ball to flanks. Even initially Dyche’s central midfielders did not tightly mark the corresponding central players, this was not a big deal, as it became another pressing trap. For those cases, the central pass looked fine, but the receiver would be under tremendous pressure from Cork and Westwood instantaneously. Both of them had the energy to sprint and engage the receiver in a 90-minute game, potentially helping Burnley to win the ball high.
The two midfielders of Burnley also recorded notable defensive statistics because of the handworks. In February, Cork had a 66.67% success rate out from 24 defensive duels; 5.50 interceptions and 11.6 recoveries per 90 minutes. For Westwood, he also had 66.67% of success rate in his 18 defensive duels, also 2.75 interceptions and 7.5 recoveries per game.
The receiver at the centre must be careful and keep things tidy when receiving a pass, any hesitations would lead to a ball lost in a dangerous area on the pitch. In the following image, Jannik Vestergaard just received the ball from a wide player. The Danish tried to take multiple touches on the ball, and they were heavy. Despite Vestergaard was free initially, the central pass triggered Cork’s press, who helped Burnley won the duel and started an attack high on the pitch.
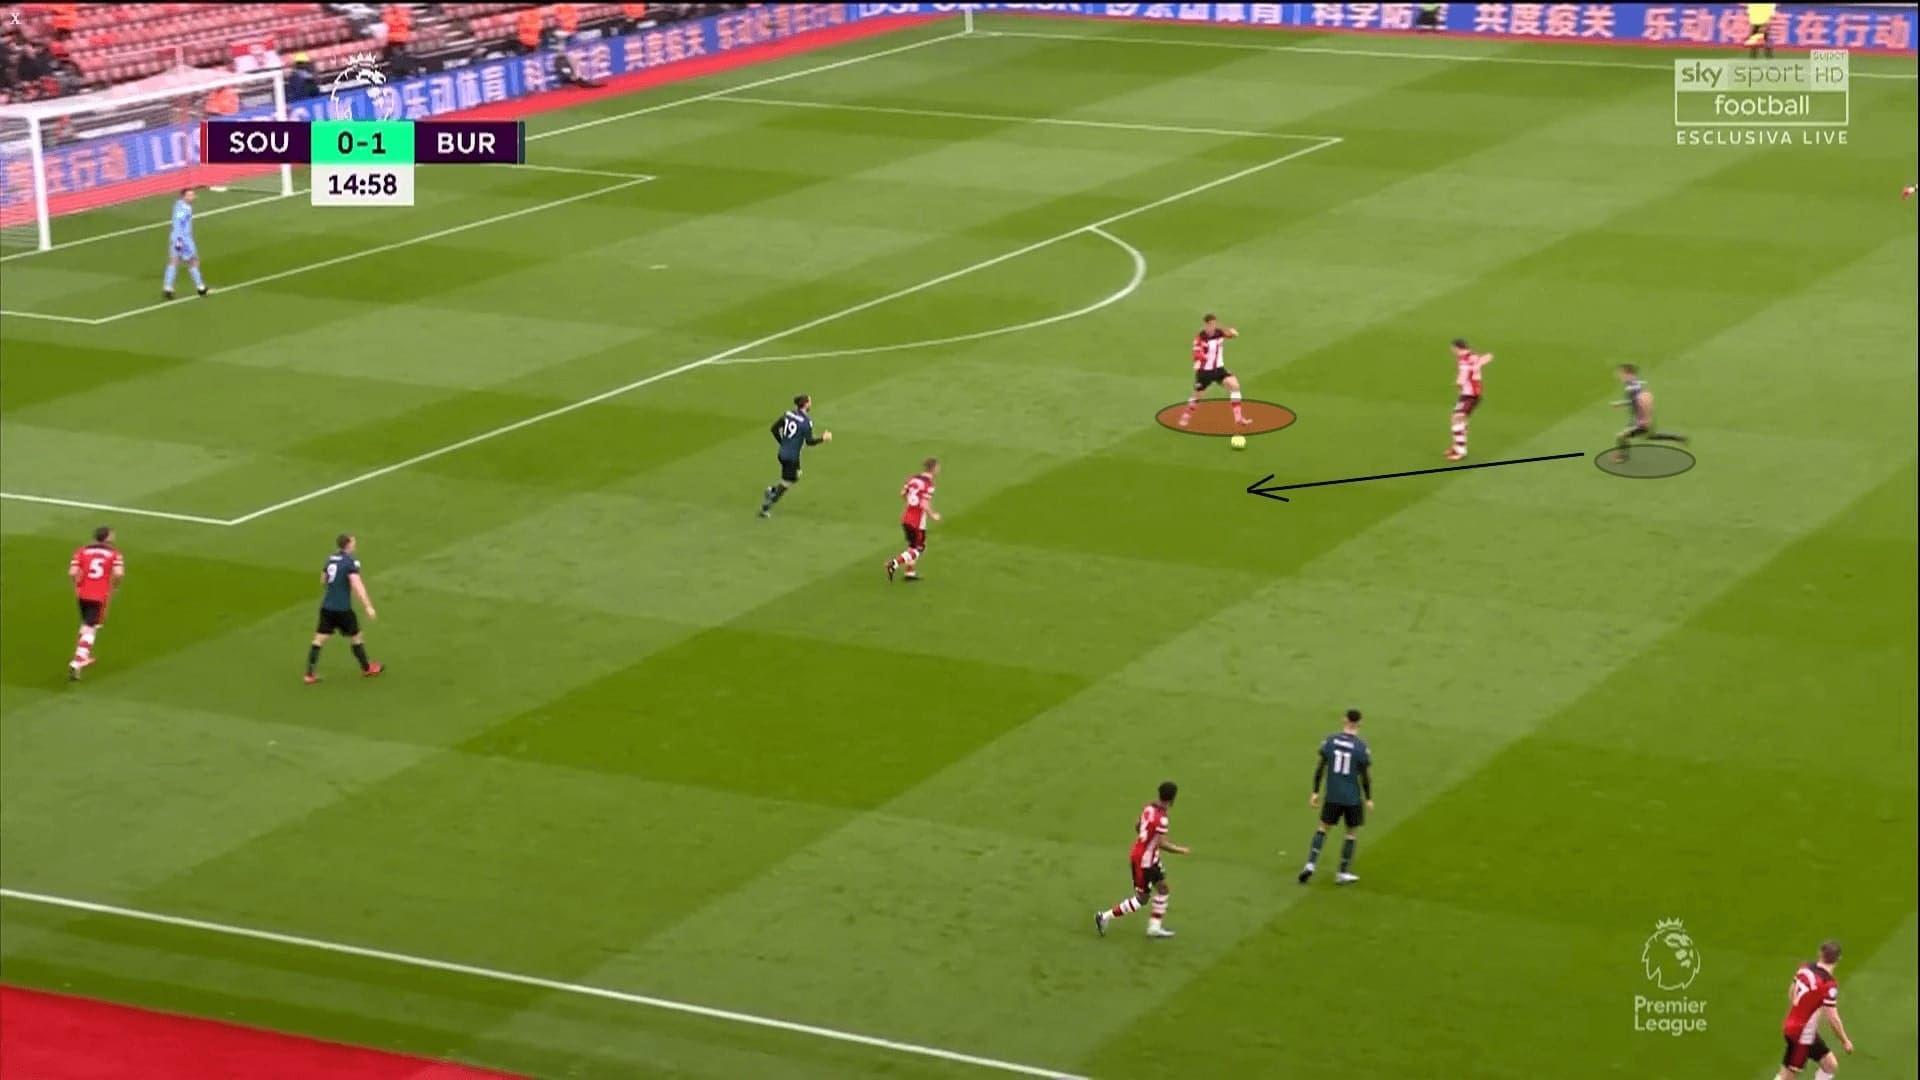
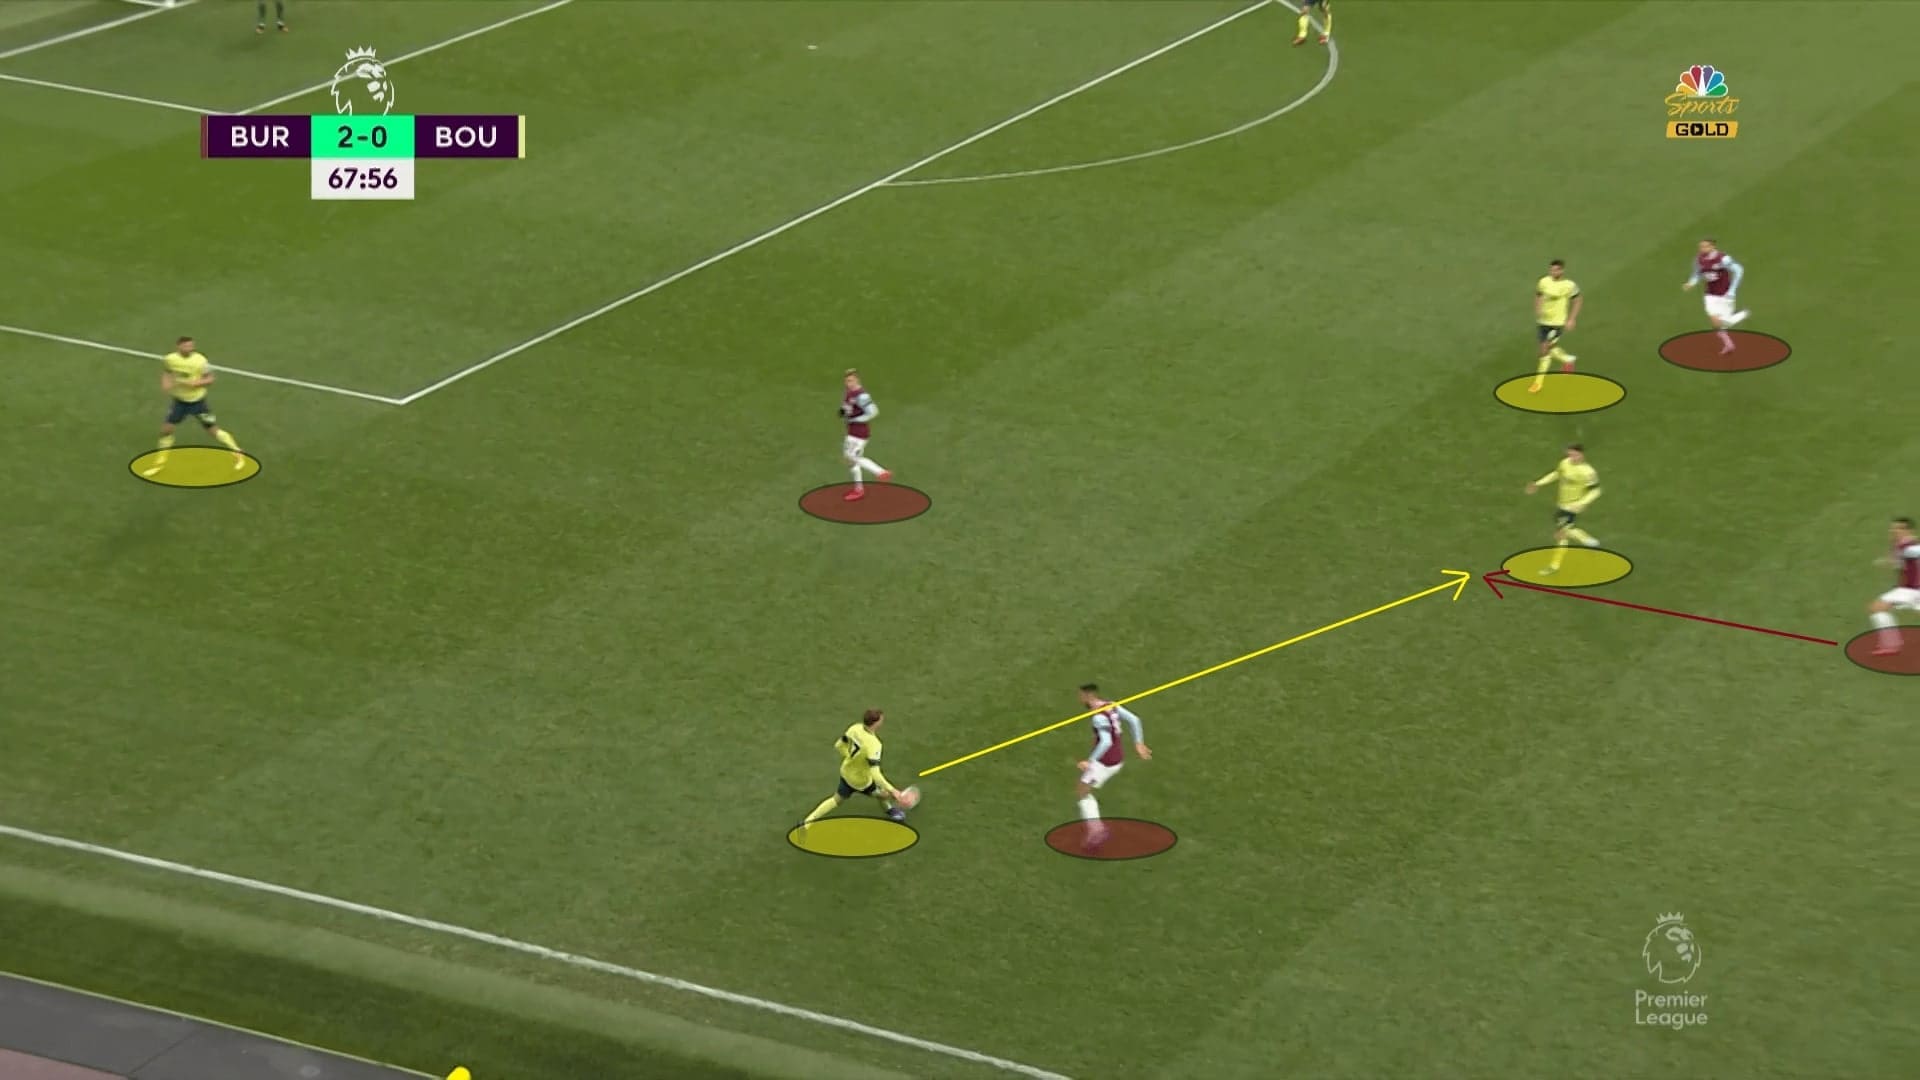
Another occasion we are showing was from the Bournemouth game. As mentioned, the build-up plays of Howe’s team was a bit slow in that game, so Burnley adapted their press easier. In this example, Burnley man-marked the oppositions early. Again, Matej Vydra’s positioning was vital as he denied the potential return pass to the centre-back. Meanwhile, a possible passing option for Jack Stacey was a central pass to Harry Wilson, who dropped to the half-spaces.
However, it was a pressing trap! When dropping, the dropping player usually focused on the ball instead of the situation behind themselves. The Burnley midfielders utilized these situations to lure a central pass, then, tried to intercept them. As you could see, Cork recognized the pass from Stacey to H. Wilson early, and he managed to reach the ball before the Liverpool loanee did. These pressing traps helped Burnley to win the ball high with their midfielders.
The low block
In the modern game, it was impossible to press 90 minutes. Therefore, Burnley also set a low block when they did not press high. They used it when defending the advantage at the St. Mary Stadium mainly. Since they set their defensive block lower, duties of players also changed a bit. In general, the shape was still a 4-4-2.
Against Southampton, it fell to the strikers to engage the wide players as the first line of defence. Again, they defended with an asymmetrical shape which was leaning on the ball side. The far side winger was tasked to tuck into the midfield to maintain compactness.
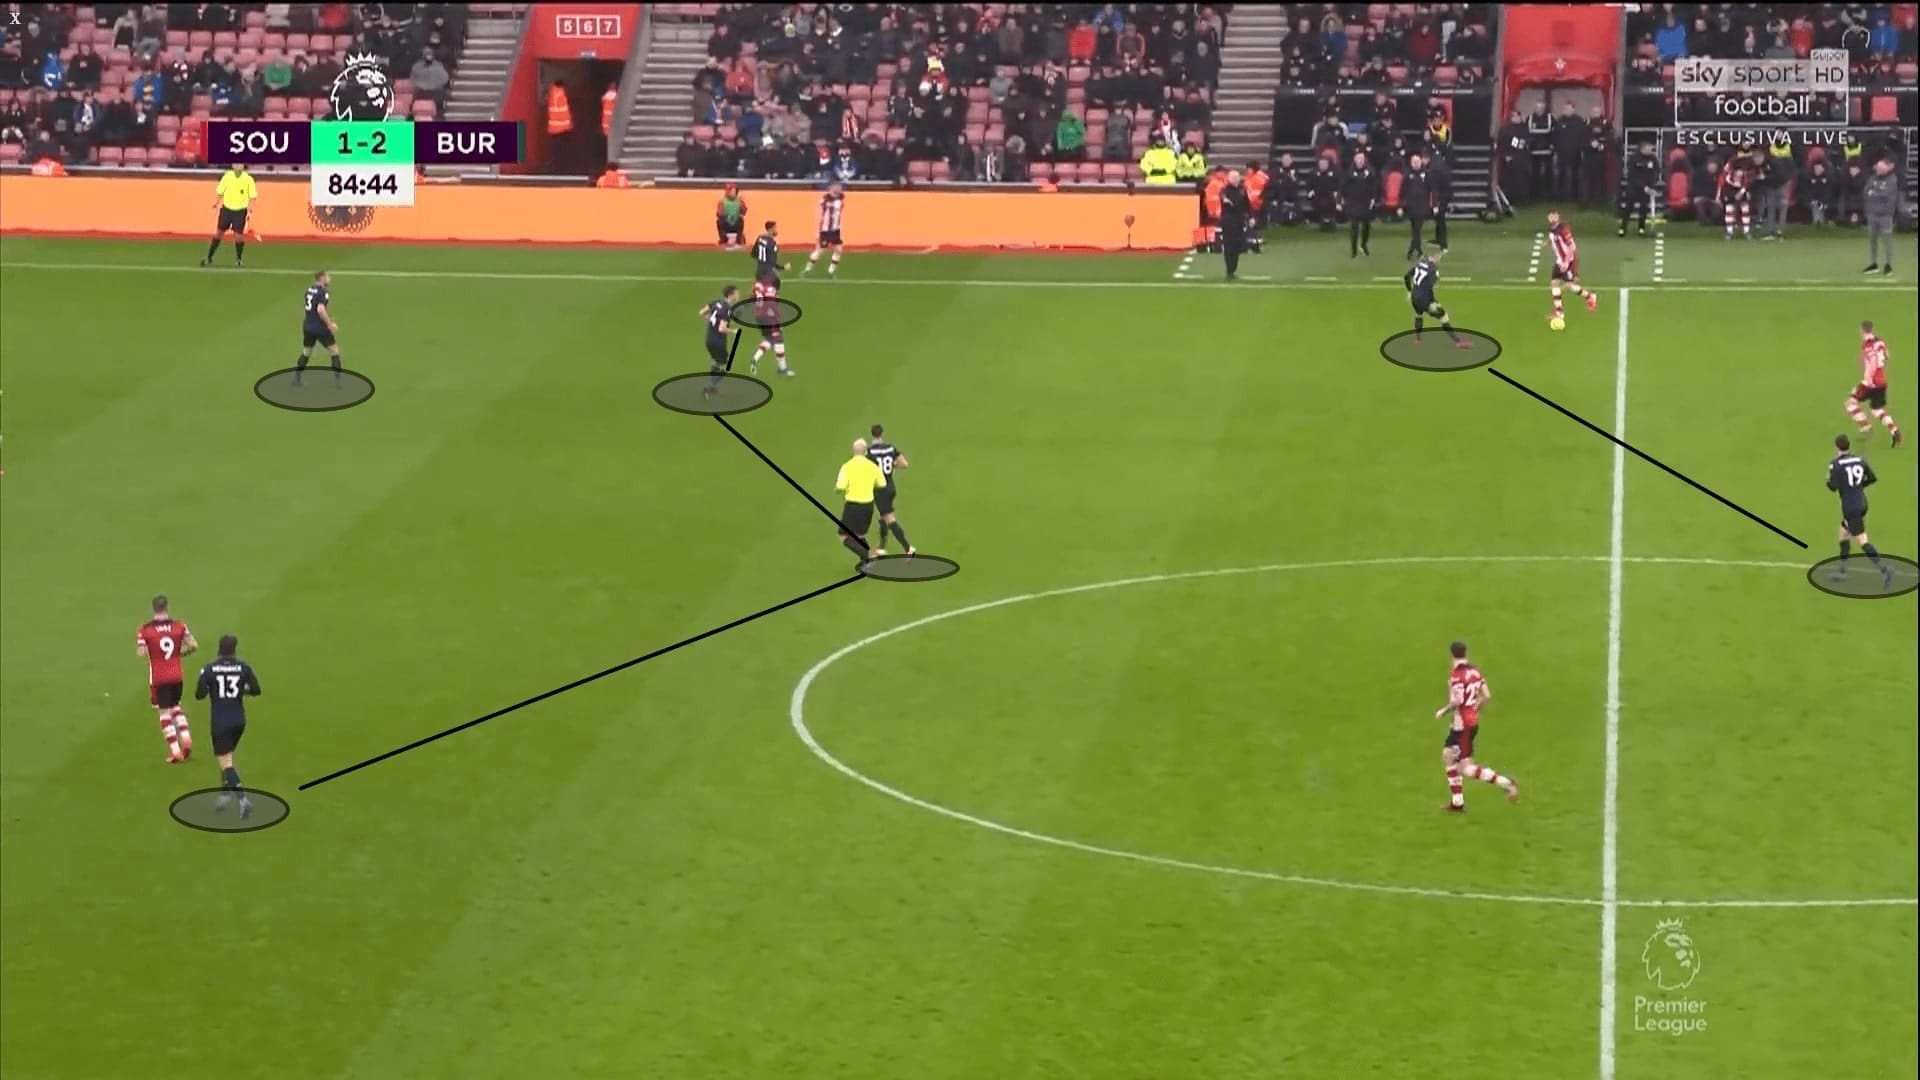
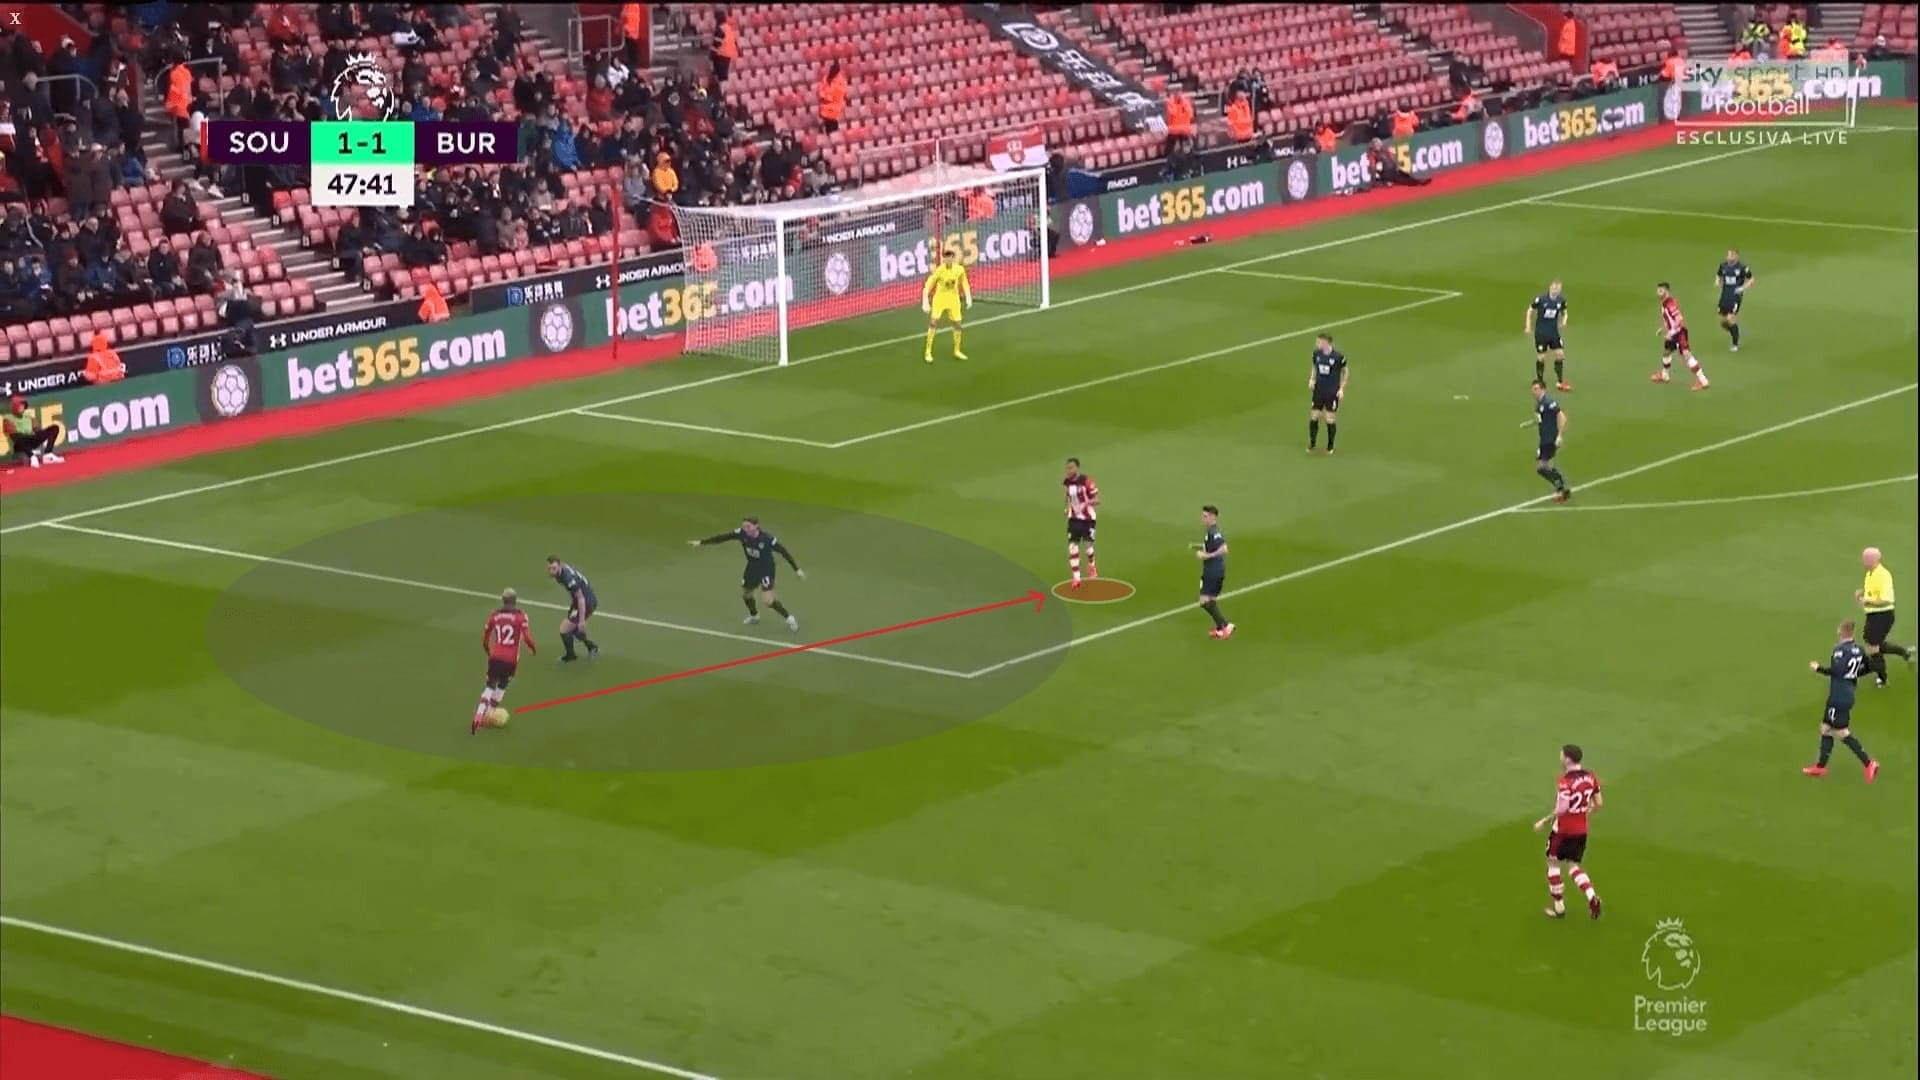
The following image was an example. Vydra became the first man to confront the Southampton wide player, so McNeil could stay deep Burnley retained their numerical equality. The Czech Republican also covered the half-spaces and he protected that zone, hence, delayed Southampton’s attack and won time for the Clarets to adjust their defensive shape.
The Burnley central midfielders were very important in different phases of the defence. Cork and Westwood were willing to cover the half-spaces, free players, track runs and helped their team to defend with a low block. Their presences were vital as the full-backs always left their positions to engage the wide players early, they needed backups to cover spaces at their back.
In the below scenario, you could see Taylor stepped out early to approach the wide player, enlarging his distance with Mee. It would be very dangerous if Jonjo Shelvey was able to receive the pass at the half-spaces, where the former Liverpool midfielder was occupying. The potential issue was solved thanks to the work rate of Cork, who stayed in his position and did his job to cover the area.
The following image further explained the duties of Cork and Westwood. When defending with a low block, both of them stayed tight to protect the ball side half-spaces. The vertical pass was unavailable under this circumstance as the Burnley midfielders covered the half-spaces.
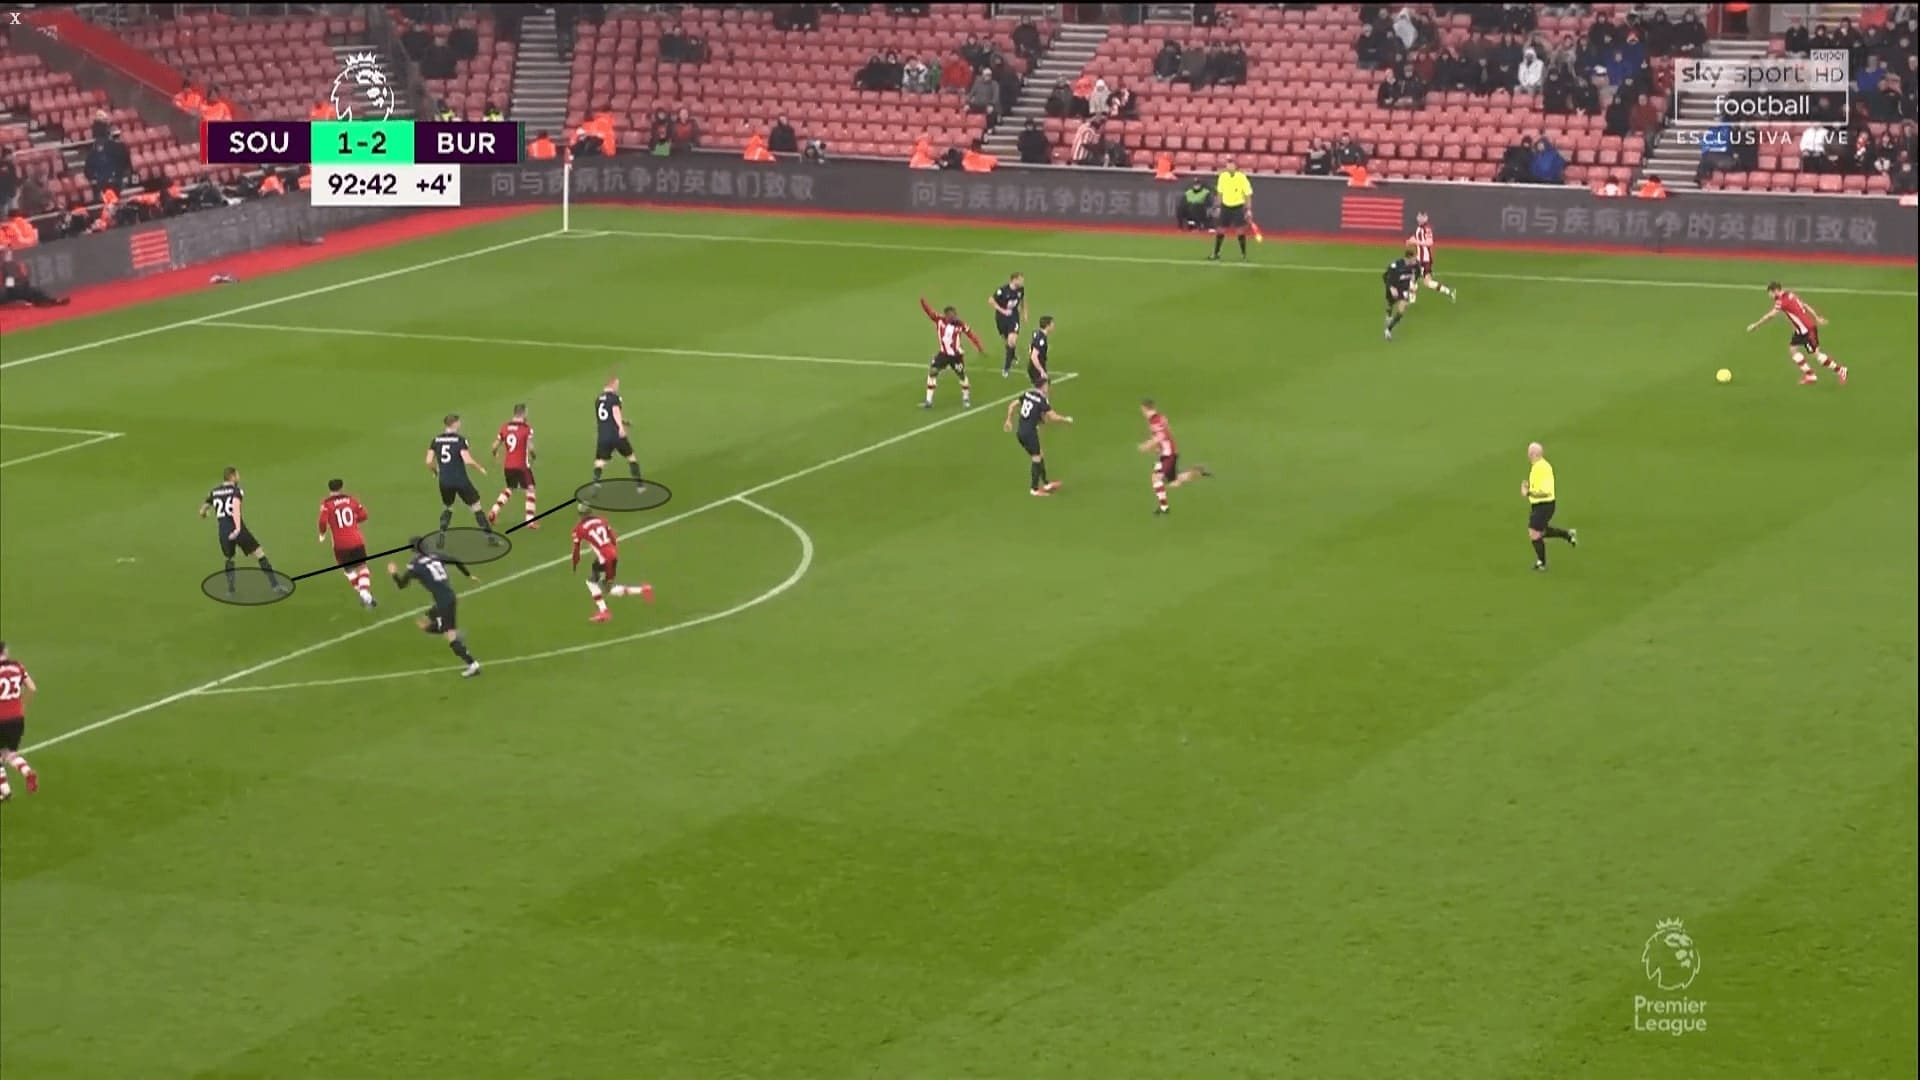
When one Burnley full-back stepped out to the wide areas, the remaining three must stay compact and the centre. This helped them to have the numerical advantage when defending in the box. Both centre-backs of the Clarets were physically strong, and they were also good at dealing with the crosses.
The Burnley centre-backs achieved remarkable statistics defensively as well. Tarkowski had an 80% of defensive duels success rate out from 25 attempts, won 82.14% aerial duels from 28 attempts; he also handed 8.5 interceptions and 15.25 recoveries per 90 minutes. Mee won 69.23% of his 26 defensive duels; 71.42% aerial duels from 21 attempts; he also had 7.5 interceptions and 15.25 recoveries per 90 minutes.
So, how did the Burnley centre-backs dominated the air battle? A large part of the success was because of their good body orientations. When adjusting their positions, Mee and Tarkowski seldom forgot to adjust their body orientations as well. They were also well-trained to stay compact. As you could see below, Mee and Tarkowski were staying very close with each other, with the proper body shapes that reduced their blindside. The close positionings increased the difficulties of the striker(s) to get between them to reach the cross.
Isolation on the ball
Since the majority of Burnley players possessed physical superiorities, Dyche would not mind his crew to defend in the 1 v 1 situations. Therefore, an important part of Burnley’s defence in this period was to isolate the wide player, force them to challenge the defenders without support.
In the Arsenal game, Dyche’s team did very well to cut the connections between the full-backs and the wingers. Saka was even replaced after the break and Arteta had to adjust his tactics. Tactically, they isolated the winger with the help of the entire defence. The simultaneous movements of the midfielders were important to cover the passing lanes and maintain compactness.
When Arsenal passed the ball to the winger, it triggered the corresponding Burnley full-back to leave their position early. At the meantime, the Clarets defence shifted to the ball side to trap the receiver.
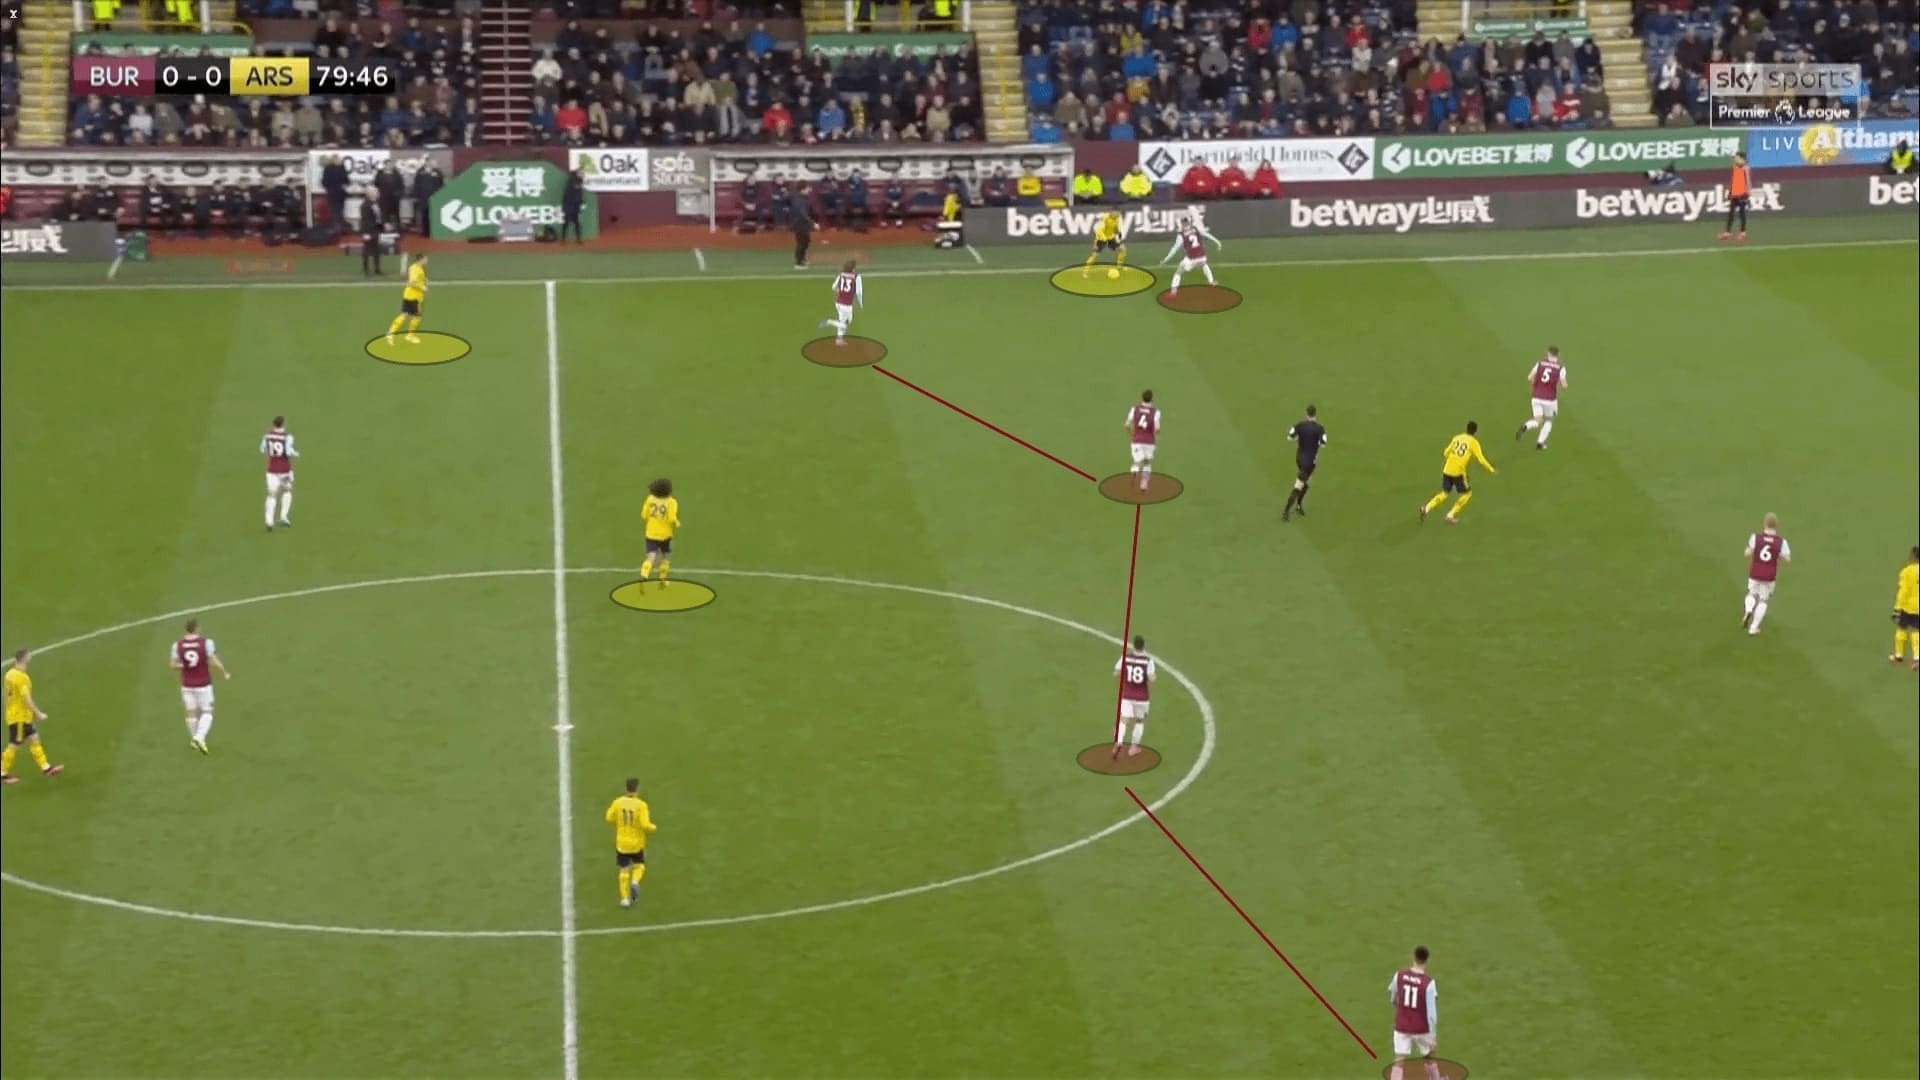
This was the dilemma was Gabriel Martinelli in the below scene. He was forced to confront Phil Bardsley, lacked passing options around him because of the positionings of Burnley players. The return pass was shut by Hendrick while Matteo Guendouzi was too far away. In those cases, the Brazilian would try to take the defender on, but Bardsley and Taylor made the situations difficult.
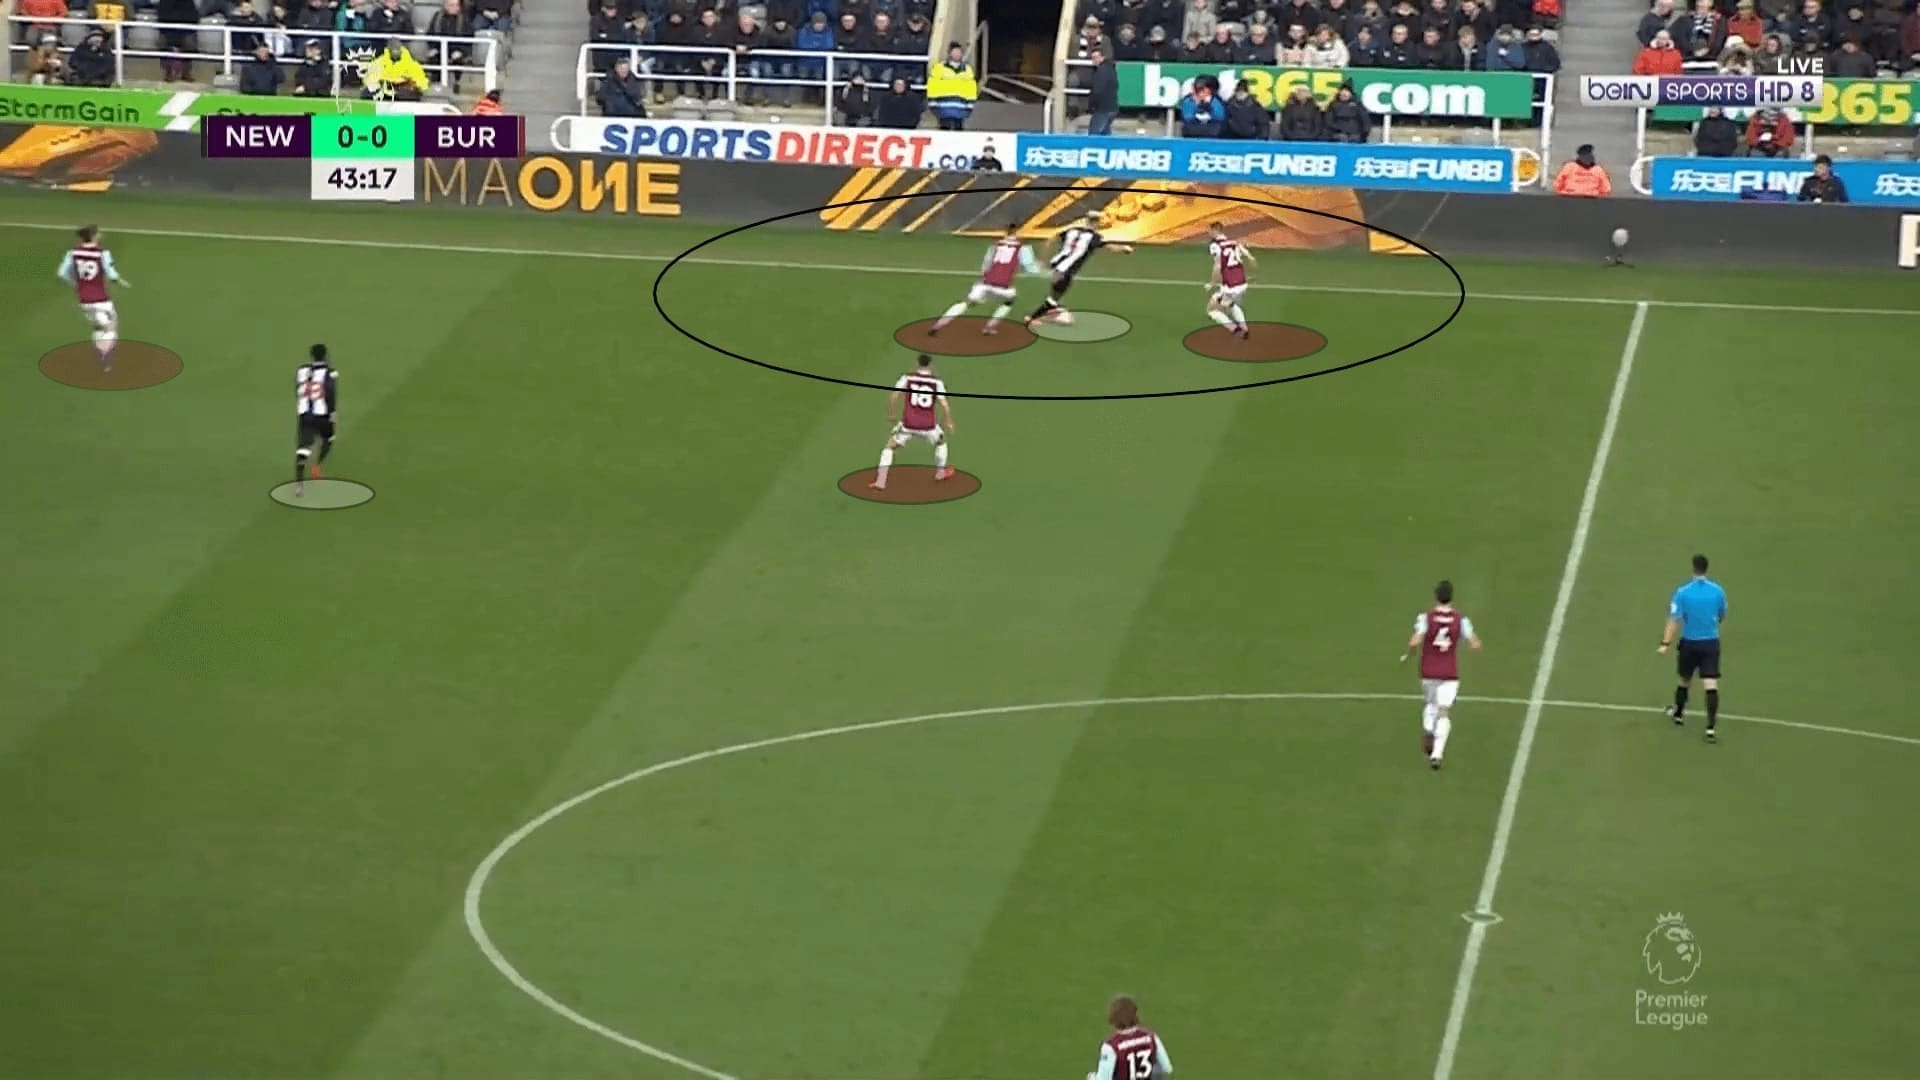
As mentioned, it was a pressing trap for the opponents to pass the ball wide, as Newcastle did in the below scenario. Joelinton received the pass in the wide areas, but he was quickly surrounded by two players, McNeil and Bardsley. Again, options around him were shut as both Burnley midfielder placed themselves on the ball side. Rodriguez also did his job to shut the return passing lane. These forced Joelinton to turn and try to take the right-back, Bardsley on, who was well-prepared to challenge.
Issues
Apparently, there is no perfect system in the world. Every system has the loopholes, Dyche’s Burnley was not an exception and on some occasions, they suffered.
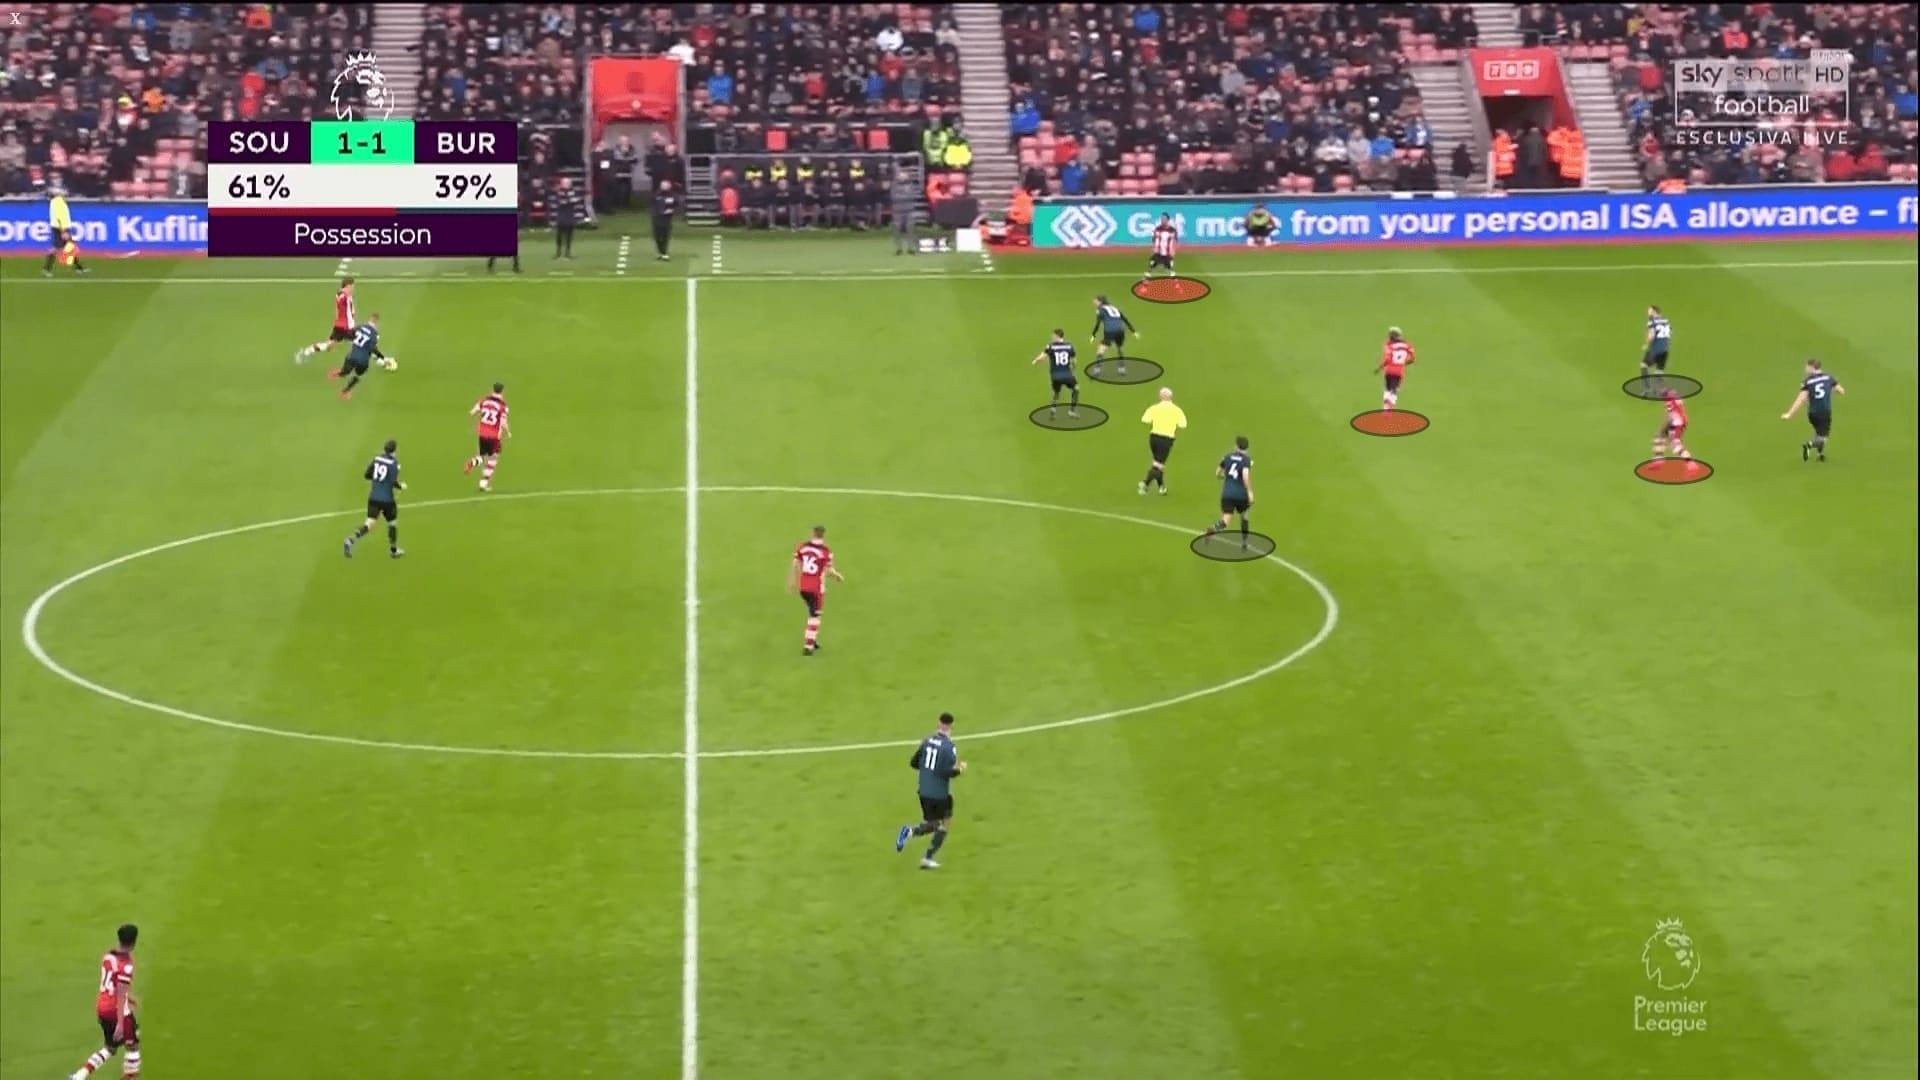
The man-marking scheme of Burnley faced some troubles when dealing with the inverted wingers against Southampton, especially Sofiane Boufal in the first half. Since the Moroccan positioned himself at the half-spaces and between the lines, he escaped from the tight man-marking. Boufal also won him some rooms to operate behind the Burnley midfielders.
When Boufal left the pitch, Moussa Djenepo came on he took a wider position in general. However, when their left-back, Ryan Bertrand pushed high and wide, the young Malian winger also stayed inner. As the following image showed, he stayed right behind Hendrick and Westwood, temporarily overloading Barsdley with Bertrand in a 2 v 1 situation. He found himself comfortable to receive the ball.
Another issue was the spaces behind the central midfielders. Mee and Tarkowski could not cover every ball behind Cork and Hendrick under all circumstances. This was the region where Burnley must suffer whenever they pushed the midfielders to press, as defending in a 4-4-2 only gave them three layers in the defence.
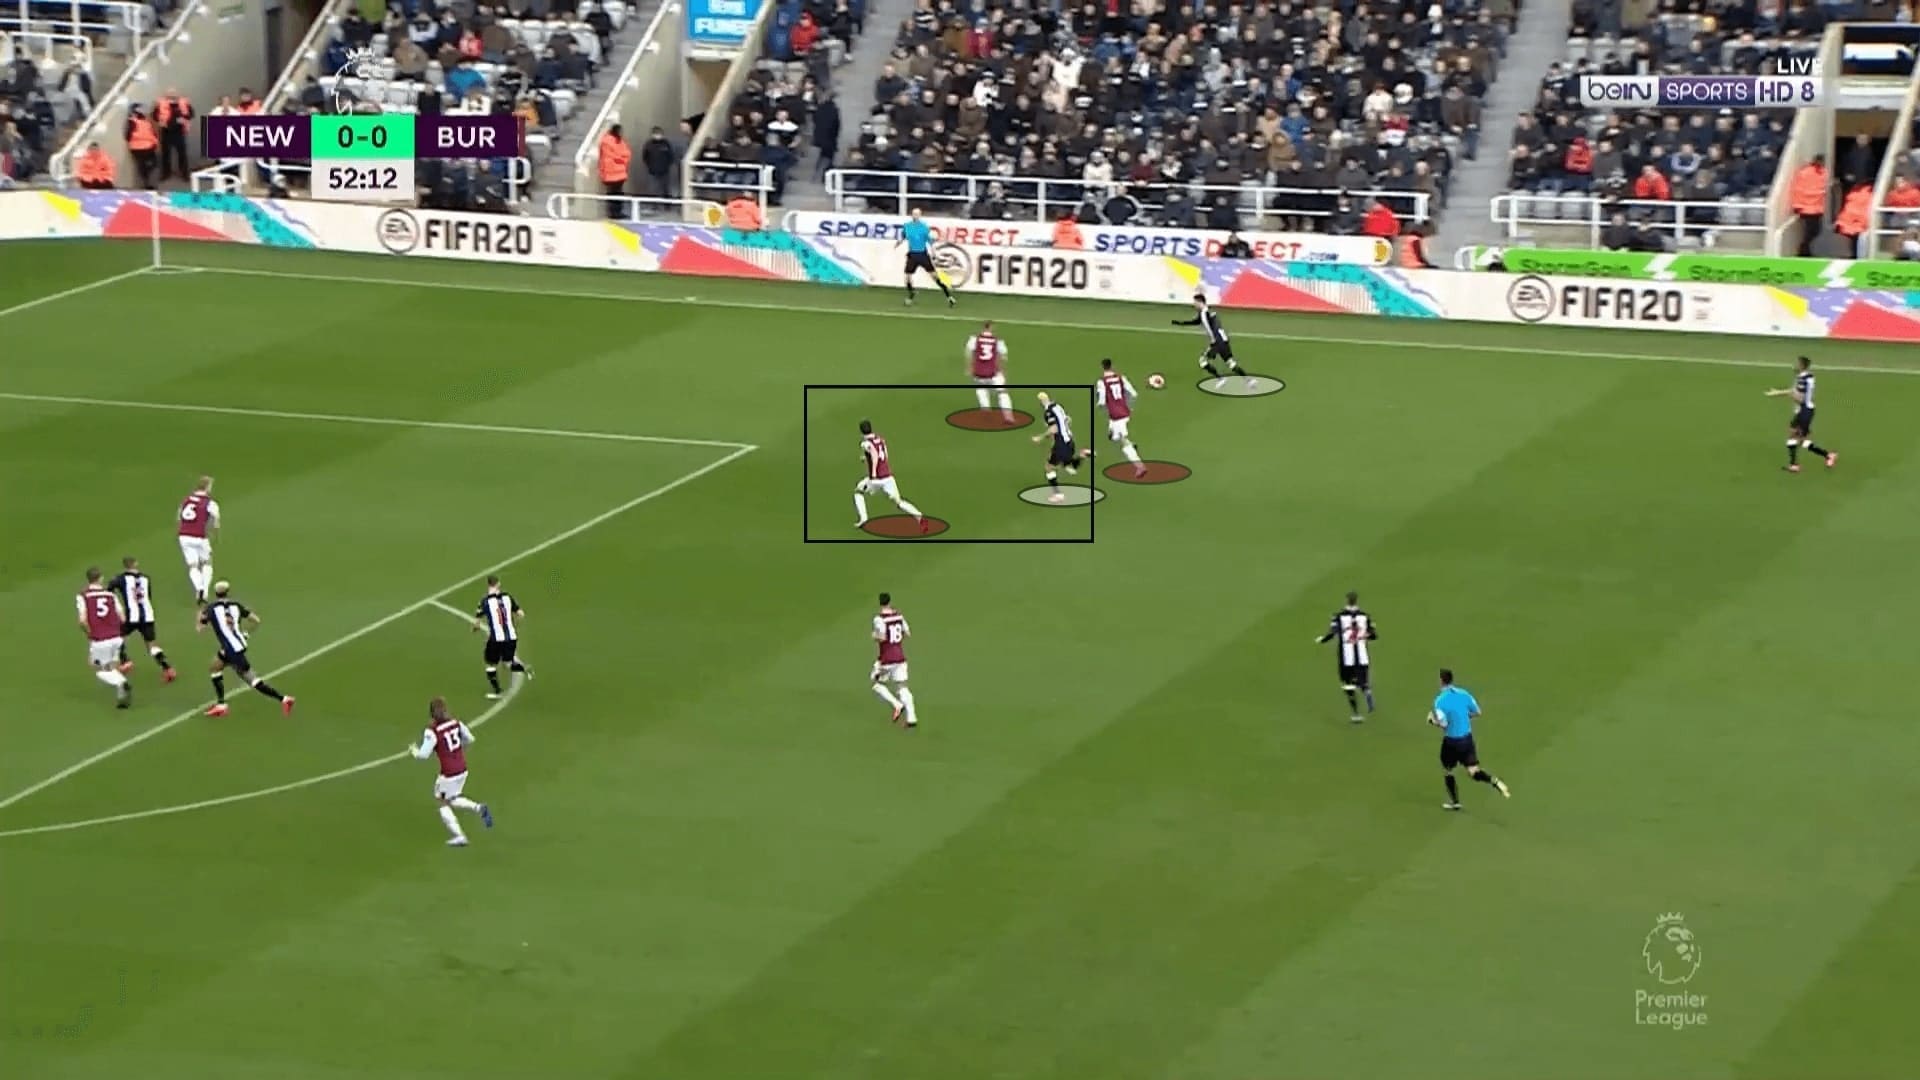
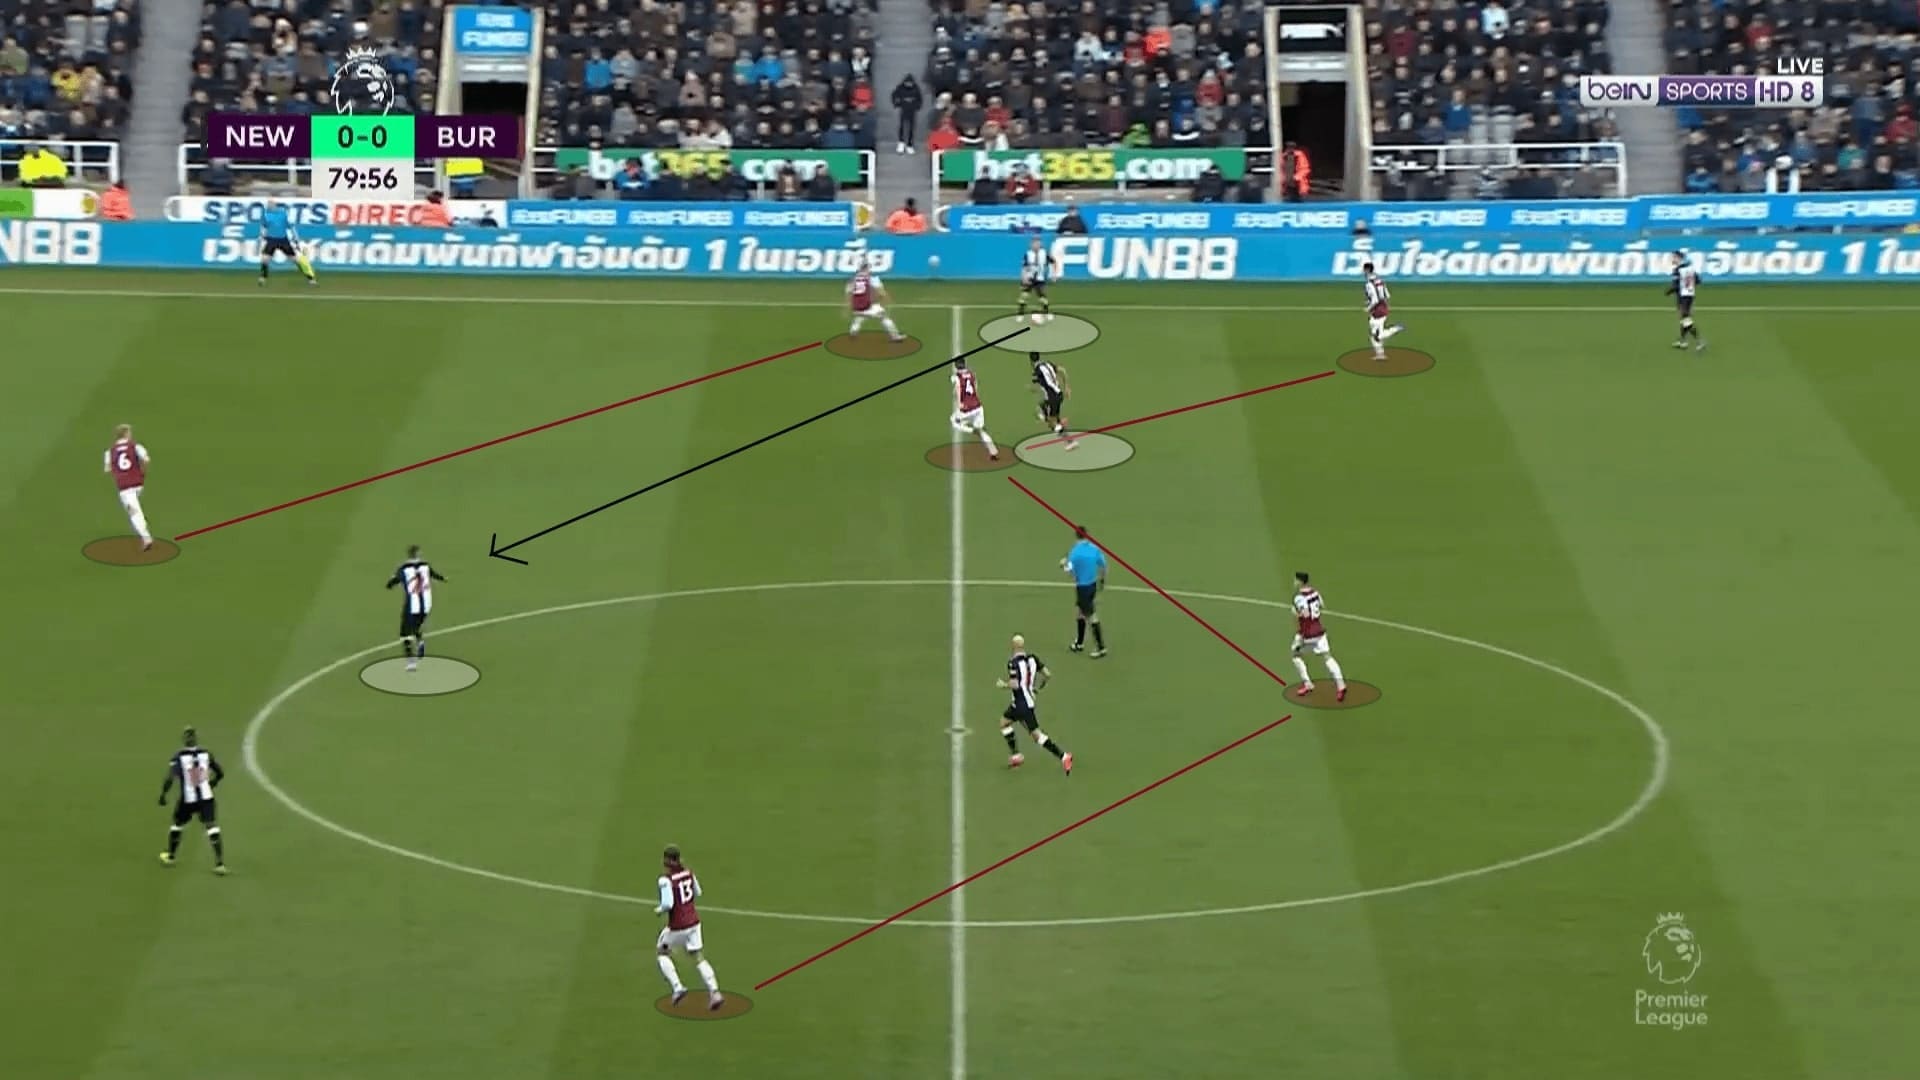
In this situation, Newcastle had the ball wide, but Taylor was late on his target. He gave rooms for an in-ball. And, against the left-footed Matt Ritchie, the body shape of Taylor was suboptimal as he gave the winger to exercise his pass with his stronger foot. Meanwhile, two Newcastle players positioned themselves between the lines. They were free as the positions of Cork and Westwood were manipulated easily, both were marking the targets already. On this occasion, Miguel Almirón received the diagonal pass from Ritchie easily and continued the attack.
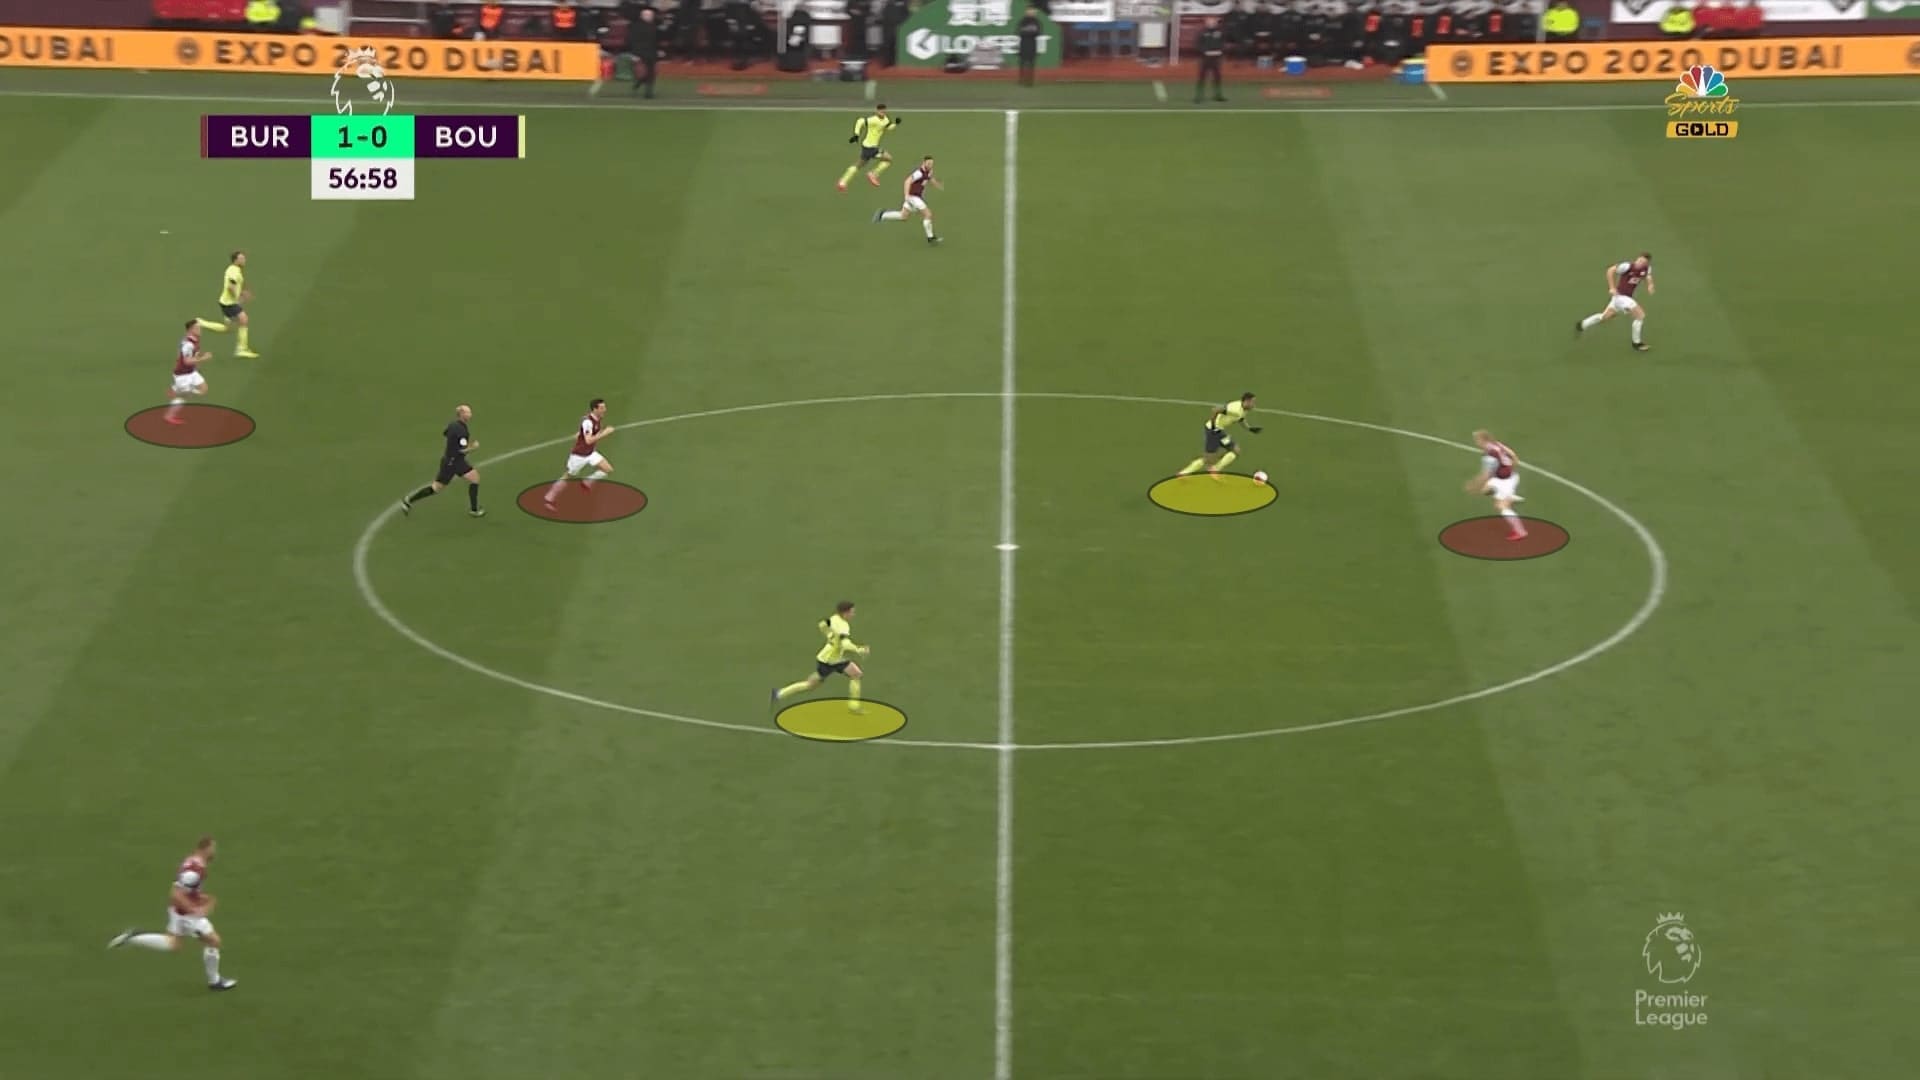
In terms of 1 v 1 battles in the air or direct physical duels, Mee and Tarkowski were enduring fighters and they were reliable. However, it was different when they were facing direct pressure. Bournemouth caught Mee in the below image. When Callum Wilson was charging forward, Mee had to confront the striker, but he lost his balance. Meanwhile, H. Wilson had the chance to run forward freely as spaces behind Cork and Westwood remained uncovered. The eventually resulted in a goal, but it was cancelled by the VAR because of an incident at the other end.
When defending with a deep block, the Burnley full-backs and wingers should have cooperated to protect the wide areas. Hendrick was committed to the defensive duties and it was common to see him track runs in the defensive third. However, there was a little issue on Bardsley’s right side. Even in the 2 v 1 situations, the former Manchester United right-back was a bit conservative to challenge or pressure the ball. He tended to keep a distance and it was too passive. For Hendrick, his defensive skills were not as good as Bardsley, he did not have the practices to approach the ball. Despite created a 2 v 1 situation, sometimes Burnley could not deny a cross as the ball carrier was not under pressure.
On some occasions, it might be a communication issue. For example, you could see Hendrick was instructing Bardsley to cover the wide area, but Djenepo was also comfortable to take the inner route and go to the centre. In this case, the Malian had the initiative as right-back gave him too many rooms. Hendrick was too far away to win the ball from Djenepo if the winger dribbled inward. Therefore, despite creating a 2 v 1 wide, Southampton were still able to get into the penalty box.
Conclusions
When mentioning the playing style of Burnley, many of us will think of compact defending or a low block. However, their performance in February proved they were a lot more than parking the bus. Instead, they pressed very high and aggressively when defending against teams playing out from the back. Of course, they also did well when sitting deep to defend with a low block and crosses. Offensively, some of their goals were absolute stunners, especially the two against Southampton. Dyche’s team were developing into a difficult team to deal with, and they also secured a draw against Tottenham in March. We will see how they continue their performance in the future.



Comments