No Kane, no Alli, no problem. At least that’s what Tottenham felt this month. Four consecutive victories, the latest being a dominant 3–0 home win against Dortmund in the Champions League, prove that they’re okay even without their England stars. Reducing the gap to Manchester City was Spurs’ main target coming to this match, as Pep Guardiola’s men were busy with their Carabao Cup final against Chelsea.
Tottenham were the clear favourite in this encounter since they haven’t lost a match against any bottom-half sides this season. Compared to last season when Burnley finished seventh, today’s Burnley are only able to sit just outside the relegation zone. Even so, they came into this match with plenty of pride after only losing one match in their last nine games since the end of last year.
Harry Kane’s return to the lineup added more advantage to Mauricio Pochettino’s squad. However, Burnley emerged victorious after Ashley Barnes’ close-range finish handed the Clarets a 2–1 win at Turf Moor. This piece will analyse how Burnley defeated Tottenham.
Lineups
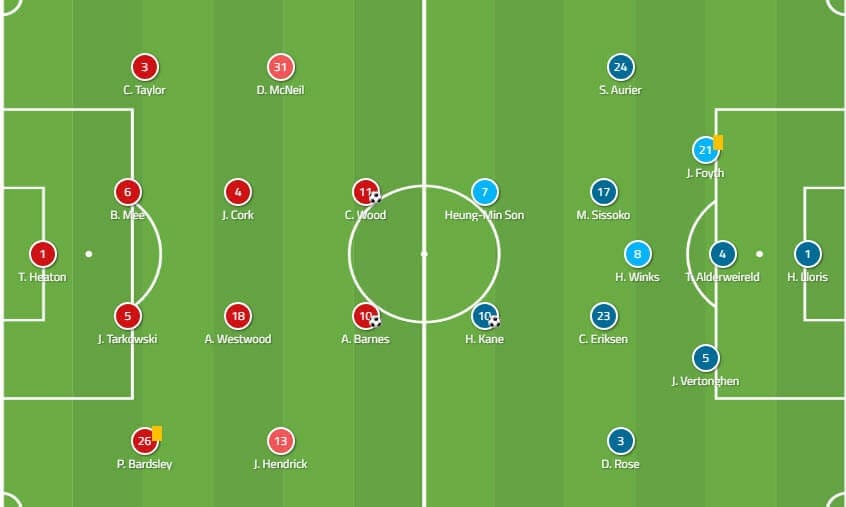
Burnley opted for their usual 4–4–2. Tom Heaton started between the sticks ahead of Joe Hart. Dwight McNeil and Jeff Hendrick provided the width while Ashley Westwood and Jack Cork were tasked with controlling the midfield. Up front, Barnes stood alongside New Zealand international Chris Wood. Names like Johan Berg Gudmundsson and Robbie Brady had to start this game from the bench.
Pochettino opted for a back three in this match, relying on the trio of Juan Foyth, Toby Alderweireld and former Ajax defender Jan Vertonghen. Harry Winks was given his 10th consecutive Premier League start due to his impressive performances. Son Heung-min was Kane’s attacking partner in the forward line. The bench was filled with the likes of Fernando Llorente, Erik Lamela, and Lucas Moura.
Burnley’s varied defensive approach
Burnley started this match with good aggression by actively pressing Spurs high up to the visitors’ penalty box. They did this to prevent Spurs from building their play smoothly from the back. Burnley opted for a man-to-man pressing approach. This meant every close passing lane was closed and forced Hugo Lloris to play long balls.
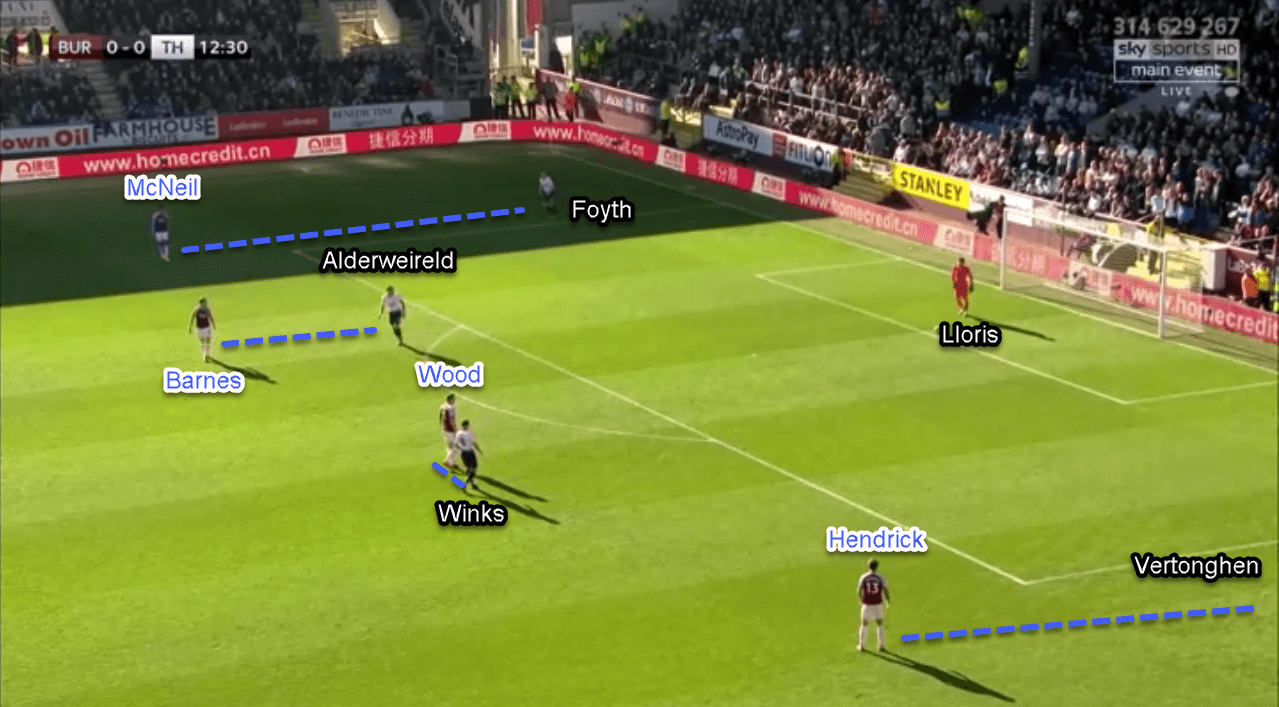
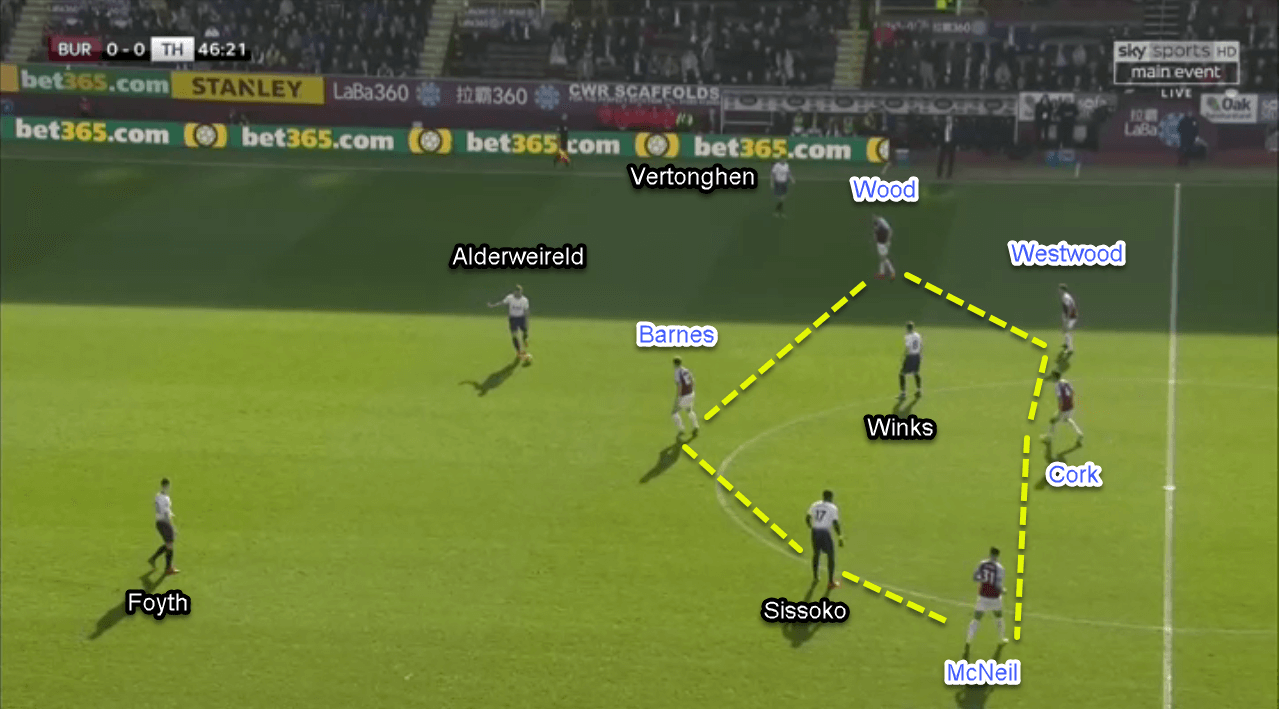
If Spurs were able to bypass the press and move the ball forward, Burnley would sit in their preferred 4–4–2. However, Dyche varied his defensive approach by also using a lopsided 5–3–2.
In that 5–3–2, Hendrick was pulled back to play as a right wing-back in order to control Danny Rose’s aggression down Burnley’s right-hand side flank. Rose was playing so wide and high, sometimes he even popped up in Burnley’s penalty box. This is why Dyche tasked Hendrick with closing Rose down.
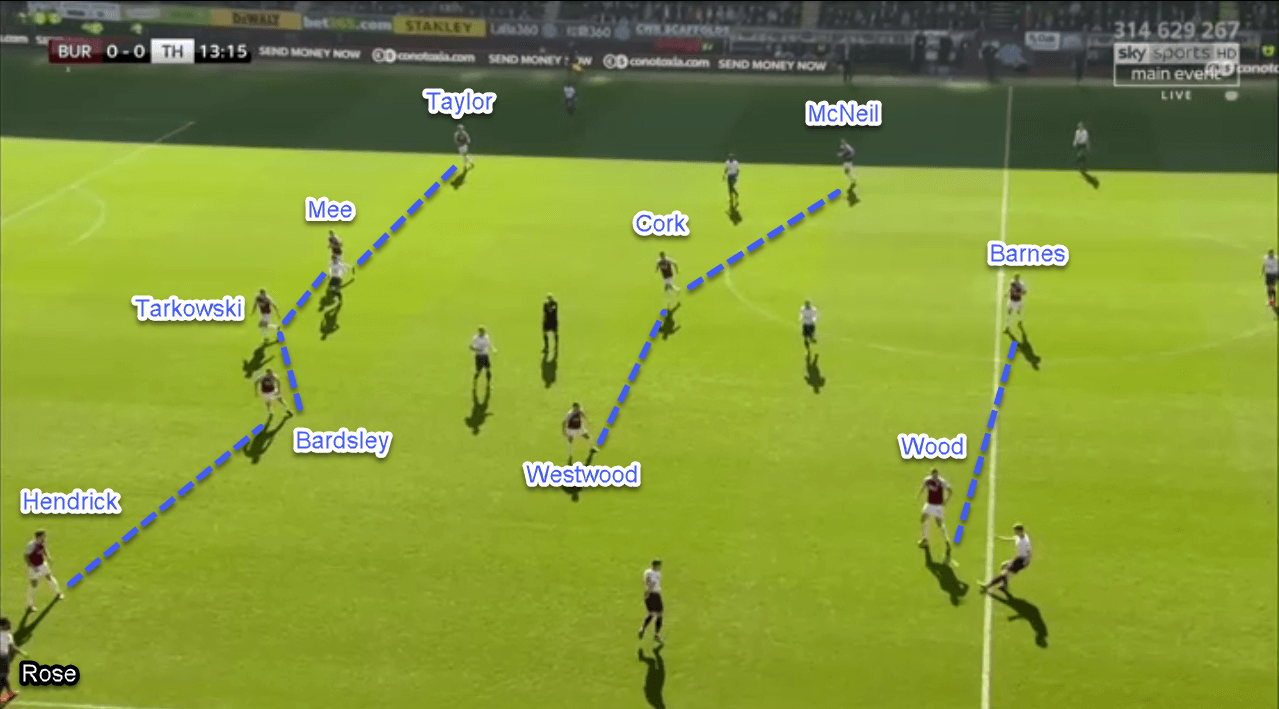
Burnley’s 5–3–2 also provided good coverage in the central part of the pitch. The home side would happily overload the middle, closing passing lanes for both Winks and Moussa Sissoko.
The midfielders and the forwards would defend closely to each other from one half-space to the other. Spurs’ defenders were then forced to build attacks from the flanks due to the good positioning of the home side’s players.
Creative, but …
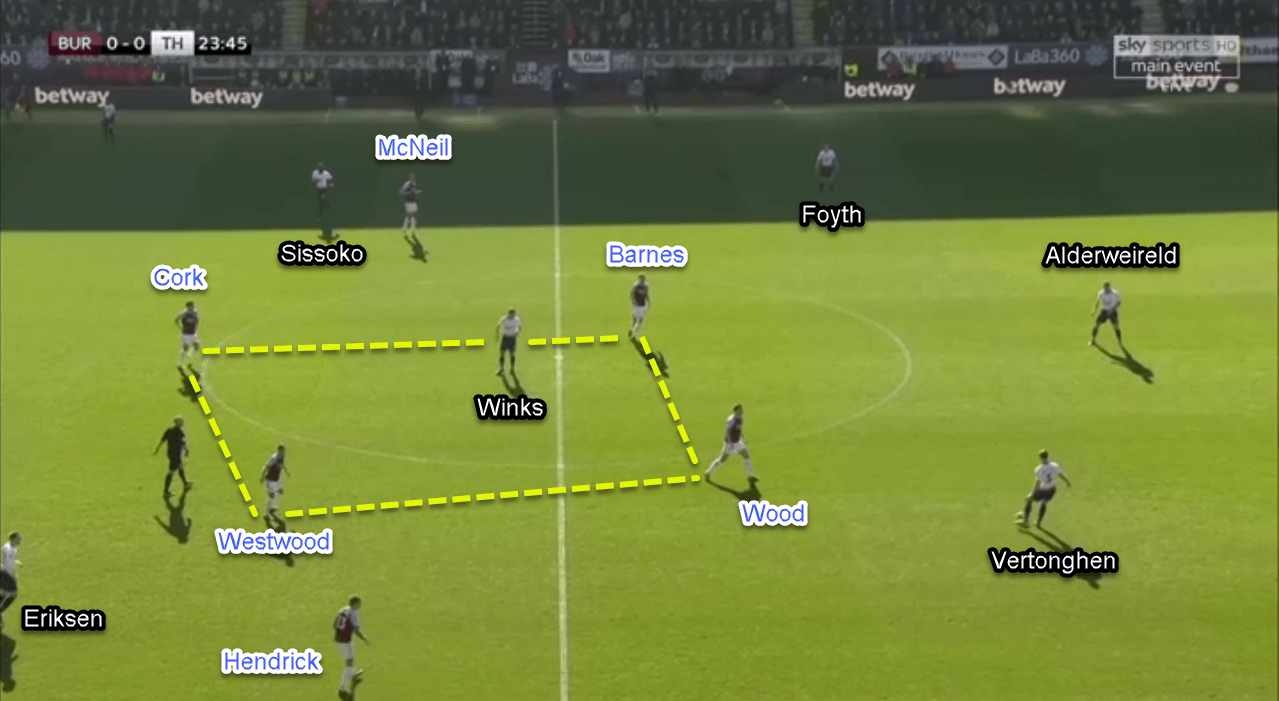
Pochettino unleashed his tactical versatility by using various approaches to unlock Burnley’s defence. They reacted to Burnley’s high pressure by placing one of their midfielders in between the lines, behind the home side’s midfielders.
With Winks and Eriksen being pressed, Sissoko then stepped up and moved into an advanced area while freeing himself from the opponent’s midfielders. This enabled Spurs to build their attacks through the middle more smoothly.
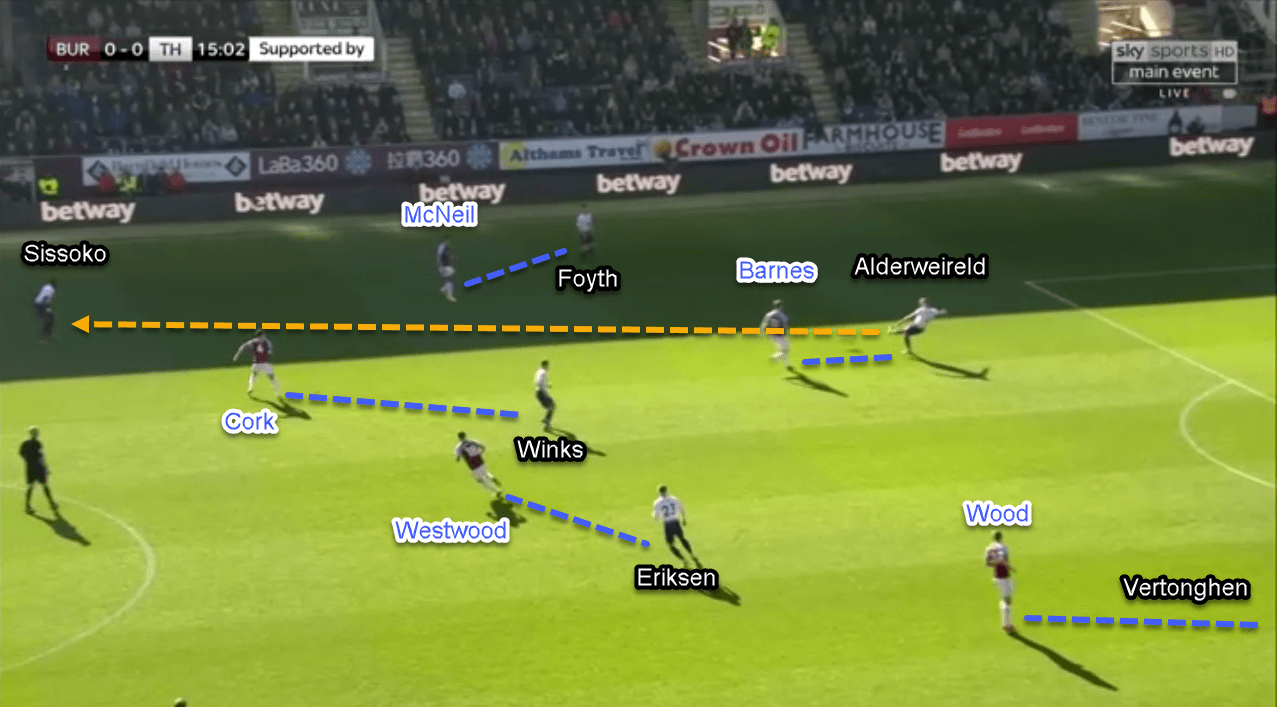
In Burnley’s area, Pochettino again instructed his men to actively try and occupy the space in between the lines. Sissoko was again the passing target as Cork and Westwood were more focused on covering Winks and Eriksen. This allowed Sissoko to receive without any hesitation and enabled him to combine with Serge Aurier or one of the forwards.
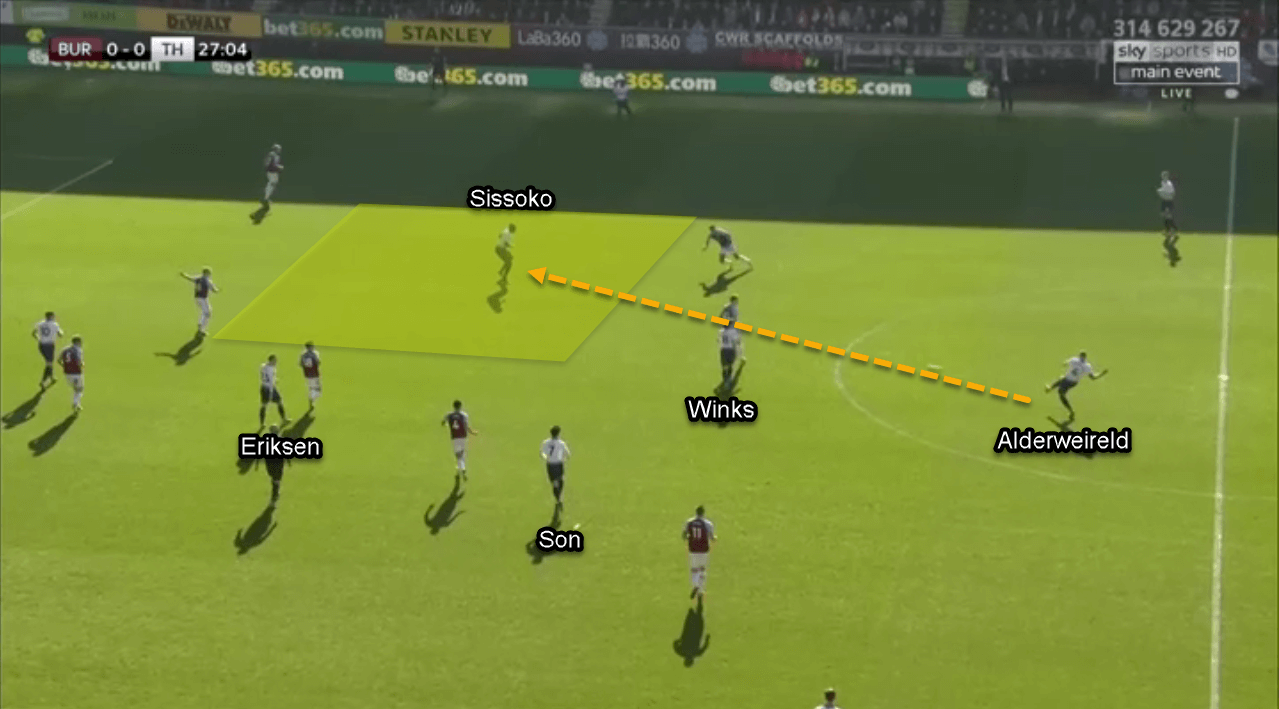
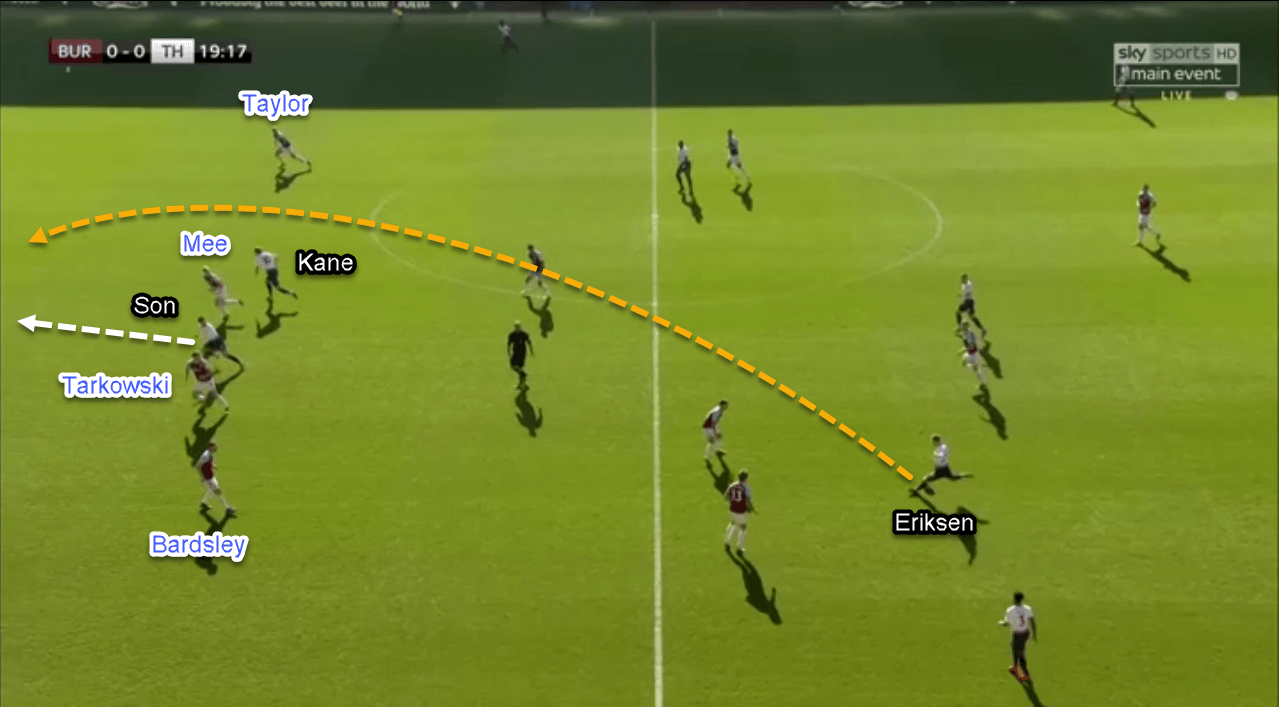
Not only using Sissoko, Spurs also used their forwards to disrupt Burnley’s defence with their slick movements. In the image above, we can see Son drop from his position while Kane is looking for the ball to be played in behind.
On another occasion, Kane was the man who actively dropped between the lines to receive while Son pinned James Tarkowski and Ben Mee back. In such areas, Kane was able to create some dangerous chances. He even forced Heaton to make a stunning save just into the second half.
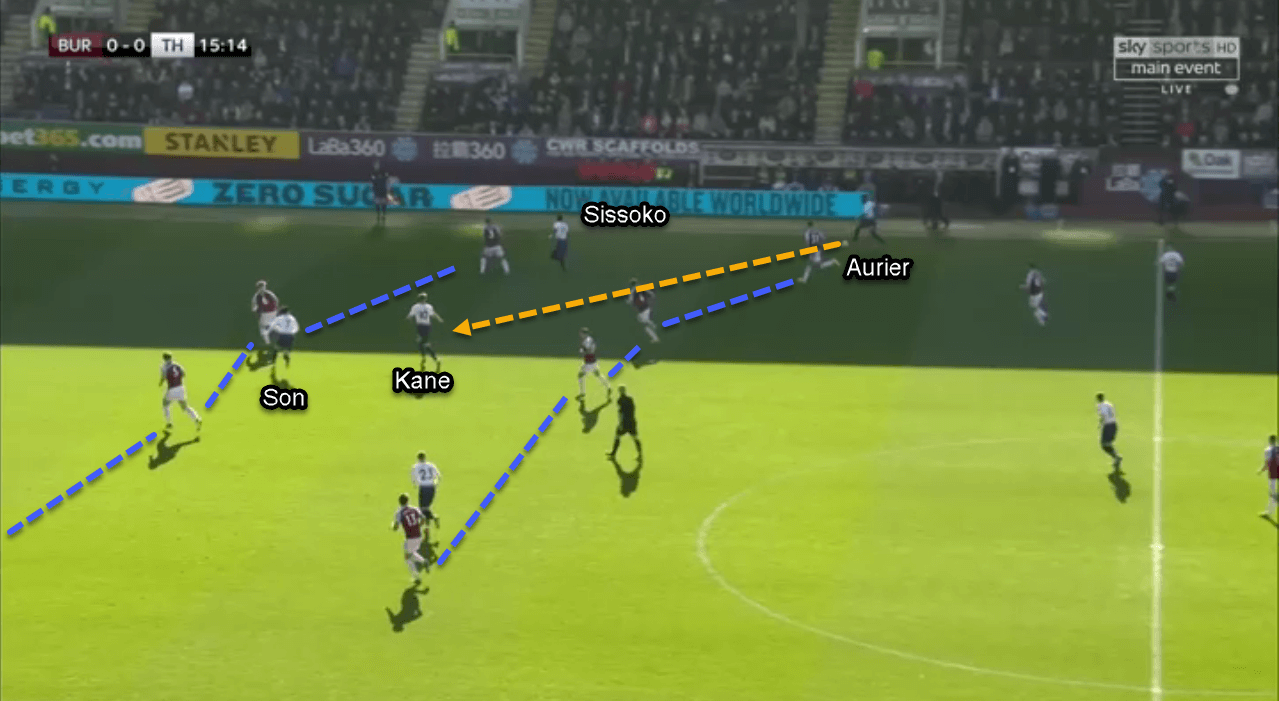
Sometimes Burnley defended with a mid-block. Unfortunately, their defence was quite poor when they used that approach. They tried to use a high defensive line while their midfielders didn’t put enough pressure on Spurs’ ball handler, which was mainly Eriksen. Twice Eriksen tried to punish the mistake by trying to find Son or Kane in behind with a lofted through ball. Unluckily, he was unable to find them on both occasions.
Spurs also used the aggression of their wing-backs to create scoring chances. Ex-Espanyol manager Pochettino would allow his wing-backs to bomb forward to create crosses in the final third. They didn’t only aim for their forwards with those crosses though. Sometimes the crossing target was the opposite side wing-back at the far post.
Spurs would happily put so many bodies inside the box in crossing situations. With his forwards marked by the home side’s centre-backs, allowing a wing-back to be a crossing target at the far post was a logical option for Pochettino to make.
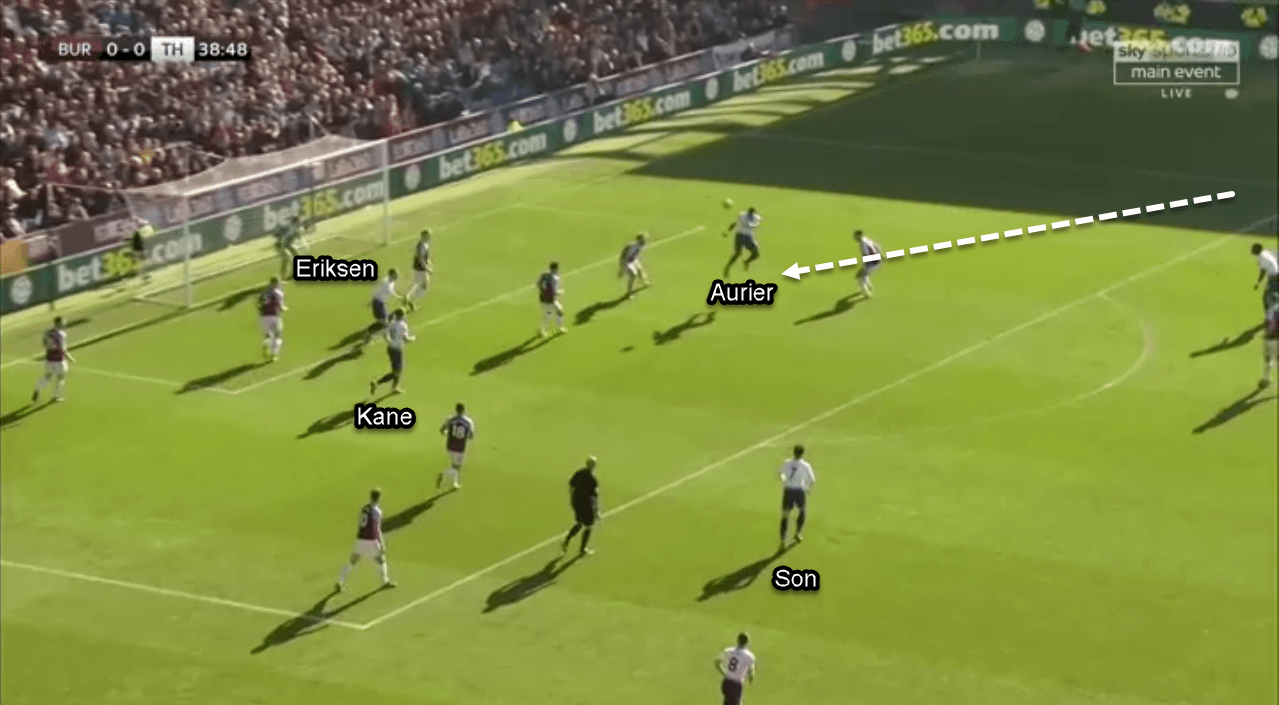
However, none of the plays mentioned above resulted in a goal for the Lilywhites. Burnley were able to nullify the threats by putting a lot of men in their defence, and using blocks and clearances as their main weapons. Although they were able to create many scoring chances, almost all of Spurs‘ attempts were weak or easily saved by Heaton.
Wood, work, woodwork
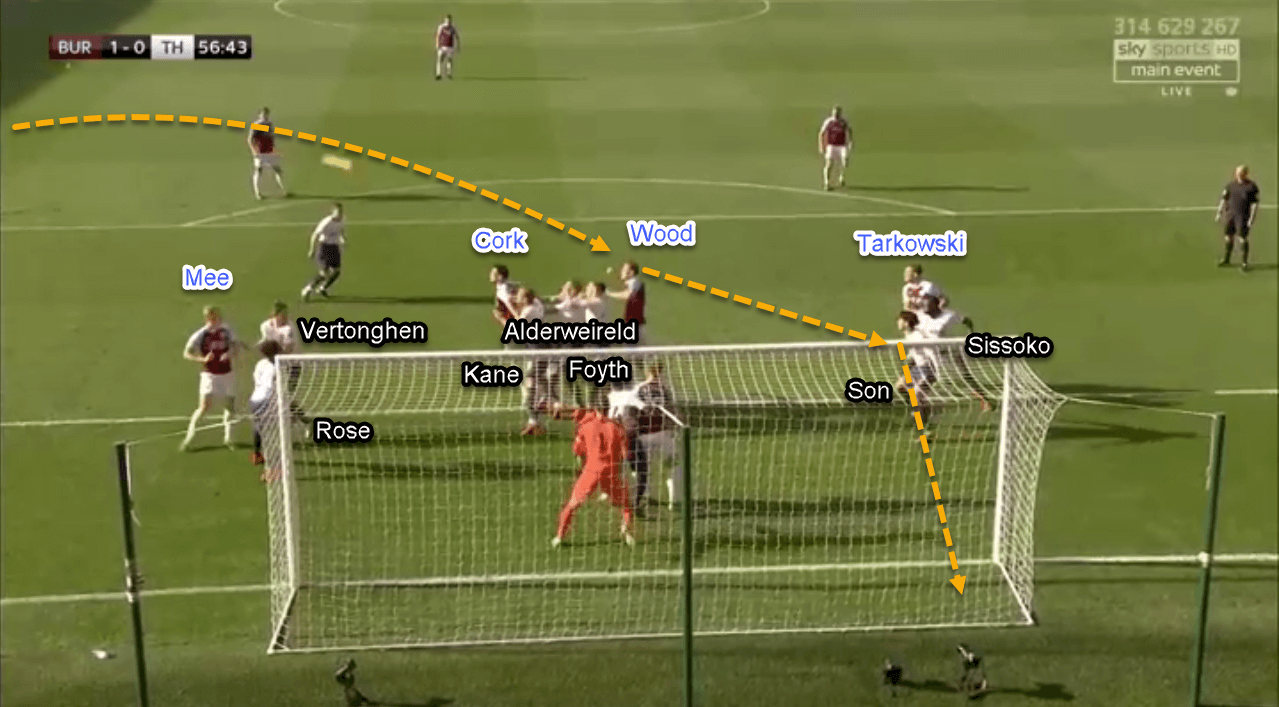
A goal finally came in the 56th minute for the home side via Wood from a well-worked corner routine. He outmuscled Foyth in the process, heading the ball into the woodwork before it went in. How well did Burnley work that corner routine?
Spurs used a hybrid of man-marking and zonal-marking to defend the corner. Aurier marked Barnes just in front of Lloris. Near the penalty spot Sissoko challenged Tarkowski while Vertonghen covered Mee. Zonally, Spurs used four players (Foyth, Son, Kane, and Alderweireld) on the six-yard line to close down Cork and Wood. Next to them, Rose and Winks were standing by their own at the near post to clear any loose balls.
In order to disrupt the defensive shape, Tarkowski and Mee, who started at the penalty spot, split towards the edges of the six-yard box. Their movements trigger their markers to follow and they also pull a new defender with their run. Mee, who runs to the near post, now draws Rose and Vertonghen with him. Tarkowski, on the opposite side, pulls Sissoko and Son to the far post.
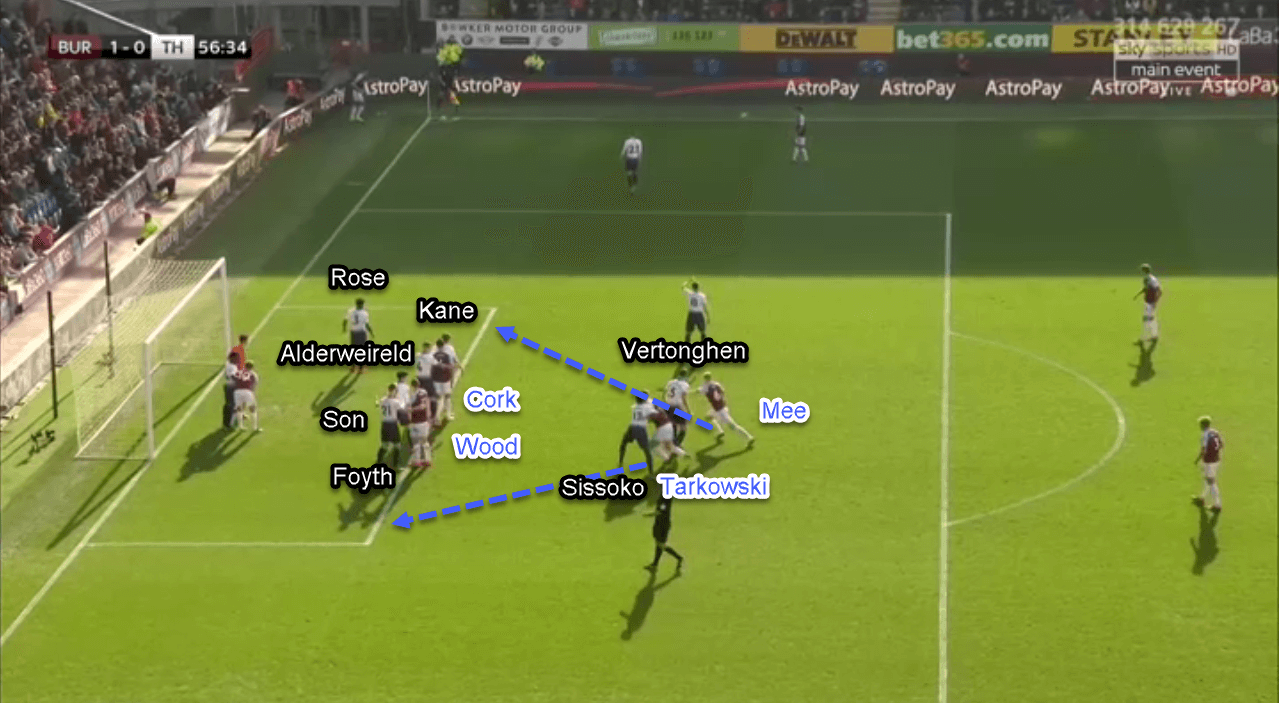
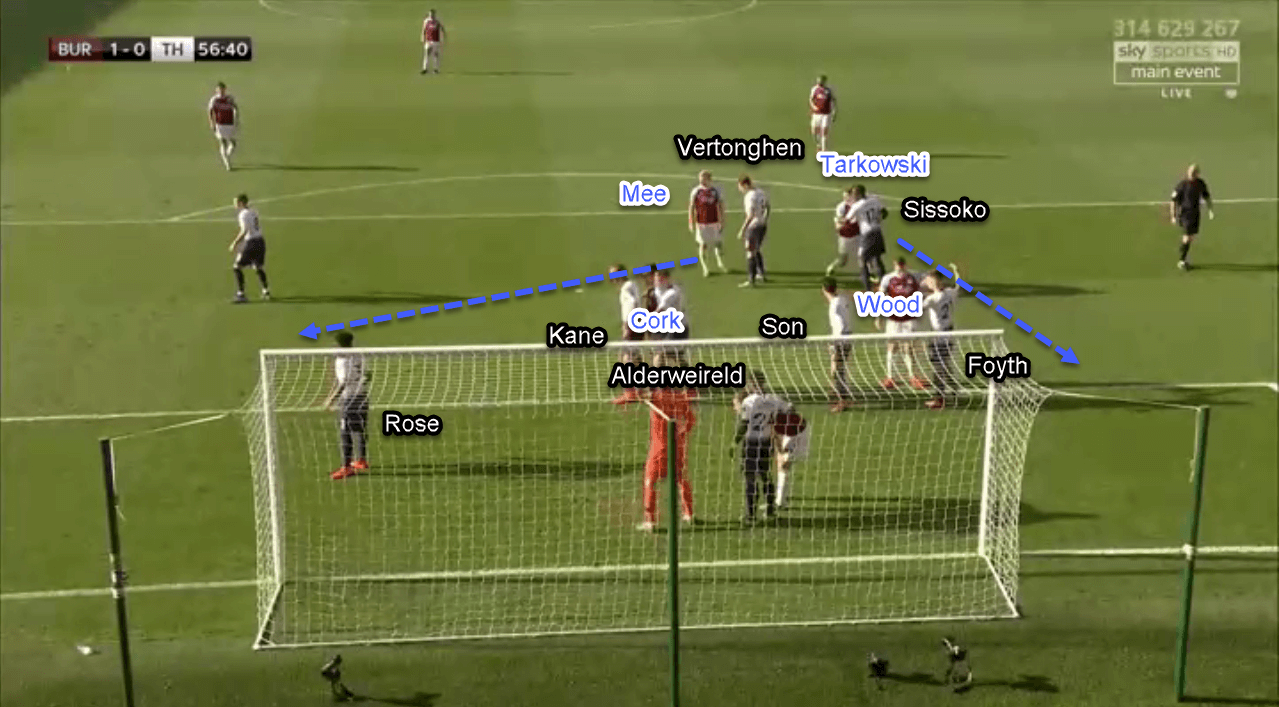
Although Spurs started by defending with four players on the six-yard line, they now only have three after Vertonghen follows Mee into the near post. Actually, they still hold a numerical advantage in this situation by having three players against Burnley’s two, but somehow they fail to maximise the advantage. On top of that, Wood escapes Foyth’s marking with ease and heads the ball home to give Burnley the lead.
Spurs did equalise not long after that goal through Kane. With a huge throw-in just near the halfway line, Rose successfully found Kane in behind Burnley’s defence. The England captain then slotted the ball into the far post to make it 1–1. Game on.
Strength in numbers
Not only utilising the physical prowess from their players, Burnley also used counter-attacks to help break Spurs’ defence down. Burnley overloaded the central part of the pitch in order to create scoring opportunities. They abandoned the flanks and focused their attacks centrally.
The wingers gladly moved inside, both Barnes and Wood actively finding pockets of space between the defenders, and a midfielder would help the attack from the second line. By overloading the central part of the pitch, it was easier for Burnley’s attackers to make slick combinations in order to create problems for the visitors. The aggression of Spurs’ wing-backs was also a helping factor for Burnley since both of them were sometimes late to track back after their attacking duties.
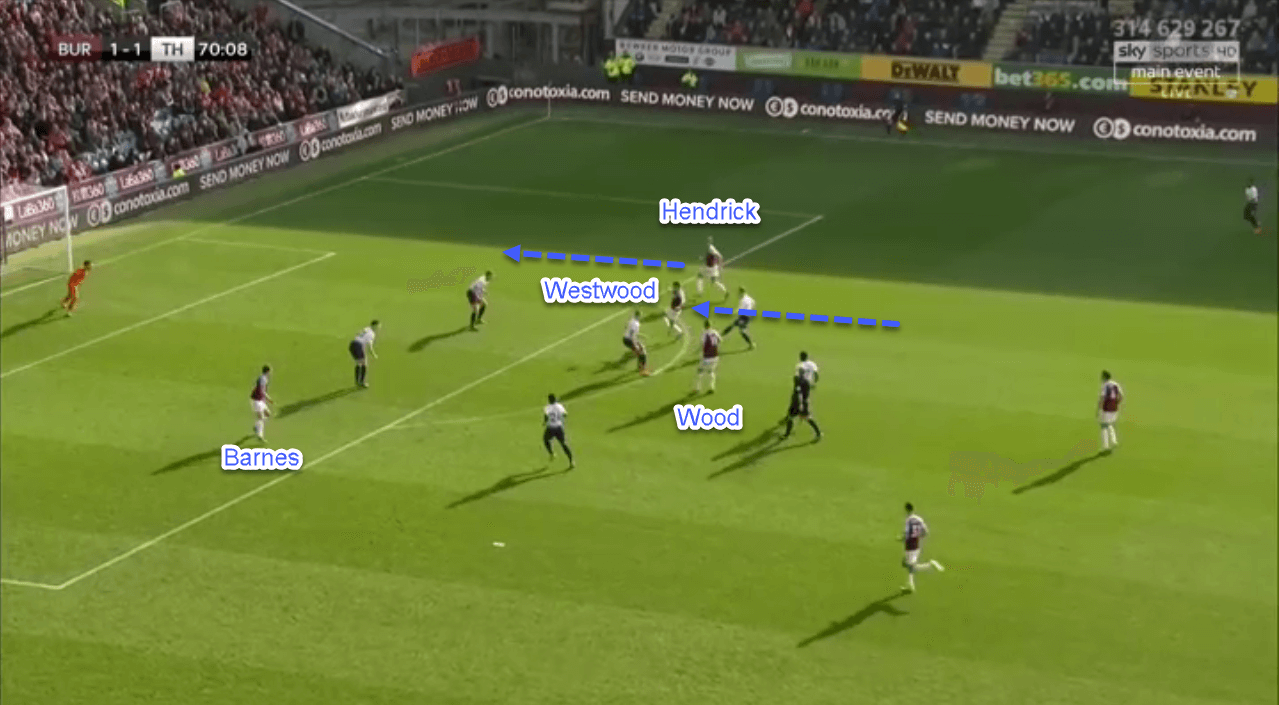
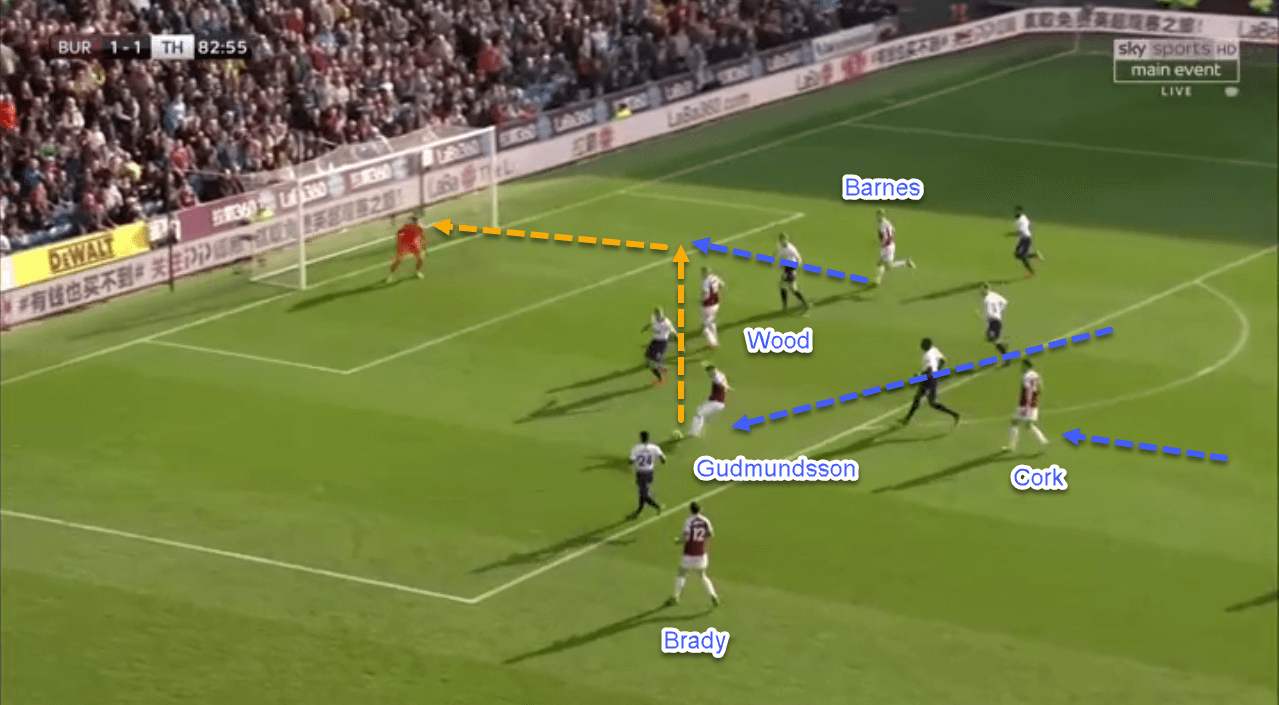
When Spurs moved into 4–2–3–1 in the latter stages of the game, Burnley finally reaped the result of this approach. With fewer men in the central defensive area, Spurs were unable to hold Burnley down for any longer.
Below, Wood and Barnes stretch the defence, thus opening a gap between the lines for Gudmundsson to break into. The Iceland international then finds Barnes with a cross-cum-shot at the far post. A tap-in by Barnes was enough to give Burnley their winning goal.
Conclusion
Spurs did their best to collect an away win at Turf Moor but sometimes their best is not enough. Despite the disappointing result, Pochettino proved once again that he’s an insanely good manager who has various weapons upon his sleeve, even with a depleted squad.
It was Burnley’s all-round brilliance that was the main star of this match. Dyche’s men successfully deployed a resilient display at the back, while also showing good attacking quality up top. With this precious win, the Clarets continue their run of good results, therefore making them move further away from the danger zone. Meanwhile, for Tottenham, this rare defeat against a bottom-half side adds more questions to their title challenge.
If you love tactical analysis, then you’ll love the digital magazines from totalfootballanalysis.com – a guaranteed 100+ pages of pure tactical analysis covering topics from the Premier League, Serie A, La Liga, Bundesliga and many, many more. Buy your copy of the February issue for just ₤4.99 here, or even better sign up for a ₤50 annual membership (12 monthly issues plus the annual review) right here.

Comments