Scott Parker’s Burnley won 0-2 against Chris Wilder’s Sheffield United in a tightly-contested match decided by small details.
With this win, Burnley (third) are only one point behind Sheffield United (second), while Leeds United have taken the leadership in the EFL Championship standings.
As we discussed weeks ago, Chris Wilder’s Sheffield United have new tactics that helped them go unbeaten in their previous 11 matches—nine wins and two draws.
However, Scott Parker oversaw an excellent performance away at Bramall Lane to end that streak.
These are two teams with recent experience in the Premier League, and both coaches have been in the English first tier for more than one season in their history.
Boxing Day gave us a tactically interesting match and put the Championship teams closer than they’d already been at the top of the standings—Leeds United, Sheffield United, Burnley, and Sunderland are in the top four, with only four points separating Leeds and Sunderland.
In this match report, we will provide a full tactical analysis of the key tactics that Burnley implemented against Sheffield United to increase their competitiveness in the Championship.
Sheffield United Vs Burnley Lineups & Formations
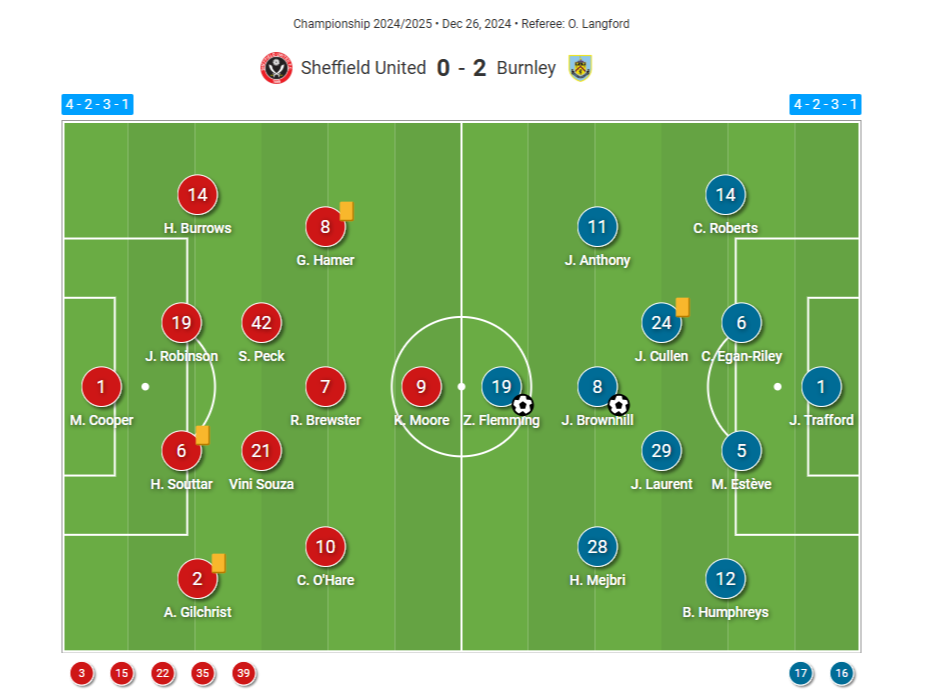
Sheffield United Lineup
Chris Wilder was going to face a difficult match, not only because of the rival but also because Tyrese Campbell and Jesurun Rak-Sakyi could not play.
They are two of the most important weapons for Sheffield United in the offensive phase.
In that sense, Wilder used Kieffer Moore as his target man and Rhian Brewster as a type of second striker, sometimes dropping to the right flank, where Callum O’Hare was.
Gustavo Hamer remained a false winger, while Vinícius Souza and Sydie Peck were in the double pivot.
There were no surprises in the defensive line while Anel Ahmedhodžić made his return to the bench.
Burnley Lineup
Scott Parker also went with an offensive full-back, Bashir Humphreys, on the left.
Like Chris Wilder, he used a flexible 4-2-3-1 initial shape.
One of the stars of the night, Zian Flemming, earned his place in the attack over Jay Rodríguez, while Hannibal Mejbri, Josh Brownhill, and Jaidon Anthony were behind the striker.
Sheffield United Vs Burnley: Build-Up Structures
During the build-up, both teams had similar structures.
Sheffield United’s structure had more variants than Burnley’s.
They dominated possession in the first half with 56%.
Their shape was usually a 3+2 from the backline, with Burrows high as the offensive left-back and the right side pinned by Alfie Gilchrist (right-back) or Callum O’Hare (right-winger).
Gilchrist could locate himself as a right centre-back when the double pivot stayed at different heights in the centre.
He could be closer to the touchline and higher if Vinícius Souza or Sydie Peck dropped into the centre-back zone.
As his heatmap shows, Gustavo Hamer was constantly floating across the pitch.
Gustavo Hamer Heatmap
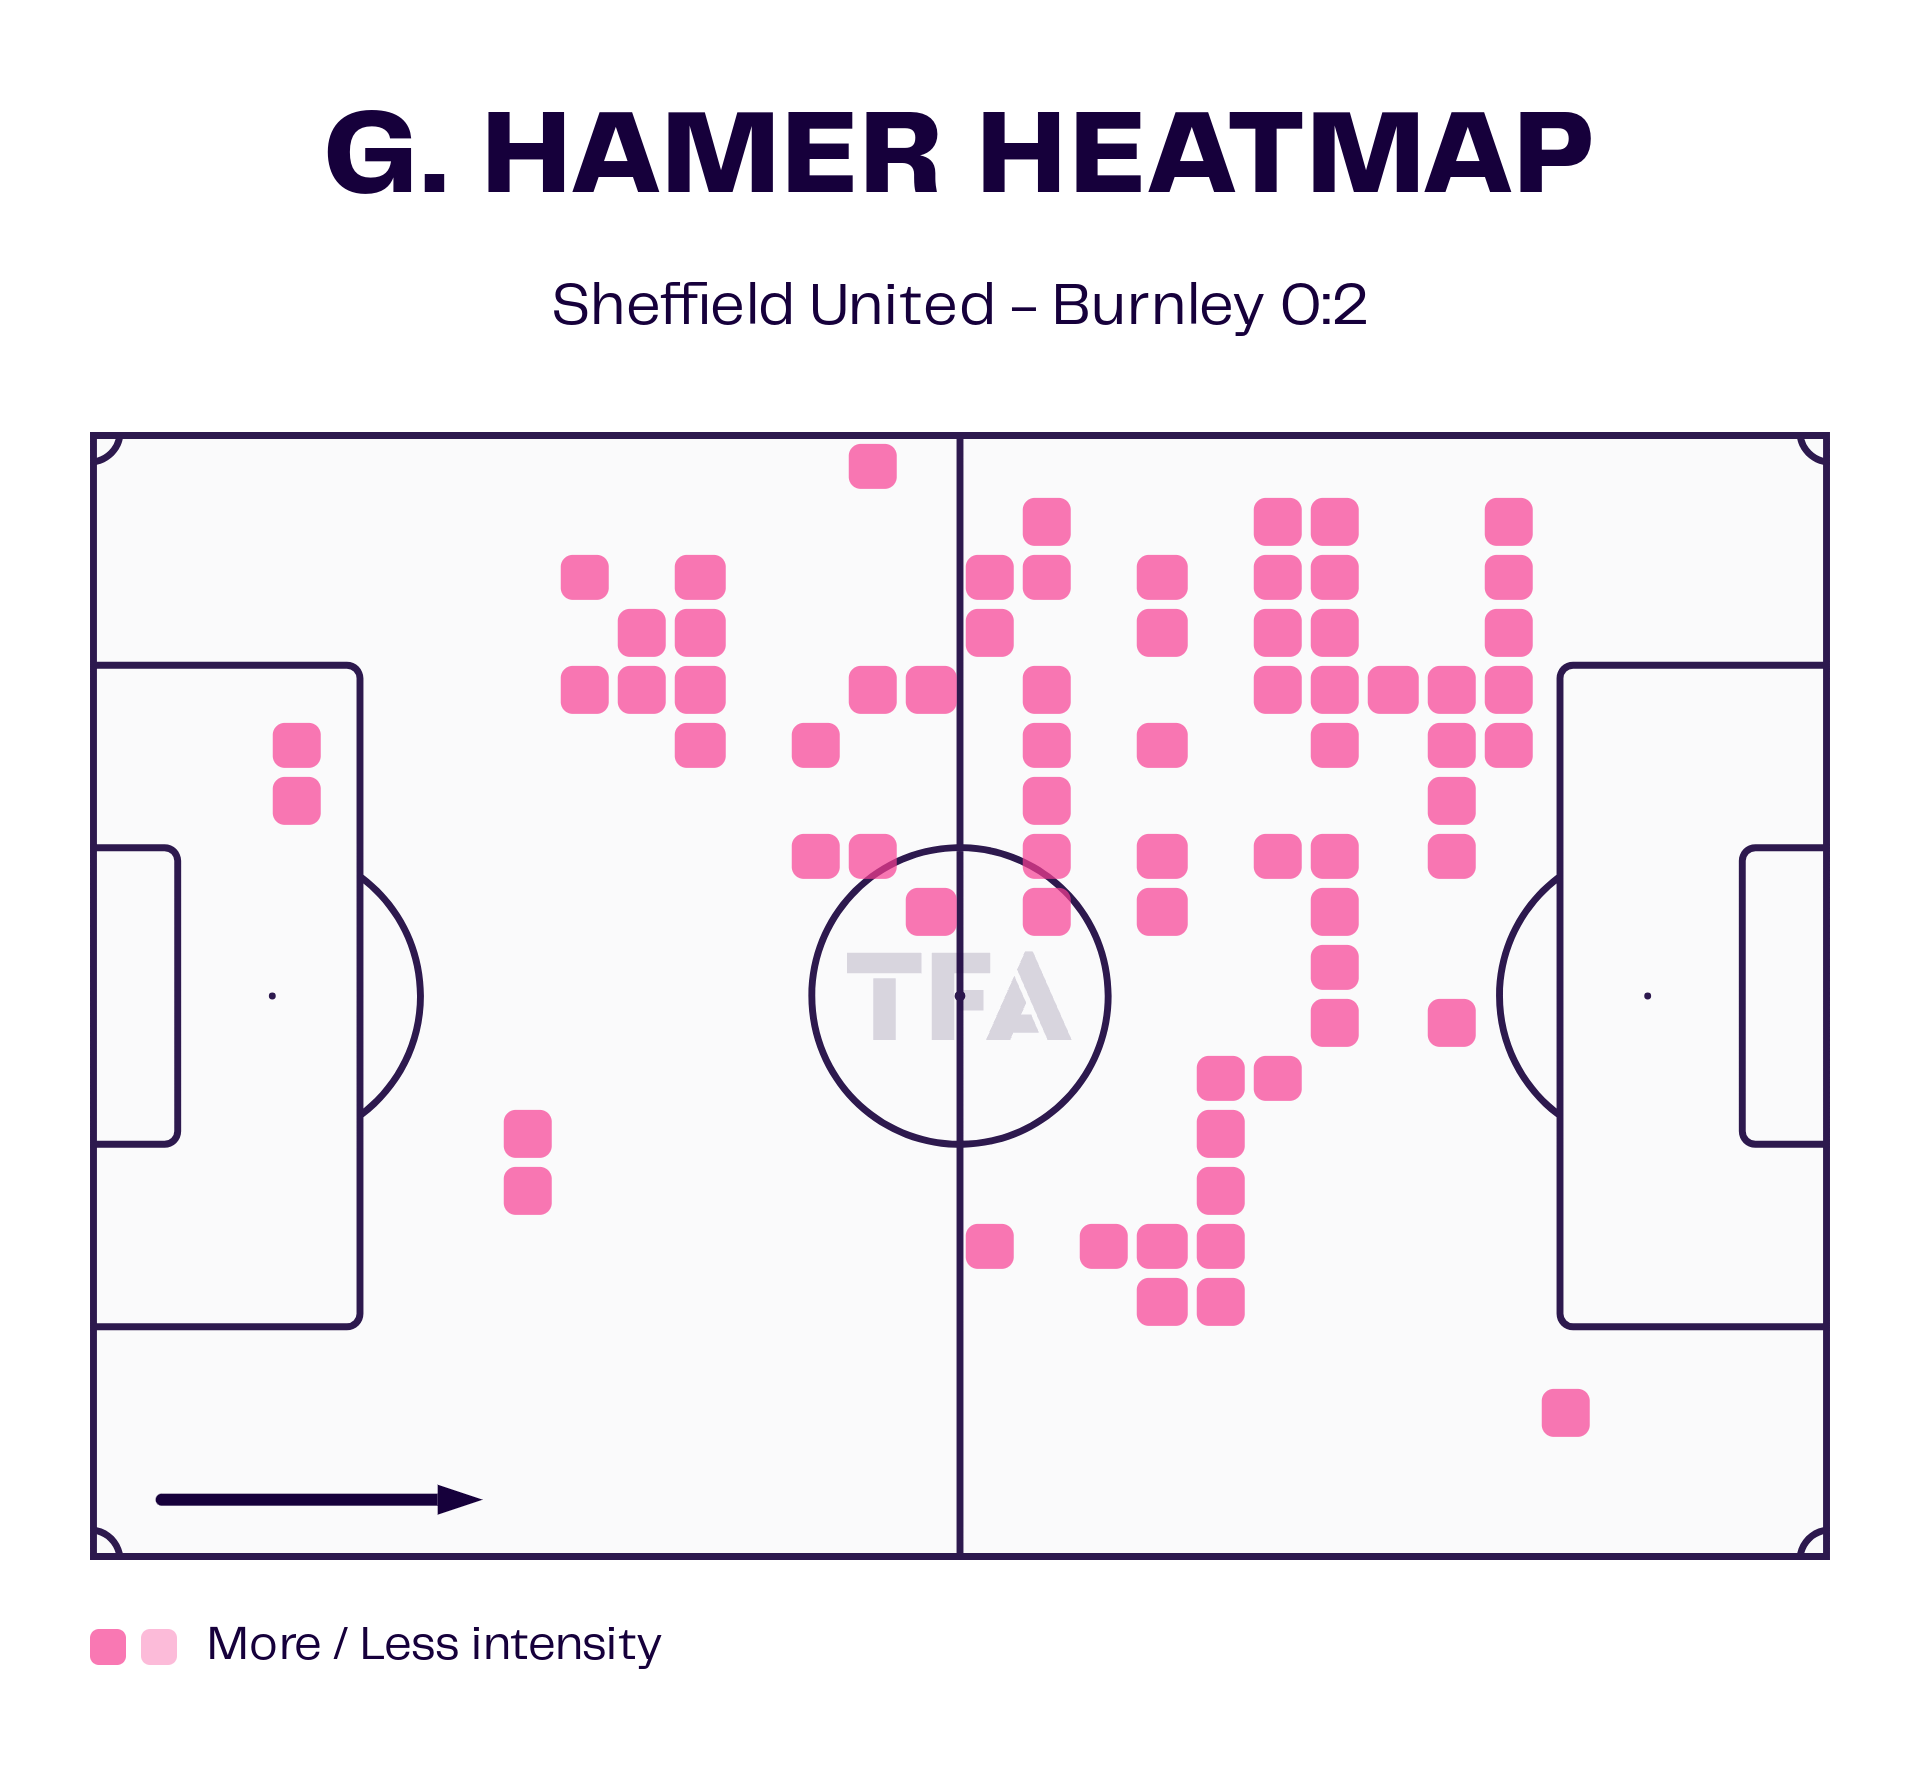
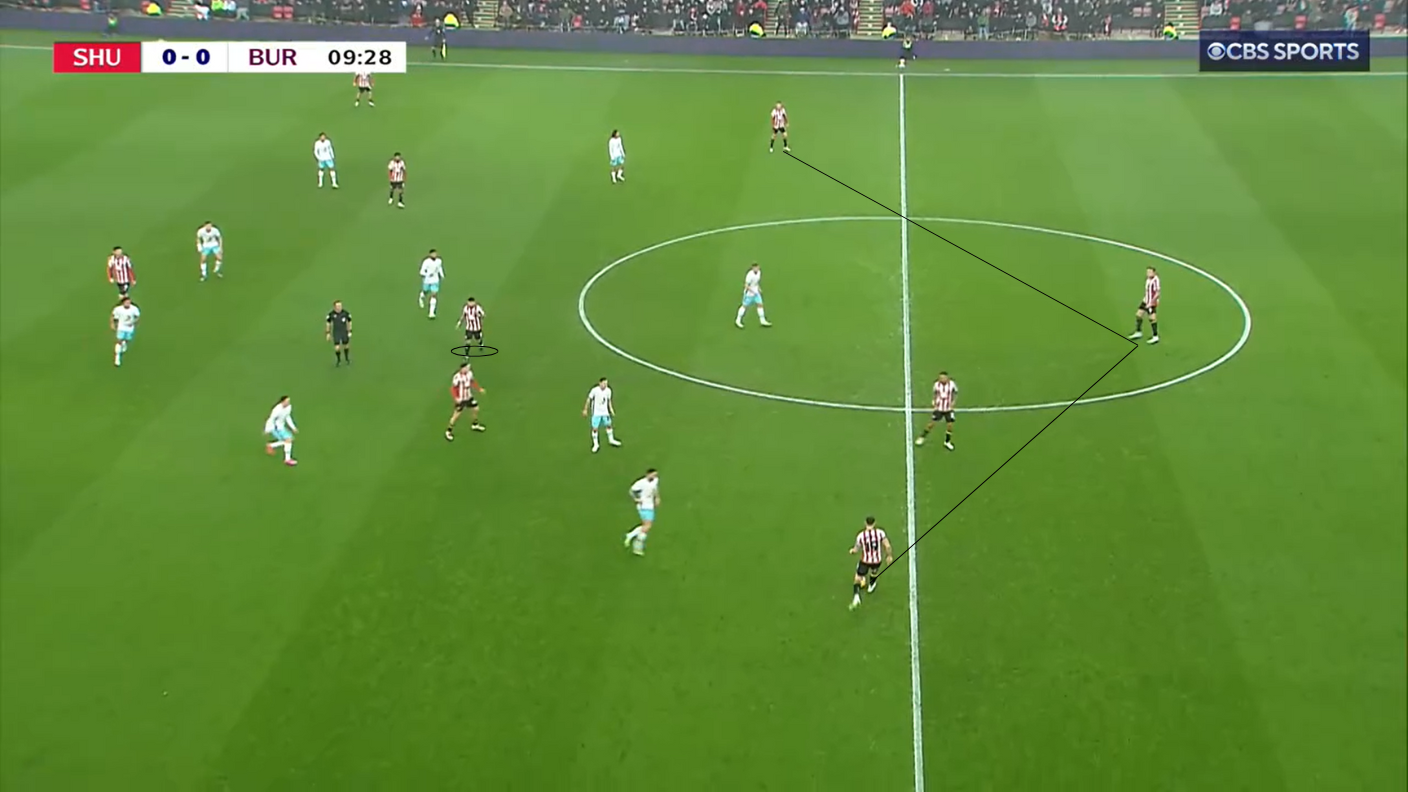
With Burrows taking the wide left channel, Hamer frequently drifted to the centre, building a 4-3-3 or being a false left-back in possession.
We can see this clearly in Figures 3 and 4 below.
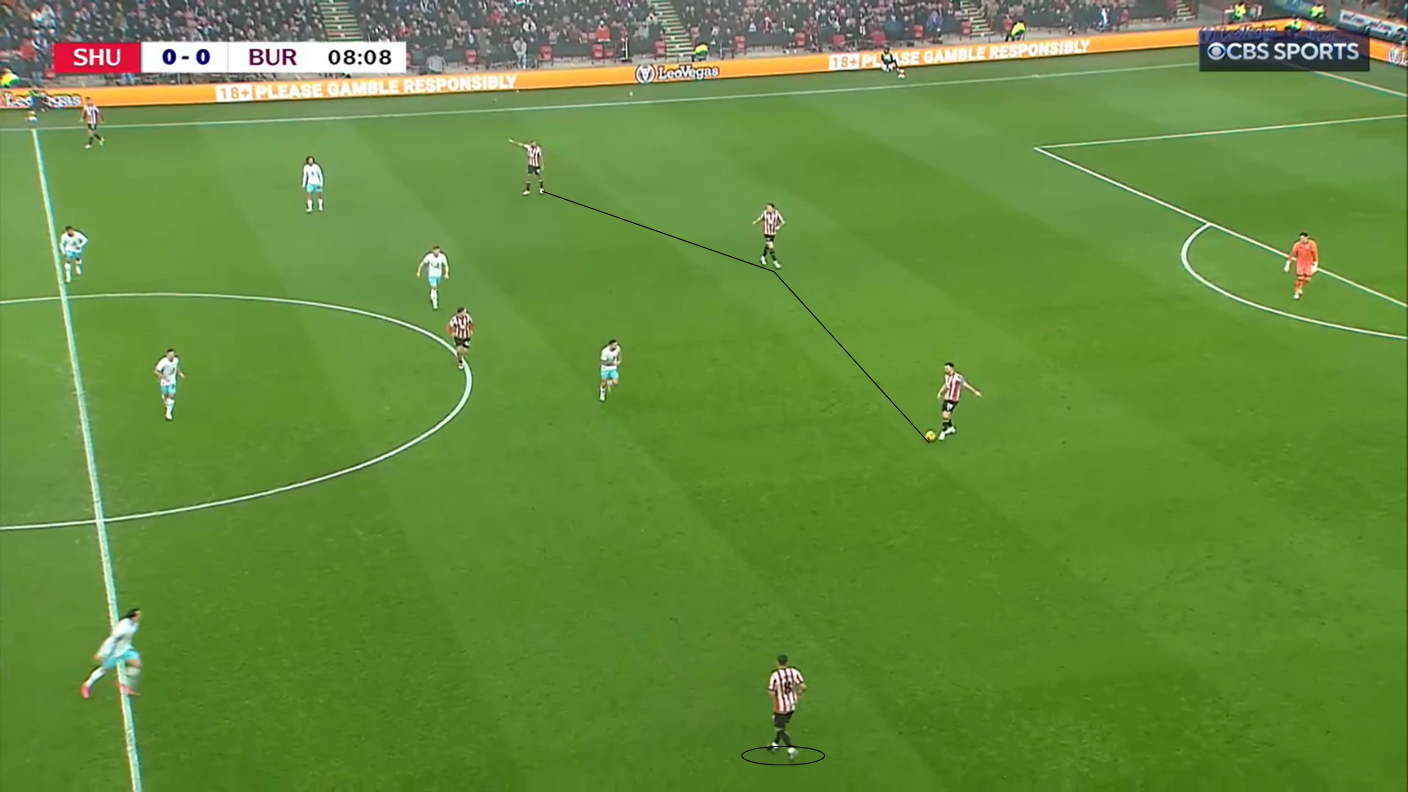
In Figure 3, Vinícius Souza is the right centre-back in possession, and Gilchrist is higher on the right side.
Burrows does not appear in either frame; he is also higher and closer to the touchline in the wide area.
In Figure 4, Gilchrist is the right centre-back, and O’Hare provides the amplitude from the right flank.
Hamer was positioned as an advanced midfielder there, and Rhian Brewster dropped a bit on the right.
The match spent a lot of time in this phase, with Burnley waiting and defending in a regular 4-3-3 to cause constant passes by jumping in the first line of pressure.
Scott Parker’s Burnley were comfortable here, and Harry Souttar, Jack Robinson, and Sydie Peck were the players with the most passes attempted during the match.
Burnley did not lose patience and waited for Sheffield United to attack their rest defence in offensive transition, and this was the key to the tactical fight.
During the build-up, the shape was similar.
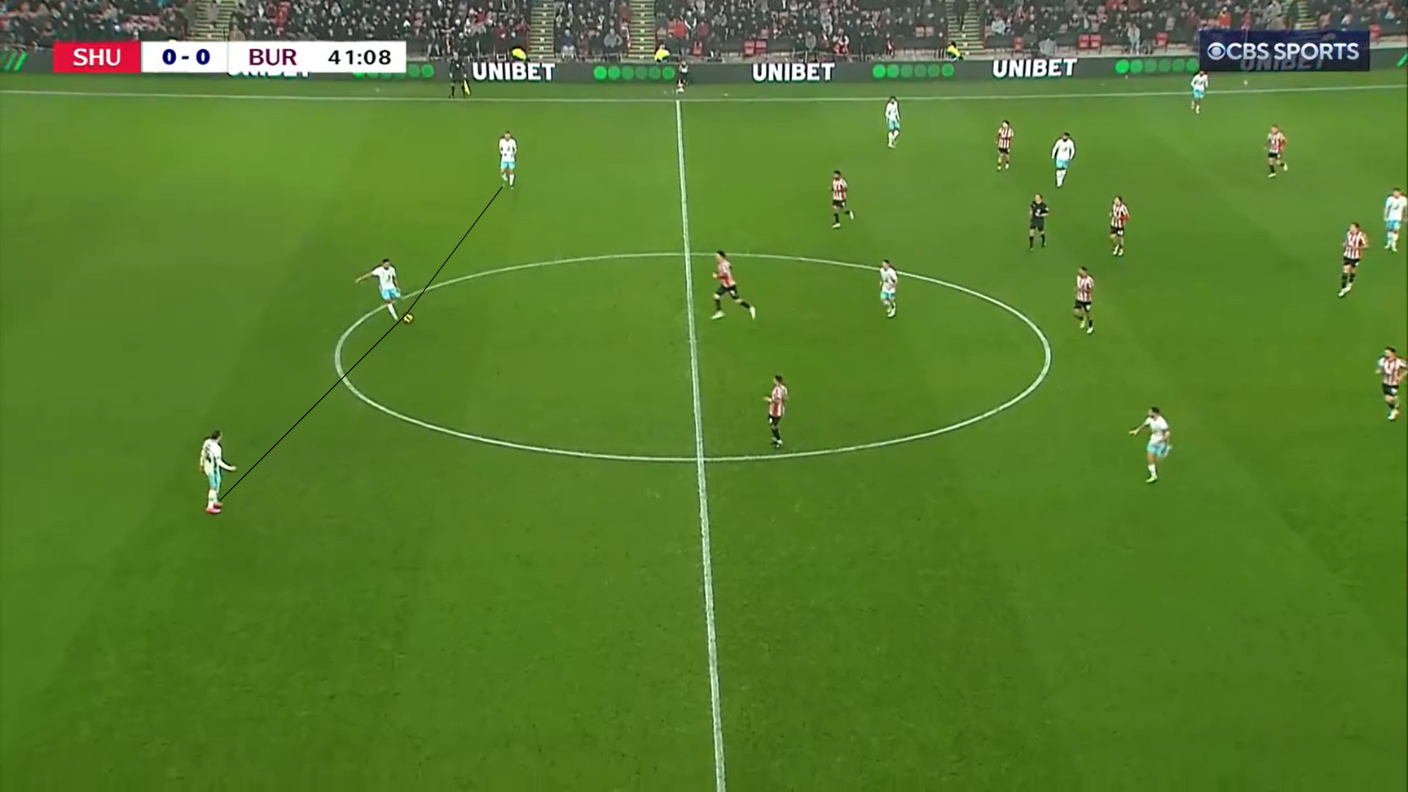
However, Burnley knew that the best way to attack Sheffield United was not via positional attacks with more than seven or eight passes.
Once the Blades were re-organised in the defensive phase, the attacks from Burnley were not dangerous.
The same happened for Sheffield United.
Nevertheless, the Blades did not exploit the transitions, and without Rak-Sakyi/Campbell and Moore as the centre-forward, their attacks needed to be slower.
Burnley Vertical Passes & Velocity
Burnley understood how to damage Sheffield United.
Close to half-time, they found a great goalscoring opportunity.
Let’s see the sequence.
pic.twitter.com/ghcaMBjWG4
— Footie Clips (@FootieClips) December 27, 2024
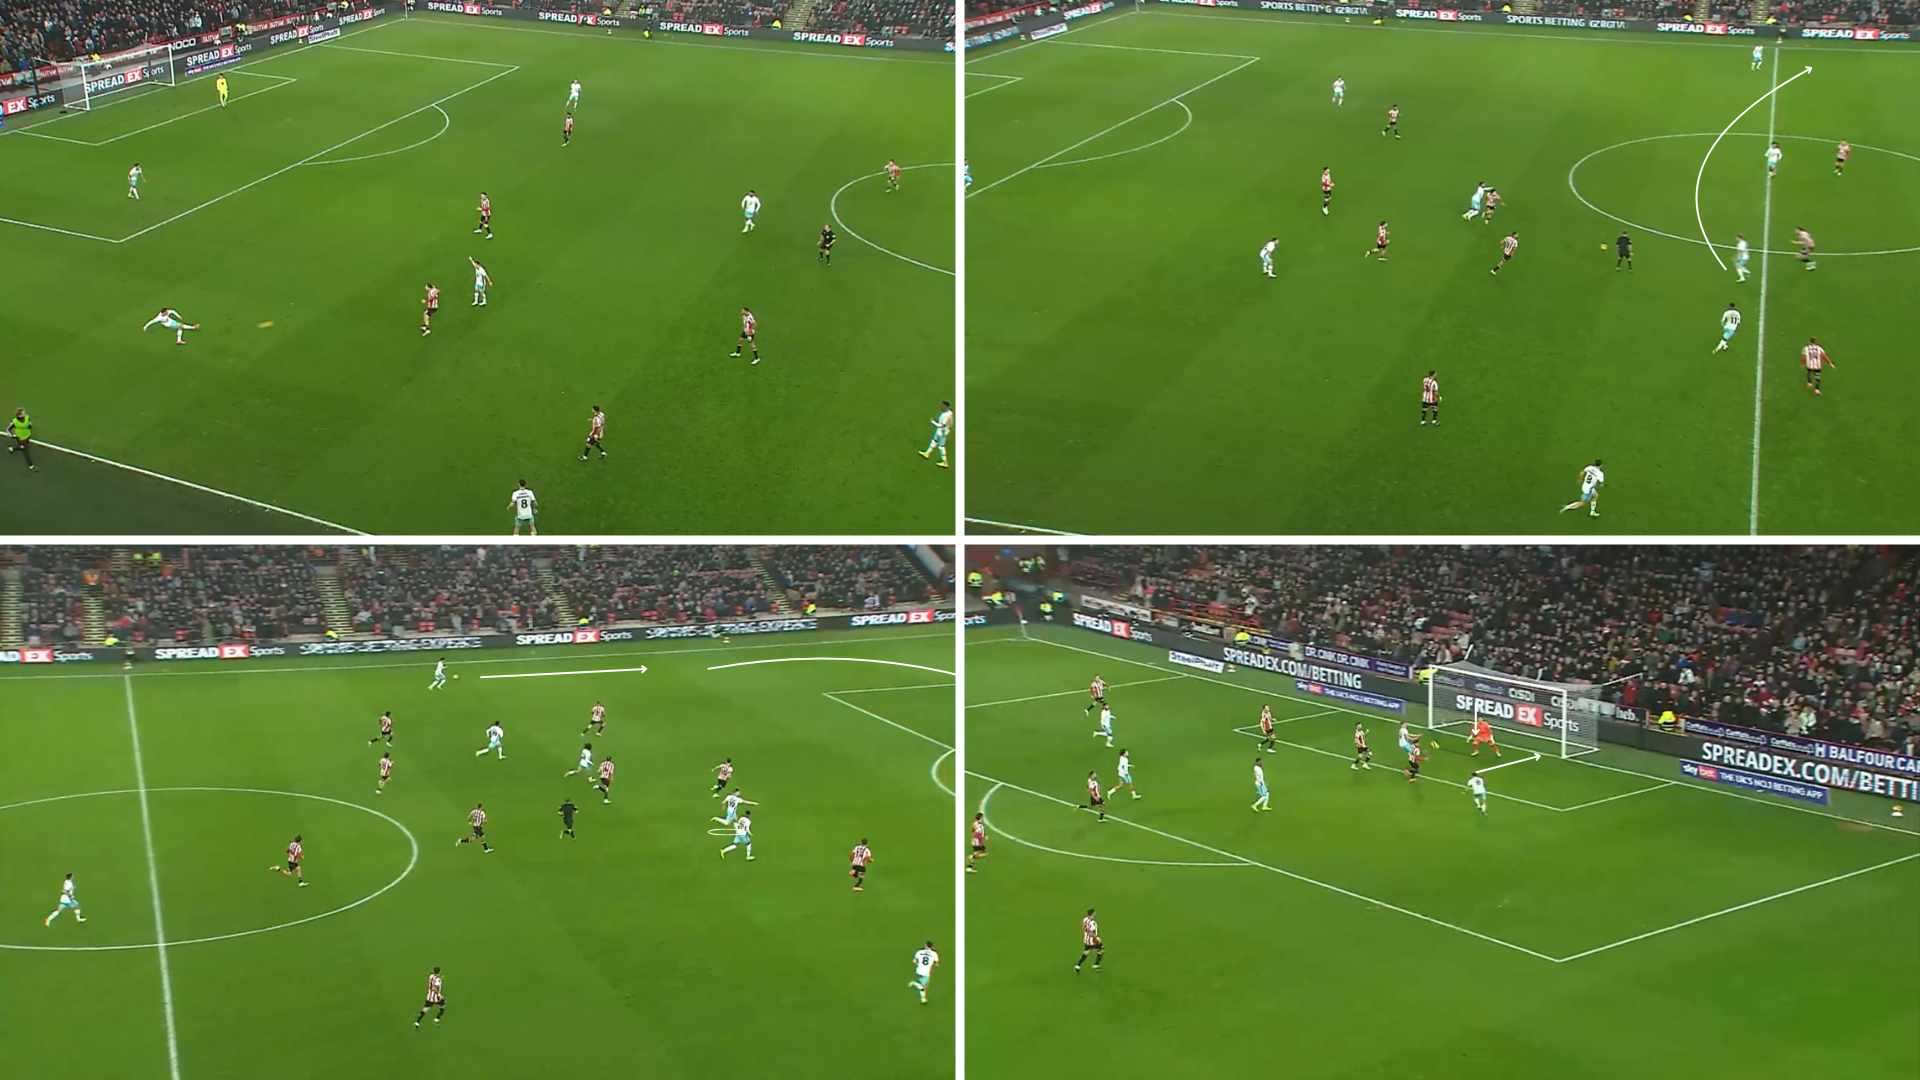
Connor Roberts’ bravery in pushing the team forward is the main element here, progressing with a powerful ground pass from wide to the centre.
Then, Josh Laurent turned forward well, and thanks to the structure, he found Zian Flemming, Mejbri, Anthony, Brownhill and Humphreys in line.
Here, Flemming read the game excellently as he did throughout the match—dropping in and delivering the ball to Humphreys on the left.
Once Humphreys had metres to drive, Flemming also became the target man between the centre-backs in transition.
With the defenders running back and paying attention to Flemming, Humphreys sent an in-swinging cross to Brownhill at the far post.
That is how the first goal arrived—a quick transition attacking Sheffield United’s defensive line aggressively.
The Second Goal: Sheffield United’s Rest Defence
At the beginning of the second half, it seemed like the match’s premise would be similar.
What made it different was how Sheffield United were attacking.
They pushed forward more intensely than in the first half but neglected their rest defence while Burnley defended their box.
That is how Burnley counterattacked again and finished off the match.
Let’s see what happens in the lead-up action to the second goal.
pic.twitter.com/CU4v5FPItu
— Footie Clips (@FootieClips) December 27, 2024
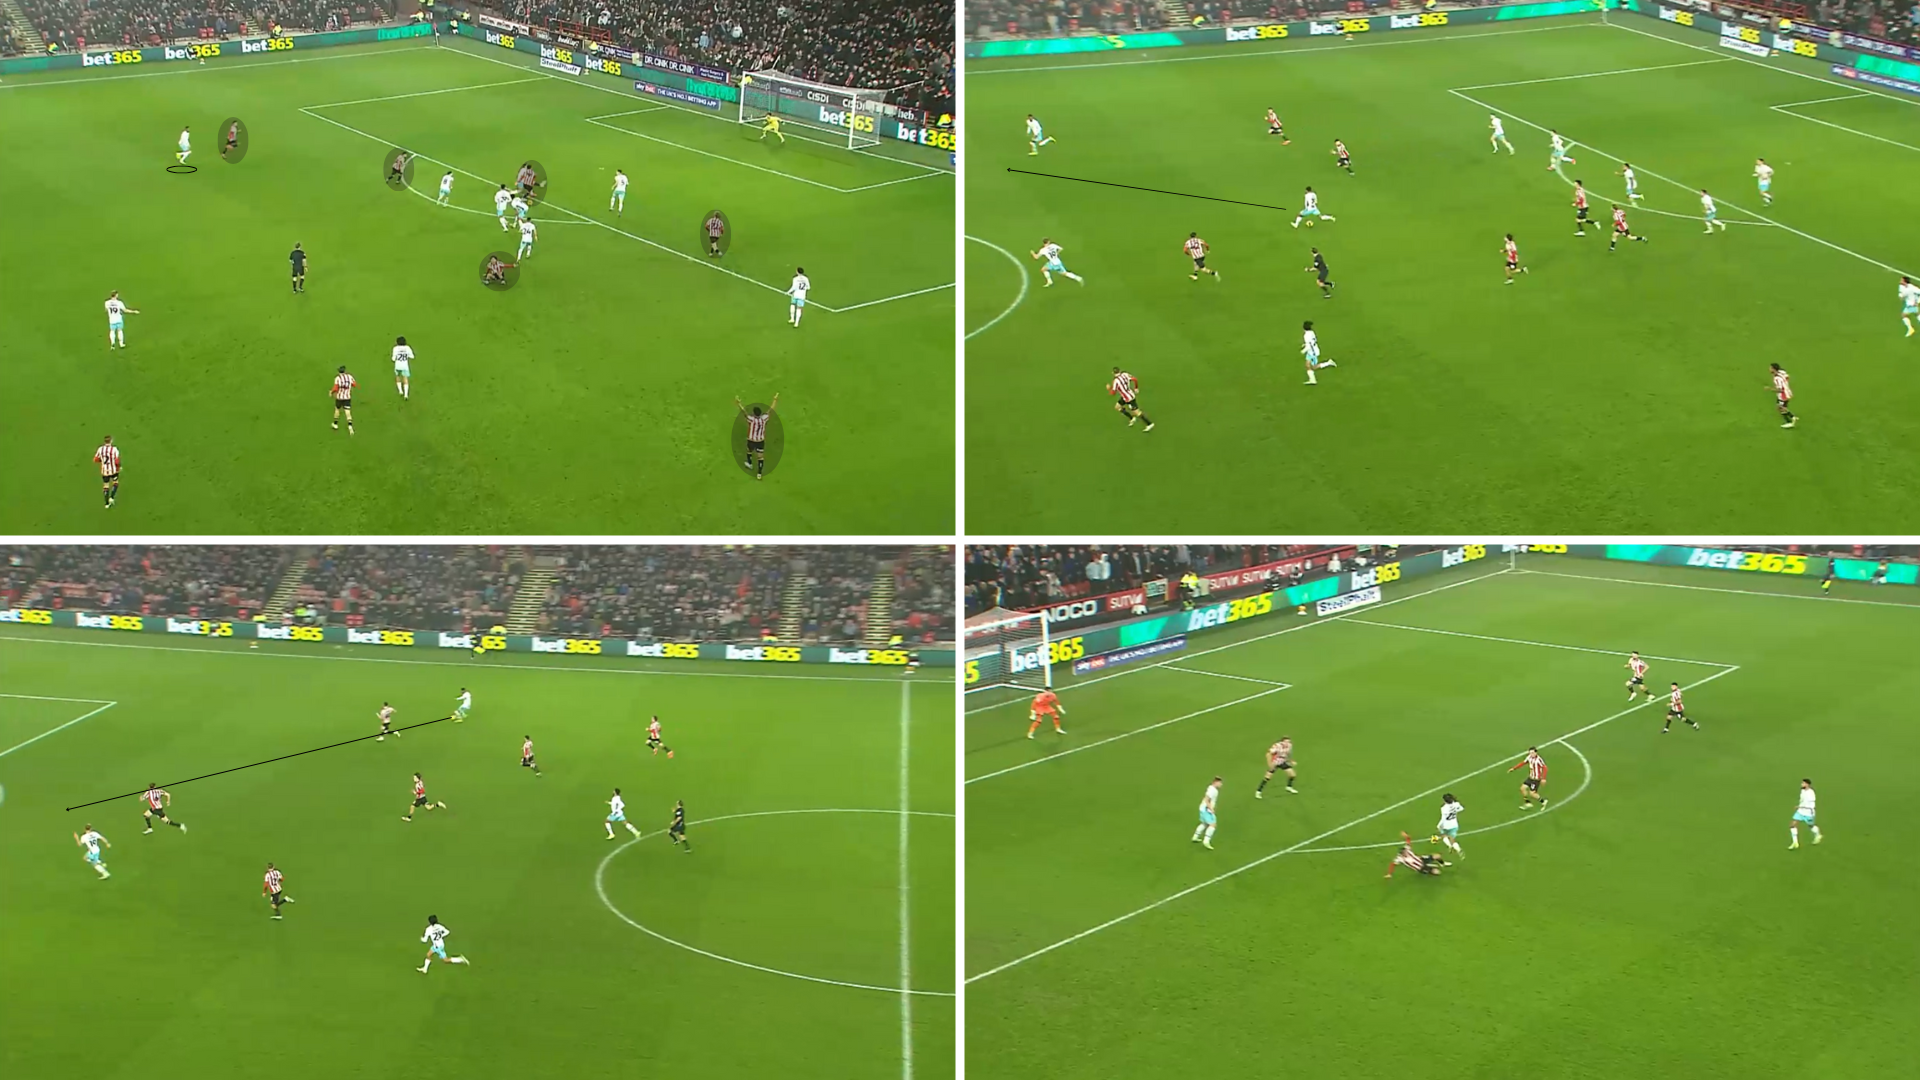
A direct free-kick provoked the second goal.
The crucial thing about it is not the execution.
Chris Wilder attacked with all his weapons.
As we can see in the sequence, there are six men behind the free-man (Anthony, the right winger) and two far from him at the moment of Burnley’s recovery.
So, once they recovered, Josh Laurent activated Jaidon Anthony on the right flank, and the run started.
Even with fewer people than Sheffield United during the counterattack, defending this type of action is very difficult—Sheffield United are running back to their goal without time to organise their block and with the threat of losing reference to their marks while they see the ball or the free men.
Anthony did not make the best decision and tried to send a long ball into a closed passing lane.
Because of his body shape and the pace of the play, Harry Souttar made a bad interception, which ended in a dangerous foul at the edge of the box.
We see another great action from Zian Flemming: a dismarking run and exploiting one of Souttar’s weaknesses—his top speed.
The Icing On The Cake: Flemming’s Goal
To finish off a fantastic performance as a target man who fed his team outside the box, Zian Flemming’s goal is amazing.
The goal starts at 0:58 seconds.
Lucky, for sure, but amazing as well.
From a threatening position, Flemming did not execute the direct free-kick particularly well.
His shot crashed into the wall.
Fortunately, once again, he tried to shoot after the rebound, and even after crashing into another wall player, the ball ended up in an unstoppable goal.
This was only the icing on the cake for his match.
His physique helped him complete some necessary runs to free up space for the team.
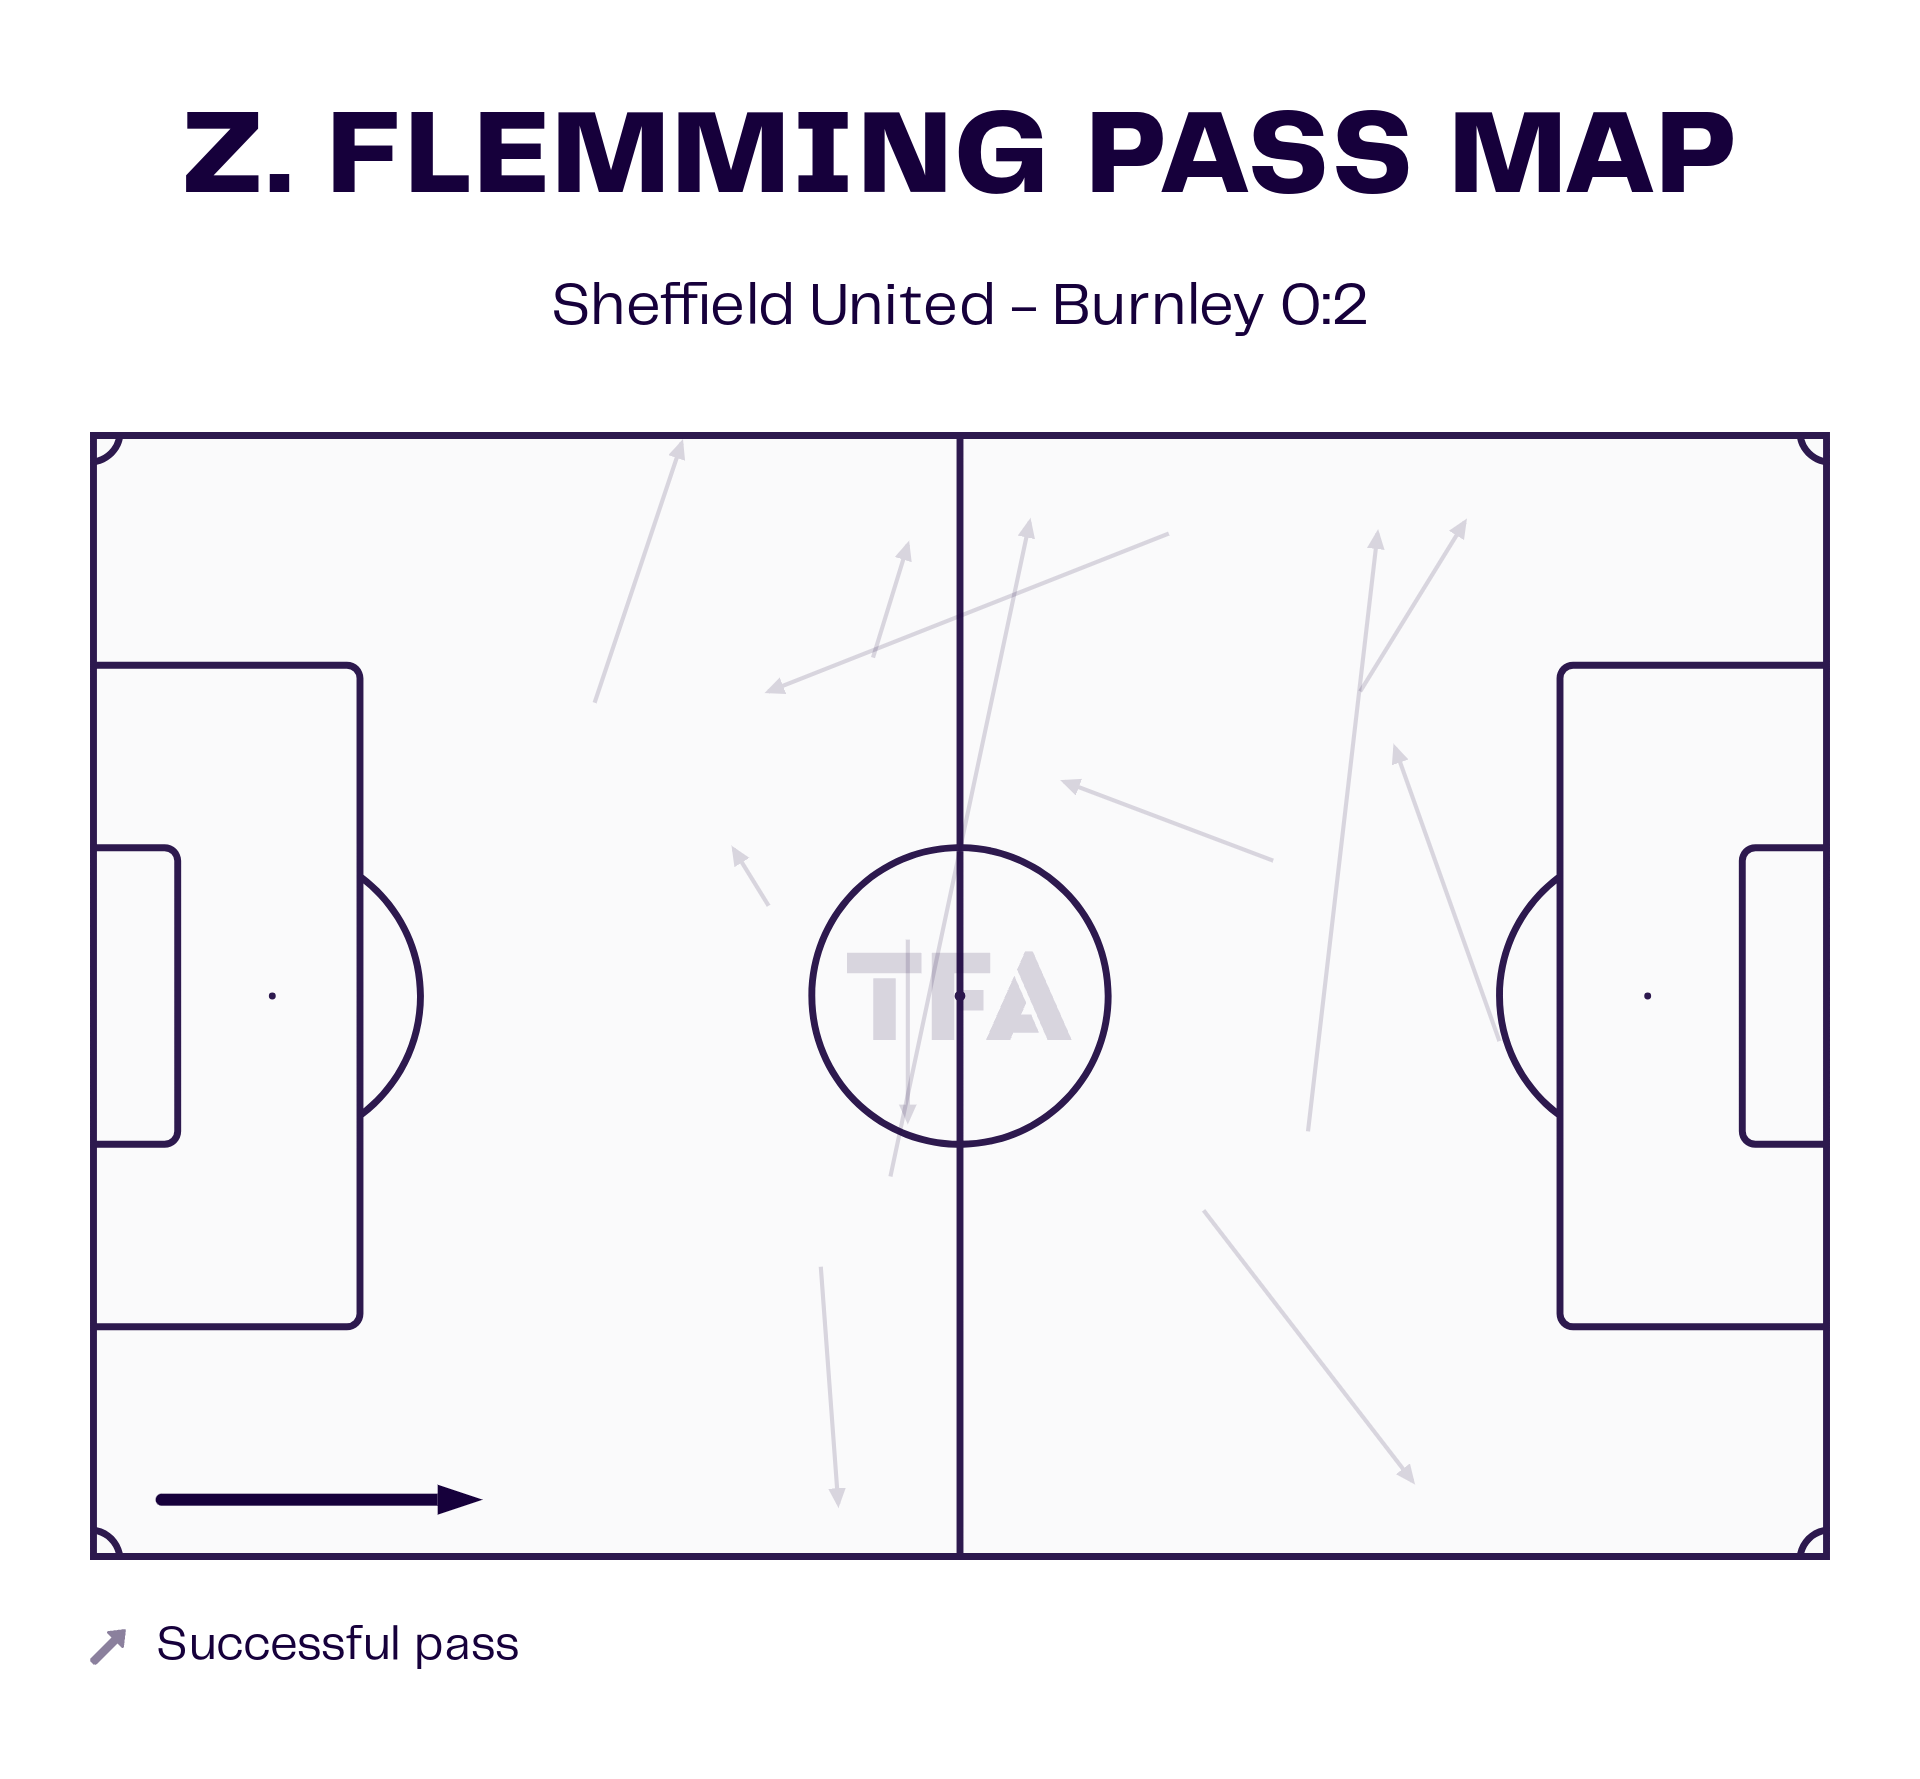
He was also accurate at passing the ball to the flanks and dragging defenders out of their zones.
Look at his pass map below.
Zian Flemming Pass Map Against Sheffield United
The Target Man: The Key?
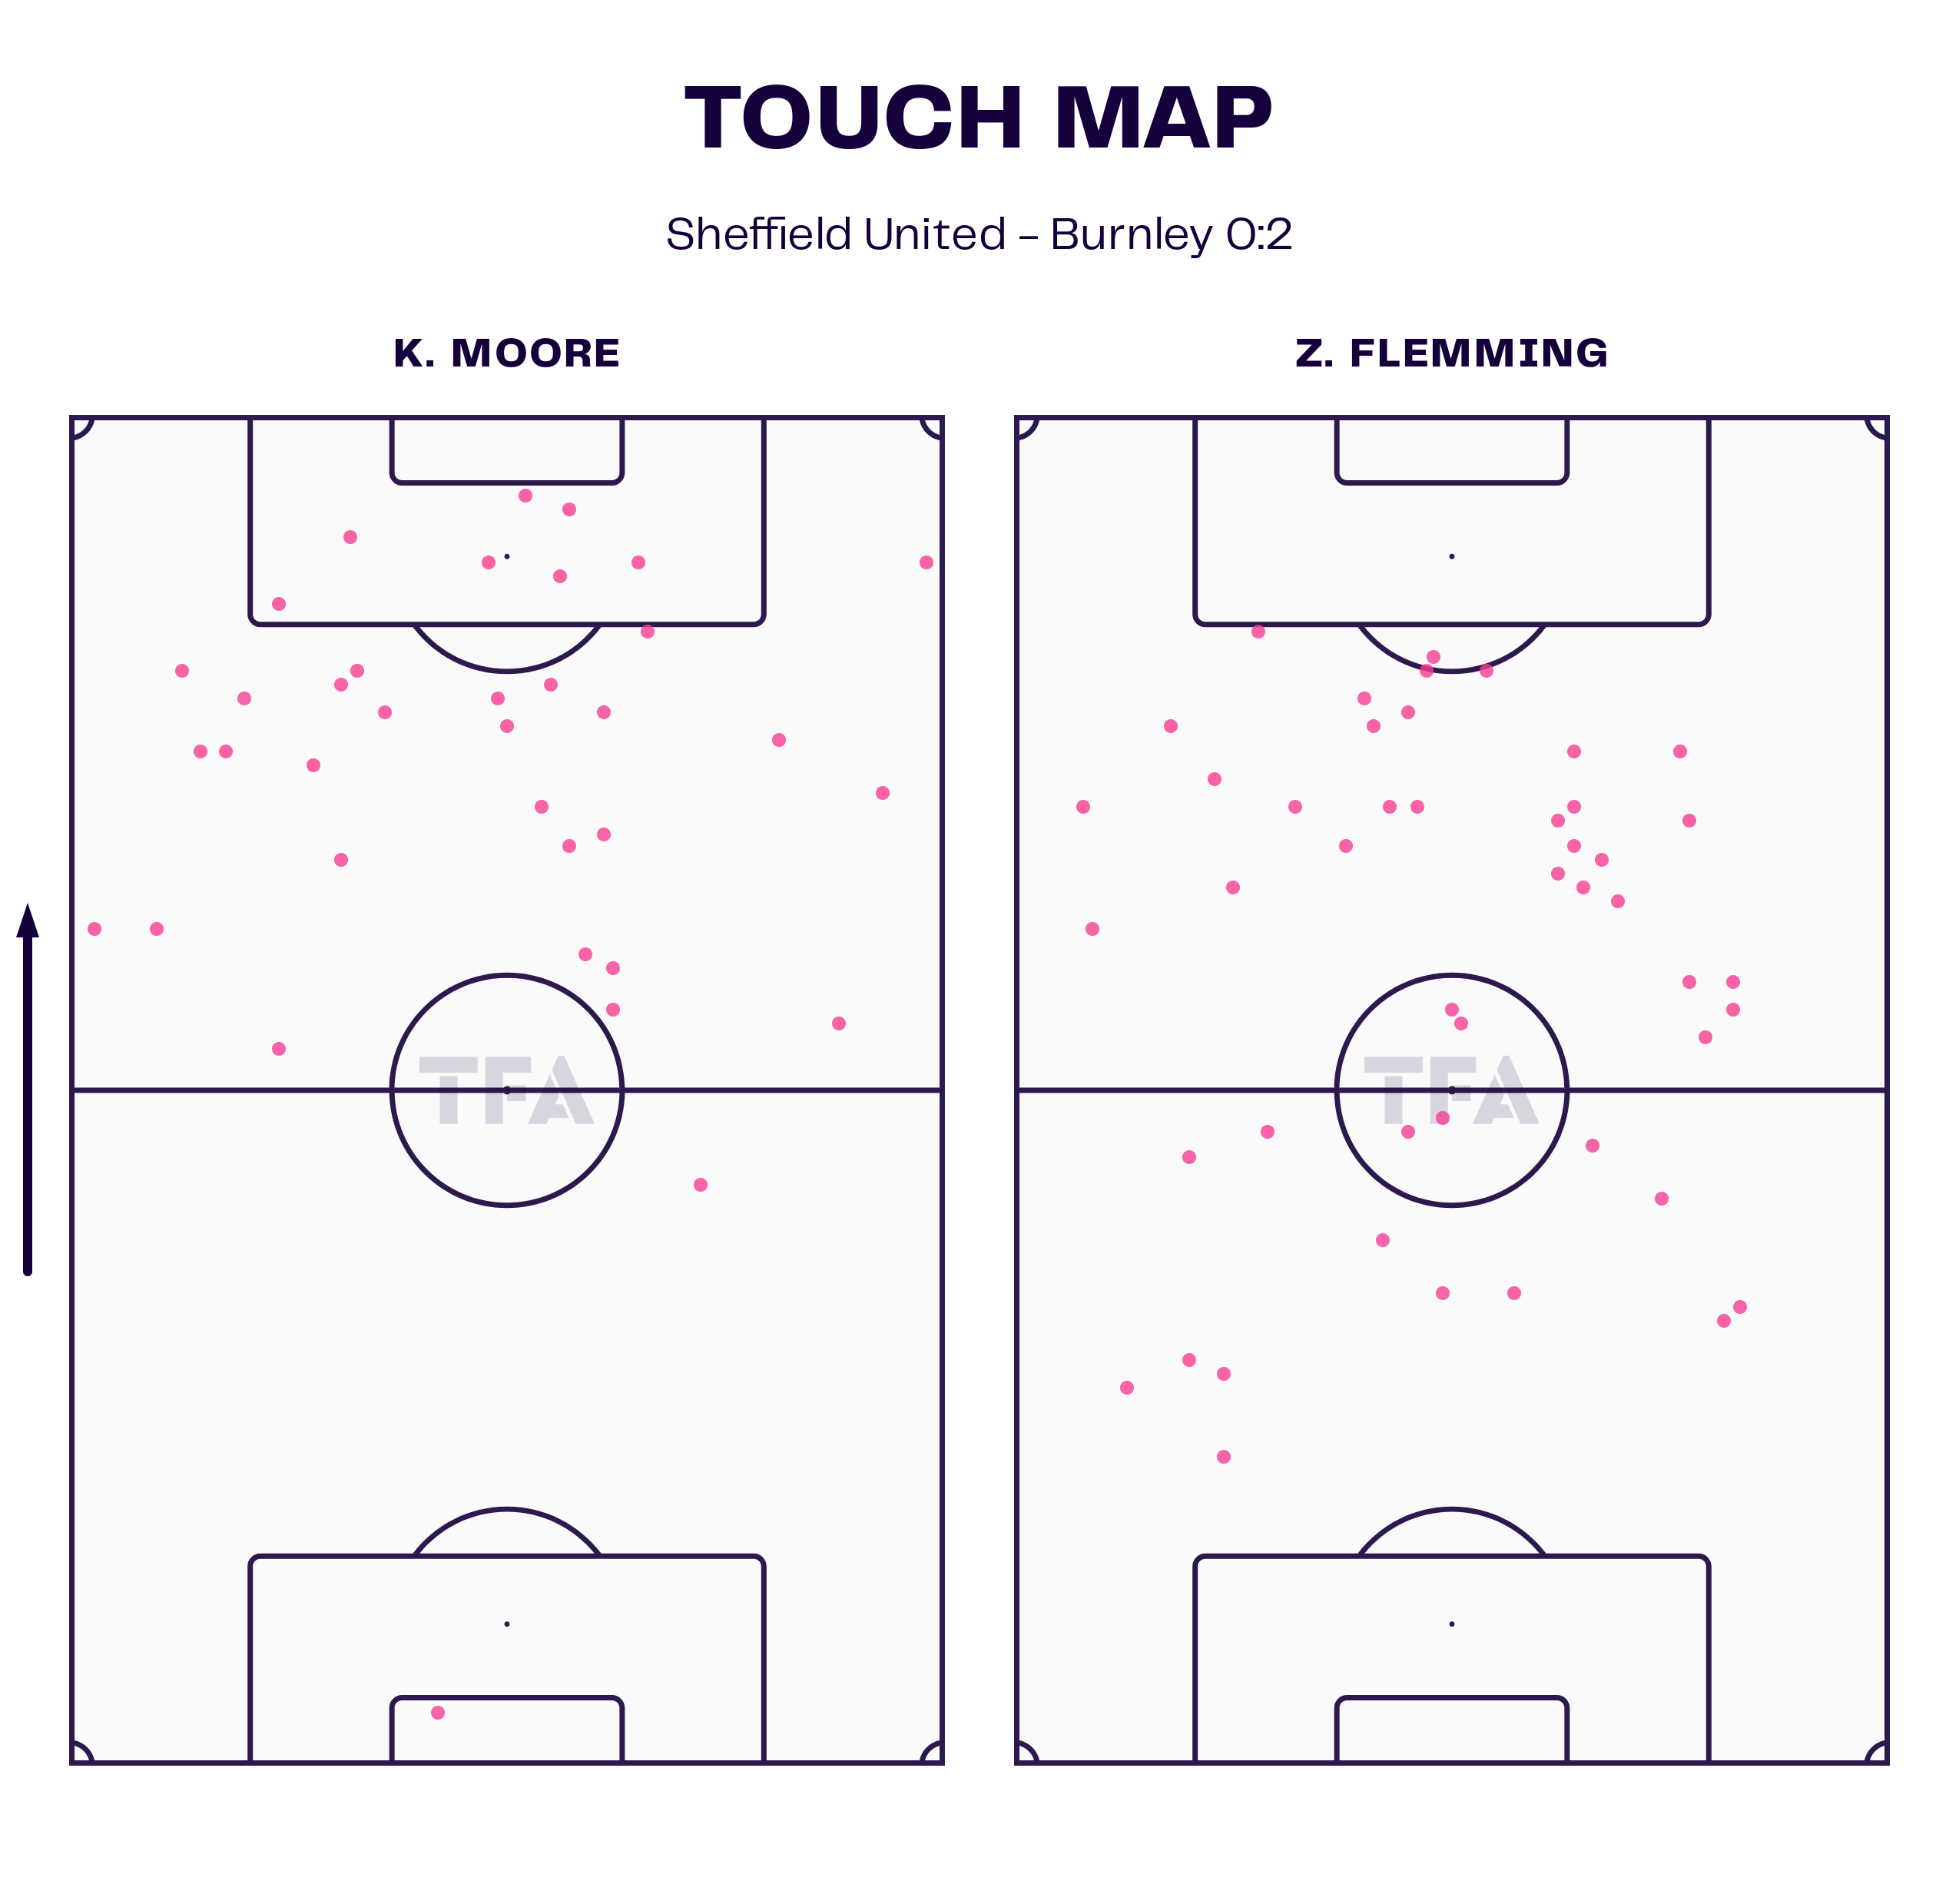
Considering Tyrese Campbell was out, Kieffer Moore could have been more involved and impacted the result more.
Also, understanding that sometimes Burnley recovered in the mid-block and destroyed Sheffield United’s passing lanes, Moore could have been a great way to progress by winning more second balls than Chris Wilder actually looked for.
Moore only won four aerial duels during the match, and he was not a quality carrier outside the box to compensate for the difficulties of attacking inside it—there, Flemming made the difference.
Conclusion
We have a new leader in the Championship after Scott Parker’s Burnley won against Chris Wilder’s Sheffield United.
If there are no surprises during the second half of the campaign, these teams, along with Leeds United and Sunderland, should be the favourites to be promoted to the Premier League this season.



Comments