Cheltenham Town made headlines for all the wrong reasons in the opening stages of the 2023/24 EFL League One season, going the first 11 games without scoring a single goal; it wasn’t until match number 13 that they picked up their first win. Darrell Clarke, the Robins’ current manager, took the reigns on September 29th, just three days after we discussed the club’s woeful attacking record in this linked analysis.
While Clarke’s Cheltenham remain in a relegation battle, they are in a far stronger position thanks to the change in manager: Clarke has managed 21 games for the club so far, winning six, drawing four, and losing 11 – by all means, they have lots of work ahead to avoid the drop into League Two, but it’s a significant improvement on the winless & goalless opening nine games prior to Clarke’s arrival. This scout report provides a tactical analysis of where and how Cheltenham have improved under Clarke’s leadership, with the analysis looking at how the former Bristol Rovers manager has utilised his side’s greatest individual strengths in his tactics.
Attacking improvement
Sure, Cheltenham Town aren’t scoring for fun, but their 21 goals in as many games is a credit to the work done by Clarke and his team. The tactics he has deployed have been beneficial to the players at his disposal as he looks to lean into the individual strengths throughout the squad. This segment of analysis looks at some of their key attacking tactics.
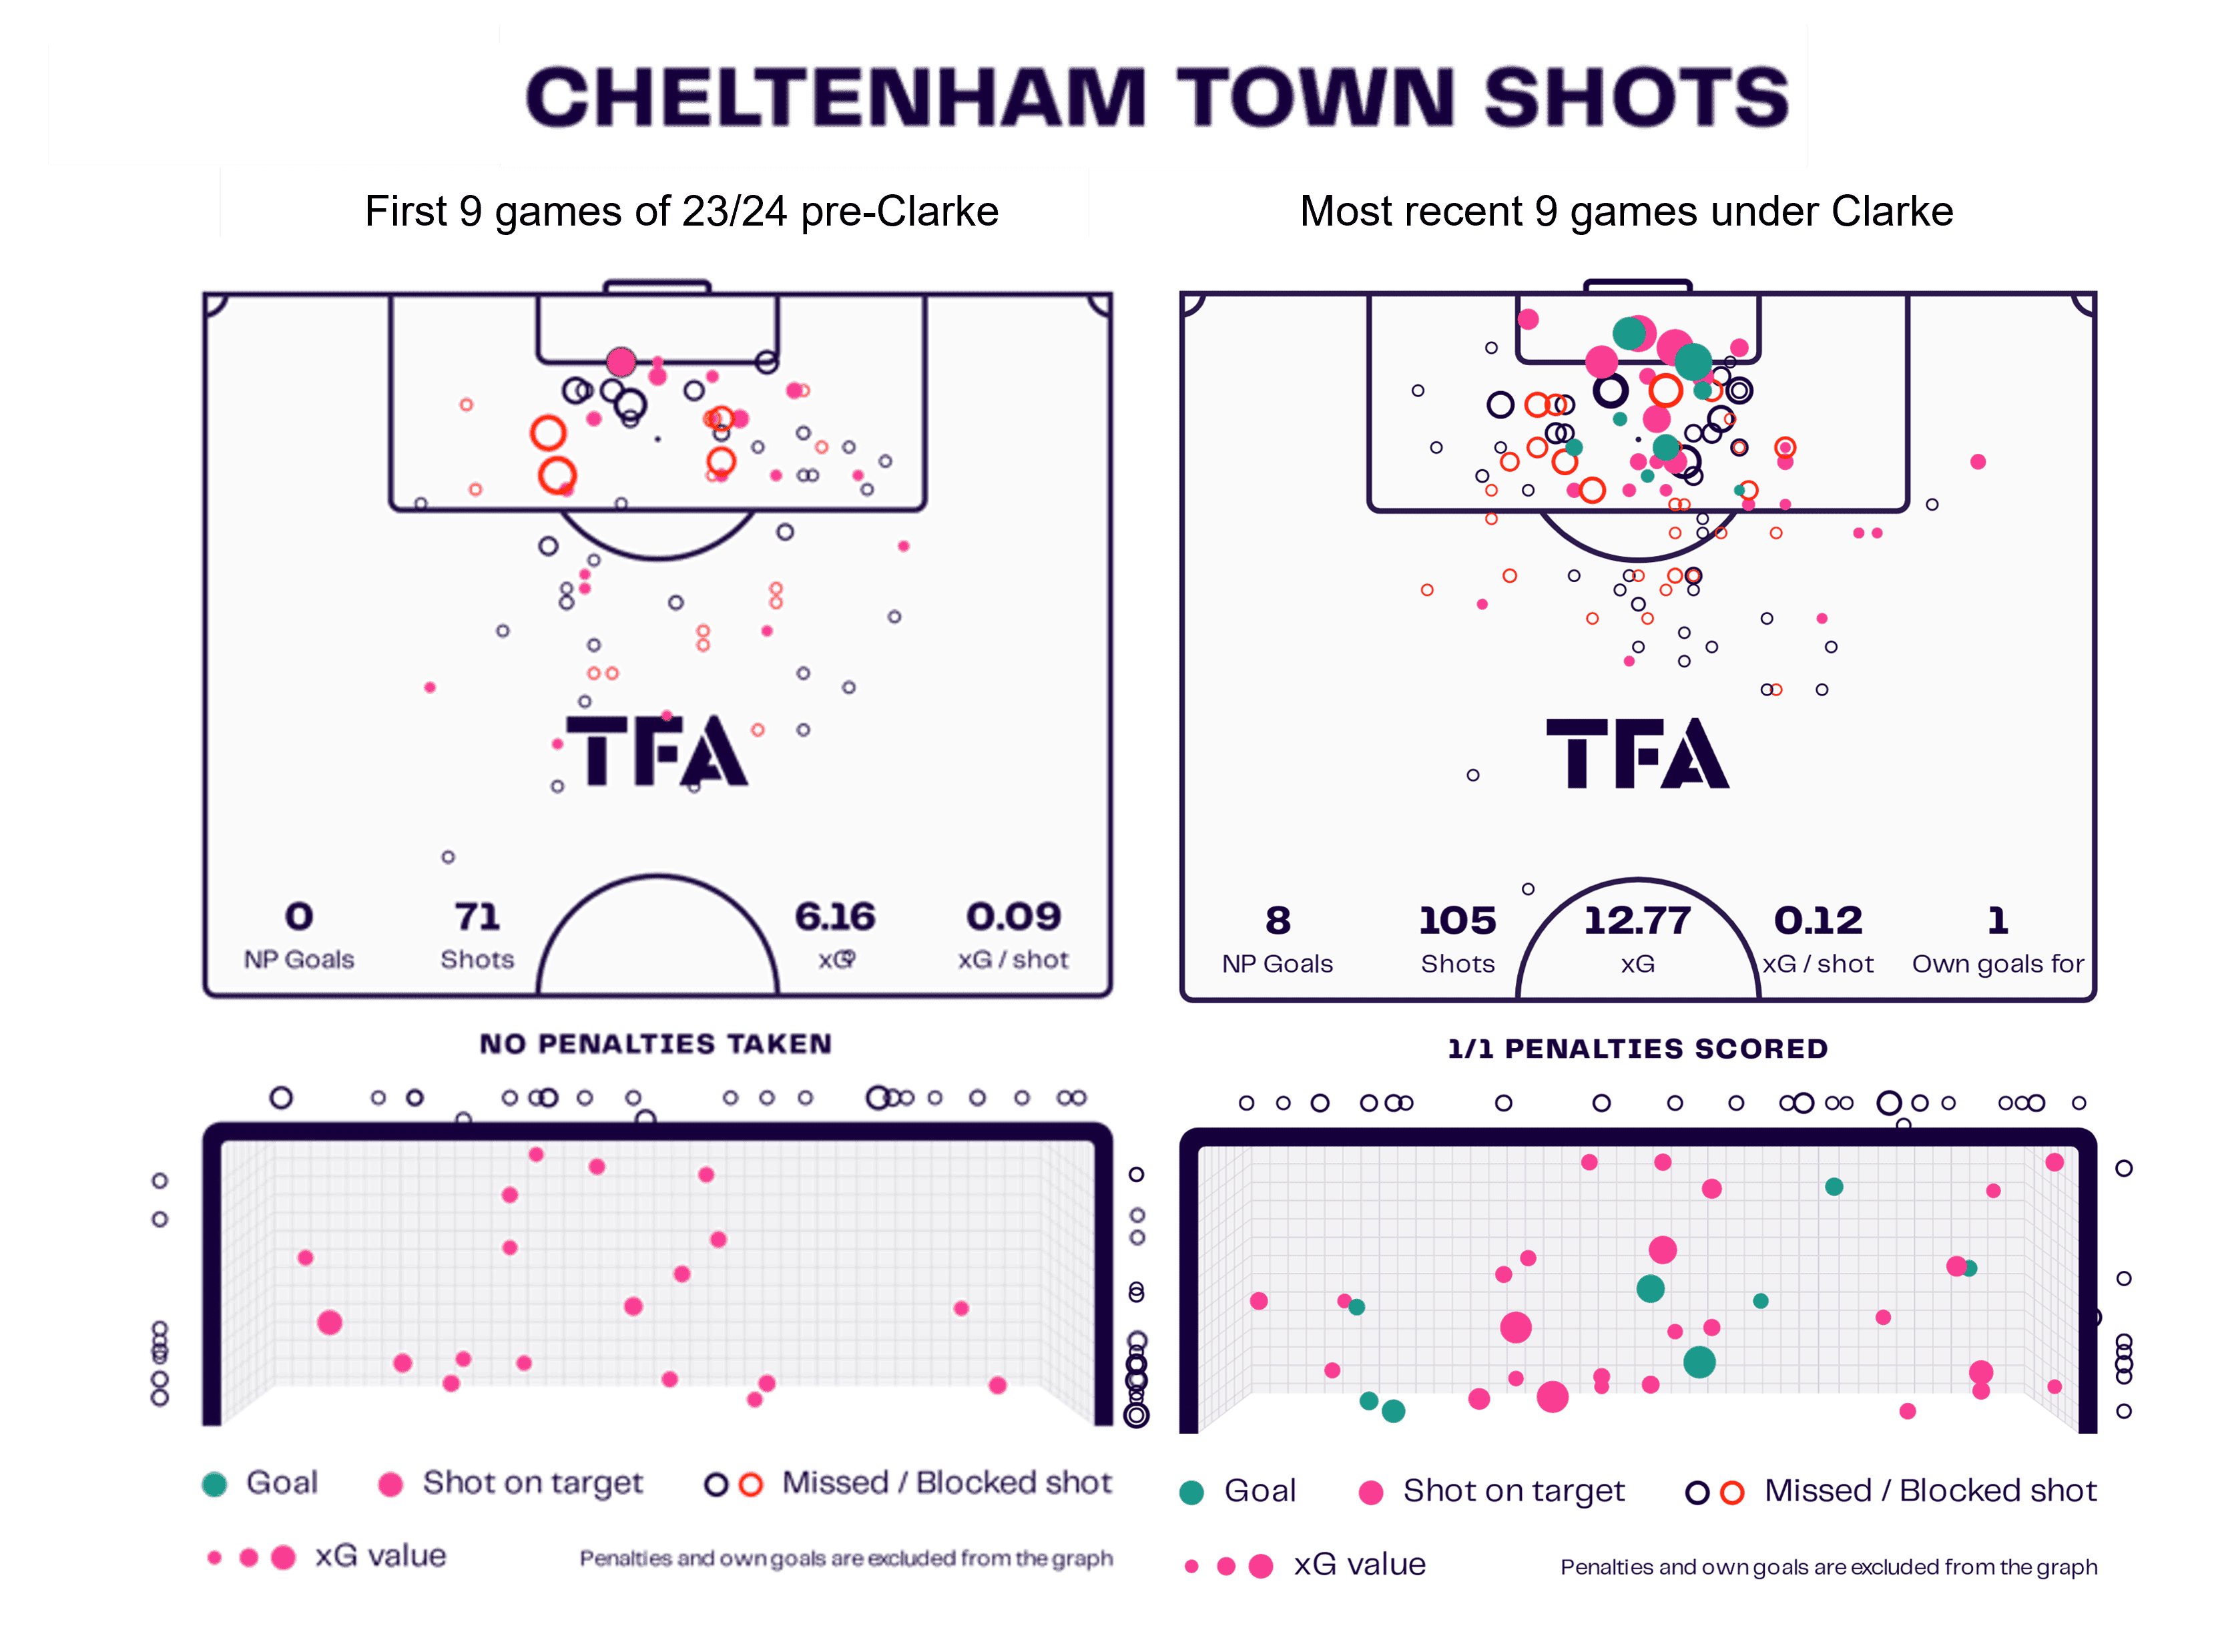
This first image paints a clear picture of the improvement made by Cheltenham since Clarke took over. In the opening nine games of the season (led by Wade Elliot for the first eight and caretaker manager Kevin Russell for the ninth), not only did they fail to score a single goal, but they didn’t look all that threatening in attack. The visual above shows Clarke’s influence by looking at his most recent nine games in charge in comparison to those dreadful opening nine games of the season. What is interesting and important to note is that Clarke has often opted for 3-5-2 and 3-4-1-2: formations Cheltenham did use a couple of times prior to Clarke’s arrival – they also used three/five-men defence formations regularly under Elliot, so this tactical continuity was important.
More shots and a higher xG – total and per shot- are clear indicators of an attacking improvement. A boost in morale and confidence likely helped, too. They’re also not afraid to try their luck from range, though they’ve had next-to-no success with that. Additionally, it is worth noting that the Robins still have the league’s lowest goal tally despite their improvement.
A significant 13 of their 21 goals this season have been scored by two players – CF Will Goodwin (six) and midfielder Liam Sercombe (seven). The pair have been standout players in Clarke’s side, benefiting from the directness of their tactics in attack. Of course, Clarke will like more players to get amongst the goals – Cheltenham’s third stop scorer has just two goals.
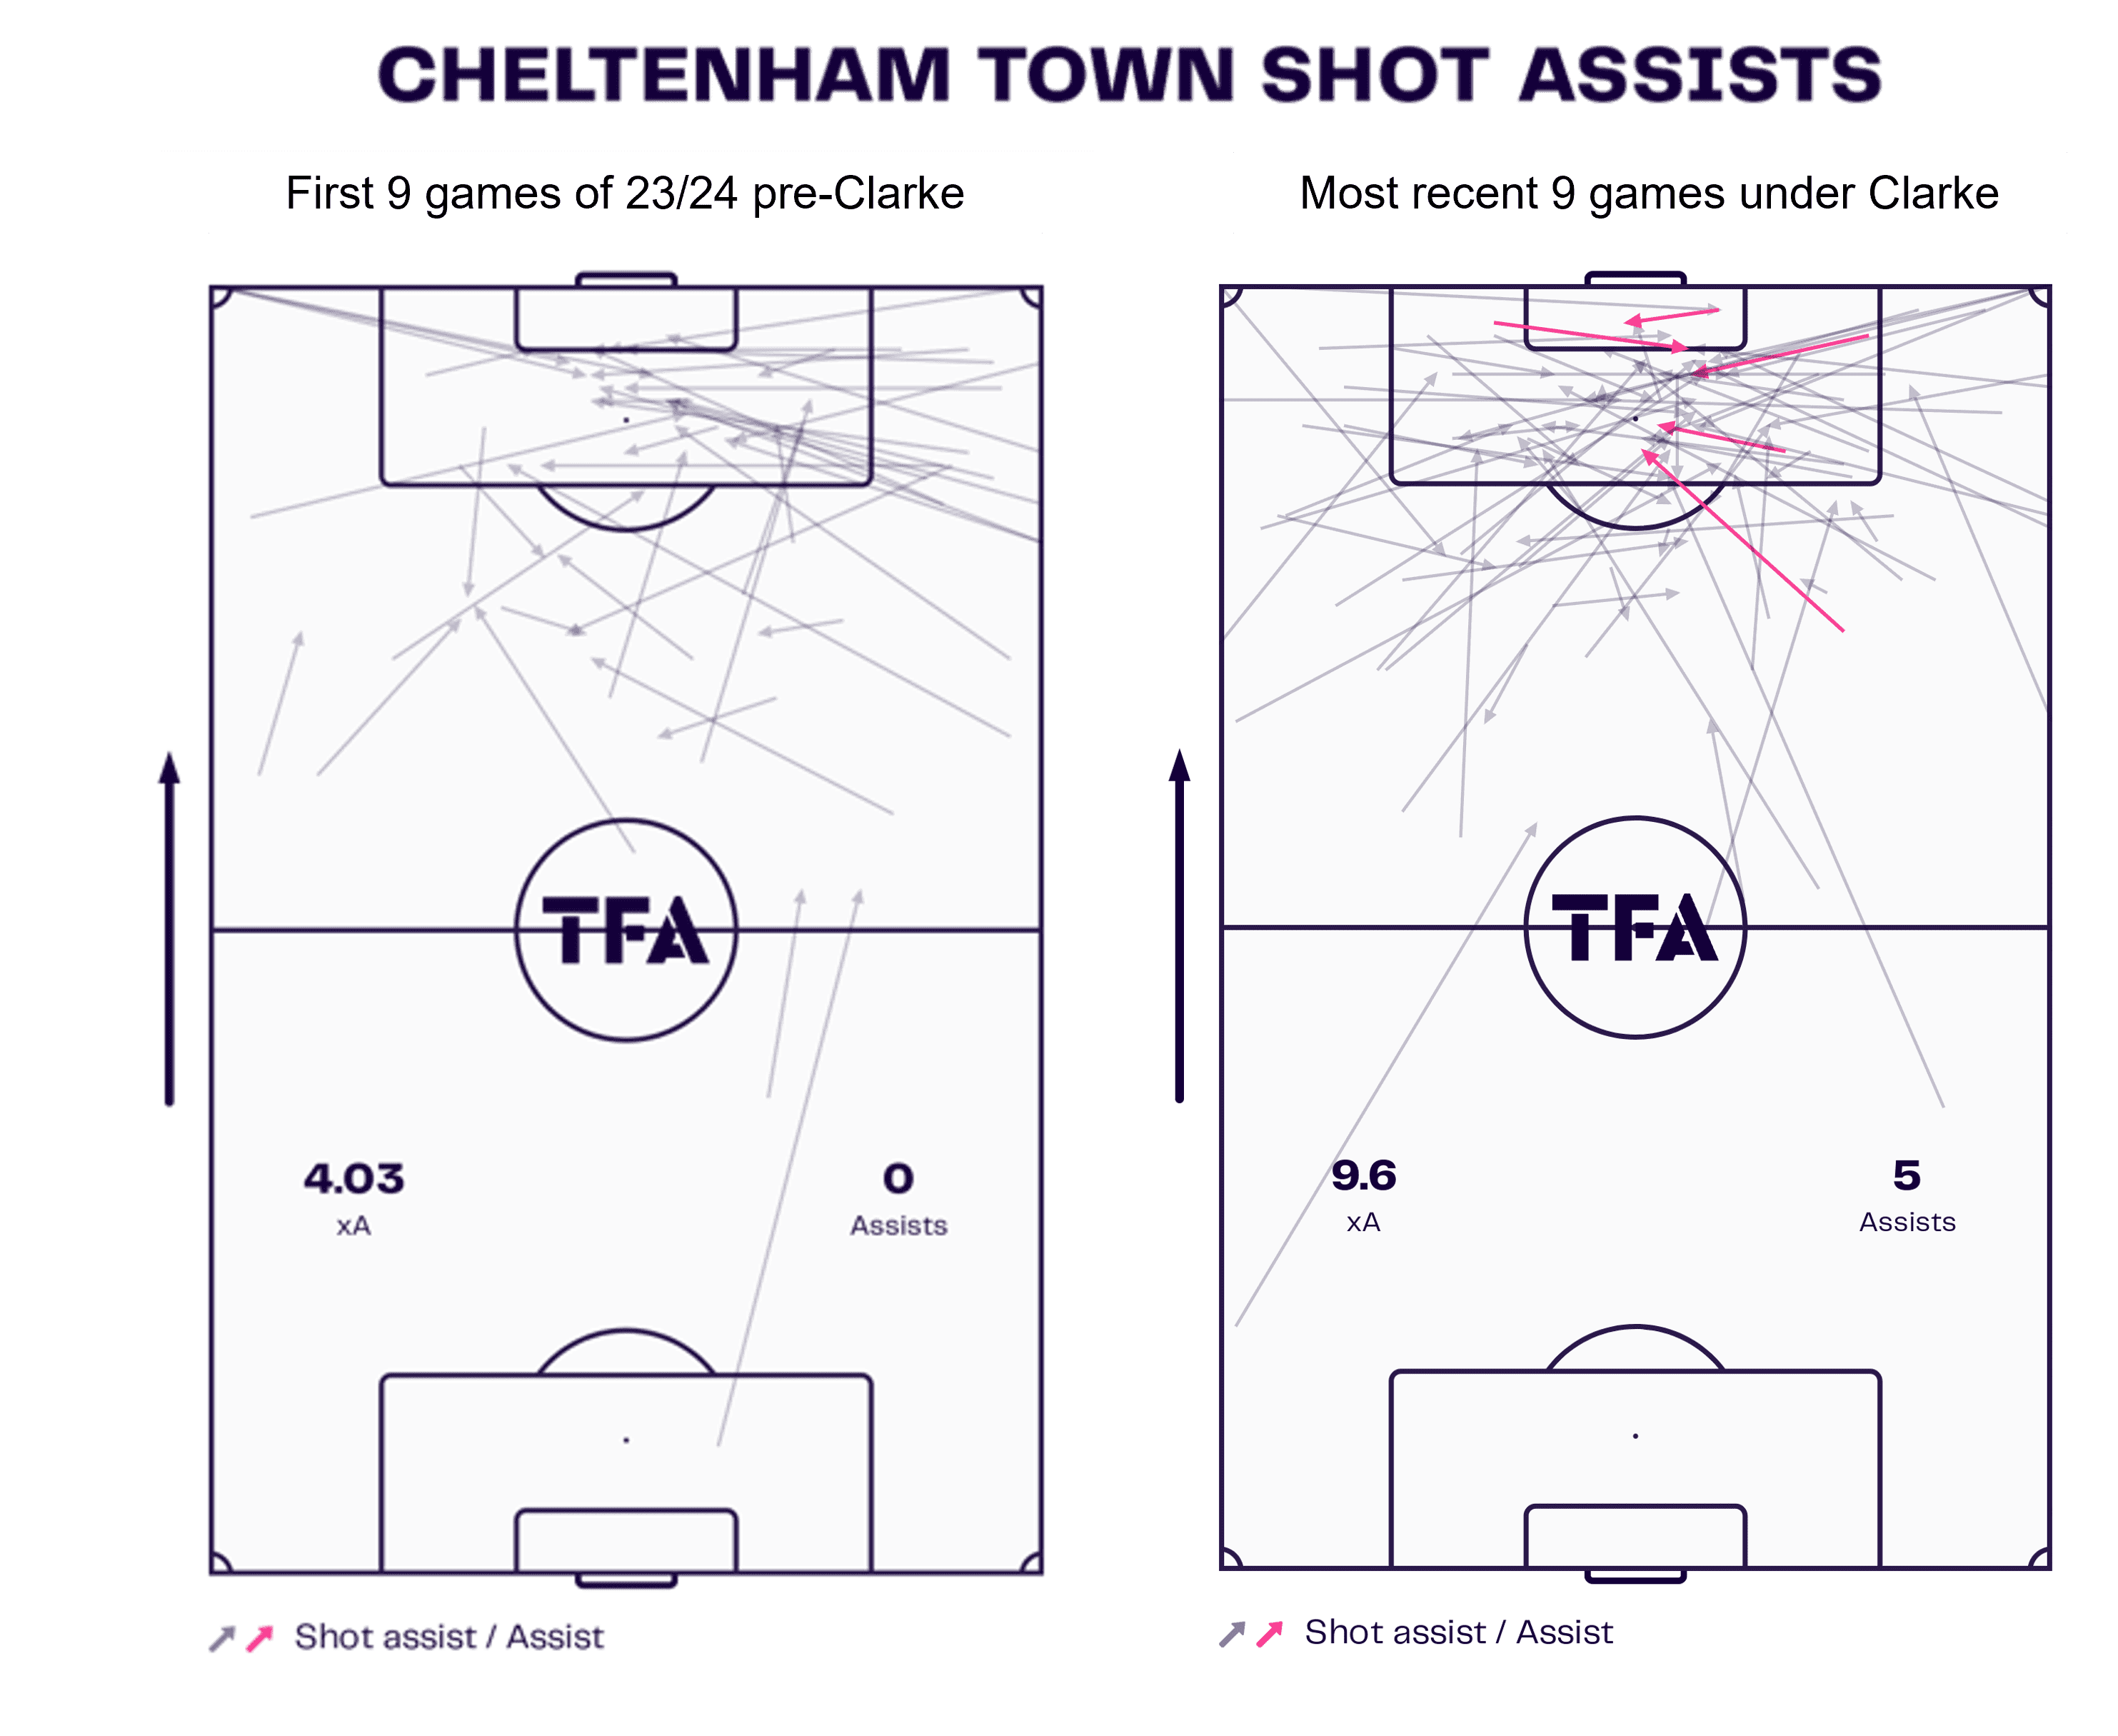
Chance creation was a huge issue in the early stages of the season – tying in with a lack of confidence, a lack of ability to adjust to the new season, and a fading in tactical identity under their previous management team. That was all reflected in the low xA at the start of the season, something that has also improved drastically under Clarke.
In their last nine league games, they’ve recorded an xA of 9.6 – over double the register from the opening nine: a clear improvement. In terms of where those chances originate from, there is something of a lasting pattern. As you can see, much of their shot assists under Elliot came in the form of deliveries from the right flank – their tendency to attack that side of the pitch has somewhat continued as the Robins offer more shot assists from that side, now with the added bonus of actually assisting goals.
What is particularly pleasing from a Cheltenham perspective is that they’ve been able to create more chances from a wide range of locations – while the right flank remains the focus, they have displayed a higher creative frequency from the left flank and central positions under Clarke.
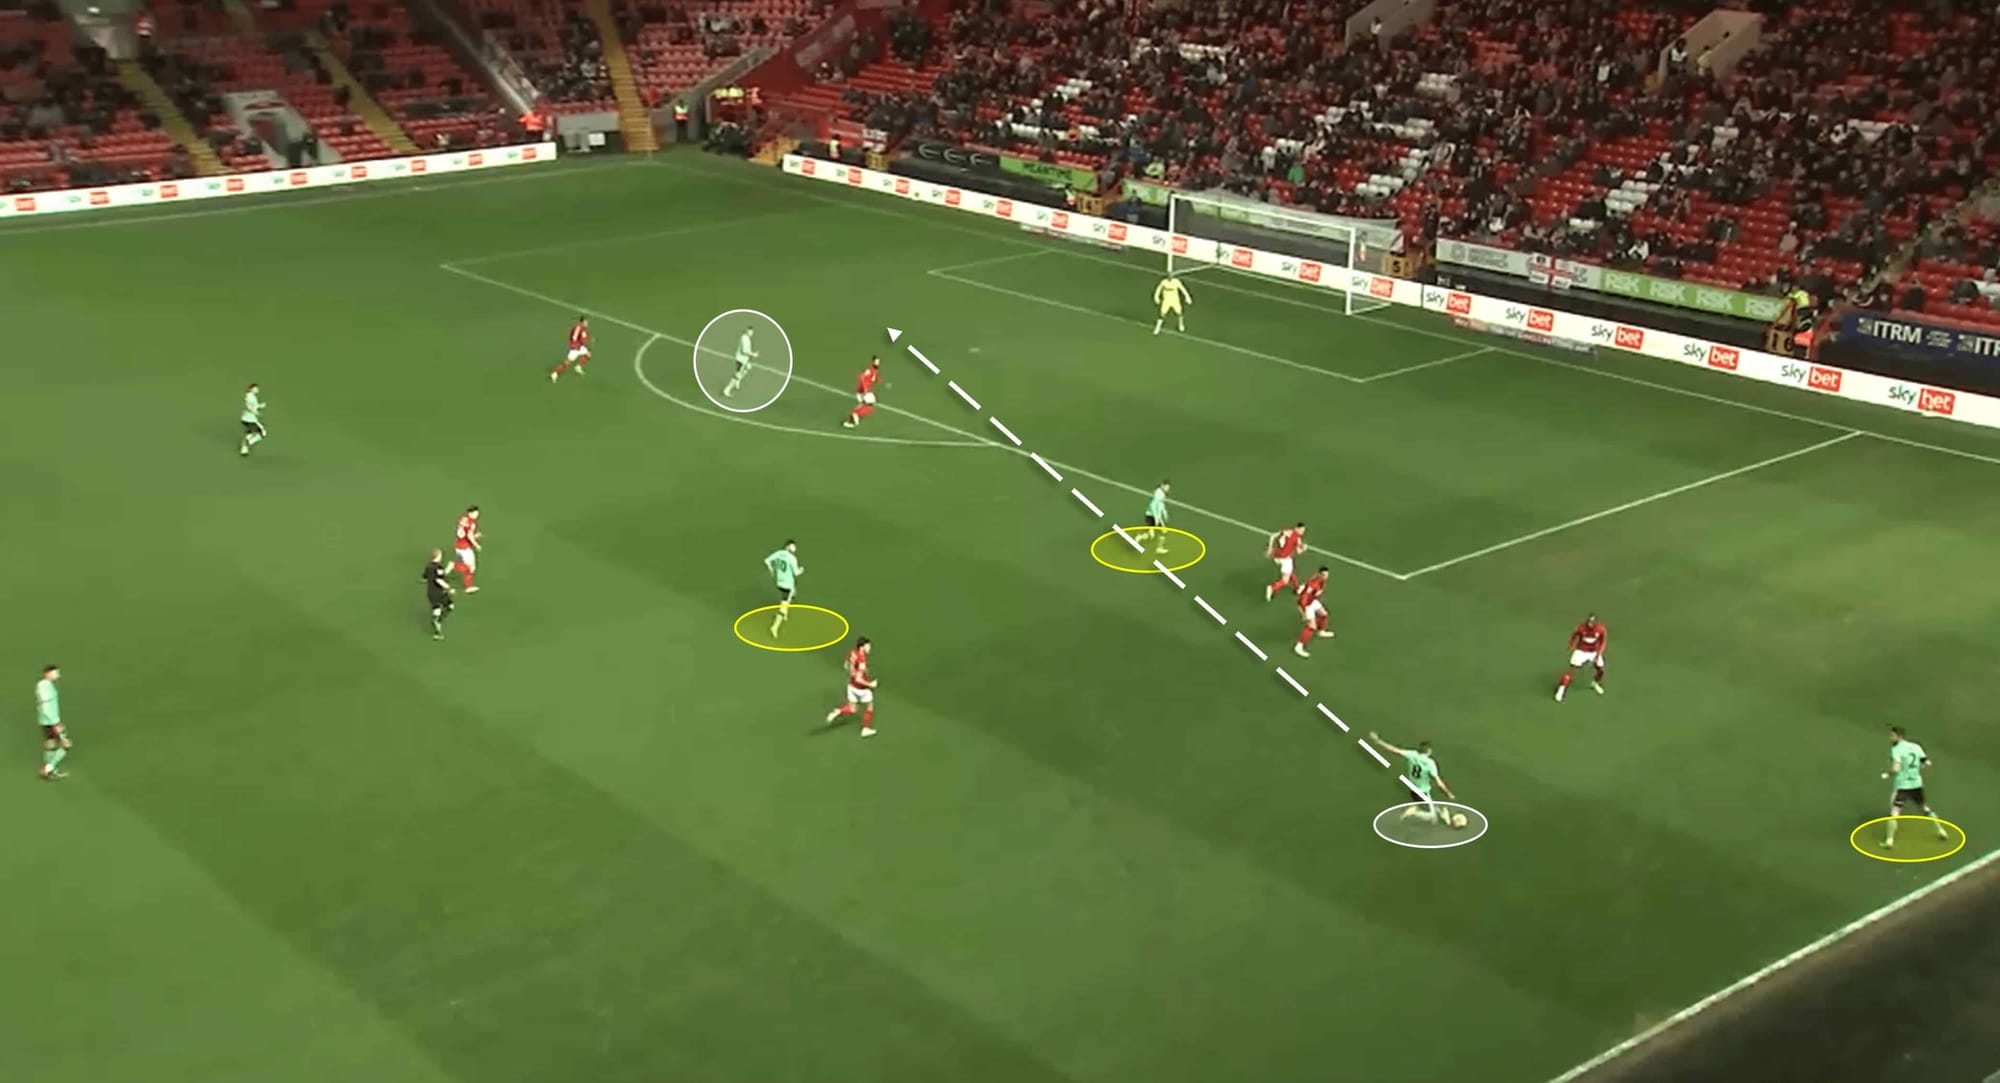
Given Cheltenham’s circumstances and, to be frank, squad quality, there was never going to be a tactical overhaul from Clarke – he wasn’t going to come in and transform them into a possession-based team; the opposite – his side have the lowest average possession percentage in League One (42%). This comes with limitations in terms of a firm approach in attack – they have to be versatile and attack according to the situation at hand, though they do try and incorporate their strengths, which is what you see in the example above.
After winning the ball in a good area, they look to attack Charlton while they’re still somewhat defensively vulnerable. The man on the ball has three close passing options, two of which (right-winger and midfield option) were easy passes – the third was tricky but not impossible. However, those options were ignored as the Robins wanted to strike quickly, and this is where we see them put their aerial ability to use with an early cross, which was executed brilliantly. Choosing the cross over the easy passes is the key takeaway here in terms of tactics.
Cheltenham make 12.96 crosses per 90, one of the lower averages in League One – but it’s important to remember that they also have the lowest possession average, so they essentially have less opportunity to cross, indicating that crossing is a key part of their tactics. Not only have they created chances from crosses in open play, but they’ve also troubled defences from set-pieces.
Aerial duels are a frequent sight in a Cheltenham match – they average 71.48 per 90, more than anyone else in League One. Of course, these occur all over the pitch, as they do for every team, but it does link in with their direct approach.
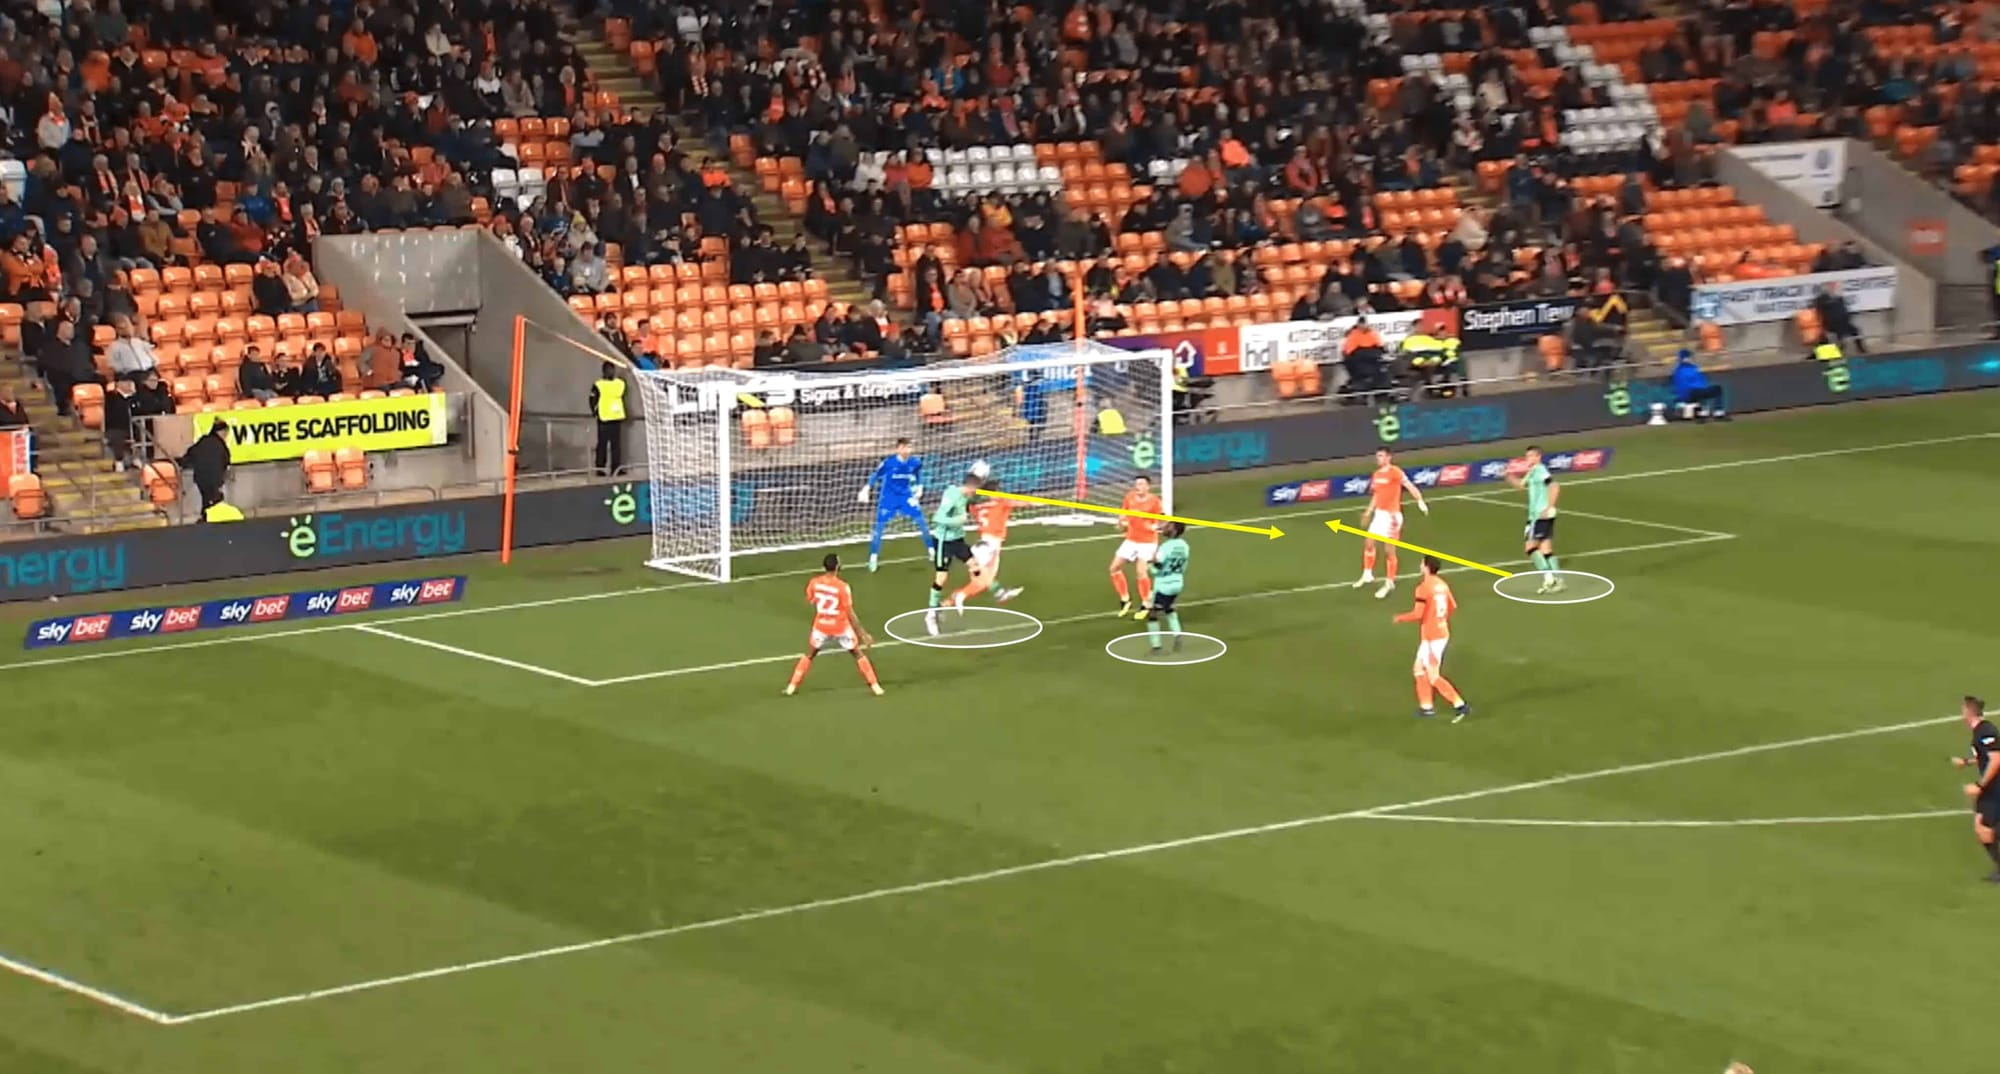
Often, when they cross, a heavy attacking presence is important for numerous reasons. Not only does it give the crosses more to aim at and the defence more to mark, but it also adds the element of the receiver being able to cushion a header back across goal to a supporting teammate – which is what you see in the image above. Another essential element of this presence is the ability to attack second balls, knockdowns, ricochets, etc. – something that has proven highly important to the Robins.
Not only does this lend itself to the height and physicality of Cheltenham’s attacking players, but it also links into their tendency to be quick and direct in attack. Their passing rate of 10.7 is the second lowest in the league, which points to a direct style – get the ball forward ASAP.
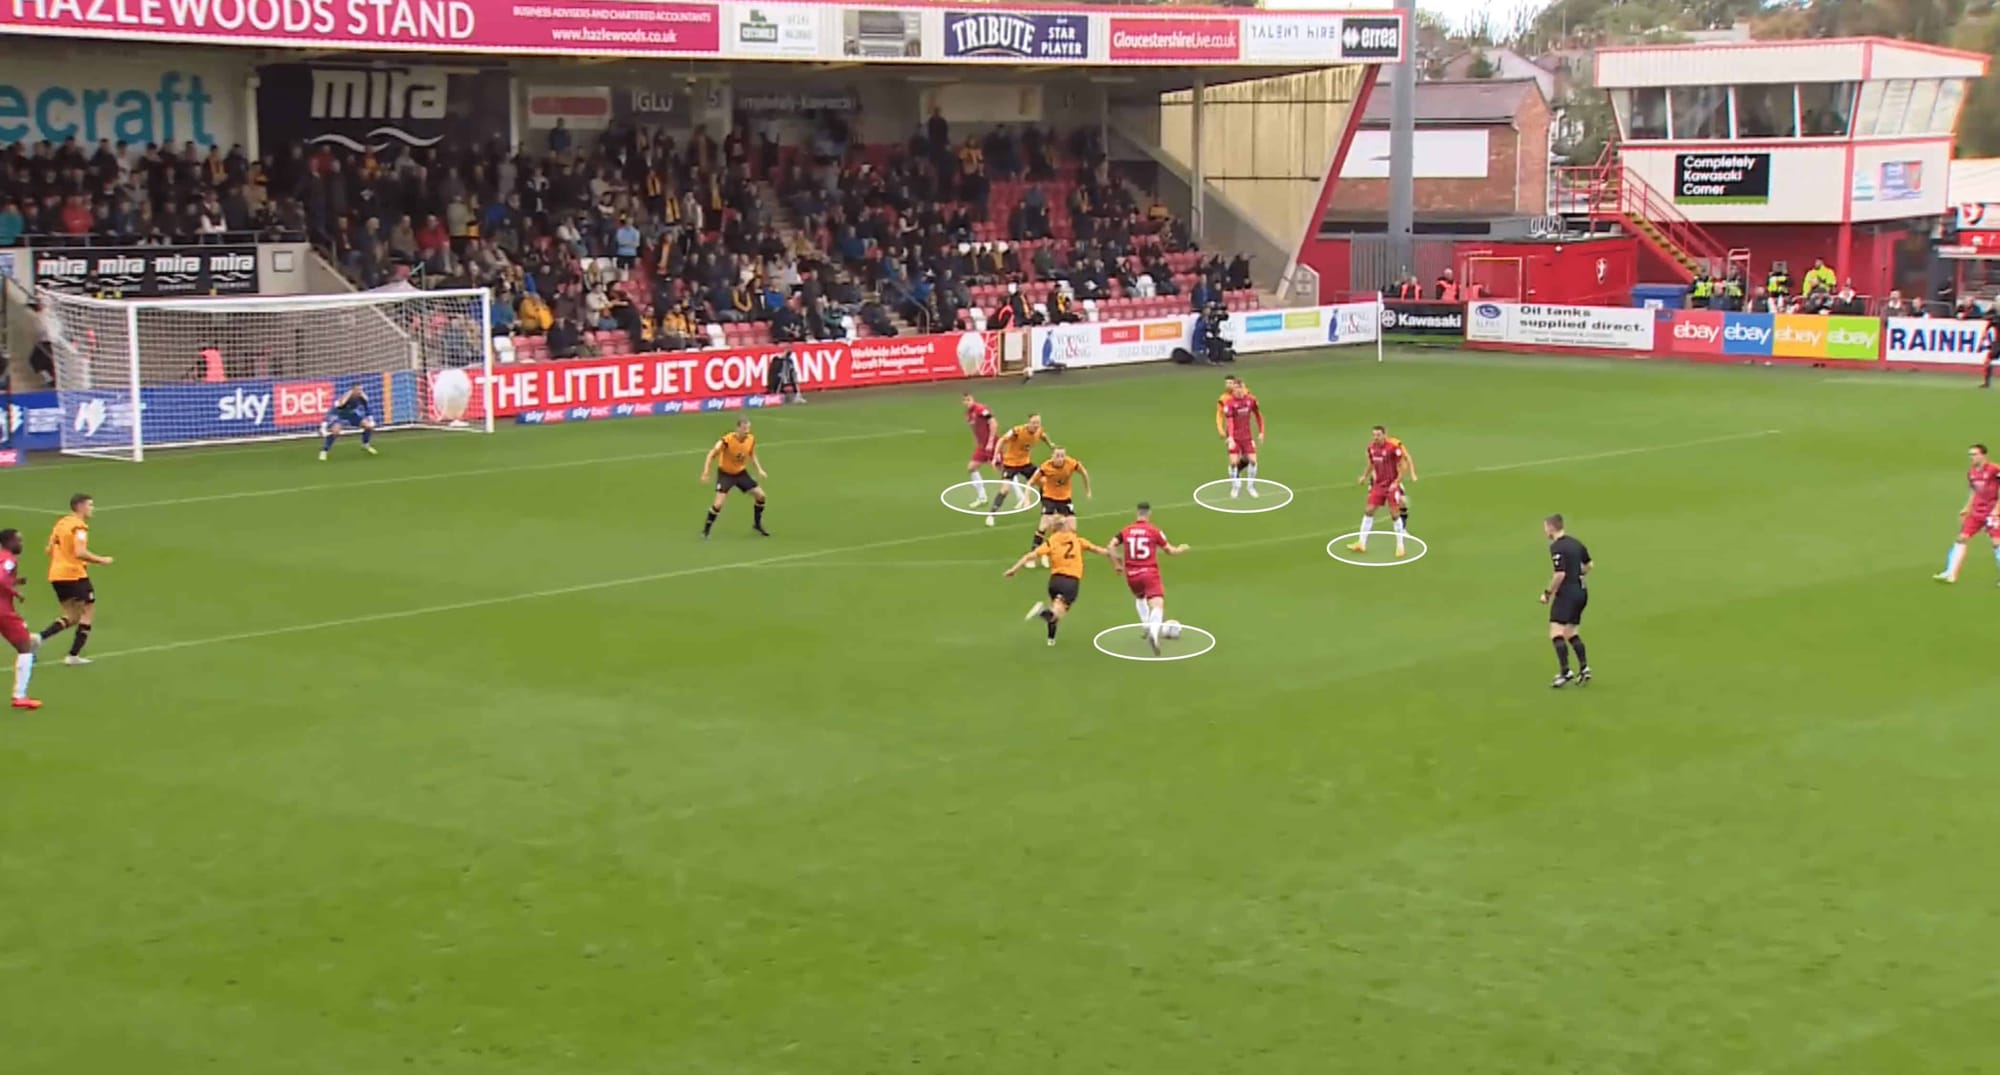
Attacking presence, particularly in central positions, is a vital part of Cheltenham’s tactics. While they look to time this well in order to avoid being left short at the back at dangerous moments, they do prefer to have several bodies in close proximity in central attacking areas. This becomes very useful when wide players drive inside from deep areas, like the analysis image above shows, but it can also be useful when wide players run toward the byline before putting a cross in.
Don’t expect to see many passing combinations in these areas, though – the high presence is aimed at causing chaos for the opposition defence while supplying multiple passing options to the man on the ball. Again, in certain areas, this presence becomes vital in the event of a second ball, etc.
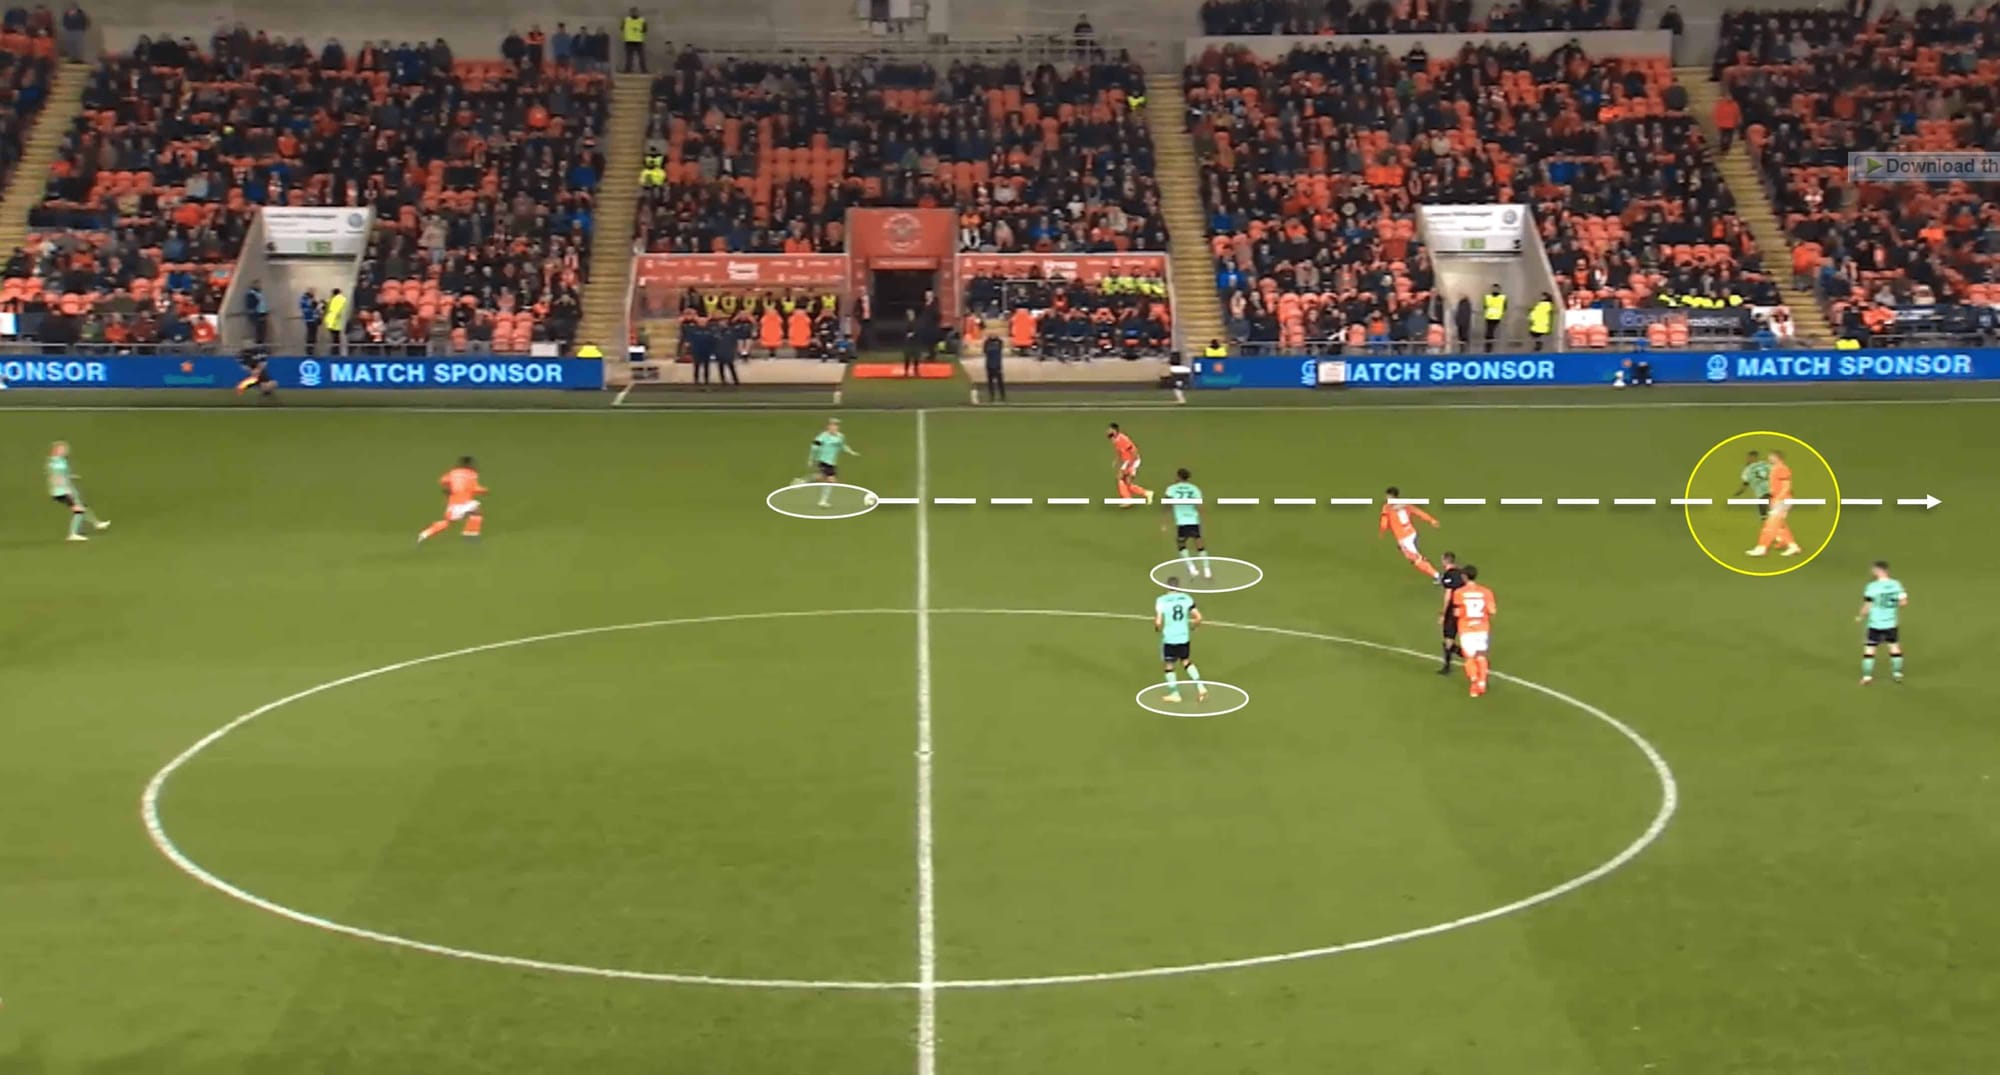
Attacking second balls and attacking in a quick & direct manner go hand in hand when it comes to Cheltenham’s work in transitions. The context for this example is important – the duo highlighted in the yellow circle had just competed in an aerial duel, with the ball being headed by the defender into the feet of an open Cheltenham midfielder.
At this moment, it is important to note the presence and positioning of the two midfielders with him – they were positioning high up in anticipation of attacking a second ball or a knockdown rather than sitting deep in fear of a turnover. While it did not happen in this specific scenario, their high positioning does give the target CF more to aim at with knockdowns.
The man on the ball wasted no time in getting the ball back into a high position quickly – while these are low-percentage passes, they certainly have their benefits in terms of relieving pressure on the Robins’ defence and midfield. And, of course, there’s always the possibility of the instant return pass working out for the Cheltenham attacker.
Raised confidence and aggression out of possession
At the time of writing, Cheltenham have conceded 40 goals, which is not a great record, but it is far from the worst in the division – a trait that may be highly important in the remaining games of the season if they are to avoid the drop. One of the key elements of their defensive tactics is their aggression in trying to win the ball back – this segment provides an analysis of exactly that.
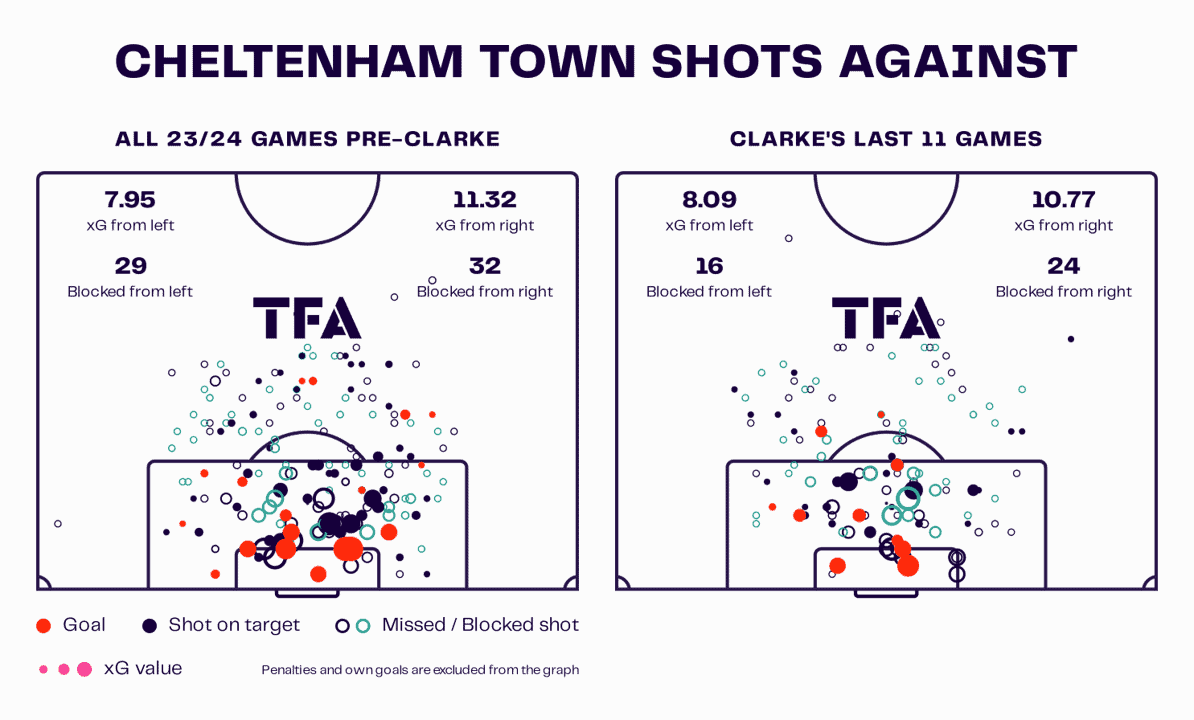
This visual provides proof and context to the improvement at the back. Here, we consider the data from Clarke’s most recent 11 games against the 11 games this season before he arrived (nine league games, two cup games). While they would still look to improve their defensive output, as we mentioned earlier, they’re performing adequately in the context of their goals for this season.
Interestingly, the xG they’ve faced has been higher on the left flank in Clarke’s last 11 games, while they shown an improvement on the right flank. However, the shot map itself perhaps gives us more insight into how many shots they’re allowing – their recent defensive form suggests they’re conceding fewer shots in central areas inside the box, especially between the penalty spot and six-yard box.
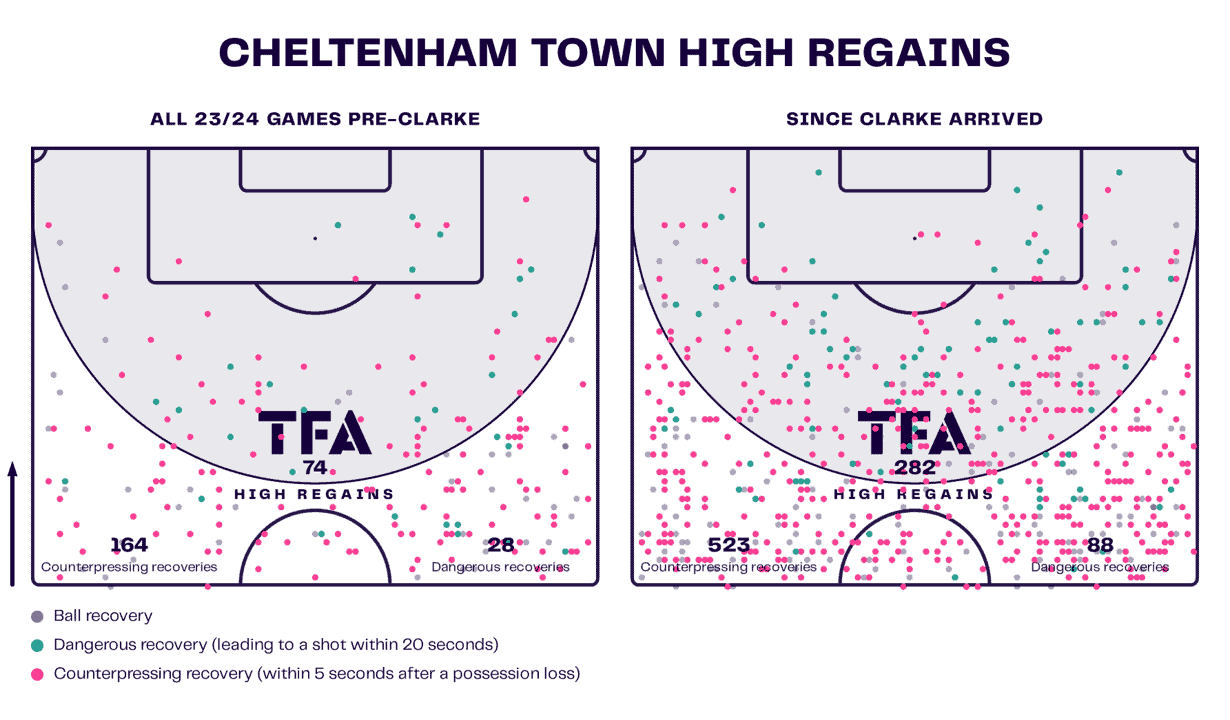
A major part of their defensive rejuvenation is their confidence to be more engaging and aggressive out of possession. We aren’t claiming that they’re the League One equivalent of Jürgen Klopp’s pressing tactics, but the numbers don’t lie – the visual above shows us that they are more proactive off-the-ball.
For context, the numbers above are not from an even number of games – 11 games in the pre-Clarke era compared to 21 games in the Clarke era. Regardless, the data still indicates a huge improvement, especially in counterpressing. Cheltenham like to capitalise on opposition mistakes and vulnerabilities and have, in fact, created numerous goalscoring chances as a result. Their record of 523 counterpressing recoveries in 21 games compared to 164 in 11 games is a significant increase. They also post similar increases for high regains and dangerous recoveries – Clarke’s team have a strong talent for this and could be key in keeping them up.
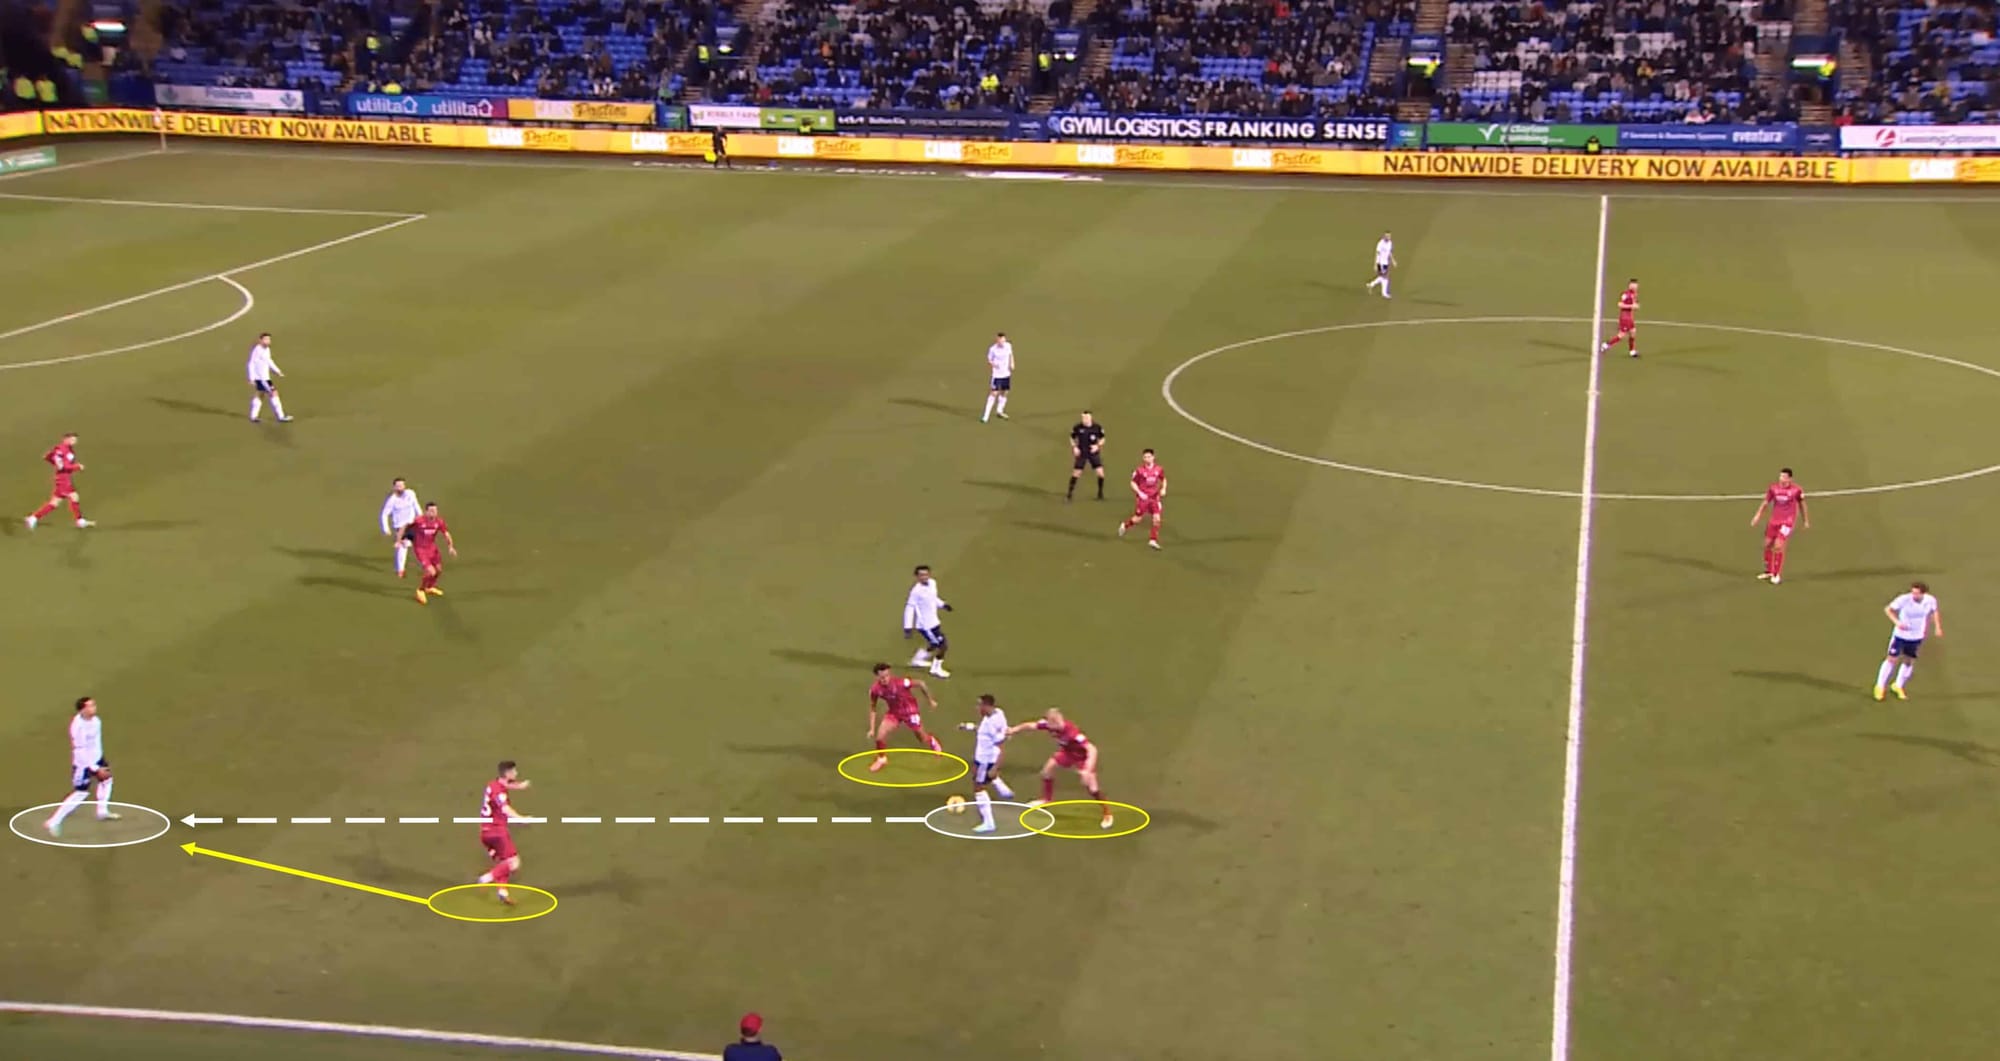
And here is an example of said counterpressing. As Bolton try to play through the thirds, they are met by several red shirts from various angles. The man on the ball in the shot is closed down by two Cheltenham players, while a third Robin applies high-intensity pressure to the next recipient in a Bolton shirt. This approach, compared to a more conservative method of having the midfielders drop and regroup, has been a breath of fresh air for Cheltenham and has had positive implications on both their defensive and attacking records under Clarke.
In terms of how their aggression compares to the rest of the league – their PPDA of 10.03 ranks just below average but well above the bottom cluster of clubs, while their challenge intensity of 6.3 ranks higher than the league average.
Conclusion
Darrell Clarke has overseen needed improvements at Cheltenham – they’re a better side now than they were in August and September, but they still have much work to do to ensure League One safety. The club currently sit 22nd in the table and are still seven points from safety (with games in hand on many teams around them). But that horrid start to the season certainly contributed to that – in a hypothetical league table since Clarke took over, Cheltenham would be several places outside the drop zone. It is up to Clarke and co. to build on this good work to create some strong momentum going into the final cluster of games this season.



Comments