Perhaps you were watching a Premier League or UEFA Champions League game this past season, and you heard the commentator say “what an excellent training ground move from…”.
Or perhaps you were reading a tactical analysis and the writer emphasised with images a particular’ passing and movement’ sequence by the team in possession.
These moments, provided they are executed in open play, are what we refer to as ‘patterns of play’.
Patterns of play, are a tactical strategy of predetermined passes with movement in attack to penetrate the opponent’s defence to either score or create a chance to score.
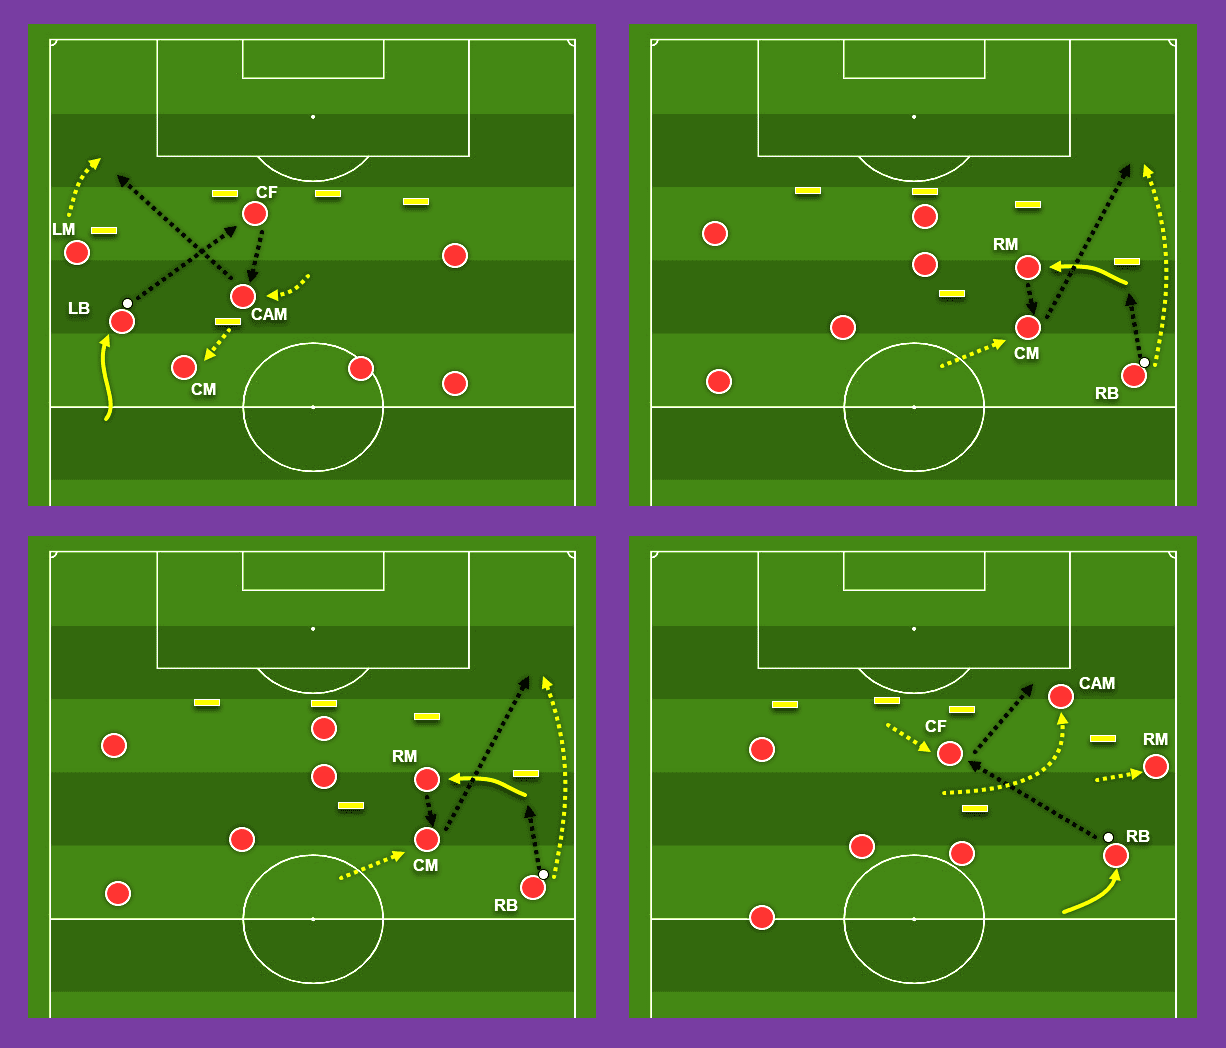
Below, we look at six patterns of play you can learn and use in the 4-3-3 system, three are for central penetration while the other three is for wide penetration.
If you are coaching the 4-3-3 system or you are participating in any high-level coaching such as the UEFA A or B licence where patterns of play are a requirement you may find the below useful.
First, we look at the patterns, but more importantly, we show you how you can get success on the training ground through the use of field mapping and the discovery of ‘what if’s’.
Below we will look at:
- Why train patterns of play
- 4-3-3 orientation
- Central patterns
- Wide patterns
- The training ground
- Getting success
Why train patterns of play
The beautiful game is not short of clichés; whether it’s the emphasis of the half-yard in a foot race or champagne football, sometimes these expressions highlight the margins in the game that separate the teams.
When two sides cannot be separated, and deadlock does not seem likely to be broken from open play it very often is the execution of a training ground move at high speed that gives one team the advantage.
If you are a coach, also consider individual and team confidence.
When the attacking team is only playing in reaction to one another, this means they are trying to discover moments and gaps out of pure randomness to get success, while at the same time the opponent can anticipate and defend.
The likely outcome is a lot of technical and tactical errors that subsequently result in higher turnovers, which weighs a players confidence.
On the other hand, when you have a team that knows the system and they can execute plays on minimal touches, and at such a high speed the opponent cannot always react to this, which in turn, offers a higher chance of success.
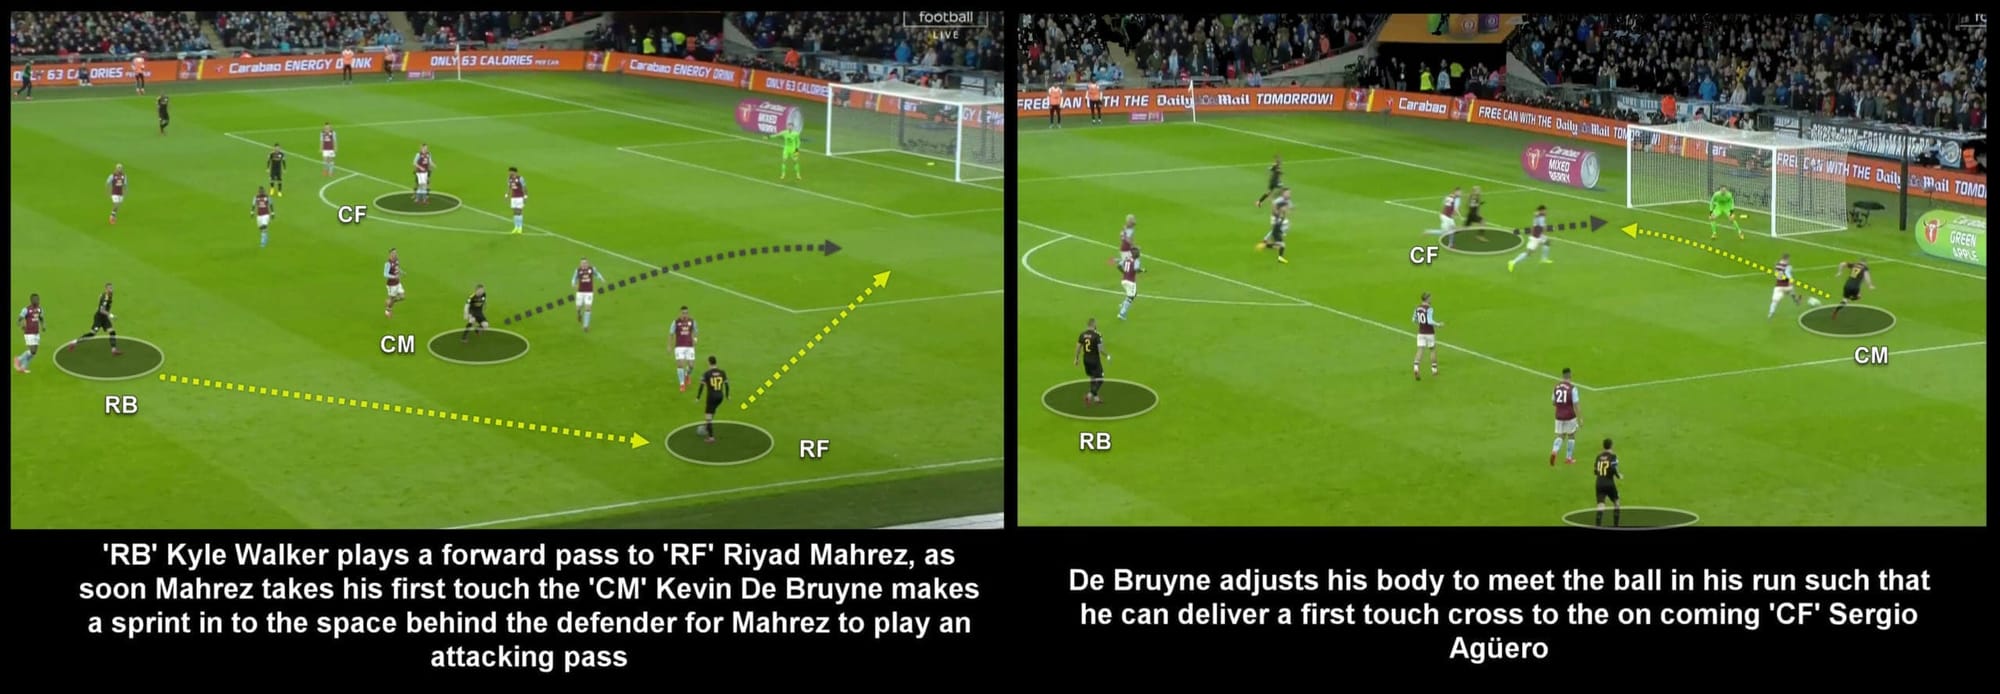
It seems If you want to show a good example of any aspect of the game today, Manchester City will provide that to you, and in droves.
I can name ten more teams in the same country off the cuff that would offer good examples of executing patterns of play, however, let’s just take the recent Carabao Cup final between Aston Villa and Manchester City.
Observing the two images above, firstly we see the ‘RB’ Kyle Walker plays a pass out to the ‘RF’ Riyad Mahrez.
Mahrez takes one touch and observes Kevin De Bruyne’s quick burst of acceleration into the space behind the defender.
On his second touch, the French forward plays a through ball for De Bruyne to meet in the box where he delivers a dangerous cross to the ‘CF’ Sergio Agüero.
Like other top-level teams, Man City exercise a lot of predetermined combinations which allows them to play through or penetrate the opponent’s defence to create high-value opportunities.
This tactical strategy is attributed to teams that get a lot of goals from open play.
Through the correct adaptation and the methodology of your training, you too can get similar and relative success.
4-3-3 Formation
All of the below patterns are based around the 4-3-3 formation.
The midfield is set up as one holding and two attacking central-midfielders.
The below will still work on any variation of the midfield; however, for this article, we will use this format.
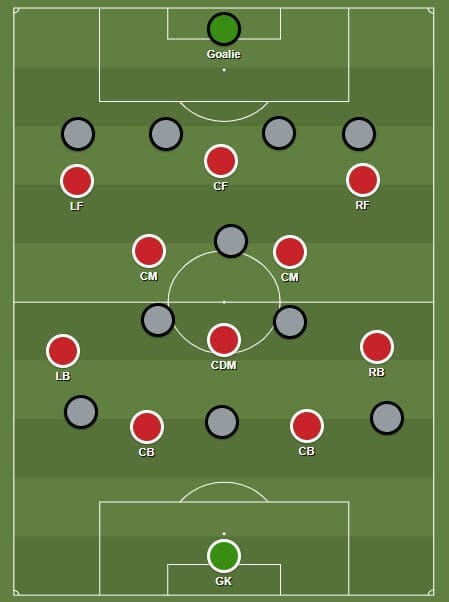
Become familiar with the acronyms per position, such that the left forward of the front three is represented by ‘LF’ and so on.
Central patterns in 4-3-3
We have three options for central penetration, two of which are combinations in the opponent’s half while the third is an option to attack from deep.
The primary difference between central and wide penetration is that central patterns in the opponent’s half generally result in players arriving in good goal scoring positions.
As for wide patterns that come to fruition, they typically result in wide crossing positions or dribbling opportunities into the box from a wide position.
That is unless the pattern includes the final ball into the box.
Note, all patters of play can be mirrored to both sides of the field.
Central A
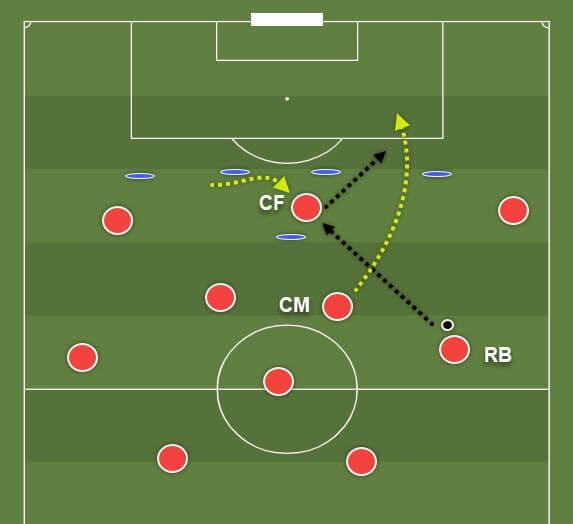
- RB looks up to play a pass forward, the CF’s run is the trigger to pass
- As the ball is travelling to the CF the CM makes a run at full sprint
- The CM must offer a good distance from the CF so the CF has an angle to pass
- The CM must keep his run between the opposition centre-back and full-back
- The quality of the first pass is key to allow a one-touch pass for the CF
- The RF must hold the width to be a wide option when the final pass cannot be made
- The CM should angle his run so that he receives the final pass facing the goal
Central B
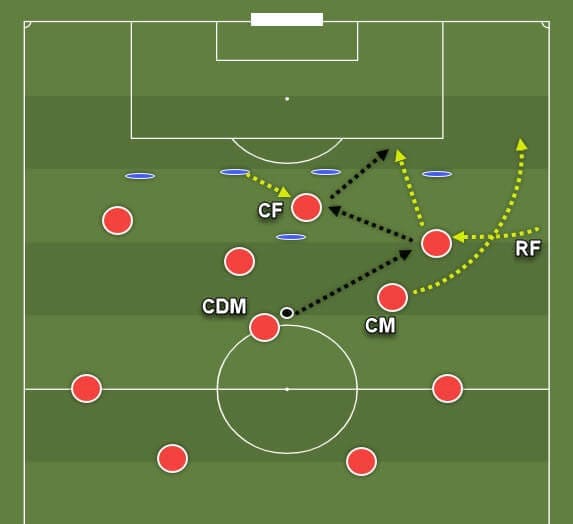
- Three pass combination which requires good pass quality and timing of movement
- The RF makes a run centrally, that is the trigger for the CDM to make the first pass
- At the same time, the CM makes an angled run to the wide channel
- As the RF receives his the ball, the CF then make a short run to be able to receive a pass
- As the RF plays a firm ground pass to the CF, he immediately makes a run forward
- The RF must try to offer a pass that the CF can play a one-touch pass with, if necessary,
- The CF then lays-off a soft pass forward for the RF to meet on his run into the box.
- The CM should remain wide as a secondary option in the game
- The RF should arc his run, so he meets the ball facing the goal.
Central C: Long
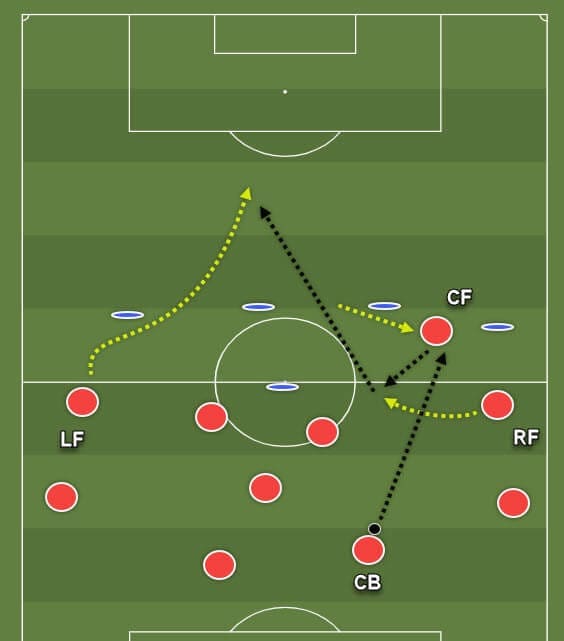
- A combination which starts from deep, because of longer passing distances one-touch may not and should not be an option in relation to good timing and movement.
- CF makes an angled run into the half-space and that is the trigger for the CB to make the pass
- The CF should be higher than the RF so there is room to lay-off the ball on his second touch
- The RF receives the ball on his run inside the field at a comfortable distance from the CF
- As the RF receives his pass that is the trigger for the LF to make his sprint forward.
- The LF’s role is key; he must sprint, not run. He must also aim to beat the offside trap as the ball is released from the RF for the third pass with perfect timing.
- In the aim of using minimal touches, the trigger for the offside trap and final pass should be on the RF’s second touch, which is the final pass.
- The LF must angle his run across the face of the full-back and behind the centre-back.
- Meanwhile, the RF’s pass should pass through the gap between the two centre-backs.
Wide patterns in 4-3-3
We have three options for wide penetration, two of which are combinations in the opponent’s half while the third is an option to attack from deep.
Again all patterns can be mirrored on both sides of the field.
The ‘blue’ icons on the field represent mannequins, work at your own pace as you may want to gradually introduce one, two or three defenders along with the mannequins over time.
Wide A
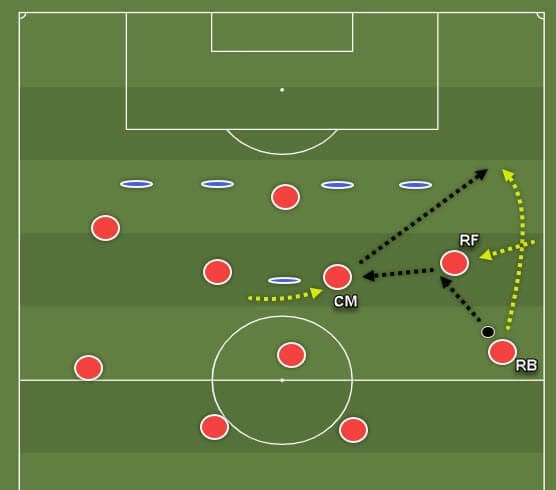
- The RB takes one touch forward as the trigger for the RF to make a run centrally.
- The RB plays a pass into the run of the RF and then makes a sprint forward in the channel.
- As the RF receives the CM makes short run away from the defender to receive a pass
- The RF should give the CM a pass that he can use to play a one-touch pass forward
- The RB should angle his run wide so that he can meet the forward pass still facing the box
- Assuming the opposition will be transitioning to defend the CF, the opposite forward (LF) and the CM’s should make runs into the box to meet a potential cross
Wide B
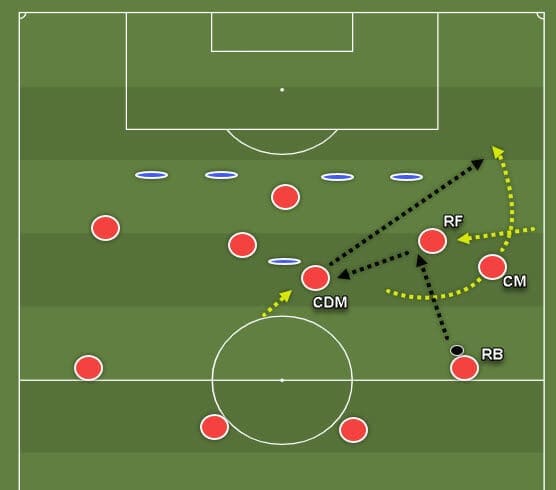
- The RF makes a run centrally as a trigger to receive the first pass from the RB
- As the RF makes his run inside that is also the trigger for the CM to overlap out wide
- The CDM make a short run in good timing to receive a pass unmarked from the RF
- The CDM then plays a pass forward to meet the run of the CM with minimal touches
- The CM should angle his run so that when he receives the pass, he is facing the box
- Assuming the opposition will be transitioning to defend the CF, the opposite forward (LF) and the CM’s should make runs into the box to meet a potential cross
Wide C: Long
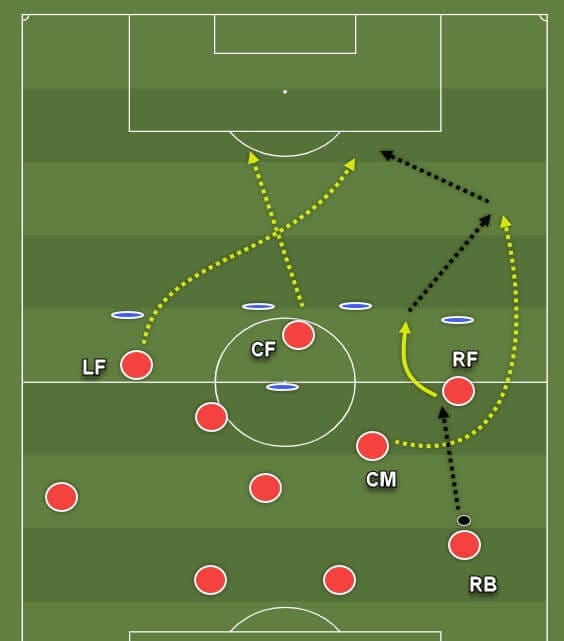
- A combination which starts from deep, because of longer passing distances one-touch may not and should not be an option in relation to good timing and movement.
- The RB plays a forward pass to the inset RF from deep.
- Simultaneously the CM makes an overlapping run and continues forward into space
- The RF makes an inside turn and dribbles high enough to offer an angle for a forward pass
- The CM about to receive the pass must play to beat the offside when sprinting for the pass
- As the RF makes the forward pass that is then the trigger for the LF and the CF to make a crossover run
- Depending on the picture facing the CM in possession and the recovery defending of the opposition, the CM must have good control and observation to play a well-timed pass to meet either forward in the crossover run.
- Timing and movement, as well as the weight of pass, are crucial factors for the success of these patterns
For all of the above patterns, I would promote gradually introducing one defender at a time along with mannequins to offer a realistic challenge to the attacking team.
The training ground
Here we look at the implementation for effective learning.
For the format of these types of sessions, I would promote training the patterns unopposed in the beginning and gradually introduce defenders.
As the patterns can be mirrored on both sides of the field, I would encourage setting up your preferred pattern on both sides of the field and have them working in alternation to one another.
After working on perhaps no more than two per session, we then go into a conditioned game outlined below, which is designed for players to become tactically aware in the 4-3-3 formation of their options and to help the players identify opportunities to execute those trained options.
Mapping
Mapping the field is not a new concept; however, it is becoming more commonplace and referenced by tactical analysts and writers in annotations.
The advantage of mapping the field is that it supports the coach in his or her aims to tactically educate the players.
As well it also creates habits in players by training in condition to the designated channels and zones.
There are many ways to map a field; some choose vertically, some choose horizontally while some honour a hybrid of both.
None of which are the authority, mapping has always been a subjective and personal preference to coaches and teams.
Through the use of mapping, terms like, ‘half-space’ and ‘Zone 14’ were born.
If this is alien to you, do not worry, that does not concern us or hold any value here.
Instead, how we map the field for training patterns is both simple and effective for both player and team development.
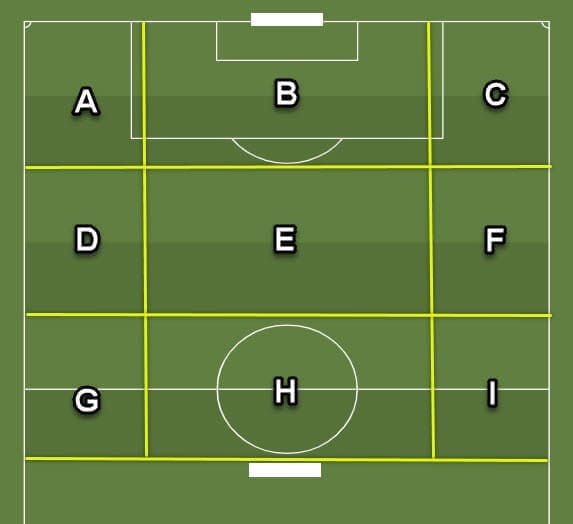
We are going to create nine zones inside one half of the field; however, going a little bigger is completely fine.
The two vertical lines can be made by coming in approximately five yards inside the box and making a channel with cones reasonably spaced.
Secondly, the two horizontal coned lines should reflect three evenly spaced thirds of the half.
To help with player buy-in as well as understanding, why not ask the players to line the field for you by showing them the image.
As for the naming of each zone ‘A-B-C’, this is simply for referencing to support the coaches understanding and the players tactical learning.
Once the field has been set up, then we look at creating a conditioned game that honours the 4-3-3 shape.
Conditioned Game
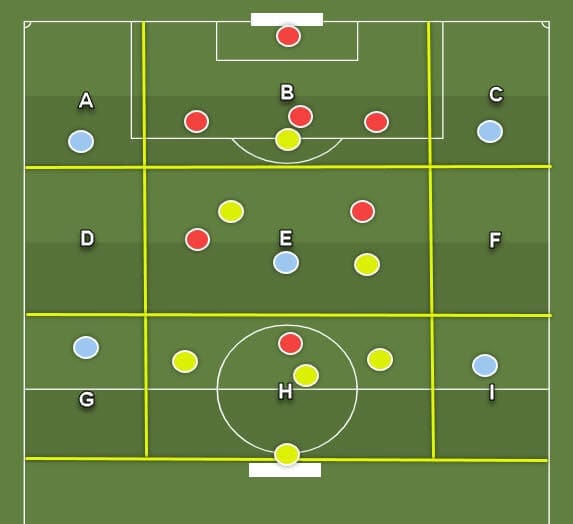
Set up three teams: yellow versus red while blues are neutral, while both yellow and red have a goalkeeper.
As reflected in the above annotation, both yellow and red have a formation of GK + 3-2-1.
You can easily adjust if you have fewer players to a 2-2-1 formation as there is room to be flexible.
The blues are with the team in possession such that the team in attack honours the 4-3-3 formation.
For example, considering the above, if the yellow team was attacking then accounting for zones A – F they would have three forwards and three midfielders.
When the yellow attack the neutral in zones’ A’ and ‘C’ is the wide forwards, similarly if the red team was attacking the neutrals in zones’ G’ and ‘I’ would be the wide forwards.
Make sure all players are honouring their primary or secondary positions.
Movement across zones; you can start with and change conditions as you go of movement for individual players or units.
Although to get success, begin with only blue players can move across zones, so that when they understand their tactical functions of width and depth and when to make penetrating runs from out wide.
Then we can allow more freedom to the yellows and reds to be more fluid and creative by allowing freedom of movement with some restrictions as you see fit.
Finally, If a team successfully executes a pattern of play that was trained award them a goal.
If they score from that pattern of play, then award them three goals.
For some groups and depending on age, this reward incentivises learning extremely well.
Options & what if’s
This is where we see the full value of creating zones to identify opportunities for predetermined patterns to be exercised.
Better yet, if that pattern cannot be executed as planned, then we are left to identify our’ what if’s’.
In Lehmann’s terms a ‘what if’ can be understood as when a planned passing sequence may be a pass from A to B to C.
However, If ‘C’ is blocked then ‘B’ may pass back to ‘A’ or forward again to ‘D’.
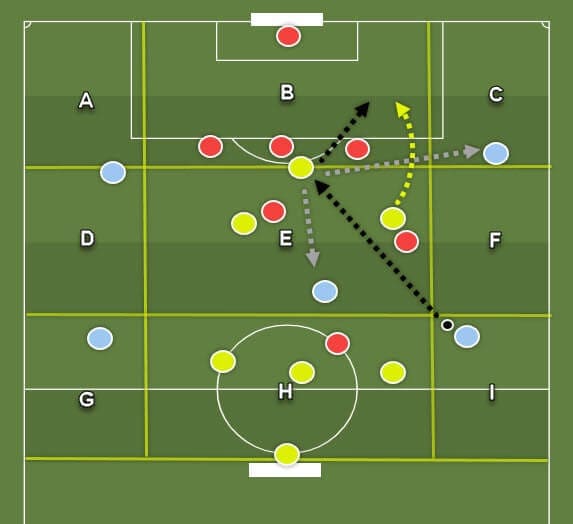
Above, we see the blue player in zone ‘I’ is the acting right-back for the yellow team looking to execute ‘central option A’.
The RB passes to the CF while the CM makes a run beyond into space to receive the final pass.
However, if the pattern cannot be completed as planned, the zones help the CF find his’ what if’s’.
In this case, the options are a wide pass for the RF in zone’ C’, a lay-off to the CM in zone E or if he has the ability and opportunity the CF can turn and play a pass into the LF in zone ‘A’.
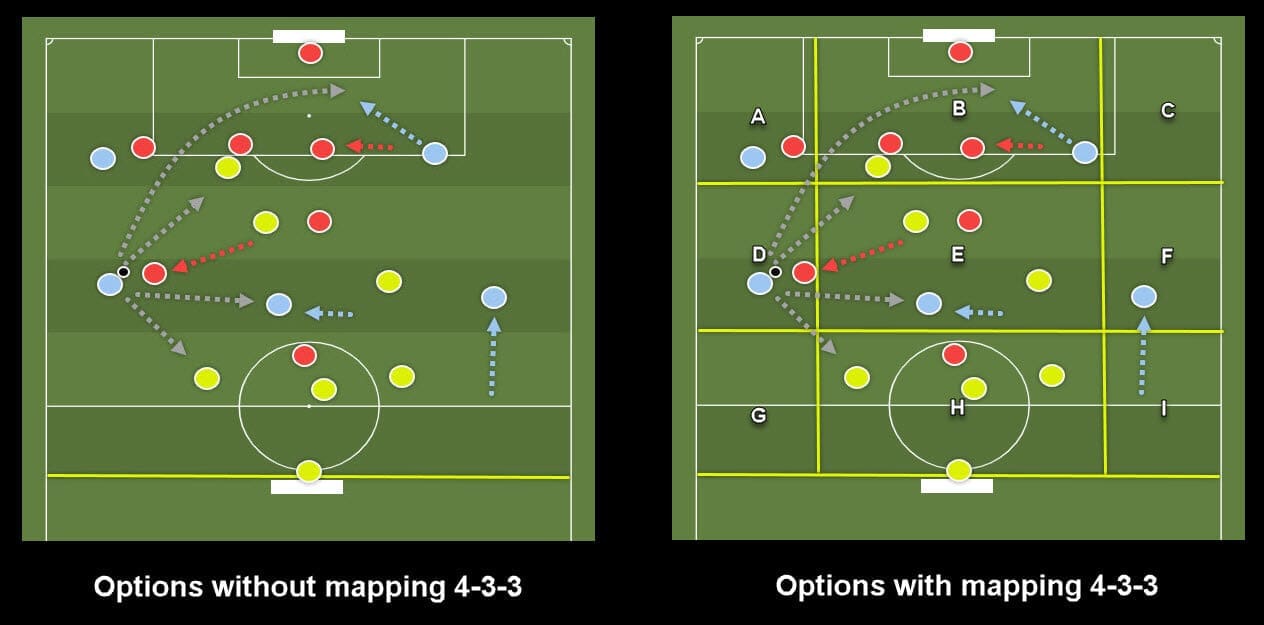
For consideration, take a look at how zoning the field helps both coaches and players identify passing options in the 4-3-3 system.
In the image above, we see the acting left-back in possession.
In open play, even top-level players may not always identify all of their available opportunities in a similar position.
However, by training in zones to reference our options, we can recognise and execute our best options much quicker.
In the above illustration, the acting left-back has four options before making his pass.
Observing options from lowest to highest, there is the safest option by passing to the centre-back, next is an inside pass where we have a numerical advantage due to the pressure of the opposition midfielder.
Gong even higher again there is an opportunity to link with the centre-forward as well as a back-post cross on the opponent’s weak-side where the acting RF makes an attacking run from zone ‘F’ to zone ‘B’.
By having these zonal parameters in place, players can not only discover their predetermined patterns but also occasionally more effective goal-scoring opportunities.
This conditioned game is very rich in coaching points and offers a lot of in-game tactical education for players.
Also, coaches can use this methodology to be rigid and deliberate in achieving specific outcomes as well, similar success can be achieved with minimal stoppages by the coach purely because of the nature of the conditions.
Getting Success
The biggest challenge is getting players to identify all at once the trained pattern of play in a 90-minute match.
However, with the right conditions of open play in training, we can develop each players capacity to read the game and identify those moments.
I have found this methodology of field mapping in a conditioned game has been an effective learning method by training the players’ ability to identify moments to use patterns of play in a competitive game.
Options central and wide: We have outlined a total of six options for a team who plays in the 4-3-3 system to seek out, create and execute.
Passing qualities, as well as good timing and movement, will always be crucial essentials to get success.
What-If’s: remember it is essential for players to identify your not only their patterns of play but also know their what-ifs if the desired outcome cannot be reached.
Mapping the field: Not only for training patterns of play, there will also come secondary success from this methodology of mapping the field.
Players improve their tactical awareness, and by understanding certain positions to certain zones at certain times, it serves to help them in their decision making and subsequently their confidence.
Repetition and patience: I will bypass the ‘Rome being built’ anecdote but emphasise the importance of staying on the course to get success.
As coaches, we sometimes have a habit of ripping up the sessions when they don’t click, however, remain on the course.
Reduce your patterns of play to one option per week.
Reduce confusion and learning overload by having them working as one single mind to identify and execute that one pattern in training and games and you will see a difference.
If you enjoyed and found this useful, but you still have some questions or want to discover more, write to me on twitter @EasyTactics.
Soon I will follow up with ‘patterns of Play in the 4-4-2 system’ only here on totalfootballanalysis.com



Comments