Last month we produced a tactical analysis on how teams play through a 4-4-2 mid-block in theory. Delving into one of the popular defensive tactics of the modern game, among other key factors we broke down how teams build from the back and play through a compact mid-block to enter the attacking third.
This month we provide you with a coaching session on how to play through a 4-4-2 mid-block.
The session has been developed around a 4-4-2 formation for the attacking team; however, the same tactical concepts apply to other formations. Making only slight changes in the setup of the below, you can get the very same success in other formations such as 4-3-3 and 4-2-3-1.
The technical and tactical demands
It’s important to keep the following principles in mind for each third of the field. In the first third, as we build, we look for both full-backs to advance high and wide while the ‘6’ drops level with the centre-backs. The temporary back-three maintain a balanced distance apart relative to the position of the ball and the opposition.
In the middle third, we look to have seven players; all four midfielders, with the ‘6’ re-joining the midfield, along with both full-backs and the ’10’. The ’10’ drops deeper, between the lines allowing freedom of horizontal movement, again relative to the position of the ball.
Moving away from ‘football by numbers’ yes, we commit seven players to the middle third; however, getting success to penetrate or retain possession demands sound technical and tactical principles being applied. The ability for players to pass, receive and dribble under pressure (the technical). Combined with, well-timed movement of players to identify spaces to receive, create overloads and progress attack to the final third or retain possession to switch (the tactical).
As we mentioned in the September edition of the Total Football Analysis Magazine, this is not a guide to put the ball in the net, although it may well help you to do that. What we are providing is a training session that utilises all the technical and tactical principles required to play through a 4-4-2 mid-block.
Warm-up
Start with a warm-up that continuously exercises the same technical and tactical challenges when building through a mid-block. Make players aware of the objective in the beginning and keep the tempo high, such to avoid any errors in practice and unnecessary stoppages for coaching.
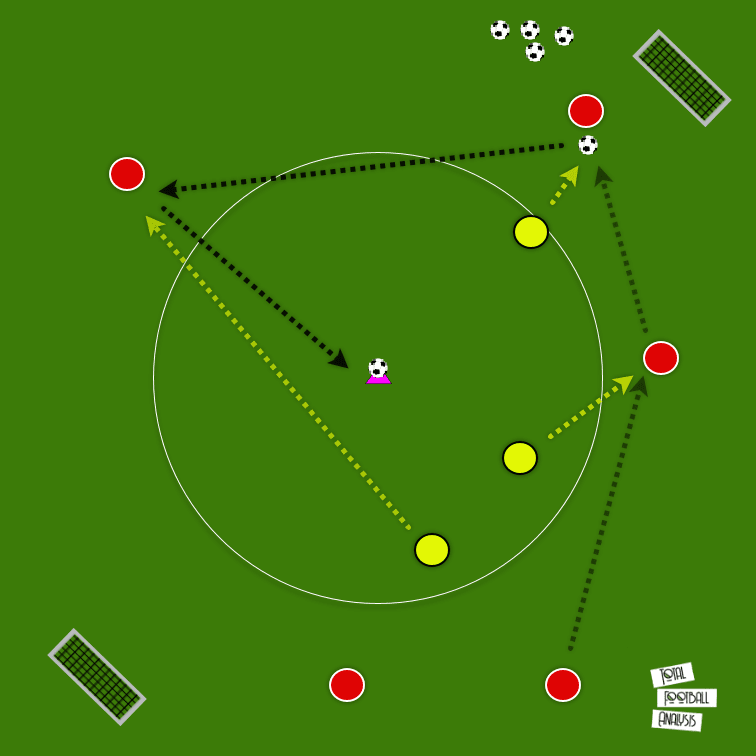
Organisation:
- 5 Red attackers vs 3 Yellow defenders,
- Place a ball on top of a cone in the centre of 20-metre diameter circle
- Place 2/3 goals 10 metres back from the circle
- Red team keep possession until they can score
- Red team scores by hitting the ball situated inside the circle
- Red team can only pass around the circle and not through before scoring
- Yellow team can move freely through the circle to engage the press
- Yellows score simply by scoring in either net outside when they win possession
- Rotate players frequently
Coaching:
- No stoppages here
- Keep the tempo highs
- Promote good pass and receiving qualities
- Promote a good first touch to evade pressure while creating passing angles
Practice 1: The defensive third
Keep in mind, the pass and movement lines in the images are ideal patterns, not prescriptive patterns. Keep it realistic and exercise common sense passing patterns and dribbling opportunities in 3-v-2 situations.
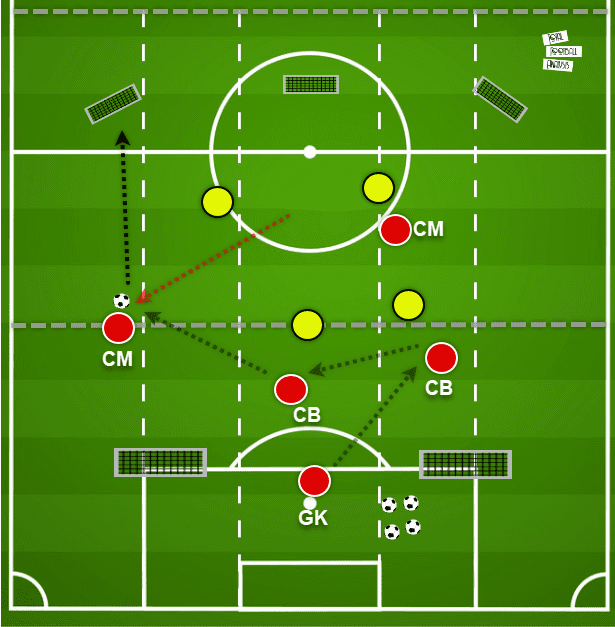
Organisation:
- Red team (attack): GK + 2 CB + 2 CM
- Yellow team: 2 strikers + 2 CM
- Red score in small goals at halfway line
- Yellow score in either large goals on the corners of the box
- Reds start with GK and look to score once inside middle third
- If Yellow win possession they can score in either big goal
- Reds must have one CM drop to create an overload
- Red defenders can dribble into the middle third when possible
- Red players can enter the middle third to help score at a shorter distance
Coaching:
- Minimal stoppages
- Promote good passing and movement in support
- CM’s should look to connect the attack
- Unbalance Yellows to one side and exploit weak side
- Utilise GK in possession when necessary
- Promote both sides to be energetic and efficient in transition
Practice 2: The middle third
This is a very dynamic part of the attack, less predictable, and a higher degree of technical and tactical quality is required. With good organisation and patience in the build-up, success can be achieved with ease. Once again, the pass and movement lines below are just one of many possible patterns; they are not prescriptive.
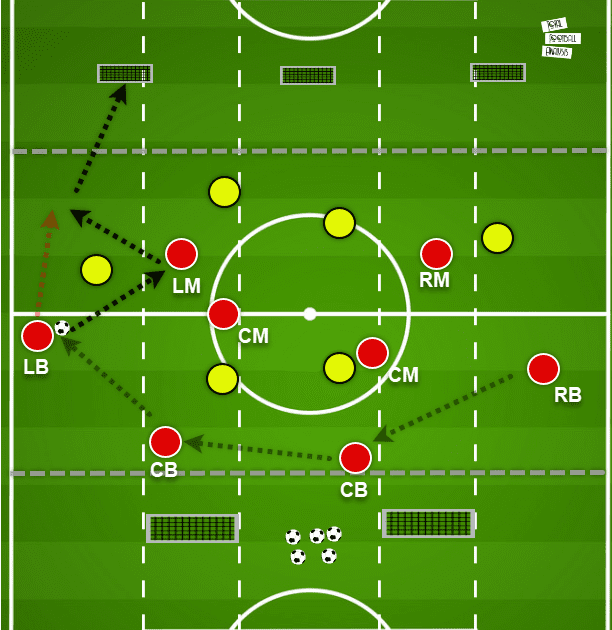
Organisation:
- Red team (attack): 4 defenders + 4 midfielders
- Yellow: 4 midfielders + 2 strikers
- Reds score in any of 3 small goals from inside middle third
- Yellows score in either of 2 large goals
- Reds CB start with possession and look to create angles to score
- Yellows press efficiently, aiming to isolate, steal possession and score
- All Red players can score
Coaching:
- Minimal stoppages
- Promote patience over urgency; this will help players tactical awareness
- Good passing and movement qualities including open body shape to options
- Promote aggression and good defensive principles from Yellows
- Red CB’s should get comfortable playing close to pressure
- Exploit the weak side with quick passes, short or long
- FB’s should hold with while LM + RM position in half-space
- Look to score from a switch in play
Practice 3: Penetration
At this part, we look to exercise realistic, penetrating passes into the final third, connecting all three units of attacking team. At the same time, we’re maintaining the real challenge and threat of the defensive team. It’s important to highlight here that different teams with different strengths at different levels may have a different outlook on how to attack the final third. Premier League contenders Manchester City, for example, have Raheem Sterling and Riyad Mahrez to beat defenders in a foot-race and drive into the box while teams with lesser quality still need to rely on overloads and passing combinations to penetrate without engaging in 1-v-1’s.
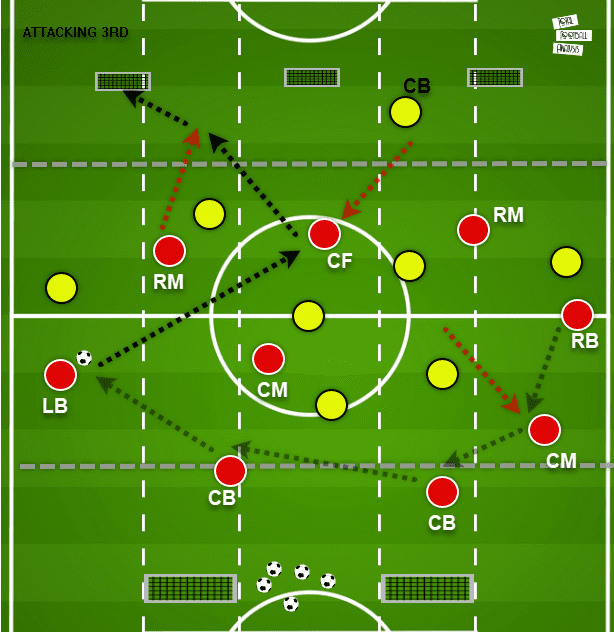
Organisation:
- Red team (attack): 4 defenders + 4 midfielders + 1 striker
- Reds starting positions should be 2-6-1 across all three zones respectively
- Yellow team: 2 defender + 4 midfielders + 2 strikers
- Reds score in any of 3 small goals, once they have entered the final third
- Yellows score in either of 2 large goals behind Red defenders
- Reds can enter final third with a passing combination or by dribbling
- Reds players should not have any more than one player occupying a passing lane
- Red midfielders should be mobile while full-backs provide the width
- Offsides apply for Yellow team in attack
Coaching
- Reduce stoppages as practice progresses
- Promote player ownership of the session
- Promote patience and tactical awareness mentality over urgency
- Encourage CB’s to play close to pressure, with
- Guide wide midfielders, striker and centre-midfielders in creating overloads
- Good technical habits, open body to play forward while protecting the ball when necessary
- Allow players to discover naturally occurring pass and run combinations
- Over time, introduce your patterns of play once principles of open play have been attained
Getting success
Like any responsible coach who knows how to get success, be realistic about your player’s ability and stage of development, as well as tactical understanding. As from here, you will be able to deliver effective sessions and coaching. Be flexible, you may have to, or may want to tweak certain aspects of the session for it to be effective. Lastly, accept mistakes will be made in training and more often in competition. That is part of the process, yet with clear principles in this aspect of the game and with more player buy-in the quicker you will see the results of this training come to fruition in competition.




Comments