So many teams now play with a midfield three. Whilst when working with a team for a season we may well find ourselves focusing on big and slightly broad concepts, like “playing out from the back”, or “finishing in the final third”, we can go a long time playing a midfield three and just expect these players to know what to do in the game, due to their familiarity with a system. This is obviously not ideal practice – and perhaps reading this, this doesn’t apply to you – but if it does or it doesn’t it is still important we work on something that often underpins our entire system in possession. The midfield three and their understanding of working together is of vital importance, and this set of practices that would come together as one session offers some examples of how we can do exactly this. Whether we use tactics that have us play with a double or single pivot, two 8’s, two 10’s, or a conventional 6, 8, and 10, we have to ensure these players not only understand their individual roles but more importantly are cohesive as a unit. This tactical analysis will provide some examples of coaching a midfield three to consistently rotate, change angle and position, and structure forward play.
Part 1
The first exercise in this analysis is a simple 3v3 with two neutral players on either end. The teams look to work the ball to one end of the grid to the neutral player, before then receiving the ball once more and looking to go the other direction. Every time they successfully work the ball to one end they get a goal.
There are four mini squares within the one larger square. We can see this set-up in the following image.
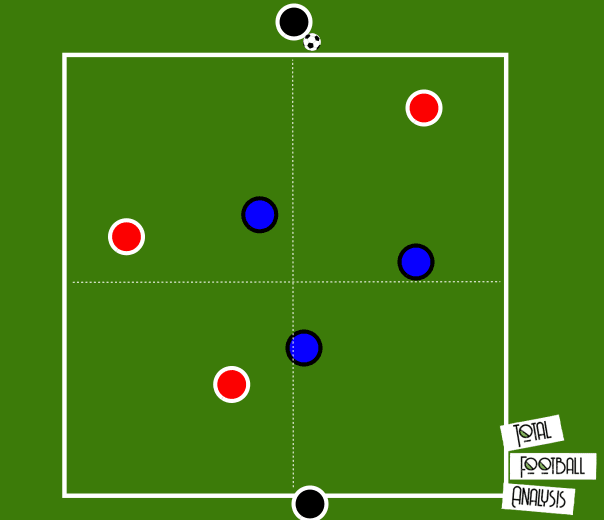
We ask the players to ideally not be in the same vertical line or horizontal line from each other e.g can we not be a box directly next to someone either laterally or vertically? This is of course impossible with three players and four boxes, however, it constantly requires our players to be moving and rotating.
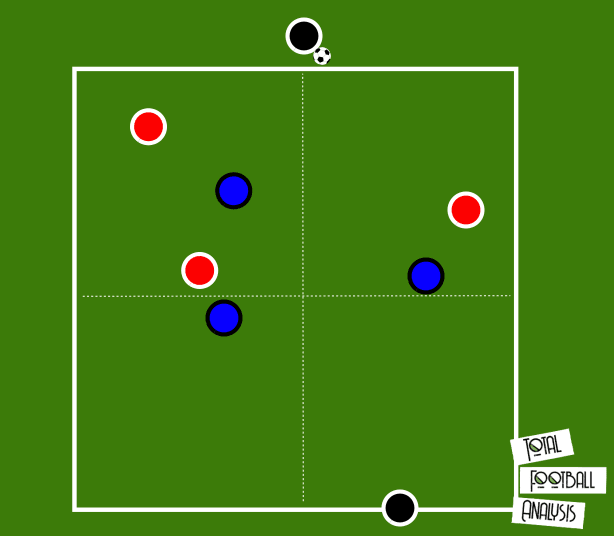
If not possible due to the players’ current level then at least ask them to not be in line with one another either vertically or laterally, as we can see the players doing in the image below.

By doing this, the in possession team aren’t offering different angles to the ball-carrier. They are too easily marked by the opposition.
Equally we need to ensure there is always one of the three players stretching the pitch and playing beyond the opposition.
Below we can see how all three red players for example are inside their own half. The blue team, defending in this case, are then able to step forward and completely take away any space for the red team to play in.
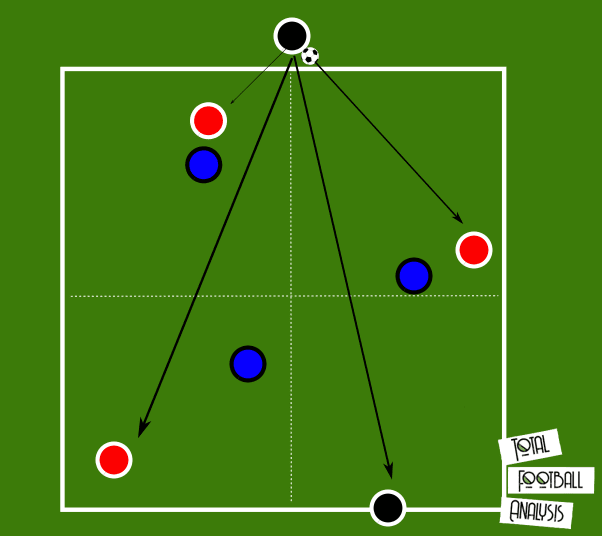
We are looking for the blue team to instead be stretched. The ball-carrier should always have four pass options in this instance, which we can see in the following image. We can see how the red team now have a presence beyond the blue three, and are stretching them as a result.
This practice allows our midfield three to begin to work on rotating with one another, constantly changing direction, but also understanding the importance of this. In doing so we create space to play through the central channel by not only finding different spaces, but manipulating the shape of the opposition midfield three, dragging them apart.
Part 2
Moving on from this we look to use a practice that brings us close to a game situation. The example shown is an 11+2 GK v 6. This is just an example for when we have larger numbers, but can of course be changed. However, ideally we want a 6v3 in the smaller square in the middle of the large square – the importance of which will be explained as we go on. This practice will work on our team in possession looking to play into our midfield three as well as having the three work on their rotations and movement.
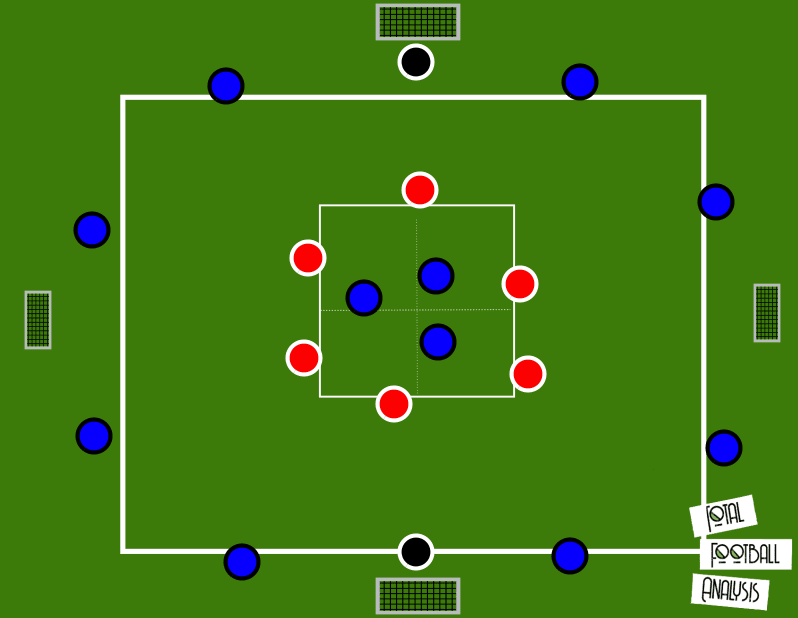
Ideally we want the 6 red players, for when the ball is won by the blue team they look to play out to their teammates on the outside. The game starts with a 6v3 rondo with the red team playing one-touch passes, and then as the blue teams win the ball they look to pass out of the rondo square to the outside.
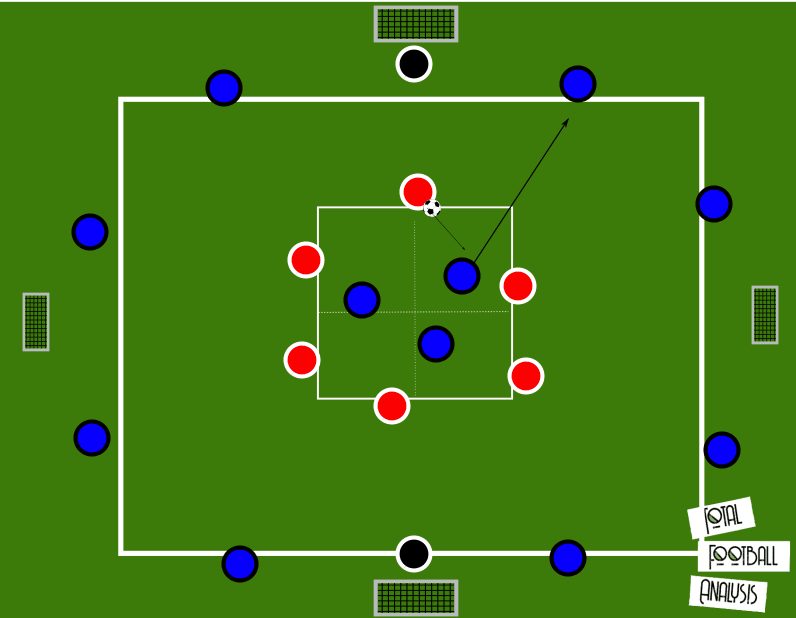
The red team can then press ideally with a pressing three and with three behind them supporting this press.
The blue team look to connect passes, with ten passes representing a goal. However, given the number of players on the outside of the square, they should be restricted from playing a pass to a teammate on the same side of the square as them, forcing them to go inside, and ideally into our midfield. The possession team should be encouraged to not force the ball into the middle but instead use quick passing to move the ball around the square.
The three midfielders can remain in the box, but as a minimum two players must stay in there. This encourages one midfield to drop out of the central square and fill a space where they could connect with a teammate over a short distance.
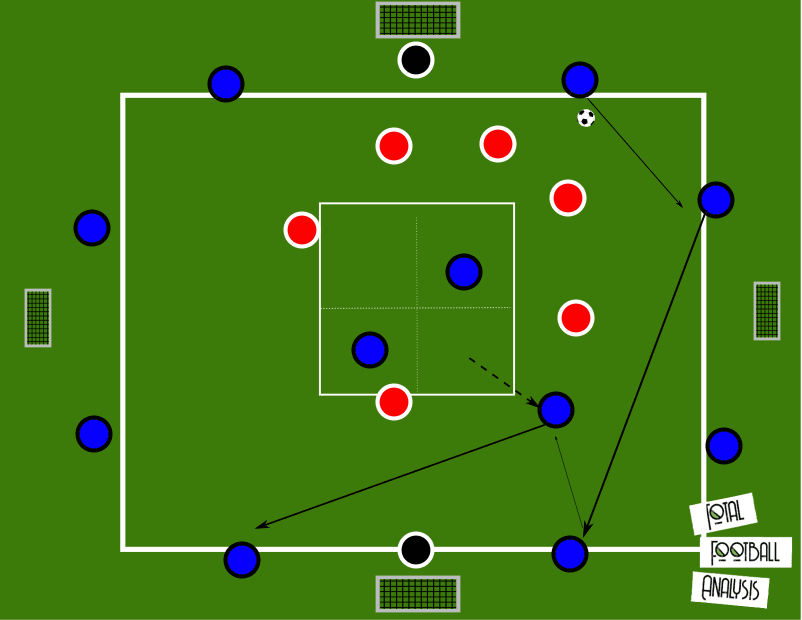
Once they have connected, as they did in the previous image, they then look to rotate with one of their midfield teammates. In the next image we can see a different midfielder dropping out of the central square as the other midfielder rotates back into this space.
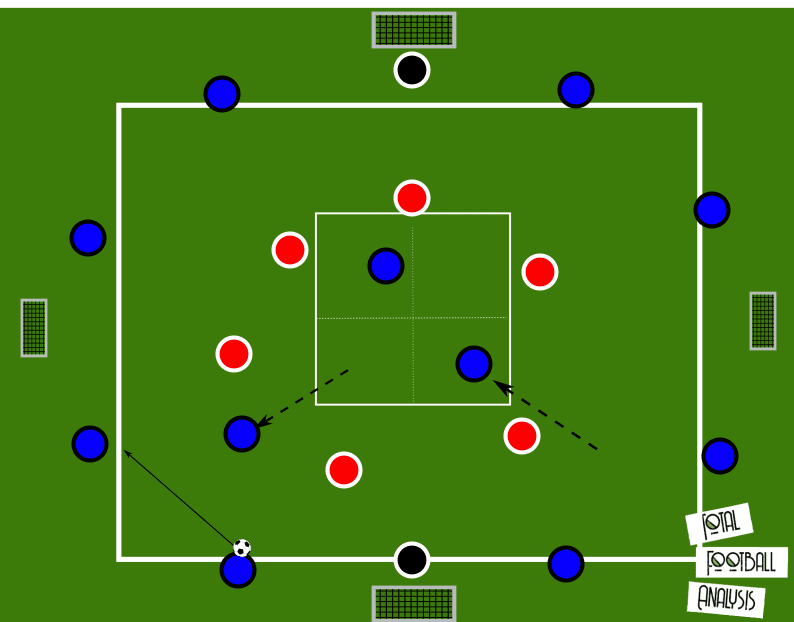
We can also divide the central square into four as well. This prompts our midfielders to not play on the same vertical or lateral lines as each other as we worked on in the previous exercise.
If the red team win possession as they press they can go to either of the smaller unprotected goal, or drive towards one of the goals guarded by a goalkeeper, looking to score themselves. The blue team can now counter-press themselves, coming in from the sides of the grid in and attempt to win back the ball and prevent the opposition from scoring. If they win it back they can continue with the same set-up as before. If the red team score, we start from the 6v3 rondo in the middle of the square once more.
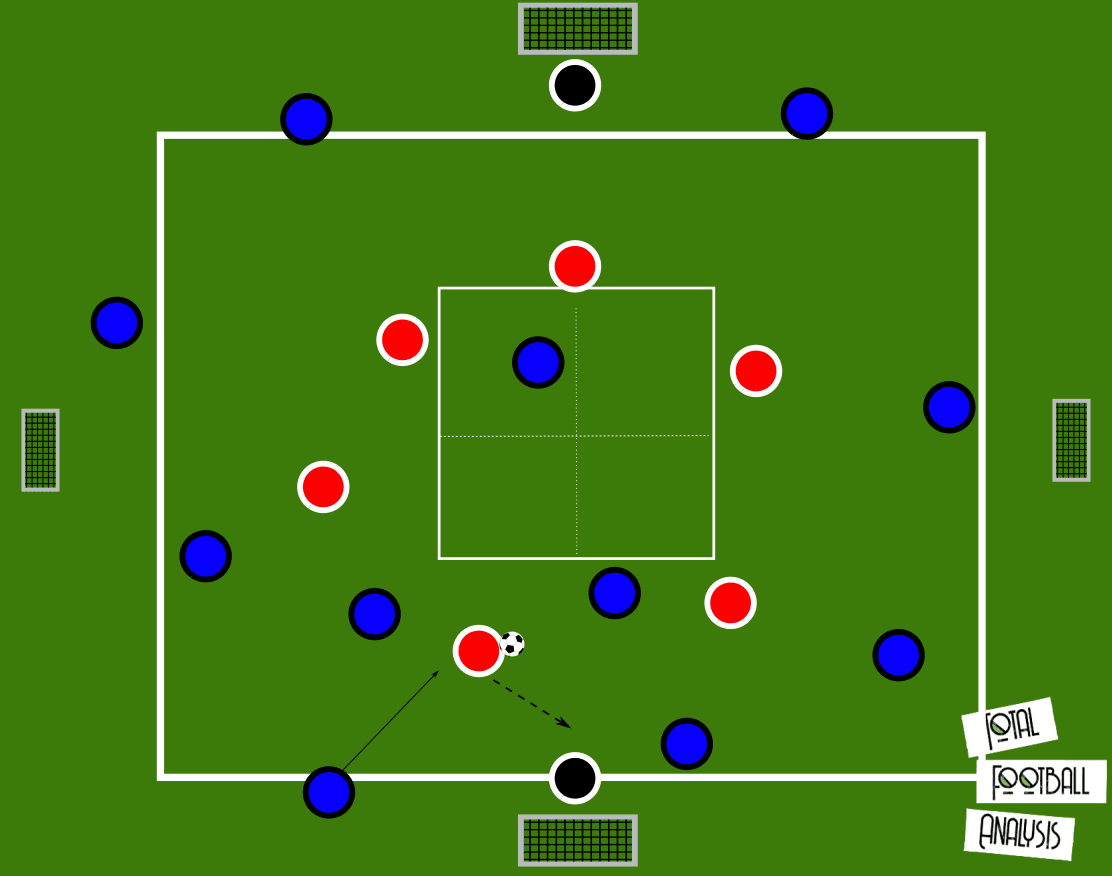
This practice also allows our team to continue to work on the importance of reacting to defensive transition, with both teams having the opportunity to do this.
Part 3
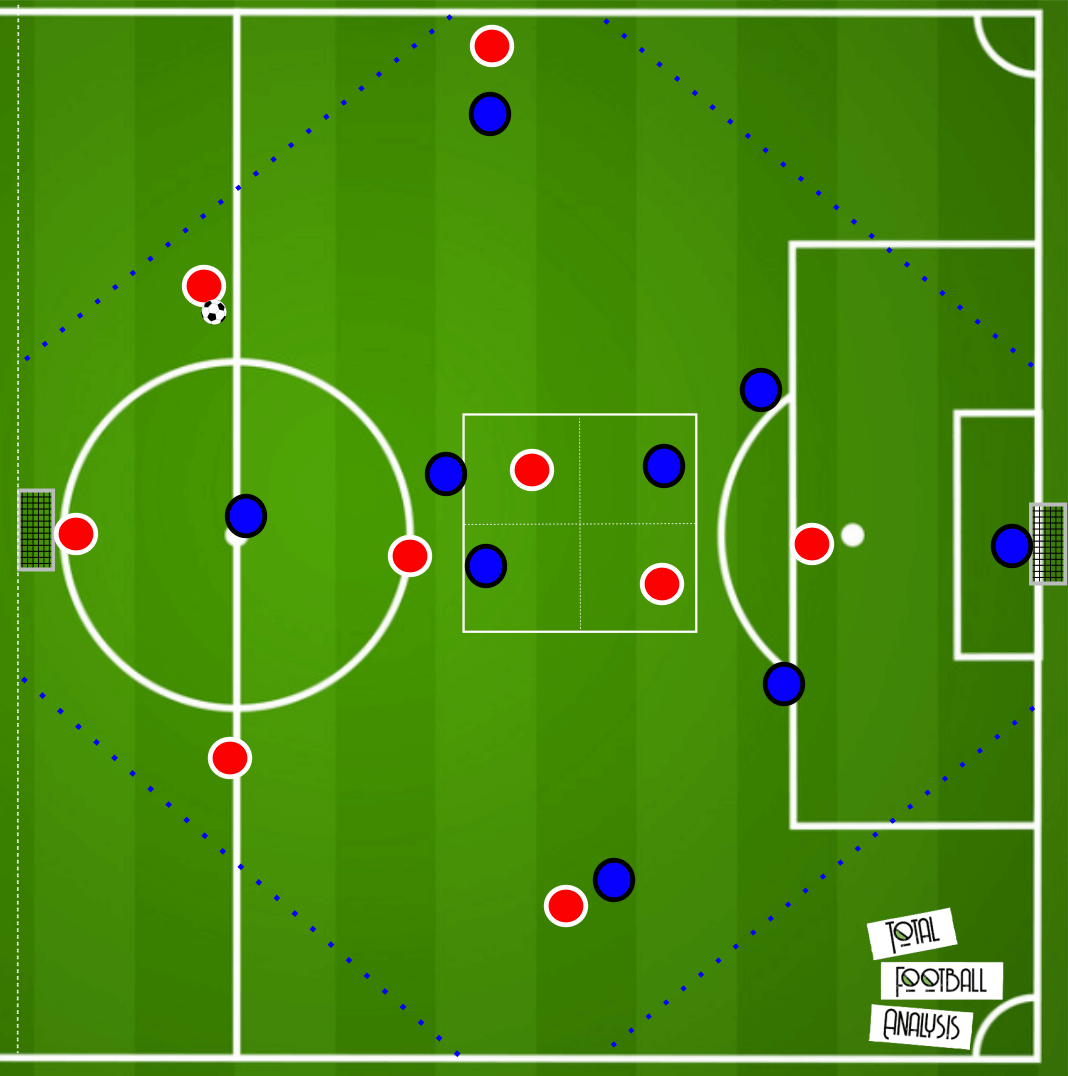
Finally, moving onto a game situation, we can use the same central grid, allowing our midfielders to work in the same setting to continue to build on the same kind of movements and rotation as a unit that they would have worked on in the previous exercise.
By also cutting off the corners of the pitch and not providing numbers in wide areas we force our teams to play inside into the central channel where possible.
Freedom can be provided to our midfield threes to move as they please, using the same square set up, divided into four, to structure their play, or we can be more strict and constrain them by again saying two midfielders must continue to play in this square. With two teams of three working in this space, it is definitely important for us to use a much bigger square though.
We can see the set up for this practice in the following image. Again, this is just an example and could be altered to still bring out the same outcomes.
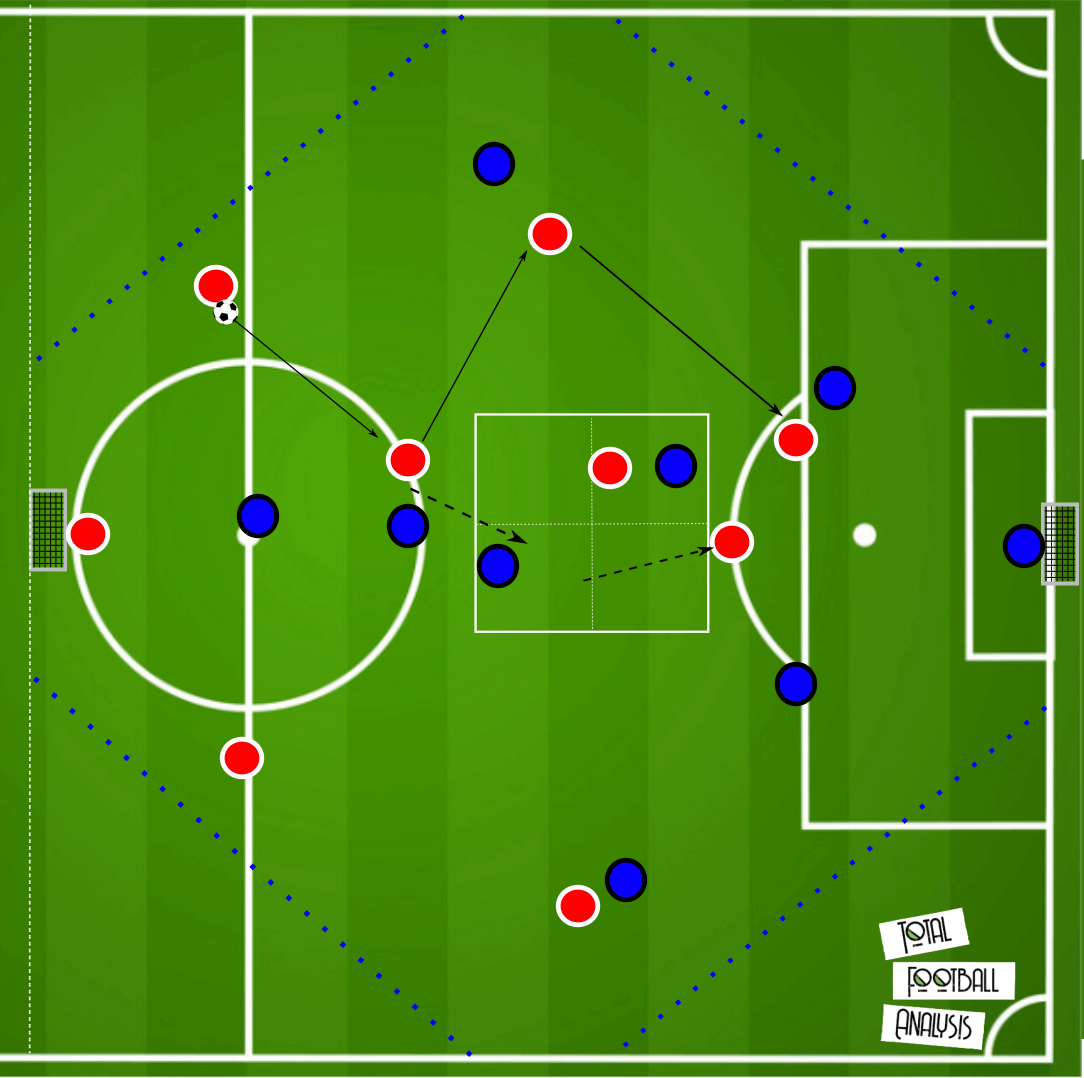
Just as in the previous example we’re looking for our midfielders to impact play and structure their team’s build up play through them. We can see such a pattern occurring in the following image as the ball is played into the deepest midfield, before being advanced into the centre-forward. As this occurs, one of the midfield three exits the square to link up with the centre-forward as the deepest midfielder drops back into the square, ensuring they maintain two in this area.
Conclusion
This set of practices suggests a progression throughout the session that starts with our midfield three exploring these rotations and movements, as well as understanding how to stretch the opposition midfield and create passing lines, through an isolated 3v3 practice. It then moves into an exercise with a lot more players and with far more for the midfielders to pay attention to. Nevertheless, the principles remain the same, with rotating into different areas to impact play, and now use this movement and positioning to allow their team to break lines and break through the press. Finally they are then able to put this into practice on a field size more similar to what they would be working in on the weekend, whilst still putting the same principles into place from the previous practices.
The examples highlighted in this article are exactly that – examples. They can be tailored with and adjusted based on numbers, level of players, or the tactics and desired outcomes of your team and their training. However, this article shows how to build up into a more game-related practice by working in practices with initially smaller numbers and less variables for players to focus on. The learning is consistent and progresses throughout the session.




Comments