Como 1907 had been promoted to the Seire B in the 2021/22 season, finishing both last couple of seasons in 13th place, which is a safe position away from the relegation battle, considering they are newly promoted.
This season, under both Osian Roberts and Cesc Fàbregas, Como FC occupies the fifth play after the end of game week 25, the same points as the third Palermo F.C. and only one point away from US Cremonese in the second place.
Being a big contender for promotion to Serie A next season, astonishing work has been done so far by I Lariani.
Como FC started their season in a 3-4-2-1 formation. However, towards the middle of December, they shifted their line-up to 4-2-3-1. Consequently, we will analyse that change and their adaptations using their wingers in possession.
Our Como FC tactical analysis and scout report will provide an analysis of Como’s style, tactics and ideas during their offensive phases. Let’s begin with their game against US Cremonese.
Como 1907 Vs US Cremonese
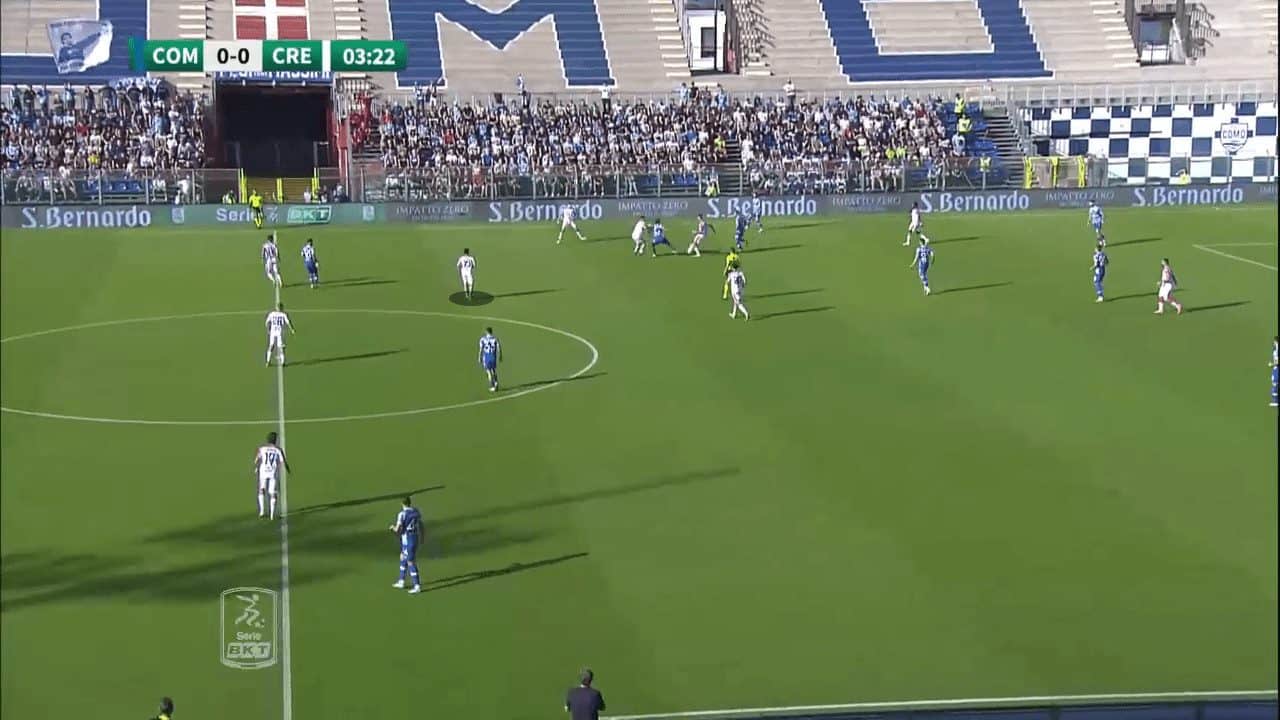
At game week nine, Como hosted Cremonese at Stadio Comunale G. Sinigaglia; as we mentioned, Como lined up in a 3-4-2-1 formation in possession against a high press of 3-4-1-2 from the away side.
Cremonese’s forward Massimo Coda usually pressed the central centre-back of Como Cas Odenthal with a curved run, forcing him to one side, which was mostly Como’s right side, aided by the presence of David Okereke to press the RCB Marco Curto.
Franco Vázquez and Michele Collocolo pressed the home side double pivot of Oliver Abildgaard and Alessandro Bellemo, leaving Michele Castagnetti (shadowed) to be the extra man behind the second line of pressing.
Como’s main intention during the build-up was to reach their attacking midfielders, Simone Verdi and Lucas Da Cunha, centrally through breaking-line passes joined by Patrick Cutrone, who had to be higher up pinning the opposition’s centre-backs.
Initially, they can evacuate the central area for their most dangerous offensive players by trying to have more time on the ball and attract the opposition’s press.
Unfortunately, that did not work against Davide Ballardini’s high press; we can notice below the presence of Castagnetti free to cover Como’s targeted area as well as the LCB Luka Lochoshvili (in yellow) is ready to step and press Verdi.
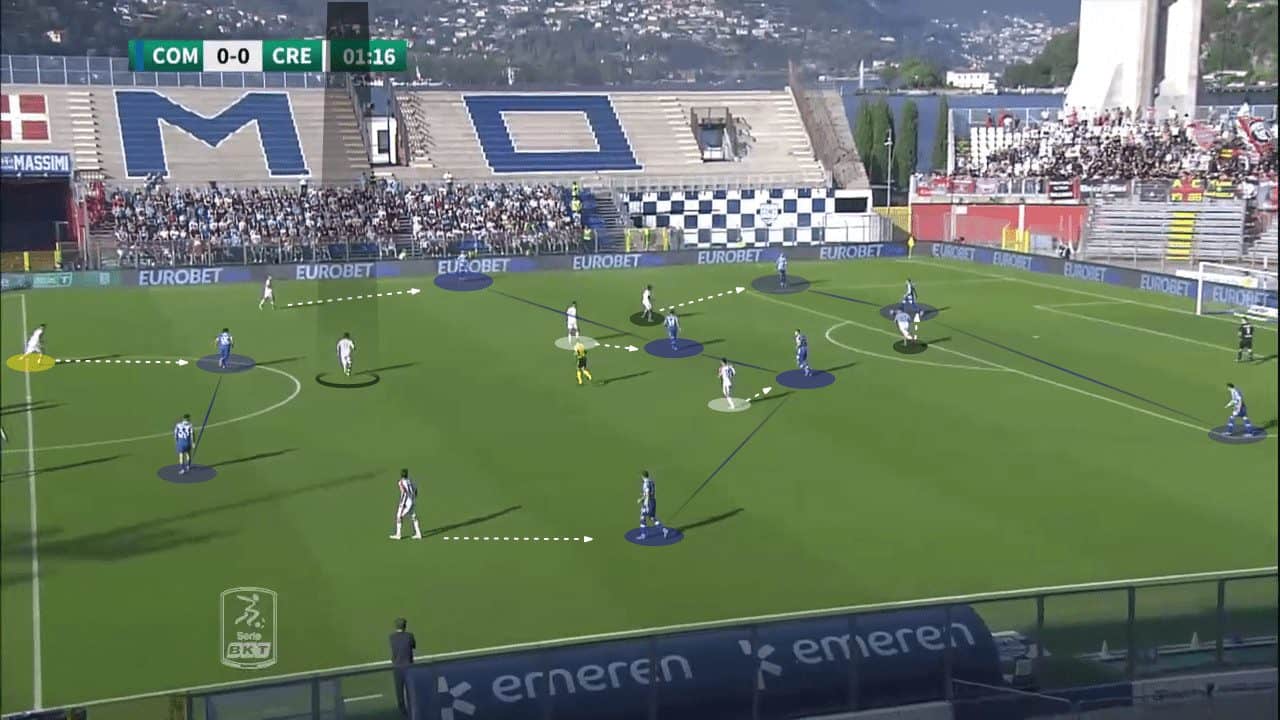
That forced Odenthal to go long for Cutrone and lose the possession.
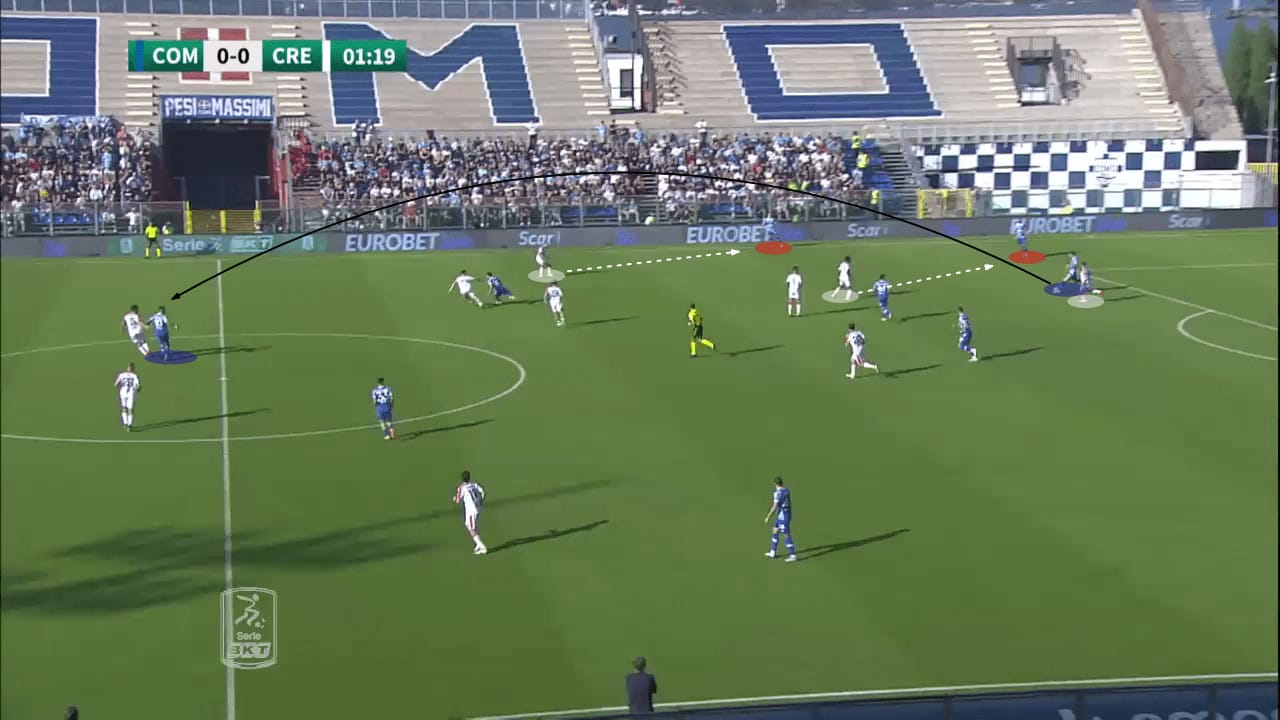
One of the main reasons Como’s approach did not work is the low positioning of their RWB Tommaso Cassandro; notice how close he is to the RCB Curto (both in red).
Besides, Como’s double pivot was not deep enough to drag their markers away; those two points we mentioned are enough to close down the space on Verdi.
We can see below how narrow is Cremonese three-player midfield in tracking back for the second ball.
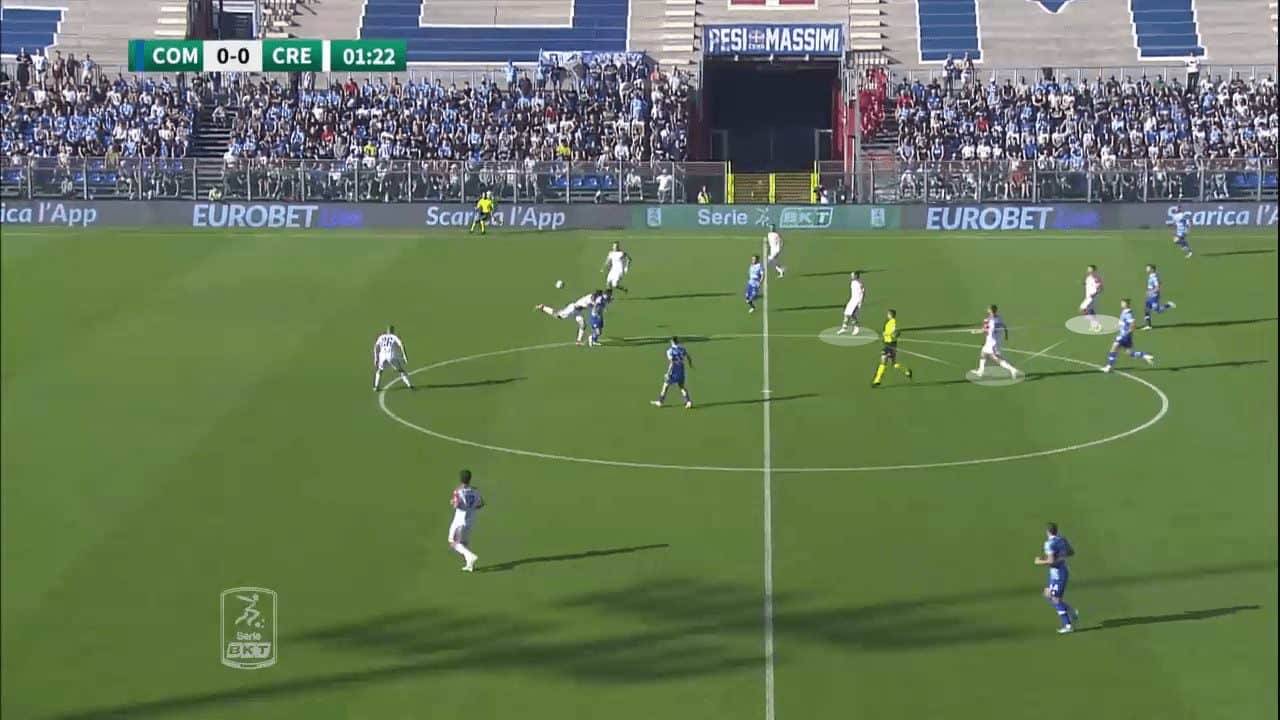
Now Curto is with the ball, trying to find Verdi, who drops to receive it.
There are three main points here. Firstly, the positioning of Cassandro (in yellow), who should have been utilising the wide free space evacuated by Verdi.
Additionally, the double pivot (in red) is not deep enough and finally, the presence of Castagnetti (shadowed), who can cover Lochoshvili, giving him the freedom to drop all the wat with Verdi.
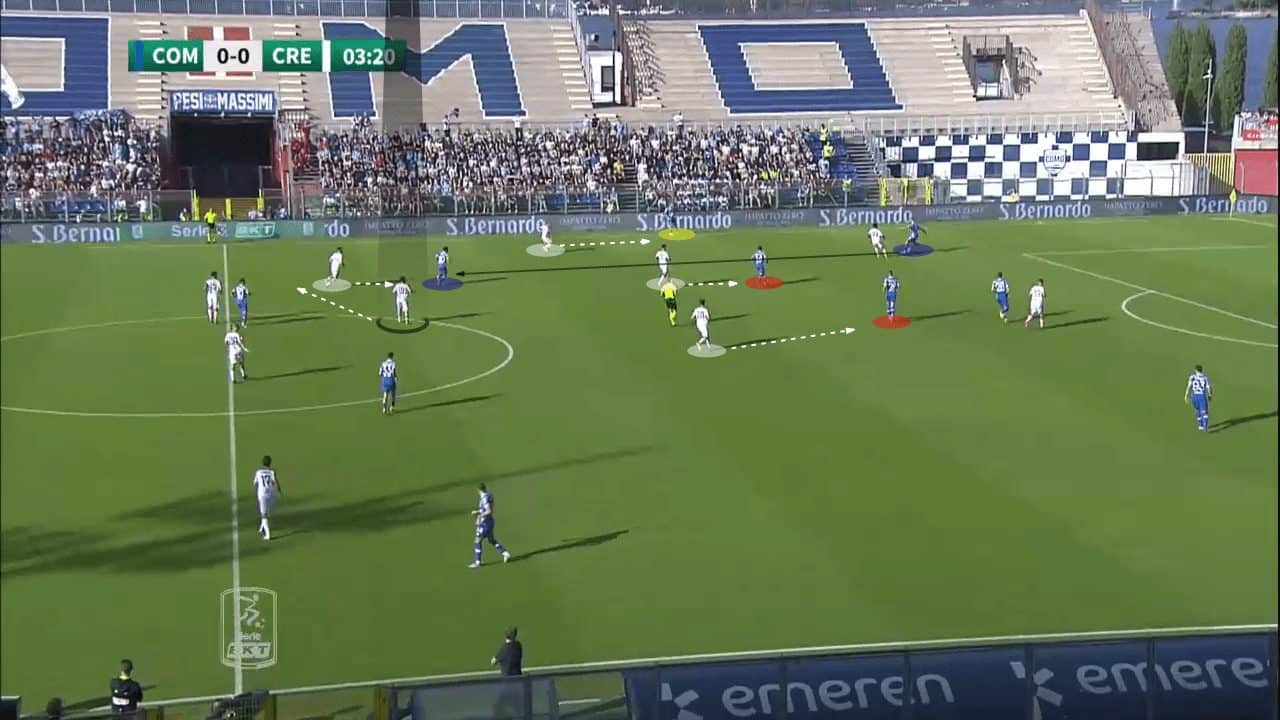
All of that resulted in a more crowded area around Verdi, who lost the ball without even the interference of Castagnetti.
On rare occasions, Como makes use of having an extra player in their first line as Cremonese front two were pressing three centre-backs; a quick-shifting of the ball to the underloaded side would cause problems for the opposition.
As shown, Odenthal quickly changes the play towards the LCB Federico Barba, and Vázquez now has to press him, leaving his marker Abildgaard, who received it.
The away side’s RWB, Leonardo Sernicola, found himself in a 2v1 against Abildgaard and Nicholas Ioannou. To compensate, the RCB Valentin Antov (in red) pushed forward to press the free man.
Como now has numerical superiority in the midfield while evacuating a space in their opposition’s backline and escaping the press.
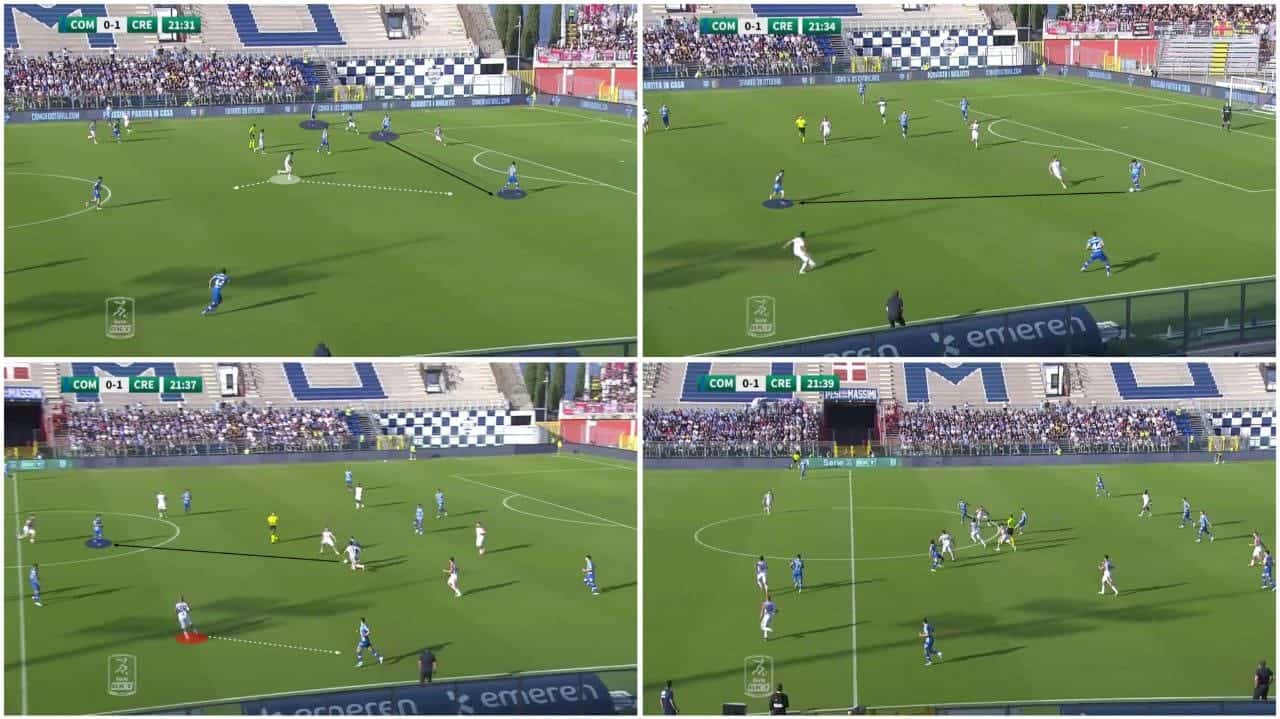
Despite being a good outlet, Como did not use that quick shifting frequently enough.
Another way they could face the high press was the dropping of Cunha (in red) dragging one defender with him, and we can notice the space evacuated that Cutrone or Ioannou should have utilised.
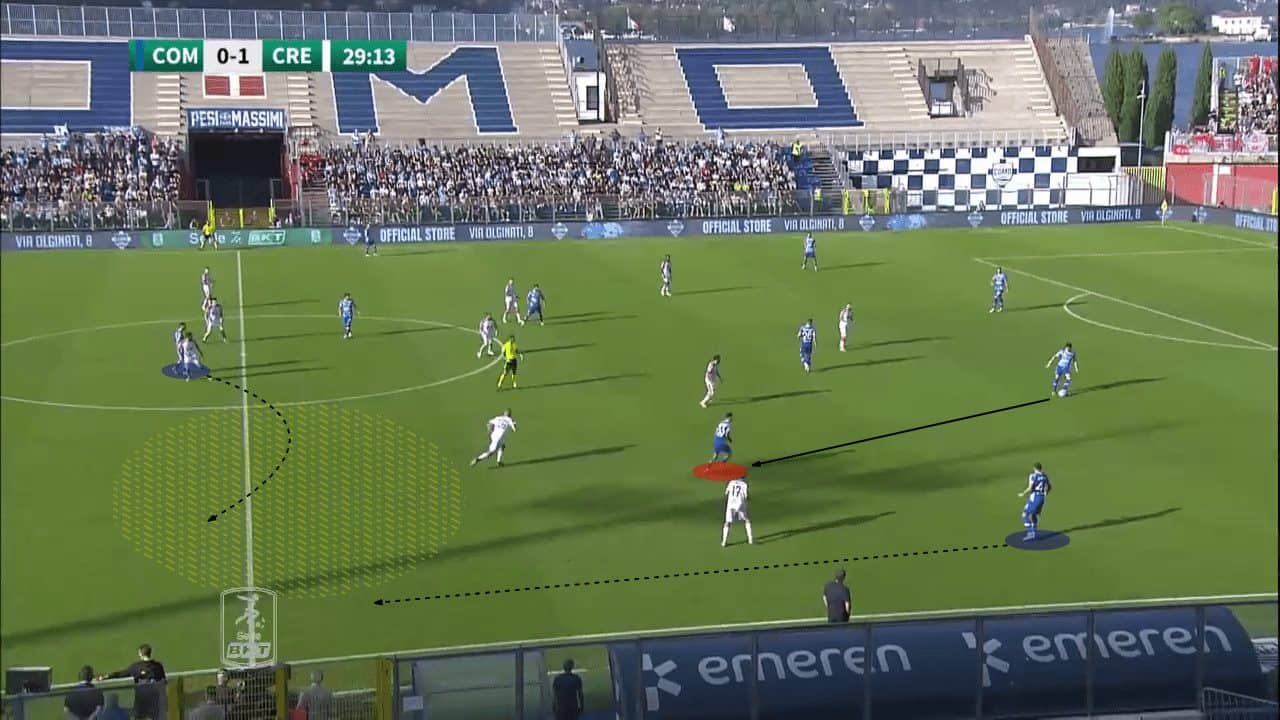
Ioannou made the run but was late, so they didn’t maximise the benefit of the situation (the same we mentioned first with Cassandro).
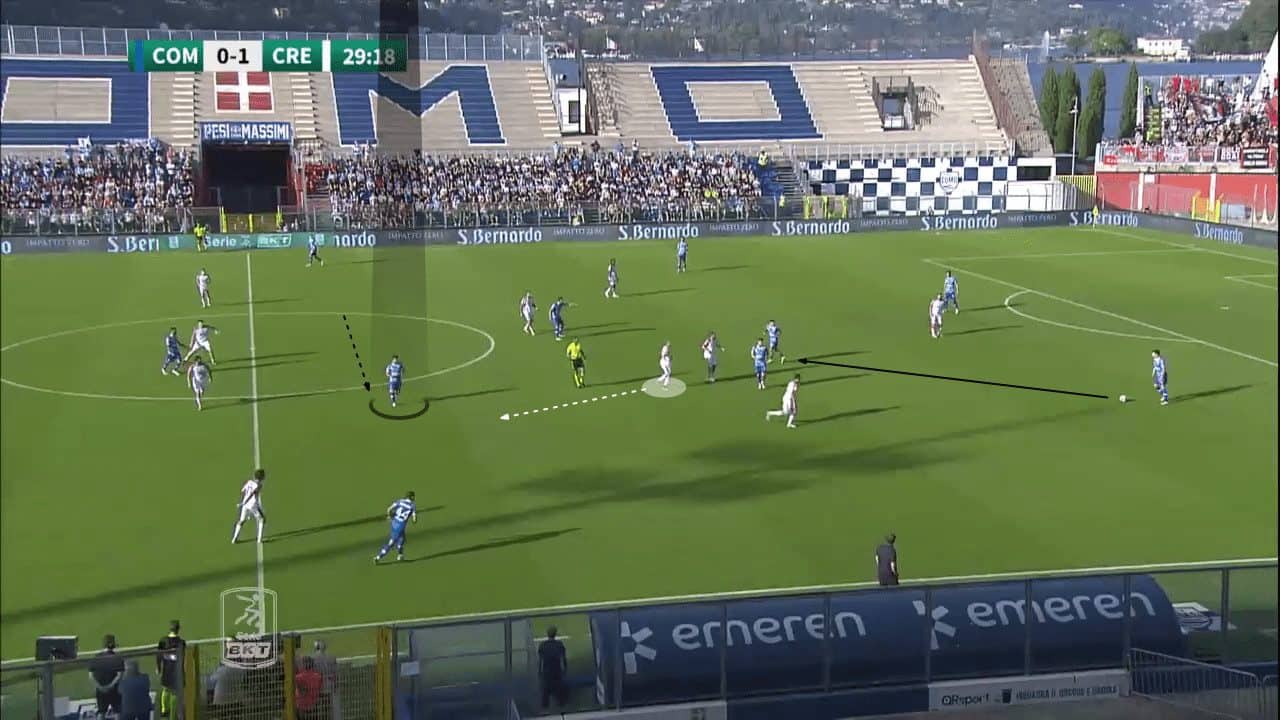
However, Verdi (shadowed) smartly moved in behind Antov, who had to follow Cunha, forcing him to return to his position.
Which maintained the numerical advantage they had in the midfield through the presence of Cunha.
Cremonese aimed to force the play to Como’s right side left a 4v2 down the left-hand side.
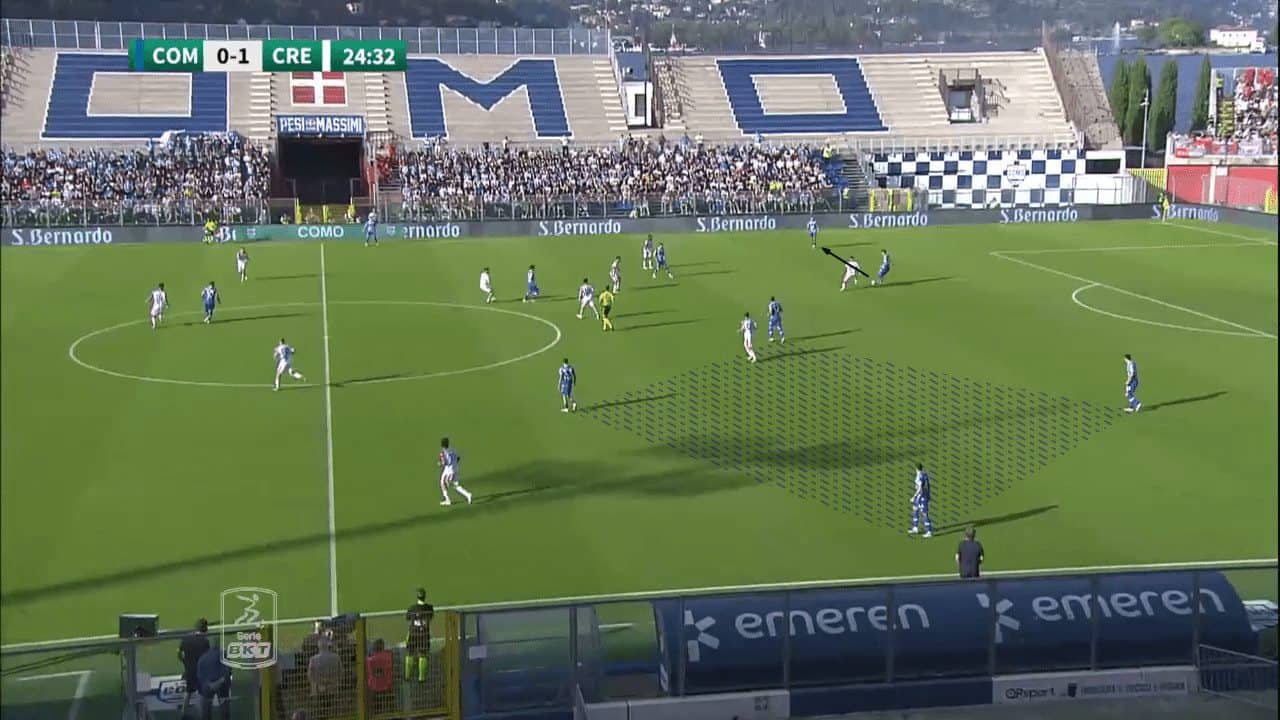
Here, Curto could have tried to switch the ball (the yellow line pass) where Sernicola would have been in a 2v1. Instead, he went down his line for Cassandro.
Although Cassandro pushed higher (compared to the first case), the high positioning of the double pivot Abildgaard and Bellemo along with the narrow midfield line of the opposition again closed the targeted area around Verdi.
Como lost the possession here again.
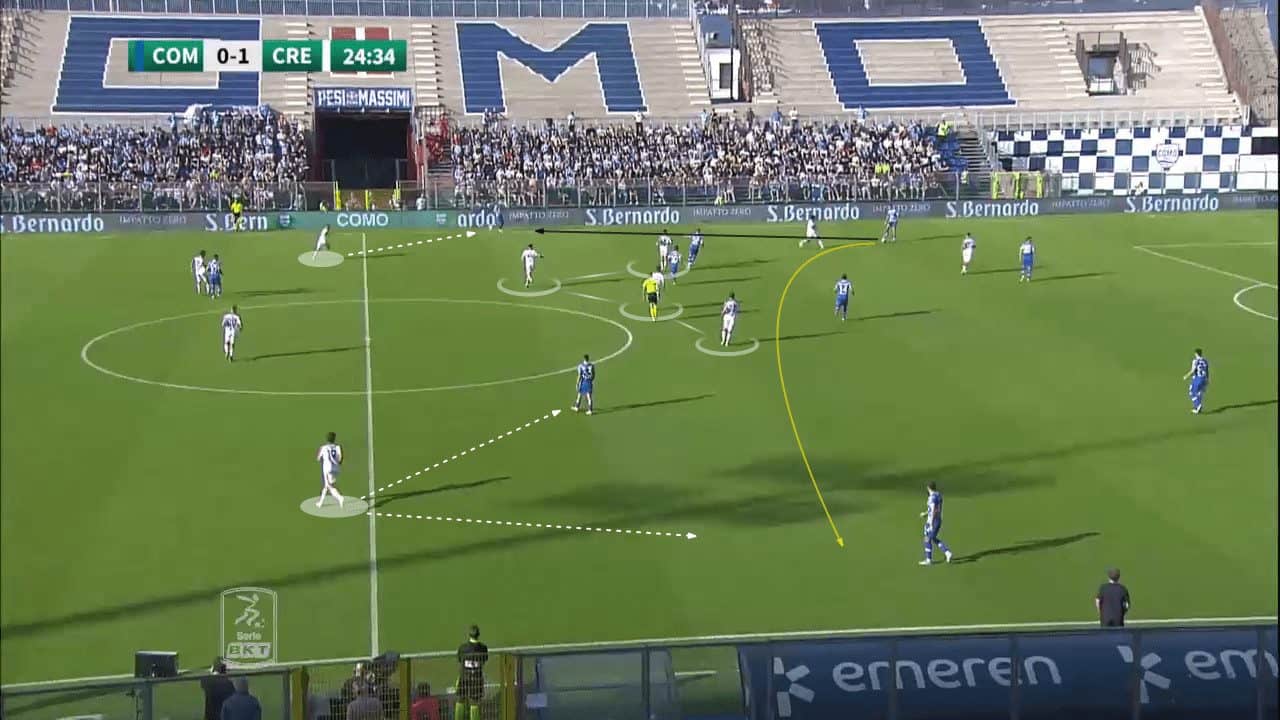
The lack of quick shifting of the ball to the underloaded side by the opposition, in addition to the crowdedness of the central targeted area caused by the low positioning of the wing-backs and the advanced presence of the double pivot, closed down all the ideas Como had for this game.
Moreover, they did not use a free player at their backline, making it easier for Cremonese to press.
Brescia Calcio Vs Como 1907
During their visit to Stadio Mario Rigamonti, Como lost by two goals to nil against Brescia, also suffering offensively where they lined up in the same 3-4-2-1 formation.
The home side relied on a 4-4-2 mid-press against the same shape from Fàbregas’ side. The front two, Flavio Bianchi and Gennaro Borrelli, were passively pressing the back line while closing down the passing lanes on the double pivot of Bellemo and Abildgaard.
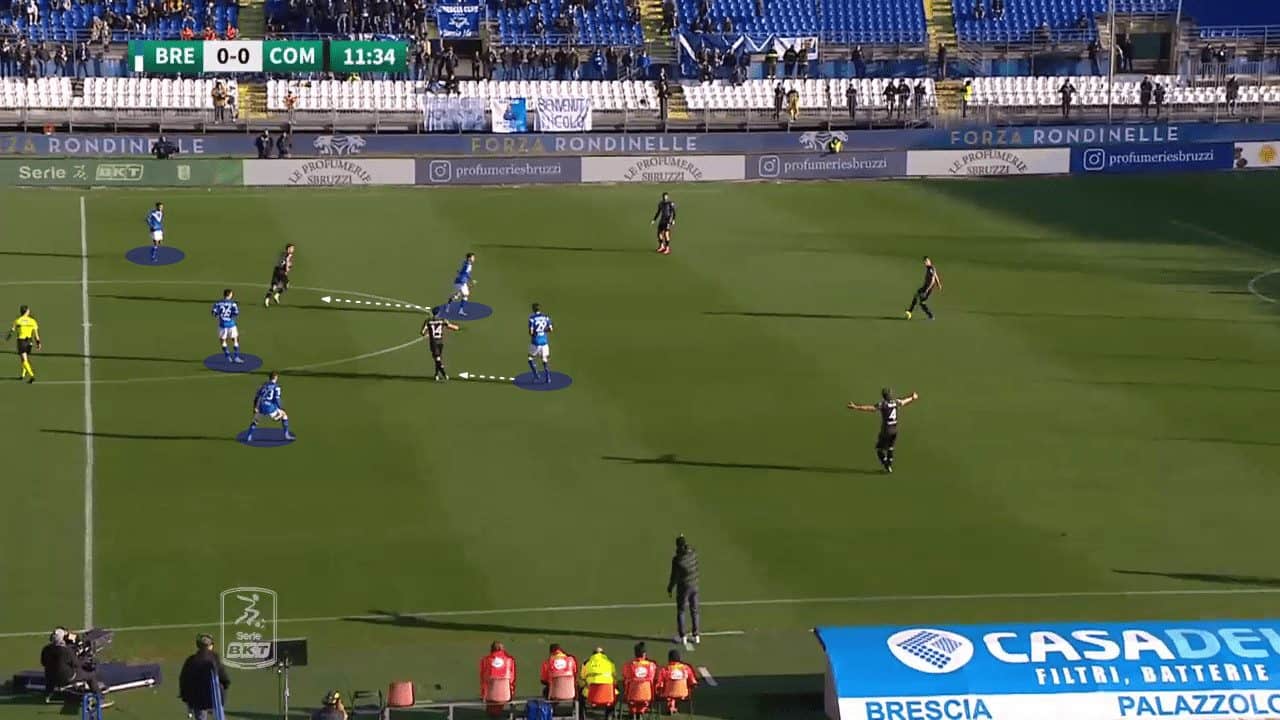
As shown below, Bianci is pressing Abildgaard on the ball. Meanwhile, Borrelli is marking Bellemo, leaving their two central midfielders (shadowed), Massimo Bertagnoli and Dimitri Bisoli, to mark Cunha and Verdi.
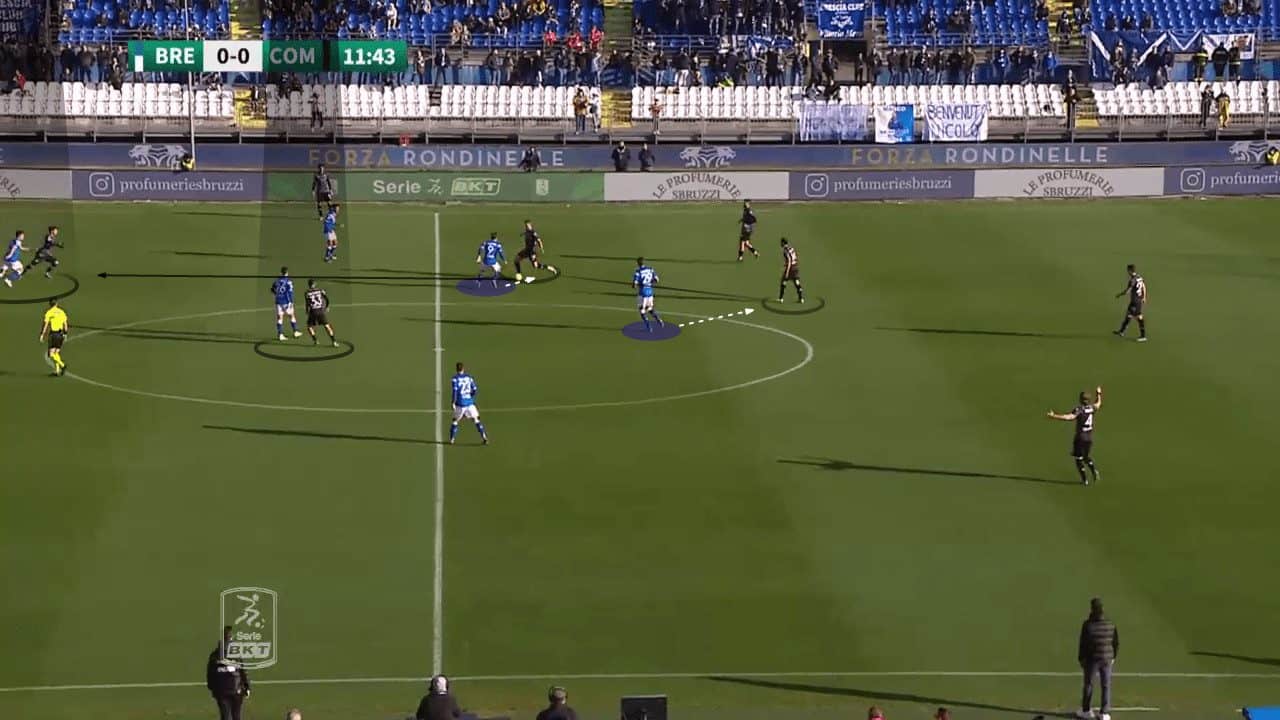
Abildgaard tried to find Verdi, but they lost the ball to the tight marking by Bisoli; the narrow midfield of Brescia shut down the presence of Cunha and Verdi.
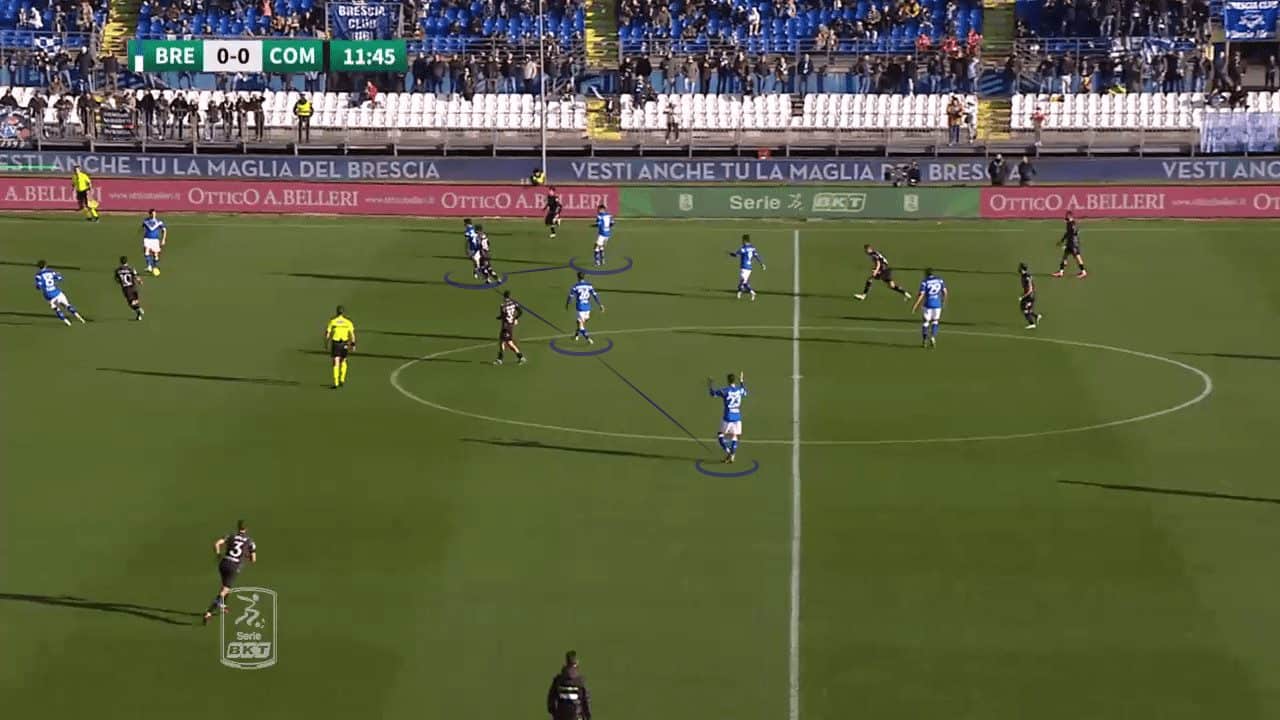
Identically, the 4-4-2 shape with Borrelli and Bianchi getting Bellemo and Abildgaard in their cover shadow alongside Bertagnoli and Bisoli marks Cunha and Verdi (in red).
Rolando Maran’s side approach was to avoid any central progression from Como. Also, through their wide midfielders, Nicolas Galazzi and Alexander Jallow’s roles were to stay narrow and ready to press the wide centre-back when he got the ball.
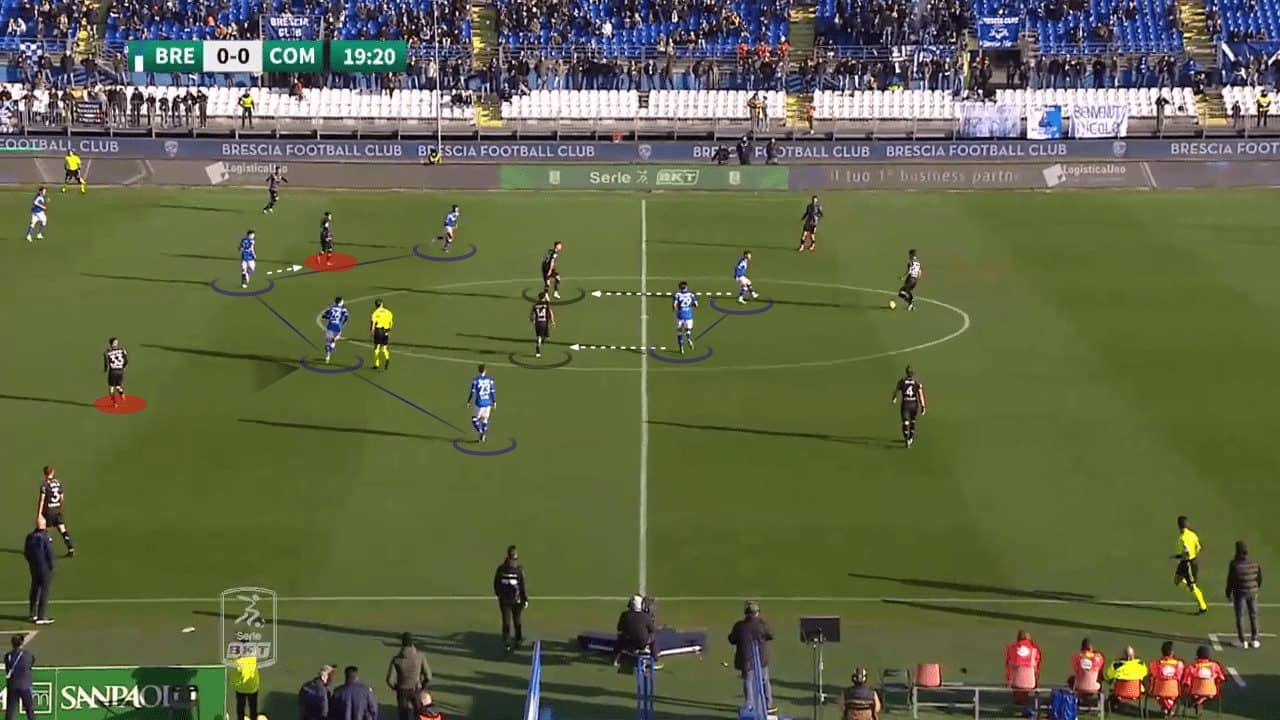
The pressing trigger here was when Como’s Matteo Solini was receiving, and Galazzi immediately pressed him.
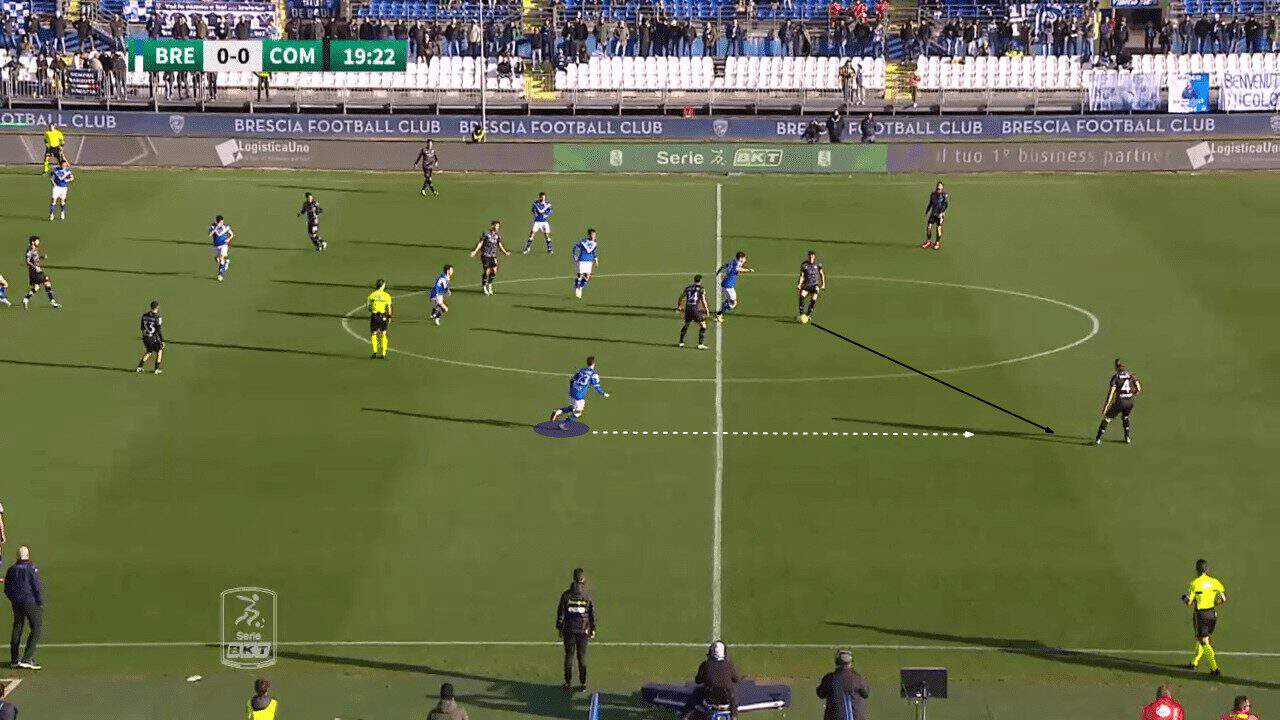
Once again, Solini were forced to go long, and Brescia regained possession.
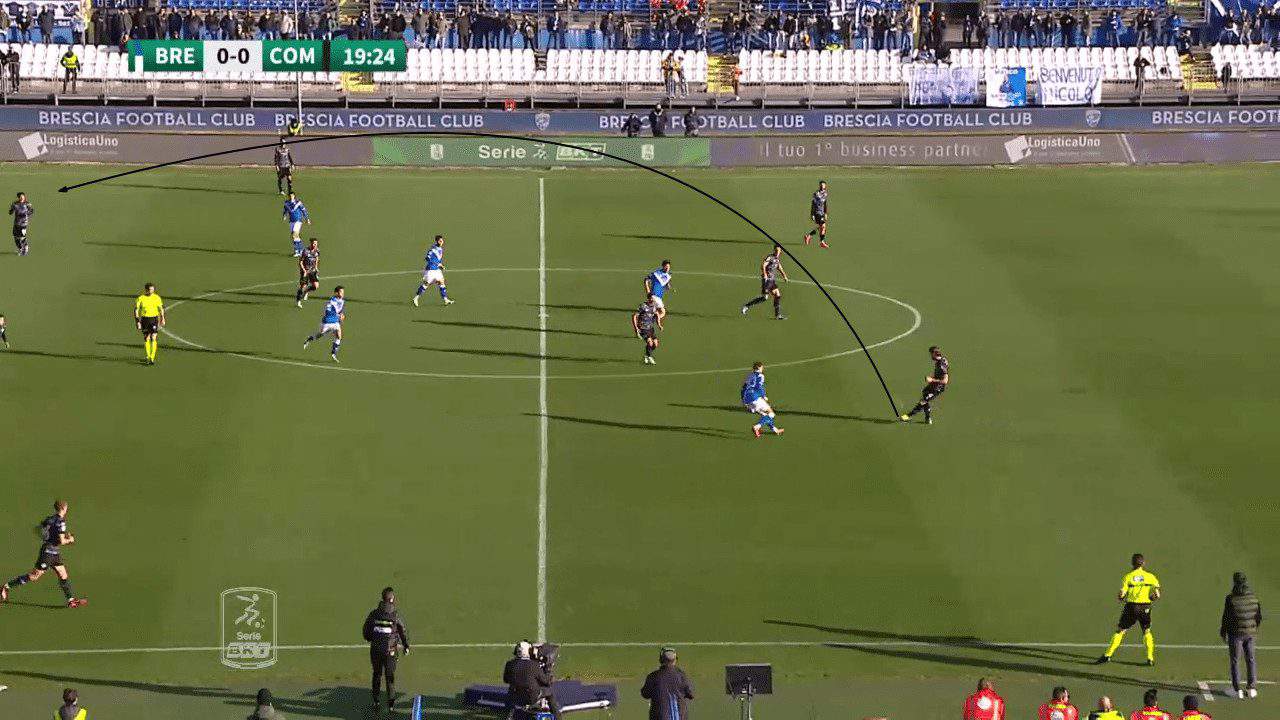
Over again, Como had faced the same obstacles and could not reach their best offensive players, Verdi and Cunha, during the progression phase.
Therefore, they started adapting their in-possession shape from their next game against Palermo.
Como 1907 Vs Palermo F.C.
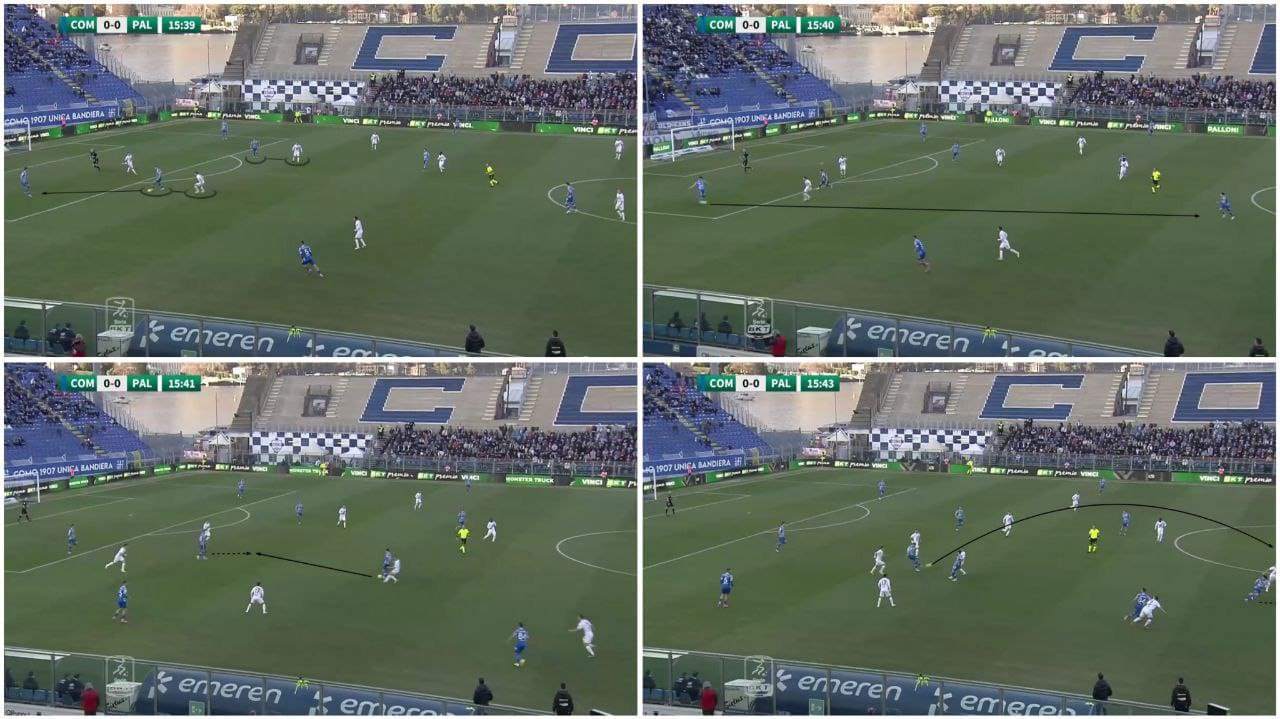
Even though the home side lined up in a 3-4-2-1 on paper, it almost turned to a 4-4-2 during the build-up, which impressively succeeded against a 4-3-3 high pressing from Palermo.
We can see below how the base of the build-up shape had changed to a back four; Curto, who used to play as a right centre-back, now switched to a right-back position.
With two centre-backs, Odenthal and Soloni joined by Marco Sala in the left-back position.
Eugenio Corini’s high pressing was based on the striker Matteo Brunori pressing on centre back and forcing the play to one side; as you will notice below, Como was forced to play on their left side.
Accordingly, Palermo’s right-winger Roberto Insigne will step in to press Solini, and his left-winger teammate Federico Di Francesco is marking Abildgaard.
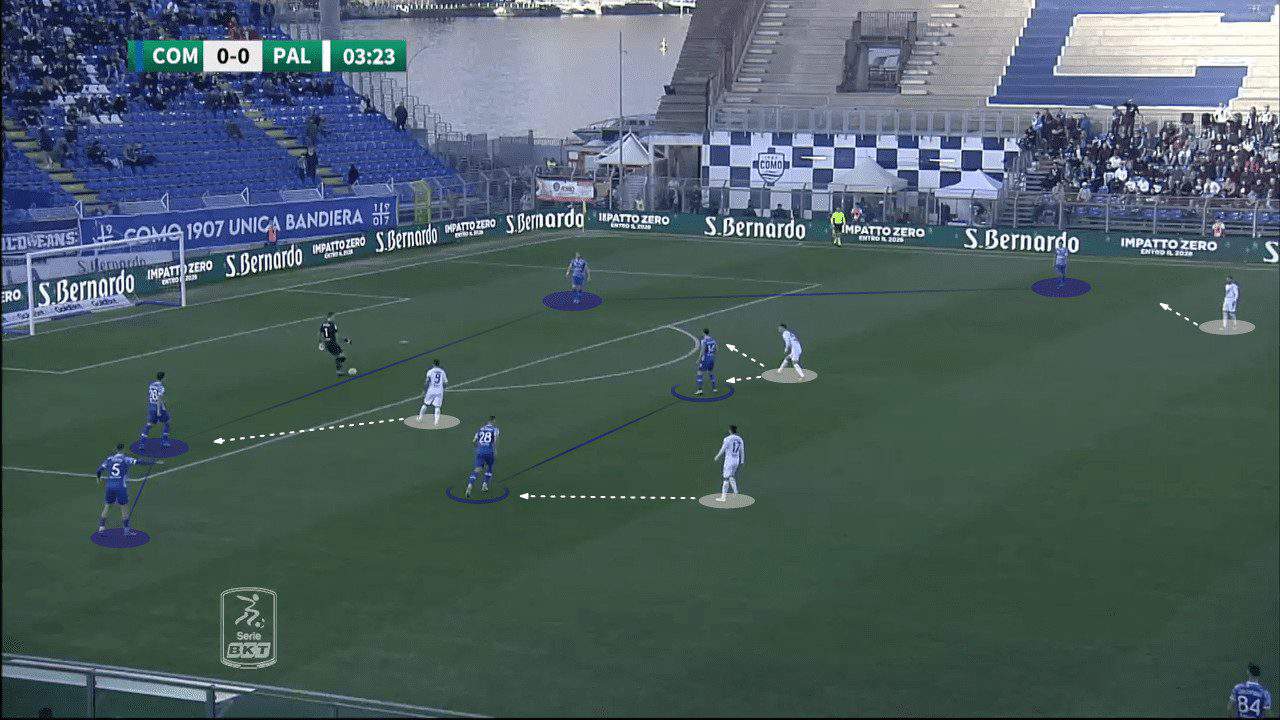
Now Solini is on the ball pressed by Insigne, and Como’s double pivot is being marked by Di Francesco (LW) and Jacopo Segre (CM). Moreover, Palermo’s RCM, Liam Henderson, stepped to press Sala.
The away side lone pivot Claudio Gomes is responsible for marking Daniele Baselli, who replaced Verdi on the starting eleven.
Solini went long searching for Cutrone.
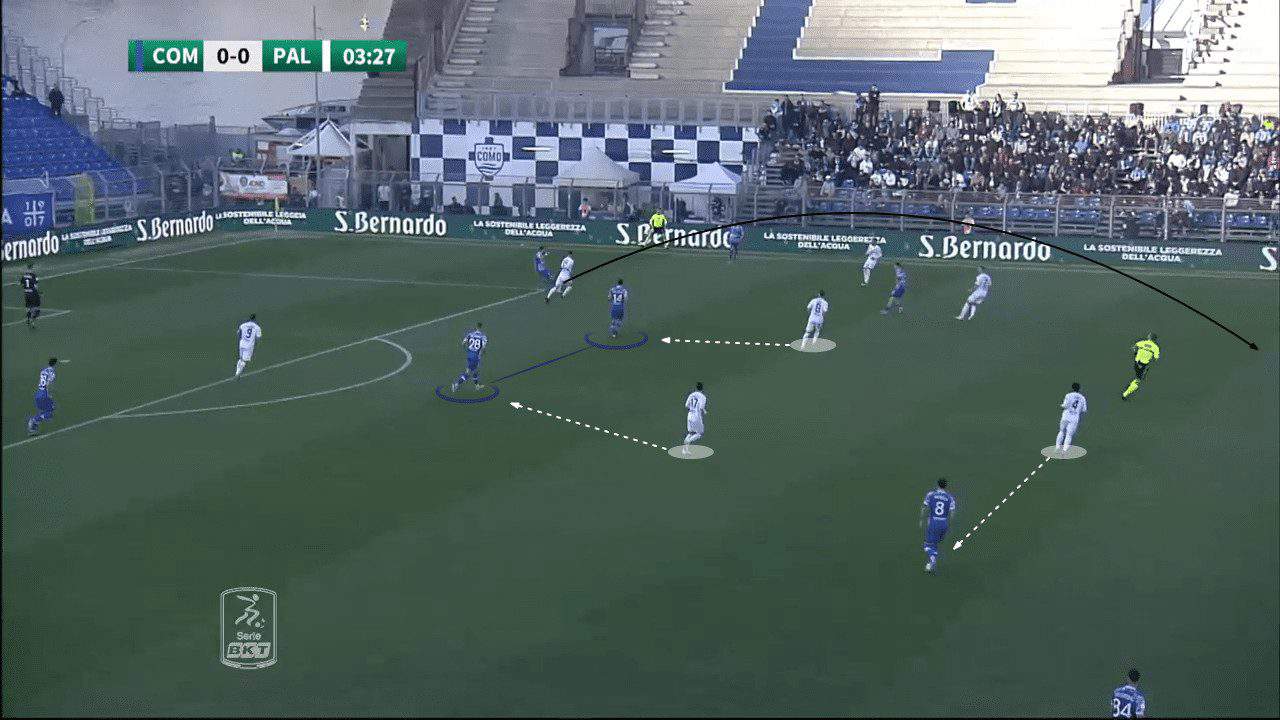
This time, Cutrone could receive and set the ball to Abildgaard and notice the high positioning of Cassandro (shadowed) down the right-hand side.
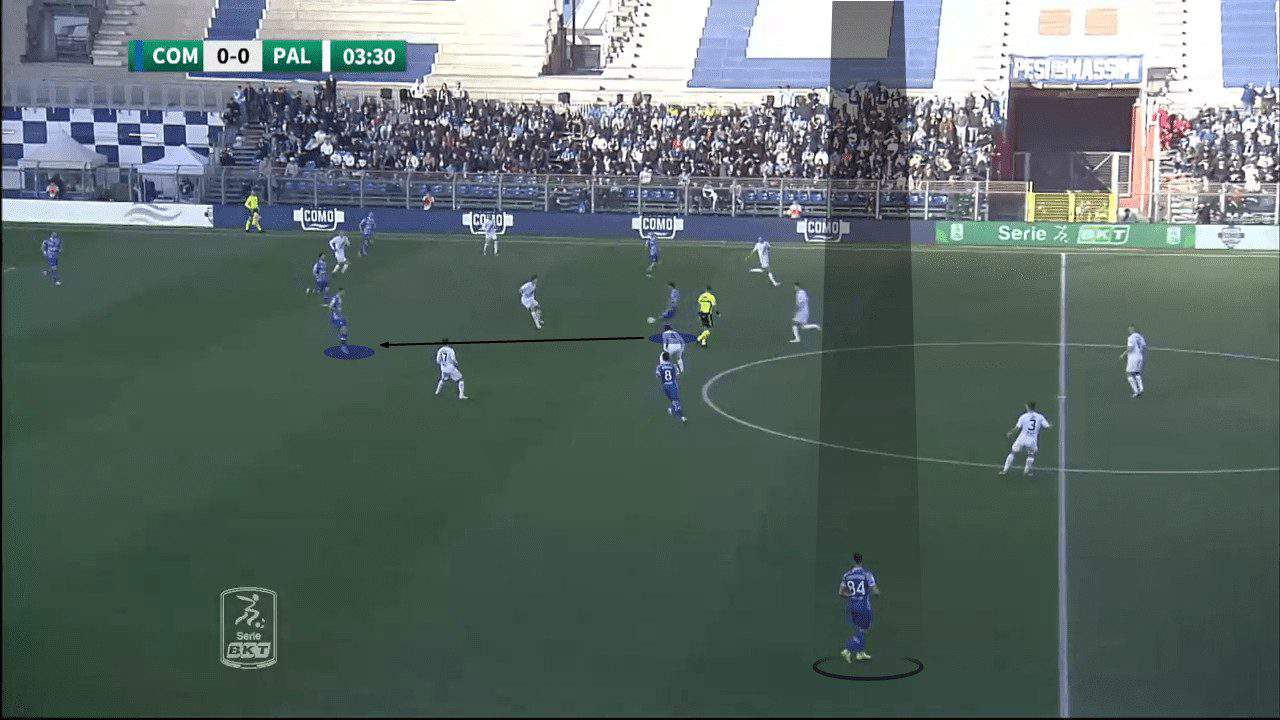
Como smoothly escaped the press; the change to a back four had a lot of advantages for them.
First, having a back. four allowed the double pivot tothere was more space between both centre backs to occupy, dragging their markers so they could evacuate the targeted space we discussed at the beginning.
Furthermore, Their new positioning of Cassandra (almost as a right winger) pinned the opposition’s left-back with him; now, the space between him and Curto increased, thus freeing space for Baselli to drop and receive, so now they overcame the crowdedness issue.
Nevertheless, Brunori is pressing Odenthal and Di Francesco with Curto, so the winger opposite to the side of the play, Insigne, shifted to mark the other pivot, Bellemo.
Odenthal plays to Cassandro (shadowed) down the line.

Cassandro passes to Baselli, here finally the central space is created thanks to the deeper presence of the double pivot which dragged Segre and Gomes.
Besides, the new positioning of Cassandro, who pinned the opposition’s left back.
Palermo’s centre-back Ivan Marconi (in red) had to press Baselli.
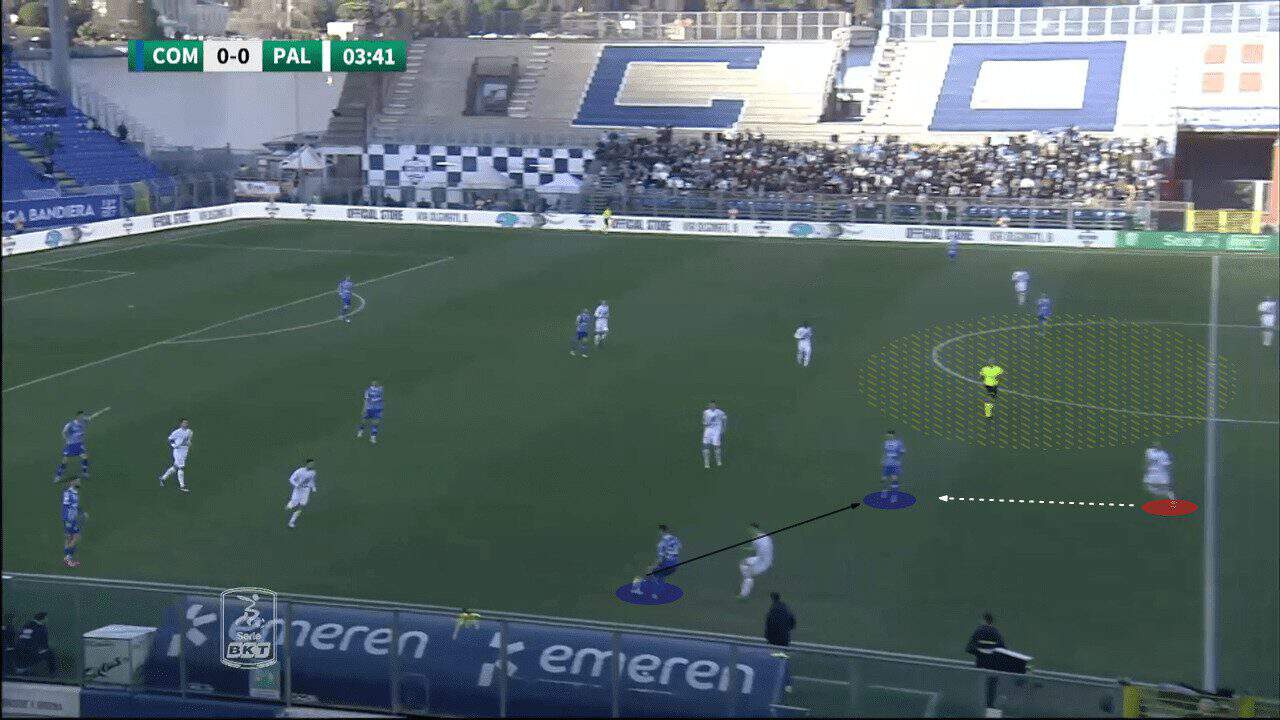
Baselli with a brilliant flick to Cutrone, who played the ball in the space left by Marconi for Baselli to utilise.
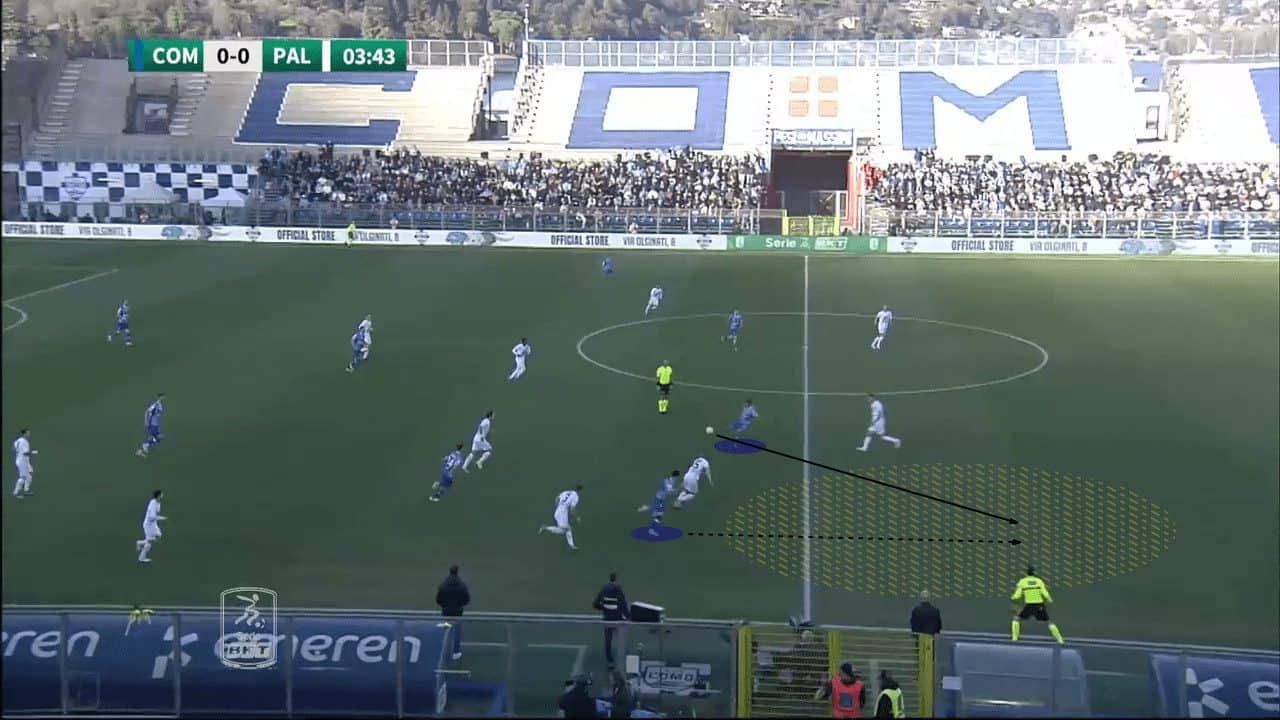
Additionally, They could go directly to Cassandra, who is providing the width now and get Palermo’s left-back Kristoffer Lund Hansen in a 2v1 as he was joined by Baselli; now they have overcome the switching problem.
Also, we can notice again how the deep position of Abildgaard and Bellemo dragged now both Gomes and Segre and aches of space are created for Basselli and Cunha (in red).
Through that, they have a better chance of winning the second ball.
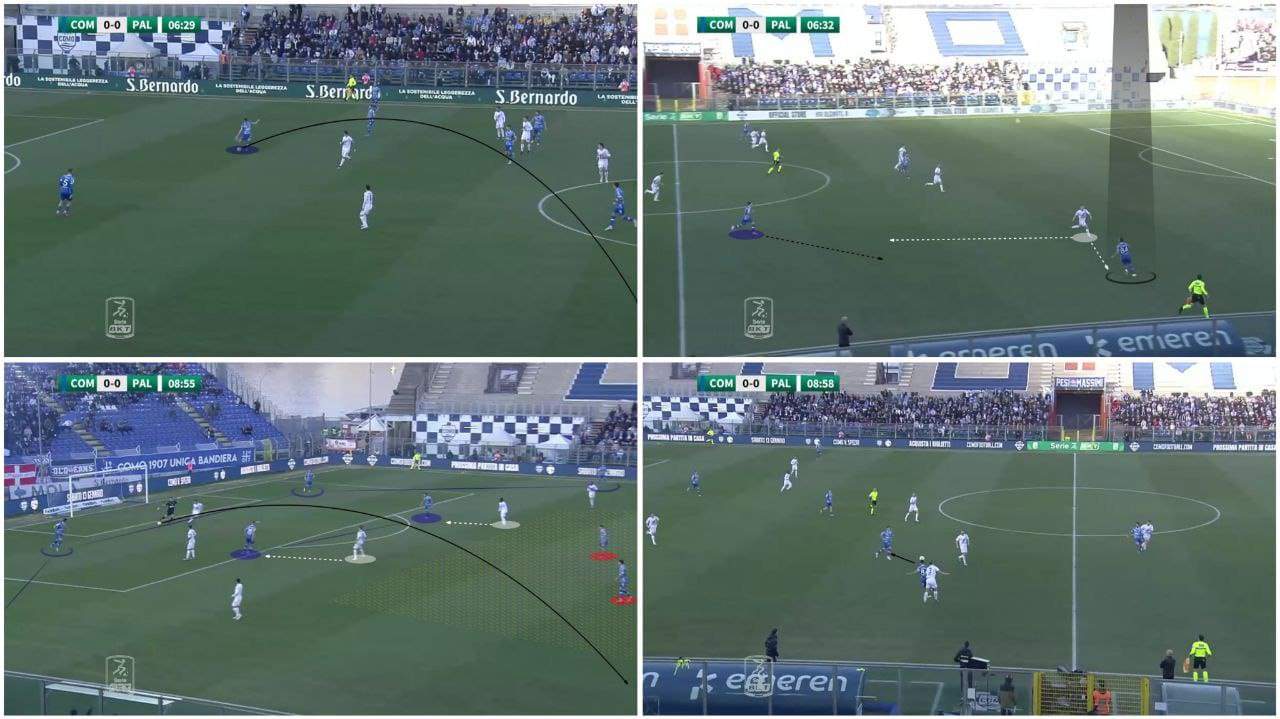
Another way they could break the press was via a direct pas to Curto, as Di Francesco (in yellow) is marking Abildgaard.
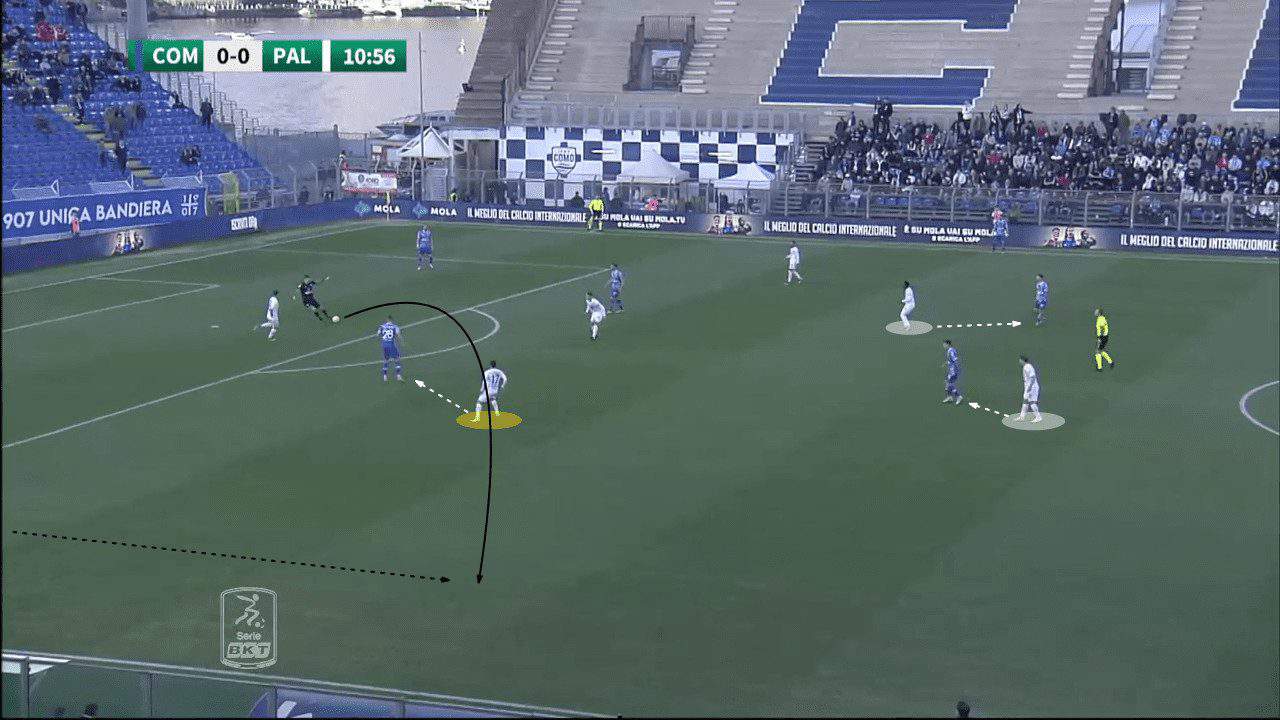
As Cassandro (shadowed), the new position pinned Hansen with him, so Curto have space and time on the ball.
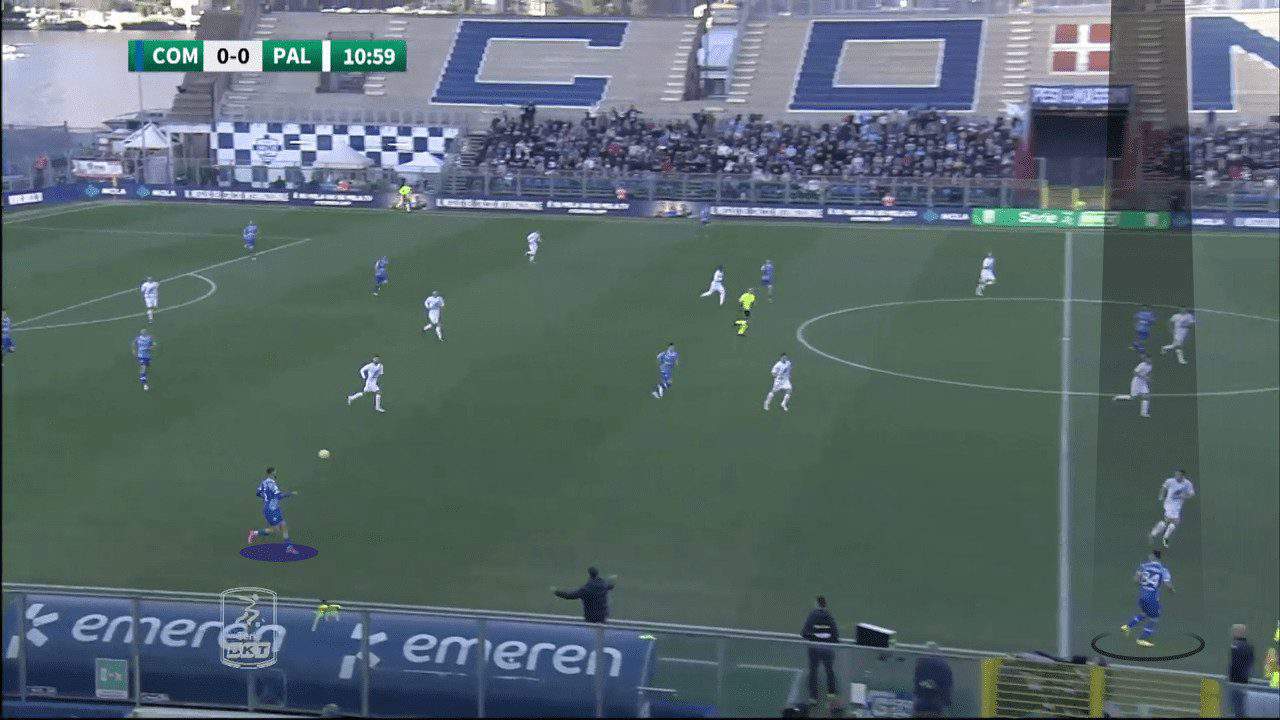
Here is another example of how smoothly they played through Palermo’s pressing; deep position of the double-pivot with the advanced position of both full-backs Curto and Sala created the gap in the midfield.
Odenthal played a direct pass towards Baselli, who received and set the ball in that gap for Abildgaard, who played a one-touch pass for Cutrone and created a threatening situation.
Como 1907 Vs Brescia Calcio
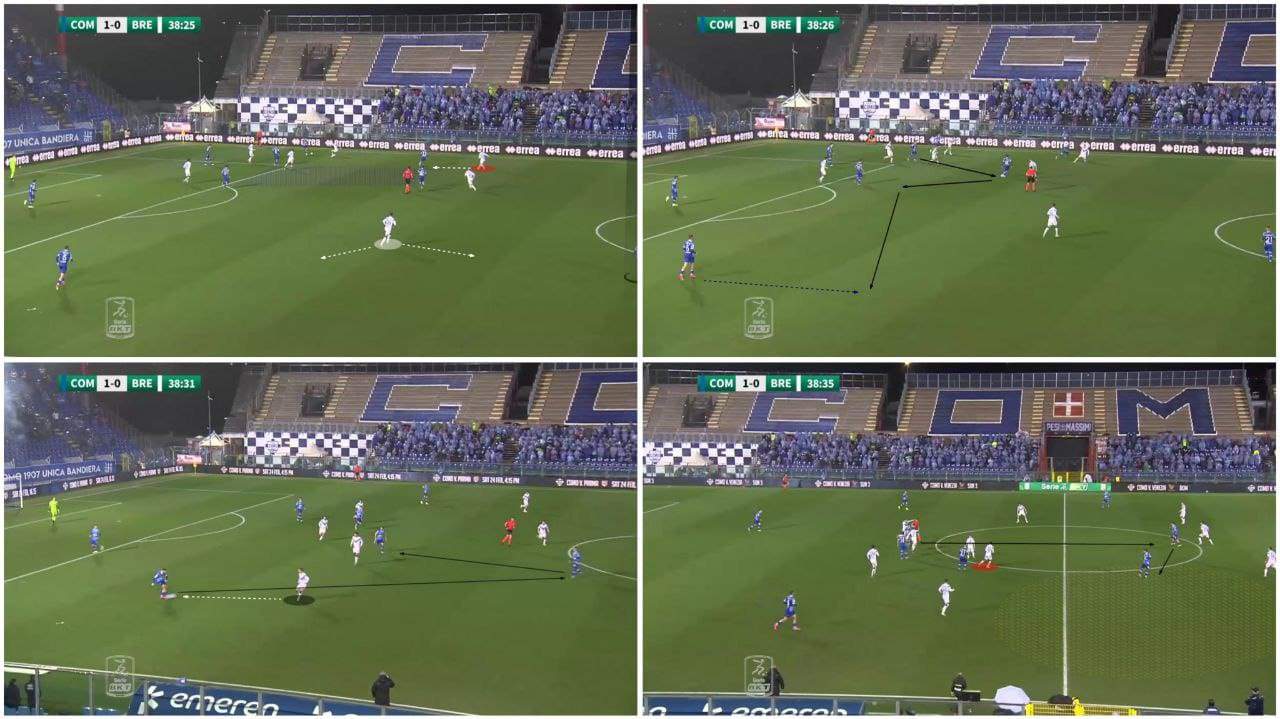
Moving on to game week 24, Osian Robert’s team settled on a back four, relying on a 4-2-3-1 formation against a 4-4-2 diamond from Brescia.
Brescia’s front two, Borrelli and Giacomo Olzer, were responsible for pressing the two centre-backs, while the attacking midfielder Birkir Bjarnason marked Bellemo.
On top of their wide midfielders, Massimo Bertagnoli and Dimitri Bisoli (in red) mark the full-backs.
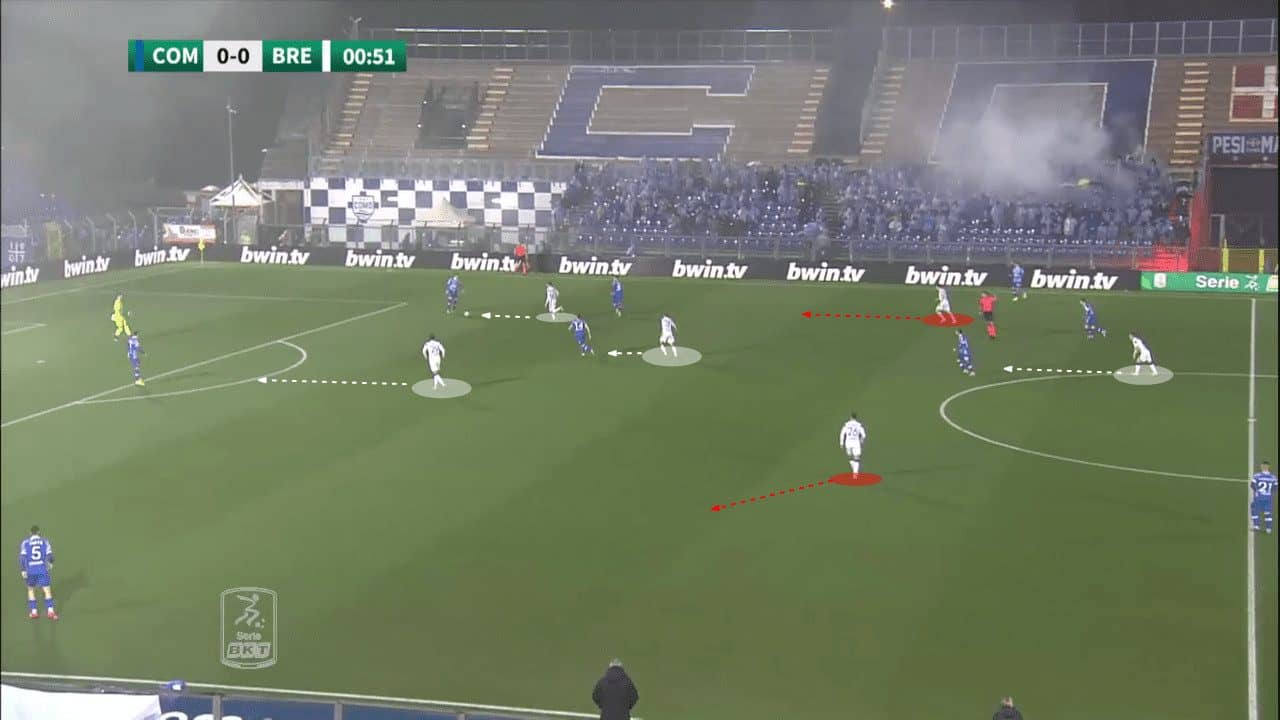
We can see below the back four of the home side and how highly positioned are the full backs especially Nicholas Ioannou who started as a left-back.
While Verdi and Cunha were joined by Gabriel Strefezza (shadowed) to form the 4-2-3-1 shape.
Here, Verdi and Cunha dropped with Bellemo and Baselli to form a box-midfield shape, trying to outnumber the opposition’s second line of pressing. Meanwhile, Strefezza stayed high.
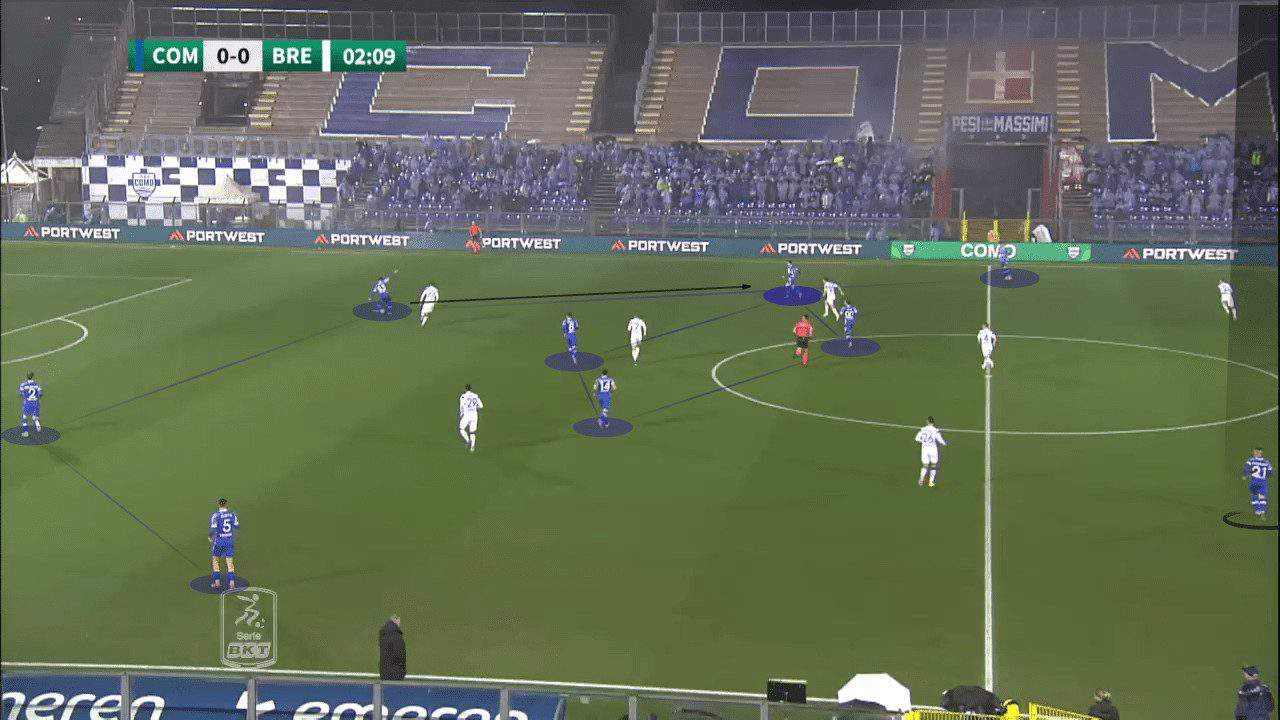
Cunha received and passed to Bellemo as Brescia’s Bertagnoli (in red) is in a 2v1 and pinned by Strefezza’s presence, not to mention the fact that Curto is free.
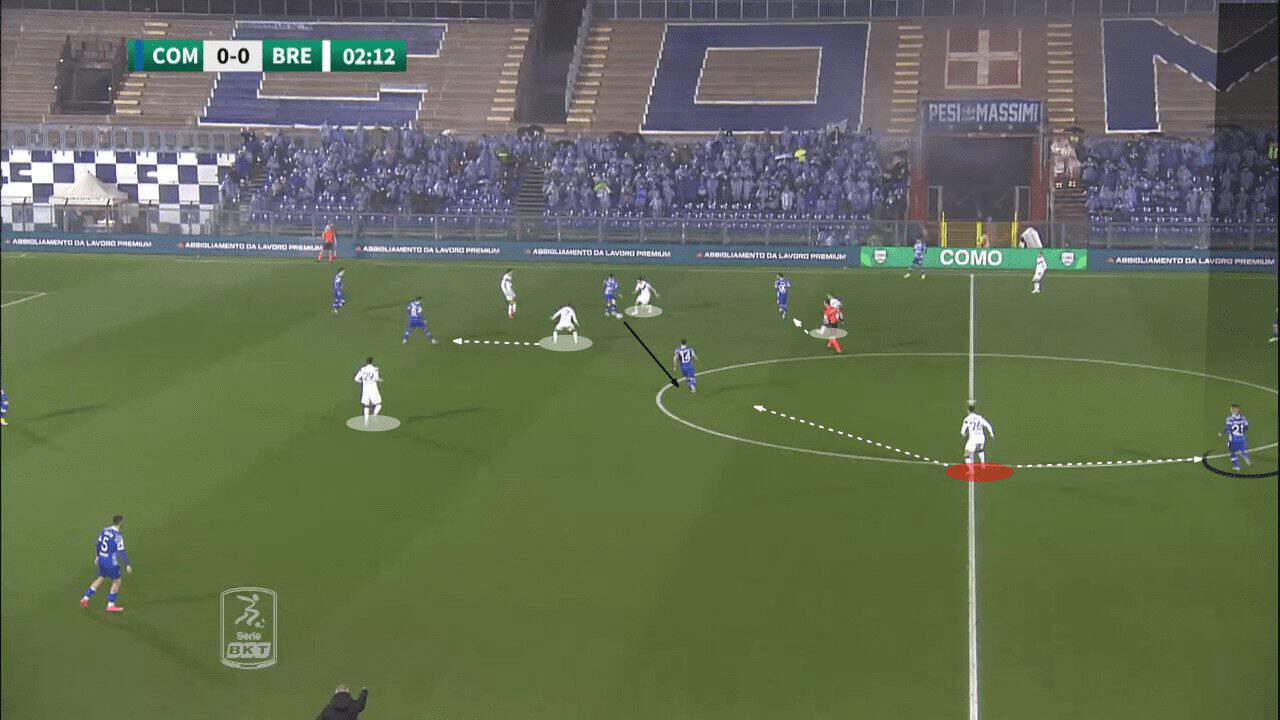
Bellemo plays a vertical ball towards his forward Alessandro Gabrielloni, who sets the ball for Curto out wide with space and time.
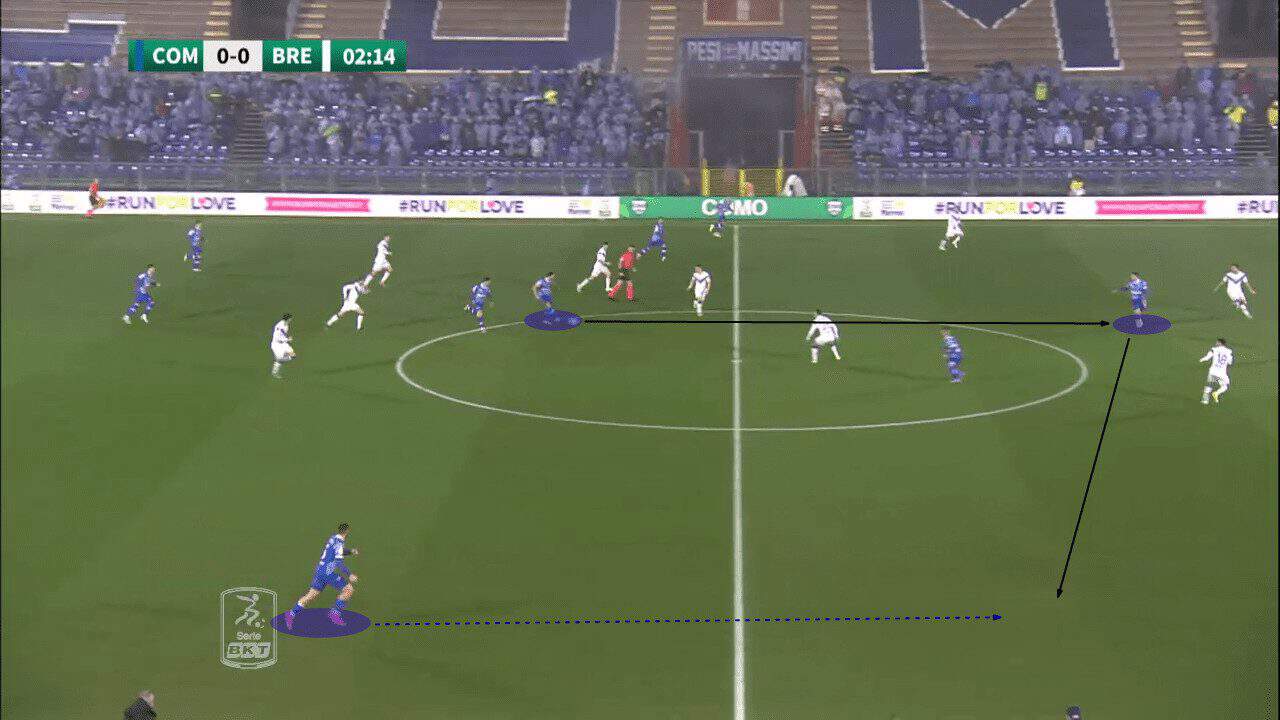
Strefezza (shadowed) also can drop and receive to get Bertagnoli in the same trouble, while Cunha stays highly positioned. Observe how highly positioned is Ioannou (in yellow).
This gives a chance to Baselli or Bellemo to drop into the left-back position to help the ball progress.
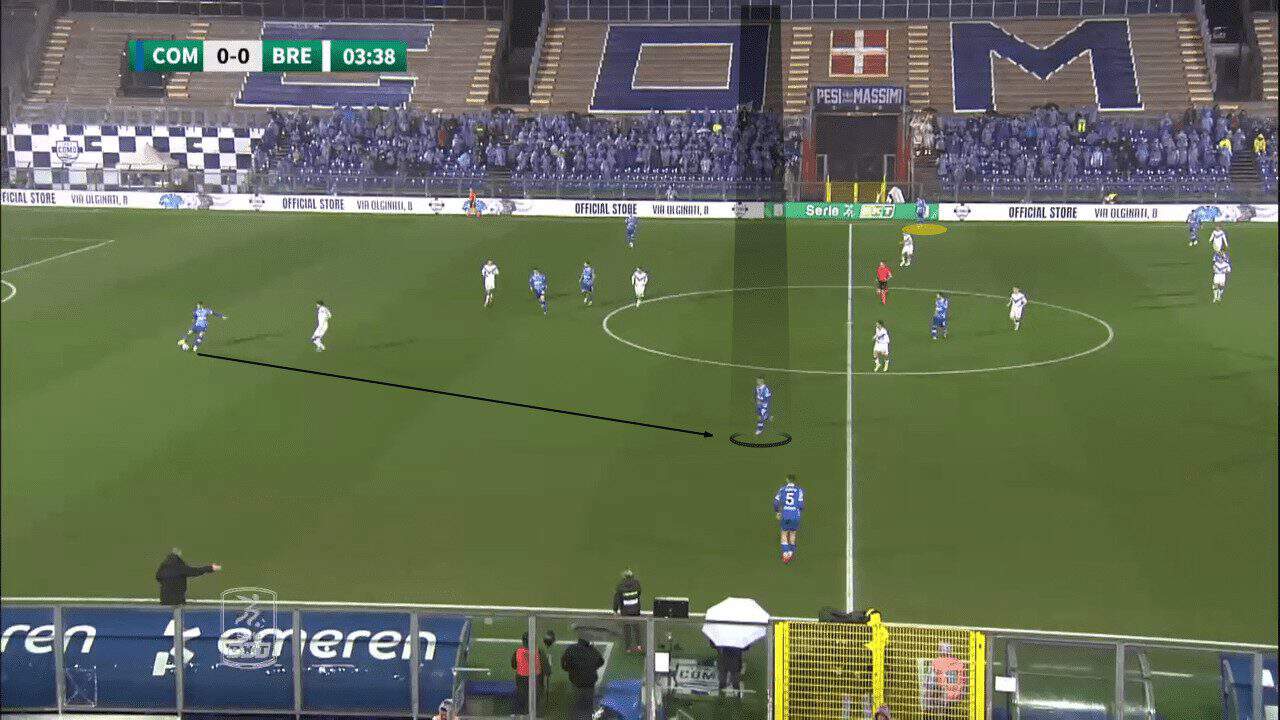
Again, Strefezza drops to drag Bertagnoli, leaving a space for Curto to receive.
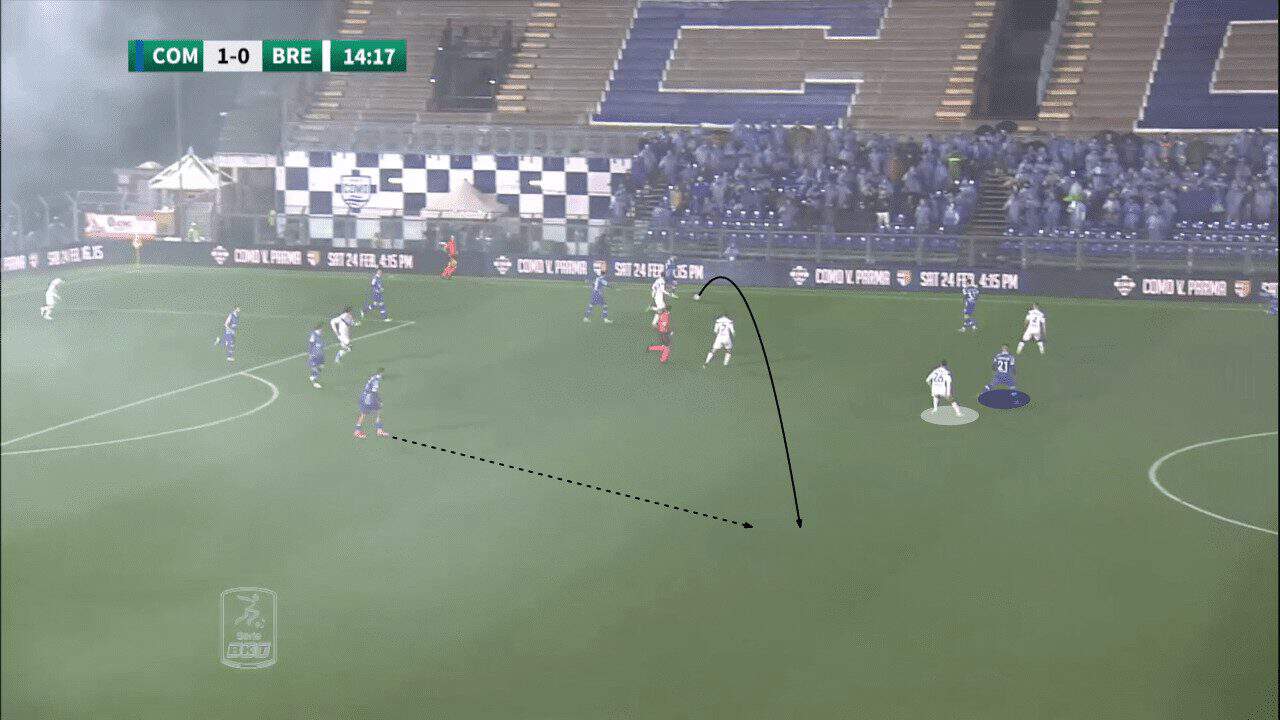
Once again, the same back-line of four with a box midfield aided by the presence of Verdi and, Cunha and Strefezza in a more advanced position.

And they maintained the switching of play as a possible outlet, as here Edoardo Goldaniga on the ball switched the ball to Ioannou (shadowed).
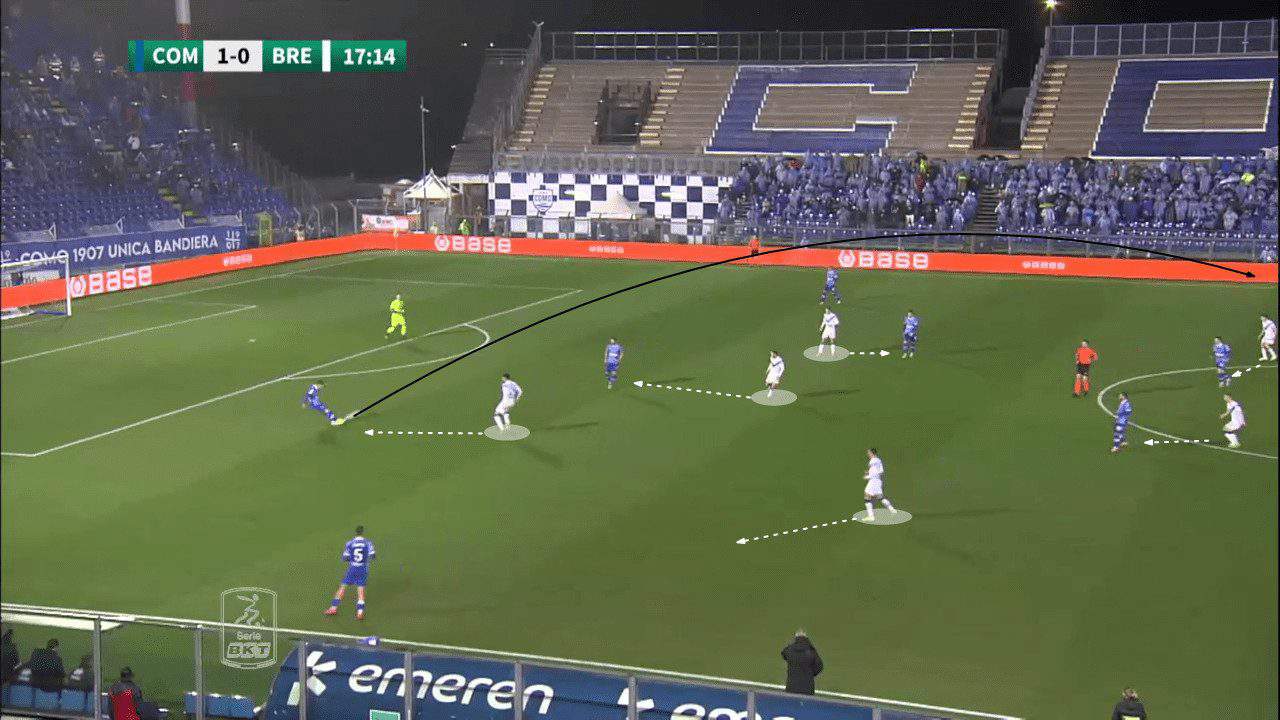
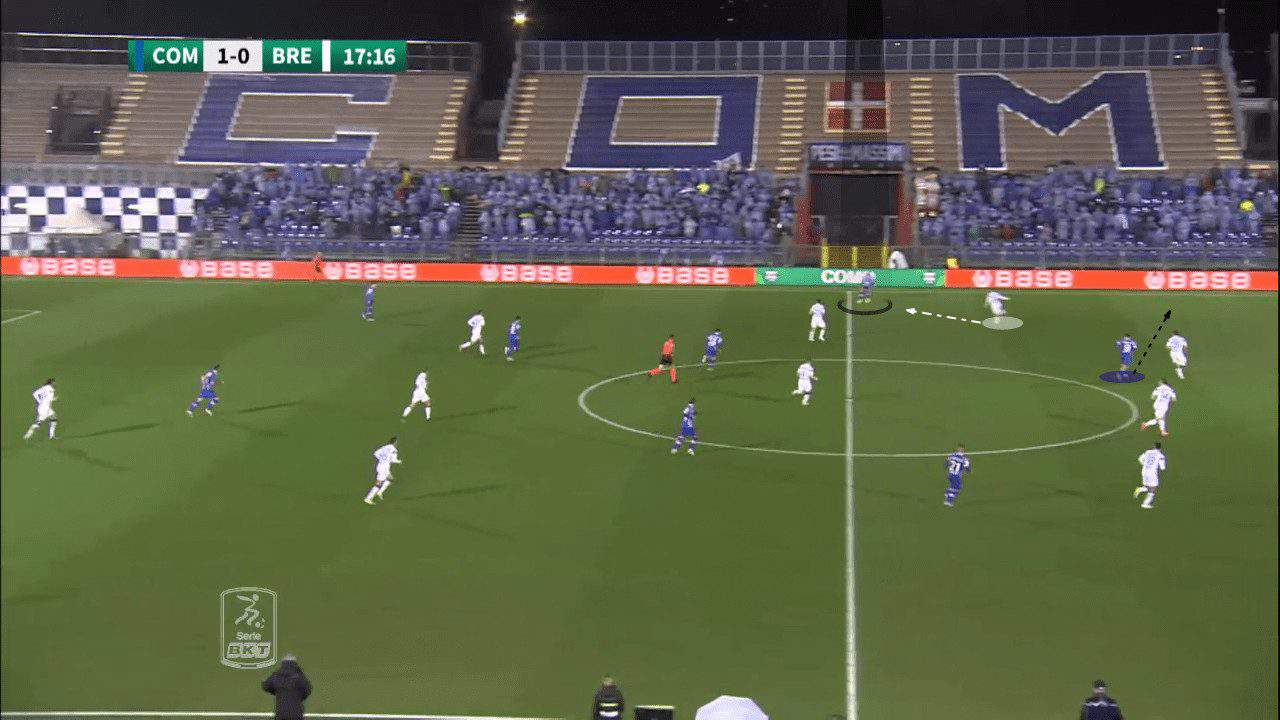
Now the goalkeeper Adrian Šemper went long directly for Gabrielloni, noticing that Brescia’s Bertagnoli was close to Curto.
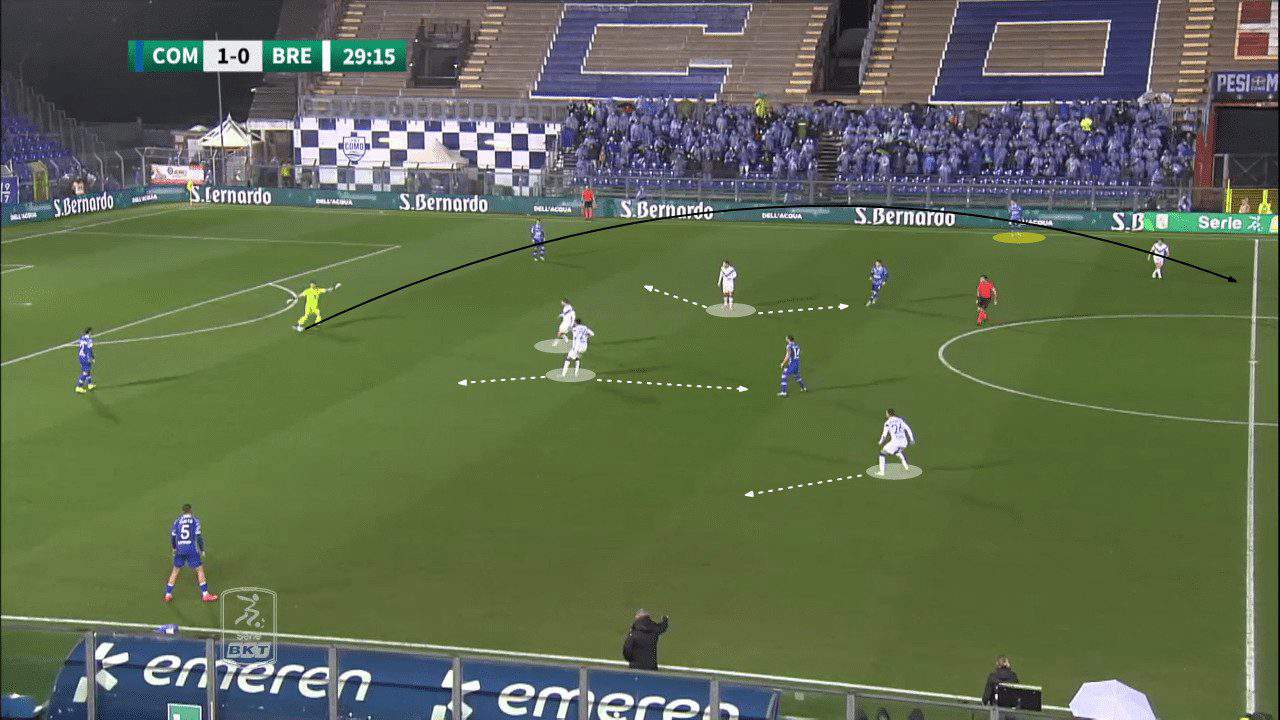
Gabrielloni received, and now Strefezza is the one joining Bellemo, Verdi and Cunha to form the box midfield, while Ioannou (in yellow) is providing the width from the L.H.S.
Moreover, Baselli dropped to the left-back position.
This box-midfield forced Bertagnoli to go narrow.
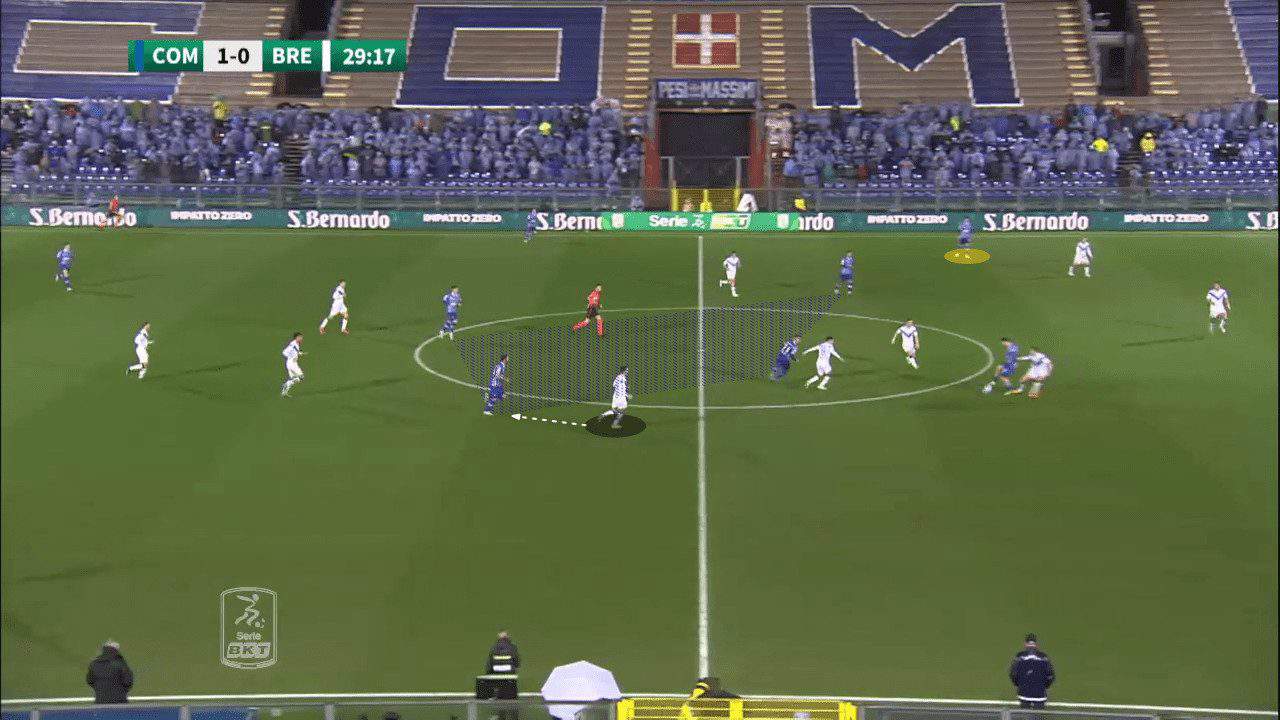
Gabrielloni now passes to Curto, who is free, and they play through Brescia’s high pressing once again.
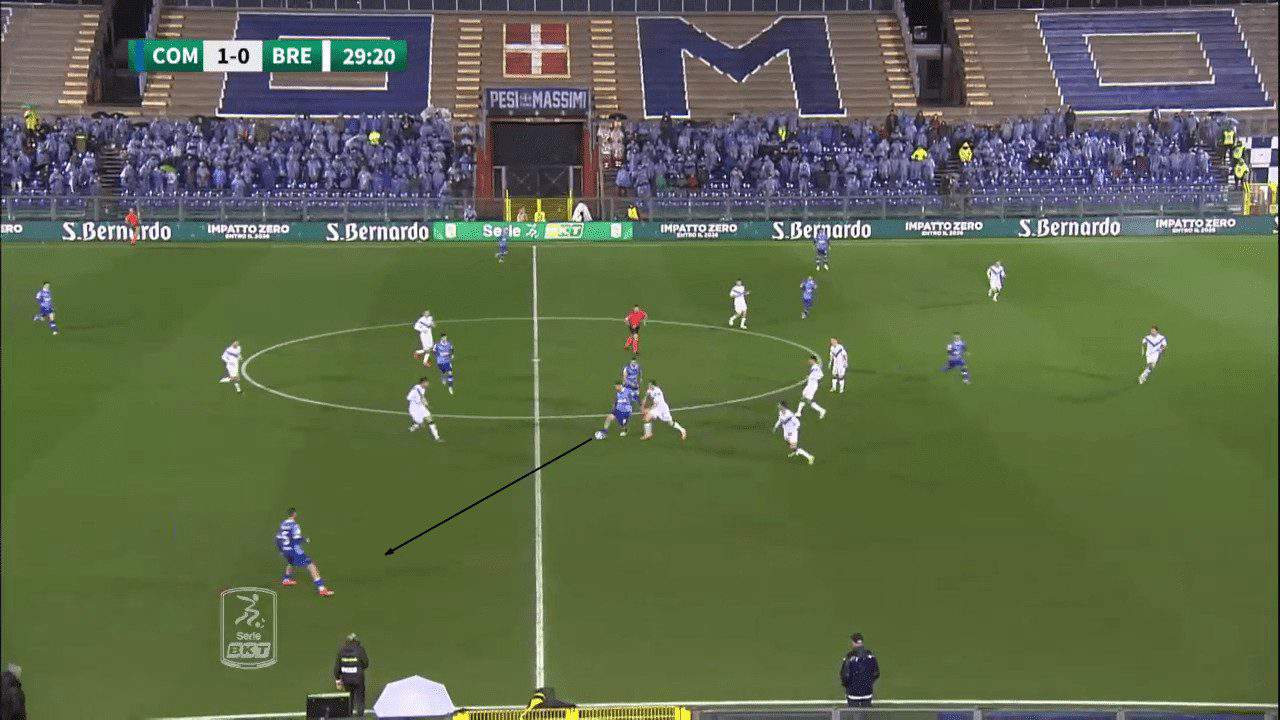
Here is again the same box-midfield; Verdi received and set the ball to Bellemo, who switched the play to Curto.
Curto had more time on the ball as Bertagnoli hesitated to press him, thanks to the narrow positioning of Strefezza.
When Strefezza received the opposition’s left back, Jallow (in red) stepped to press him. Strefezza set the ball for Baselli, who played a vertical pass to Gabrielloni.
Gabrielloni passes to Verdi, who goes to utilise the space left by Jallow.
Conclusion
Como FC is having a magnificent season so far.
It would be very interesting to see them in the Serie A next season with their ability to adapt their shape, principles and approach in the middle of the season to improve their in-possession game.
The way they overcame the problems of their double pivot and full-back positioning by reaching their central attacking midfielders more frequently gave more strength to their performance.



Comments