In 1998, Dejan Stanković left Crvena Zvezda, the historic club at which he’d been playing since 1992 when he joined their youth academy, to embark on a playing career in Italy.
Initially joining Lazio, Stanković won a Serie A title, two Italian Cups, two Italian Super Cups, the last ever UEFA Cup Winners’ Cup, and a UEFA Super Cup title with I Biancocelesti before departing Italy’s capital for Internazionale in February 2004.
With Inter, Stanković’s legend in Italian football grew further as he claimed five more Serie A titles, four more Italian Cups, four more Italian Super Cups, and a legendary UEFA Champions League title with José Mourinho in 2010, defeating Louis van Gaal’s Bayern Munich in the final after famously defeating Pep Guardiola’s Barcelona in the semi-final.
After earning ‘serial winner’ status as a player in Italy, the midfielder retired in 2013.
Since then, Stanković spent a year as Udinese’s assistant manager, a year as Inter’s team coordinator, and almost three years as a UEFA advisor before taking his first role in management in December 2019.
He returned to where it all started for him in earnest—Crvena Zvezda—to replace Vladan Milojević in the hot seat at Rajko Mitić Stadium, AKA ‘Marakana’.
81 games, 63 wins, and two Linglong Tire SuperLiga titles later, Stanković has established himself as a very promising young coach in Serbia’s capital.
As well as retaining a highly impressive 77.5% win rate at Zvezda, the ex-Inter man guided Zvezda to an exceptional 108-point, undefeated season in 2020/21.
He also led them to the Round of 32 in the UEFA Europa League—their joint-best performance in European competition following 1992 (the breakup of Yugoslavia)—where they were knocked out on away goals after drawing twice with one of Stanković’s old Italian enemies: AC Milan.
From all of this information, we can safely say that Stanković’s reign as Zvezda boss has been a positive one.
He’s achieved this success while endorsing what may be fairly described as a dominant, aggressive style of football.
This tactical analysis provides some insight into the playing style and principles of Stanković’s Crvena Zvezda.
My analysis dissects what I’ve identified as some key aspects of Stanković’s tactics at Marakana to share ideas about one part of what’s keeping this Crvena Zvezda side performing at such a high level—the tactics and playing style.
Build-up, ball progression, and the holding midfielder’s important role
Under Stanković, Zvezda have been more possession-dominant and high-scoring than they were before his tenure.
For example, in 2017/18 and 2018/19, Zvezda averaged 58.6% and 58.7% possession, scoring a total of 96 and 97 league goals, respectively.
Last term, however—Zvezda’s first full season under the 43-year-old—the Belgrade-based club scored 114 league goals while keeping an average of 64% possession—the highest in Serbia’s top flight.
Additionally, Zvezda made the most passes in the Linglong Tire SuperLiga (544.42 per 90), with the best passing accuracy (87.1%).
They played the fewest long balls (41.97 per 90) but the highest number of progressive passes (88.58 per 90), with the best progressive pass accuracy (84.6%).
Per Wyscout, a progressive pass is: ‘A forward pass that attempts to advance a team significantly closer to the opponent’s goal’.
This, along with the fact that we know they’ve played the fewest long balls in the league, starts to paint the picture of a team that is quite vertical in possession and very ball-dominant but tends to search for shorter, more accurate forward ground passes before opting for a less controlled long ball—the latter of which they resort to relatively rarely.
In this section, I’ll analyze Zvezda’s tactics during the build-up and ball progression phases to highlight some of the key tactics they deploy in possession to successfully move the ball upfield via ground passes. I’ll focus particularly on the important role that the deepest midfielder plays in these two phases.
Last season, Stanković primarily lined his team up in a 4-3-3/4-1-4-1 shape, with the central midfielder naturally dropping deeper than the two wider midfielders.
So far this season, in what is still a young campaign, Stanković is yet to deploy the 4-3-3/4-1-4-1 of last term, generally favouring one of either the 4-2-3-1 or the 4-diamond-2.
Regardless of which base shape Zvezda have resembled more this season or last, some of their key principles have remained steadfastly consistent.
One consistent element of their tactics has been a preference for having one midfielder (one member of the double-pivot in the 4-2-3-1 or the naturally deepest midfielder in the 4-1-4-1/4-diamond-2 shapes) drop deep during the build—up—just in front of the two centre-backs who typically split quite wide.
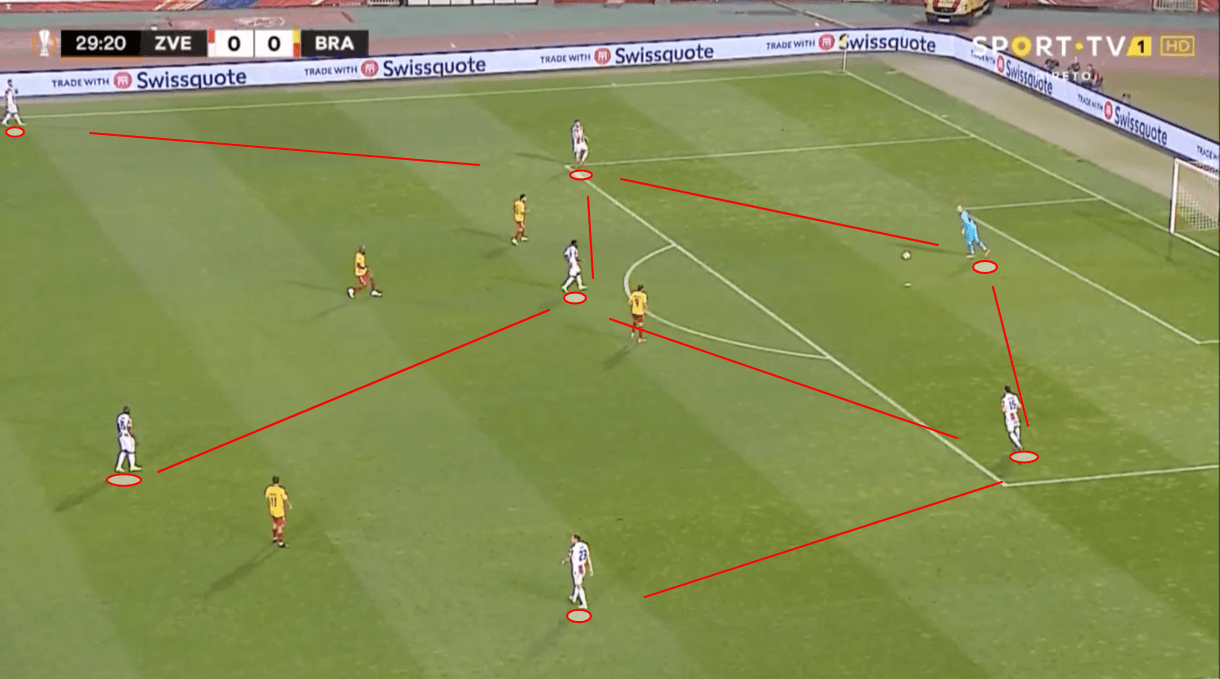
Figure 1 shows an example of this shape forming in Zvezda’s build-up while they played with a 4-2-3-1 in their recent Europa League group stage win over Braga.
With the ball at the feet of goalkeeper Milan Borjan, Zvezda’s centre-backs split wide, making room for one holding midfielder to drop deep centrally while his midfield partner remains higher.
This higher midfielder makes himself a potential forward passing option for his deeper midfield partner should the latter receive the ball and turn, while also making himself a different, more advanced passing option for Zvezda’s other deep-lying players in the build-up.
This midfield staggering helps Zvezda with ball progression by creating more natural passing angles than flat lines would typically allow, while it also makes them more difficult for the opposition to mark and block off from passes.
It’s something you see a lot of teams do, so it’s not a major surprise to see this concept make an appearance in Stanković’s successful, possession-dominant Zvezda side, though it is a smart move.
If Zvezda can play through their deepest holding midfielder, they will.
They prefer to progress through this midfielder—often either Guélor Kanga, who played the second-most passes (78.87 per 90) of any deep midfielder in the Linglong Tire SuperLiga last season or Sékou Sanogo who also played a relatively high number of passes (57.73 per 90) in the league last season—and this player needs to be very comfortable on the ball in terms of breaking lines with his passing as well as, ideally, good at receiving on the half-turn.
In a situation like we see in figure 1, the midfielder can’t receive the ball from the goalkeeper due to the opposition’s tight marking which forces the ‘keeper to choose another option and he ultimately opts for a long ball.
However, to reiterate, Zvezda will generally search for shorter ground passes first in this phase of play before then opting to go long should that prove too difficult or if they feel that playing the shorter passes would be too risky, perhaps due to the opposition’s aggressive defending.

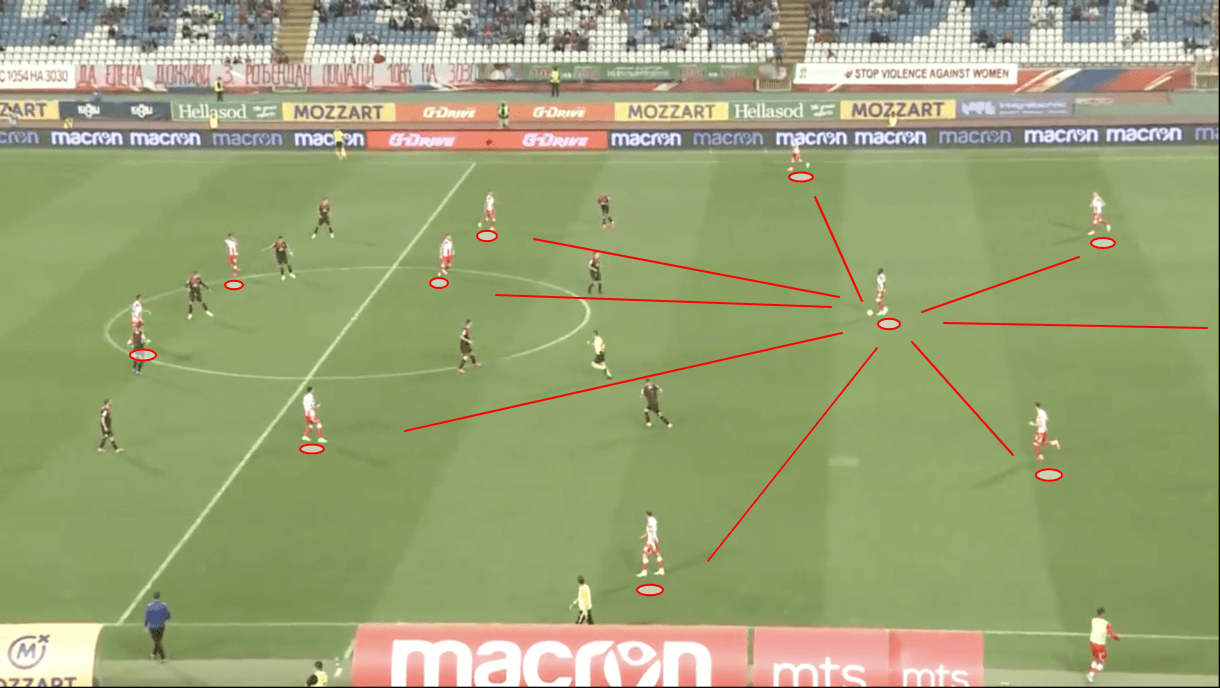
If they can play the ball into the deep midfielder and he manages to turn, his field of vision will generally look like it does in figure 2.
Here, we see the options that Stanković’s offensive shape creates for this player during the build-up.
This image shows an example of Zvezda’s offensive shape when operating in the 4-diamond-2 formation, but you’ll see something very similar in the 4-2-3-1/4-1-4-1 formations, though maybe with an additional central midfielder and one less striker.
During the build-up, Zvezda’s shape offers the goalkeeper and centre-backs a route into the holding midfielder.
This midfielder will typically be positioned very centrally, as we see him here, but he must enjoy some freedom to move around if he needs to get out of an opposition player’s cover shadow or create a better passing angle for a teammate.
You won’t see him move too far wide, however.
He’ll generally be quite central like we see here, so as to ensure that he enjoys the full range of passing options available to him in this shape on receiving and turning, as we see here.
The plethora of short forward passing options presented to this player on receiving and turning, which figure 2 depicts, highlights the important, central role that the holding midfielder plays in the build-up for Stanković’s side and how they set up to progress through the lines via this player.
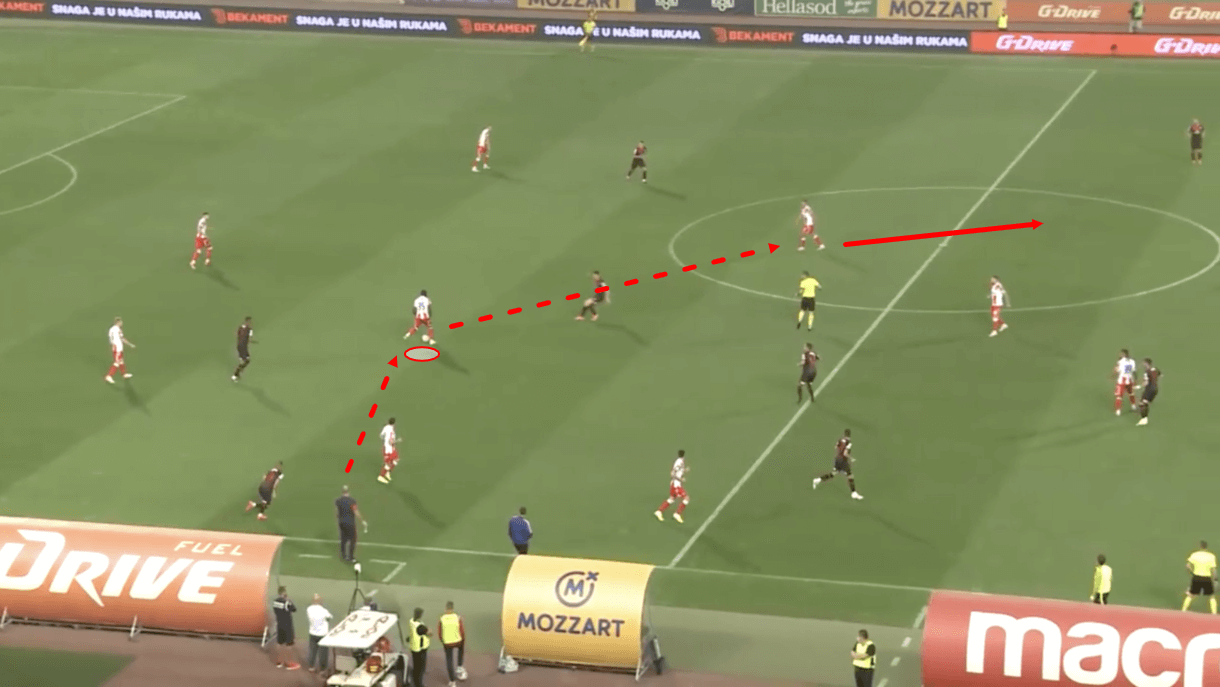
In the example shown in figure 2, the opposition blocked the passing lanes into central midfield quite well with the positioning of their midfielders.
Ultimately, this resulted in Zvezda’s holding midfielder playing the ball out wide rather than playing straight through the centre.
Figure 3 shows an example of an occasion where Zvezda’s opponents weren’t quite as settled and organised in their defensive shape, and this allowed the holding midfielder to play a short forward pass into central midfield to advance the play.
We can see from this image how the range of forward passing options created for Zvezda’s holding midfielder can allow him to progress the side through midfield directly and securely.
By naturally giving him a lot of options with this offensive shape, Zvezda increase the chance that at least one of them will be available and then they can easily progress through central midfield.
As this passage of play moves on, we see the receiver turn and carry the ball into the opposition’s half, starting a dangerous attack on the last defensive line.
Stanković’s structure for the build-up and ball progression phases makes play like this far easier than it otherwise would be for Zvezda.
Of course, as mentioned, they also need the holding midfielder to be comfortable on the ball, in terms of passing and receiving on the half-turn, but the general structure plays a big part in their success in these phases.
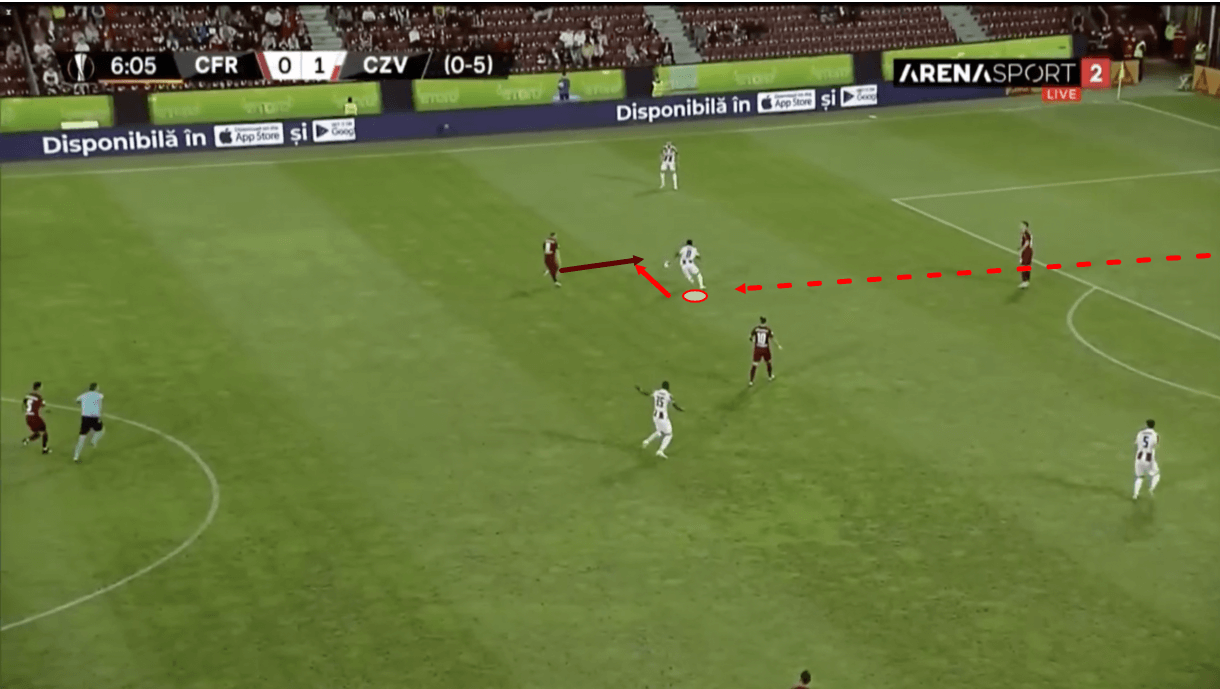
Due to the frequency at which Zvezda feed the ball into the holding midfielder and the important role he plays in their build-up and ball progression, opposing teams do target him with their press and either try to prevent the initial pass into him from being played via tight marking or by pressing aggressively to capitalise on a misplaced pass or something like the midfielder taking a heavy touch while trying to turn.
We see an example of the opposition pressing the holding midfielder’s heavy touch while turning in figure 4.
Just before this image, the midfielder received the ball in build-up having dropped deep as usual.
He tried to take the ball on the half-turn but a heavy touch took control of the ball away from him and gave the pressing player a chance to regain possession for his side.
As play moves on from here, we see the opposition win the ball in an aggressive, threatening position from where they can attack Zvezda’s goal.
This, again, highlights the importance of the holding midfielder’s on-the-ball quality in this team, as well as the perils of passing out from the back to try and play through the lines.
This player needs to have quality on the ball to limit these mistakes.
Otherwise, they will inevitably allow too many turnovers in dangerous positions by playing out from the back via short passes and through this player.
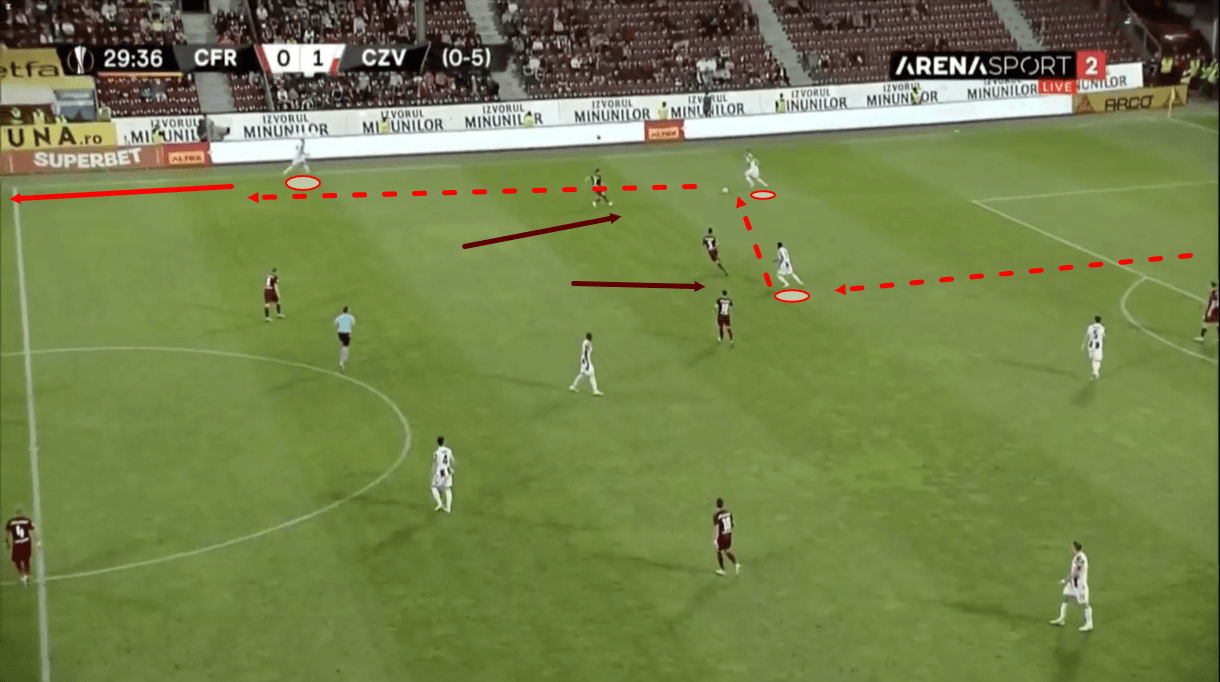
As we move on into figure 5, however, we’ll see an example of why Zvezda are happy to take the risk of building out from the back via short passes, as their holding midfielder doesn’t allow too many of these deep turnovers to occur and even when facing aggressive, high pressure and competing in Europe—as was the case in figures 4 and 5, which are from Zvezda’s recent Europa League play-off clash with CFR Cluj—they can enjoy the benefits of this tactic thanks to their familiarity with this form of build-up, their offensive shape, and their technical quality.
The scene in figure 5 looks very similar to what we saw in figure 4, with the holding midfielder receiving centrally, oriented slightly to the right side of Zvezda’s offensive structure.
He once again attracted pressure here but this time he retained control of the ball while turning and managed to send the ball out to the right centre-back, who we see positioned quite wide, in more of a typical full-back position, split far from his central defensive partner, as is typical in this team’s build-up.
As Zvezda’s right centre-back then received the ball, he too attracted pressure but the pressing player was in a negative 1v2 situation, as Zvezda’s right centre-back could quickly send the ball through to the right-back, positioned slightly higher and wider on this wing.
This sent the ball past Cluj’s midfield line, as the right-back could carry the ball into the opposition’s half for Zvezda, creating a 4v4 as he joined Zvezda’s three furthest forward attackers in the 4-diamond-2 shape (the ‘10’ and two strikers) to attack Cluj’s back-four.
Thanks to the individual quality of Zvezda’s attackers, this was very much a dangerous situation and an excellent example of how Stanković’s side can quickly break lines in build-up through initial short passing to draw the opposition’s aggressive press before then progressing with a forward pass and driving at the backline.
Zvezda are happy to accept the risks that come with playing out from the back via short passes against an aggressive press to enjoy the benefits that come with breaking those initial, aggressive lines of pressure and quickly creating a very dangerous attacking scenario.
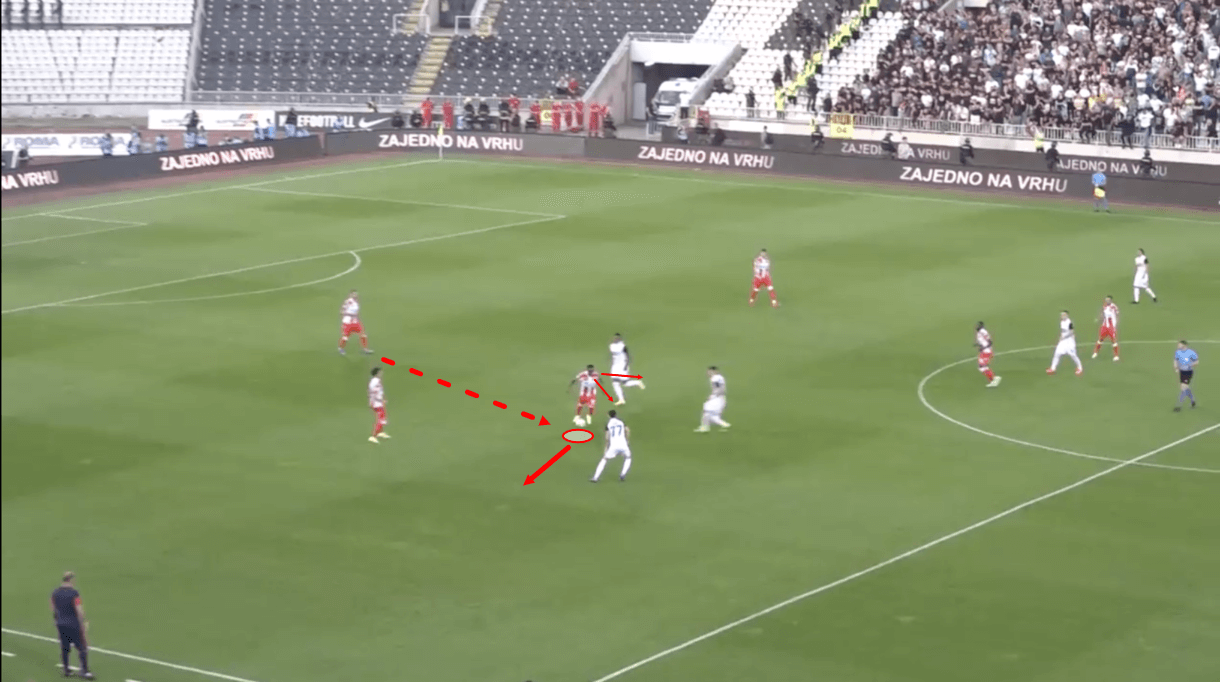
Another way that Zvezda’s holding midfielders (again, primarily Kanga or Sanogo) sometimes deal with aggressive opposition pressure is by intelligently drawing fouls from them, which helps Zvezda to gain some territory, force the opposition back, and create an opportunity to progress upfield via a free-kick.
Figure 6 shows an example of one occasion where Kanga bought a foul during Zvezda’s recent 1-1 SuperLiga draw with Partizan.
Just before this image, Kanga received the ball from the backline.
As controlling the ball, he diligently scanned over his left shoulder before turning.
This is shown in figure 6.
While scanning, Kanga noted the aggressive incoming pressure from the two Partizan players standing between him and the opposition’s half.
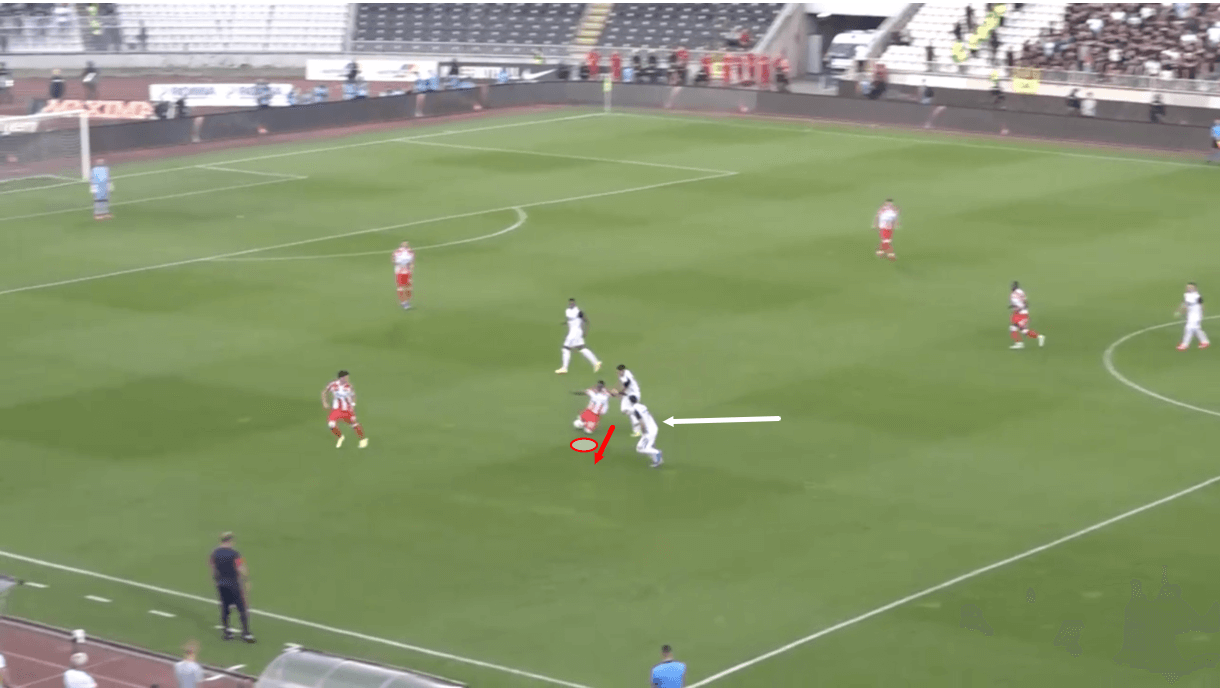
One option here would be to play the ball backwards, but in passing to the full-back, you arguably put your team in a worse position by allowing the opposition to pin you into the wide-area with their pressure.
Instead of that, Kanga stuck out his left arm towards the closest opposition player, put this arm and his body between the pressing player and the ball to protect it and started carrying the ball towards the opposition half.
As figure 7 shows, the pressing player was unable to get to the ball before coming into contact with Kanga and the Zvezda midfielder managed to intelligently win a free-kick for his side here, helping them to gain some territory and get past the press with a free-kick, rather than ending up pinned into the wide-area or, worse, allowing a turnover and facing a dangerous counter-attack.
This passage of play highlights another important part of the holding midfielder’s role within Stanković’s side: the intelligence and ability to win fouls where necessary when facing aggressive pressure.
In the league, last season, Zvezda, as a team, won just 14.06 fouls per 90, the fifth-lowest of any SuperLiga side, which perhaps isn’t what you’d expect from such a possession-dominant team.
So far this season, they’ve managed to win 15.96 fouls per 90 in the league, which is the most of any SuperLiga side.
Kanga has won the most fouls in the league (5.13 per 90), while Sanogo has won the second-most of any Zvezda player (2.12 per 90).
Last season, Kanga won 2.23 per 90, while Sanogo won 1.85 per 90.
These stats further highlight where some of Zvezda’s additional fouls are being won and highlight the important role that these Zvezda players perform in winning fouls to avoid allowing turnovers and prevent the opposition from creating a favourable situation via their aggressive pressure.
So, it’s clear that the holding midfielders play a key role in Zvezda’s build-up and ball progression phases in several ways.
They’re central to Stanković’s structure in these phases and a lot of the play goes through them.
These players need to have good technical and mental attributes to cope with the demands of this crucial role.
Going long and using the width
As mentioned previously, Stanković’s side will generally search for shorter forward passes in build-up before opting to play a long ball.
That’s not to say that Zvezda never go long from the ‘keeper, however, they do, either to just give the opposition a different kind of problem to deal with or to take advantage of a game-specific situation, such as, for example, the opposition full-back being particularly short, a weakness that Zvezda may try to exploit by targeting him with a long ball to be contested with a taller Zvezda attacker, or even one of the full-backs, who often position themselves quite high in possession and have been targeted with early long balls against smaller opposition full-backs in the past.
Additionally, to play out from the back via short passes, it’s not just the holding midfielder that must be good on the ball—though he is the most important one in this system—you also need your centre-backs and goalkeeper to be particularly good on the ball and Zvezda’s ‘keepers do have some limitations in this regard.
As a result, they’re happy to play the ball long from goal-kicks sometimes or go long when struggling to build up via short passes.
As mentioned at the beginning of this tactical analysis, though, Zvezda play the fewest long balls in Serbia’s top flight, and their general go-to in build-up is to try and play out via short passes first.
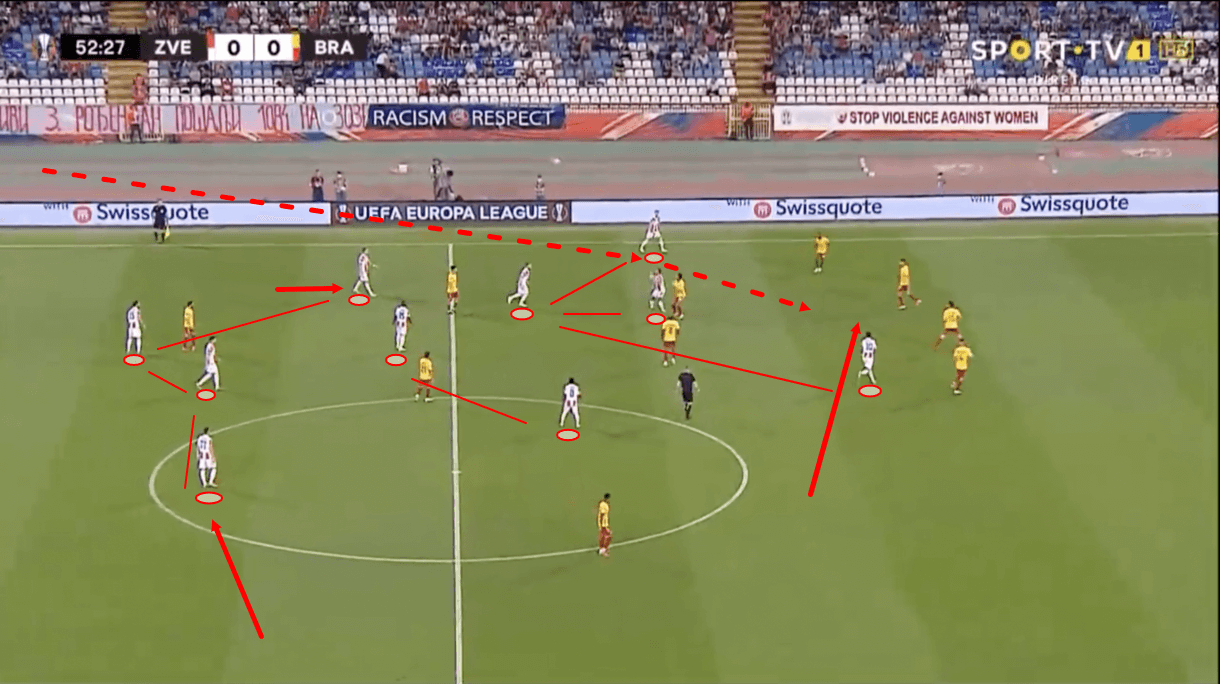
When going long from the back, Zvezda’s shape typically appears as we see it in figure 8.
The entire team will congregate in the middle third of the pitch, in the area around the intended long ball receiver.
Zvezda naturally have a very horizontally compact midfield in the staggered, narrow 4-2-3-1/4-diamond-2 offensive structures.
As a result, when the ball is played long, players simply have to retain their regular shape, position themselves very close to each other, using the intended receiver as a reference point to gather around, as was the case in figure 8.
Zvezda want to outnumber the opposition in the central pocket of space just in front of the receiver to win the second ball.
The compact, narrow midfield structure helps to achieve this and you’ll also often see the near-sided full-back advance into midfield to provide even more support to the team’s effort to win the second ball.
The left-back can be seen doing this in figure 8, and as he does so, the right-back stays deep to form essentially a back three, in case the second ball is lost.
As well as that support in front of the receiver, Zvezda typically provide this player with runners in behind in case flicking the ball on ends up being the necessary action.
With the diamond shape or the 4-2-3-1, Zvezda have generally got three attackers during periods of possession: The ‘10’ and two strikers in the diamond or the striker and two wingers in the 4-2-3-1.
If one of these players are the intended receiver, which is often the case when these long balls are played from the ‘keeper, the other two typically look to make runs in behind to capitalise on a flick-on.
We see this happening in figure 8, with the far-sided attacker, in particular, making a dangerous run into space just behind the receiver.
As play moves on from here, the right-sided attacker ultimately gets onto the end of the receiver’s flick-on thanks to his run into the space just in front of the opposition’s backline and behind the receiver.
This is a very common run to see Zvezda’s attackers make during the ball progression/chance creation phases.
The attackers love to run across the width of the pitch into space emerging on the opposite side, which we see an example of here in figure 8 and which we’ll see another example of as we move on to figure 9.
To wrap up our discussion around Zvezda’s long balls from the back, however: congregation around the middle third, horizontal compactness, an overload in the space just in front of the receiver, three players at the back to guard against losing the second ball, and one or two active runners just behind the receiver are the main things that Stanković’s side aim to ensure when playing out long from the back, to achieve success from these situations.
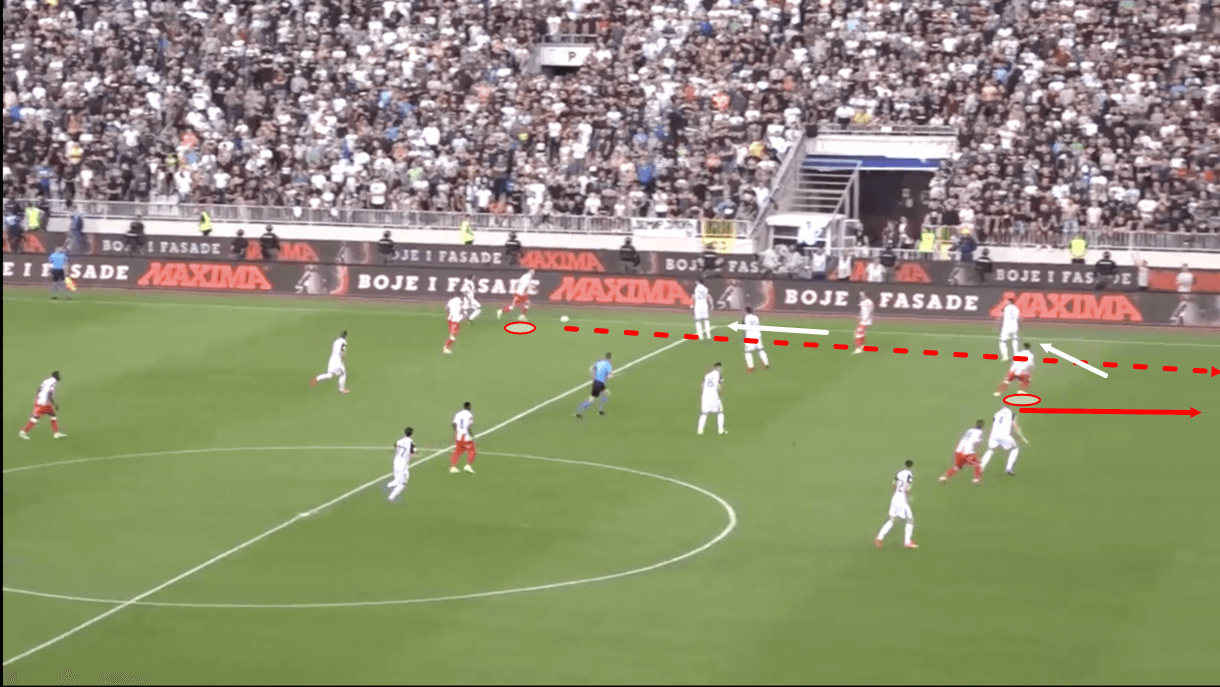
When playing long directly from the goal-kick, you’ll generally see Zvezda shaping up as they do in figure 8, aiming for the centre-forward, 10, or wingers/full-backs.
Often, though, Zvezda will attempt to play out from the back with short passes before going long if they struggle to beat the opposition’s press doing that.
In these instances, it’s common to see Zvezda’s ‘keeper/centre-backs send the long ball out to the full-back, who will be positioned high and wide, taking advantage of space in the wide area.
Figure 9 shows an example of how this type of attack often ends up looking, with the full-back facing forward to either carry the ball upfield, similar to how the full-back acted on receiving the shorter through ball back in figure 5, or play a through ball of their own into the path of attacking runners ahead of them, which was the case in this example of figure 9.
Back when we analysed figure 2, we saw how Zvezda’s plethora of central passing options for the holding midfielder can force the opposition to defend in a very narrow shape to protect the centre and prevent Zvezda’s holding midfielder from availing of these central, forward passing options.
It’s common to see Zvezda’s opponents get dragged into the centre to prevent them from progressing through this more dangerous area.
As a result, there’s often a lot of space for the full-backs to exploit out wide and Zvezda’s ‘keeper/centre-backs will often try to exploit this directly from the build-up with a long ball on some occasions, which we see an example of in figure 9.
When this happens, the opposition’s full-back can get drawn out to Zvezda’s full-back to close him down and prevent him from progressing play via a run.
We discussed the potentially devastating effects of those progressive runs from the full-backs when we looked at figure 5.
Figure 9 shows an example of the opposition full-back getting drawn out to Zvezda’s full-back.
While this prevents the full-back from progressing via a run, this also starts a chain reaction that results in space being created for Zvezda’s forwards which the full-back can exploit via a long through pass.
As the opposition’s full-back advances, one of Zvezda’s attackers—either the 10 or the near-sided forward—will push out into the space on the wing behind this player to provide a progressive option for the ball carrier.
Then.
the opposition’s near-sided centre-back is forced out wide to block the path into this player.
This creates space for Zvezda’s remaining two attackers to exploit via a run in behind the defensive line.
In figure 9, we see the left-forward running into the large gap that’s opened up between the opposition’s two centre-backs while the right-forward begins his run just behind the far-sided centre-back, into the space between him and the far-sided full-back.
If the far-sided centre-back steps over to close the space between him and the near-sided centre-back, then Zvezda’s right-forward gets a lot of freedom and if he doesn’t step over to close this space, then the left-forward is free.
This shows a potential benefit of Zvezda’s quick long passes out to the wing from the ‘keeper/centre-backs, as well as one more benefit of the plethora of central passing options created for the holding midfielder.
Even if the opposition block off the midfielder’s passing options, that can lead to lots of space opening on the wing for the full-back to exploit and once players start getting pulled out of position to close this space, that creates space further up the pitch for the attackers to exploit.
All of this happens very quickly in-game and within around three passes (‘keeper-full-back-attacker), Stanković’s side can be through on goal in a very dangerous situation.
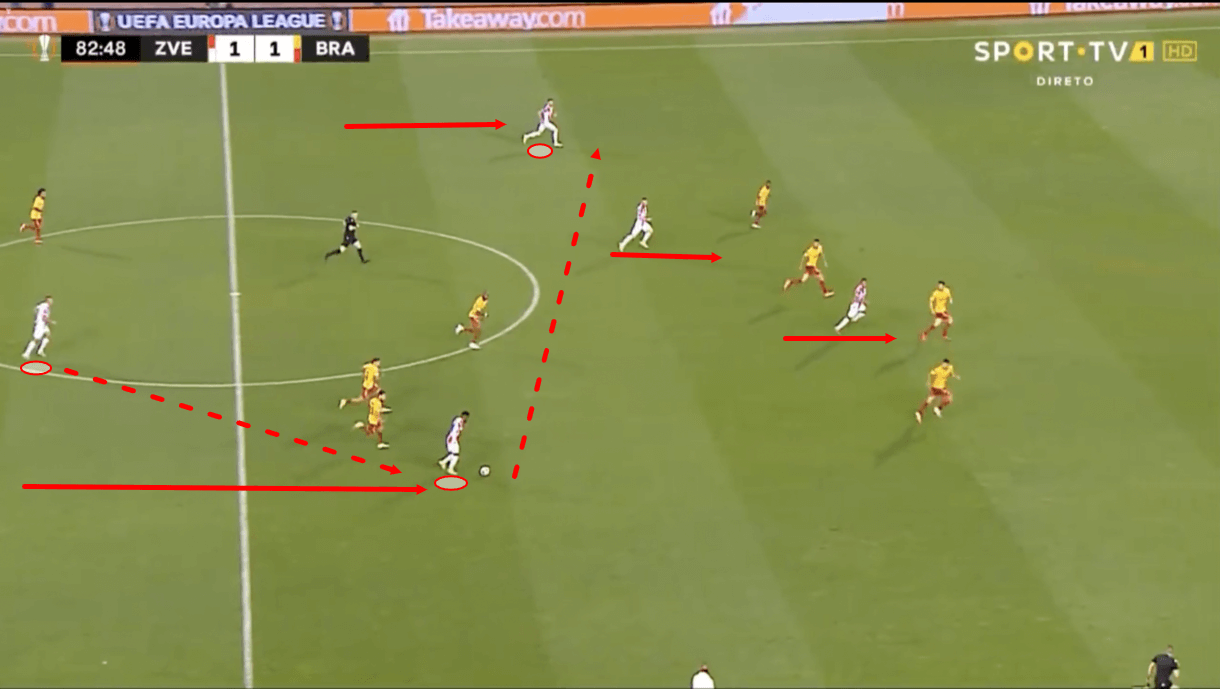
Zvezda often enjoy a lot of space out wide on the counter, which they’ve exploited well under Stanković.
Figure 10 shows an example of one such occasion.
Just before this image, Zvezda’s right-winger regained possession in central midfield by tracking back well and applying pressure.
After regaining possession for his side, the right-winger received support from the right-sided holding midfielder, who advanced from his deep position to fill the gap vacated by the right-winger when he dropped deep.
As the right-winger found the midfielder, we got this scene in figure 10, with Zvezda’s remaining two attackers running through the centre—attracting the opposition’s entire back-four towards them—and the left-back driving into the resulting space on the far side of attack.
As play moves on from here, the midfielder switches play to the opposite wing, playing the left-back through into space and giving him a chance to drive at Braga’s weakened defensive structure in transition.
If the left-back attracts Braga’s right-back towards him, space opens up for Zvezda’s left-forward to attack and if the Braga right-back opts not to close him down, then he gets the chance to progress into the final third via his dribble.
Similar to the situation observed in figure 9, this highlights how Zvezda can successfully unsettle the opposition defence by exploiting the underloaded wing, though this time, we see how this helps Zvezda to succeed in transition.
Stanković’s side loves to exploit this weakened area in transition and as such, this type of scenario is a common one to see Zvezda try and create.
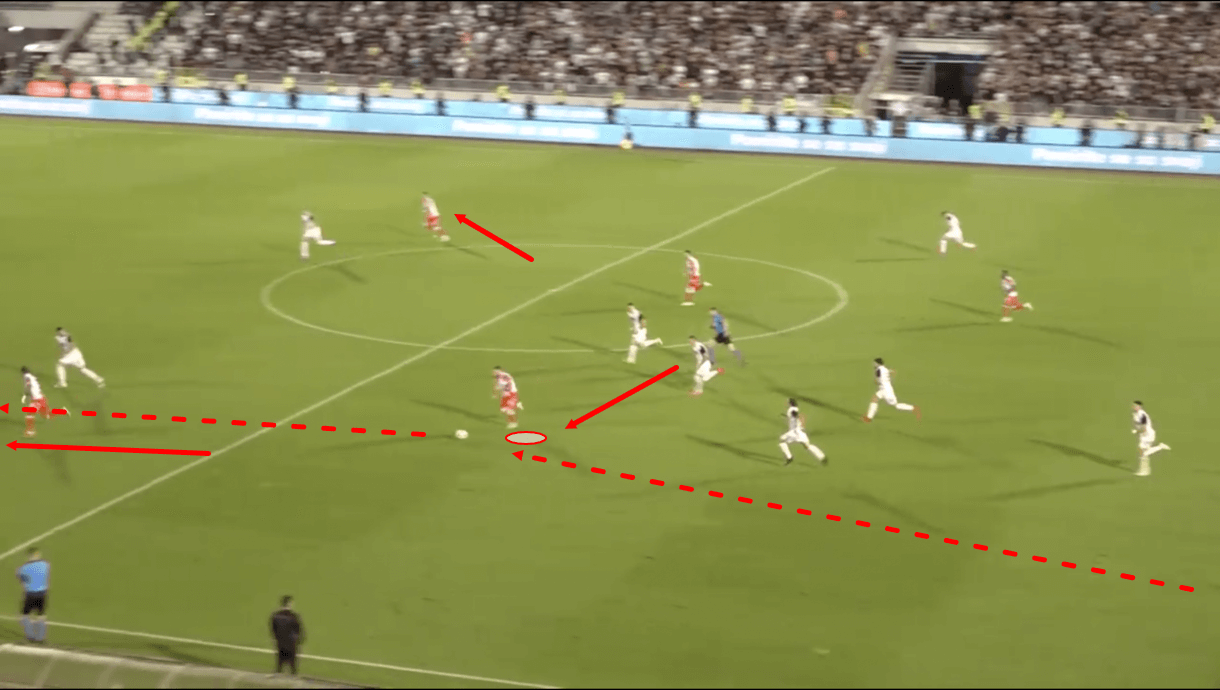
Moving on into figure 11, when Zvezda win the ball deep, they also like to counter quickly and exploit the underloaded wings that form when the opposition sends more players forward in attack.
On those occasions, though, Zvezda’s full-backs will be positioned far deeper, having just been defending an opposition attack, and won’t be able to exploit the space out wide.
Zvezda’s three attackers are crucial in transition to attack starting from deeper areas, as they allow their side to get the ball upfield quickly and then exploit the wings.
One of Zvezda’s attackers—typically, the 10—will look to find space well in front of the opposition’s backline to receive a quick ball forward and for the defenders to aim for after regaining possession.
Meanwhile, the remaining two attackers will target the wings with their runs.
This results in what we see here in figure 11—the 10 running at the backline from deep, with runners either side of him attracting the opposition’s centre-backs with them.
From here, the 10 can choose to play one of those attackers through into space on the wing or try to dribble into the space being created centrally due to the centre-backs getting pulled out wide.
So, the 10 plays a very important role in transition by looking for space when his team doesn’t have the ball so they can quickly find him after regaining possession deep, while the forwards must be ready to target the space out wide with their runs to give the 10 options and potentially create an opportunity for him to progress centrally.
This highlights some of Zvezda’s tools in transition—a phase in which Stanković’s men are typically very well prepared and dangerous thanks to their exploitation of the space out wide and the 10’s intelligent exploitation of space in front of the backline.
Rotations and free movement in chance creation
As we saw a glimpse of when we analysed figure 10 and saw the right-sided holding midfielder advance to fill in the space vacated by the right-winger, it’s common to see a degree of positional fluidity and free movement within Zvezda’s offence.
Indeed, Stanković has got a group of intelligent players at his disposal who are well aware of each other’s movements and the space that is vacated or that can be exploited as a result of them, and in this section of analysis, we’ll take a look at an example of this team’s positional rotations in possession to highlight this important element of their game.
As well as the intelligence to be aware of each other’s movements and react to them accordingly, players need to have trust in each other, as teammates, to play with freedom on the ball and to make those movements in the first place and both of those mental attributes are heavily apparent within Zvezda’s fluid attacking game.
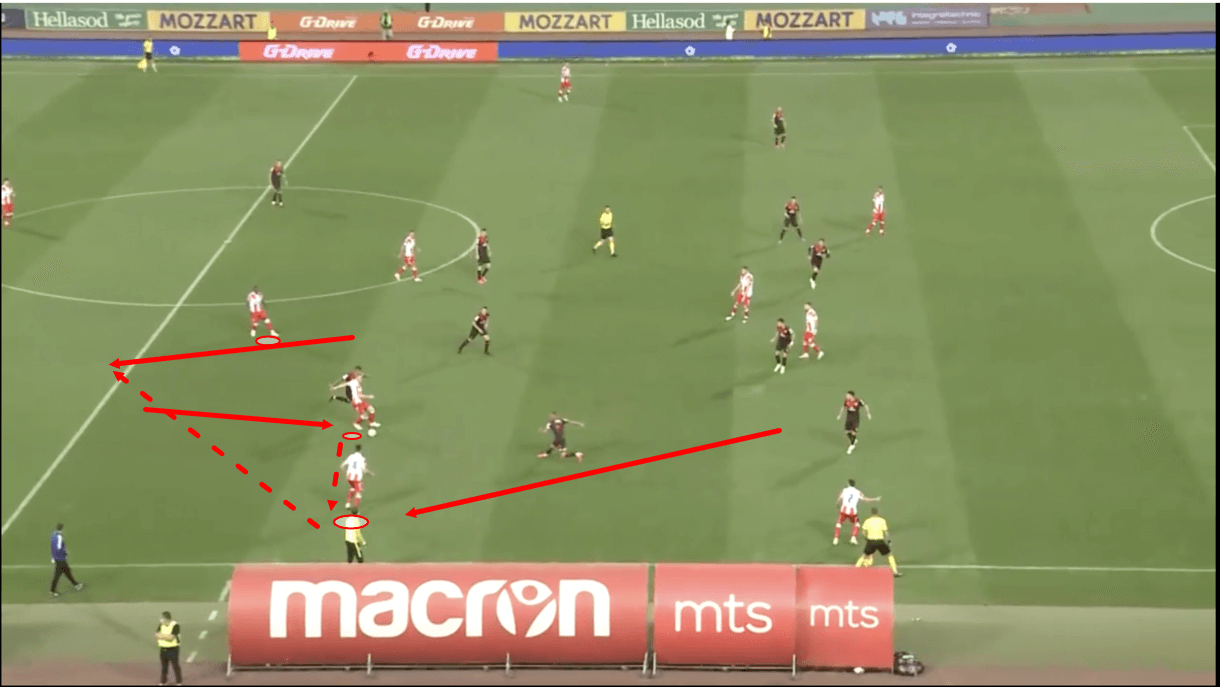
Figure 12 shows an example of Zvezda’s fluid movement.
Just before this image, the right centre-back was in his typical right centre-back position during the ball progression phase, central just inside his half, when the right-winger dropped from his position on the same vertical line to the one we see him occupying here, deep on the right-wing.
This was an intelligent move that made him a viable option for the centre-back, having previously been in a blocked passing lane, surrounded by defenders.
As he dropped, the right-back advanced further upfield, while more importantly, the right centre-back carried the ball forward out of defence and into midfield, dragging the opposition’s left-forward, who’s just behind him in this image, with him and evading his challenge with some good technical dribbling quality.
This movement from the two Zvezda players unsettled the opposition’s defence.
Stanković’s men have quickly created a new and difficult situation for them to defend against on the right-wing.
Meanwhile, Zvezda’s right-holding midfielder drops into the right centre-back position vacated by the centre-back.
As mentioned earlier, Zvezda’s holding midfielders are typically some of their more skilled players on the ball and by dropping into this space, he would not only provide cover for the marauding centre-back but would also be able to take advantage of the space created here thanks to the centre-back’s run which dragged the opposition’s left-forward away.
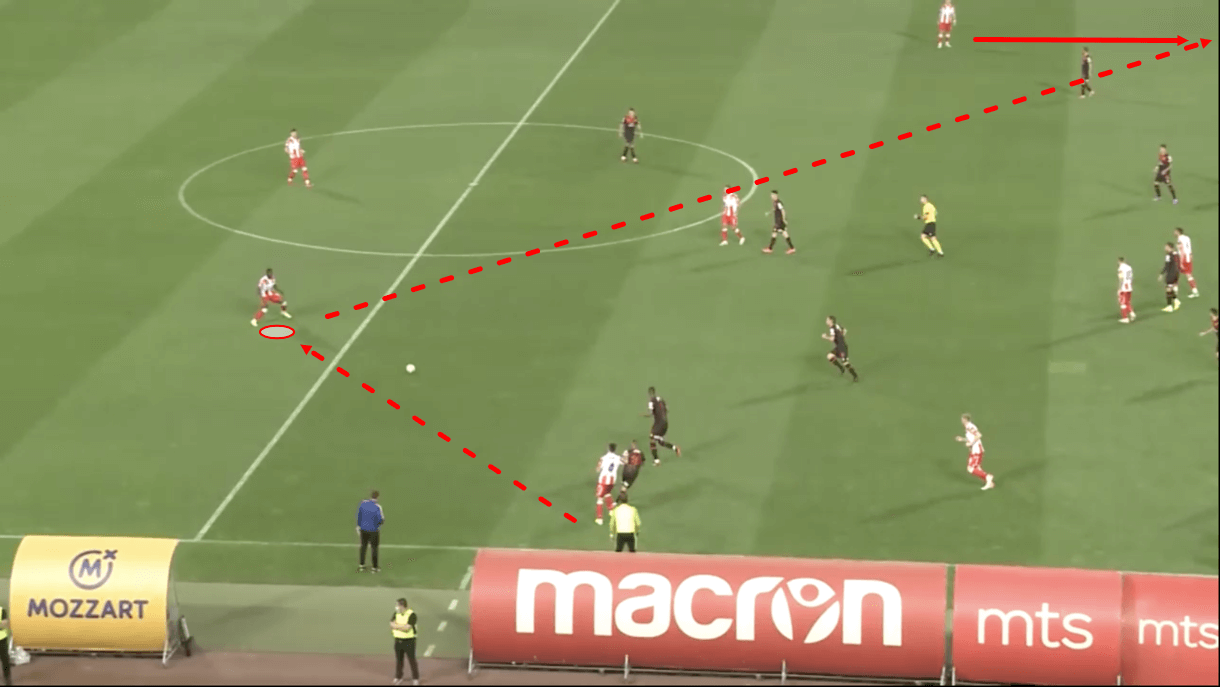
As play moves on into figure 13, we see that after the centre-back passed to the right-winger, the ball ended up going back to the centre-back position where it initially started, but despite being in the same position, now Zvezda had a much more favourable situation, with one of their most-skilled passers on the ball, unmarked, against a more unsettled opposition defence.
This is just one example of Zvezda’s positional rotations in possession, but it highlights how beneficial they can be in unsettling the opposition, moving them around and creating a more favourable situation for the team on the ball quickly and easily.
This example also highlights the chemistry and trust between Zvezda’s players as well as their intelligence to make these movements and break down the opposition.
As this passage of play moves on, we see the holding midfielder send the ball across the pitch to the left-back advancing on the opposite wing which, as is probably more evident in figure 12, is a much less heavily defended wing than the right at this moment.
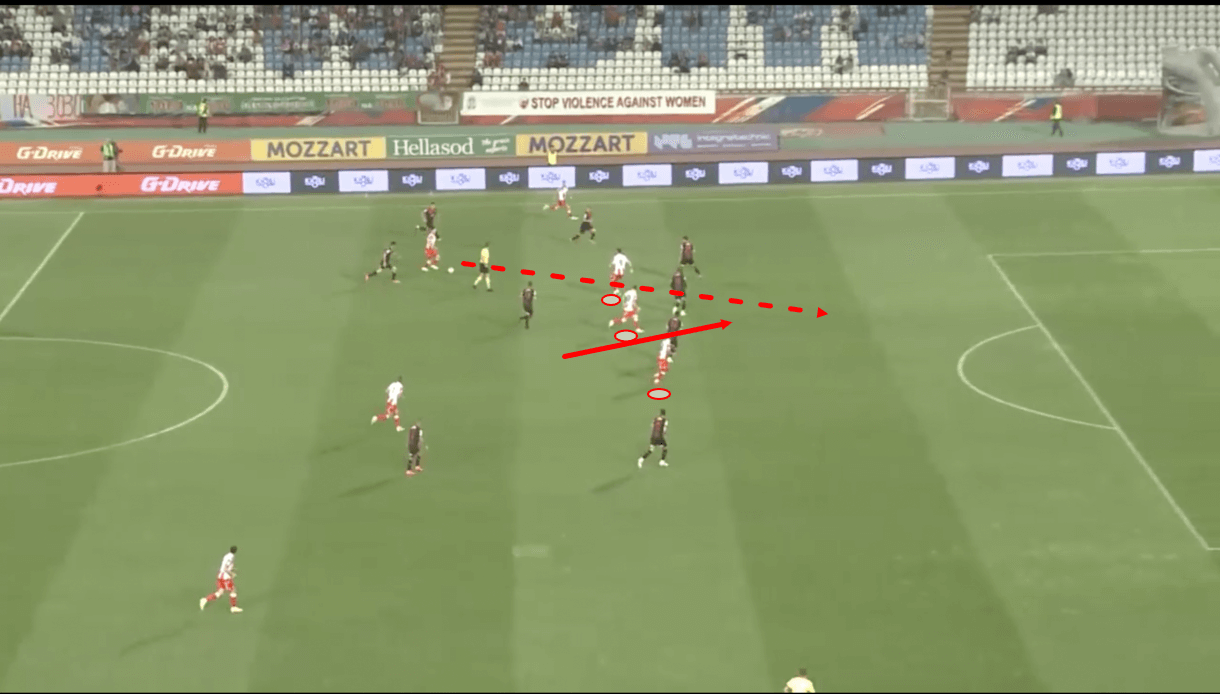
As well as rotations in the ball progression phase, Stanković’s side demonstrate plenty of free movement in the chance creation phase when looking to create shooting opportunities.
At least one of their full-backs will always be driving into the attack to provide width, as is evident from this image and others.
Depending on the game-state, you might see both full-backs joining the forward line but in general, the near-sided full-back will join the forward line while the far-sided full-back sits slightly deeper, which is evident in figure 14.
What’s also evident in figure 14, however, is the movement of Zvezda’s number 10.
As we saw when analysing his role in transition to attack, this player generally enjoys plenty of freedom to drift around and exploit space in or around the opposition backline.
In the final third, it’s common to see this player form a straight-up front three with the two strikers ahead of him.
Though this creates a very congested central area, at least until the ball is played in behind the backline, this creates a 3v2 overload for Zvezda against two centre-backs, which Zvezda often come up against.
Again, the 10 typically enjoys a lot of freedom to move around and find space to exploit, but when he moves into this position, he creates a very difficult situation for the centre-backs to defend against and unless they react quickly to an unusual problem, then it can lead to a good goalscoring opportunity for Zvezda, as was the case here in this example, as the ball was played through into space behind the opposition backline and the 10 advanced to exploit that space behind the defensive line and create a 1v1 with the goalkeeper.
This highlights how this player’s freedom of movement in the final third can make him something of a wildcard which is very difficult for teams to defend against.
Aggressive defending
In our final section of analysis, we’re going to look at Zvezda’s aggressive nature off the ball.
Stanković’s side is the most aggressive in SuperLiga without the ball, in terms of their pressing intensity.
They ended last season with a PPDA of just 7.03—the lowest in Serbia’s top-flight—while they’ve currently got a PPDA of just 6.56, which is, again, the lowest in SuperLiga.
So, it’s clear that this team likes to win the ball back quickly and they do that by pressing high with a lot of energy, congesting the centre of the pitch through their narrow shape and forcing the opposition into wide areas where it’s easier to press them aggressively.
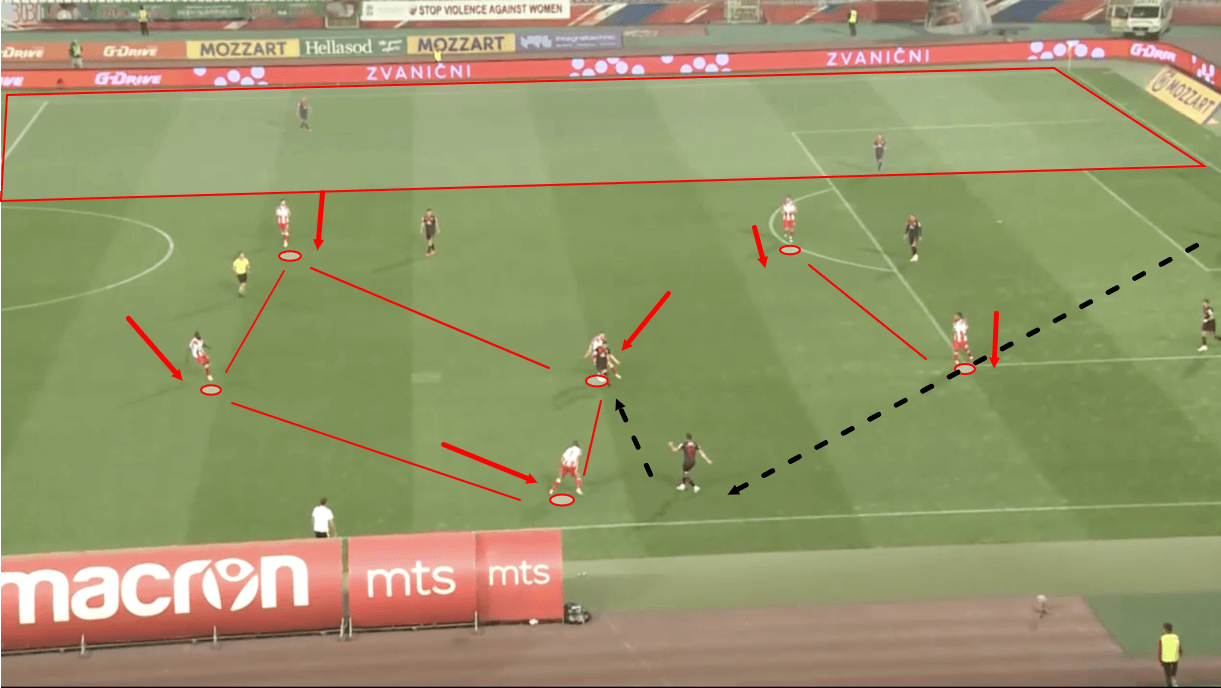
Figure 15 shows an example of Zvezda’s high-block.
In this instance, Stanković’s side were playing with a 4-diamond-2 shape but they could easily be using that system or the 4-2-3-1 here, with the only difference being that the player closest to us in this picture would be the right-winger in the 4-2-3-1 and it’s the right central midfielder in the 4-diamond-2.
Just before this image, the opposition’s goalkeeper sent the ball out to his left-back, as Zvezda naturally had the centre of the pitch overloaded with their 4-diamond-2 shape.
Additionally, the front three always sit very high and very compact during the high-block phase, retaining access to the opposition’s centre-backs and holding midfielder (where applicable, which is the case here in figure 15).
With a ball into the centre and a short pass to the centre-backs/holding midfielder out of the question, the opposition ‘keeper sent the ball out to the full-back, where there was space.
However, as the ball arrived with the full-back, Zvezda’s shape sprang into action.
The players were already positioned very close to one another and this compactness makes it more difficult for the opposition to play through them, especially as they approach as a unit in the high-block phase and press aggressively.
The wide central midfielder leads the press and is happy to act as a winger would, coming all the way out to the full-back to challenge for the ball, with his midfield teammates retaining their diamond shape and following closely behind to make sure that they stay compact and make it difficult for the opposition to play through them.
One of the opposition’s central midfielders came close to support the full-back, as is common when the ball is played out wide to him.
On this occasion, the 10 opted to drop deep, away from the strikers, to pick up this player but it’s just as common to see one of the deeper central midfielders advance to pick this player up.
This will largely depend on whether the opposition’s holding midfielder is high or low and how much of a passing option they are at this point.
In this case, the holding midfielder was very deep and the strikers do enough to make a pass to him impossible, so Zvezda’s 10 dropped to provide more support in midfield.
As play moves on here, the ball is played short to the near central midfielder but due to the pressure on him, he’s forced to quickly release down the wing, where Zvezda’s right-back is positioned to prevent the opposition’s left-winger from progressing and this leads to a turnover.
This highlights why Zvezda have got such a low PPDA.
They like to congest the centre and force the opposition out wide, where they benefit from the extra defender that is the sideline.
When the ball is out wide, Stanković relies on his midfielders’ energy to get from the centre to the wing and the space around the ball-carrier quickly to ensure compactness which will make it more difficult for the ball carrier to progress.
Again, the midfield’s energy is key here as the wings are naturally more open in this diamond shape but Zvezda generally retain high energy levels that help them to press aggressively as a unit all over the pitch to quickly regain possession.
Figure 15 highlights that when the ball does move out to one wing, Zvezda essentially don’t care about the other wing.
They’re happy to leave space open on that wing, which is a potential big weakness if the opposition can pull off the switch.
However, Zvezda generally press quickly and aggressively enough that the ball carrier doesn’t have the time and space—even if he does have the skill, which is a big question in and of itself—to make the switch, which is why Zvezda are happy to leave that space open and leave the players on the opposite wing free, in favour of retaining their compact diamond shape, pressing and positioning themselves in relation to their teammates and the space around the ball carrier to be more difficult to play through in this tight area.
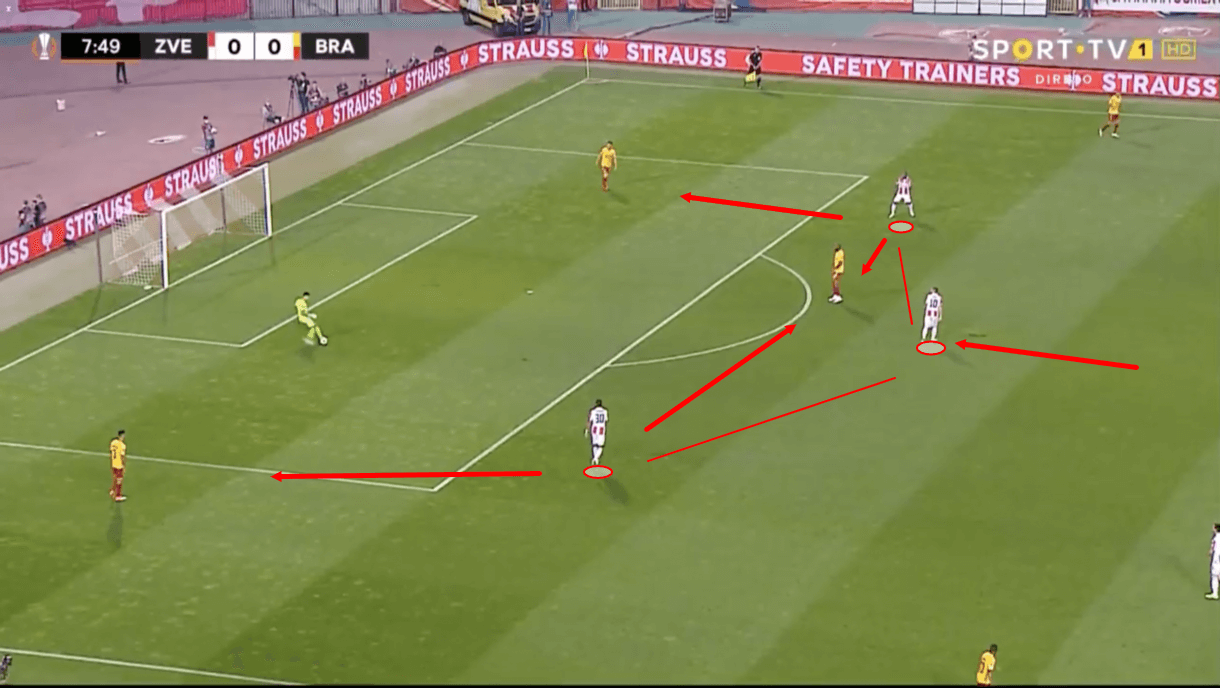
We see an example of Zvezda’s front three defending together as the opposition try to play out from the back via short passes here in figure 16.
As we mentioned, these players like to stay close together, retaining access to the holding midfielder and the centre-backs.
If the opposition decide to take them on and back themselves to play through their press, then it can lead to a very dangerous high turnover.
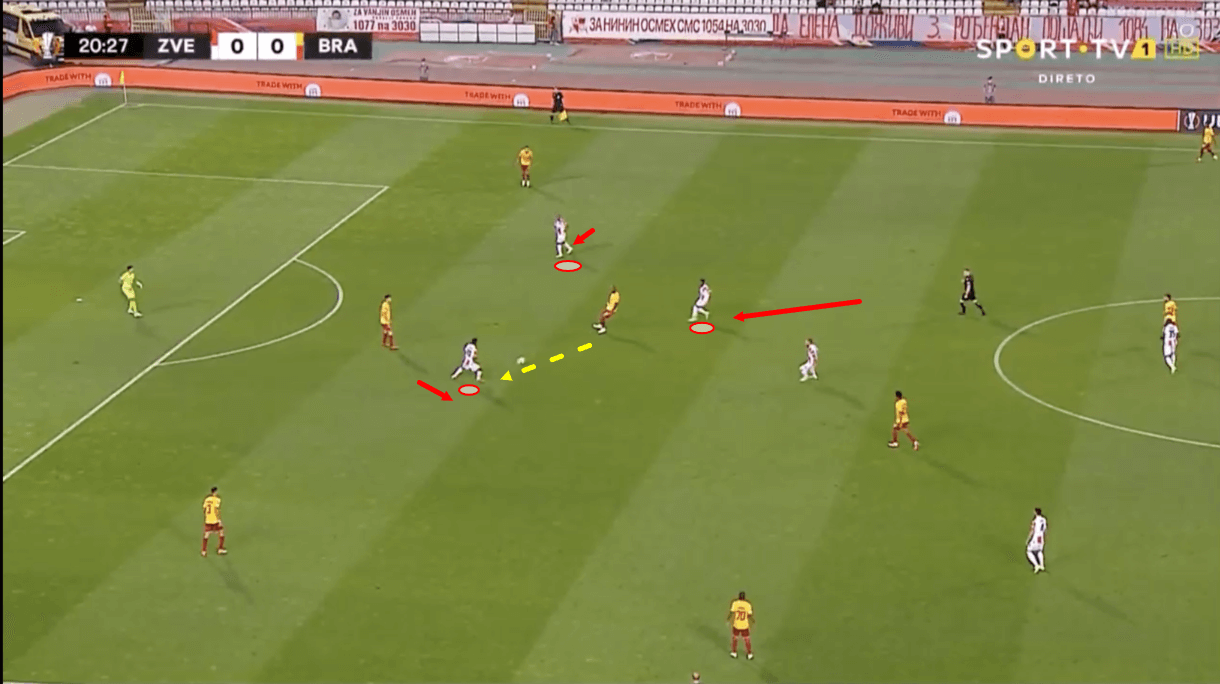
Later on in the same game as the one we analysed in figure 16, we saw an example of Zvezda forcing a high turnover thanks to the proximity of their front three to one another and the pressure they place on the opposition’s centre-backs and holding midfielder.
Just before figure 17, the opposition’s left centre-back (positioned very centrally here) played the ball into the holding midfielder.
This player was immediately under pressure from behind thanks to Zvezda’s 10, who prevented him from turning and the player tried to quickly release the ball out towards his side’s right-back, positioned deep here.
However, Zvezda’s front three had this player in a triangle here that they were determined to prevent him from leaving with the ball.
As a result, Zvezda’s left-forward was alert to the holding midfielder’s attempted pass and stepped out to make an interception that forced a very high, dangerous turnover and a great attacking opportunity for Zvezda.
This highlights one key benefit for Zvezda of the close proximity of their front three and the aggressive pressure they place on deep, central players if they do receive the ball in build-up.
Additionally, this highlights how aggressively Zvezda defend the centre of the pitch.
They play with narrow formations because they primarily want to guard the centre of the pitch and prevent the opposition from playing through here, as it’s generally going to be a more threatening area from where more damage can be done.
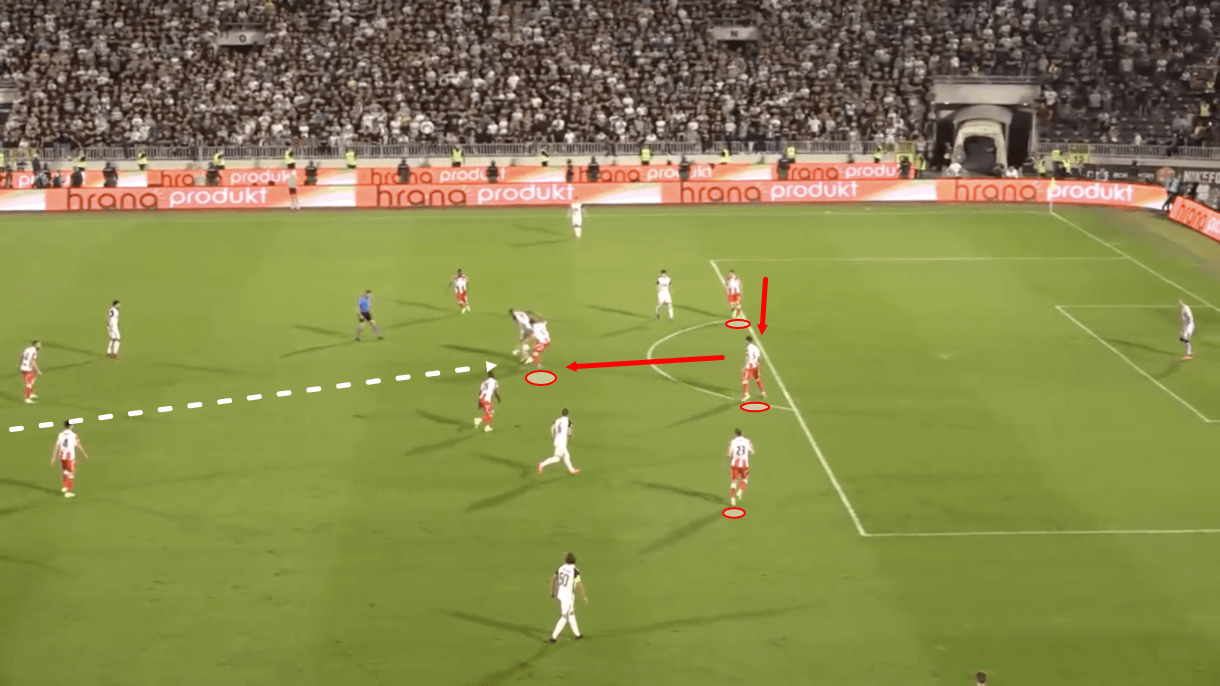
When defending deep, as was the case in figure 18, aggression is also apparent in Zvezda’s play.
This particular example highlights Zvezda’s centre-back stepping out of the backline to close down an opposition attacker receiving the ball in front of the backline, even though this allows space to open up in defence to potentially be exploited.
The right-back steps across to fill the space vacated by the centre-back when this happens, and Zvezda’s centre-backs have the freedom to step out of the backline and confront attackers rather than defending deeper.
The success of this tactic relies on good aggressive centre-backs who are comfortable in 1v1s and who are typically good decision-makers.
Conclusion
To conclude our tactical analysis of Dejan Stanković’s Crvena Zvezda, we can see that they’re an aggressive team in and out of possession who like to get the ball upfield quickly, though ideally building up via short passes from the back to draw pressure before then exploiting space in behind the midfield line, but not always.
This is evidently a team with a good level of understanding and trust, who Stanković has got making really effective positional rotations in the ball progression phase, with a 10 who enjoys freedom of movement in the final third to find and exploit space.
Without the ball, Zvezda press very aggressively, as a unit.
They focus on protecting the centre of the pitch but when the ball moves out wide, the midfield jumps into action as a unit to prevent ball progression.
Meanwhile, at the very beginning of the opposition’s build-up, their front three remains very close together, again to prevent central ball progression.
This analysis has highlighted some strengths and weaknesses of this side but, at present, they’re one of the most dominant sides in Europe in terms of their domestic accomplishments and they’re performing to a high standard in their European competition too, which makes Stanković’s side a team to watch and learn from.

Comments