The festive period sees the games come thick and fast with hardly any time to prepare. On Sunday, one of the EFL Championship leaders Leeds United travelled to St Andrew’s Stadium to face Pep Clotet’s Birmingham City. Both teams came into this game on a back of one-all draws on Boxing Day. This game was a perfect opportunity for both sides to get back into winning ways after picking up poor results in the last three games.
In this tactical analysis, we will take a closer look at both teams’ tactics that lead to such a thrilling encounter.
Lineups
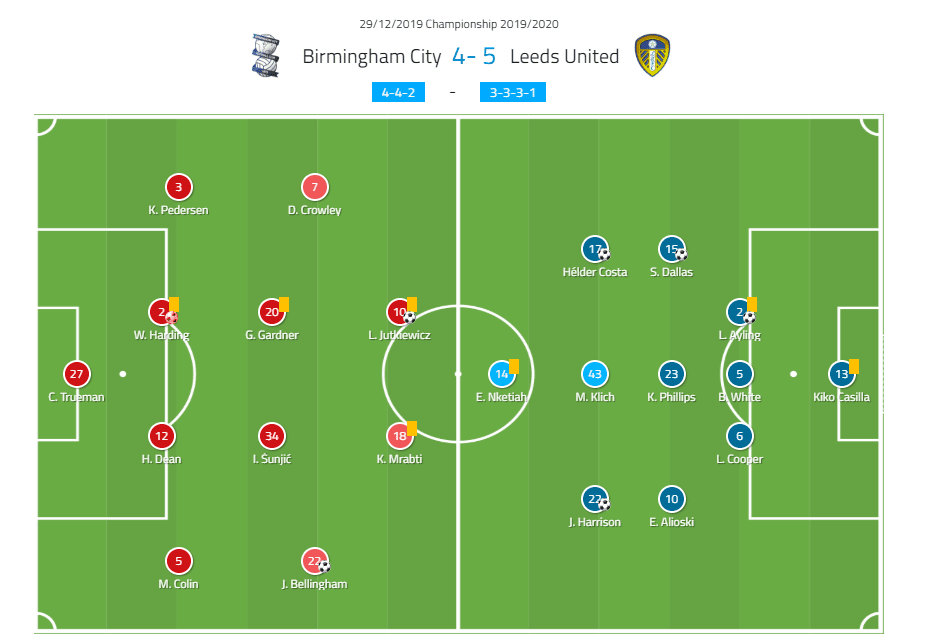
Birmingham made three changes following a one-all draw away to Blackburn on Boxing Day. The backline including the goalkeeper remained the same. Connal Trueman (goalkeeper), Maxime Colin (right-back), Harlee Dean (centre-back), Wes Harding (centre-back) and Kristian Pedersen (left-back) kept their place in the starting XI. However, there were three changes regarding the midfield unit. Only Gary Gardner kept his place while Ivan Šunjić, Dan Crowley and Jude Bellingham came into the side after being absent for the Blackburn game. The striker partnership remained the same with Kerim Mrabti playing just behind the lone striker Lukas Jutkiewicz.
Their opponents, Leeds United, made only a single change for this game. The striker Patrick Bamford made his way out for Arsenal loanee Edward Nketiah. Kiko Casilla remained between the sticks with Luke Ayling, Ben White and Liam Cooper forming the back three. Hélder Costa started the game on the right wing with Jack Harrison occupying the left. In the middle of the park, Kalvin Philips was the one to provide defensive cover for the back line with Stuart Dallas and Mateusz Klich playing slightly further ahead of him.
Leeds down the right and Birmingham’s pedestrian defending
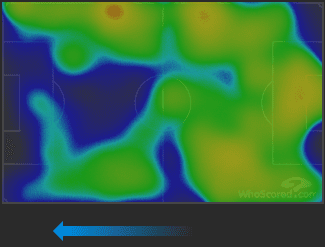
The visitors from Yorkshire set-up in a pretty unique 3-3-3-1 formation when having ball possession. The first line of build-up was comprised of Ayling, White and Cooper with Dallas and Alioski often positioned very wide near the touchlines and Phillips operating in the centre, thus, composing the second line of build-up. In this game, Leeds United were heavily focused to attack down the right flank with 50% of their attacks go through that side.
As we can see in the image below, the whole backline is situated more to the right with the right-sided centre-back Ayling on the ball. It indicates Leeds’ preference to build-up and attack down that side which happened many times in this game.
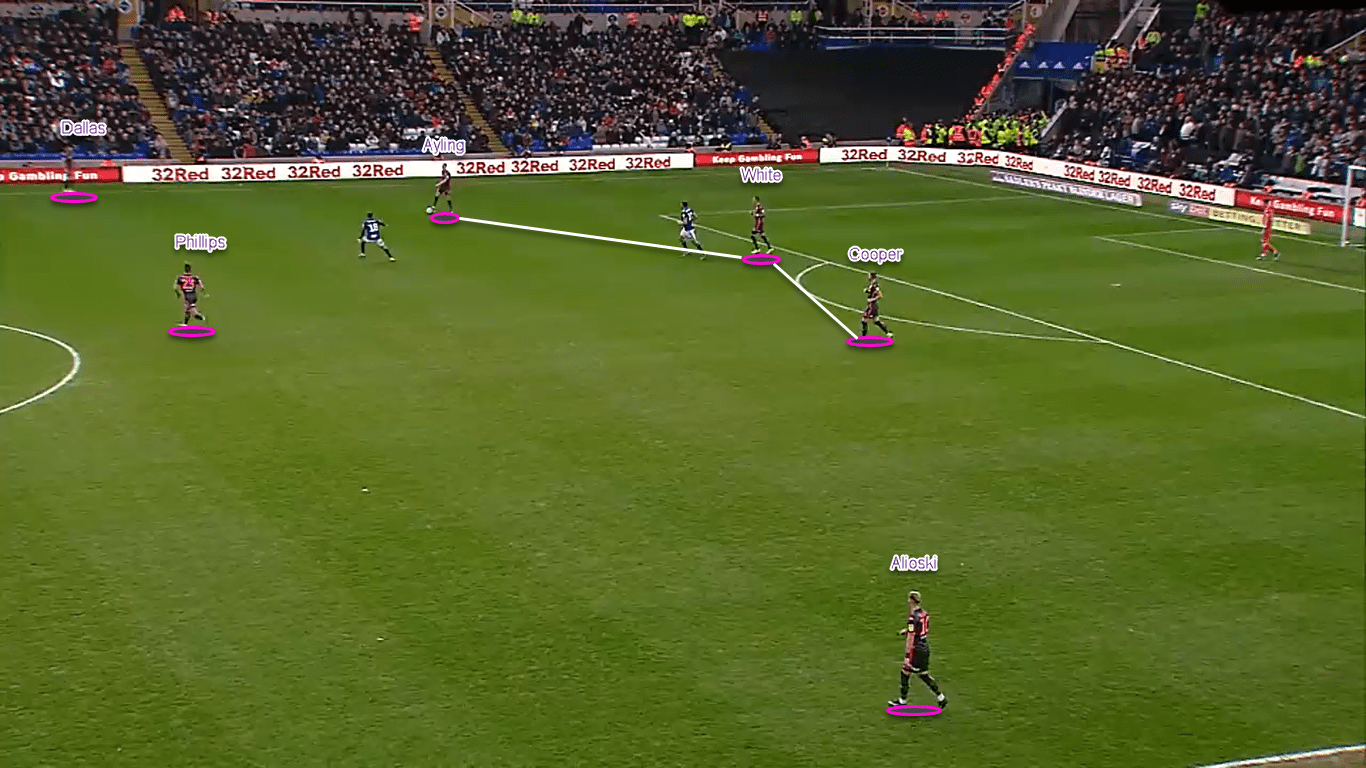
Marcelo Bielsa’s side was causing Birmingham trouble near their defensive third when having three or four players on the right-wing within close proximity to each other. The most involved players when combining down the right for Leeds were Ayling, Dallas and Costa. This trio registered two out of three highest passing combinations in a team (9 between Ayling and Costa and 9 between Dallas and Costa).
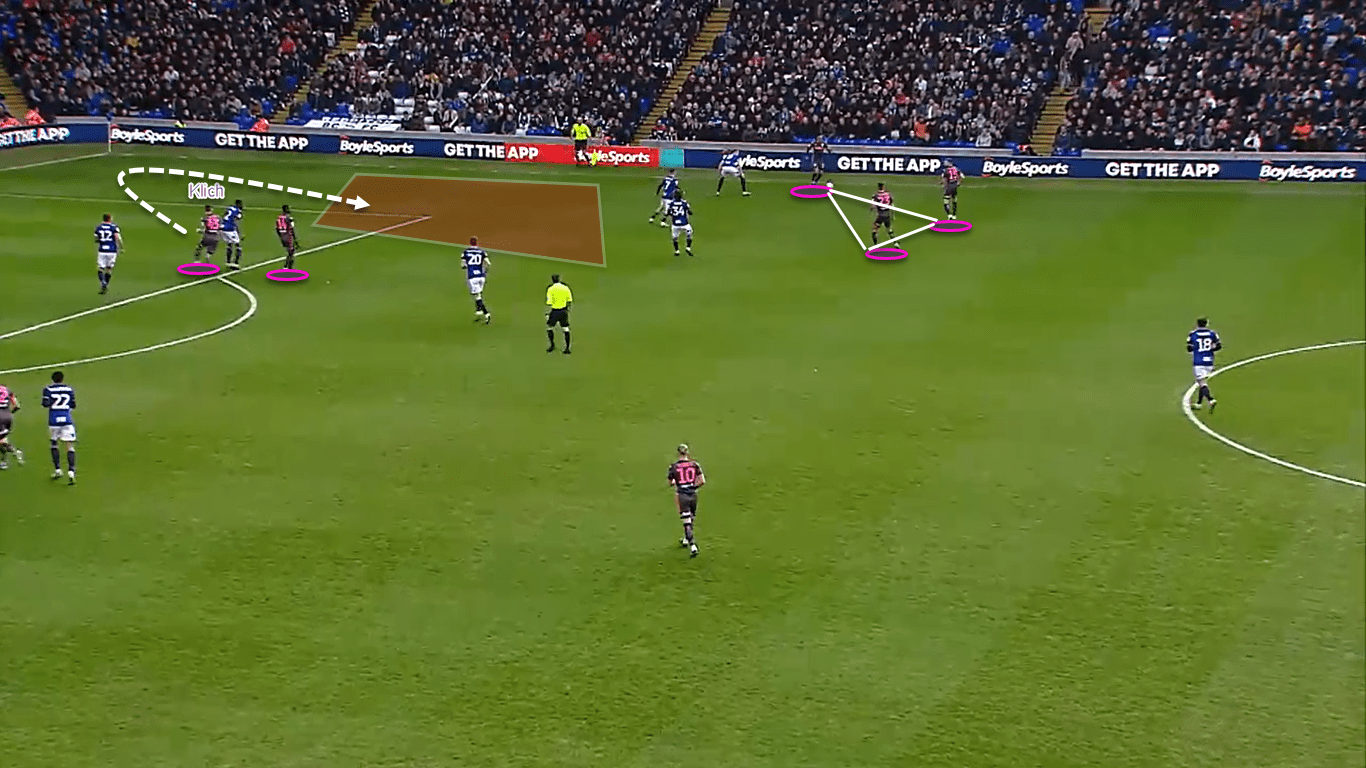
In the example below, we can see three Leeds players overloading the right-wing, thus, attracting an equal number of opposition players. Consequently, it creates space in behind them for Klich to exploit when running on a blindside of Birmingham’s centre-back.
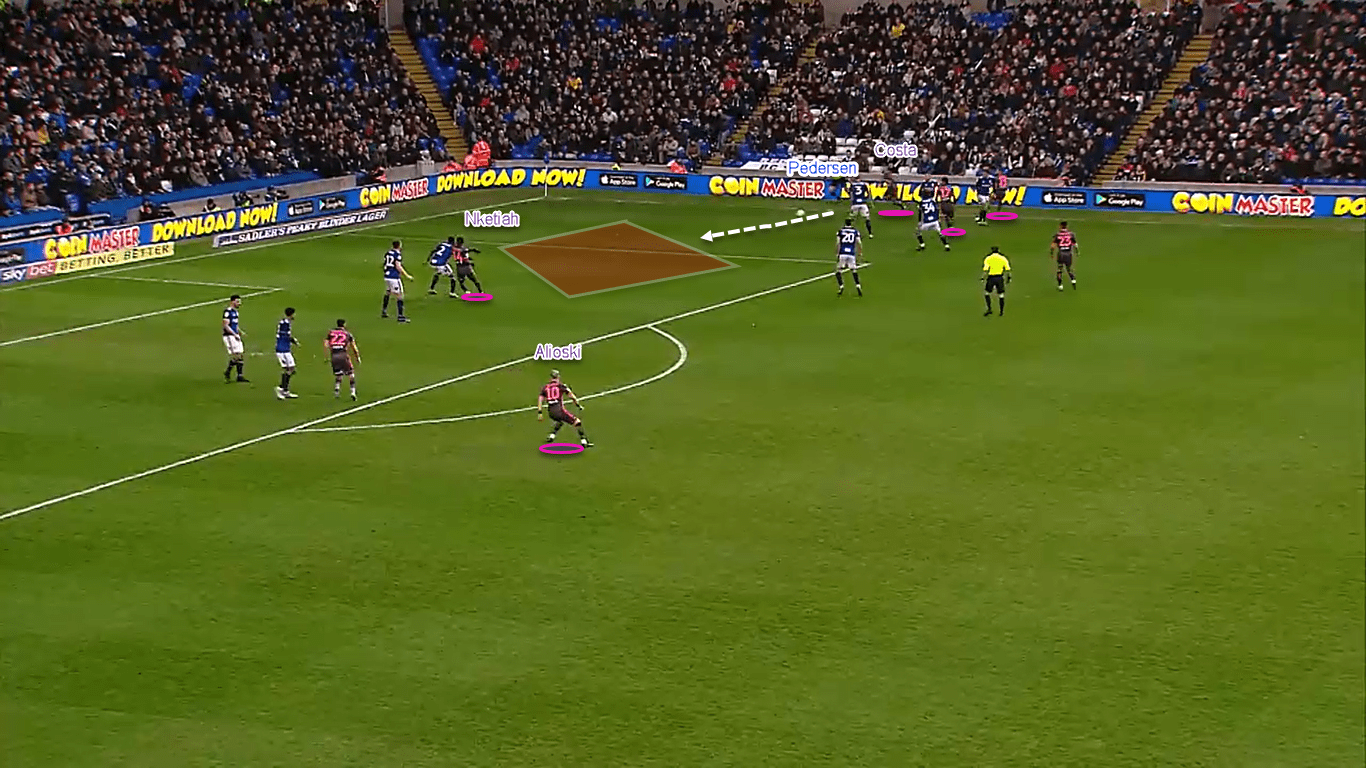
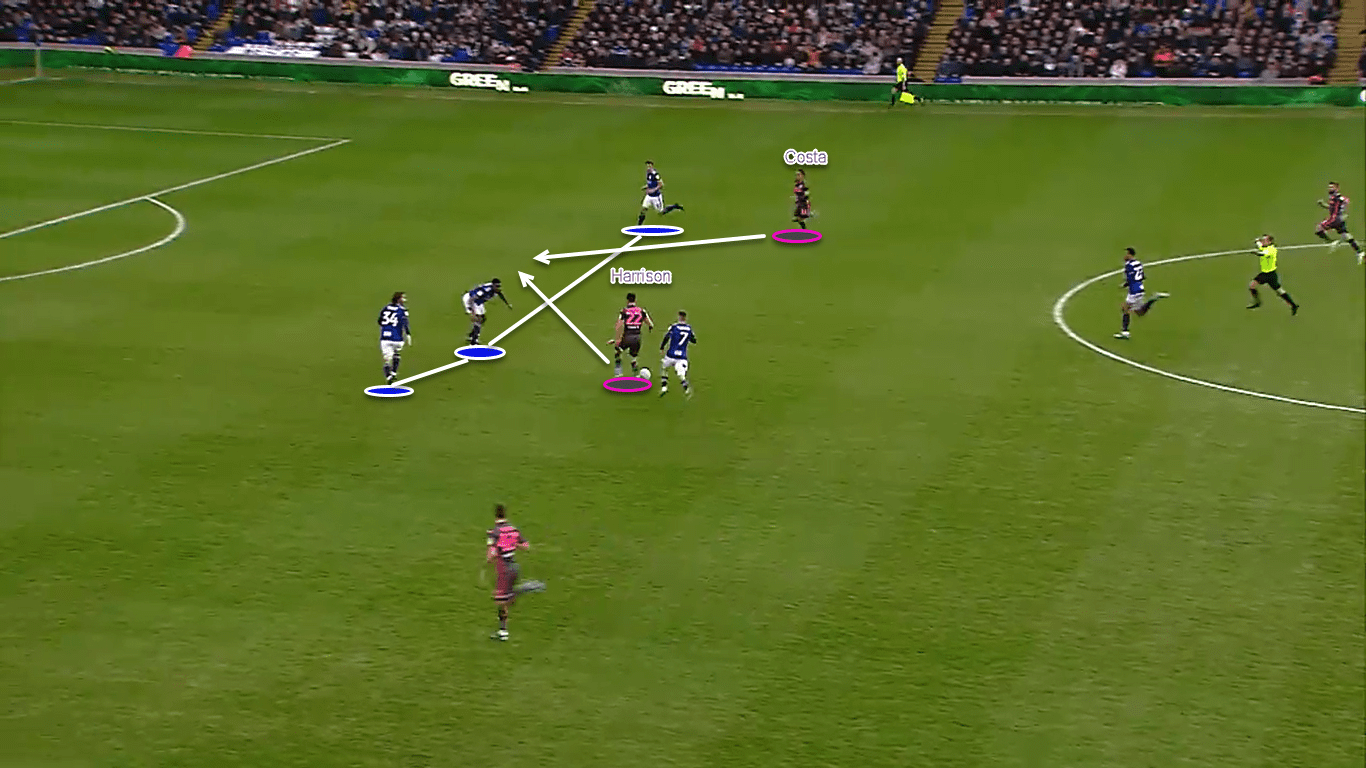
The following illustration displays another Leeds’ attack down the right-wing. This highlights the biggest issue that the home team faced in the first 30 minutes which was ponderous defending and constant switching off when Leeds were interchanging passes down Birmingham’s left side.
Here, Plotet’s team had a numerical advantage of four versus three but still could not contain the opponents down that side. Leeds managed to work their way out of the congested area with Pedersen caught completely ball watching and letting Costa to drive into the box. Nketiah pinned back Birmingham’s centre-back Harding, thus, prohibiting him from stepping out to confront the Portuguese winger.
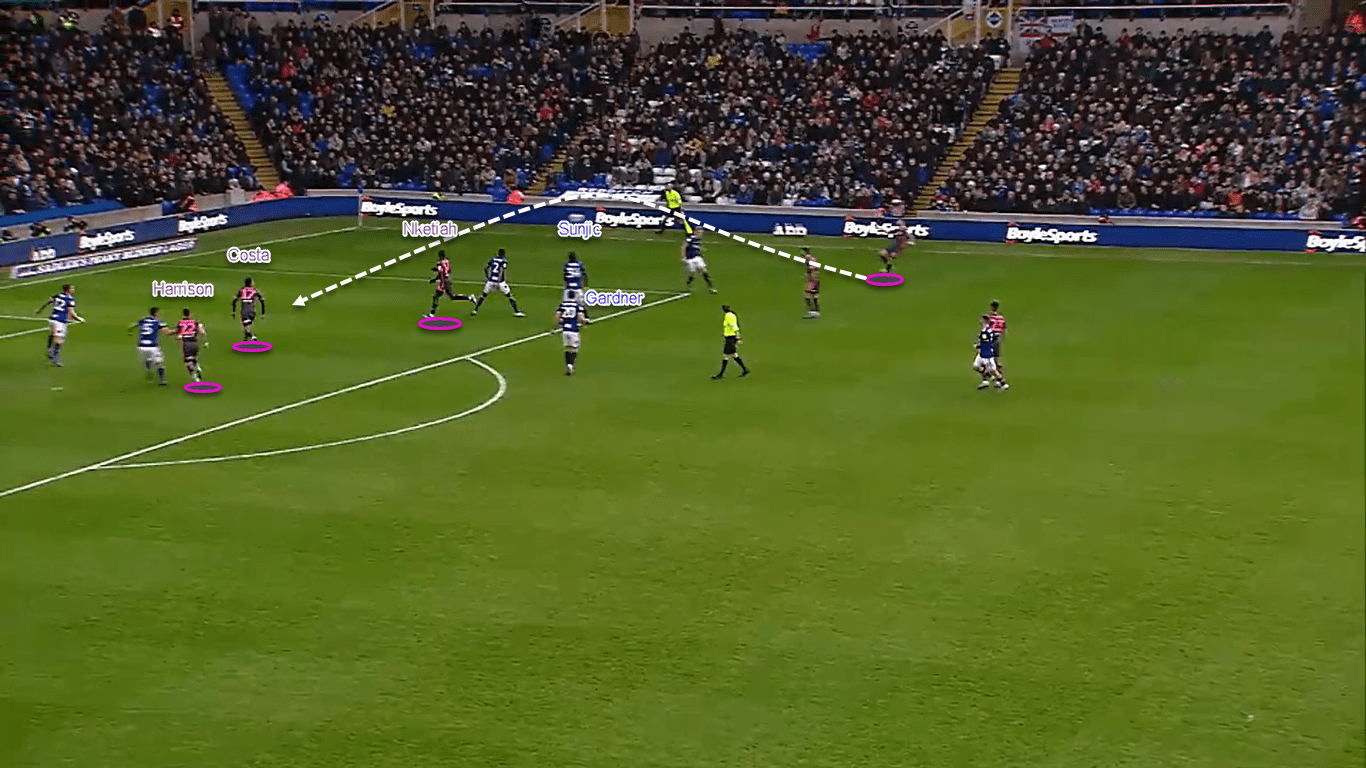
The second goal that the Blues conceded was more than preventable. Once again, it was a result of lack of concentration meaning that the players switched off at crucial moments and did not track Leeds’ players.
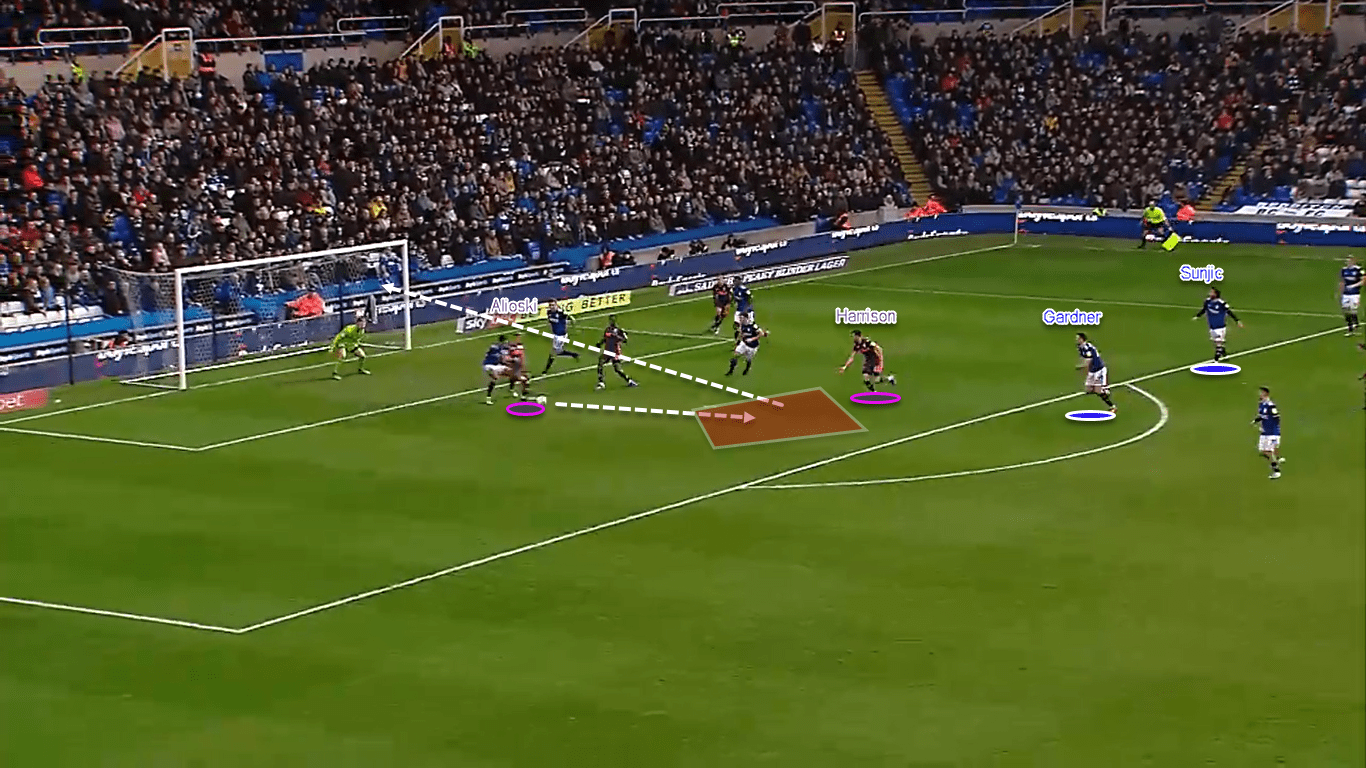
As it can be seen in the illustration below, Harding loses Nketiah out of sight, whereas Dean fails to step out on time to confront Costa. Harrison, in this instance, is carefully looked after by Colin but only momentarily. In the second image below, Colin loses Harrison who receives a pass from Alioski to make it 2-0 for the visitors. Noteworthy is the body language of Šunjić and Gardner who remained very passive spectators watching Harrison taking a shot and not trying to challenge him.
Defending deeper in their own half while Leeds were on the ball was not the only instance when Birmingham looked ponderous. Defensive transitions were also a concern in the first half an hour for the home side. This is exactly how the first goal was conceded after an unsuccessful set-piece.
Birmingham’s build-up issues
The first half an hour certainly did not have any indication that Birmingham will end up scoring four goals on the night. The Blues offered little threat going forward failing to manipulate Leeds’ man-marking system when playing out from the back. In the first 20 minutes, Bielsa’s side allowed Birmingham to perform 23.5 uncontested passes in the top 60% of the pitch as recorded by the Passes Allowed Per Defensive Action (PPDA) metric. This statistical metric indicates that the home team was able to enjoy spells of possession in their own half; however, as mentioned already, the Blues could not find the way how to use all this possession in a penetrative way.
In the example shown below, we can see that Leeds were marking the majority of opponents in a man-oriented manner; however, the press was not extremely aggressive. The player on the ball had time to pick his head up and look around but any diagonal or vertical passes were not possible in this instance with Leeds United man-marking the opponents adequately.
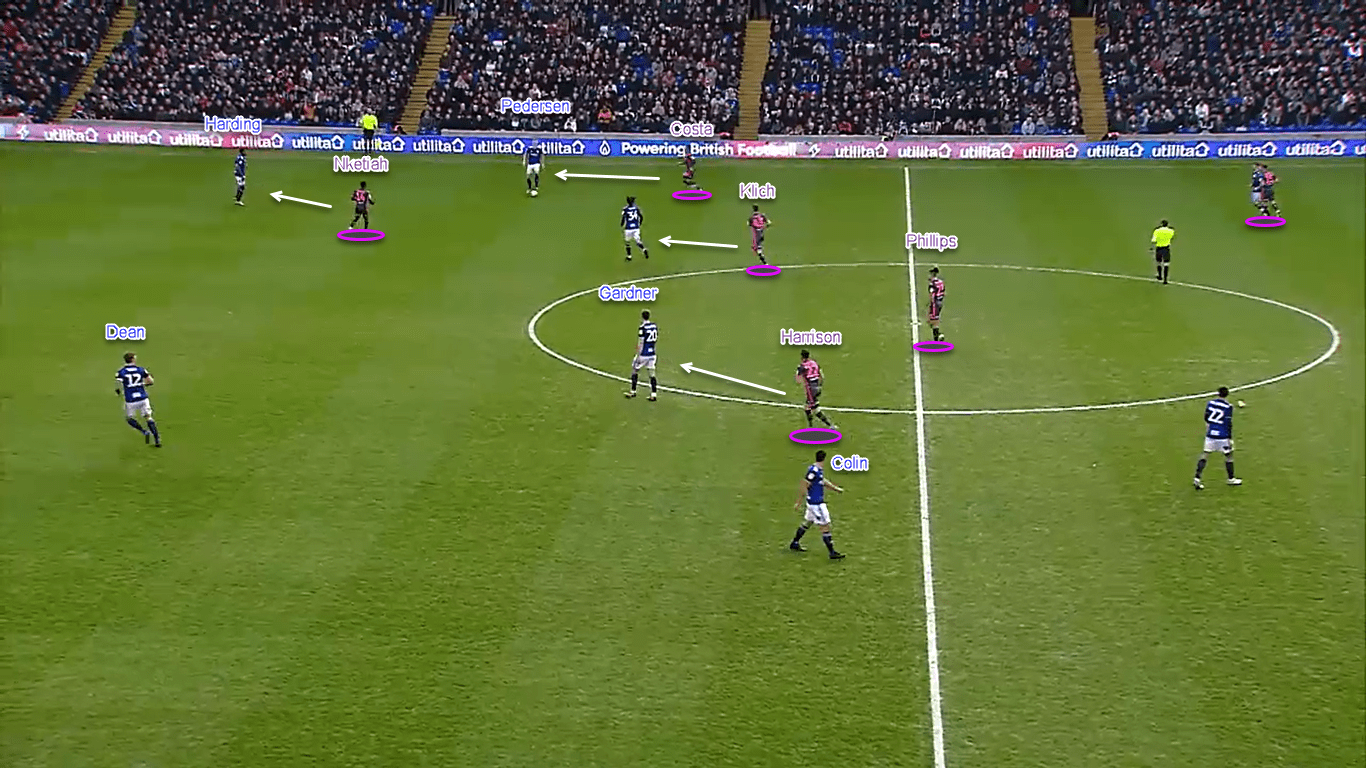
Here we can see the situation similar to the one displayed above. Both Bellingham and Gardner are man-marked, Pedersen is closed down by Costa, Klich is ready to close down Šunjić and Nketiah intelligently positions himself so that he can cover shadow Dean and possibly intercept a pass to Harding. The most obvious pass is to Šunjić but Klich is already anticipating that and even if the Croatian receives the ball, all three midfielders would be tightly man-marked since Birmingham’s build-up was fairly static. The home team failed to drag the pressing players away from important areas to open space for other players to exploit.
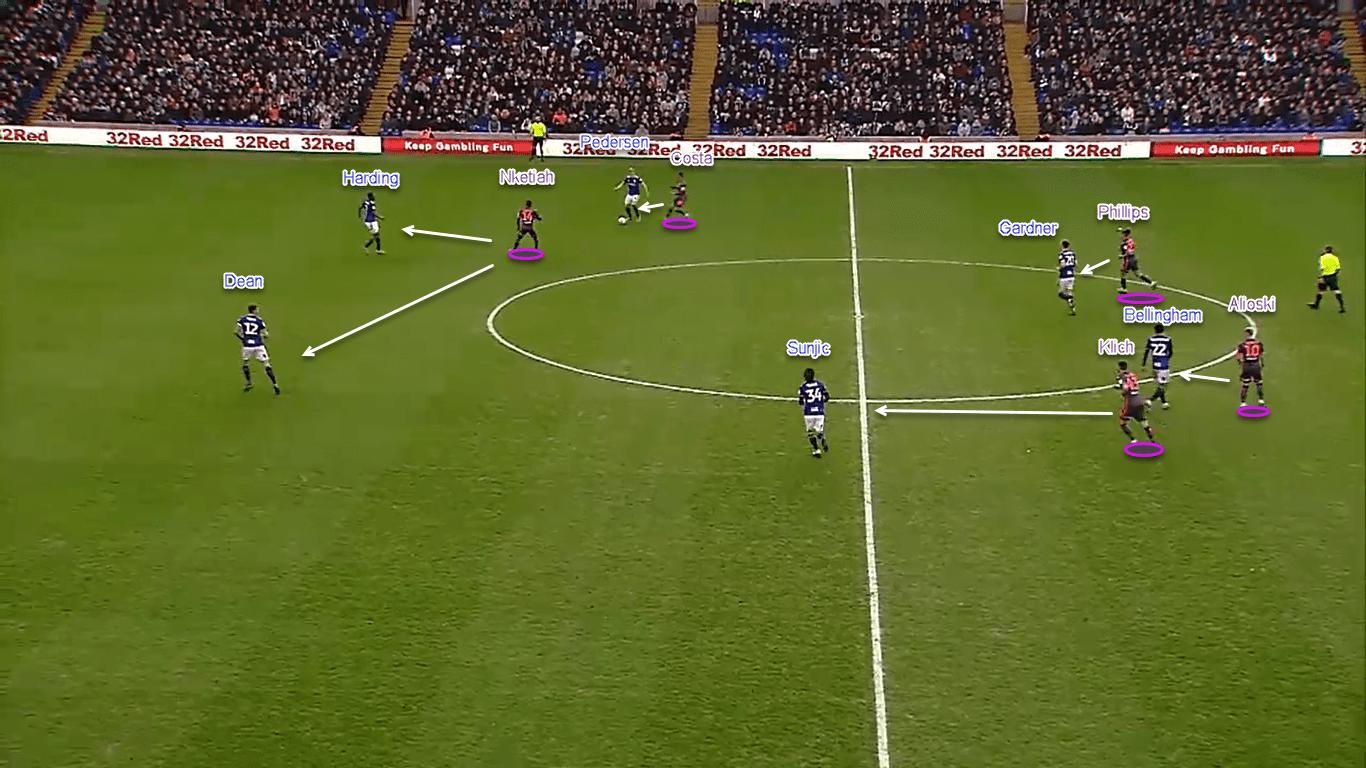
Another great example of Birmingham’s inability to penetrate Leeds’ man-marking system. The home team tried to create an overload on the left side but did not manage to get anyone into the highlighted area with all four players being tightly man-marked again.
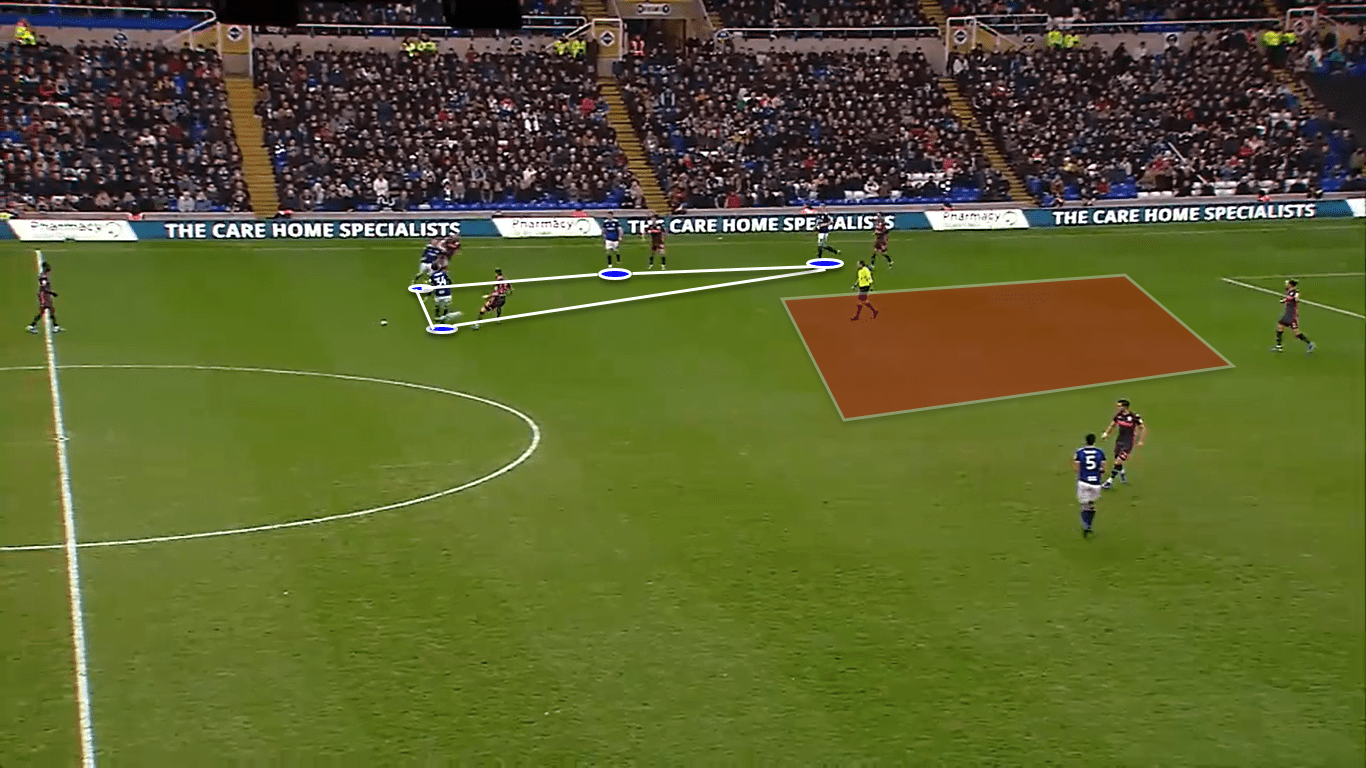
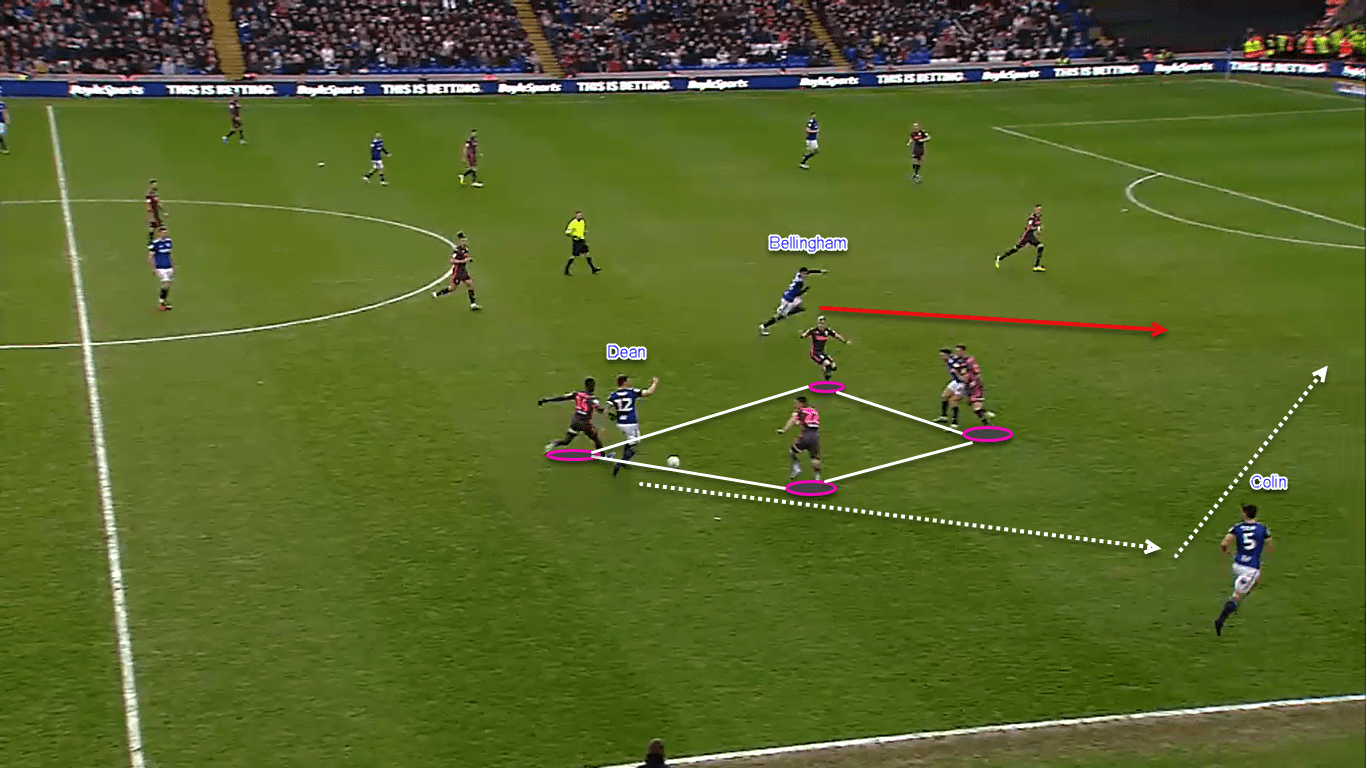
The only quality bit of play that the home side managed to create came from a slightly changed approach. The Birmingham centre-back used the tactic called dribble to attract. Dean drove forward with the ball leaving Nketiah behind him. Bellingham was man-marked by Alioski, Colin had Harrison covering him, whereas Cooper was glued to Mrabti. When Dean got closer to Harrison, the latter decided to step out and close him down which freed up Colin who made an overlapping run.
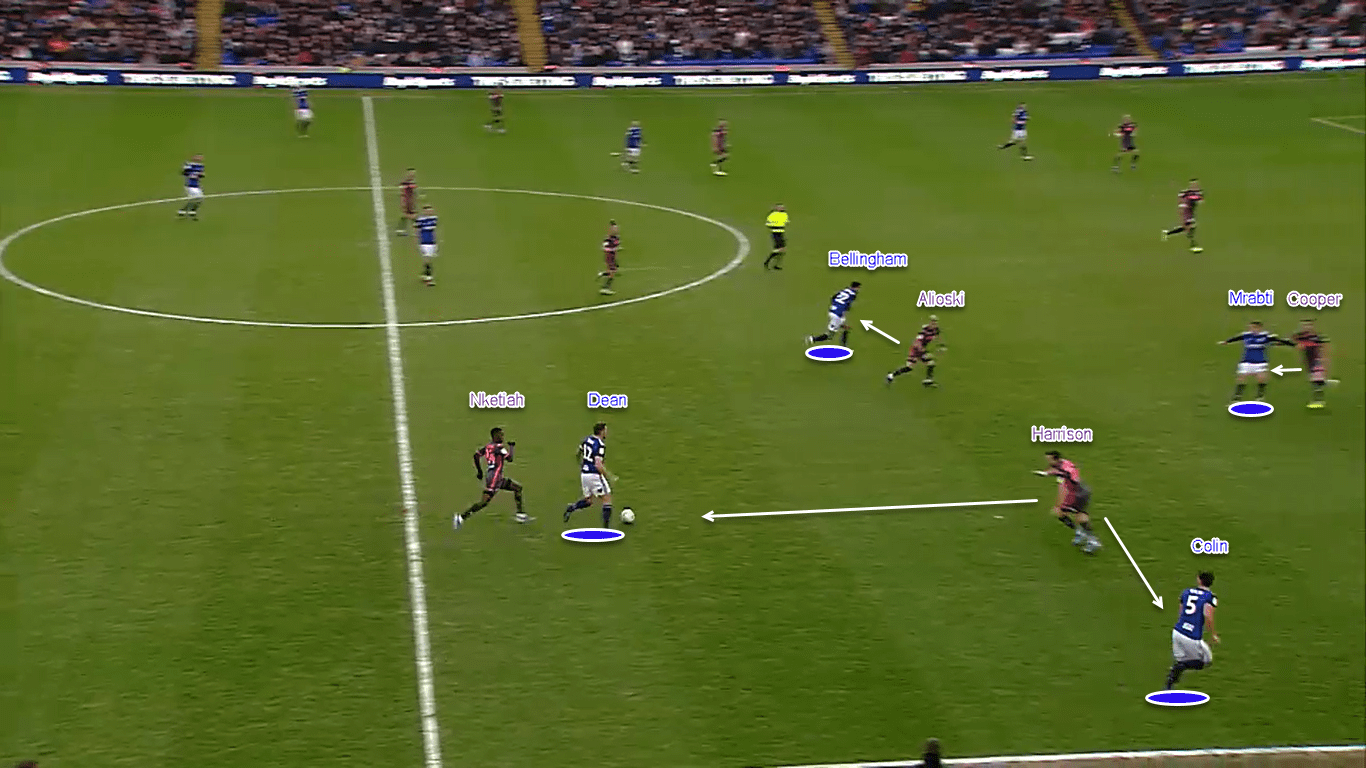
Here we can see that Dean attracted three players which created space for Bellingham to run in behind and Colin continue his overlapping run.
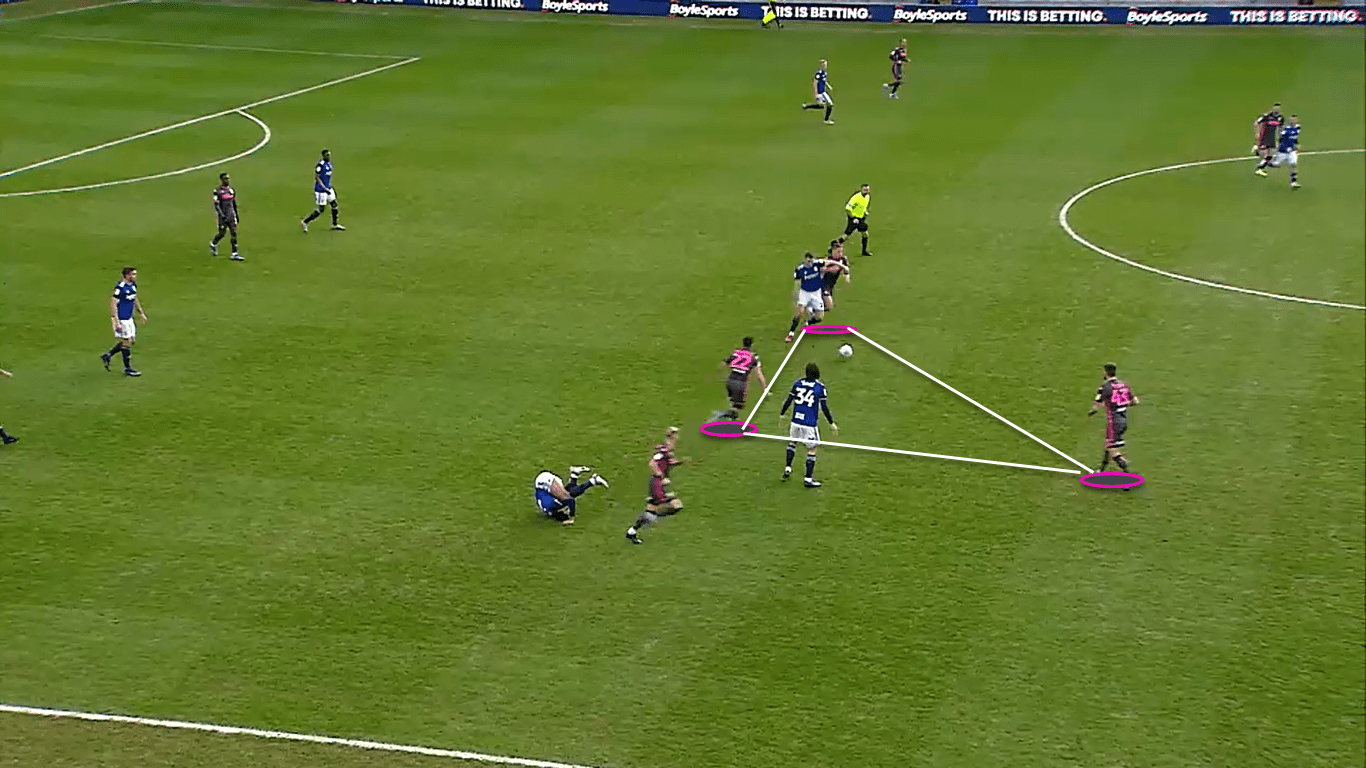
After Birmingham City pulled one back, the defensive intensity offered by Leeds United increased right away. From 23.5 PPDA in the first 20 minutes, the same metric registered only 7.2 PPDA after the goal was scored and remained fairly stable for the remaining part of the first half. It means that Birmingham was afforded only 7.2 passes on average in the top 60% of the pitch after they made the score 2-1. One of the examples can be seen below where the Blues found it hard to retain ball possession after being heavily pressed in tight spaces.
Alterations in the second half
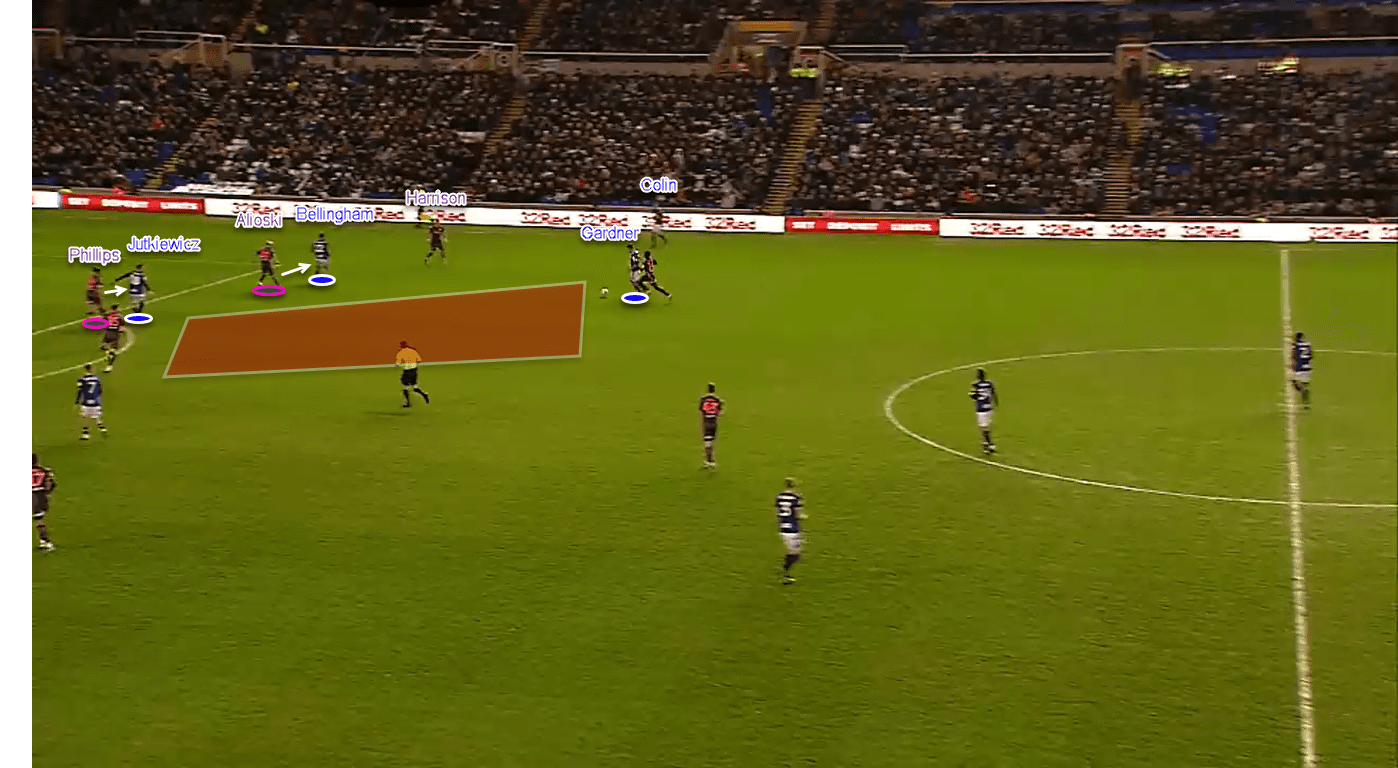
Birmingham City decided to be a bit more competitive in the second half and as we will see later in this analysis. The main tactics were to position certain players in more advanced positions, therefore, forcing certain Leeds’ players back and creating room in deeper positions for the player on the ball. Here we can see how Bellingham moves to the right inside channel, thus, dragging Alioski with himself. In addition, Jutkiewicz pinned Phillips while Harrison had to keep an eye on Colin. All of that created space for Gardner to run into.
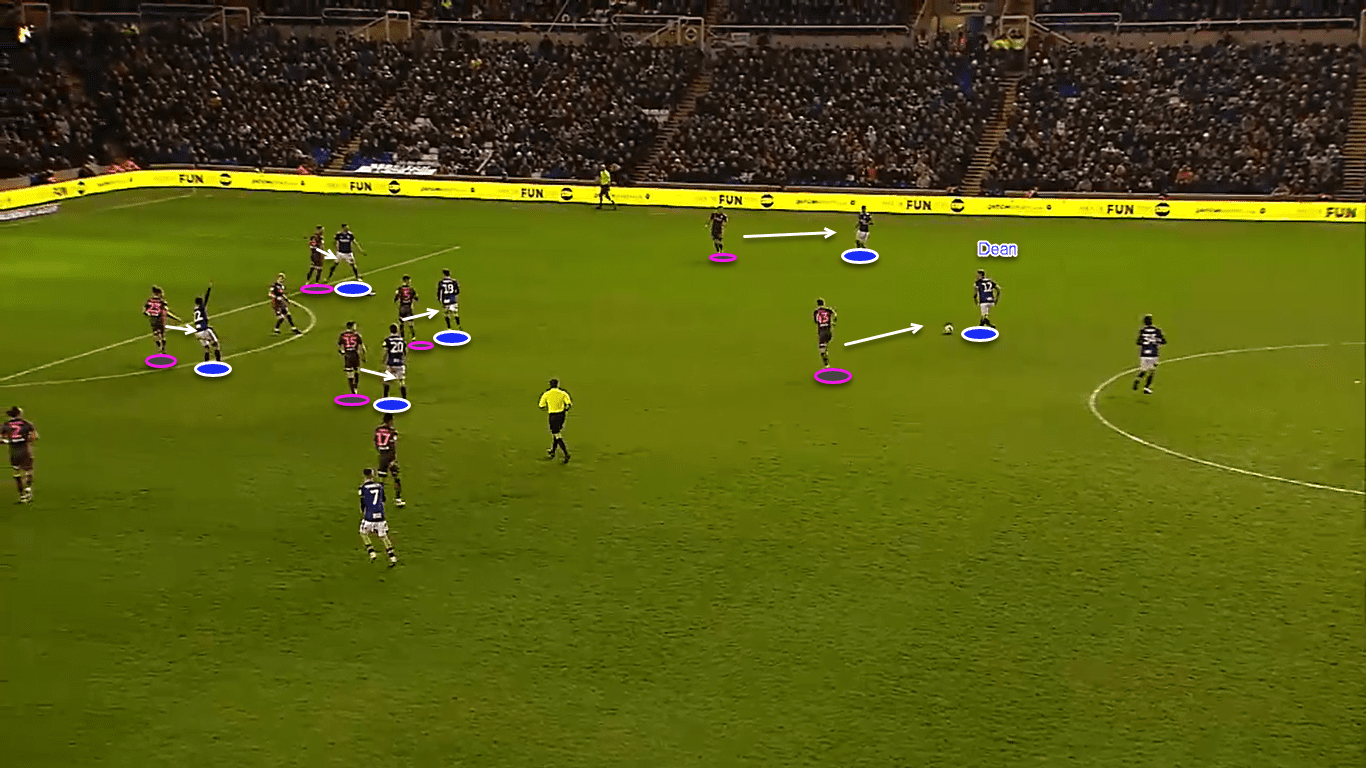
As mentioned previously, Leeds employed a man-marking system and Birmingham struggled to work around it. As explained above and shown in the image below, having players in more advanced positions was the solution for the Blues to create more space higher up the pitch since man-marking is vulnerable to players being dragged and moved about.
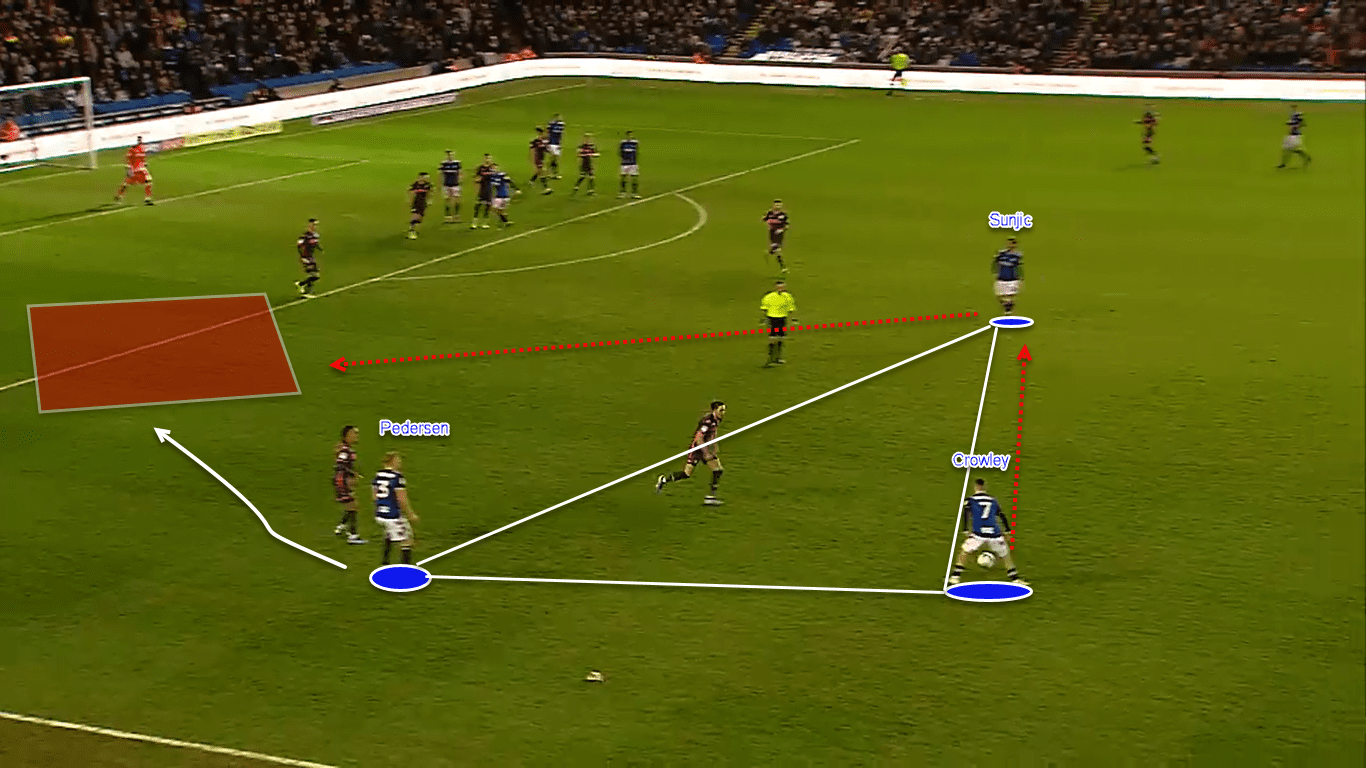
In addition to the tactics explained above, the home team’s reliance on long balls increased in the second half as well (15% first half; 22% second half). It forced Leeds to engage into aerial duels which (if lost) made the game unstructured from the Leeds point of view. As it can be seen in the example below, Birmingham won the aerial duel and saw the Yorkshire team slightly out of shape. The ball carrier (Gardner) had space in front of him to carry the ball forward.
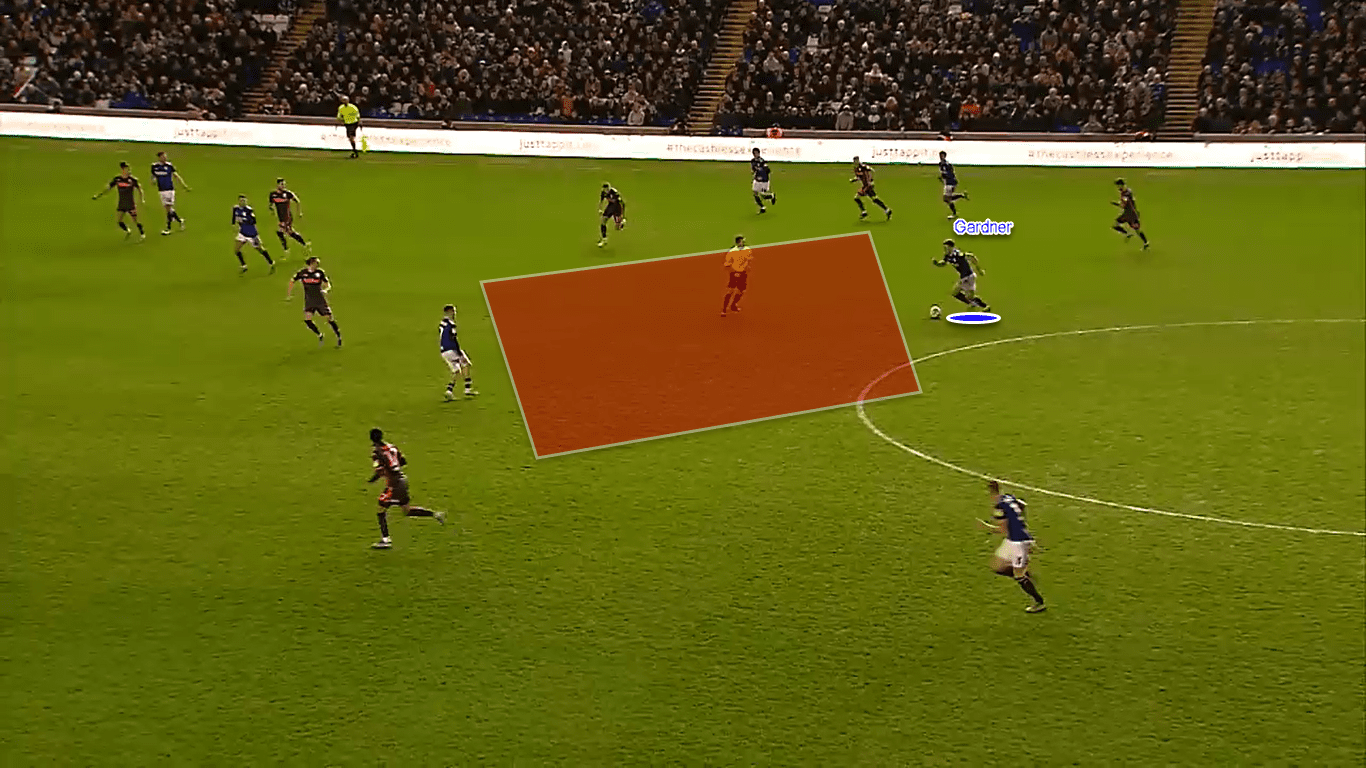
The play was switched to the left wing with Birmingham working in a triangle (Šunjić, Crowley, Pedersen). This combination led to a corner kick which eventually resulted in Birmingham’s second goal of the game.

Leeds also did slight adjustments which were related to their formation. The first half saw Leeds setting up in a 3-3-3-1 formation which was changed to 3-4-3 after the half-time. White moved to the right centre back which meant Phillips dropped in between Cooper and White. As a result, Ayling moved to the right wing-back position. Klich and Dallas now played as a double pivot.
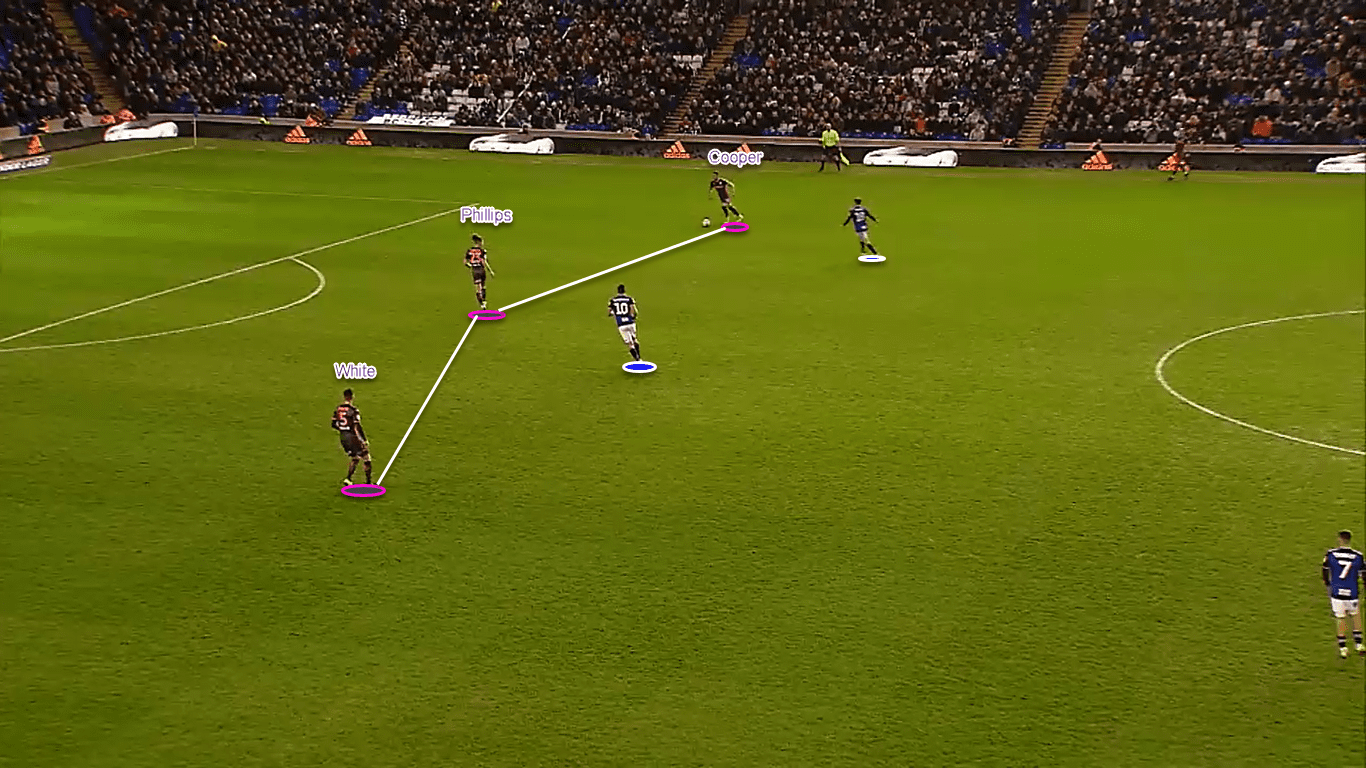
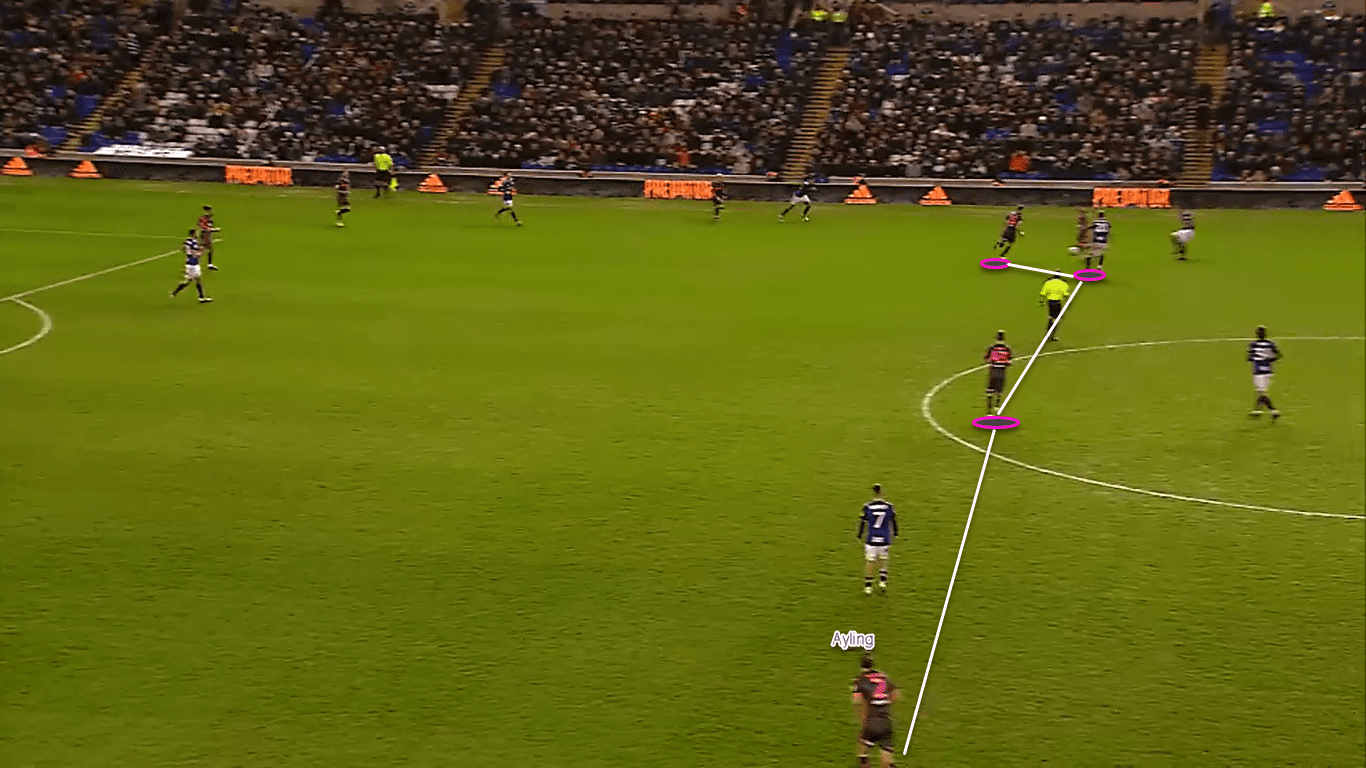
The main advantage of this tactical transformation was with regards to Ayling positioning on the pitch. This attacking fullback now found himself higher up the pitch and was able to make use of his attacking qualities to a greater extent. Here we can see how Leeds were trying to overload the left flank with Ayling making ground down the right-wing expecting a switch of play.
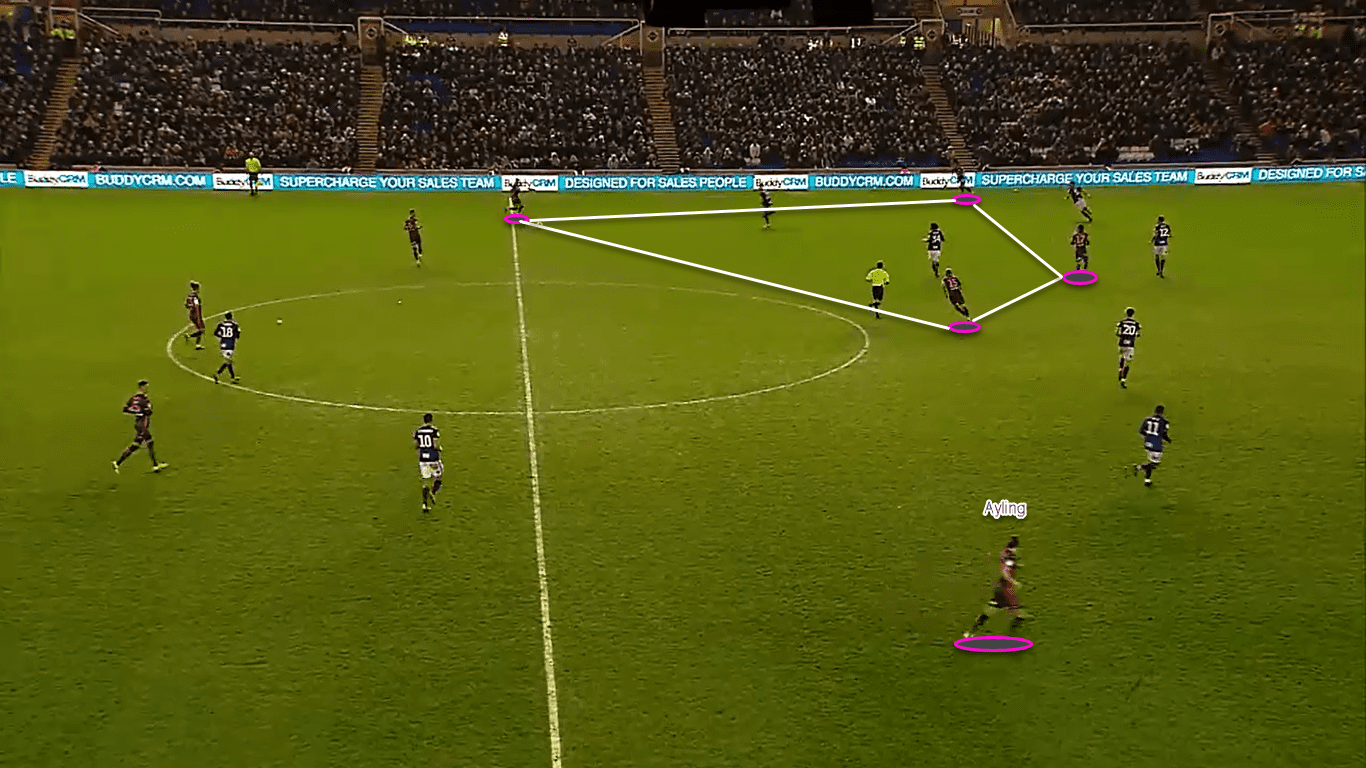
Leeds overloaded the left-wing and a huge space is now available on the right side after inviting Birmingham’s players over to the left.
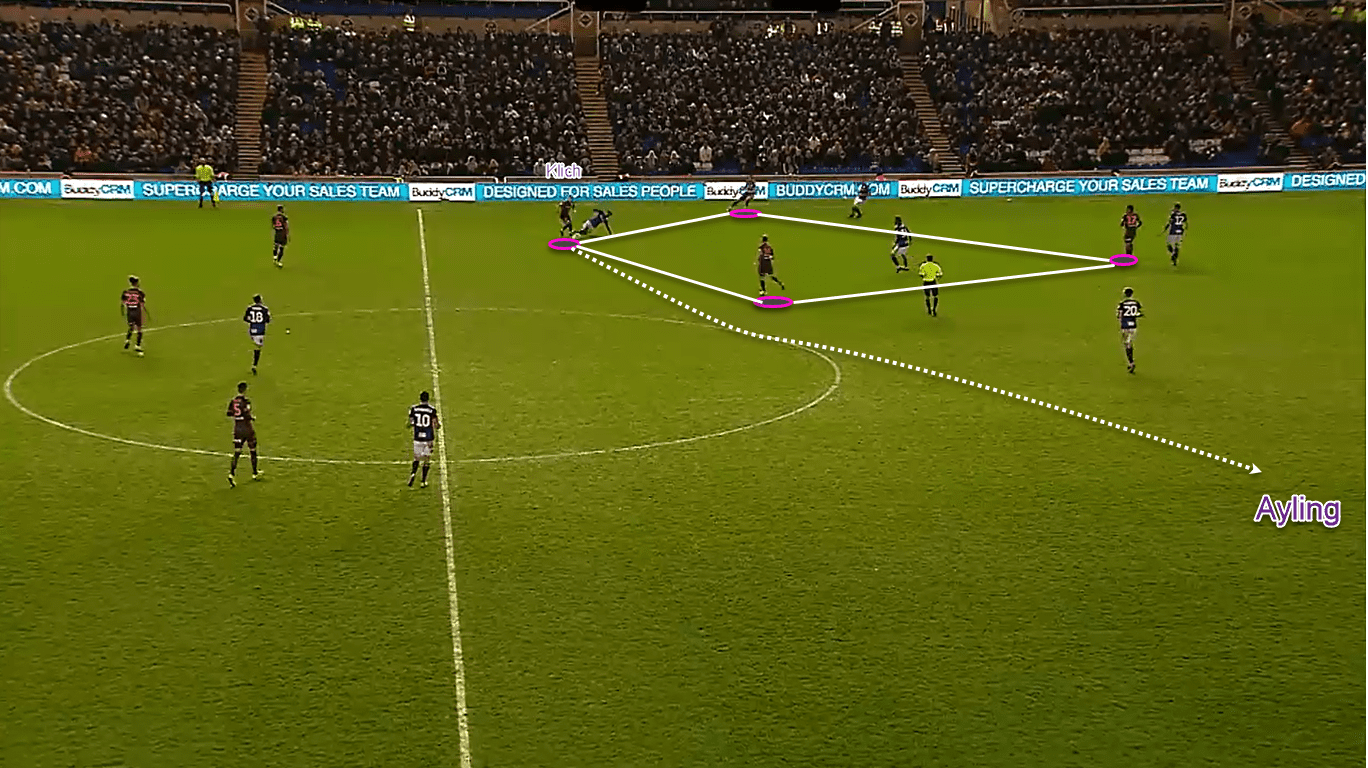
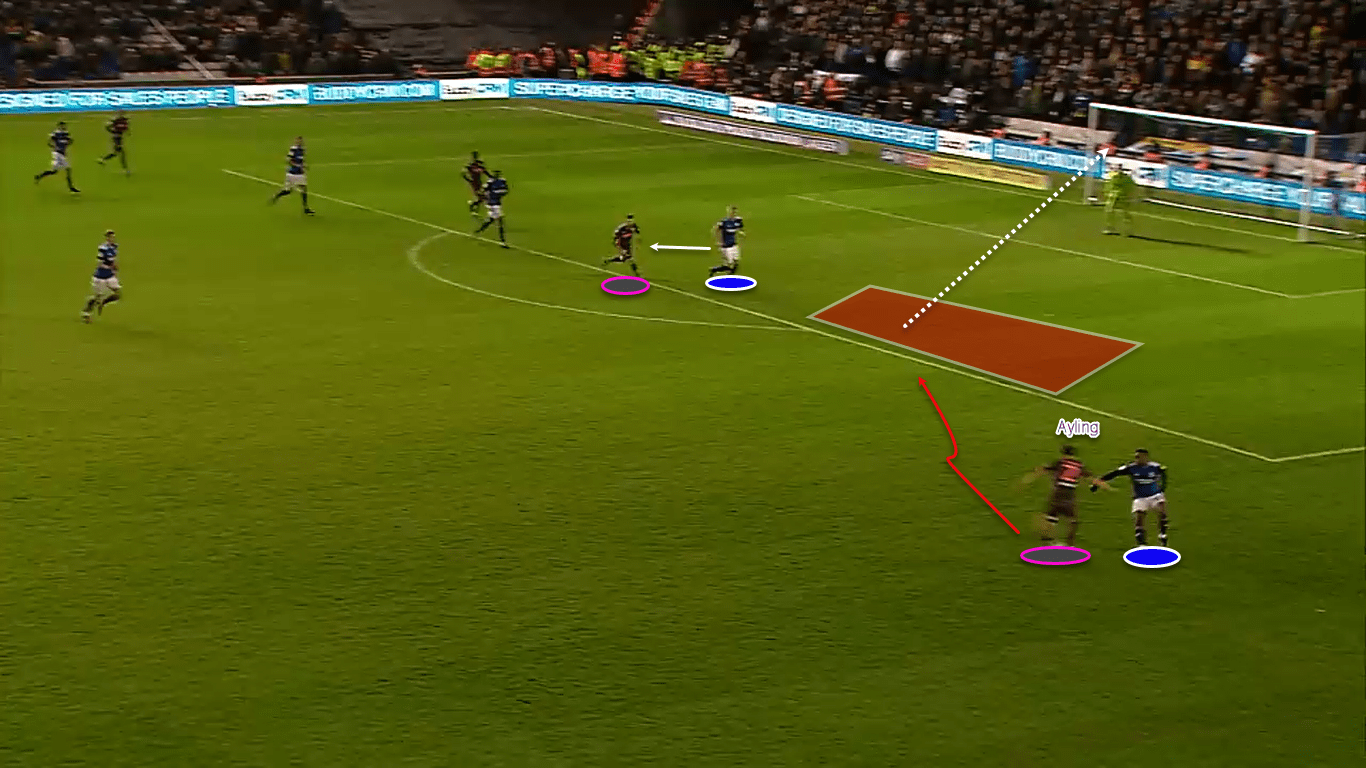
Klich played a diagonal Crossfield pass to Ayling who found himself in a one against one situation on the right-wing (from overload to underload). Ayling beat his opponent easily and scored a cracking goal to put Leeds in front 3-2.
The last 15 minutes saw a crazy ending to the game with both teams interchanging goals every few minutes once the game became really open.
Conclusion
Probably nobody could have foreseen such a scoreline before the match. Both teams finished the game with an xG value of 1.23 meaning that their finishing was better than the quality of chances created. This victory saw Leeds going top of the league with West Brom suffering an unexpected defeat at home to Middlesbrough. Birmingham, on the other hand, remain 10 points behind the sixth-placed Sheffield Wednesday.

If you love tactical analysis, then you’ll love the digital magazines from totalfootballanalysis.com – a guaranteed 100+ pages of pure tactical analysis covering topics from the Premier League, Serie A, La Liga, Bundesliga and many, many more. Buy your copy of the December issue for just ₤4.99 here



Comments