Leeds United’s new calendar year slump continued, as they lost all the points in weekend’s EFL Championship fixtures. In the midweek clash, they travelled to Griffin Park to play against Brentford. However, despite having a higher xG, Marcelo Bielsa’s team still failed to secure an away win. The hopes of being promoted directly to the Premier League is slowly fading.
Thomas Frank’s team was enjoying a strong run recently, with seven wins in their last 13, only losing twice. They climbed to the fifth of the table and provided a stern test for Leeds.
In this tactical analysis, we will show you how Brentford drew against Leeds United. This analysis focuses on the tactics adopted by both managers.
Lineups
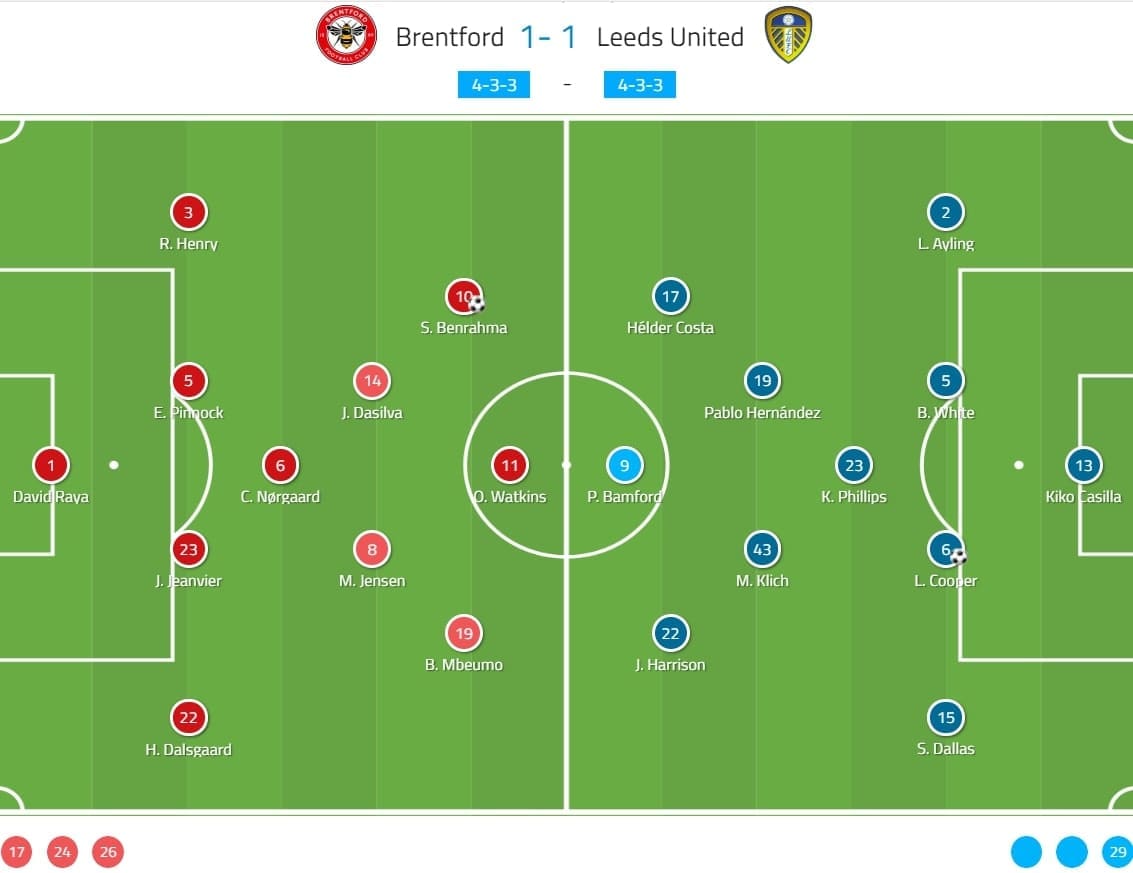
Frank started with the exact squad as they did in the win against Middlesbrough. The midfield trio was formed by Christian Nørgaard, Joshua Dasilva and Mathias Jensen; the front three were Saïd Benrahma, Bryan Mbeumo and Ollie Watkins.
Leeds only had one change from the last game, as Ezgjan Alioski stayed on the bench. Ben White returned to the centre of the defence, partnered with Liam Cooper; Luke Ayling was moved to the right-back and Stuart Dallas played as a left-back; Kalvin Phillips returned from suspension and played as a lone pivot.
Leeds’ attack was well-planned
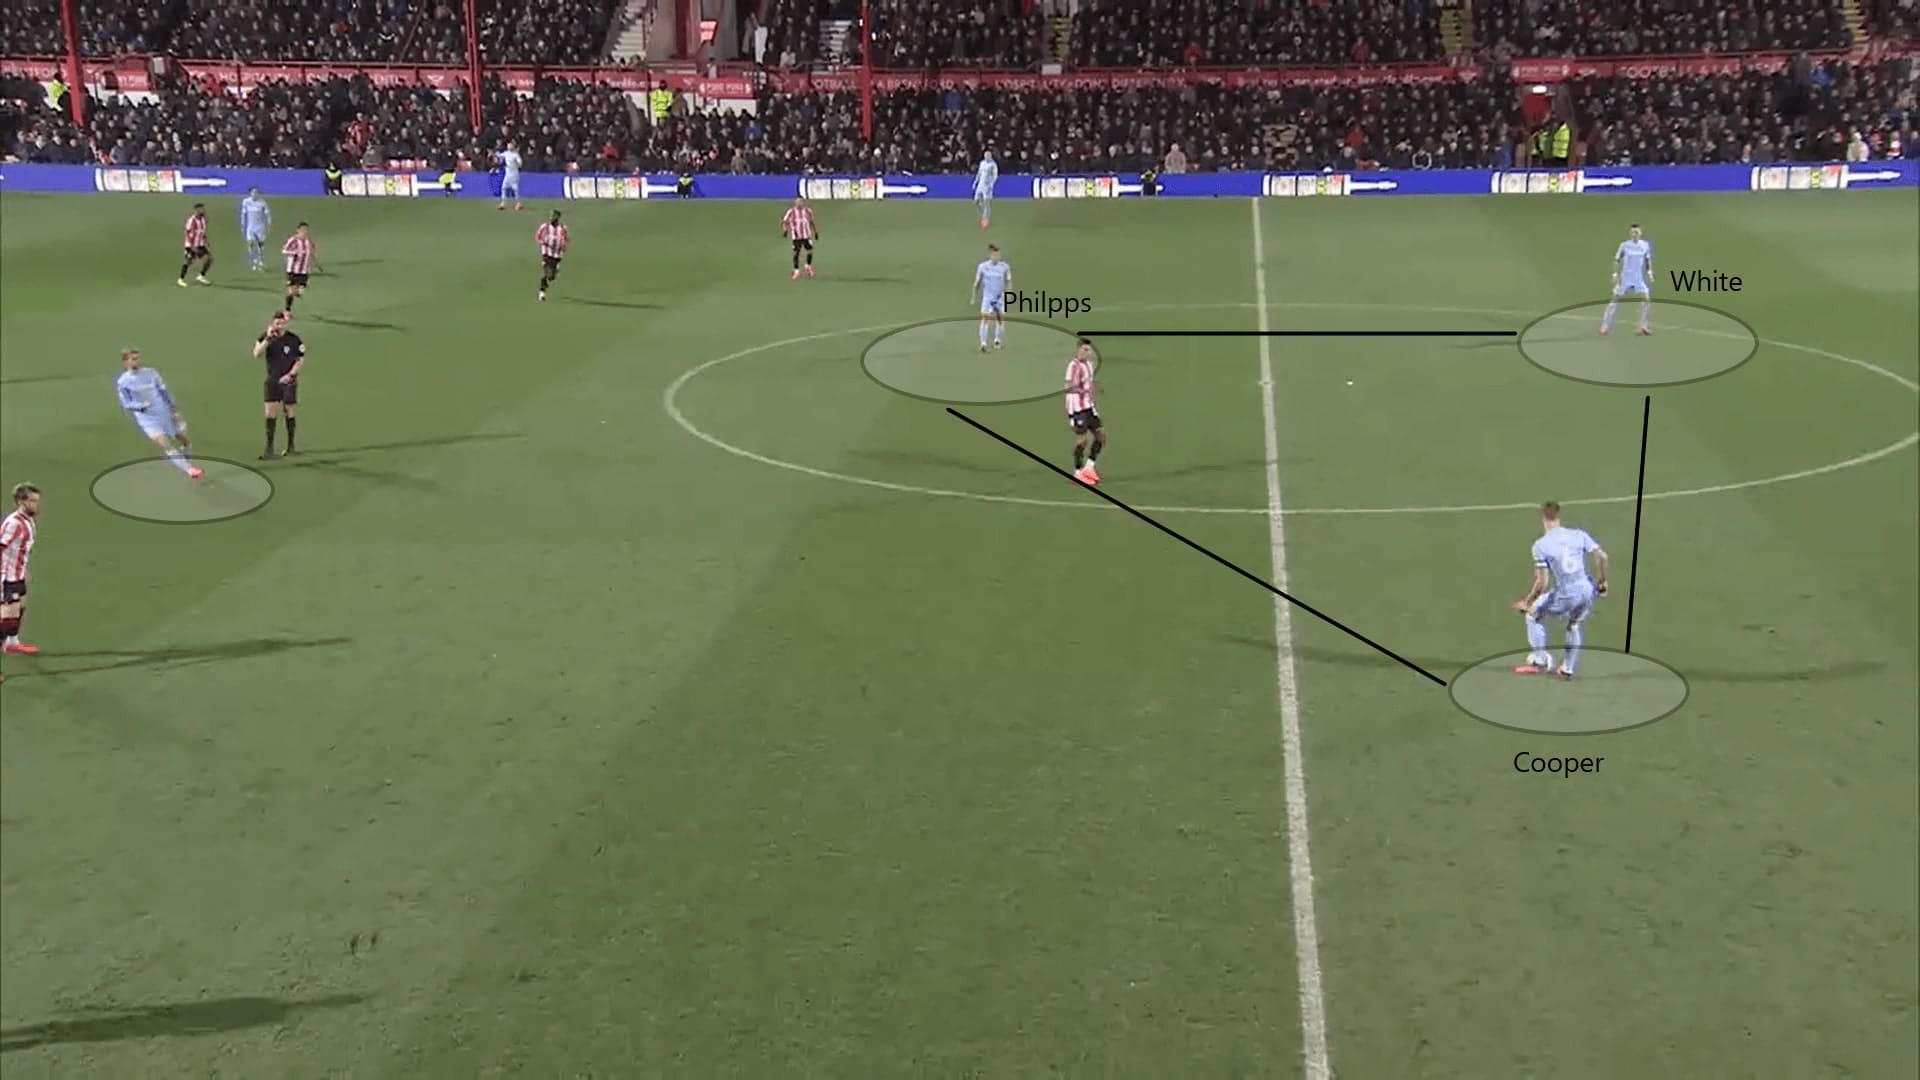
As their own style, Leeds tried to keep the ball and play out from the back in the first phase of their attack. Again, in this match, Leeds used two centre-backs (Cooper & White) and the sole pivot (Phillips) to form a passing triangle in their own half. They had 68.42% of possession and 516 passes in this game.
For the two advanced midfielders (Pablo Hernández & Mateusz Klich), they stayed higher and seldom dropped in the build-up phase. Leeds were confident to progress the ball with these three players.
As shown in the following image, the passing triangle by White, Cooper and Phillips possessed an absolute numerical advantage against Watkins. Both Hernández and Klich stayed in advanced positions.
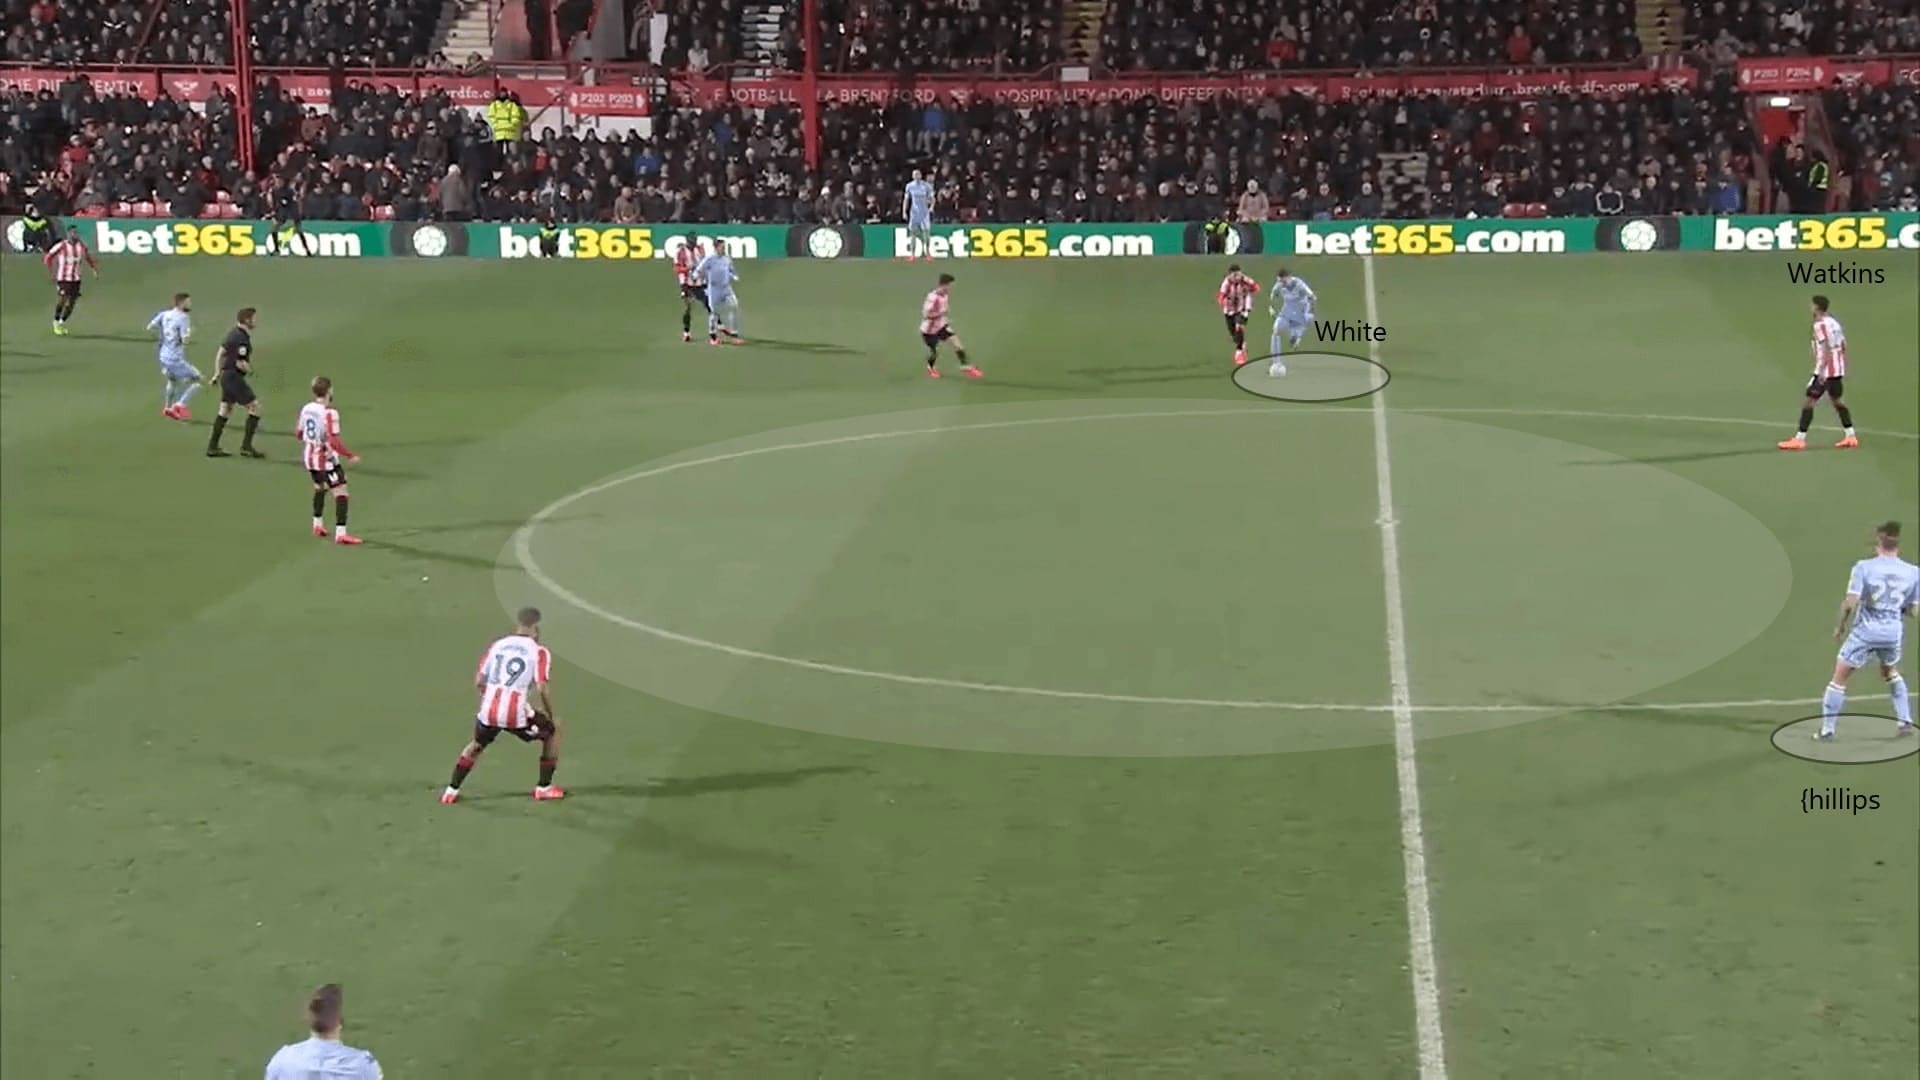
On some occasions, Phillips’ body orientation was not the best to receive a pass or he was marked by a Brentford player. Therefore, White was also happy to rotate his position with the 24-year-old pivot.
With Phillips dropped deeper, it left the midfield unoccupied and opened the spaces for the centre-backs (usually this was White) to carry the ball.
In this situation, Phillips filled the centre-back position, pinned Watkins and allowed White to carry the ball forward.
However, an issue of Leeds’ build-up play was the high positionings of the front players. They lacked vertical penetration options in this phase; in this game, they tended to play long.
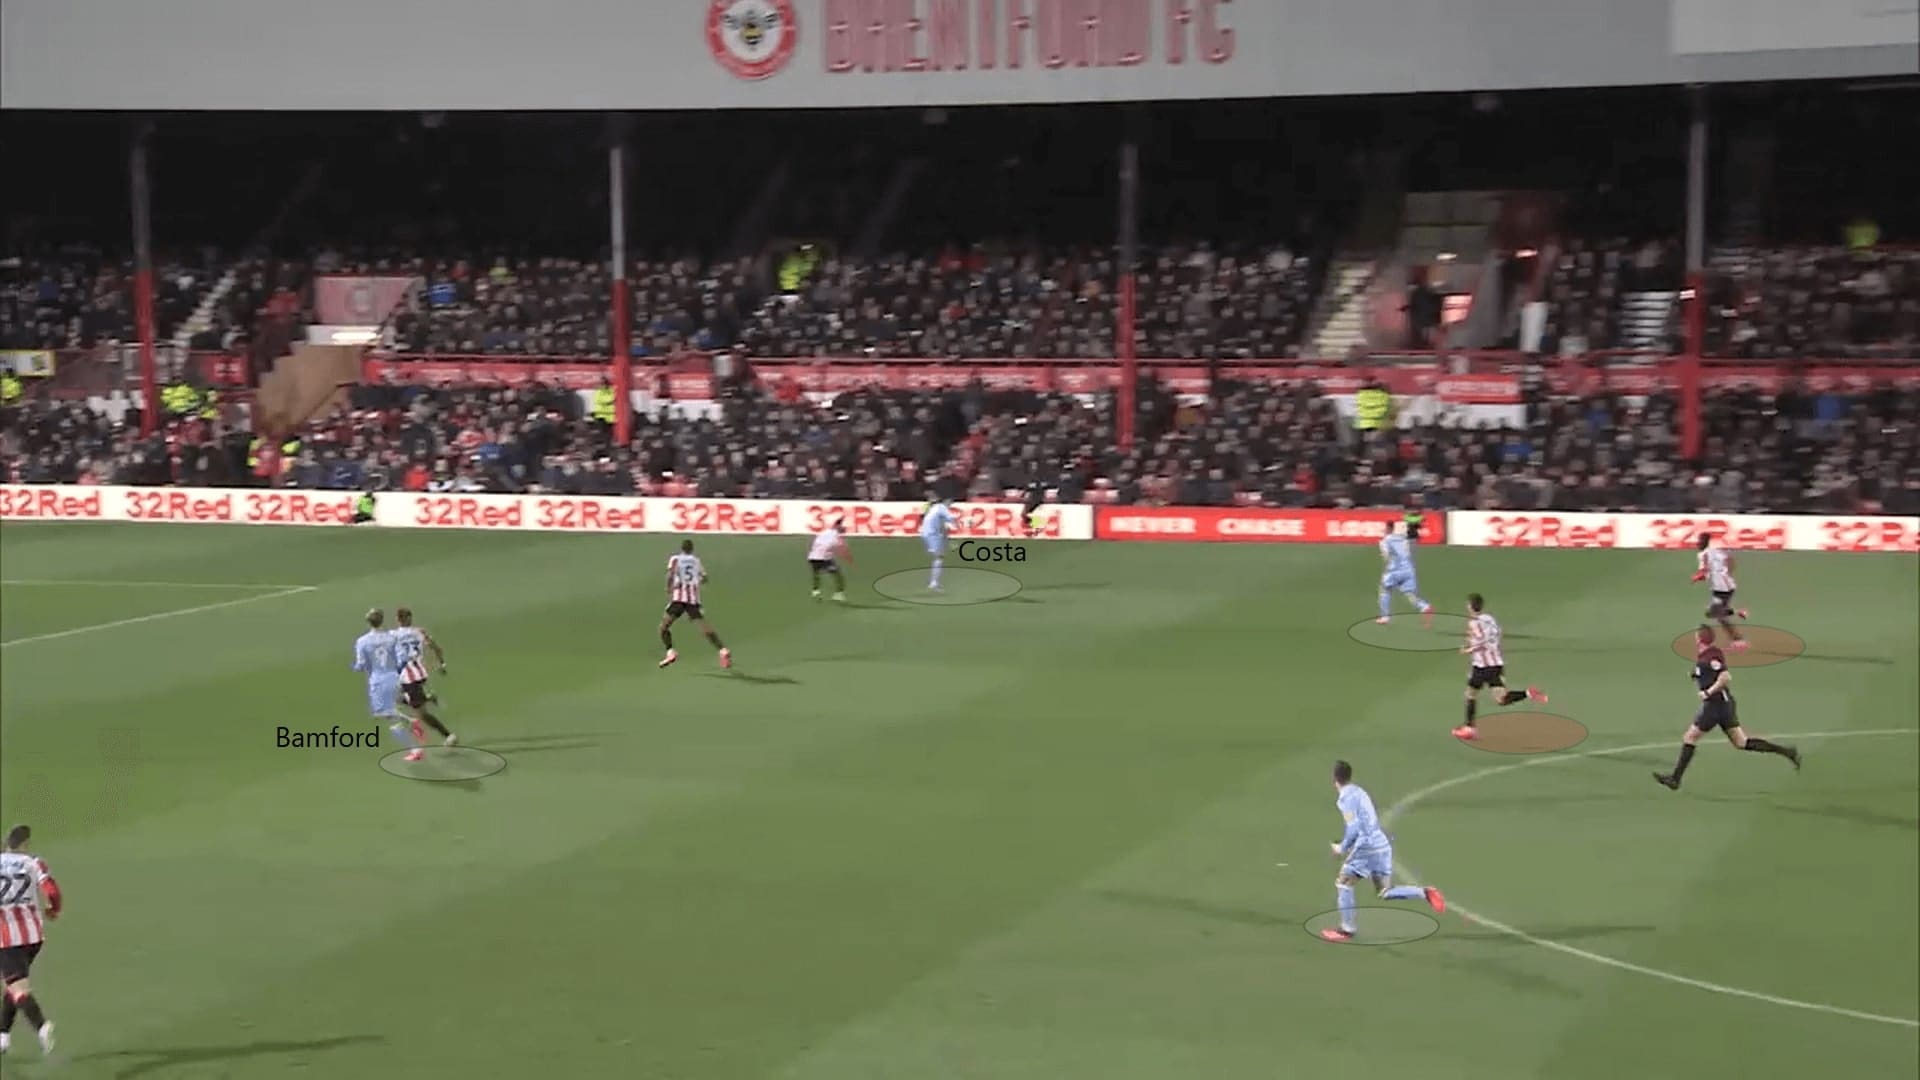
By playing long to reach the final third, Leeds could have the following benefits. First, they would manage to get past the midfielders and striker of Brentford without any risks.
Also, since both midfielders played higher, they could also join the attack and get into zone 14 early. This allowed Leeds to generate a chance in the oppositions’ half quickly.
In this example, Hélder Costa received the long ball; Klich and Hernández were in a position to join the attack, it helped them to leave the Brentford midfielders behind.
Also, with this approach, Patrick Bamford could stay high to push the defenders deeper, while Jack Harrison provided the width, stretching the pitch with Costa.
In the second half, Leeds wanted an additional goal for three points, hence, they slightly adjusted the strikers’ position (Bamford or Jean-Kélvin Augustin). When a forward went wide with the support from an overlapping full-back, Leeds had numerical superiority in the wide areas.
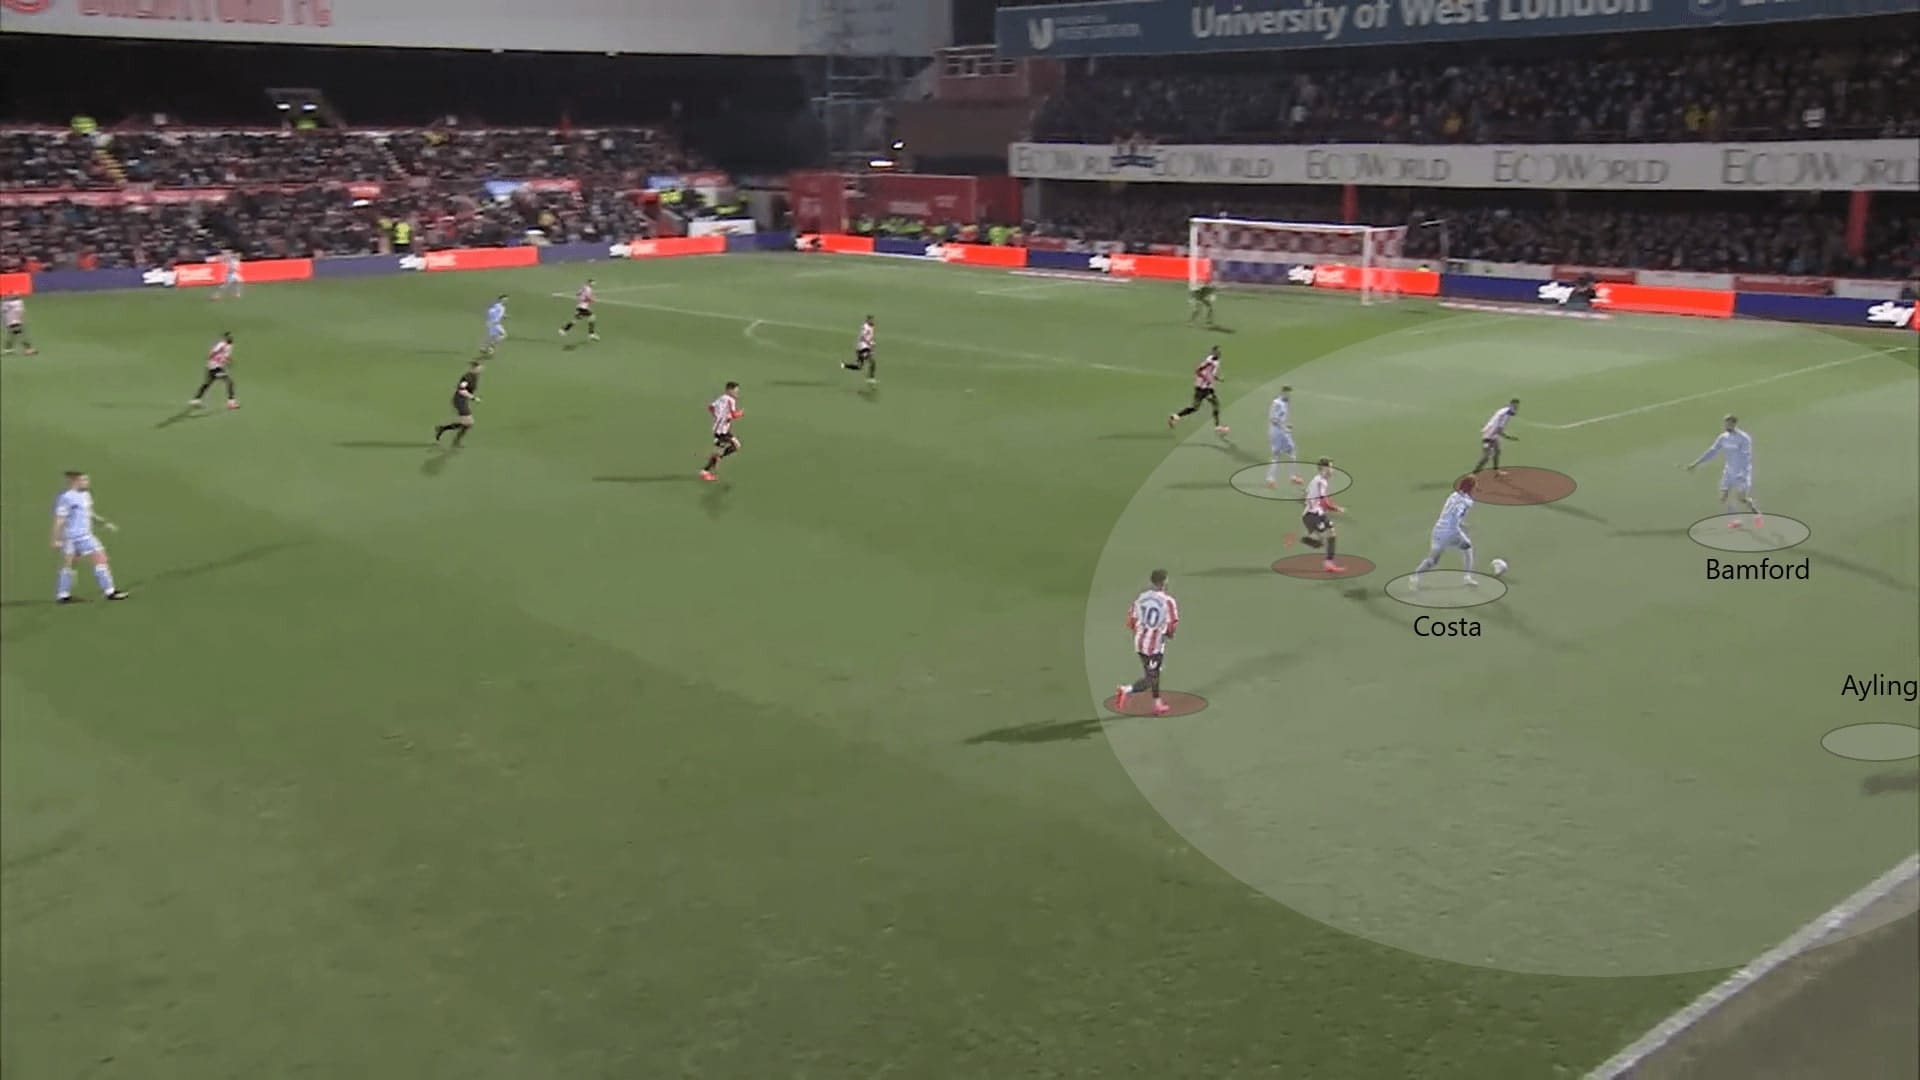
In this example, Leeds had the right-winger (Costa), right-back (Ayling), forward (Bamford) and a midfielder on the right flank. They overloaded Brentford, which was a four v three (or three v two) situation.
They could have gotten to the byline and crossed quickly. However, Harrison arrived at the box late often. When Bamford left the frontline, Leeds did not have a player to attack the goal in the box.
On the other side, it was slightly better, as Costa would stay in the box early, but Brentford also defended the crosses well.
Leeds players were too reluctant to shoot outside of the box, they had only one attempt which was out of the area in this game, and it was an effort from Ayling. It was slightly unconvincing as they had a left-footed player on the right (Costa) also two advanced midfielders joining the attack. These players should have been encouraged to shoot more often.
Energetic press of Brentford
For Brentford, they pressed strategically with energy and tried to disrupt the build-up of Leeds. Usually, the front three and a midfielder would position themselves high to pressure the Leeds’ backline.
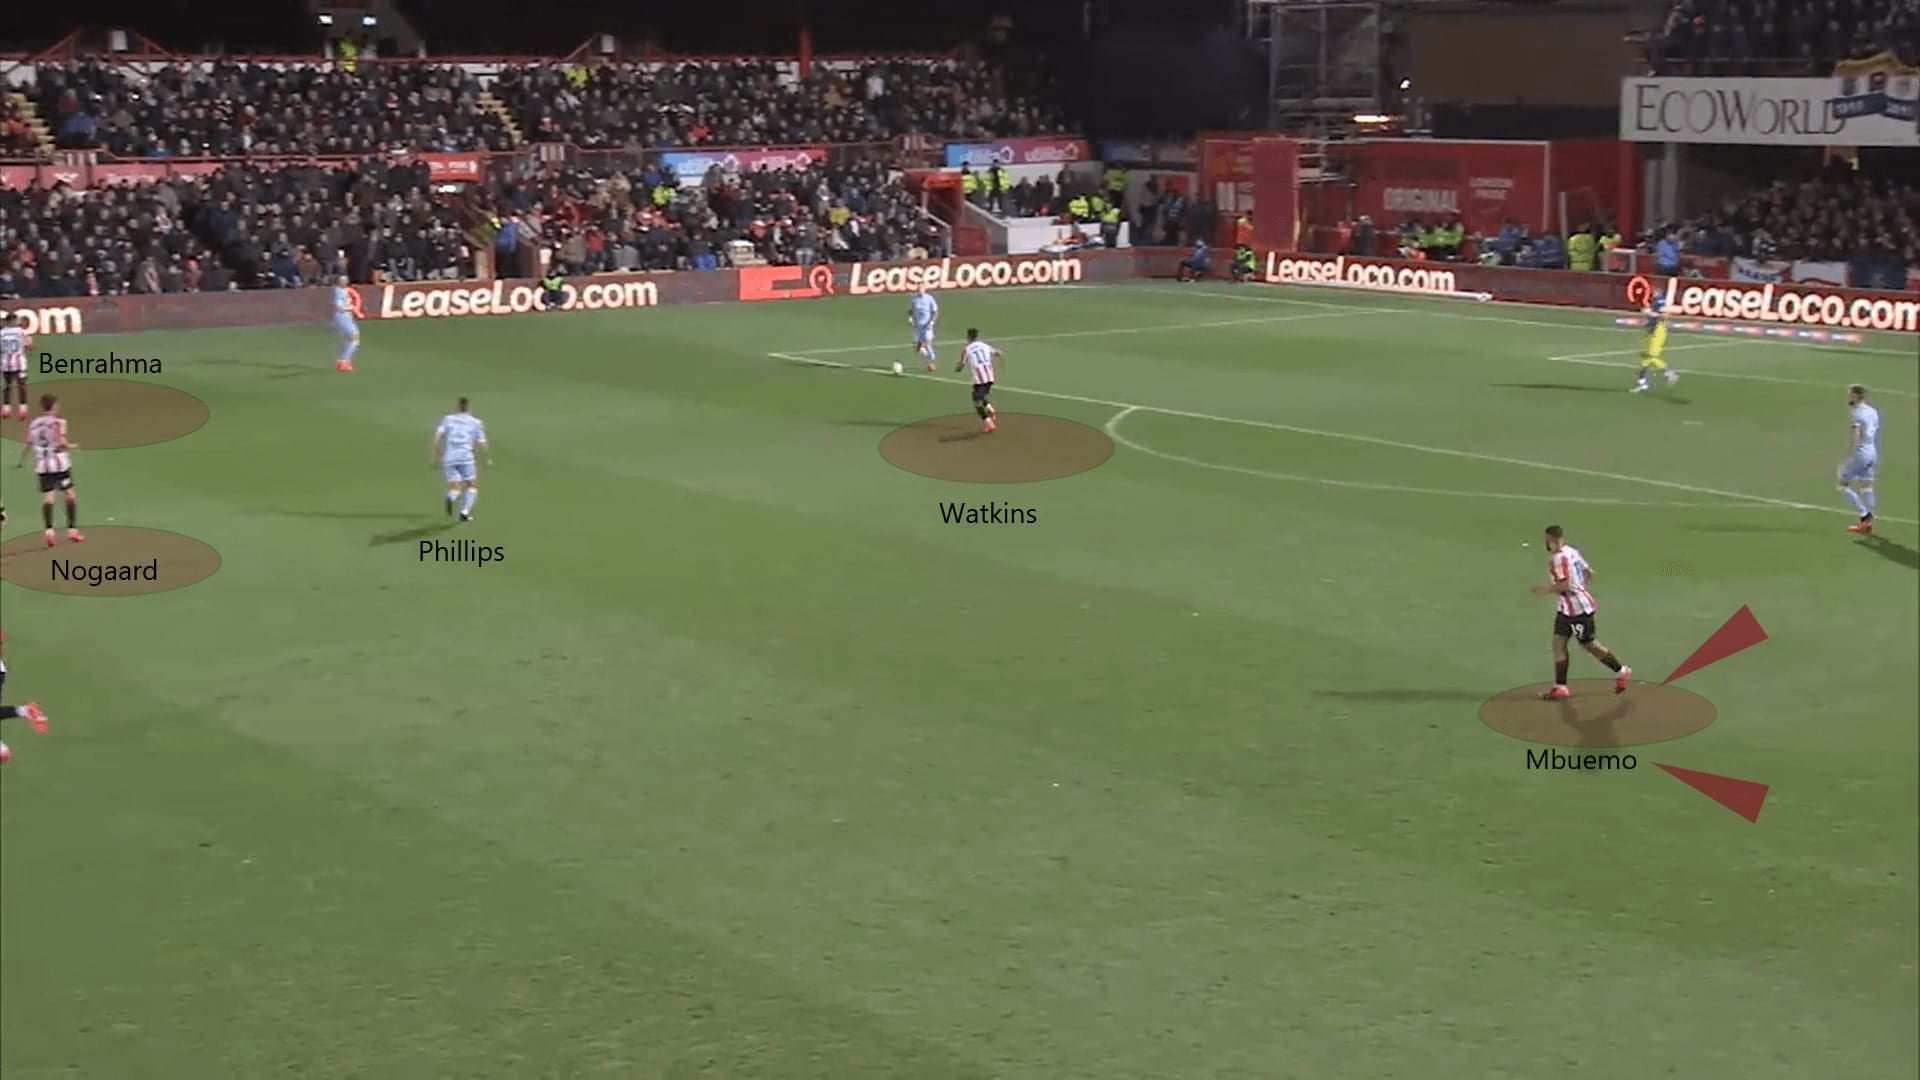
In the first image, we saw the shape of Brentford’s press when a centre-back (White) was on the ball.
The sole pivot (Phillips) of Leeds was marked by a midfielder (Nørgaard); the striker (Walkins) denied a return pass and covered another centre-back (Cooper); winger (Benrahma) on the ball sidestepped out early on the right-back, aimed to prevent this pass or even intercept it; the far side winger (Mbeumo) stayed between the full-back and centre-back, kept both players under control and denied the switch plays.
As a result, this forced White to play long, Brentford were confident to win the ball in the air.
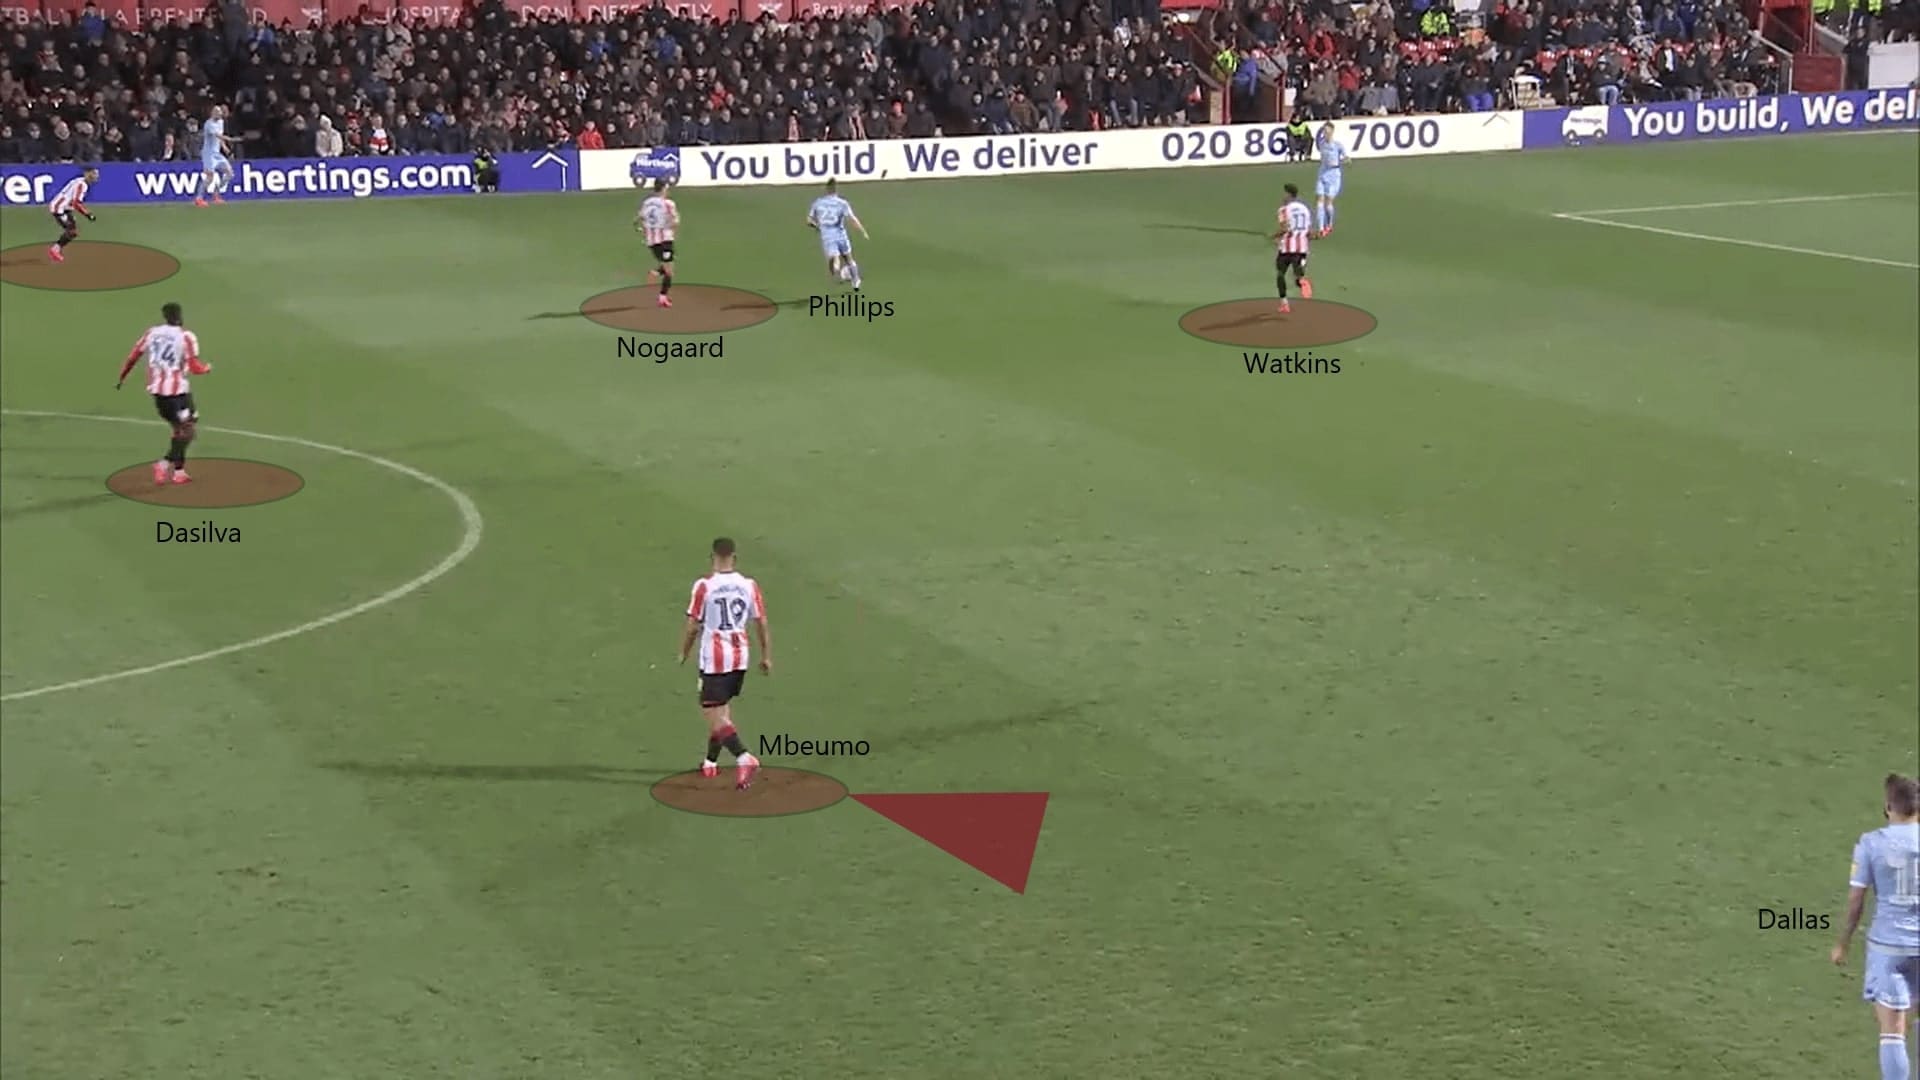
If Leeds managed to progress the ball further, then, the entire defence of Brentford dropped slightly deeper, especially the winger on the far side.
In this situation, Nørgaard came out for Phillips; Walkins was around White to deny a return pass; Benrahma tried to anticipate the pass in case Leeds tried to find Ayling.
The greatest differences were the positionings of Dasilva and Mbeumo. The No.14 of Brentford stepped slightly higher to occupy the spaces at the centre; winger on the far side (Mbeumo) also retreated deep, but he still kept the left-back (Dallas) under control.
In case Phillips suddenly turned and tried to switch the ball to the left, Brentford had the chance to recover the ball high and turn it into a counter-attack.
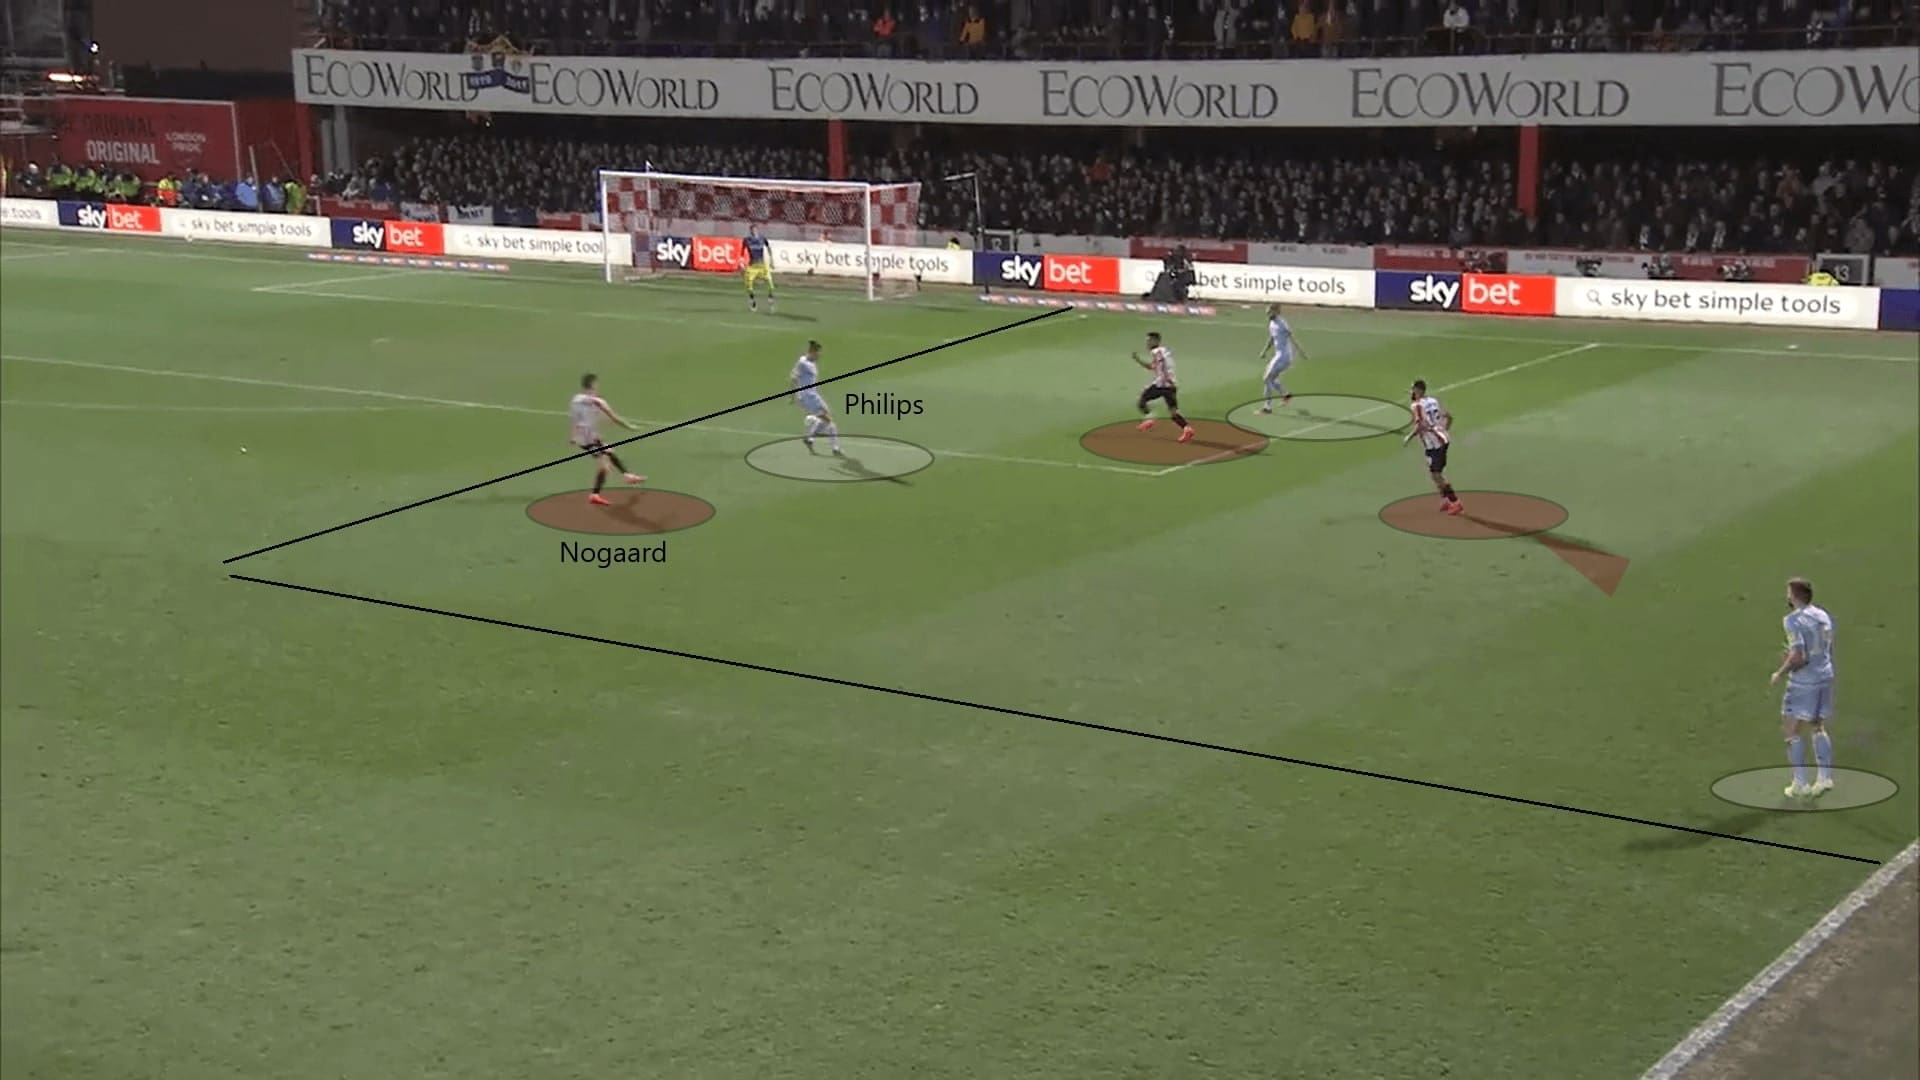
When it was possible, they trapped Leeds player at a side, then tried to press with three players to win the ball back.
Usually, the players were the striker (Watkins), a winger (Mbeumo in this case) and Nørgaard (as he was marking Phillips for most of the time).
In this case, they reached numerical equality, which was a three v three on a flank. However, the pass from Phillips to Dallas was denied given the closed body orientation of Leeds’ sole pivot.
As a result, they forced Phillips to pass the ball back to the keeper, Kiko Casilla, who was uncomfortable with his feet.
The approach was rewarded with a goal, the far side winger (Benrahma) intercepted the ball from Casilla’s feet and scored.
As explained, Leeds tried to overload the wide areas by moving the striker to a flank. Also, their wingers dropped slightly deeper to look for ball progressions and combinations with the full-back.
In response, Brentford also pressured Leeds heavily on the flanks, they managed to minimize the threat.
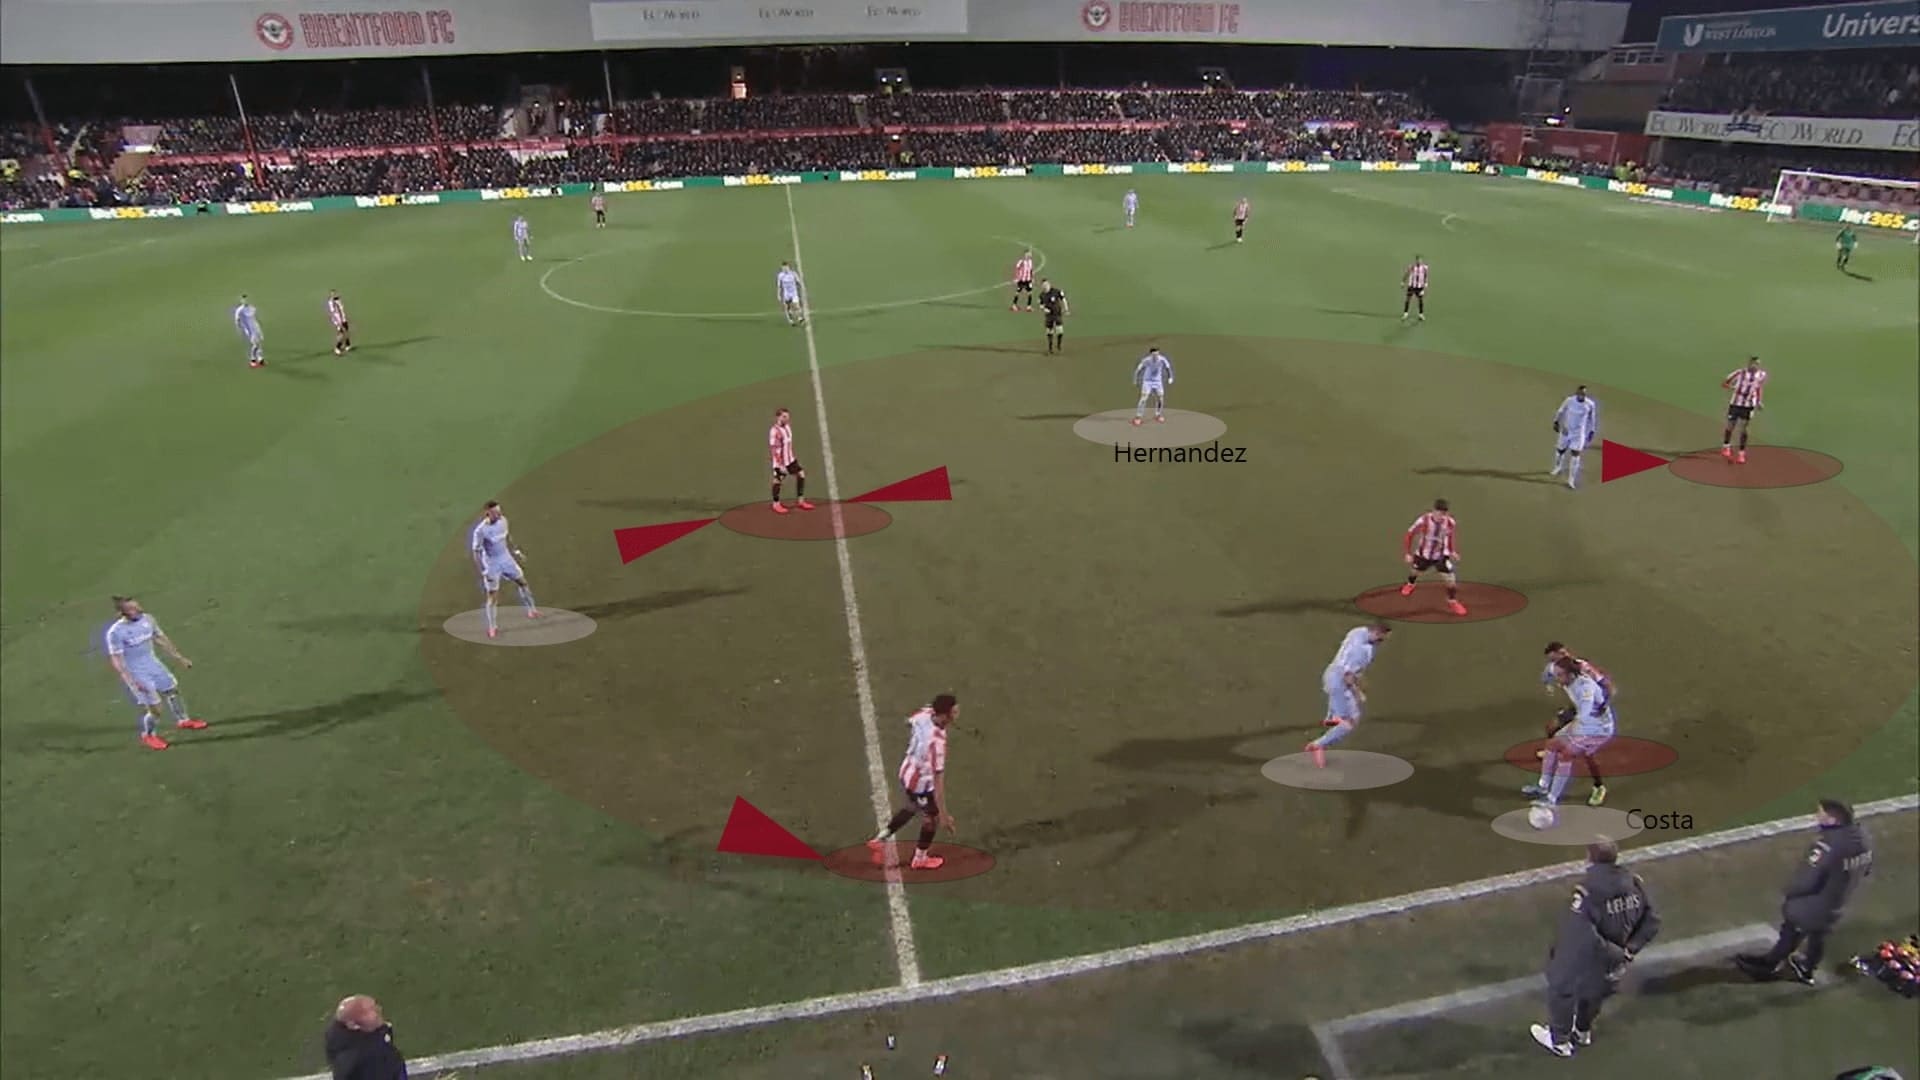
On this occasion, Costa was holding the ball against a defender. The former Wolves winger could hardly turn as he did not have room; Brentford’s midfielder and wingers did well to cover the passing options at the back, as both Ayling and White were covered; the positioning of the midfielder was wise, as he stayed between two players, he kept both grey shirts under control.
Brentford eliminated the numerical advantage by committing their players to the flanks, hence, they reached numerical equality. Even though Klich received the pass from Costa, eventually, the home team recovered the ball as they had enough numbers to defend.
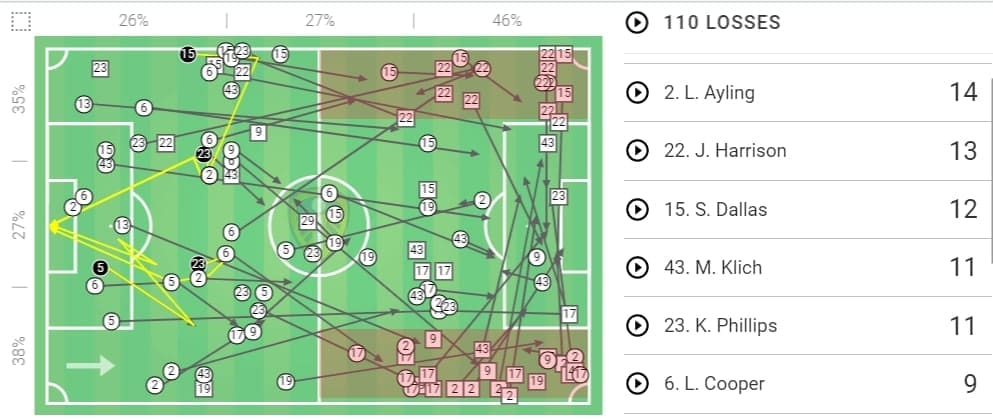
The below graph summarized all 110 losses of Leeds in this game, it also reflected Brentford’s intensive press on both flanks. The full-backs (Ayling, Dallas) and left-winger of Leeds were the players lost the ball most often.
Also, Brentford managed to steal the ball from Phillips on 11 occasions. This was an uncomfortable game for Leeds.
Leeds’ high press & Philips
For Leeds, they continued to record a low PPDA (6.63) in this match. Bielsa’s men pressed high and tried to win the ball back as soon as possible.
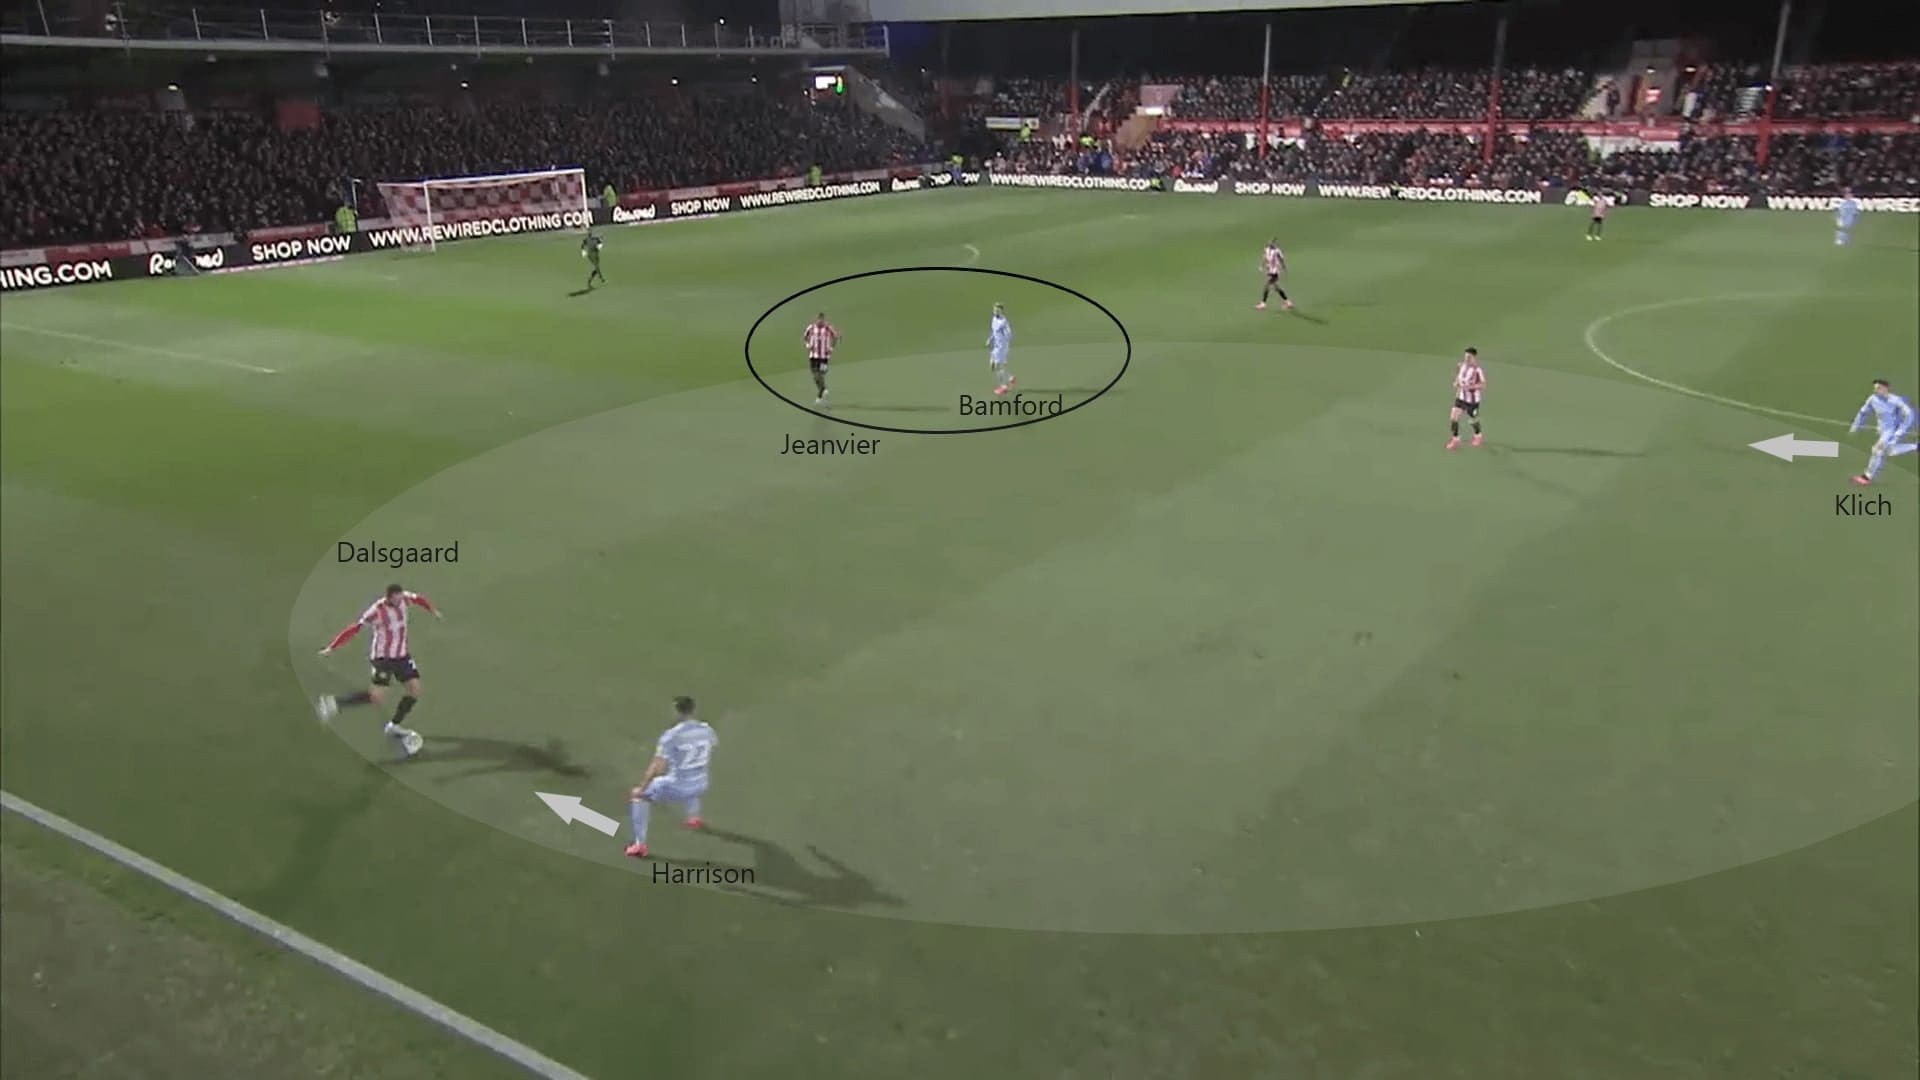
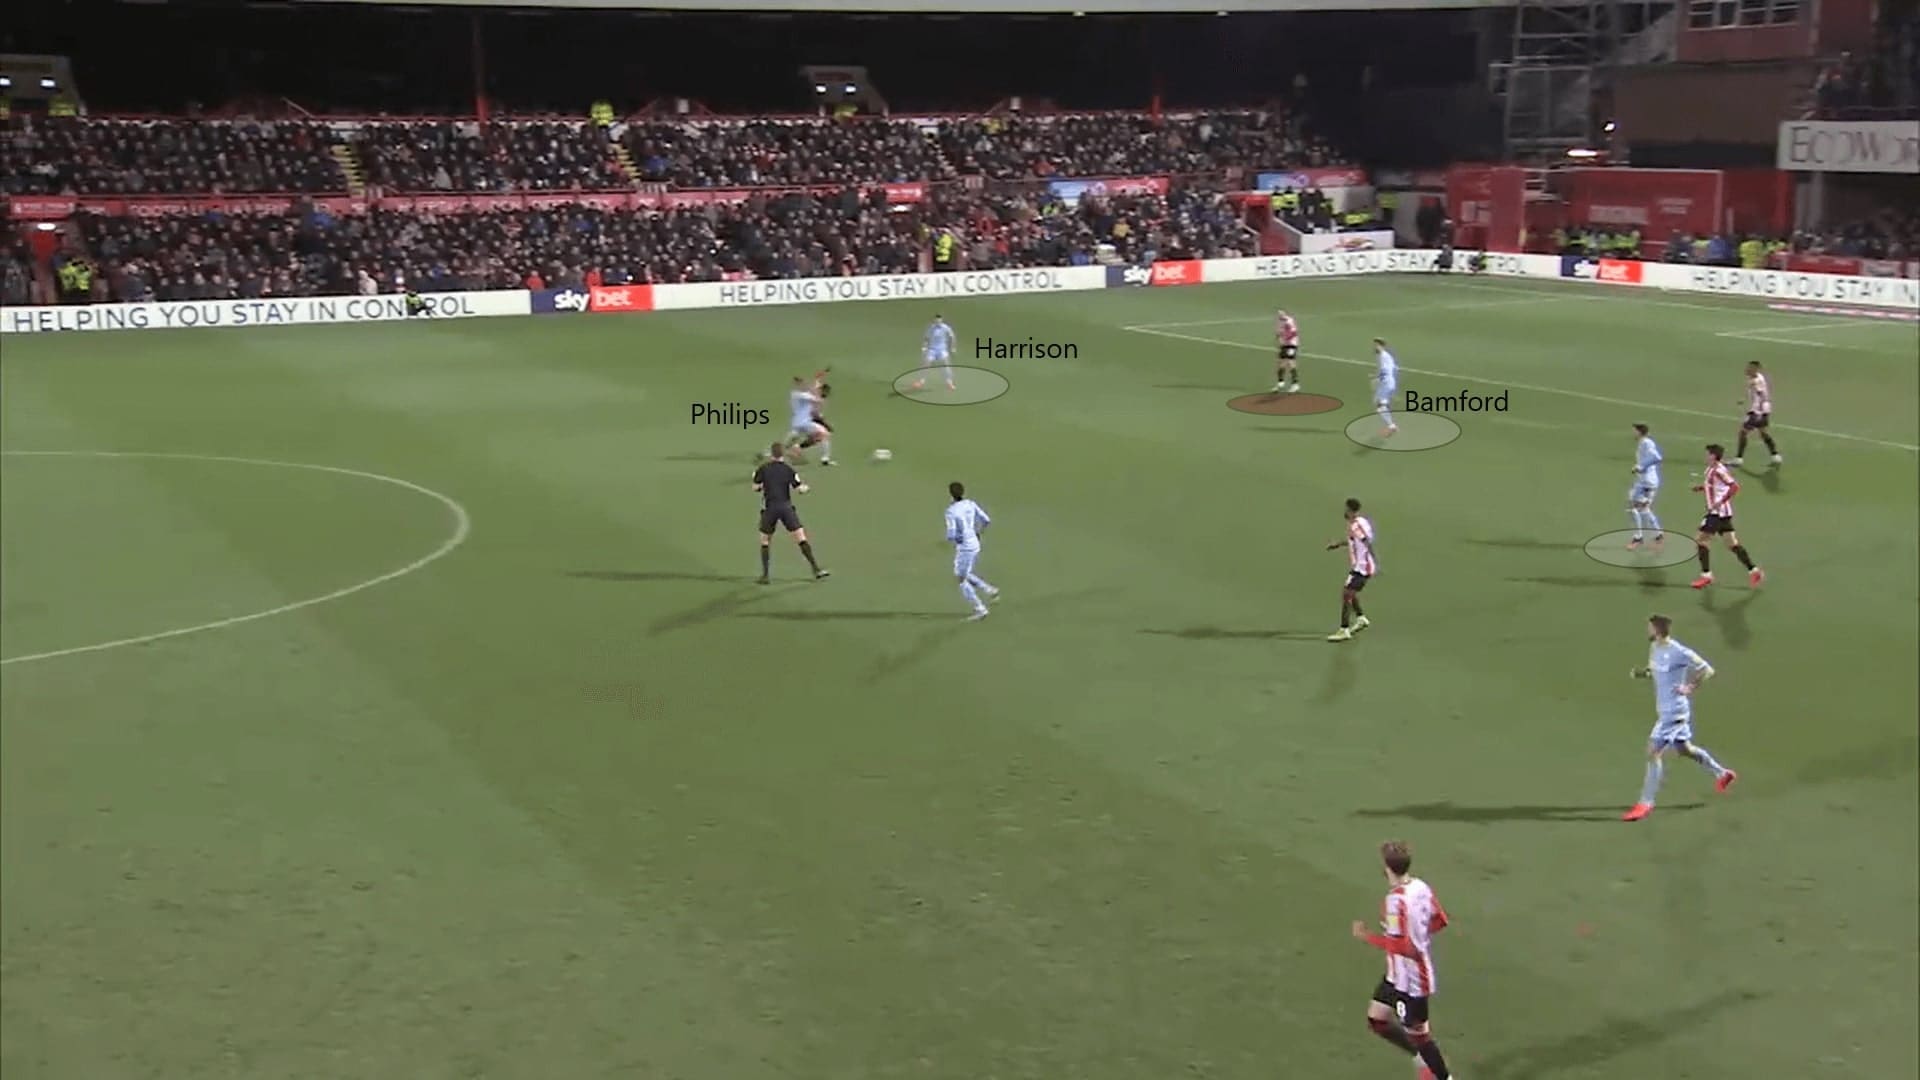
Leeds did well to pressure the flanks of Brentford, denied their possibility of playing out from the back. On the left, it was impressive to see the striker (Bamford) and the left-winger (Harrison) press unanimously; the midfielder (Klich) also stepped out early to cover the free man at the midfield.
Once the centre-back (Julian Jeanvier) passed to the full-back (Henrik Dalsgaard), it triggered the press of Leeds. In this situation, Bamford and Harrison closed the ball side together, with Klich joining the press by closing the midfielder. They forced Brentford players to play long without much time to think, hence, tried to lower the quality of the pass.
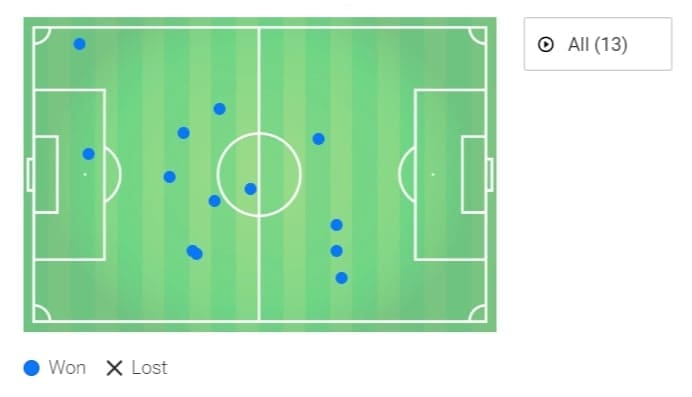
When defending, we could not forget the impressive performance of Phillips. The sole pivot of Leeds did a remarkable job in terms of defending the transitions. From the statistics, he recorded 13 recoveries (four in the oppositions’ half) and two interceptions.
Below is the recovery map of Phillips in this game, he won the ball back mainly at the centre of the pitch, protected the defenders and gave instant pressure when defending the transitions.
Below is a game example. When Phillips won the ball back high on the pitch, it could have even resulted in a Leeds’ shooting chance.
In this situation, Phillips came forward as he anticipated the pass and stole the ball. Bamford picked the ball in zone 14, meanwhile, Harrison was a free player. This created an overload on a Brentford defender in an instant, also led to a Leeds’ shooting chance.
This example perfectly showed how Phillips’ presence helped the team to turn a defending transition to a quick offensive transition.
Brentford tried to exploit the exposed defensive line
For Brentford, they also planned to attack directly to exploit the spaces around the exposed Leeds’ defenders.
Since Bielsa’s team opened their shape and played out from the back, the distances between players were large, and Brentford tired to create the horizontal gaps between the defenders.
For the wingers, they tried to manipulate the full-backs’ position with an outside run or inside run, the objective was to generate the chances for the striker (Watkins) against a centre-back.
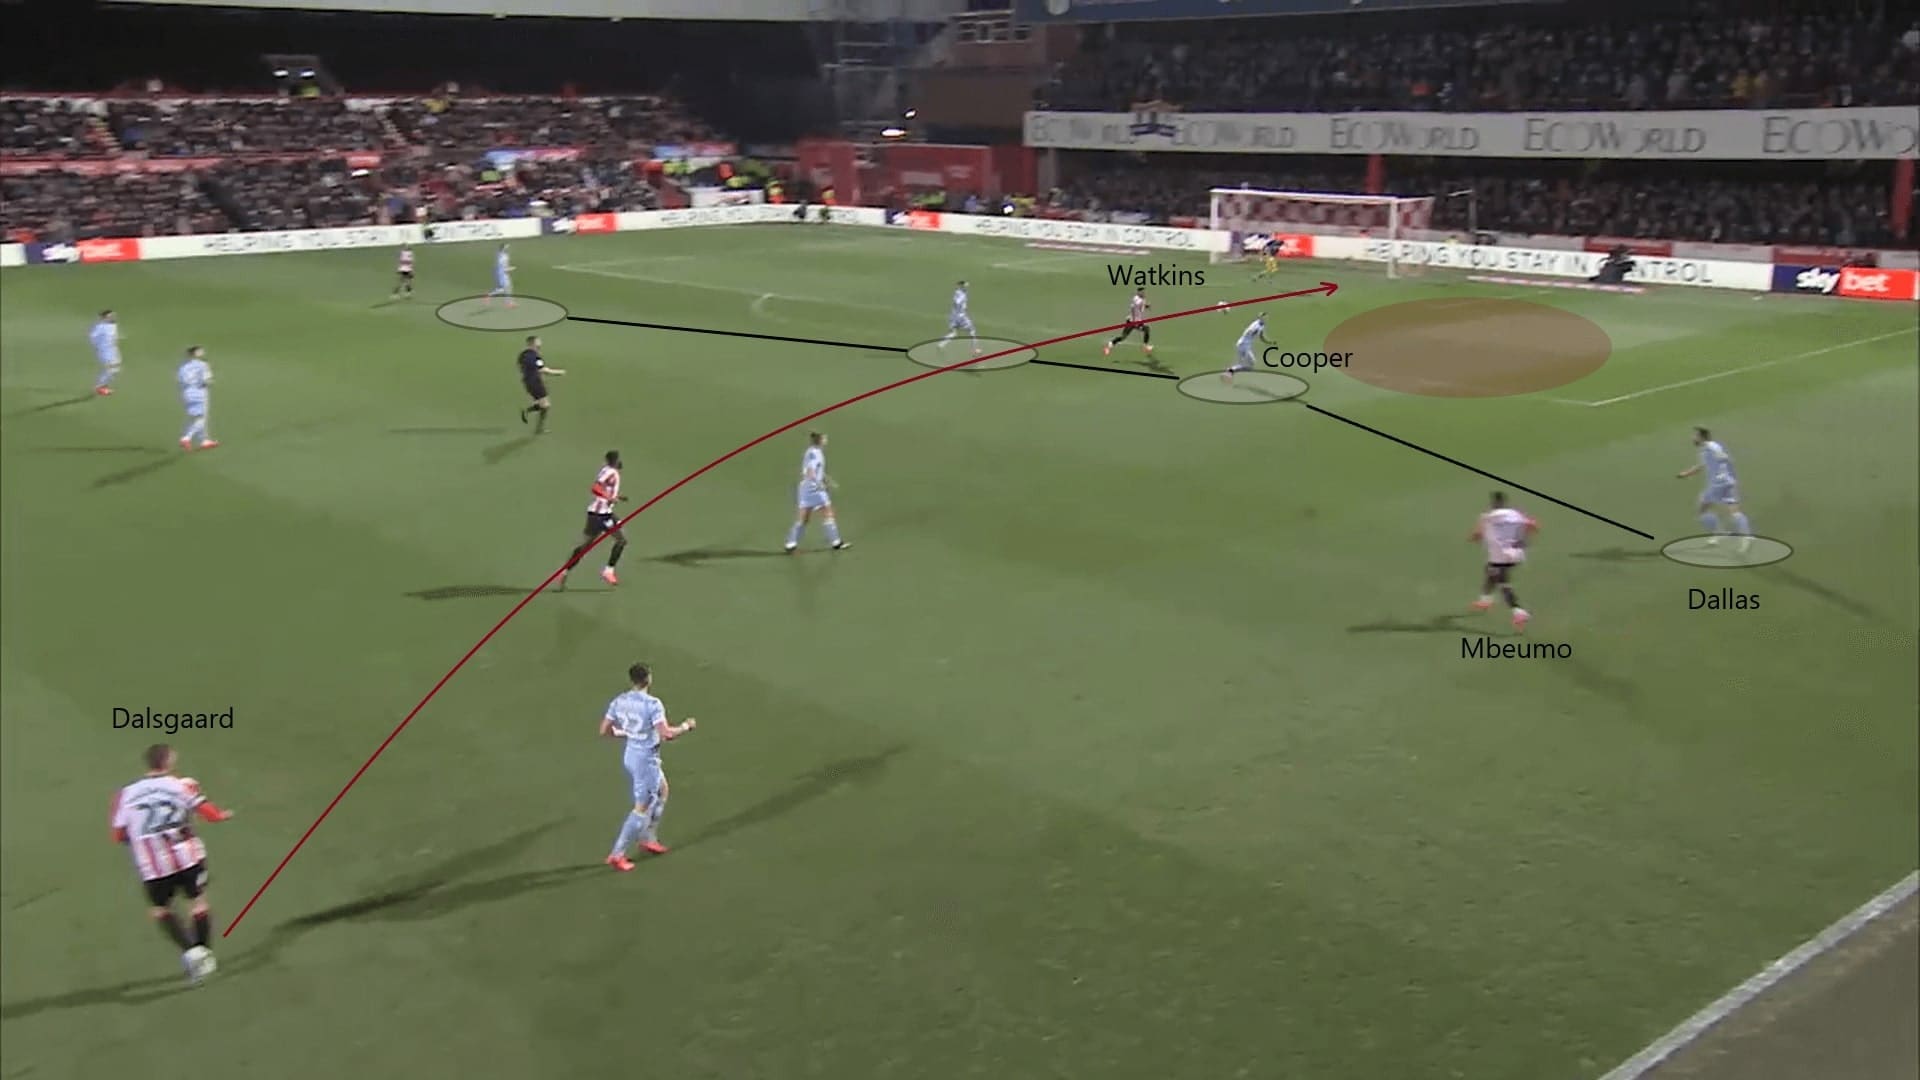
In this situation, at the moment when Dalsgaard played long, the left-back of Leeds (Dallas) was far away from the left centre-back (Cooper), as Brentford’s right-winger (Mbeumo) took Dallas wide by his positioning.
This created a favourable condition with Watkins attacking the spaces behind Cooper. However, the pass could not reach the striker.
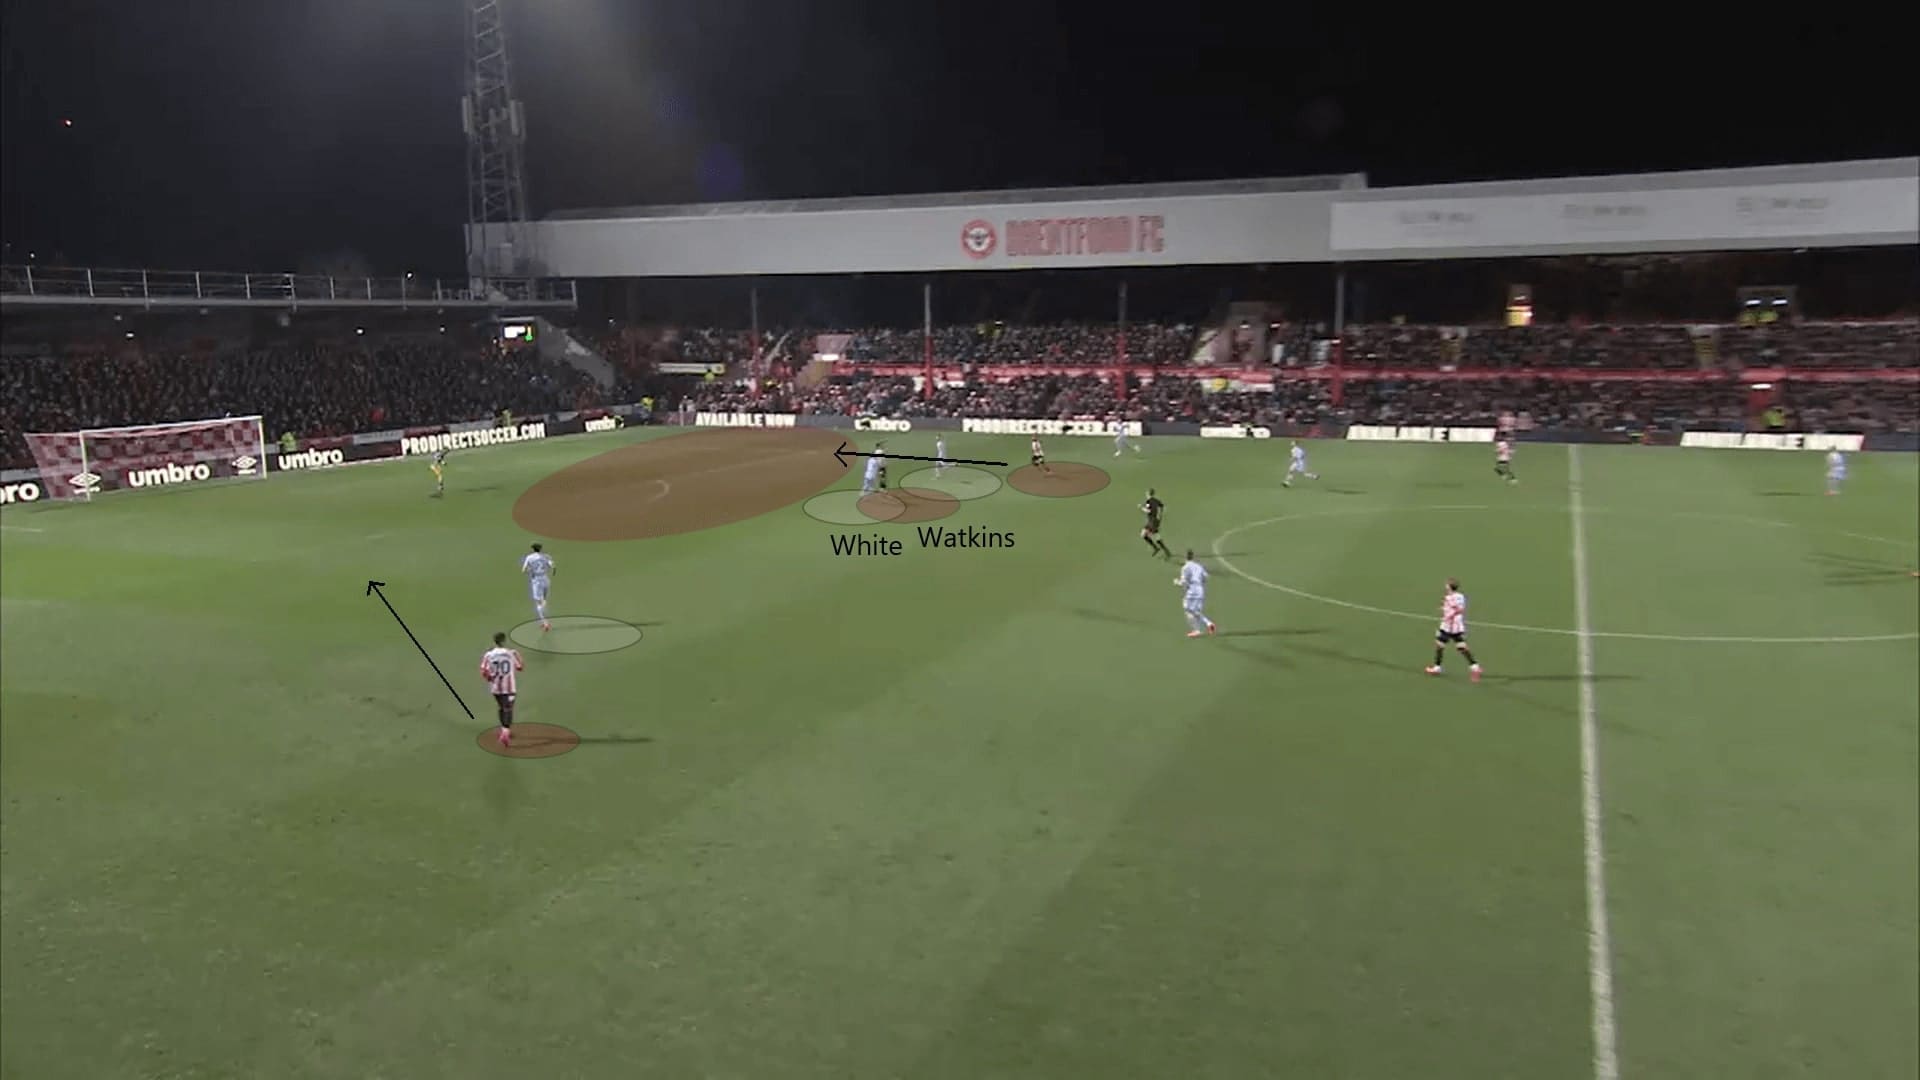
On other occasions, Watkins served as a target man of Brentford. Again, when the forward came out to fight for the ball in the air, he took a centre-back with him.
In this scenario, White followed Watkins tightly in the aerial duel. Meanwhile, both wingers of Brentford (Mbeumo & Benrahma) tried to make the forward runs ahead of the defenders.
It was an ideal situation as both of wingers were isolated against a defender, and they were at their blindside. The defenders had to choose to focus on the ball or on the wingers.
On average, Watkins attempted 4.91 aerial duels per game this season. Comparatively, this figure was much higher in this game, nine (44%). It reflected the significance of Watkin’s aerial presence in the game.
Conclusions
It was another disappointing result for Leeds. By xG, they were a lot higher than Brentford (0.89 – 0.23). However, they still missed the finishing in the final third. As a striker who stayed in the box on most occasions, Bamford could have converted more chances when he met the crosses. On the left, Harrison was limited by multiple defenders and he seldom received the ball. Maybe, Bielsa and his team should look for a solution without Bamford as the lone striker. They could either play Augustin in that position or even use a ‘false-9’ in the attack. They have no more rooms to back off, they must take the points as many as possible in the future.
Brentford continued their dream to experience the Premier League as they moved to the fourth of the league after this draw. It’s even possible to climb over Leeds in the future as they are behind Bielsa’s team with a two-point margin. Their next opponent is Birmingham, not the toughest one to take on, but certainly, they would give everything to fight for the points.


Comments