The first international break of the new season came to an end last Tuesday with club football returning to action only a couple of days later. On Friday night, Derby County welcomed Neil Warnock’s Cardiff City at the Pride Park Stadium.
After a tremendous last season under Frank Lampard, the 2019/20 EFL Championship campaign has been far from perfect for the Derbyshire club so far. Coming into this game, ‘The Rams’ were sitting in the 19th position having won only a single game so far this season. The start to the new campaign for their opponents has been far from ideal as well, with Cardiff being placed 13th in the table after accumulating eight points in the first six matches.
Philip Cocu’s intention to play possession-based football was evident in this game, however, not to the extent that could have been expected. Despite Derby having 64% of possession and performing a total of 13 attempts at goal, there was not a notion of dominance coming from the home side. Hardly any of those chances could be considered clear cut opportunities.
On the other side, Warnock’s tactics were as expected when playing against a team that has a majority of possession. Cardiff were a lot more direct and tried to hit the home team on the counterattack using their pacey wingers. The visitors managed only 36% of ball possession but had 13 shots at goal as well.
This tactical analysis will take a closer look at both teams’ game strategies and explain the key moments that lead to a one-all draw.
Line-ups
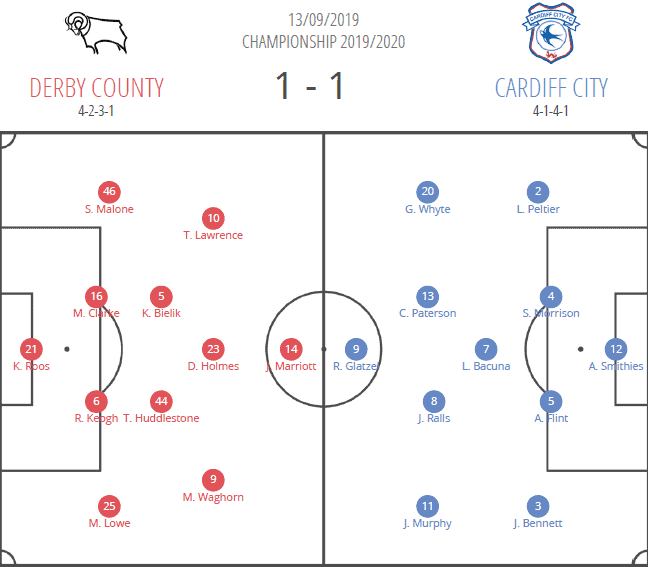
Despite making four changes since the last game before the international break against Brentford, Cocu stuck to the preferred 4-2-3-1 formation. Matt Clarke came in a place of Krystian Bielik at the heart of the defence with the Polish international being moved slightly higher up the pitch into a holding midfield position. This alteration in personnel saw Jason Knight starting the game on the bench. Duane Holmes was selected instead of Kieran Dowell for the number 10 role, whereas Lee Buchanan made his way for Scott Malone at left-back.
Warnock was less impulsive and made only a single change since the last game against Fulham. Callum Patterson came in place of Lee Tomlin to sit just behind the lone striker Robert Glatzel. On paper, it looked like a 4-2-3-1 with Joe Ralls and Leandro Bacuna forming a double pivot.
Derby’s build-up
The home team was expected to have a majority of the ball in this game, thus, they had to find the way to penetrate Cardiff’s defence. The visitors from Wales tended to go with two players in their first line of press meaning Cocu’s side had to have a one-player advantage in the first build-up phase. This is a necessary prerequisite for teams that try to play out from the back.
An example of Derby’s build-up play is displayed below. It was on both centre-halves Richard Keogh and Clarke, with the Polish international defensive midfielder Bielik supporting the two, to aid the ball progression from the back. Moving further up the pitch, the first build-up line of three had two players in front of them for further progression of the ball. Since Bielik moved back to the left inside channel to form a back three, it was an attacking midfielder Holmes who dropped deeper to the position vacated by his Polish teammate. Additionally, Tom Huddlestone more often remained on the right channel.
In general, Cardiff’s central midfield duo Bacuna and Ralls applied tight man-marking to their direct opponents in those areas. It was not a big problem when Derby did not try to drag them out using players’ rotational movement. However, as it will be seen later on when Derby did apply an aforementioned tactic, it allowed the home team to cruise through the middle third with relative ease.
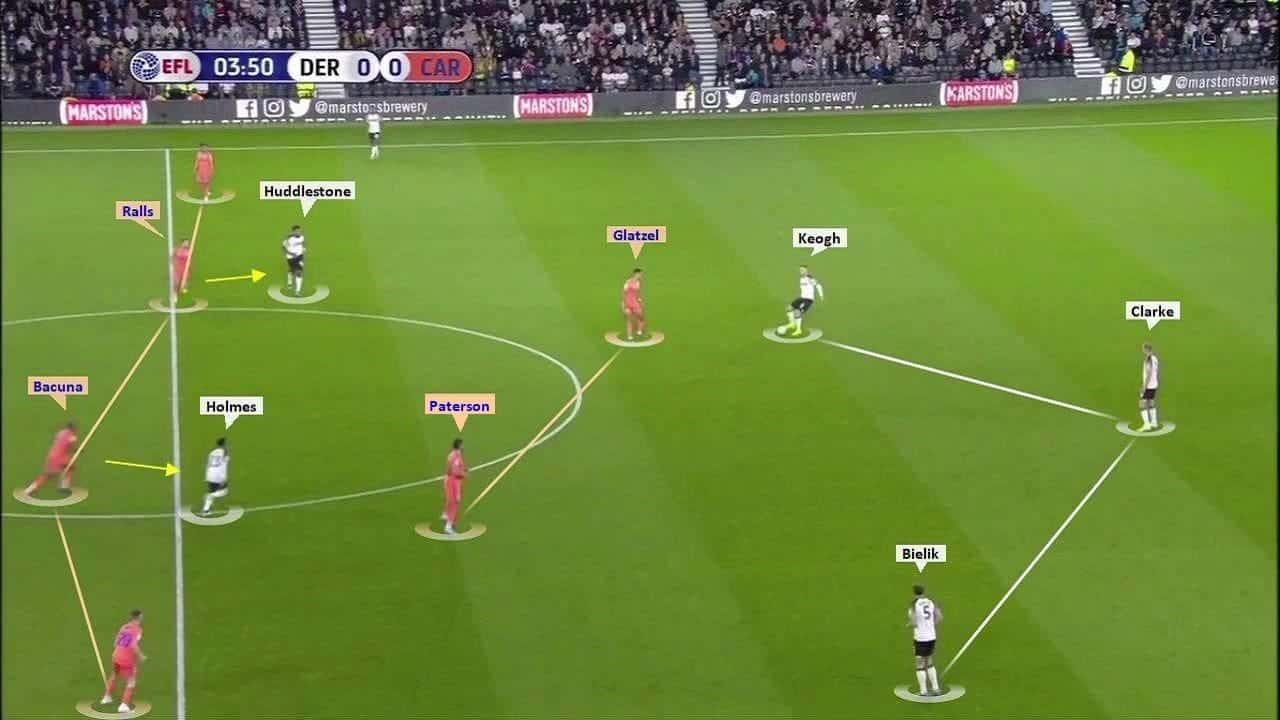
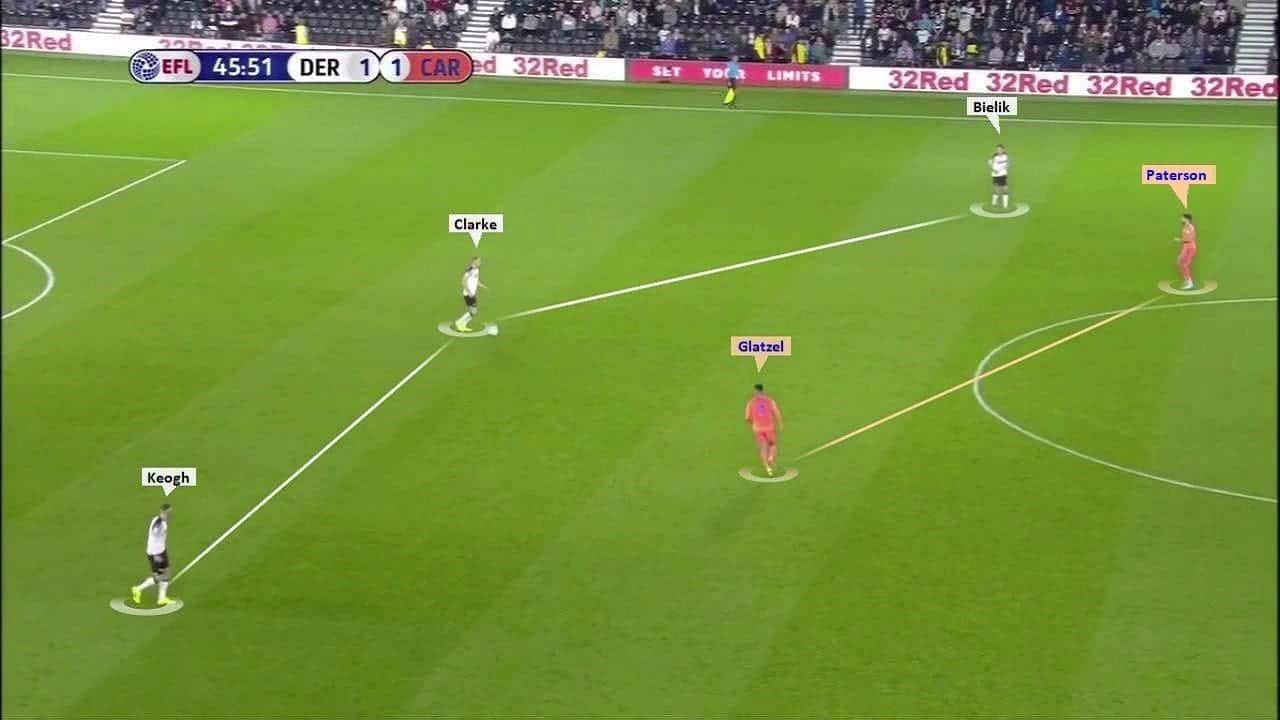
Such tactics to have a one-player advantage in the first build-up phase and Warnock’s instructions to man-mark in midfield paid dividends for the home team when progressing through the middle third.
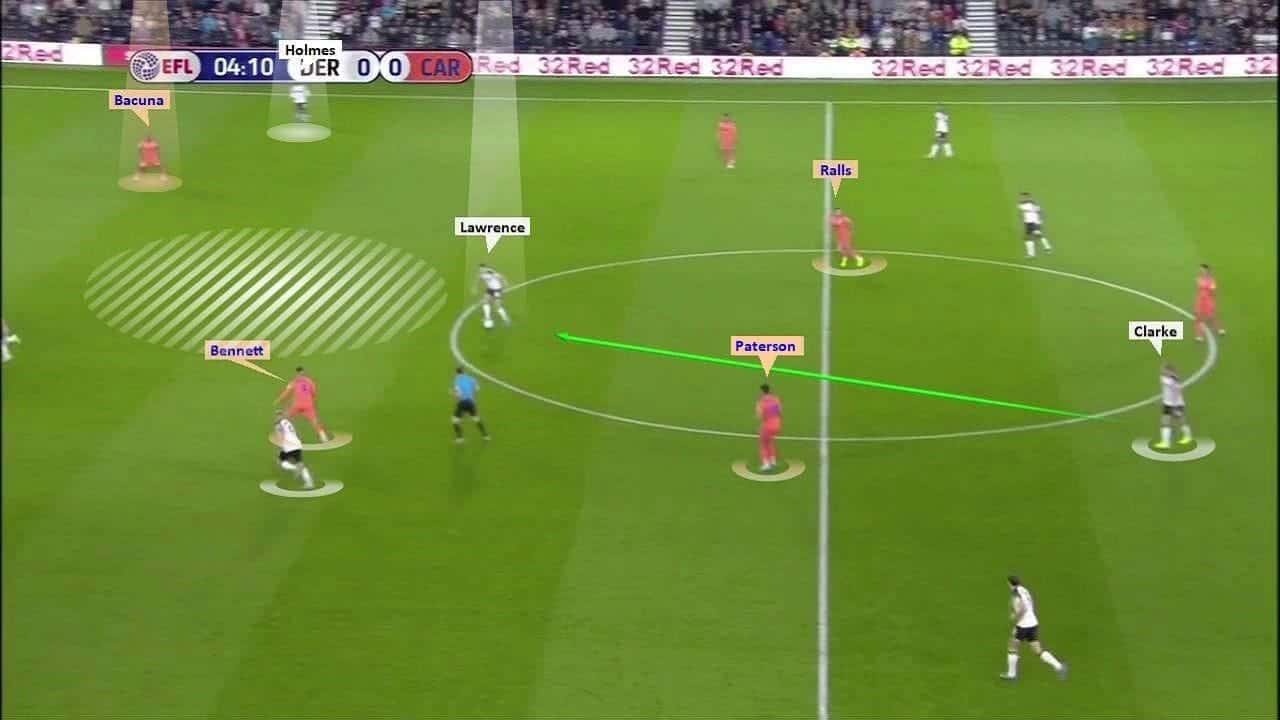
In the first picture below, it can be seen how Paterson and Glatzel were stretched out trying to cover the distance created by the three opposition players. As a result, Derby’s ball carrier had time and space to exploit the gap that appeared in the centre of the pitch. In this situation, Ralls was man-marking Huddlestone and Joe Bennett was doing exactly the same with Martyn Waghorn. It is noteworthy that Waghorn is a right-winger and Bennett a left-back- clear evidence of man-marking in this case.
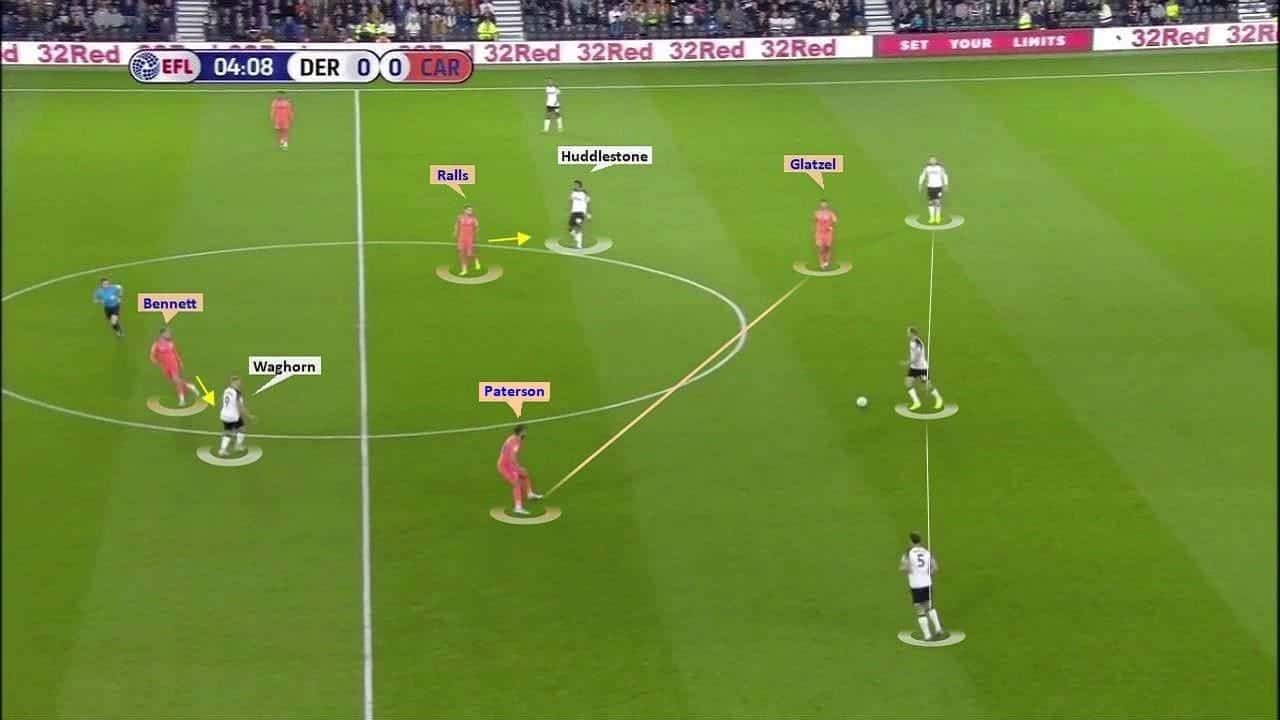
In this scenario, a key aspect behind a successful ball progression from the defensive to the midfield third was the home team’s player rotations. As it was mentioned above, Waghorn moved away from the right-wing and positioned deeper into midfield, whereas a central attacking midfielder Holmes did the opposite. He vacated his central position and moved to the right-wing, thus, pulling Bacuna out of his original position in midfield due to Cardiff’s adopted man-marking system.
Consequently, a huge gap appeared in the middle of the park that was exploited by Tom Lawrence who also vacated his position on the left-wing and moved more centrally. The Welsh winger then played the ball to the right to Holmes who won a corner kick. Derby’s only goal of the game came straight after a corner kick that was created by this particular attacking manoeuvre.
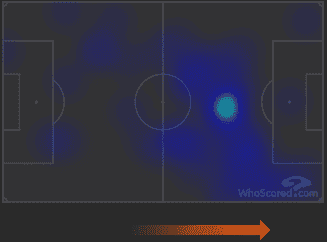
With Bielik often moving back to form a back three and Holmes dropping deeper into central midfield or drifting wide, the average position that Lawrence took upon the pitch was more of a central attacking midfielder rather than a left-winger. The heatmap displayed below supports this statement.
Space for Derby’s centre-backs
Throughout the whole game, Cardiff usually tended to defend in a mid-block rarely using a high press strategy. It resulted in Derby’s centre-backs having a lot of time on the ball to determine the next action. Since no one was really pressuring any of the centre-halves sometimes they chose to drive forward with the ball themselves instead of trying to play out.
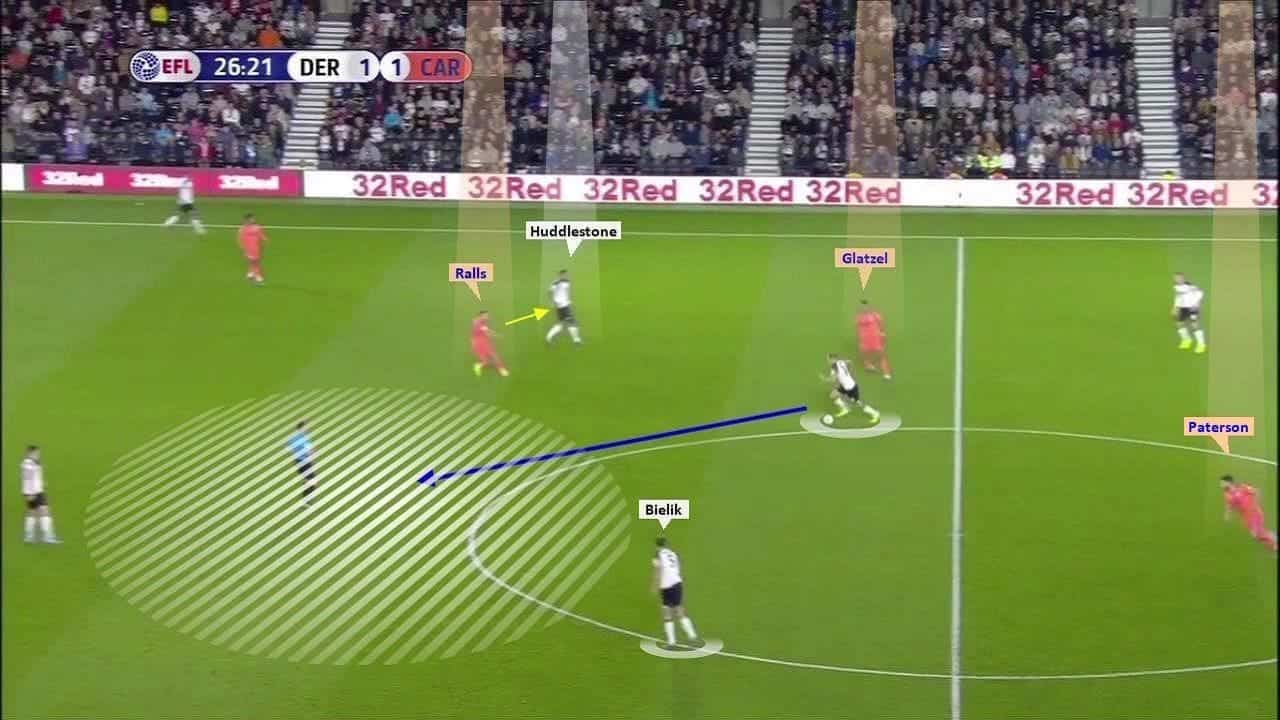
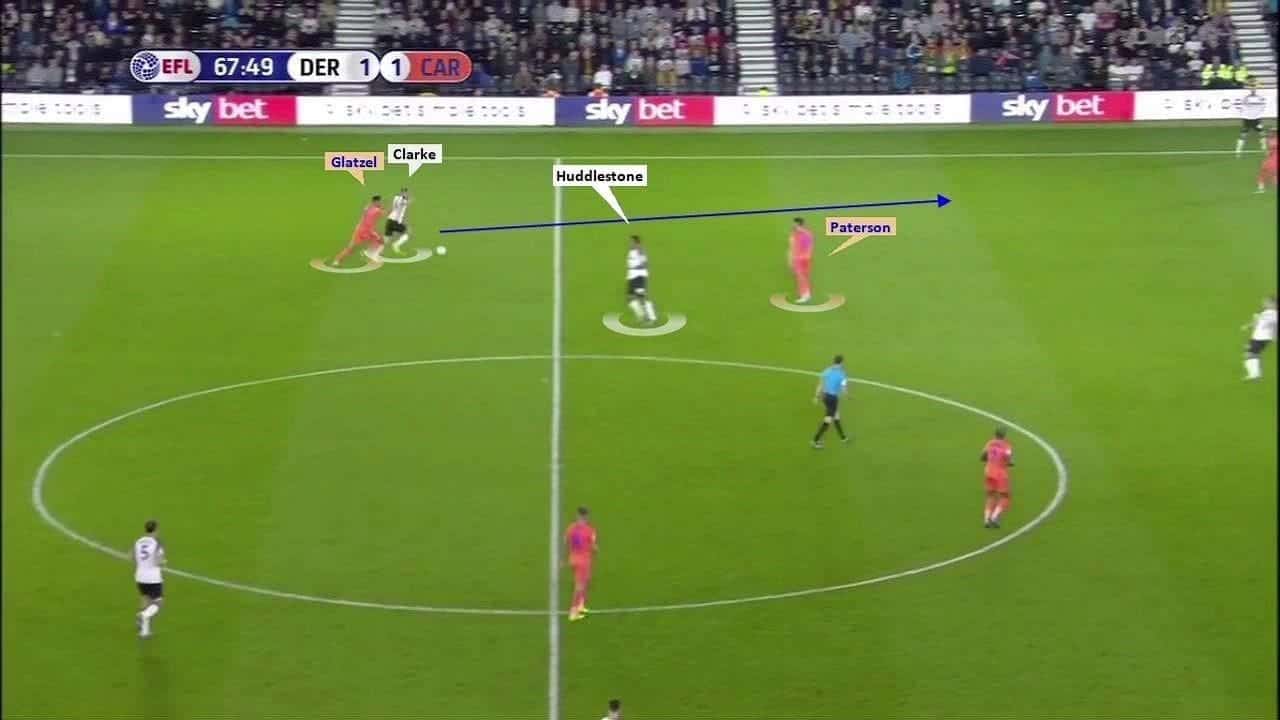
Matt Clarke was usually the one who drove forward with the ball from defence for the home team. He had the most touches (96) out of both sets of players. The image below illustrates the central defender’s ability to bring the ball from the back. A key thing to point out here is Huddlestone’s position: he situated himself slightly to the right, thus, dragging out Ralls with himself. It opened up space for Clarke to run into since Glatzel did not put enough effort to follow him.
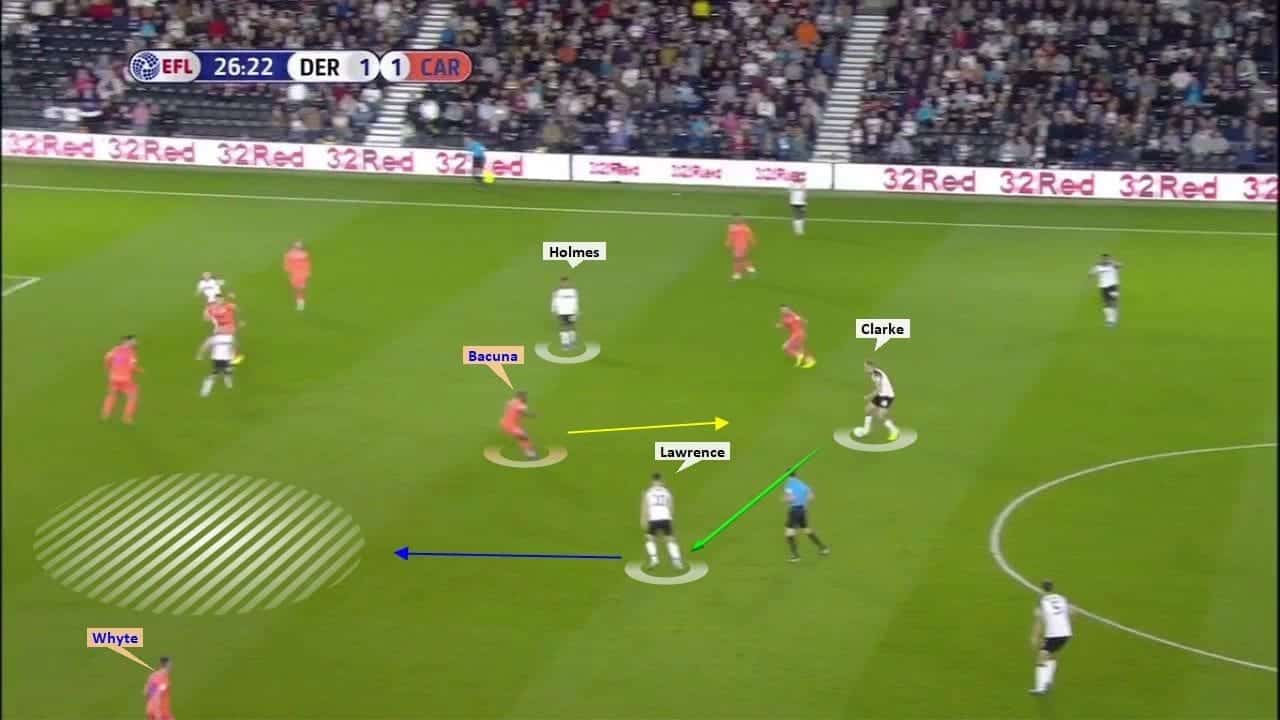
In some instances, Derby’s centre-back was able to travel with the ball for almost one-third of the pitch without anyone trying to confront him. An example shown below illustrates such a situation. Here, Clarke brought the ball close to the final third with only Bacuna stepping out to interfere with him. Nevertheless, as it was the case throughout the majority of the game, Lawrence drifted more centrally from the left and offered himself as a link-up. In this particular moment, Derby created a two versus one situation and progressed the ball to the last third.
An example below demonstrates another situation when Clarke was utilised for bringing the ball from the back. Like in the example before, Huddlestone intelligently adjusted his position to create a channel for his teammate to run into. Nonetheless, the very passive behaviour from Paterson cannot be ignored, who did not even try to challenge the opponent.
As good as the tactic was, it had some major flaws. Cardiff’s first line of defence did not track back on most occasions and stayed close to the halfway line. Thus, when Clarke’s adventures to carry the ball for one-third of the pitch did not succeed and he lost the ball high up the pitch, it made the home side vulnerable on the counterattack.
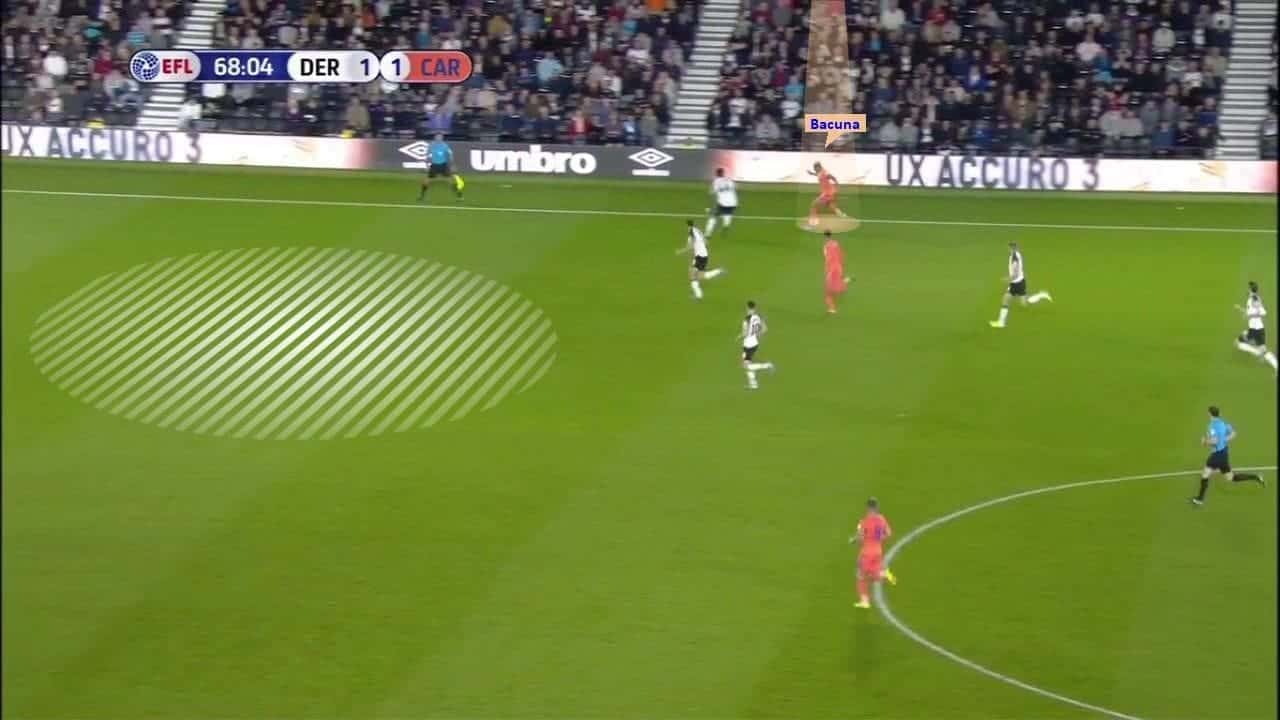
The image below illustrates such a situation perfectly. After losing the ball deep into the opponent’s half, Clarke was unable to track back on time that left his teammates covering up for him. From first sight, everything looked under control as there were three Derby players against the two opponents.
However, note the space in behind highlighted in white. This is where Clarke was supposed to be if not for his adventurous forward run. Cardiff worked it out pretty well how to mitigate the one player numerical disadvantage by exploiting the space highlighted in white. Fortunately for Cocu’s team, the visitors lacked quality in the final phase and did not make use of the opportunity.
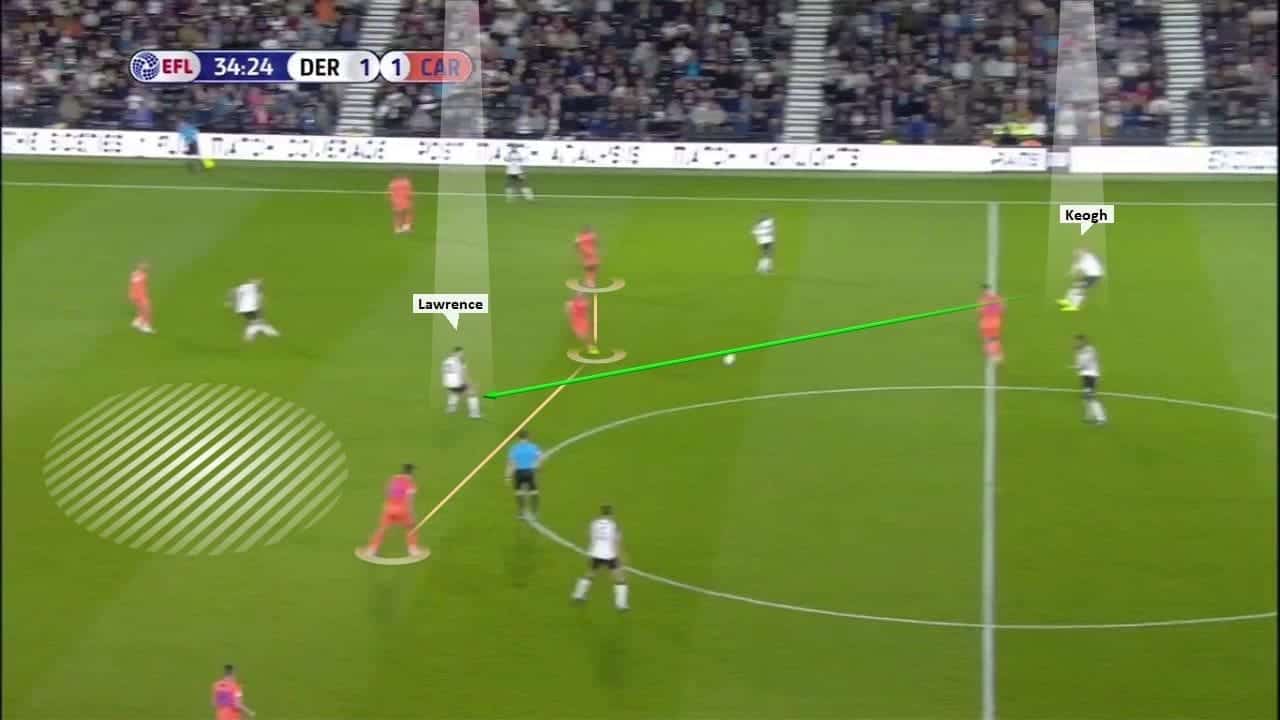
When one of the centre-backs did not drive forward, he still managed to find a free teammate in between the lines. Lawrence was at the centre of attention once again after drifting from the left to the centre of midfield.
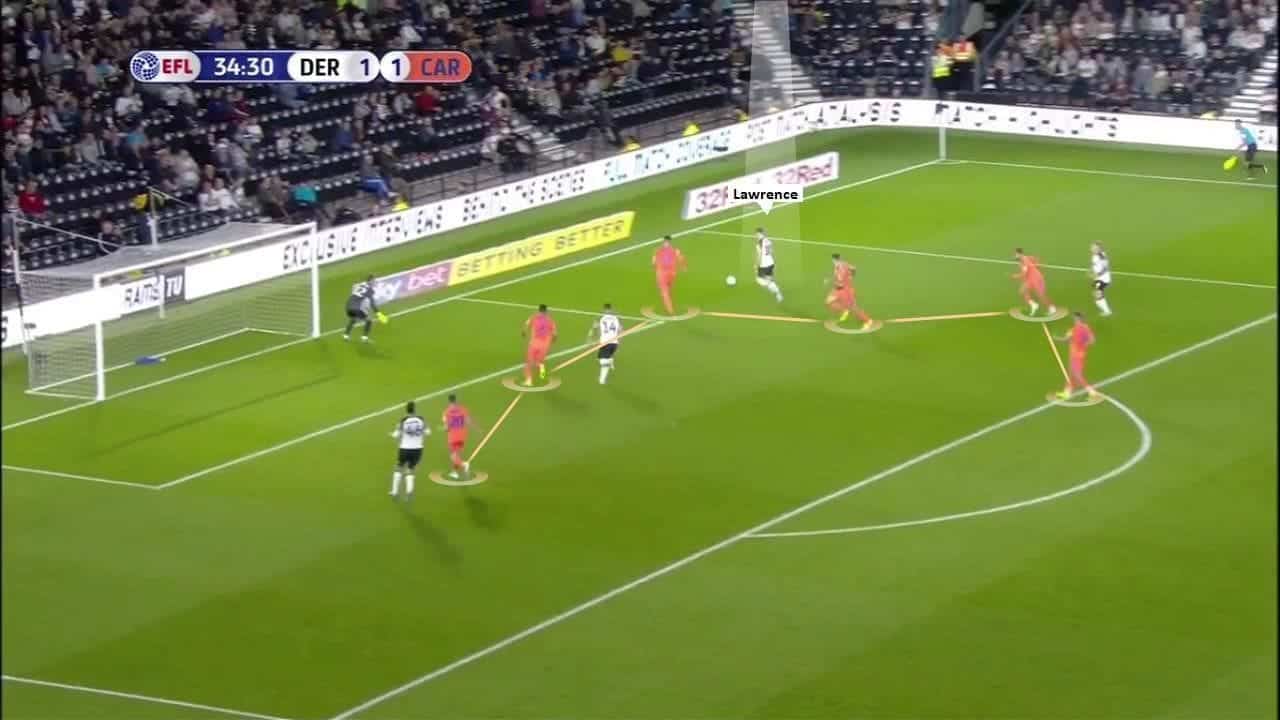
Throughout the whole match, Derby exploited spaces through the middle but struggled in the final third. Below is an example of one of the situations where the Rams would get into the penalty box but Cardiff would be solid enough to contain the opponent.
Derby down the right and offensive transitions
It has been noted that Derby County under Cocu do not press as intensively as they did under Lampard. In fact, this observation is correct; however, in certain areas of the pitch, the pressure is still applied nevertheless as pretty much every team does this.
Since their opponents from Wales are not the best team for ball control in tight spaces, this is when the applied pressure paid dividends. In the image below, we can see Derby’s tight pressing that resulted in winning the ball back and starting the offensive transition.
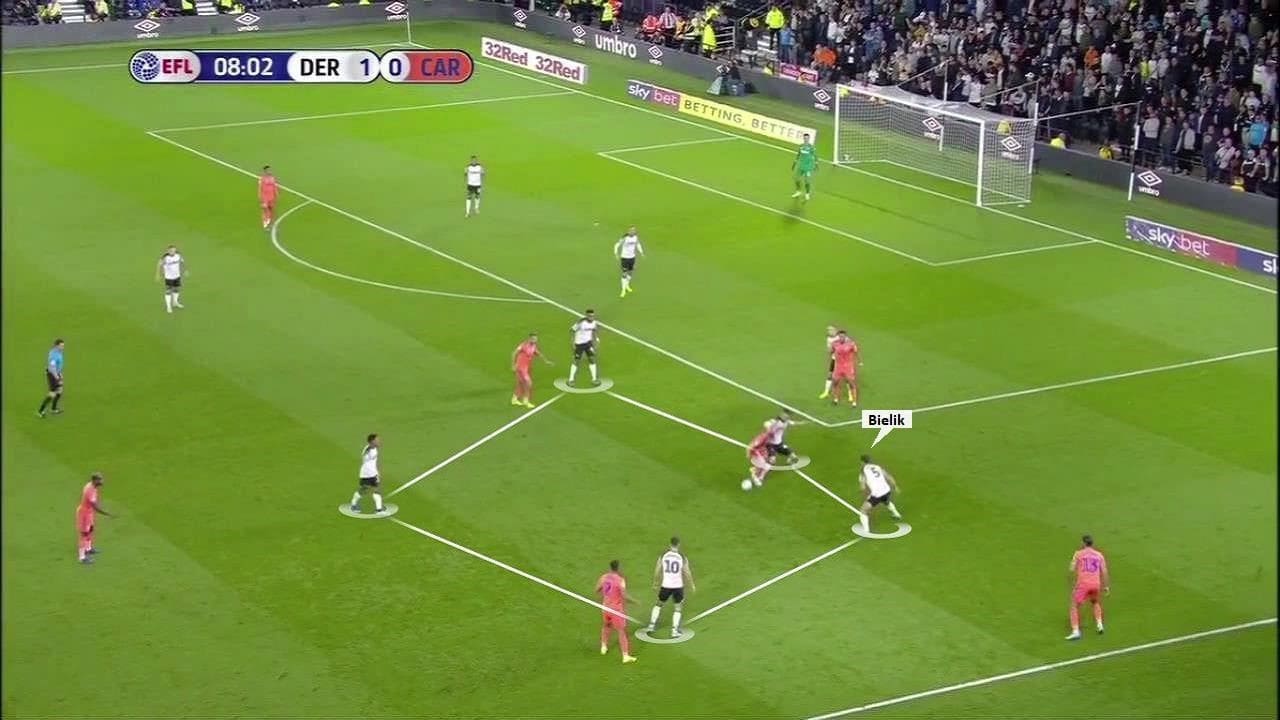
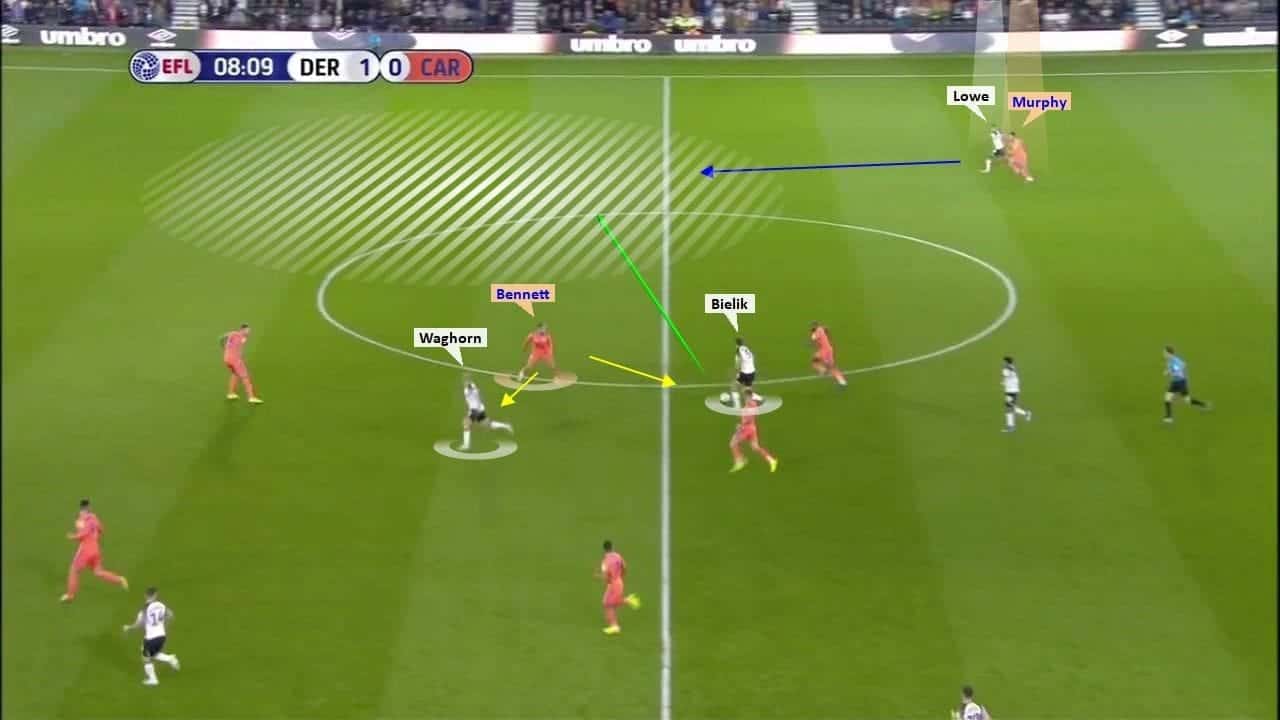
Regaining of ball possession followed with a rapid offensive transition with Bielik being the initiator. Here we can see how he carried the ball all the way from the edge of his penalty area to the halfway line. Waghorn intelligently shifted to the side leaving Bennett in two minds of whether to challenge the Polish defensive midfielder or stick with the initial marker.
Since the ball was won back on the left side from Derby’s point of view, it freed up space on the opposite side. Josh Murphy was caught sleeping that allowed Lowe to gain the advantage when sprinting forward. Unfortunately for the home team, these transitions did not result in anything meaningful.
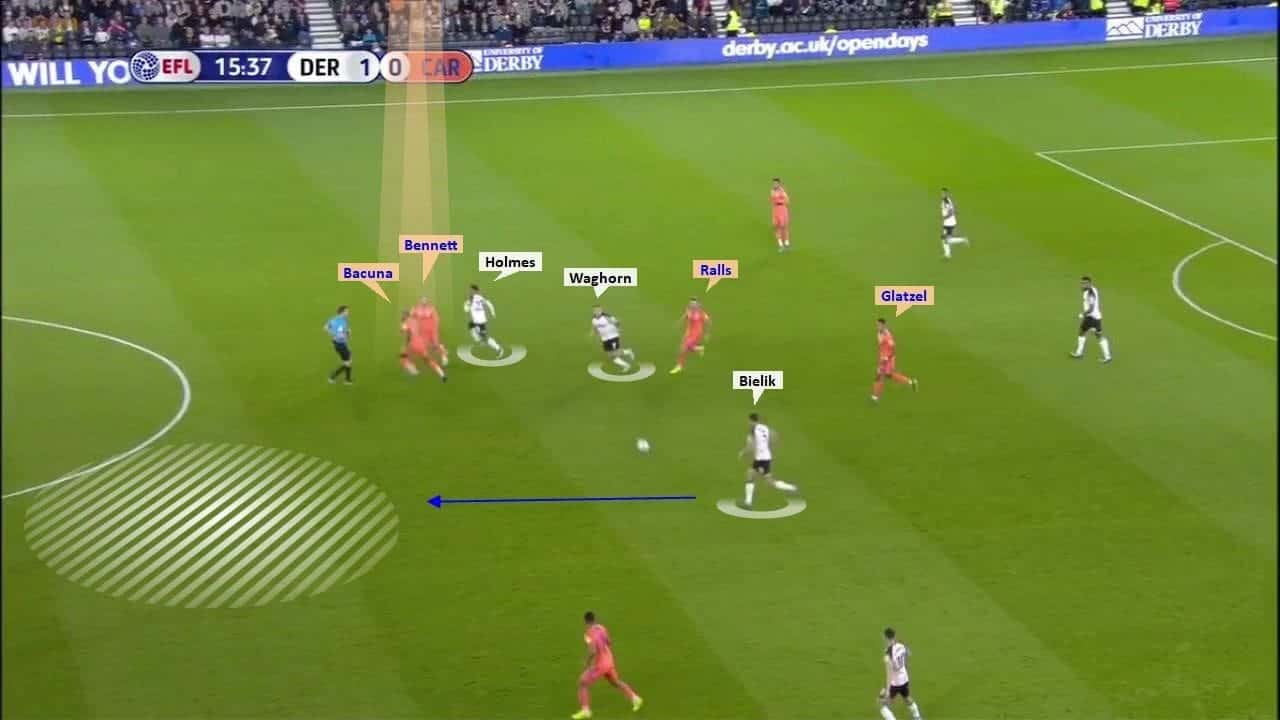
Another offensive transition from the Rams is illustrated below. The Polish midfielder was a key figure once again driving the team forward. A key thing to note here is how concerned Bacuna and Bennett were tasked with the man-marking. Bacuna was responsible for marking Holmes whereas Bennett followed Waghorn everywhere. With Glatzel not tracking back and Ralls helping out his teammates, Bielik had acres of space in front of him to run into.
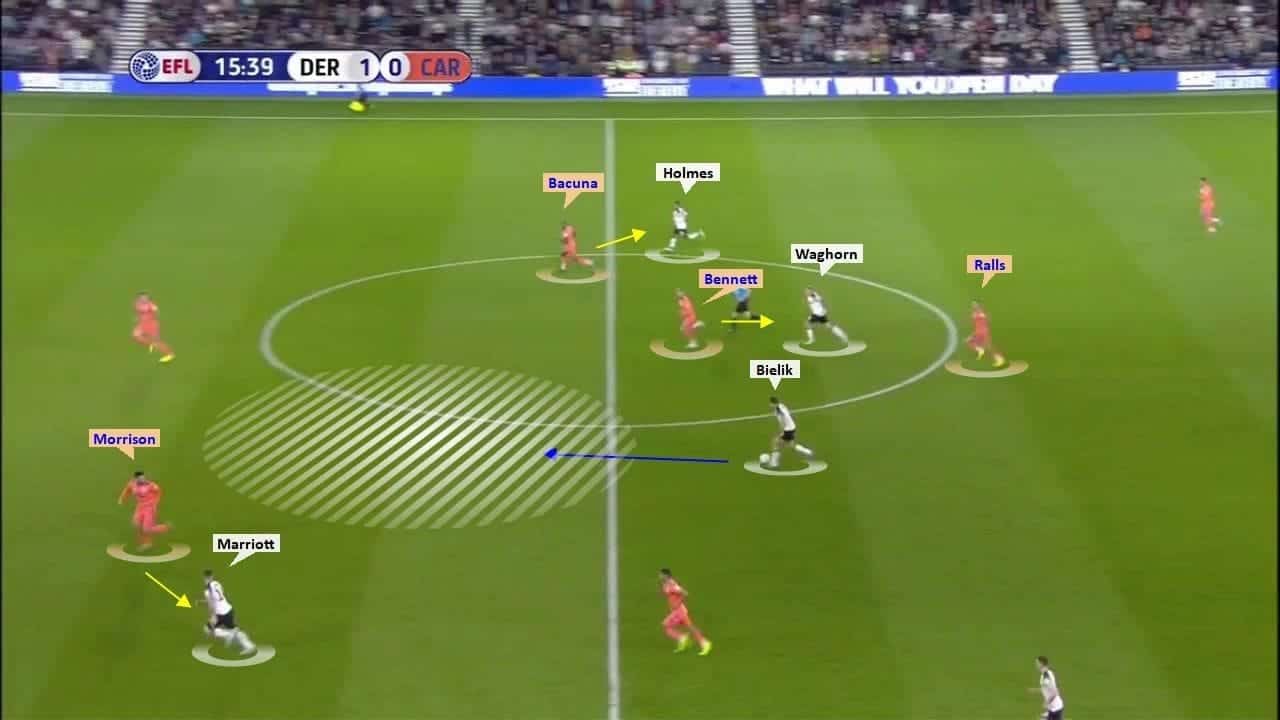
The aforementioned Bielik travelled one-third of the pitch once again with no one getting anywhere near him. Both Bacuna and Bennett continued following their initial markers, whereas Sean Morrison could not step out to confront the ball carrier due to Jack Marriott’s position wide on the left. Consequently, the ball was carried for a lengthy distance but with no end product yet again.
The last form of Derby’s attack was playing down the right flank involving the right-back. In these situations, the home side was able to pass their way past the opposition’s defence. However, as mentioned already, lack of intricate decisions and quality in the final phase were the biggest downfalls for the Rams in this game.
The illustration below shows how the home team managed to attack down the right-wing. Bennett stepped out to create a three against two pressing situation, however, it was easily bypassed with a single pass that found Max Lowe.
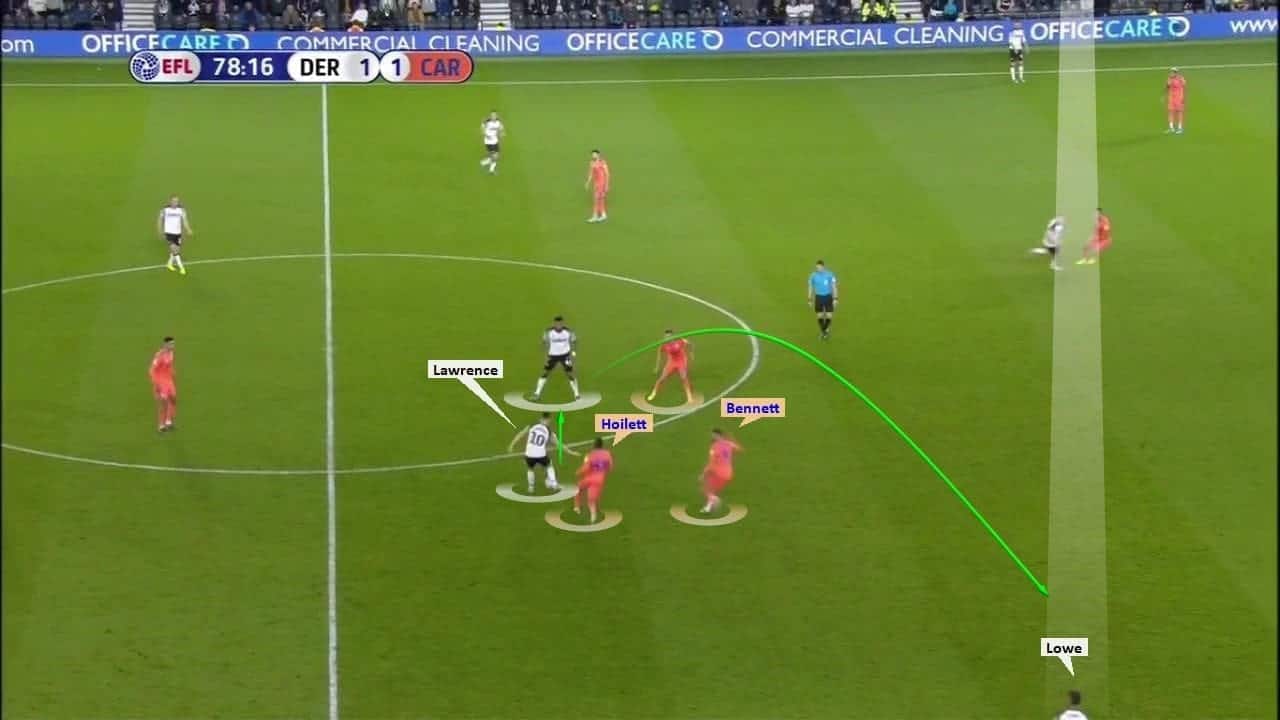
As a result, the visitors’ left-back was caught out of position that was exploited by Lowe.
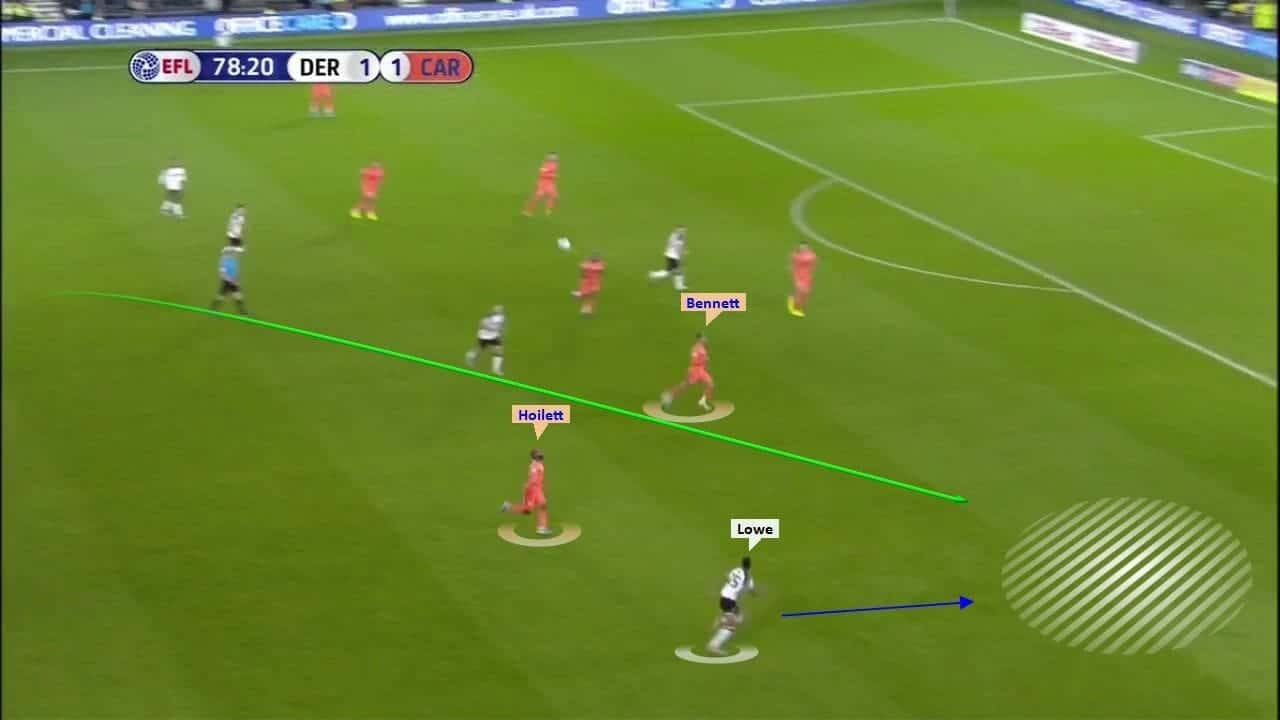
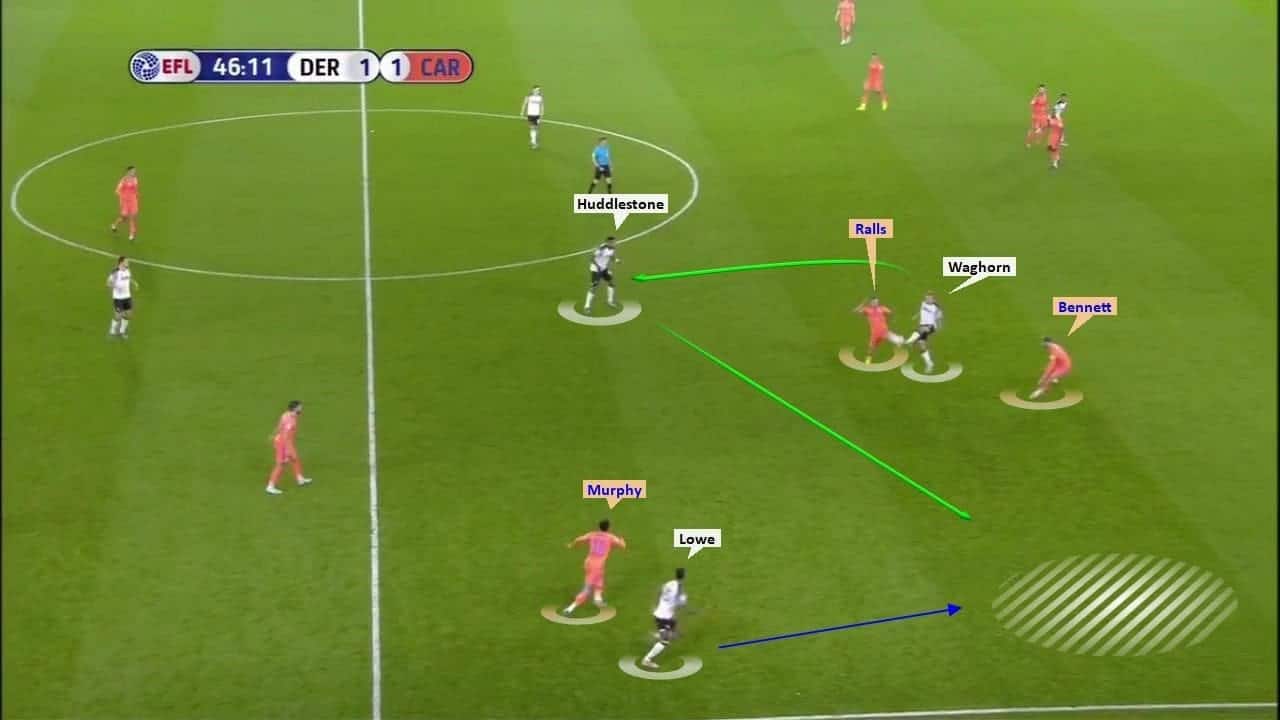
A very similar episode is displayed below. Here again, Bennett stepped out to mark his direct opponent Waghorn whilst Murphy was caught sleeping. Derby’s right-winger laid it off to Huddlestone who then found Lowe with a precise pass. However, none of these promising situations resulted in anything dangerous.
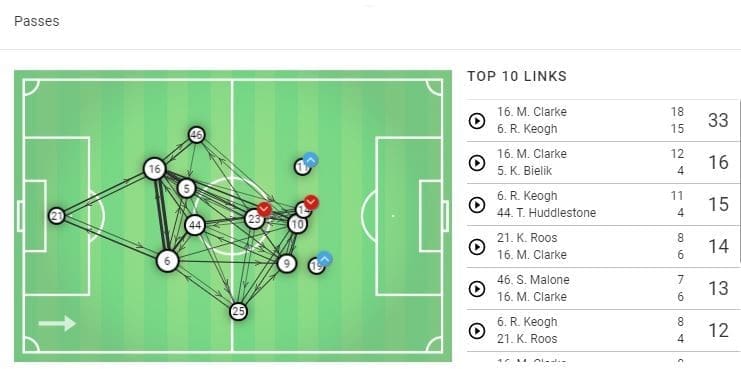
All in all, the passing networks map illustrated below backs up everything that was explained in this analysis so far. The thickest arrows between both centre-backs with medium-thick arrows going through the midfield indicates the most prominent patterns of play. A lack of connection is present on the left side with left-back Malone (no. 46) rarely joining the attack since he is not a modern-day full-back. A lot more was going on the right side with Lowe (no. 25) pushing higher up and connecting with more teammates. Also shown is Lawrence (no. 23), occupying a more central role rather than staying on the left-wing as was explained.
Cardiff’s build-up
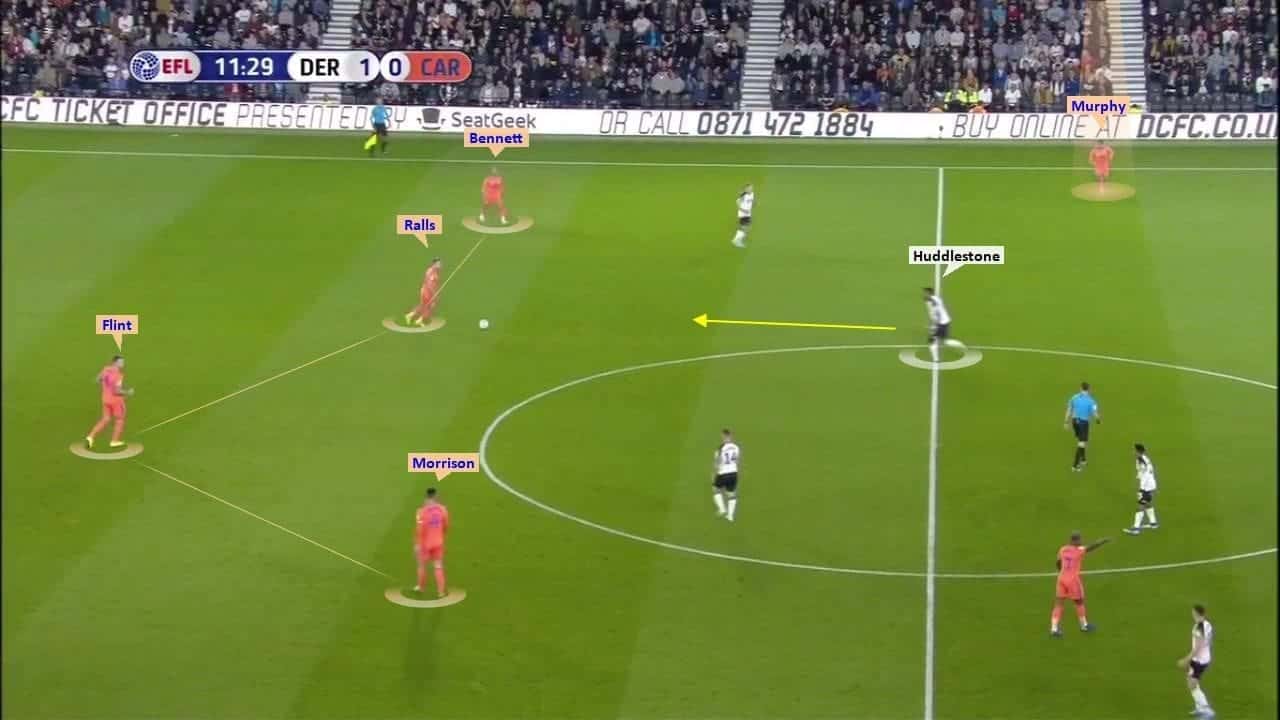
The teams that Warnock has managed throughout his career have never been famous for their ability to play out from the back. The Welsh side is another one that plays a more direct type of football. Nonetheless, not every single build-up play started with a long kick from Cardiff’s defensive third. There were times when Cardiff tried to build up from the back like a modern team.
The Bluebirds also had a tendency to start the first build-up phase by possessing a numerical superiority. In the image below we can see Ralls dropping deep to collect and then distribute the ball. This choice seemed justifiable enough as Ralls recorded a 78% passing accuracy in this game, the best of the whole team. The intention was to play down the flanks mainly involving Murphy and Glatzel who also dropped deep to link-up with the English winger.
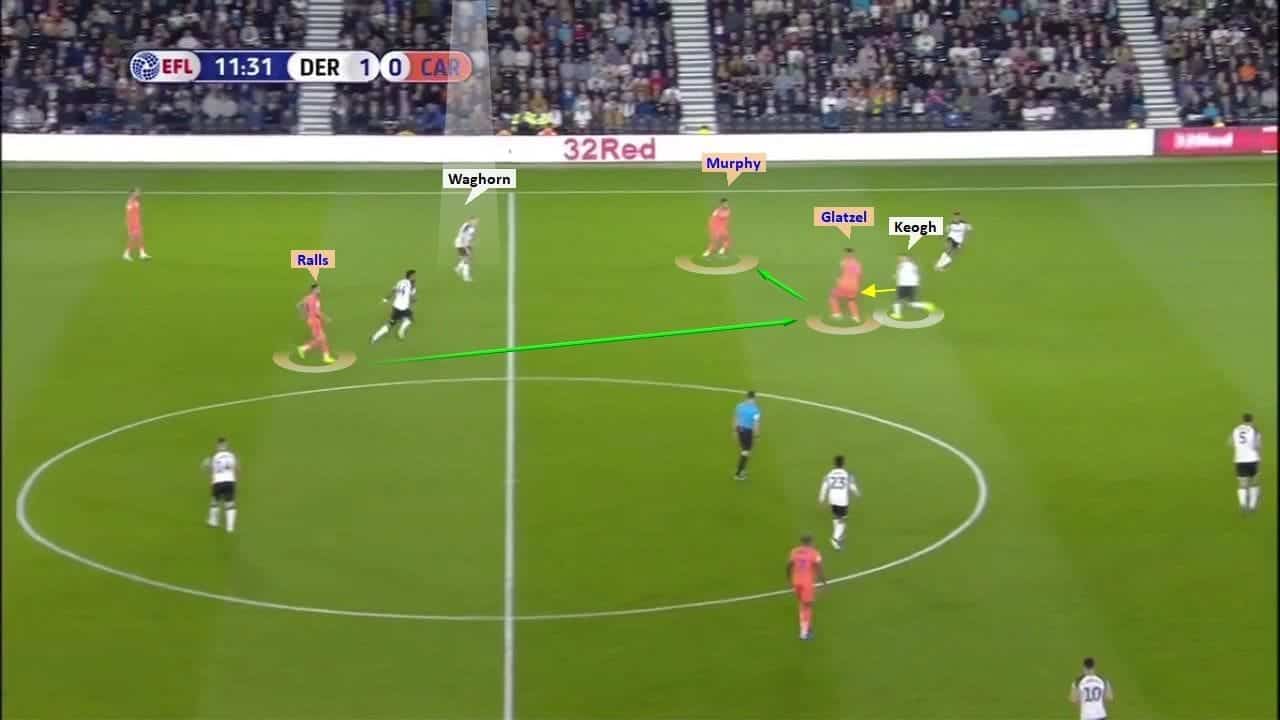
Below is such an example when the German striker dropped deeper, thus, dragging the opposition’s centre-back Keogh out of position and at the same time linking up with Murphy. The latter used his pace and dribbling skills to bomb down the left wing and threaten the home side.
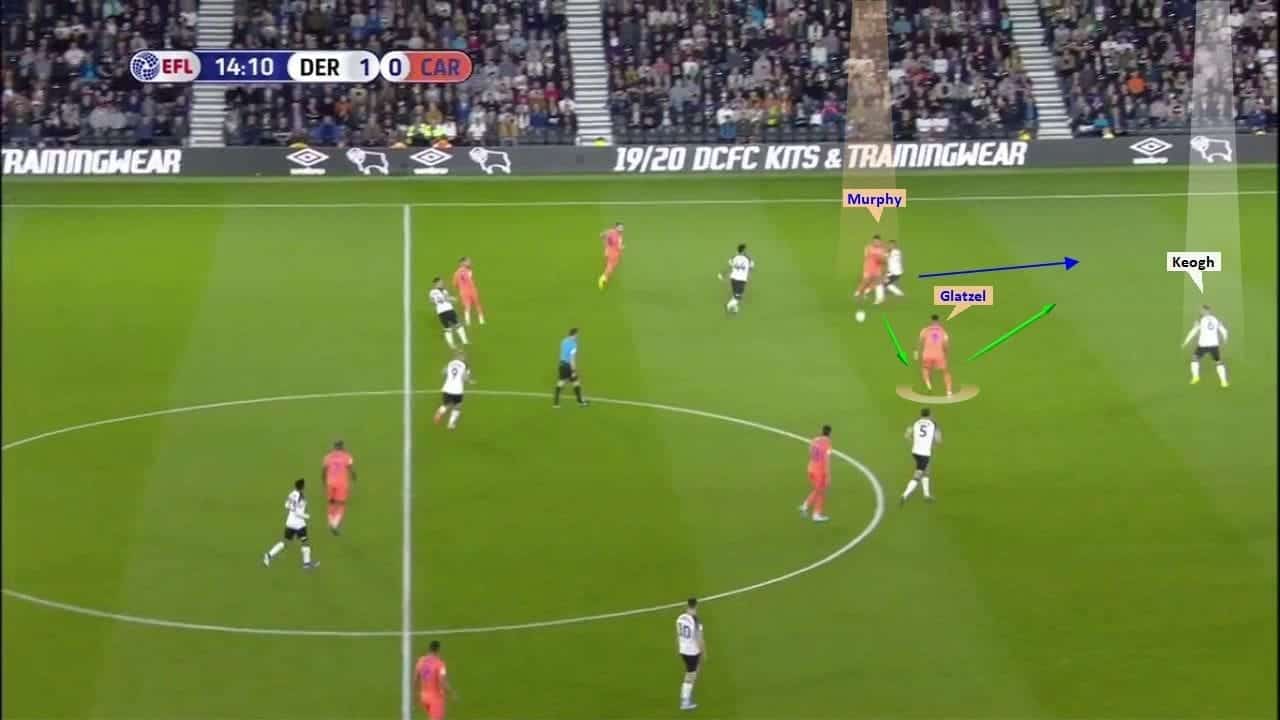
Another very similar situation is captured below. Here, Glatzel dropped deeper once again to support the progression of the ball through the middle third.
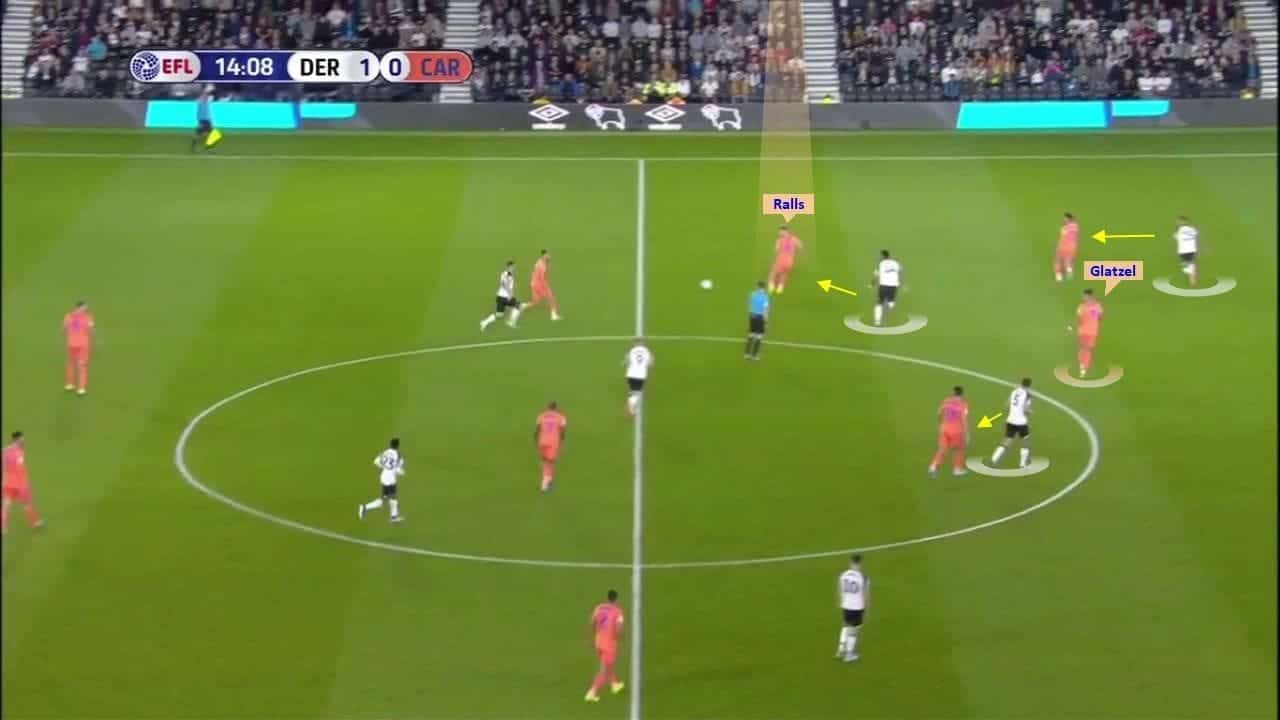
Initially, the ball was played to Murphy who then played a quick one-two with the German striker. Note the position of Keogh who did not follow Cardiff’s striker this time, probably being wary of Murphy’s pace and wanted to cover the zone.
Cardiff winning first and second balls
It would not be considered Warnock’s team if it was not good in the air. In this game, the Welsh side won 30 aerial duels and some of them consisted of important first and second balls.
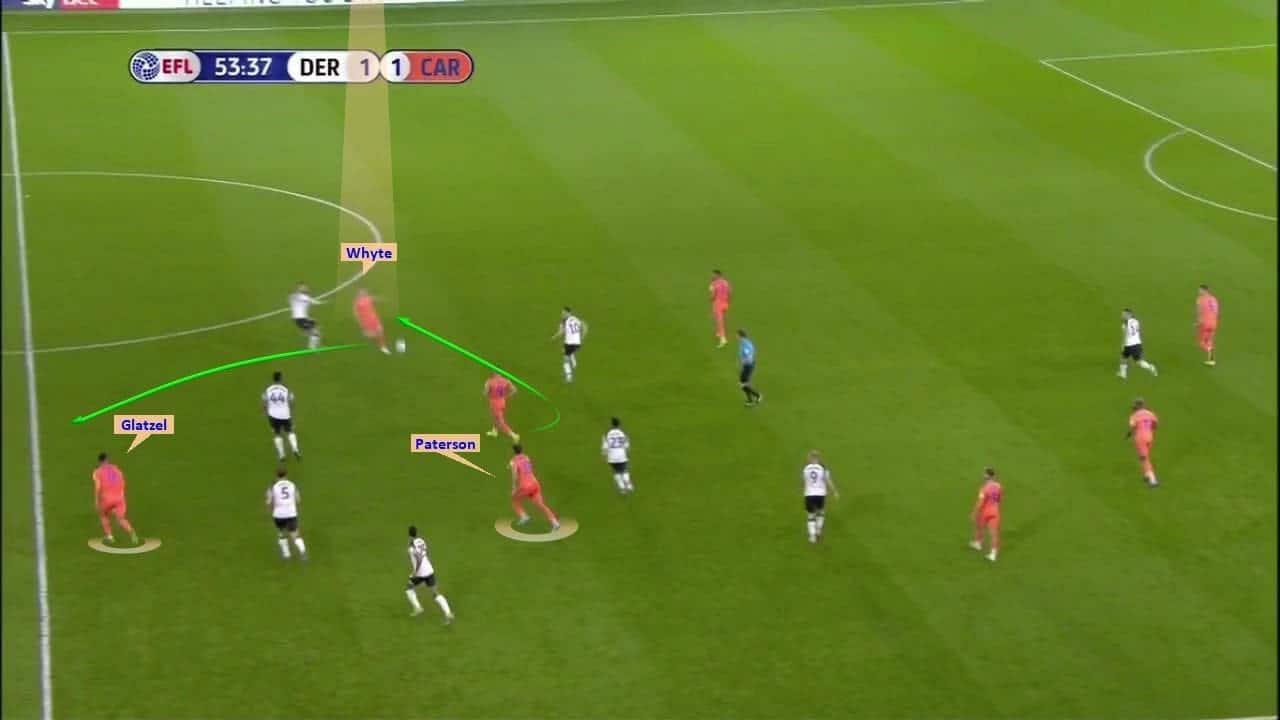
Like in the image below, six Derby players were surrounding three pink shirts but it did not stop the Bluebirds from winning the aerial battle. Paterson won the first ball, Gavin Whyte won the second, which put Glatzel in behind the six black and white shirts.
A substitute Nathaniel Mendez-Laing did exactly the same, making use of his aerial strength against a physically weaker right-back. This particular tactical manoeuvre freed up Junior Hoilett on the left since the opposing right-back was busy battling in the air.
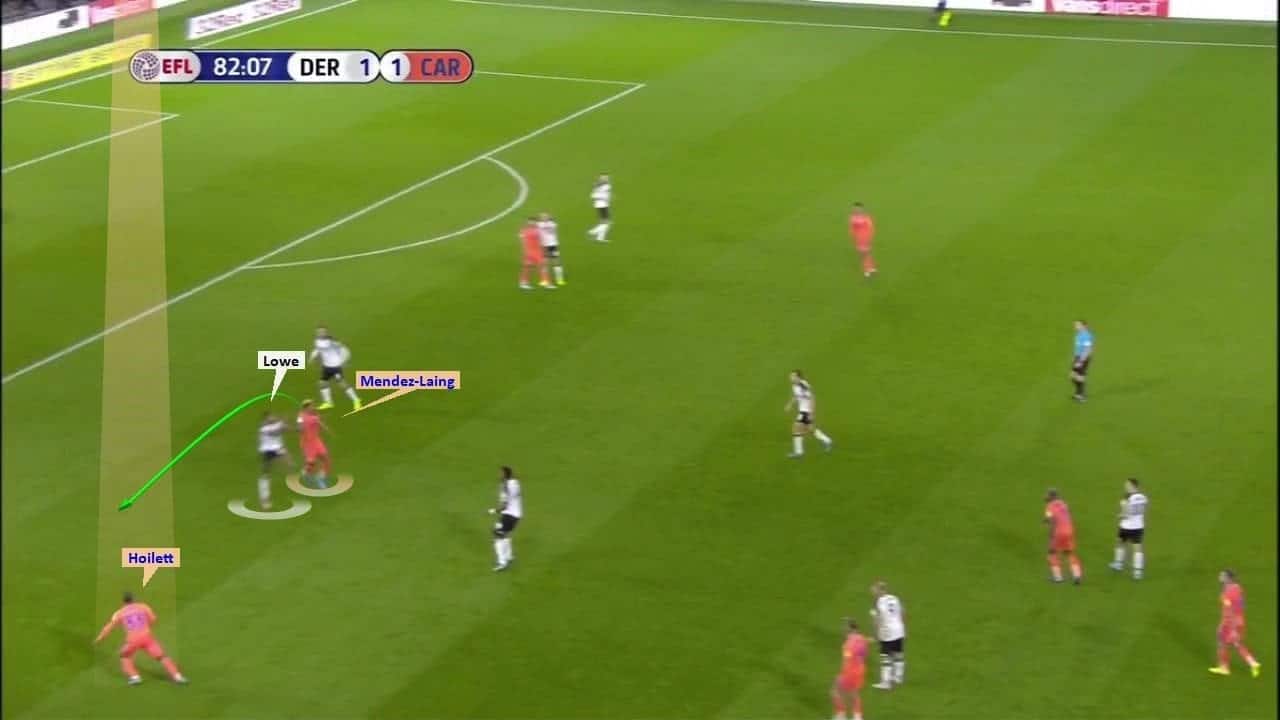
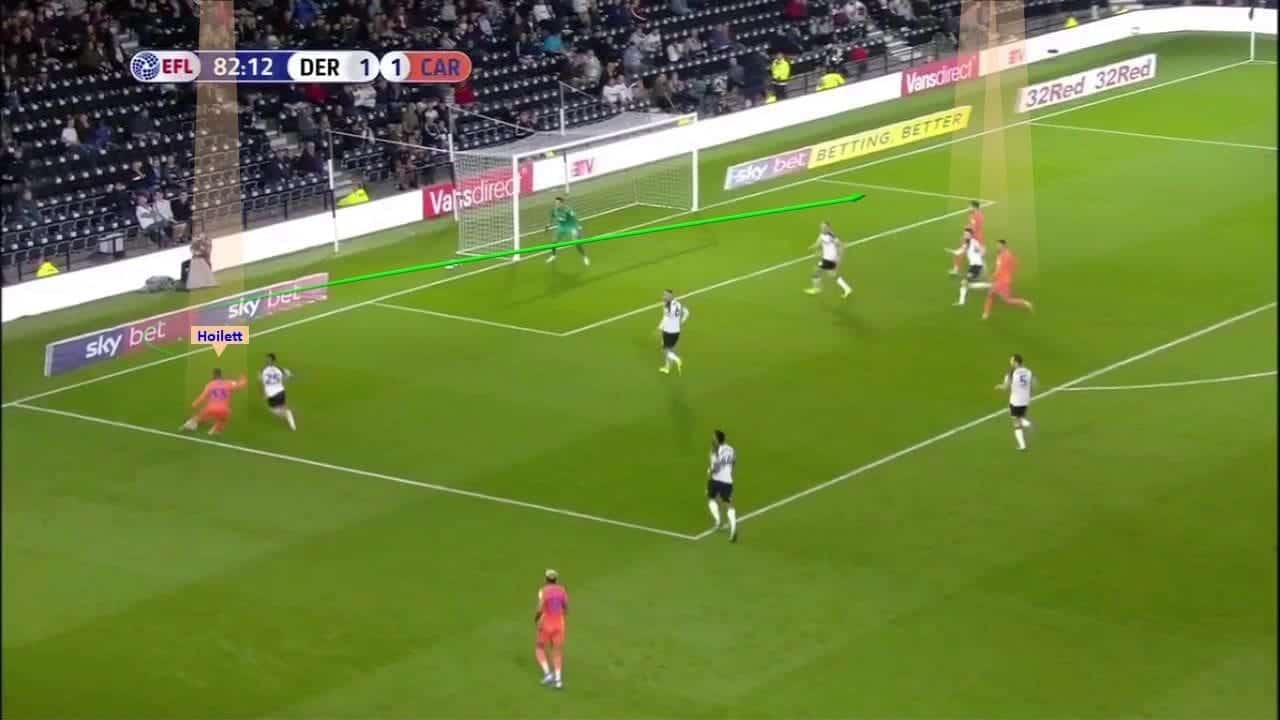
Such an old-school attacking play when a big man wins a header and releases a pacey winger down the flank usually resulted in crosses. However, only five out of 14 Cardiff’s deliveries into the box reached its destination on Friday night.
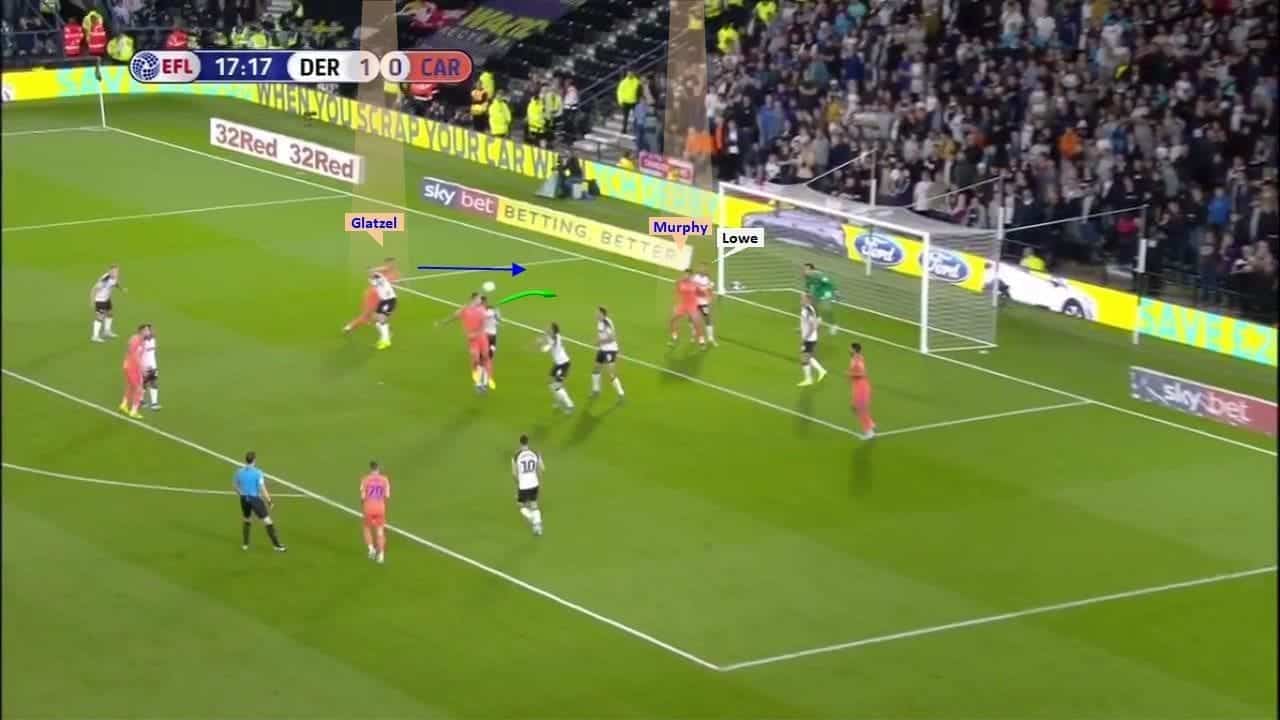
The last image must be dedicated to the throw-in that resulted in a penalty conceded by the home team. Aden Flint out-jumped Huddlestone while Keogh was caught ball watching and lost Glatzel out of his sight. It is worth noting Murphy’s position close to the goal by blocking Lowe in order to create space for Glatzel to run into after a won header.
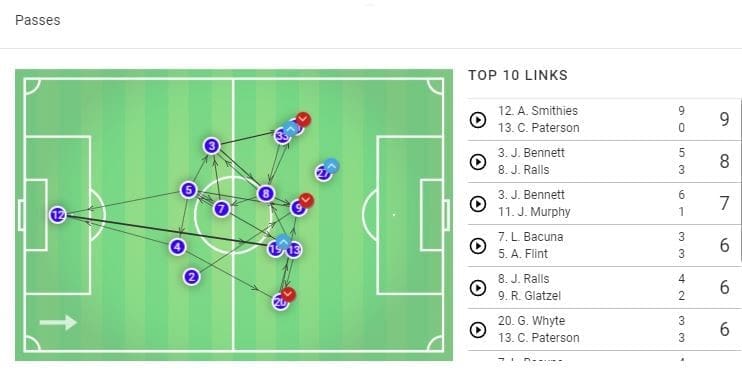
Below we can find a graphical representation of Cardiff’s passing networks. The strongest connection was established between the goalkeeper and Paterson (thickest black arrow) that denotes the Bluebirds’ direct style of play. The second and third strongest connections belong to the left side where Bennett (no. 3), Murphy (no. 11) and Ralls (no. 8) combined the most. Glatzel (no. 9) is also worth mentioning as he linked with Ralls six times and was involved in Cardiff’s build-up as mentioned previously.
Conclusion
As this analysis explained, Derby had most of the ball and were able to penetrate the opponent through the middle and the right flank. Despite that, Cocu’s team lacked creativity and quality in the final third which did not allow them to take advantage of the good positions they were in at times. Contrarily, the performance of their opponents was as expected and proved yet again that you do not need to be the most flashy team in the Championship to achieve a positive result.

If you love tactical analysis, then you’ll love the digital magazines from totalfootballanalysis.com – a guaranteed 100+ pages of pure tactical analysis covering topics from the Premier League, Serie A, La Liga, Bundesliga and many, many more. Buy your copy of the August issue for just ₤4.99 here.


Comments