Saturday’s round of EFL Championship clashes offered up an interesting affair at Loftus Road as the, prior to kick-off, fifteenth-placed Queens Park Rangers hosted second-placed Leeds United. With the odds looking stacked in Marco Bielsa’s side’s favour, Mark Warburton’s QPR side ran out 1-0 winners.
The three points for the home side moved them up a single place in the Championship table, from 15th to 14th. Meanwhile, despite defeat, Leeds remained second in the table with Fulham trailing by four points.
This tactical analysis will dissect the clash between the two and highlight key areas of the two sides’ tactics while using analysis to show how they impacted the game’s outcome, a 1-0 win for the hosts.
Lineups
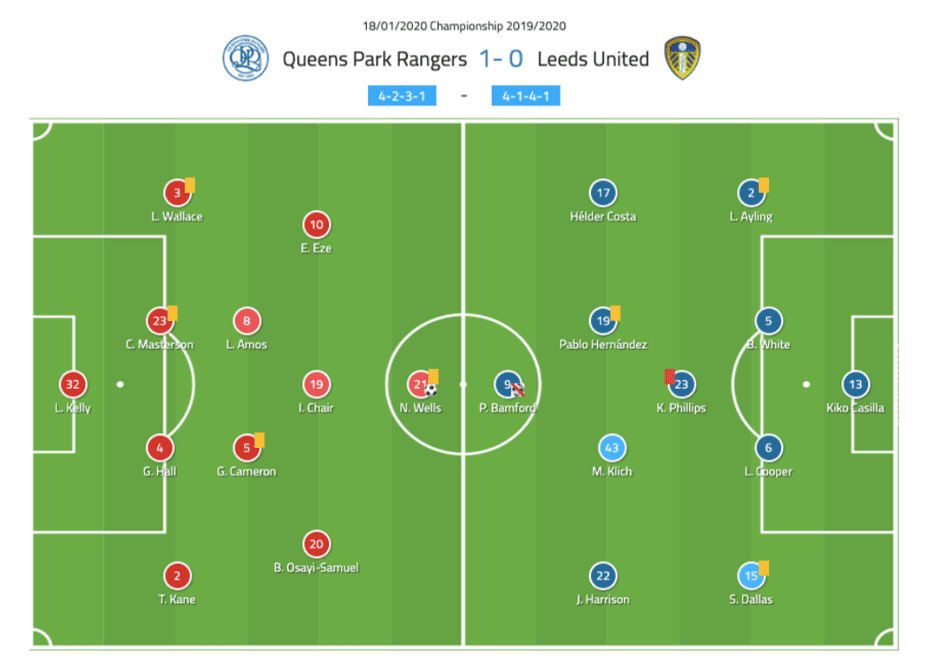
In the home dugout, Warburton opted for the same starting formation that he had done for the five games previous to the visit of Leeds – that being a 4-2-3-1. The last time the side differed from the set up was for a 4-1-3-2 in the 1-0 away defeat to Reading. In terms of personnel, three changes were made by QPR. Joe Lumley, Ryan Manning and Dominic Ball made way for Liam Kelly, LJ Wallace and Conor Masterson.
Leeds also opted for a familiar-looking set-up, with a 4-1-4-1 Bielsa’s formation of choice, as it had been in the three previous games. The starting formation has only been differed from on three occasions in the last ten games, all three being for a 3-3-3-1. To his starting lineup, the Argentine made only one change. Barry Douglas was switched with Pablo Hernandez.
Leeds’ long balls from the back
In an effort to move from defence to attack quickly, which may have been a retaliation to going a goal down after 20 minutes, the away side often attempted incredibly direct passes. The thinking behind this may have been either for midfielders to pick up loose second balls should they occur or to attempt to drop the ball between QPR’s defence and goalkeeper for Patrick Bamford to run onto. However, these direct passes were ineffective.
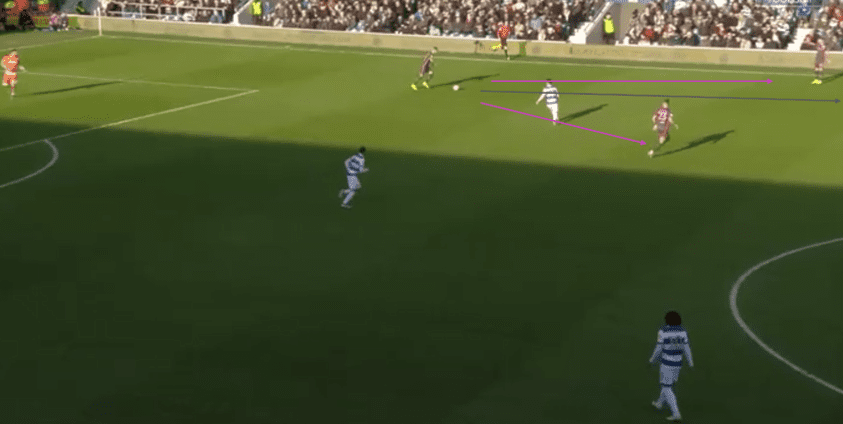
As can be seen in this annotation, the Leeds backline often opted the play long balls forwards despite having shorter passing options to play through the thirds. The short options are marked by the two pink arrows, however, what Liam Cooper actually does is marked by the grey, a punted ball forward towards QPR’s back four.
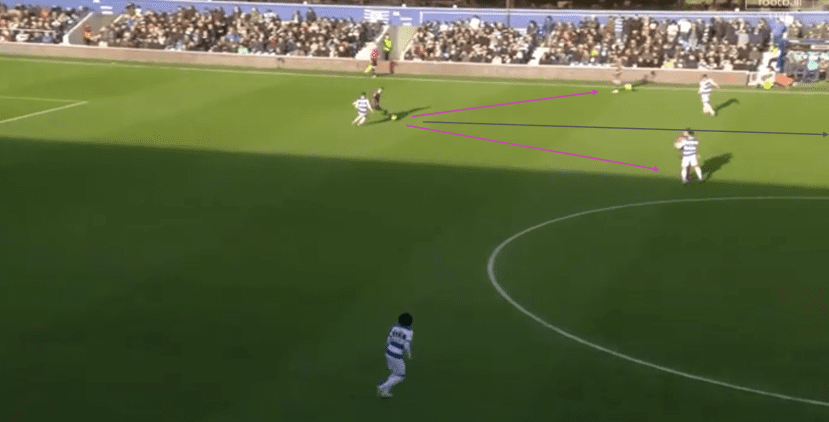
Here, another example of Leeds’ direct passing can be seen. Again, with two short passing options, Cooper opts to play the ball long to the home side’s back four. This tactic was predominantly enforced from Cooper’s side of the defence. This tactic contributed to Bielsa’s side attempting 44 long passes, 17 more than Warburton’s side, only 22 of which were successfully completed.
The above figure suggests that this tactic was unsuccessful due to only a 52% long pass completion rate and this was due to the ease Queens Park Rangers’ backline had in dealing with the lofted passes. This heavily contributed to the home side’s 52 interceptions and 45 clearances, compared to Leeds’ 40 interceptions and 14 clearances.
QPR’s pressing response
In response to Leeds attempting to cut out the middle third with a long pass from defence to attack, QPR used a two-man pressing system to pressure the centre-backs and force Leeds through the thirds. Between Nahki Wells and Ilias Chair, the pair would work in tandem to attempt to prevent a long ball being played forward.
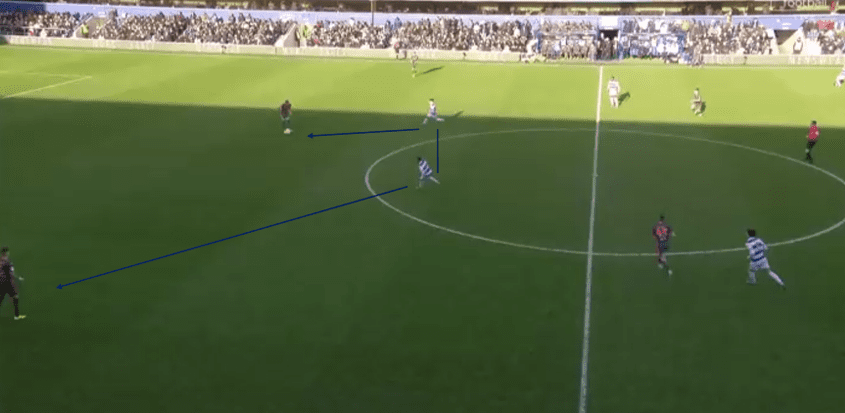
As can be seen here, the two worked in tandem, as if a striking partnership as opposed to a lone striker and attacking midfielder, to pressure the two central defenders. When Cooper or Ben White would look to be leaving Leeds’ third of the pitch, the attacking pair would remain close together while one of the two quickly closed down the defender in possession to prevent a direct pass.
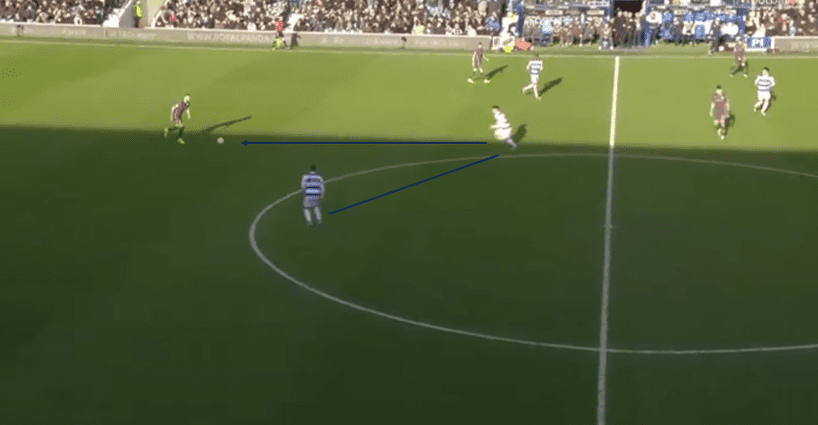
As can be seen in this annotation, Cooper appears to be sighting a long ball opportunity and as such Chair has instantly and intensely provided pressure to the man in possession. With Wells close by should Copper pass to White, who would then have been pressed by Wells, the pair work as a team to prevent a long pass. This further frustrated Leeds’ tactic coupled with the inaccuracy of the long passes when they were attempted.
QPR’s narrow attack
A key feature to QPR’s tactics which assisted in the home side bagging the only goal of the afternoon was their desire to attack with as little width as possible. To do so, Warburton’s two wingers – Eberechi Eze and Bright Osayi-Samuel – looked to drive inside where possible, like inverted wingers, as opposed to playing wider.
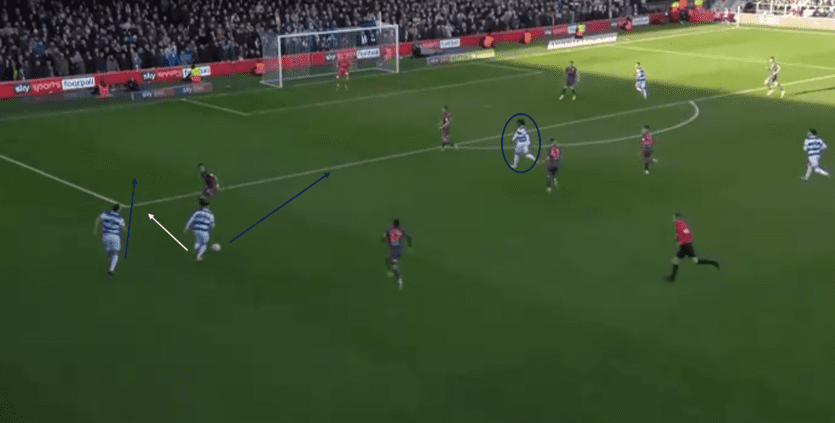
Here, an example of a QPR player who has had possession of the ball out wide to then drive inside and narrow the pitch. In this instance, Eze has already drifted inside and Chair has moved wider to receive possession, as opposed to making the run marked by the white arrow, Chair follows the blue and drives inside with possession.
A two versus one overload is created on Luke Ayling due to LJ Wallace joining the attack from defence to provide a little extra width. This then creates the space for Chair to drive into as Ayling is unable to decide whether to follow the run of the full-back or to follow the attacking midfielder inside.
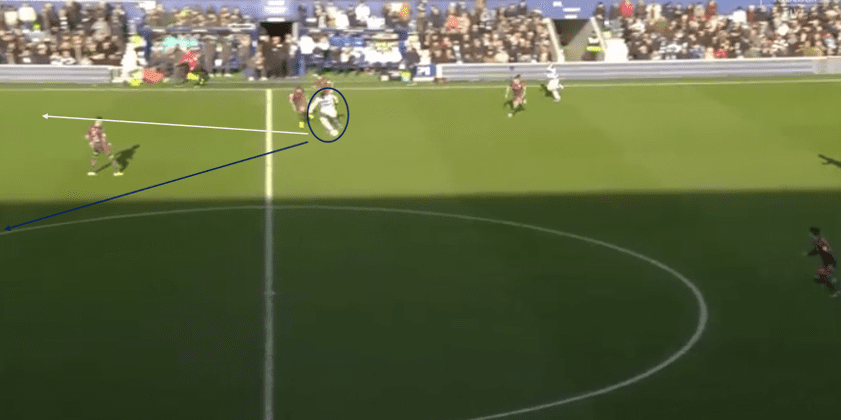
An example of this tactic can be seen in the build-up to winning the free kick which QPR scored their goal from. With Osayi-Samuel picking the ball up in a wide position, instead of attempting to follow the white arrow and move into a wide position, he follows the blue. By driving inside as opposed to out he is able to evade Leeds’ defenders until he arrives at the edge of the Whites’ box, where he is fouled. From the resulting free kick, Wells scored the match-winning goal.
Leeds’ width in attack
While the home side was playing narrow when on the attack, the away side looked to make the pitch as big as possible to find gaps in QPR’s backline. This led Marco Bielsa’s side to attempt 29 crosses at Loftus Road, only 11 of which were successful. This number massively dwarfs QPR’s five attempted crosses due to their differing widths in attack.
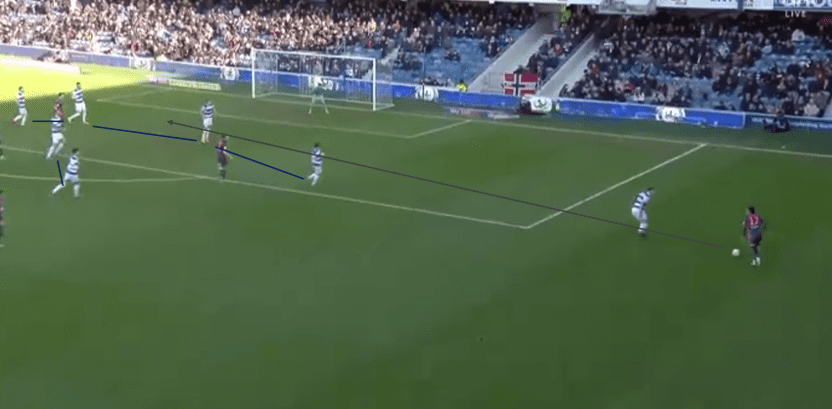
It is fair to say that during the game Leeds put the home side under the cosh, with QPR enjoying just 37% of the possession. Due to this Mark Warburton’s side became very compact, both within their lines and between them. As can be seen in this annotation, QPR’s back four are incredibly compact, as are the deeper midfield two of the 4-2-3-1, with little space between them and the defence.
Due to this, Leeds attempted to get as wide as possible, rather than play through the home side’s lines, and then hit crosses into the area between the two centre-backs. This other key tactic of Leeds was another reason for QPR’s interceptions and clearances figures. It was the compactness and defensive solidity which ensured three points for the home side and frustrated Leeds on the goal-scoring front.
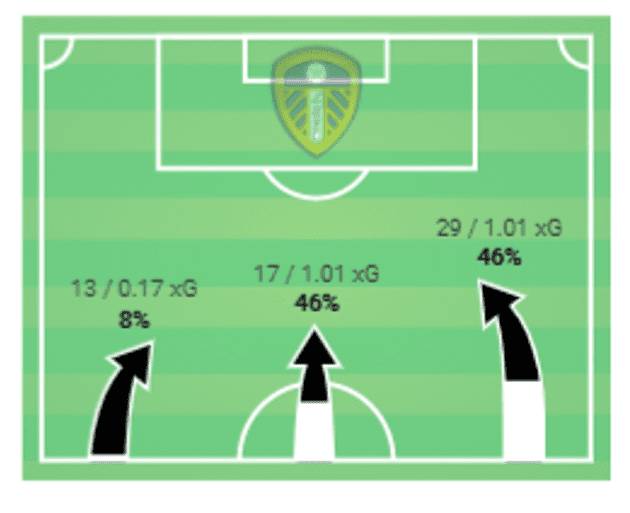
This preference to attacking wide can be seen in the away side’s positional attack map, as seen above, which shows that 42 of 59 total attacks came down the flanks, although they did not necessarily contribute the most to the side’s expected goals.
Conclusion
While it was certainly clear that Leeds United enjoyed the best of the statistics, Mark Warburton will have been delighted that his side’s narrow attack and compactness in defence were effective against Marco Bielsa’s Whites.
While the result will have been an incredibly disappointing one for the away side, especially due to the missed penalty, some comfort may have been taken from Brentford failing to defeat Huddersfield Town. However, with three defeats in the previous four league and cup matches, some concern may grow if that form continues.
This tactical analysis has dissected the EFL Championship clash between Queens Park Rangers and Leeds United, highlighting key areas of the two sides’ tactics. Analysis has then been used to show how that impacted the game’s outcome, a 1-0 victory for QPR.



Comments