The EFL Championship play-off final is widely regarded as the most expensive game in football, estimated to be worth £160 million. A win escorts you to the riches of the Premier League, whereas a defeat may lead to the sales of assets to balance the books. Here, however, we were also treated to a local derby between Brentford and Fulham. Brentford are known for their savvy recruitment, having generated large sales on several occasions. Scott Parker’s team have increased financial muscle behind them, perhaps best demonstrated by Aleksander Mitrović staying after relegation.
In the two games in the regular season, Brentford came out victorious both times – 1:0 at Griffin Park, and a late 2:0 win away in the first game after the restart. The Bees had a tremendous comeback in their play-off second leg against Swansea City – the last game ever at Griffin Park. Fulham were defeated by Cardiff City at Craven Cottage, but a solid victory in the first leg allowed them to progress to Wembley.
In this tactical analysis, I will conduct analysis to look at the tactics of Brentford and Fulham in the EFL Championship play-off final.
Line-ups
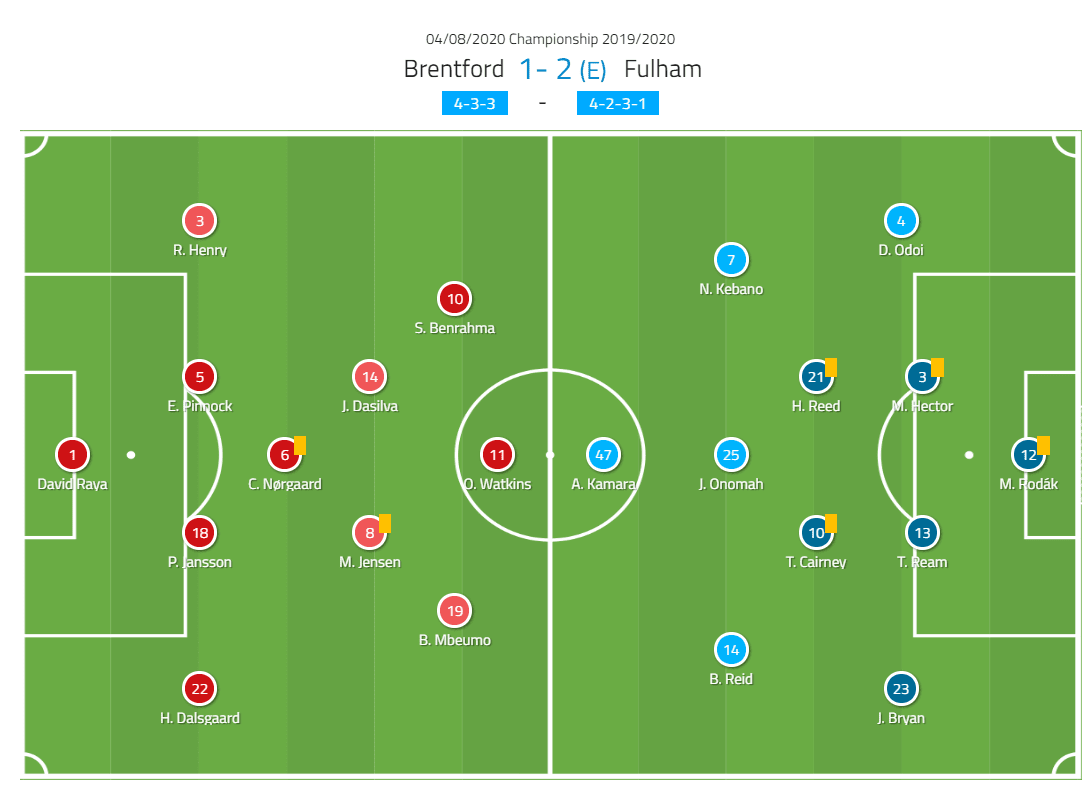
Brentford made one change to the side that beat Swansea. Josh Dasilva came into the starting 11 in place of Emiliano Marcondes. Ollie Watkins has 26 goals this season – joint-top with Mitrović. Potential Chelsea target Saïd Benrahma has 17 goals and nine assists.
The major news from Fulham’s end was the absence of their star striker once more. Mitrović missed both previous play-off games completely but did manage to make the bench here. This meant that Bobby Reid retained his place. Also, Denis Odoi replaced Cyrus Christic at right-back, and Aboubakar Kamara was chosen ahead of Anthony Knockaert.
Fulham build-up
Fulham have at times this season encountered problems with their build-up structure, resulting in ball progression becoming more difficult and less successful. Harrison Reed’s introduction and subsequent excellent performances have helped in that aspect. Furthermore, Tom Cairney has tended to reside in deeper areas recently, offset by the emergence of Joshua Onomah as an attacking threat.
This tactic involving Cairney was deployed once more here, perhaps to a greater extent than in previous instances. As a result, a box shape often formed in central areas. Importantly, this could overload Brentford’s first line and allow it to be bypassed simply. Additionally, the line-breaking pass could also engage a Brentford midfielder, causing him to step out and vacate space, which could consequently be played into and exploited – the essence of Fulham’s strategy.
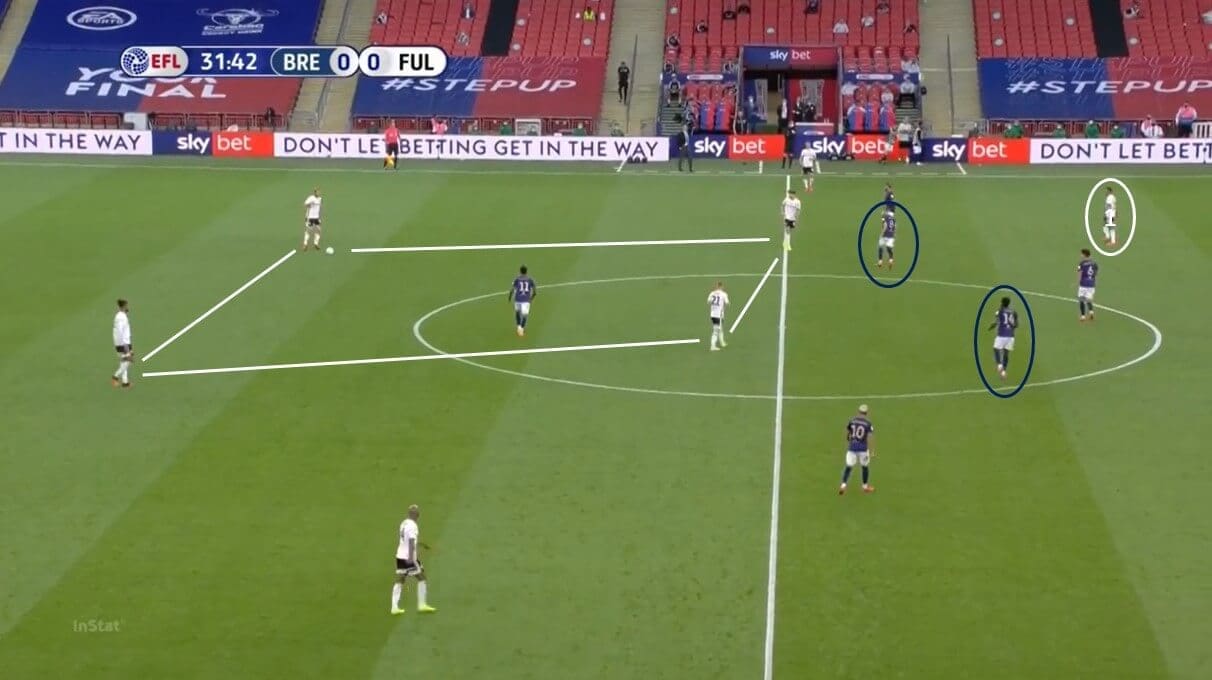
The image above illustrates their common build-up structure. Reed and Cairney would remain on the same line, never going in alongside the centre-backs. Their positioning restricted the movements of their respective opposition markers. Mathias Jensen and Josh Dasilva were being pinned, therefore giving the centre-backs increased time and space. Players in more offensive positions could then dismark themselves in search of an incisive pass. For instance, Reid and Onomah were both central, thus overloading Christian Nørgaard and creating a free man.
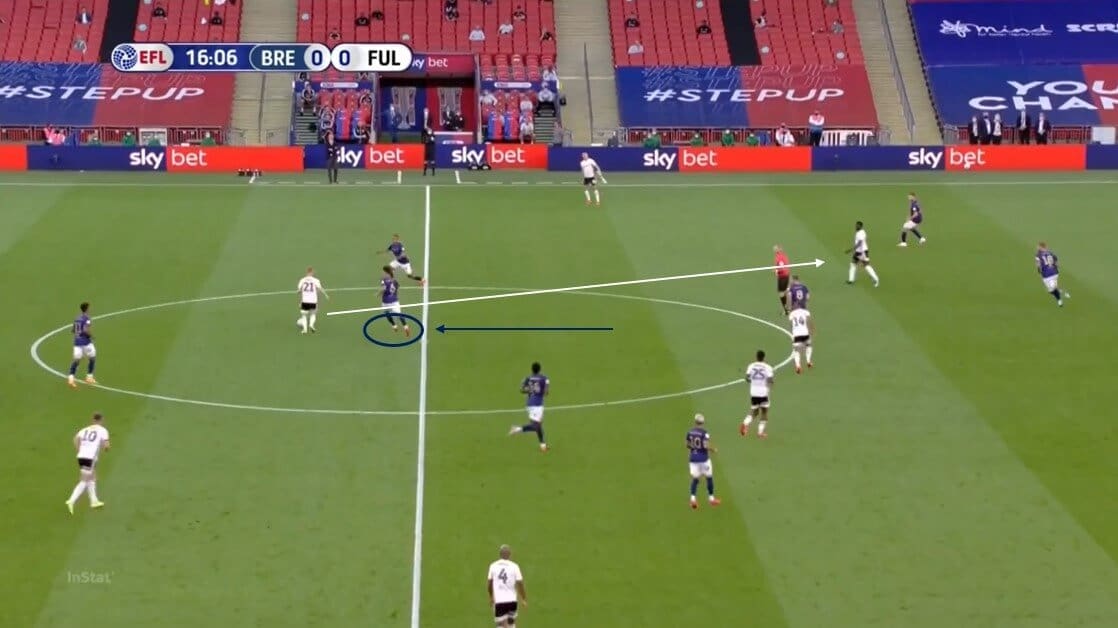
Here above displays an excellent example of this. Reed has possession, this triggers Nørgaard to engage the Southampton loanee. Naturally, this creates space between the lines. On this occasion, Jensen has covered for the Dane however that is not enough. Kamara identifies this now available space and forms an open passing lane, and then receives off Reed. Jensen is also partially occupied by Reid.
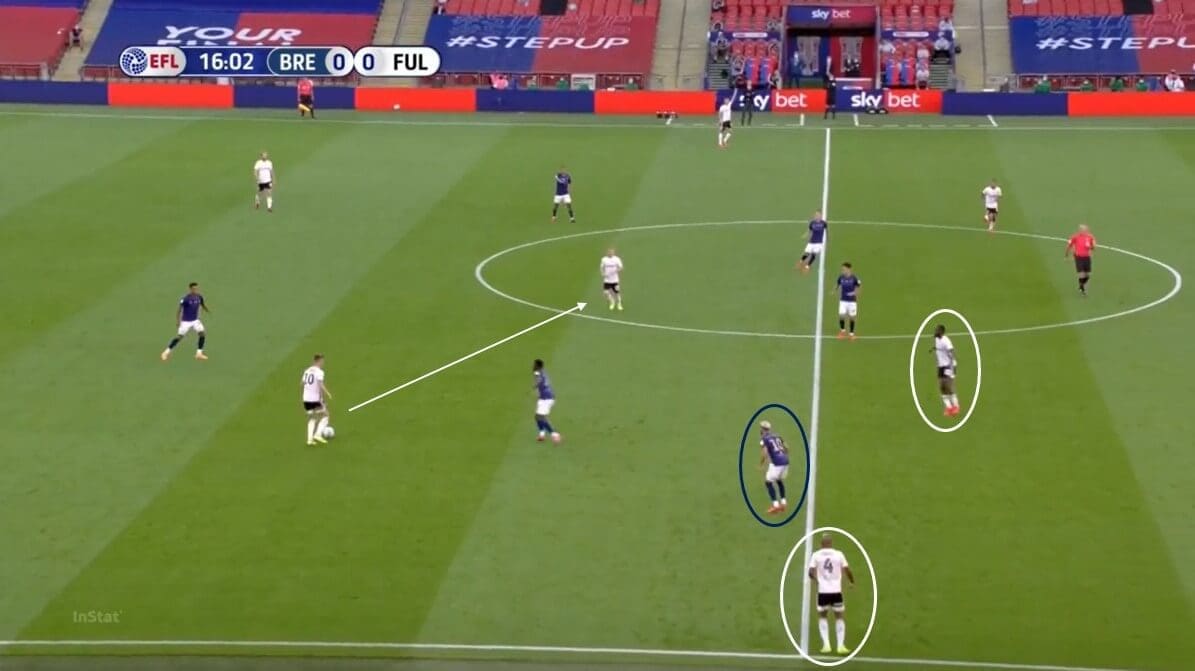
This example portrays a similar example. Cairney’s possession in the half-space sees Dasilva move out from the second line to pressure him. Onomah cleverly positions himself where Dasilva would normally be. However, Reed isn’t able to find him with a third man pass. I personally think that Odoi is too high than you’d like: this results in Onomah’s space in the right-half-space being minimised as Benrahma is closer to press. Deeper positioning from Odoi would see Benrahma higher, and Onomah in greater space with easier access to him in the half-space.
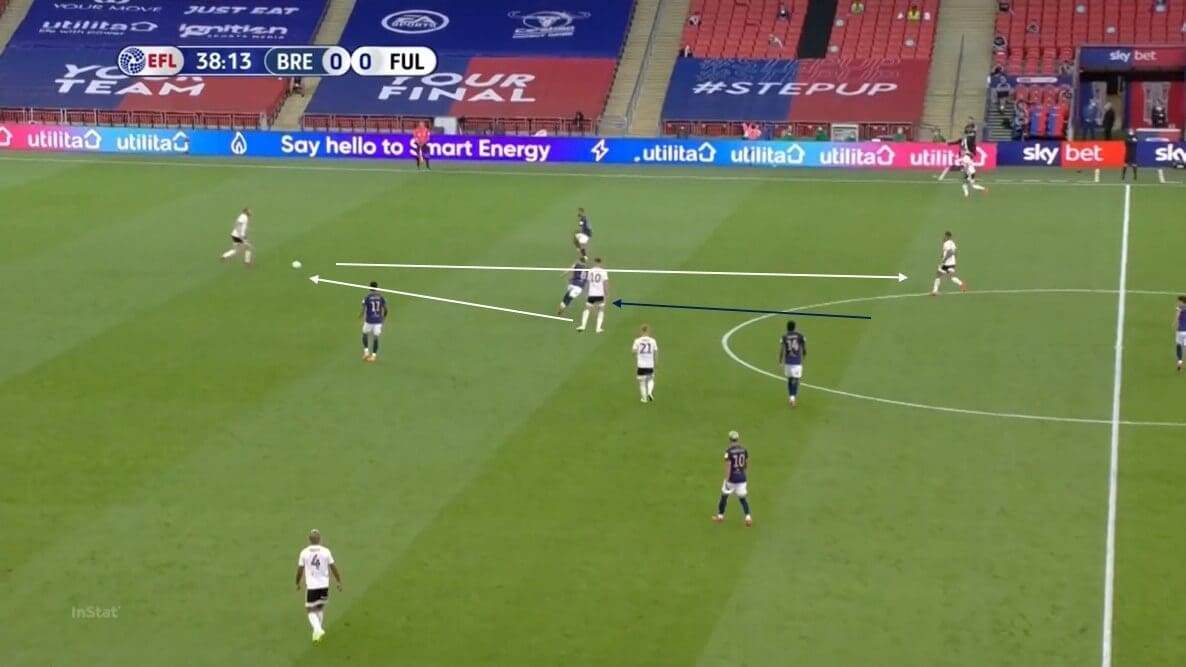
We can see here the epitome of Fulham’s tactics in this phase of play. Cairney, on the left-hand side of the double pivot, attracts Jensen, but quickly lays it off to Tim Ream. The American consequently bypasses Jensen into the feet of Reid. Joe Bryan – the left-back – is also open.
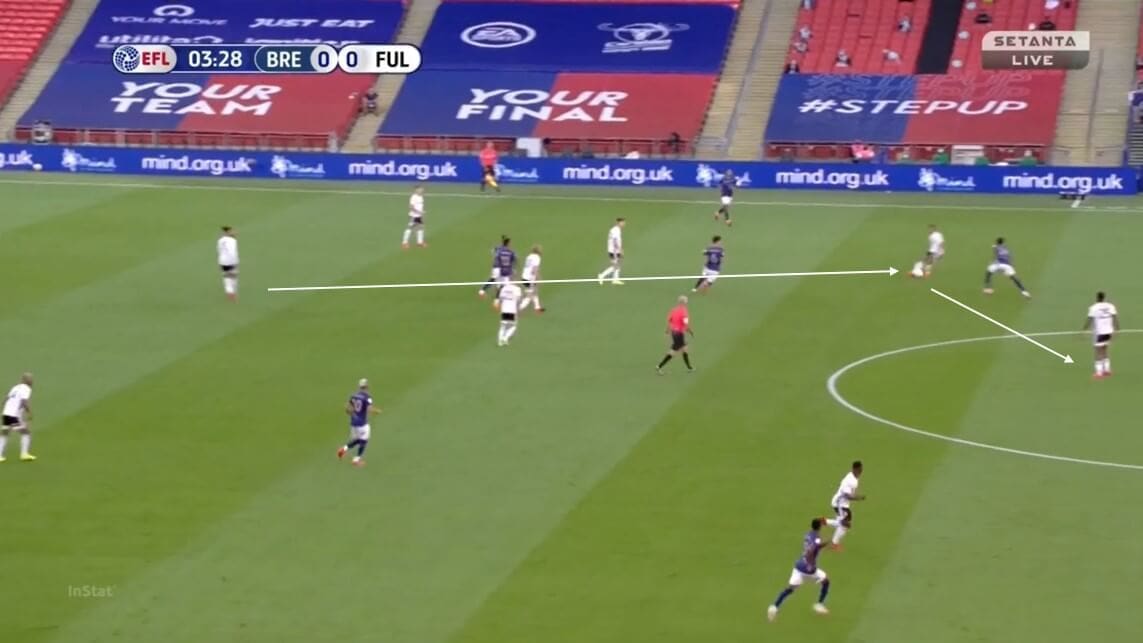
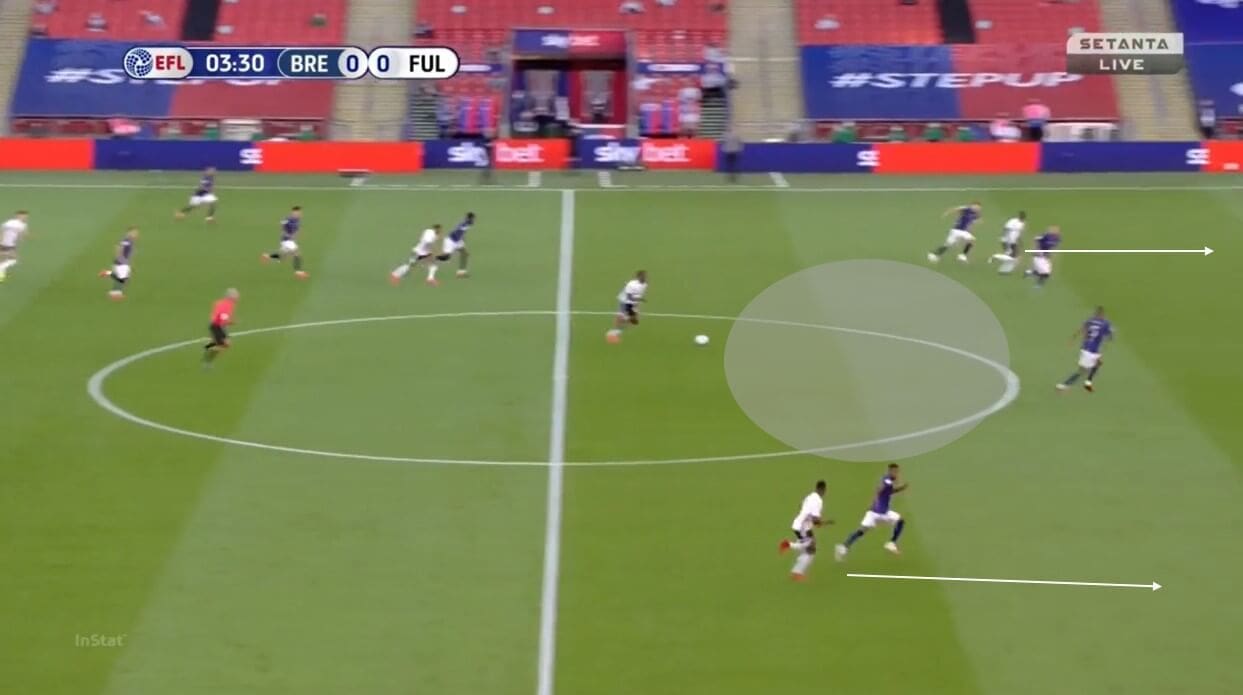
In this final example, Reid and Onomah combine to be able to drive at the Brentford defence. The sequence originates from Michael Hector playing through several committed Brentford players, and this dangerous pass means Dasilva immediately applies pressure, but is too fast and is sidestepped himself. Onomah is found and has considerable space. Furthermore, the depth runs made by Kamara and Neeskens Kebano that are visible below further stretch Brentford’s defence. I’d like to have seen this contradicting movement to Reed and Cairney’s utilised more often, as it would have likely seen increased space arise between the lines of Brentford’s midfield and defence for the likes of Reid and Onomah to capitalise on.
Brentford press
Perhaps the most striking thing about Brentford’s activities out of possession was how passive they were. The Bees weren’t sitting in a low-block, but a PPDA of 16.3 is higher than usual for Frank’s side.
Brentford were generally content for the Fulham centre-backs to have possession. Whether Reed or Cairney were pressed or not was dependent on their height and space upon receiving. Another trigger was when the ball was passed out to the full-back from the first line; however, this was rare due to the aforementioned box shape prevalent in Fulham’s build-up and the numerical superiority this generated. The wingers remained wide, protecting the pass into the full-back or access to their respective half-space.
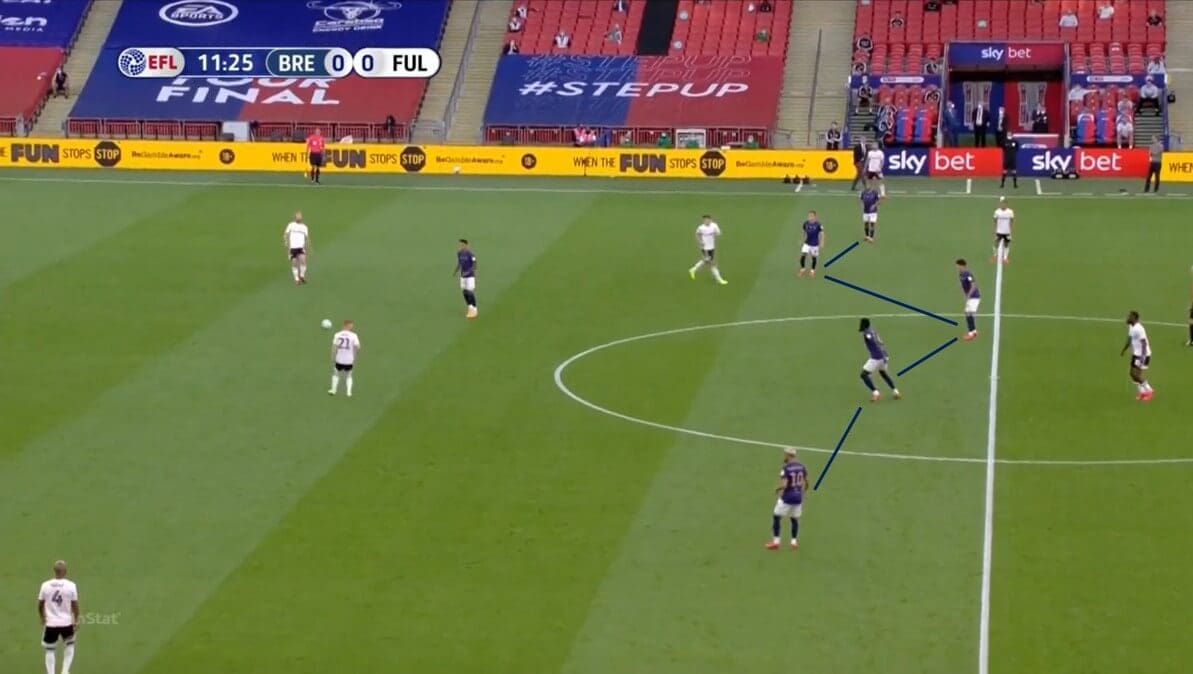
This image above shows the basic structure of Brentford when seeking a turnover in their favour. Jensen and Dasilva were the players that jumped forward most often, with triggers including a backwards pass or an opportunity for a blindside press. This duo – when not advancing – would also block passing lanes to Fulham players between the lines. Interestingly, Nørgaard was routinely positioned in this second line, therefore forming a 4-5-1 structure. Usually, he is the man tasked with covering between the lines. Indeed, this call seemed a mistake as Fulham’s ball progression was well-executed.
After the drinks break in the first half, Nørgaard began reverting to positions that are more commonly associated with his style, and that he is used to normally. We can see here below in the 28th minute that Nørgaard is now located on an alternative, deeper line compared to his midfield partners.
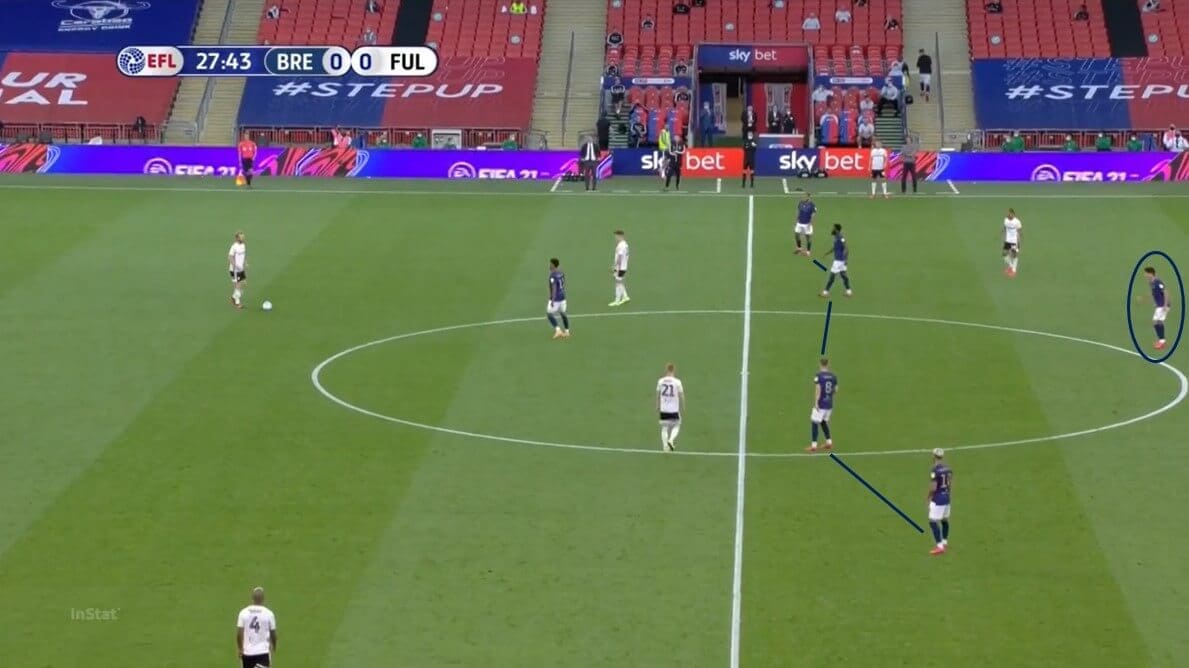
When conditions were optimal Brentford were able to adjust into a 4-2-2 defensive shape. Whenever both Reed and Cairney have been covered, this change was possible, otherwise, a player could commit from midfield unnecessarily, leaving space to play through centrally. We can see below that Watkins is covering Reed in his cover shadow while Cairney has the same issue with Jensen – because he has jumped – as well as his close proximity to Nørgaard. The structure’s narrowness forces Fulham backwards.
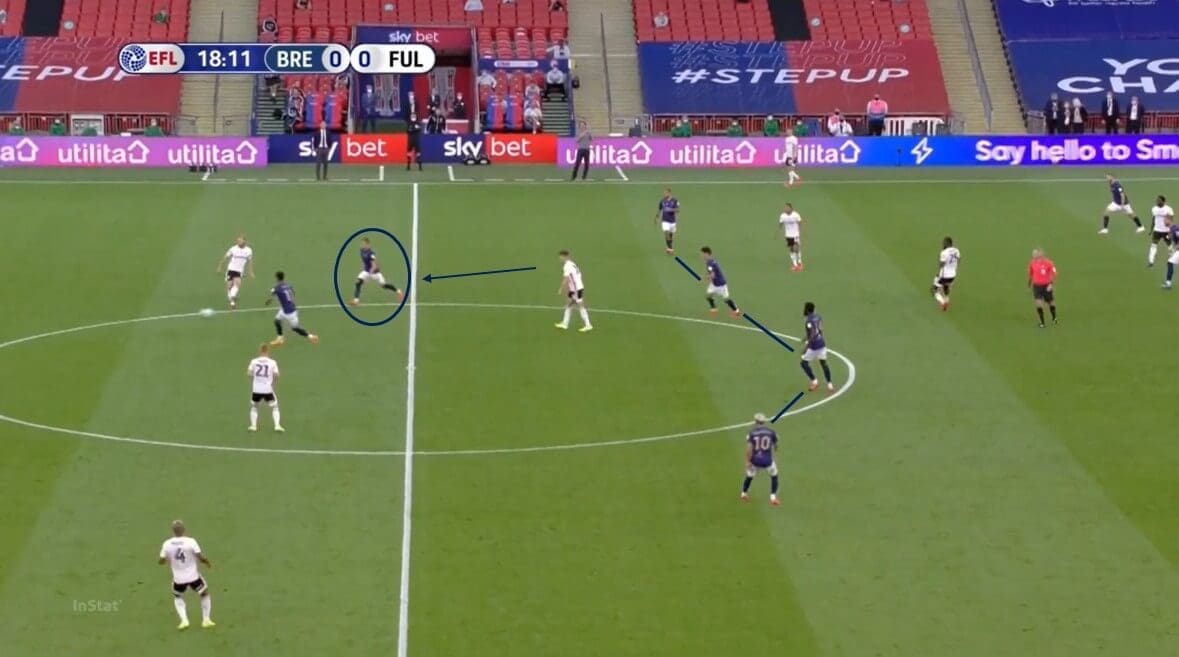
Here below is a similar example. Jensen has jumped to be part of the first line as Reed is in his cover shadow, even with this Dasilva has pushed up slightly to cover Reed. Jensen protects against the return pass. Watkins is moving out to engage Hector and can curve his run to ensure Cairney remains in his cover shadow.
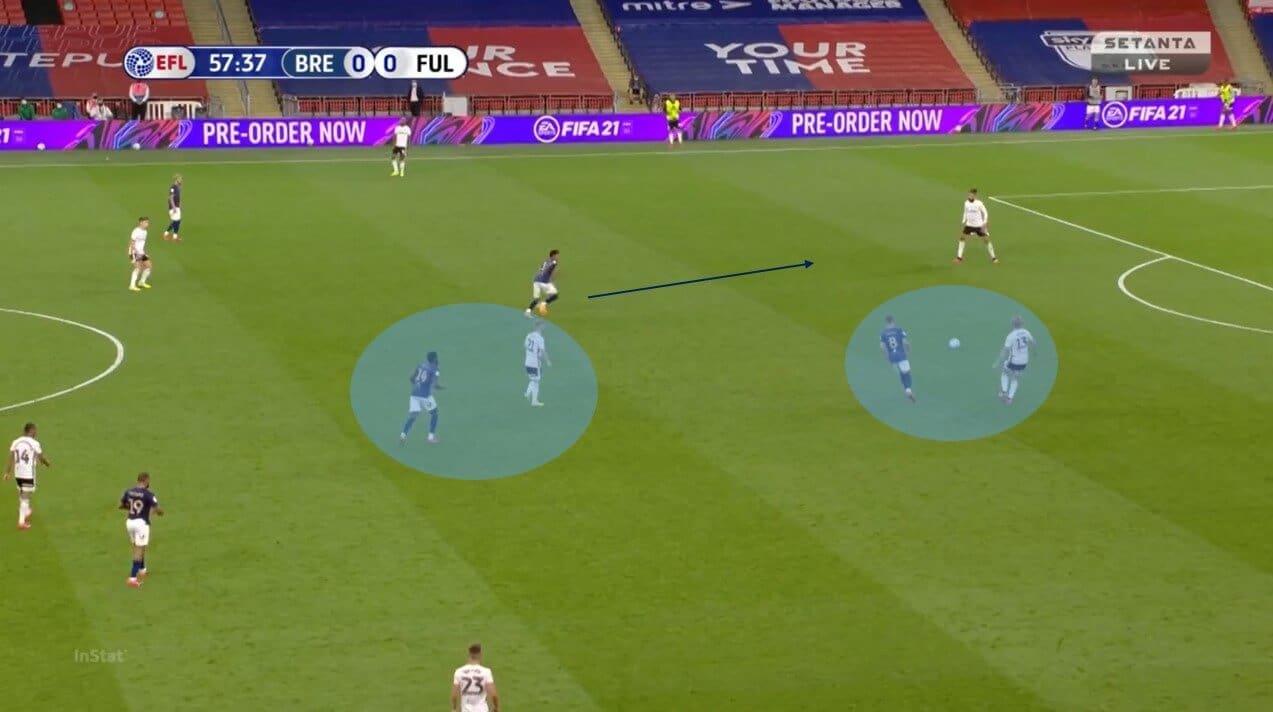
Fulham press
Parker chose to have his team consistently form a 4-2-2 wjem out of possession. Onomah – in his role as the 10 – was the player who was the second part of that first line, next to Kamara.
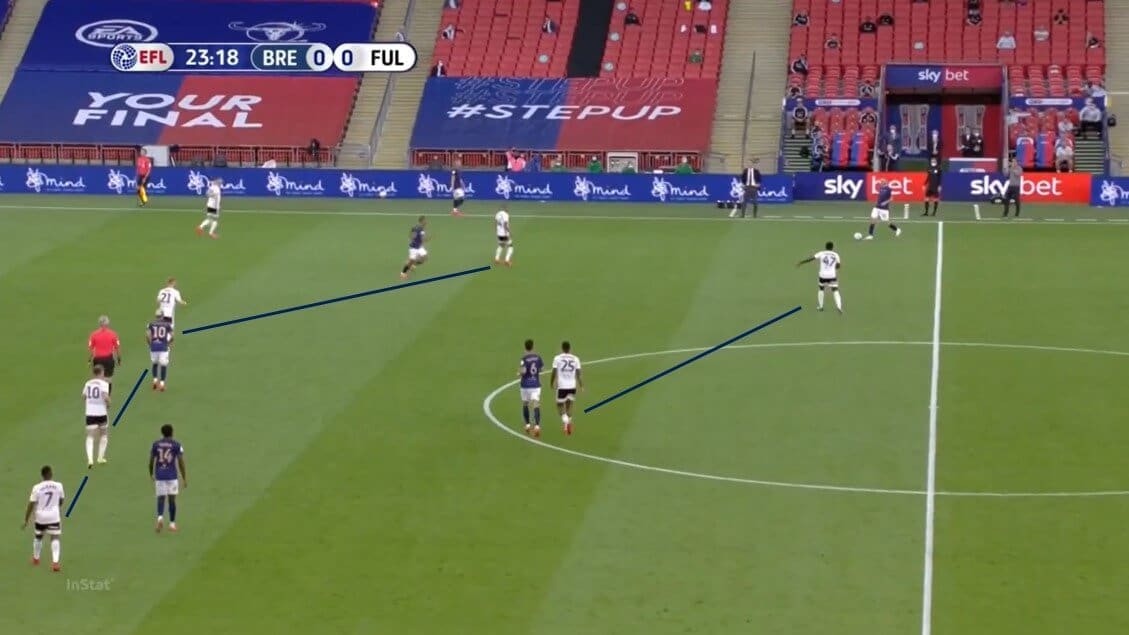
The structure they utilised is evident above. Kebano and Reid would fall back to become part of the second line, taking up positions parallel to Cairney and Reed. However, because of the different tendencies of the Brentford wingers, they had varying roles. For example, Reid was on the side of Bryan Mbeumo who, compared to Benrahma, is more of a natural winger, in that he remains wide. Therefore, the former Cardiff man would prevent access to the wings – guiding play towards the centre instead. Indeed, in this example, No.10 Benrahma is particularly central.
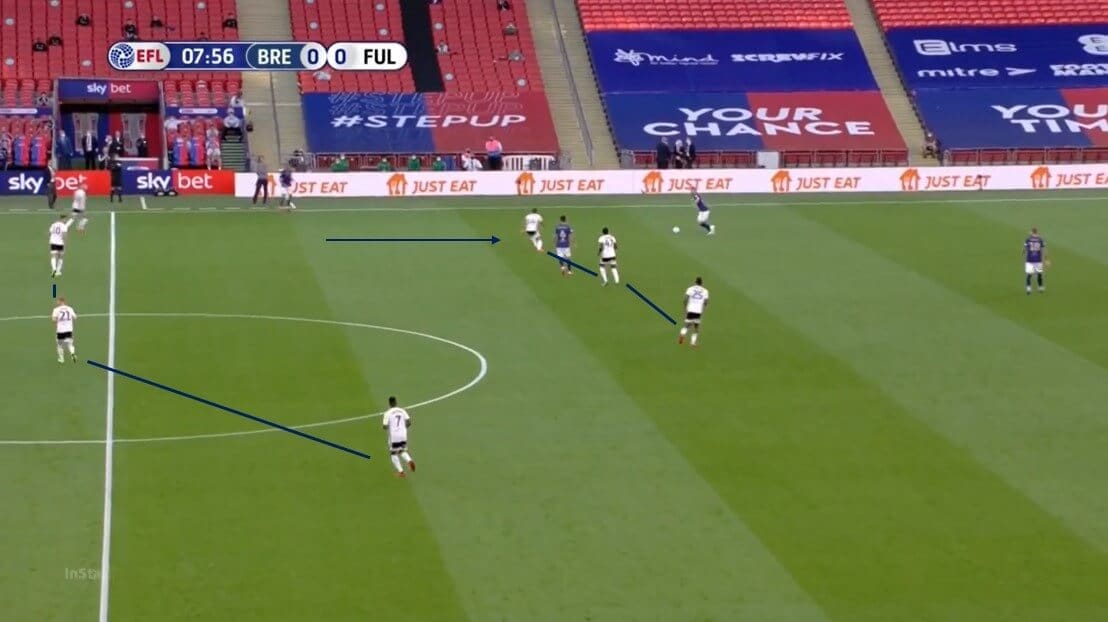
In this instance above Reid steps up to form a situational 4-3-3. Such a scenario would occur when the full-back – in this case, the right-back – has possession, especially in deeper areas. Via the use of their cover shadow wide passing lanes can be blocked off, either forcing them backwards or long where there is a higher chance of a turnover.
Brentford’s adjustments
As they went 1:0 down just before half-time in extra-time, Frank naturally made some tactical alterations in search of an equaliser. Firstly, it is worth seeing their structure with the ball originally – this can be seen below.
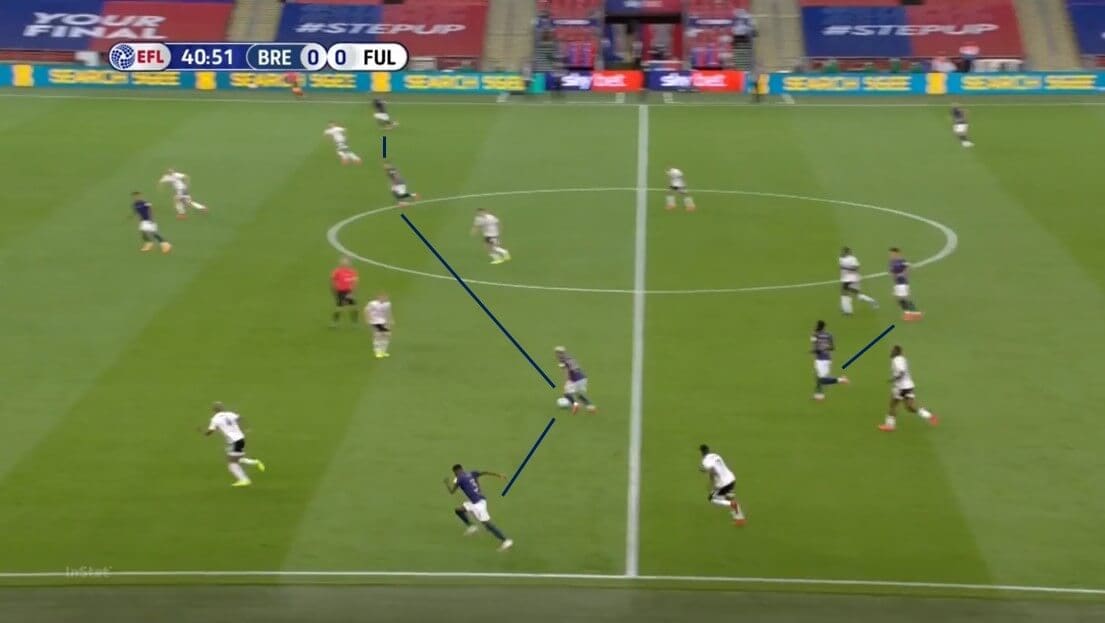
Although their regular formation was a 4-3-3, this evolved into an asymmetric 4-2-3-1 in possession. Dasilva became part of the double pivot with Nørgaard while conversely, Jensen advanced. Benrahma comes inside while left-back Rico Henry provides the width, as well as this, Mbeumo prefers to stay close to the touchline on the right wing.
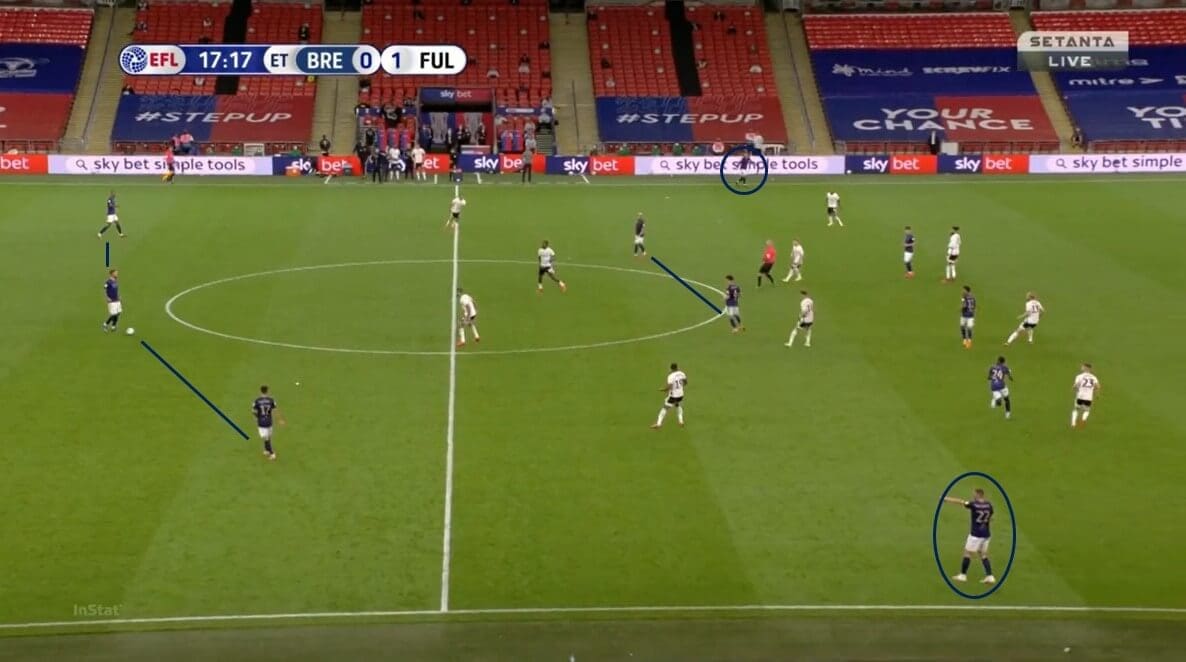
This next image above demonstrates the significant changes made after Fulham’s first. There is now a back three, whilst maintaining the double pivot. The wing-backs are extremely high, hoping to pin back the defence. Also, they may indirectly free their teammates in more central positions between the lines in the half-spaces, the trio in that area is obvious.
Conclusion
Fulham performed admirably here under immense pressure. In a match that was extremely tense, a moment of great skill and intuition from Bryan gave them the edge. The Whites nullified Brentford’s fearsome attacking trio very well, with them struggling to create any clear goalscoring opportunities. Brentford will be disappointed that they haven’t managed to gain promotion. They didn’t have the fluidity and skill that is usually associated with their play. Nonetheless, they will regroup and still look a strong bet for promotion next year.


Comments