After Saturday’s round of Championship fixtures, Lee Johnson’s Bristol City saw themselves rise to fifth in the table following a 5-2 demolition of Huddersfield Town at Ashton Gate. The result for Danny Cowley’s Terriers has left the Yorkshire club in 18th, just two points above the relegation zone.
However, when consulting the match’s statistics, it seems somewhat of an oddity how the Robins were able to win so convincingly. The visitors boasted a greater possession percentage, 59% to City’s 41%, a much greater number of passes and accurate percentage, 527 completed passes with 80% accuracy to the home side’s 365 and 74%. Coupled with only one fewer shot, 11 to City’s 12, and the same number of corners, four.
Admittedly, Johnson’s side’s xG was far greater, with 1.58 to Town’s 0.69, however, that does not prove quite as night and day as the result does. This tactical analysis will, therefore, dissect the clash between the two sides and highlight key areas of their tactics. Analysis will also be used to explain how they had an impact on the outcome of the game.
Lineups
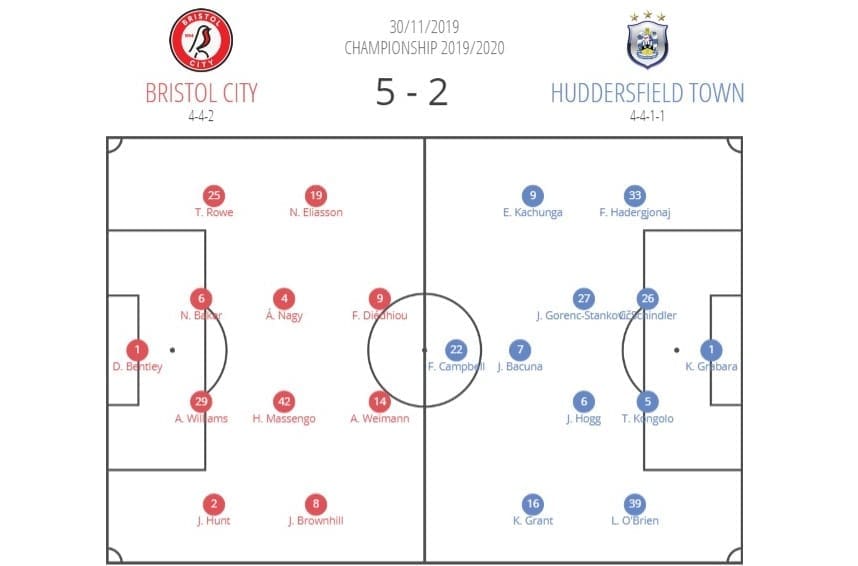
Following on from the home side’s 4-1 defeat against West Bromwich Albion at the Hawthorns in their last outing, Johnson made radical structural changes to his starting lineup. A 3-5-1-1 was ditched in favour of a four-back formation, in 4-4-2, which the Robins had not deployed since the 2-1 victory over Charlton Athletic in late October. In terms of personnel changes, five were made. Bailey Wright, Pedro Pereira, Korey Smith, Callum O’Dowda and Kasey Palmer were dropped in favour of Jack Hunt, Tommy Rowe, Han-Noah Massengo, Niclas Eliasson and Famara Diedhiou.
Like City, the visitors also made a change in structure and a number of alterations in the starting lineup following their last outing. Cowley dropped his trusted 4-2-3-1 following the 1-1 home draw with Swansea City for a rarely seen 4-4-1-1. Alongside the structure change, the Terriers also made two changes in the starting XI. Trevoh Chalobah missed the game through suspension and Alex Pritchard dropped for Florent Hadergjonaj and Terence Kongolo.
Bristol City’s energetic press
From the off, Lee Johnson’s side made life difficult for the visitors, with an energetic press muting an attempt to play through the thirds. The press was not strictly high and not strictly structured, however, relied on City’s attackers intelligently picking their moments to pressure the Terriers’ defence quickly and aggressively. This constituted of two styles of pressure, which were applied when the Robins’ frontline sensed the opportunity to claim possession or force a mistake.
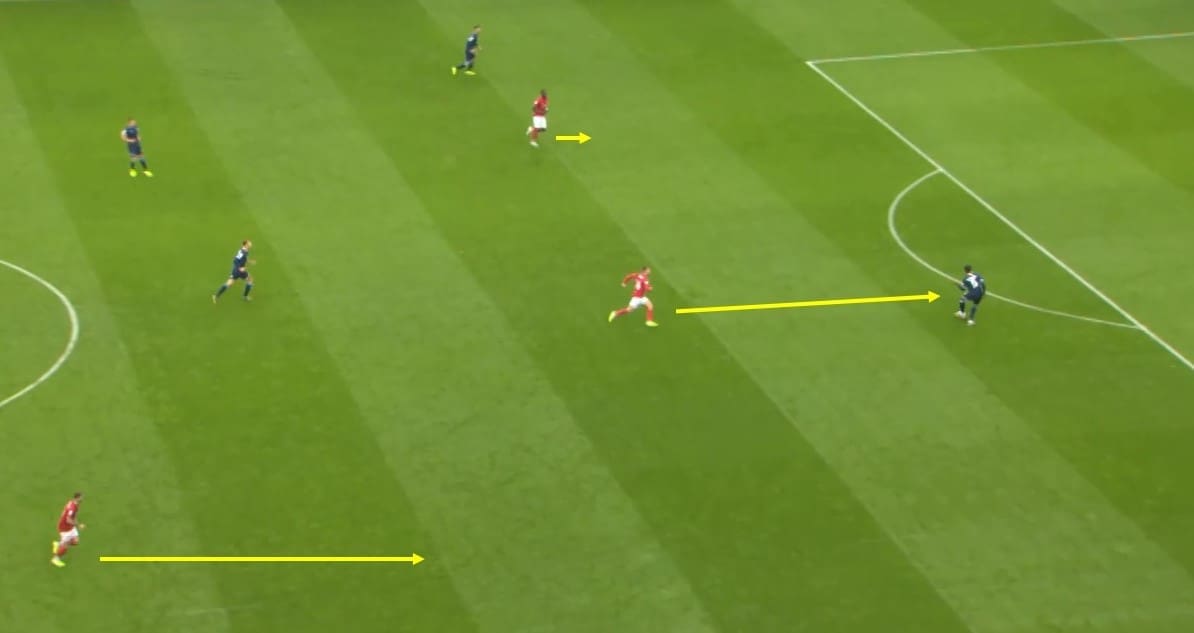
Here, the home side’s first style of the energetic press can be seen. As mentioned, there is no specific shape to this press, but the attacker closest to the ball has sensed an opportunity to force the opposition into a mistake. Therefore, Andreas Weimann has initiated the press and closed the ball down quickly and directly. As a result of that, his surrounding teammates quickly close in to shut off passing lanes and provide backup.
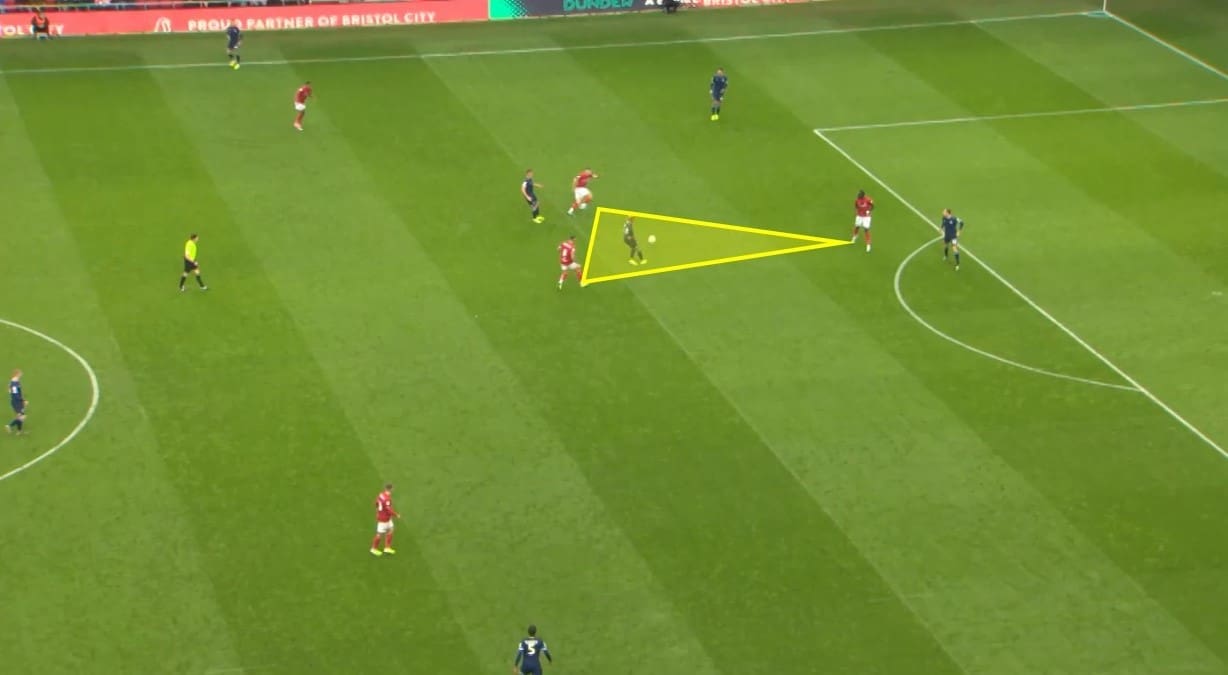
To complement the first style of the press, the second – which can be seen here – was used when there were a greater number of attackers in position and used more of a structure. As can be seen, the attackers would form a triangle-like shape around the Town player with the ball to win back possession high up the pitch. While one base point closes in from behind the man with the ball, the further two points cut passing lanes whilst also closing in on the ball carrier.
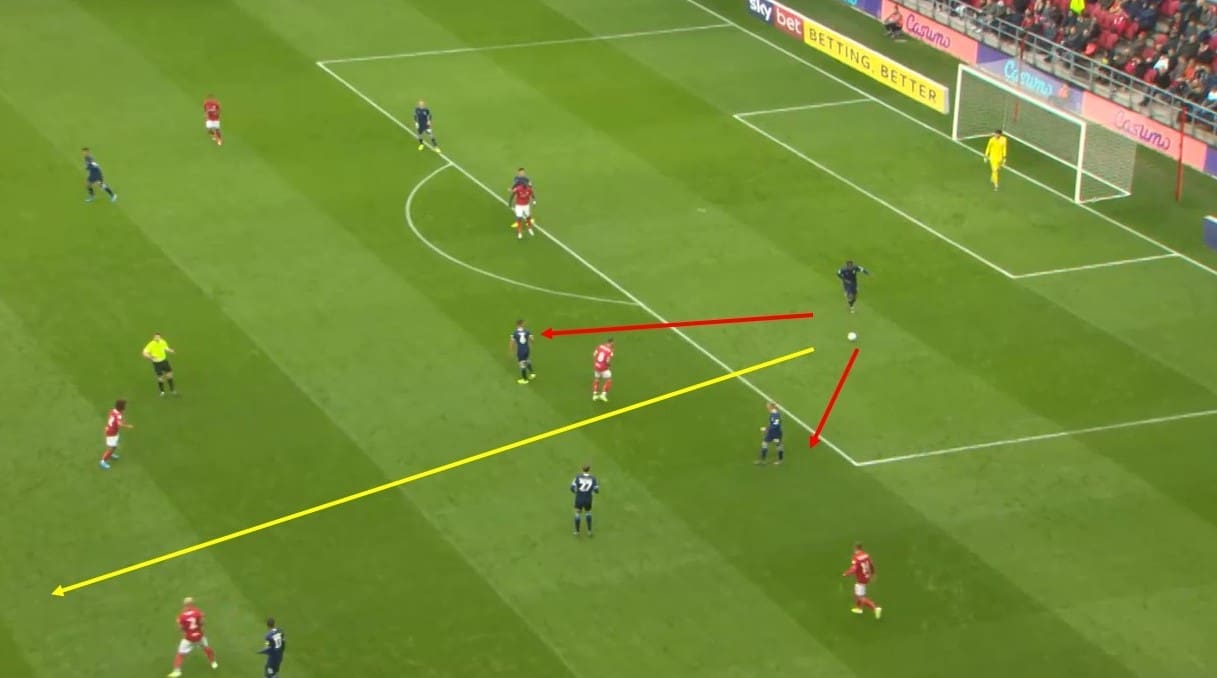
As can be seen in this annotation, the energetic press deployed by Johnson had an effective impact on Cowley’s tactics. Huddersfield wanted to build their play through the thirds where possible, however, the energetic press made life difficult to build up from the back. As such, the defenders’ confidence was knocked, and often as in this example – despite having the two short passing options marked by the red arrows – opted for a long ball upfield to relieve pressure from themselves. The Terriers did boast a vastly greater number of completed passes than City, but their effectiveness was stifled by this pressure.
Johnson’s overload in attack
As well as wanting to put pressure on the Terriers’ backline when in possession to expose them, Lee Johnson looked to put pressure on the backline when attacking by creating overloads. He did this, for the majority, by having his 4-4-2 look more like a 4-2-4 when in possession and the opportunity presented itself. The in-possession structure was coupled with playing highly advanced full-backs, who often looked to join the attack. These overloads often would have been difficult to transition back into a defensive shape, but it was a gamble that paid off for Johnson.
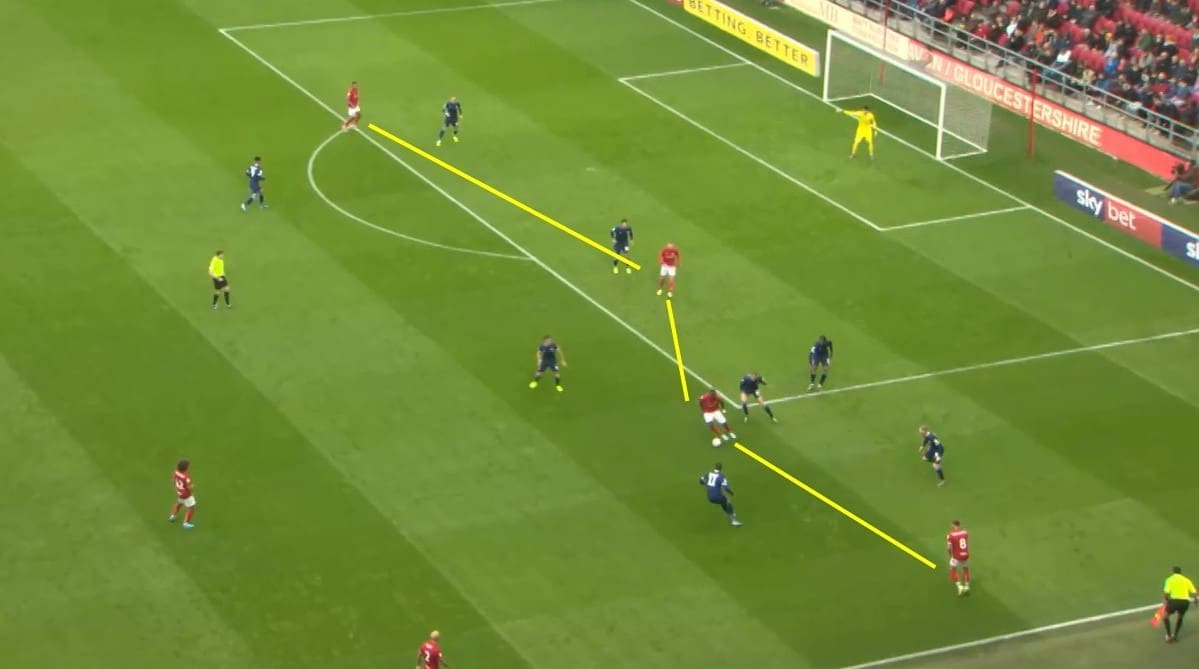
As can be seen here, the home side’s wide players – Josh Brownhill and Eliasson – would look to be level with the two strikers where possible, high and wide. This was then supported by the two central midfielders and two full-backs when the opportunity arose, which would create Johnson’s desired overloads. This, therefore, required a large amount of continuous energy from the Robins’ wide players.
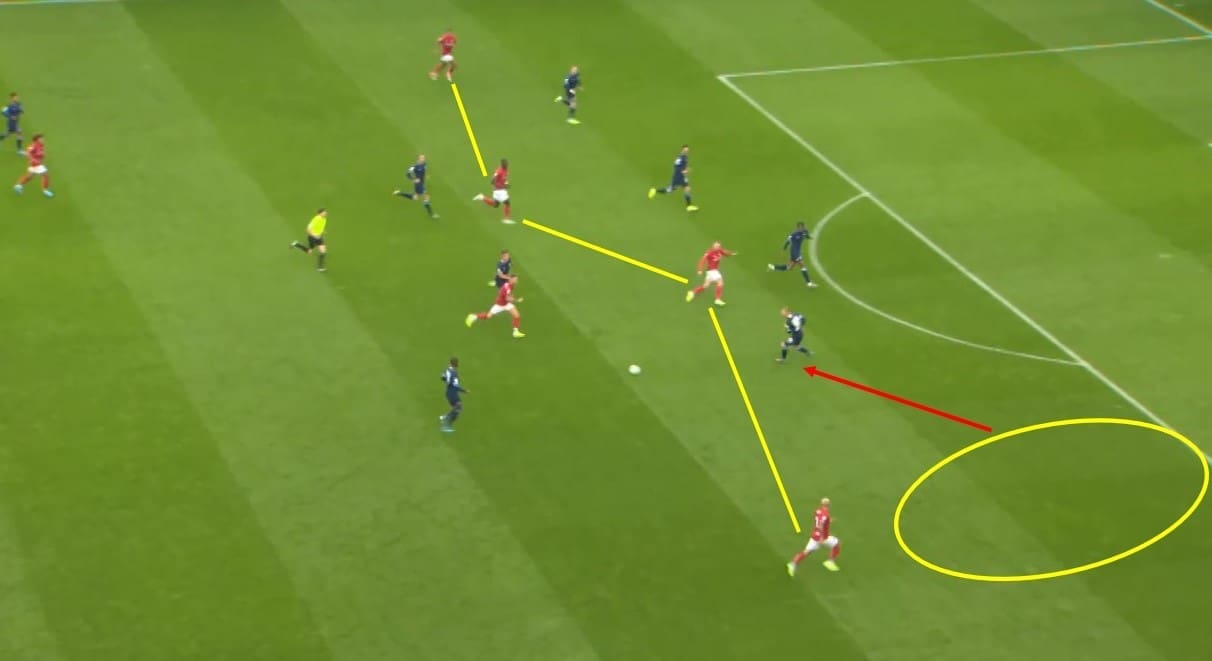
Here, the build-up play to Johnson’s side opening the scoring can be seen. While the four in attack shape has been created, this time it is due to the highly advanced full-backs that were employed, with Hunt joining in the attack – which paid dividends. Due to the numbers in attack, Lewis O’Brien has been drawn out to meet the ball – as marked by the red arrow – which has left a large area of open field for Hunt to attack. Following the through ball played wide, City ultimately end up with the ball in the back of the net following a cut-back cross.
The Terriers’ man-marking
Another feature which played a vital role in Bristol City claiming victory over Town was a tactic of the Terriers’. While, in theory, man-marking seems the most viable over zonal marking, due to each defender picking up a free attacker and clearing the ball should it come near – in practice it is not as simple. While the away side was effective in going man for man and clearing initial balls in the box, they lacked concentration and lost their shape for second balls; here was where the game was won and lost.
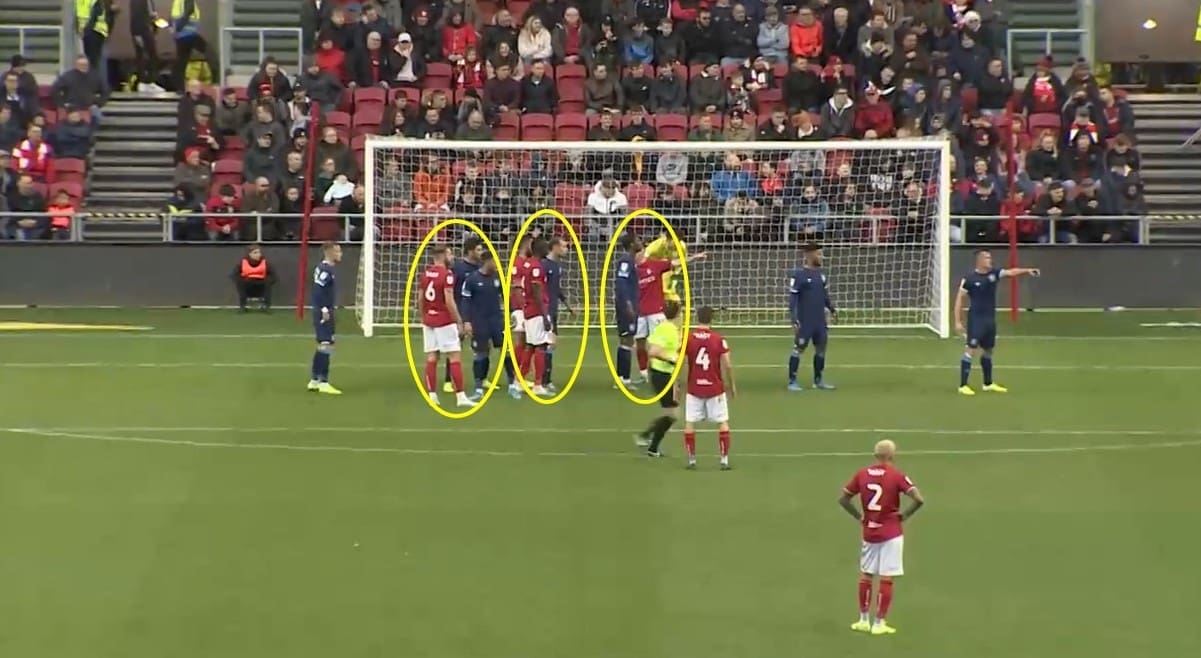
As can be seen in this annotation, Cowley deployed a man-marking system for the visitors. As stated, this was effective in clearing the ball first time, however, a lack of concentration led the away side to struggle with second balls. Naturally, structure in a man-marking system is displaced following a delayed cross, but that was costly for the Terriers as three of the home side’s five goals came directly from crosses, two of which were second balls from set-pieces.
Bristol City’s delayed crosses
To take advantage of the lack of concentration in the Terriers’ man-marking setup, they deployed a tactic in which they would delay crosses to disrupt the defensive shape. Admittedly, however, they did not use this as often as they could have, with some crosses taken directly into the 18-yard box. This tactic resulted in the Robins’ second and fourth goals, and defensive unawareness from crosses also saw the third goal scored.
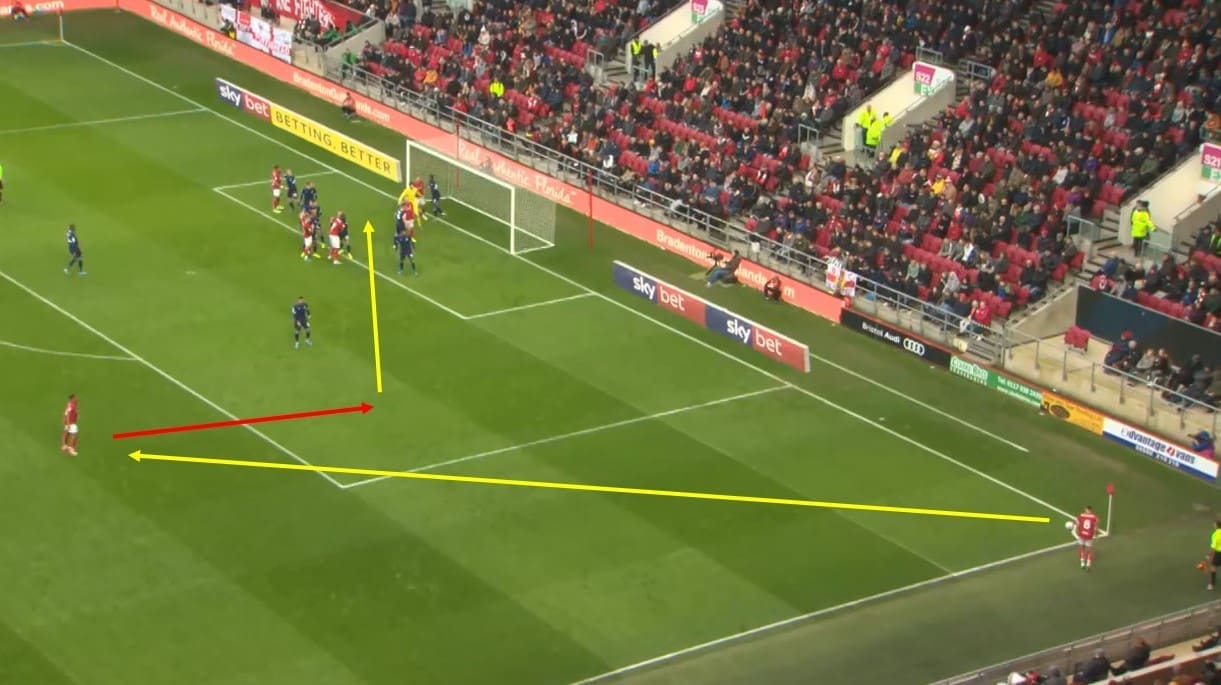
Here is an annotation of the build-up play to the home side’s second goal of the afternoon. As can be seen within the box, Cowley’s side is man-marking, which has allowed Brownhill to spot an opportunity from the corner. With a ‘short corner’, not exactly a short pass but the same in principle, the structure in the box is displaced as the cross is delayed. Having received possession on the edge of the box, Eliasson then makes the run which is marked by the red arrow and his back-post cross is turned into his own goal by Kongolo, due to the defence losing their shape and track of attacking players.
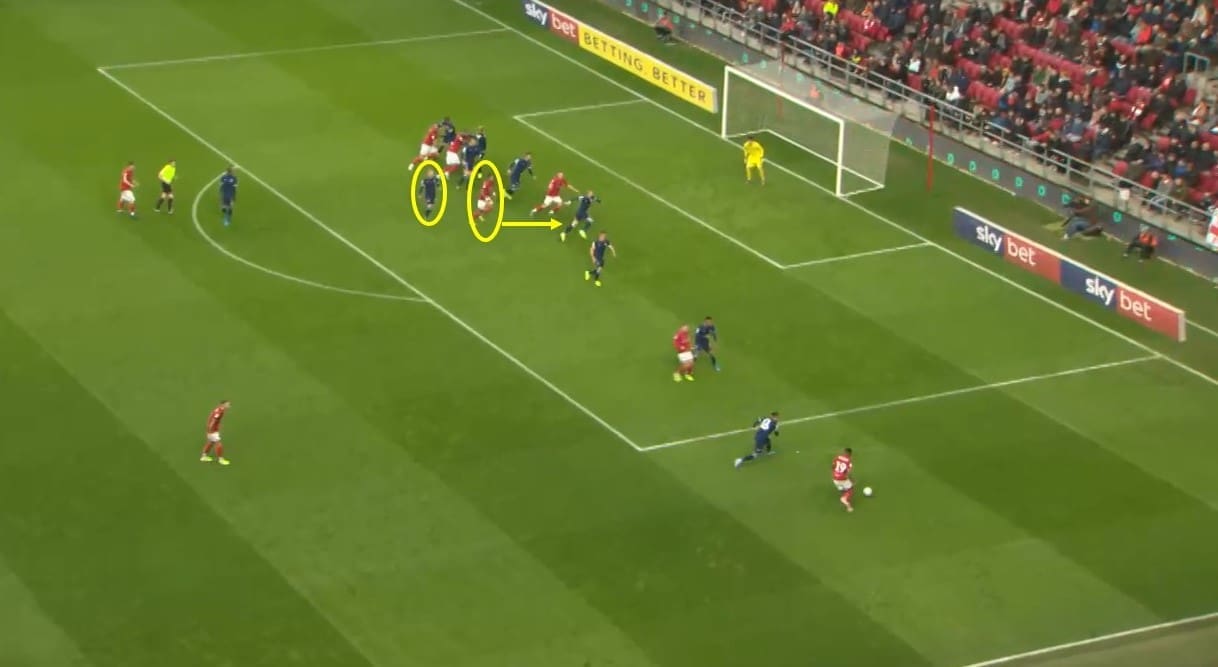
Then, in the build-up play to Johnson’s side’s fourth goal, a corner was taken directly into the 18-yard box, however, was cleared back out to Eliasson in this position. While the defensive line was solid for the first cross, concentration is lost after the ball is cleared and O’Brien, who is supposedly marking Ashley Williams, allows the man he is marking to break free of him. Having not had his run tracked, Williams is able to meet the second cross from the Swedish winger to head home City’s fourth.
Conclusion
Danny Cowley will be massively disappointed that his side enjoyed the better of key stats but fell to such a convincing defeat at the hands of Bristol City. Going into the clash, however, it would have been fair to admit that the high-flying Robins were always going to pose a tough task for the Terriers, who are getting back onto their feet following a tough start to the season.
In the opposite dugout, Lee Johnson will be delighted that his Bristol City side was able to pick up three further points in their push for a play-offs spot. While not enjoying the better of the stats, his side were effective and finished their chances with deadly efficiency.
This tactical analysis has dissected the clash between Bristol City and Huddersfield Town, highlighting key areas of the two sides’ tactics, whilst also using analysis to explain how that had an impact on the outcome – a 5-2 victory for the Robins at Ashton Gate.

If you love tactical analysis, then you’ll love the digital magazines from totalfootballanalysis.com – a guaranteed 100+ pages of pure tactical analysis covering topics from the Premier League, Serie A, La Liga, Bundesliga and many, many more. Buy your copy of the November issue for just ₤4.99 here


Comments