Millwall and Swansea faced off in the first-midweek game since the EFL Championship returned. This was not, however, a meaningless game of any sort. They are both still in contention for the play-offs, and thus promotion to the Premier League.
Steve Cooper’s Swansea have had an excellent 0:3 win away at Middlesbrough, costing Jonathon Woodgate his job, but then a surprise loss to Luton Town under Nathan Jones, thus leaving them four points of sixth place. Liverpool loanee Rhian Brewster has one in two games so far, carrying on his good form. Millwall have performed admirably under Gary Rowett since his appointment and looked to be in prime position. But defeat against Derby County and a draw away at Barnsley have left them five points off Cardiff who occupy the final play-off place.
In this tactical analysis I will conduct analysis to look at the tactics of Millwall and Swansea in this EFL Championship match.
Line-ups
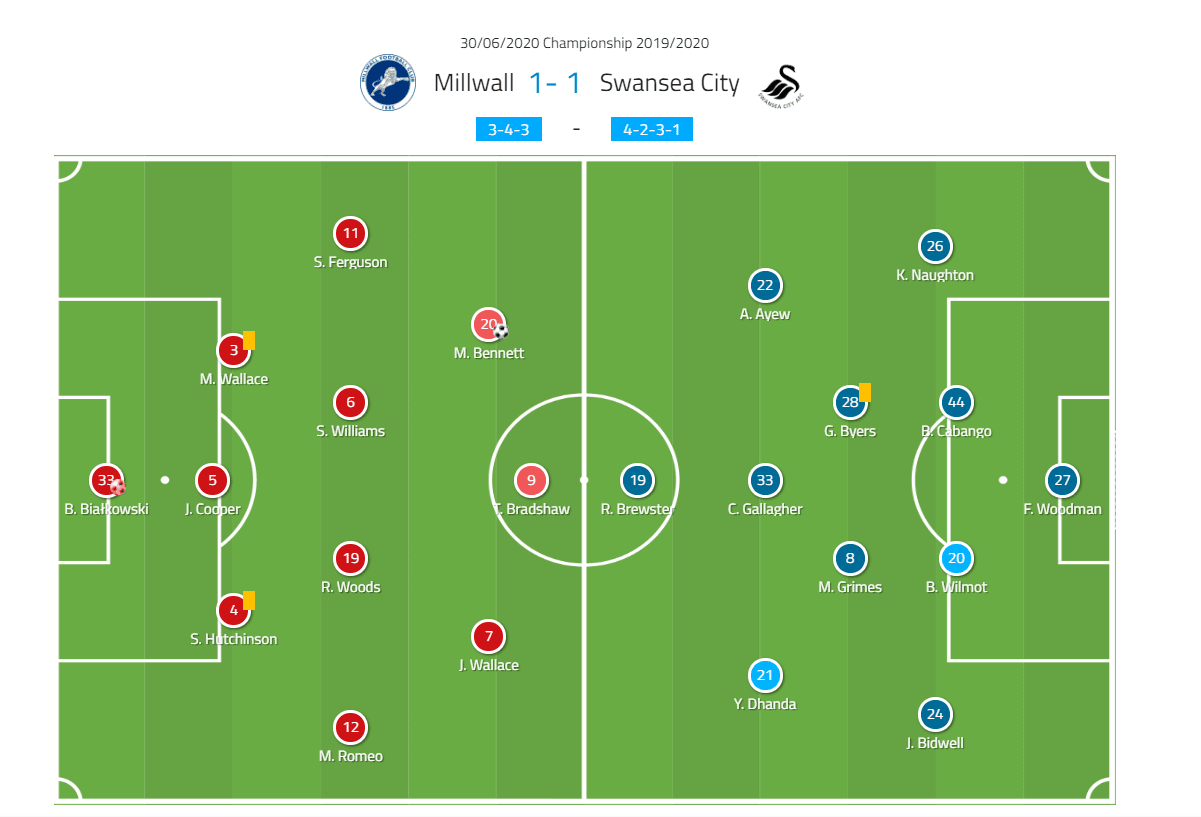
The home side lined up in a 4-5-1. Rowett made one change to his starting 11; Ryan Woods came in for youngster Jayson Molumby. Jed Wallace had 10 goals and nine assists to his name before kick-off. Matt Smith, their leading scorer with 12, remained on the bench however.
Swansea manager Steve Cooper opted for three changes to the side that lost to Luton. Kyle Naughton came in at right-back in place of Connor Roberts; George Byers replaced Jay Fulton while Yan Dhanda was preferred to Aldo Kalulu.
Swansea’s build-up
Cooper’s tactical philosophy revolves around keeping the ball on the ground and playing into feet. Indeed, his side is not suited at all for directness. Brewster is 5’9” and winning aerial duels isn’t his speciality, especially not against the aerially dominant Millwall backline. The Swans encountered significant problems versus Millwall’s defensive set-up as we will see in this analysis.
Their build-up structure was linear – arguably contributing to their problems because of a lack of invention. The full-backs were positioned on the same horizontal line as the double pivot pairing of Matt Grimes and Byers. Grimes was the one who tended to remain deeper, whereas Byers altered his positioning often, moving higher regularly. The purpose of this was to attract a press from Millwall’s midfield duo: Woods and Shaun Williams, which could be exploited by the likes of Conor Gallagher. In practise though it did not play out as intended. This can effectively be explained by Millwall’s PPDA being 11.2, indicating a degree of passivity in their defensive actions.
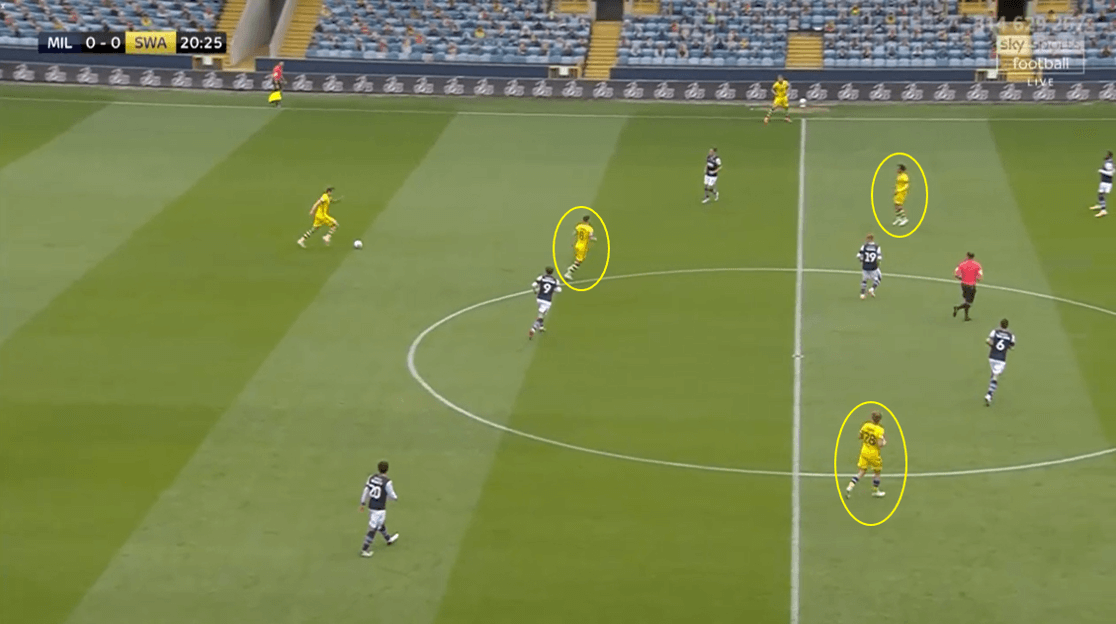
In the image above we can see just how the double pivot is situated on different vertical lines. Having Byers, or Grimes on occasion, more advanced could help generate numerical superiorities and ease ball progression. However, the trade-off is one less player in the first phase, which was inhibiting for the Swans.
With Rowett electing for two centre-midfielders there was greater opportunity for them to be overloaded through movement from Swansea’s more offensive players. Dhanda and Andre Ayew are not archetypal wingers who remain close to the touchline, instead, they prefer to come inside into the half-spaces – visible above in the first image with Dhanda’s positioning. We can also identify this below in the Swans’ passing map. What is also evident is how thick the passing line between the two centre-backs is. Whilst this is natural it does indicate to an extent the struggles Cooper’s side had with progressing through the thirds.
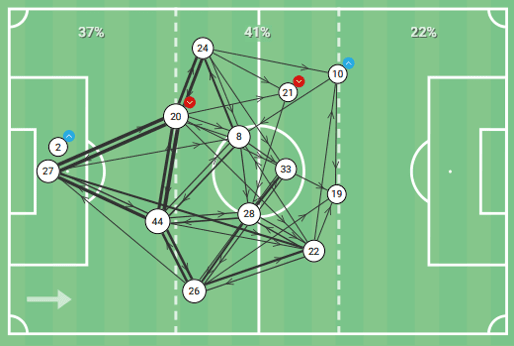
The main problem can be summarised as a lack of midfield options to bypass Millwall’s press. Furthermore, there was little fluidity and rotations from the attacking quartet, like moving from high to low. Swansea had 61% possession in the first half, showing their control, albeit ineffectualness as well. Additionally, Swansea’s average pass length to the final third was 37.1m, 8.3m more than Millwall, a surprising statistic due to Swansea’s usual preference to play short.
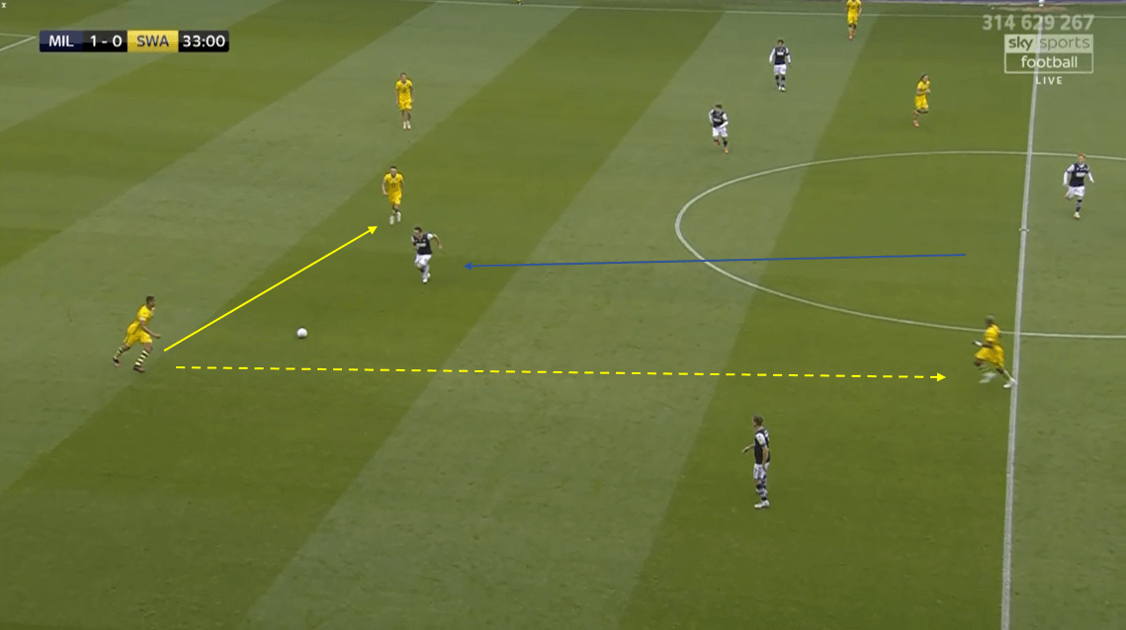
The above example illustrates the epitome of Swansea’s tactic. Grimes, who has dropped deeper, has got Williams to engage him, thus allowing Ayew to drift inside into vacated space. However, right-centre-back Ben Cabango isn’t aggressive enough to play this progressive pass and just plays backwards to Grimes.
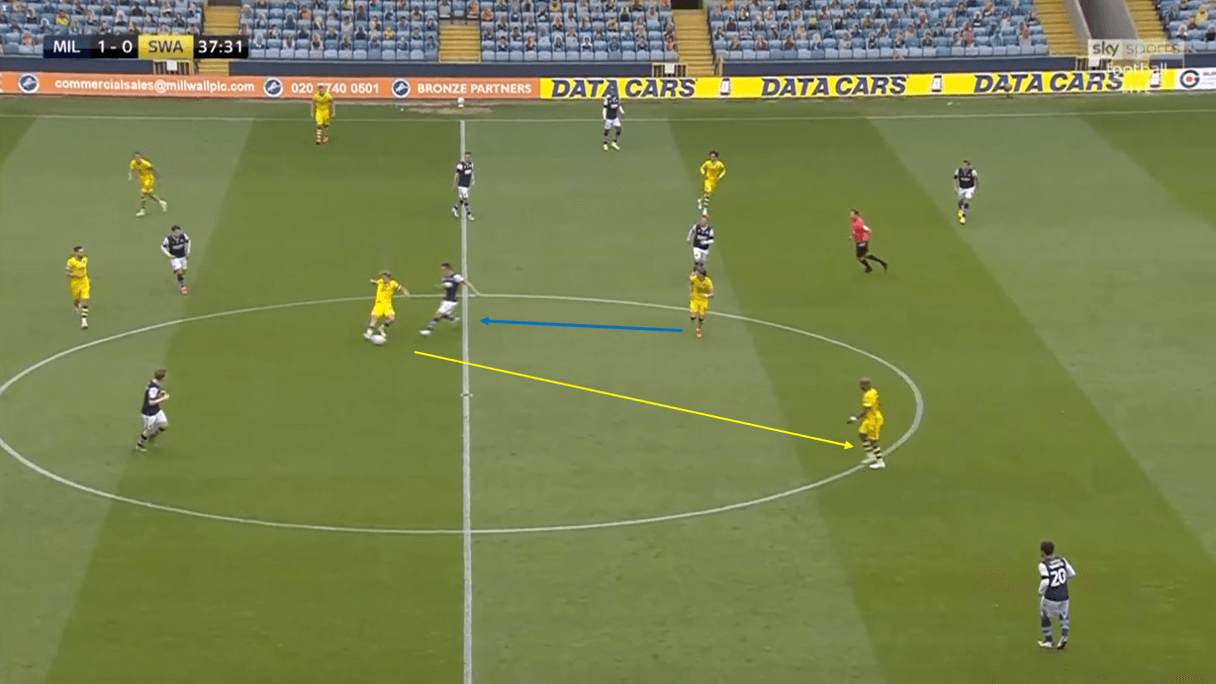
Here is something similar. Byers has possession and Williams is pressuring him, however, Ayew has come central to exploit this and receive. This is a well-executed version of the desired pattern of play that should have been seen more often.
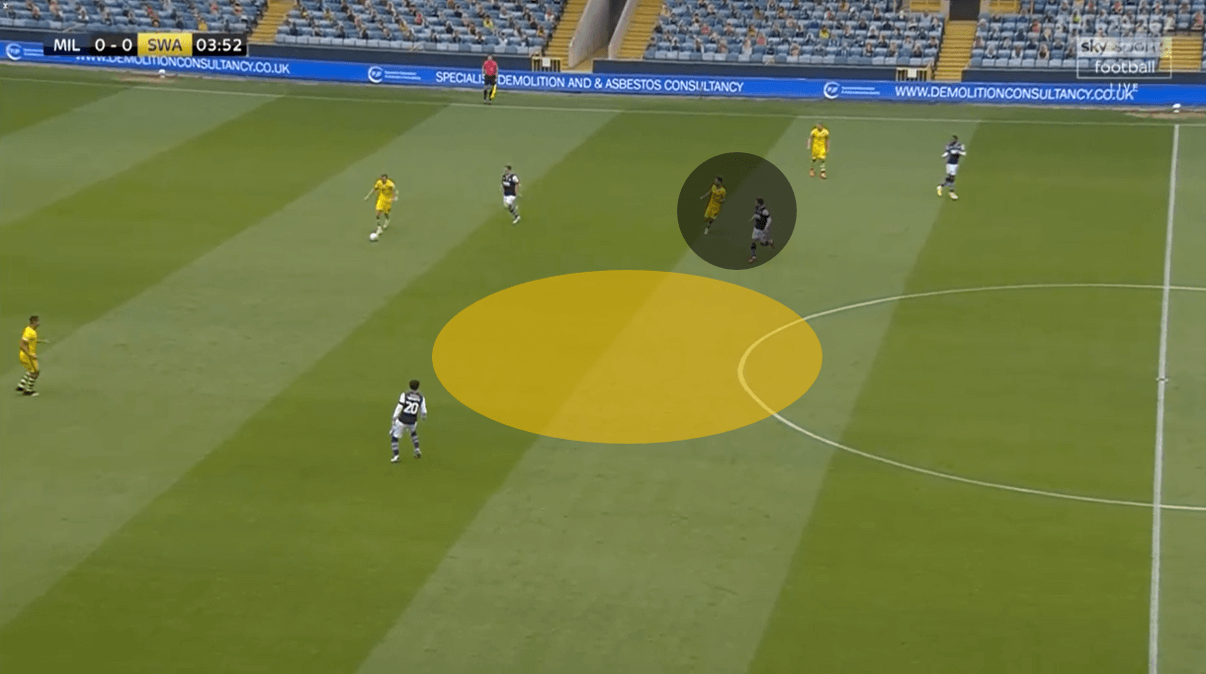
In this instance, the effects of that aforementioned tactical nuance involving Grimes and Byers is clear, and how simple it is to nullify them. Tom Bradshaw is tight to Grimes and Wallace is pressing Ben Wilmot from behind. Therefore, an out-ball is required. There is an obvious pocket of space centrally which holds strategic importance, and is – crucially – unoccupied. Ideally, with Grimes not a viable passing option currently, Byers has some positional awareness and move here – he doesn’t. Subsequently, the ball is forced back to the goalkeeper who clears it long, leading to Millwall regaining possession.
Millwall press
Millwall aimed to suffocate the initial phase of ball progression. This was not through a high press, however – after such a long break that tactic is unsustainable relative to their physical capacity. Instead, they formed a mid-block and focussed on blocking central passing lanes.
The wingers – Wallace and Mason Bennett – were intent on preventing access to the half-space, where Dhanda and Ayew were likely positioned. Bradshaw’s main goal was to avoid any penetrative, line-breaking into Swansea players located between the lines, either through immediate pressure/marking or correct positioning. Woods and Williams were space-orientated, as otherwise they may be manipulated towards areas they don’t want to be in.
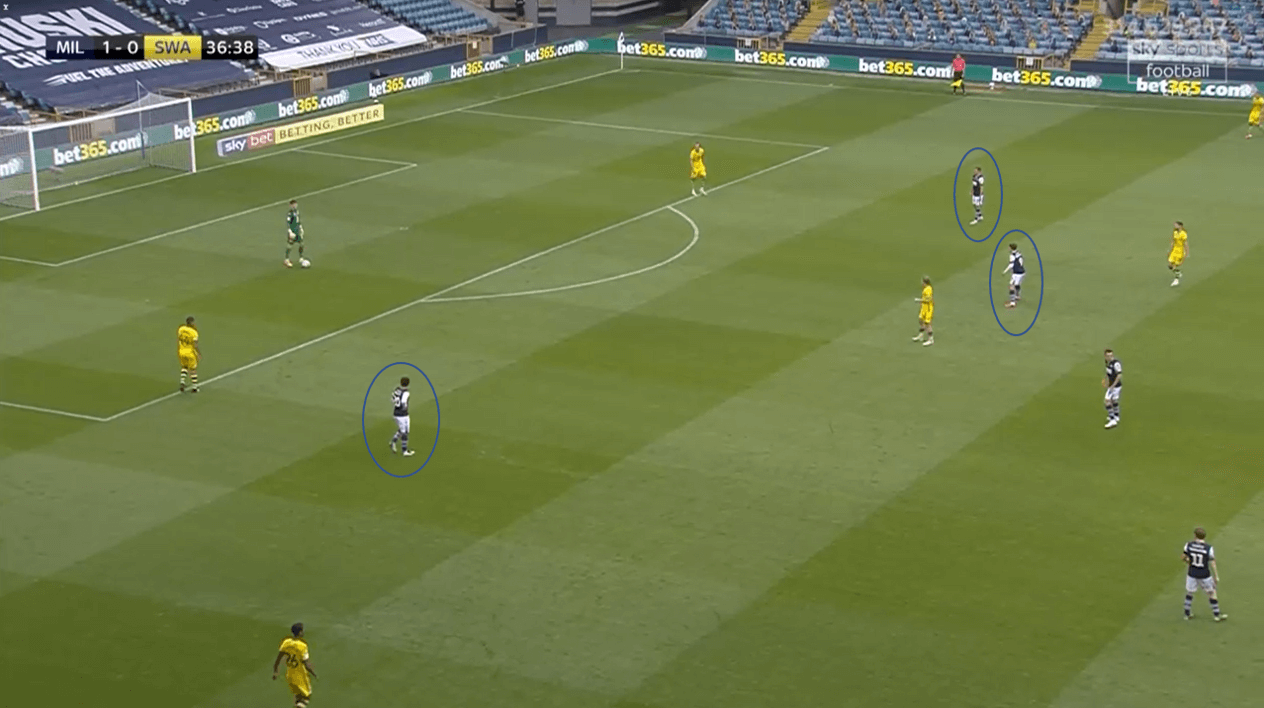
This image above depicts the front three’s usual structure. Both wingers are in such a position they can either press the centre-back or turn to apply pressure to their respective full-back after a chipped ball. Left-wing-back Shane Ferguson (No.11) is also ready to press if necessary.
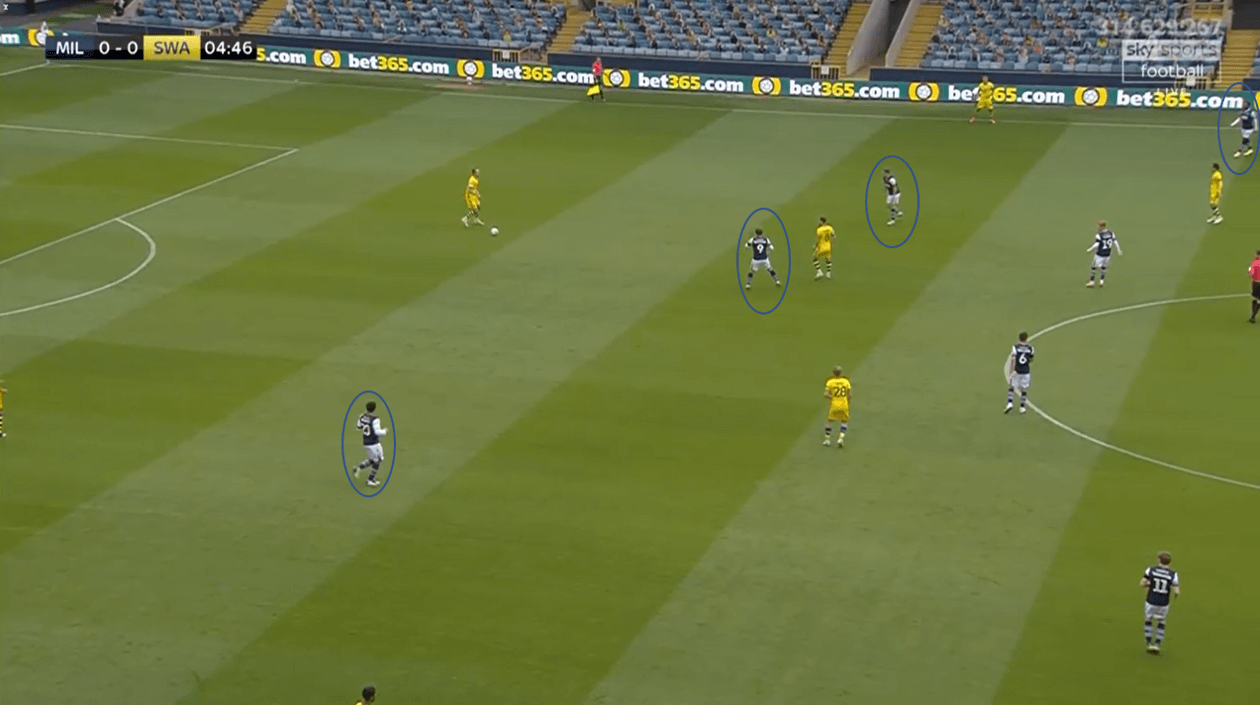
Again here we see that Millwall are to content to sit off while remaining compact and blocking passing lanes. Wallace here is thwarting access to Dhanda in the half-space. Moreover, right-wing-back Mahlon Romero is not afraid of pushing up to be in a more optimum position if left-back Jake Bidwell receives, especially with regards to Wallace being slightly more central.
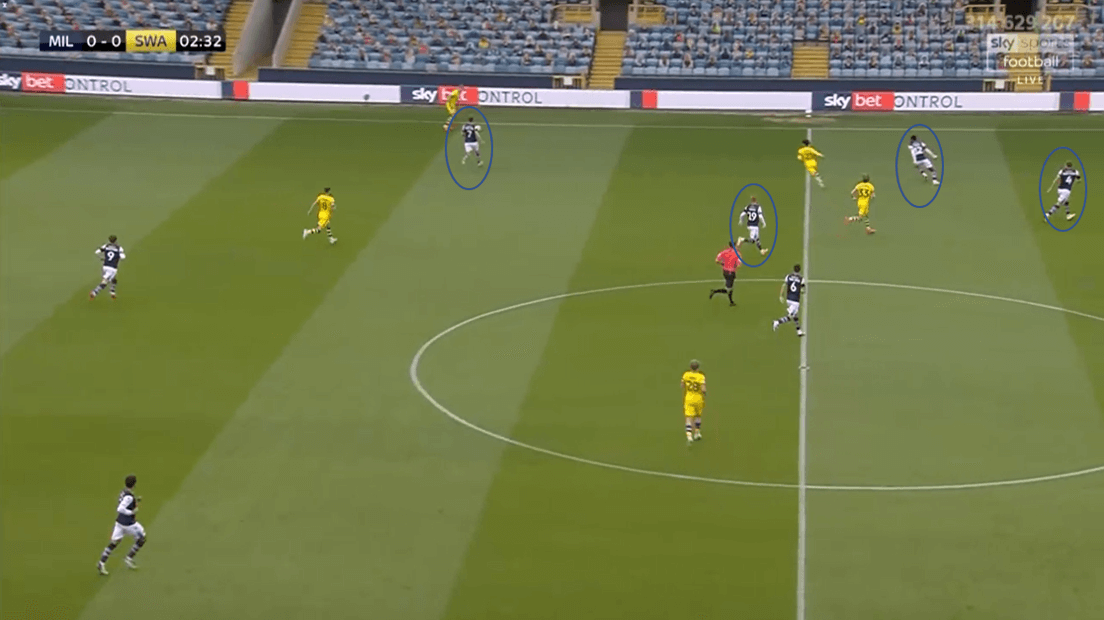
This example above shows their structure when wide. Wallace curves his run to hinder any attempt at playing centrally. Romeo remains tight on Dhanda. Because of the three centre-backs, No.4 Shaun Hutchinson can move across and shepherd Gallagher’s depth run. Woods is also another body entering the half-space.
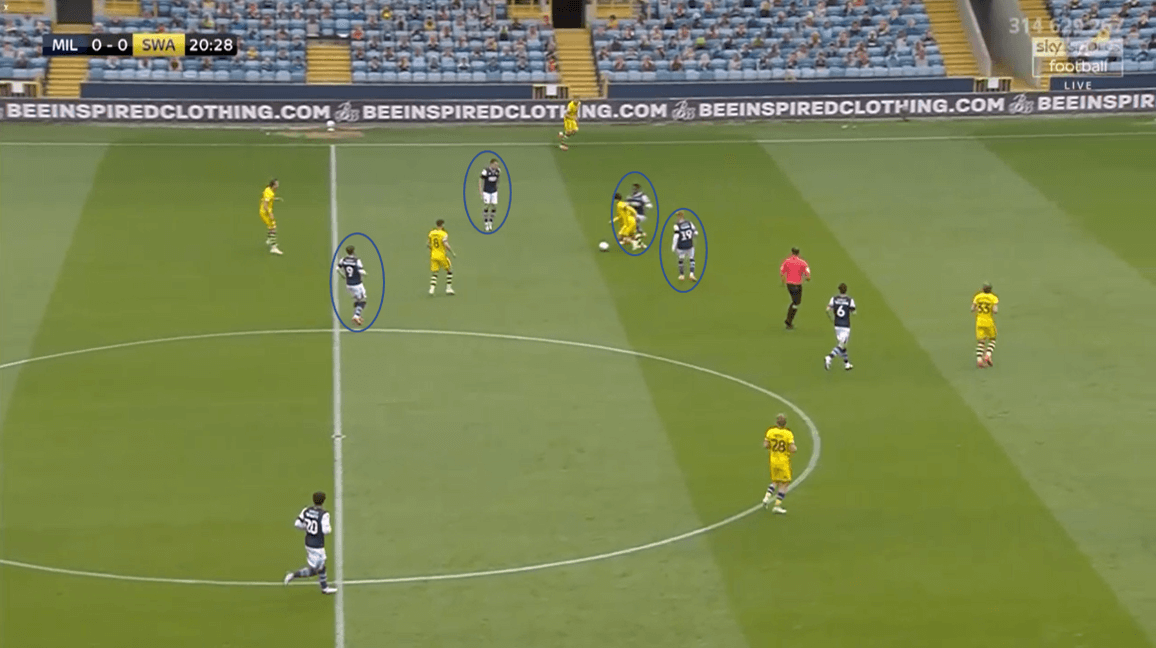
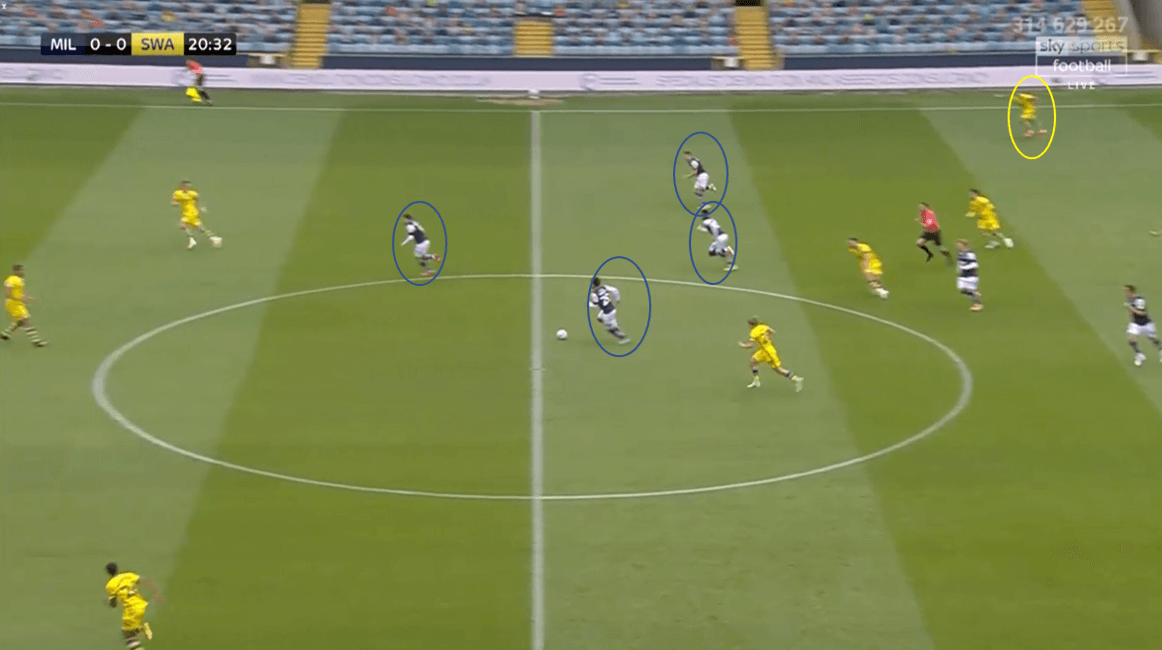
Here above we see the effectiveness of this pressing trap. Millwall invite the pass into the half-space but consequently collapse upon Dhanda. Due to the proximity, there are no simple passing options, but four defenders who can close gaps and tackle. The image below shows how this eventual turnover led to Swansea being disorganised during a defensive transition – mainly due to Bidwell being too high – resulting in a Millwall goal.
Millwall corners
The Lions have scored 14 goals from set-pieces this campaign, a total that puts them near the highest in the whole of league. Their squad profile means set-pieces can be a particularly effective goalscoring tool. Jake Cooper is 6’3”; Hutchinson is 6’2, as is Murray Wallace. Here Millwall had 12 corner-kick situations, and while they didn’t score from one, they did create some good chances, with some interesting routines.

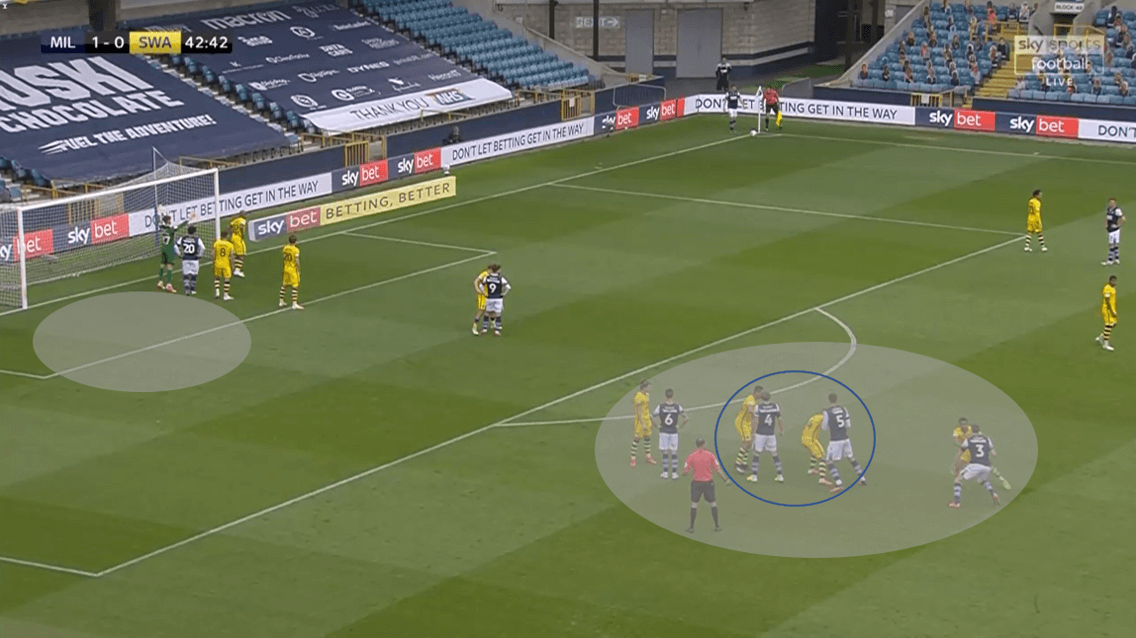
This first routine is especially unique, seen above, and then below. While having clusters of players in deeper areas to then move forward and attack with more momentum isn’t uncommon this quartet being that deep is rather unusual. Note how the back-post is unoccupied, and the presence of Hutchinson and Cooper in this quartet. This aerially dominant pairing subsequently peels off and attack the space at the back-post. The delivery though is poor and is cleared.
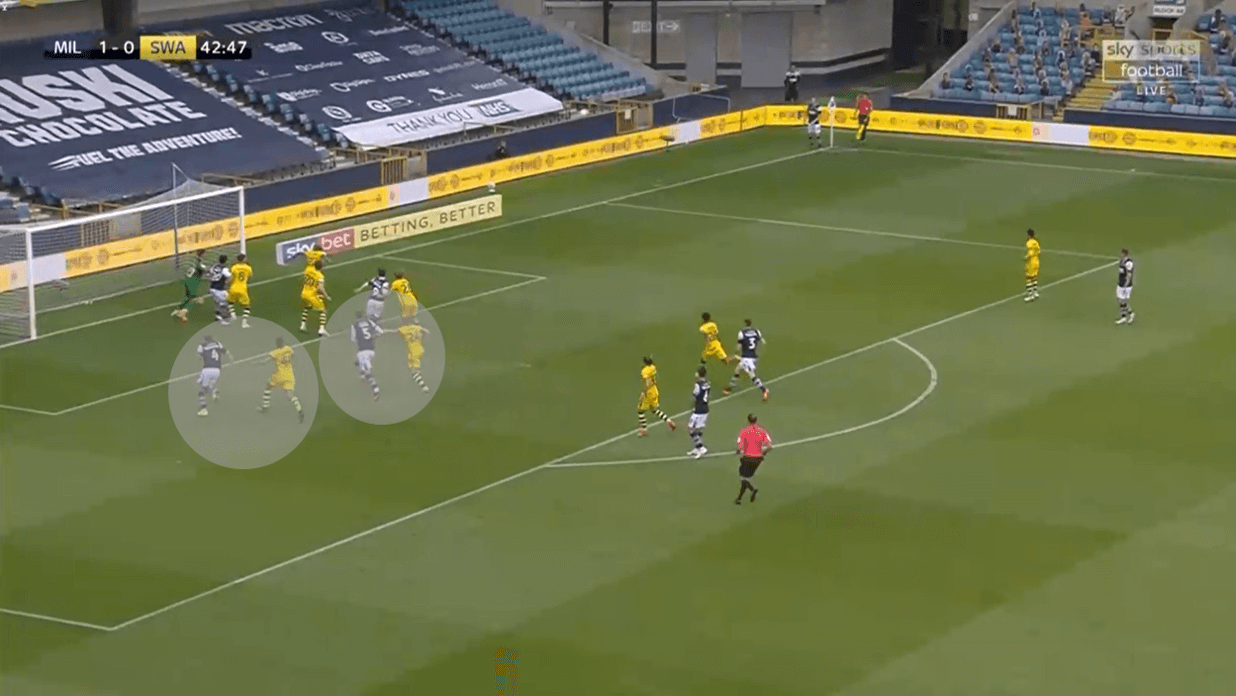
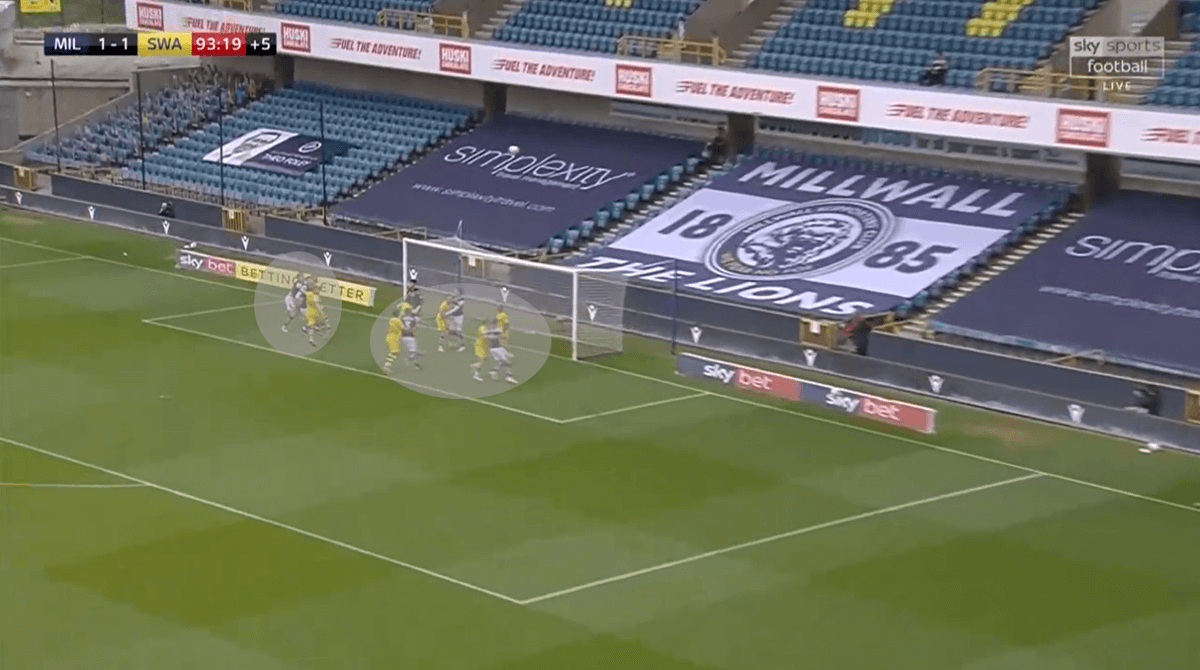
In this example below the tallest players have once more gathered together, but this time overloading the back-post as a group. They have the capability to gain aerial superiority, and positional, over the smaller Swansea defensive unit. Indeed, Murray Wallace hits the post in this instance.
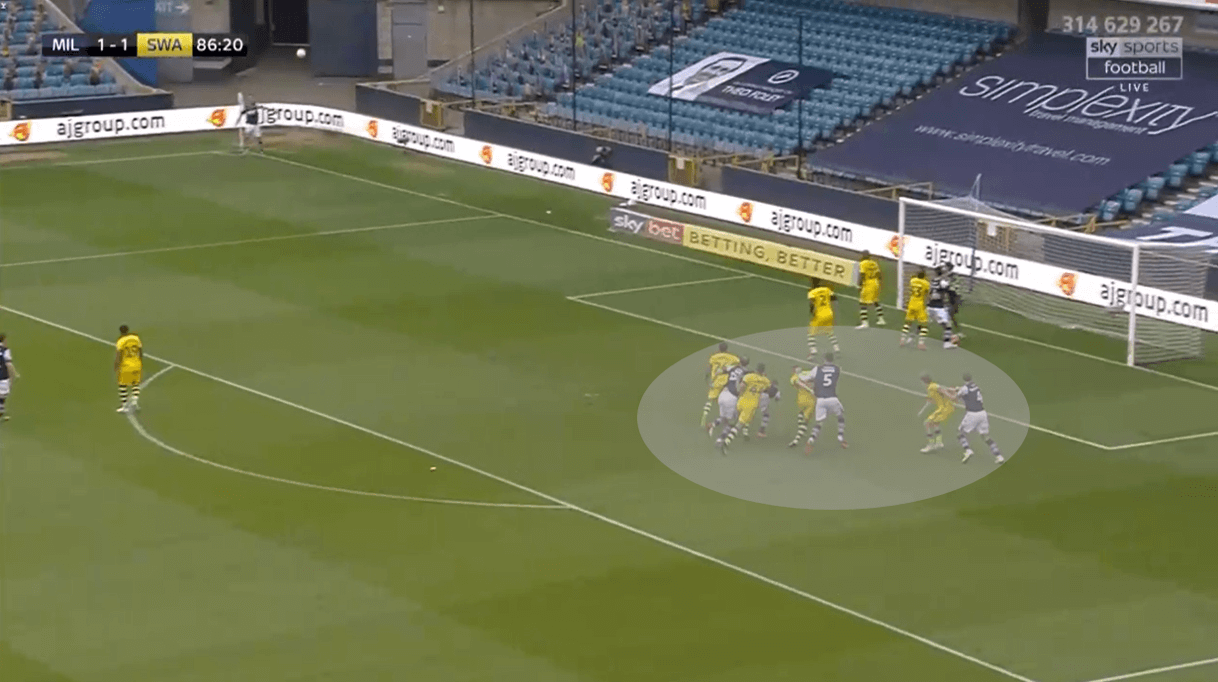
Here below there are similar principles but a somewhat different routine. At this point in the game, Rowett had brought on Matt Smith, an extremely effective target-man. The delivery is aimed at him and Cooper, at the far post, with the hope of a knockdown back towards the goalmouth. The goalmouth here is also more densely populated than the previous examples. However, they are crowded out, and Swansea safely clear.
Conclusion
Swansea will be the happier of the two teams with this result, though, in truth, a draw doesn’t help either team in their respective play-off push. The Swans’ issues with ball progression meant they never created any clear chances from open-play, with their goal coming from an excellent free-kick from Brewster. Millwall were defensively solid and their goal arose from the perfect situation. From this fixture, the home side looks like the team with any hope of sneaking in, though they’ll need a superb run of form.



Comments