The Championship has a real knack for throwing some curveball results into the mix, especially at the business end of the season. You’ve got sides throwing everything they have to earn promotion to the Premier League whilst clubs are fighting for their lives at the other end of the table, and sometimes, those trying to avoid relegation find an extra gear to pick up invaluable points against those further up the table.
That’s what we got with Huddersfield in their most recent game against play-off hopefuls Millwall, with the Terriers snatching a 1-0 win over Gary Rowett’s side despite facing an onslaught from the Lions. This result saw Millwall sit in the final playoff spot in sixth place, while Huddersfield have closed the gap to safety to three points.
This tactical analysis will look at the defensive tactics that allowed Huddersfield to hold on against a barrage of Millwall attacks, while also looking at how they were able to steal a goal against the run of play. Additionally, we will provide an analysis of Millwall’s tactics and performance with the aim of identifying the reason behind their goalless loss.
Lineups
Hosts Millwall went with their usual 4-2-3-1 formation and actually opted for the same starting eleven as their 2-1 win over Swansea City in the match prior to this one. The scorer of the first goal in that game Tom Bradshaw led the line, with wide support coming from George Honeyman and the other goalscorer in the Swansea win – Andreas Voglsammer.
Both of those wingers came off as Millwall opted to utilise all five of their substitutions as they tried to salvage something from the game – Duncan Watmore and Oliver Burke replaced the duo. Romain Esse, Scott Malone, and Jamie Shackleton also came on from the bench but failed to make an impact.
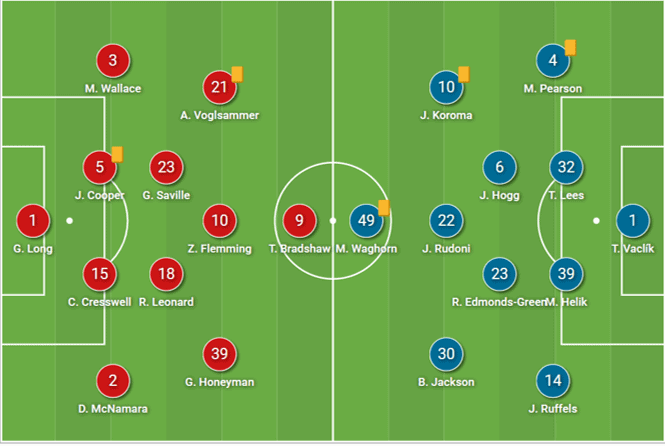
Huddersfield reverted to 4-2-3-1 after switching to a 4-4-2 variation against Norwich City in the game prior, a game in which they picked up a 1-1 draw – another strong result. Martyn Waghorn started the game as the lone striker but was replaced at halftime by Danny Ward, who went on to grab the winning goal.
With Rarmani Edmonds-Green lining up in midfield this time around instead of at right back as he did in the previous game, Matty Pearson came back into the fold in defence – the rest of the back line remained unchanged. Josh Koroma and Ben Jackson kept their places on the flanks, while Jack Rudoni operated in an attacking midfield role.
Millwall in attack: The pros and cons
So far this season, Millwall have averaged more goals and xG per 90 than their opponents when they’ve faced the Lions, but they underwhelmed in this department against Huddersfield, coming away with an xG of just 0.95 despite having a high number of shots.
It is noteworthy that Millwall’s average possession per game is 45.32%, meaning their games are usually fairly even and potentially more open with more of an “end-to-end” dynamic to them. However, in this fixture, they registered 69.6% – something they aren’t particularly used to, and it showed as they failed to break Huddersfield down. This segment will look at an example of when Millwall did look threatening in attack due to the pitch being more open, and an example of when they failed to find the spark to penetrate Huddersfield.

In the early stages of the game, there seemed to be something of a disconnect in the Huddersfield ranks at times, off the ball especially. This provided Millwall with pockets of space to exploit, and when this occurred, Millwall’s eyes lit up and they looked to punish the Terriers.
The example above shows what can only be described as a mix-up between Huddersfield’s roles. The man pressing the nearest Millwall option is Edmonds-Green, but his positioning only leaves space in a dangerous midfield area behind him – it must have been a teammate’s job to press that close option. George Honeyman is the Millwall man in midfield who recognises the space left by his opponent and makes a run further forward to receive the ball from Murray Wallace, and it set up what was a very dangerous attack for the hosts.
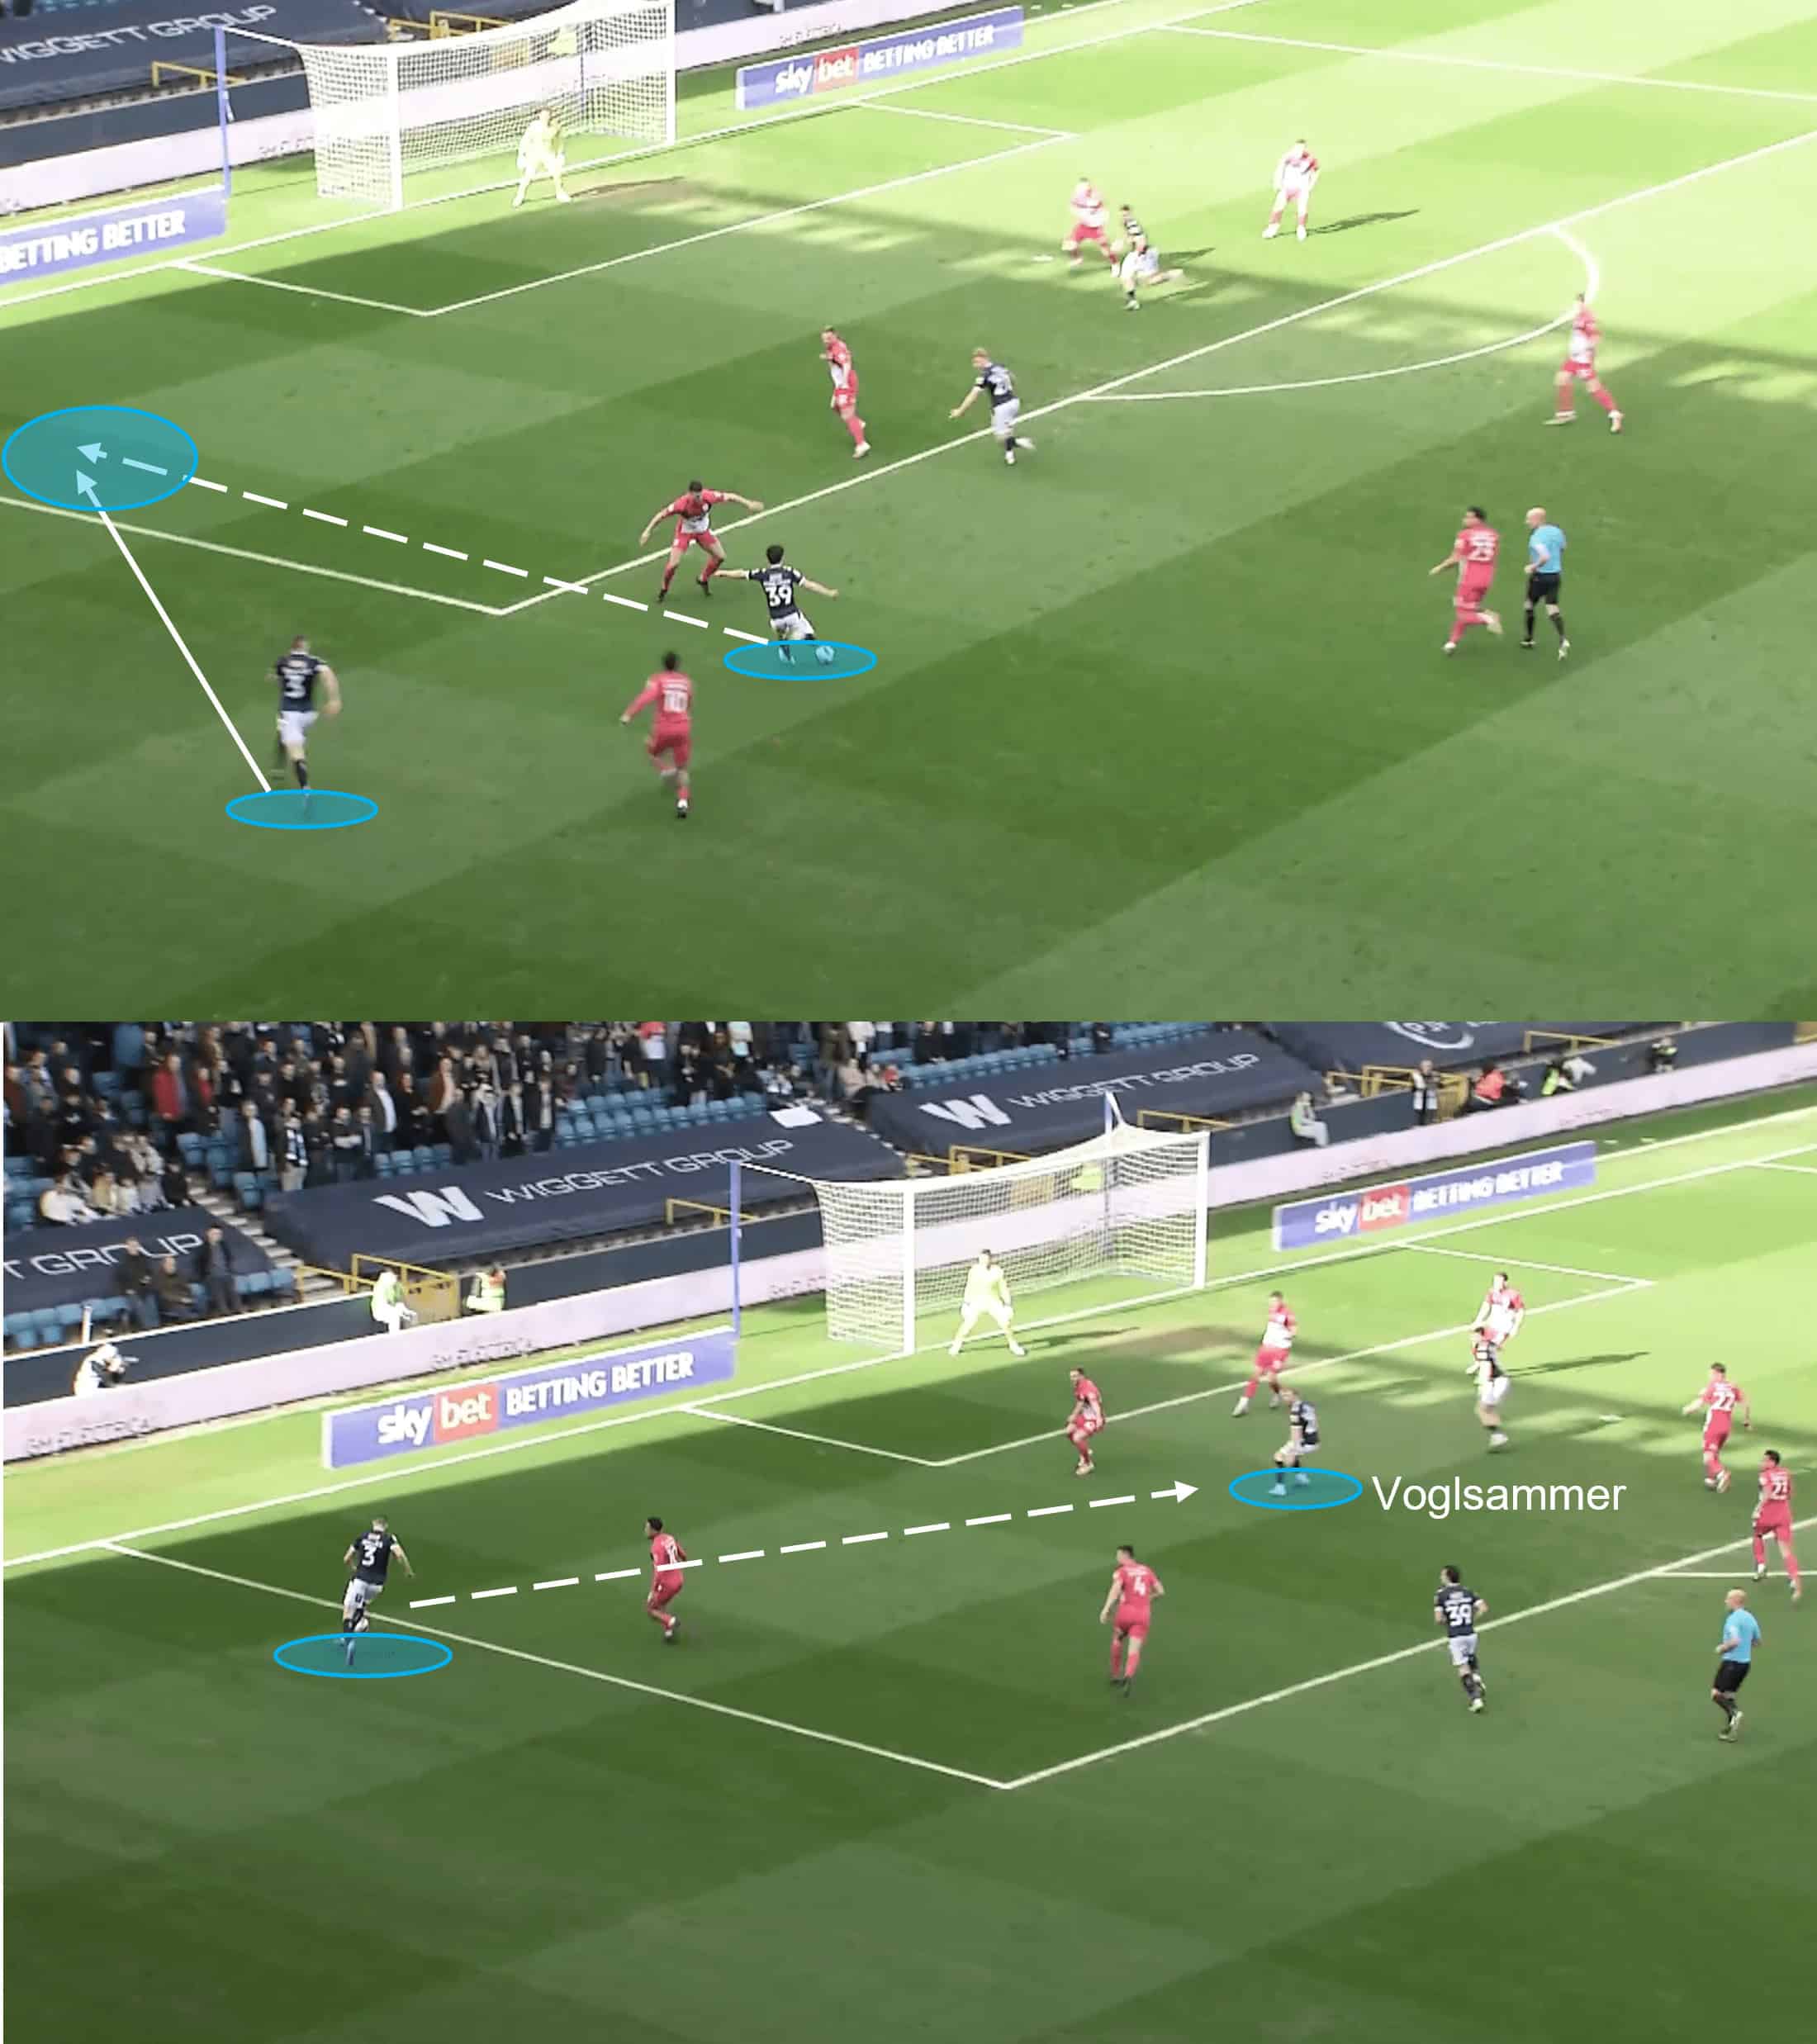
Honeyman showed good pace on the ball to carry it into the final third where he was greeted by a number of red shirts. To his delight, an overlapping run by Wallace arrived, and the former Sunderland midfielder found his partner from left back. Wallace collected the pass well before executing a pulled-back low cross into the feet of Voglsammer, who did very well to lose his marker – but the more amazing feat in this move was how he somehow managed to blaze the ball over the bar when he was unmarked from 10 yards out.
Finish aside, this was a quick and incisive attack from Millwall, and this early let-off for the visitors may have been the alarm bell they needed to shore up their defensive shape.
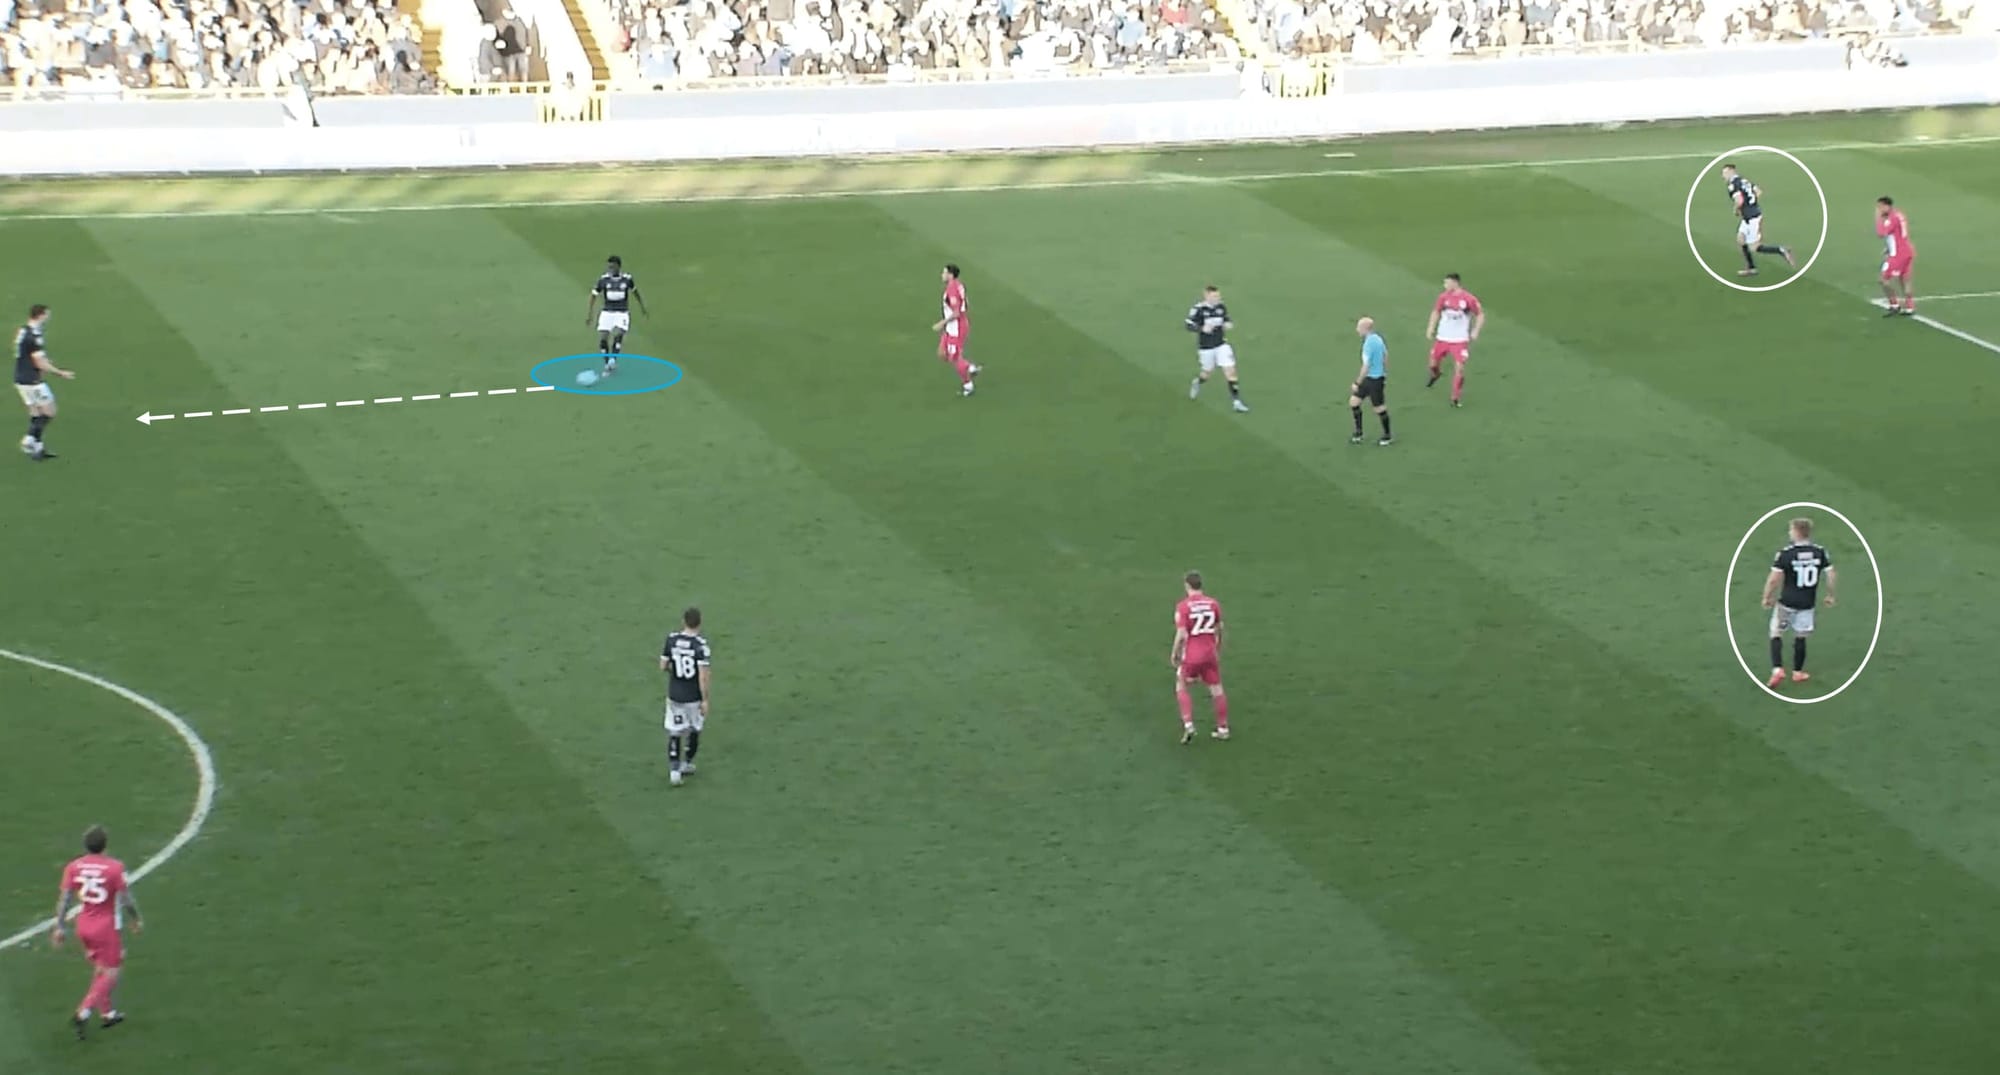
We’ll get into the numbers behind Millwall’s efforts on goal shortly, but the strong defensive shape from the visitors clearly had a negative impact on the mentality of Millwall. On a number of occasions throughout the match, the Lions would come up against a deep Terriers set up with a heavy numerical presence, and they showed a weakness in their failure to break them down.
Whether it was a mentality issue or a creativity issue, there were various opportunities to make a positive pass forward that aided the Millwall attack, but so many times did they take the easy option by placing a five-yard pass either backward or laterally. This slowed down any momentum Millwall had earlier in the attack and gave Huddersfield the chance to make sure they were prepared for their opponent’s attack.
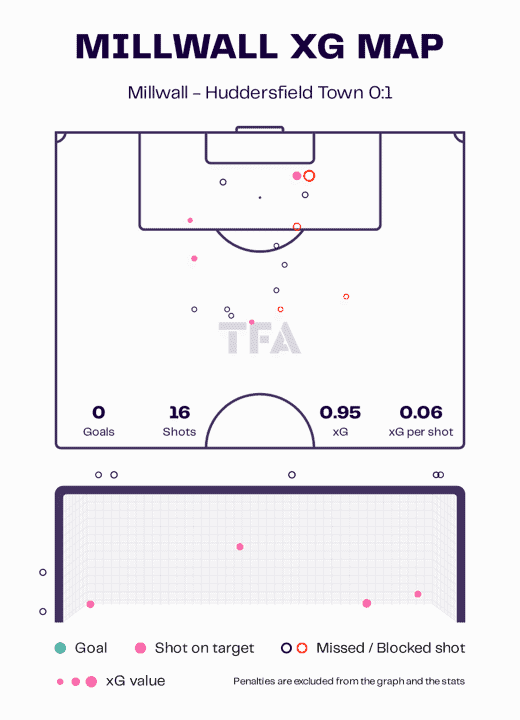
This xG map only solidifies the notion that Millwall struggled to break their opponent down. Of the 16 shots they recorded, only six were inside the box, with two of those hitting the target. That leaves a whopping 10 shots from outside of the box, with two of them being on target. A higher number of long shots suggests a lack of patience from Millwall, as well as a lack of creativity and/or problem-solving ability.
Huddersfield’s snatch & grab gameplan
The base stats won’t tell you this, but the visitors weren’t camped in their own box for 90 minutes. In fact, in parts of the first half, they showed good energy and intensity, especially out of possession. However, the key to their win was a strong defensive structure and taking their chance when they could in a game where they were very limited in terms of attacking opportunities.
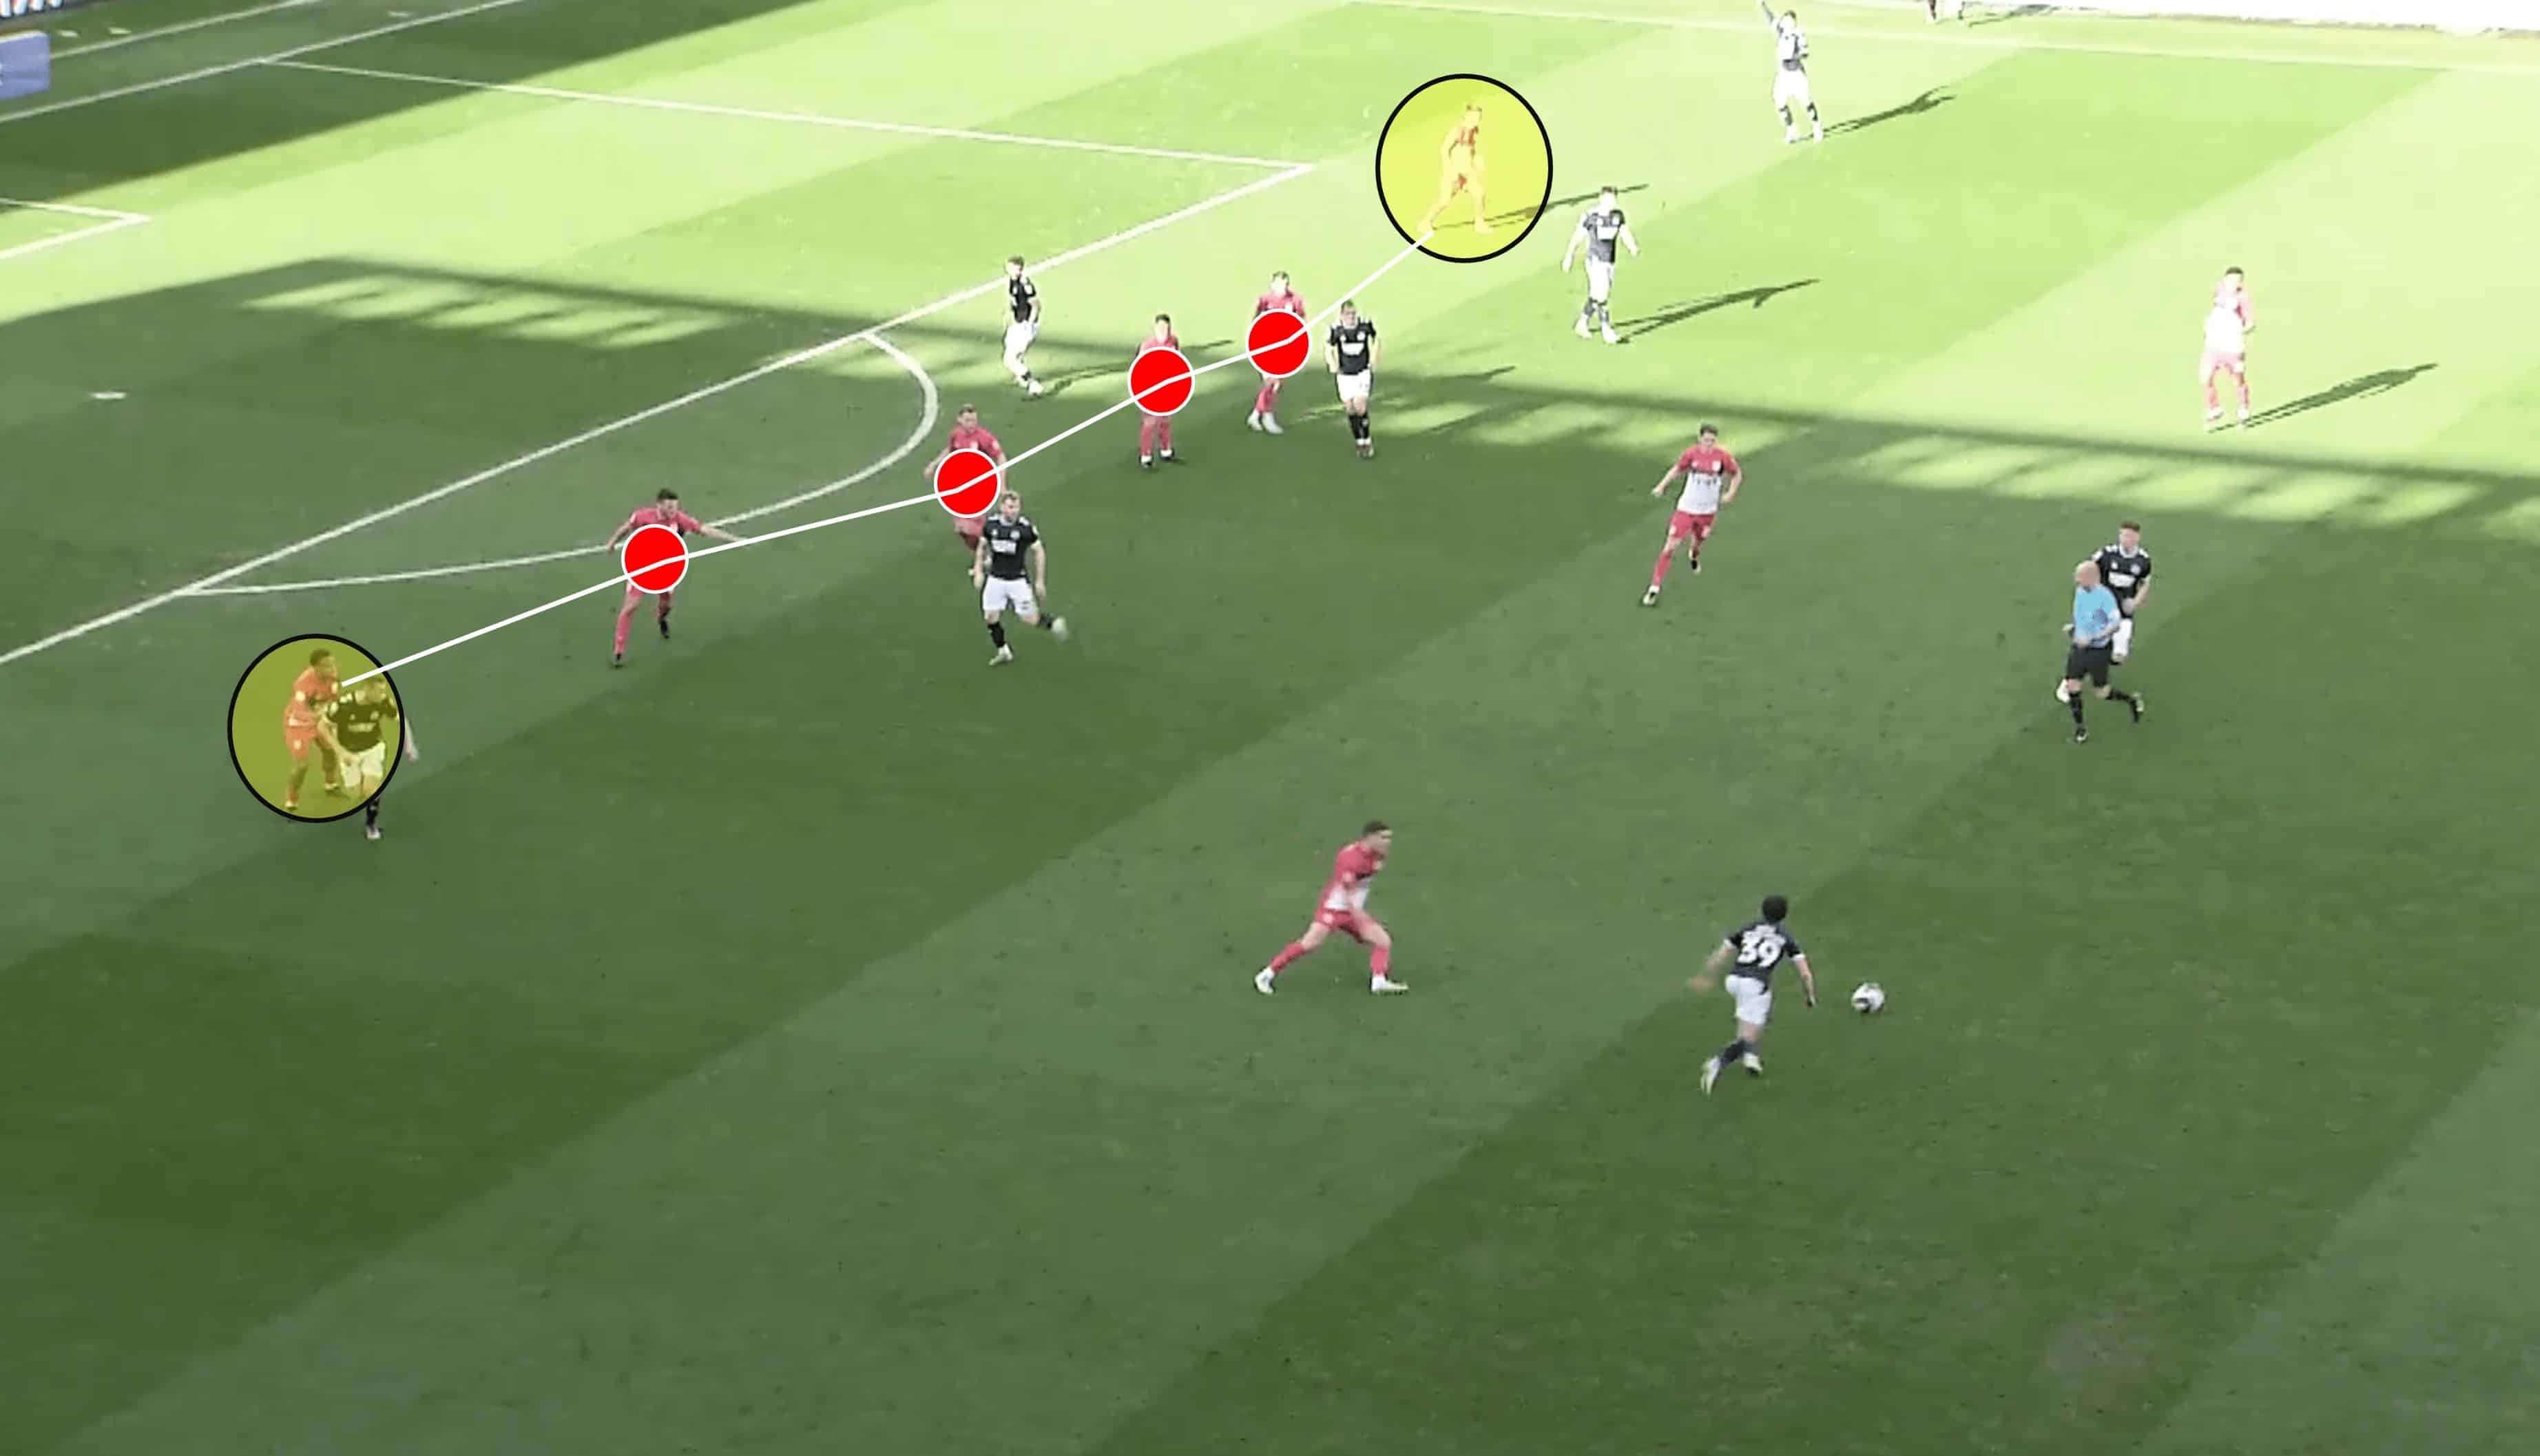
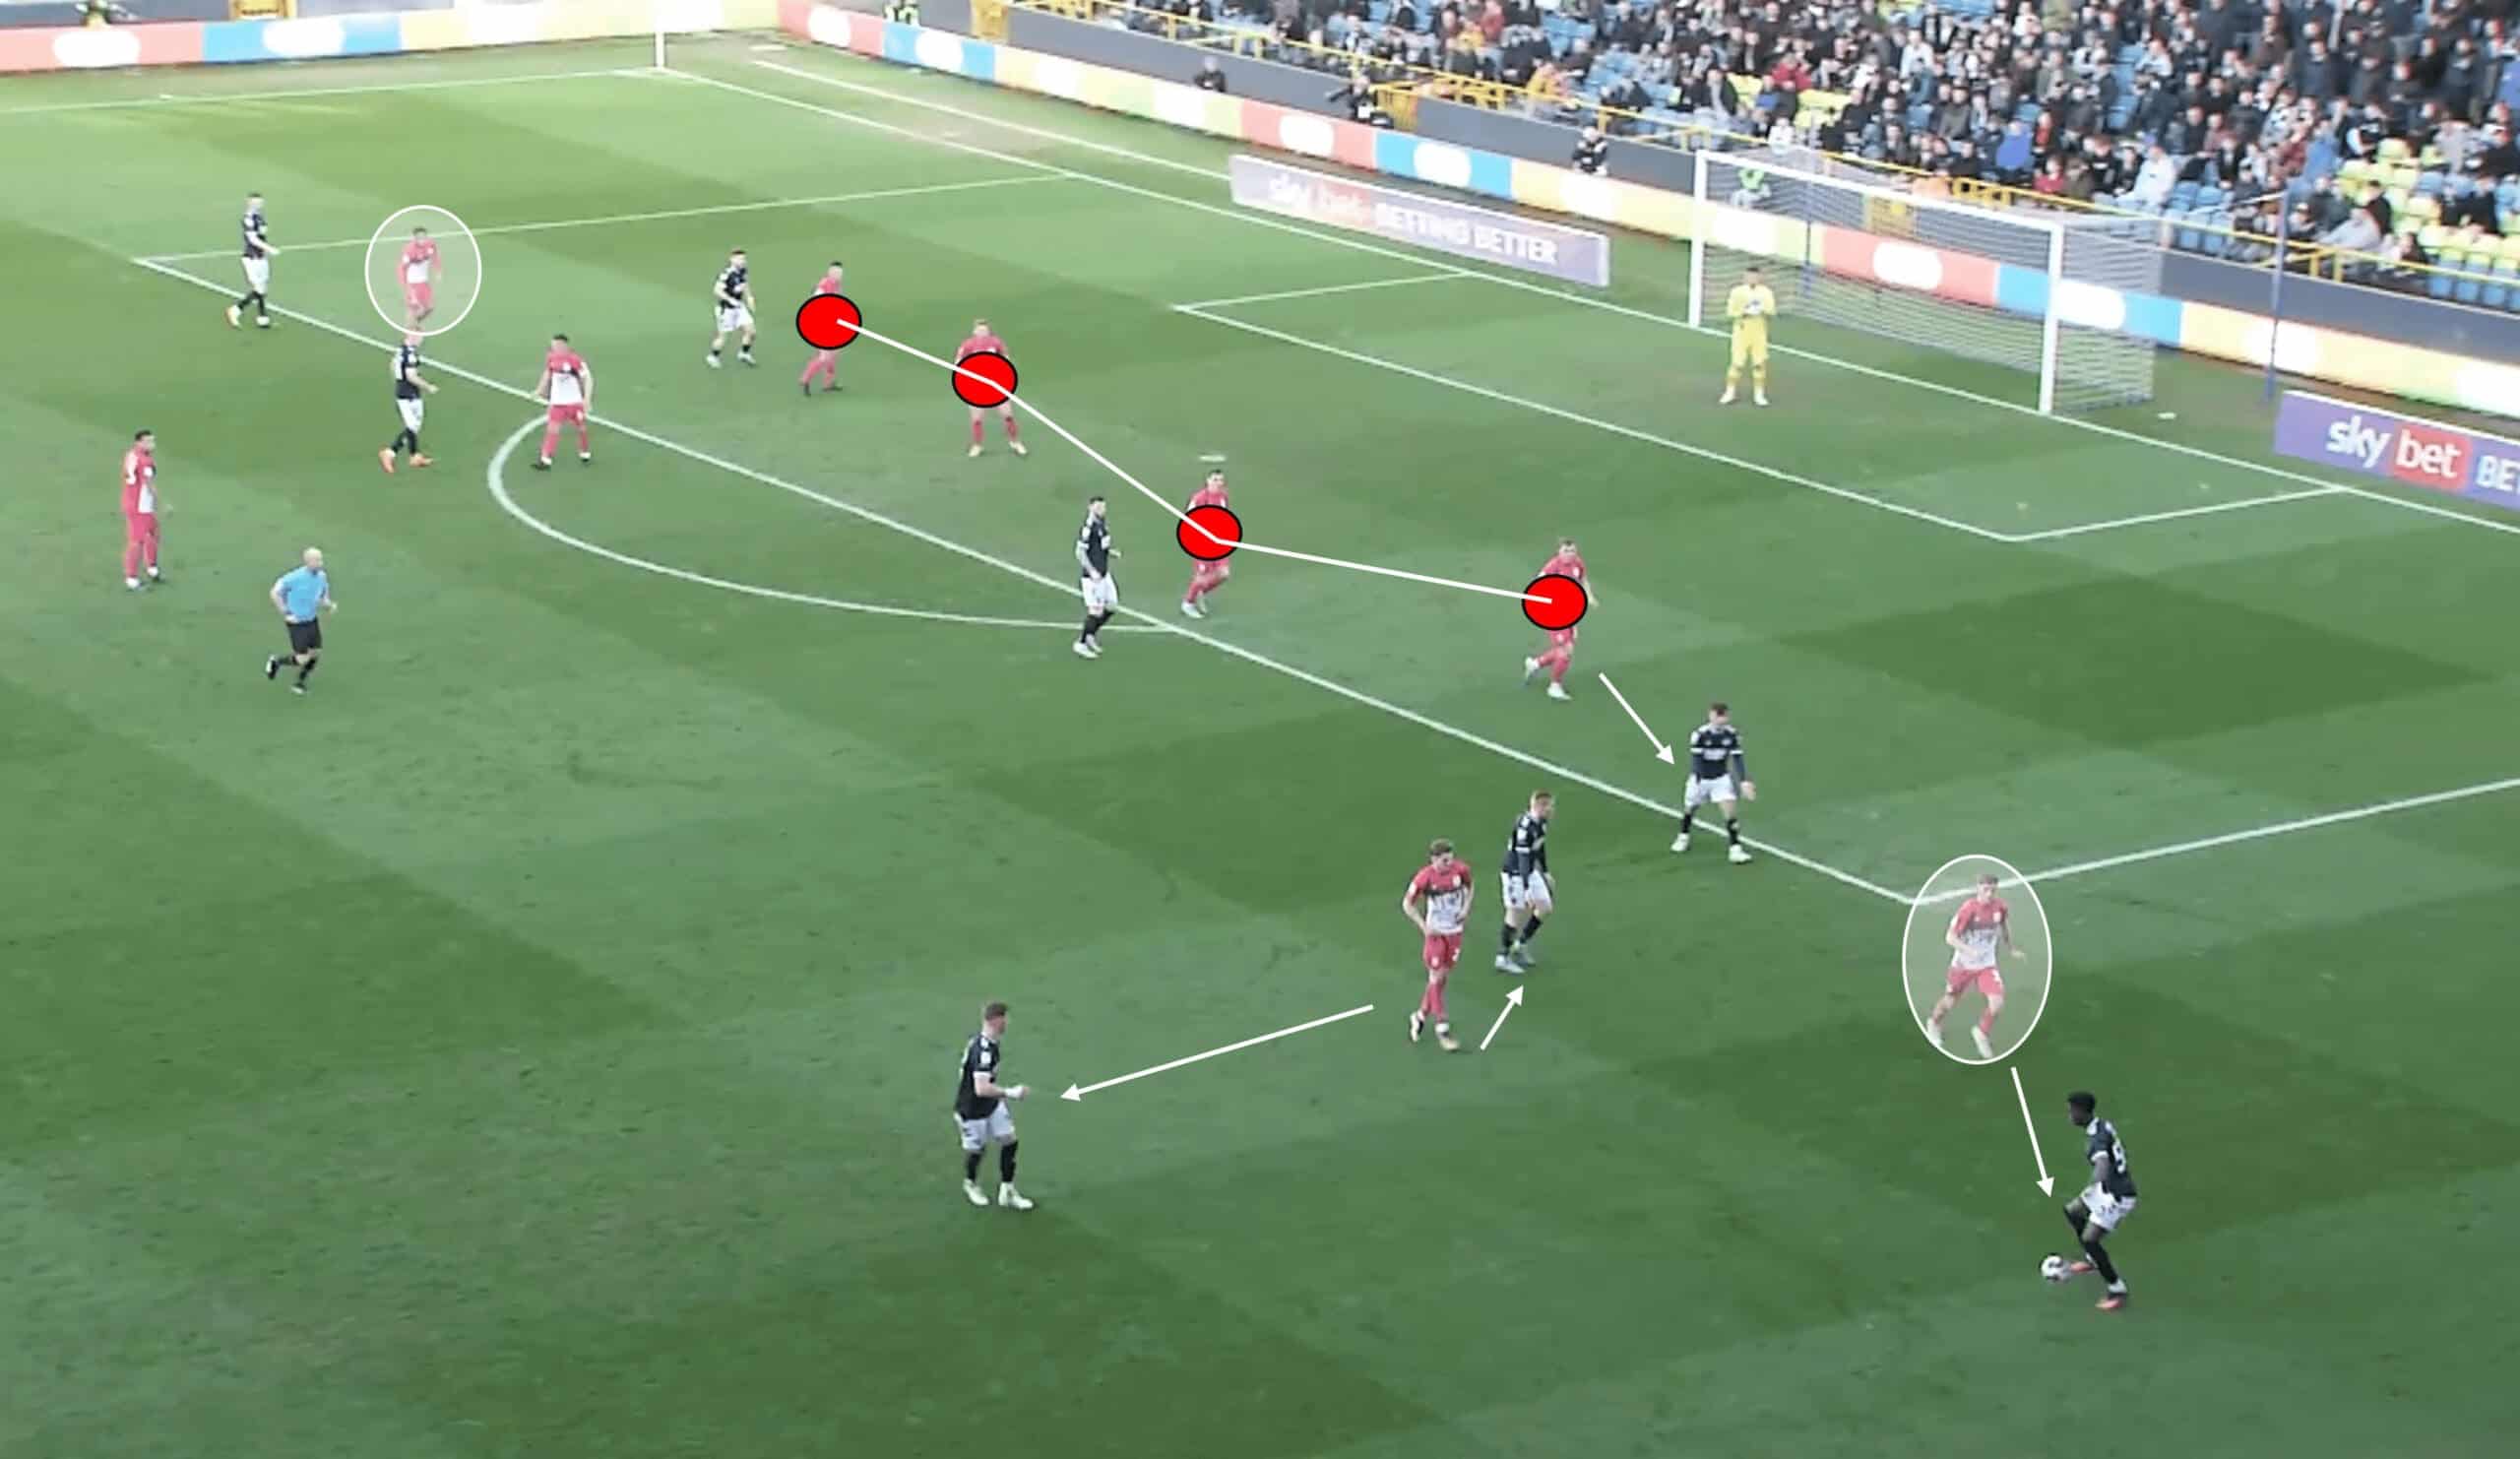
When defensive structure and solidarity were called upon, this was typically the shape we’d see from the eventual victors. Where possible, they would avoid dropping their line inside their own box, looking to keep Millwall outside of the final third. In terms of individual positioning, the back four became extremely narrow, with the wingers from both flanks dropping in to act as momentary full-backs, essentially creating a back six. The midfielders would press the ball and try to protect the back six from ground passes, instead looking to force Millwall into either long shots or long balls forward.
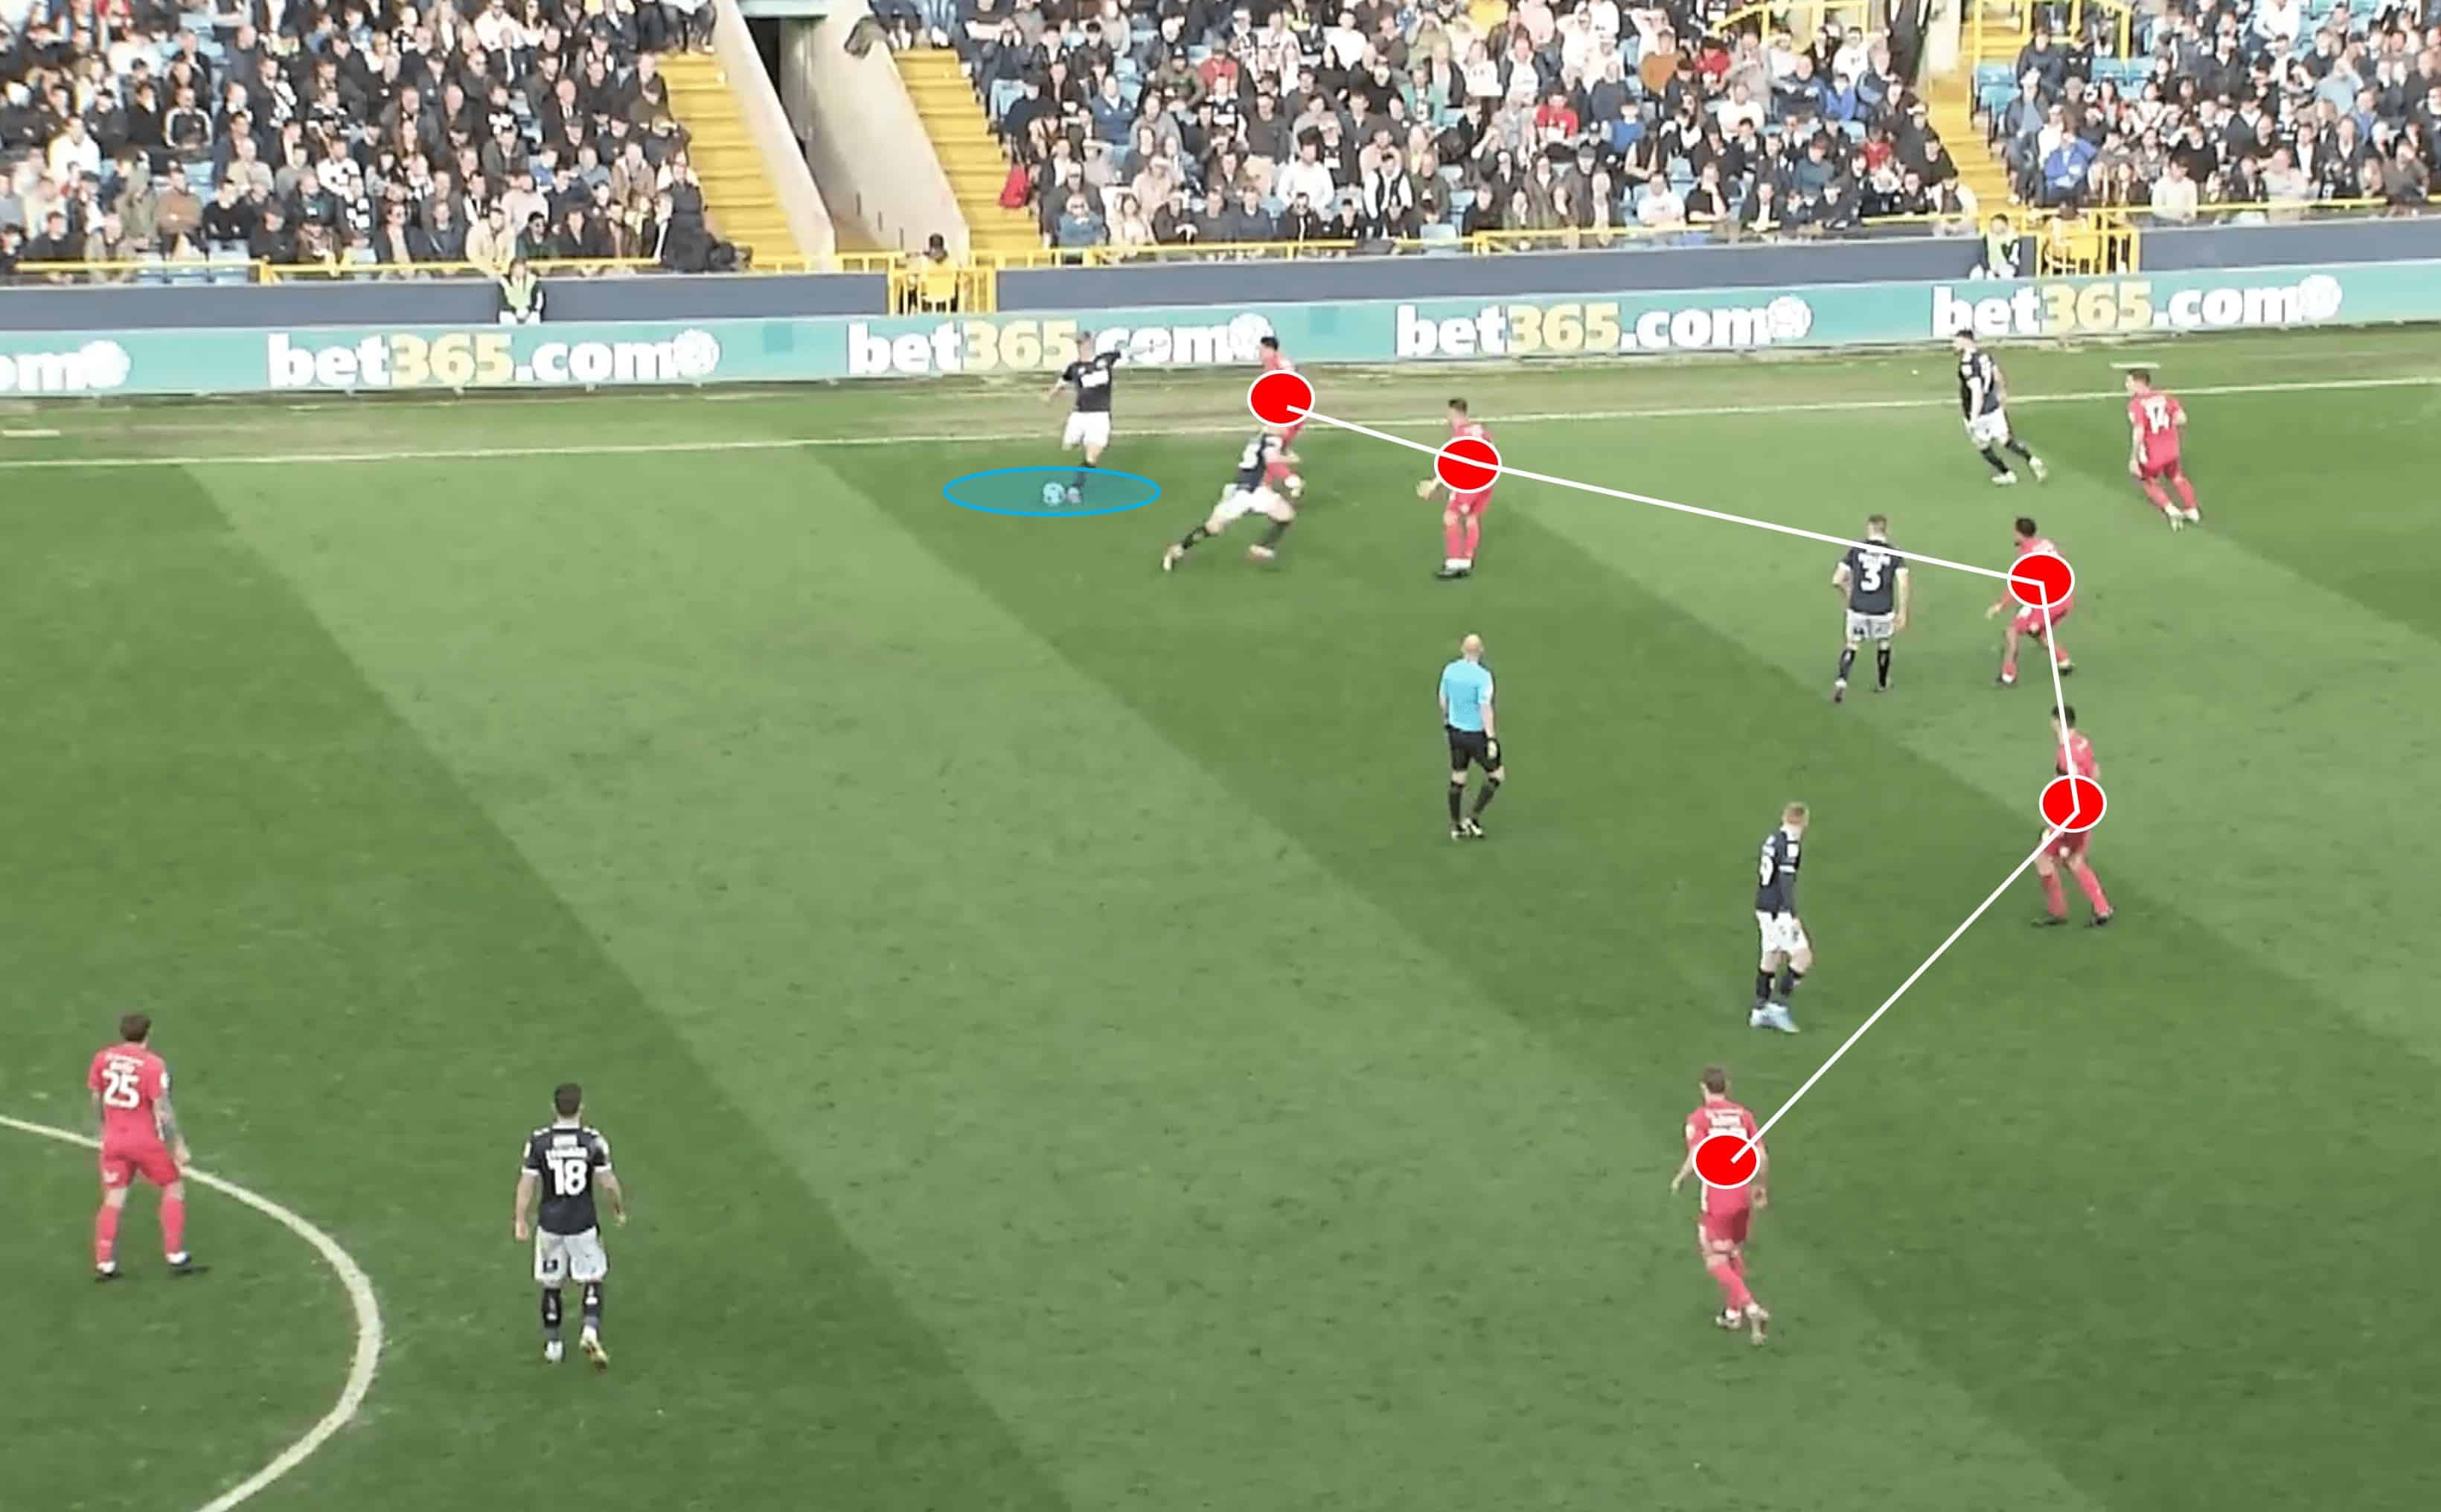
Certain triggers would initiate a response from Huddersfield, and it highlighted a strong cohesion in defence. Triggers such as a heavy first touch from a Millwall shirt, a loss of balance, or turning back to face their own goal with the ball all caused Huddersfield to up the intensity slightly, whether it be with a direct 1v1 press or the tightening of a unit shape – the latter is what we see above.
They left very little space between each other to eradicate the possibility of Millwall penetrating that area, and they also curved the shape in an arch to try and keep the opposition back and ease the pressure on their back line.
This attack not only helped Huddersfield grab what turned out to be the winning goal, but it also summarised their tactics in possession when winning the ball in their own half amid a Millwall attack. A turnover in midfield and Huddersfield would look to hit the channels as Millwall’s full-backs would usually be high up the pitch.
Rudoni latched onto Jonathan Hogg’s direct ball with effective ball control and wasted no time in driving forward while Millwall’s defensive presence was still in disarray. He proceeded to flash a dangerous ball across the face of goal with the aim of finding Danny Ward, but the ball passed everyone and came out on the other side. Nevertheless, the attack was not finished there…
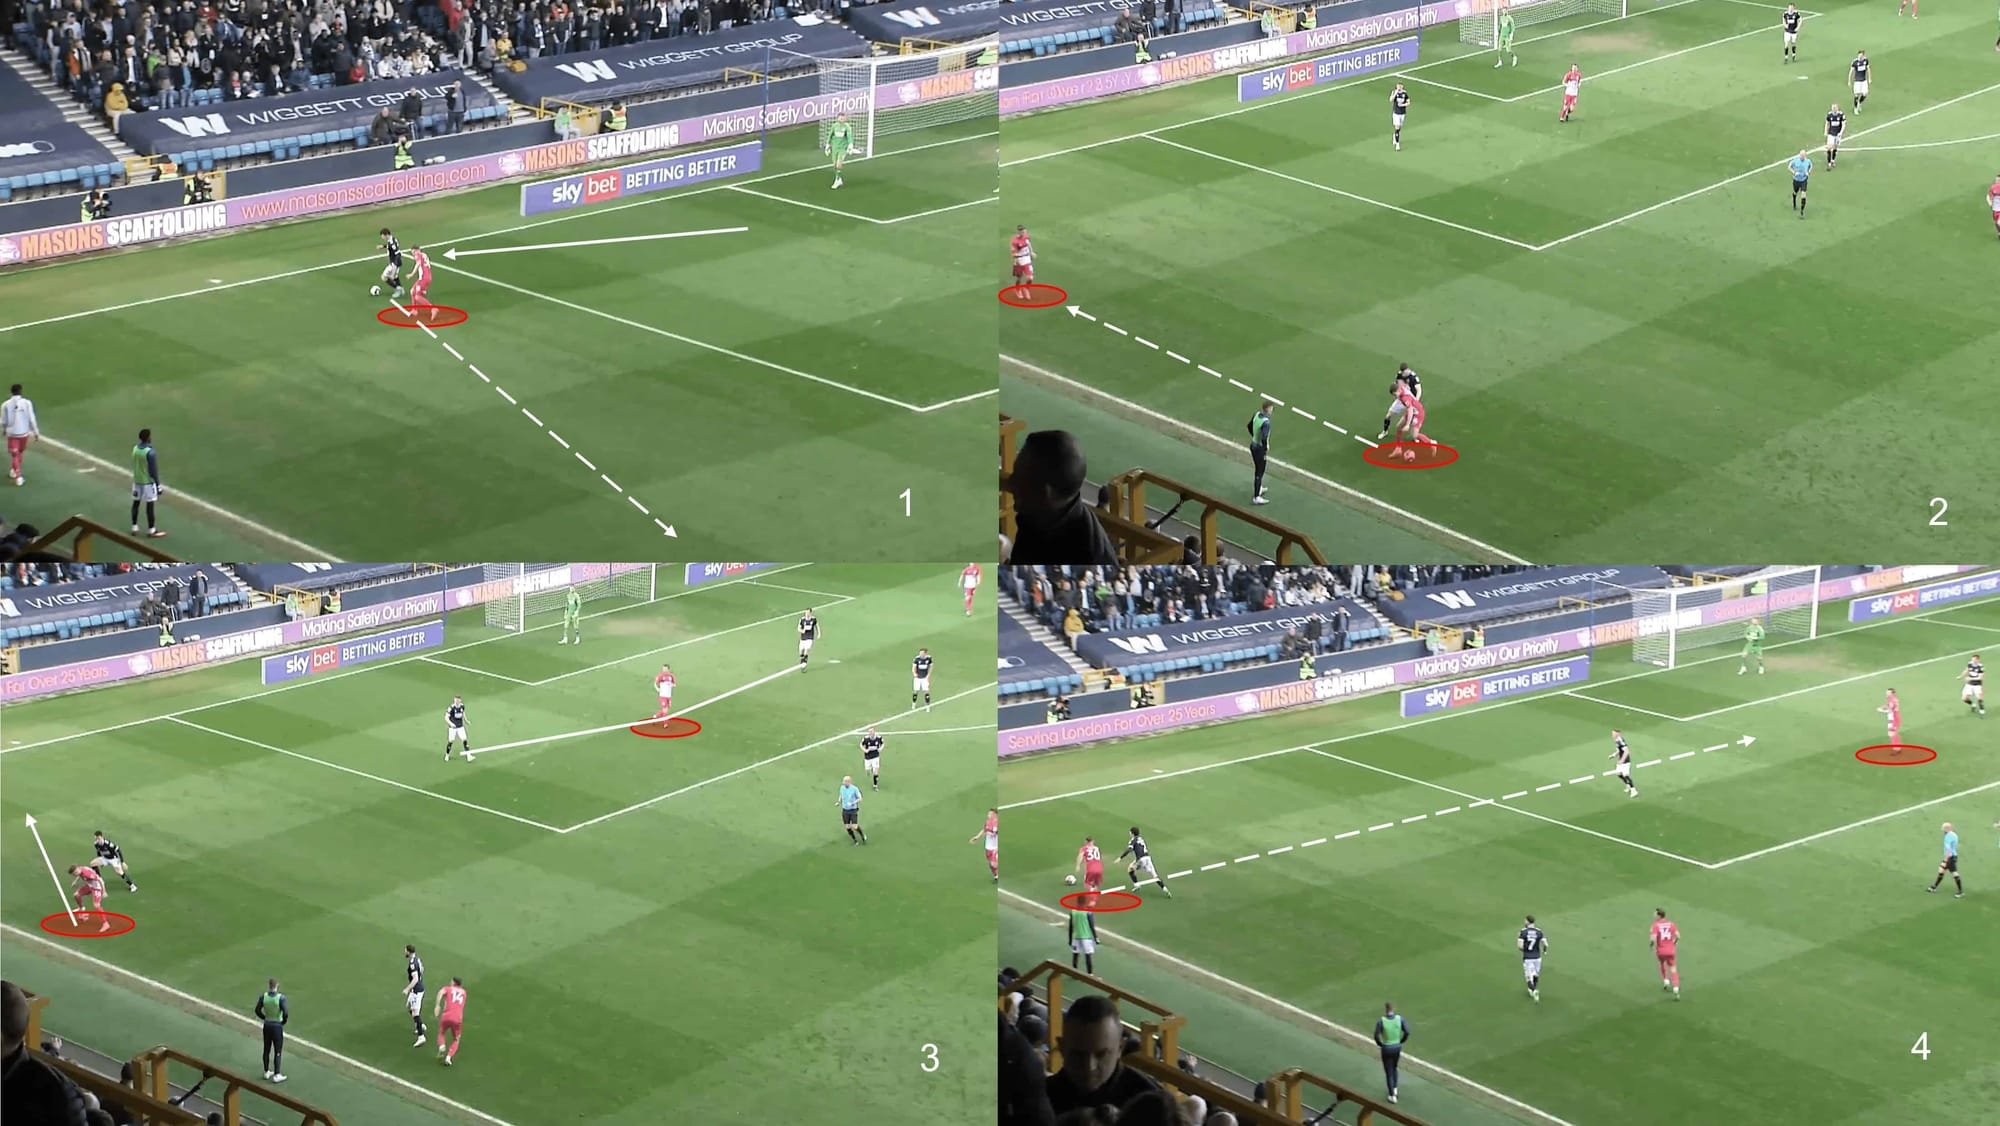
Ben Jackson showed good tenacity to heap the pressure on the Millwall defender after the previous cross failed to find a target in the box. His pressure forced a poor clearance, with the ball landed at the feet of left-back Josh Ruffels, who proceeded to feed the ball back down the line to the feet of Jackson – Jackson showed the same confidence and attacking intent displayed by Rudoni in the prior attack, beating the full-back before sending a cross into the path of Danny Ward, and the forward was able to connect with this one to grab that all-important goal.
This move showed good gameplan execution – hit the channels in the event of a midfield transition, get into 1v1 situations on the flanks and try and get the ball into the box: all with aggression and directness.

After going 1-0 up, Huddersfield, unsurprisingly, showed little interest in attacking and looked to defend what they had. Of course, they would have liked to slow the game down and control the ball or even look to kill the game off with a second goal, but Millwall found a new gear in how they controlled possession and forced the visitors deep into their own half. So, to combat this, Huddersfield turned to the same shape we discussed earlier – a narrow back four with the wingers dropping in as makeshift full-backs.
With so many red shirts in and around the box, you can see why Millwall failed to break them down and resorted to long shots.
Analysing Huddersfield’s press
As the game grew older, it looked as though Huddersfield became more and more confident in their plan, and that included the positioning and timing of a triggered press. They never operated under a high press against Millwall, but in certain areas, they looked to create difficult 1v1 scenarios via a press from the striker, for example. Their pressing, while effective enough to contribute to a big three points, was far from perfect, as the analysis below looks at.
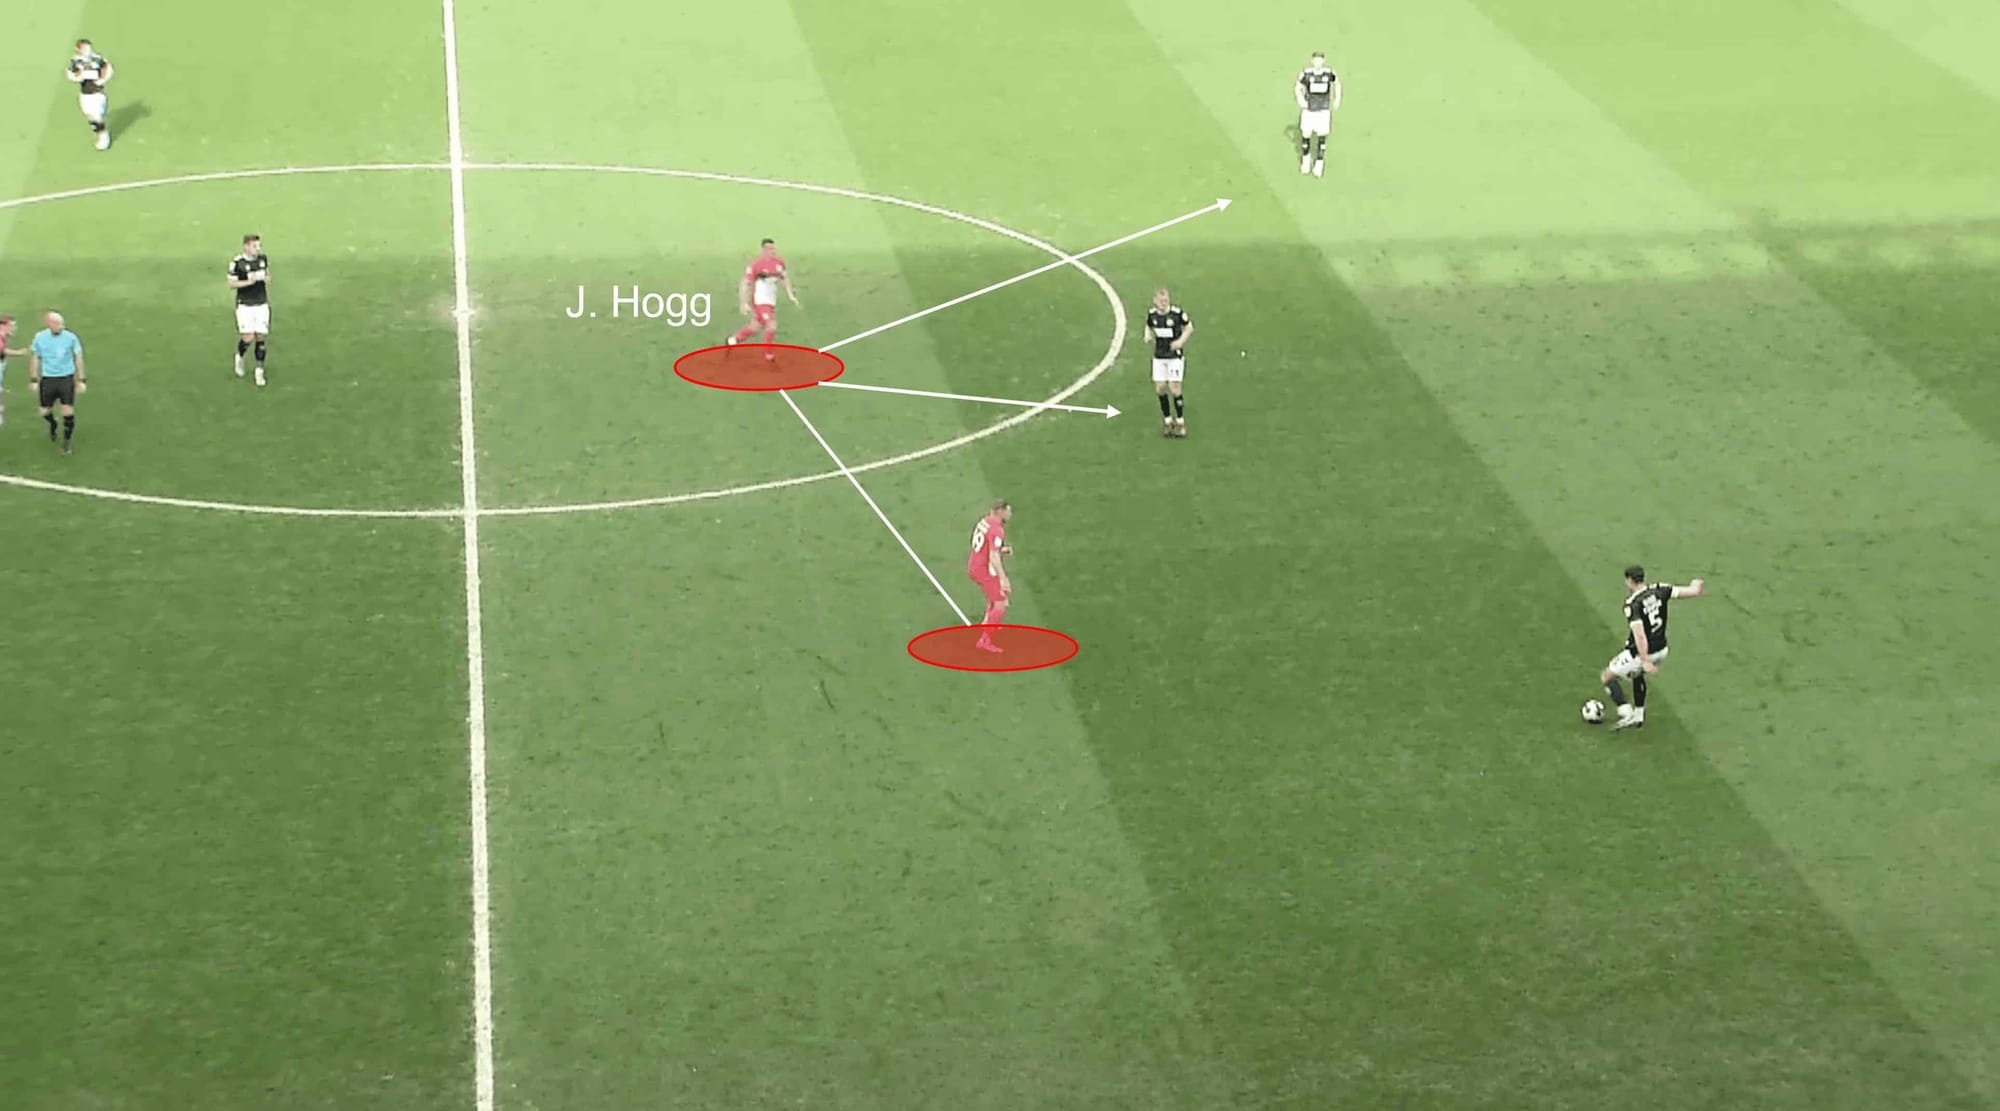
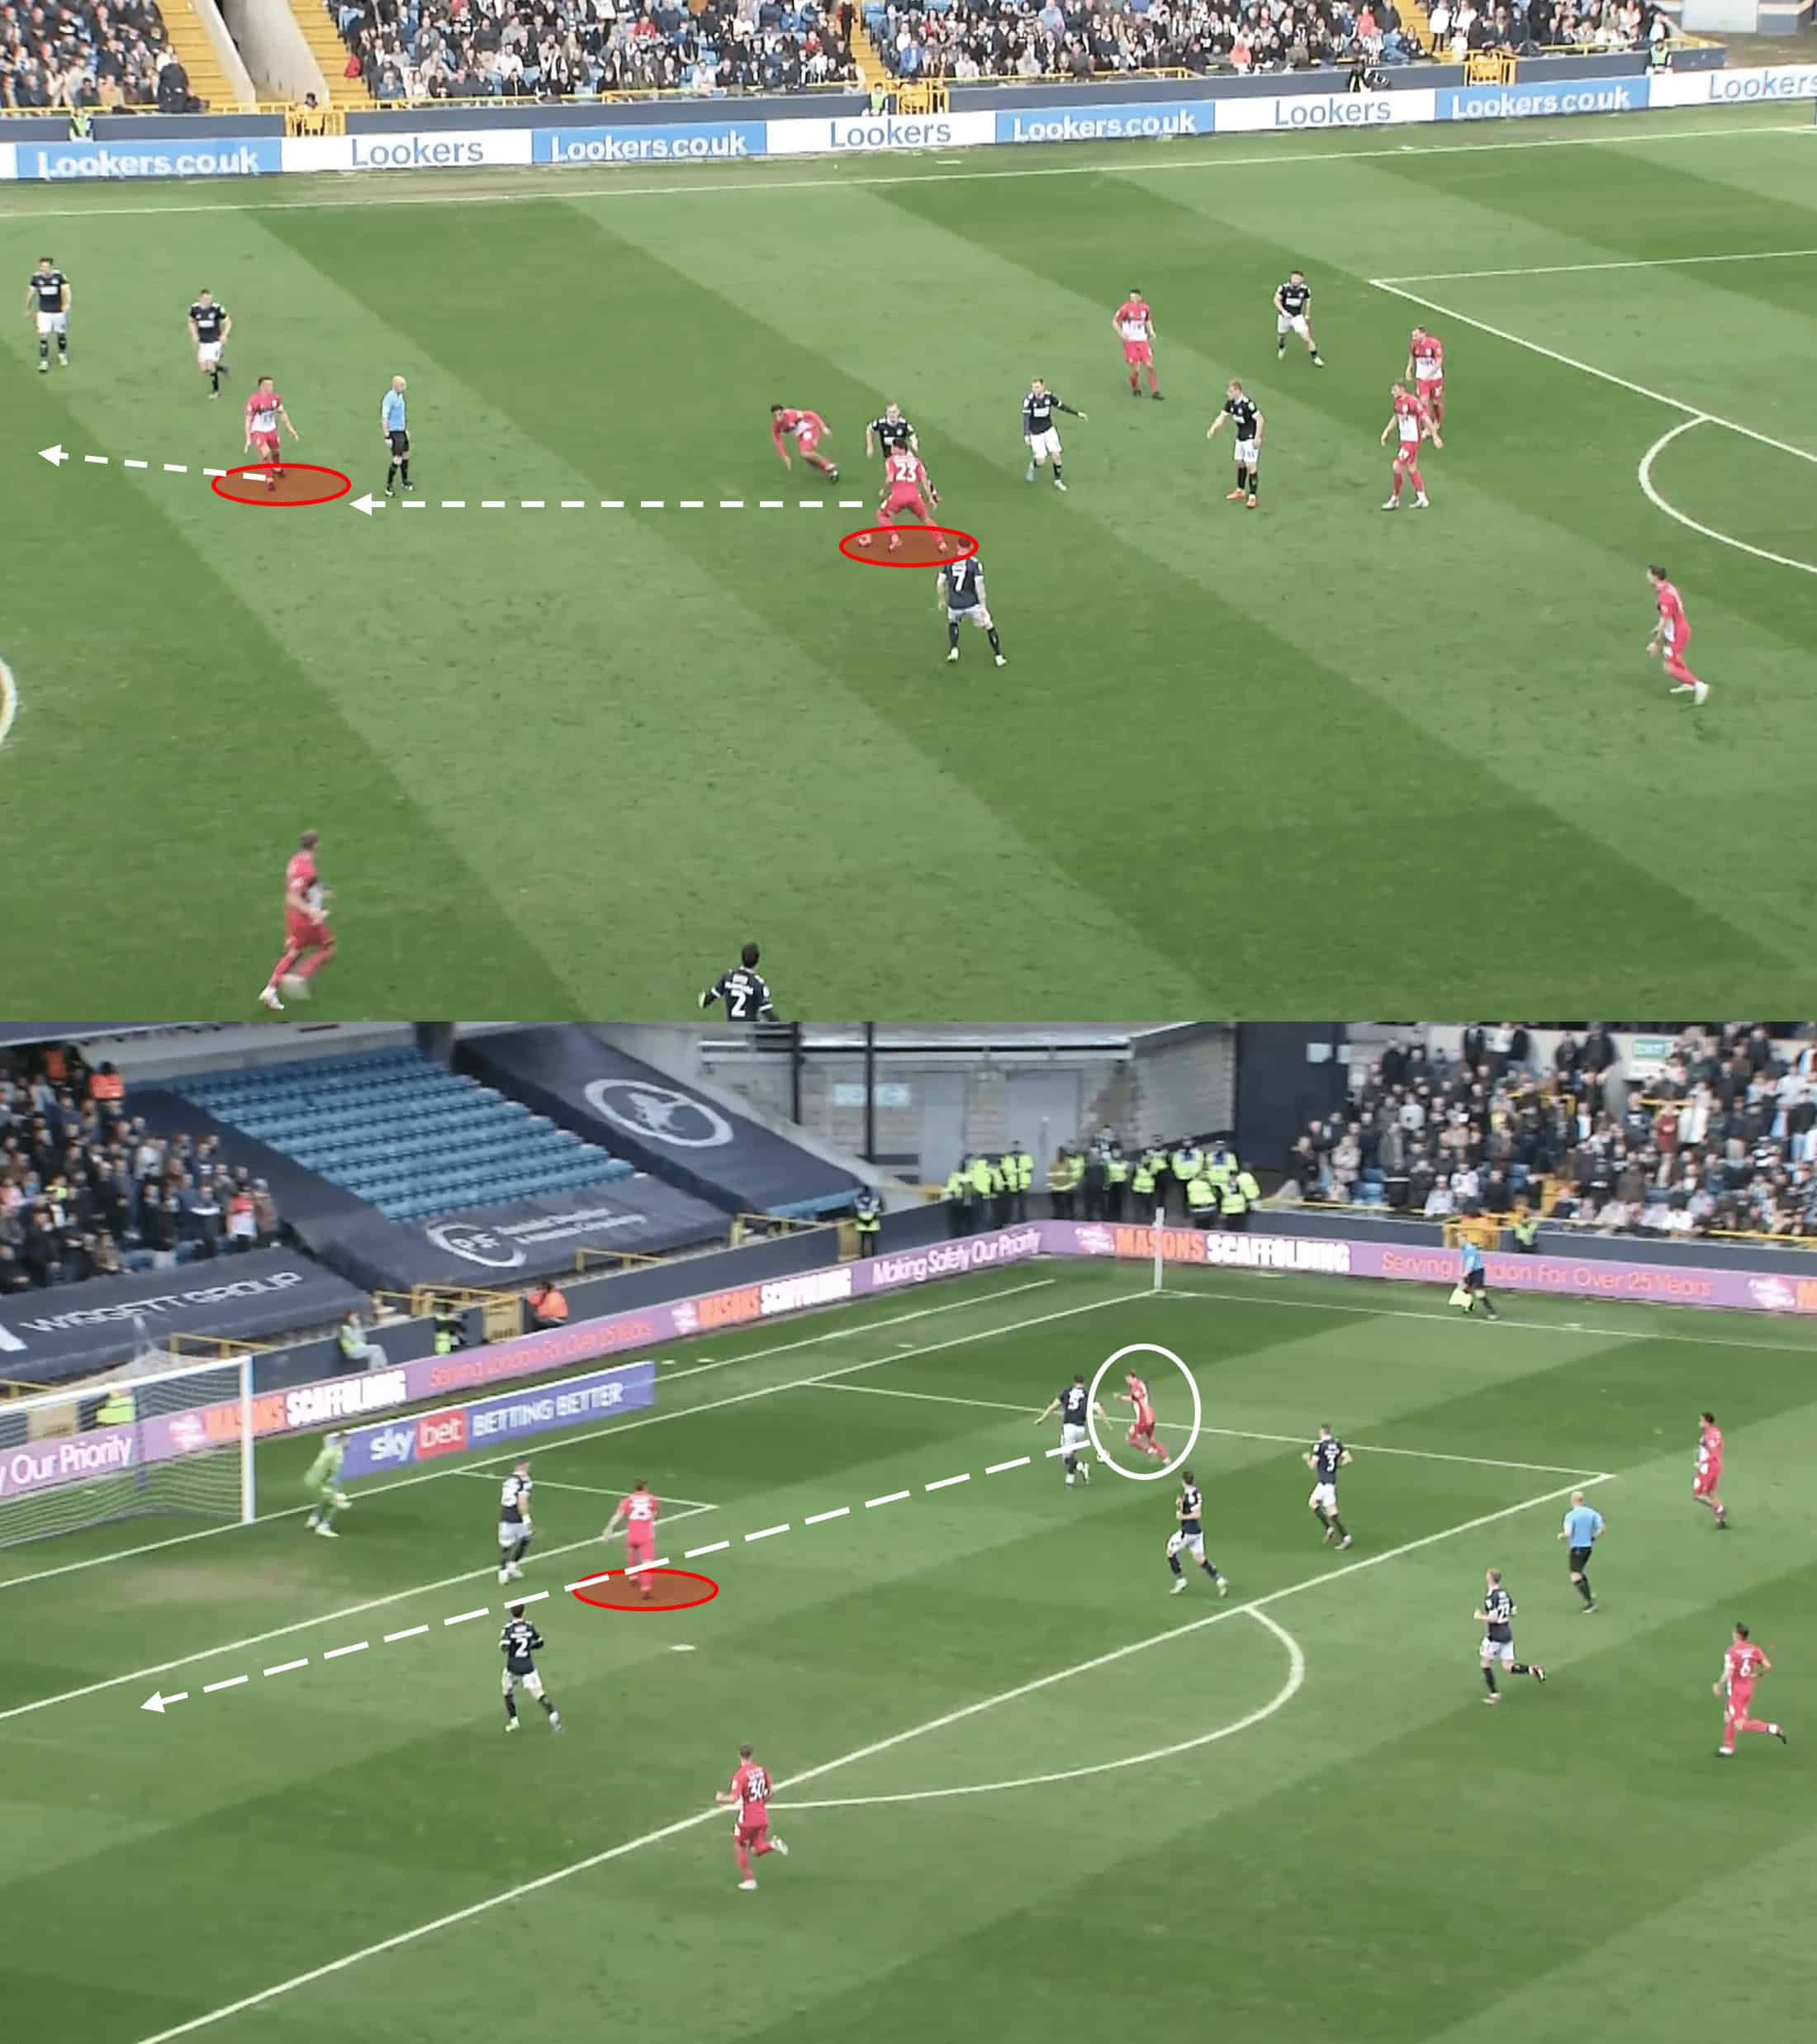
Particularly before their goal, we’d see a press from Huddersfield with little presence. Striker Waghorn (Danny Ward in the second half) would often be joined by either Hogg or Rudoni in a two-man pressing system. Waghorn would often instigate the move by beginning to press the ball, with the closest of the two midfielders joining the forward on stand-by mode – that midfielder would apply minimal pressure or even hold their position in the middle to force Millwall out to the flanks.
This sometimes made it difficult for Millwall to play into the central areas of midfield, but as we will see in another example below, this pressing system came with its risks.
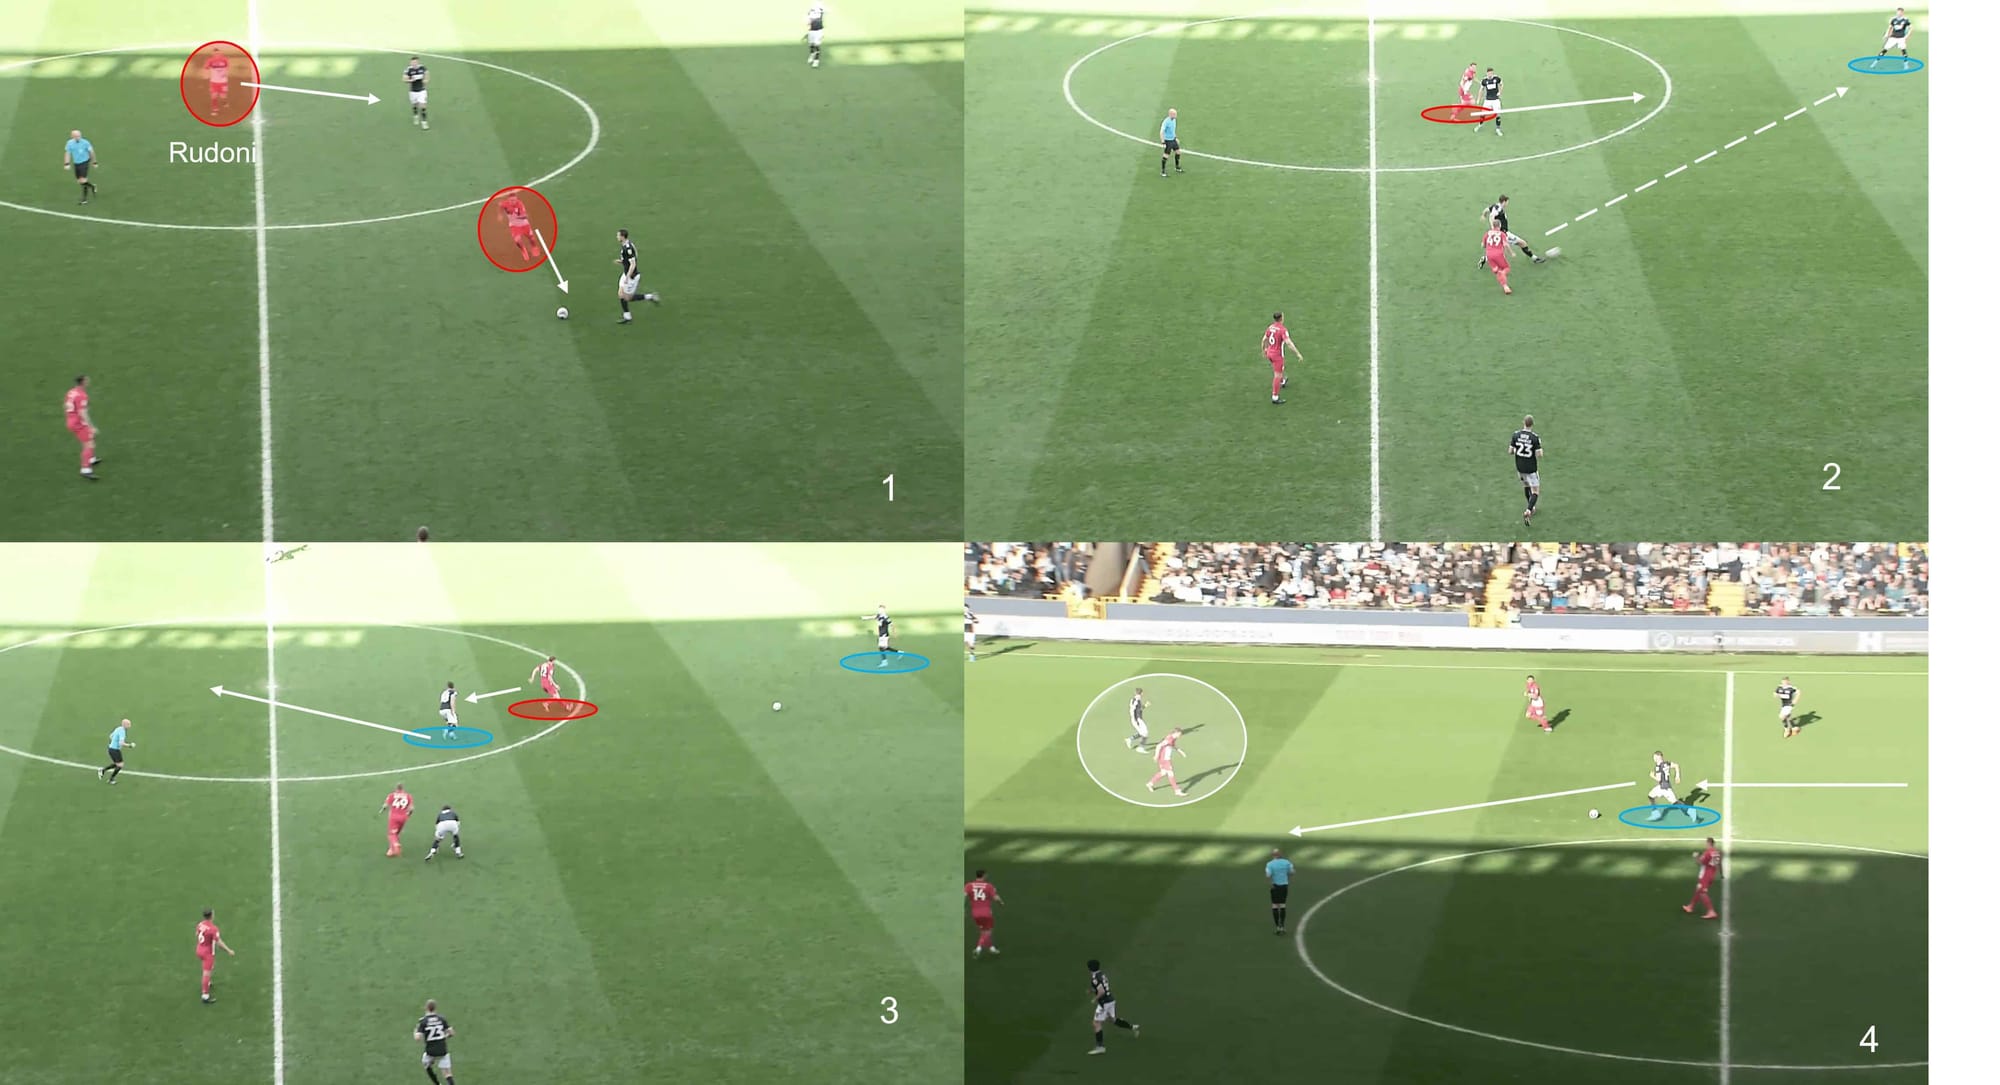
This press started like any other of its kind, with Waghorn pressing the ball. His counterpart shows good strength under pressure to retain the ball and pass to his teammate in defence. Now, this is where individual knowledge and understanding of roles and responsibilities come into play – Rudoni’s role in this particular example should have been to hang back and mark the midfielder he was initially, but his instincts kicked in and he began to press the defender receiving the ball.
About halfway through his journey, he realised the mistake he made and tried to get back, but the damage had already been done. As soon as he left his opponent, that midfielder started to make a run forward into the gigantic space left thanks to Rudoni’s indecision. With the Huddersfield man retracting his press, the Millwall defender was handed the freedom to drive forward with the ball and was allowed all the way to the edge of the final third.
This could have been avoided by Rudoni sticking where he was, to begin with, but with some assistance in midfield from teammates after he began to recover.
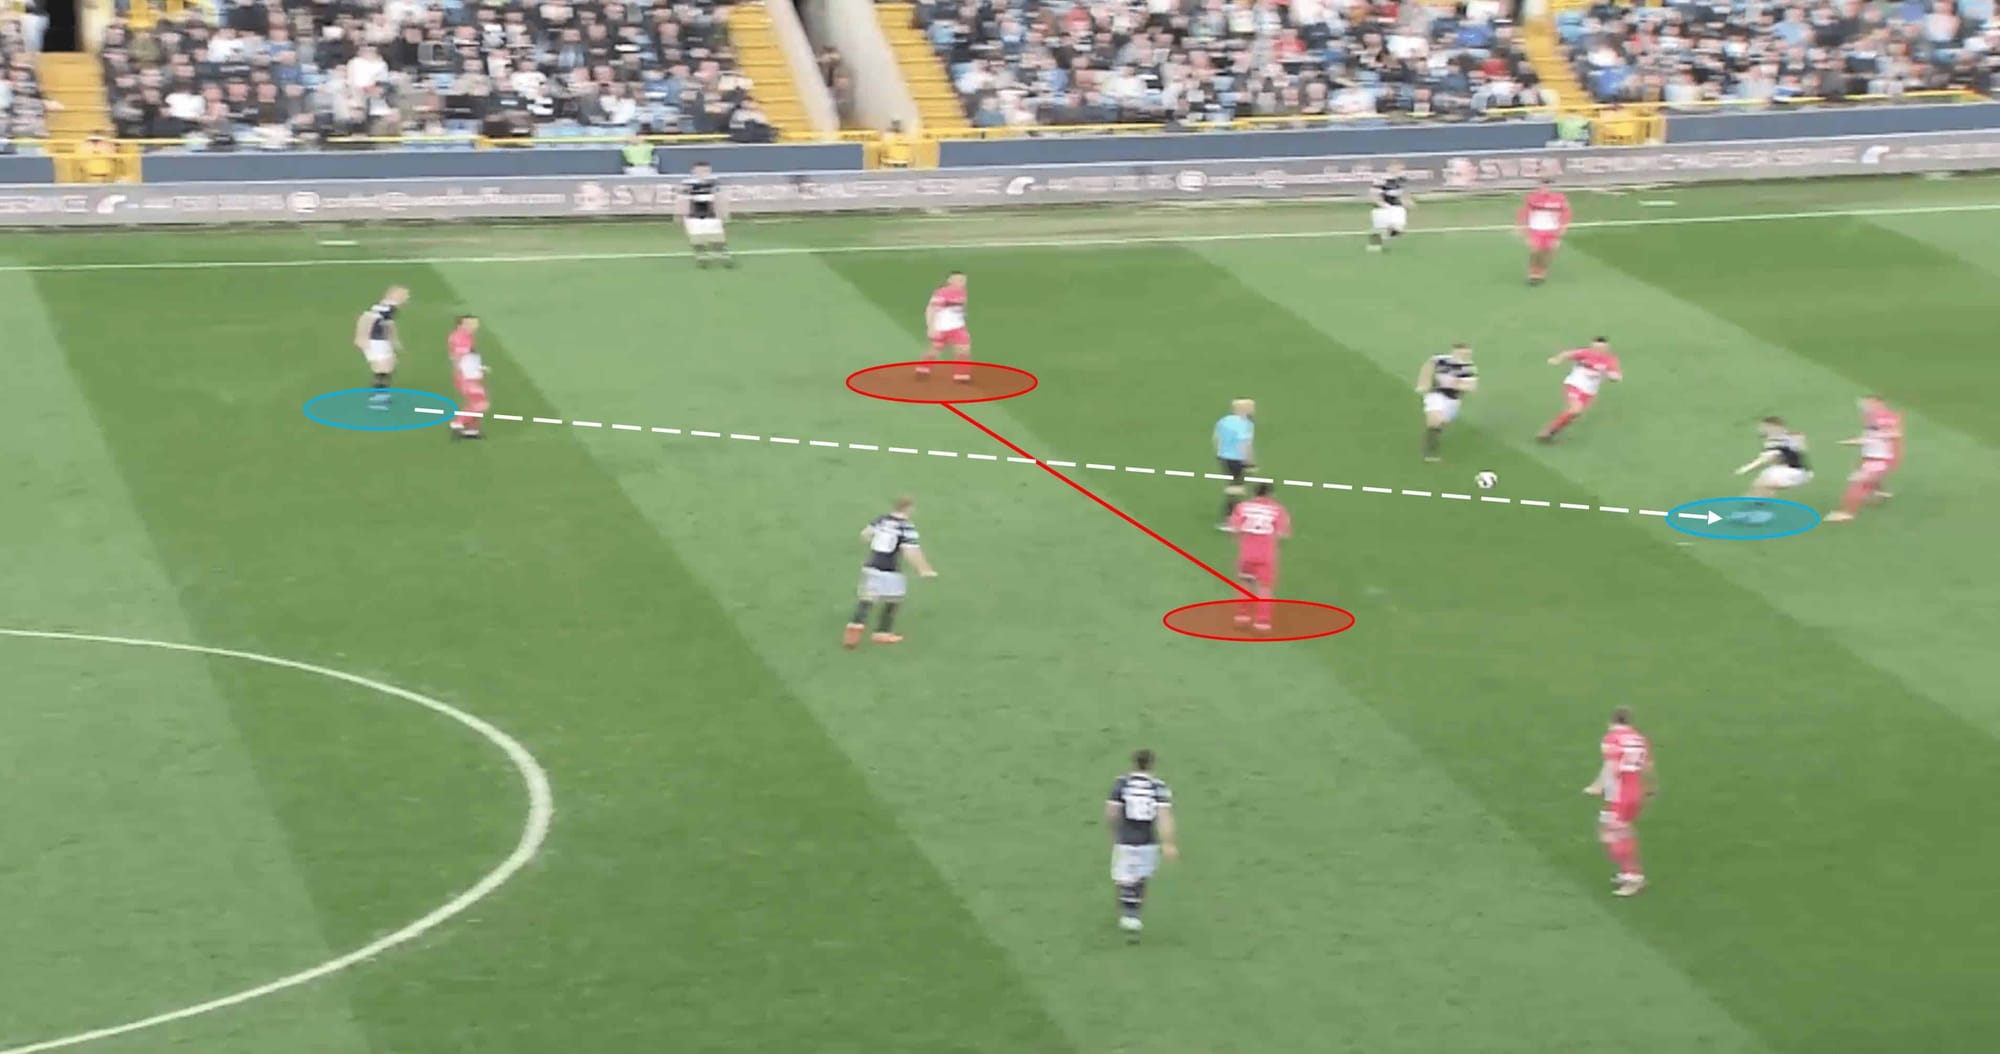
Rudoni wasn’t the only one at fault for this type of thing, as veteran Hogg was also involved in a similar situation in the second half. The fact that this happened more than once with different players suggests that it is down to a tactical fault – whether it’s individual instructions or positions.
Hogg was pressing in a wide area, which resulted in the space between him and his midfield teammate being wider than they would’ve liked, giving Millwall the chance to play a line-breaking pass. Given their league position, obviously, Huddersfield’s performance is going to have gaps in it, but they could be punished for mistakes like this.
Conclusion
Millwall did themselves no favours here. If they slip out of the play-off race and miss their chance, this will be the performance that they’ll kick themselves about. Their attacking play was lacklustre for the most part and offered fans very little hope that they’d find a goal, despite the stats.
Credit should go to Neil Warnock’s men for how they conducted themselves, especially defensively. We said this could be the game that Millwall regret, but it could also be the game that Huddersfield look back on as the catalyst for survival in the Championship.



Comments