Last season, Southampton finished rock bottom in the Premier League – Leeds United and Leicester City joined them in dropping down the Championship, and immediately, many people had those three clubs pegged as promotion favourites for the 23/24 campaign. And while they all lived up to that to a certain degree – they were all involved in the battle for promotion, only Leicester were able to secure automatic promotion. They were, of course, joined by Ipswich Town who achieved the unthinkable back-to-back promotion under Kieran McKenna.
However, in a strange feat of irony, last season’s bottom two Premier League clubs would meet at Wembley for a place back in the top flight for the 24/25 season. Russell Martin’s side saw off Leeds in the playoff final, which is often coined the “richest match in football” due to the financial rewards for reaching the EPL at Wembley. This tactical analysis will take a look at how the Saints secured an immediate return to the top flight, with the analysis discussing the key tactics used by Martin’s men and why Leeds United ultimately fell short.
Lineups
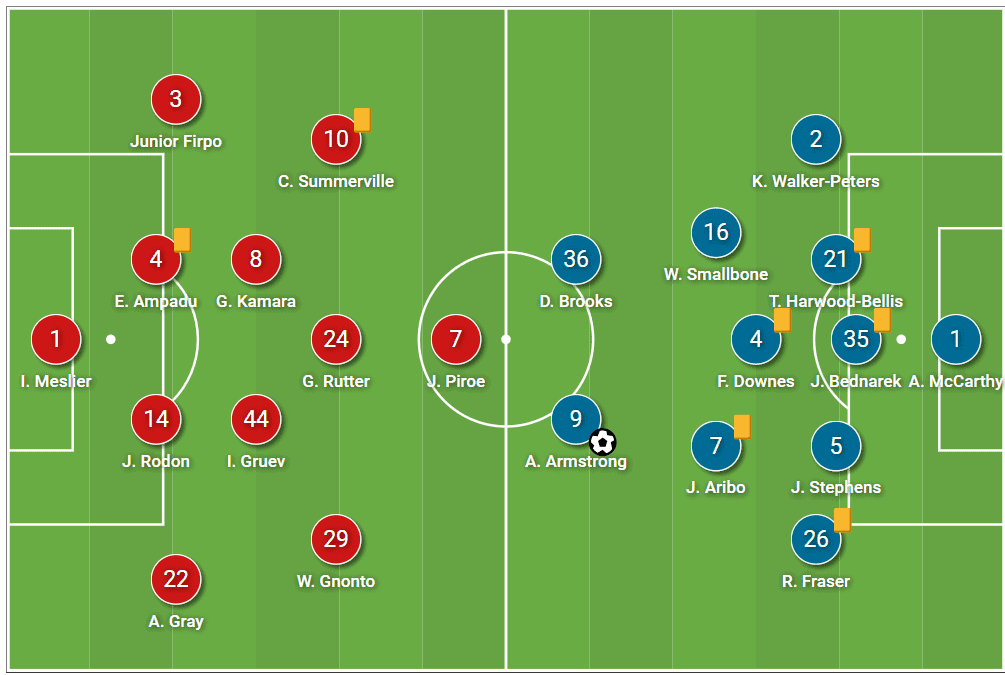
Leeds lined up in a 4-2-3-1 shape, which has been their preferred formation all season, using it 75% of the 23/24 campaign. Like their Wembley counterparts, Leeds fielded the same starting 11 that brought them victory in their playoff semi-final second leg. Right back, Sam Byram was the only player who played the first leg but missed out on the remaining two fixtures due to a hip problem. Up front, Patrick Bamford was hoping to be back among the squad following a recent injury, but that was not to be – Joël Piroe was tasked with leading the line.
For the most part of the 23/24 season, Southampton fielded a 4-3-3 formation. However, this has not been the case since the Saints beat Leads at Elland Road on the final day of the regular – they played with a 5-3-2 that day and did the same away at West Brom in the playoff semi-final first leg, 3-5-2 at home in the second leg. The 5-3-2 continuation occurred at Wembley. This lineup was, in fact, the very same that Martin fielded in the second leg 3-1 victory.
Saints’ early possession domination
If you check the match stats for this one, you’ll see that Leeds had 57% possession, but up until they conceded in the 25th minute, it was Southampton who enjoyed the larger share of possession. Here, in this first analysis segment, we take a look at the themes and patterns that emerged in those opening 25 or so minutes and how they played a part in Southampton scoring the only goal of the game.
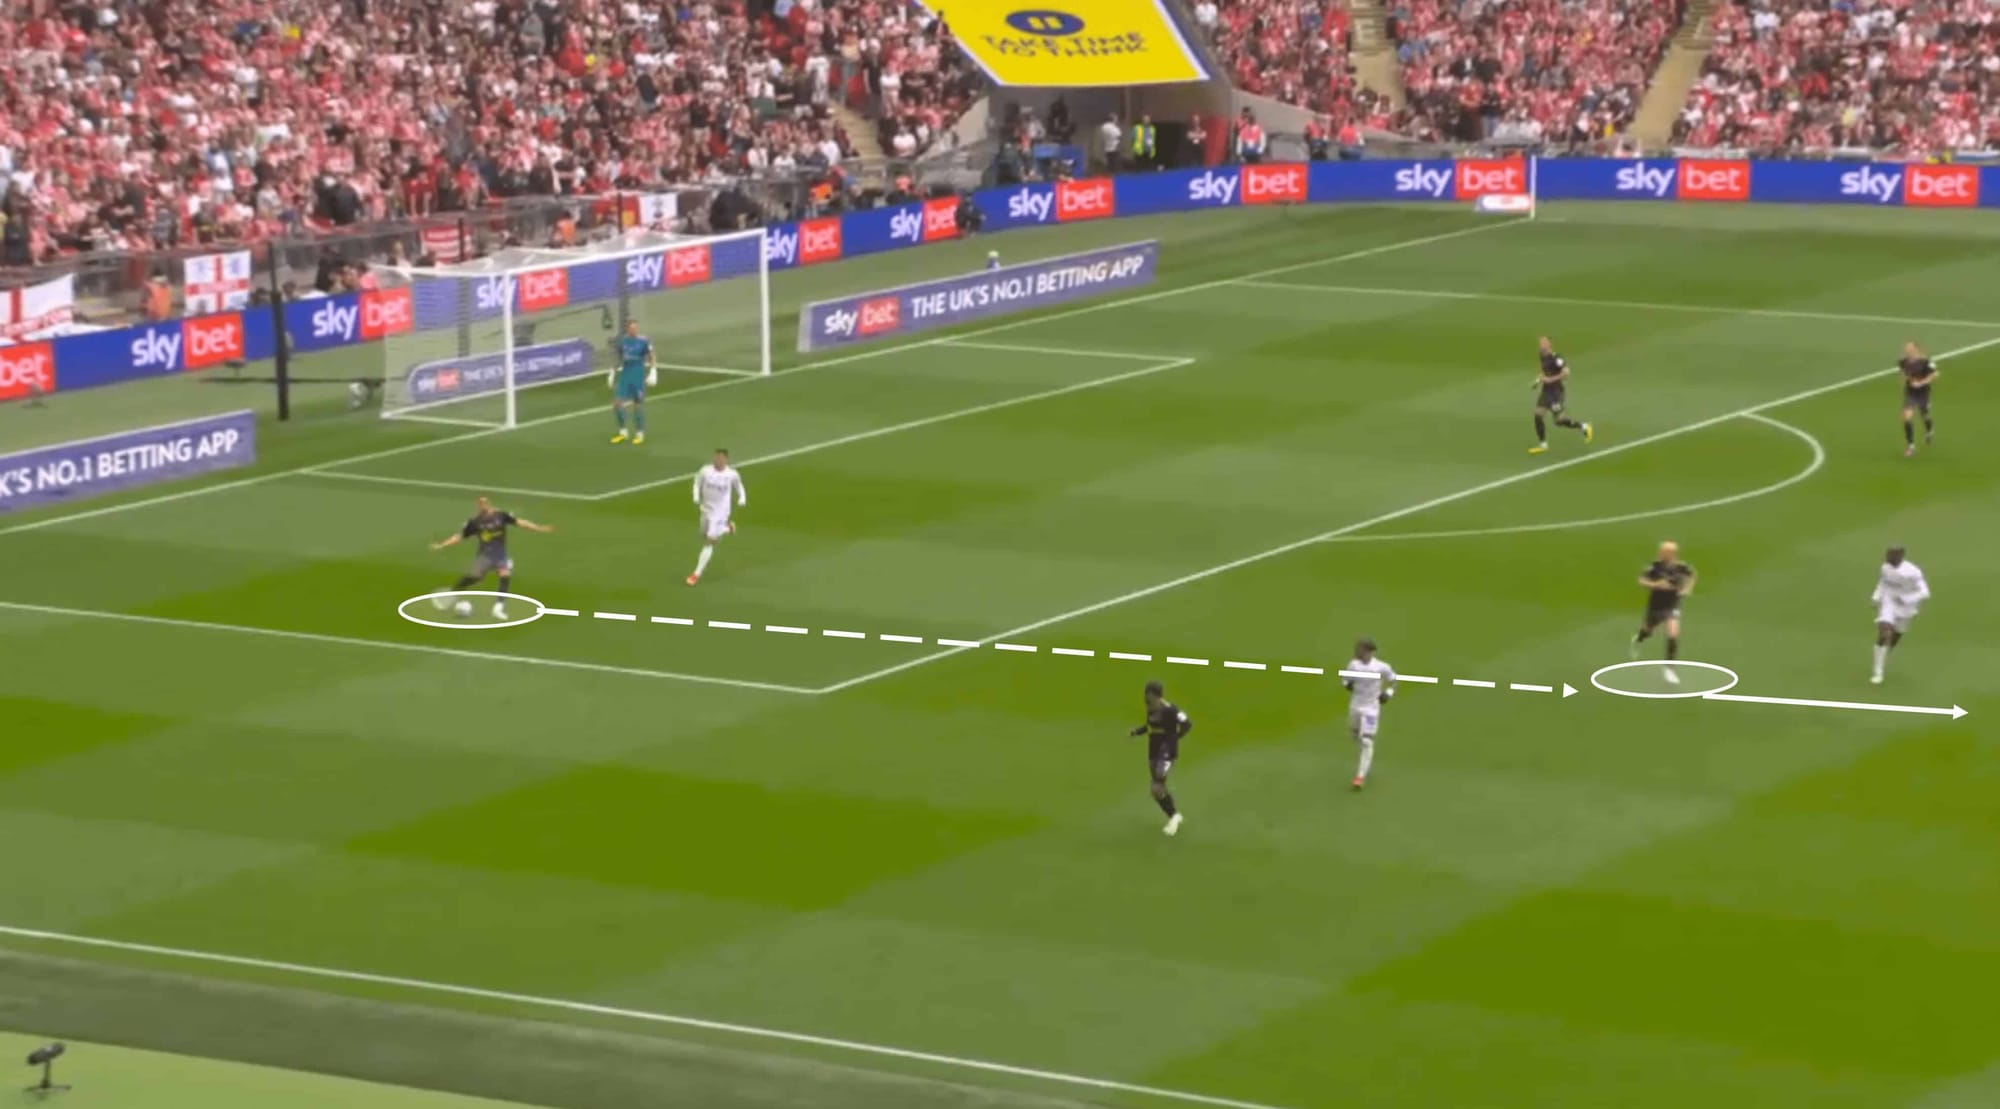
Southampton showed signs of wanting to get the ball forward quickly and effectively, with a purpose other than just to get the ball away from their own goal. Leeds were keen on pressing Southampton in a bid to disrupt their possession, but Southampton have produced excellent results under similar circumstances throughout the season.
Knowing which pass type to use and when was key to their tactics, especially in these early exchanges—the one above shows us what they wanted to achieve. A pass into midfielder Will Smallbone may seem dangerous given Leeds’ presence, but the execution of the pass, the speed of it, allowed Smallbone to receive the ball with the option of pushing forward.
Playing out from the back, regardless of the sub-method of those tactics, was often done by Taylor Harwood-Bellis. The defender is now set to join the Saints on a permanent basis following his loan spell this season – their playoff victory triggers the permanent transfer clause in his loan contract.

While Southampton were often quite structured and methodical in their build-up approach in their own half, the pace and intensity soon increased once they got into the final third, with clever off-the-ball movements and passing combinations playing a vital role, and was visible in the example you see above.
The above move was possible following another well-executed forward pass from Harwood-Bellis into the front line. From the centre half having possession in his own half to the Saints getting into the Leeds box, Southampton used just three passes – a demonstration of their speed and directness in attack.
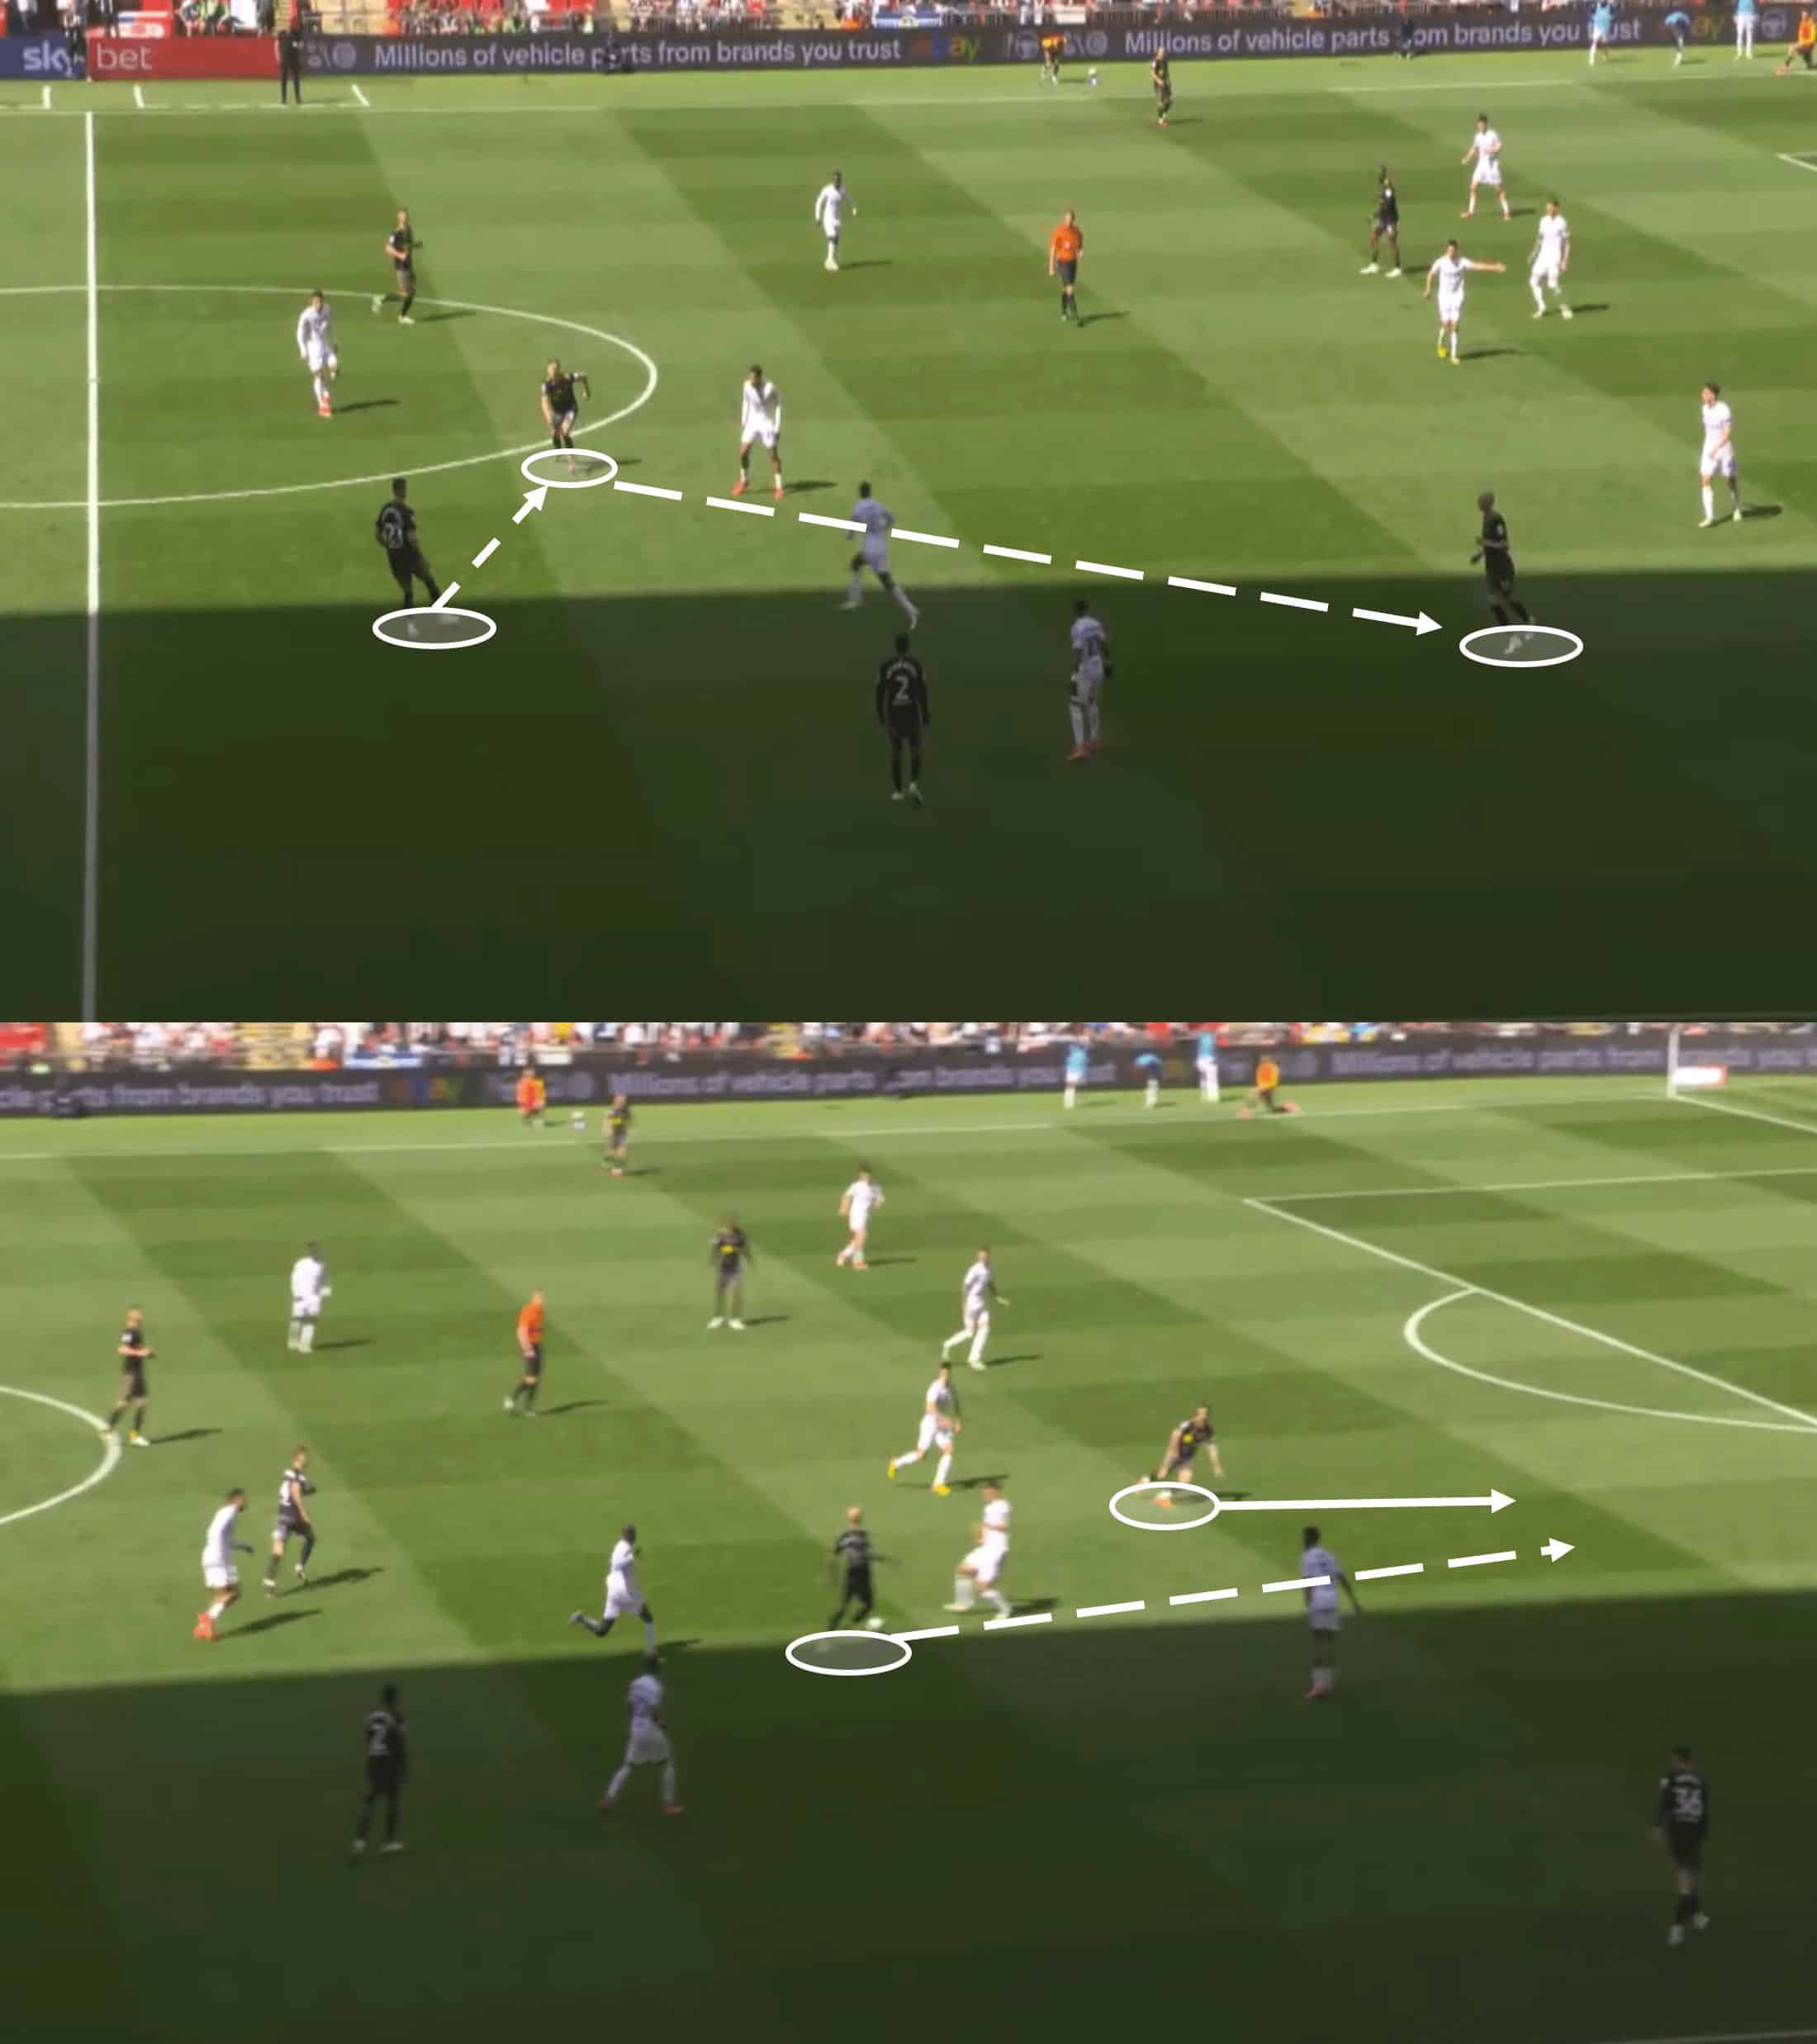
Those patterns and combinations were something Southampton executed on a number of occasions or attempted to at least. Their goal, though, was a direct result of a similar passing combination to one that should have served as a warning for Leeds earlier on.
One subtle movement and quick pass into Smallbone, who showed good awareness to take up an unmarked position that far upfield, and Southampton turned safe possession into a dangerous attack. The following through ball from Smallbone was weighted perfectly for goalscorer Armstrong to collect before slotting the ball home.
Southampton’s defensive switch-up
Over the course of the season, Southampton have been fairly aggressive and energetic out of possession, recording a PPDA of 10.37 and a challenge intensity of six. However, Russell Martin thought it would be more effective to wield a more defensive weapon to combat the attacking threat of Daniel Farke. This saw the Saints register a much higher PPDA of 16.
However, as we touched upon earlier, this defensive approach did not come to fruition until after the Saints took the lead – this was a result of a mix of both teams’ reactions to the key moment.
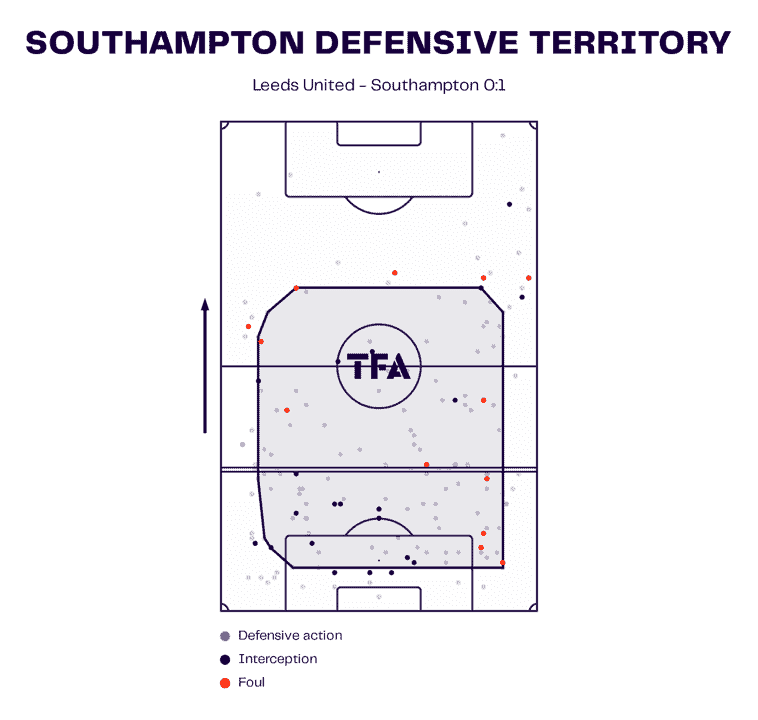
This graphic depicts Southampton’s defensive territory for the full match. As you can see, they didn’t engage much in the final third or in the Leeds half at all, especially in central areas. As we’ll see momentarily, protecting those central areas became a key focus for Russell Martin’s side as the game evolved.

After Armstrong’s goal, the game changed; there’s no other way to put it. Sure, the Saints had their share of attacking moments and spells of possession, but we saw a lot of Leeds controlling the ball with Southampton happy to soak up the pressure; happy to protect what they had, particularly in the second half.
A narrow back five was often in use – the wing-backs would take up wider positions when required to combat a wide threat (which is why you can’t see their LWB in the shot above). Meanwhile, the midfield three would also be compact, looking to block off passing lines into a Leeds shirt between the midfield and defensive units. You could pose the question that if Southampton wanted to block that route to goal (the space between midfield and defence), why not just have the defensive line higher and close to the midfield? Well, the likely answer is that Russell Martin was well aware of the pace Leeds possess in attack, and pushing his defence higher would given Leeds a better chance of playing those passes in behind for forwards to run onto.
Leeds’ failure to capitalise on attacking moments
In the early stages of the game, even when Leeds weren’t controlling possession, they had strong chances to go forward in transition but failed to make any of them. Equally, once they did get a grip on the game, they struggled to lay a glove on the eventual victors.
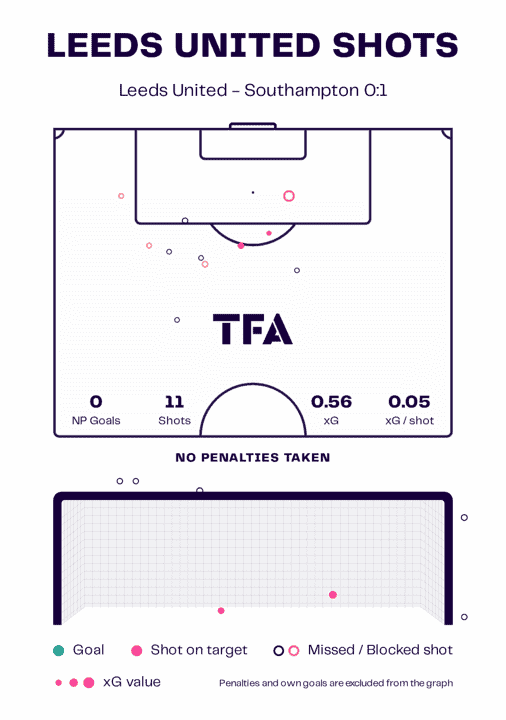
The shot map above tells you a lot about Leeds’ final third activity in this huge game. The Yorkshire side showed signs of being dangerous in possession, but with an xG of just 0.56 from 11 shots, they never looked too likely to score. Not to say that Saints fans weren’t nervous whenever their opponents came forward – Leeds’ attacking firepower over the season has been impressive at times.
Another detail that paints a picture of Leeds’ struggle in front of goal is that they managed just two shots on target out of 11, with both of those efforts coming from outside the box. To fail to register a single shot on target from inside the box in such an important fixture must be incredibly frustrating for Leeds fans.
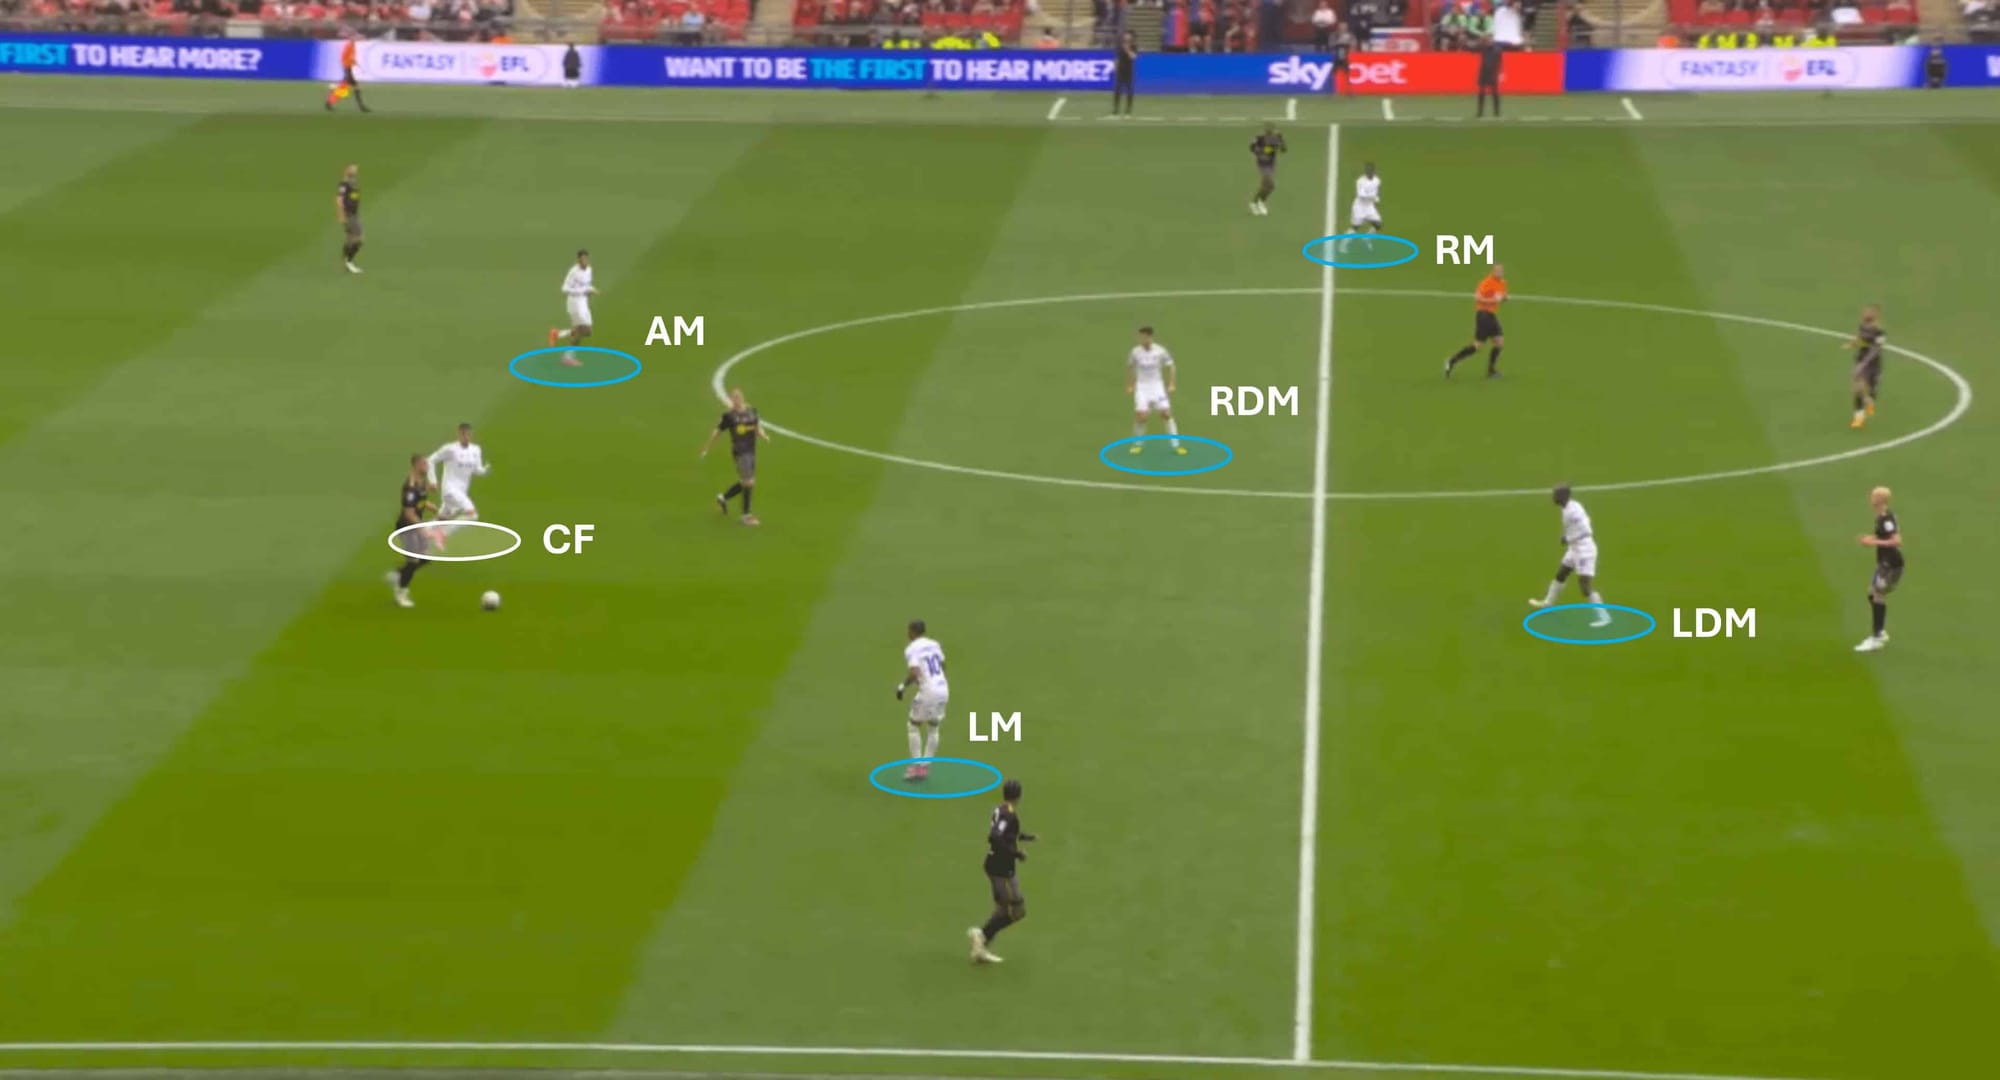
As we mentioned, in those early moments where Southampton controlled much of the possession, Leeds were keen to win the ball back quickly – pressing the Saints with high intensity when they were deep, but also engaging quickly in the midfield third like the example above shows us. The front four would receive added assistance from the two deeper midfielders, with the aim of blocking midfield options for Southampton – this came with mixed success – as we saw, Southampton were able to exploit Leeds’ midfield in the build-up to their goal. But, there were also some successful moments in the press for Leeds, which led to promising attacking transitions.
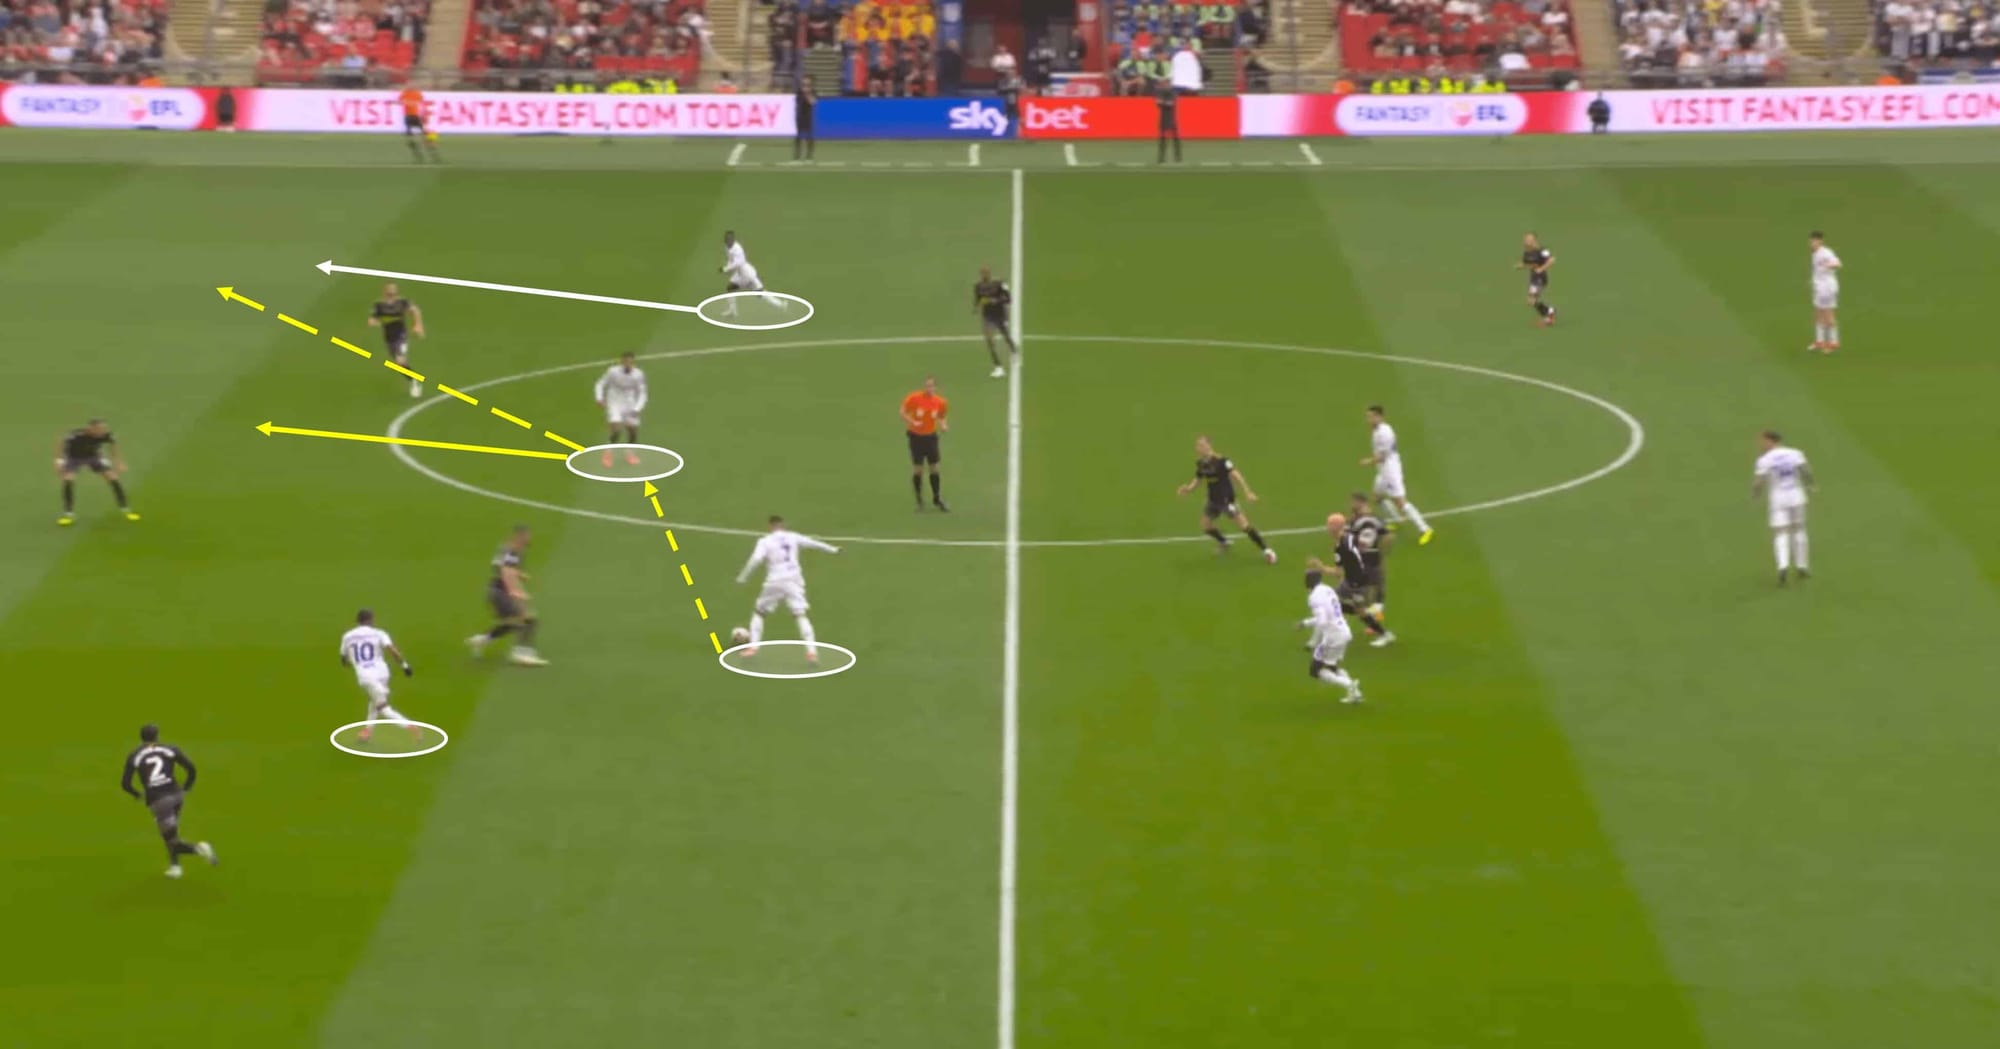
But one thing Leeds failed to do was make them count. Whether it was the big-game pressure, the event & atmosphere, or anything else, Leeds never really got clicking in transitions when it mattered most.
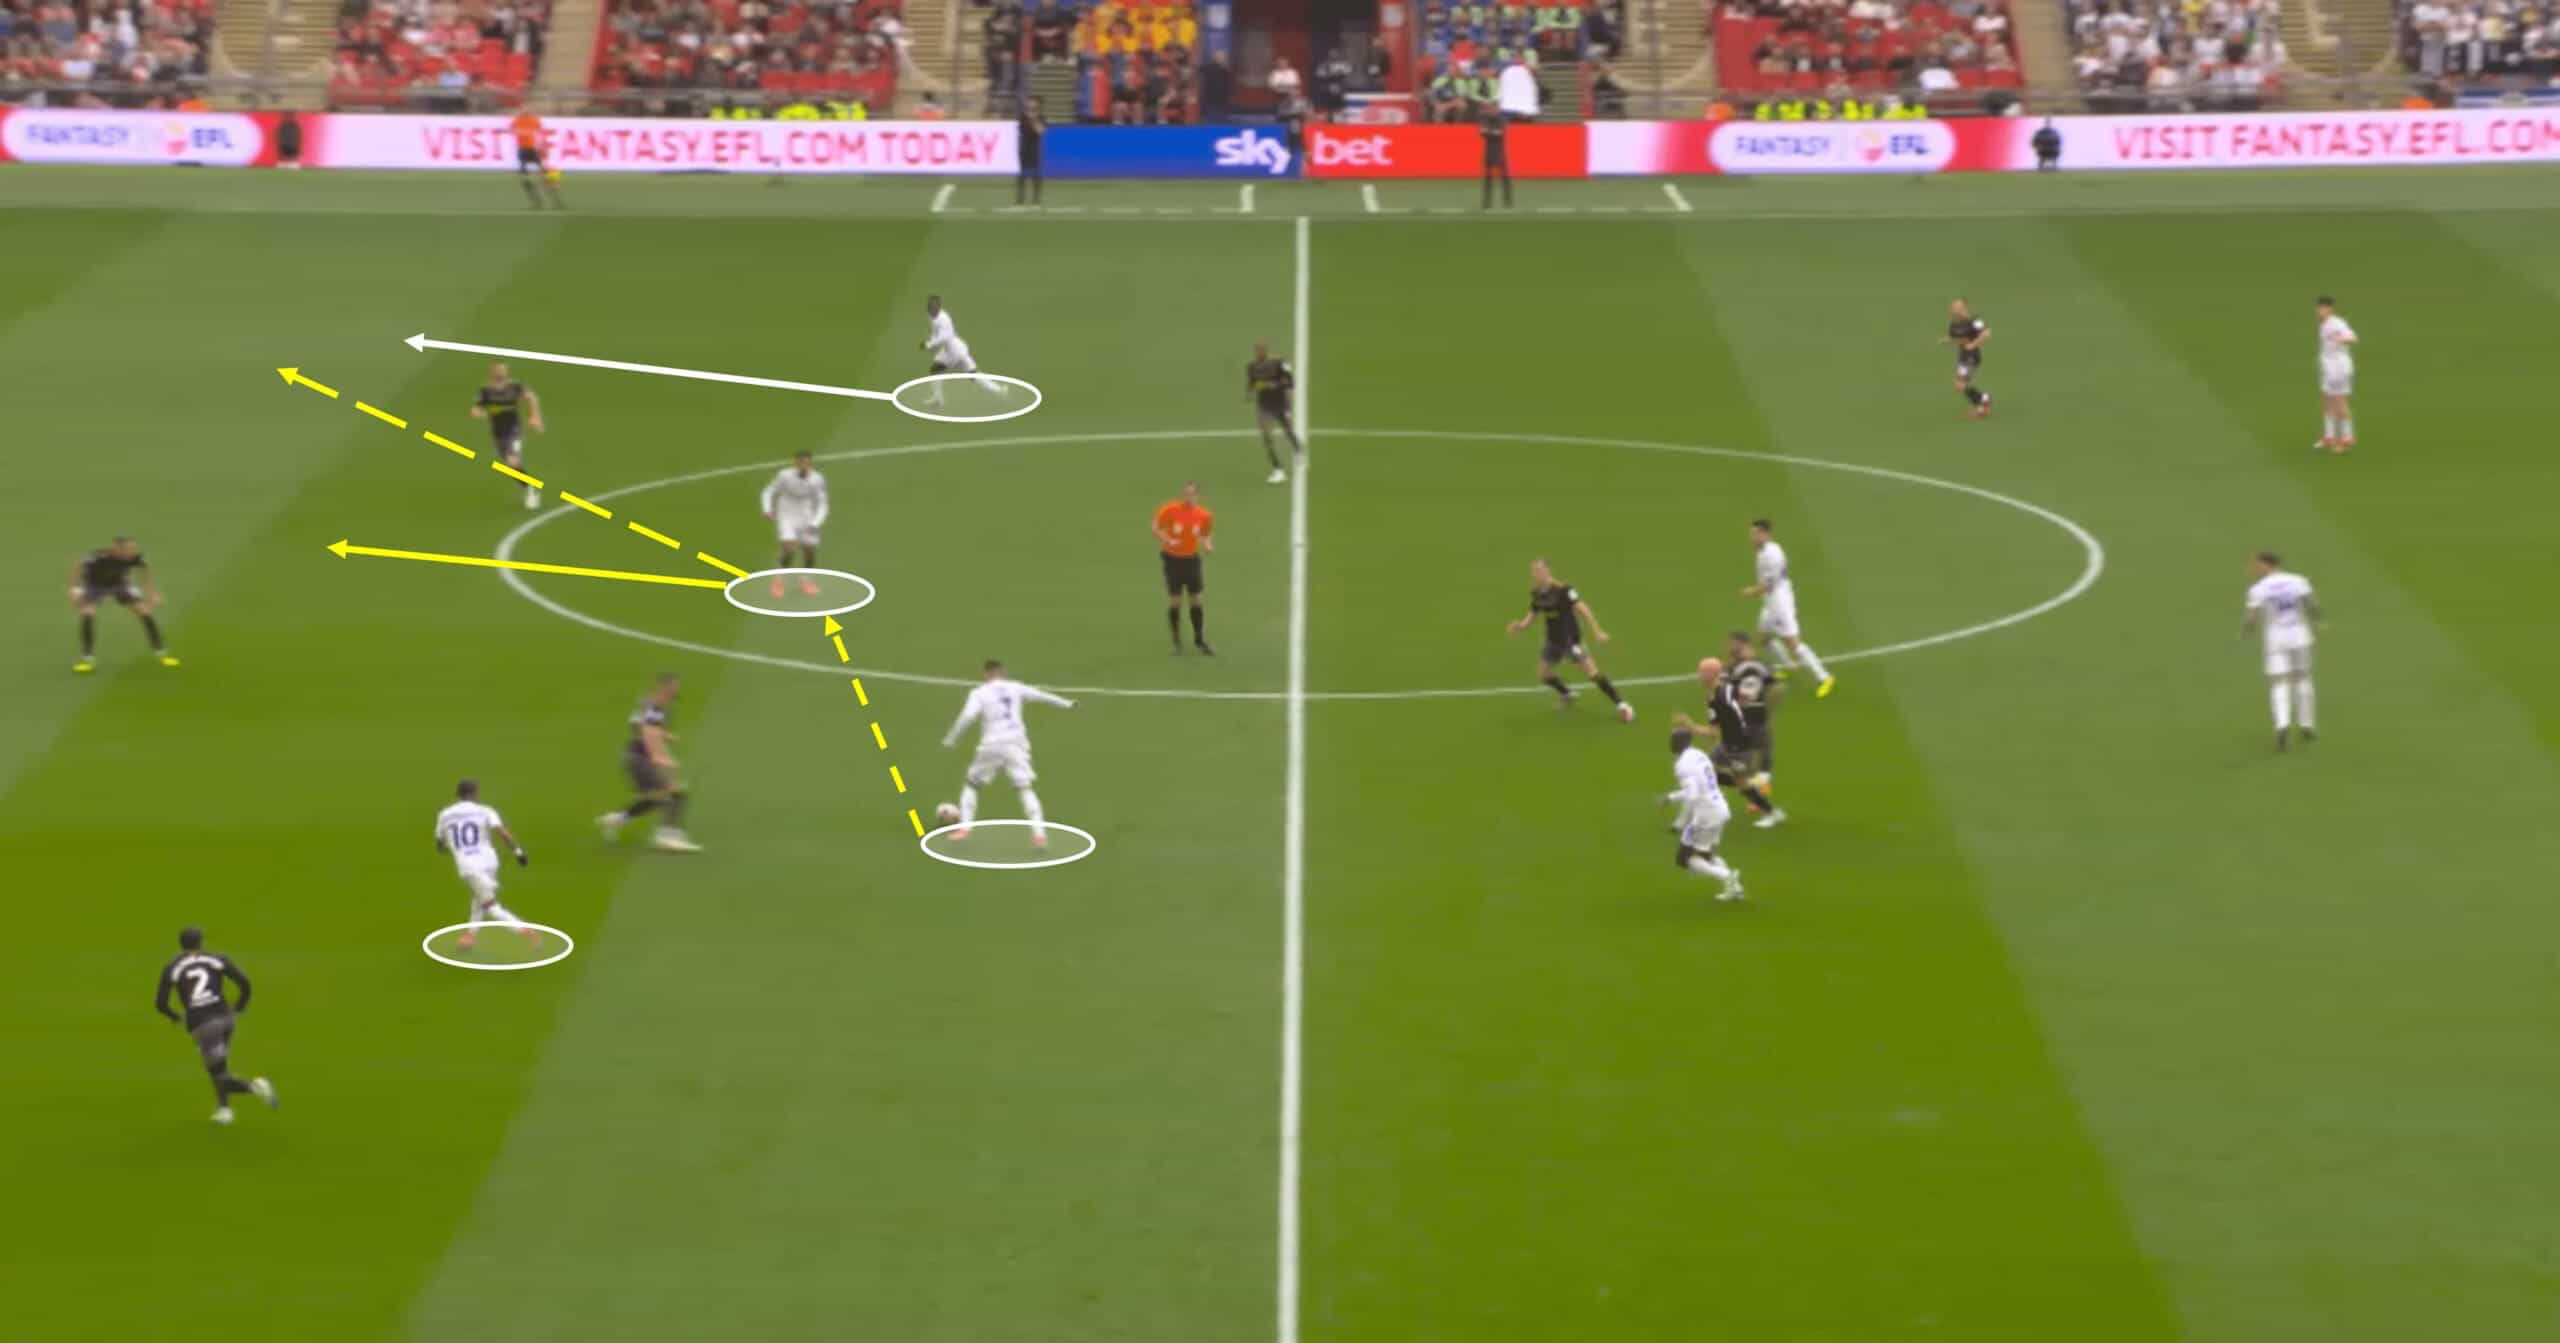
Take the example above: Piroe has the ball in midfield, but as he receives it, he shows no signs of scanning or awareness of the oncoming Harwood-Bellis – the result was a failure to gain full control of the ball quickly enough from Piroe, meaning he couldn’t shift the ball onto an attacking teammate. The yellow lines in the image above represent what Leeds would likely have looked to do in this move if Piroe was able to get that first pass off quicker.
Conclusion
Leeds will be kicking themselves for not securing a Premier League return, and they’ll certainly be building a squad looking to mount a title charge in the 24/25 season, but whether or not Farke is the man leading that charge remains to be seen.
Southampton, it is fair to say, deserved the victory on the day – a good opening spell of possession which they capitalised on. The 65 or so minutes that followed Armstrong’s goal required a lot of focus and teamwork from the Saints to limit the threat of Leeds’ large possession rates, and that’s what Russell Martin got from his side.



Comments