Having played one another five times last season in all competitions – including in the Checkatrade Trophy final and in the play-off semi-finals – Sunderland and Portsmouth renewed their rivalry in their third game of the League One campaign.
Last year’s battles saw two Pompey victories – one being at Wembley – two draws and one Sunderland win, with the Black Cats progressing over the two legs in the end-of-season showpiece before losing out in the final against Charlton Athletic.
Here, Sunderland triumphed 2-1 to secure their first victory of the season, making it two defeats out of three for their south coast rivals in the process. We will provide an in depth tactical analysis of the match, looking at the tactics of both teams, as we produce an analysis of how Sunderland claimed the three points.
Lineups
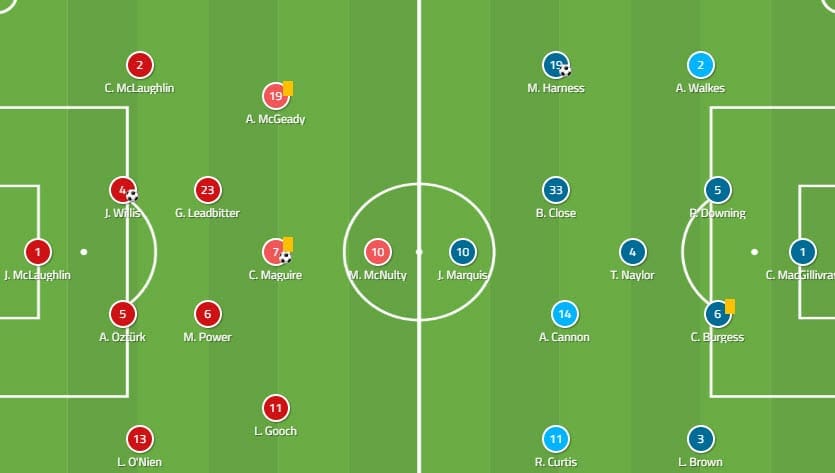
Having started the campaign with a back three, manager Jack Ross switched to a back four for their midweek Carabao Cup clash at Accrington Stanley – and following a comprehensive 1-3 win opted to stick with it here within a 4-2-3-1 formation.
Alim Öztürk , fresh from an impressive display in Lancashire, kept his place at the heart of the defence ahead of Tom Flanagan, with Conor McLaughlin shifting from a wide central defender within a three to an orthodox left-back. Midfielder Max Power came in for his first league start after battling back from an ankle injury, accompanying the experienced Grant Leadbitter in the centre of midfield as they were preferred to George Dobson. In attack, the creative trio of Aiden McGeady, Chris Maguire and Lyden Gooch were tasked with supporting striker Marc McNulty.
For the visitors, they made a slight alteration to their usual 4-2-3-1, boss Kenny Jackett opting for more of a 4-1-4-1 instead. Whereas Tom Naylor would usually be partnered by a fellow out-and-out defensive midfielder in order to give defensive solidity, he, instead, sat behind two more box-to-box players in Andy Cannon and Ben Close. Ronan Curtis and summer addition Marcus Harness started out wide, with John Marquis the lone frontman.
Pompey look to overload from deep
As mentioned above, there was a slight variation in the set-up of Portsmouth here, as opposed to their usual trend under Jackett. Usually, Naylor and one other would sit in front of the two central defenders in order to produce a compact defensive square in the middle of the pitch. This, in turn, would give license for both full-backs to bomb on and provide offensive support – yet here, it was slightly different.
Instead of Naylor remaining in front of the defence, here he would feed one of the two central defenders before then dropping in to almost produce a back three, thereby allowing the defender on the ball to step out of defence and look to overload centrally. Naylor’s versatility is key here, as he is equally adept in the middle of the pitch or the centre of defence, meaning that if the player on the ball lost possession high up the pitch, Naylor would be able to offer a genuine option as cover until their normal structure could be resumed. An example can be seen here below.
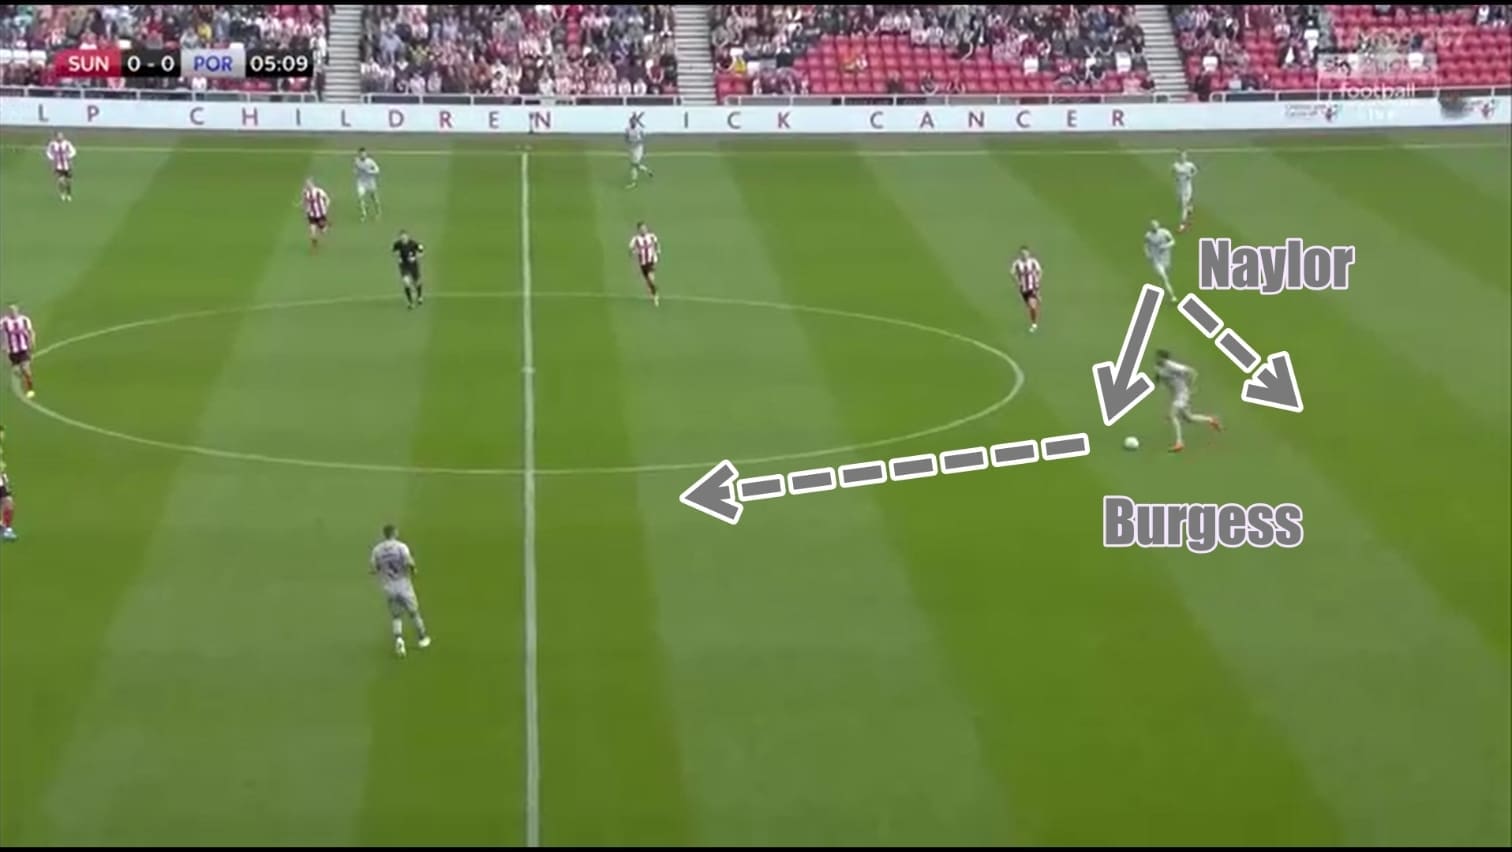
Naylor begins with the ball just short of the centre-circle, having received from a throw-in on the right-hand side. He carries it across the pitch before passing to left-sided central defender Christian Burgess. Upon playing the ball to Burgess, Naylor then drops in behind the recipient in order to take up his position and thereby allowing Burgess to step out as he knows he has cover behind him.
The reason that Jackett and company looked to do so may be due to the spaces left open by Sunderland within their defensive block. The two wide midfielders drop deep to produce a 4-4-1-1 when out of possession, however, the two offensive-most players do not usually provide huge vertical compactness. As a result, this can leave the wide midfielders overloaded should the opposing defence step out with the ball – which is exactly what Portsmouth did.
In the instance below, right midfielder Lyndon Gooch has dropped in to produce a flat midfield four when out of possession. As Pompey left-back Lee Brown is relatively aggressive in his positioning, being high and wide in advance of the ball, upon Burgess’ decision to step out into the open space ahead of him, Gooch is now posed with a problem: do I engage the man on the ball, and leave the pass to the full-back open? Or do I allow Burgess to step out – to ensure that both Brown and Burgess are in front of him and within his eyesight, and he can thus react to any pass made in order to remain defensively compact – however then run the risk of being overloaded? As it was, Gooch opted to sit off Burgess and then react to the pass out to Brown.
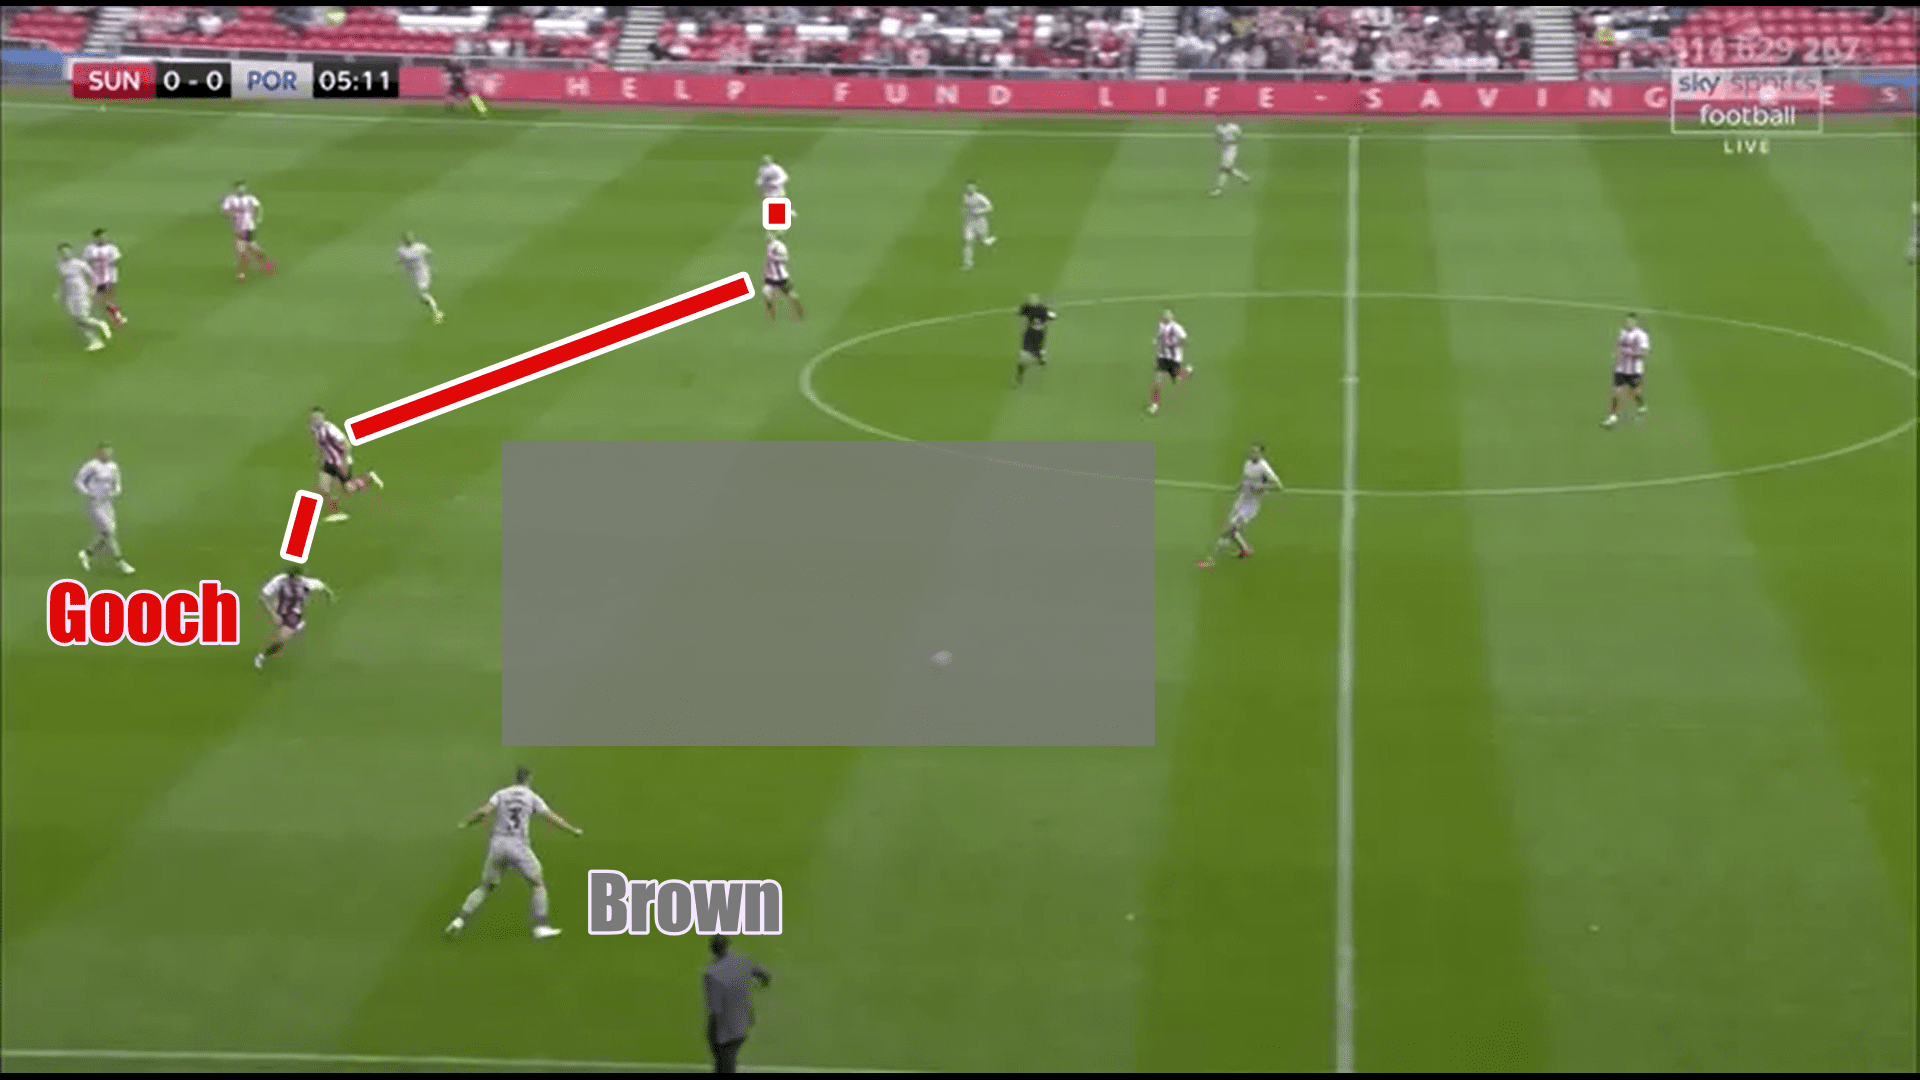
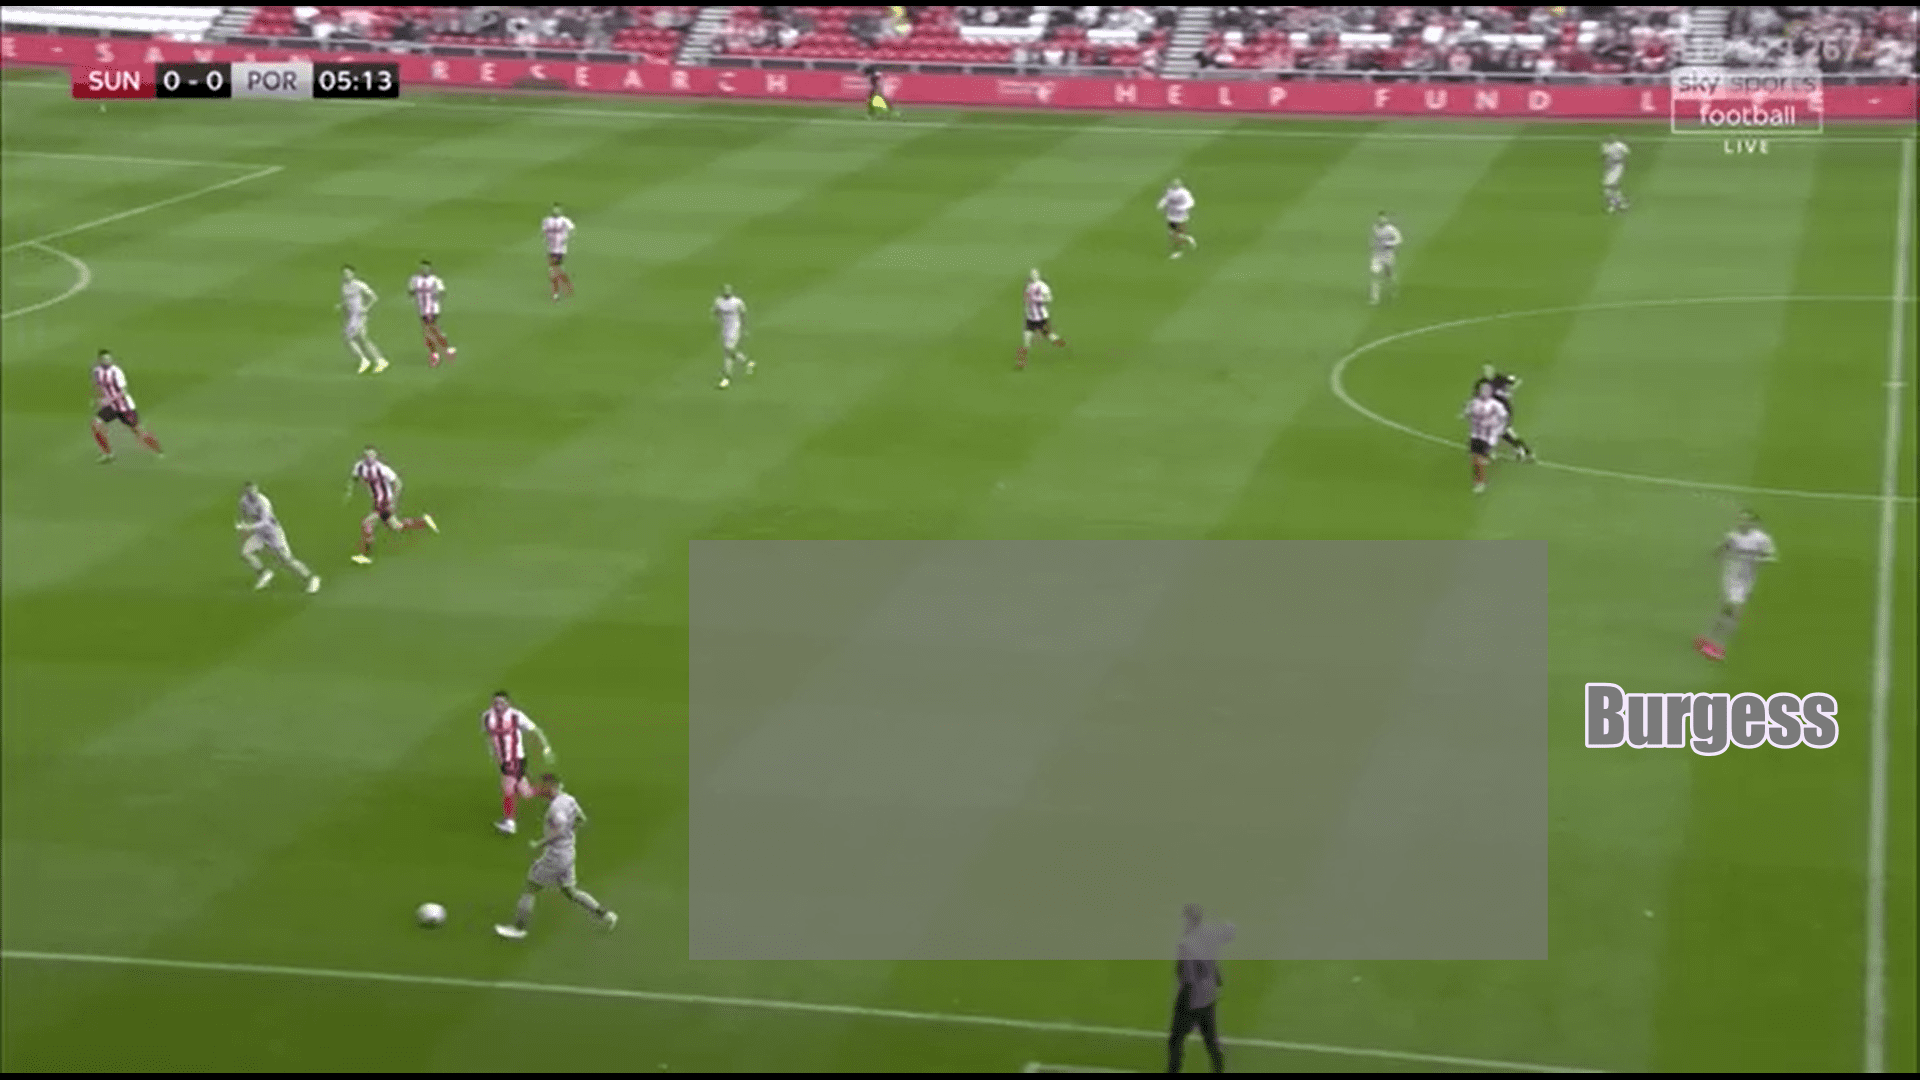
However, despite cleverly taking advantage of Sunderland’s defensive set-up here, they could have gone even further in order to convert it into real offensive danger.
Having played the ball out to Brown, Burgess then opts to drop back into his defensive line. If he had, instead, remained bold and retained high vertical height, he could have moved into the space indicated by the grey box, and then provided Brown with another option in-field. Burgess could then have advanced up the field with the ball, providing an overload in midfield, therefore, giving his team a greater chance of retaining and building within Sunderland’s offensive third. As it was, as Burgess did not advance higher, it meant that Brown could only play the ball down the line to Curtis (out of the picture) and thus made it easier for Sunderland to defend against, as they knew there was only one realistic option for the full-back and could, therefore, react accordingly. Had Burgess stepped out, it would have given another dimension to their attack.
Central rotation
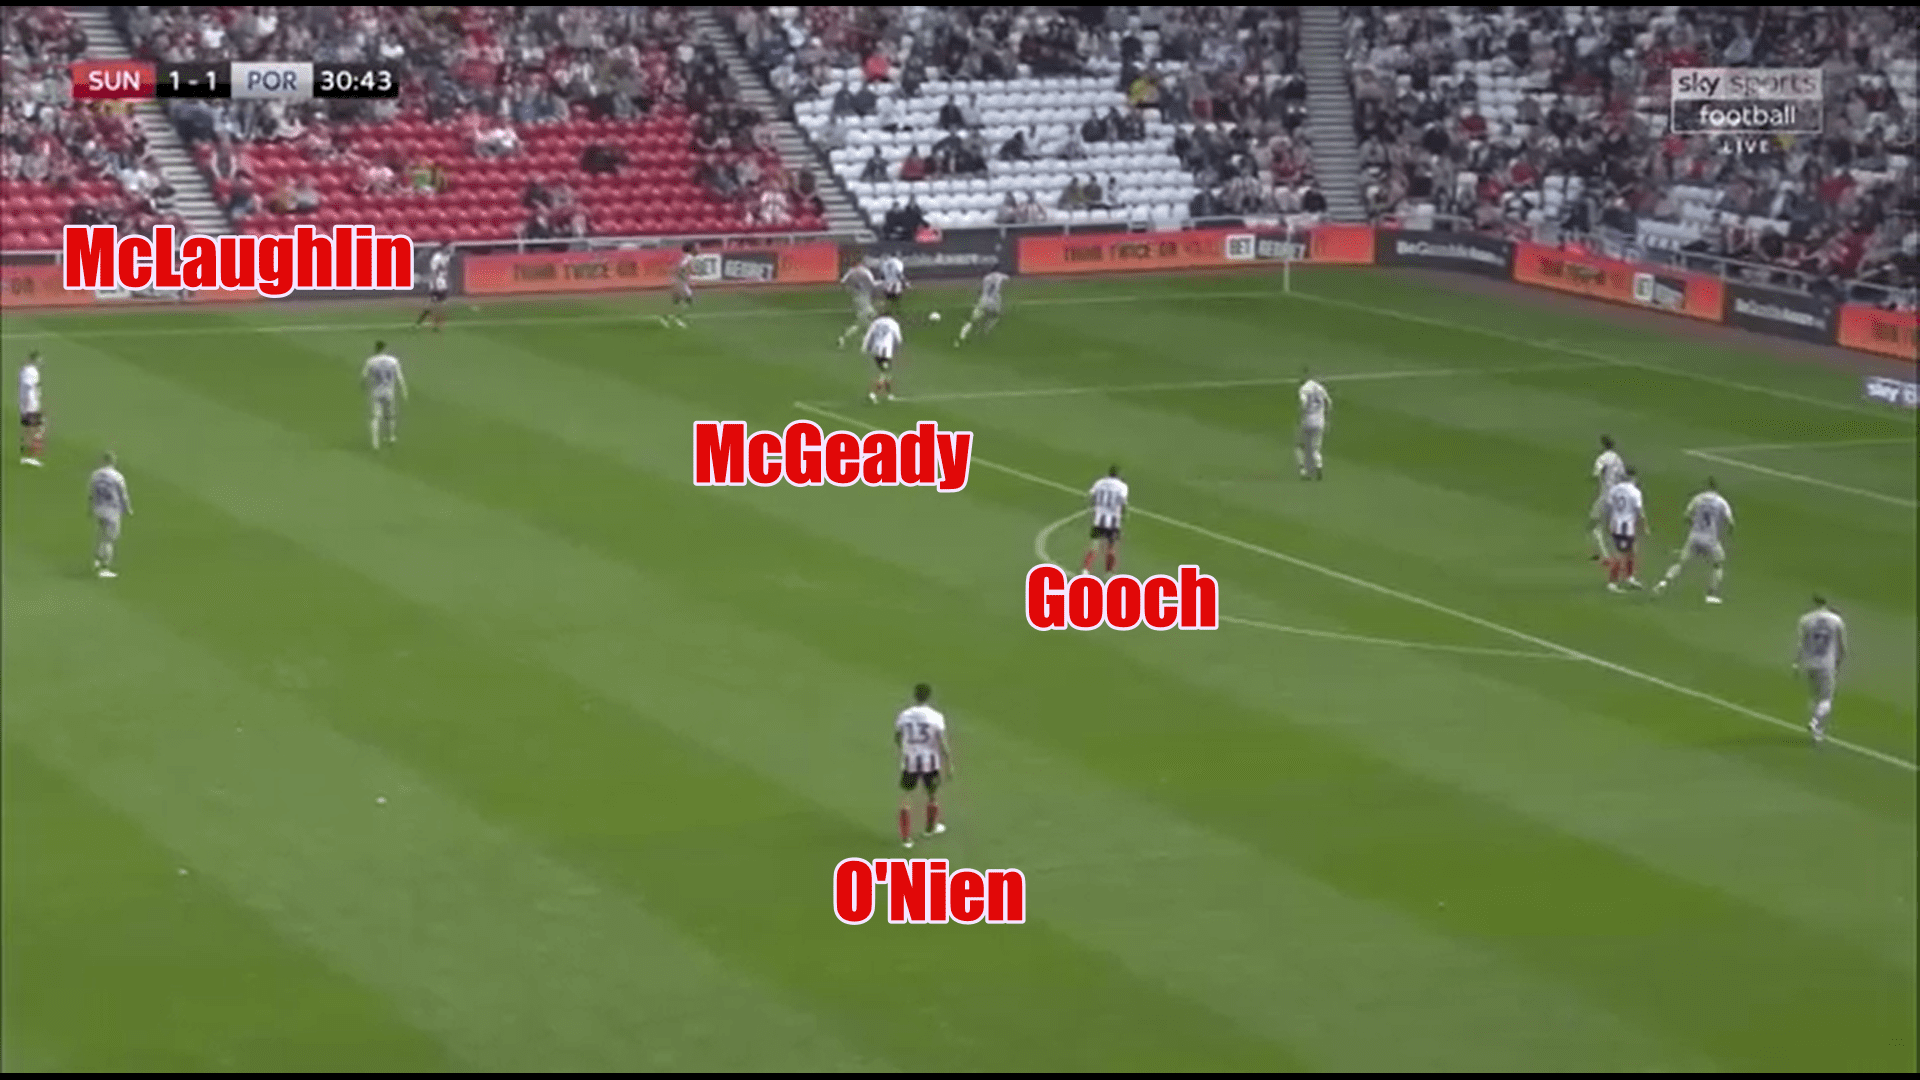
For the Black Cats, they looked to use clever inter-changing and positional fluidity within the final third, using their full-backs to provide width and thereby allowing a central overload. Their offensive trio of McGeady, Maguire and Gooch are all able to dominate one-versus-one either on the flanks or in more central areas, and as a result they looked to get them in such situations as frequently as possible. With McGeady and Gooch, as they were down to be the widest of the three, they would frequently drift inside into at least the half- space or sometimes further. This would then allow them to, upon receiving the ball, have the option of going inside our outside in order to beat their man, with this being facilitated by the aggressive positioning of their respective full-back also – as can be seen below.
Here, with the ball on the left-hand side, McLaughlin and O’Nien are both within the Portsmouth offensive third (McLaughlin having played the ball down the line). As they are both situated so high, it gives their team offensive width without using their wingers, and so McGeady and Gooch can therefore move inside in order to try and get on the ball and use their creativity and flair to hurt Portsmouth from more central. It was an occasion such as this that led to Sunderland’s winner, with McGeady picking up the ball just inside the width of the penalty area, beating his man to the touchline and crossing for Maguire to tap home.
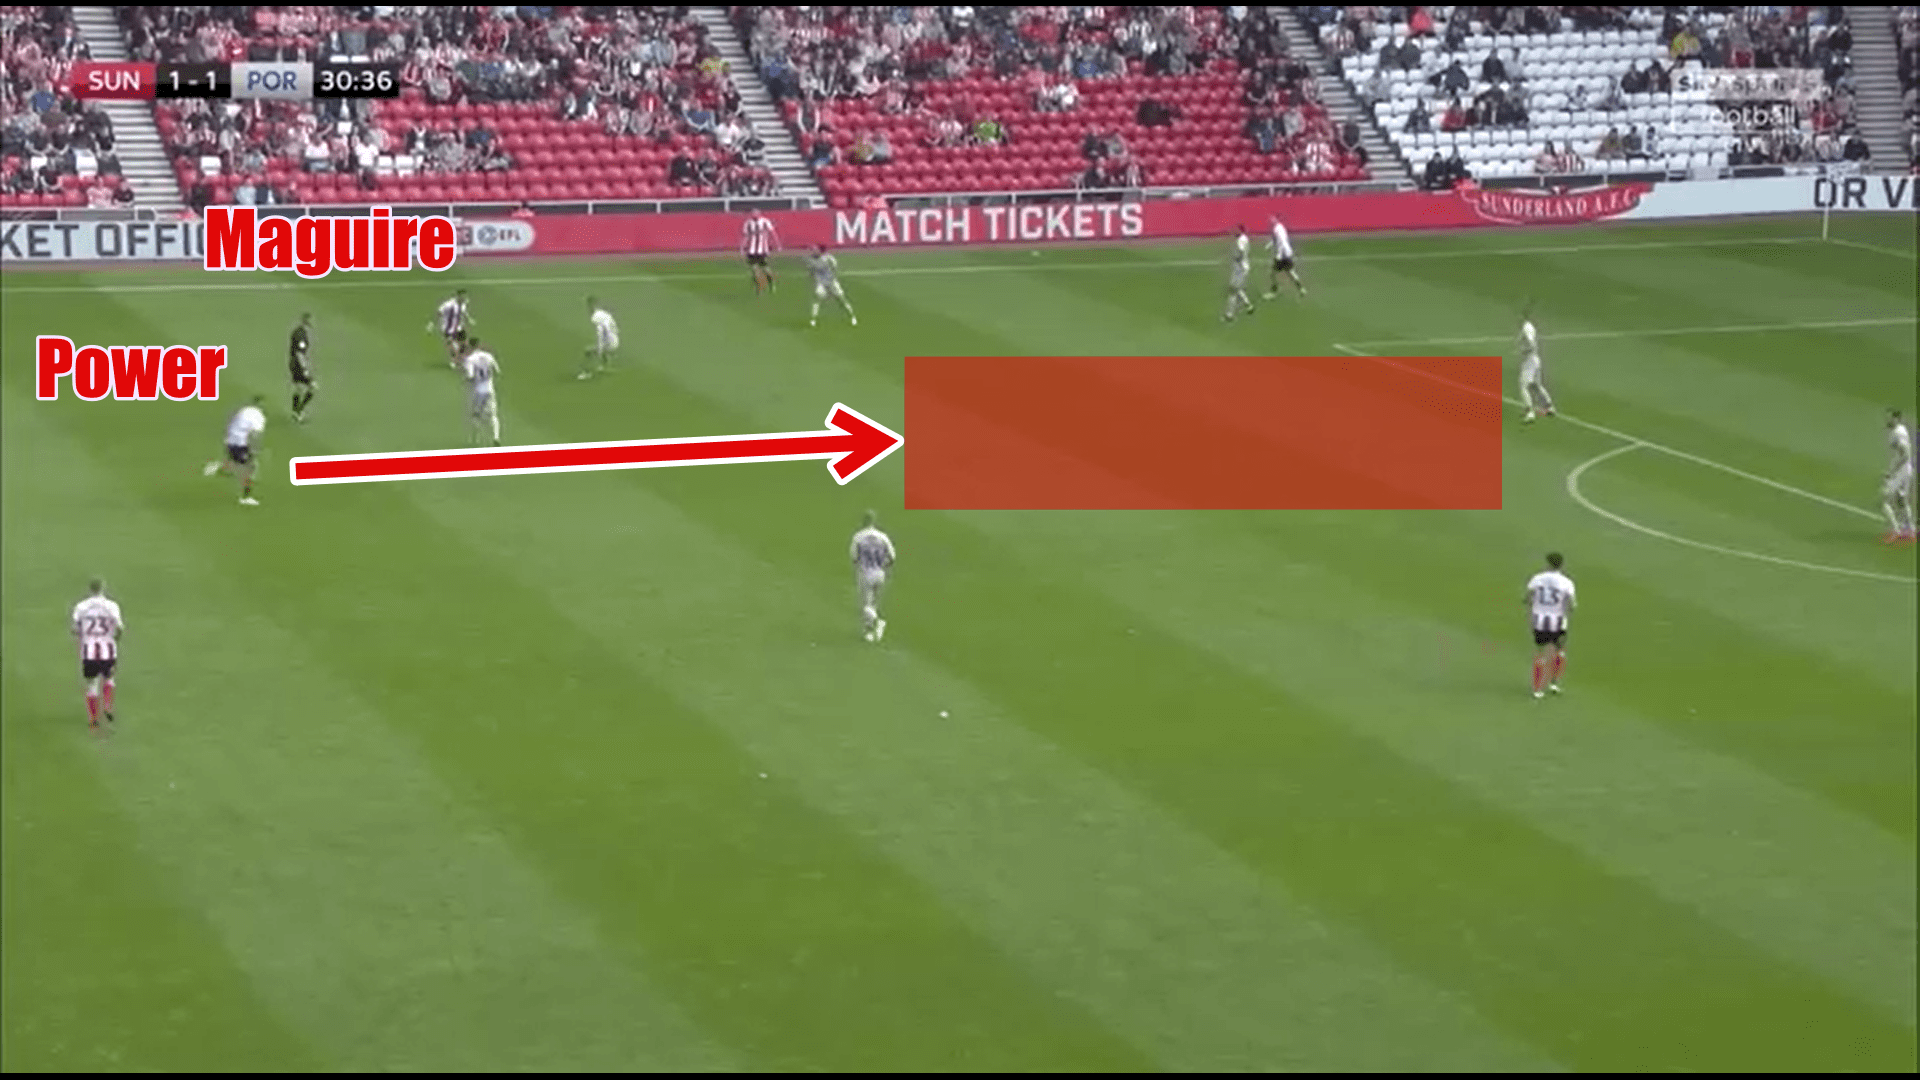
As well as this, Maguire was also key in retaining the ball and allowing his side to create in-and-around the Pompey area. On occasions, he would drop out of his usual ‘number ten’ position, and drag out one of the Portsmouth central midfielders in the process. This would then create an opening for a third-man run from one of the two midfielders from Sunderland – usually Power – to invade.
An instance can be seen below, where Maguire pulled away from the striker, it opened up the space off the back of the Portsmouth midfield, which then allowed Power to run beyond his man and into the space. It was movements such as this that created confusion for the Portsmouth midfield, with Power frequently arriving untracked from deep.
Half-space domination
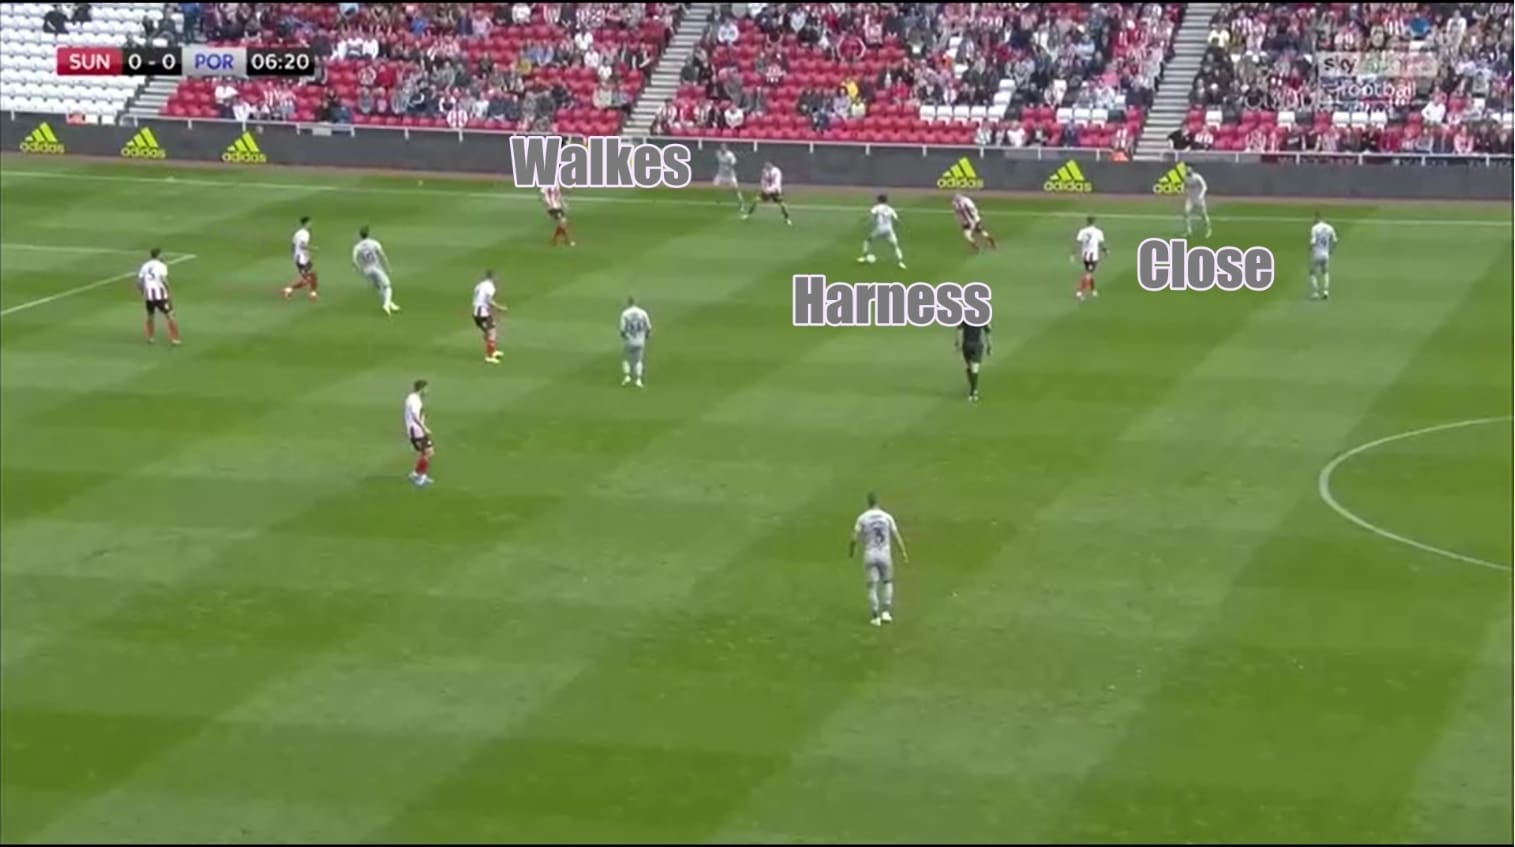
Much like their hosts, Portsmouth too looked to move their wide attackers inside in order to combine with the full-backs and central midfielders and thus play short, sharp passes to try and free up the full-back to put in a cross. The central midfield alteration allowed them to do so, with either Close or Cannon providing support to the wide men to allow such movements. Two occasions are analysed below.
Firstly, it can be seen that right-back Anton Walkes is positioned right on the touchline, whilst right winger Harness has come inside slightly to receive the ball from Close. The three are all in close proximity to one another, forming a triangle around their opponents as they look to bounce the ball quickly and efficiently before either allowing Harness to turn and drive inside, or sending Walkes down the line from where he can try and deliver a cross.
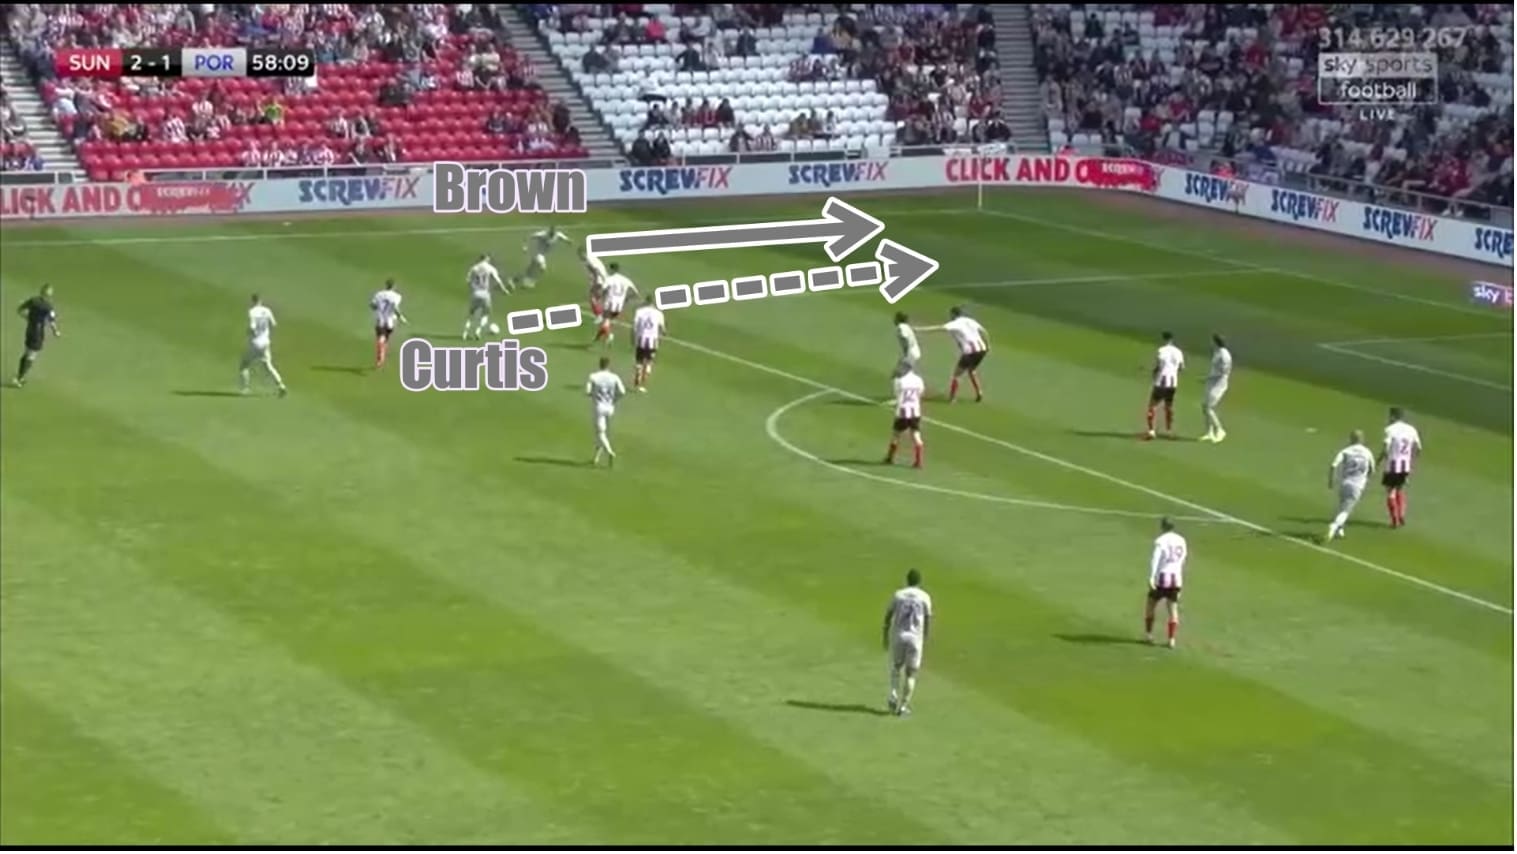
Additionally, once they reached the penalty area, the winger would remain on the inside in order to create space for the full-back to overlap, again looking for quick interchanging between the two to try and produce a ball into the box for Marquis to attack. Here, Brown has played the ball to Curtis in the half-space before instantly bursting beyond his man to try and get in behind from the through-ball, where he can then deliver either a cross or a cut-back to be attacked.
Conclusion
It was a match of few opportunities, with all three shots on target resulting in goals. Portsmouth dominated much of the ball in the match without creating a huge amount of chances, with 58% of possession yielding just one shot on target, whilst Sunderland defended well throughout and ultimately managed to carve out the two goals. Both sides will definitely be at the top of the table come the end of the season – and Sunderland’s victory here could well have a big say on who finishes higher.
If you love tactical analysis, then you’ll love the digital magazines from totalfootballanalysis.com – a guaranteed 100+ pages of pure tactical analysis covering topics from the Premier League, Serie A, La Liga, Bundesliga and many, many more. Buy your copy of the August issue for just ₤4.99 here.



Comments