Last season in the EFL League Two, Cheltenham Town and Forest Green Rovers were in a very different state to each other. The former, under the management of Michael Duff, were among the relegation battlers and survived the cut by sixteen points. Meanwhile, Mike Cooper’s side haven’t looked back since they won promotion from the National League. After a struggling 2017-18 season, Forest Green saw their fortune changed as they became promotion chaser by finishing fifth. Still, their record wasn’t enough to help them achieved what they wanted as they failed under the hand of Tranmere Rovers.
With that in mind, there is no doubt when Forest Green entering this season hoping to finish what they haven’t. But their opposition for this match, Cheltenham has risen up as a potential promotion chaser after an impressive eighteen unbeaten matches at home. Unfortunately, two goals from Jack Aitchison and Elliott Frear had ended the streak and secured an impressive derby win for Forest Green.
This tactical analysis will provide an analysis of Forest Green’s 2-1 win over Cheltenham. Meanwhile, using statistics, we will point out the standout tactical points from both sides’ tactics and analyse what went wrong for Duff’s tactics.
Lineups
Cheltenham entered this match lining up in their familiar 3-5-2 formation. The home side didn’t have the service of Hull loanee Max Sheaf and former Southampton graduates Joshua Debayo due to injuries. Both were key players for Duff’s side during the first stage of the season, especially the Nigerian defender.
Meanwhile, another loanee in Jake Doyle-Hayes continued to be one of the first choices in Cheltenham’s midfield three alongside Conor Thomas and Ryan Broom. Two former Forest Green strikers in Reuben Reid and Tahvon Campbell missed out on the occasion to face their former club as the players who led the line was Gavin Reilly and Luke Varney.
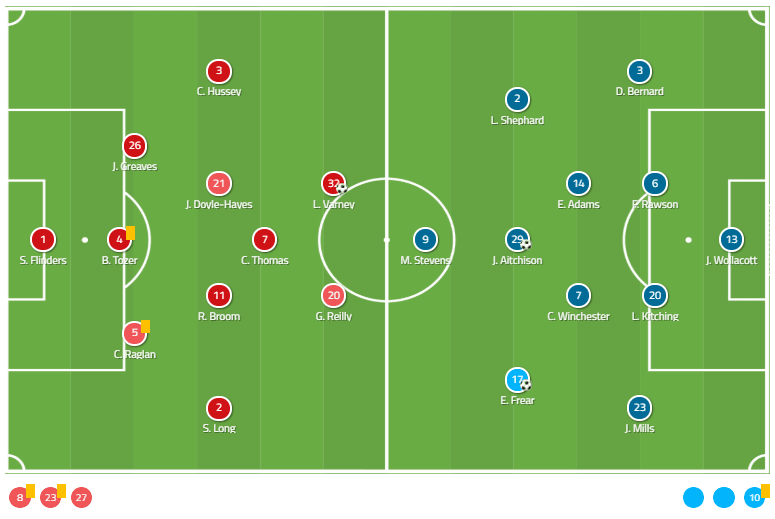
Meanwhile, Cooper also didn’t have several of his best players to choose from. One of them was George Williams, who played a key role in his tactics. His replacement, Elliott Frear, only joined the club in October after being released by Motherwell. On the opposite flank, Forest Green also missed the service of Dayle Grubb as right-back Liam Shephard was forced to play out of his preferred position.
While Joseph Mills continued to start among the team’s back-four alongside Farrend Rawson, Liam Kitching and Dominic Bernard, his brother, Matt Mills was absented through injury. Another centre-back in Nathan McGinley remained doubtful before the match as he was among the unused substitutes.
Cheltenham’s style of play
When in possession, Cheltenham tended to put an emphasis on building their attacks from the back. Using three centre-backs who usually kept the distance between each other at a considerable rate, they circulated the ball inside their half to invite the pressure from the opponent. At times, it was also possible that one wing-back and a pivot dropped deep and created a passing block.
The intention of this was to keep numerical superiority in case Forest Green players attempted to press high. If they wanted to commit more players into the opposite half, there would be space opened to allow Cheltenham players to capitalise.
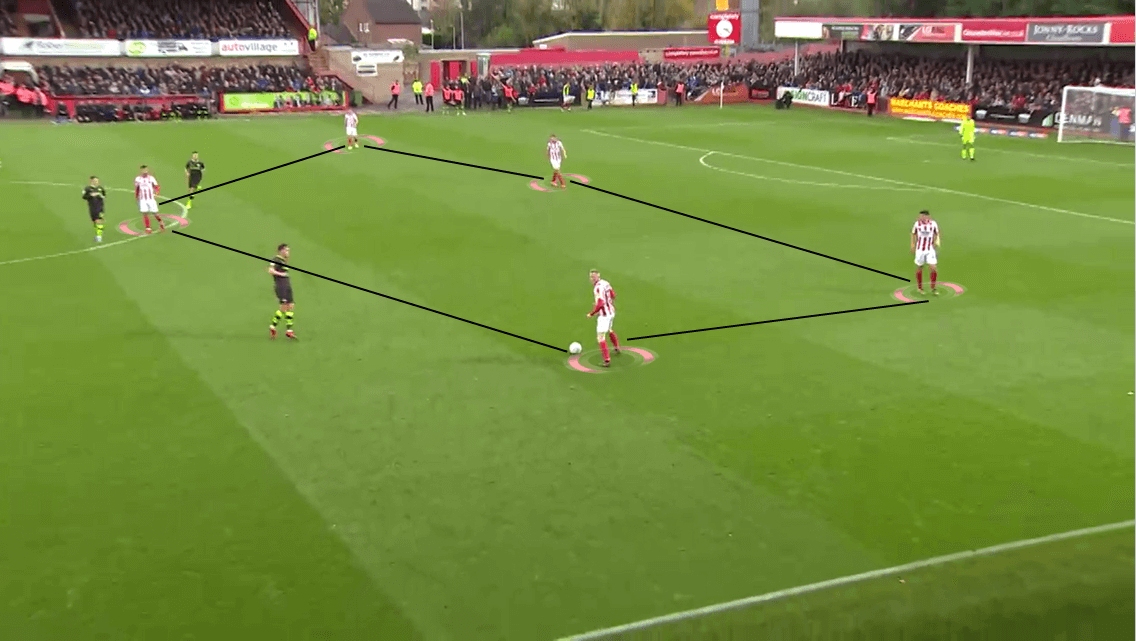
Having more players than Forest Green gave the home side advantage of maintaining and recycling possession in a more effective way. But due to the fact that the opposition pushed their shape high up the pitch, they were able to close down the possible gaps that Cheltenham could have capitalised. Instead, Duff’s side were forced to circulate the ball more often back home without progressing it into the opposite half.
This was one of the reasons contributed to the fact that Cheltenham were the more superior team in terms of possession. Their possession percentage never dropped below 52% during the match, and even reached its peak at 68% in between Forest Green’s goals. They did manage to recover a similar number in 65% when they were looking to come back into the game inside the second half.
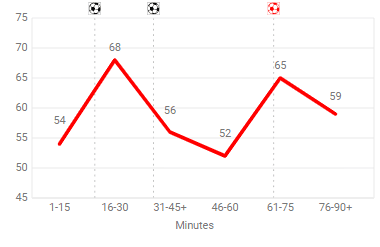
Again, when you were able to hold much of the ball but couldn’t create many chances, the opposition would come back to hit you. And it was the case for Cheltenham when they conceded two goals just inside the first period.
When they lost the ball, Cheltenham players would form a 5-3-2 formation inside their half with both strikers led the line. They aimed to stretch their shape wide to cover both the wide and the central areas. Since they had at least eight players positioning inside the defensive third, it was viable for the home side to create a defensive juggernaut in front of Scott Flinders’ goal.
Furthermore, having an advantage in numbers also allowed Cheltenham to create overloads during their defensive situations, similar to the shot below. Also, by pushing their shape a bit higher and positioned on the edge of the defensive third, they were able to eliminate gaps in between the lines and prevented Forest Green to progress the ball into it. Creating overloads would help them in recovering possession as they had more players than the opposition and applying pressure on the ball carrier became an easy task.
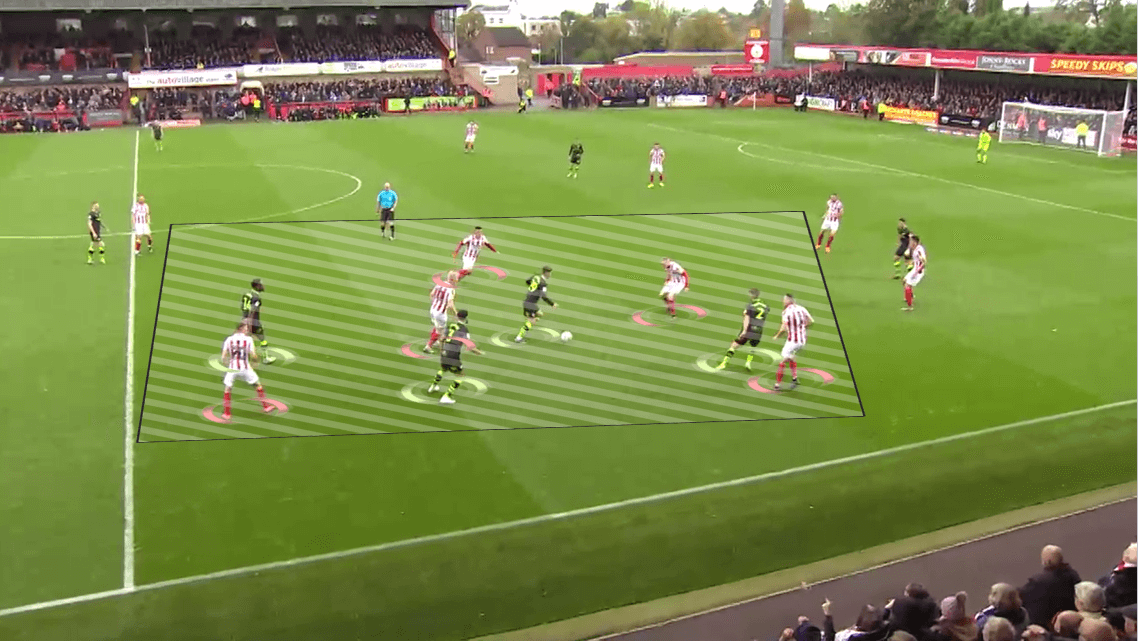
In contrast, though, pushing their shape higher and left zone 14 unoccupied invited Forest Green to capitalise that. While Cheltenham’s midfielders did manage to screen the space between them and the defensive line, they left space in front of them for the likes of Ebou Adams and Carl Winchester to work. Meanwhile, the attacker(s), which was Frear in this situation, was able to sit on the shoulder of defenders and waited for a through ball to be sent towards.
Another option for Duff’s side to counter against the attacking strategy was to make the most out of their offside trap. Unfortunately, though, with Aitchison ran into the blind side of the Cheltenham’s defender, there was not much that they could do. The former Motherwell player eventually turned up at the end of Adams’ through ball and was clear on goal to score Forest Green’s second goal of the game.
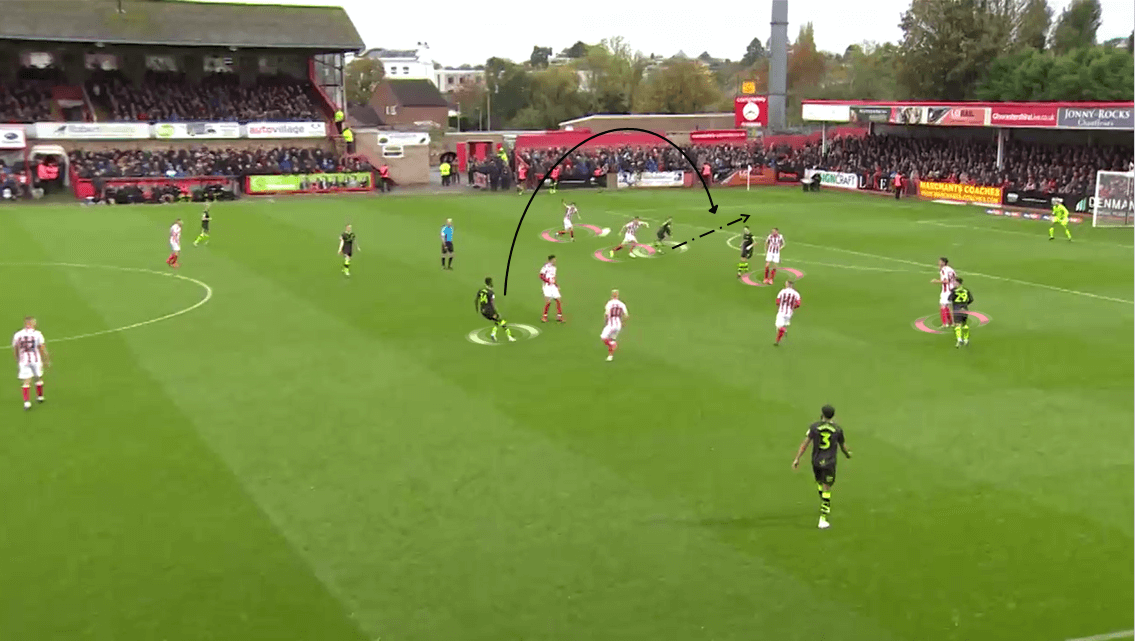
Offensively, Cheltenham were a wing-oriented team and tended to distribute the ball out wide from the build-up. Using two attacking wing-backs in Sean Long and Chris Hussey, they were the player who carried the ball out of defence into the opposite half. Another player who also took on that responsibility was Ryan Broom as the Welsh midfielder occasionally dribbled with the ball.
Besides the involvement of the two wing-backs, the central midfielders also drifted wide on several occasions to provide support for Long and Hussey. Alongside that, they also capitalised one major problem that Forest Green constantly showed during the match. When either wing-back dribbled with the ball, he would drag the opposition’s full-back out from his position, similar to the shot below.
As Dominic Bernard, who involved in the situation, moved out to close Hussey down, he left a huge gap behind his back. This invited Varney to move into and became a possible passing option for the former Sheffield United defender. With Rawson being pinned down centrally and the same can be said for Liam Kitching, Forest Green left the space unoccupied. From out wide, Varney could opt to make a cross into the box for his strike partner, Reilly, or lay the ball back for the late arrivals.
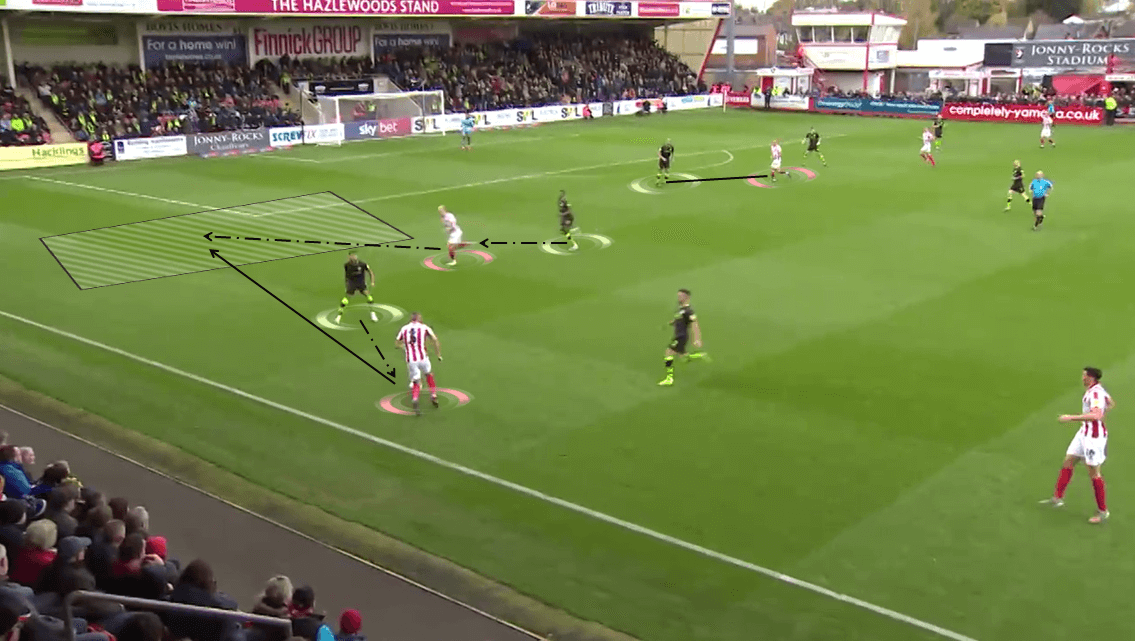
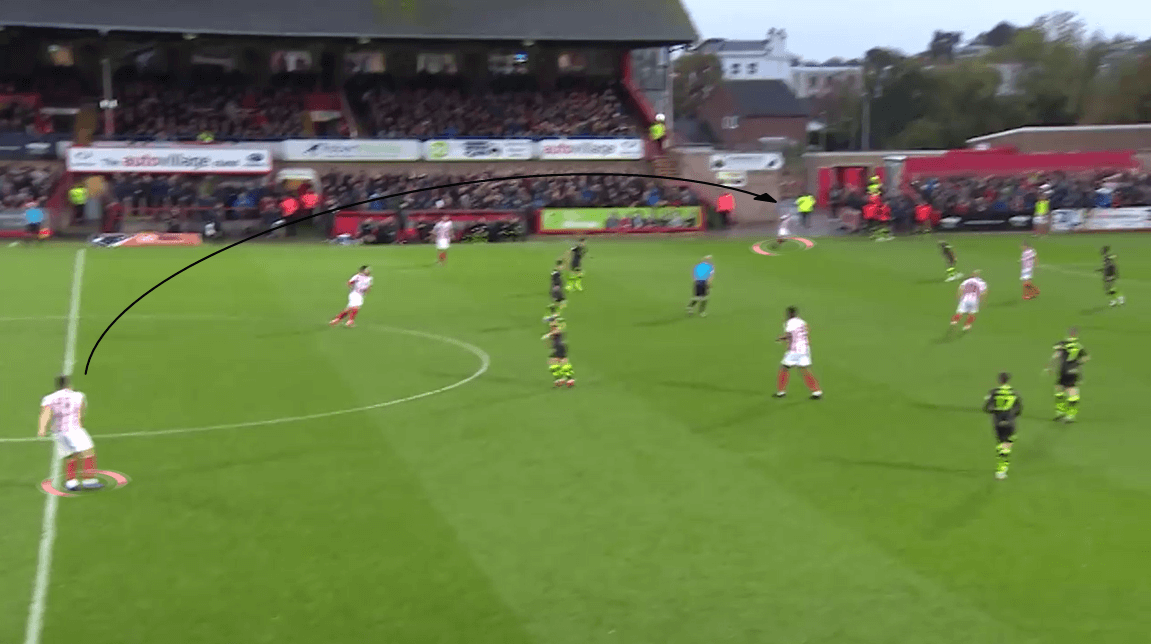
Later in the second half, Cheltenham had a few changes to their attacking style as they put an emphasis on using more long balls. It is understandable for this option with the pressure of finding goals to hope for a comeback within a few minutes left on the clock.
Still, they focused on distributing the ball wide along with relying on crosses, but in a more direct way. Their attacking effort paid off during the 67th minute with Varney scored a consolation goal for the side. During the remaining period, Forest Green opted to lower their tempo and limited Cheltenham’s attacking threat, which was why the home side didn’t manage to find any more goals.
Forest Green’s style of play
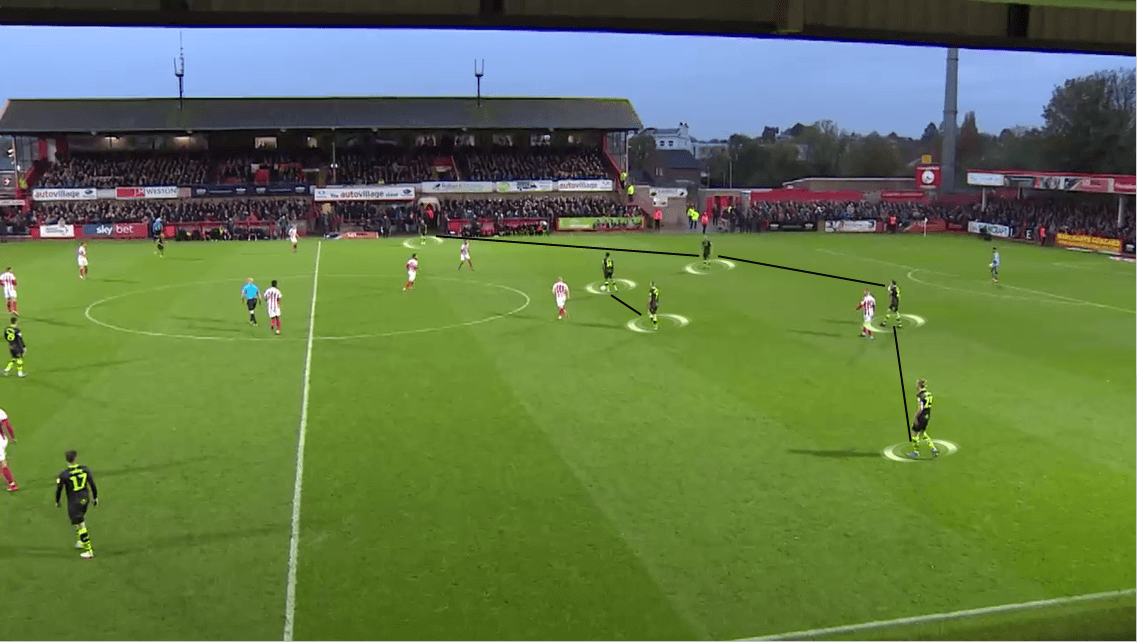
Similar to last season, Forest Green had the tendency of focusing on playing out from the back. When they controlled possession, both full-backs would stretch wide to give the team width while the pivots positioned themselves on the edge of the middle third. But the fact that Adams and Winchester moved too close to the centre-backs disconnected the link between them and the attackers up front.
Aitchison had the option of dropping deeper and positioned himself in the central area. He would act as the connection between the passing block and the attackers. On several occasions, Adams also took on this responsibility to help the team had more players up front. Those scenarios switched the team’s formation into a 4-2-1-3 or even a 3-3-1-3 as Winchester positioned himself near the centre-backs and Adams screened the space in front of them.
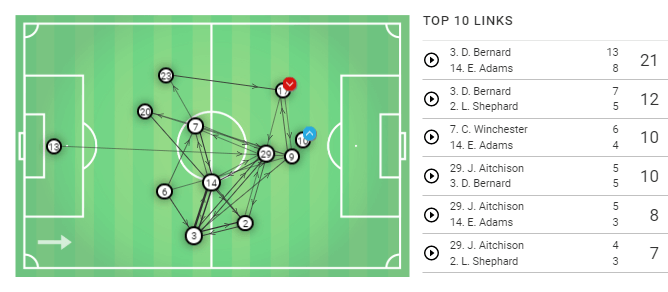
Speaking of Aitchison, it is hard to argue that the Celtic loanee had a big influence in Forest Green’s style of play during the match. As shown in the team’s pass map below, he was the focal point of most passes during their attacking transition process and formed many links with the players surrounded him.
In the role of a roaming playmaker, his responsibility was to receive passes and then distributed it forward. Off the ball, he would position himself in pockets of space but also came near the ball carrier to offer to pick up the ball. Not the type of player who likes to dribble, Aitchison let his passes do the talking with 25 out of 31 passes completed and registered one second assist.
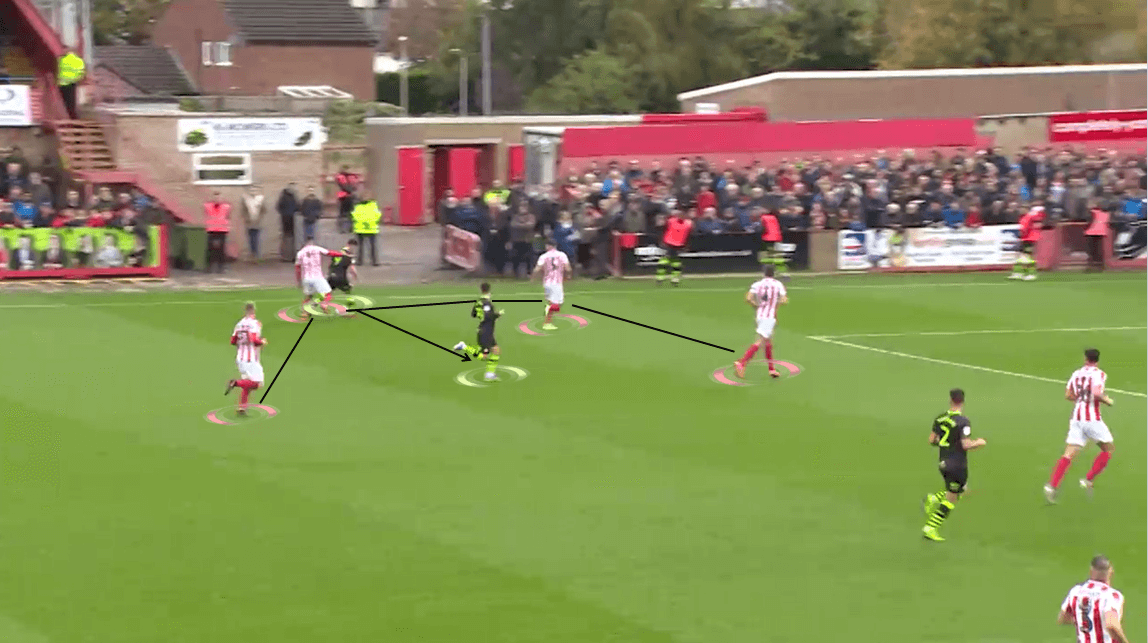
His goal to open the score for Forest Green was the perfect example for several of his mentioned traits. When Mathew Stevens had the ball out wide, he faced the pressure from four Cheltenham defenders. Aitchison noticed that and came deep to offer a possible passing option. During that process, he also picked out free space in the central area of the defenders to receive the ball in a more efficient way.
Along with following the former Peterborough striker to the 16-yard box, he constantly called for the ball. Inside the box, a quick one-two with Shephard was enough to help him picked out the shot towards Flinders’ goal.
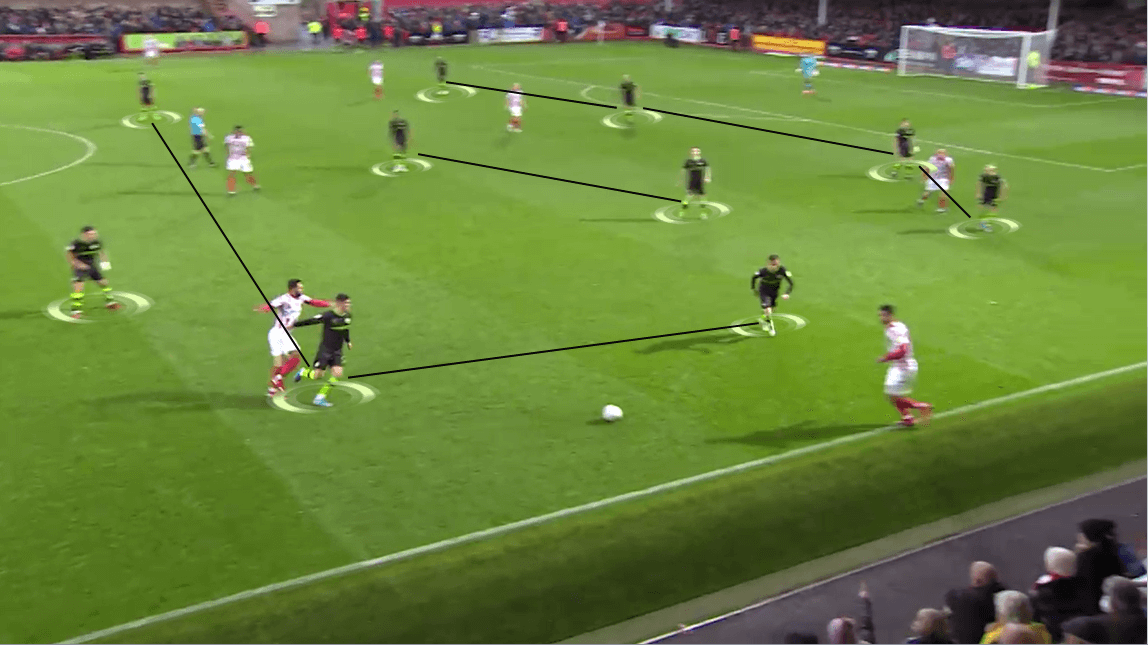
Defensively, Forest Green set up their team in a 4-2-3-1 formation with the two pivots positioned in between the lines. They aimed to stretch their shape wide for creating overloads on both flanks of the pitch. The full-back and winger on the action side would become a focal point when shifting the shape across. They were the first players to close the opposition down as they waited for support from their teammates during the press. The intention of this strategy was to prevent Cheltenham to distribute the ball wide more often and forced them to circulate the ball inside their half.
In case the home side wanted to focus the ball centrally, they would also face the intense pressing from the attackers. Stevens and the attacking midfielder were tasked to marked Cheltenham’s centre-backs and either a central midfielder or a full-back if they opted to offer a passing option. Adams and Winchester also moved up to support them by intercepting through balls that headed towards the other two central midfielders, allowing a counter-attack to take place.
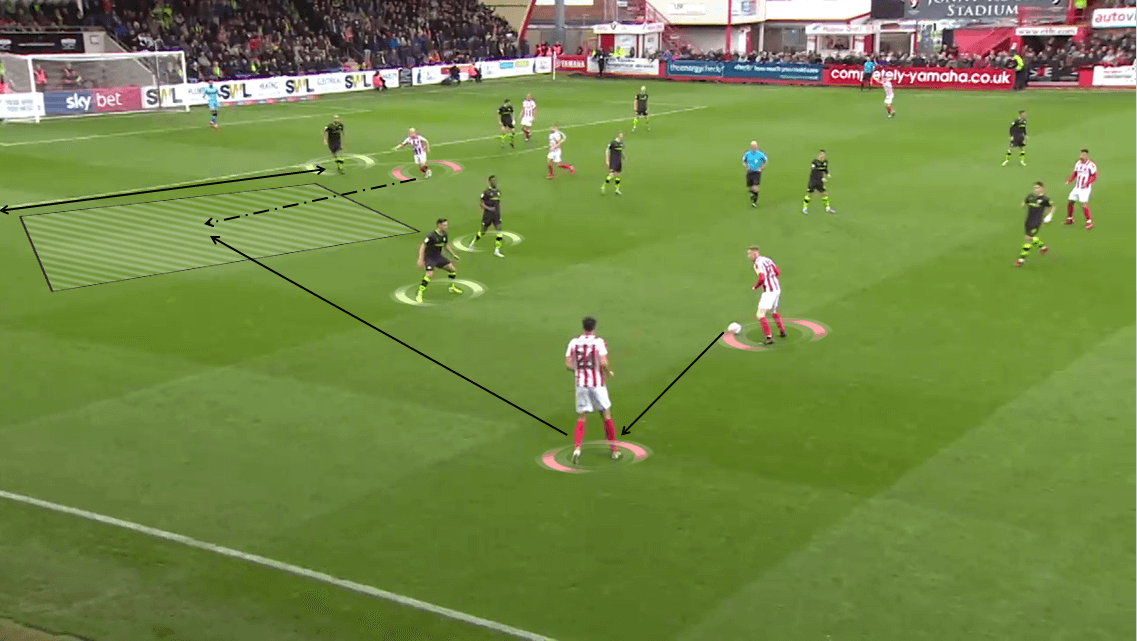
At times, stretching the shape too wide also resulted in a major problem for Cheltenham to capitalise. In the first half, the home side constantly attacked down Forest Green’s right-hand side, which we also analysed earlier. By luring right-back Bernard out of his position and pinned down Rawson using one striker, they have created a huge gap in between the two players.
With Adams and Shephard oriented their sight towards the ball carrier, the space behind their back remained unoccupied. It would obviously invite the Cheltenham attackers to move into and received the through ball from their teammate.
Hussey’s high positioning was one of the factors that helped Cheltenham enjoyed more success from their left-hand side as he was able to connect with Broom and Reilly more often. Meanwhile, the opposite full-back Long tended to stay deep more often and the same could be said with central midfielder Thomas.
Conclusion
There were high expectations before this match when the two teams who were in good form met each other. With Cheltenham, they were confident of continuing their impressive streak of eighteen unbeaten matches at home. For Forest Green, climbing to the top spot was viable to them if they secured a positive result and Crewe had their result contrasted.
Indeed, both teams delivered a fascinating match with chances being created throughout the game and less possession-oriented situations where one team circulating the ball among the players while the other one stayed conservative. But at the end, the visitors came out with three points, having been registered more chances than their opponent and also became the first team to win at Whaddon Road in eighteen matches.

If you love tactical analysis, then you’ll love the digital magazines from totalfootballanalysis.com – a guaranteed 100+ pages of pure tactical analysis covering topics from the Premier League, Serie A, La Liga, Bundesliga and many, many more. Buy your copy of the October issue for just ₤4.99 here


Comments