After narrowly missing out on automatic promotion from the EFL League Two, Port Vale and Mansfield Town both secured spots in the division’s play-off final at Wembley Stadium with the winners earning the right to League One football. Eventual victors Port Vale beat Swindon Town on penalties after a deadlock over two legs, while Mansfield Town beat Northampton Town 3-1 on aggregate. A strong start from Vale allowed them to gain a stronghold on the game, with a helping hand in the way of a Mansfield Town red card during the first half. This tactical analysis will put a scope on the tactics deployed by the winners along with an analysis of what key elements Mansfield got wrong.
Lineups
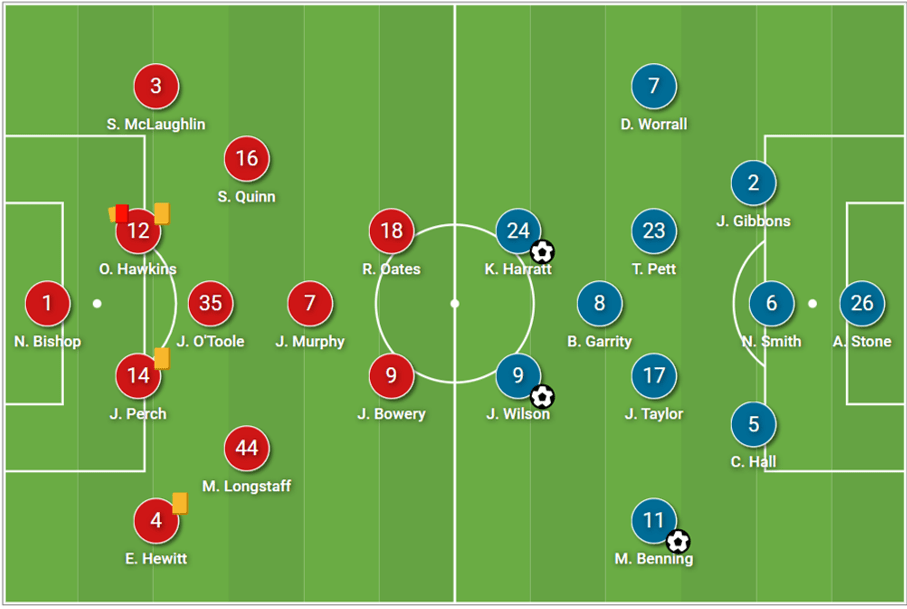
Nigel Clough deployed a 4-3-1-2 shape for the Stags, with Nathan Bishop, on loan from Manchester United, between the sticks. Stephen Mclaughlin and Elliot Hewitt operated as full-backs with veteran James Perch lining up alongside the eventual recipient of a red card, Oliver Hawkins. A wealth of experience was present in Clough’s midfield in the shape of Stephen Quinn and John-Joe O’Toole, who lined up next to another man with Premier League experience in Matty Longstaff. The midfield trio had more experience ahead of them with Jamie Murphy operating in a more advanced position. Jordan Bowery and Rhys Oates lead the line.
Darrell Clarke opted for a 3-5-2 which allowed for defensive stability, midfield dominance and a strong offensive presence. Former Mansfield player Aidan Stone started in goal, with a back three of Connor Hall, Nathan Smith, and James Gibbons. In midfield, David Worrall and Mal Benning operated on the flank, with Tom Pett, Jake Taylor, and Ben Garrity in the engine room. James Wilson partnered Kian Harratt up front.
Port Vale dangerous in transition
From the early stages of the game, Mansfield Town appeared to be getting dragged into positions and scenarios they wouldn’t want to be in – particularly in midfield areas in the first half – in fact, they had such a difficult time dealing with it that it resulted in Vale taking an early 2-0 lead with both goals coming in quick succession. Port Vale, who seemed to be one step ahead in so many moments during the fixture, reacted to this by drawing Mansfield into this more often, opening space up in wide areas to exploit.
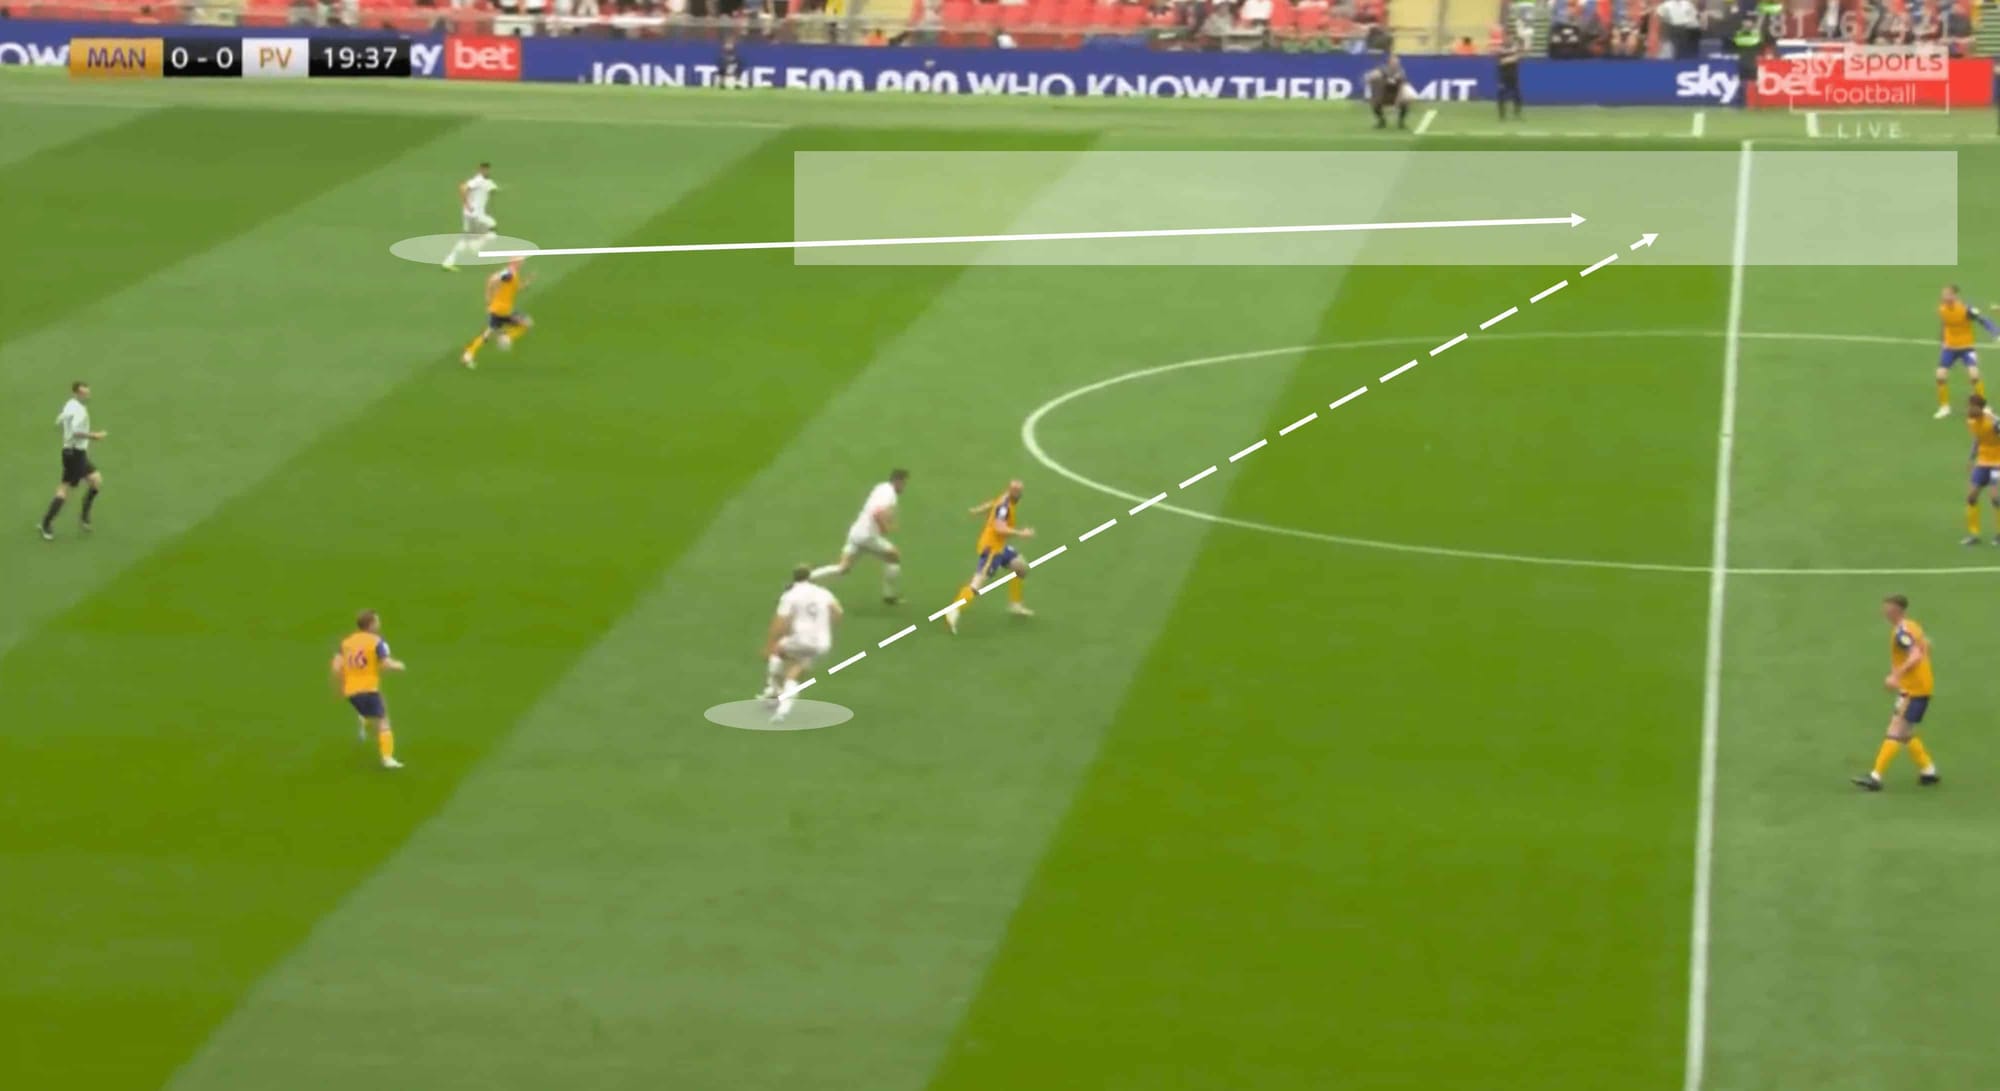
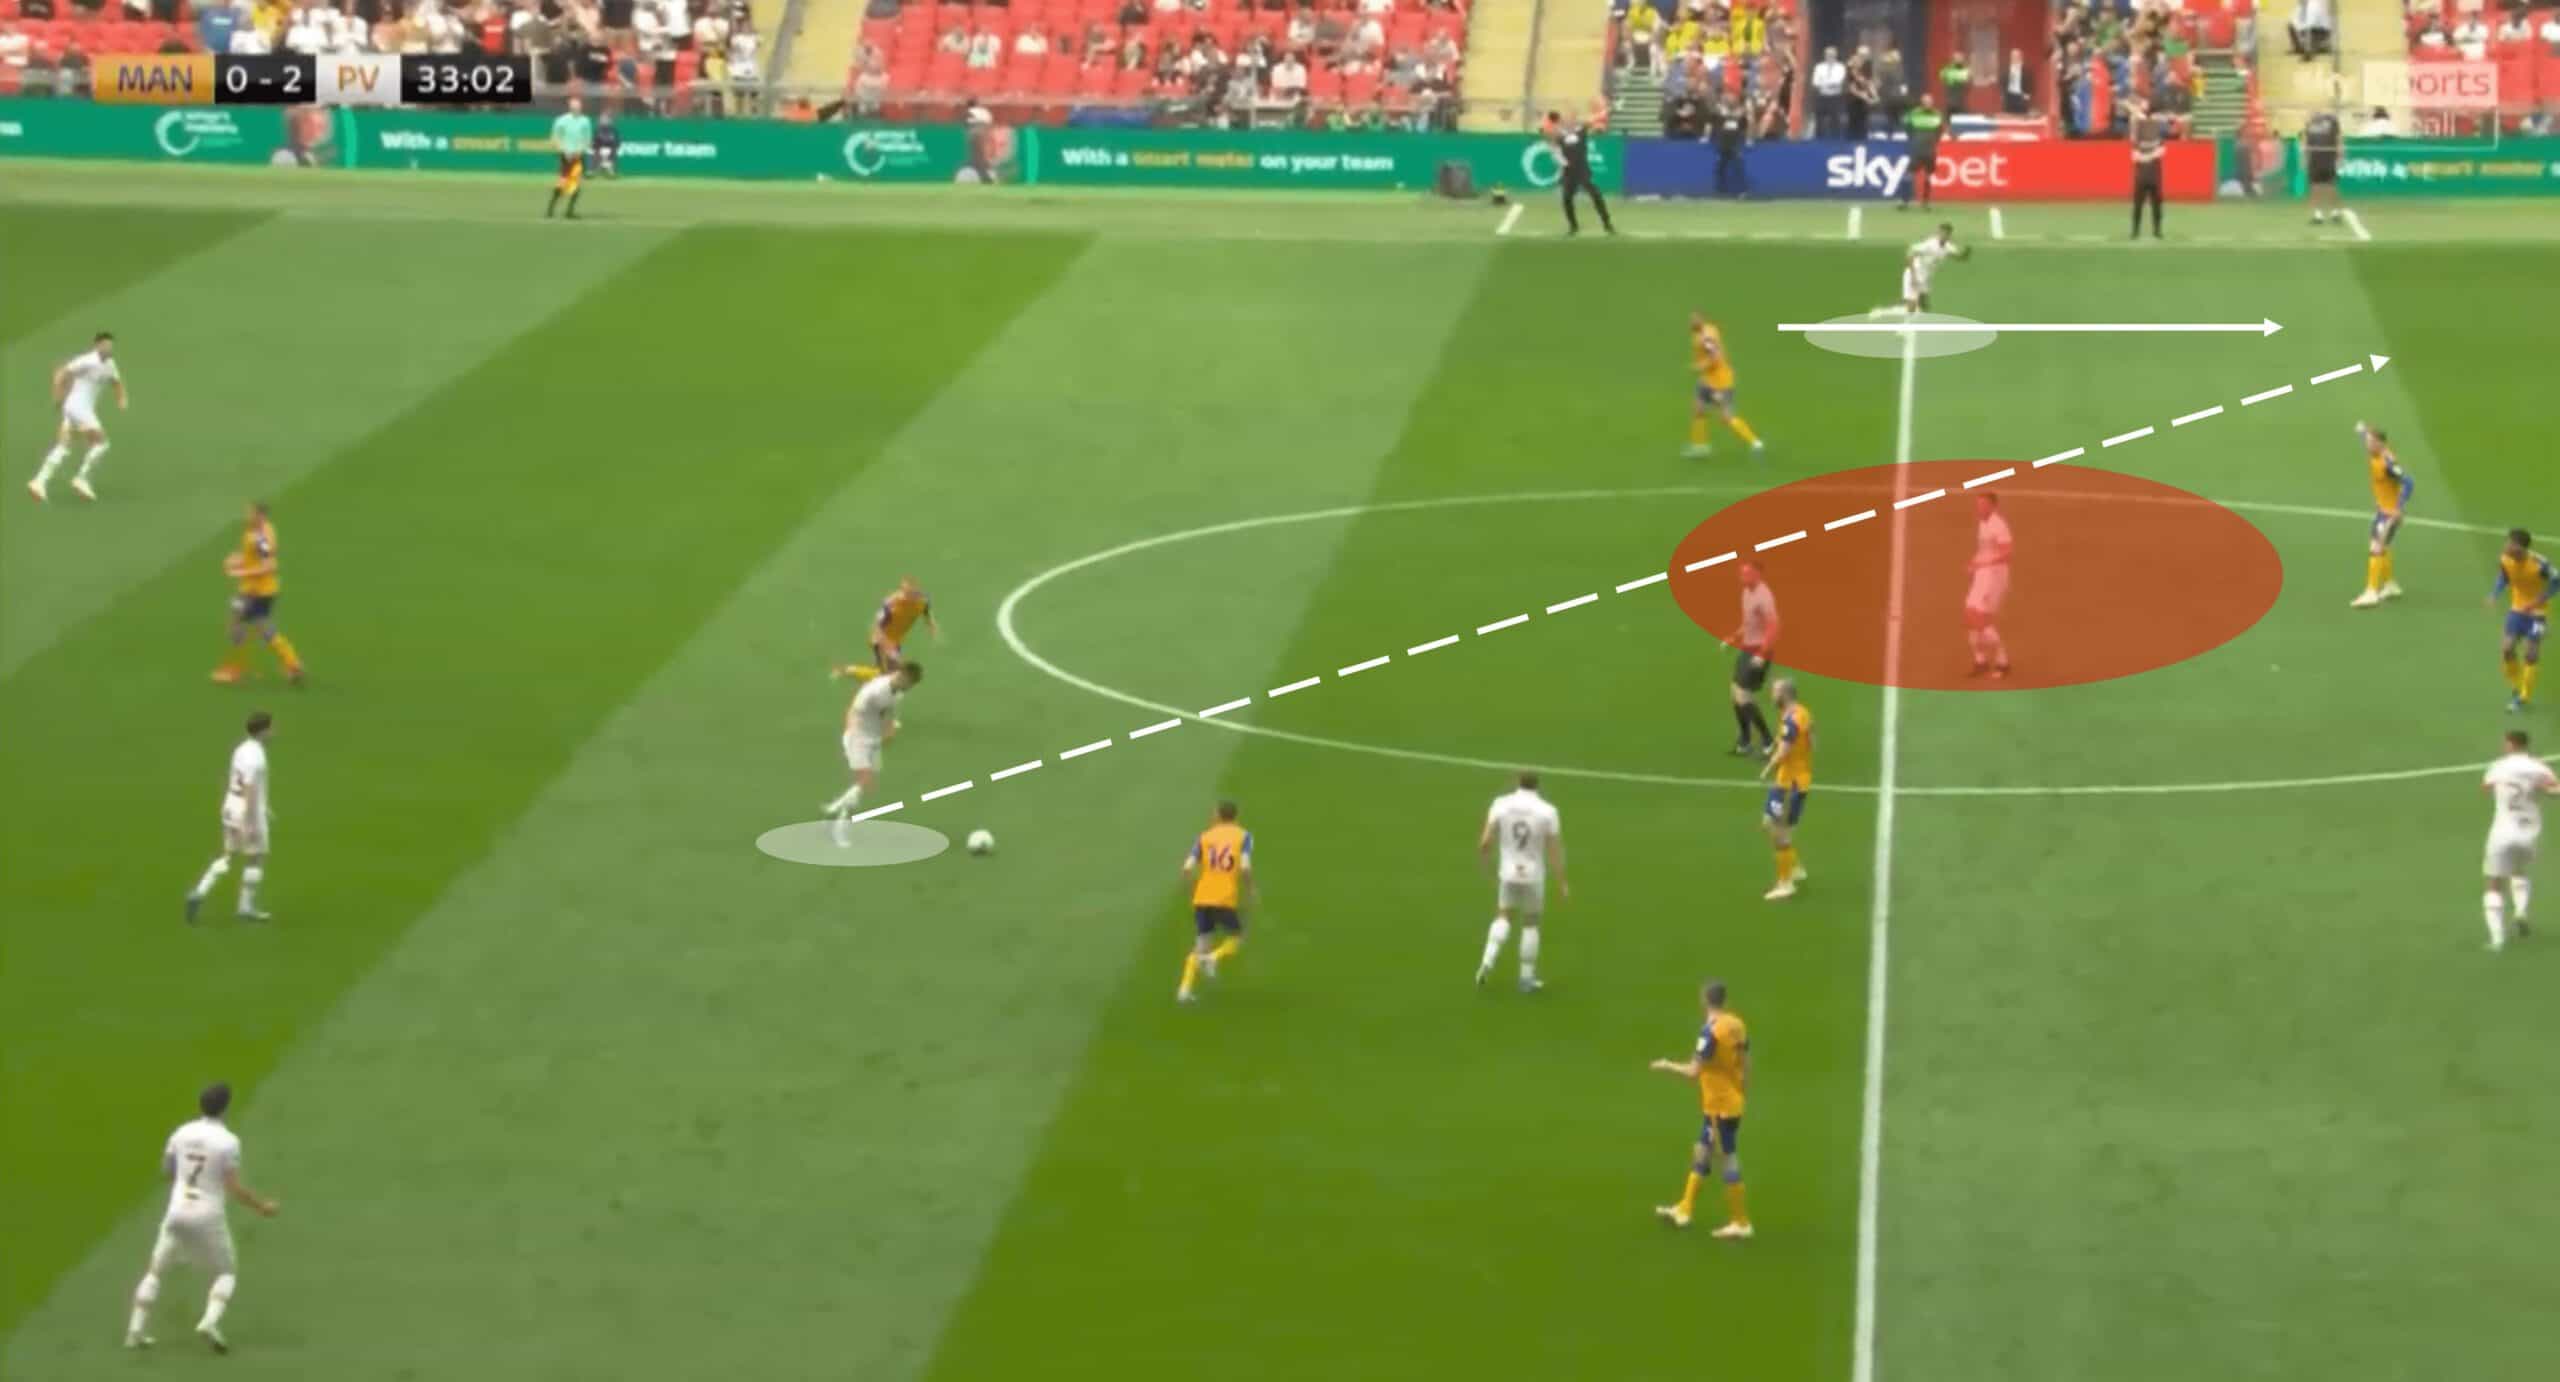
The first major example of this occurred just 20 minutes in when a failed Mansfield attack resulted in a disjointed and unorganised midfield unit and Port Vale possession. James Wilson dropped in deep, using his physicality to defend the ball before launching the pass that set the wheels in motion towards his left wing-back.
As you can see from the image above, Mansfield struggled in defending both the runner at wing-back, who was able to run the flank under no pressure at all and also Wilson who shrugged off a challenge to control the ball and wait for the right moment to unleash the ball.
Mansfield’s issue in midfield was mostly down to positioning and they found themselves in no man’s land and simply chasing their counterparts. Another clever element of this phase of play is Wilson’s teammate immediately beside him – his presence means his marker, by instinct, tracks him rather than pressing Wilson, giving the forward more time on the ball.
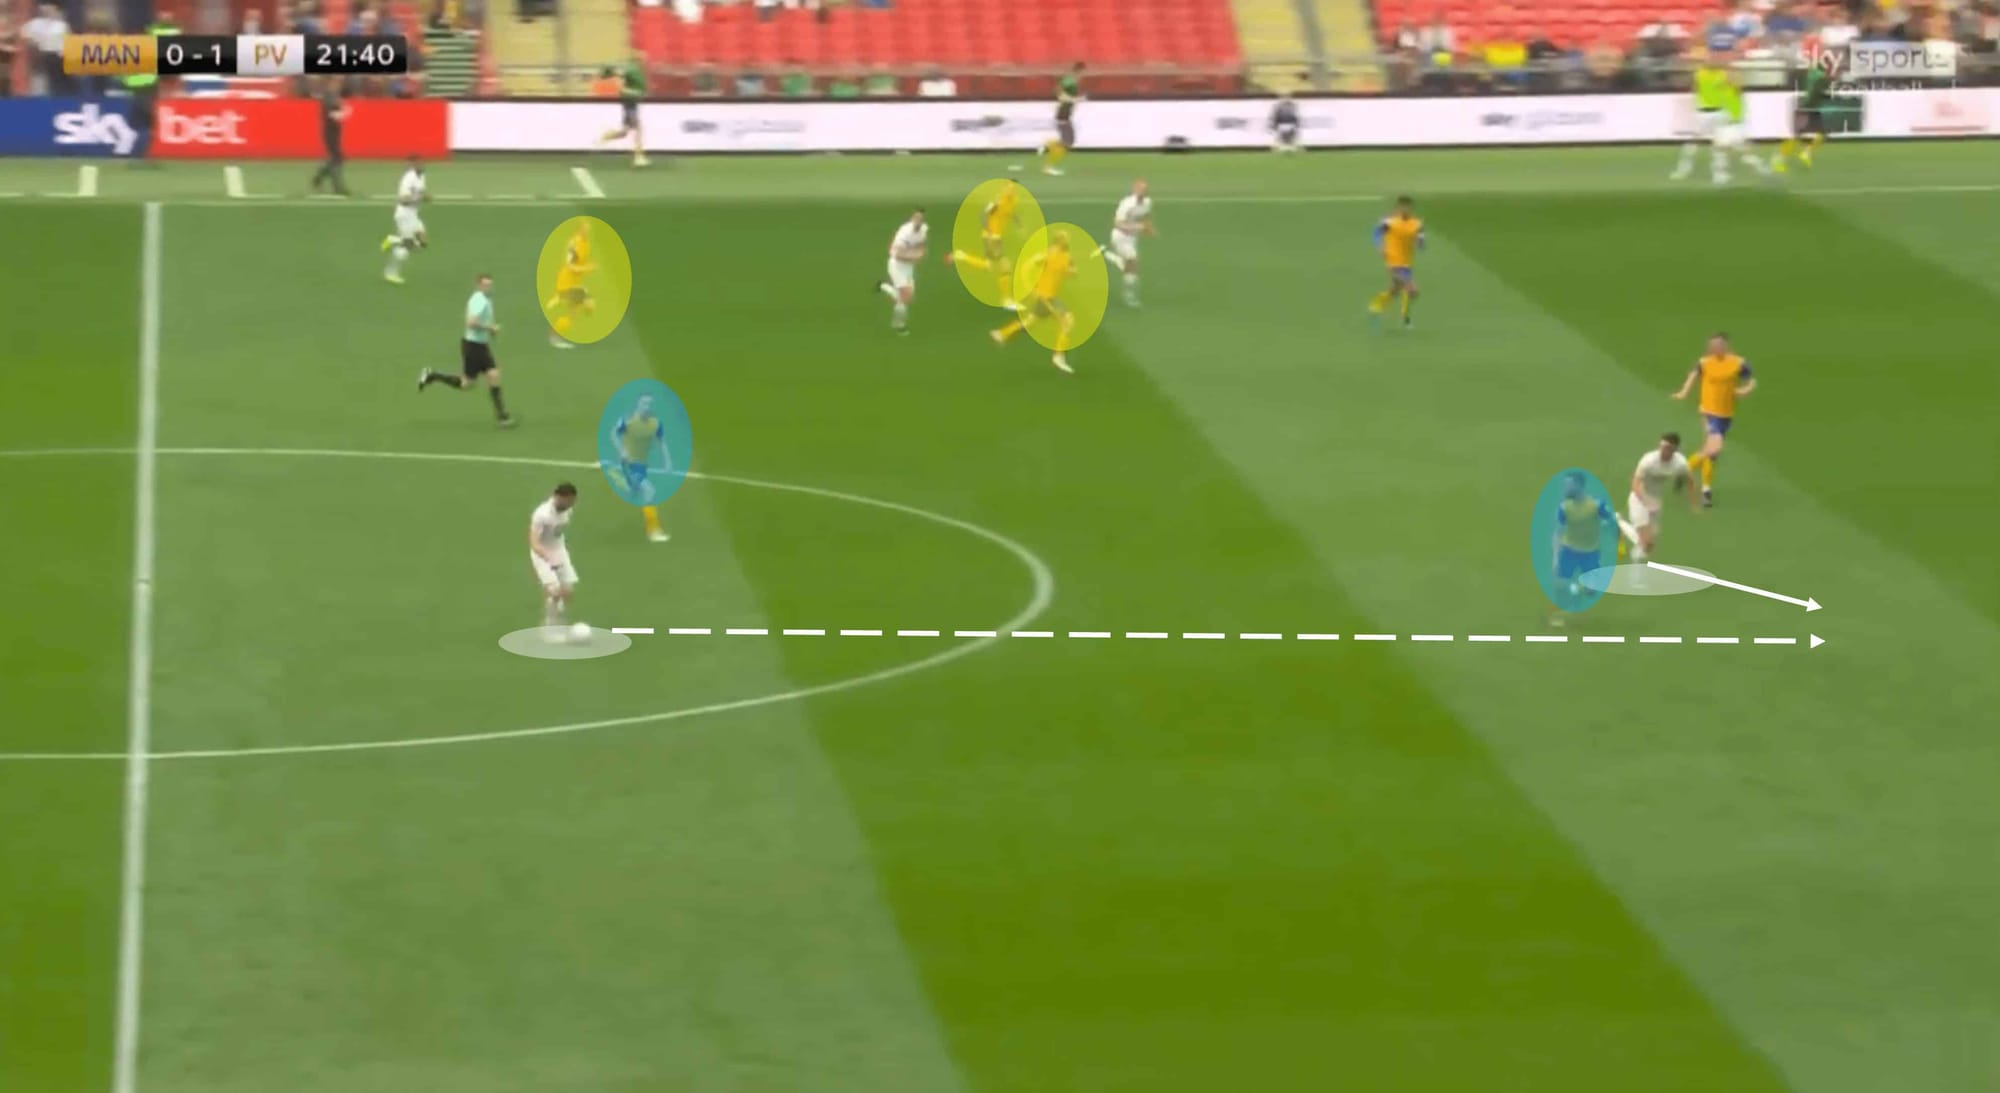
Above is another example of Port Vale launching an attack in transition following a failed attempt from Mansfield at flooding an area in midfield. We can see from the image that Mansfield had a heavy presence on the far side with very little cover in central areas – those that were present (marked blue) were caught on their heels and were unable to contribute effectively. The blue-marked midfielder’s starting position was slightly too high which allowed Vale to completely bypass him with a simple pass once the transition was in full swing.
The blue-marked defender’s positioning was also poor as he lost the Port Vale attacker who made a darting run in between the full-back and centre-back to run onto the through ball. Mansfield’s reaction to these sorts of scenarios gave Port Vale numerous chances to attack and the eventual winners would take advantage of it in the opening half an hour to effectively kill the game off and quickly take a 2-0 lead.
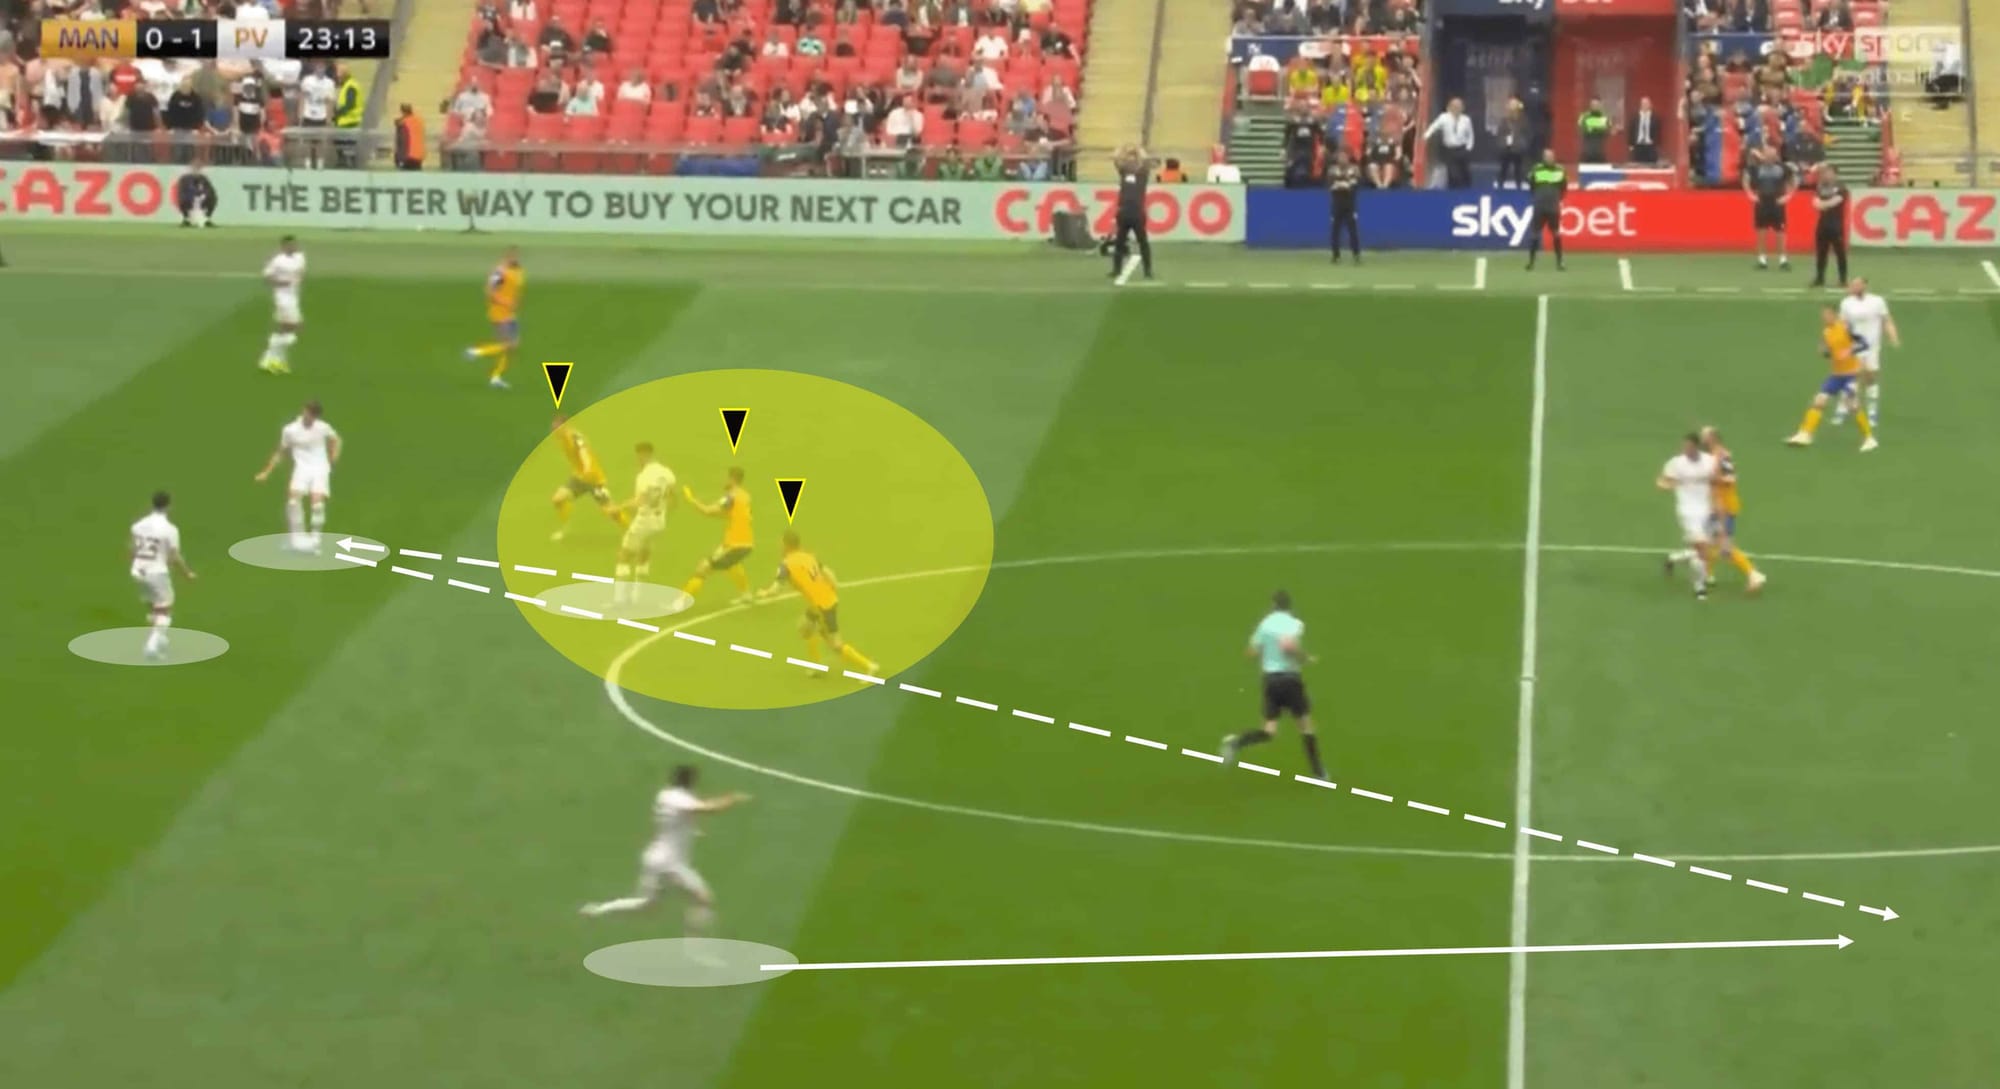
The final major example of this theme is proof that Mansfield failed to recognise that it was even happening until after this moment had passed – attempting this heavy midfield presence in a compact shape so often and so early in a game suggests it was part of the Stags’ game plan, but Port Vale were just too composed and well-prepared to deal with it.
In the image above, all three highlighted Mansfield players, who are in extremely close proximity to each other, are intent on closing the ball down following a tidy lay-off pass from Harratt. The first-time pass was then relatively simple into the David Worrall on the right, who progressed forward with the ball, with the attack eventually handing Vale a second goal. Yet again, Mansfield’s organisation and sheer lack of understanding of their roles made things all too easy for Clarke’s side.
Relentless Valiants in search of more goals
Despite the poor start to the game from Mansfield, Port Vale would have been well aware of the potential threat posed by the Stags, and therefore refused to sit back and defend their lead in a passive fashion. The Valiants appeared to be under strict instruction to keep their foot on the pedal to keep Mansfield at bay and maintain their score to nil at half-time to minimize the hope of any comeback. Below is an analysis of how Port Vale played without fear both in possession and without the ball.
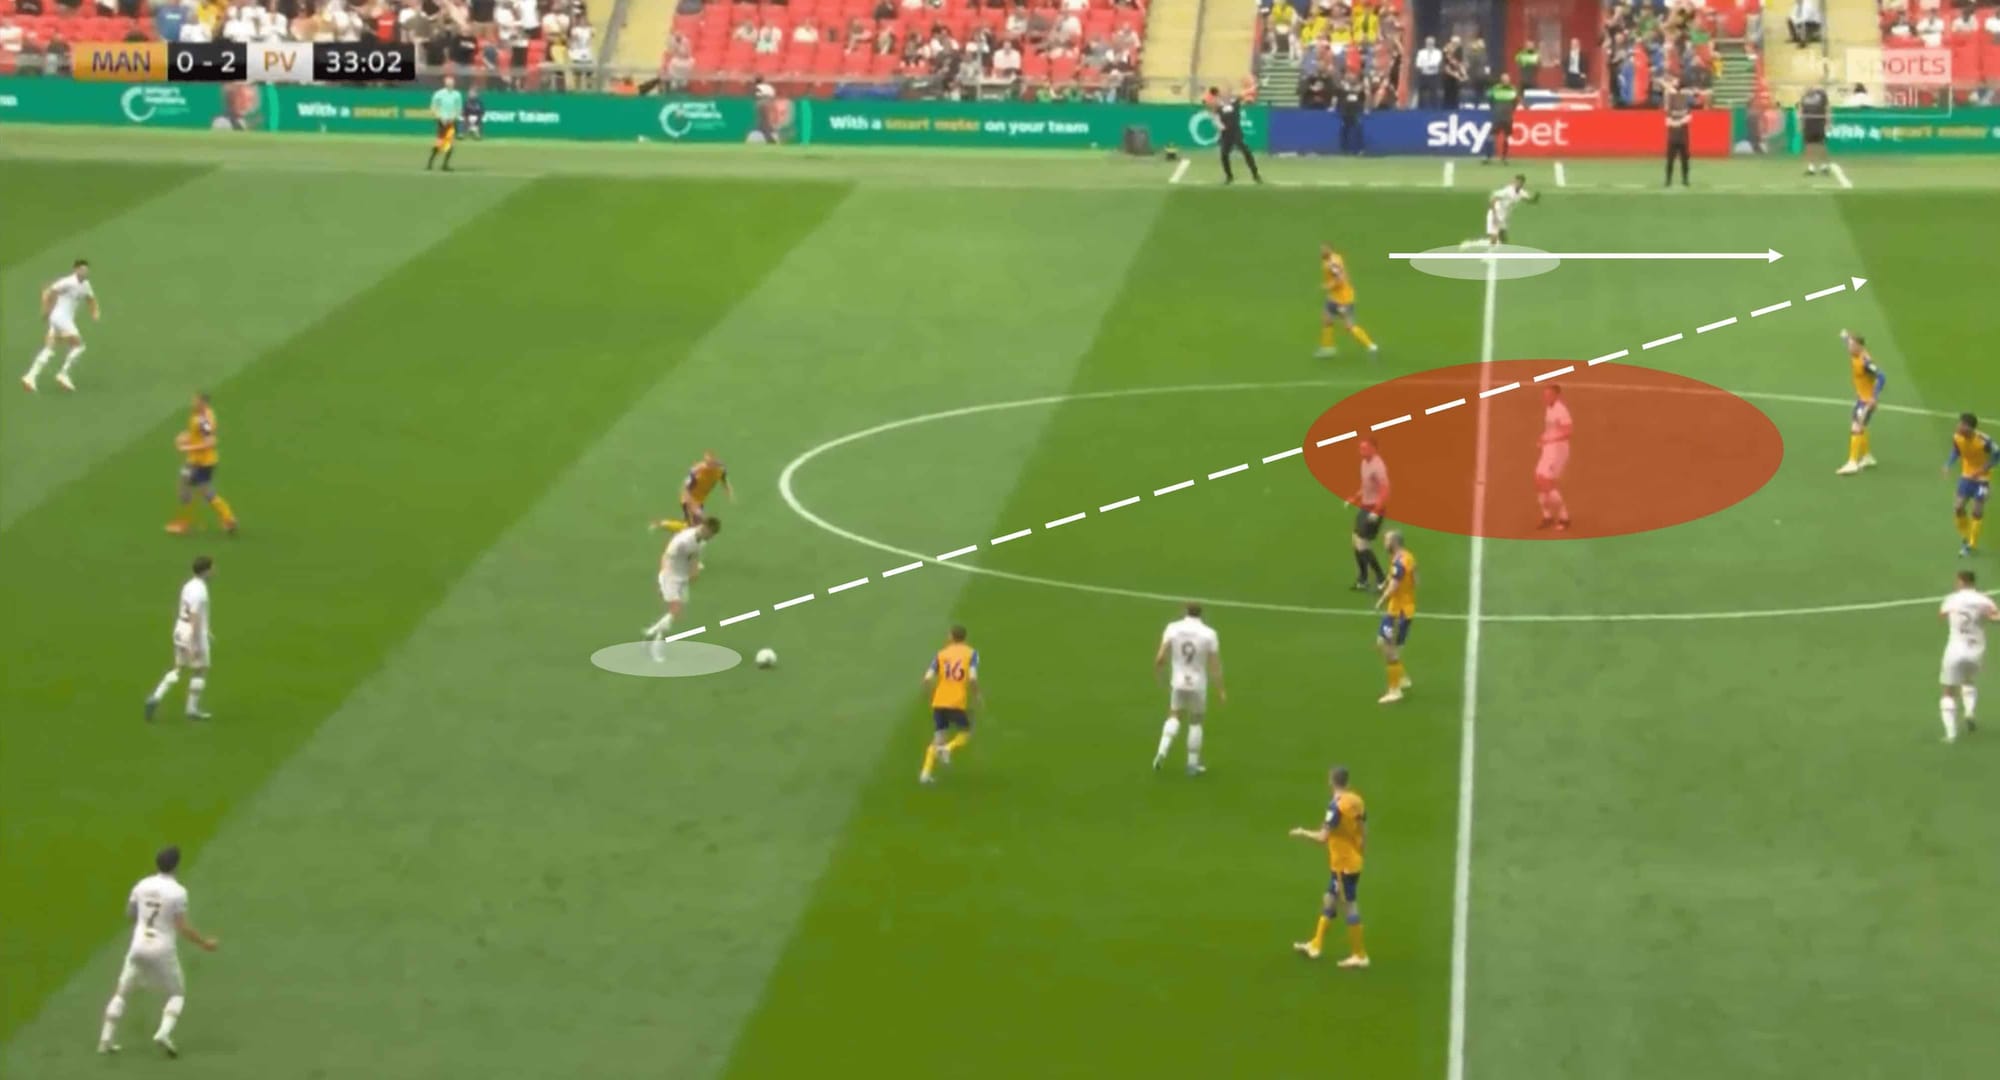
Port Vale had already found some success in targeting the flanks when in possession, and this was partly down to their formation – the wing-backs offered the width while the midfielders were able to ensure zonal integrity and presence in the middle. Again, Mansfield failed to eliminate the threat of this piece of possession becoming a sincere attack, despite the multiple options in doing so.
Poor individual defending allowed the Port Vale midfield on the ball to beat not one but two opponents to free himself into some space, while poor/non-existent marking in more than one place encouraged Vale to surge forward – there was acres of space for Benning to operate in under no pressure, while his central teammate in the red-marked zone also had a worrying amount of space to work in and could’ve been an alternate option to take this attack forward.
Credit still must go to Port Vale. Not only for the actual movement and passing ability but for playing in such a positive, forward-thinking way. The CM on the ball could’ve easily played a pass to Worrall on the right (bottom left of the image) to slow the game, maintain possession and pin Mansfield back. But Port Vale, like a shark smelling blood, knew Mansfield were hurt and vulnerable and fancied their chances of going 3-0 before half-time. Below we will see the tactics used by Clarke and his side out of possession in the latter stages of the game.
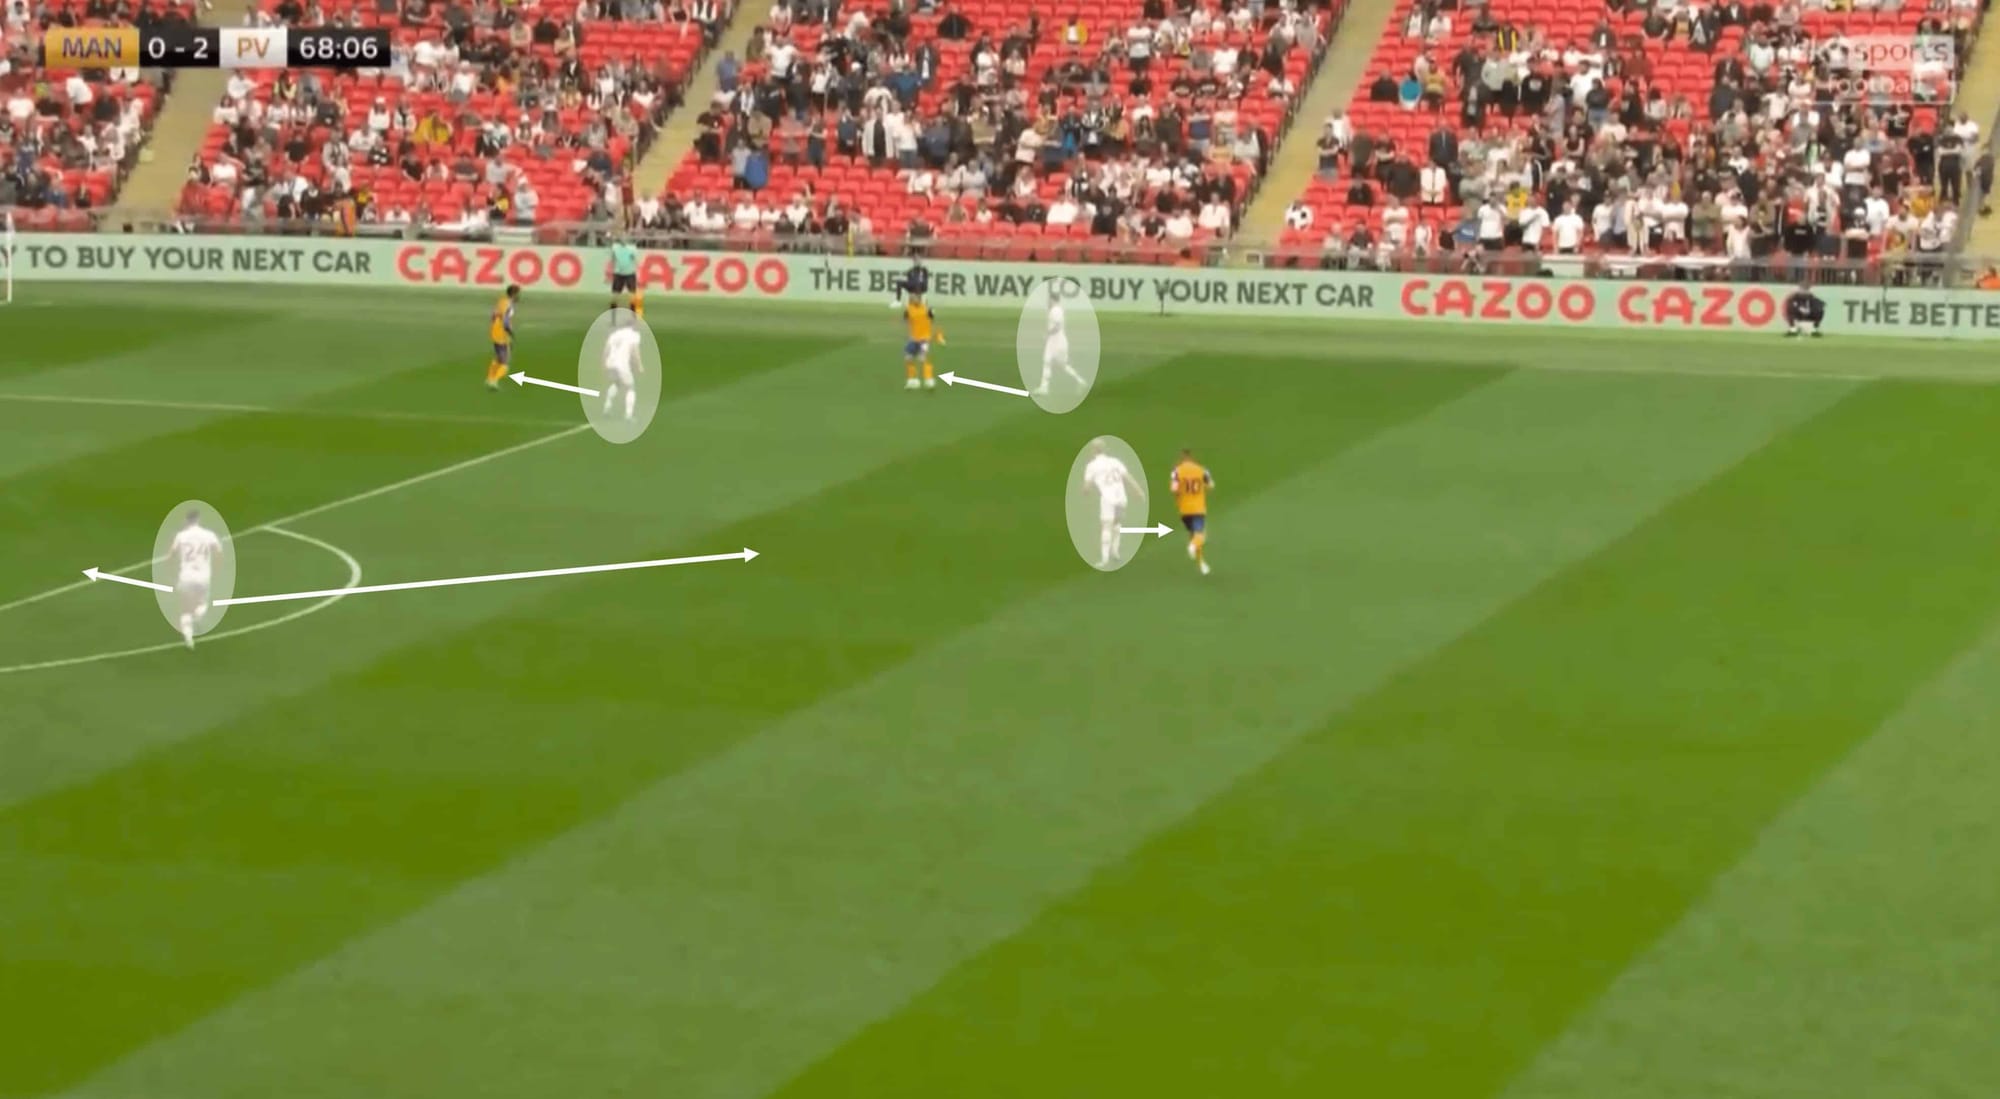
Even by this stage of the game, Port Vale were working extremely hard in every sense. We just saw an analysis of their attacking hunger, but we saw a number of instances of their defensive discipline throughout the game. As we will see below shortly, Mansfield had good spells of possession but failed to deliver due to Port Vale’s organisation deep in their own half, but the Valiants also made things hard for the Stags higher up the pitch, forcing them into more unwanted long balls.
Above, we can see that Vale would commit as many as four players to apply pressure to Mansfield in high areas of the pitch, which worked well in situations like this as they were well set up positionally, but they also outnumber their opponents in the area Mansfield wanted to play in. Having this high presence played into their hands in the event of a turnover and transition in midfield.
Stags’ struggle in attack
Despite having slightly more possession over the duration of the game (53%) and boasted stronger numbers in several passing stats, Mansfield managed just three shots on target out of eight total – a number you’d perhaps expect in a mid-table clash at the start of the season, not in a play-off final when you need a goal to stand any chance of success. Due to both the defensive capabilities of their opponents and their own attacking downfalls, Mansfield really did not give Port Vale too much worry about – the analysis below will cover that.
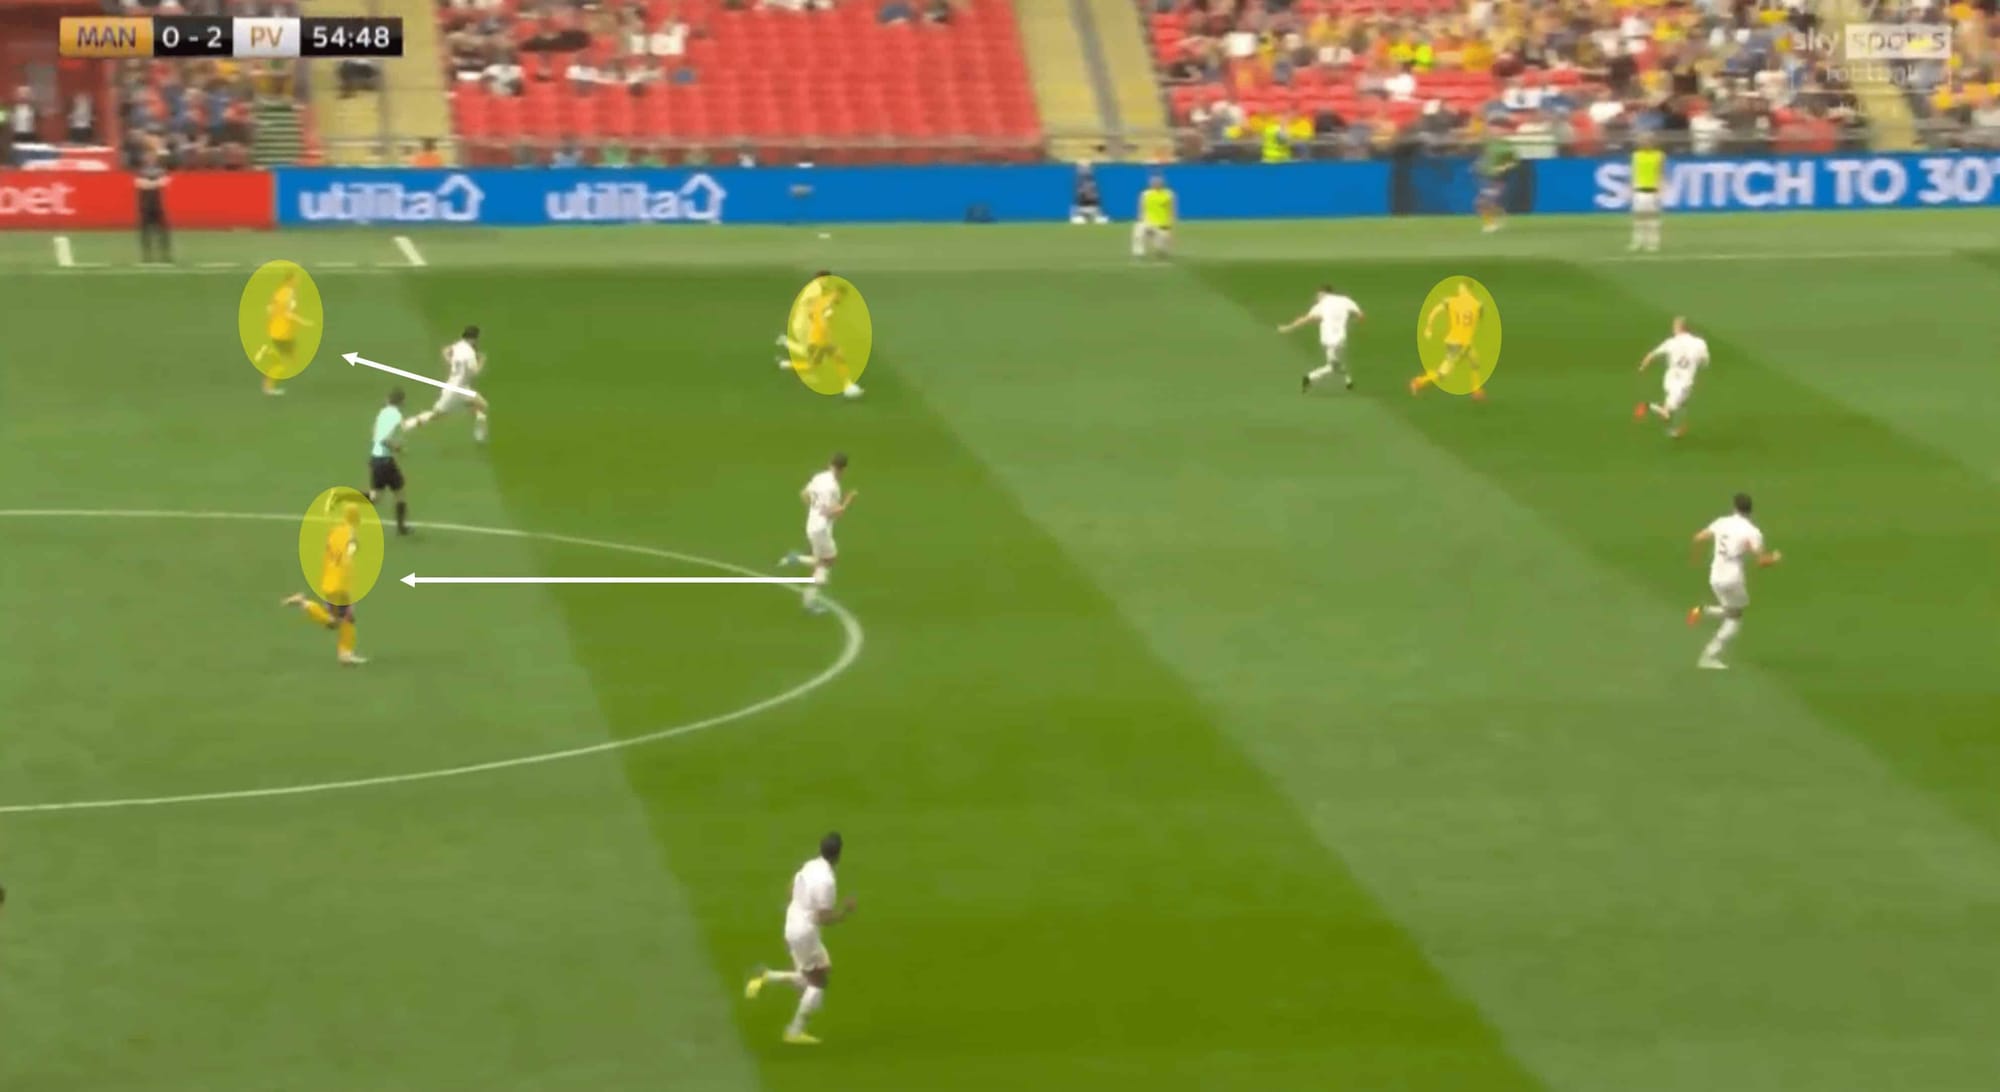
It was between the 48-58th minute that Mansfield dominated the ball with 68% possession in that period, but don’t be fooled into thinking they had Port Vale against the ropes at any point. A lot of this possession was in unthreatening zones and with comfortable, slow play. In the frame above, the Mansfield man carrying the ball is looking to drive forward into the attacking third but with next to no support. He eventually loses the ball to the opponent challenging him in the image, but even if he had wriggled free of him, he would be very limited in options to continue the attack.
This is where Mansfield struggled – building strong attacks and sustaining pressure – which is also why we saw very little error from the Port Vale backline. Decision-making from the Stags on several occasions was also questionable, as well as the choice to not commit many players forward in these kinds of situations.
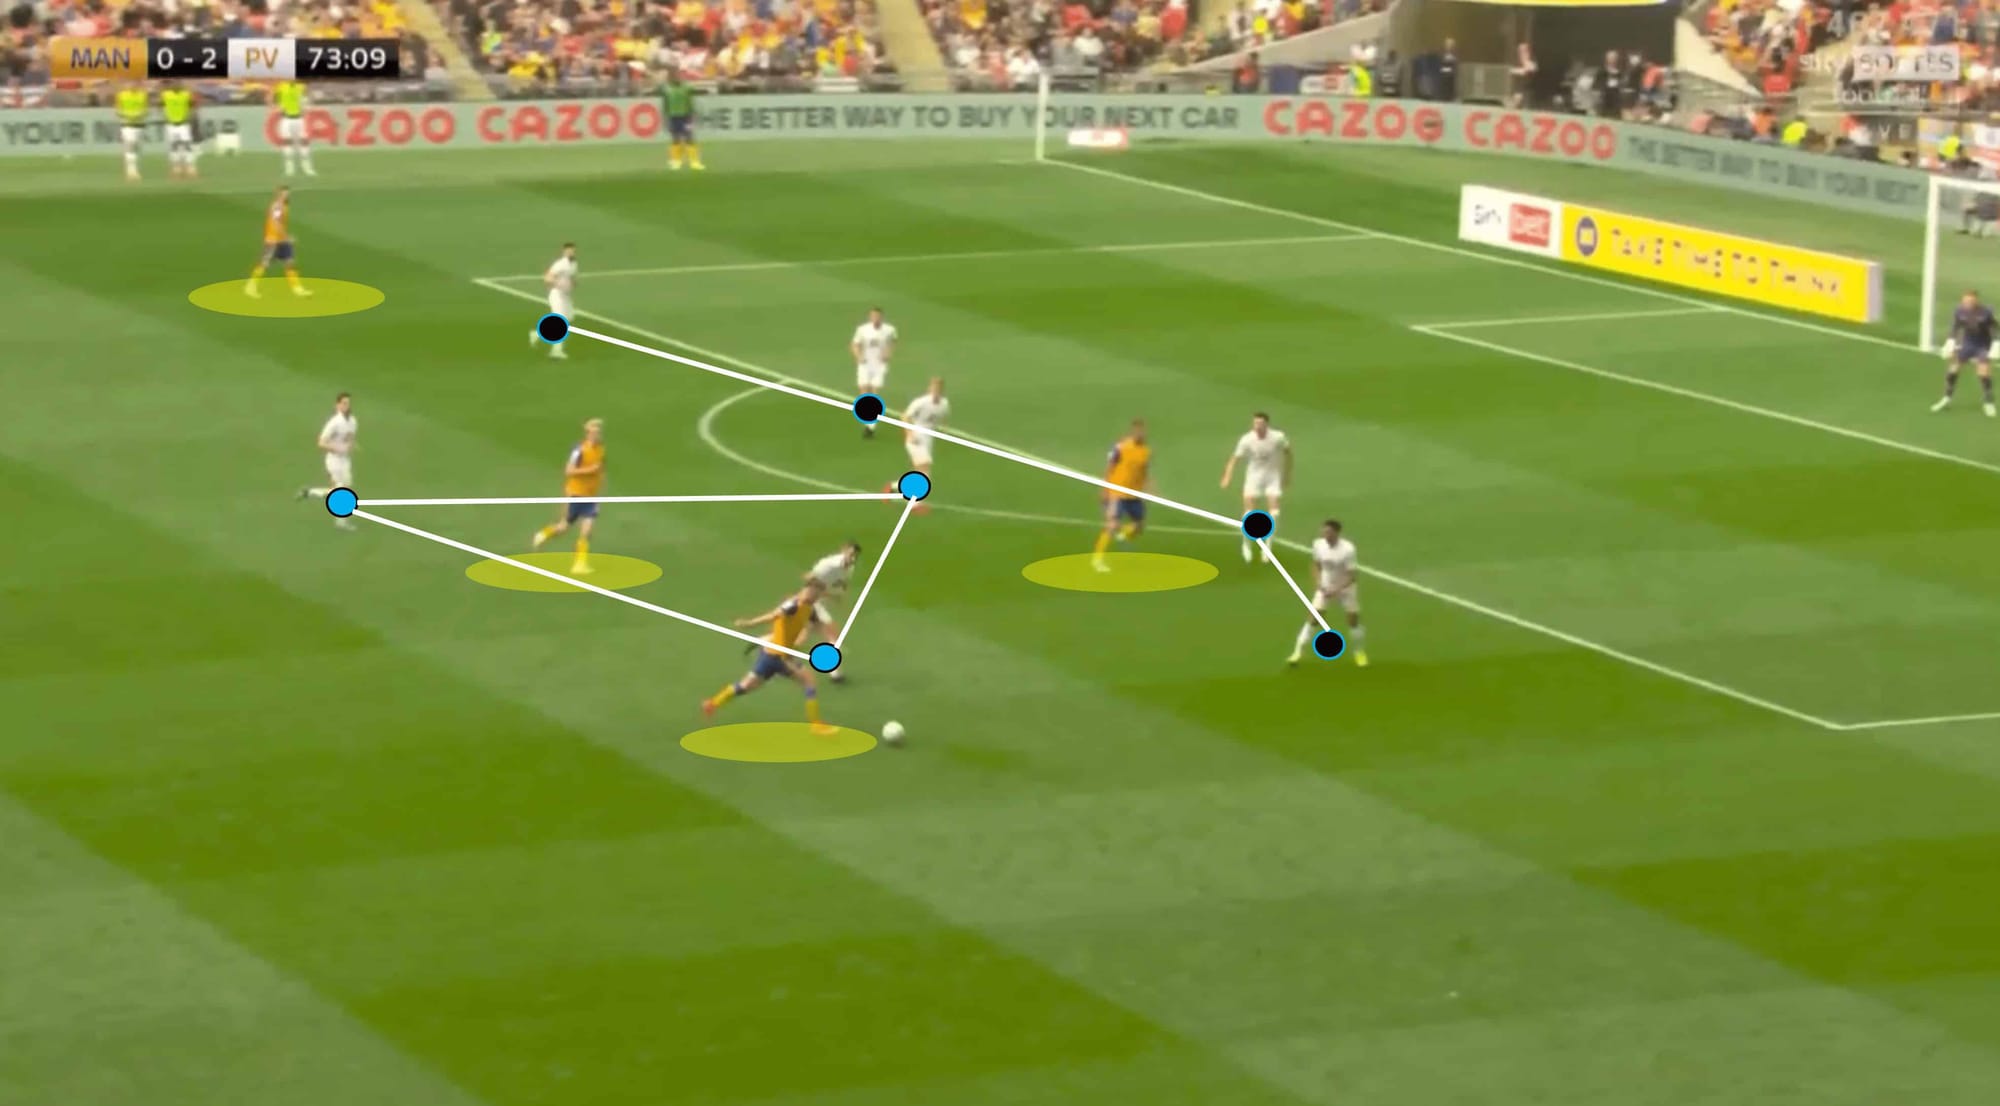
This final image above is another example of Mansfield getting to higher positions on the pitch but showing little tactical idea of how to execute the attack. Despite there being four yellow shirts in the frame (one of them being the man on the ball), their best option was deemed to be chancing a long shot from an awkward, almost impossible, angle. Very little support is given to the man on the ball, and it is really quite baffling that there was no overlapping support arriving on the flank to then receive the ball and deliver it into the box.
Praise must go to the defensive work done by the leaders though. A compact back four located at the edge of the box so as to not invite Mansfield in too much and offer their forwards very little to work with at the same time. The shape and width of the Vale midfield three also added to the difficulty in progressing this attack as they effectively blocked off all angles and options close.
Conclusion
If you didn’t know this was a play-off final, you’d be forgiven for thinking Mansfield Town were a mid-to-low table side based on this performance. They showed a real difficulty in ever getting a grip of the game and giving their opponents something to truly consider a threat.
As mentioned, sustaining pressure and continuous attacking was a huge problem area for Clough’s men and this was a major factor in Port Vale looking so dominant. But credit must go to the Valiants as they put on a display worthy of promotion. They took advantage of their opponents’ mishaps and killed any Mansfield momentum quickly with two early goals – from there it was clever game management and passion that allowed them to secure the victory and with it, promotion to the EFL League One.




Comments