England went some way to get revenge for their World Cup exit at the hands of Croatia on Sunday afternoon as the Three Lions secured a ticket to the inaugural UEFA Nations League semi-finals following a dramatic 2-1 victory over the men from the Balkans.
In this tactical analysis today, we will give an overview of my observations throughout the game and attempt to highlight key areas where the game was won and lost.
First Half Observations
England began the game in what has become since the World Cup their customary 4-3-3. While Croatia also set up in a familiar way in a 4-2-3-1.
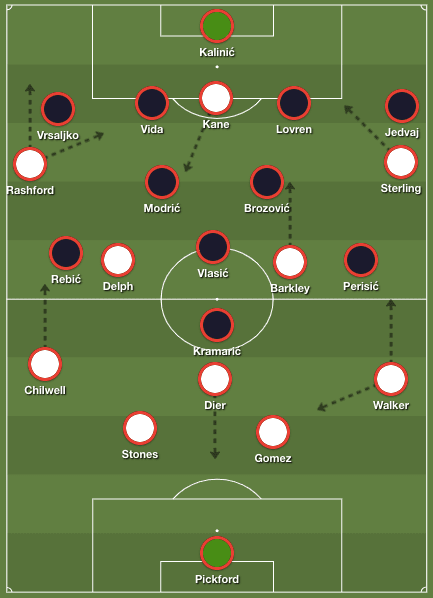
England were able to dominate the first half and really should have been one or two goals up by the time the referee blew his whistle after 45 minutes. One way in which England were able to control the first half was through their effective use of combinations when they had the ball. Across the field, there were some interesting link-ups between the players and it was clear that England had an obvious plan with what they were doing. Below are some examples.
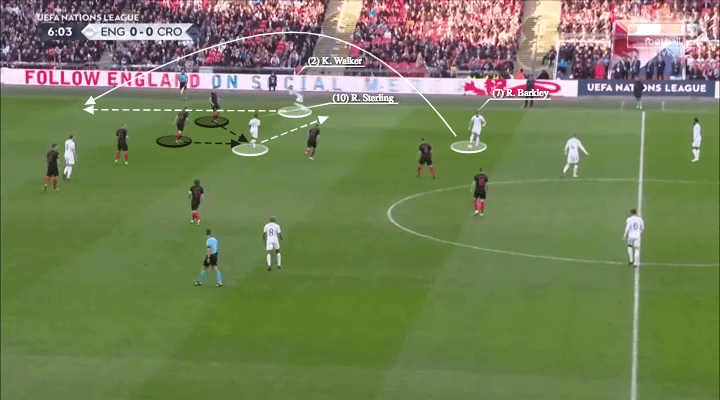
Kyle Walker and Raheem Sterling are, of course, very used to playing with each other by now and their movements should be second nature to one another. Here, we can see Sterling operating in that dangerous half-space position in behind Croatia’s midfield and thus attracting the attention of the two Croatia defenders on the far side. With Sterling dropping in and taking with him the attention of the two wide defenders, Kyle Walker is able to make a break in behind with which Ross Barkley is able to pick him out. Although the move eventually broke down, it was an ominous warning sign for the Croatia back four.
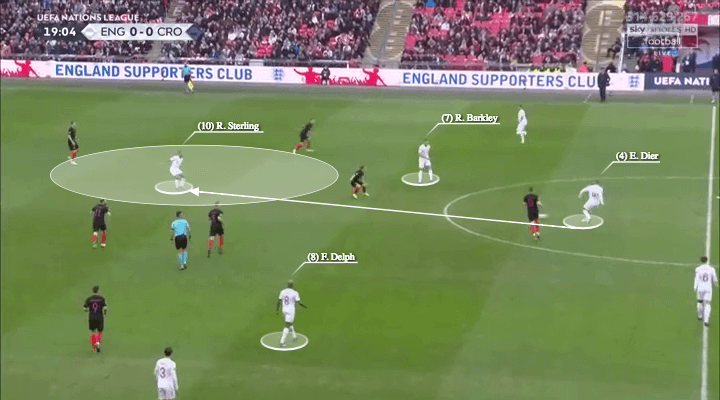
Above, we can again see that Sterling has picked up some space in front of the Croatia back four but in behind the midfield five. Ross Barkley and Fabian Delph have positioned themselves fairly wide to allow Sterling to find this space. In the World Cup, one of England’s biggest threats was when Sterling was able to pick up these positions and play in close proximity to Harry Kane. Kane, who himself is pictured off-camera, eventually picks up the ball following a dummy by Sterling and England established themselves in a dangerous position. With both Sterling and Rashford coming in from their wide positions in order to link play with Kane, Marcelo Brozović was often swamped by England players.
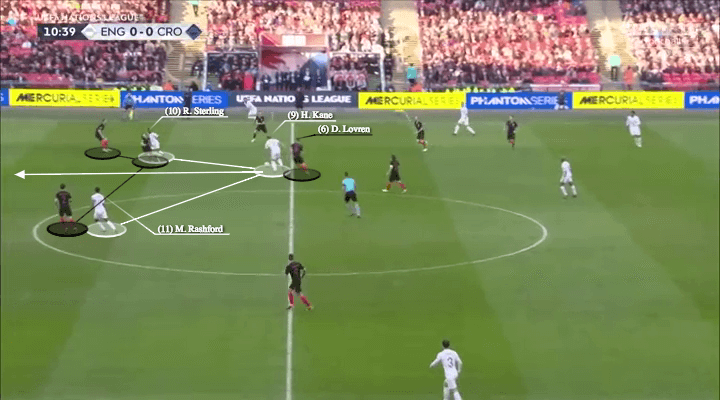
Above is a perfect example of Rashford and Sterling coming in from their wings to link the play with Kane. Without the presence of a nominal number ten, Kane is often required to drop a little deeper to link the midfield and attack as he often does for Tottenham. In this case above, England managed to lure the Croatian midfield into pressing high and as such Brozović is not in his defensive midfield position. Dejan Lovren is forced to go with Kane as he drops off creating huge gaps in the Croatian back four for Sterling and Rashford to exploit.
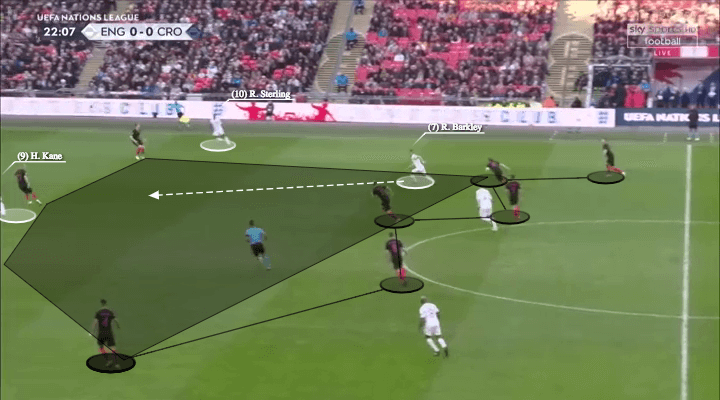
The space between Croatia’s midfield and their back four was there to be exploited for the entire first half. When watching the game, it seemed that Croatia didn’t really have a cohesive plan on how to fetch the ball back from England. Luka Modrić and Nikola Vlasić tended to press aggressively against Barkley and Delph, with Brozović aiding the press. However, the back four were stuck between coming and going. Above, we can see that the Croatian back four is being forced backwards by England’s attackers, who have positioned themselves very high. Although this space was there to be exploited, England just couldn’t find the killer instinct when they found this space.
Croatia weren’t just struggling without the ball, they had real problems developing and sustaining any attacks when they had the ball. Kramarić was often left isolated against the much more physical England centre-backs and as such, he began to drop deep in an attempt to find the ball (below).
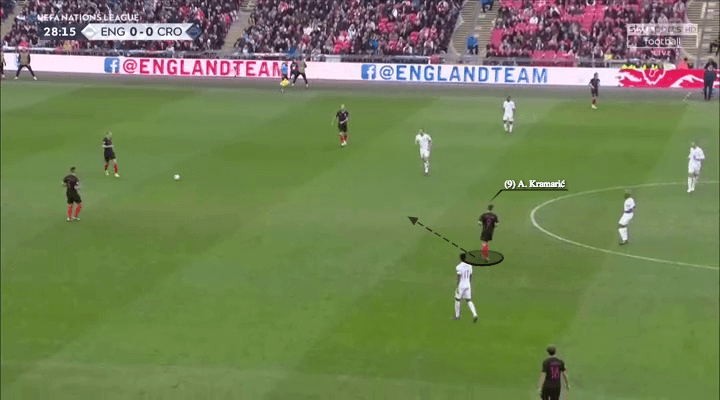
With their central striker coming short, Croatia began to find themselves quite limited in options when trying to progress the ball forwards.
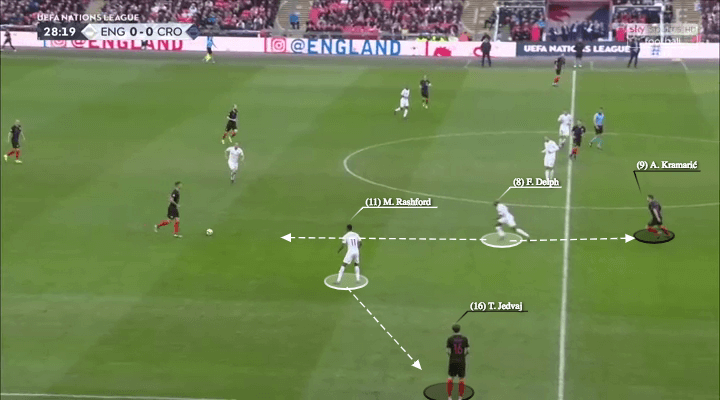
Neither Jedvaj or Kramarić are making particularly helpful movements in order to receive the ball and are both being well marshalled by Delph and Rashford, who are cutting off Lovren’s passing options.
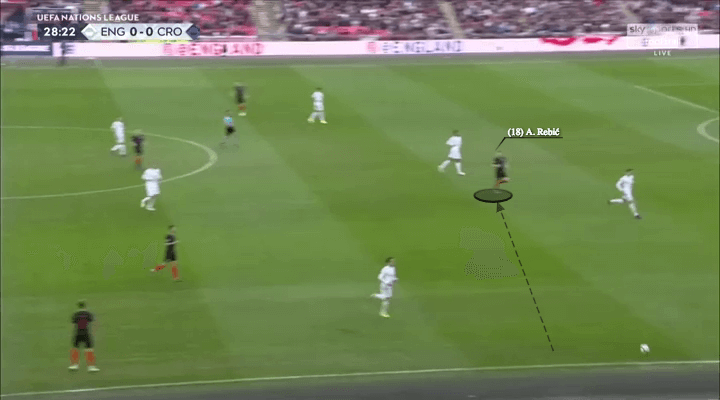
With Kramarić coming short for a lay-off, Ante Rebić instinctively moves inside to occupy that central striker position, something at which he is very adept. However, with the passing lanes well blocked by the England midfield, he is never really in a position to receive the ball and instead Lovren plays the ball into a space where Rebić was originally and they turn the ball over easily.
It wasn’t all positive for England in the first half, however. They did go in at nil-nil and if Croatia had been a little bit more efficient with the ball, they could have caused England some more problems. The role of Eric Dier was slightly perplexing throughout the game, especially in the first half.
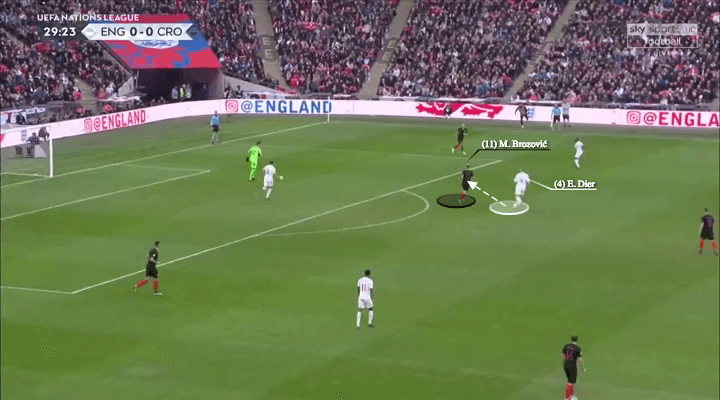
Although Dier was operating as England’s holding midfielder, he was often the highest pressing of the midfield three but wasn’t all that effective in this role. Above, we can see that Dier has tracked Brozović and forces a long clearance by the goalkeeper.
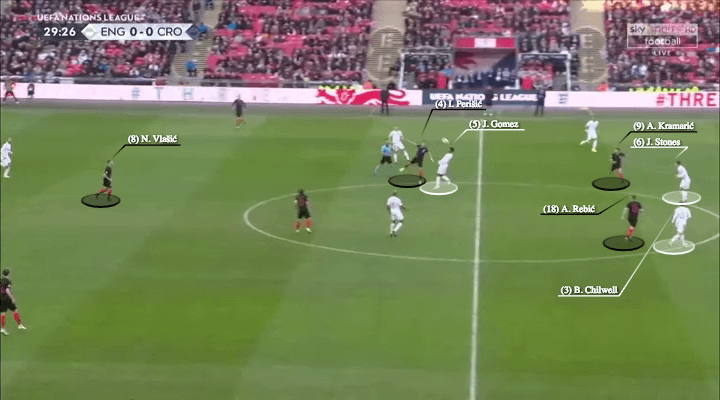
However, the clearance falls into the area in which Dier would’ve been occupying which forces Joe Gomez to attack the ball in a much more advanced position than the rest of the back four. This leaves Kramarić and Rebić 2v2 against Stones and Chilwell which is not a situation in which England want to leave themselves. With Dier pressing the opposite holding midfielder, Nikola Vlasić (Croatia’s number 10) is able to move into space as he doesn’t really have anyone tracking him. Vlasić does eventually pick up the ball but Gomez is able to recover and drop back into position.
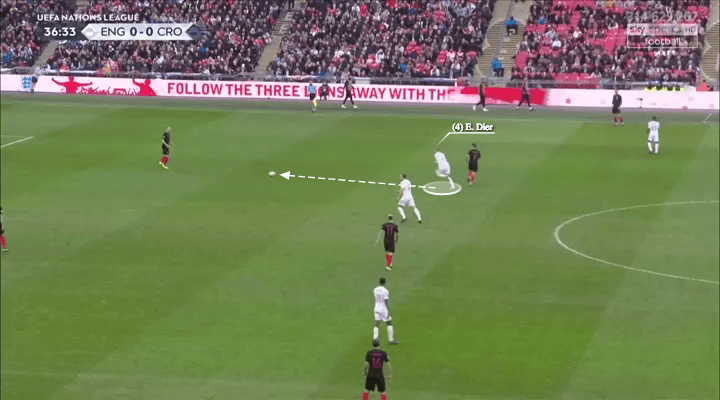
Again slightly later in the half, we see Dier being not only the highest midfielder to press but the highest player full stop. Here he is following a pass into Vida and attempting to press him.
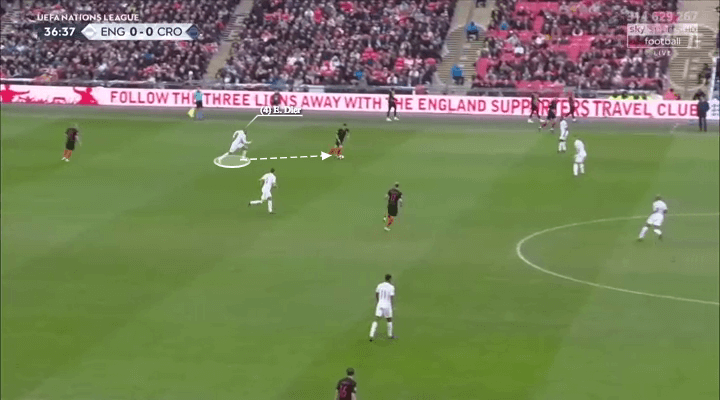
Dier is easily bypassed and is now forced to chase back the Croatian midfielder, who can carry the ball into England’s midfield.
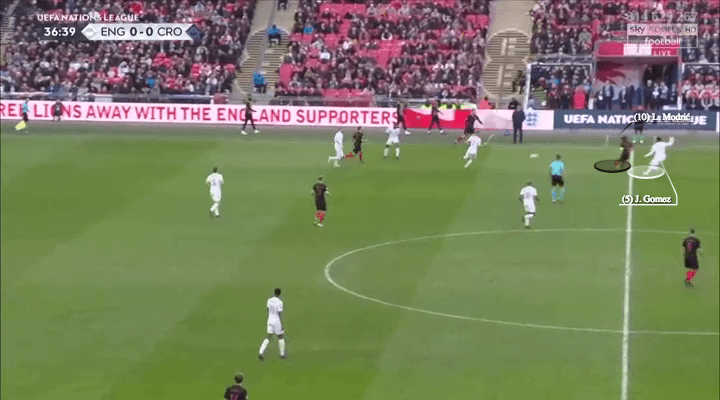
Again, Joe Gomez is forced to commit out of his defensive line, this time to try and cut-off a ball into Luka Modrić’s feet.
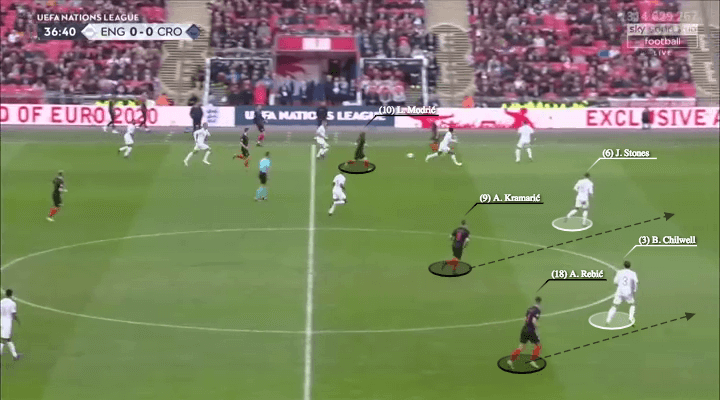
With Gomez pressing up out of the back four, this again, leaves Croatia with a 2v2 opportunity and England without their holding midfielder to protect them.
Eric Dier is a very capable presser of the ball, however, he would often break out alone and look to charge the ball wherever it was on the field. His pressing would often disrupt England’s defensive structure and leave them in potentially vulnerable situations.
Second Half Observations
The second half began in much the same way as the first had gone. Croatia were still leaving large gaps between their midfield and defence. Below, we can see that four of the five Croatian midfielders have been attracted towards the ball, leaving a huge space for Rashford to break into. Unfortunately, the move again breaks down but it appeared as though Croatia hadn’t learnt their lessons.
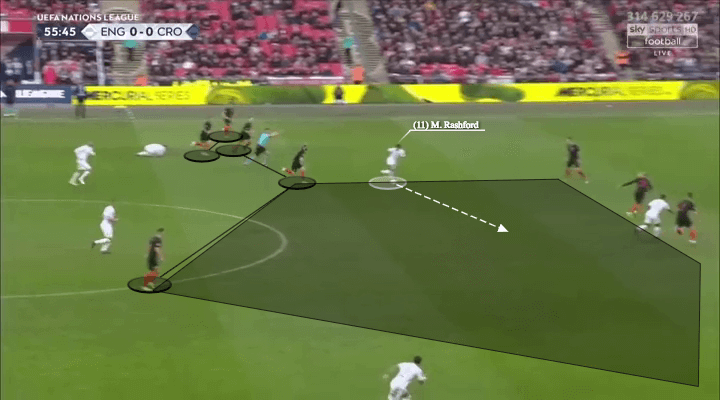
However, it was Croatia who took the lead somewhat against the run of play.
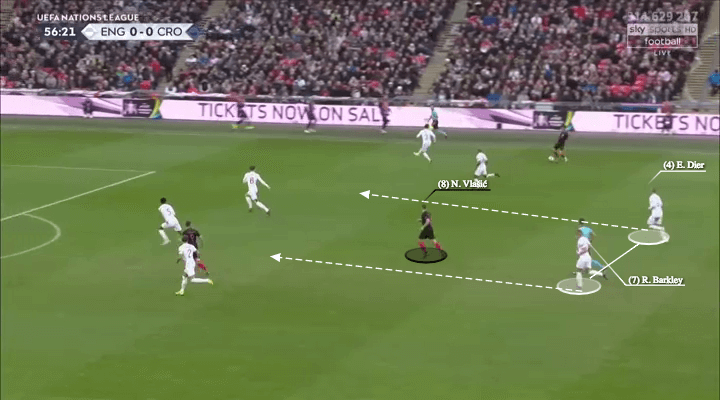
The goal did arise from some similar issues that England were having in the first half. Above, we can see the build up for Croatia’s goal and I have highlighted the positions of Eric Dier and Ross Barkley in relation to Croatia’s attacking midfielder Nikola Vlasić. They are poorly positioned. With Dier being the assigned defensive midfielder of the midfield trio, you would expect him to be positioned much closer and possibly goal-side of his opposite number Vlasić. However, both him and Barkley are caught ahead of the ball.
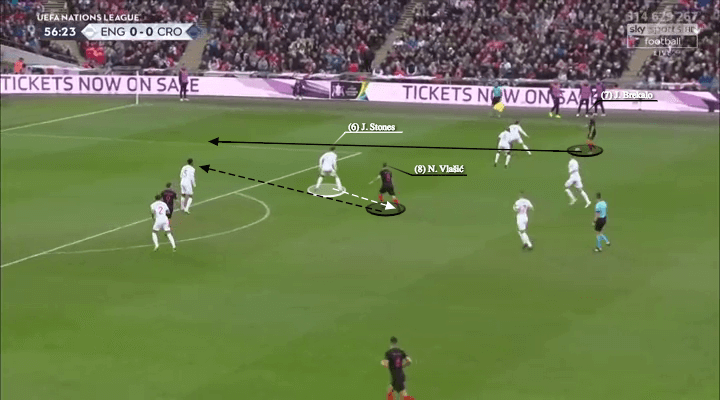
With neither Barkley nor Dier providing effective support for Stones and Gomez, Stones is forced to make a decision. He either stays in his line and allows Vlasić to pick up the ball in space on the edge of the box or he tries to anticipate the ball into Vlasić’s feet by stepping up to intercept the pass. If Dier was in a position to stop the ball into feet then Stones could stay in his defensive line and the danger may well have been averted. However, Stones chooses to step up and Brekalo plays a smart ball in behind him into space.
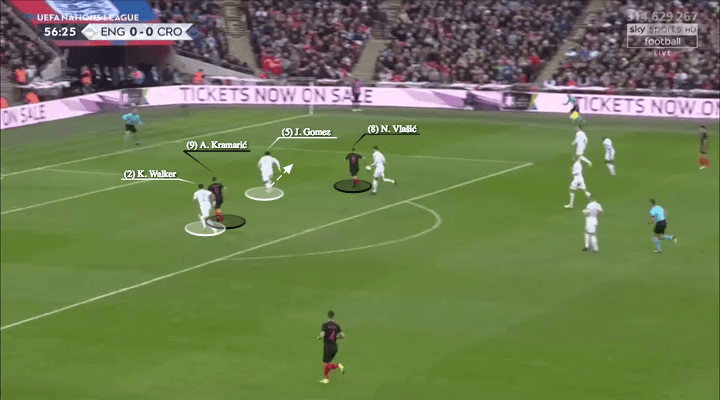
With Stones stepping up, Joe Gomez is forced to move across to cover the pass, leaving Kyle Walker 1v1 at the back post which allows Kramarić the eventual goalscorer time and space to bring the ball down following Vlasić’s cross.
The goal stunned England and the game fell into a bit of a lull for 20 minutes and Croatia were able to grow into the game and England’s attacking dynamism from the first half disappeared. Croatia began to press England much more effectively and started to lay traps for England as seen below.
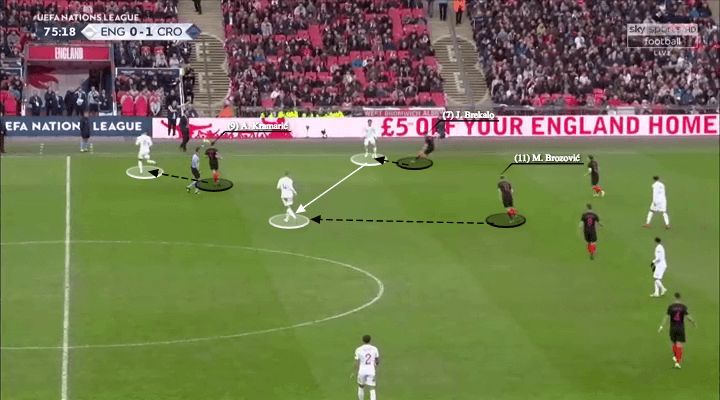
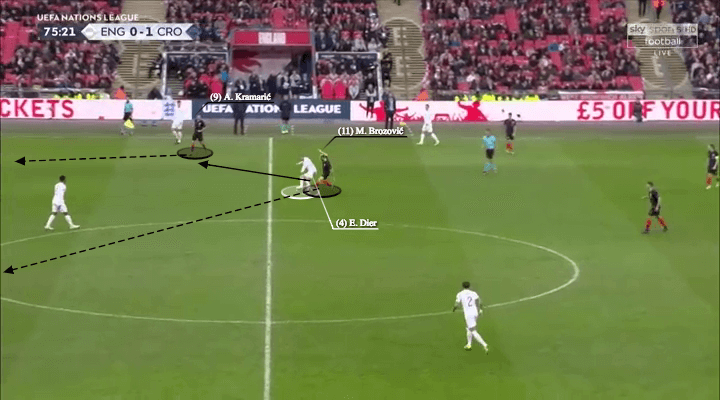
Croatia manage to cut off all but one passing option for England and are thus able to win the ball (below) in an advantageous position and Kramarić is fed through by Brozović who eventually has his shot blocked on the edge of the box.
The combination play from the first half had deserted England and the players ended up getting into each other’s ways more than anything. Below, we can see both Chilwell and Sterling making a similar run into the same space and leaving Dele Alli with very little options on the ball.
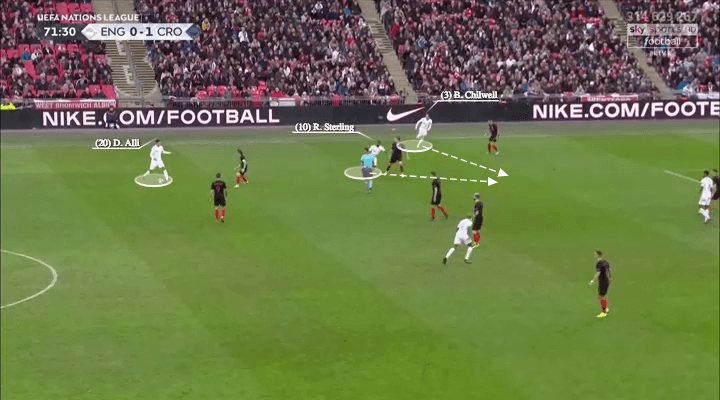
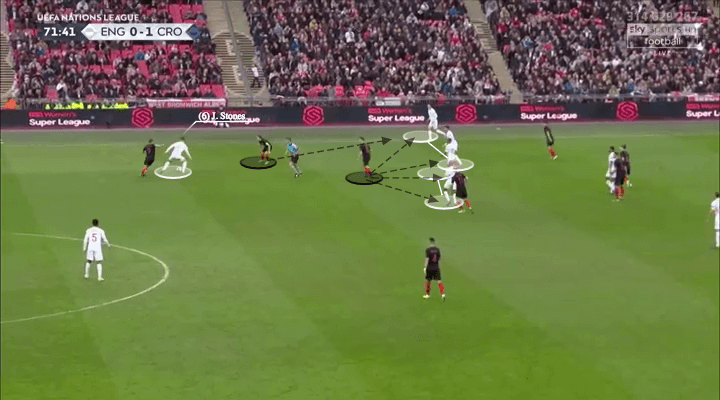
Alli is forced to play the ball back to Stones (below) and he himself moves into the already congested half-space. With four England players within a couple of yards of each other, it becomes very easy for Croatia’s players to shadow press and block off the passing lanes for England’s deep players. Stones is forced to dither on the ball as he doesn’t have a clear pass into a teammate’s feet and eventually loses the ball.
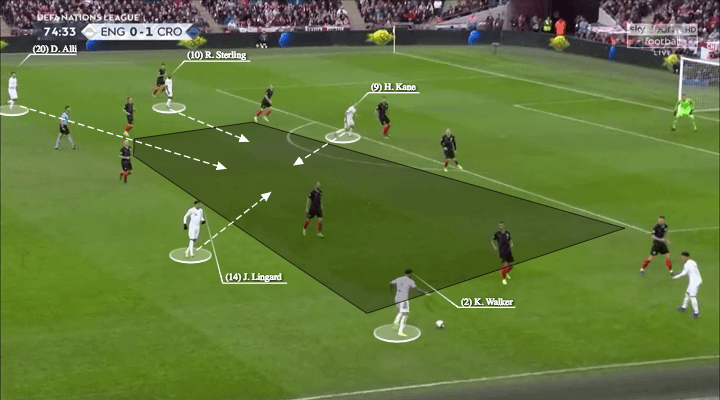
On the other side of the pitch, England were having the opposite problem. Below, we can see Kyle Walker with the ball with very little options. Croatia have left a fairly sizeable space between their midfield and defence but no England player is breaking their neck to offer an option in this dangerous area. If one of Lingard or Sterling, for example, moved into this space, they would begin to ask questions of the Croatia defenders, who would be forced to make a decision to move up out of their defensive line and press the half-space player or to stay and give the player time on the ball.
With no clear option for a pass, Walker attempts a hopeful ball into the box which is easily gathered by Kalinić.
Nonetheless, England were able to turn the game around thanks to their trusty set pieces. Throughout the game, England were causing numerous problems for Croatia from dead ball situations. Below are some examples.
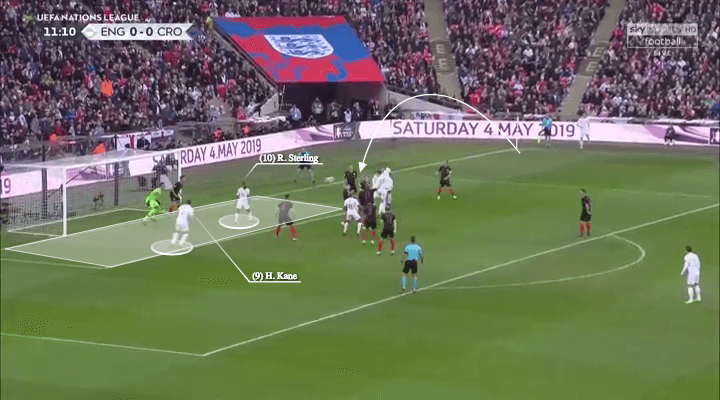
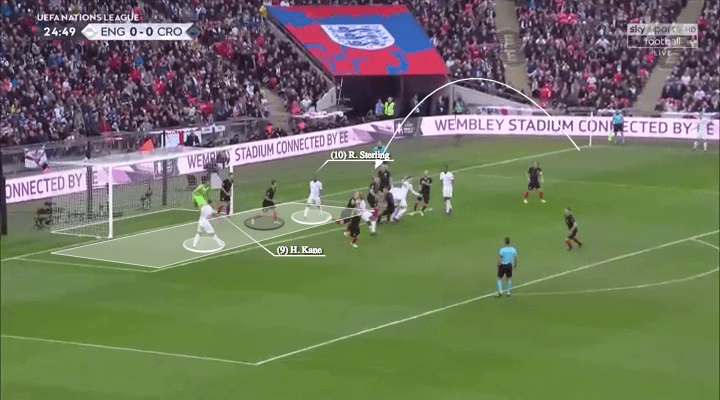
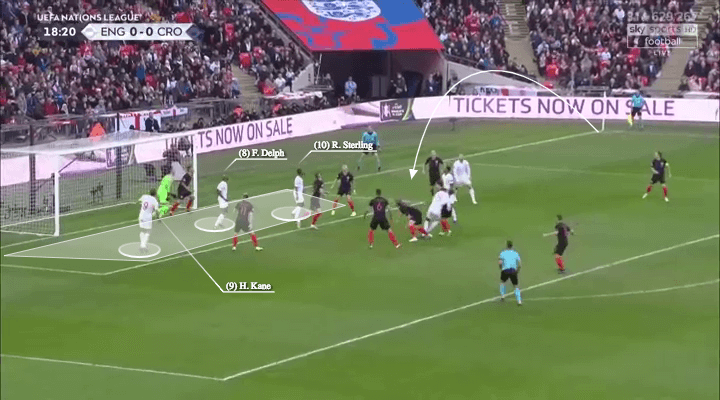
England have a clear plan with their corners. They want the likes of Stones, Gomez, Dier or Maguire, if he is on the pitch, to attack the initial delivery. The cross is usually an out-swinger. When the ball is on its way in, Harry Kane will loop around the back and position himself in the six-yard box alongside Raheem Sterling or Fabian Delph on occasion. We can see on the three images above that they are rarely tracked. Kane’s headed goal against Tunisia in England’s first group game came from this exact situation. Although England didn’t manage to take advantage on Sunday, they certainly posed a threat every time.
England’s first goal instead came from a long Joe Gomez throw-in.
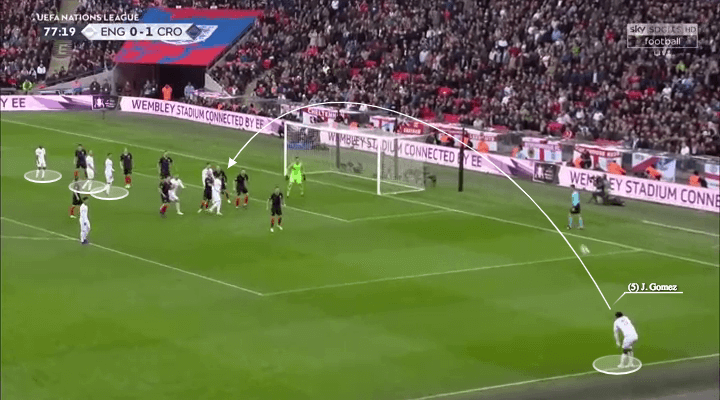
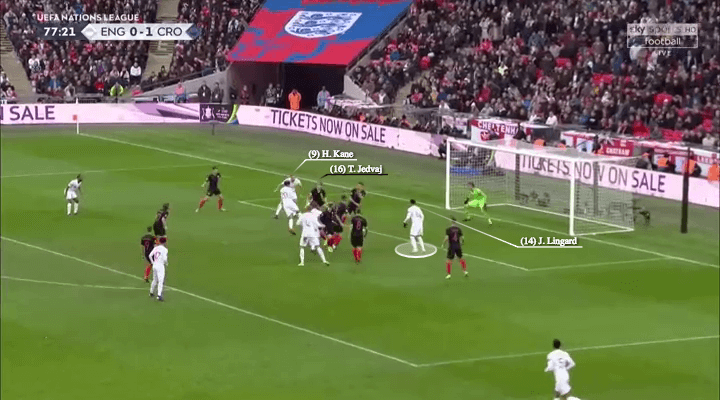
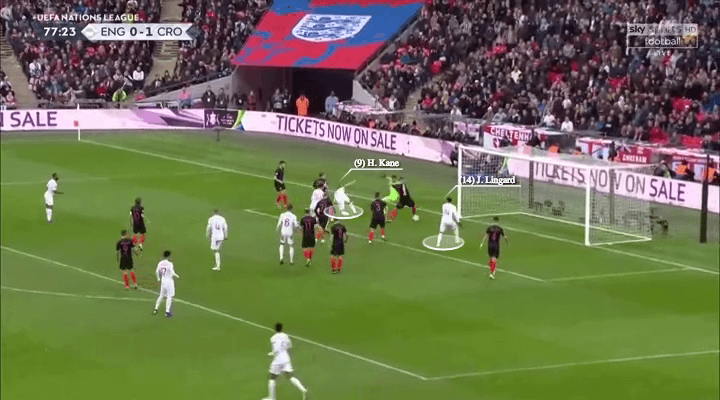
The same principles applied, however. A select group of players would attack the initial delivery with Kane and another looking the pick up the second ball at the far or near post. On this occasion, Harry Kane won the second ball at the far-post before playing it across to Lingard at the near-post, who had a tap-in.
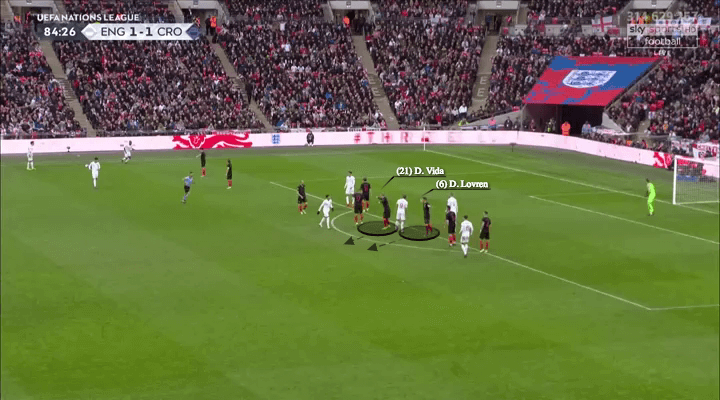
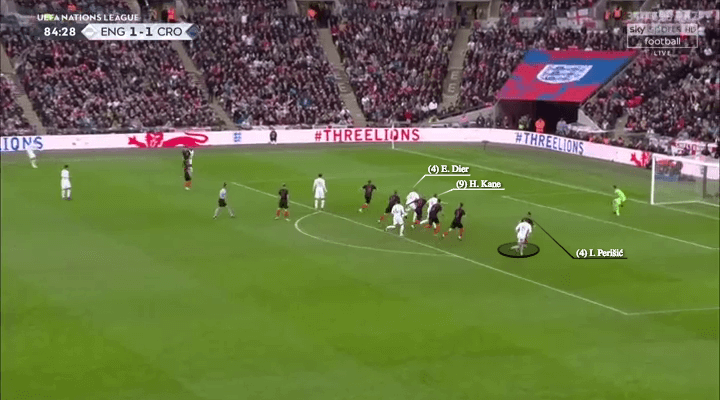
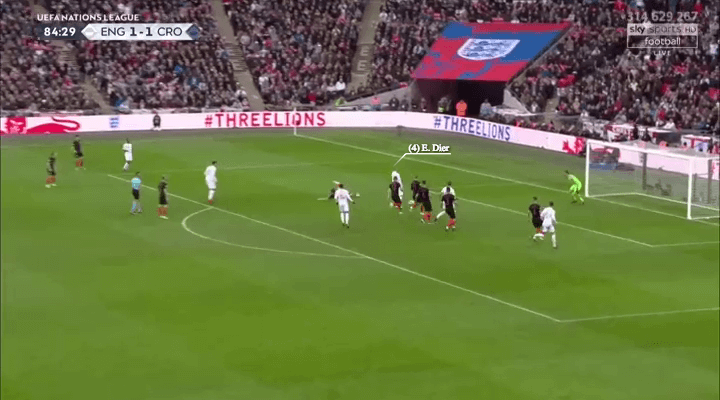
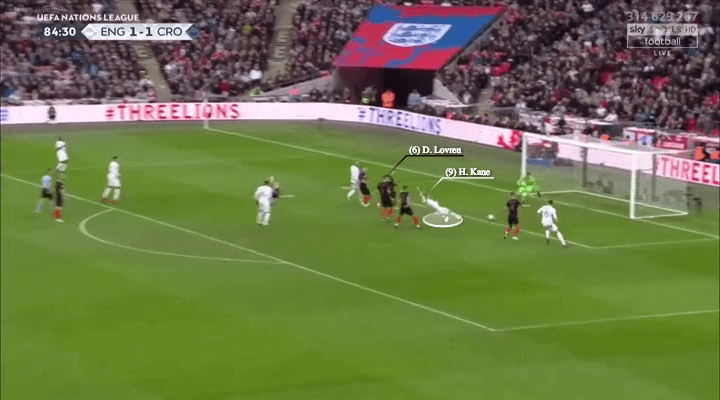
England’s second goal and the eventual winner came from a wide Ben Chilwell free-kick. Chilwell struggled with his delivery all game up until this point when he picked the perfect cross. Note in the first image that Vida and Lovren are trying to push their defensive line upwards and out of the box in order to force Chilwell to put in a pin-point ball but also to give their goalkeeper time to come and claim if he can.
This doesn’t work, however, as the Croatian line is staggered and everyone is played onside by Ivan Perisić at the back post. Eric Dier makes an intelligent run to the near post which distracts the Croatian defenders and also blocks their view of the ball.
Harry Kane gets the first touch on the ball as it bounces just outside the six-yard box which is a testament to the quality of delivery. Croatia will be disappointed to concede from two set-pieces but England worked both incredibly well and deserved to score from a number of dead ball situations earlier in the game.
Conclusion
Overall, England deserved to win following their first-half exploits. It is difficult for National sides to play the way club sides do and as a result, they may not always score free-flowing goals that a Manchester City would be proud of. However, England at the moment are one of the best sides in the world when it comes to set-pieces and as of yet, no-one has worked out has to stop them. It is a great achievement to progress from this group of three strong sides and is a testament to the work done by Southgate in galvanising a young group of hungry England players.
Croatia, however, looked like a team who had recently suffered a devastating defeat in Russia and a shadow of the side who dispatched with England in the semi-final. With many of their star men moving into their twilight footballing years, it is going to be a difficult task for them to move on from the likes of Modrić, Lovren and Perisić in the coming years. Relegation into League B will be disappointing for them but it may give them an opportunity to bleed in some of their younger stars and build their competitive experience against sides that are less imposing than England and Spain.

Comments