Much has been made of Leicester City’s squad – an excellent assortment of highly technical players under a great manager in Brendan Rodgers. With Liverpool pulling away on a successful title charge by every game, the Foxes need to make sure that their displays are within perfection.
This English Premier League game against Daniel Farke’s Norwich City F.C was a perfect game for Leicester to show their dominance and put pressure on Liverpool.
On the other side, the Canaries desperately were looking to hold out a draw. Being in the penultimate position in the league, Farke’s young Canaries have been battered and have just struggled to hold on.
In this tactical analysis, we show you the tactics of both Norwich City and Leicester City. We will show you the analysis of why Farke’s Norwich battled out a draw with Rodger’s Leicester.
Lineups
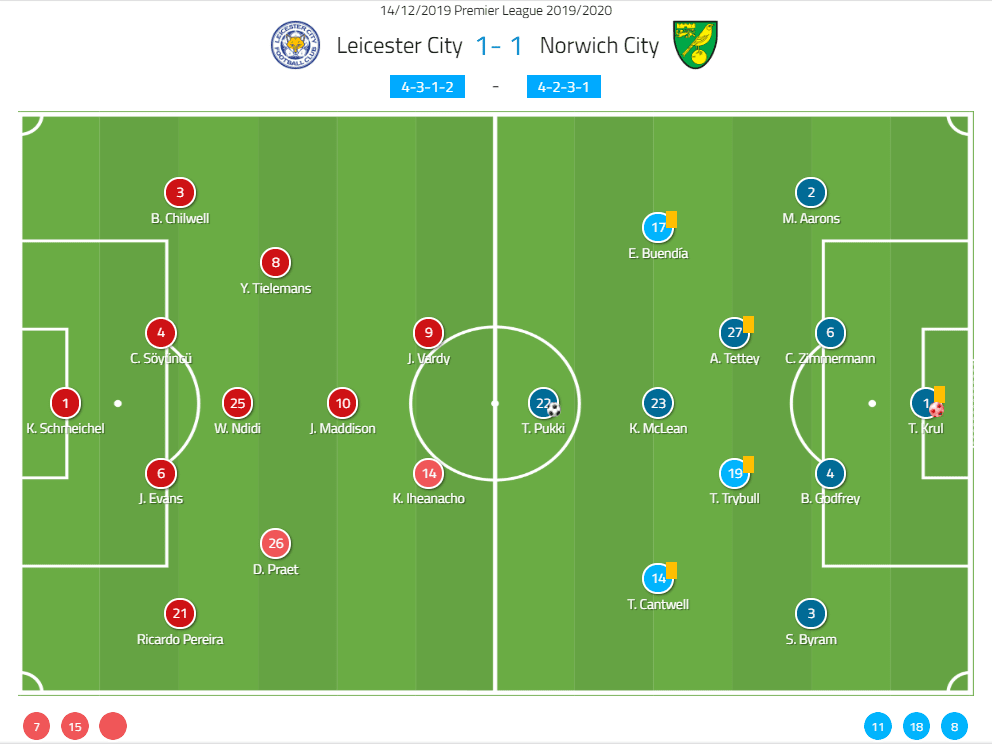
Rodgers made no changes to his Leicester squad that demolished Aston Villa FC 4-1.
On the other hand, Farke made two changes to his squad that lost to Sheffield United 2-1. Central defensive midfielder Mario Vrančić was replaced by Tom Trybull while attacking midfielder Onel Hernández was replaced by Todd Cantwell.
Leicester’s dynamic four ultimately hurt the Foxes in attack and defence
The midfield that the former Celtic manager put out was set in a diamond with Wilfred Ndidi at the base, Youri Tielemans and Dennis Praet as wide midfielders and James Maddison as the central attacking midfielder.
The idea from the Foxes was ingenious in a lot of ways. Both Praet and Tielemans are excellent technically and great athletically. The idea was to have both Belgians in the halfspaces. This would position Leicester’s best, technical midfielders near their attacking full-backs. Combine this relationship with the use of a two-striker system and you would create triangles on the wings.
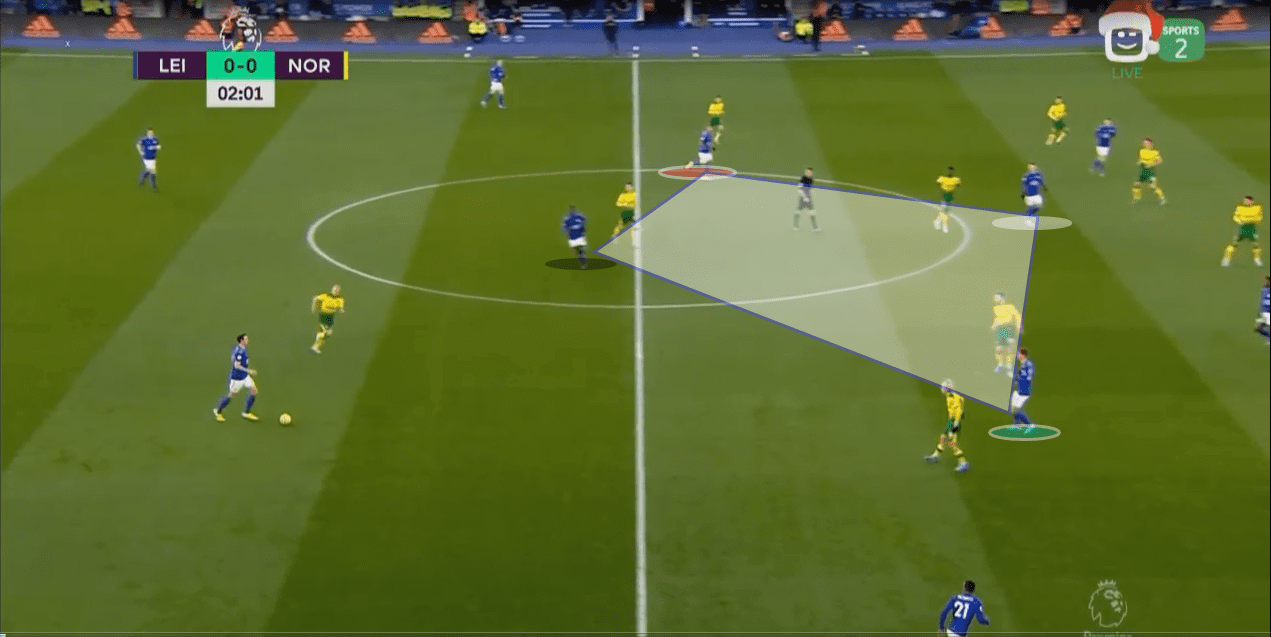
Here we see the diamond assortment of Leicester’s midfield. Ndidi is shown in black, Tielemans is shown in red, Praet is shown in light blue, and Maddison is shown in white. Notice that inside this diamond, there is a huge space of which Leicester can’t take advantage. We’ll come back to this later.
In this picture, we see Praet nicely positioned between two Norwich players allowing the centre-back to pass to the right-back of Leicester as Praet attracts the attention of the two Norwich players.
Praet and Tielemans also created a nice complement to the Foxes’ attacking full-backs as they would always be there as a passing option. At the same time, these technical midfielders allowed the Foxes to attack, especially in the buildup.
While doing buildup, Praet and Tielemans would be on either side of the field. Their proximity to the full-backs allowed the centre-back pairing of Çağlar Söyüncü and Jonny Evans a passing option. Their pass to the midfielders would allow the Foxes to bypass the first line of the press by Norwich.
Due to their proximity to the full-backs, they would slip a pass into the full-backs and a simple pass combination would release the running full-back. This combination opened another avenue for Foxes’ buildup as now they were not just restricted to playing through the central defensive midfielder.
However, this structure became more problematic in the game and hurt the Foxes more than it helped them.
The first problem was the amount of space that Leicester conceded in the centre. In a diamond formation, the whole tactic is to crowd the centre and to build through the centre. However, Leicester’s diamond formation was too big.
Ndidi would stay near the centre-backs while Maddison would stay near the two strikers upfront. This left Praet and Tielemans to tidy up a big space in the centre – a task which was impossible seeing that Norwich lined up in 4-2-3-1, a formation that put five players in the centre of the pitch.
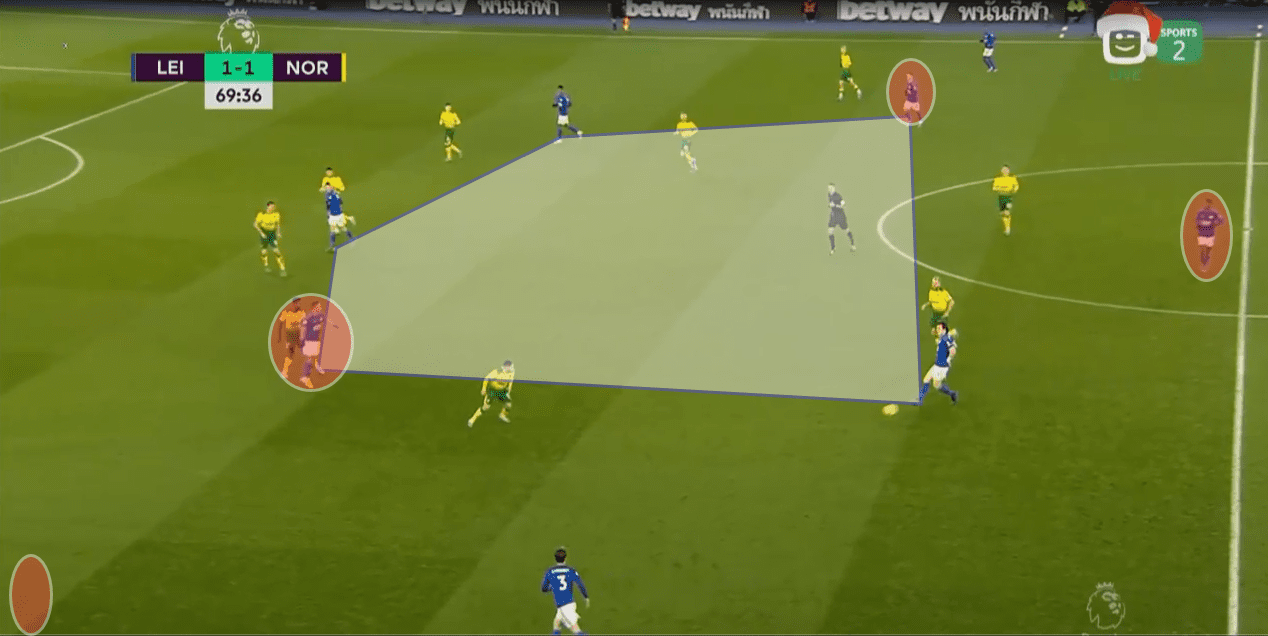
In this picture, we see the diamond midfield spread out over the pitch. Freedom in a diamond is limited as it can lead to scenarios like these. As a result, Leicester have no central attacking impetus with the diamond lop-sided and not structured well. Scenarios also happened when Leicester did keep a disciplined diamond.
Regardless of discipline, the diamond took away Leicester’s central attacking impetus.
It is no wonder that Leicester offered no attacks through the centre. Out of their 52 total attacks, Leicester only attacked through the centre in nine of them, with an xG of 0.31. In terms of Leicester’s attacking prowess and talent, that is a serious short-coming in their attack.
Conversely, this gap in the centre transferred to a defensive liability for the Foxes. With the midfielders positioned relatively far apart, the Foxes were left open in the middle. Norwich enjoyed much success in this middle as they recorded an xG of 0.89 with their attacks from the centre.
The 4-2-3-1 from Norwich allowed them to take advantage of this gap as the three attacking midfielders can accordingly position themselves in the gaps and as such, find runners – something which Norwich does not have a lack of.
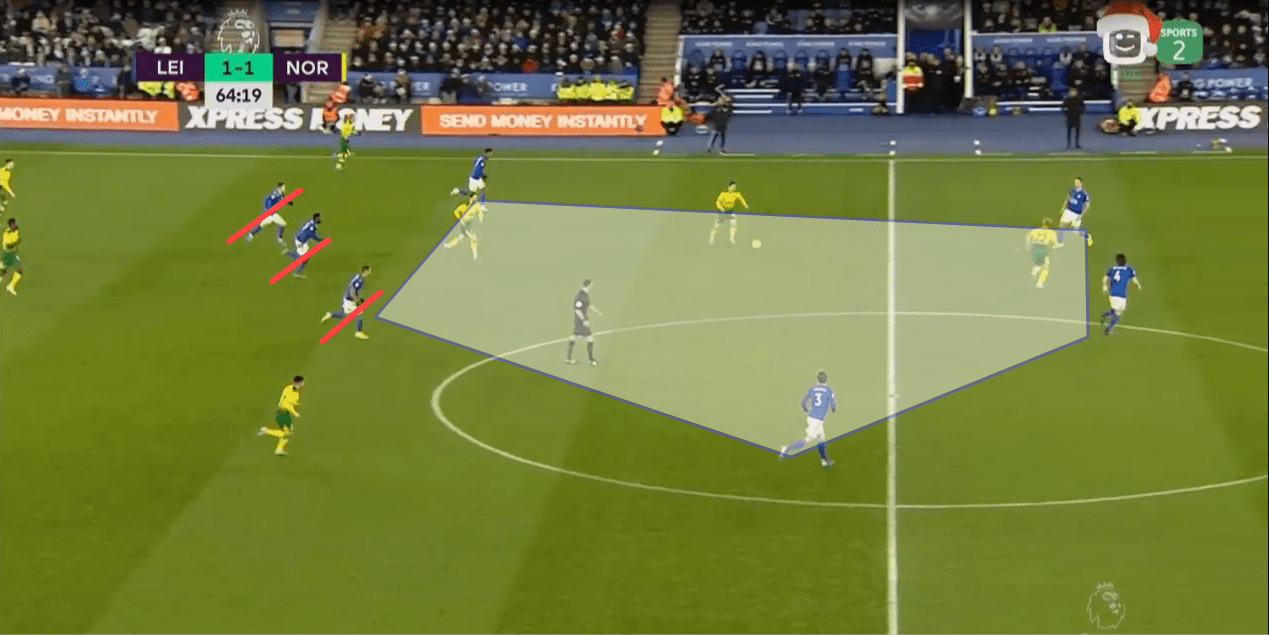
This picture shows the liabilities, in defence, the diamond midfield brings. Loss of possession becomes dangerous as the lack of central presence means that Leicester’s midfield is not able to aid in defence to the greatest degree.
This creates space between the midfield and defensive line, as shown here, which Norwich can take advantage of.
Buendía functions as Norwich’s creative and attacking fulcrum
With only one recognized striker in Teemu Pukki, the Canaries needed a creative fulcrum that would take advantage of Leicester’s midfield flaws with the right passes. They found that person in Emi Buendía who was without the best-attacking midfielder on the pitch – statistically and tactically.
In an attacking sense, Buendía attempted five through balls – completing all of them. Additionally, Buendía completed six passes to the final third – a completion rate that was superior to Maddison’s 88%. 100% accuracy in forward passes and an 80% completion rate in progressive passes, compared to Maddison’s 83% rate for both statistics.
While Maddison certainly recorded a few more through ball and forward passes, this is to be expected when Leicester had the majority of the possession. The more important thing here Buendía’s accuracy and end-results of those passes – setting his teammates through and defeating lines of the Foxes in dangerous positions.
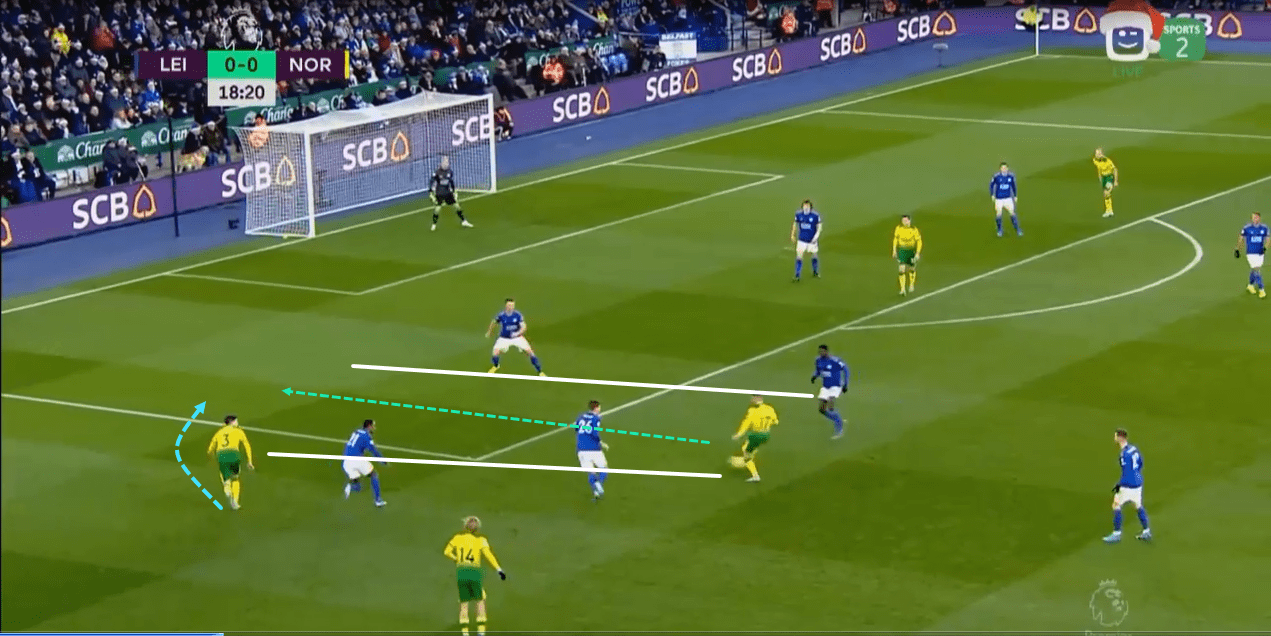
Here we see Buendía’s quality on the ball. He recognizes the vertical opening in Leicester’s defence and as such, pulls off an inch-perfect pass to the full-back who is overlapping with a curved run.
This pass will take out most of the defence on that side allowing the full-back to have time and space for a low cross or a cutback.
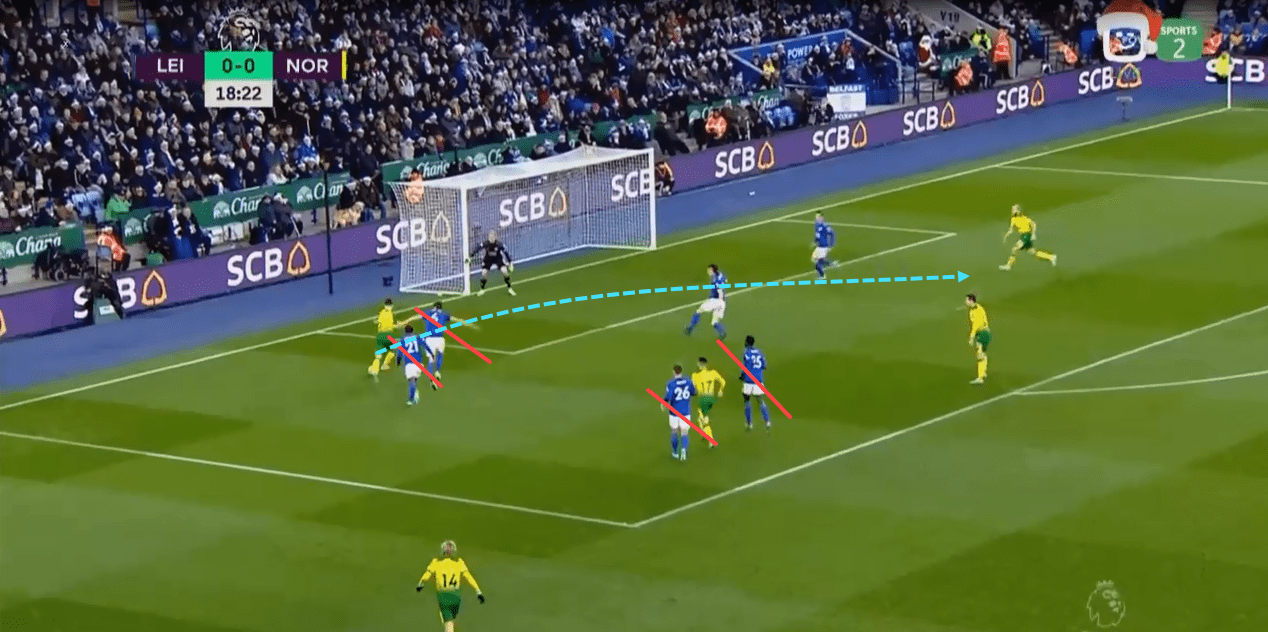
Buendía’s through ball puts the full-back well ahead of the defence, eliminating four players. On the other side of the pitch, Pukki is open and the full-back hits a low cross to Pukki.
Unfortunately, it lacks a little of the pace allowing Leicester to claim possession. However, if the ball had been hit a tad bit better, Norwich would have found themselves a goal – a testament to Buendía’s creative vision.
Tactically, Buendía was very intelligent in doing his job in keeping possession and finding the right passes. One of the main ways he helped the Canaries was by his ability to recognize the space that Tielemans and Chilwell were consistently leaving whenever they attacked.
Chilwell, out of the two Leicester full-backs, is the more venturing and attacking based. As such, the pair of him and Tielemans often left space on their side. Buendía recognized this early on and often times found himself in this space.
This space occupation was critical as it presented Norwich a viable and safe attacking outlet. With a player who has the eye to spot the final-third pass, Norwich could defend resolutely and then quickly find Buendía and attack.
In fact, this sequence of counter-attacking and finding Buendía was what led to the goal for Norwich.
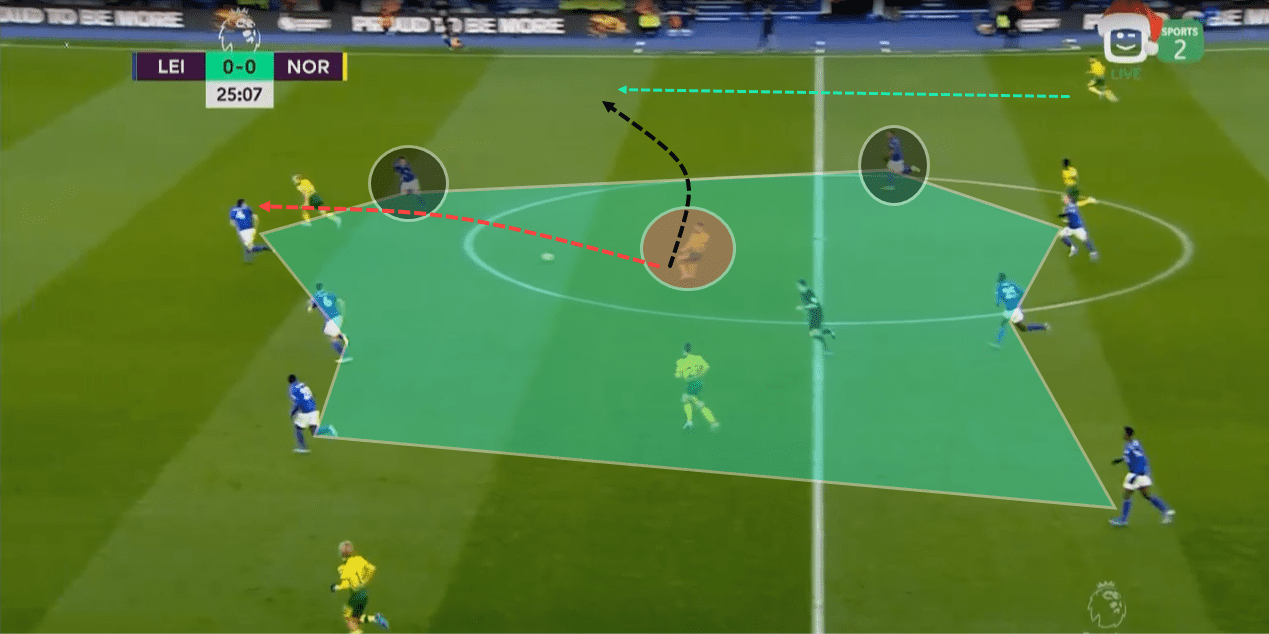
Buendía’s positioning, shown in red, is rewarded as he gets the ball in acres of space between Leicester’s midfield and defensive line. He can pass to the overlapping full-back or in this case, he takes advantage of Tielemans’ and Chilwell’s poor positionings. Due to how high Chilwell was, he is not in the perfect position. Tielemans, on the other hand, is too high to support Chilwell.
As such, Buendía passes it to Pukki, slicing from left to right. This takes out Chilwell from the equation, leaving Pukki against Söyüncü
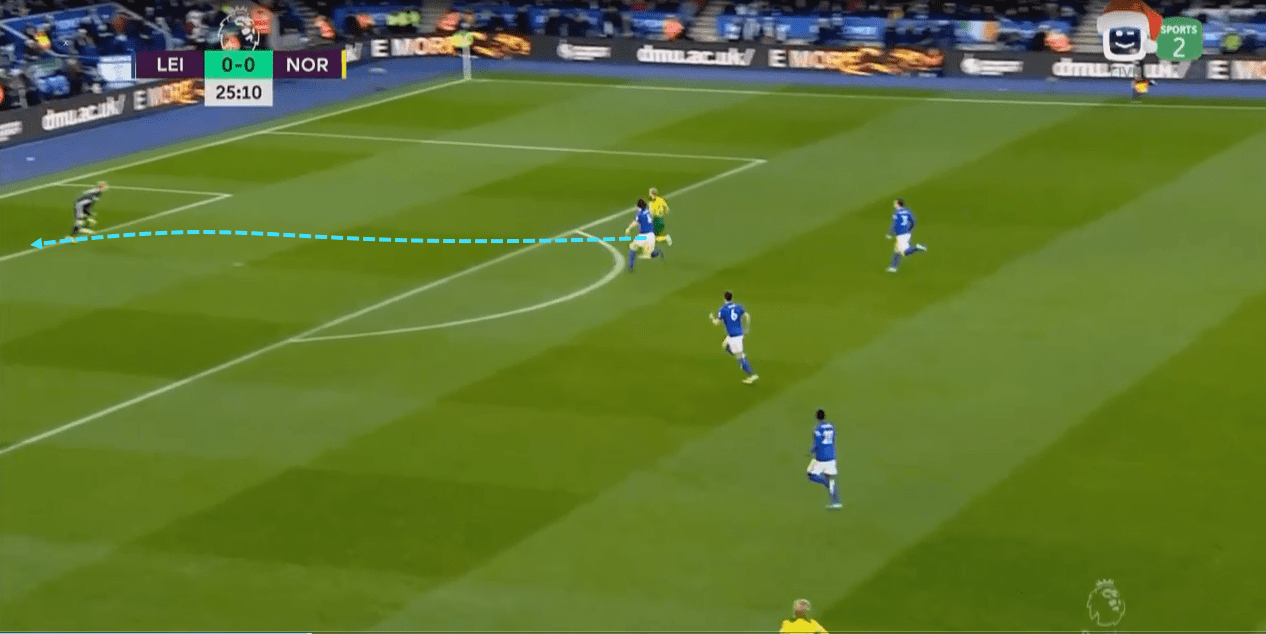
Pukki is now slightly ahead of Söyüncü and as such, can take a shot which converts into a Norwich goal.
Norwich’s resolute defensive work diminishes Leicester’s attacking brilliance
An important tactical point was Norwich’s defensive organization. It was very effective at containing Leicester’s attack and stopping critical involvement from players such as Jamie Vardy and Maddison.
This defensive tactic was very evident in the first-half where, despite the 1-1 scoreline, Leicester only had an xG of 0.35. This statistic improved in the second-half where Leicester recorded an xG of 0.97. However, given their recent form, these numbers against a team that has conceded 35 goals are startling, to say the least.
So how did Norwich control Leicester’s attacking brilliance?
For starters, their use of a 4-2-3-1 formation limited the space that the two Foxes strikers had. With the use of a pivot, the Canaries were able to create numerically advantageous situations in the centre of the pitch which lessened the space available for the strikers.
Consequently, when defending, the Canaries assumed a formation of 4-5-1, with their attacking trio diligently dropping deep to cover the wide spaces more effectively. This is where Leicester’s diamond comes into play. As discussed before, the diamond formation forced fewer members in the middle in the central space. This tactic from the Foxes, in addition to Canaries’ 4-5-1, stonewalled Leicester City from playing through the centre.
The play was forced down the wings where the Canaries could control the passage of play more effectively. The Foxes fell into the trap as 41% and 33% of their attacks occurred on the left-hand and right-hand side respectively. Naturally, since the play was occurring on the wings where space is limited, Foxes couldn’t create as many clear-cut chances.
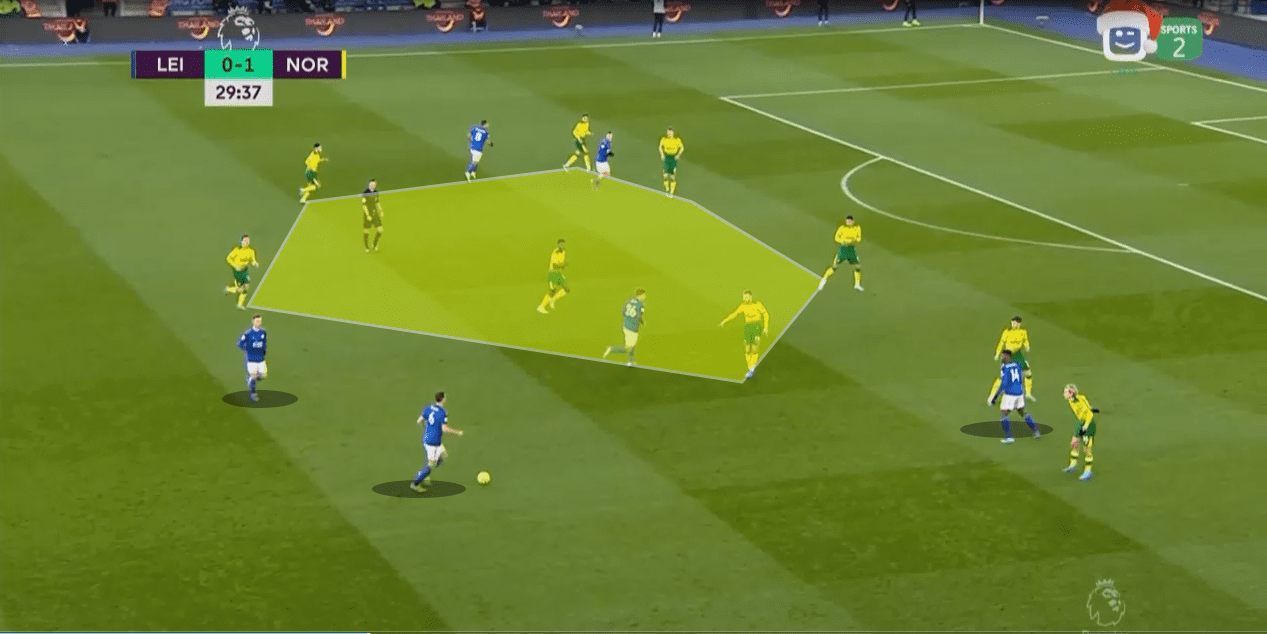
Norwich has crowded the centre, shown in yellow, leaving no space for Leicester attackers. As such, Leicester start to divert their attention to the side as seen with Evans, Maddison, and Kelechi Iheanacho moving to the wings.
In fact, their xG on the left-hand side was 0.50 while their xG on the right-hand side was 0.39 – a telling fact of Norwich’s excellent defensive work in stopping the Foxes.
Leicester City, however, have some of the league’s best-attacking full-backs. Ben Chilwell has been excellent down the left-hand side while Ricardo Pereira has been a solid right-back.
How did Norwich stop their progression as both of these full-backs are a dangerous attacking outlet?
There were specific pathways and movements that allowed the Canaries to stop their Foxes in the wing areas.
The main way Farke’s team controlled Rodger’s full-backs was by using a fluid interaction between the defensive and midfield line. This fluid understanding allowed the Canaries to use partnerships and positionings of the players to control the full-backs.
The first movement was having one of the wide midfielders from the block of five to temporarily shift to the defensive line. With now five centre-backs, the midfielder had the liberty to man-mark the full-back knowing the central balance of the team has not been disturbed. As such, the midfielder would block passing lanes to the full-back and limit combination play with the full-back.
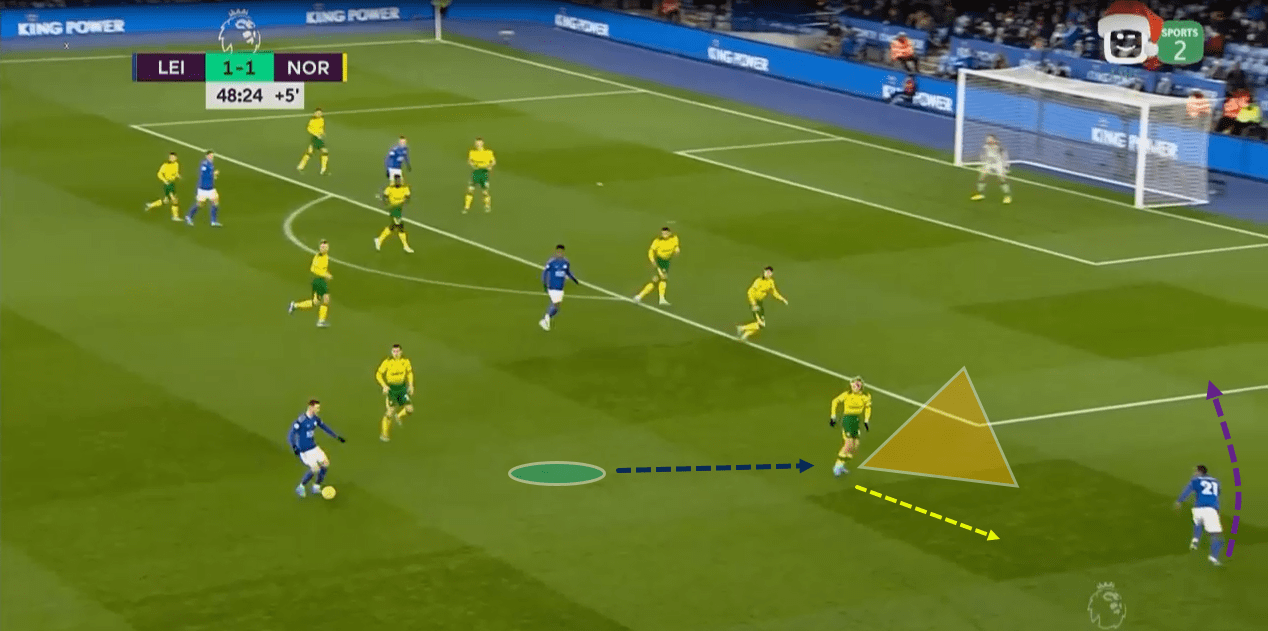
Here a Norwich wide midfielder moves from his position in the midfield, shown in blue, to the wings to block the passing option to Pereira. He can move right-ward to block a direct pass while Pereira’s curved run will not have any effect as the Norwich midfielder cover-shadows him.
As such, Maddison has to move from this area and try to find space somewhere else.
This movement didn’t happen every time – there was a specific trigger for this that ensured that Norwich weren’t always reducing their midfield. The trigger was whenever the ball was played in the respective half-space and one of the Leicester players would advance forward. This specific trigger ensured that the necessary blocking movements only occurred at the sides of the play.
Another movement that was common was having the full-back man-mark the Leicester full-back.
This movement would have the full-back go upfield from his defensive line and go to the midfield line. At the same time, a midfielder would go deep to take up the spot that the Canary full-back left.
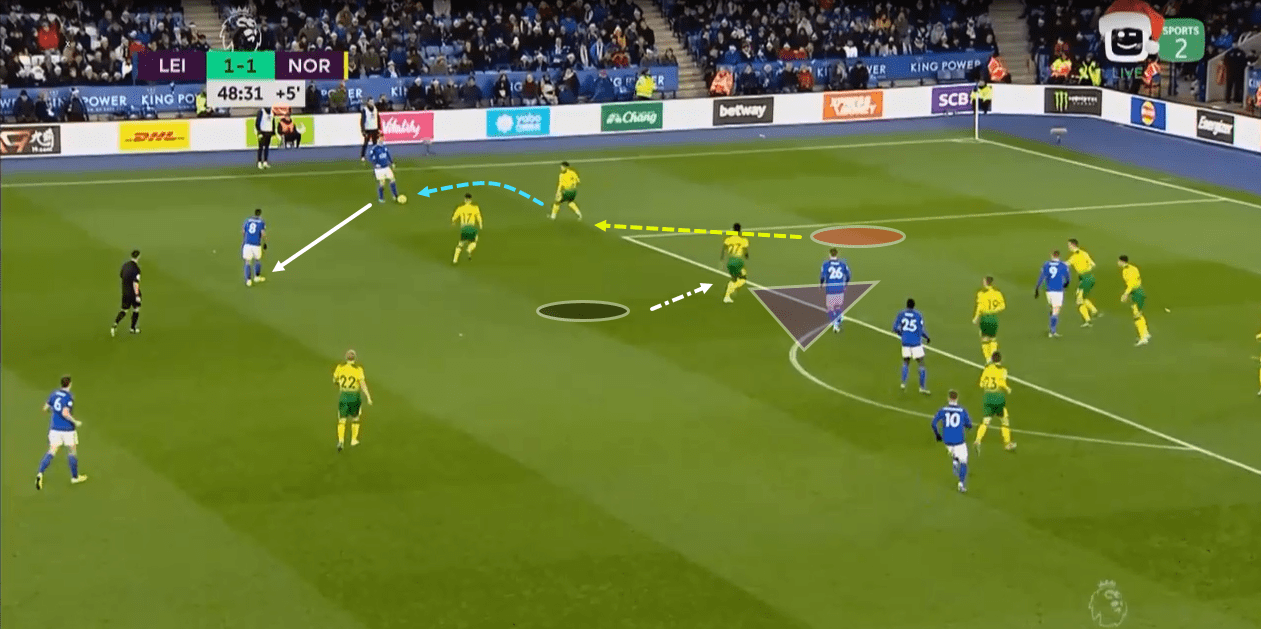
The full-back moves upfield from his position in the defence, shown in red. Conversely, a Norwich midfielder moves inwards and cover-shadows a Leicester player, not allowing any penetrative passes inside the box.
The full-back pressures Chilwell in a curved run which forces the Leicester full-back to pass backwards and restart the play.
This second type of movement’s goal was similar to the previous movement: to contain the full-back and prevent combination play. However, there was another purpose behind it. This combination would, first of all, keep Leicester guessing as to how Farke’s team defended. This element of surprise made Rodger’s team a bit more hesitant.
Secondly, having a full-back, who is much better at defensive work than a wide midfielder, come up and mark the opposition full-back strengthens Norwich’s defence whenever wing-play got very fluid and there was a real danger of Leicester penetrating.
As a result, the number of successful actions from wing play was severely reduced. For example, both Chilwell and Pereira recorded a total of two accurate crosses from a total of nine attempted crosses.
Conclusion
With this draw, Liverpool go ten points clear from Leicester City. Many have said that with this, the title is effectively wrapped up for those down at Melwood Road yet as the likes of Chelsea have shown, anything is possible in the Premier League.
Norwich will be delighted to have held the ambitious Foxes to a song. The Canaries will no doubt take this display as motivation for playing themselves out of the relegation-sized hole they find themselves in.
If you love tactical analysis, then you’ll love the digital magazines from totalfootballanalysis.com – a guaranteed 100+ pages of pure tactical analysis covering topics from the Premier League, Serie A, La Liga, Bundesliga and many, many more. Buy your copy of the December issue for just ₤4.99 here


Comments