North Macedonia played their first-ever game at a major international tournament on Sunday versus Austria. They ultimately lost the match 3-1, but this fixture was always going to be cause for celebration for the southeastern European side given the circumstances. Fans of the country which has a population of just over 2 million people were given even more reason to celebrate in the 28th minute when 37-year-old national hero Goran Pandev scored North Macedonia’s first-ever goal at the UEFA European Football Championship.
Pandev’s goal was an equaliser to Stefan Lainer’s 18th-minute opener, and despite delivering what has been described as a ‘spirited’ performance, the European Championship debutants were denied a point as Michael Gregoritsch put Austria back into the lead in the 78th minute and Marko Arnautović scored in the 89th minute to seal all three points for Das Team.
The “versatile” midfielder Marcel Sabitzer of Bundesliga side RB Leipzig, who’s been the subject of transfer links to EPL North London rivals Tottenham Hotspur and Arsenal among other clubs of late, played an important role in his team’s game-winning tactics on Sunday. In this piece, we provide a tactical analysis of Sabitzer’s role in Austria’s tactics for their opening game of EURO 2020, which saw the 27-year-old deliver a dominant display in multiple phases of play. This tactical analysis also discusses North Macedonia’s tactics, how and why Sabitzer was key for Austria in breaking them down, and some examples both of what Рисови Risovi did well and what they did badly in response to Austria and Sabitzer’s impressive performance.
Lineups and formations
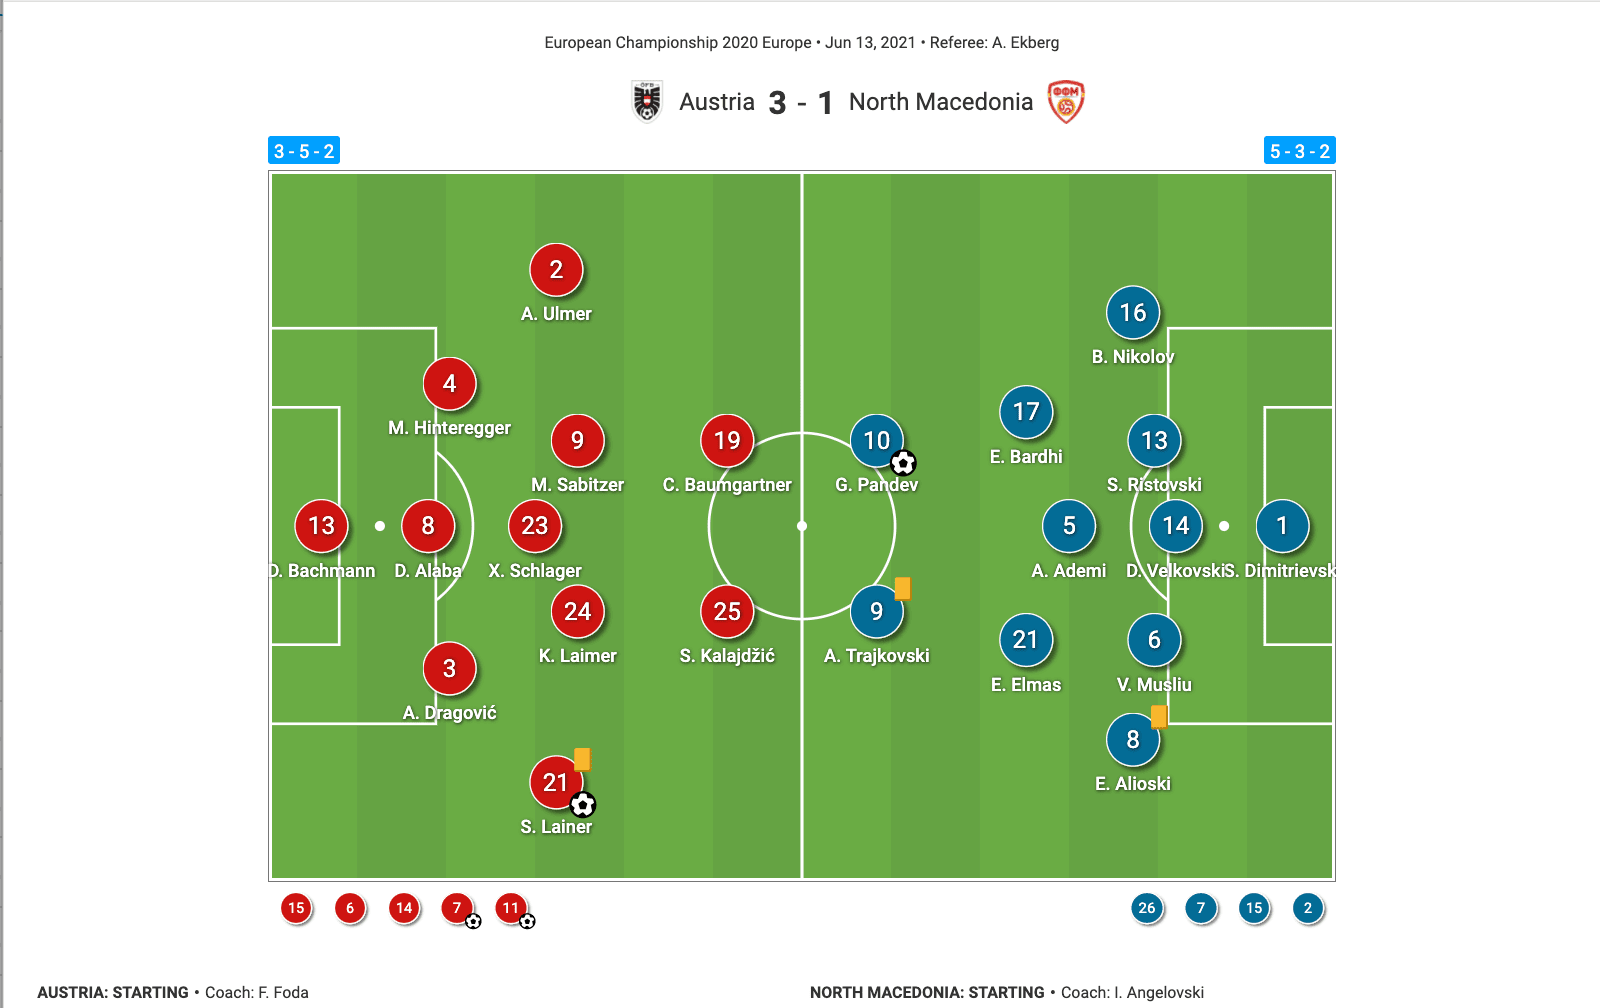
Firstly, we’ll discuss both teams’ lineups and formations from Sunday’s game, which can be seen in figure 1. Starting with the eventual winners, Austria lined up in a 3-1-4-2 shape for this fixture. Daniel Bachmann started in goal, behind a back three consisting of Aleksandar Dragović at right centre-back, Martin Hinteregger at left centre-back, and David Alaba in the central centre-back position.
Lainer started at right wing-back, Andreas Ulmer played at left wing-back, while Austria’s central midfield trio consisted of Konrad Laimer on the right, Sabitzer on the left, and Xaver Schlager in a central, holding midfield position. Lastly, Christoph Baumgartner started at left centre-forward, alongside Saša Kalajdžić at right centre-forward.
Austria made the first substitution of the game at half-time, with Philipp Lienhart replacing Dragović. Meanwhile, Das Team’s second-half goalscoring duo were introduced together at the 59th minute, as Gregoritsch and Arnautović replaced Baumgartner and Kalajdžić. Franco Foda made his final two substitutions in second-half stoppage time, with Julian Baumgartlinger replacing Laimer in the 93rd minute and Stefan Ilsanker replacing Schlager one minute later to see the game out.
As for North Macedonia, they lined up in their usual 5-3-2 shape, with Stole Dimitrievski starting in goal, Stefan Ristovski playing at right centre-back, Visar Musliu playing at left centre-back, Darko Velkovski playing as the central centre-back, Boban Nikolov starting at right wing-back, and Ezgjan Alioski starting at left wing-back.
Рисови Risovi’s central midfield trio consisted of Enis Bardhi on the right, Eljif Elmas on the left, and Arijan Ademi in the central, holding midfield position, though this trio swapped places at times, with Elmas and Bardhi occasionally occupying the deeper, central position. Aleksandar Trajkovski partnered captain Pandev at striker. Trajkovski usually played at left centre-forward, with Pandev on the right, though they sometimes swapped.
North Macedonia made four substitutions during this game. The first two came in the 64th minute, as Tihomir Kostadinov and Egzon Bejtulai replaced Trajkovski and Nikolov. Later on in the second half, while trailing Austria by a goal, Ivan Trichkovski replaced Bardhi in the 82nd minute, and in the 86th minute, Igor Angelovski attempted one last throw of the dice, bringing on attacker Milan Ristovski for centre-back Musliu. By this point, North Macedonia had switched from a back five to a back four but that gamble was ultimately not enough to secure a point for the lowest-ranked team in the competition.
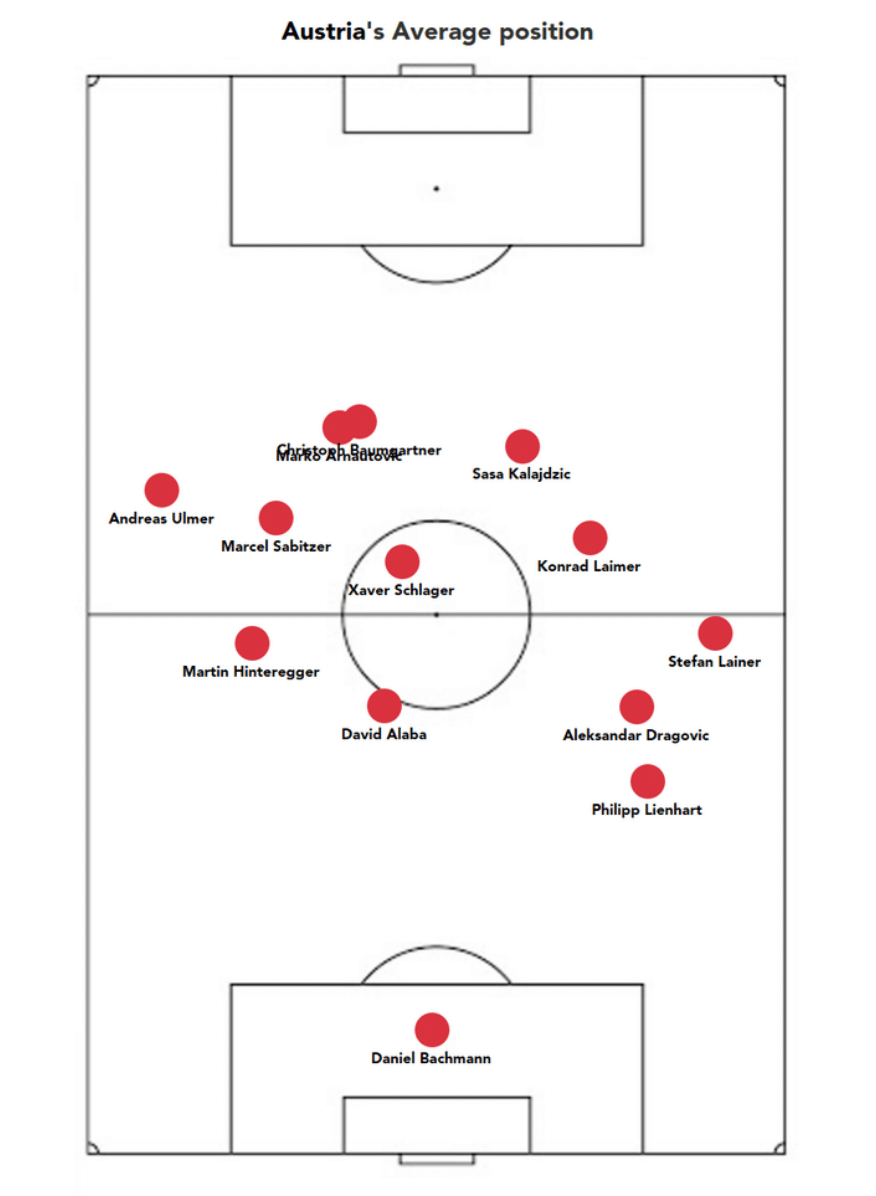
Figure 2 shows us the average positioning of Austria’s players in Sunday’s game. It’s worth noting Sabitzer’s average position here before we go on to discuss his impact on this match in more detail. As mentioned, the RB Leipzig midfielder occupied the left central midfield position in Austria’s 3-1-4-2 shape. That left him typically occupying this channel where he is placed in figure 2 between the left-wing and the very centre of the pitch.
During North Macedonia’s periods of possession, regardless of whether they were just beginning an attack during build-up, attempting to progress into the opposition’s half, or inside the final third attempting to play into North Macedonia’s penalty area, Sabitzer was typically found relatively deep in the left half-space. As we’ll go on to analyse in greater detail, his role in this position was key to Austria’s win, as it helped him to exploit some issues in North Macedonia’s defensive tactics and become heavily involved in his team’s ball progression and chance creation phases.
Austria’s ball progression and transition to attack
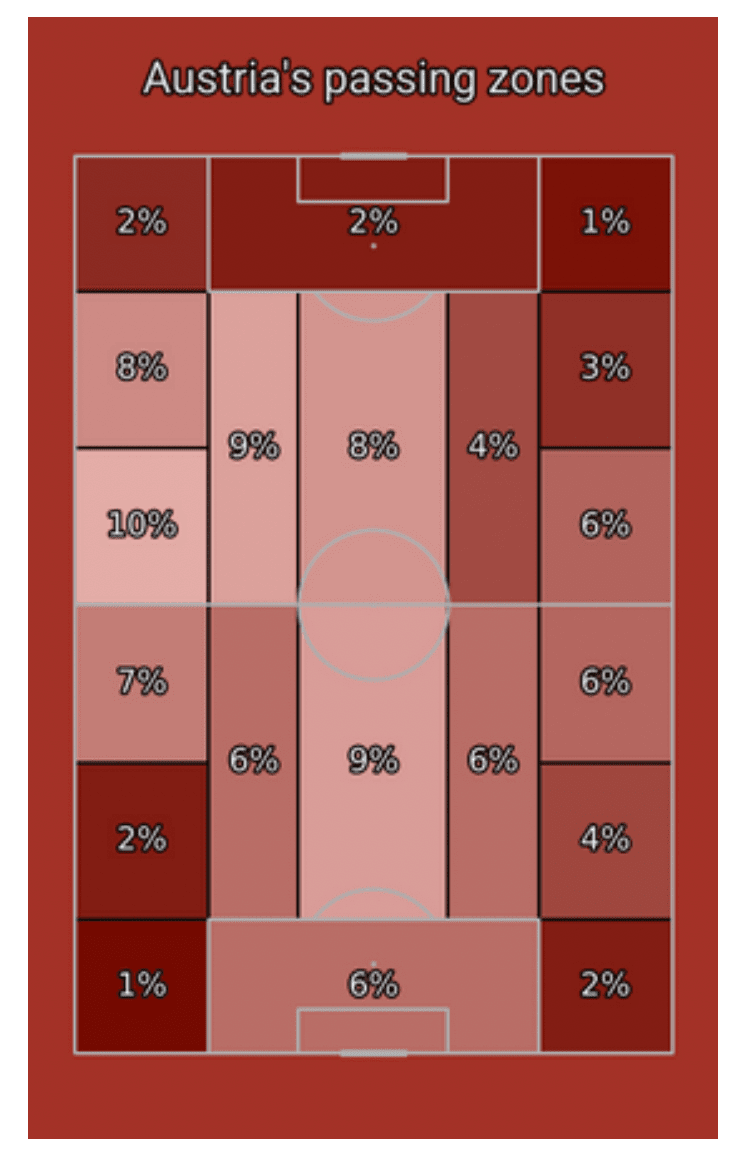
Figure 3 provides a breakdown of Austria’s passing zones versus North Macedonia – the higher the percentage, the more passes Austria played in that particular zone. As this image highlights, Austria heavily favoured the left side of the pitch – Sabitzer’s side – over the right in this game. This isn’t by chance, a lot of this is down to the presence and influence of Sabitzer.
As the image shows, Austria passed around the centre of the pitch a lot on Sunday. Between the length of the two boxes, 17% of their passes were played in between the width of the centre circle. However, as many as 15% of their passes were played in the much narrower left half-space area between the two boxes, compared to just 10% in the right half-space area of the same width and length.
Meanwhile, 27% of their passes between the length of the two boxes were played on the left-wing – the width of which went from the sideline to where the left half-space begins – while 19% of their passes between the length of the two boxes were played on the right-wing area of the same width.
All in all, 15% more of Austria’s passes were played on the left side of the pitch than on the right side, highlighting how much more involved the left side of the pitch was in Austria’s ball progression and chance creation than the right side was.
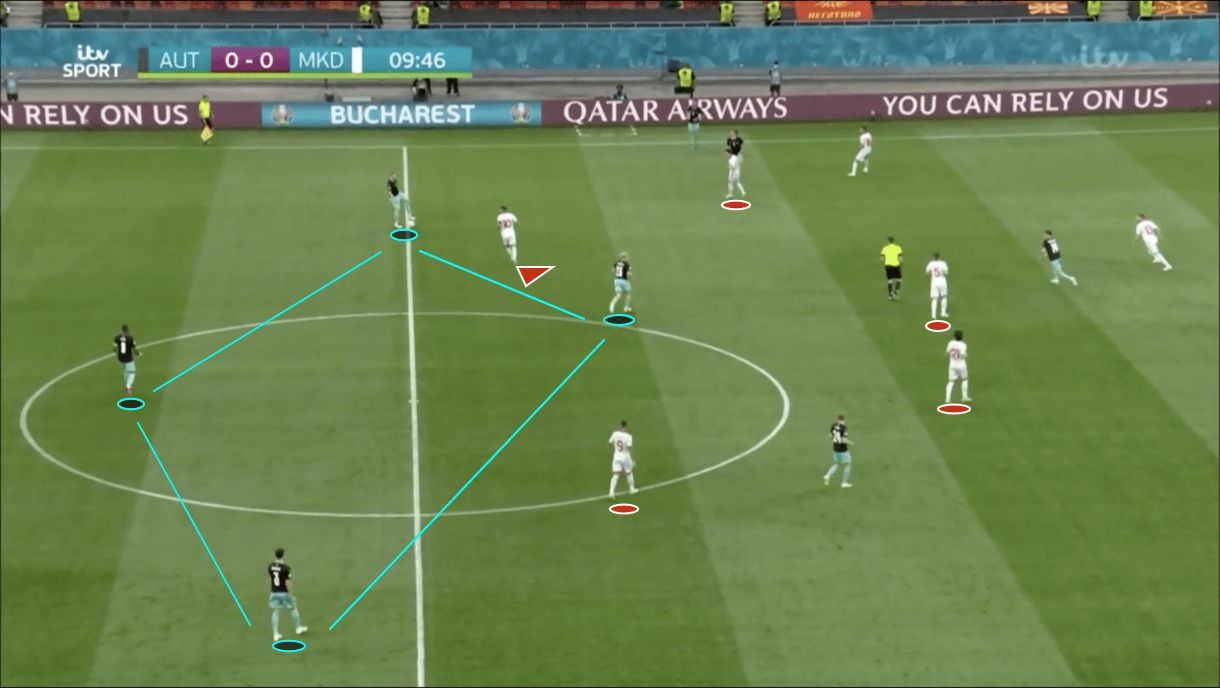
Austria set out to play through the centre, and holding midfielder Schlager, more than they ultimately ended up being able to. In figure 4, we see an example of how Austria looked for parts of this game, in and around the centre circle in their 3-1-4-2 shape, attempting to effectively progress the ball into North Macedonia’s half and give their more advanced teammates a chance to create goalscoring opportunities.
It was common to see Austria’s back three and holding midfielder form the diamond shape we see here throughout Sunday’s game. Their goal at this point was to find Schlager with enough time and space so that he could turn and enjoy forward passing options galore in front of him in the form of the 4-2 shape that the Austrian shirts in front of him formed.
The wing-backs provided width, the central midfielders provided short passing options in the half-spaces, 200cm (6’6”) tall Kalajdžić provided a big, physical centre-forward option to aim for, and Baumgartner sometimes dropped deep into the ‘number 10’ position to provide another short passing option like the central midfielders, and sometimes sat on the shoulder of North Macedonia’s centre-backs, threatening in behind the backline – the latter being an option that would more likely be used in combination with Kalajdžić’s aerial threat.
Austria’s back three outnumbered North Macedonia’s front two and played lots of short lateral passes with each other to try and open the passing lane into Schlager, however, as seen in figure 4, Pandev and Trajkovski were tasked with blocking those passing lanes and keeping Schlager in their cover shadow.
The North Macedonian front two didn’t press Austria’s centre-backs aggressively, they just ensured that they couldn’t progress through the centre and they did this very effectively for the most part when Austria just had this diamond to progress out from the back with and as a result, Das Team’s ball progression plans were stifled.
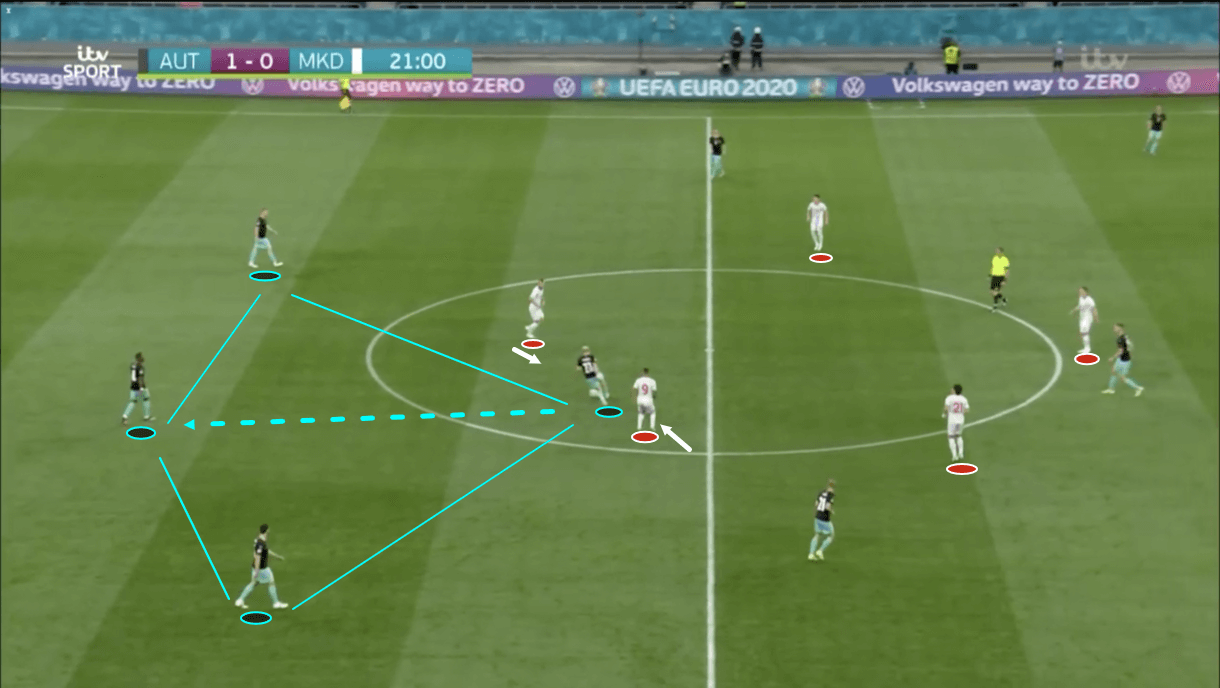
In figure 5, we see an example of one occasion where Austria’s central centre-back Alaba managed to play the ball into Schlager’s feet but as mentioned previously, Das Team’s goal wasn’t just to find Schlager but to find him with enough time and space to turn. Even on occasions where Austria managed to get the ball into Schlager’s feet, North Macedonia generally did well to prevent him from progressing play.
While the holding midfielder received the ball here as a result of Pandev not getting across to screen the pass quickly enough, Trajkovski was on the midfielder’s back as soon as he got the ball, preventing him from turning and facing North Macedonia’s goal. As play moved on, the holding midfielder was forced to just play the ball back to Alaba.
Figure 5 also highlights how North Macedonia congested the centre of the pitch to make it harder for Austria to play through this area. As mentioned previously, North Macedonia didn’t press aggressively from the front, instead prioritising control of central midfield.
As a result of their relatively passive defending from the front, they achieved control over Austria’s holding midfielder with their attacking duo, while their wide central midfielders tended to mark Austria’s wide central midfielders closely when they occupied more advanced positions and drifted into their zone during the ball progression phase. This left North Macedonia’s holding midfielder free to pick up one of Austria’s centre-forwards (Baumgartner) if he dropped into the 10 position or to press higher and prevent Schlager from turning as a last resort if the centre-forwards were beaten.
North Macedonia were comfortable with allowing Austria’s centre-backs to have the ball in these deeper positions so that they could maintain a 5v3 numerical superiority in central midfield.
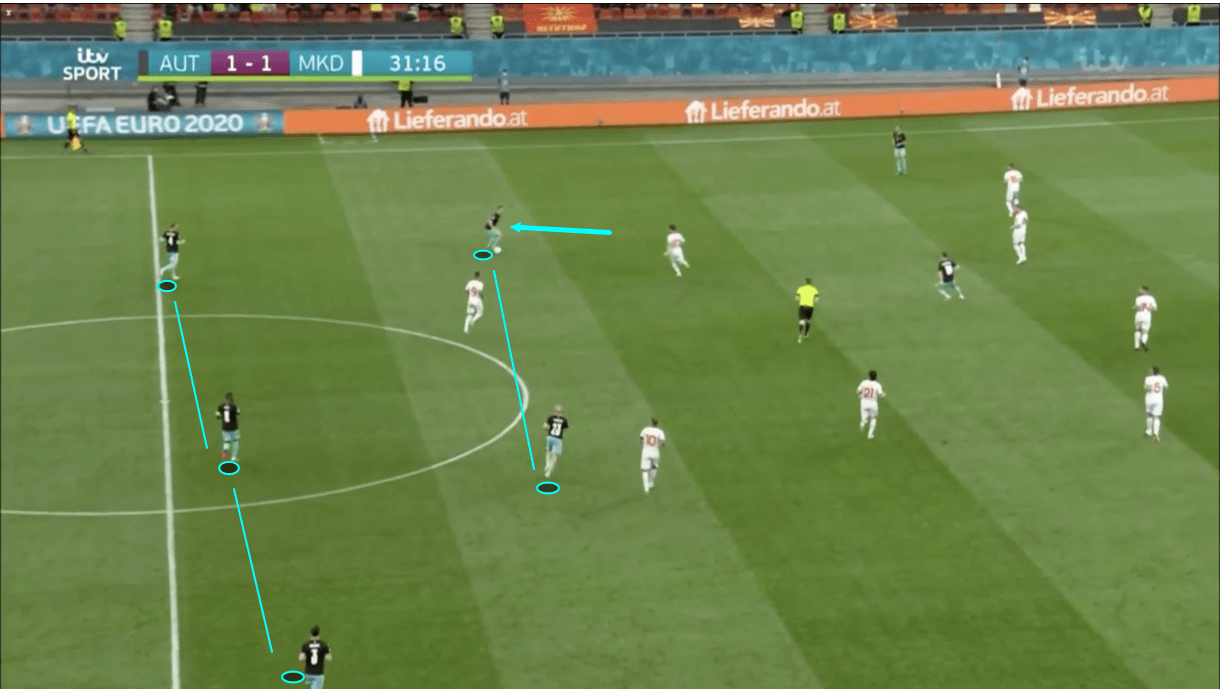
Before too much time went by in the first half, however, Austria found a way around this in the form of Sabitzer, who began dropping deeper, out of Bardhi’s zone – meaning that he was out of the advanced position where Bardhi would mark him tightly – and essentially forming a double-pivot alongside Schlager. The 27-year-old dropped deep in the left half-space, where we see him on the ball in figure 6, doubling up on North Macedonia’s right centre-forward with Schlager. He did this consistently for the vast majority of the game, from around the 10th minute and played a pivotal role in Austria’s ball progression as a result.
North Macedonia were set up very well to deal with Austria’s initial plan, but they failed to effectively respond to the new threat that Sabitzer posed throughout the game, which ultimately cost them. From this position, Sabitzer enjoyed most of the forward passing options that we mentioned earlier which Austria had planned to be available to Schlager, while Baumgartner dropped into the advanced left half-space position that Sabitzer vacated quite often.
The Bundesliga playmaker made good use of these options and consistently played the connecting role between Austria’s backline and forwards.
A lot of Sabitzer’s threat in this deep left half-space position came from the fact that he was often allowed way too much space for a player of his technical quality as a result of the North Macedonian wide midfielders not pressing him that high and the centre-forwards not being in position to close him down, having been preventing the pass into Schlager. However, about midway through the second half, North Macedonia’s wide midfielders started to put more pressure on Sabitzer when he received the ball to try and nullify his threat.
This worked to an extent – this tactic did prevent Sabitzer from enjoying so much time and space and led to him not progressing the ball as much as he did before, however, this created other problems for North Macedonia a lot of the time, which led to them failing to prevent Austria from progressing the ball altogether.
When North Macedonia’s wide midfielder pressed Sabitzer when he received the ball in the ball progression phase regardless of how deep or wide he went, they generally pressed alone. The team didn’t press as a unit, and as a result, gaps opened up in North Macedonia’s once solid and disciplined defensive shape for Austria to exploit. Sabitzer essentially created space for his teammates by attracting opposition midfielders to him.
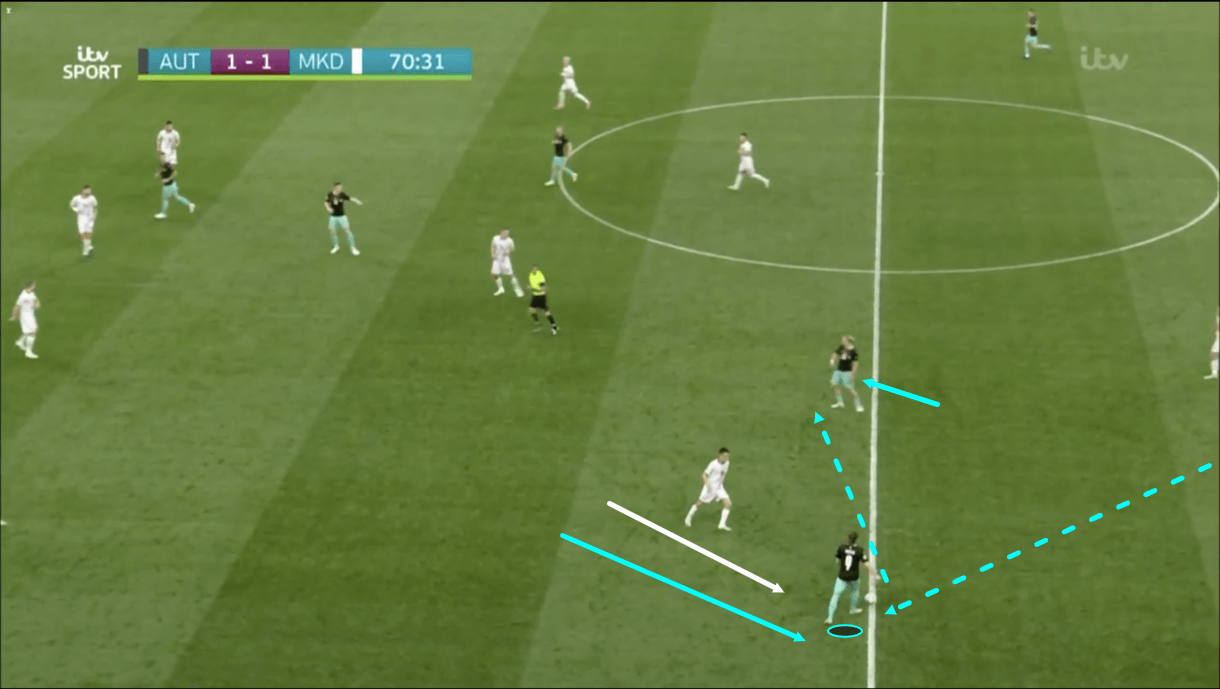
We see an example of this in figure 7, where Sabitzer has received a pass during the ball progression phase and as he’s attracting the opposition midfielder to him by this point, he intelligently shifts out wider than before, creating a big gap in North Macedonia’s midfield for Schlager to exploit through his movement. So, by pressing Sabitzer more aggressively, North Macedonia essentially allowed Austria to play through the centre via Schlager as they originally intended.
This shows how Sabitzer’s role in the left half-space created a dilemma that North Macedonia had no answer for. If Sabitzer was free, he could use his technical quality to progress the ball himself, but if he was pressed like in figure 7, then Schlager could progress play, as North Macedonia didn’t press as a unit, failed to remain compact and allowed Austria to open them up in the centre.
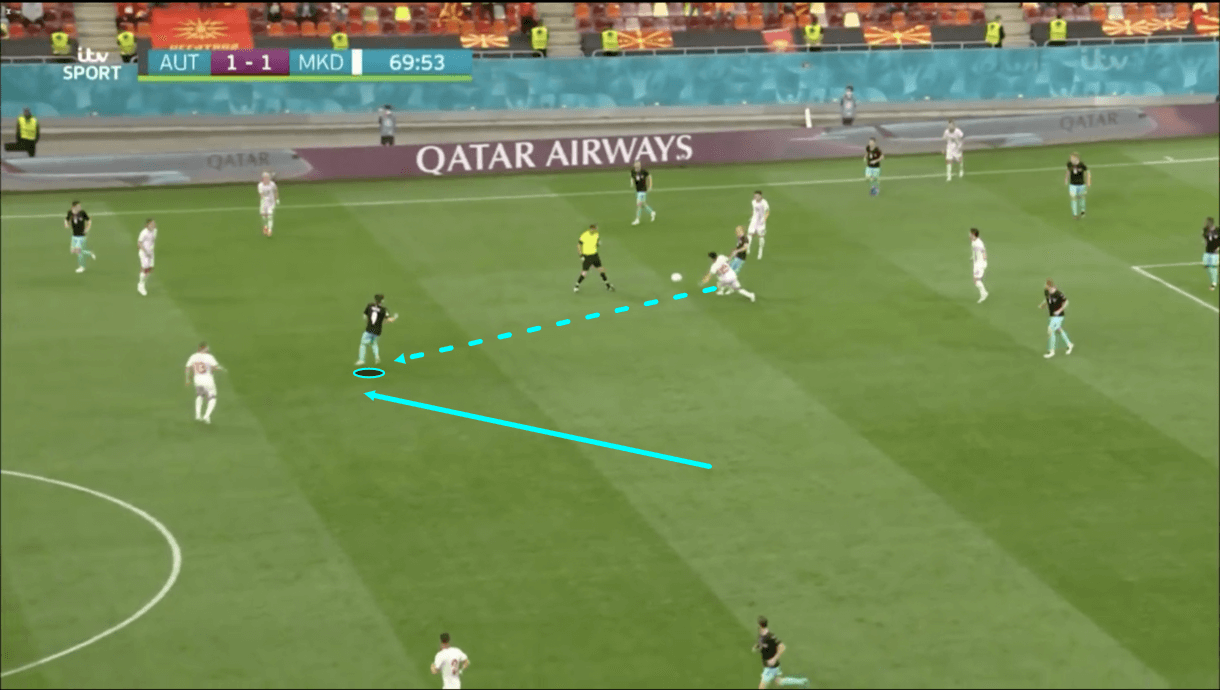
Sabitzer also played an important role for North Macedonia in progressing the ball during the transition to attack. In figure 8, we see the RB Leipzig man occupying a different position from where we’ve seen him before in this tactical analysis. Here, we see Sabitzer in the centre of the pitch, more towards the right than the left.
During transition to attack, Sabitzer frequently drifted into more of a 10 position behind Austria’s centre-forward duo. Here, he could exploit space centrally between North Macedonia’s midfield (which was usually higher than normal having just been on the attack) and defensive lines, provide a central passing option for his deeper teammates and enjoy more of the pitch to aim for with his passing than when he’s on the left, simply because there are more options in the centre.
This area was usually too congested as a result of North Macedonia’s defensive tactics, as we’ve analysed, however, it opened up in transition and like in regular ball progression, Sabitzer played a key role in linking the defence to attack during transition. As seen in figure 8, Sabitzer could get in behind North Macedonia’s holding midfielder during this phase of play, receive the ball, enjoy time and space to turn and attract a North Macedonian centre-back out of the backline, creating more space for the runners ahead of him who he would aim for with his impending pass. The playmaker created a couple of goalscoring chances for his side like this.
Austria’s chance creation
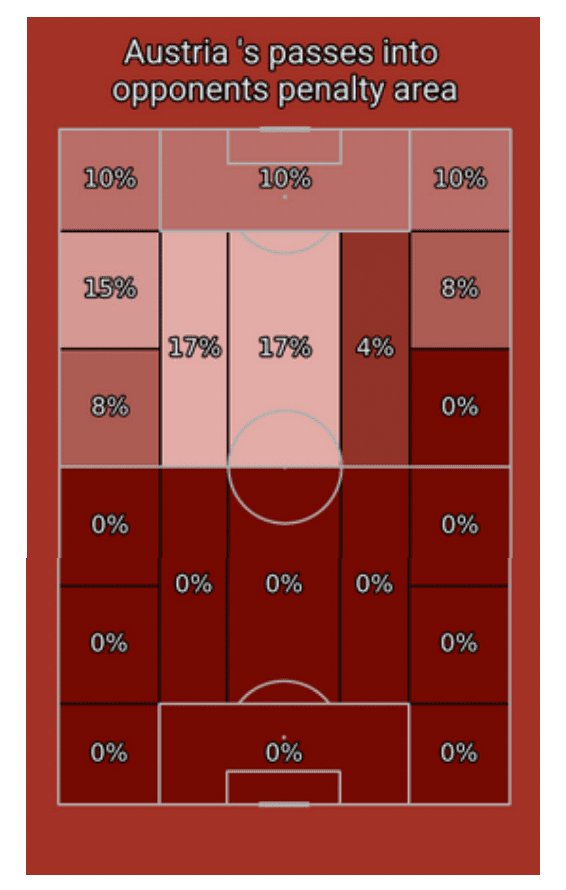
Sabitzer didn’t just play a key role for his team in the ball progression phase, he also played a key role in chance creation. Figure 9 provides a breakdown of the zones from where Austria’s passes into the penalty area were played on Sunday.
Again, the central zone between the edge of the box and the halfway line was heavily involved during this phase, with 17% of Austria’s passes into the penalty area coming from this zone. However, just as many of their passes into the penalty area (17%) came from the narrower left half-space, with just 4% coming from the right half-space. Meanwhile, 33% of Austria’s passes into the penalty area came from the left-wing, while just 18% came from the right-wing.
So, 28% more of Austria’s passes into the penalty area came from the left side of the pitch than from the right side of the pitch. Again, this isn’t a coincidence and Sabitzer played a big part in how heavily involved the left side of the pitch was in getting the ball into the box, and ultimately chance creation, for Das Team in this fixture.
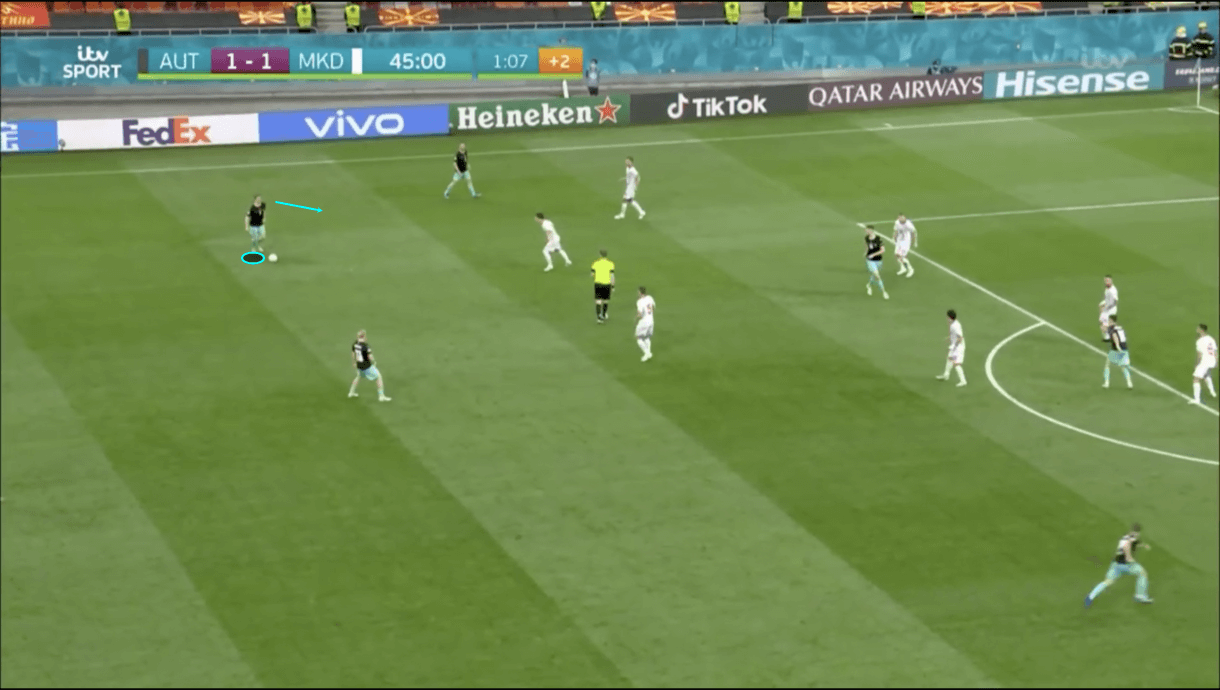
In figure 10, we see Sabitzer on the ball, once again in the left half-space, but this time more advanced than where we’ve seen him previously. Before, we saw the RB Leipzig man occupying a deeper position to assist his side in ball progression but here, we see him just on the edge of the final third, where he was often found to assist his side in chance creation.
Similar to when he occupied the deeper left half-space during ball progression, Sabitzer tended to enjoy too much time and space in this more advanced left half-space position as a result of North Macedonia’s wide midfielders not wanting to press too aggressively and allow gaps to open further up the pitch. North Macedonia were quite passive, defensively, in this game and were generally happy to sit deep and compact, aiming to keep Austria at a distance and prevent them from playing through the centre.
However, like in the ball progression phase, Sabitzer’s technical quality made life difficult for them despite being kept at a distance as he was afforded enough time and space to pick out passes and he’s capable of playing dangerous and accurate balls from positions like the one we see him occupying in figure 10.
Sabitzer created numerous chances for his team from this position and passes from this advanced area of the left half-space played a big part in him generating 1.45 expected assists versus North Macedonia – more than any other Austria player. He even provided the assist for Lainer’s opening goal via a well-weighted and accurate drilled long ball from this area, highlighting his effectiveness at creating chances via the left half-space.
Some of the chances that the 27-year-old created from this position came from an attack that began with Sabitzer picking the ball up and progressing it via his deeper left half-space position which we analysed previously. He often progressed the ball down the left side of the pitch, forcing North Macedonia back and pinning them into their 5-3-2 deep block. He’d then advance up the left half-space to where we see him in figure 10 before receiving the ball again and creating a chance. This shows how his important roles in ball progression and chance creation linked.
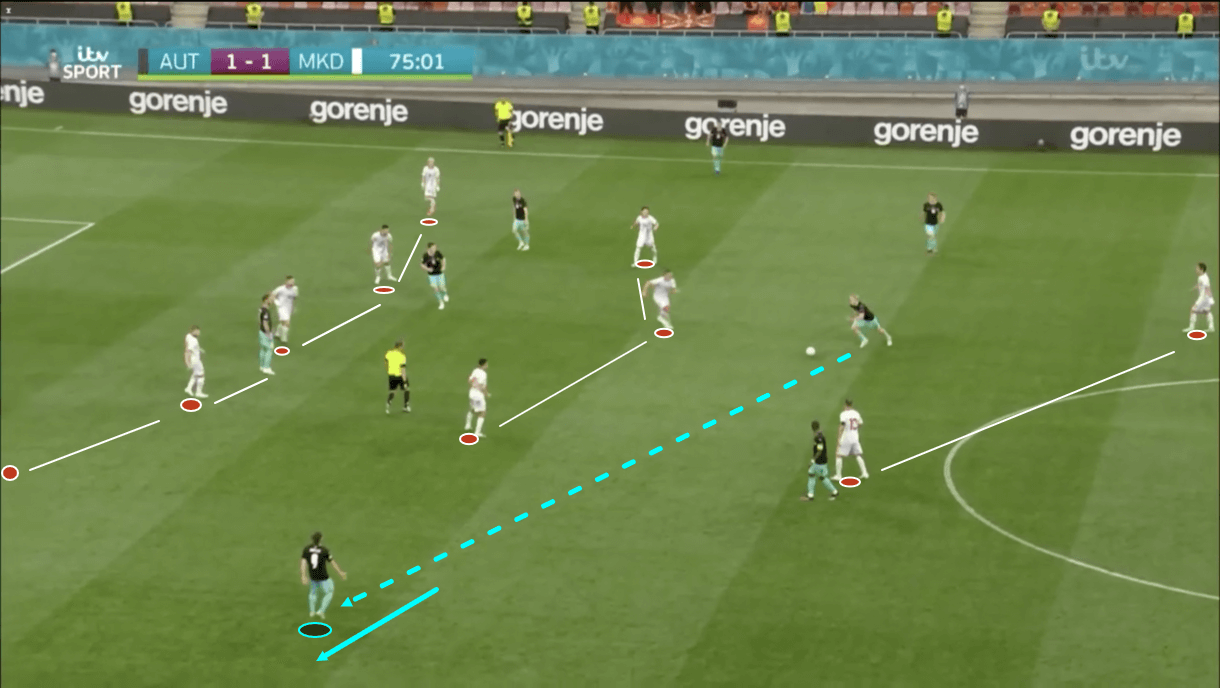
Sabitzer demonstrated intelligence and spatial awareness throughout the game during both the ball progression and chance creation phases. During the chance creation phase when Austria were in possession in or around the final third, Sabitzer did a great job of finding space and making himself a viable forward passing option for his side thanks to these attributes. We see an example of this in figure 11.
North Macedonia’s narrow, compact 5-3-2 block was very effective at congesting central midfield and preventing Austria from playing through this area, as this image demonstrates, with Austria’s central attackers in these positions struggling to find space. However, this shape didn’t offer a lot of cover out wide and during the chance creation phase, it was common to see left central midfielder Sabitzer drift out to the wing to exploit space.
When the ball was on the right side of the pitch, North Macedonia’s compact shape also failed to offer much coverage in the left half-space where Sabitzer loved to roam, and the RB Leipzig man, who could reportedly be available for transfer for as little as €17.5m this summer, frequently demonstrated his intelligence and spatial awareness by shifting into this space and offering his side a good, dangerous forward passing option, as figure 11 demonstrates. Along with attacks which he began himself in the deeper left half-space position, this was a common way that Sabitzer got on the ball in the left half-space during the chance creation phase.
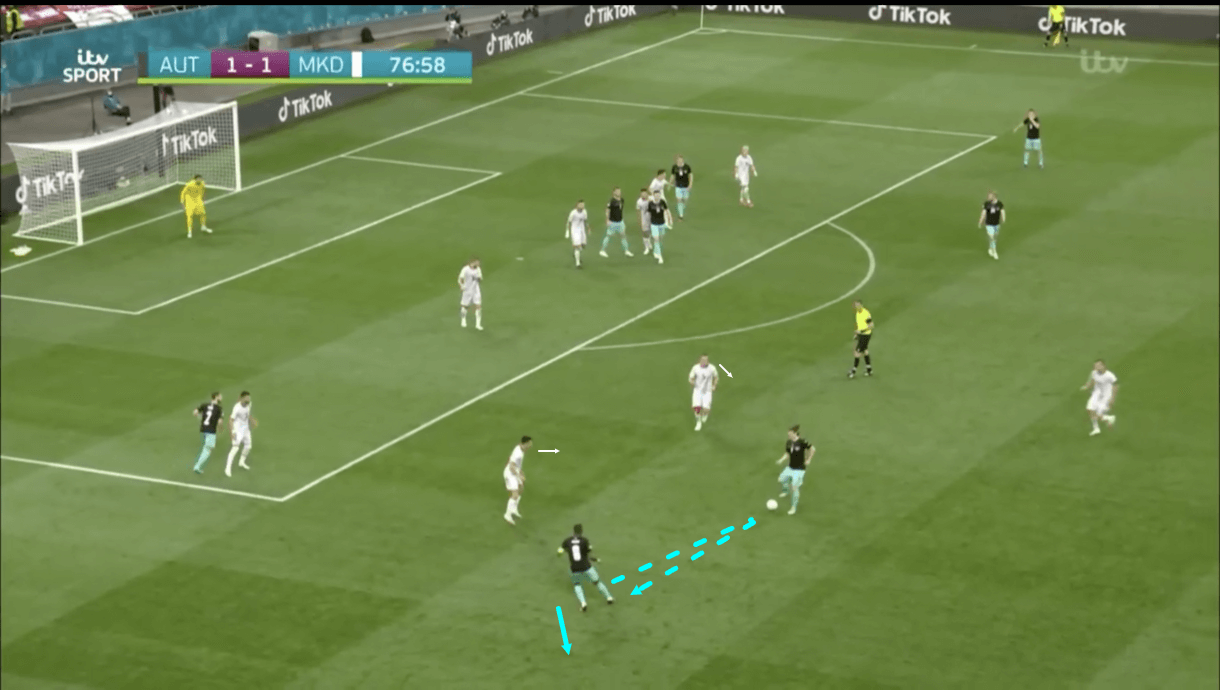
Sabitzer was consistently Austria’s biggest threat throughout this game and as the match wore on, the playmaker attracted more and more attention from his opponents when he got on the ball. This, along with his ability to free himself up in the left half-space, played a small but important part in Austria’s second goal, which was assisted by Alaba who marauded forward from the centre-back position as Das Team became more and more desperate for a goal.
Alaba found himself on the ball on the left wing, but with North Macedonia’s right central midfielder closing him down quite tightly and the opponent’s right wing-back offering more cover just behind. This made it difficult for Alaba to create a chance himself, which is when he opted to use Sabitzer.
As we see in figure 12, Alaba made a short pass to Sabitzer in the left half-space and the RB Leipzig man immediately attracted the full attention of North Macedonia’s right central midfielder, as well as the holding midfielder, both of whom began to close him down.
Alaba took that opportunity to shift out to the wing slightly, creating more space between him and the right central midfielder before he quickly received the ball back from Sabitzer. Now, with more freedom to progress forward, Alaba carried the ball down the wing to create a 1v1 with the opposition’s wing-back, won that 1v1, and played a cross into the box which assisted Austria’s second goal.
Sabitzer’s role in this goal was admittedly minimal, but he was still involved at a key moment to support Alaba at a pivotal point in the game, demonstrating how important his ability to free himself up in the half-space was for Austria.
Austria’s pressing
Austria pressed far more aggressively than North Macedonia did in this game, and Sabitzer played an important role in his side’s aggressive defending. The RB Leipzig man made a total of seven ball recoveries in this game, three of which came in the opposition’s half. Sabitzer made more ball recoveries in the opposition’s half than any other Austria player in this fixture.
The 27-year-old’s role tended to change during the high pressing phase, however. Like in the transition to attack, he often moved into more of a 10 position, or even a centre-forward position, during this phase of play, with holding midfielder Schlager moving up into central midfield alongside Laimer. This shifted Austria from a 3-1-4-2 into more of a 3-4-1-2/3-4-3. When North Macedonia progressed further up the pitch into the middle and final thirds, Sabitzer usually dropped back and Austria generally shifted back into their 3-1-4-2 shape.
The purpose of this change during the high pressing phase was to prevent North Macedonia from enjoying numerical superiority during their build-up, with their three-man backline outnumbering Austria’s two-man forward line. By turning Sabitzer into a temporary member of the forward line, Austria were able to match up with North Macedonia’s backline 3v3 during this phase.
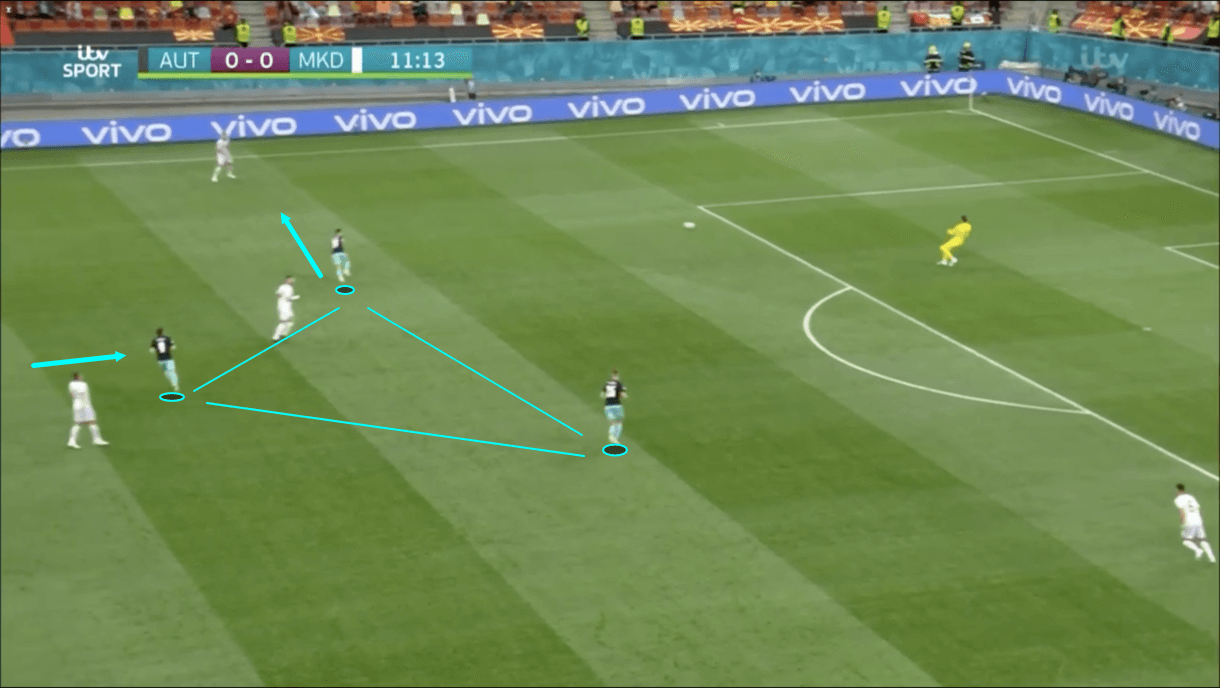
We see an example of Sabitzer in his temporary forward position during the high pressing phase in figure 13. At times he was deeper than the other two forwards, like in this example.
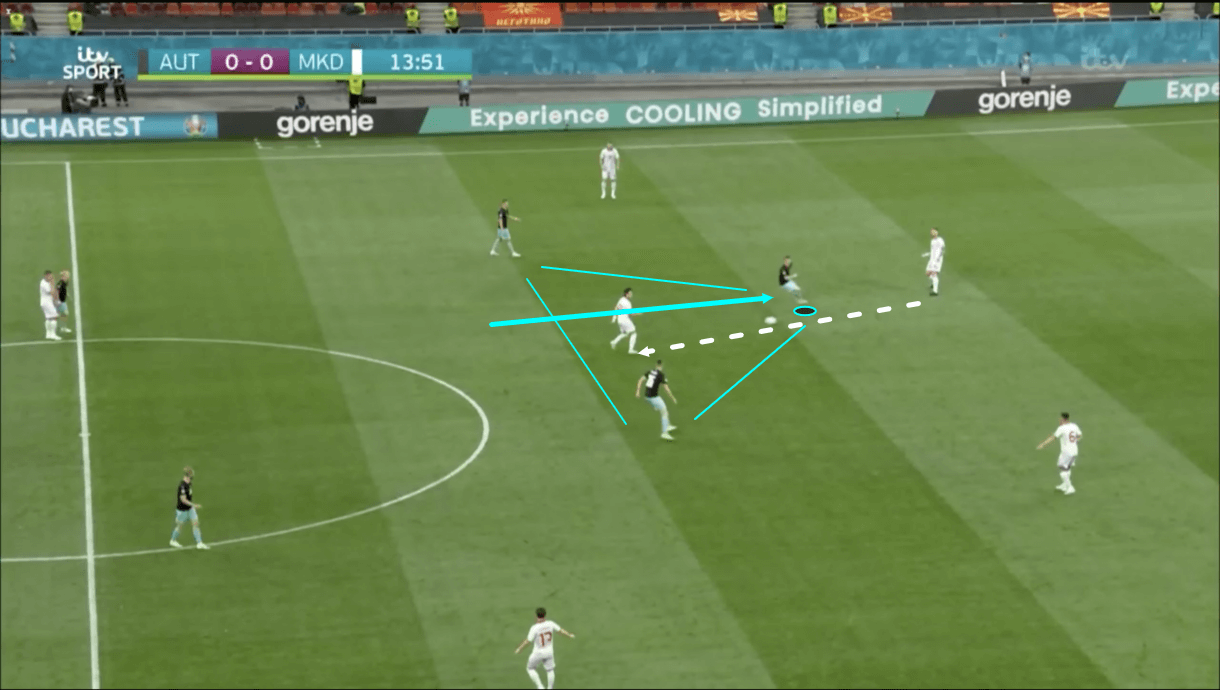
While other times, Sabitzer was the most advanced Austrian player on the pitch, with the other two forwards sitting deeper, as we see in figure 14. However, what generally remained consistent was that Sabitzer would stick to North Macedonia’s central centre-back very tightly regardless of his position as the southeastern European side built out from the back, while the other two forwards would retain access to the wide centre-backs and try to stay in a pretty tight triangle shape with Sabitzer, keeping either the central centre-back (see figure 13) or the holding midfielder (see figure 14) in the centre of that triangle, which was a pressing trap.
North Macedonia often tried to play out short from the back, through the holding midfielder similar to Austria, and the Austrian attackers pressed these players quickly and aggressively while creating dangerous pressing traps as we see in figure 14 to punish them when they played into this area in the centre of the triangle. As play moved on after figure 14, the triangle closed in on North Macedonia’s holding midfielder and Austria forced a turnover in a dangerous area of the pitch.
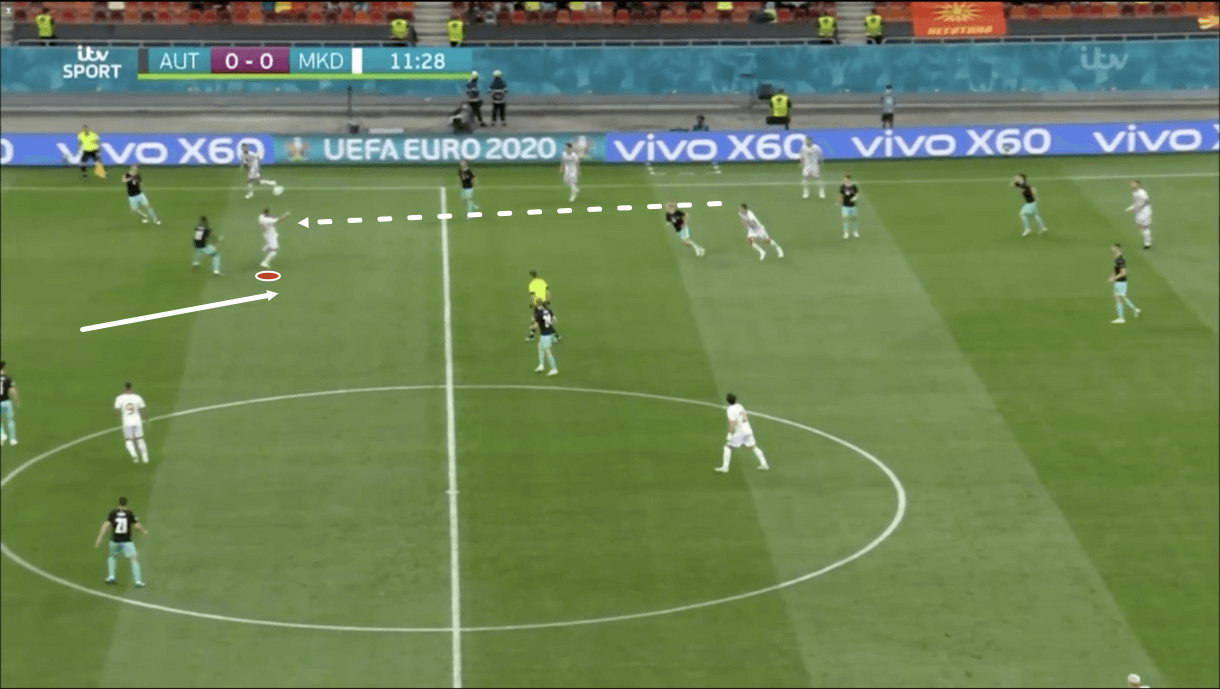
One positive way in which North Macedonia dealt with Austria’s change in shape during the high pressing phase is that this created more space between Austria’s midfield and defensive lines, as a result of the holding midfielder advancing into central midfield. Like we see in figure 15, North Macedonia effectively exploited that space throughout this game with direct balls into the forwards, who would drop to exploit the space between the lines.
We see Pandev doing so here in figure 15 while dragging Alaba out from the backline, and as this particular passage of play moves on Pandev controls the ball very well before playing a teammate behind Austria’s backline.
North Macedonia reacted very well to Austria’s change in shape and exploited this space frequently both during regular attacks and counter-attacks throughout the contest. Austria counter-pressed frequently and this space was often more open when they did so, allowing North Macedonia to capitalise and start dangerous counters.
Trajkovski and particularly Pandev’s intelligent movement into this area was key in helping North Macedonia to enjoy those counterattacking opportunities, while counter-attacks were a major part of North Macedonia’s offensive efforts versus Austria, as they enjoyed 17% efficiency from counter-attacks compared to just 7% efficiency from positional attacks. So, it’s clear that their reaction to Austria’s change in shape was undoubtedly positive in some ways.
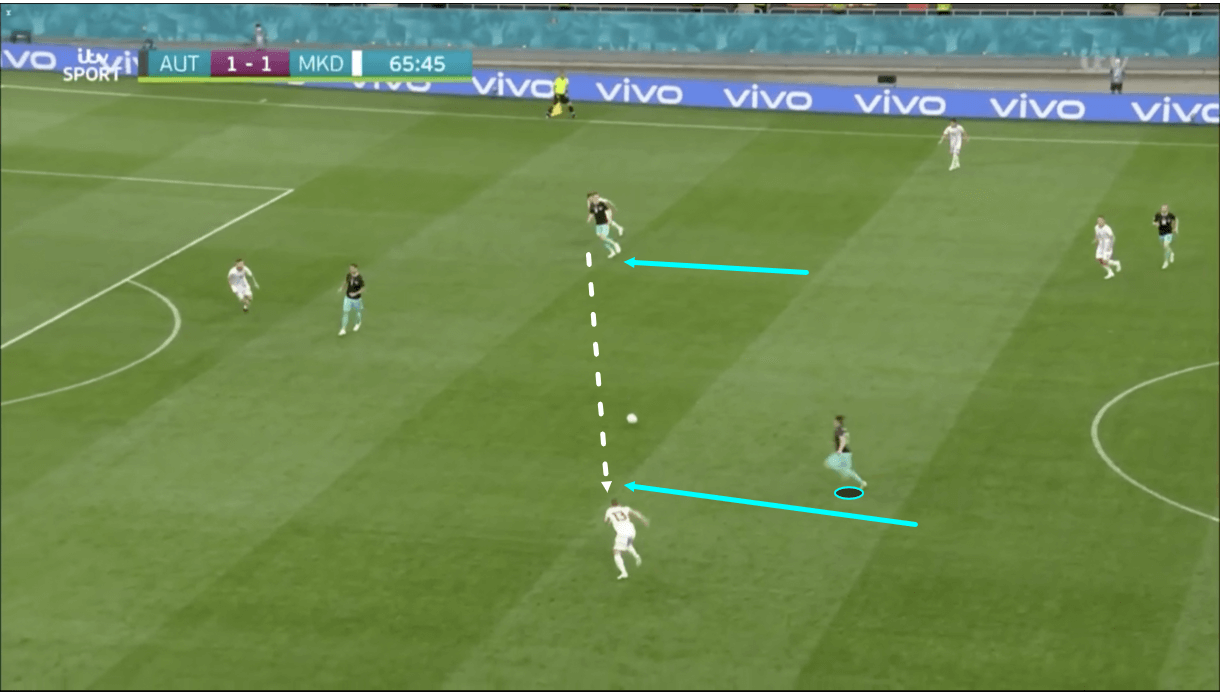
In figure 16, we see another example of how Austria’s aggressive pressing also had plenty of benefits though, particularly thanks to Sabitzer’s contribution. Just before this image, North Macedonia’s centre-backs were pressed aggressively by Austria’s forwards as they attempted to play out from the back. The forwards ultimately forced a risky pass across the centre of the pitch to another centre-back, and Sabitzer was ready to pounce on that ball. As play moved on here, Sabitzer made the recovery and set his side off on a dangerous counter-attack, again highlighting his key role for Austria in the high pressing phase.
Conclusion
To conclude this tactical analysis of Austria’s 3-1 win over North Macedonia, we can see how Sabitzer played a pivotal role in the ball progression, chance creation, transition to attack, and high pressing phases for Das Team to help them secure their opening-game win versus Group C opponents North Macedonia at the weekend.
Austria created far more chances than they otherwise would have on Sunday thanks to Sabitzer’s mix of intelligent movement, relentless pressing, and technical quality. This was key to breaking down North Macedonia’s disciplined, compact block time and again throughout the game and securing all three points for Foda’s side.


Comments