At the time of writing, Derby County occupy the second position in EFL League One with 78 points after 39 matches, trailing behind Portsmouth who hold the top spot with 83 points. Paul Warne’s side has demonstrated a balanced performance both defensively and offensively. Defensively, Derby County rank third in terms of defensive solidity in EFL League One, conceding 34 goals, trailing Portsmouth with 32 goals against and Lincoln City on 33.
On the offensive front, they rank as the fourth most prolific attacking unit, having scored 69 goals. This places them behind Peterborough United, Bolton Wanderers and Barnsley, who have scored 74, 71, and 70 goals respectively.
What is intriguing is that they are the leading team in terms of goals scored from set-pieces in EFL League One, with a tally of 20 goals, a margin of three more than second-placed Stevenage. This accounts for a proportion approaching 29% of their overall goal tally.
It is noteworthy that they exhibit diversity in their set-piece executions and are capable of posing a threat in various situations. From corner kicks, they rank as the second most proficient team in EFL League One, having scored 11 from this set-piece, on par with Shrewsbury Town and trailing Bolton Wanderers, who are a single goal ahead. However, their proficiency extends beyond corner kicks, as they have managed to score numerous goals and create dangerous opportunities from direct free kicks, indirect free kicks, and even throw-ins.
In this tactical analysis, we will focus on elucidating and clarifying their various tactics at corner kicks and indirect free kicks, highlighting their diversity, effectiveness, and execution quality.
Corners
We will start with their effective attacking corner routines, the most well-organised of which not only depend on a single idea but also combine ideas at particular timings.
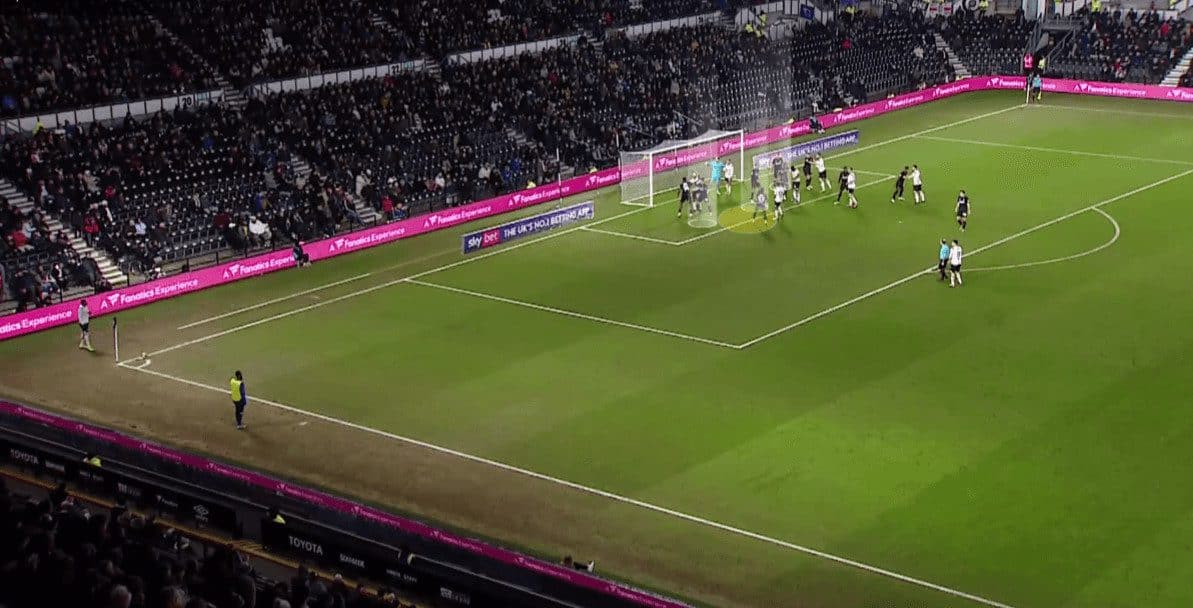
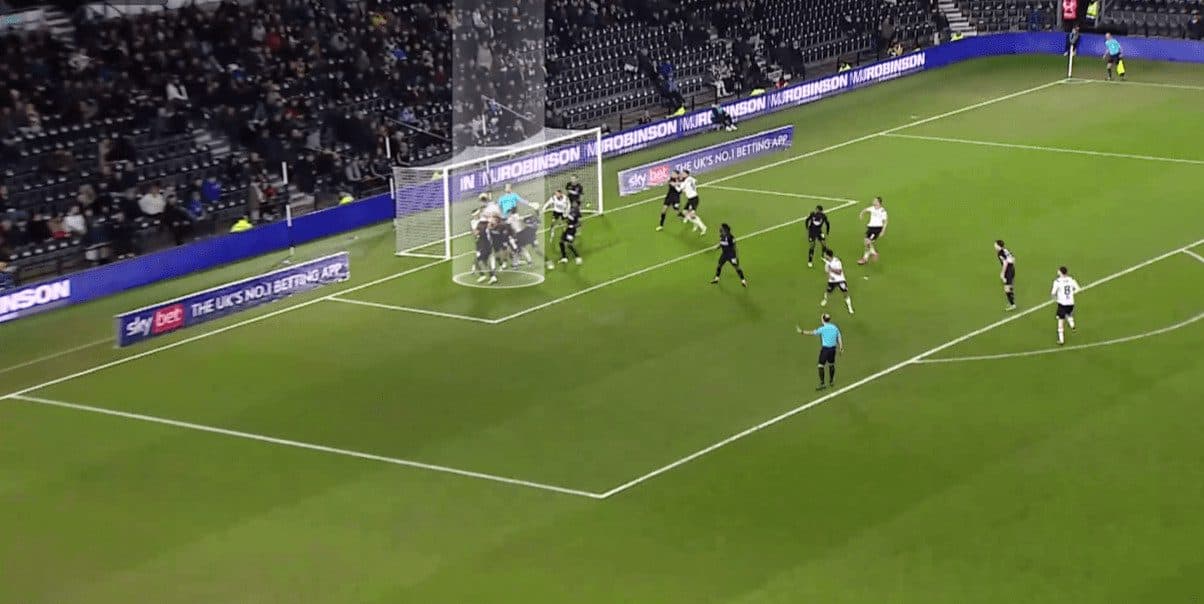
In the case below, the opponent defends with three zonal defenders and a rebound defender, while the rest are man markers. They aim to target the area between the first and second zonal defenders, shown in a yellow circle.
You may ask about the reason for putting an attacker, with his marker, at the targeted area at first—this is a principle of underloading to reassure the opponent that a defender is with the attacker there. So, the second zonal defender may shift a little towards the far post, where most of the attackers stand. Thereafter, the attacker moves away from the targeted area, dragging the marker with him for another attacker to target it.
In the two following photos, when the taker raises his hand, the switch we talk about begins while the white spotlighted player is the targeted one.
It isn’t a coincidence that a teammate stands very close to him because this player will turn around to block the targeted player’s marker, which is called a screen, to make him free to attack the targeted area with all of his momentum. Thanks to his movement, he can jump higher than defenders who try to leap from a static position, a dynamic mismatch — this is another major benefit.
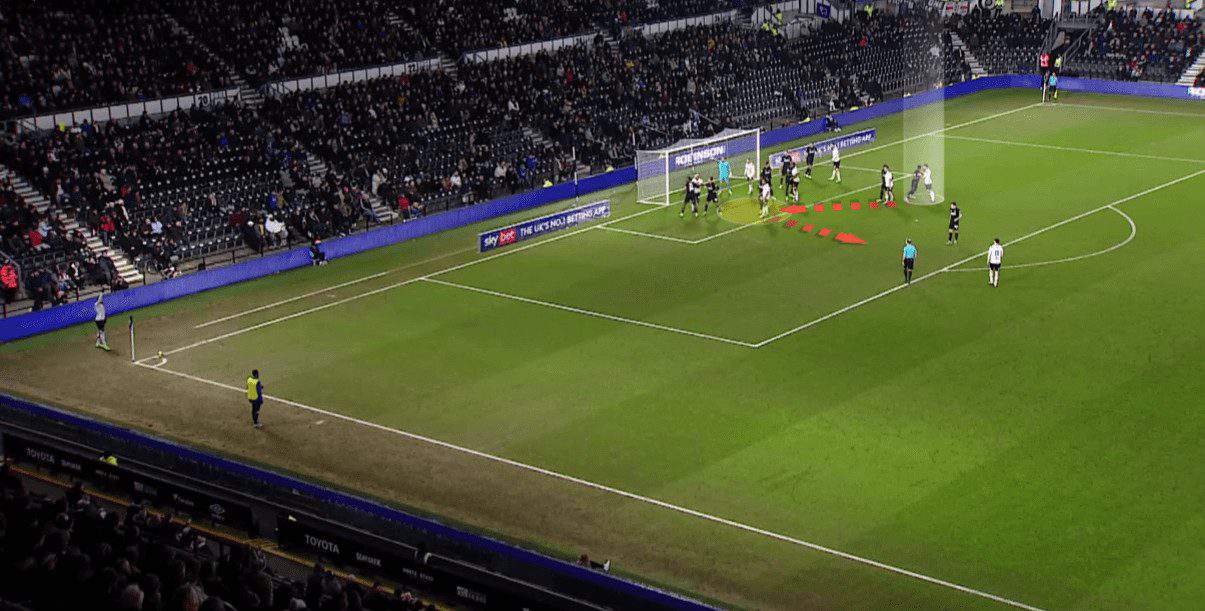
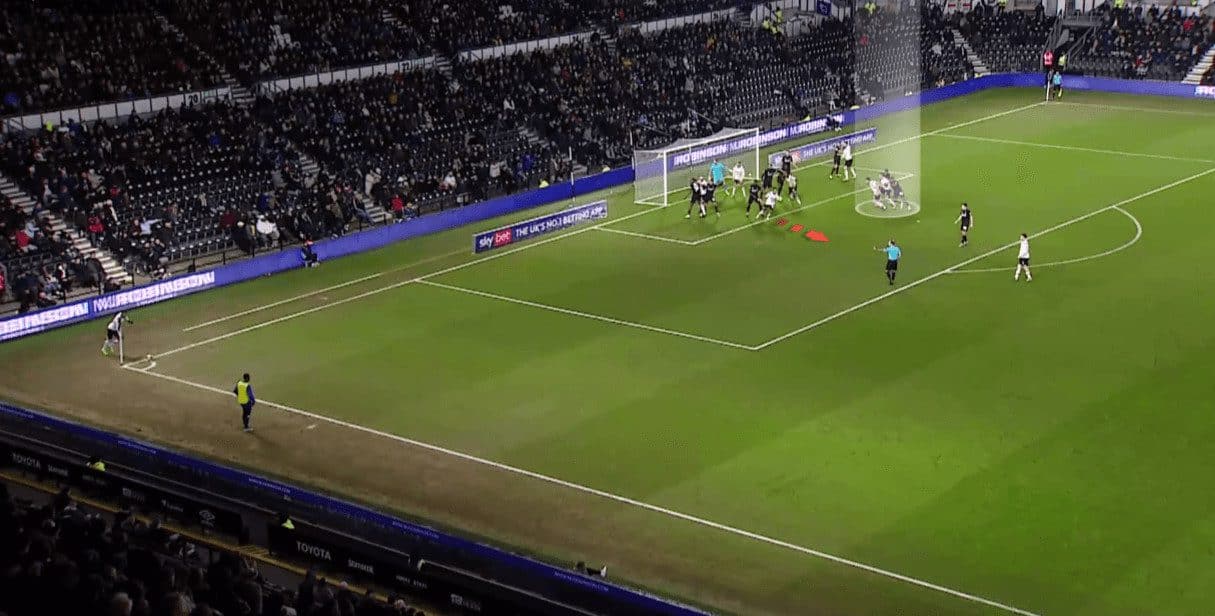
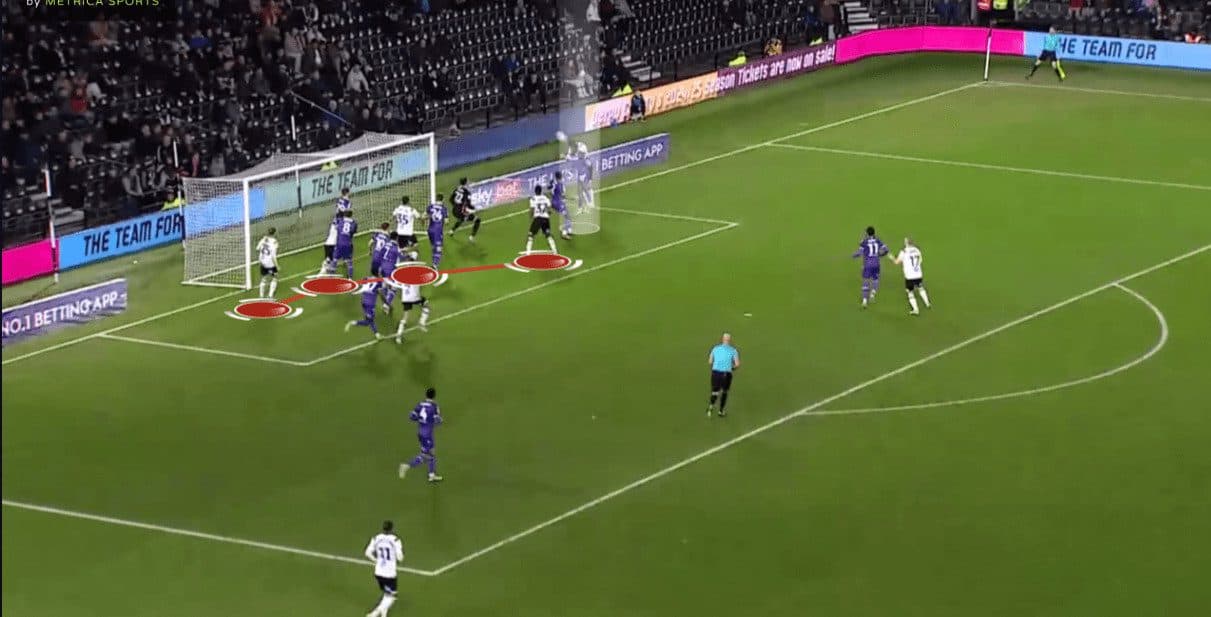
You will find three players who can chase the ball at the targeted area — the first and second zonal players, as well as the goalkeeper, who may go out to claim the ball in the air. That’s why the three red-highlighted players are asked to do blocks.
We should mention that it looks easy, theoretically, but it is difficult to find players to perform blocks in this manner without committing fouls and against two defenders, the zonal one and his marker.
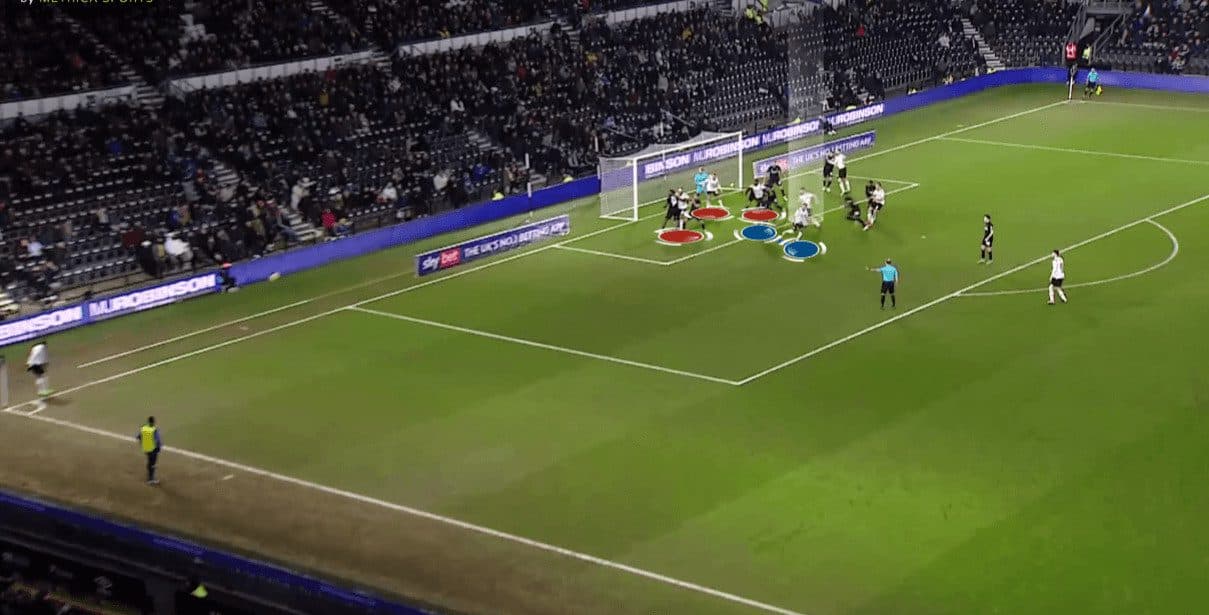
To be realistic, a player can’t still block two defenders all the time, but he is only asked to delay them even for a moment to give the targeted player a small advantage in timing. These blocks also make defenders unable to jump with all of their power.
It should be mentioned that the priority is to block the zonal defender because the man marker’s priority is to mark the blocker himself — not the targeted zone.
Finally, the targeted player can brilliantly outperform all of these delayed defenders and score.
The second idea we will talk about is that they target a player starting after the far post, nearly on the line, a lot.
This gives them many advantages, as we will explain; in the photo below, the opponent follows a hybrid defending system with four zonal defenders, four man markers, a rebound defender and a short-option defender.
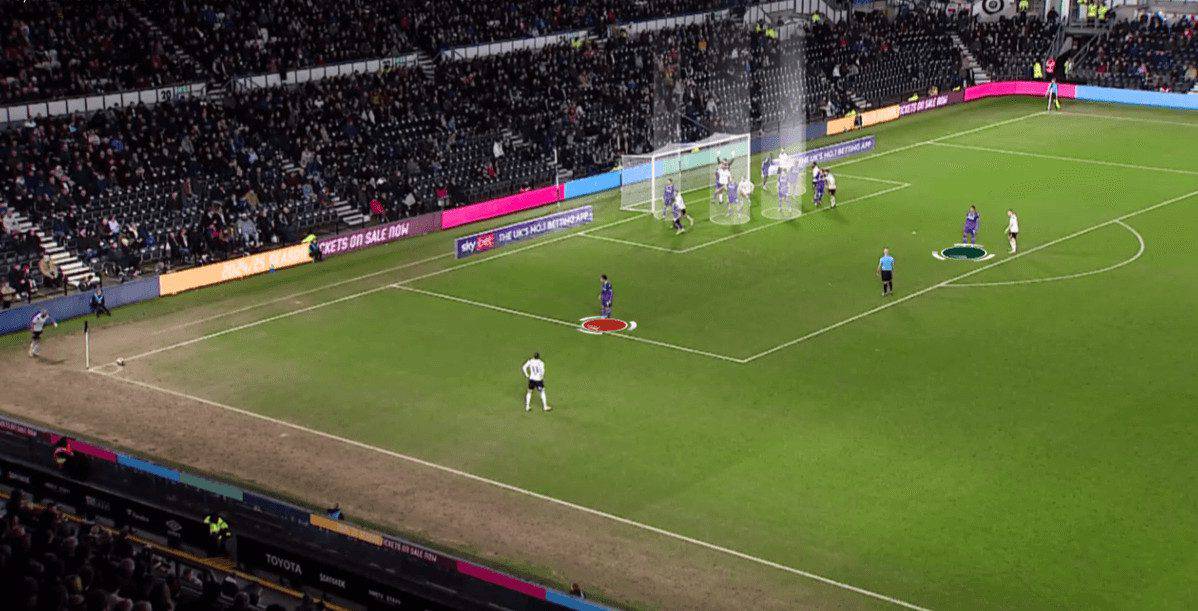
Let’s focus now on the targeted player standing on the far post nearly on the line, which causes a problem of orientation for the defender who struggles to keep track of the ball and the attacker at the same time because of the difficult body shape he is forced to stand at. If he stood with an open, inclined body shape facing the defender and the ball at the same time, he would find himself standing out of the goalmouth, leaving the attacker’s path to goal open.
This attacker will exploit this orientation problem to take the arched path, shown below, but the red attacker’s role is essential to block the last zonal defender from stepping back, preventing him from getting the ball.
The other important role is using a player to block the goalkeeper, thus stopping him from claiming the ball or just delaying his reaction without committing a foul.
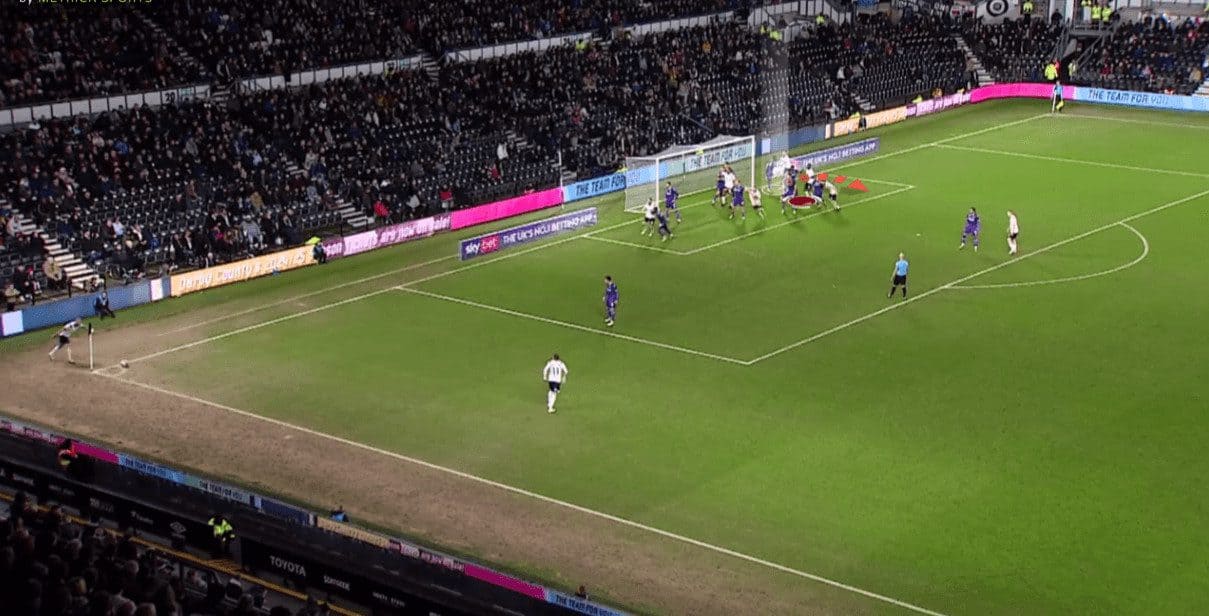
In the photo below, the block and orientation problem are clear.
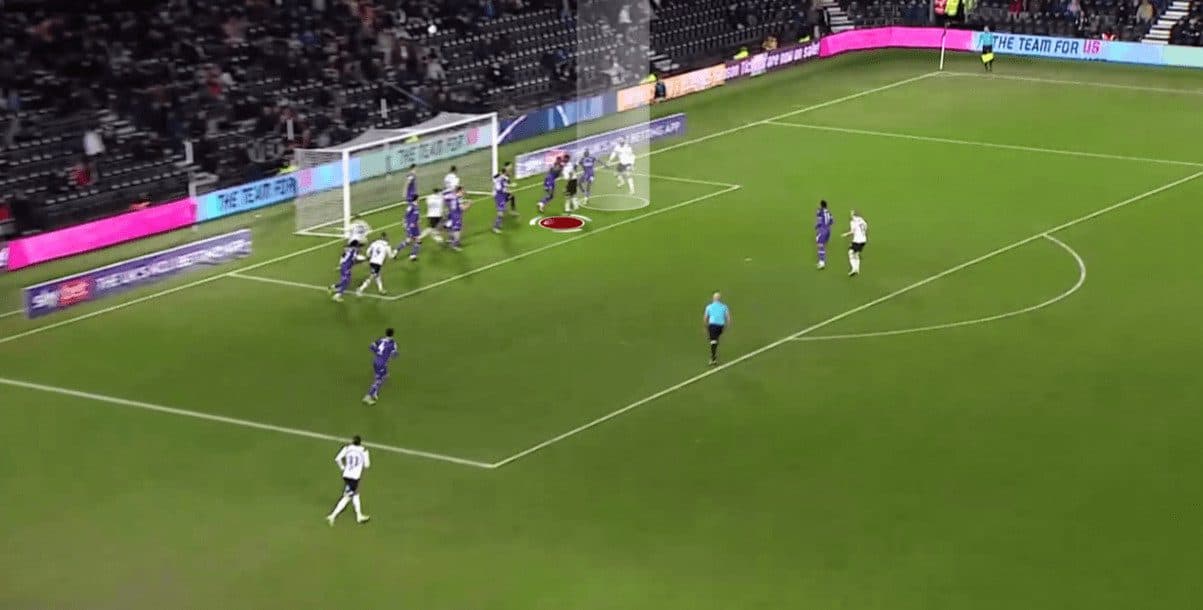
Getting the first touch there is good, but it is still difficult to score from the first touch, so they need a second part of the plan, which is asking four attackers to frame the goal and be ready to receive the headed pass.
Framing the goal is an easy yet effective way to increase the probability of completing the headed pass. In the end, the cross was a little low, so the first targeted player couldn’t control the ball, so it hit the marker.
In the case below, they use the same general idea of placing a player on the far post, but in a different way. Let’s analyse this in detail.
In the first photo below, the opponent uses only three zonal defenders, leaving the far post without zonal defenders, so Derby County ask a player to block the goalkeeper, as usual.
In this case, they use another player, in blue, starting on the penalty spot to run behind the first player they usually target; they have no problem freeing him up using his teammate’s screen, in white, as usual, as shown in the second and third photos.
With this trick, they have two players who can target the far post; the first one goes inside while the second comes behind him. In the fourth photo, the big chance for the first player is clear, while the second one is available behind him.
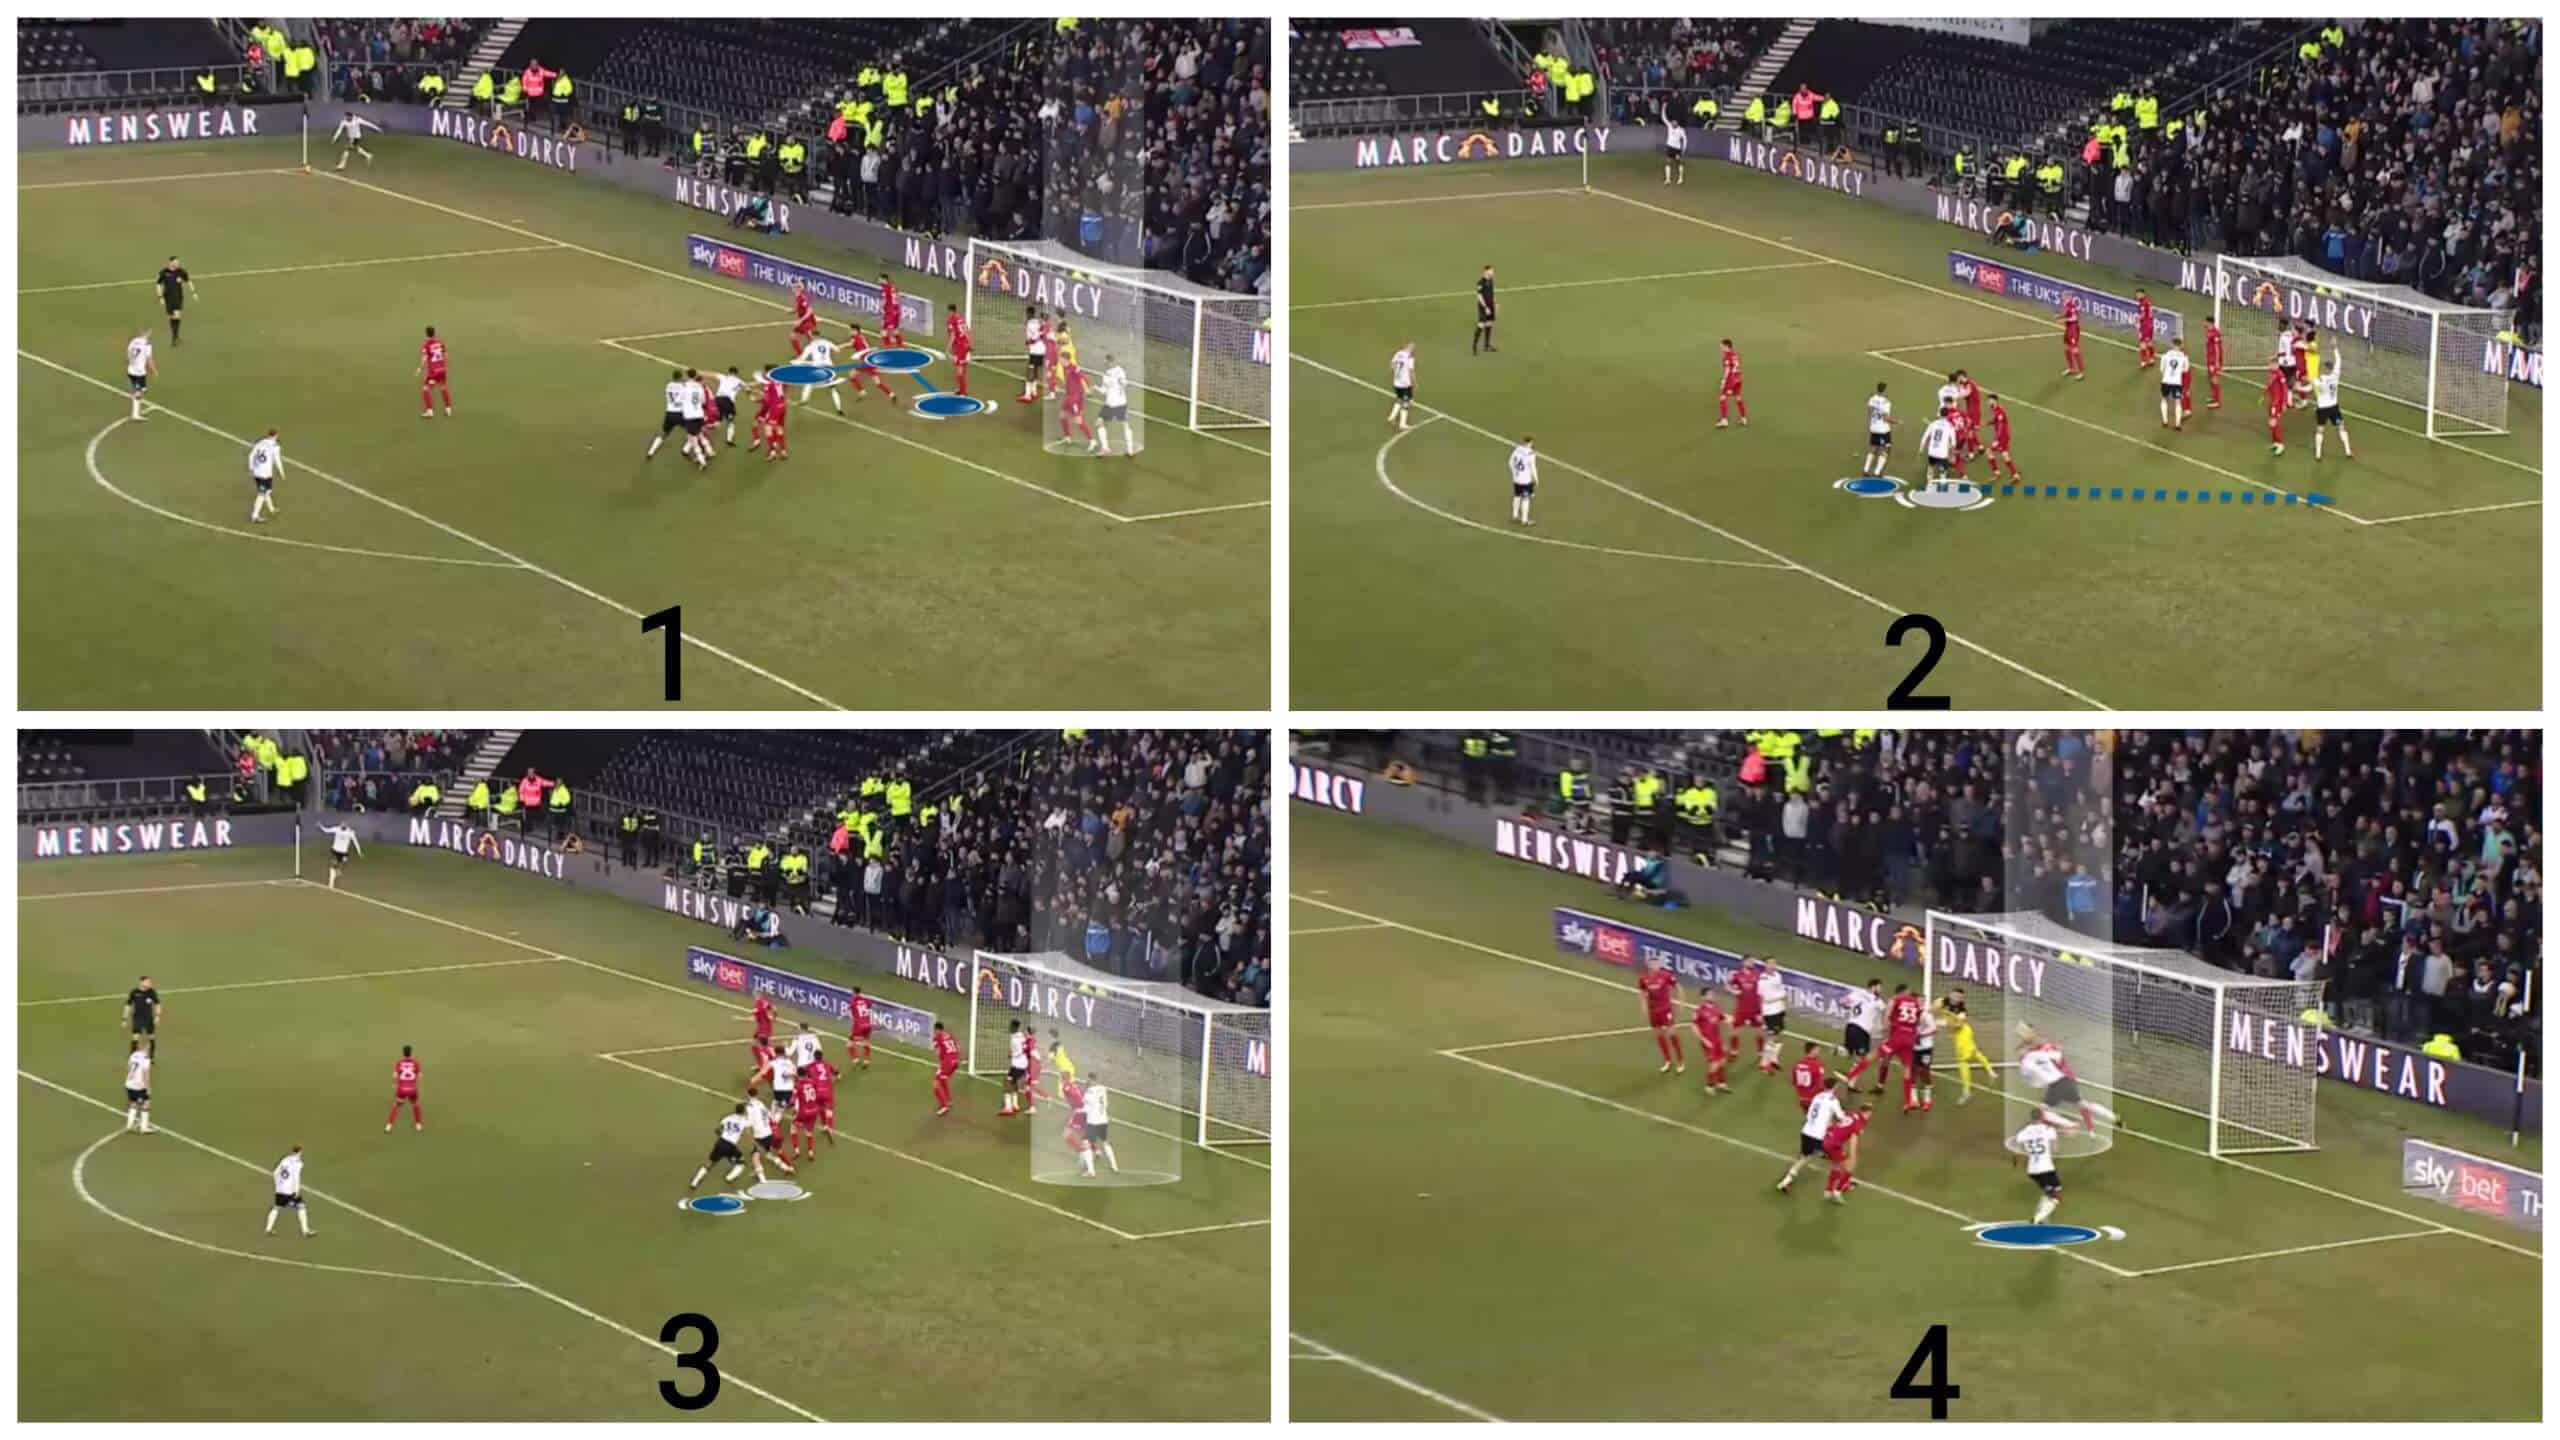
The ball passes the first targeted player; unfortunately, the second player can’t control it.

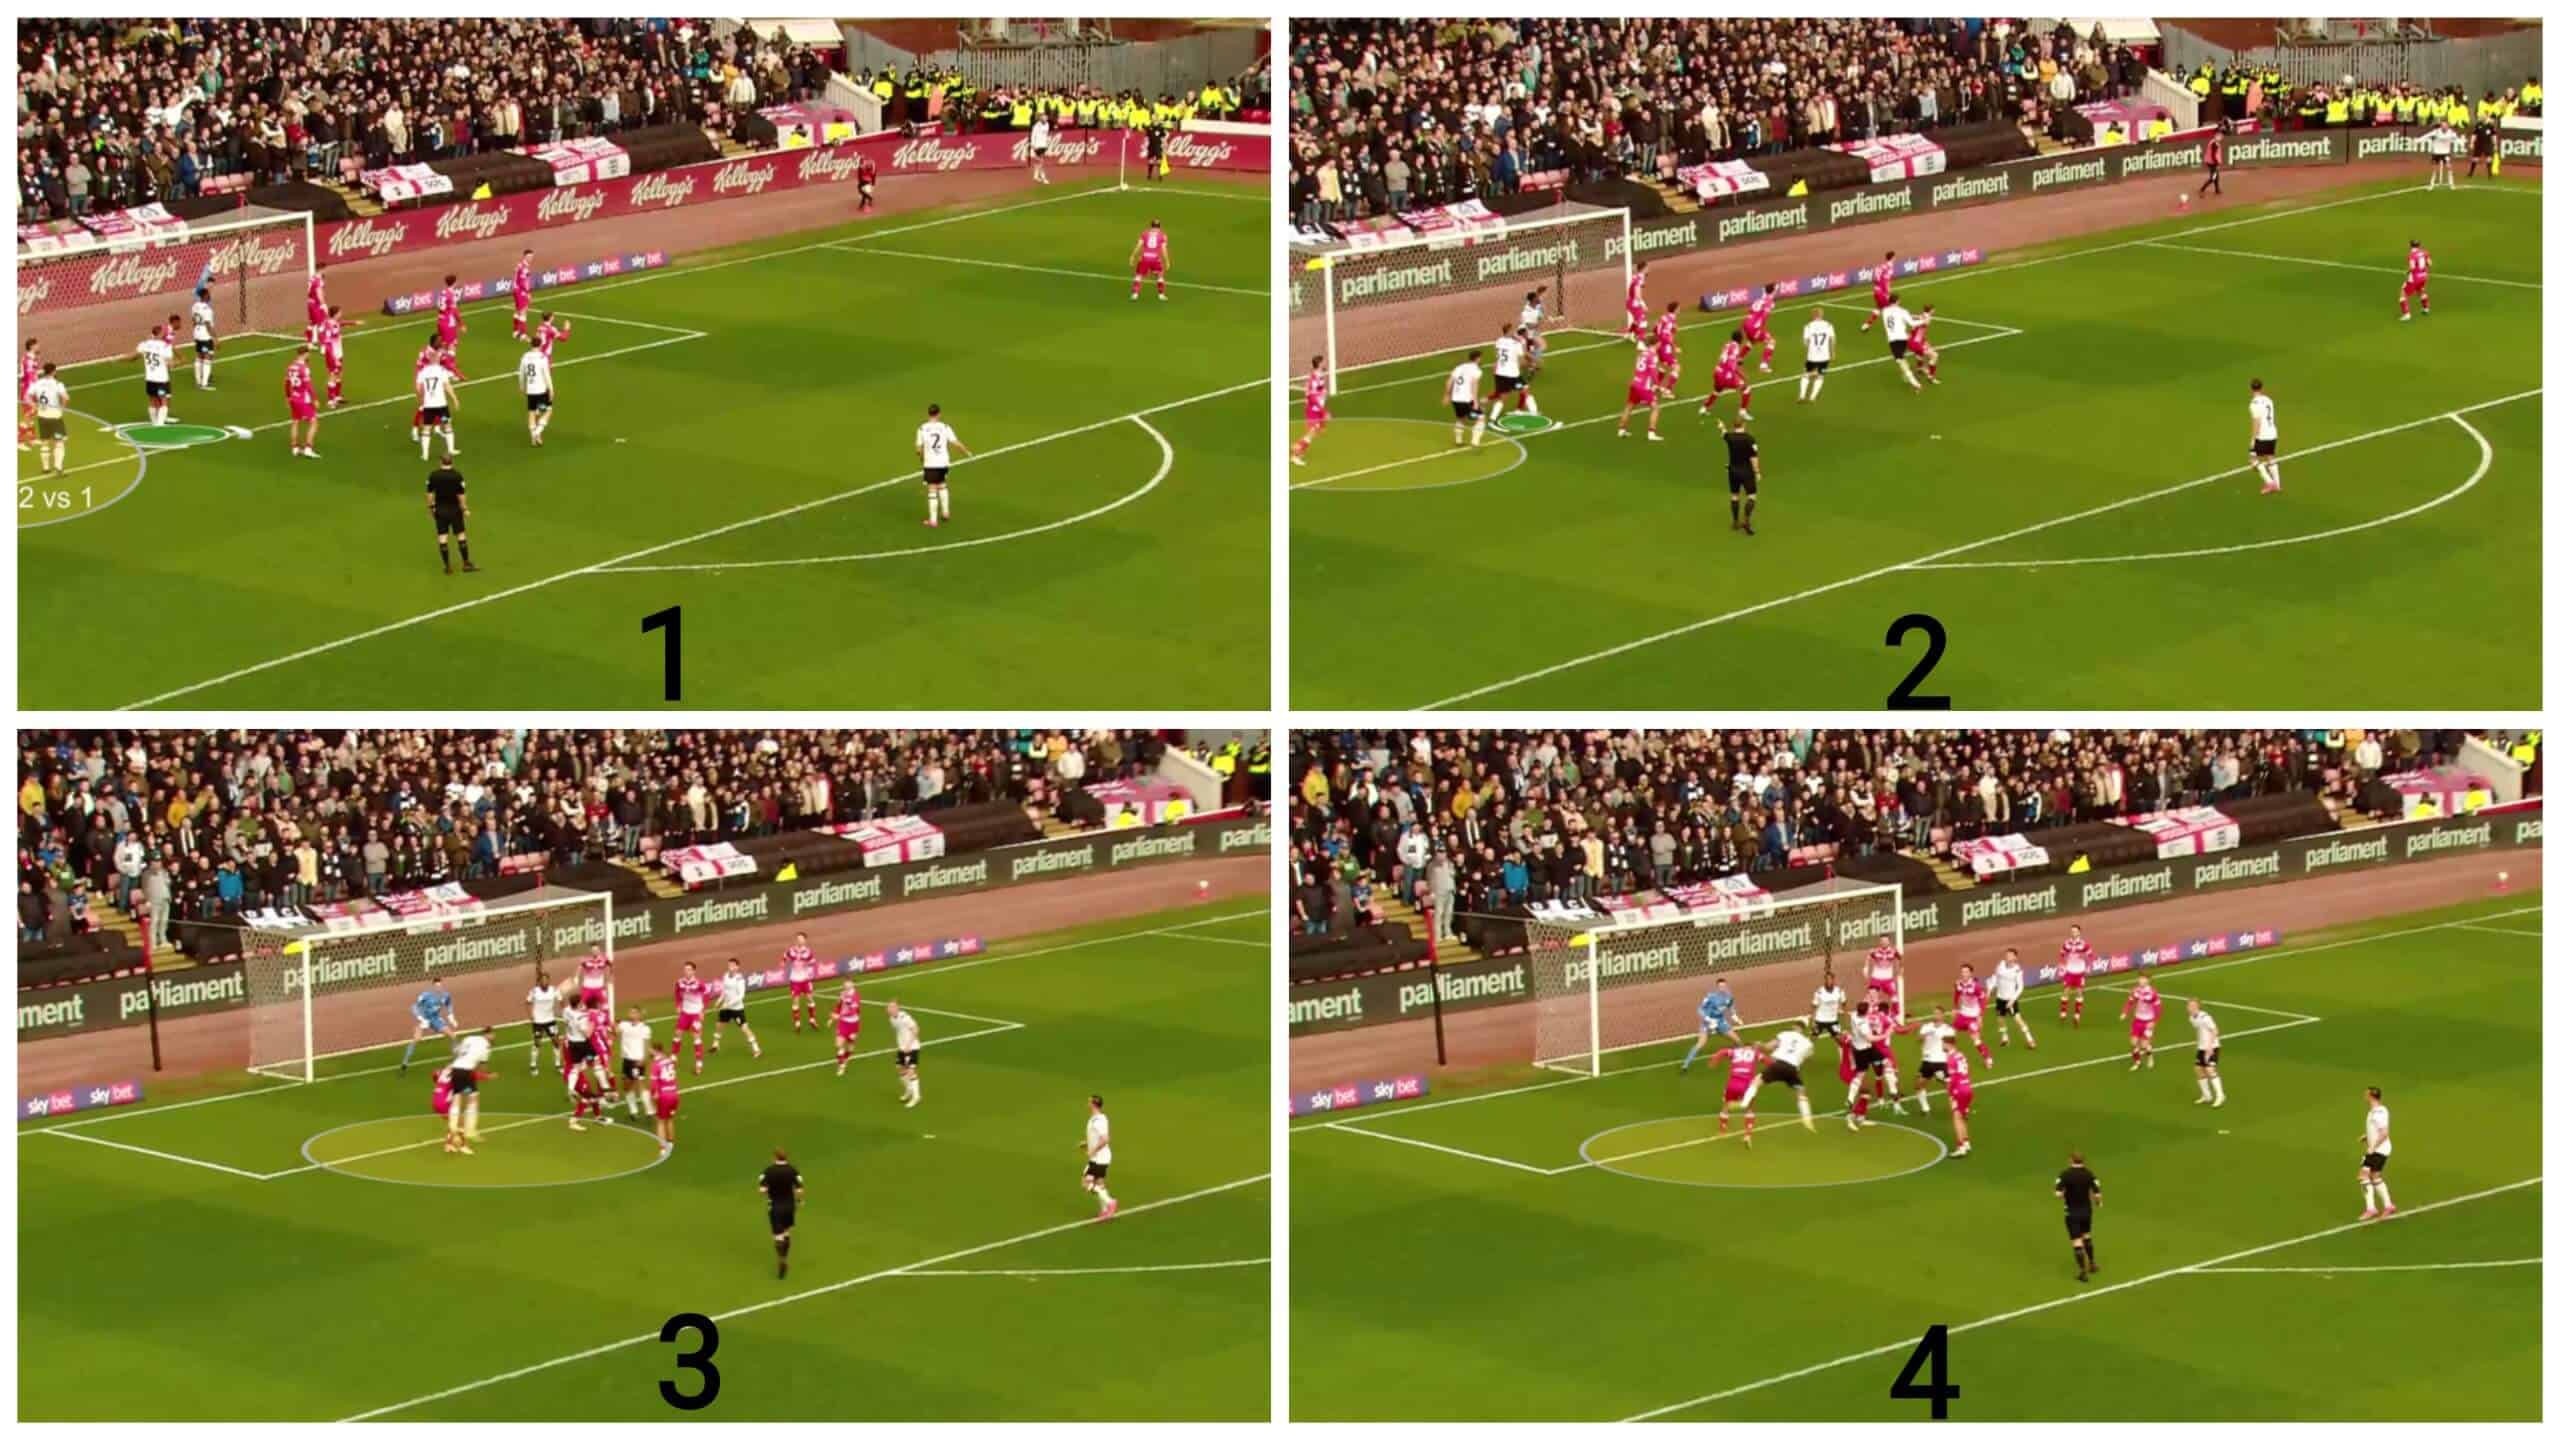
Defences that neglect the far attacker, giving priority to the attackers at the middle and the near post, could find it more difficult. At the far post, attackers enjoy a 2v1 situation, as in the case below, where the targeted player is out of shot.
What makes it more difficult is asking the last zonal defender, in green, to step more toward the middle, as most teams do, and that is reasonable, but Derby County ask two attackers to block the last zonal defender, in green, and the goalkeeper, as done in the second photo below.
In the third photo, the two attackers go inside to target the ball, one in front of the marker and one behind. The second one succeeds in getting the ball because of the orientation problem, as shown in the fourth photo — the result is a goal.
The third idea we will talk about at corners is asking many attackers to start out of the box, as shown in the first photo below, where five runners face three man markers. These movements along this long distance confuse the man markers, allowing attackers to easily escape them because they aren’t sticking to the attackers and are forced to track them all this distance. Besides the orientation problems they may face, it also becomes difficult to track the ball.
In the second photo below, the plan is for three attackers to run toward the near post, aiming to drag as many attackers as they can while asking the highlighted player to target the far post with the help of his teammate, who blocks any marker trying to go to him, in the green arrow.
In the third photo, the last zonal defender is forced to go to the targeted player, but the targeted player outperforms him because he comes all of this distance free, so he can jump higher from movement, a dynamic mismatch, as shown in the fourth photo below.
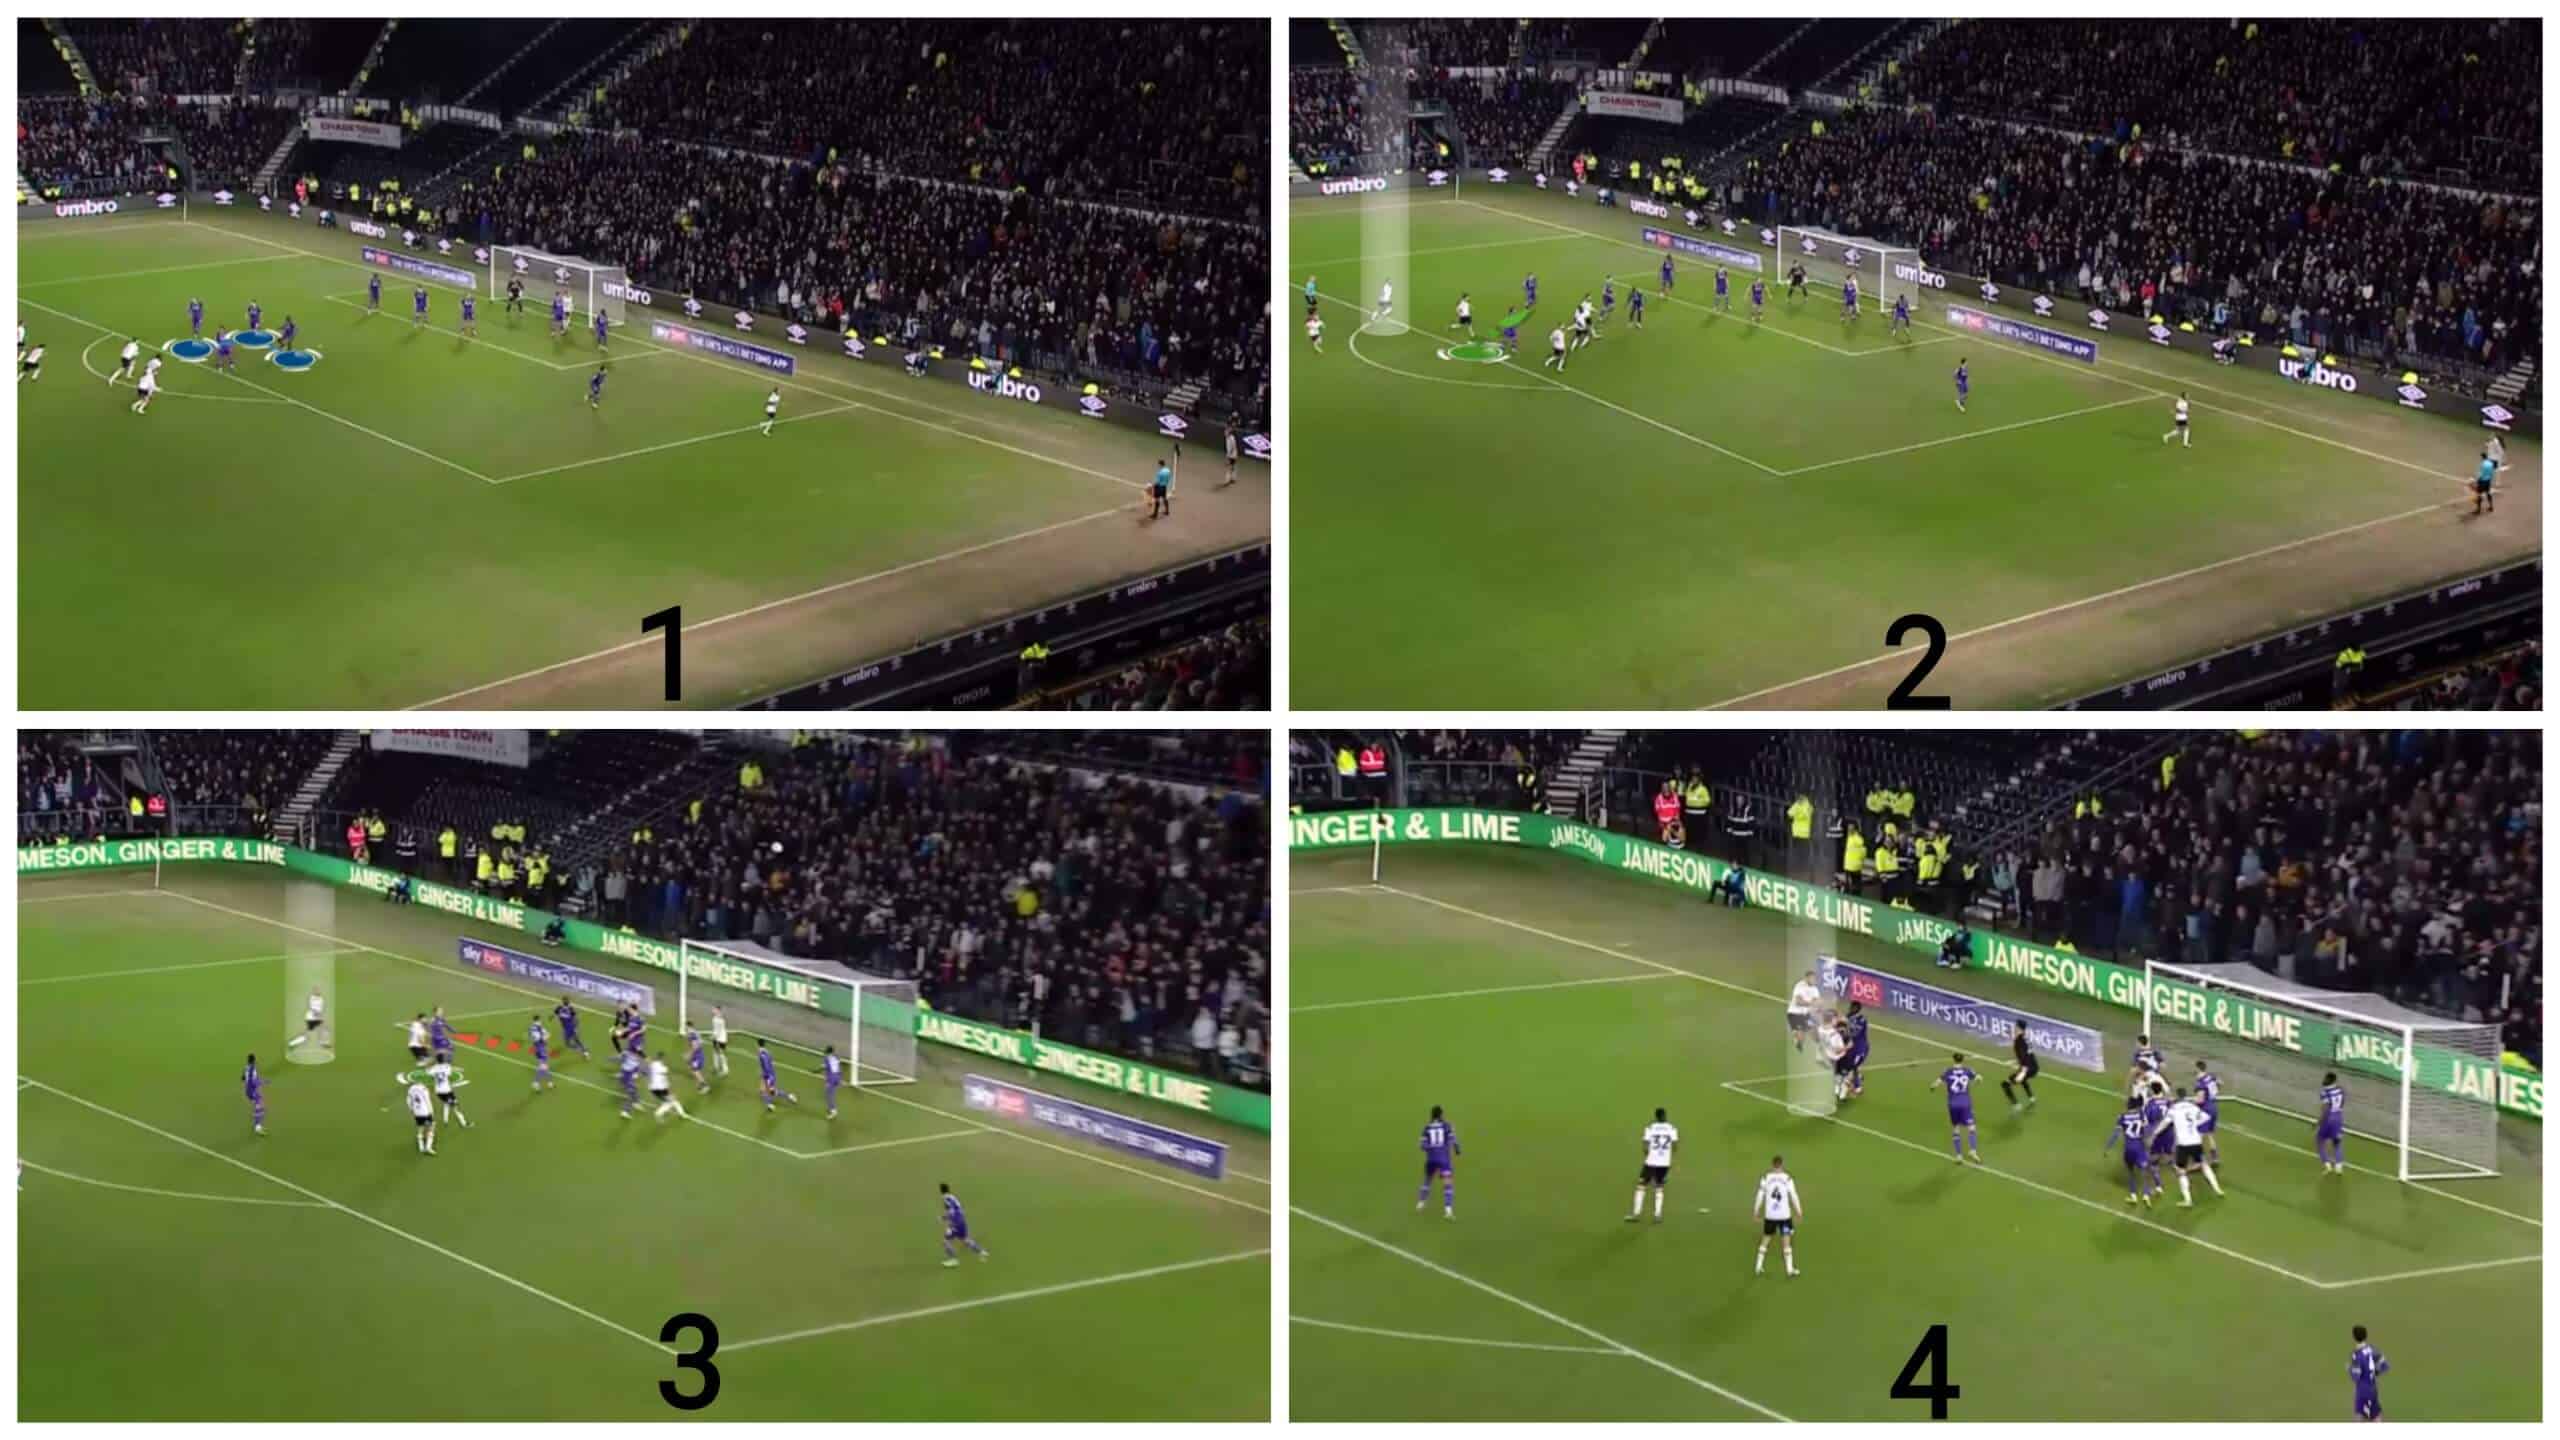
The plan works, but the goalkeeper saves the ball, as shown below.
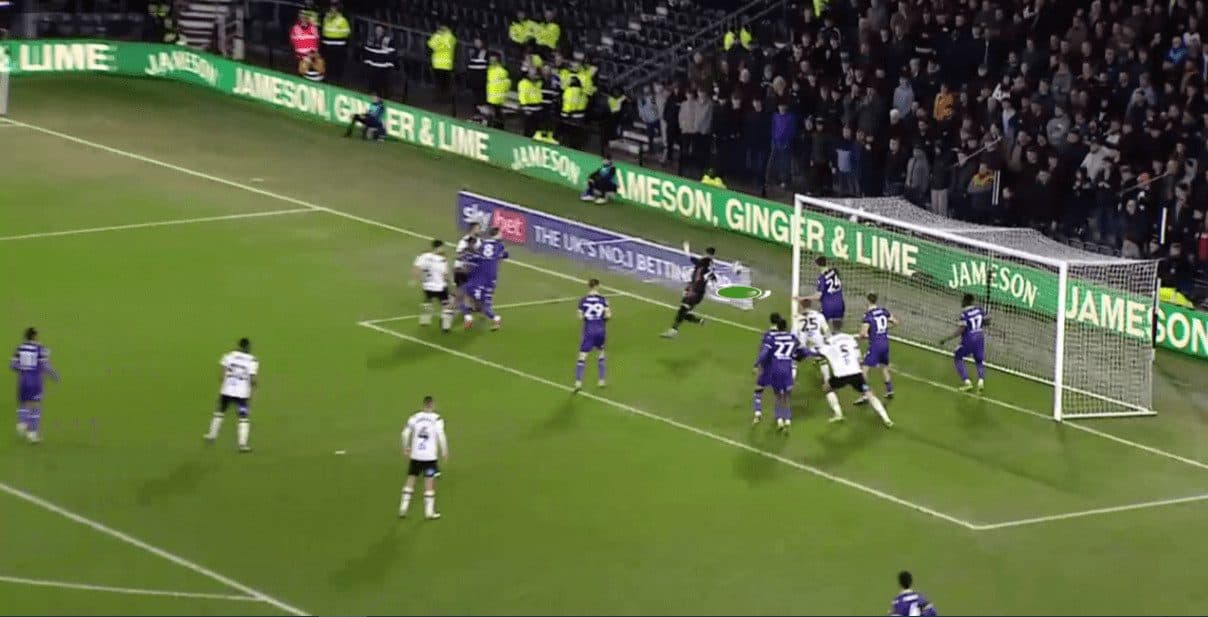
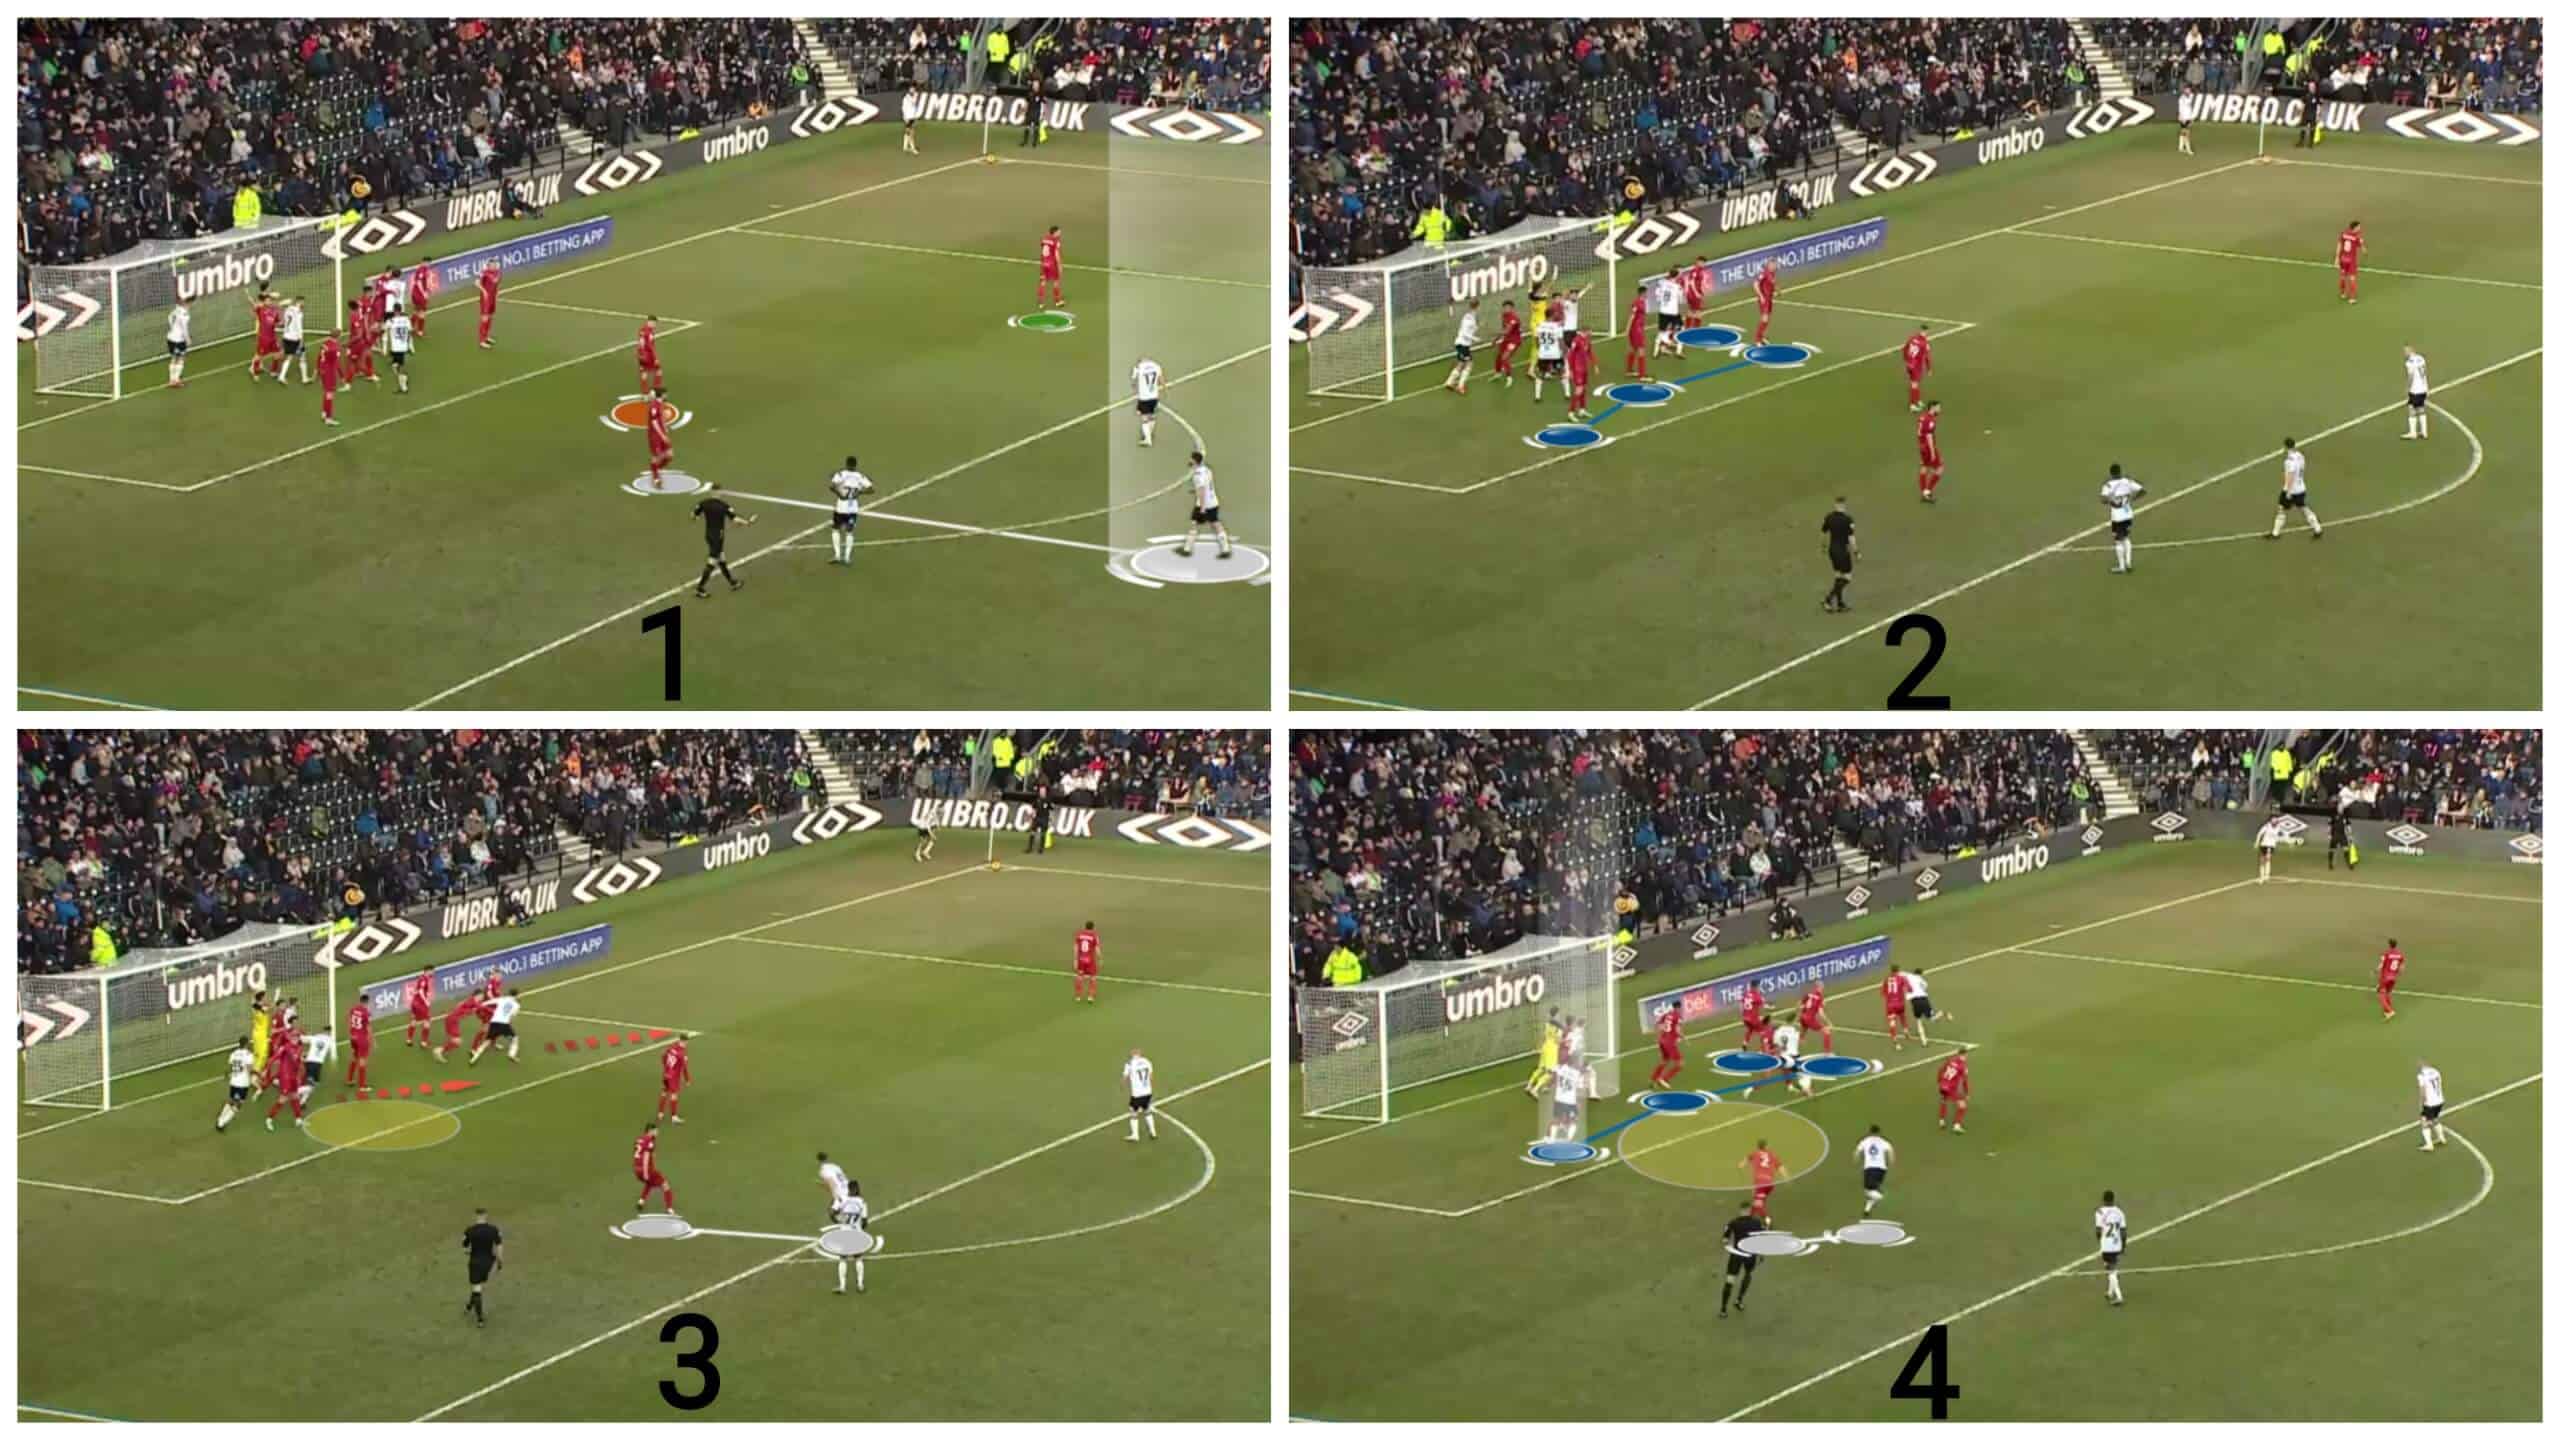
In the case below, they use a similar strategy by asking the targeted player to stand out of the box, so the area between him and the six-yard box is empty except for his awaited marker beside the short and rebound defenders who won’t bother him, as shown in the first photo below. What helps to achieve that uncrowded area is asking the attackers to stand behind the four zonal defenders, thus dragging their markers with them.
In the third photo, the routine begins to target the area between the third and fourth zonal defender, shown in a circle. At first, two players move away to the near post, dragging their markers with them (red arrows).
Secondly, the targeted player can easily escape from his marker along this distance with the same orientation problem by moving to the far post, forcing him to focus on the player without tracking the ball; then, drifting right at the moment that marker focuses on the ball, as shown in the fourth photo.
But now they have the same three problems: The third and fourth zonal defenders beside the goalkeeper, the two players going to block the goalkeeper and the last zonal defender, as shown in the fourth photo.
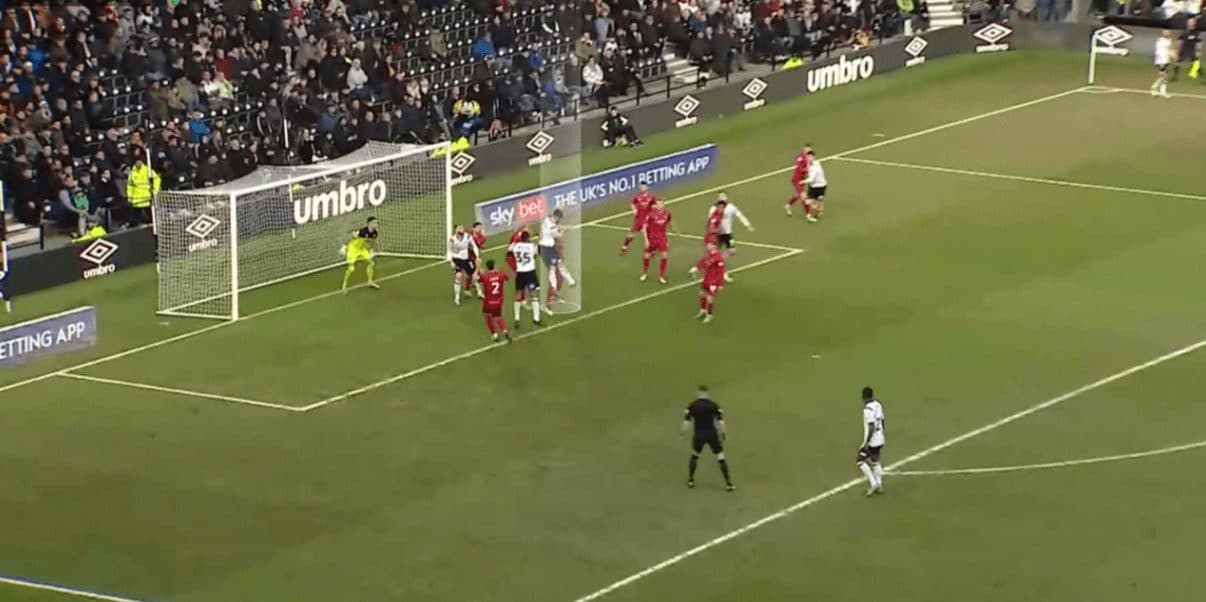
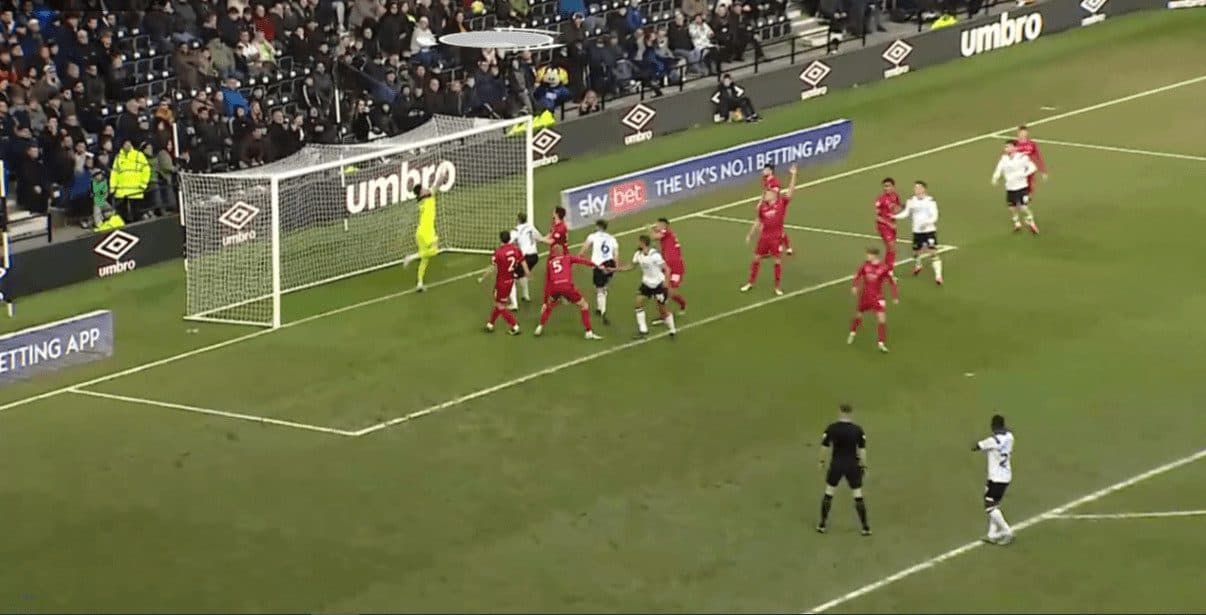
This time, they left the third zonal defender free, so he troubled the targeted player while heading the ball, so the ball went high.
Free-kicks
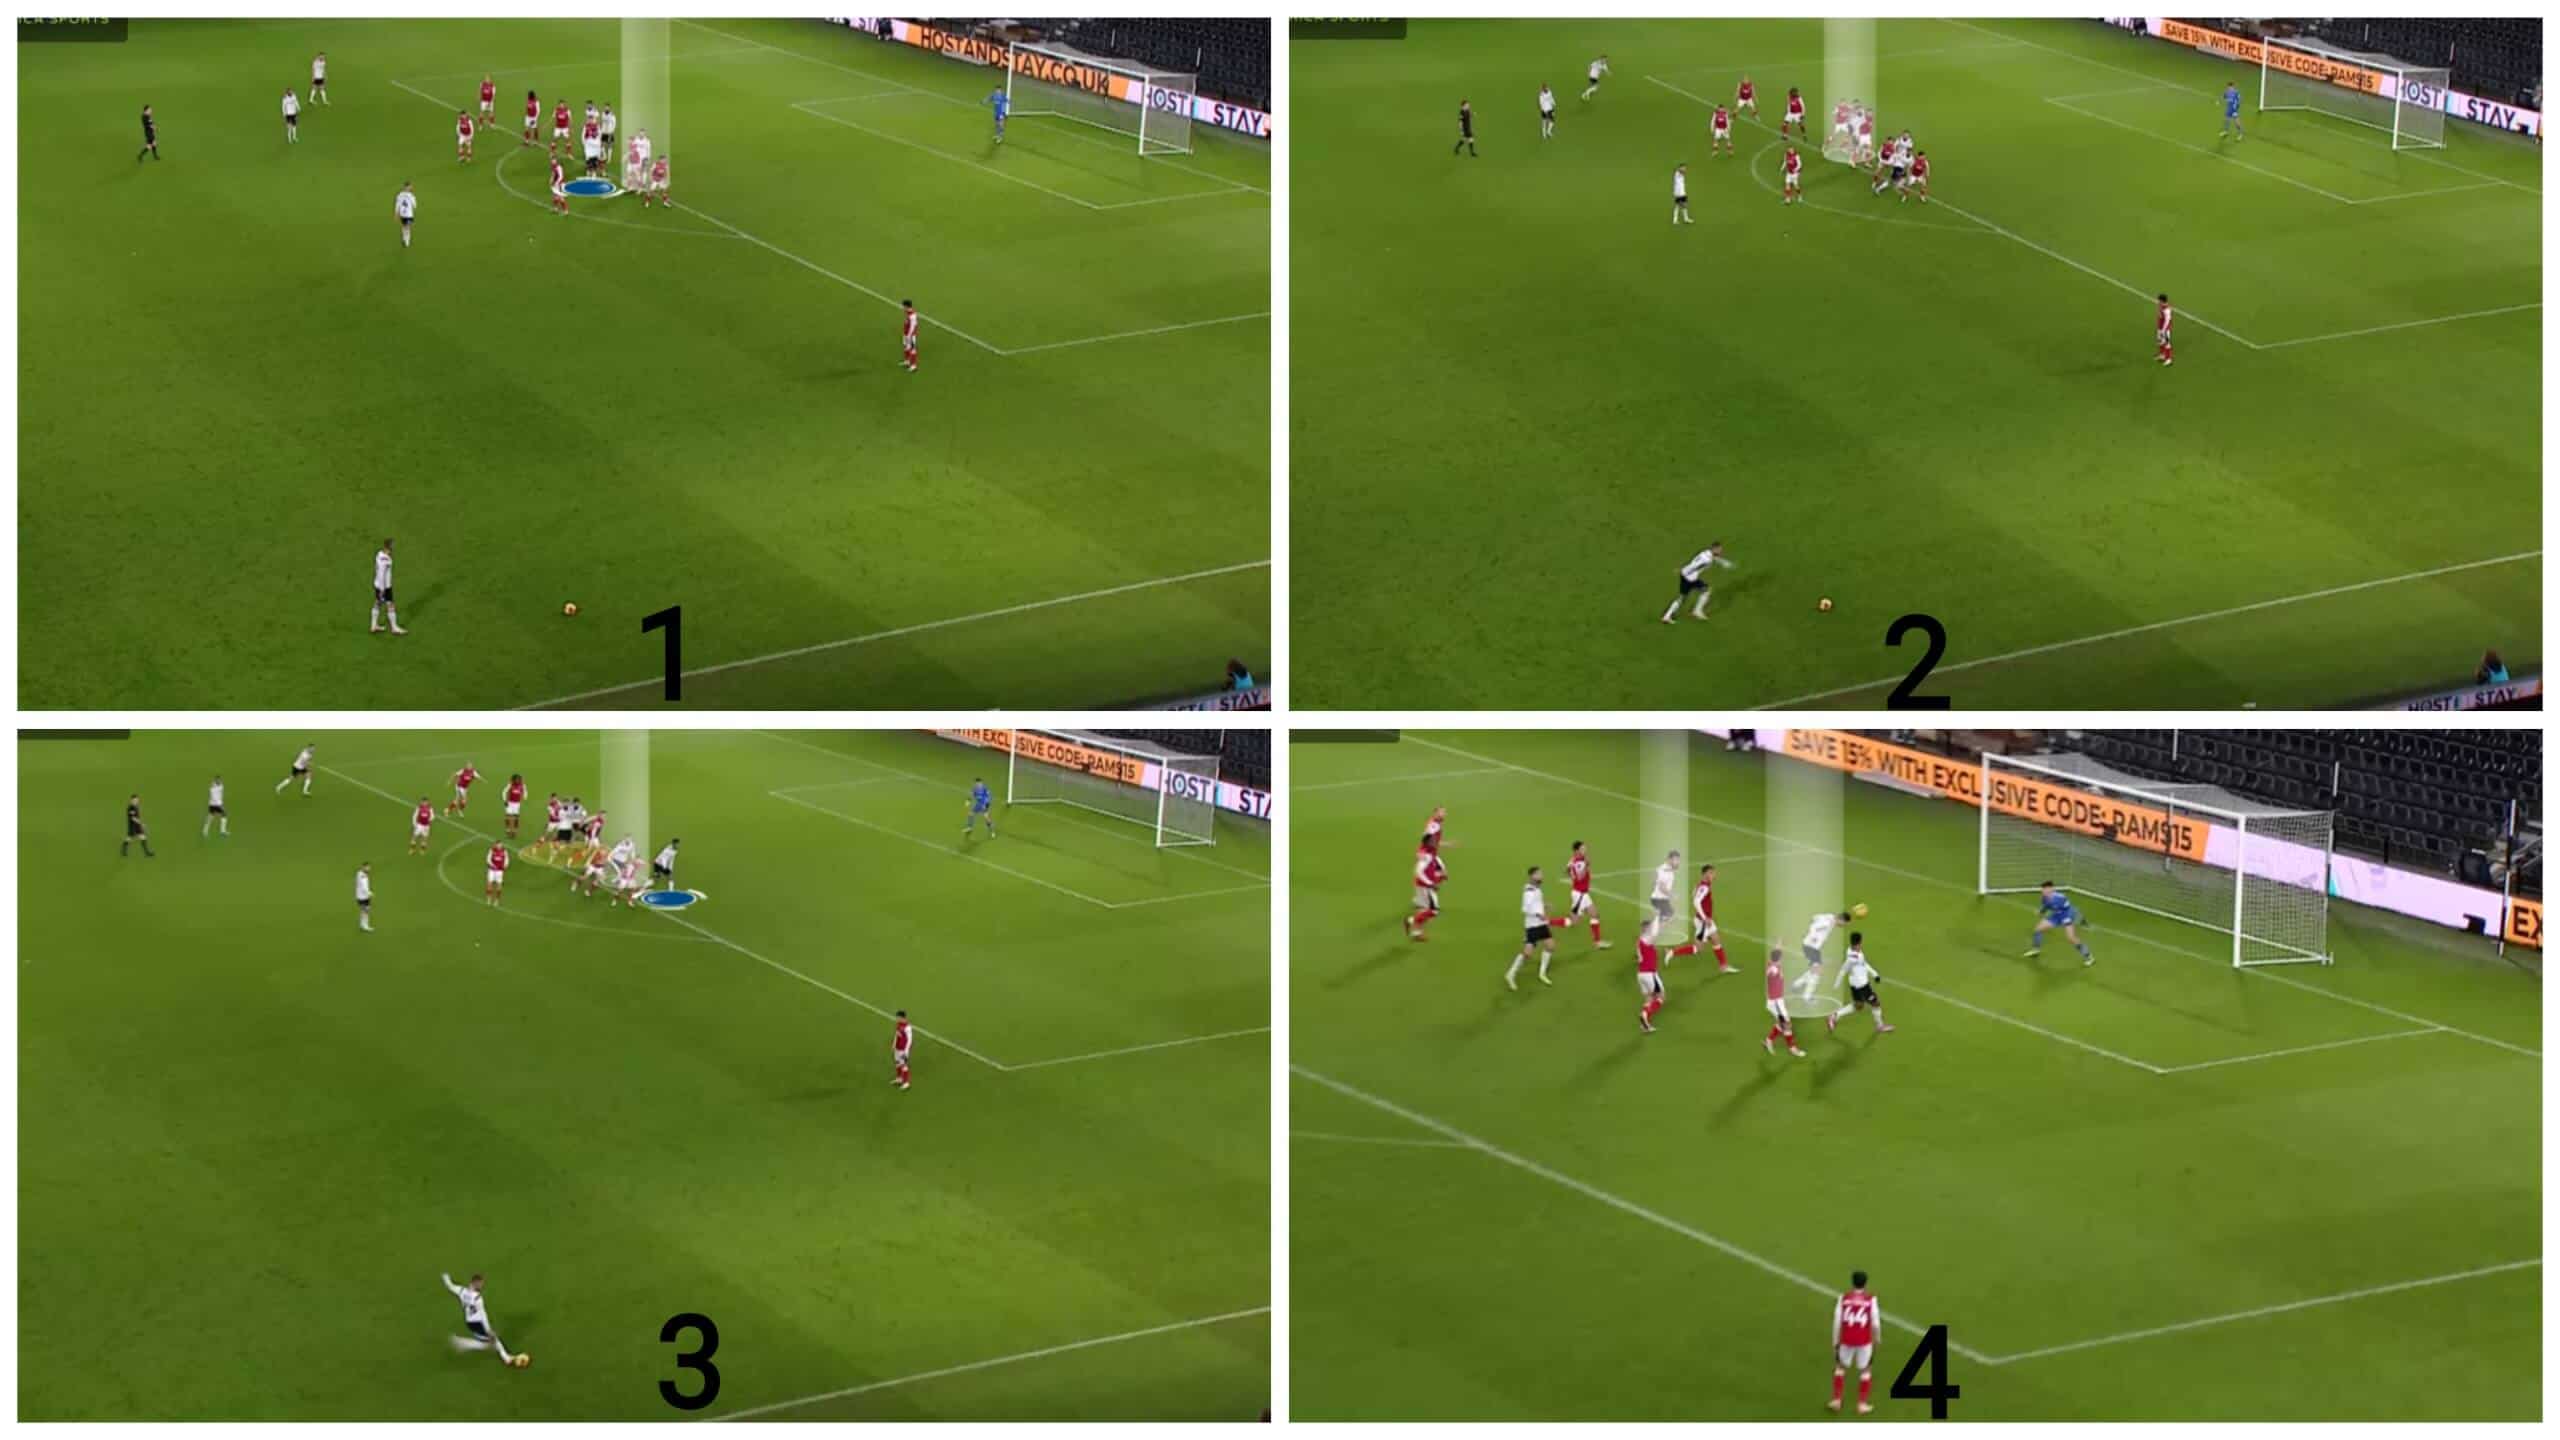
Regarding free-kicks, we should mention that Derby often use simple yet effective ideas by targeting initial offside players trying to get onside via fake deceptive runs. Let’s go into detail!
In the first photo below, the targeted player stands in an offside position, making the second defender assured that he is offside. Still, he can get onside with two triggers — the first being the blue attacker’s movement when the taker starts to run. At the same time, the second is the two offside players, highlighted in the second photo, who act as if they are the targeted players trying to drag the defenders to drop earlier. In general, this strategy becomes more efficient when using your best players at heading the ball in this role.
The result is shown in the third photo when the targeted player is onside, giving the defender a small push from the back. The plan works, and the result is a goal.
In the first photo below, the same strategy is used to score another goal, but the trigger is different. This time, the trigger of the early drop comes from one of their best headers starting deep and running to the far post. The defender is afraid not to catch him and decides to drop back earlier than the line. As a result, the two green targeted players are onside, as shown in the second and third photos. The plan works; the result is a goal.
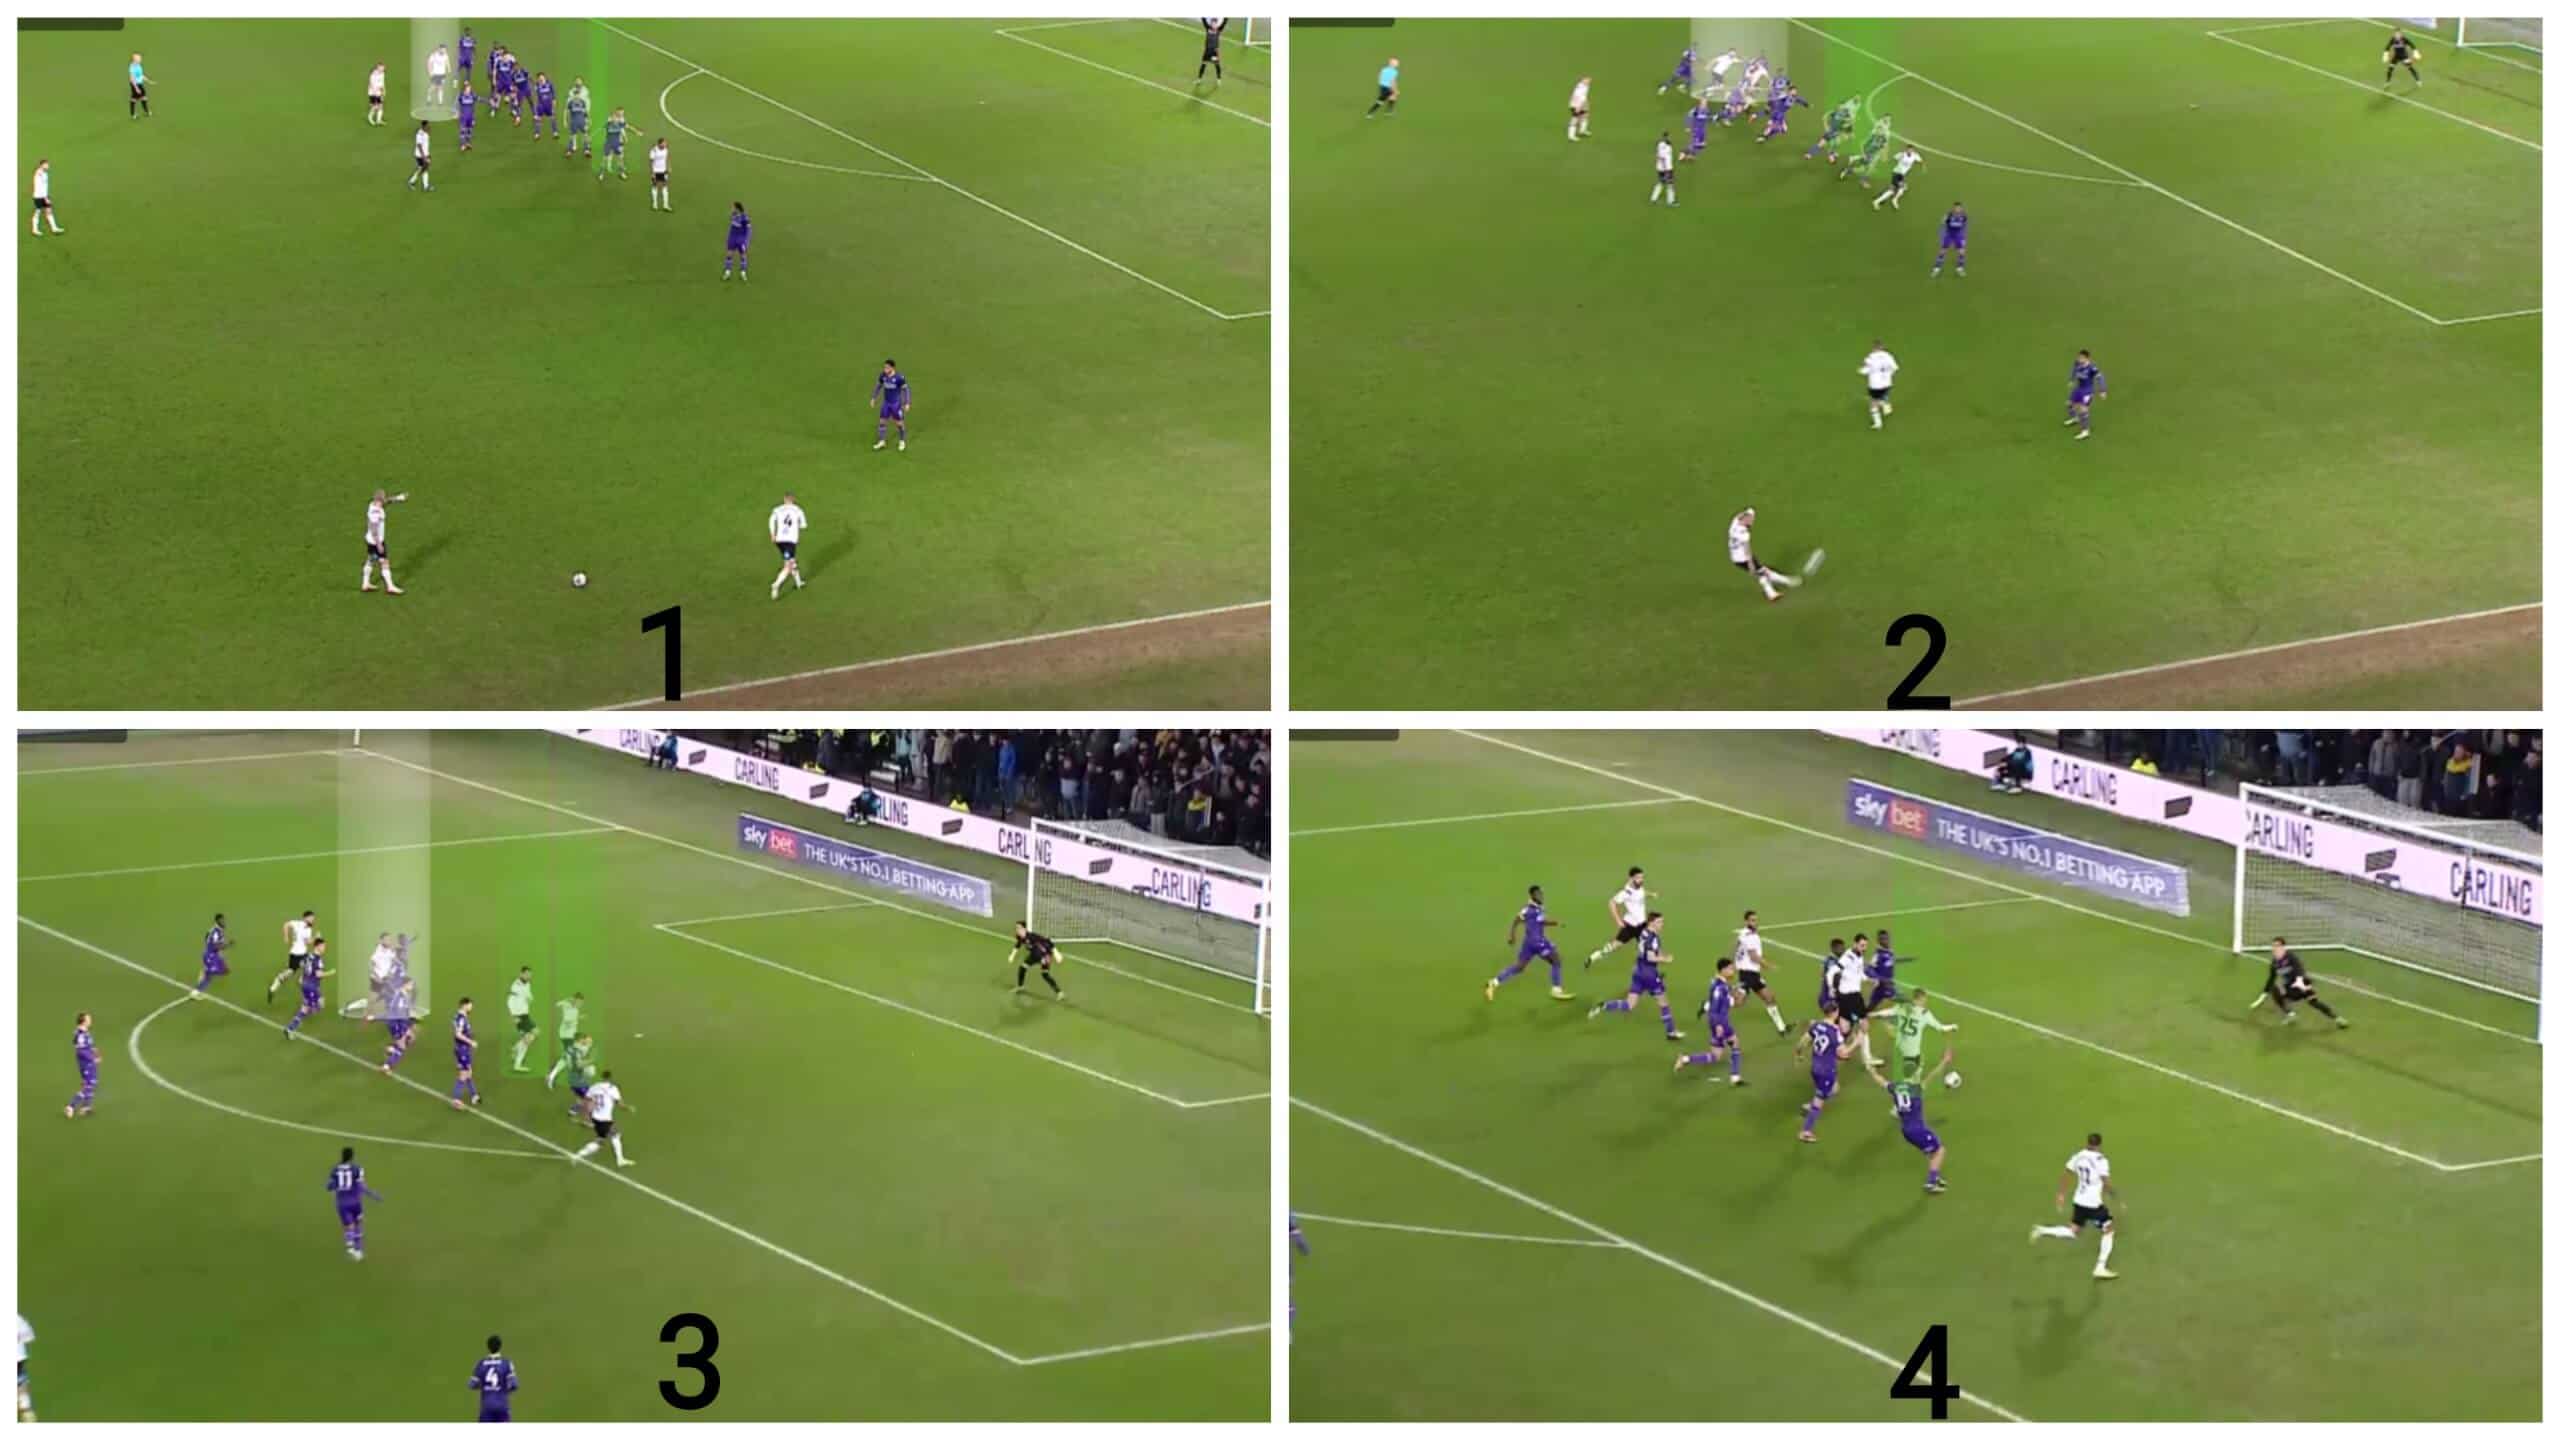
We should mention that this method is risky because there is a chance of still being offside, but when it succeeds, it becomes dangerous.
Conclusion
In this analysis, we have demonstrated how Derby County have become the most prolific team in scoring goals from set-pieces in EFL League One. We have also highlighted their diversity in exploiting corner kicks through well-executed routines. These routines incorporate various strategies, such as utilising screens, targeting the far post, or instructing multiple players to initiate runs outside the penalty area to disrupt a dynamic mismatch over defenders.
In our set-piece analysis, we have also elucidated how they use offside players before the free kick is taken. However, by employing deceptive movements and runs, they avoid being caught offside and become available to receive the cross easily.


Comments