Swansea City are going from strength to strength in 2019 after another excellent away performance and victory, this time in the FA Cup third round at Aston Villa. In this FA Cup tactical analysis, we’ll look in detail at how Swansea were able to win comfortably at Villa Park, and what went wrong for Aston Villa.
The Villans had already completed the Championship double over Graham Potter’s Swansea City following their Boxing Day win at the Liberty Stadium. Surprisingly, Potter decided against making wholesale changes to the starting XI that beat Reading 4-1 on New Year’s Day. He made just one change up front, Oli McBurnie sitting this one out due to illness as Courtney Baker-Richardson deputised.
Potter has been dubbed the ‘tinker-man’ by some sections of Swansea City’s supporters this season. Not one that’s afraid to try and implement new ideas, he’s received criticism of late for switching between different players and formations.
In 2019 however, despite playing twice in only four days, he’s maintained some continuity in terms of personnel and formation. As a result, his side has delivered arguably two of their best performances of the season, racking up seven goals and two wins (both away from home) and a first clean sheet in 10 games.
Dean Smith, meanwhile, did decide to make changes to his starting XI. He made six in total, with O’Hare, Kalinic (gk), Taylor, Adomah, El Ghazi and Hogan all coming in, but he was left reeling after a lacklustre performance.
Aston Villa’s ineffective press and shape
There were a number of similarities between this game and Swansea’s 4-1 win at Reading on New Year’s Day. Not only in terms of Swansea’s attacking performance, but also the weaknesses of the opposition too.
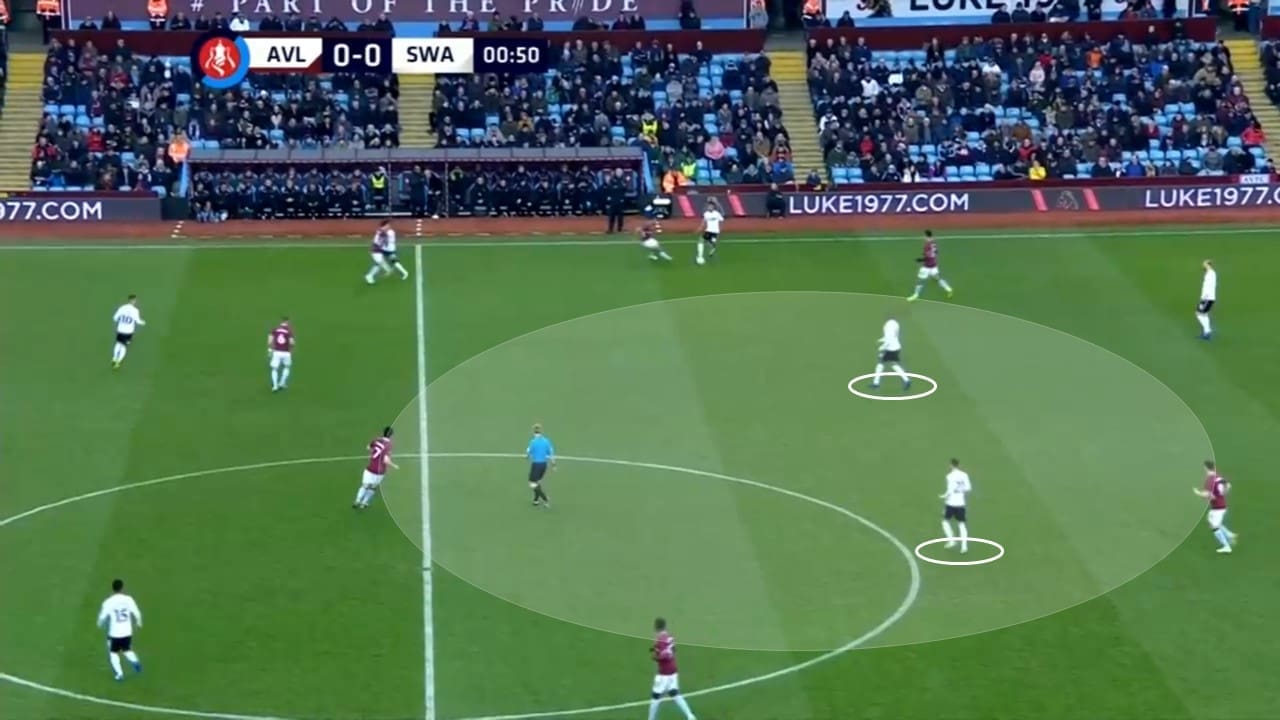
Firstly, both Aston Villa and Reading adopted a relatively high press with no success against a Swansea City side known for wanting to play out from the back. Graham Potter’s side are still learning the art of playing out from the back. On numerous occasions this season, they’ve been caught out, losing possession in their own half and putting themselves under avoidable pressure.
Sticking to their guns – and rightfully so – they were able to bypass a poorly-executed press, allowing them to find plenty of space in between Aston Villa’s lines.

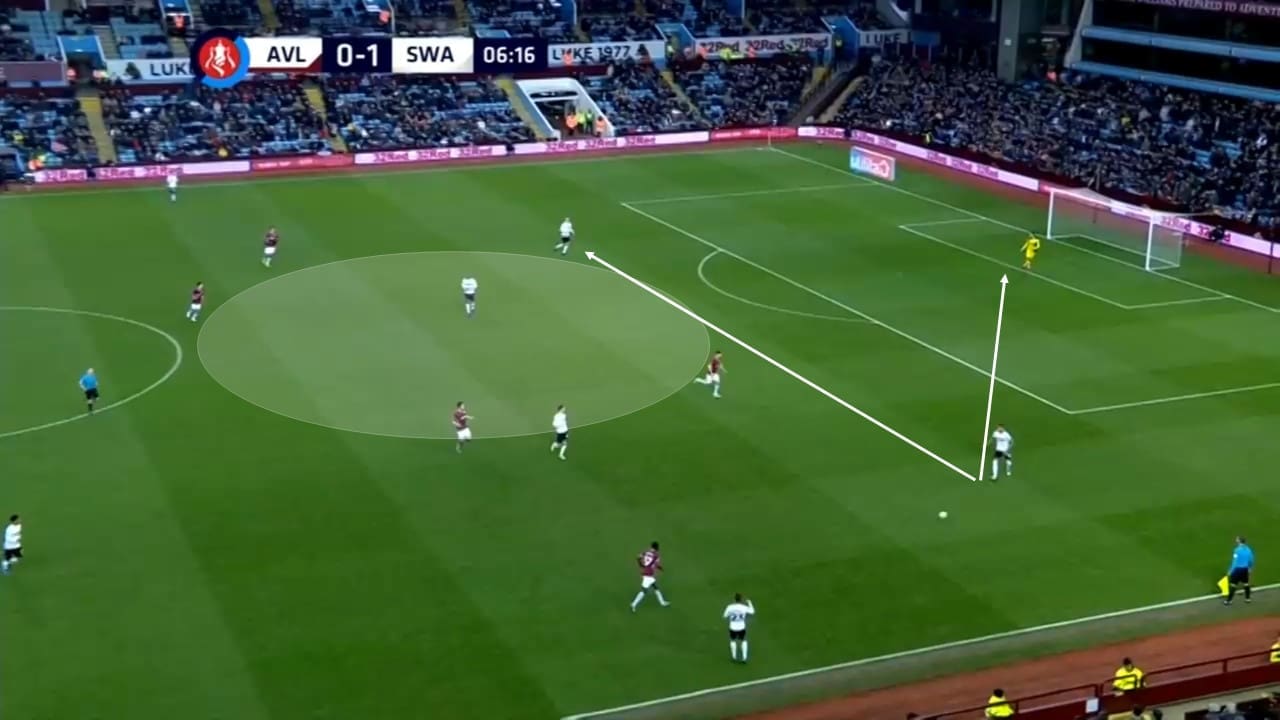
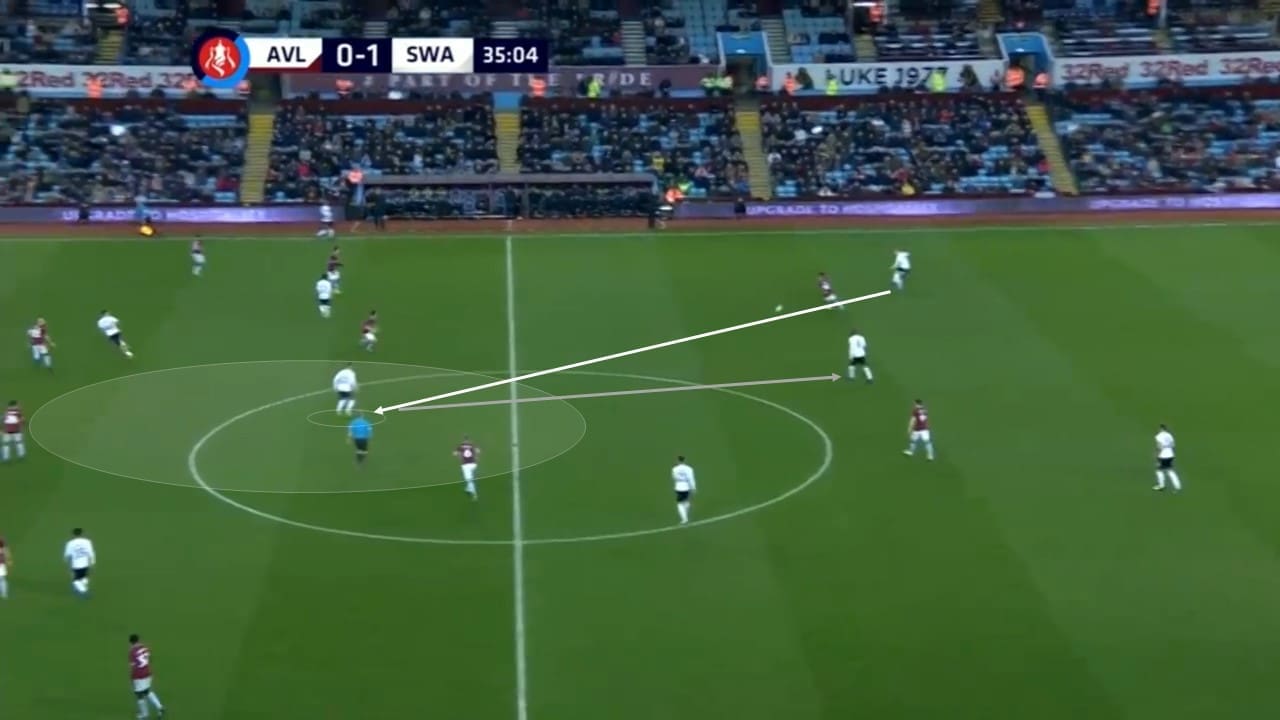
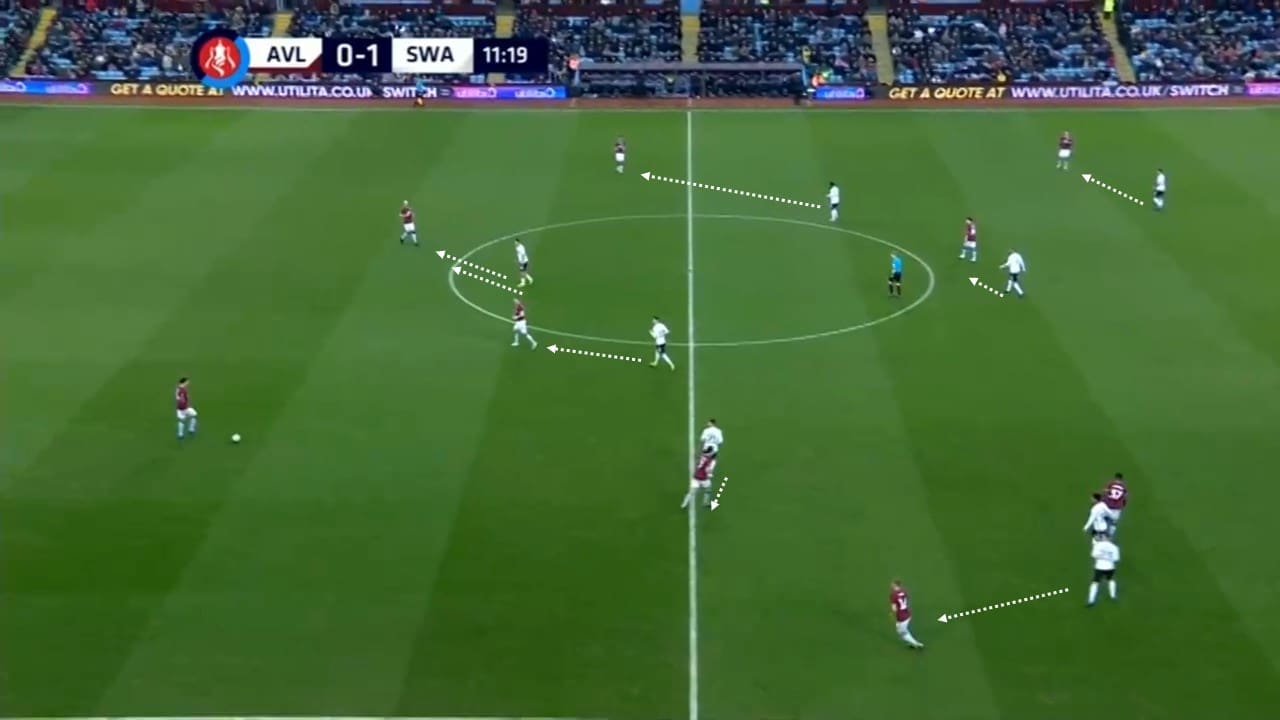
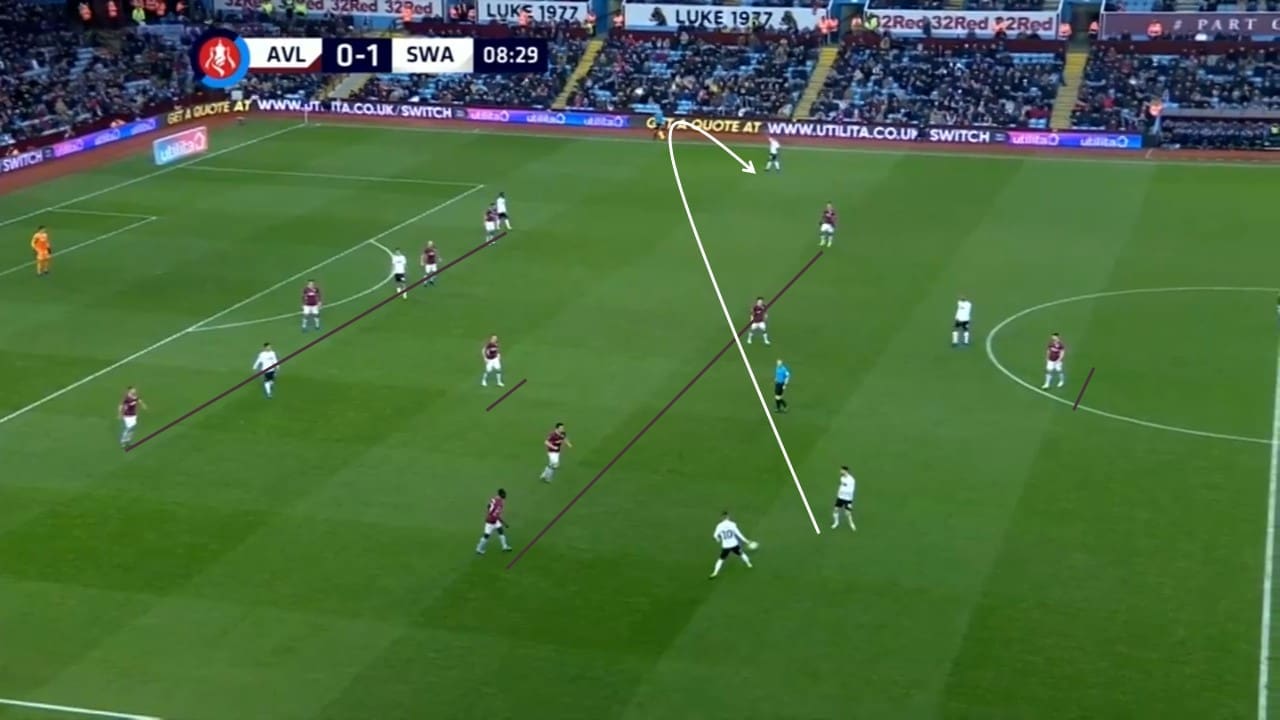
Aston Villa rarely got it right when it came to the basic principle of blocking the passing lanes. Below is an example of how centre-back Mike van der Hoorn was easily able to get a forward pass out to the right-back ahead of him.
Better awareness and positioning would have ruled out this passing option. However, the pass is successfully made and Swansea’s attack can progress further up the pitch.
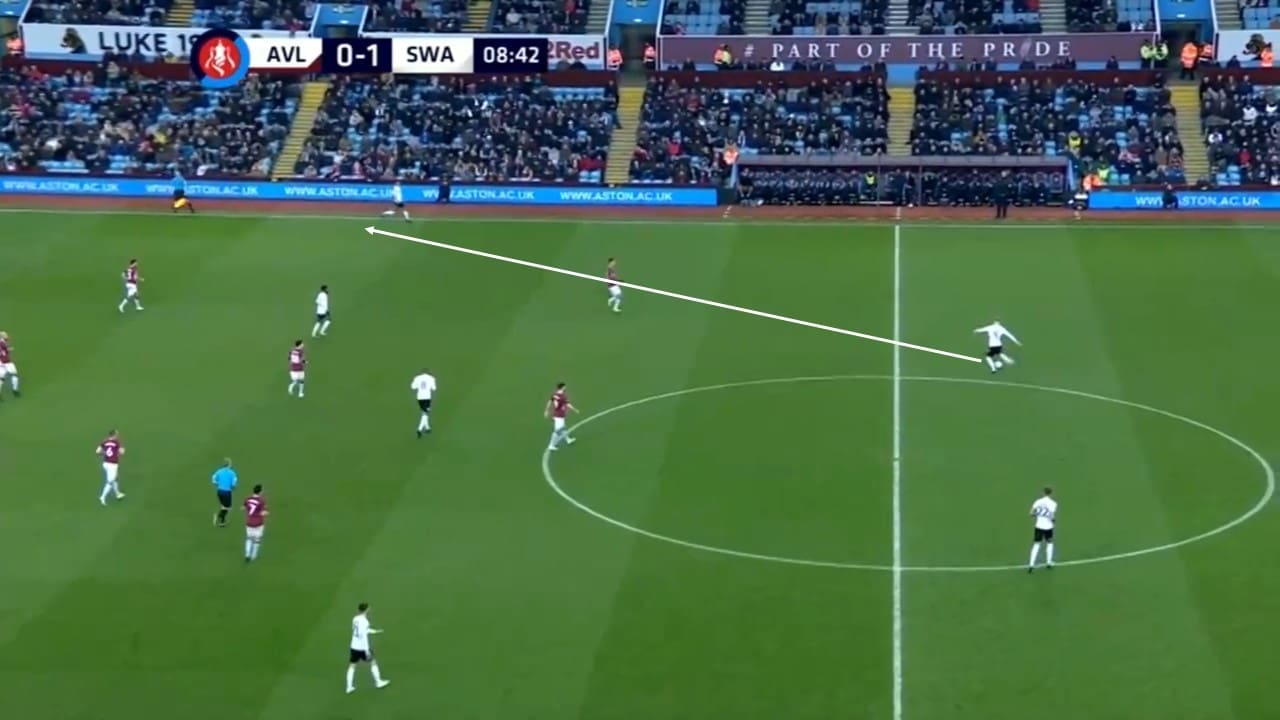
The examples available in the opening 20 minutes of the game of Swansea’s ease to bring the ball out and quickly move in Aston Villa’s half are almost endless. Worrying from the home side’s point of view was the length of time it took to fix these issues and plug the gaps in the middle third and beyond.
During the first half, Dean Smith and John Terry were seen in conversation as they desperately needed to find a way to nullify the opposition.
Swansea’s effective press and midfield dominance – forcing Villa down the sides
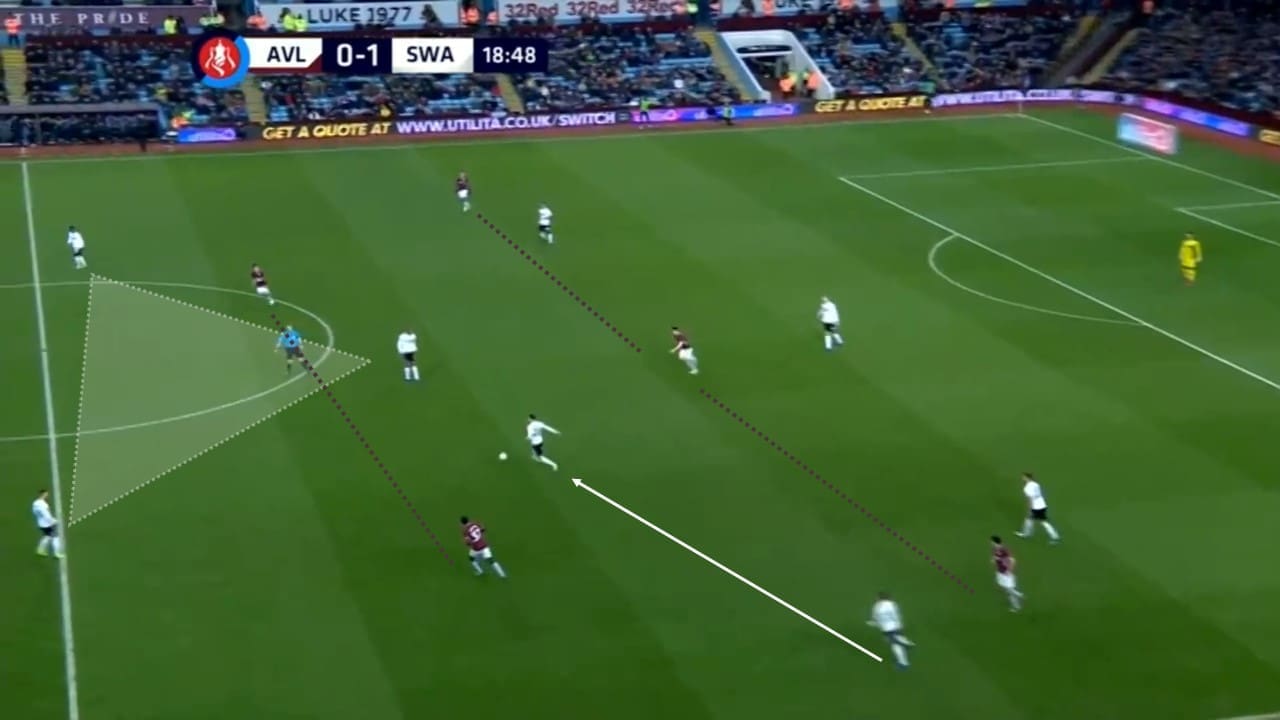
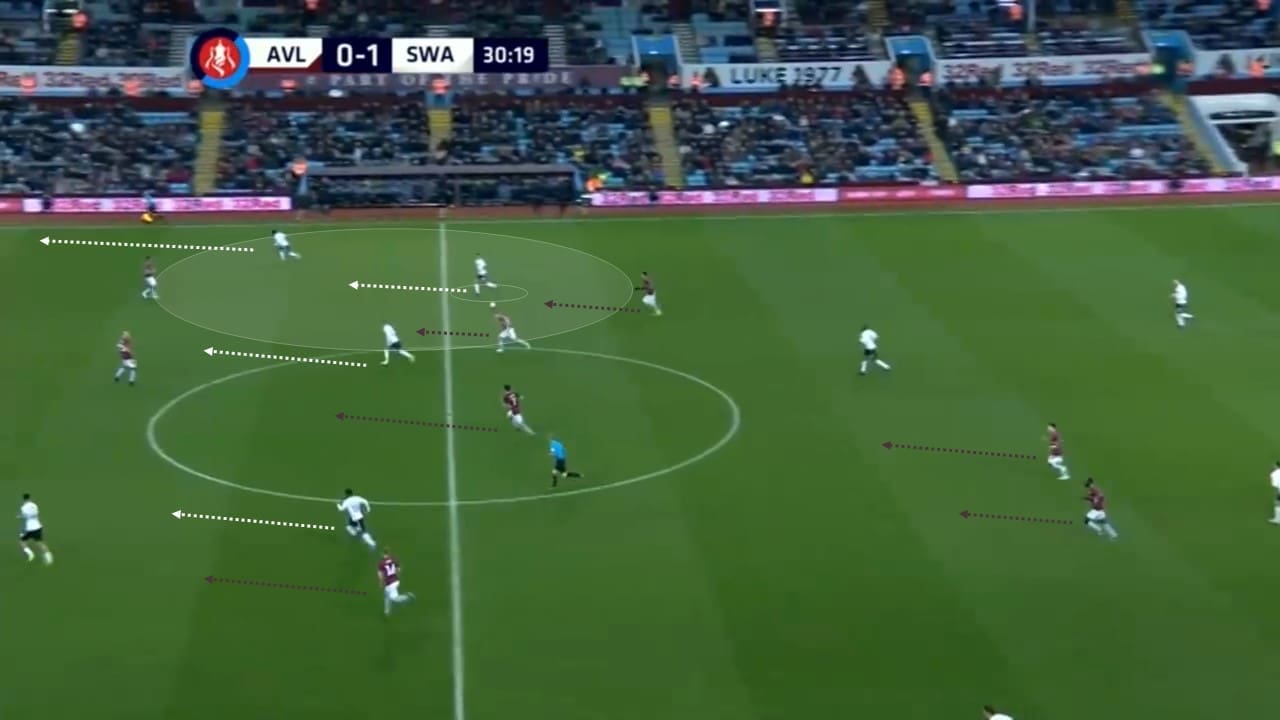
Compare Aston Villa’s press to Swansea’s. Less energy was required, but well-positioned players were effectively used to block key passing lanes. This saw Swansea dominate the middle of the pitch, forcing Aston Villa down the sides. If Swansea could regain possession in these areas, large pockets of open space were available for quick counters.
Swansea City will often only ask one player – usually the striker – to press the player in possession. The others ensure they are well positioned to block the passing lanes. The likes of Bersant Celina, Nathan Dyer and Wayne Routledge – the trio playing behind striker Courtney Baker-Richardson – showed good intelligence, often looking over their shoulder to ensure they blocked a passing route to their opposite number.
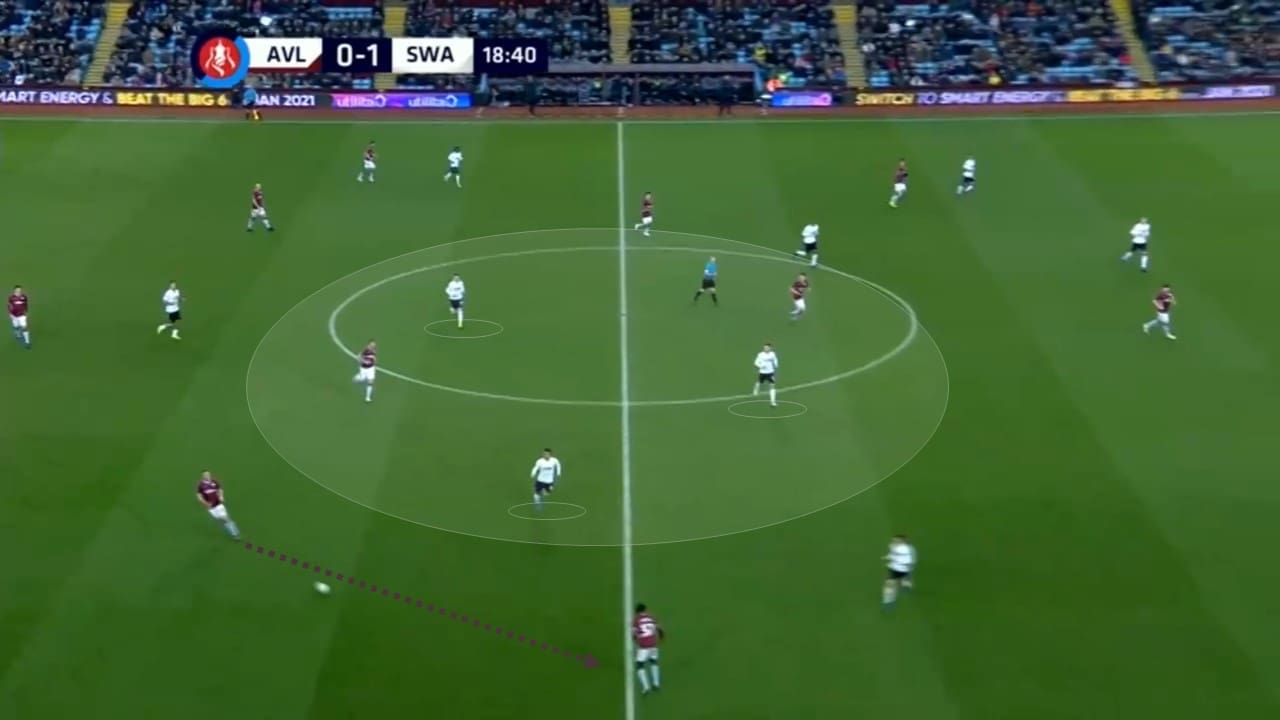
Swansea’s central dominance, combined with an effective press that forced Villa to move the ball into wide areas, allowed them to create a good platform to attack from if they won possession.
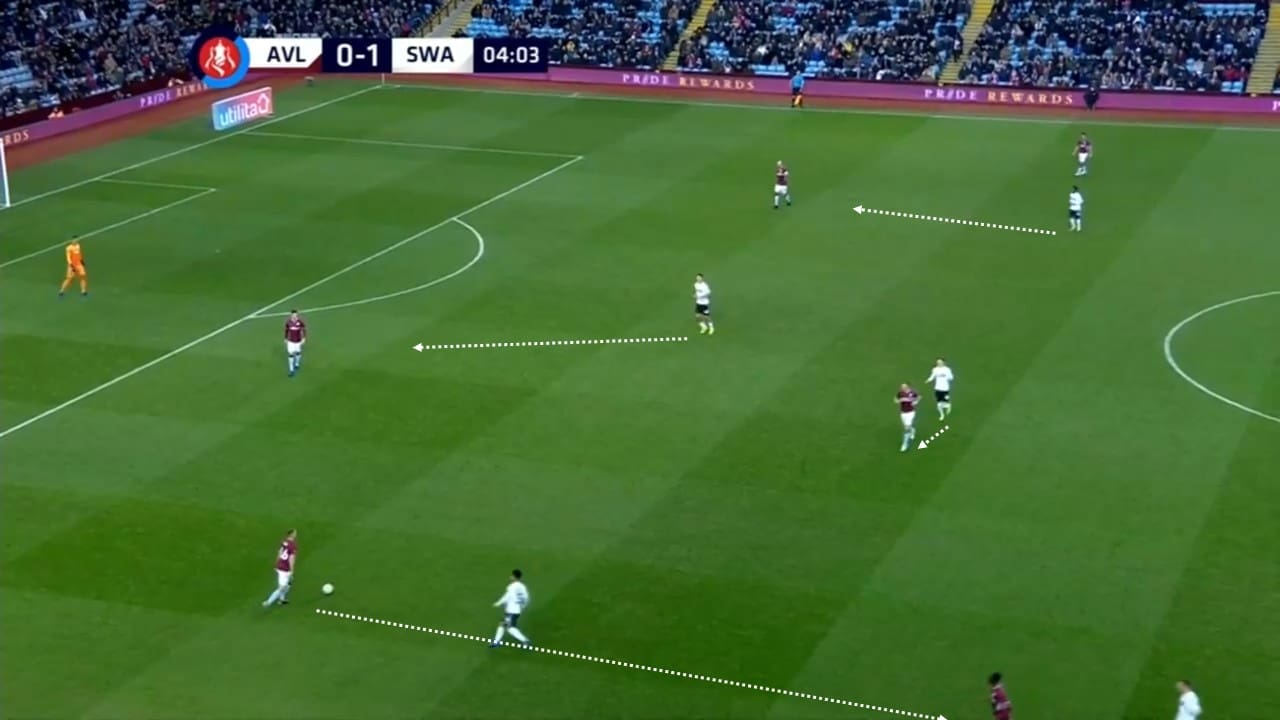
The screenshot below is a good example of this. Aston Villa play the ball wide and Swansea are quick to press the receiver of the ball. If they can win possession, there’s plenty of space in the middle – with three players available in open space – all of whom can easily receive the ball in order to start a quick counter-attack.
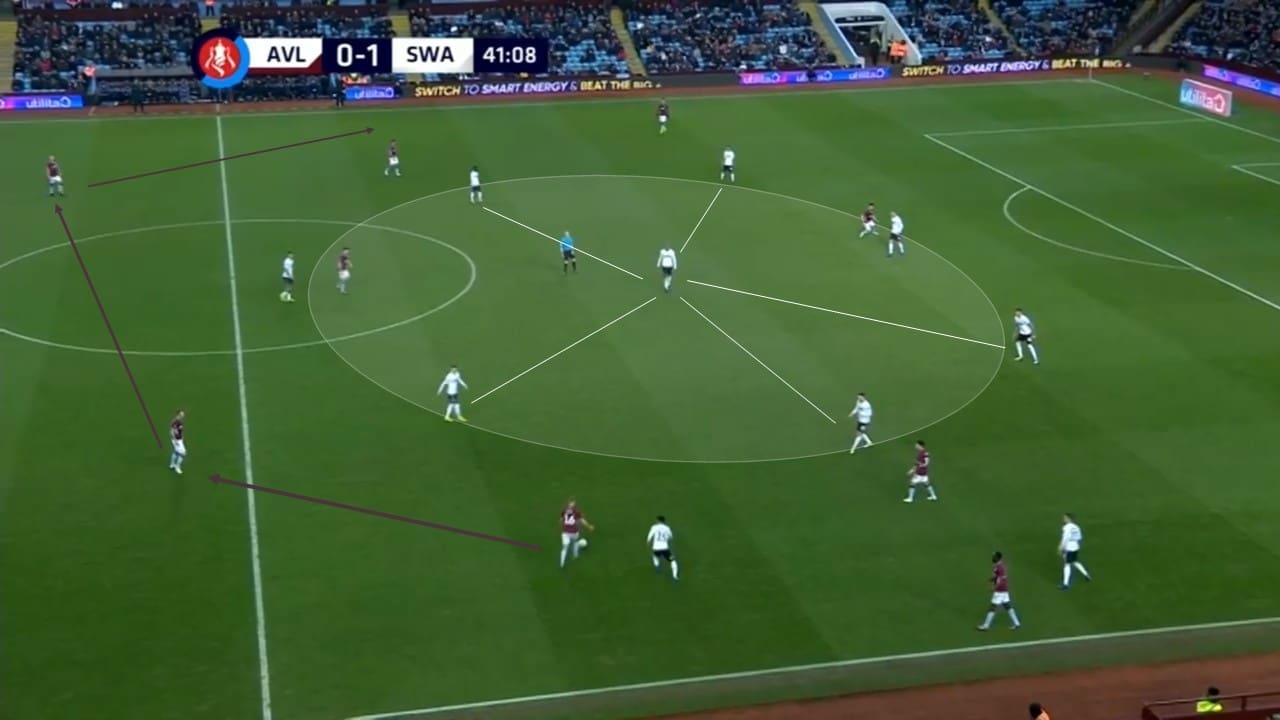
Below is another similar example. Swansea City block off the key passing lanes, which isn’t too difficult as they completely dominate the central area. Aston Villa’s two wide right players are marked out. The player in possession is tracked by Wayne Routledge who also covers a forward passing route.
Therefore, Aston Villa’s only option here is to recycle the ball back around the defence and over to the opposite side.
Swansea’s early opener
Another similarity to Swansea’s 4-1 win at Reading was the early goal. Just like at the Madejski Stadium, Graham Potter’s side opened the scoring within the first two minutes.
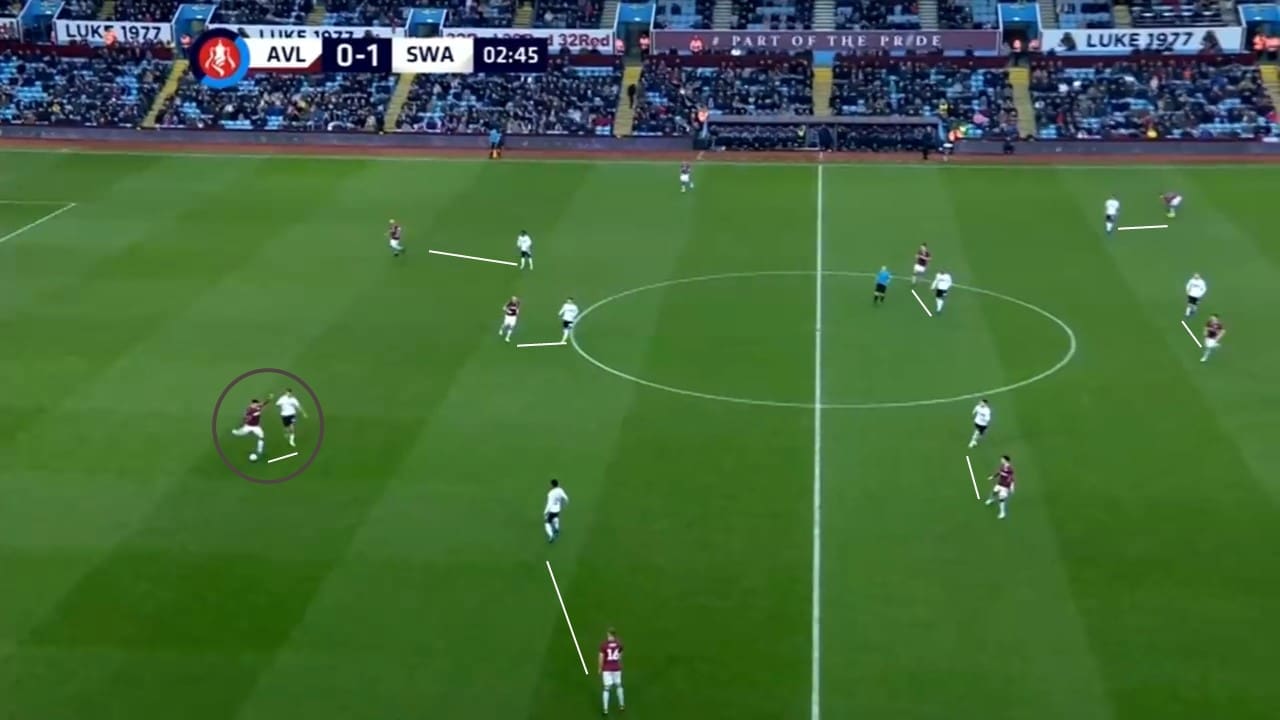
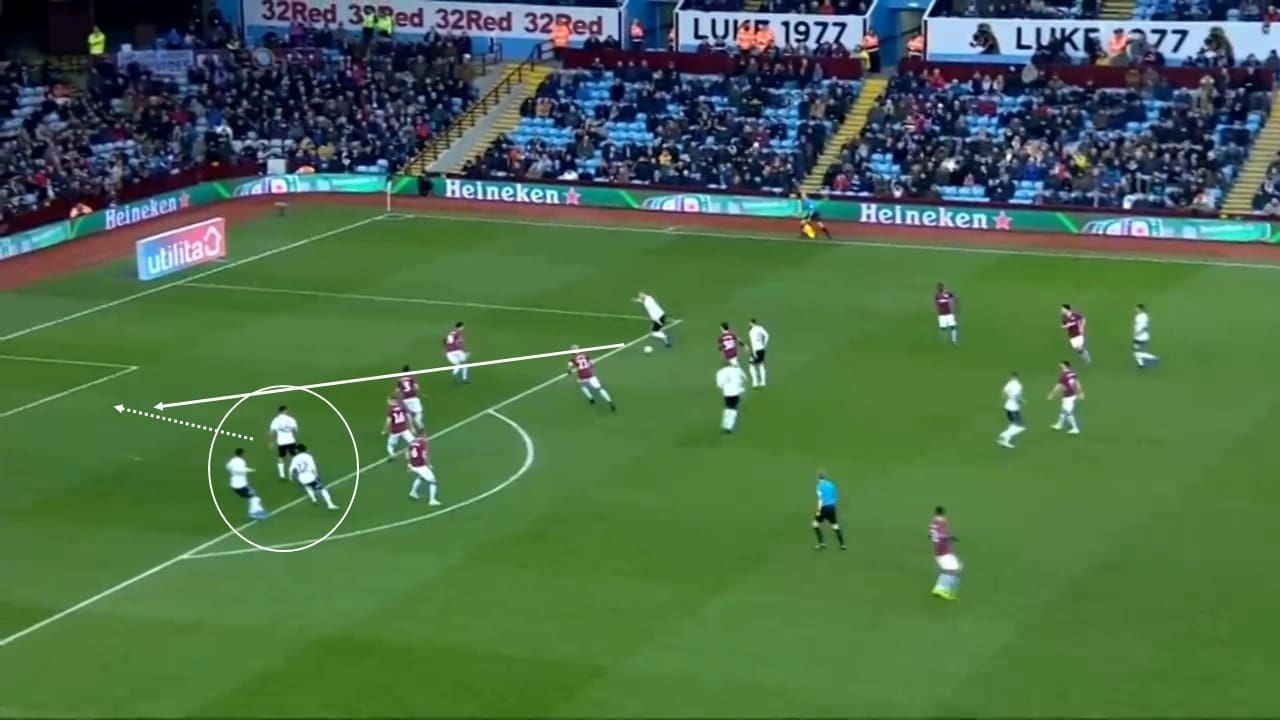
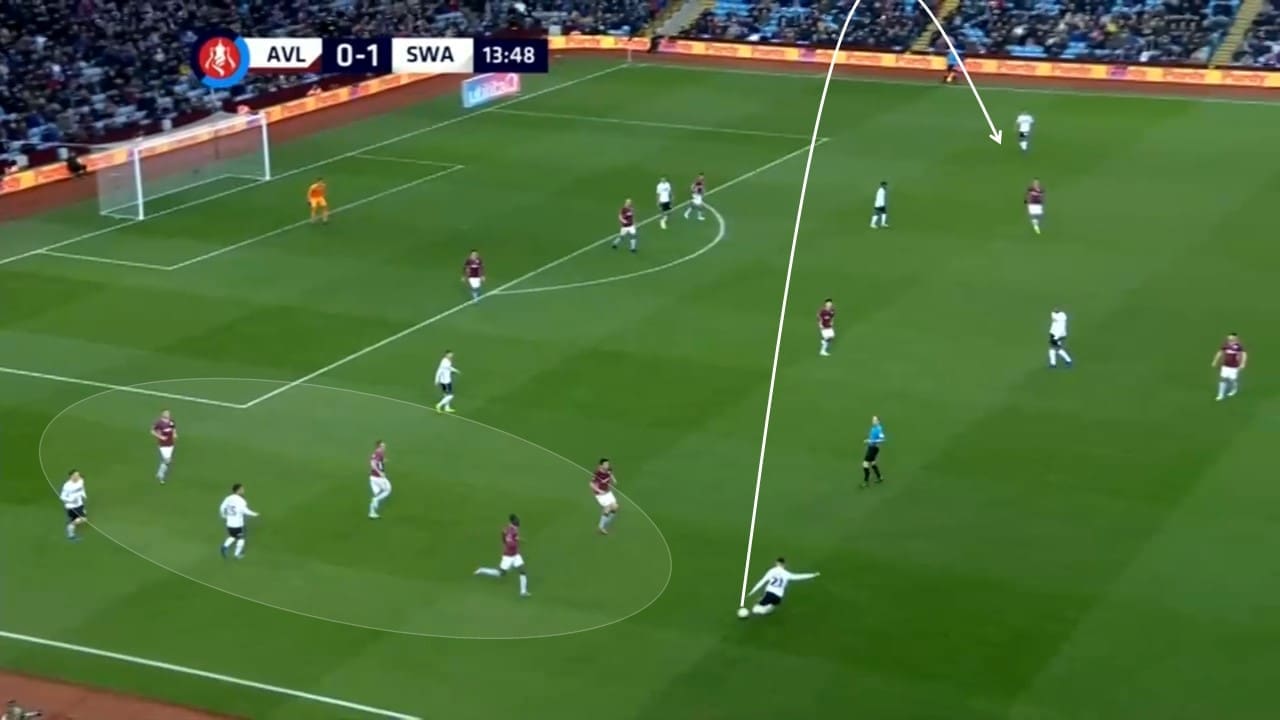
After a corner isn’t completely cleared following a punched clearance from the goalkeeper, Mike van der Hoorn (circled, below) keeps his position in the penalty area – rather than instantly returning back to his defensive position. A poor touch from an Aston Villa player allowed the ball to be won back on the edge of the box and it’s instantly played to Van der Hoorn.
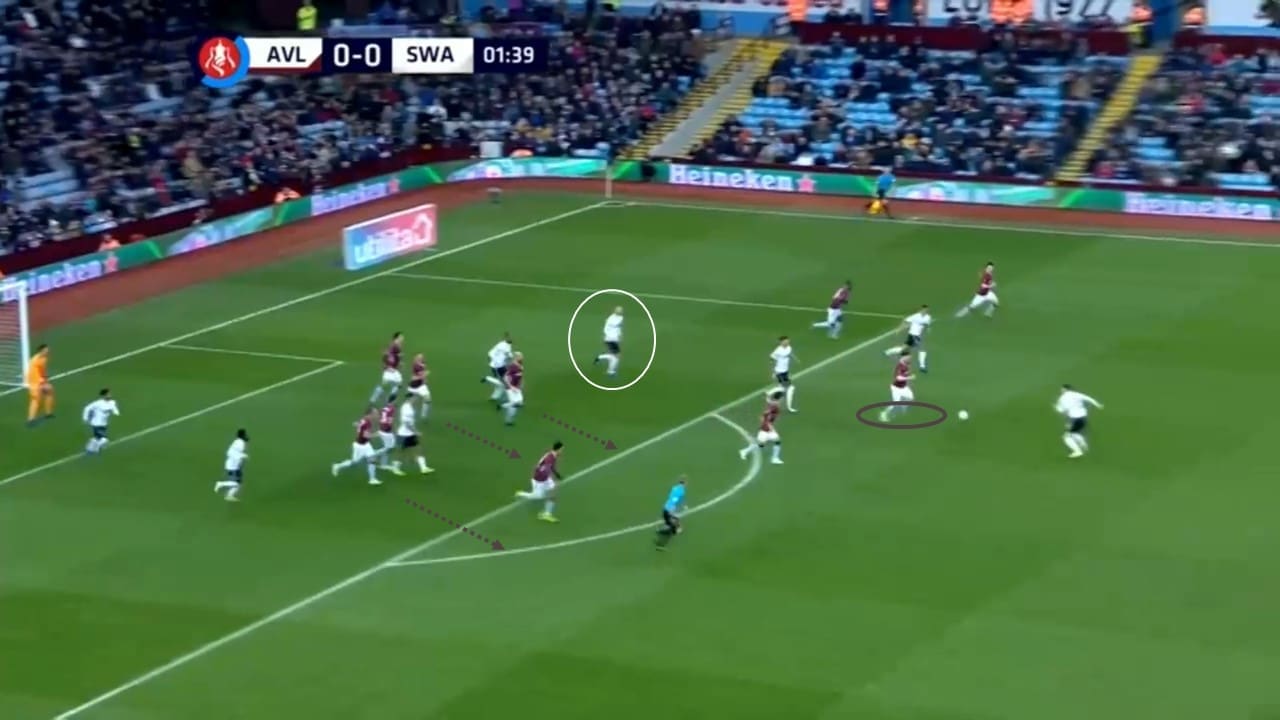
The home side’s defence moves out too early and is caught out. Benefiting from this, three Swansea players are all waiting near the edge of the penalty area for the cross. Baker-Richardson is the lucky player to get on the end of it to poke it past the goalkeeper.
Swansea’s use of the half-spaces
Throughout the first half, Swansea City were able to make use of the half-spaces as a result of Aston Villa’s poorly executed press. For those unfamiliar with the term, these are the channels between the central and wide channels – or in other words, typically between the full-back and centre-back. So many examples of Aston Villa’s ineffective press coincides with there being many examples of Swansea’s use of the half-spaces.
Some might argue that the half-spaces only exist just outside the opponent’s penalty area. In this case, however, Swansea proved that half-spaces in deeper positions proved to be just as useful. This was especially the case considering that when the ball was moved into these deeper areas, five or sometimes six Aston Villa players were behind the ball and tracking back.
The half-space is growing in popularity and has somewhat replaced “zone 14” – the area in front of the penalty area – as the key area to create effective open play attacks. None other than Manchester City manager Pep Guardiola is a big advocate of the half-spaces, as well as many others. You’ll often see their attackers occupying them, with a large number of their open play goals created from the half-space.
Like the reigning Premier League champions do, Swansea City use their full-backs to ensure width at all times as the two wingers move inside into these half-spaces. On occasions when the full-backs aren’t providing width, another player will take over that role temporarily.
This creates a dilemma for the opposition’s defence. They must decide to either stick to a narrow defensive shape, congesting the middle and allowing the two opposing full-backs space out wide, or shift out to the flanks and potentially leave gaps between the full-back and centre-half.
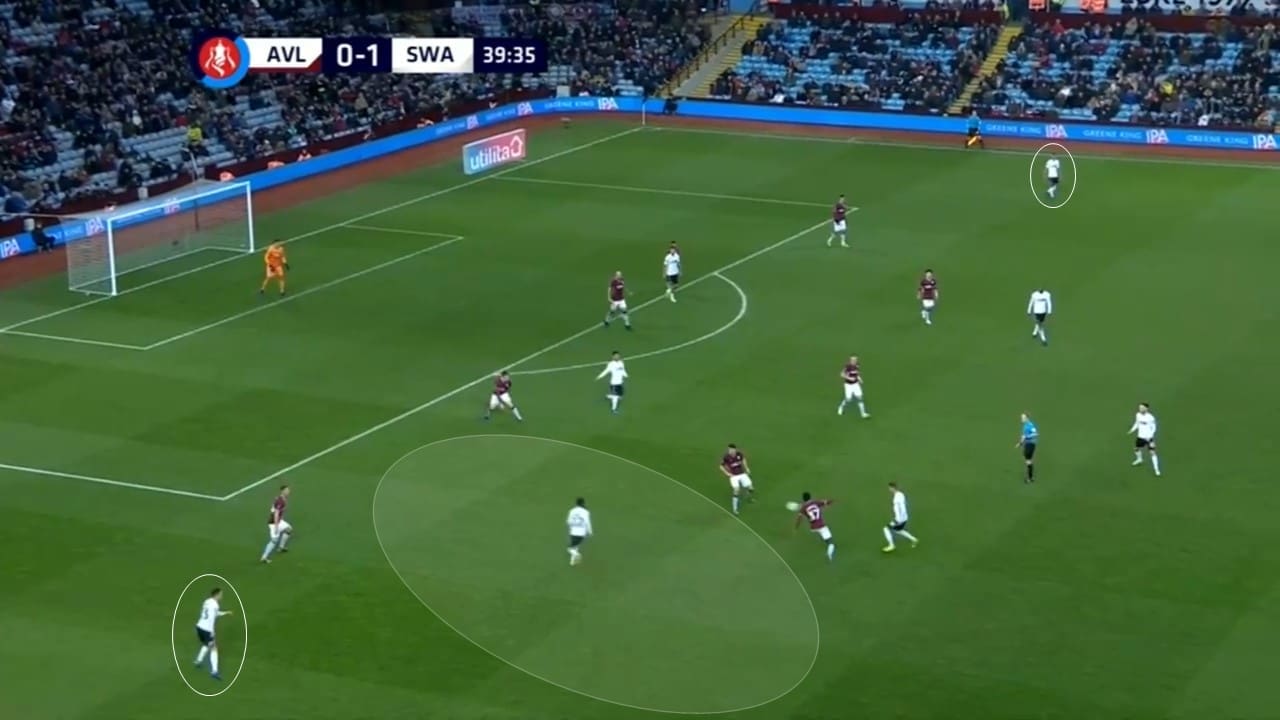
Below, Swansea City have a player in each of the two half-spaces. With a full-back and a winger making different runs, Aston Villa have problems tracking the movement.
Swansea’s quick, inter-changing passing & movement
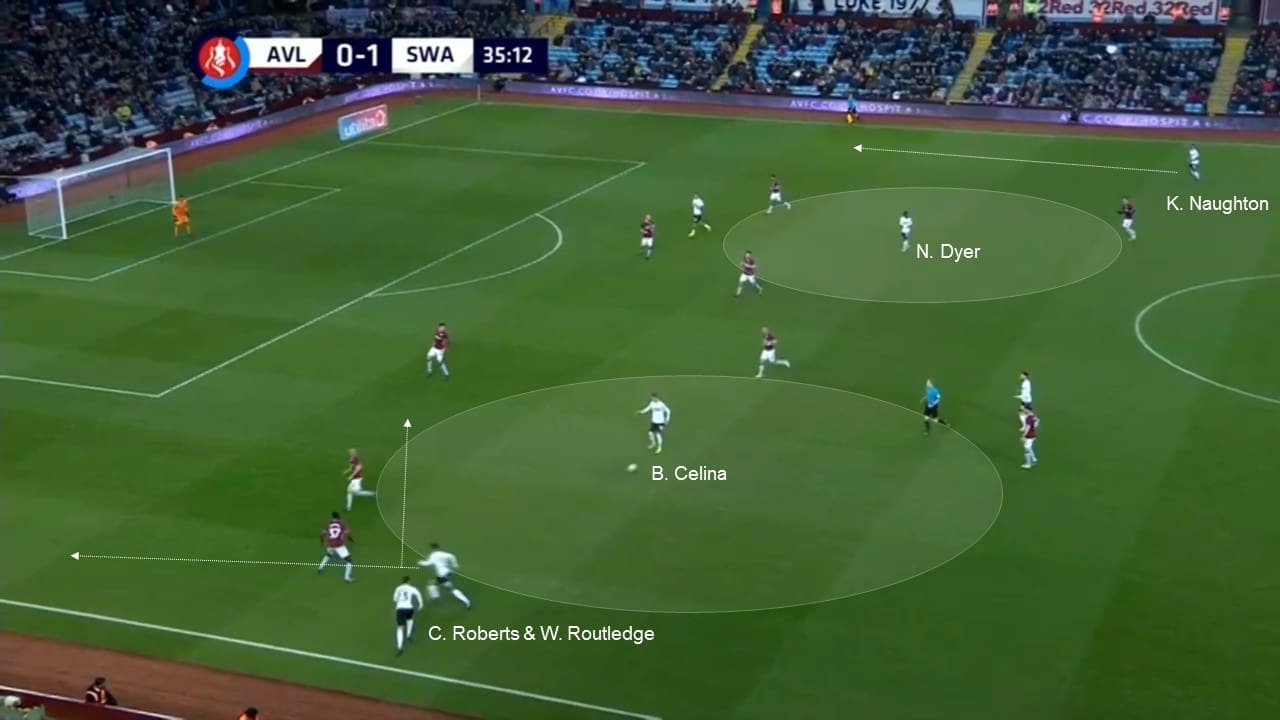
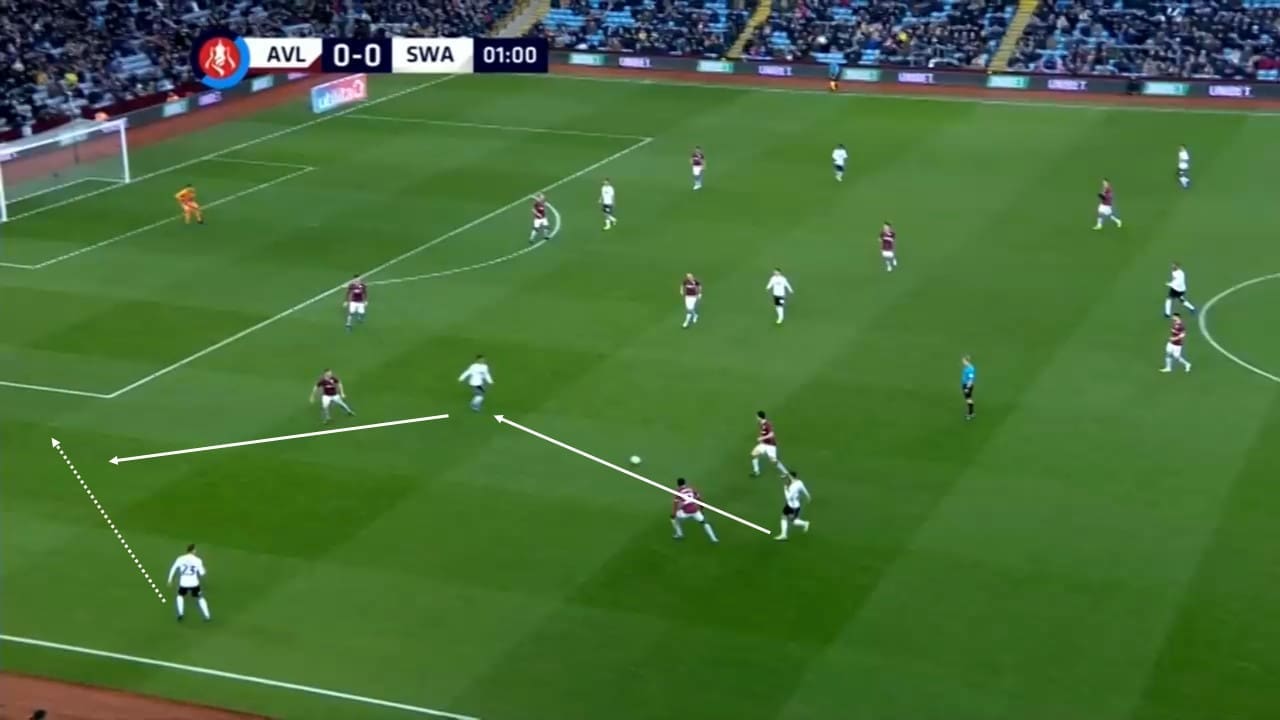
This follows on from the point above. Swansea were able to make use of the half-spaces, not only because of Aston Villa’s poorly executed press but due to their quick passing and movement.
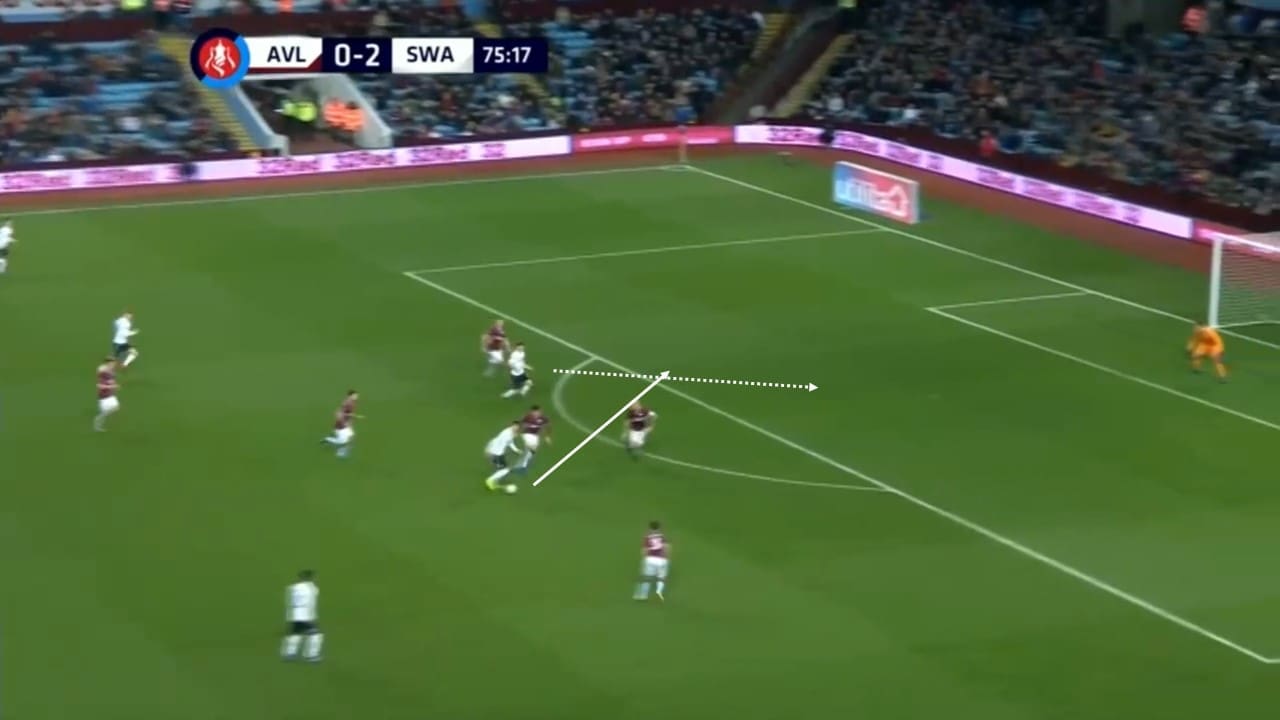
Below, the two white arrows show the forward movement through the half-spaces. The diagonal run of Courtney Baker-Richardson is excellent here as he attracts two defenders away from not only the player in possession (Leroy Fer) but also his teammate running through the left half-space (Bersant Celina).
Fer has options either side of him as he runs through. He slips the ball into Celina’s path to his left but his cross goes beyond his team-mates.
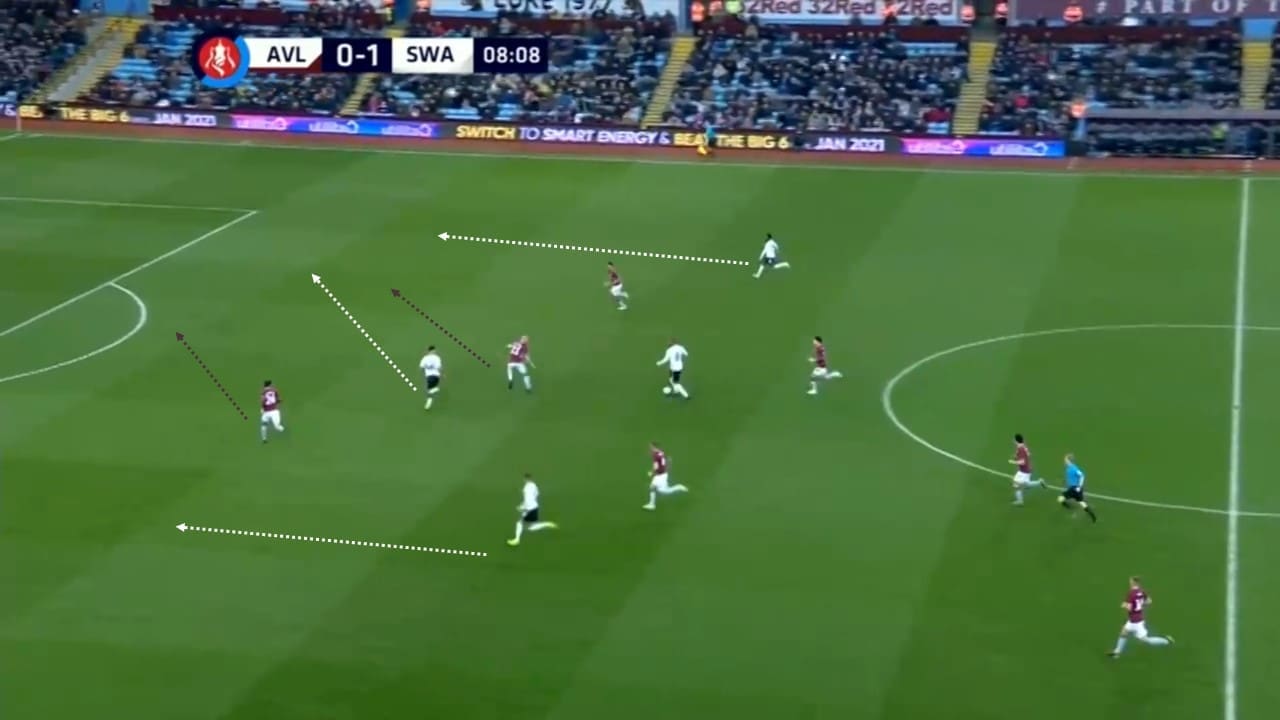
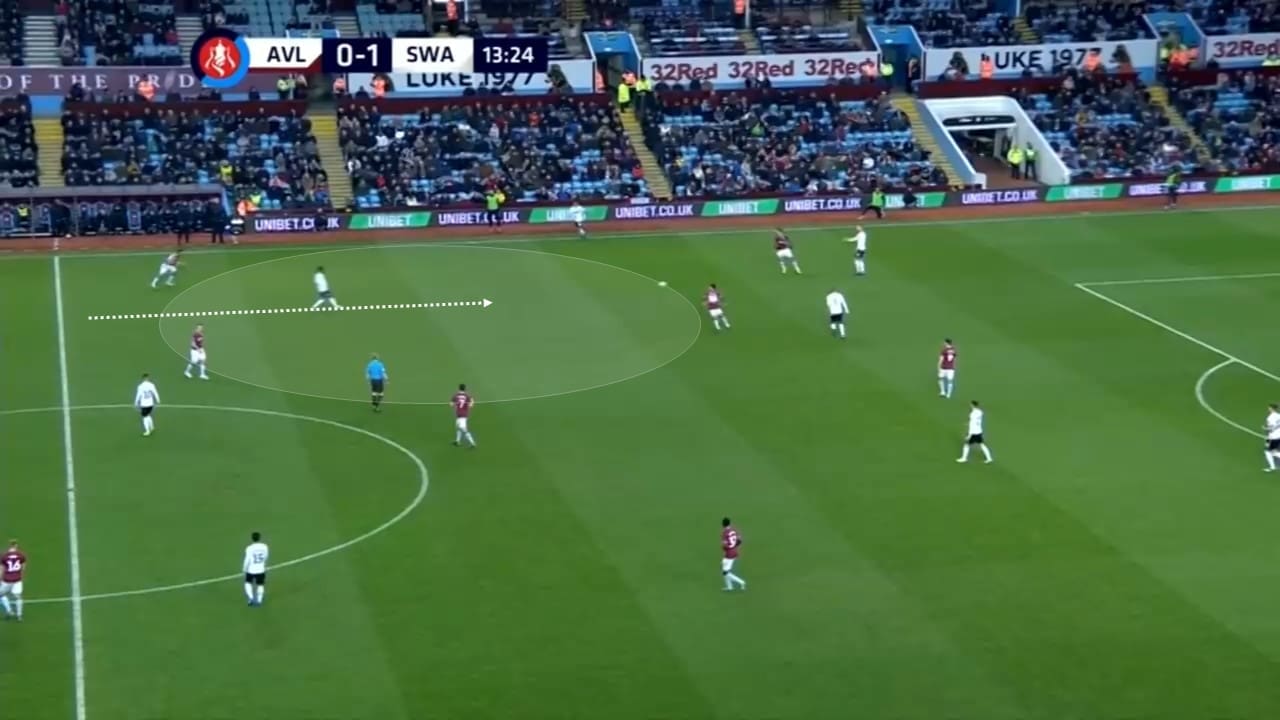
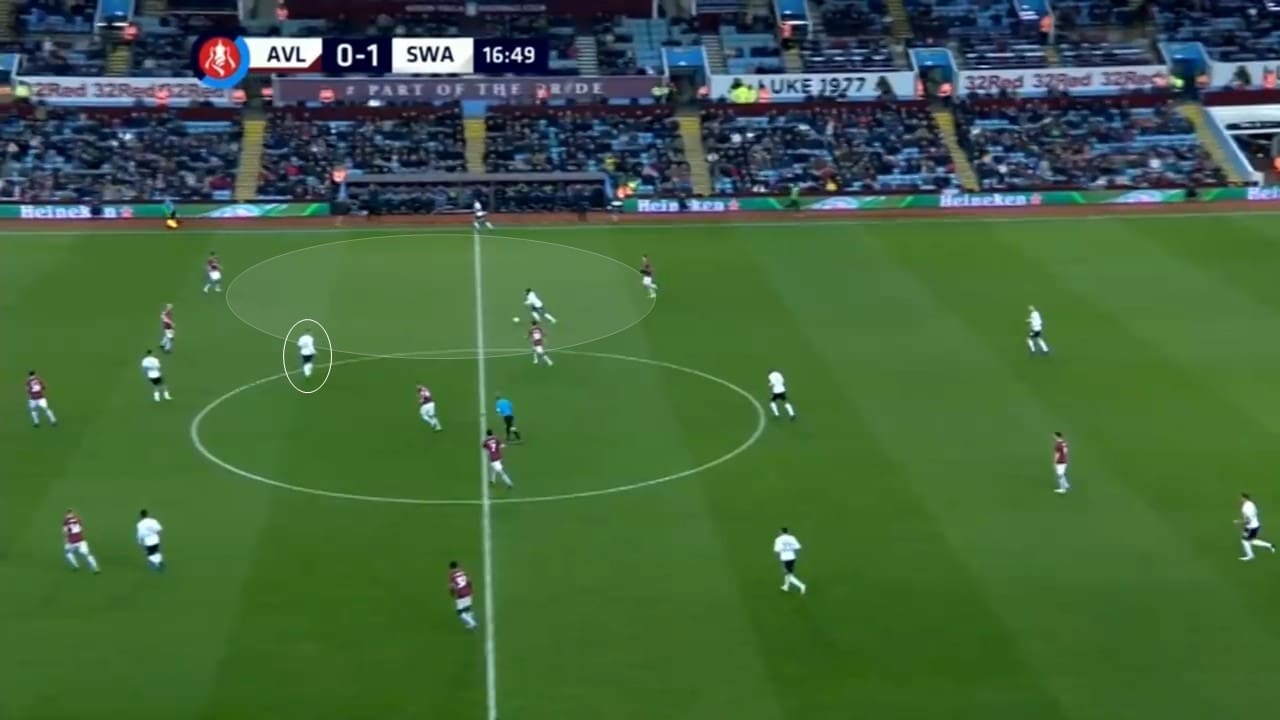
On the occasions when space wasn’t available in these areas, Swansea City had players with the ability to switch the play with accurate, long diagonal passes. This allowed them to switch the play and move it away from tight, congested areas.
Swansea’s superb second goal
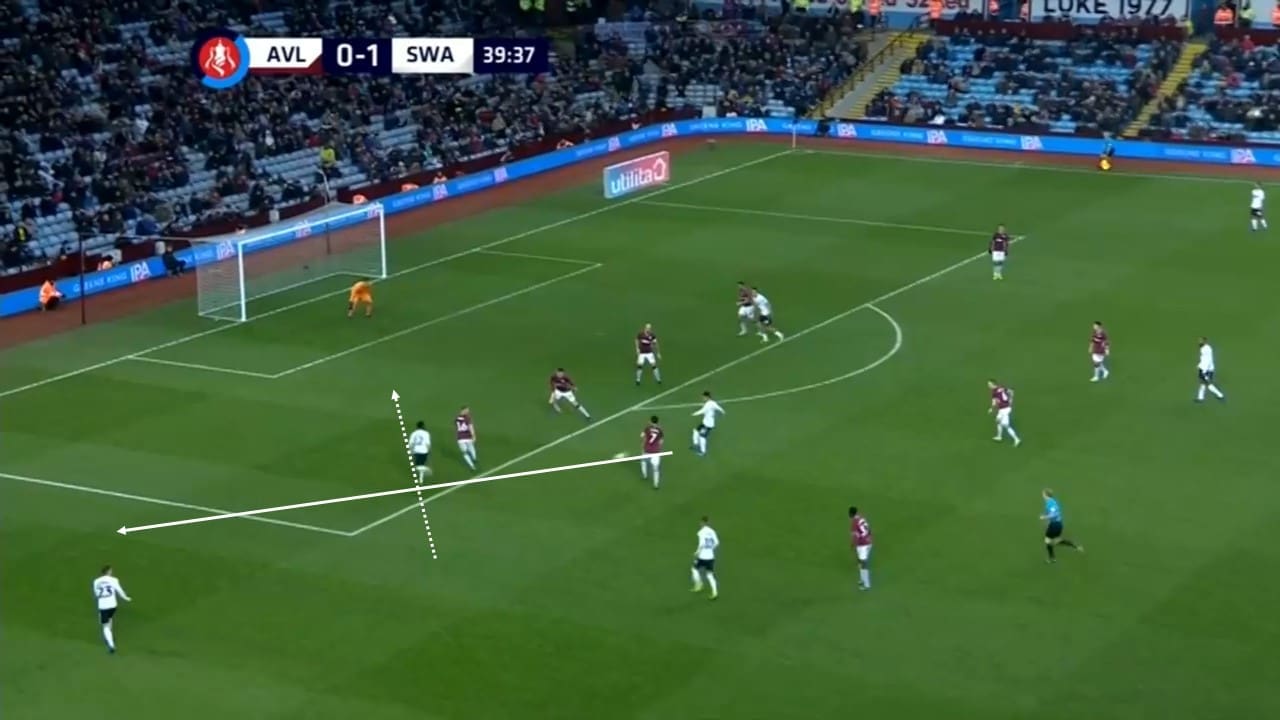
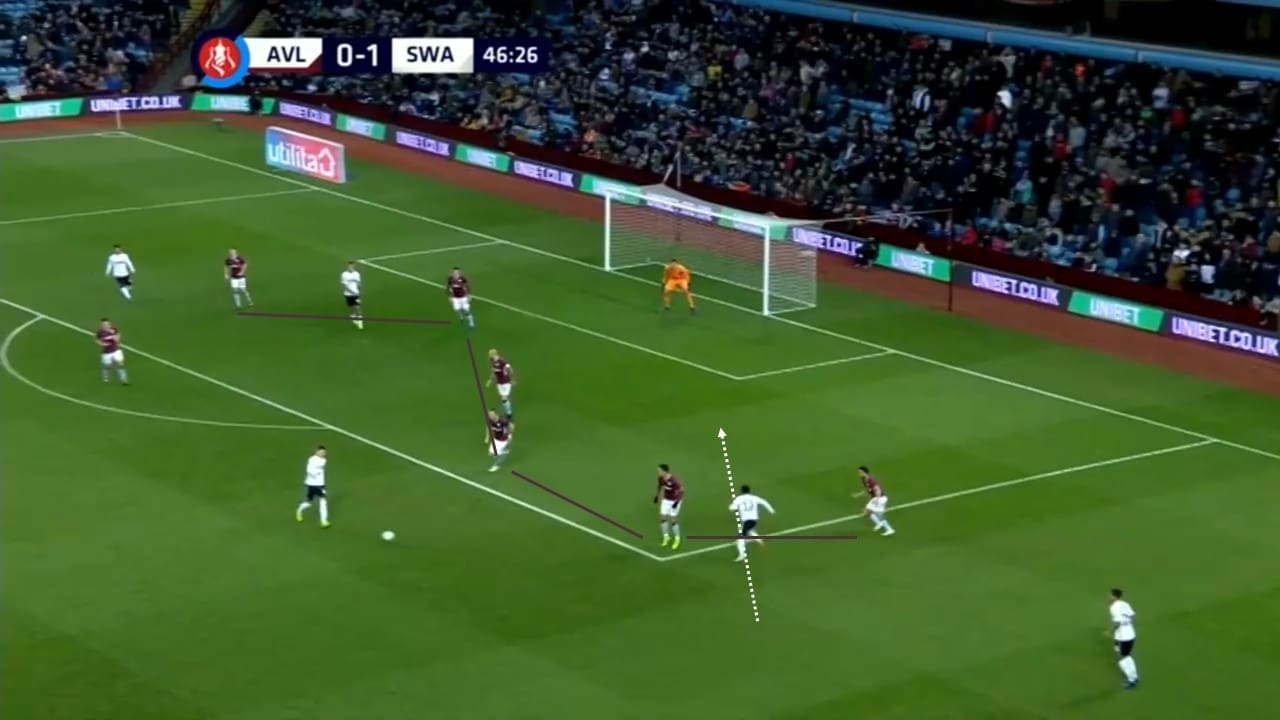
Swansea’s second goal was the pick of the bunch. Nathan Dyer’s inside runs again caused problems for Aston Villa’s defence. The screenshot below shows him making a run 13 seconds before scoring. Bersant Celina doesn’t pick him out this time but Dyer moves back and waits for another opportunity.
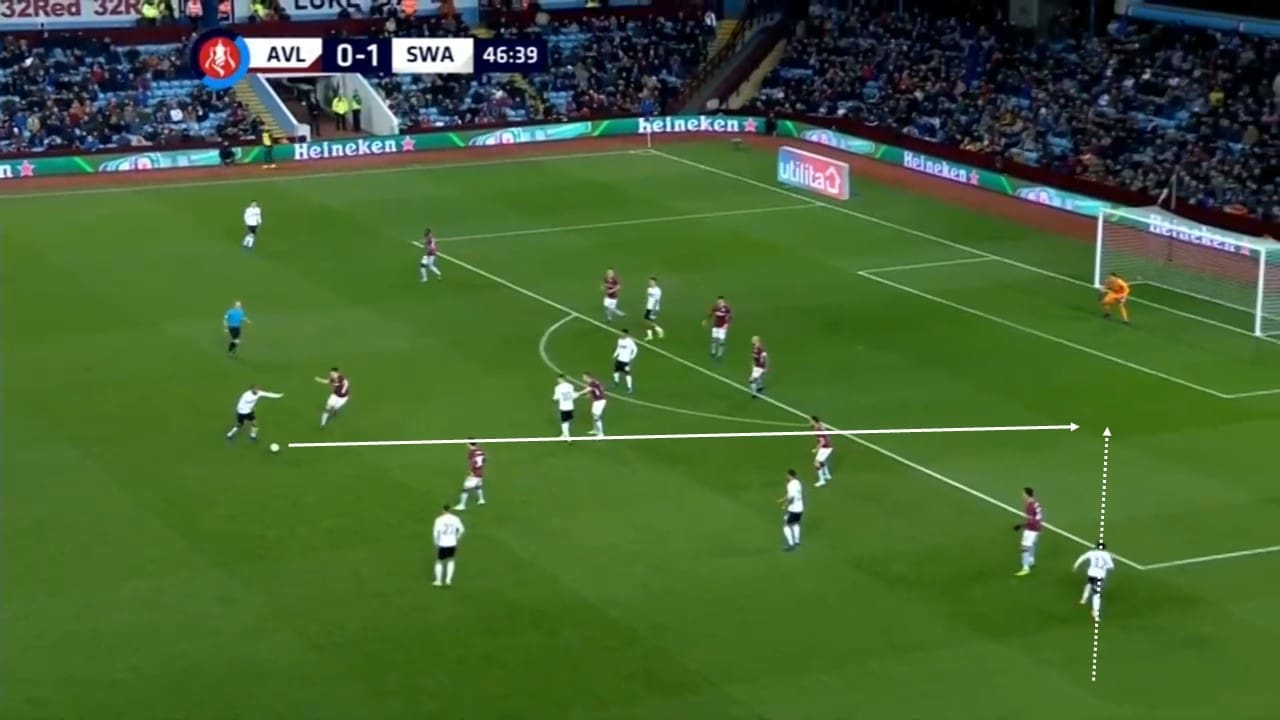
The ball is dropped back to Leroy Fer who picks out Nathan Dyer’s second inside run with an inch-perfect pass, cutting through four Aston Villa players. The winger tucks the ball in to double Swansea’s advantage.
Aston Villa change things in the second half
Like Reading did on New Year’s Day, Aston Villa fixed their array of problems and finally began to grow into the game. They improved their midfield shape and plugged the gaps that we showed earlier in the analysis.
Below shows how they improved their press and ensured that they didn’t allow space in behind their front lines. Swansea City are now the side forced into wide areas from the back and into recycling the ball around the backline.
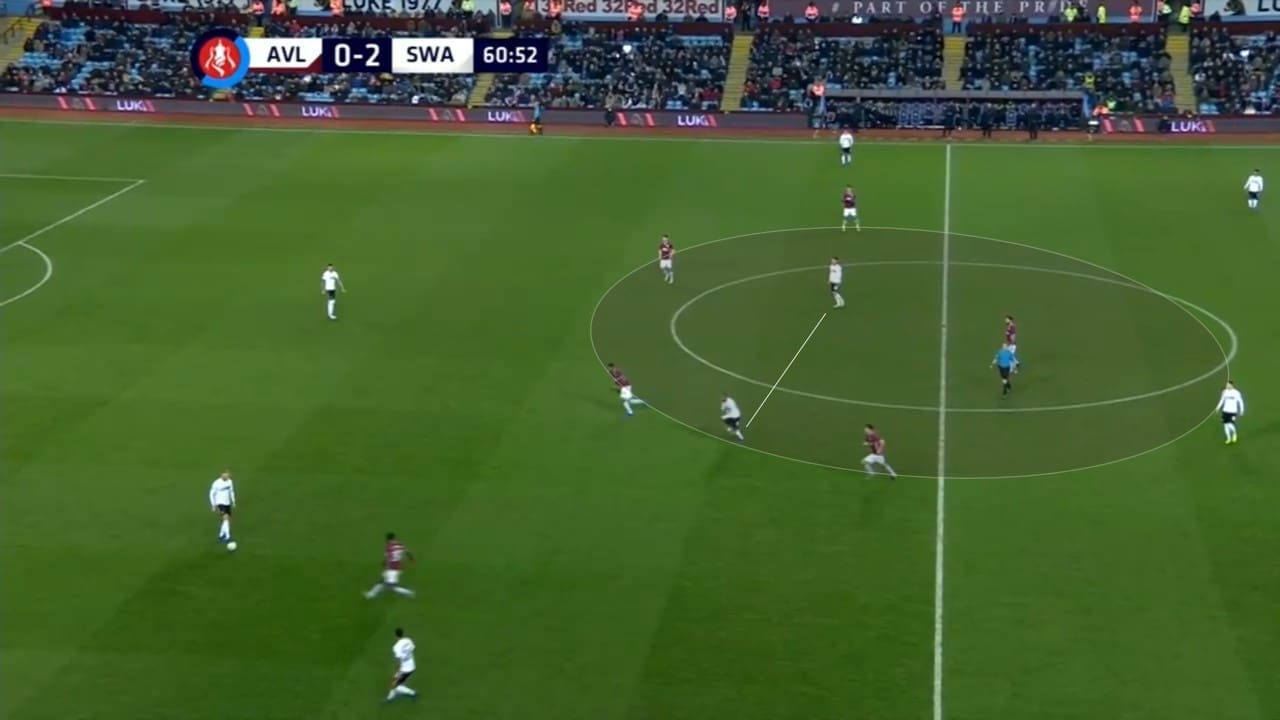
After the majority of their attacking play in the first half had been down the flanks, Aston Villa began to move forward through the middle. The introduction of Henri Lansbury for the hosts provided some creativity through the central channel that they had been severely lacking in beforehand.
Like at Reading, Swansea sat deeper, happy to sit on their 2-0 lead.
Swansea’s double change inspires a third goal
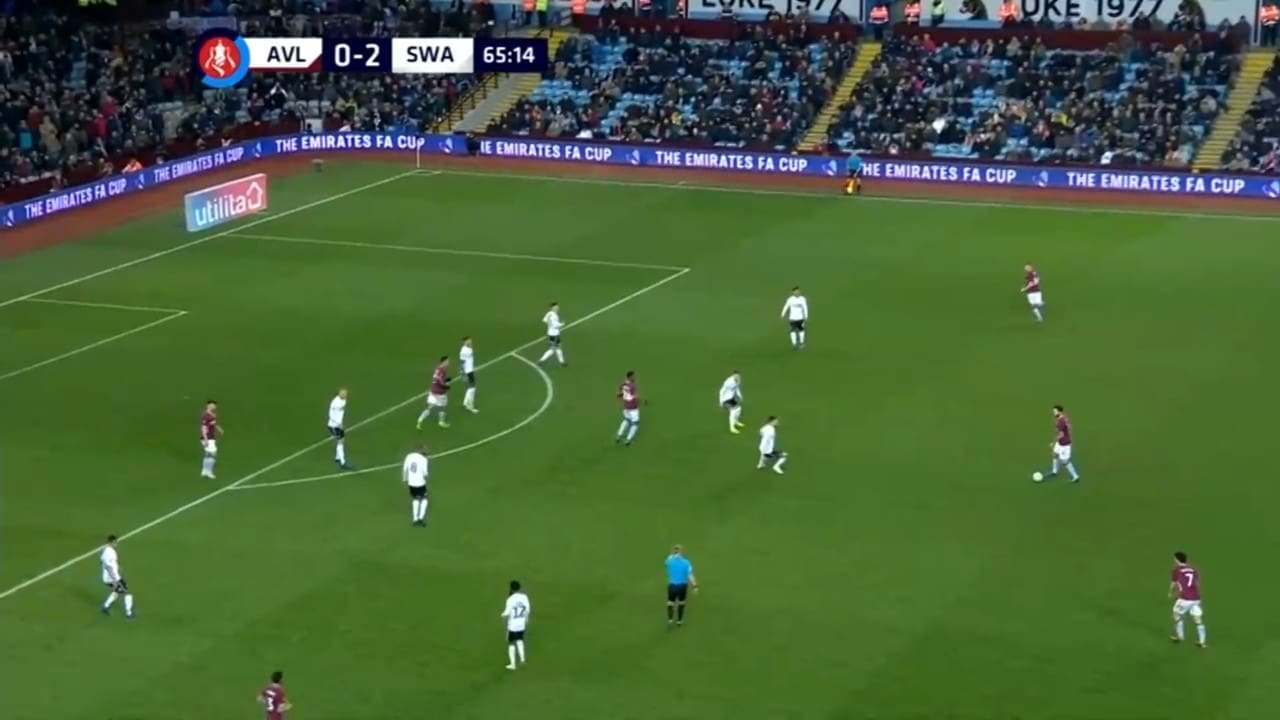
As Aston Villa began to enjoy their best spell of the game during the middle part of the second half, Swansea City boss Graham Potter made a double change in the hope of regaining some control and to relieve the pressure on his defence.
The introduction of Jay Fulton joining Matt Grimes in deep midfield gave Leroy Fer (circled, below) more freedom to get further forward in attack. The full-backs, also circled, continue to provide width.

Winger Dan James also came on and added a different dynamic. He moved inside off the left flank and got a shot on target within moments of entering the field.
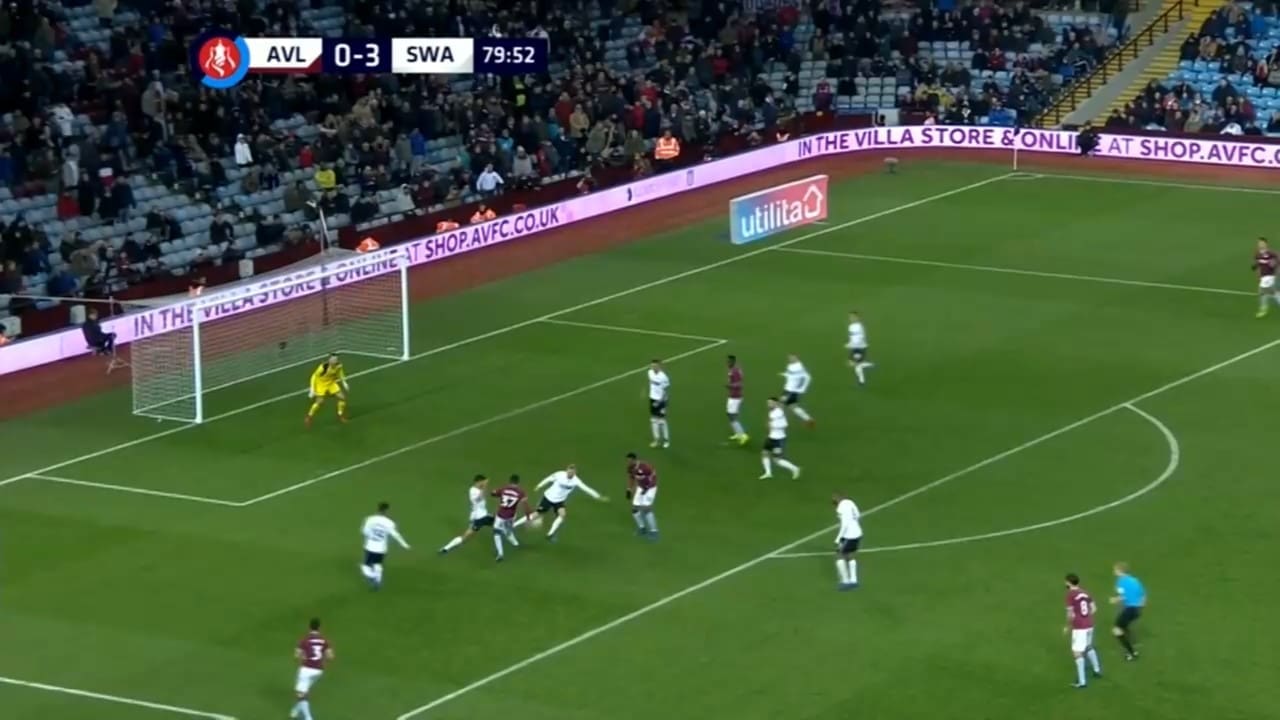
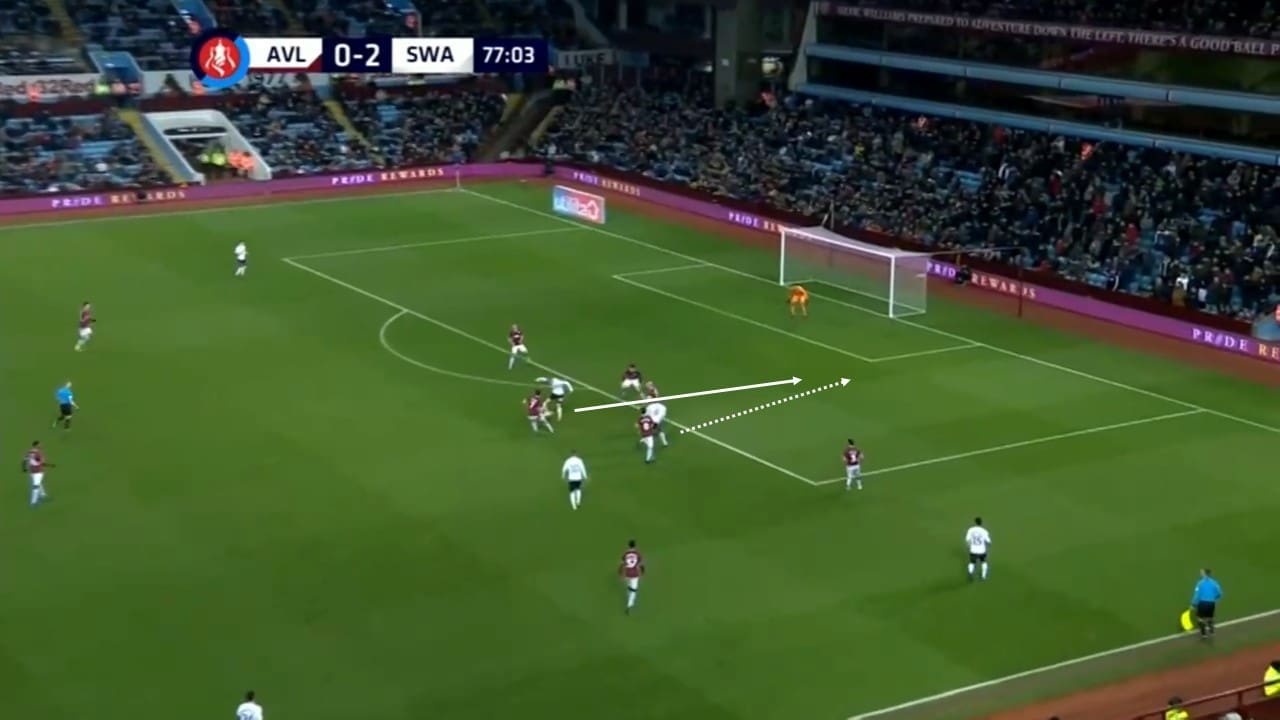
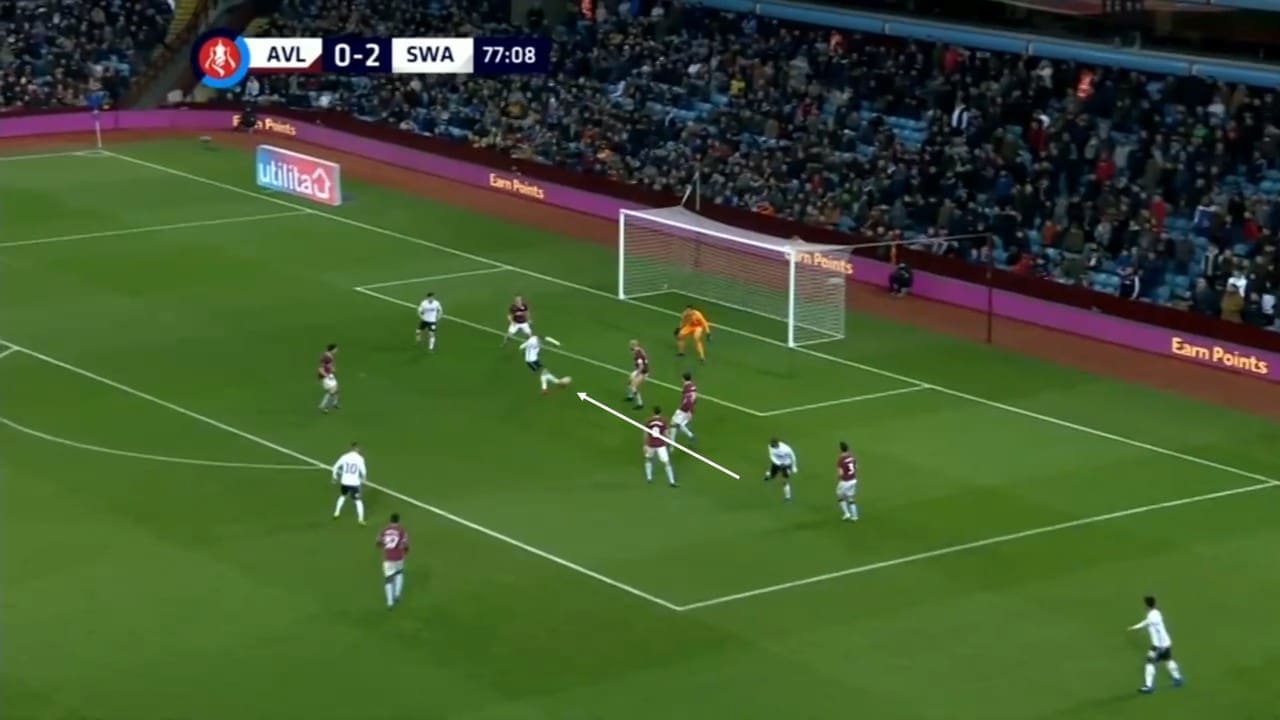
From a throw-in on the right-hand side, Leroy Fer – arguably the man of the match – is able to receive the ball, turn and make a run inside before a quick one-two with Jay Fulton on the edge of the area.
He’s now in behind the Aston Villa defence. After an unsuccessful challenge from Alan Hutton, Fer can pick out Jay Fulton near the six-yard area who can finish simply past the goalkeeper.
Final thoughts
Aston Villa fans and manager Dean Smith were left angry after this showing at Villa Park and rightfully so. They were unorganised and slow, leaving Swansea City to take full advantage with another clinical display.
Graham Potter has experimented with his team this season with the use of different formations and personnel but surely he must now stick with what appears to be a winning formula. However, surely up and coming opponents will have watched their recent wins and won’t make the same mistakes as Reading and Aston Villa.
If you love tactical analysis, then you’ll love the digital magazines from totalfootballanalysis.com – a guaranteed 100+ pages of pure tactical analysis covering topics from the Premier League, Serie A, La Liga, Bundesliga and many, many more. Get your copy of the FIRST of two December issues for just ₤4.99 here, or the SECOND of the December issues with an annual membership right here.




Comments