Matchday fourteen of the current FAWSL campaign brought us a potential upset in the making with West Ham Women visiting Chelsea Women at Kingsmeadow. Chelsea are without debatably their best attackers in Sam Kerr and Ji So-yun, who are both participating in Olympic qualifying matches. Would West Ham be able to step up and steal some points from the currently dominant Chelsea squad?
After analysis, we see that West Ham chose to deploy in a rarely seen formation to create opportunistic overloads. Chelsea used attacking tactics that suited the formational foundation that West Ham had set for the encounter.
Could West Ham topple the charging Chelsea? This tactical analysis will tell us exactly how it happened.
Lineups
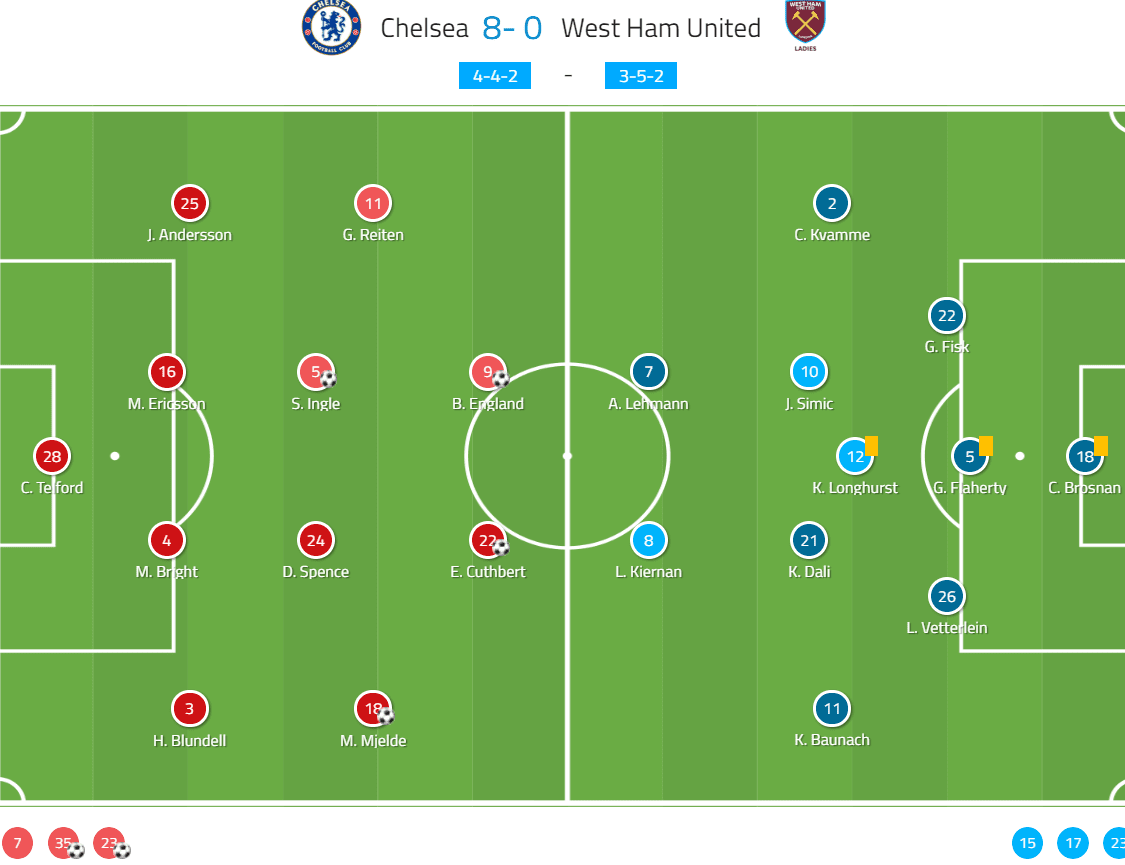
Chelsea (4-4-2): Telford; Blundell, Bright, Eriksson (c), Andersson; Mjelde, Ingle, Spence, Reiten; England, Cuthbert
West Ham United (3-5-2): Earps; Fisk, Flaherty, Vetterlein; Kvamme, Dali, Longhurs, Simic, Baunach; Kiernan, Lehmann
Chelsea: counter-press
In a match that had an almost completely even split of possession (Chelsea: 51% and West Ham: 49%), Chelsea sought to make every possession as unpleasant as possible for the visiting Lady Hammers. This was done with the use of intense counter-pressing directly upon losing the ball.
There are many ways to counter-press as a unit. In this instance, Chelsea sought to use a passing-lane oriented counter-press to regain possession of the ball in dangerous spaces. In this form of counter-pressing, all nearby Chelsea players position themselves to create cover shadows and cut out any nearby West Ham passing options. This tactic is difficult to execute for multiple reasons.
Firstly, the pressing positioning of the off the ball Chelsea players is fully dependent on the positioning of the nearby West Ham passing options. This means that every relevant Chelsea player must immediately identify the nearest passing lane and move into it. This must happen as quickly as possible. If not the West Ham players will play out of the press and move into dangerous space down the pitch
Secondly, the closest Chelsea player to the West Ham ball carrier must pressure the ball as quickly and intensely as possible. The more pressure applied, the less the ball carrier is able to survey passing options nearby. On the other hand, if there is little to no pressure, the ball carrier will have a much easier time playing out of the counter-press.
Thirdly, this must be done as fast as possible. Time is one of the biggest constraints to a successful counter-press. The longer a team has possession of the ball, the more time they have to get organized and play out of the press. A successful counter-press must be executed within a few seconds.
Fourthly, if one player is out of position within the counter-press, West Ham can potentially pass out of the press and the counter-press as a whole was for nothing. Everyone must act in accordance with each other.
With all of this in mind, Chelsea were able to execute many successful counter-presses that translated into immediate chances on goal.
A little after the half-hour mark, we see an example of a successful Chelsea counter-press. Five Chelsea players are attacking down the left flank in an attempt to play behind the West Ham line and then into the box.
Erin Cuthbert has been closed down by two West Ham players, is knocked off her feet and is dispossessed.
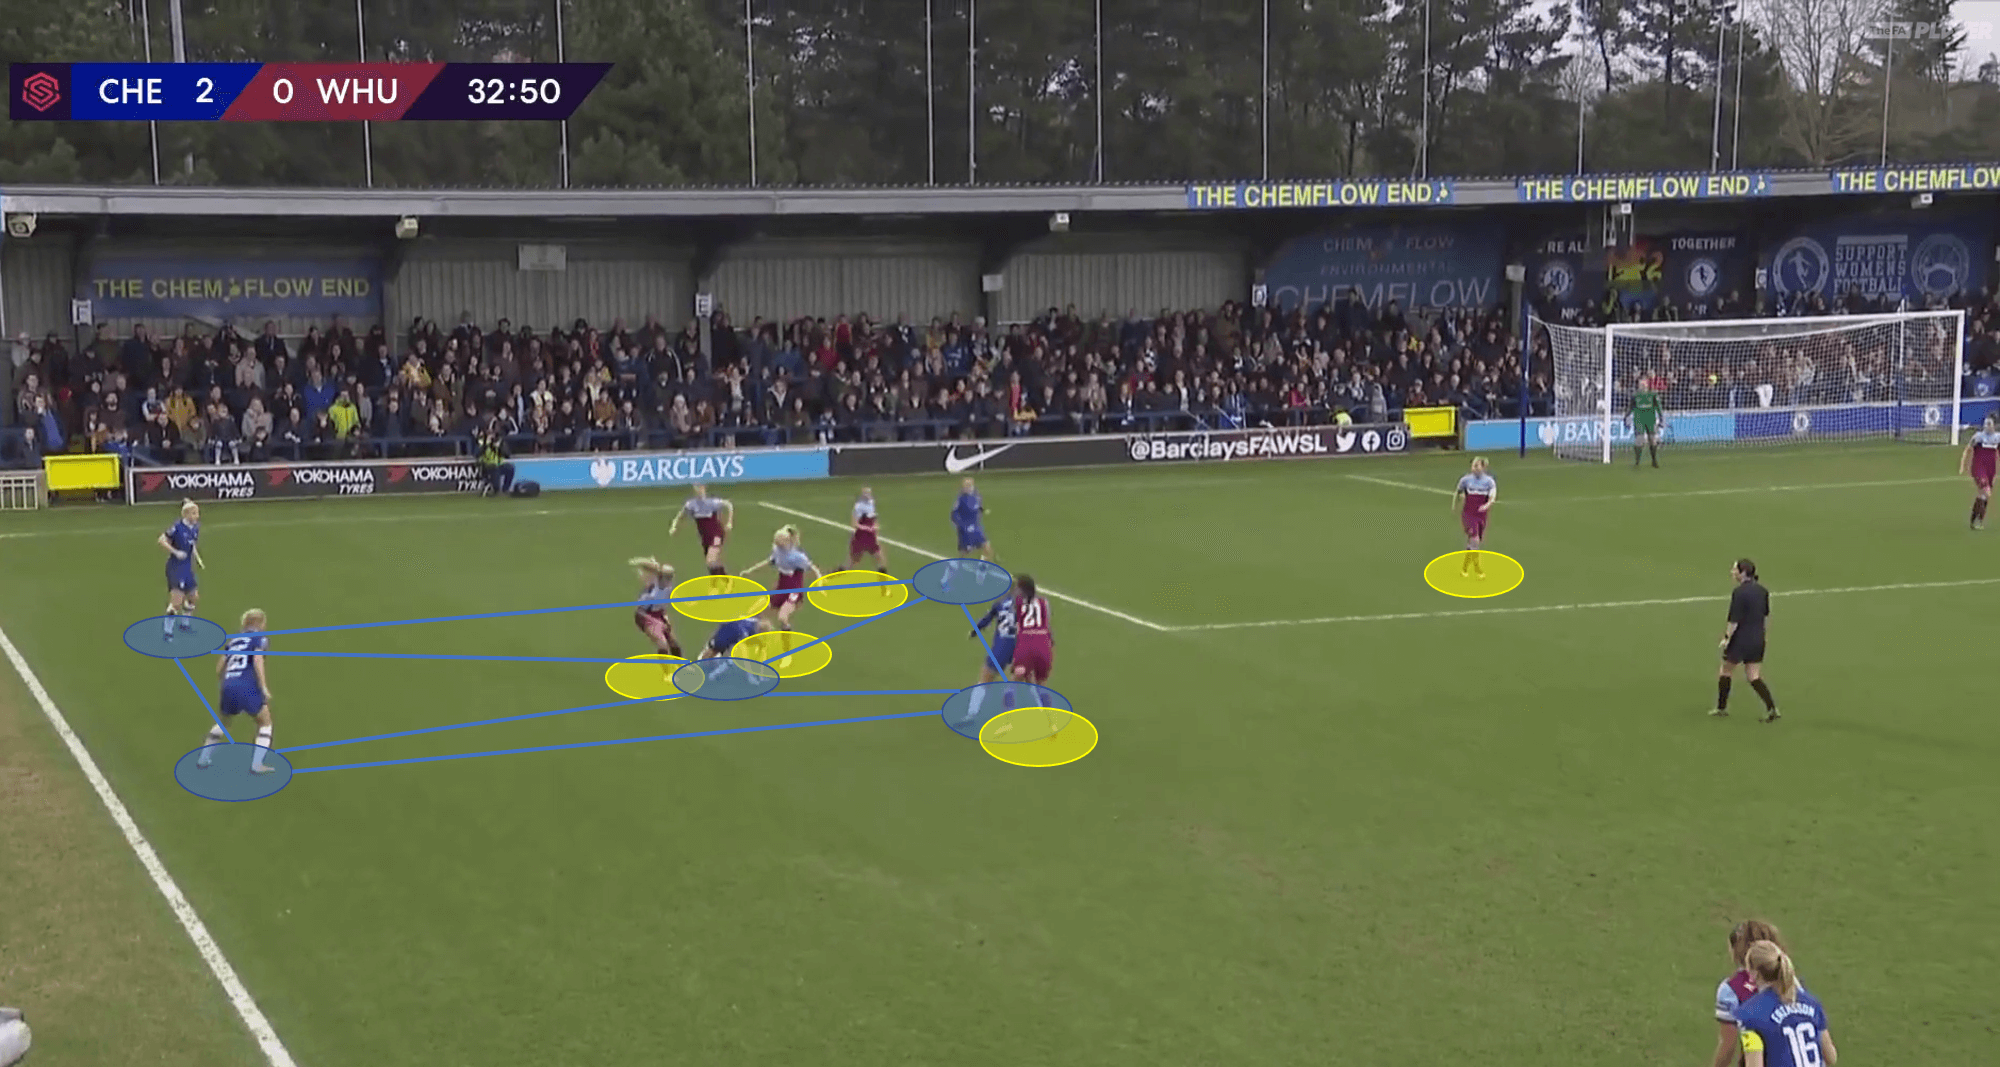
The entire Chelsea unit quickly springs into action. Cuthbert, as the closest player to the new West Ham ball carrier, immediately pressures the ball with immediate and almost reckless intensity. As Cuthbert applies pressure, the nearby Chelsea players move into possible passing lanes to create cover shadows and restrict available space.
Guro Reiten has cut off any passing options to the centre of the pitch through the West Ham backline. Drew Spence has stepped forward to cut off any passing options to both midfielder Kenza Dali and forward Alisha Lehmann.
The West Ham ball carrier is under intense pressure with no quality passing options to escape. Notice that this all happened within two seconds.
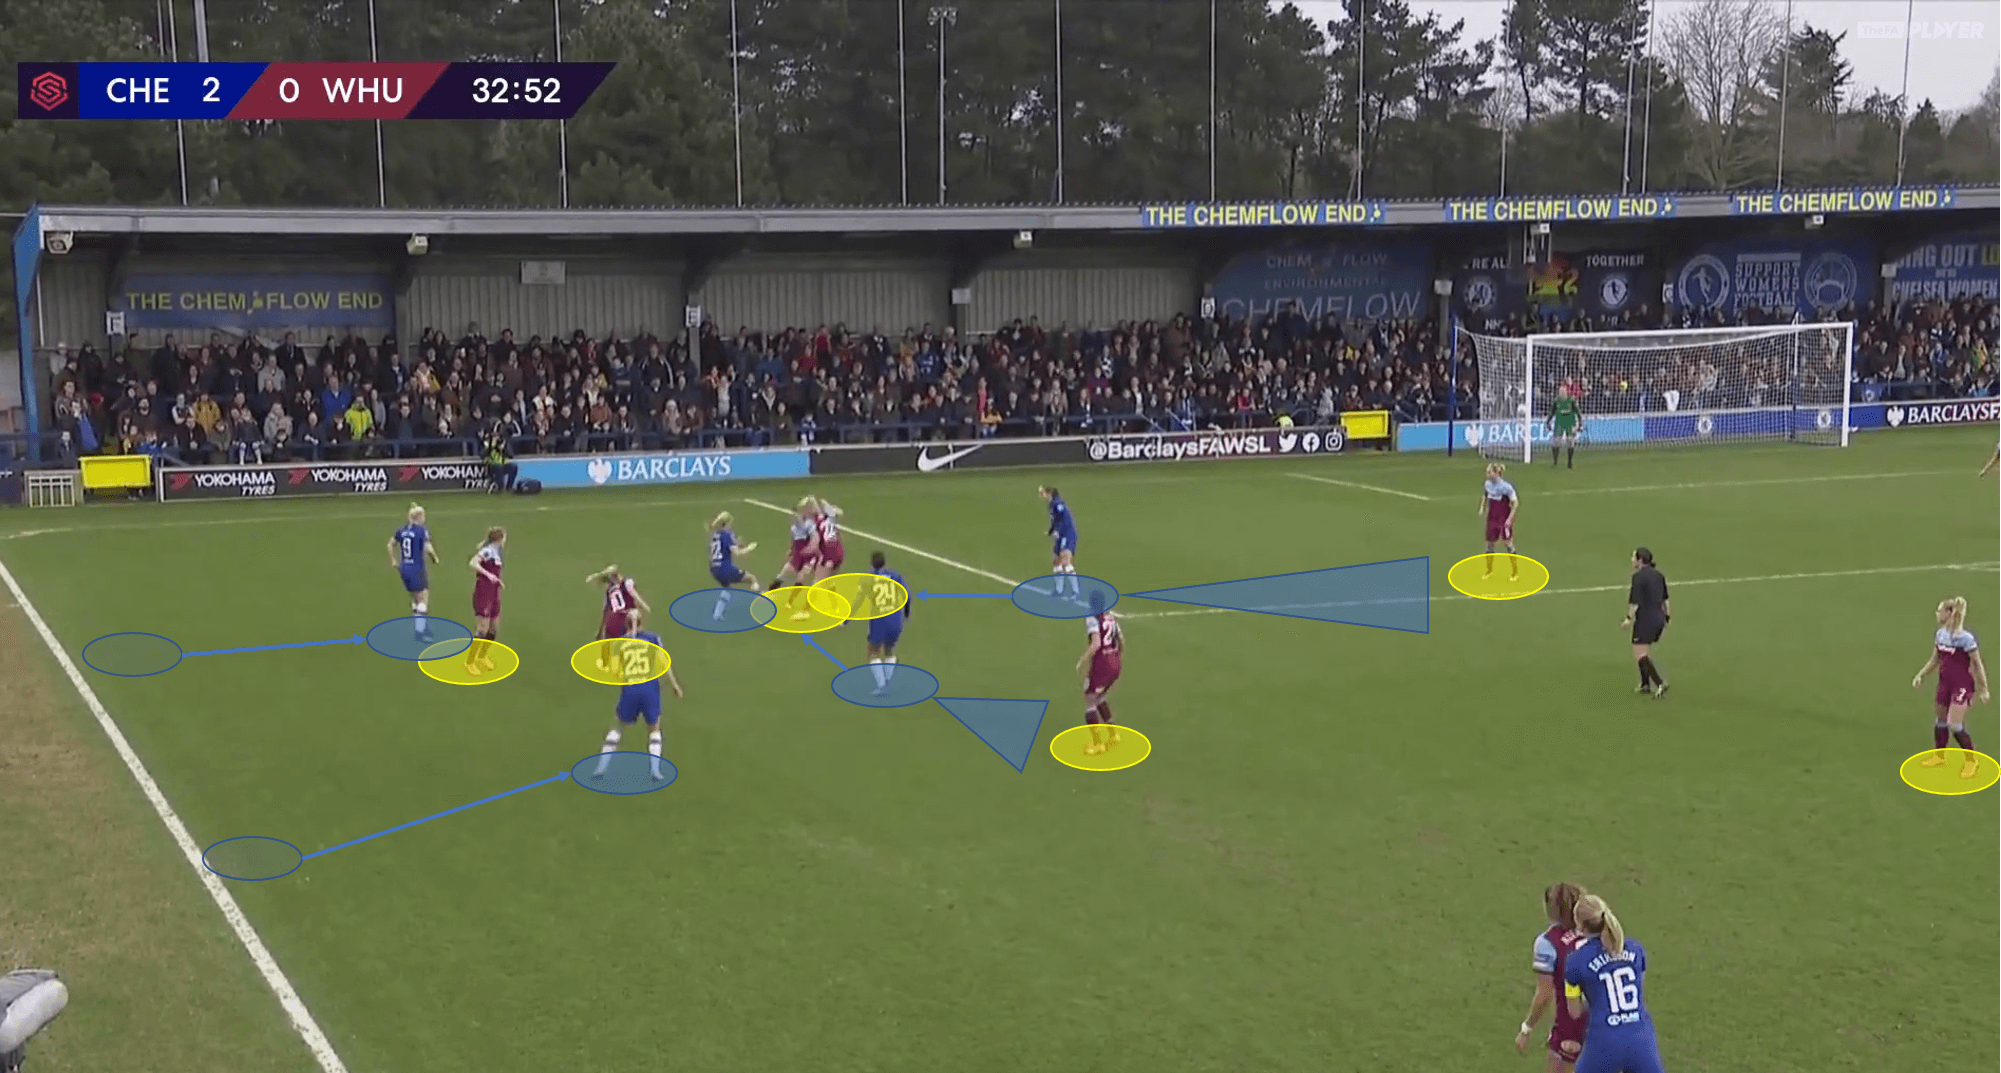
Cuthbert forces an attempted pass to deflect high into the air and into the box. Immediately, the entire Chelsea unit breaks to the open space in the centre of the attacking thirs to set up a chance on goal. The ball makes its way to England, who is in space in the box. She attempts a shot on goal but misses above the left corner.
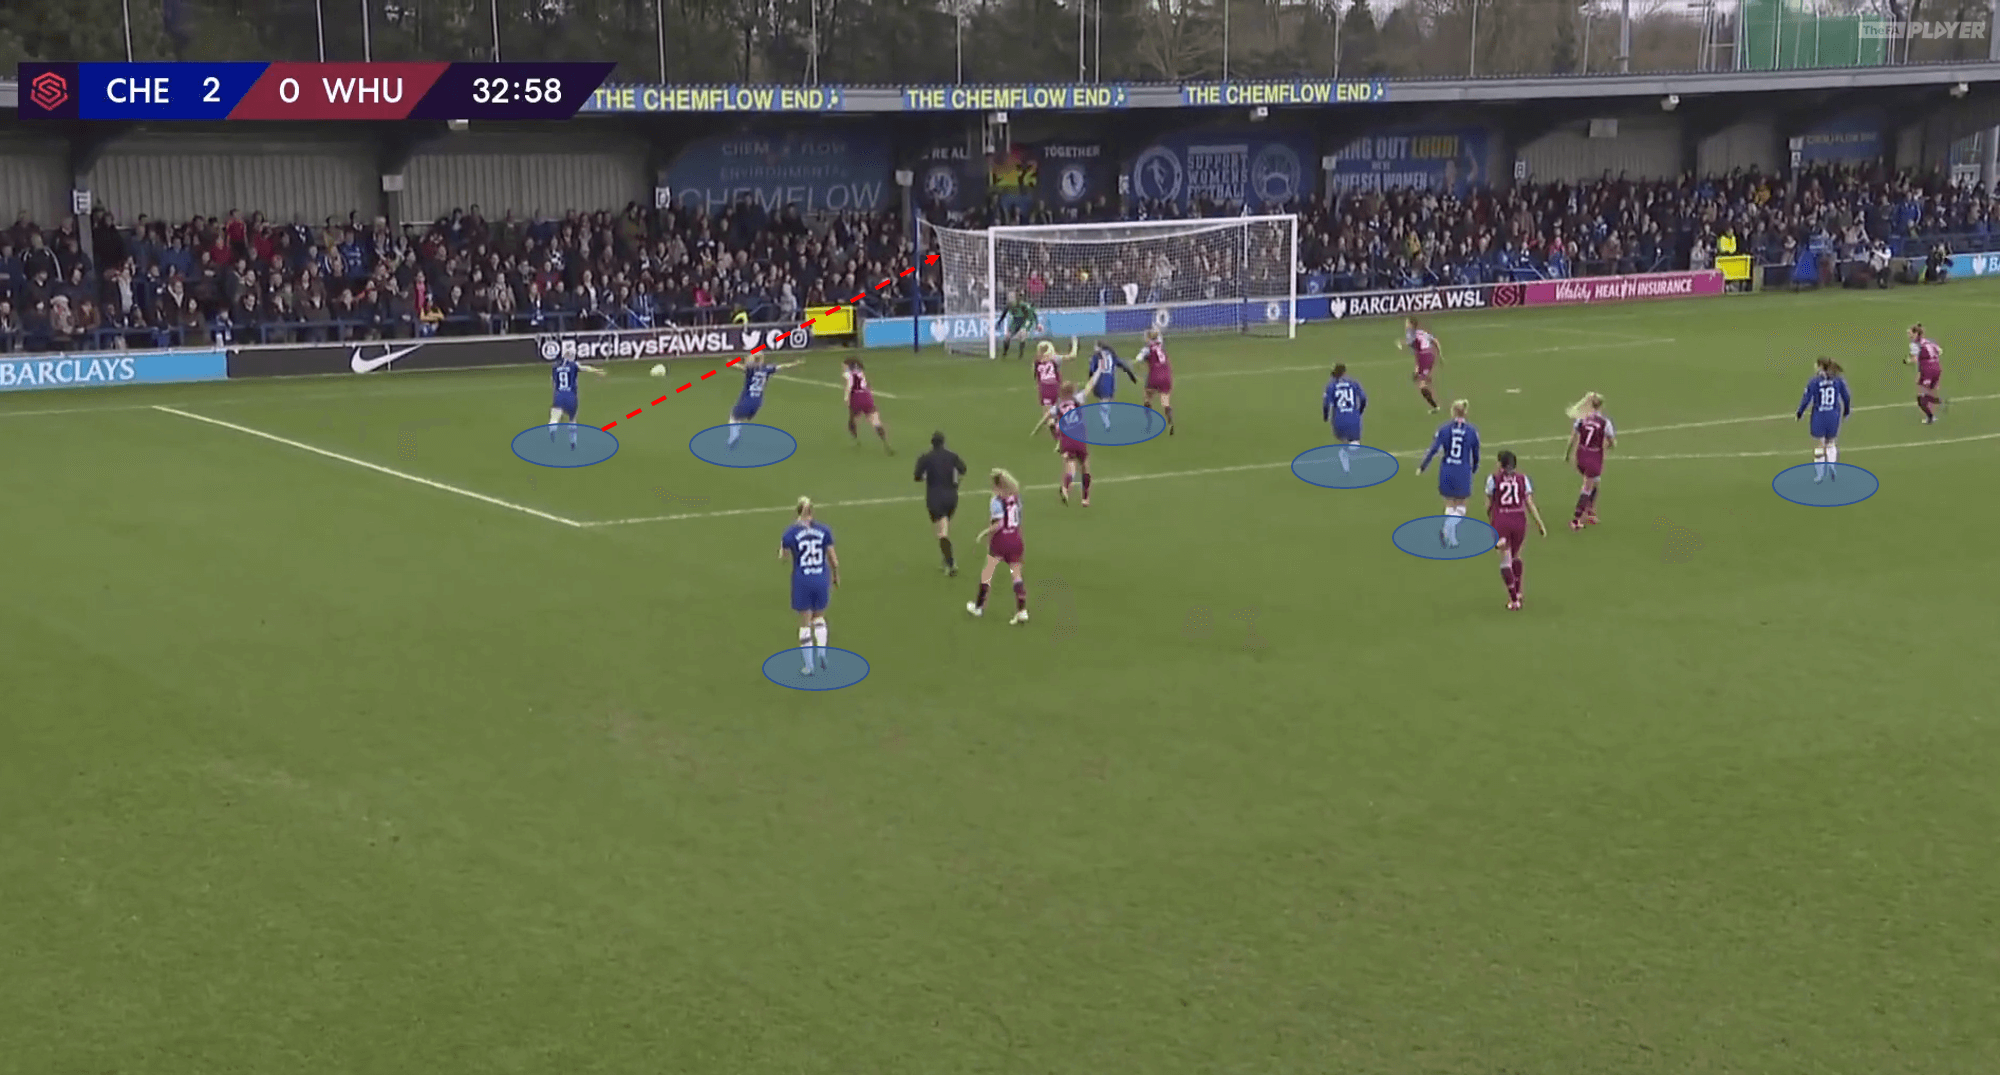
In this moment, Chelsea have lost the ball, won it back and created a chance on goal, all within eight seconds. This counter-pressing tactic was used throughout the match and helped Chelsea to keep West Ham off-balance at almost all times.
West Ham: 3-5-2
West Ham chose to align in a 3-5-2 formation. The primary aim of this tactic was to create a formidable line of 5 in the back when out of possession. This was done by having West Ham’s wingbacks drop into line with the three defenders as soon as the ball was lost. This helped to create defensive coverage across the centre and halfspaces.
When gaining possession, West Ham would push their wingbacks higher up the flanks. Chelsea’s favoured formation throughout the campaign has been a 4-4-2. In theory, the wingback’s movement to the midfield line would give West Ham a 3v2 overload in the defensive line and the 5v4 overload in the midfield line when in possession.
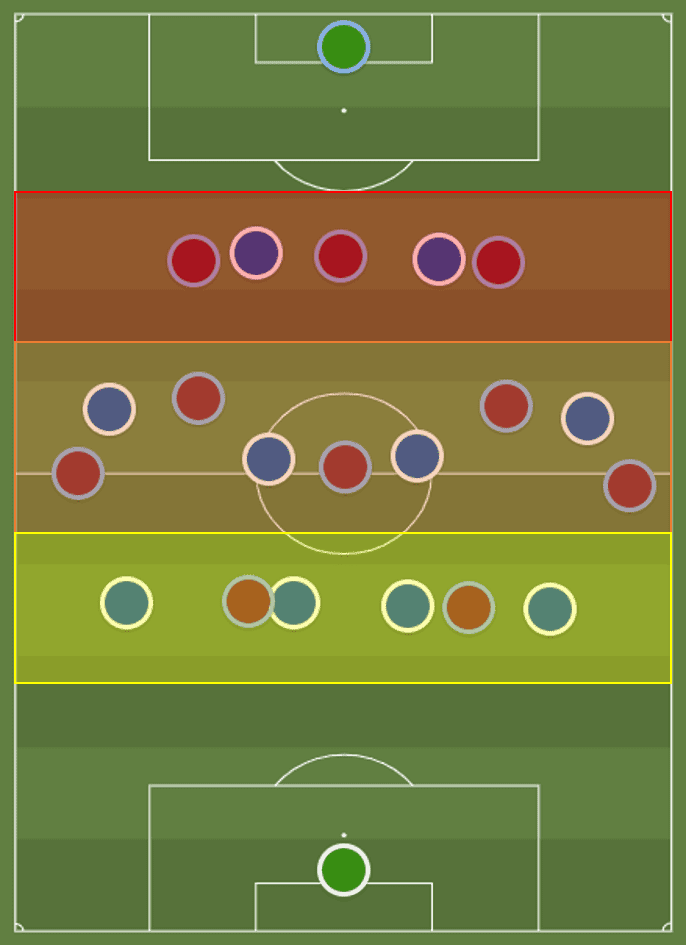
West Ham sought to build out of the back and progress through the thirds by taking advantage of these overloads. This tactical plan led to only one shot on target throughout the match.
When out of possession, three central midfielders would remain higher above the defensive line to restrict central access. The midfielders, along with the two forwards, would remain central and force play wide to the flanks. Once play was forced wide, West Ham would aim to smother the Chelsea attack and recover the ball.
Below, we see a moment in which West Ham have had enough time to allow the wingbacks to drop into the defensive line. In this specific situation, Chelsea have attempted to play the ball up the left flank through the left back and left midfielder.
Chelsea eventually progress into the shifting West Ham defensive block. At this point, they choose to play back to the goalkeeper to recycle possession and begin a new attack. This is perfectly fine with West Ham, who are currently keeping the potent Chelsea attack out of their half.
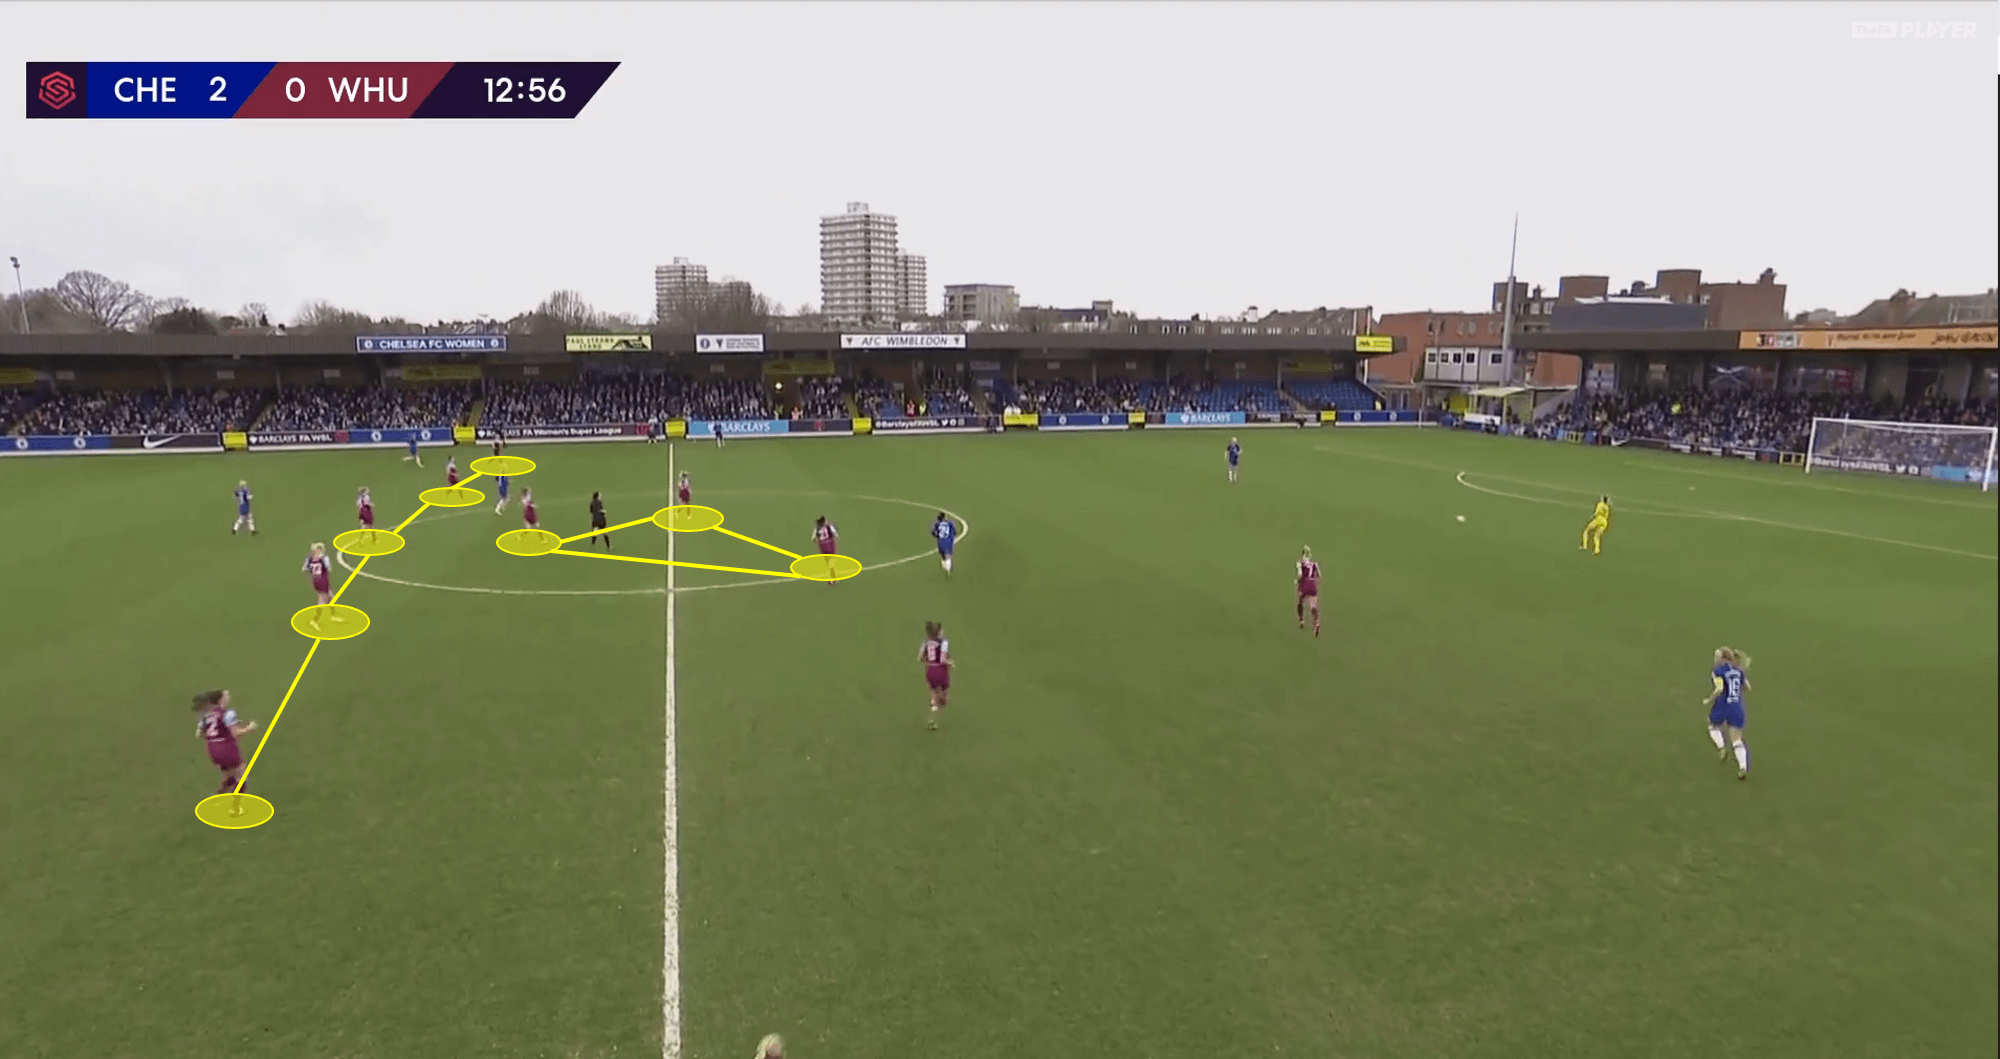
Unfortunately for West Ham, this tactical plan also left open a major window of opportunity for Chelsea transitional attacks. In the moment the ball is lost, the West Ham wingbacks were tasked with quickly repositioning themselves in the defensive line. This left an opening for Chelsea to quickly move the ball forward into space behind the wingbacks to create dangerous attacks.
In the thirty-first minute we see that West Ham have just lost the ball in the Chelsea half. West Ham’s wingbacks are making recovering runs to move into their defensive positions.
The central defenders maintain their positioning in the central channel, while awaiting the wingback’s arrival. Chelsea play the ball into the right halfspace as quickly as possible. Although, this specific play is called offside against Chelsea, we can see that these moments of transition from attack to defense could be very dangerous for West Ham.
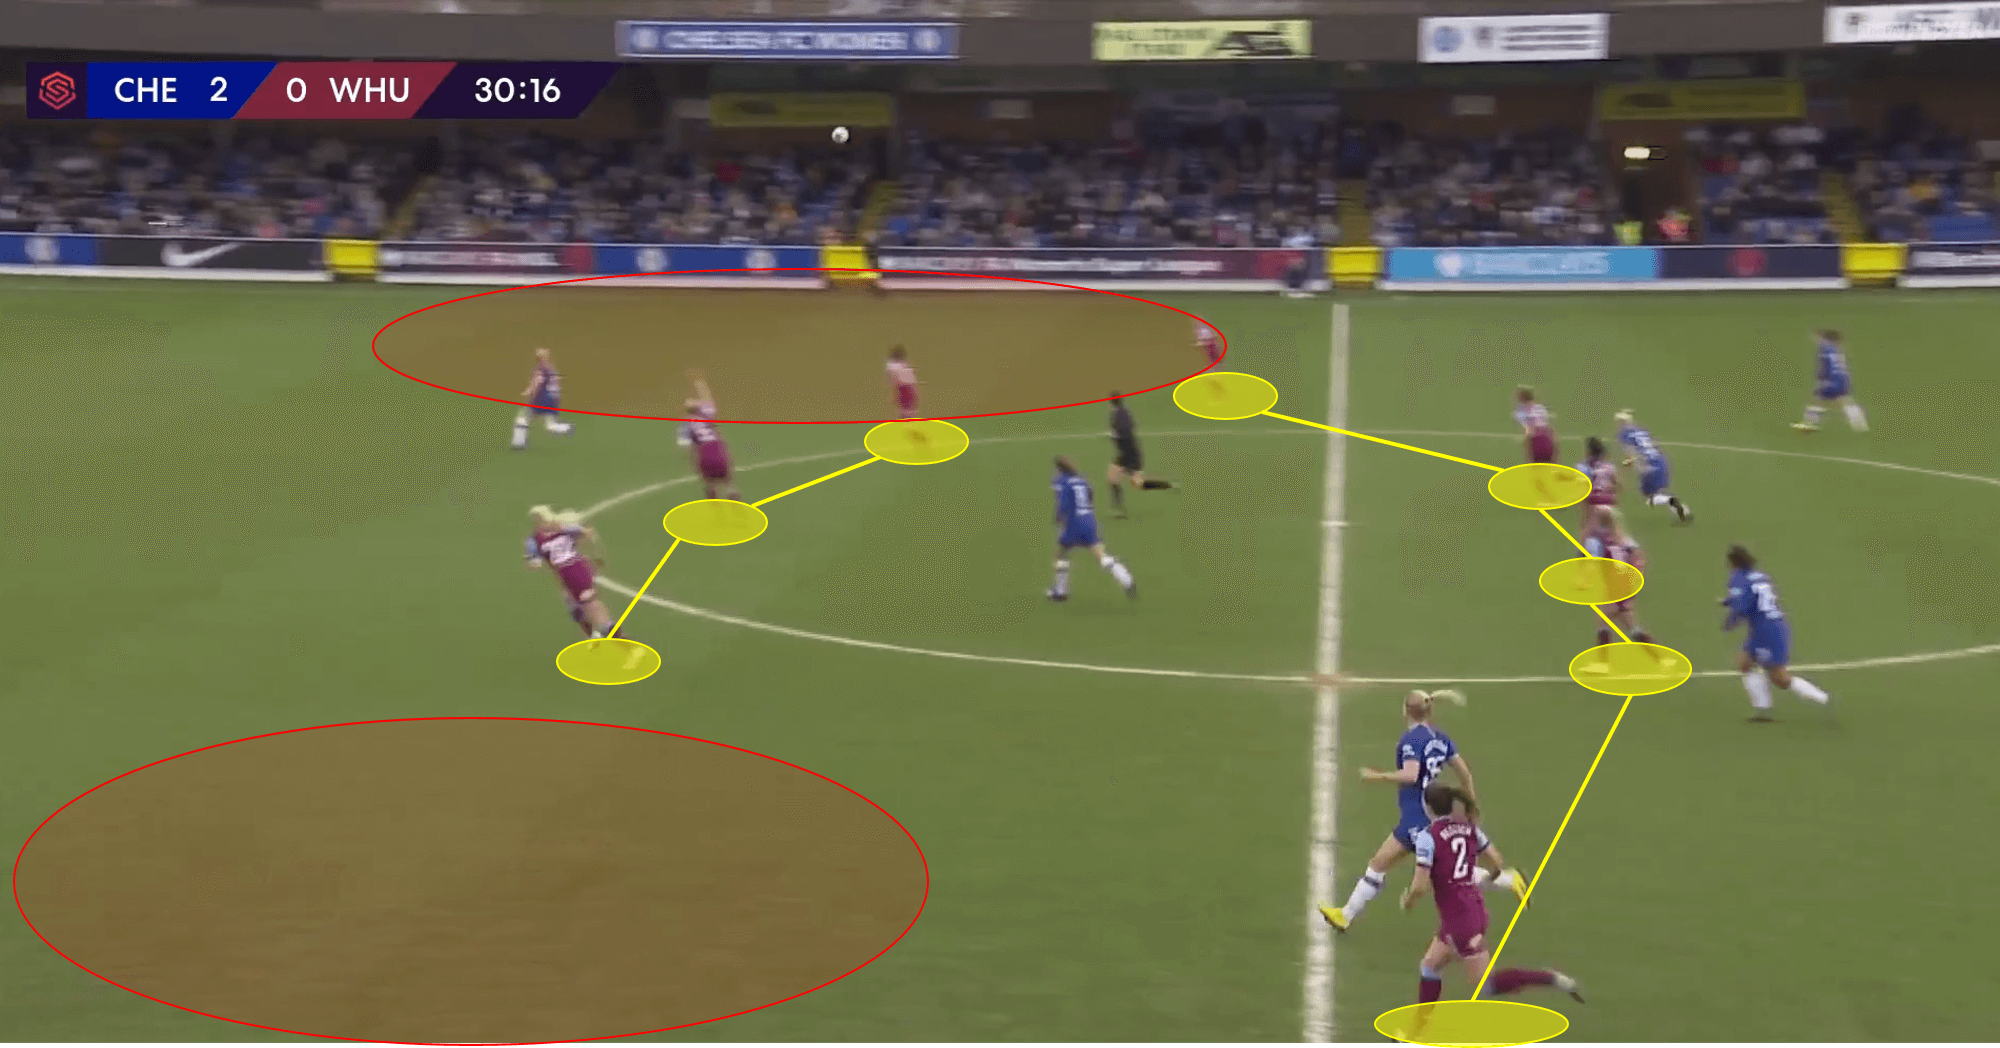
West Ham’s tactical plan of using wingbacks to solidify the defence when out of possession and create overloads in the midfield when in possession was a hypothetically great plan. This would’ve allowed West Ham to control the important parts of the pitch in both the possession and out of possession phases.
Unfortunately, a major weakness of the 3-5-2 can be quick transitional play to the halfspaces and flanks by the opponent, which leads us to our next tactical point.
Chelsea: playing direct
Chelsea typically seek to play out of the back and manipulate the team shape and individual positioning of opponents to progress through the thirds and create chances on goal. For this match, Emma Hayes sought to attack the inherent weaknesses in West Ham’s formation: the lack of defensive coverage in transitional moments.
By quickly playing direct when gaining possession of the ball, Chelsea were able to move the ball to dangerous attackers in space before West Ham could recover their defensive shape. This was done through two main tactics.
Firstly, Cuthbert would remain central and attract the attention of the West Ham central defenders. In these moments Beth England would drift wide into the halfspaces, ready to make an attacking run behind. Left midfielder, Guro Reiten, also tended to push high in the halfspace ready to make an attacking run behind the West Ham defensive line.
It must be noted that Reiten is technically rostered as a midfielder, but she is quite capable of playing as a winger, number ten or striker.
Secondly, Cuthbert was also capable of creating attacks all on her own. She constantly harassed the West Ham central defenders with her movements and was often found making her own attacking runs behind the line.
Both of these attacking tactics led to goals for Chelsea.
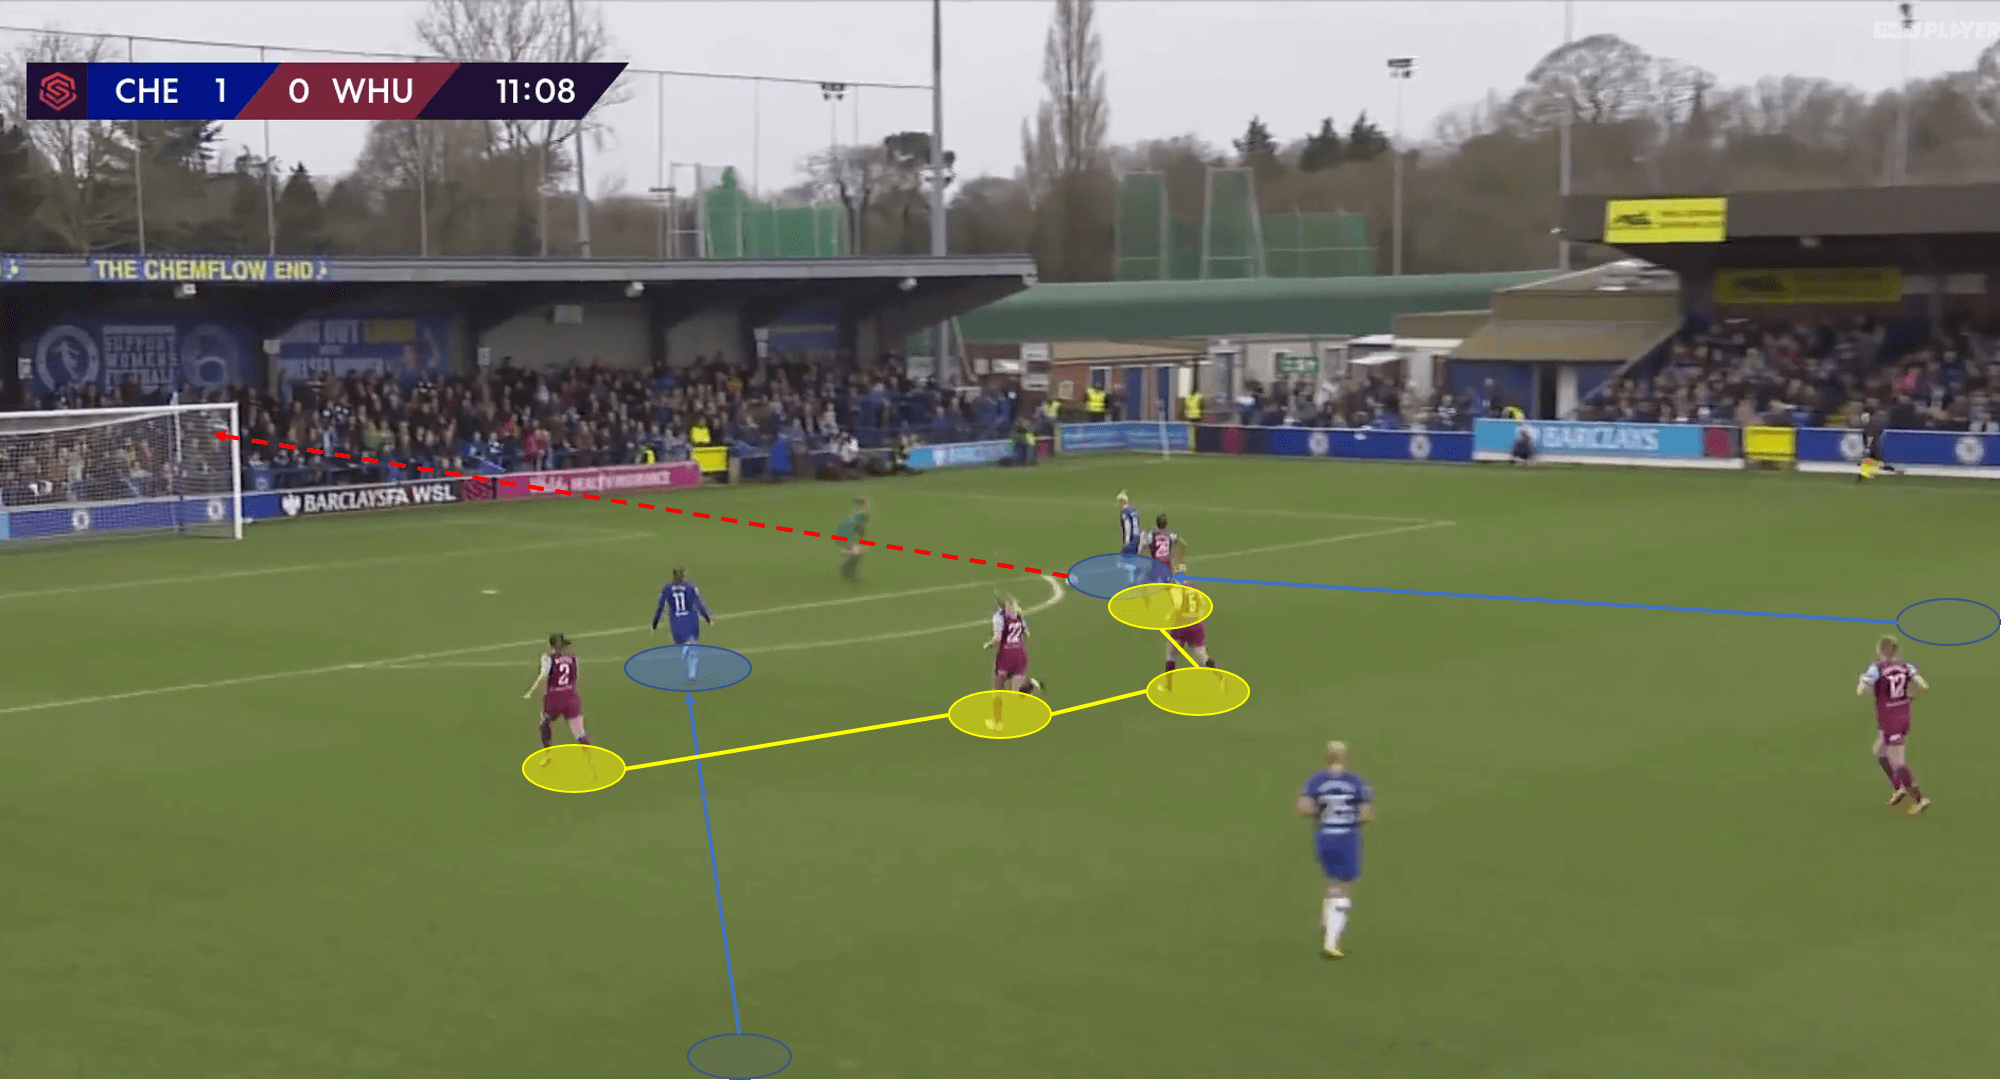
Early in the match, we saw Cuthbert use her movements to create an attacking platform for her teammates. In the twelfth minute, Chelsea’s goalkeeper, Carly Telford, has gained possession of the ball. Telford recognizes that West Ham’s backline is disorganized and the wingbacks have not dropped into the defensive line yet.
In this moment, Cuthbert drops into space in front of the West Ham defensive line to receive. England and Reiten, who are in the halfspaces, recognize Cuthbert’s dropping movement, and push forward to ready themselves for attacking runs behind.
Telford identifies the momentary 3v3 in the West Ham backline and sends a forward ball to the feet of the dropping Cuthbert. As Cuthbert drops, Reiten and England dash forward in the halfspaces. Both Chelsea attackers are aligned on the blindside of their defenders and have a few yards head start in their sprints.
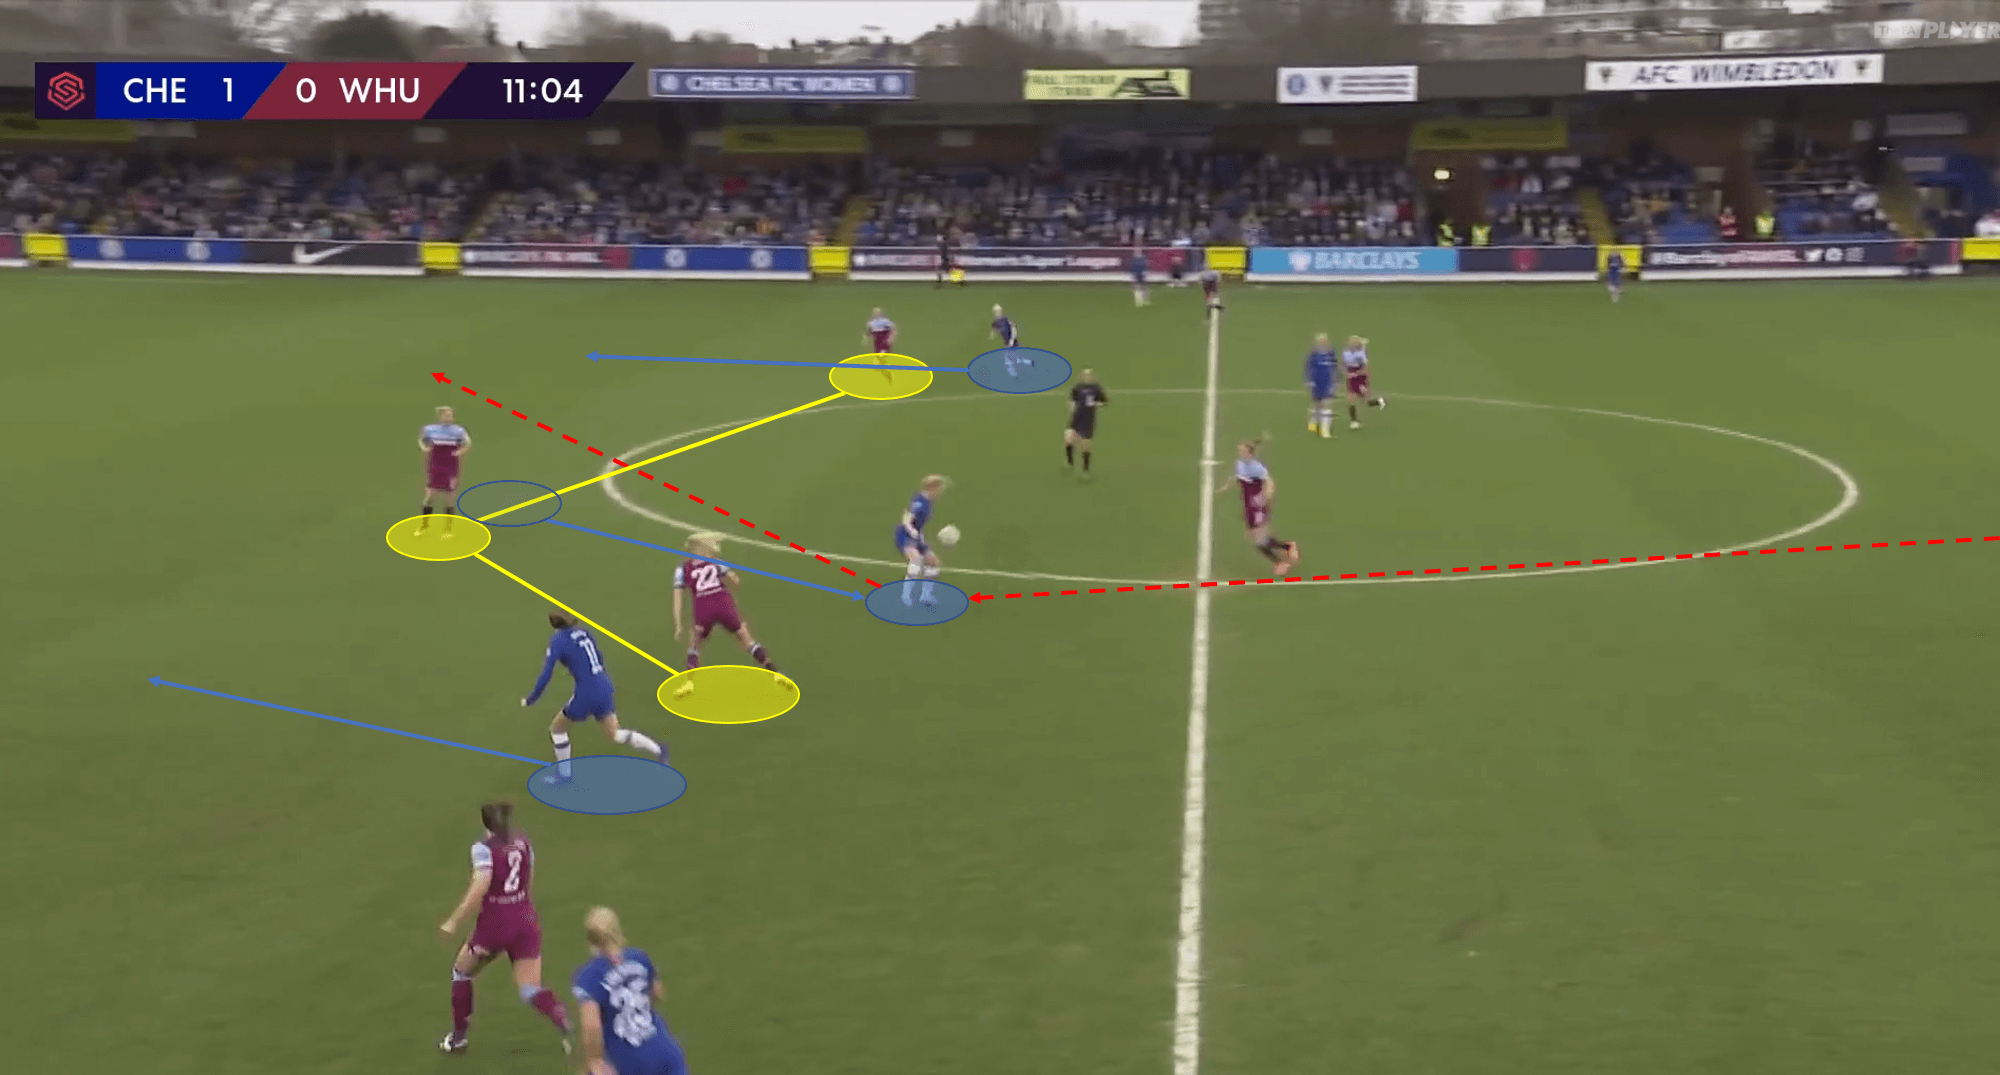
Cuthbert wastes no time possessing the ball and immediately plays the ball forward into the attacking run of England. England, who was able to get a few yards ahead of her defender, easily receives the ball. England than cuts past the approaching goalkeeper and places the ball in the back of the net.
Notice in the image below that both England and Reiten are completely behind the West Ham backline.
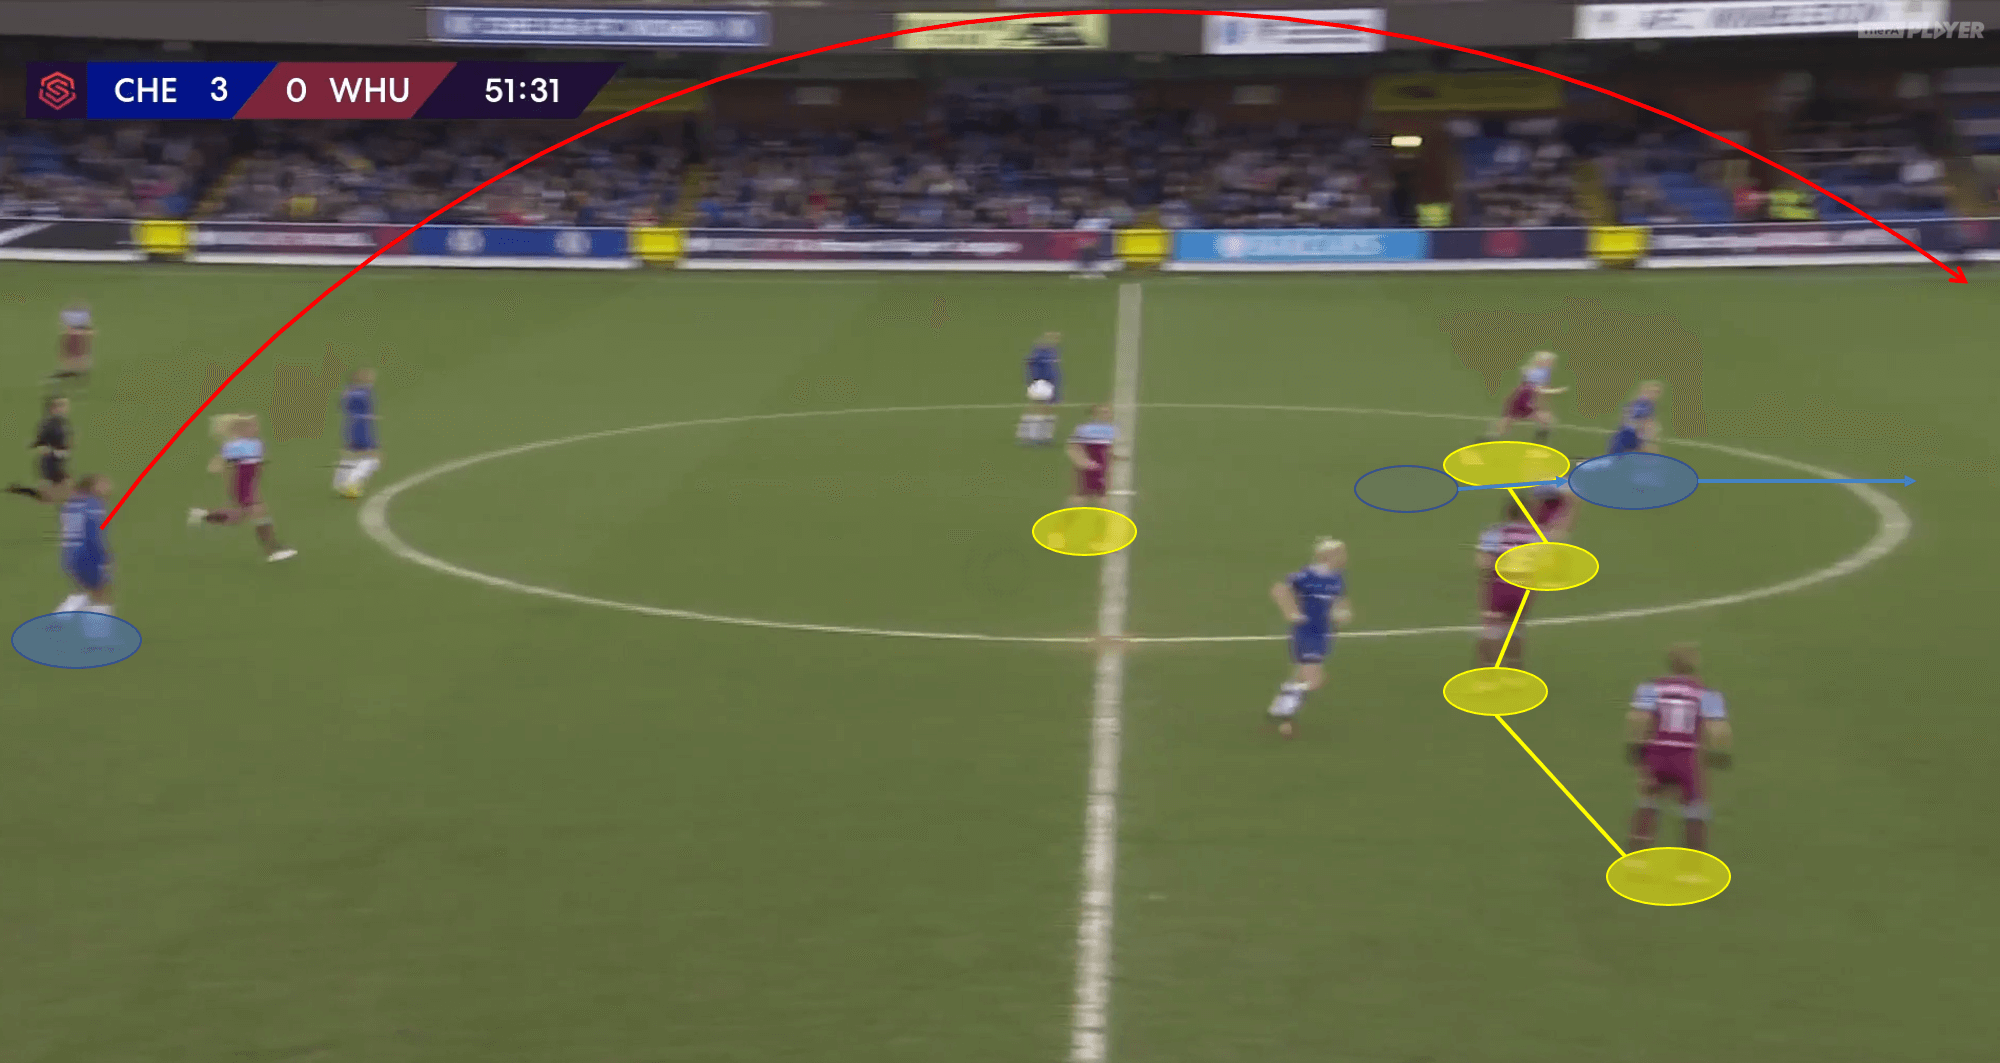
Cuthbert also allocated her individual attacking skills to tally goals for Chelsea. Early in the second half Chelsea have successfully defended a West Ham corner kick. The ball rolls out centrally to the feet of Drew Spence.
As soon as Spence turns upfield she sees that West Ham currently have four players back to suppress any Chelsea counter-attack attempt. Unfortunately for West Ham, three of the defenders are flat-footed and Cuthbert is already sprinting forward in anticipation of a direct ball into space behind.
Spence sends a ball over the West Ham line and into the path of Cuthbert, who already has a one to two yard gap on her tracking defender. Cuthbert penetrates forward with the ball and send in a goal from about thirty yards out.
Chelsea used direct forward play to constantly harass and keep the West Ham defensive unit on the back foot. By allocating different tactical movements within their direct style of play, West Ham struggled to stop the Chelsea attack.
Chelsea walked off the pitch with a resounding 8-0 victory.
Conclusion
Chelsea continues their unbeaten FAWSL campaign and shows no signs of slowing down. Chelsea will be glad to keep their current attacking momentum with a potential Championship deciding match at league-leading Manchester City coming in a few weeks. West Ham walks away with possible apprehension knowing that they have a match against the current league leaders at home this upcoming weekend.


Comments