Last weekend saw one of the biggest upsets of the season, and given how it’s been going so far, it might take some beating. Brighton & Hove Albion Women managed to clinch a 2-1 victory away to Chelsea Women. Suffering their first loss of the season comes at a time when Manchester City recorded a victory against Arsenal Women on the same weekend which has hotly increased the battle for the FAWSL title.
On paper, this tie appeared to be a possession-based style against a pragmatic, counter-attacking approach. Emma Hayes has swatted aside Aston Villa and Tottenham Hotspur 4-0 in recent weeks and this was expected to bear a similar result.
This tactical analysis will look to examine and explain where it went wrong for Chelsea Women and what Hope Powell’s side did tactically to enforce the mistakes.
Lineups
The game saw a few surprises, especially from Chelsea with Maren Mjelde. Ji so-Yun, Pernille Harder, and Fran Kirby left on the bench. Millie Bright was out of the squad altogether which meant there was a reshuffle across the pitch. The reshuffle also saw a change in formation with Hayes using a 4-3-1-2 formation rather than her preferred 4-2-3-1. Their system has always been very fluid but with the personnel that started, it seems that the game plan would go in one direction. Brighton started in a 4-1-4-1 system but shifted between a 4-5-1 and 5-4-1 depending on the situation in-game.
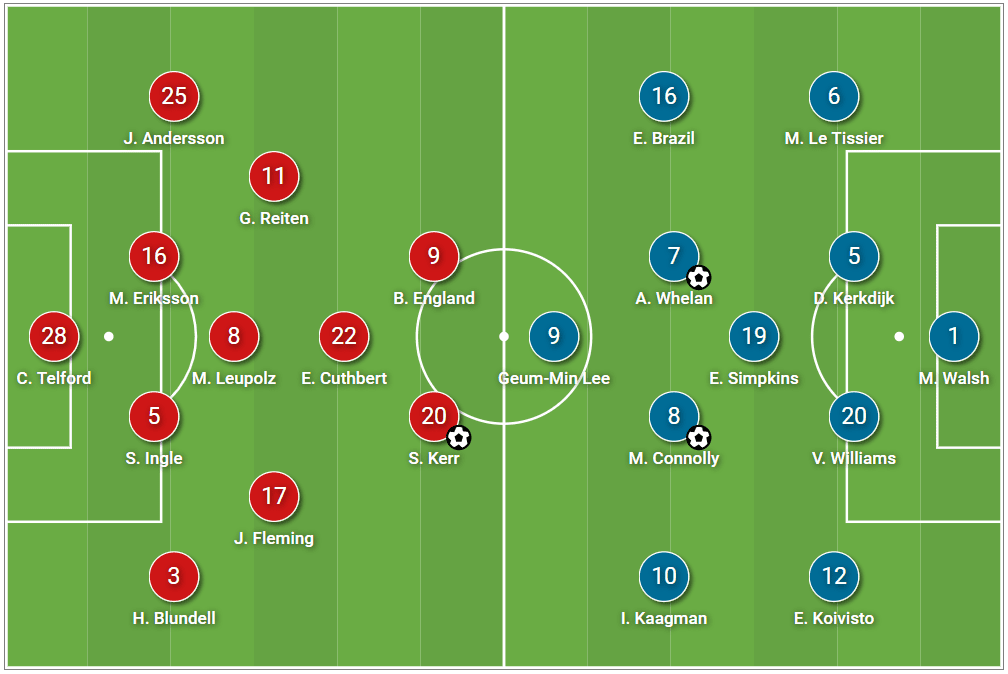
Brighton’s defensive diligence & Chelsea’s attacking method
Brighton’s main strategy was to create numbers behind the ball in a compact, organised manner. The aim behind their 4-5-1/5-4-1 off the ball system was to theoretically outnumber Chelsea in midfield and create defensive overloads. The two number ‘8’s had to be compact whilst the wingers had to be narrow and stop Chelsea’s busy midfielders from making forward runs. Chelsea often use the half spaces to create their attacking opportunities and Powell ensured they didn’t have too many chances by adding more players in these areas. Creating overloads here meant that Chelsea weren’t able to play with the freedom they usually do.
Teams have played with a deep block against Chelsea before but no one has been able to successfully stop the movement in the half spaces. One factor was the missing Harder who is excellent at finding spaces and movements off the ball, one which Cuthbert was unable to replicate it effectively.
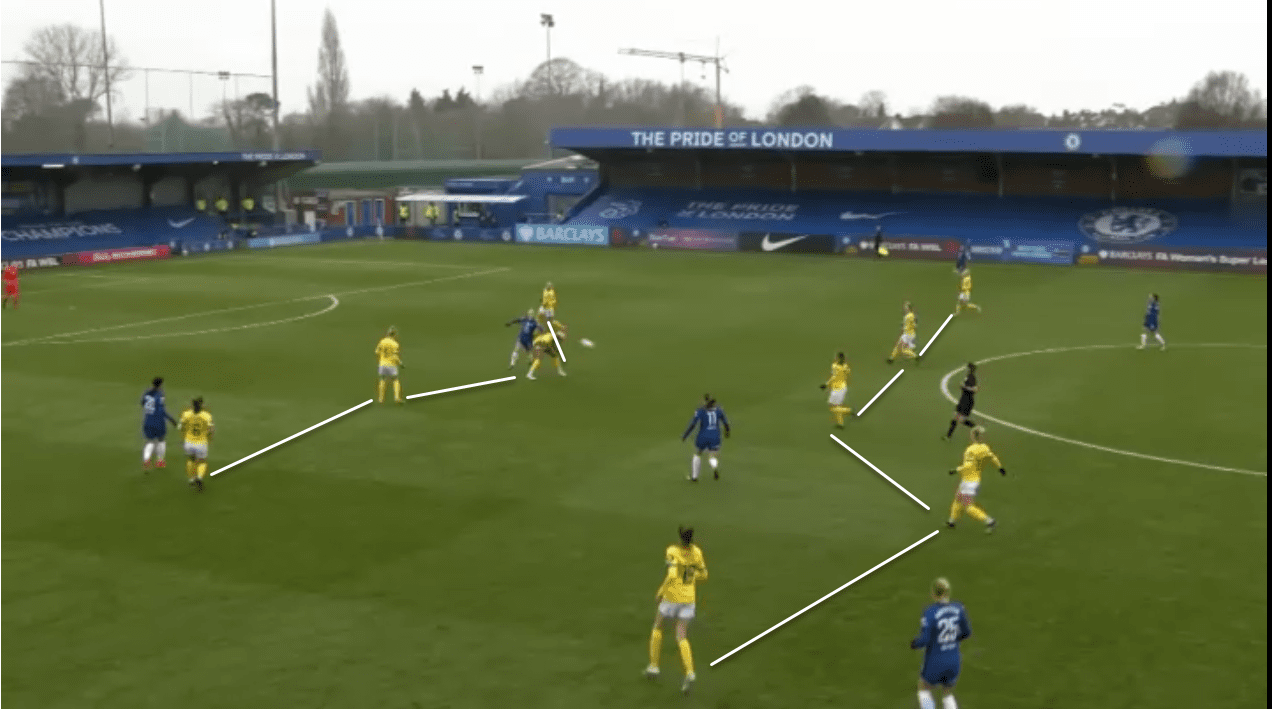
This image shows an excellent example of Brighton making it difficult for Chelsea to play through and stopped them from making easy runs through. Chelsea’s midfield consisted of Jessie Fleming, Guro Reiten, Melanie Leupolz and Cuthbert. All four players tried to condense the pitch to try and overload the central areas but Brighton did well to stop the runs. Chelsea used a 4-3-1-2 system which meant they were focused on trying to go through the middle which Brighton tried to counteract by packing numbers of their own.
The players were covershadowed by Brighton’s and were limited to their backs to goal which forced them to look for other solutions. Fleming, Cuthbert, and Leupolz, in particular, tried to create movements and exchanges to open up a bit of space for Kerr and England but ultimately the ball constantly landed in the wide areas. It was in midfield where they needed to ensure they stopped Chelsea’s supply. To do this, Brighton opted for a zonal marking system off the ball. Their 4-5-1 not only keeps the spaces between the lines small, additionally it allows them to pressurise the ball carrier and force them into passes to win the turn over.
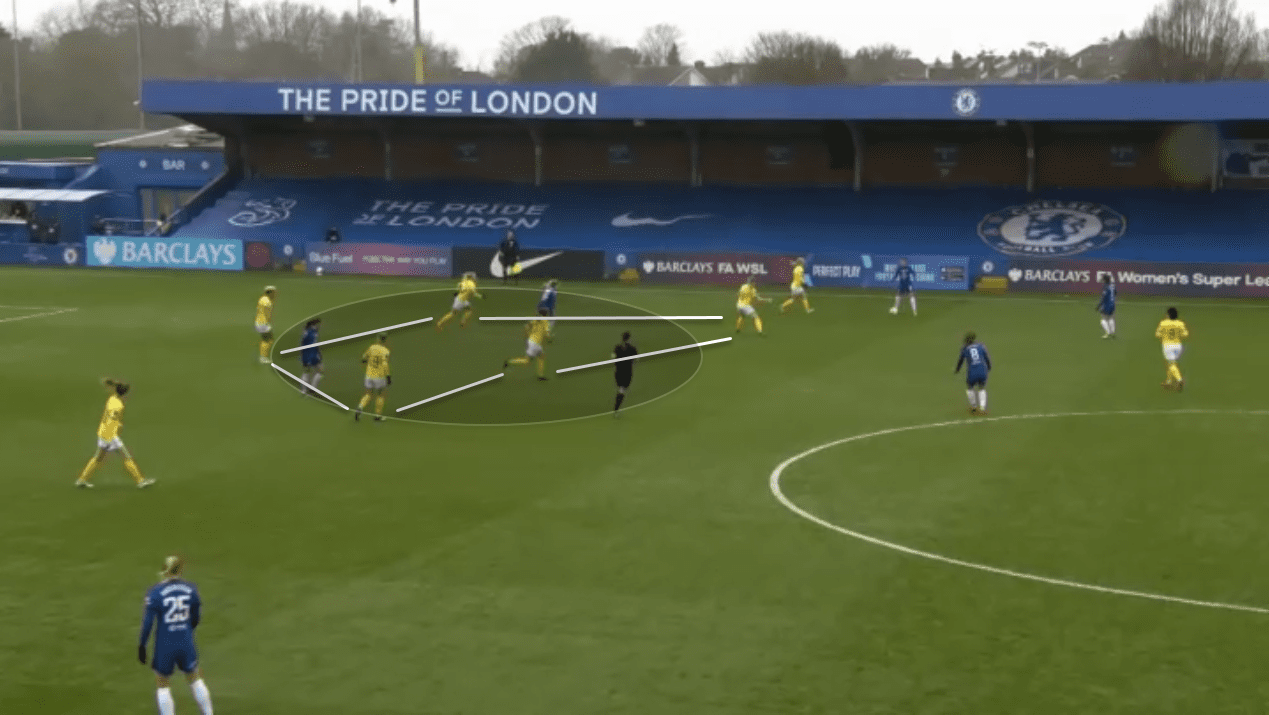
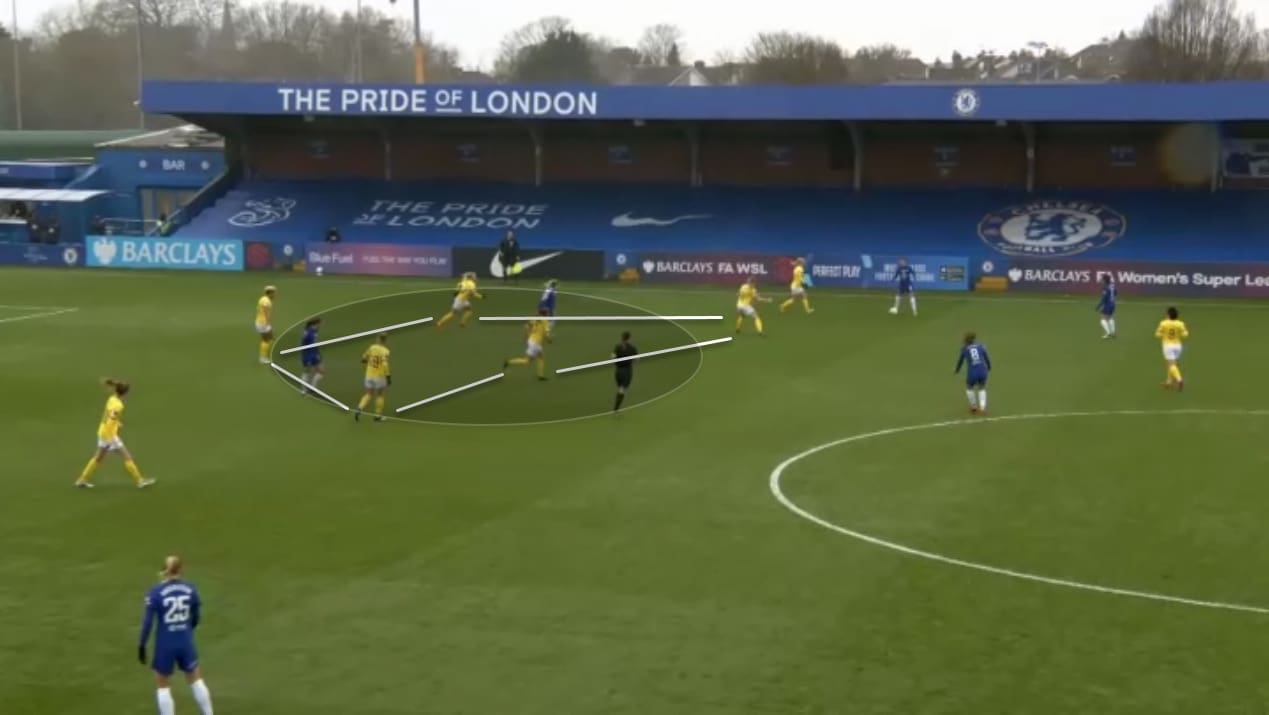
This image shows Brighton creating a clear distinct shape that has boxed and overloaded two of Chelsea’s midfielders and while they are not man-marked are free to pick up possession in this area. Once they do so, Brighton have enough players to drop and press immediately to counterpress and win the ball back.
Given the nature of Brighton’s shape and tactics, Chelsea had to find alternative means of finding ways to attack. The wide area has been a regular source but they’ve traditionally used the half spaces to do so. Kirby, Harder, and the left-winger often interchange in this area and create overloads to find short crossing chances. The overlapping left-back sometimes comes into play to create an extra passing option. However, this game saw Brighton stop Chelsea from using the half spaces by placing extra players there. The 5-4-1 system ensured they covered the central areas.
Naturally, this saw Chelsea have to dig out other solutions and in this case, they found joy down their left flank. Being the only real area of penetration, Andersson quickly became Chelsea’s only source of supply given the problem’s they faced in midfield. The formation they played naturally forced the full-backs to push up but they concentrated their efforts through the Swedish left-back.
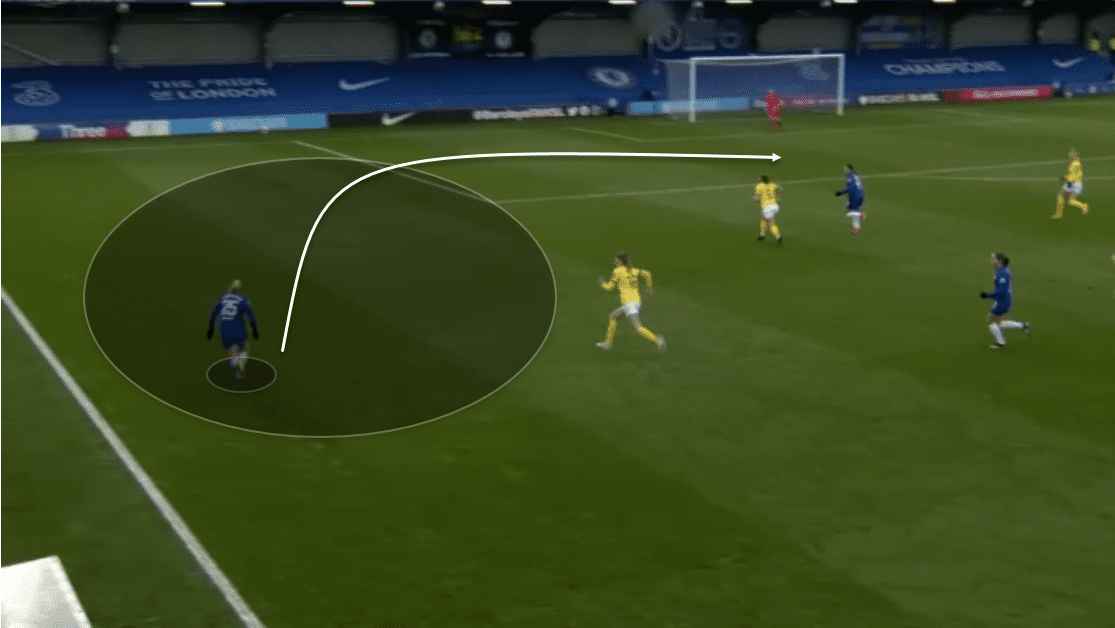
As the image above shows, Chelsea were able to find a lot of space in the wide areas, which Brighton were happy giving away. Letting Chelsea use the wide left area meant they were able to clear any crosses coming in due to the sheer number of players in the area. While Kerr and England are both good in the air, Brighton’s centre-backs were confident in overpowering the duo and winning the aerial battle.
Positional play in midfield
What contributed towards their loss was Chelsea’s inability to control the midfield areas due to a combination of factors. This mainly included a lack of a midfield controller namely Ji, who started the game on the bench. Reiten and Fleming were tasked with this role as Leupolz is the player who usually controls possession in the deeper areas to progress play from deep. In this game, Leupolz was unable to unlock Brighton’s compact defence but not from a lack of ability but rather her skillset is more suited towards tempo controlling and possession recycling.
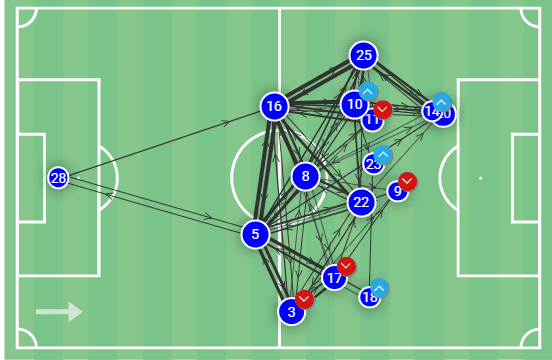
The pass map above shows Chelsea’s main positions throughout the match and it’s notable how narrow the midfield four were. The closest player to Leupolz (#8) was Cuthbert (#22) and though she is a great ball player, the Scottish international isn’t one who can unlock defences with her passing range. Their overall higher positions were fine but Brighton’s solid positional play needed creativity to break down the resolute defence.
In doing so, they inevitably found more space between the lines because of Brighton’s zonal marking system. They afforded Chelsea the space to play in front of them and allowed some of their players to move between their defence and midfield. By doing so, they didn’t break their shape and were triggered when the ball moved into the space. This trigger caused Brighton to use 2-3 players to close in and create a box which either forced Chelsea to pass it back towards the central defenders or misplace a pass forward.
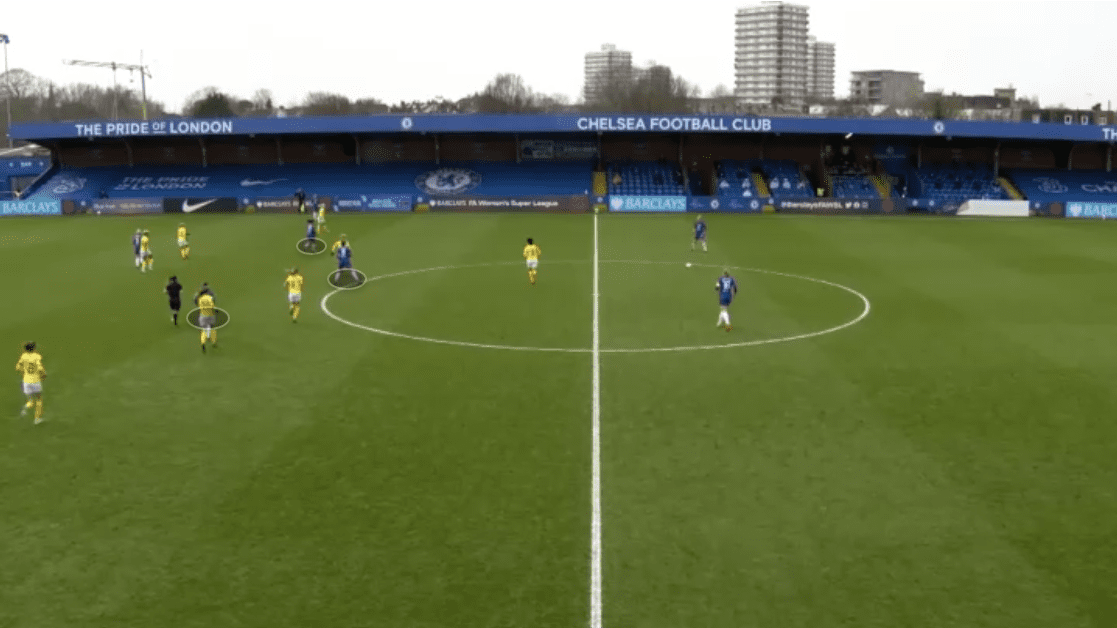
Playing a very narrow formation, Chelsea should have been able to match up against Brighton’s midfield four but as the image above shows, they played a very high line and though the three midfielders are in central areas, neither of them was able to play penetrative passes into the forward line. Most of their penetration came through the wide areas, specifically from Andersson which we discussed in the earlier section of this analysis.
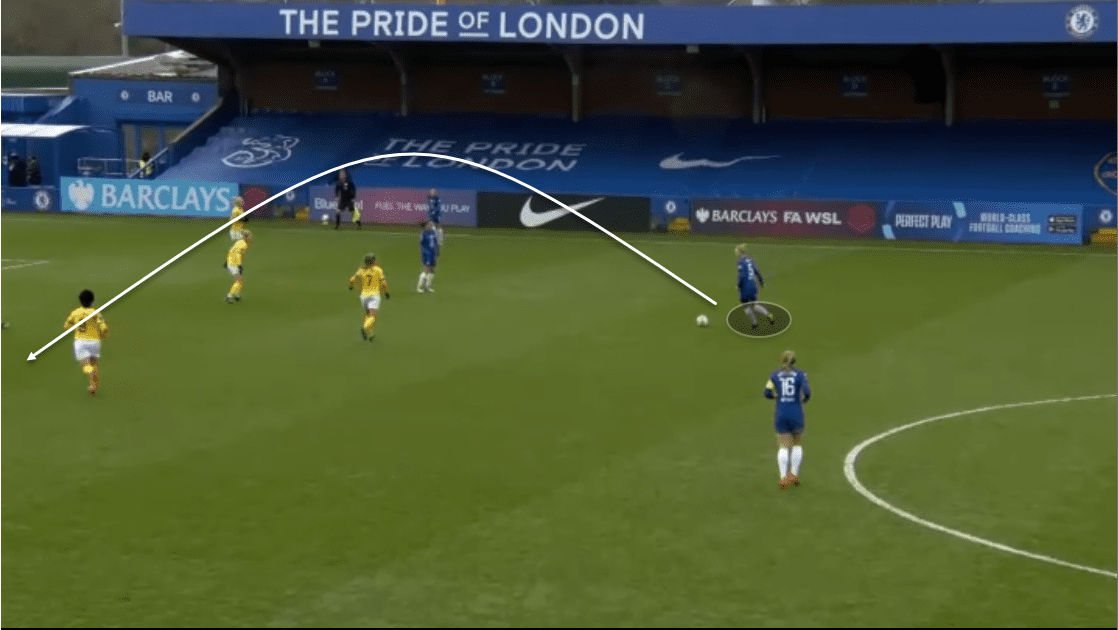
What this tactic also did was force Chelsea to play long balls into the wide areas and force crosses to the centre. In this case, it allowed Brighton time to reorganise their defensive line and clear anything that came in between. As the image below illustrates, you can see Ingle looking for a passing option and though she has two to her right, both players can easily be closed down by the four Brighton players in close vicinity.
Invariably the change in midfield setup also meant there were not enough players willing to make runs into the box except Kerr and England. Harder playing in the ‘10’ position often makes forward off the ball runs and creates space for other players to run into. In this case, the midfielders were all ball players and wanted to get on the ball than off it.
Ji is often the one who dictates play by playing quick, progressive passes and finding the wide players. However, this time, the lack of urgency and movement from the midfield four allowed Brighton to become very comfortable out of possession. You could see a difference in Chelsea’s play when Ji, Harder, and Kirby came on which coincided with a few chances being created almost instantly.
Final remarks
This analysis has highlighted a few key factors that contributed towards Chelsea’s downfall and though missing personnel can be blamed towards their loss. A mixture of Brighton’s resilience in defending but also a change in system that forced Chelsea’s players to operate in a way that they aren’t very used to. This was written before the game against Arsenal in midweek so there may be some differences given the lessons learnt from this game. Many onlookers would level this as an anomaly with Chelsea getting back to winning ways again but they must be careful to not fall into this trap again. Better counter-attacking sides especially in the UEFA Women’s Champions League will be able to exploit the gaps in behind with better accuracy.



Comments