In the final group stage games of the 2022 FIFA World Cup, Brazil suffered their first defeat of the tournament by losing 1-0 to Cameroon, while Switzerland secured their place in the last 16 by beating Serbia 3-2 in a highly eventful fixture. This piece will provide a tactical analysis of the Switzerland vs Serbia game.
Switzerland struck first blood via Xherdan Shaqiri in the 20th minute, but Serbia hit back not long after, first levelling the tie in the 26th minute via Aleksandar Mitrović and then going into the lead nine minutes later as Mitrović’s strike partner Dušan Vlahović tucked one away himself.
However, Serbia weren’t able to take that lead into half-time, as Switzerland struck once more before the midway break, with in-form Breel Embolo scoring his second goal of the tournament — for a comprehensive breakdown of the Swiss striker’s game, read our tactical analysis and scout report of Embolo at Monaco in Ligue 1 in 2022/23, published just before the World Cup, here at Total Football Analysis.
There was to be one more goal in the contest and it went Switzerland’s way, as Remo Freuler scored just after the restart to put his team 3-2 up — a lead they’d go on to retain until the final whistle blew, securing their place in the round of 16 where they’re set to face off with Portugal.
To tell the tactical tale of this tie, we’ve split this piece up into three acts: 1. Early jostling sees Serbia settle into the lead, 2. Switzerland break through Serbia’s attempted fortification, 3. Switzerland held firm where Serbia faltered.
We hope that this piece provides a clear breakdown of the key tactics employed by both sides in this exciting contest while following how the changing game state influenced both teams’ respective tactical approaches.
Lineups
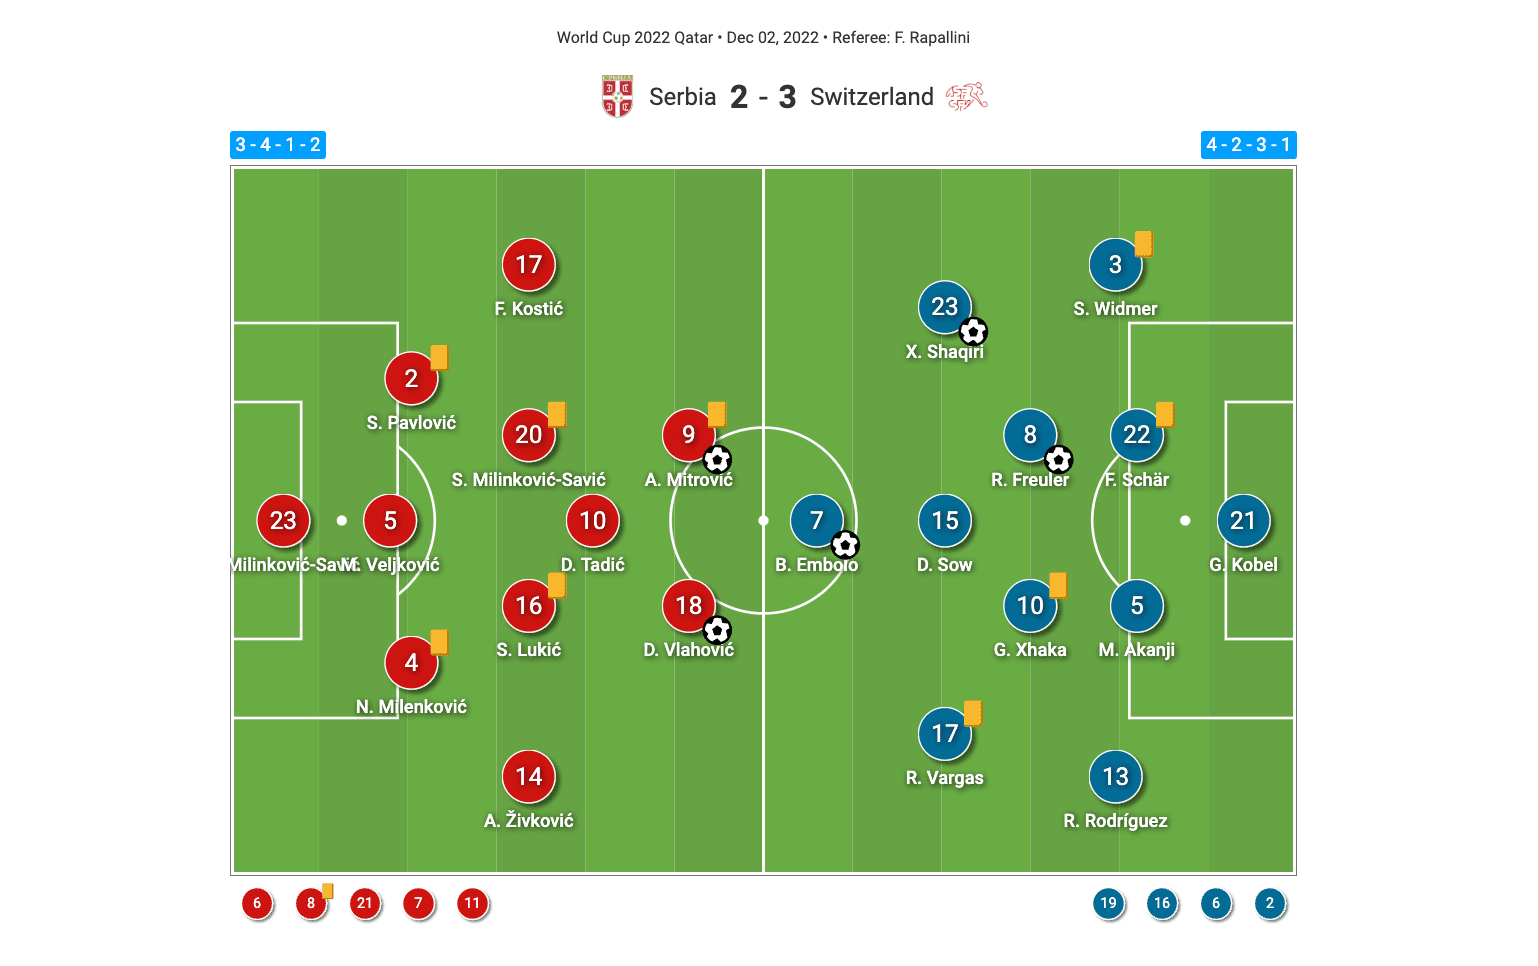
Firstly, let’s look at the lineups that both teams went for in this one. Starting with Serbia, Dragan Stojković lined his side up in a 3-4-1-2 shape with Vanja Milinković-Savić in goal behind right wing-back Andrija Živković, right centre-back Nikola Milenković, centre-back Miloš Veljković, left centre-back Strahinja Pavlović and left wing-back Filip Kostić. Serbia went with Saša Lukić and Sergej Milinković-Savić in midfield behind Ajax number ‘10’ Dušan Tadić, who played just off of Vlahović and Mitrović.
Stojković made five changes during the contest to freshen up his starting XI. Firstly, we saw a double substitution in the 55th minute when Nemanja Gudelj replaced Veljković and Luka Jović took over from Vlahović. We saw Nemanja Maksimović replace Sergej Milinković-Savić 67 minutes into the tie, and Serbia finished off their substitutions in the 78th minute with another double swap as Nemanja Radonjić came on for Živković and Filip Đuričić took over from Tadić.
As for the eventual winners, Murat Yakin lined his side up in a 4-2-3-1 shape. The Swiss went with Gregor Kobel in goal behind right-back Silvan Widmer, right centre-back Fabian Schär, left centre-back Manuel Akanji and left-back Ricardo Rodríguez. Freuler played alongside former Arsenal captain and current Swiss captain Granit Xhaka at the base of midfield behind right-winger Shaqiri, number ‘10’ Djibril Sow and left-winger Ruben Vargas. Embolo completed Switzerland’s starting XI up front.
Yakin made just one less change than his counterpart over the course of the contest and he waited until later in the contest to tinker with anything. Switzerland’s first two substitutions came in the 68th minute, with Edimilson Fernandes replacing Sow and Denis Zakaria taking over from Shaqiri, adding some extra defensive solidity to the Swiss midfield. In the 83rd minute, Christian Fassnacht replaced Vargas and then, Switzerland’s final substitution in stoppage time saw Red Bull Salzburg’s Noah Okafor replace Embolo to see out the game.
Early jostling sees Serbia settle into the lead
We’ll kick off this tactical analysis, then, by looking at how the early stages of the game saw Serbia claim a 2-1 lead. The first thing to note with regard to Serbia’s two first-half goals is their offensive shape and the roles within their system that contributed to their breaking down of the Swiss defence.

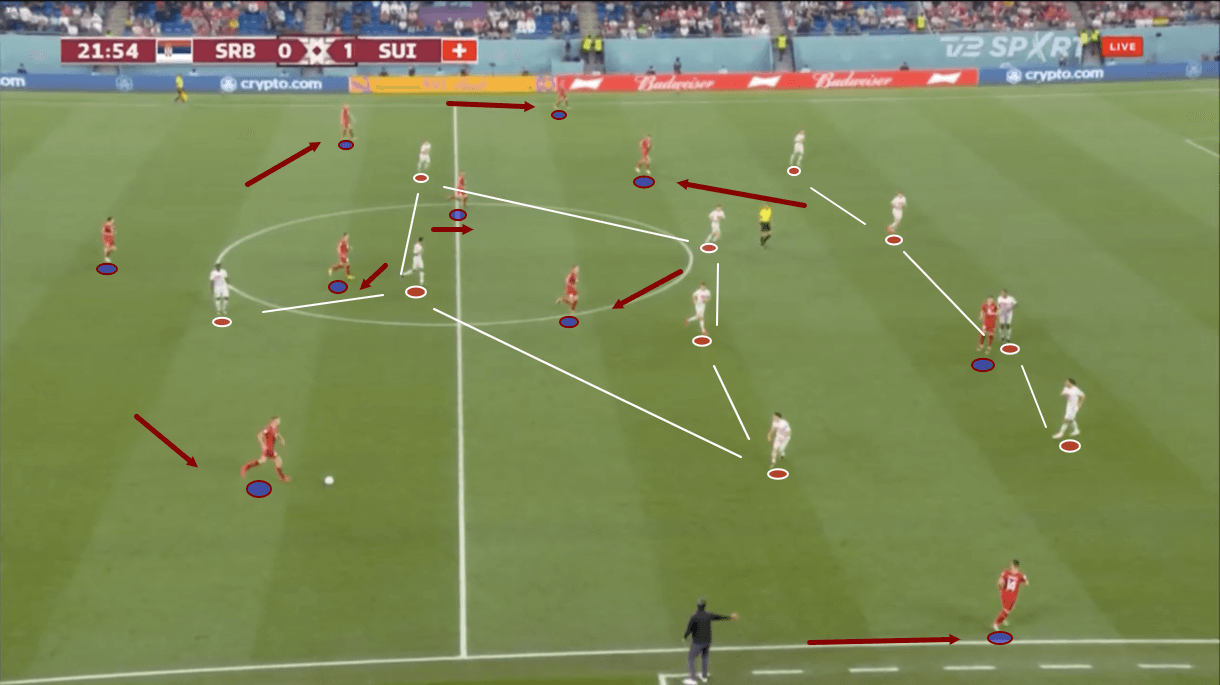
Again, Serbia lined up in a 3-4-1-2 while Switzerland went with a 4-2-3-1. We can see both of those shapes in figure 2 but, of course, as the team in possession, Serbia’s shape is slightly more scattered around, with the centre-backs having shifted out wide, the wing-backs moving very high and the midfield trio (the two holding midfielders and the ‘10’) staggering to sit on different vertical and horizontal lines to each other to aide ball progression through midfield via the creation of better passing angles and being more difficult to mark.
This 3-1 build-up structure was common throughout the game for Serbia, with their centre-backs constantly shifting into wider positions and one midfielder dropping off deeper than the other. Additionally, high and wide wing-backs were a constant feature of Serbia’s game too, with those players tasked with staying on the touchline. They were used quite a bit for long switches of play from the opposite-wing centre-back, as the Swiss defence focused on preventing progression through midfield more than the wide areas.
We also notice how one of the two centre-forwards — the one at left-forward — has dropped off a bit from the Swiss backline here. This was another constant in Serbia’s game versus Switzerland. The left forward specifically would drop off to try and occupy space between the lines and either receive here, allowing himself to turn and create facing the backline or drag Switzerland’s right centre-back out with him, then creating space for his strike partner or ‘10’ Tadić to exploit. Mitrović occupied the left-forward position more often than Vlahović but the two strikers rotated responsibilities.
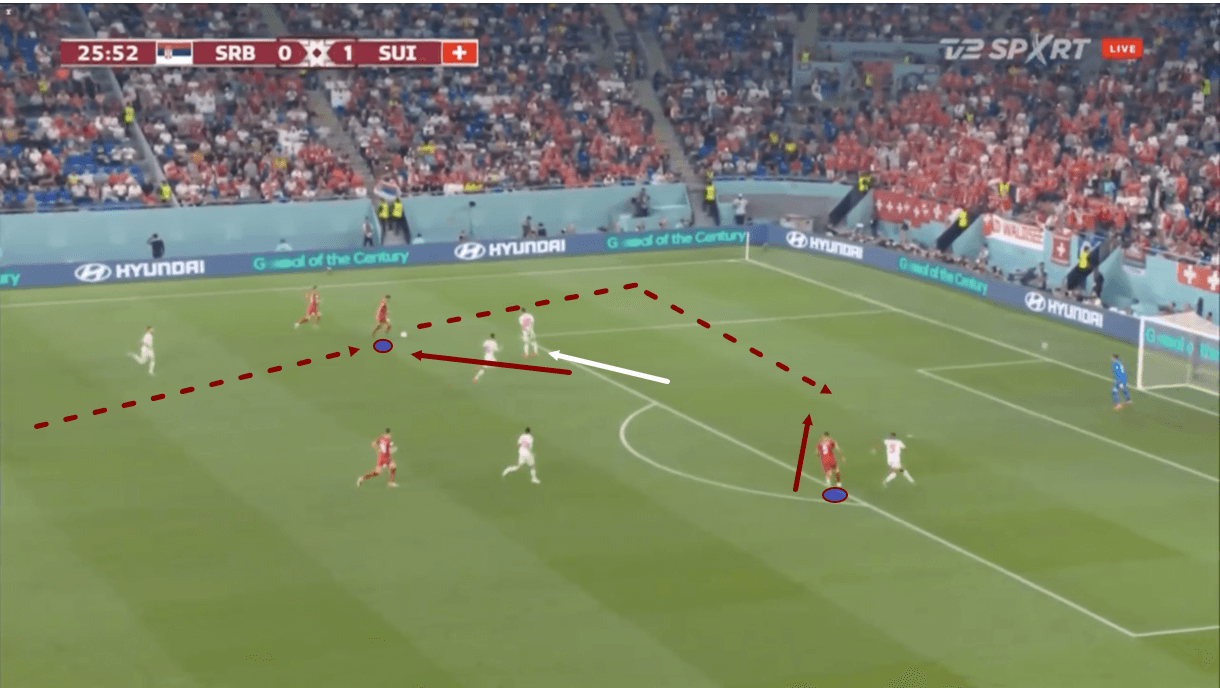
Figure 3 shows an example of the latter. As the left-forward (Vlahović on this occasion) dropped to receive as his side countered, he pulled Switzerland’s right centre-back away from his position. This created lots of space for Mitrović to attack, which he did, scoring Serbia’s first goal of the game.
The two forwards and the ‘10’ linked up well for Serbia throughout the game and provided a constant problem for Switzerland’s centre-backs. They’re not an easy attacking combination to deal with, which they demonstrated as they ripped Switzerland’s defence apart here to score a goal. The split strikers combined again for Serbia’s second goal, proving how much of a handful they were for Switzerland’s defence to deal with.
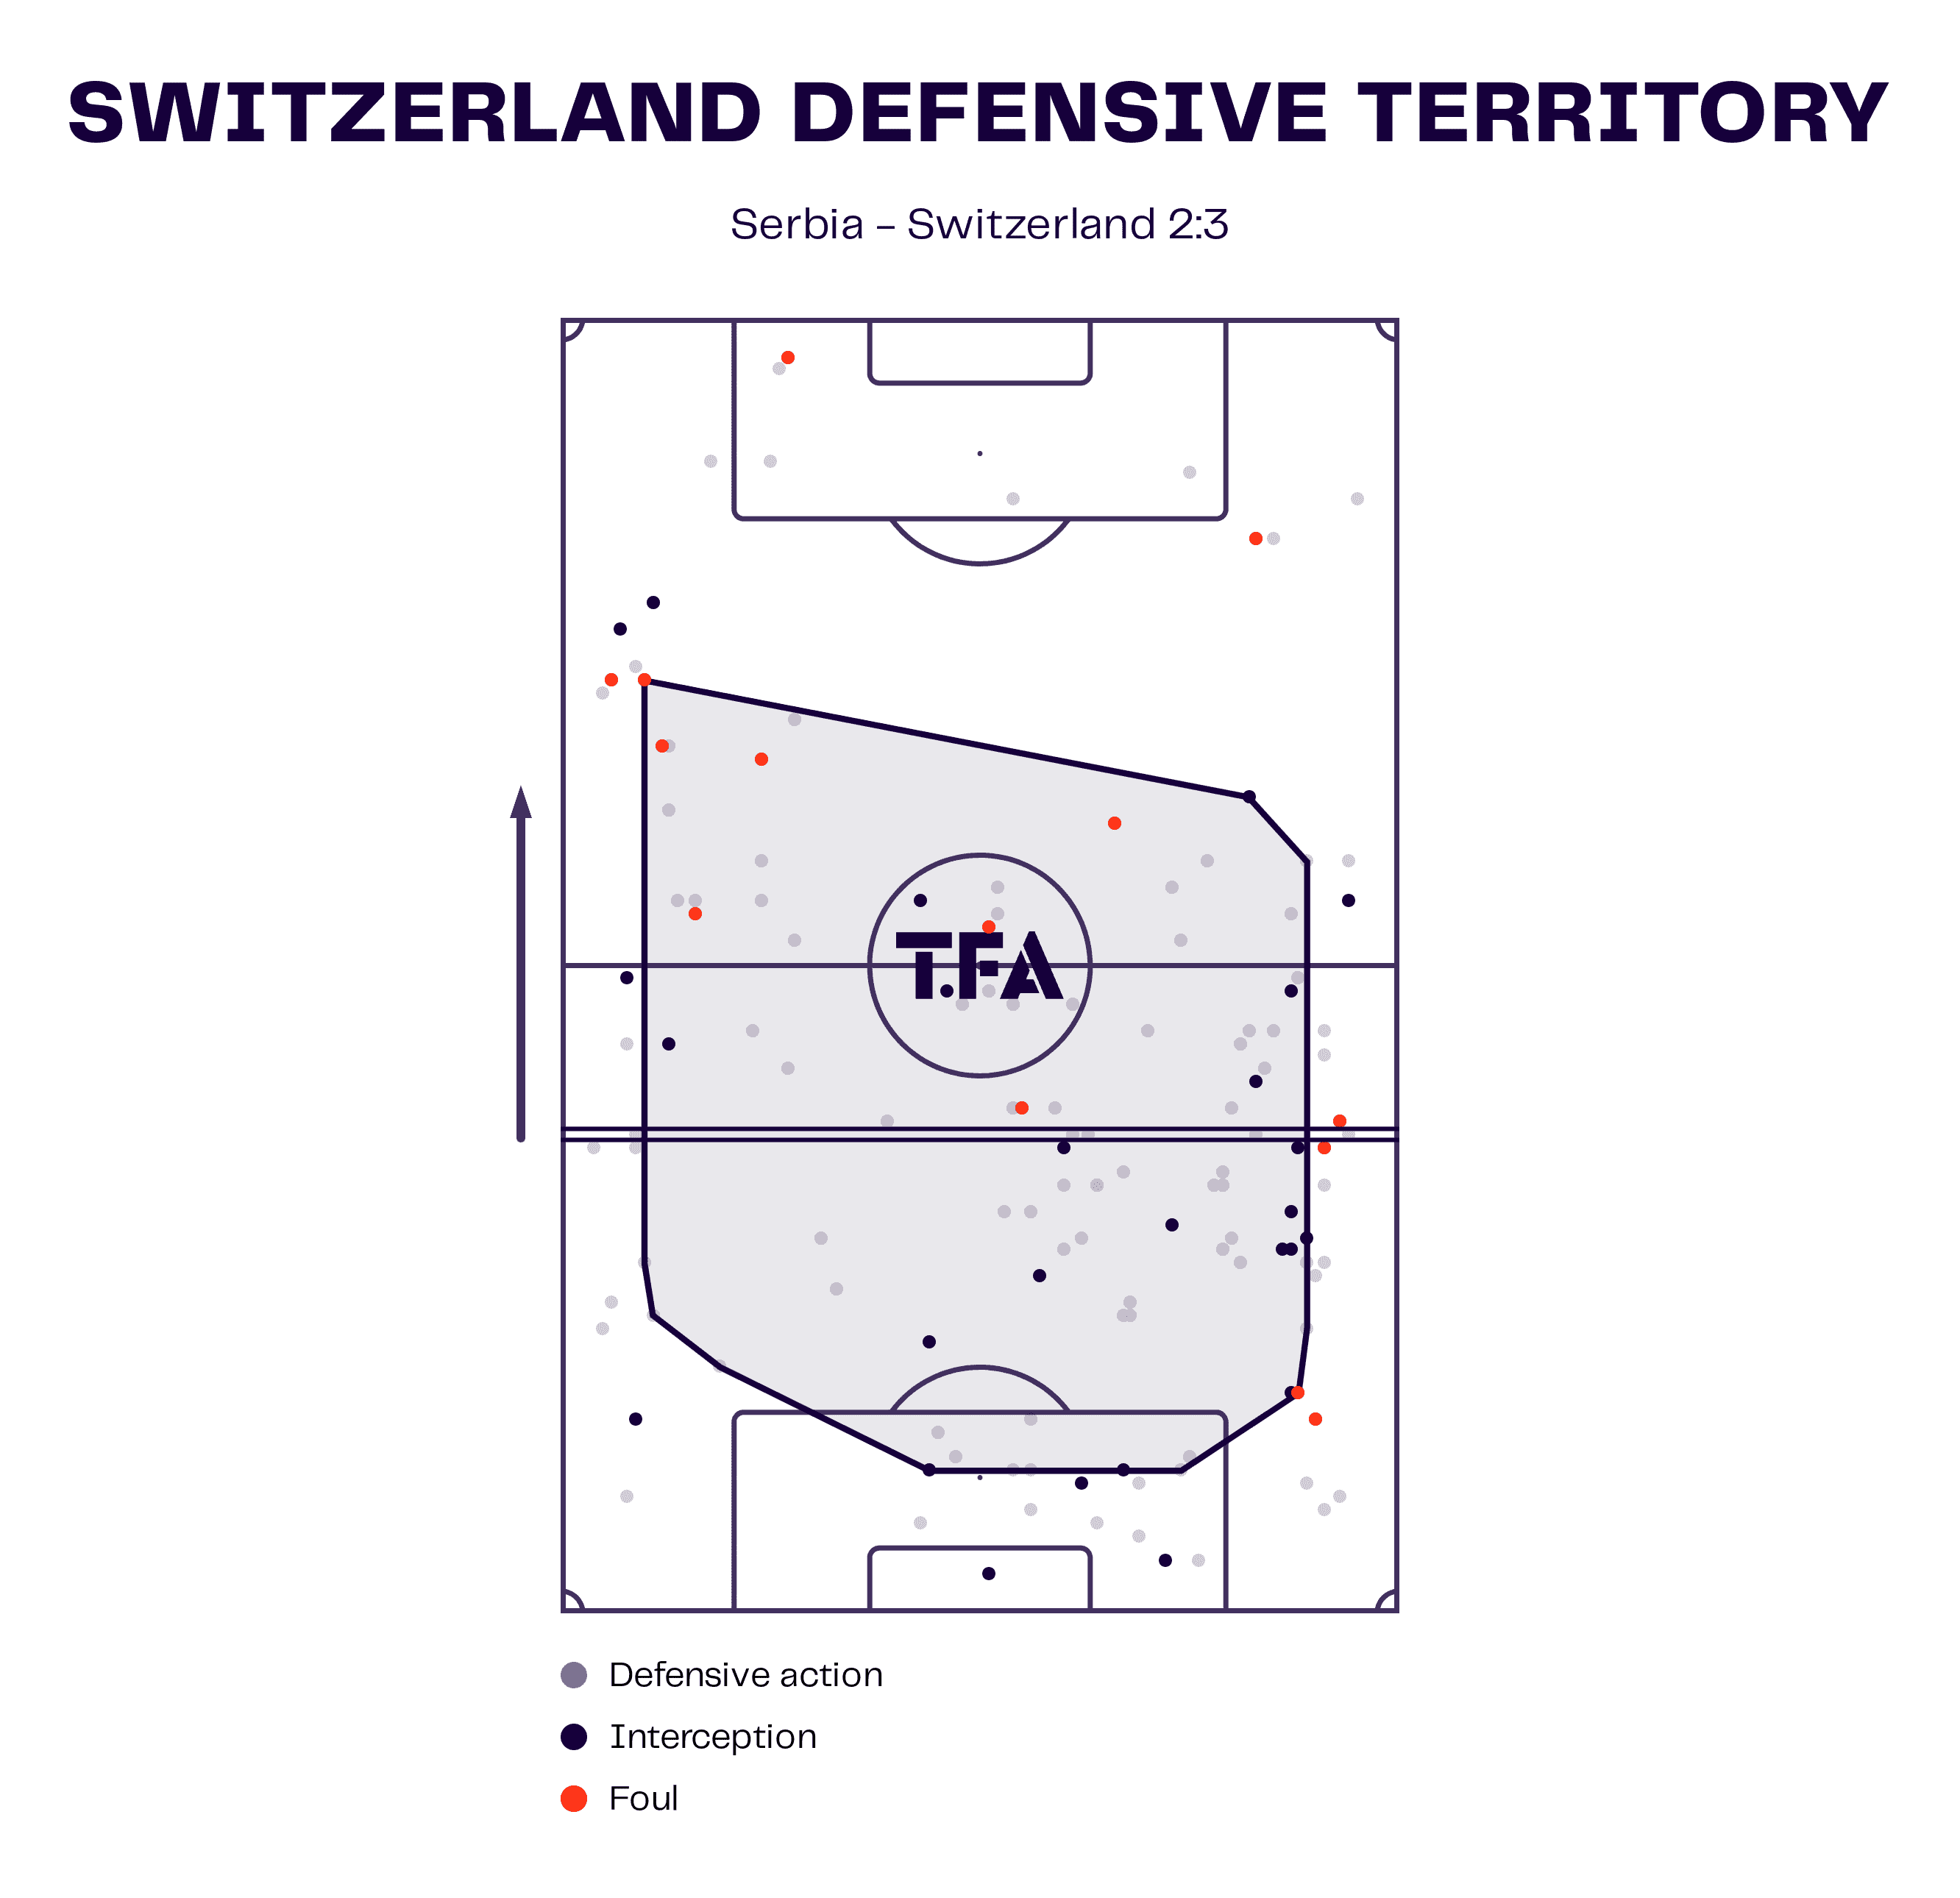
Switzerland’s defensive territory from this game shows how much of the battling between these two sides went on in that half-space that Serbia’s left-forward dropped into throughout the game. Sometimes Serbia came out on top and created chances as a result of their progression through this area, and sometimes Switzerland successfully stopped the attacks.
Overall, we’d say Switzerland ultimately did a good enough job at defending against these attacks, and Serbia’s movement to drag the Swiss midfield around to create clearer openings for the dropping attacker could’ve been better. Take nothing away from the Swiss defence that made plenty of interceptions in this area to prevent the desired progression, however.
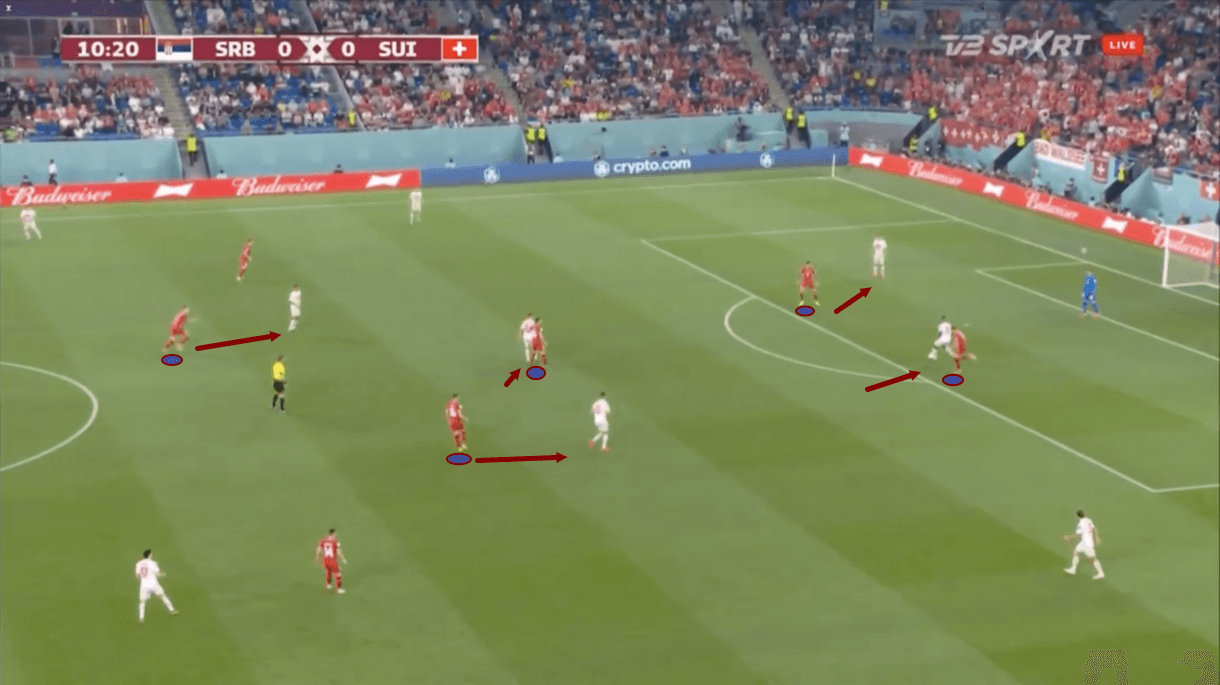
The other part of Serbia’s tactics that contributed to their first two goals of the game was their high press. Serbia pressed aggressively for the most part in Friday’s game, ending the contest with a PPDA of 6.7, overall. Their press focused on winning the ball high, giving Switzerland no time on the ball, even when playing out from the back, as we see in figure 5.
The strikers were responsible for Switzerland’s centre-backs and pressed from out to in, keeping the full-backs in their cover shadows. Meanwhile, Serbia’s midfield marked in a man-oriented fashion, especially Tadić who marked one of Switzerland’s holding midfielders tightly all the time. Then, the Serbian holding midfielders would step up to control the other Swiss midfield passing options, with one naturally pressing higher, alongside Tadić, as Switzerland typically built up with a 2-2 base shape.
This press helped Serbia to create good counterattacking opportunities which helped them to score their two goals. They are a side that prefers to play in transition rather than create via positional attacks; their aggressive pressing and subsequent counterattacks suited this preference well.
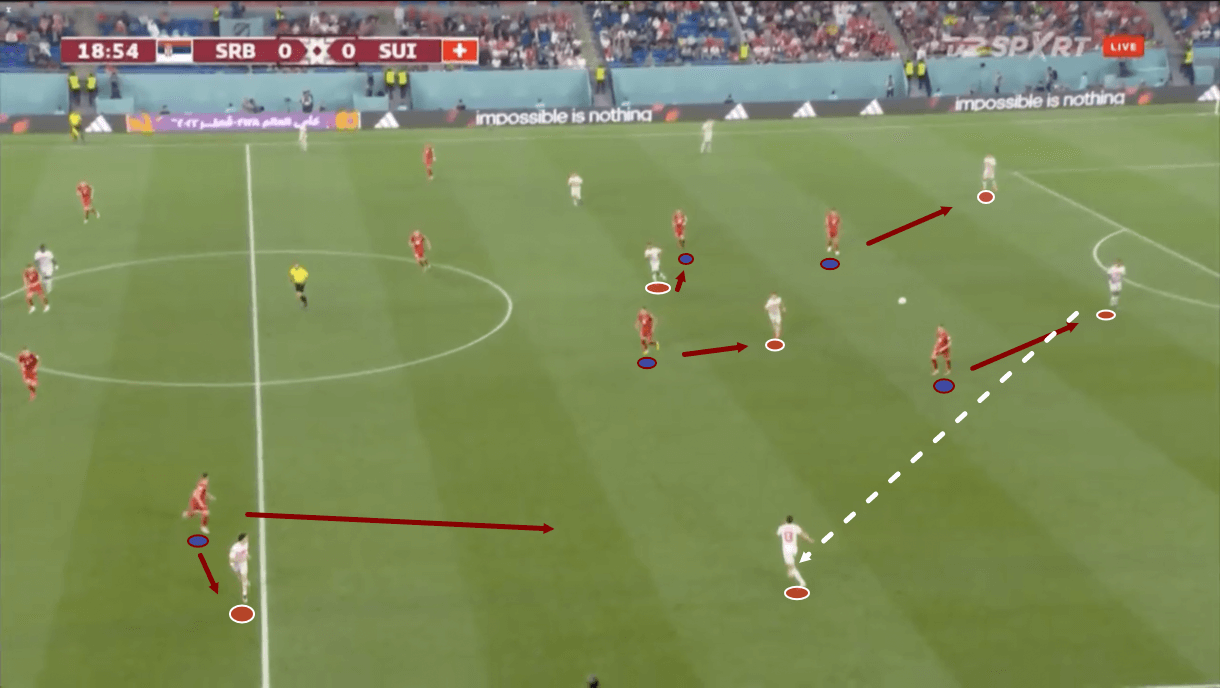
However, where Switzerland thrived in the early portion of this match was with their off-the-ball to drag the Serbian players about, manipulate their positioning and create space for someone to receive and attack the Serbian goal.
The full-backs frequently benefitted from this, as figures 6-7 demonstrate. Firstly, remember how Serbia’s midfield and forwards defend here — man-oriented in the centre, with at least one of the holding midfielders pushing up to get tight to Switzerland’s other holding midfielder — whomever Tadić wasn’t marking. Tadić often dropped onto Switzerland’s right-holding midfielder, meaning Serbia’s right central midfielder (Lukić) would advance to cover Switzerland’s left-holding midfielder.
With the Serbian strikers occupied by the Swiss centre-backs, this created plenty of space for Switzerland’s left-back to receive, with Serbia’s right wing-back occupied by both him and Switzerland’s left-winger.
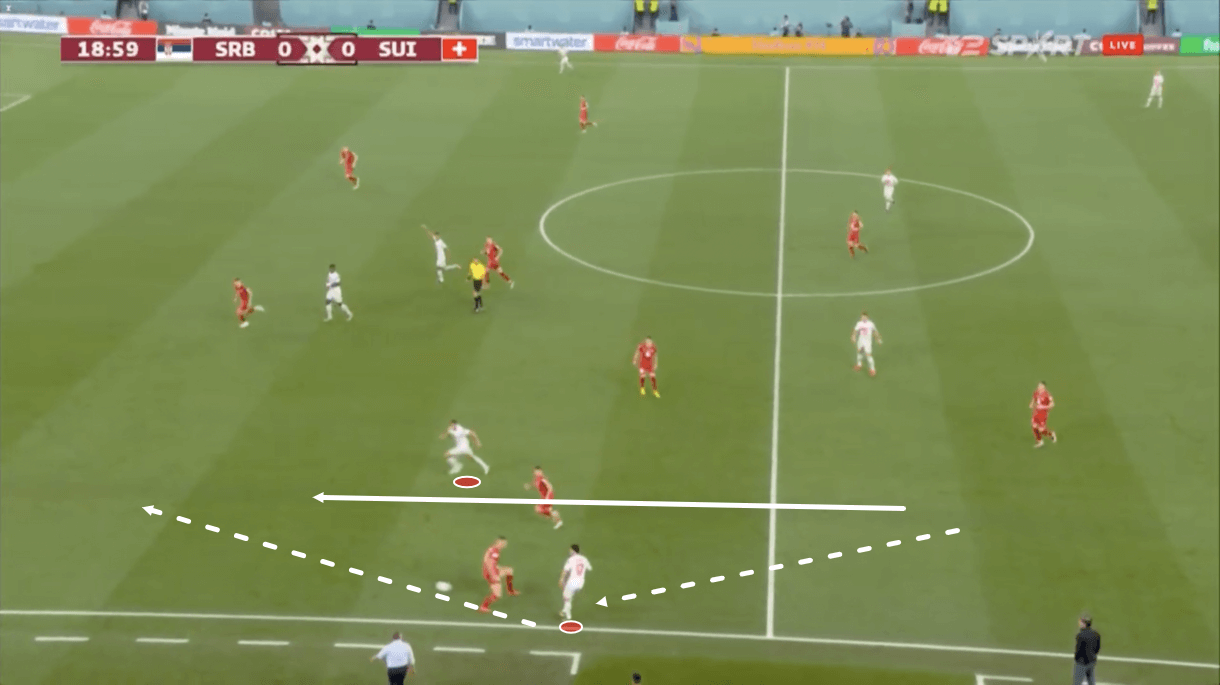
A quick one-two between the full-back and winger, on this occasion, saw the Swiss left-back played into space in the final third, behind Serbia’s left wing-back and left centre-back who was dragged out of position hastily to try and support the overloaded wing-back.
Switzerland created plenty of wide overloads in this fashion throughout Friday’s game and repeatedly used the free full-back as an outlet when the Serbian midfield was all tied up to generate the 2v1 on the wing. Switzerland’s first goal came as a result of these tactics.
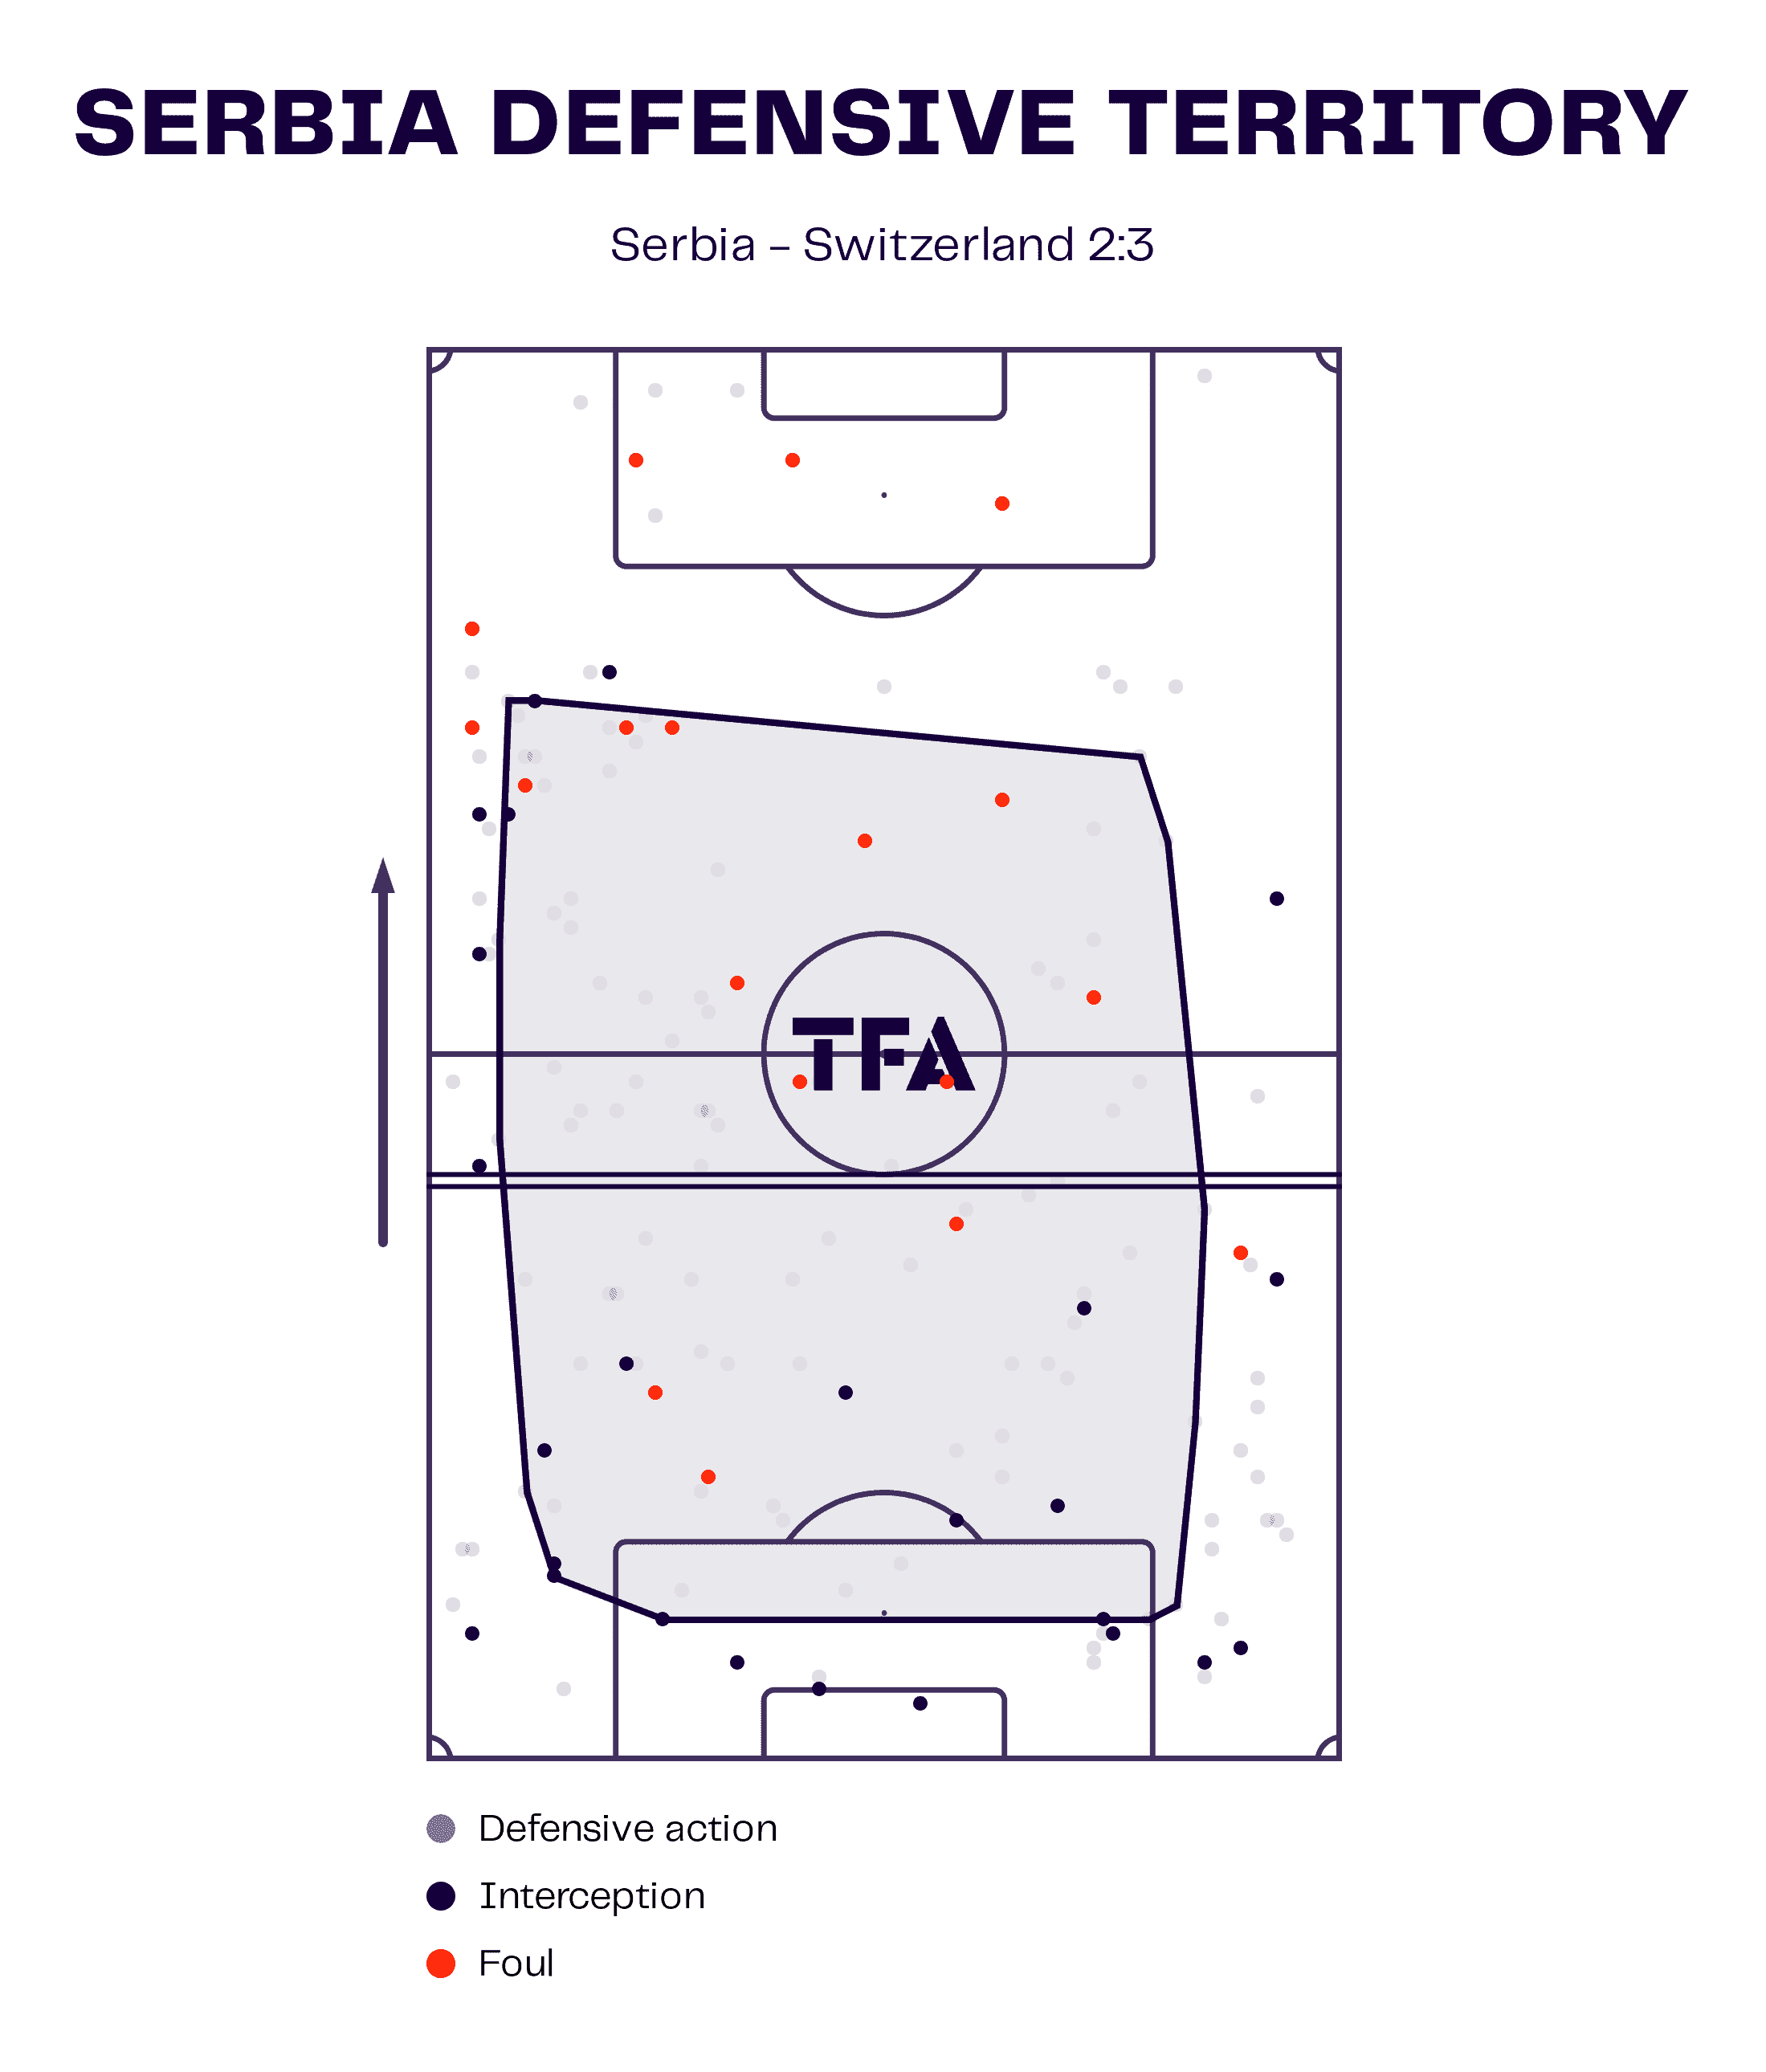
We see how many of Serbia’s defensive actions came out on the wings as a result of Switzerland’s tendency to play through these areas via their defensive territory above.
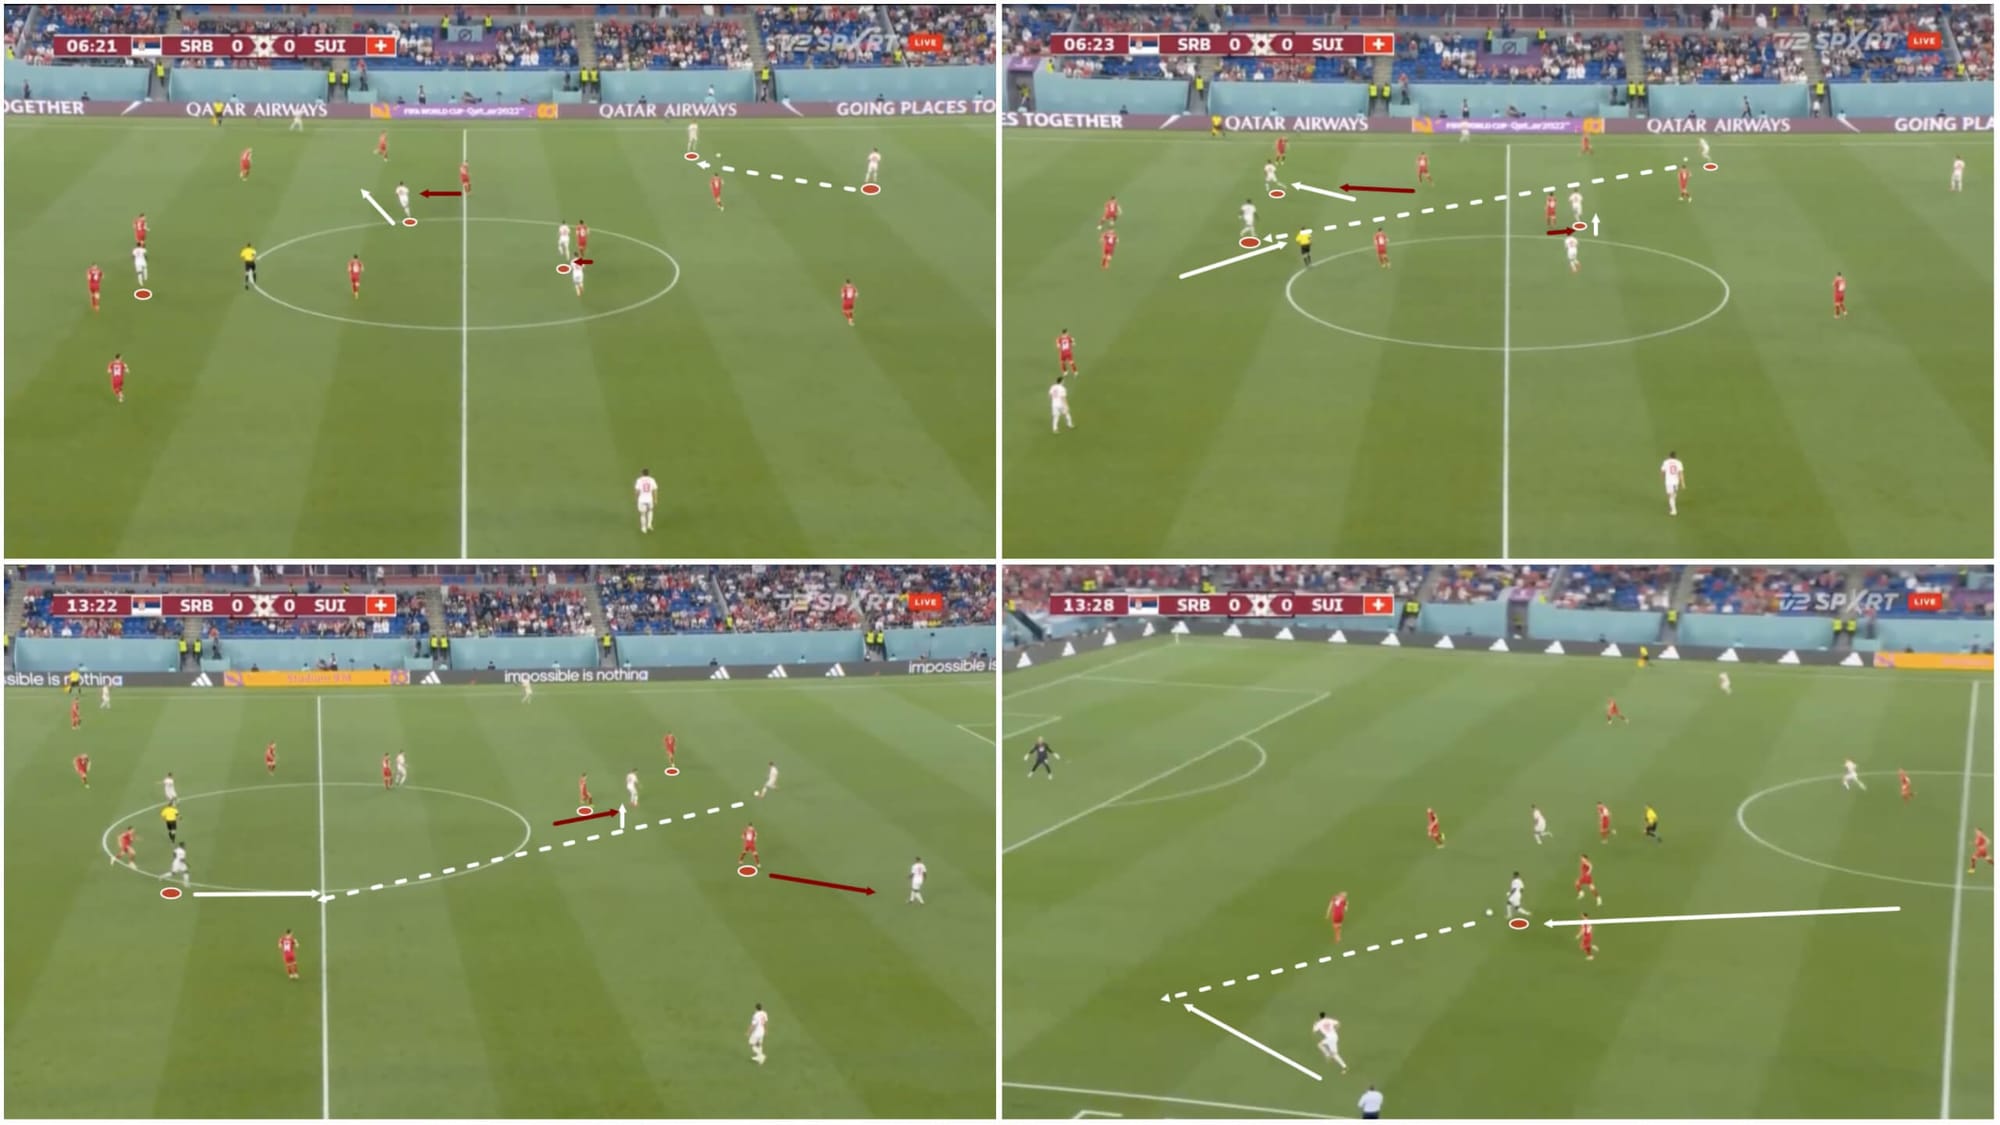
The other common beneficiary of the Swiss off-the-ball movement to manipulate Serbia’s defensive shape throughout this game was Embolo. The forward loves to drop deeper and receive to feet where he can either then link up with a teammate in between the lines or turn and run at the defence himself (we see an example of the latter in the bottom two quadrants of figure 9.
In the top two quadrants, we see how Switzerland’s right central midfielder pinned Serbia’s ‘10’ to him, while the movement of Switzerland’s ‘10’ into the half-space dragged Serbia’s left central midfielder away. This created a clear path from the ball carrier through to Embolo who could then comfortably receive in the middle third.
In the bottom two quadrants, we see how Serbia’s ‘10’ was again pinned to the Swiss holding midfielder and the Serbian right-forward was pinned to Switzerland’s left centre-back. Embolo dropped into the passing lane resulting from this, enabling himself to receive in the middle third, turn and carry the ball into the final third, where he laid it off out wide to the winger with plenty of space for that player to attack behind the backline.
Switzerland’s forward demonstrated excellent off-the-ball movement throughout the contest — these are just two examples from many in the game that show the importance of the forward’s intelligent off-the-ball movement and his teammates’ intelligent positioning to manipulate the opposition players’ positioning and creating space through which they were able to progress. Switzerland demonstrated a greater understanding and implementation of these concepts in Friday’s game, allowing them to generate far greater chances through the valuable central areas than Serbia could as a result.
Switzerland break through Serbia’s attempted fortification
After taking the lead in the 35th minute, Serbia made a significant change to their mindset and defensive tactics. Instead of continuing to press aggressively, they dropped off a bit and tried to contain the Swiss attacks a bit more, focusing now on preventing Switzerland from progressing deep into their half into the valuable areas of chance creation rather than winning the ball high, forcing turnovers and creating good counterattacking opportunities from valuable positions.
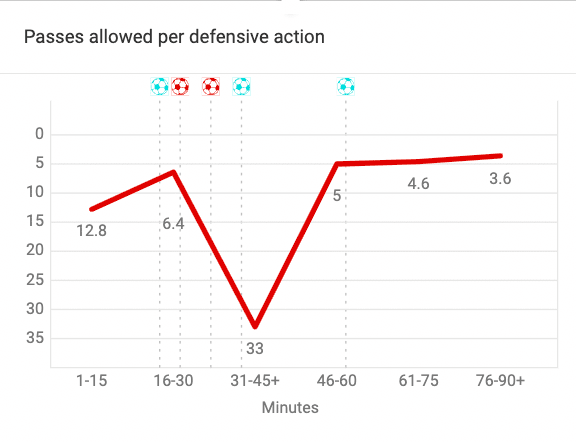
This change is clearly shown in figure 10 which provides a timeline of Serbia’s PPDA throughout this game. There was a notable drop during the period when Serbia held the lead.
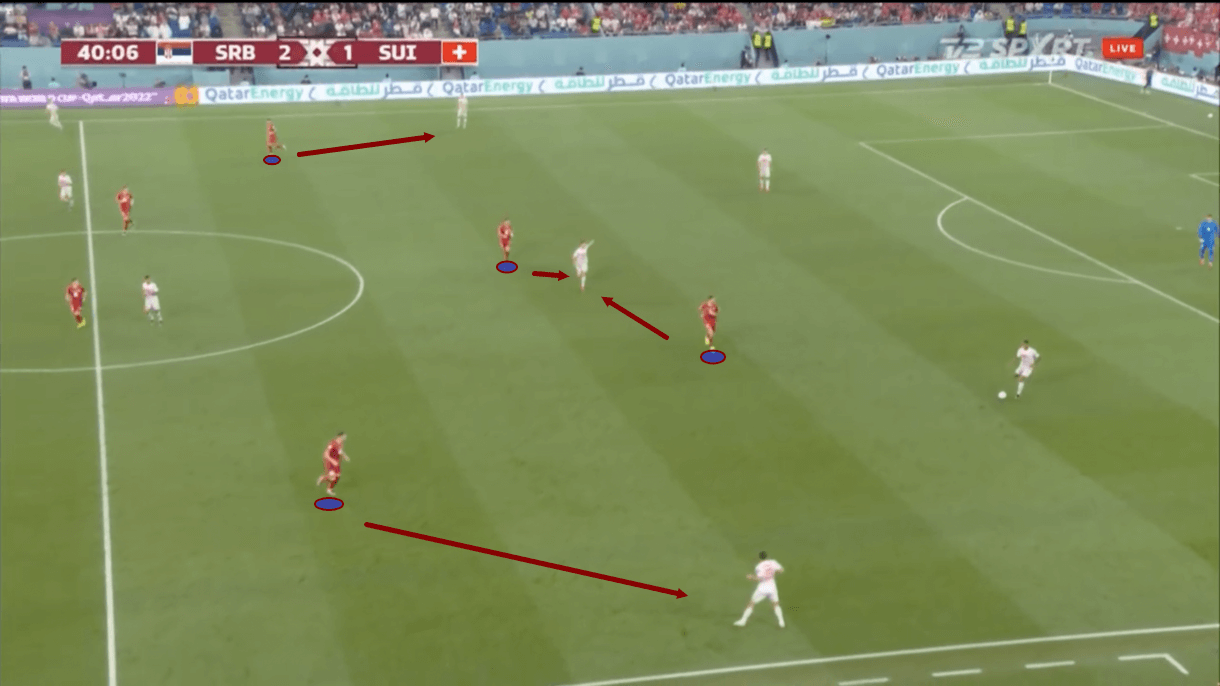
Now, Serbia’s forwards were not occupied by Switzerland’s centre-backs, but instead focused on controlling Switzerland’s holding midfielder — they were happy for the centre-backs to have the ball for as long as they wanted now, instead trying to just limit the quality of their passing options.
This freed up the Serbian ‘10’ to drop deeper and, crucially, add an extra body to midfield, thus killing Switzerland’s chance creation via the full-backs as now Serbia had easier access to those players and the wing-back was not overloaded.
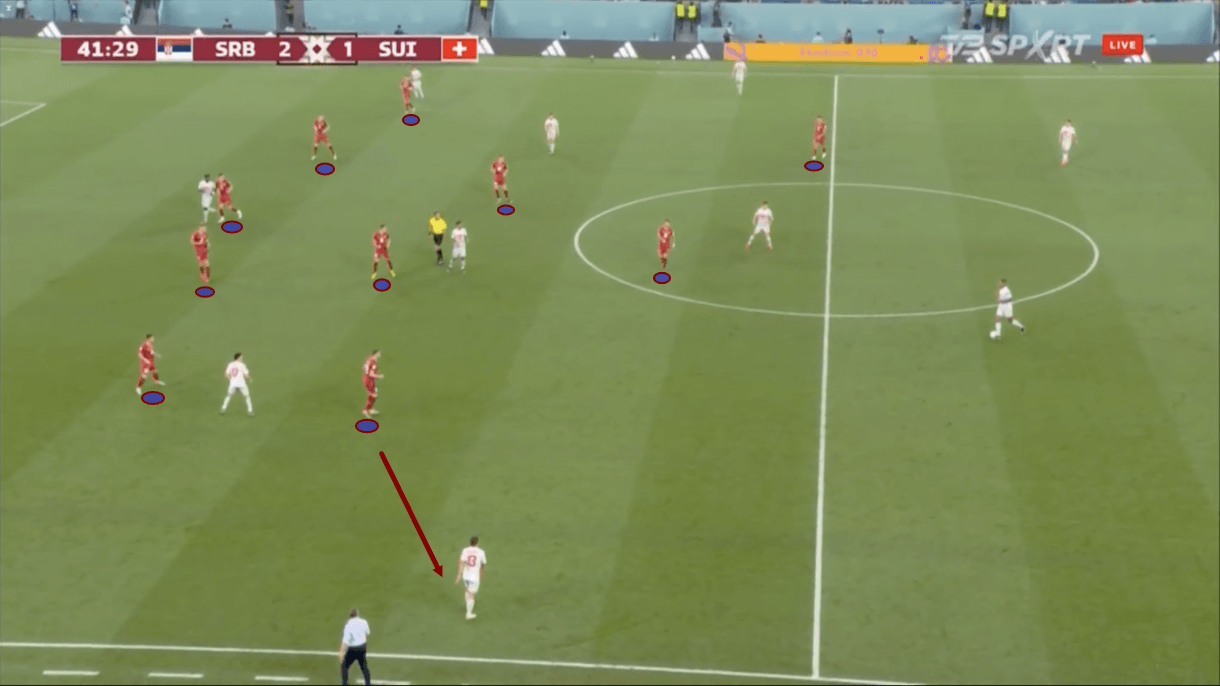
This was true when Serbia were defending high, as was the case in figure 11, and when they were defending deeper, as we see in figure 12. The extra body in midfield allowed the Serbians easier access to the Swiss full-backs, making the progression through them, which had been a key part of Switzerland’s ball progression tactics, far more difficult to achieve.
At the same time, the more passive Serbian press resulted in a more compact shape between the lines that was more difficult to pull about. This also, then, made it more difficult for Switzerland to break lines by passing through the centre to Embolo.
This change presented a new challenge for Switzerland to overcome, but as we know, they managed to overcome it within just a few minutes — before the first half ended.
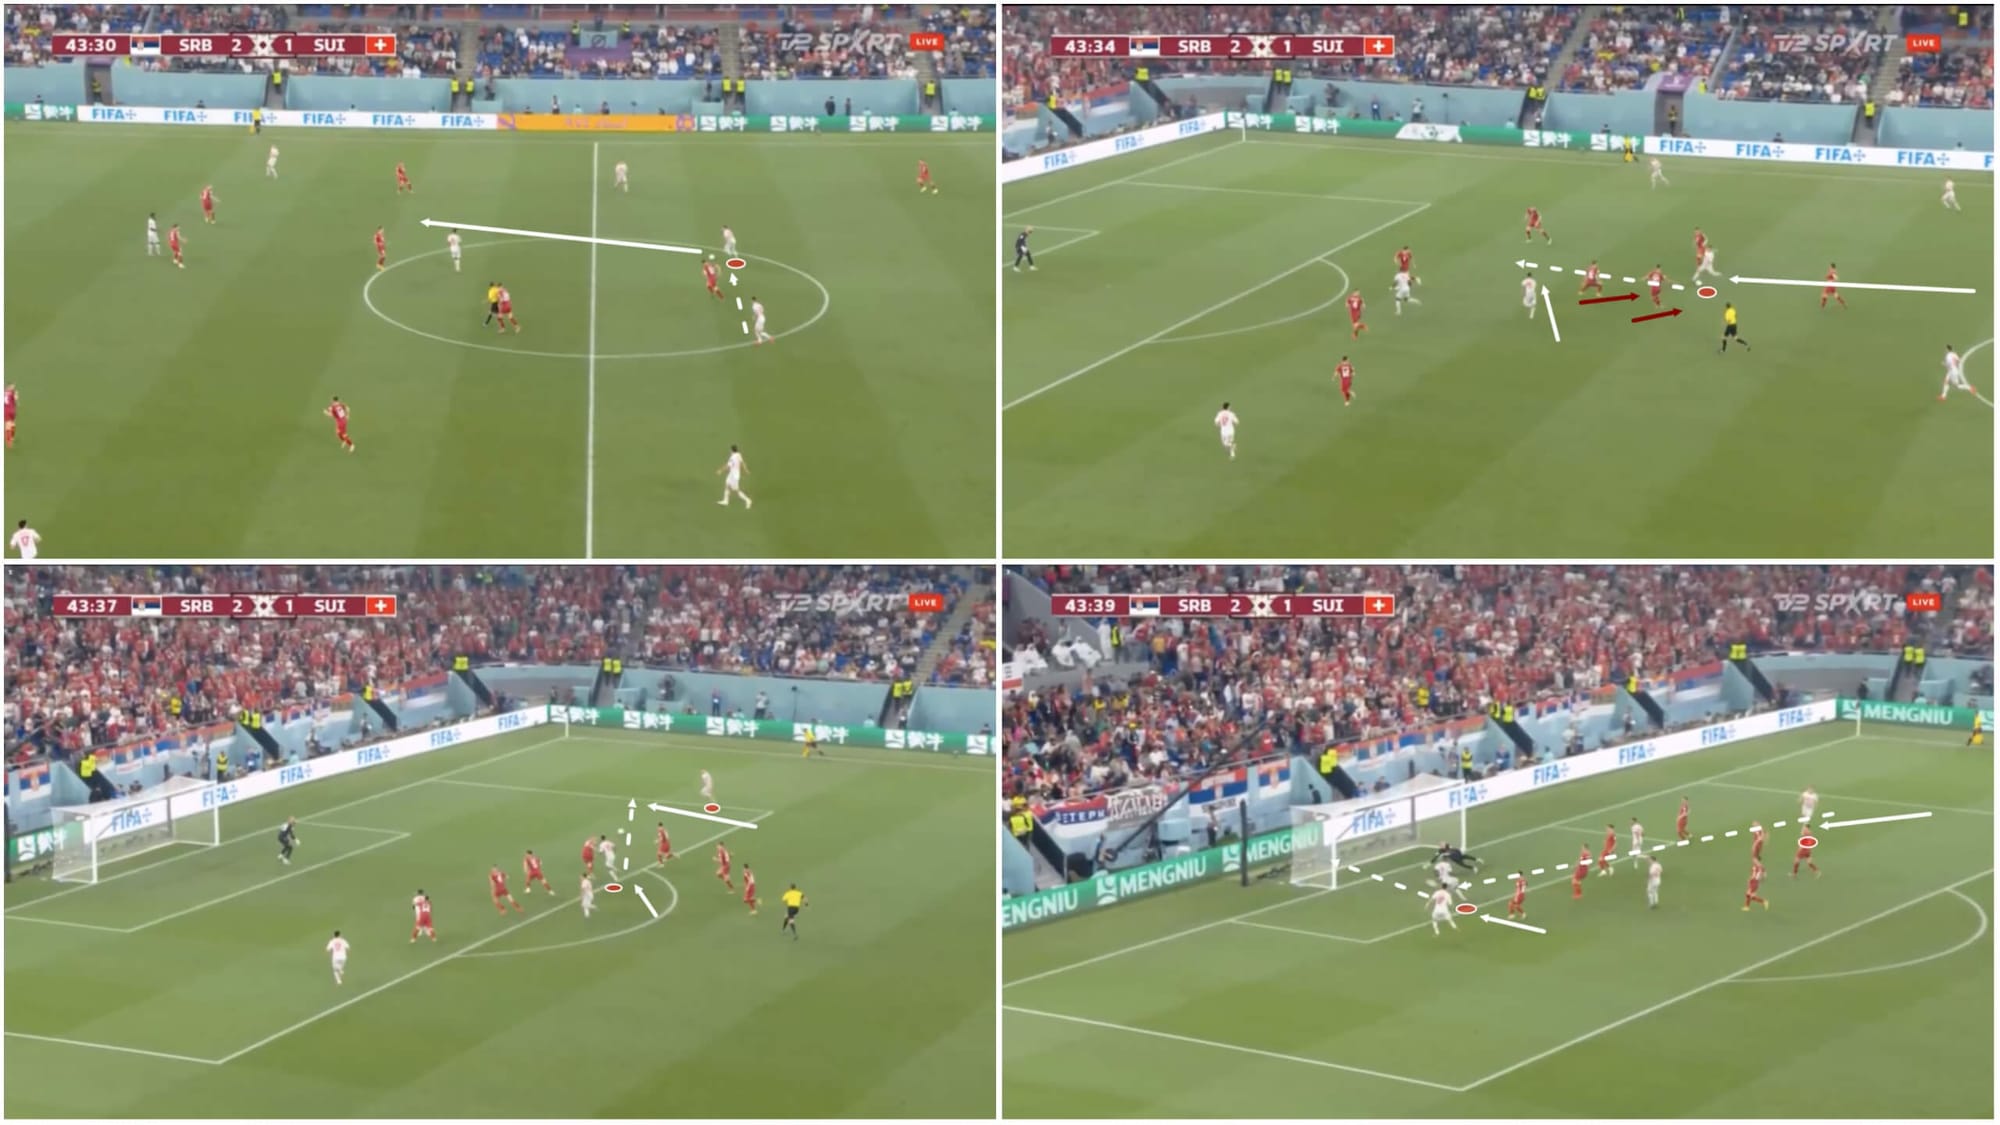
The solution was found via Shaqiri, who dropped deep to receive with plenty of time and space against the now more passive Serbian defence. From his own half, in the top-left quadrant, we see that Shaqiri was able to carry the ball all the way to the edge of the final third before being challenged.
When he was finally challenged, he attracted pressure from two Serbian midfielders who allowed a tiny bit of space to open up behind them as a result. They blinked. This was the moment Shaqiri had dropped deep and carried the ball forward for. As he saw this movement, he knocked the ball through for Sow to receive in that new bit of space created behind the Serbian midfield.
From here, Sow was able to send the ball to the right winger in plenty of space out wide. He sent the ball low and hard across the face of goal for Embolo to finish off in a very good shooting position, levelling the tie once more for the half-time break.
Switzerland did a great job of adapting to the new challenge that Serbia presented them with during the latter part of the first half and passed the test with flying colours to set up a box office second-half shootout.
Switzerland hold firm where Serbia faltered
Early in the second half, Switzerland took the lead as Serbia went back to pressing aggressively, thus opening up the possibility of progressing through the full-backs once more, which Switzerland capitalised on. Then, Switzerland held off Serbia well for the remainder of the second half, successfully fortifying their box where Stojković’s side failed, earning their place in the last 16.
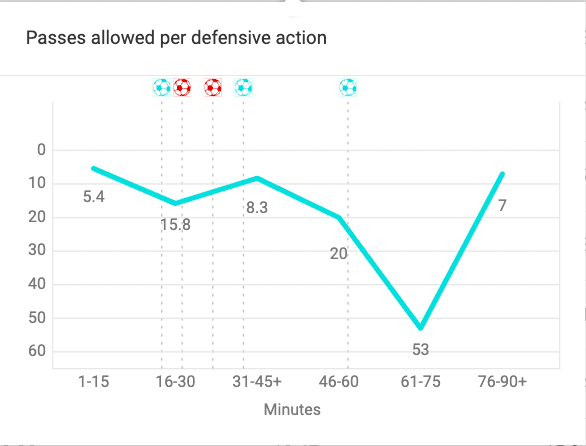
We see how Switzerland’s PPDA dropped off for a large portion of the second half compared to where it was in the first half but did pick up again in the late stages of the game. Still, they took a more cautious approach for most of the second half and were successful with it.
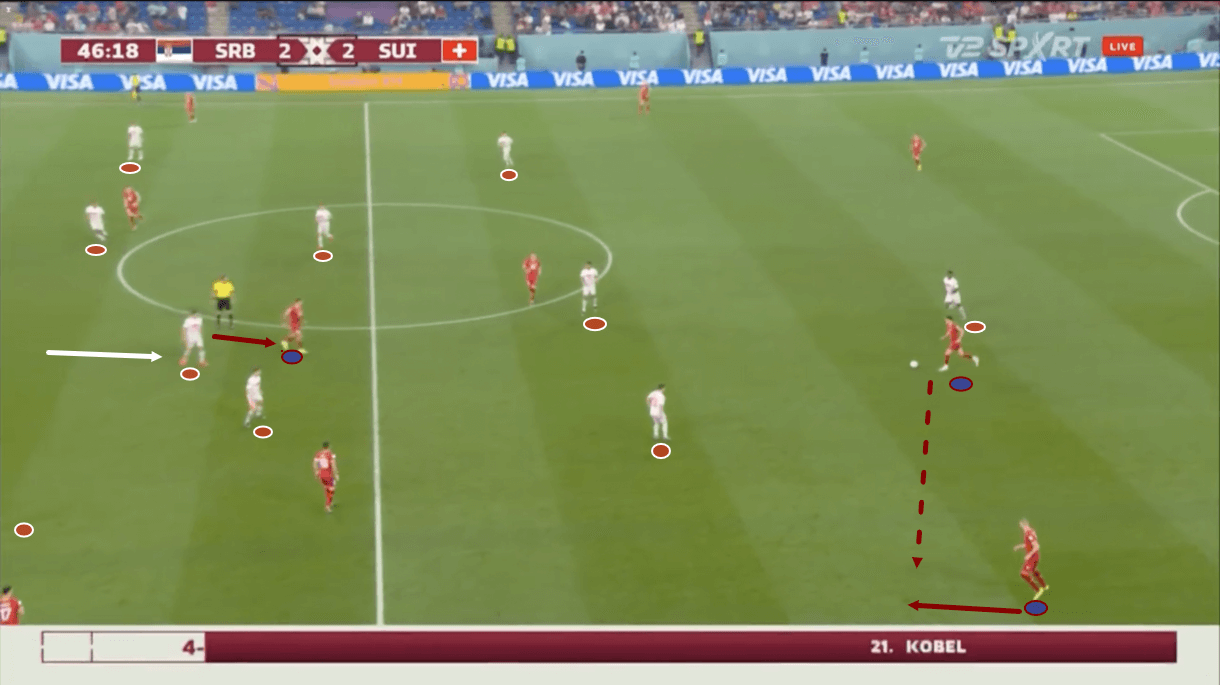
Throughout the contest, whether it was in the latter stages after retaking the lead or before then as figures 15-17 show, Embolo pressed the Serbian backline — this didn’t change. He always ensured he blocked off a passing lane to one of the other centre-backs before pressing the ball carrier, as we see an example of in figure 15.
Furthermore, Switzerland’s wingers and ‘10’ typically remained quite central, creating a five-man box around the middle of the park and making it difficult for Serbia to play through this area. The dropping Serbian left-forward was the biggest thorn in the side of these tactics, and this required Switzerland’s right centre-back to defend aggressively, stepping out of the backline as figure 15 shows.
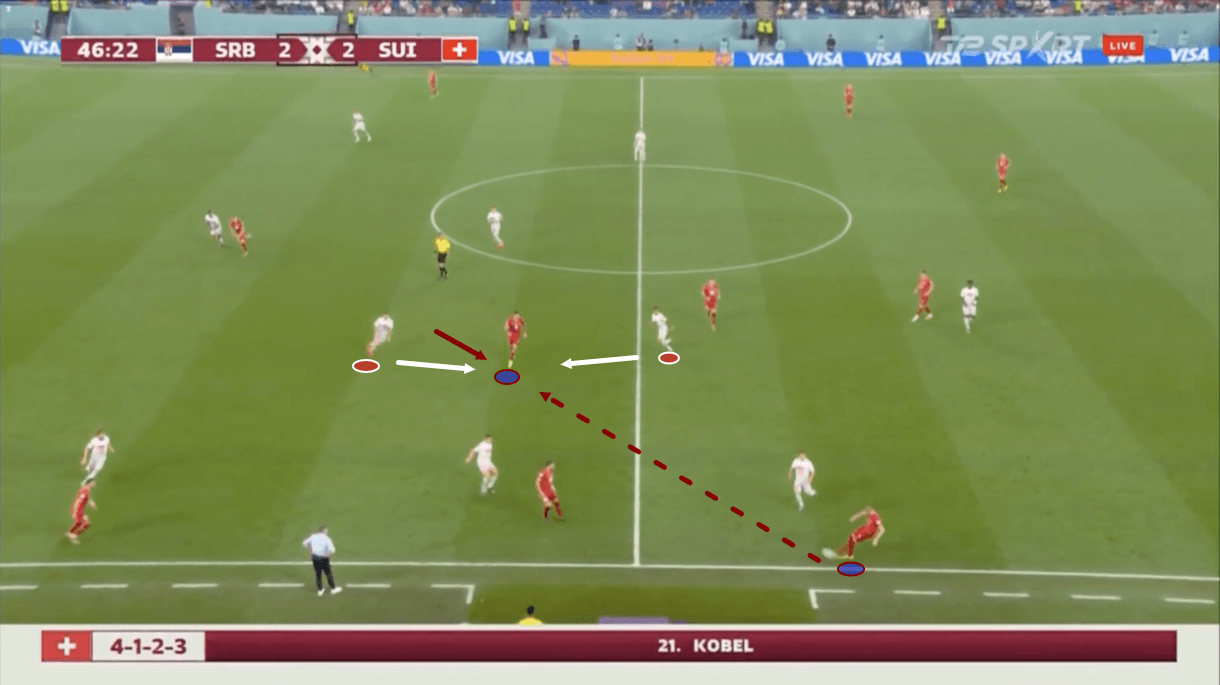
When Serbia were inevitably forced out wide, the ball-near Swiss winger would jump to close down the receiver, while Switzerland’s right-holding midfielder was dragged out wide by the movement of Serbia’s ‘10’ into the wide area giving an option to the Serbian wide centre-back. With this movement, along with the movement of Serbia’s holding midfielder in the centre of the pitch here, Stojković hoped to see his side create a clear route into the dropping left-forward in a similar fashion to how Switzerland frequently created a route into Embolo so much.
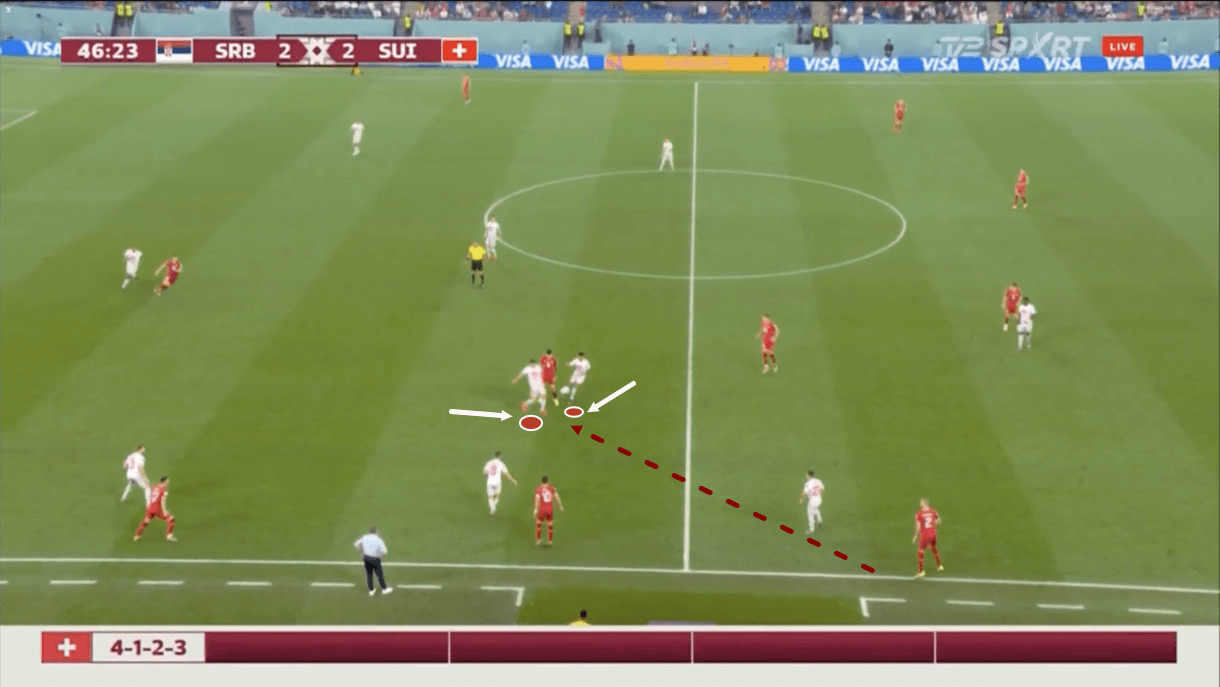
However, as we mentioned earlier, while these tactics from Serbia were very challenging, Switzerland did well to deal with them effectively a lot of the time, as was the case in figure 17, where the advanced centre-back and ‘10’ both closed in on the left-forward, aware of Serbia’s intent, preventing him from receiving and shutting this attack down.
Switzerland’s mid-block was extremely effective at controlling the space in midfield and preventing Serbia from progressing through these valuable areas, as we saw in this example, and this continued to be the case throughout the second half, playing a major role in how Switzerland successfully rebuffed Serbia’s attacks.
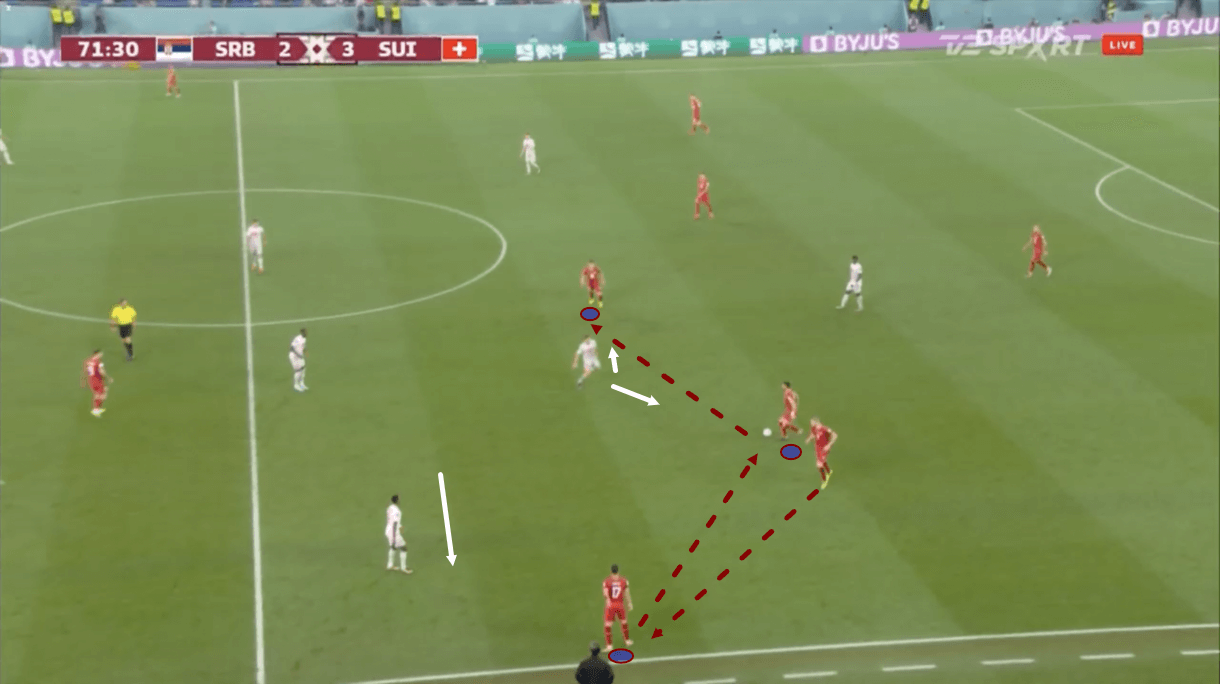
Control of the central areas was a key battle in the second half which Switzerland ultimately won via their effective defensive tactics but Serbia demonstrated some good tactics in their attempts to create opportunities to progress through the centre. For instance, in figure 18, Serbia manipulated the movement from Switzerland’s wingers out wide as the pass was played to the wing-back to isolate the Swiss ‘10’ centrally and overload him with one of their holding midfielders and their own ‘10’.
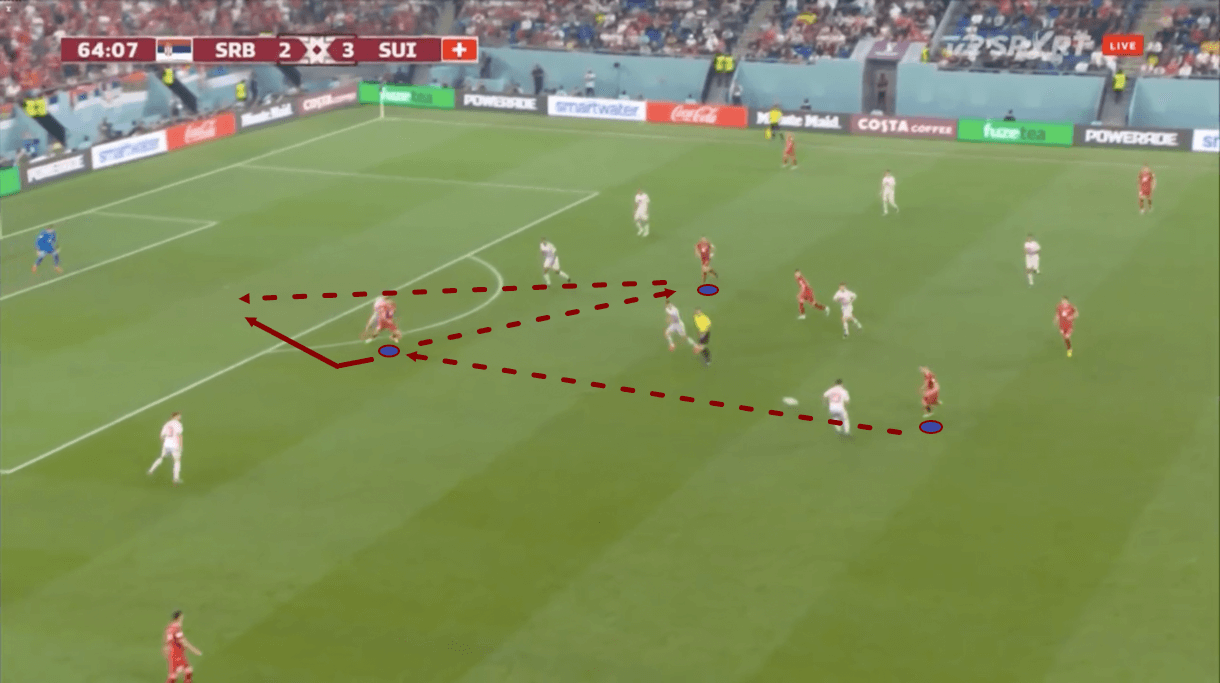
On the occasions when they did manage to progress through the Swiss defensive block, the centre-forwards and their hold-up play continued to be a serious challenge for Switzerland’s centre-backs to deal with. The hold-up play on display and link-up between Serbia’s forwards resulted in some good bits of chance creation but they failed to generate any clear-cut opportunities as a result of this.
Conclusion
Despite spending the vast majority of the second half in ‘defence-first mode’, Switzerland ended this game with 3.13 xG to Serbia’s 0.93, demonstrating how much better they ultimately fared in this game in terms of creating plenty of good opportunities and limiting their opponents’ opportunities.
We hope that the tactical story of this fixture is clear from our tactical analysis, as are the distinctive battles that occurred at different parts of the game due to the evolving game state.



Comments