In our previous analysis, we discussed floated crosses, highlighting their main features, which include isolating the standout player in a 1-v-1 situation against the marker away from the zonal defenders and the orientation problems they cause. We have also explained their effectiveness in leagues not of the highest level and how any team with a strong and distinctive jumper can threaten the opponent’s goal and score many goals.
We have also answered the question that may come to everyone’s mind: why do we no longer see them at the same rate at the high level? We have explained several defensive methods employed by elite teams to counter them, which have reduced their usage somewhat.
However, Everton continue to use a specific type of floated crosses with remarkable results even against elite teams, which seem to have not found a radical solution to defend against this type. It is noteworthy that Everton leads the Premier League in expected goals (XG) from set-pieces with 16.18 at the time of writing and is the second-highest scoring team from set-pieces in the Premier League with 15 goals, following Arsenal, who scored 18 goals.
Everton also rank second in most goals scored from corner kicks in the Premier League with nine goals, tied with Bournemouth and Luton Town, behind Fulham, Liverpool, and Arsenal, who scored 10 goals each. It’s worth mentioning that Everton has earned fewer corner kicks than all of them, standing at 160 corner kicks in 14th place among the teams with the most corner kicks gained. Meanwhile, Arsenal is third with 234 corner kicks, and the closest team to them is Luton Town, which is in 9th place with 182 corner kicks at the time of writing.
In this tactical analysis, we will explain Everton’s tactics in using floated crosses in a way that remains effective. We will narrate Everton’s story. Beginning the tale on February 4, 2023, just days after Sean Dyche took charge of Everton when they secured a victory over Arsenal with a solitary goal from a corner kick. This moment might be etched in the memories of Arsenal’s fans due to the fierce competition for the league title.
The previous season
As we have mentioned in the previous part, the counter-ideas are centred around preventing the attacker from running freely before jumping, with many explained methods, to stop any probable dynamic mismatch until zonal defenders deal with the cross and regarding nods, the zonal defenders should form a narrow organised line applying the off-side trap being ready if the opponent targets a far area empty from zonal defenders to get the first touch, but what will happen if there are no zonal defenders at the targeted area while being also close for attackers to threaten the goal directly or indirectly?!
This area is the area after the far post, highlighted below, which is empty from zonal defenders while nods come from near position to the goal and in a side way, avoiding the offside. We all know that there is no zonal defender there, especially when some teams ask the last zonal defender to step more inside, not in front of the far post, giving priority to the goalmouth and asking the goalkeeper to claim any cross going there through the six-yard, but floated crosses are too high to be claimed while also asking attackers to block the goalkeeper and the last zonal defender who is forced to step back to the targeted area. Some defending teams also assign the best headers at the near post and the middle, leaving the far post to the weakest player of the zonal line, aiming to stop the cross before reaching him by the goalkeeper or the zonal players before him. Let’s explain in detail and begin the journey!
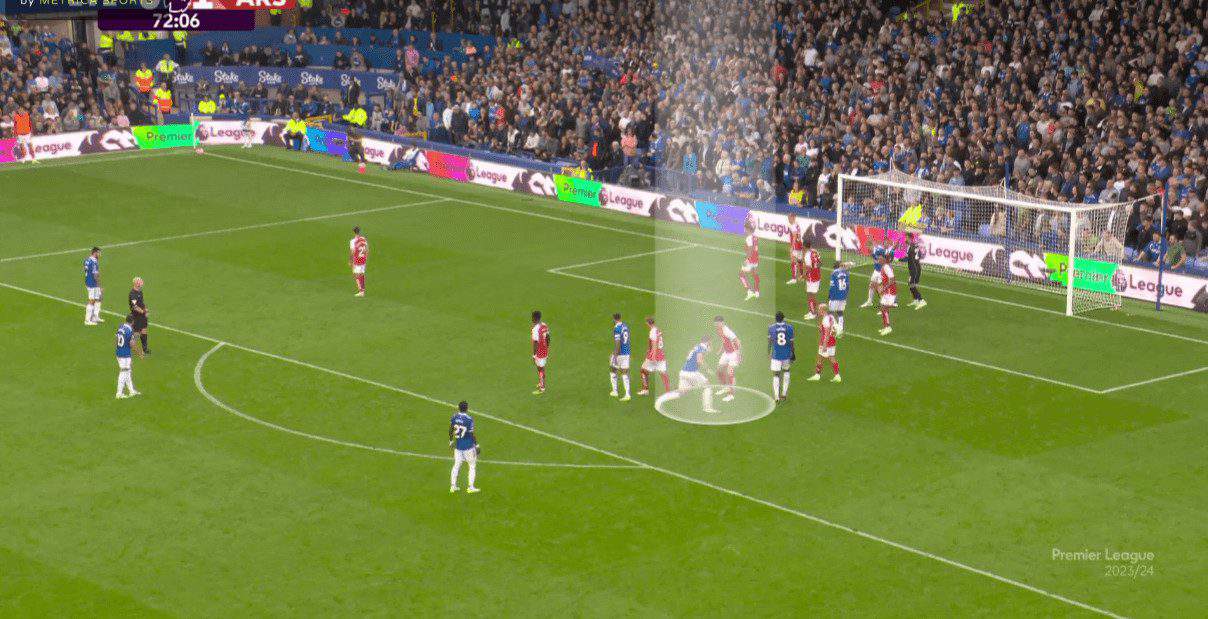
In that match against Arsenal the previous season, we see below that Arsenal used four yellow zonal defenders. In contrast, Everton target James Tarkowski, whose marker was Martin Ødegaard. This makes sense because we have said that his role as a marker is tracking the marker only without caring about the ball until a zonal defender comes. Still, there isn’t any zonal defender there!
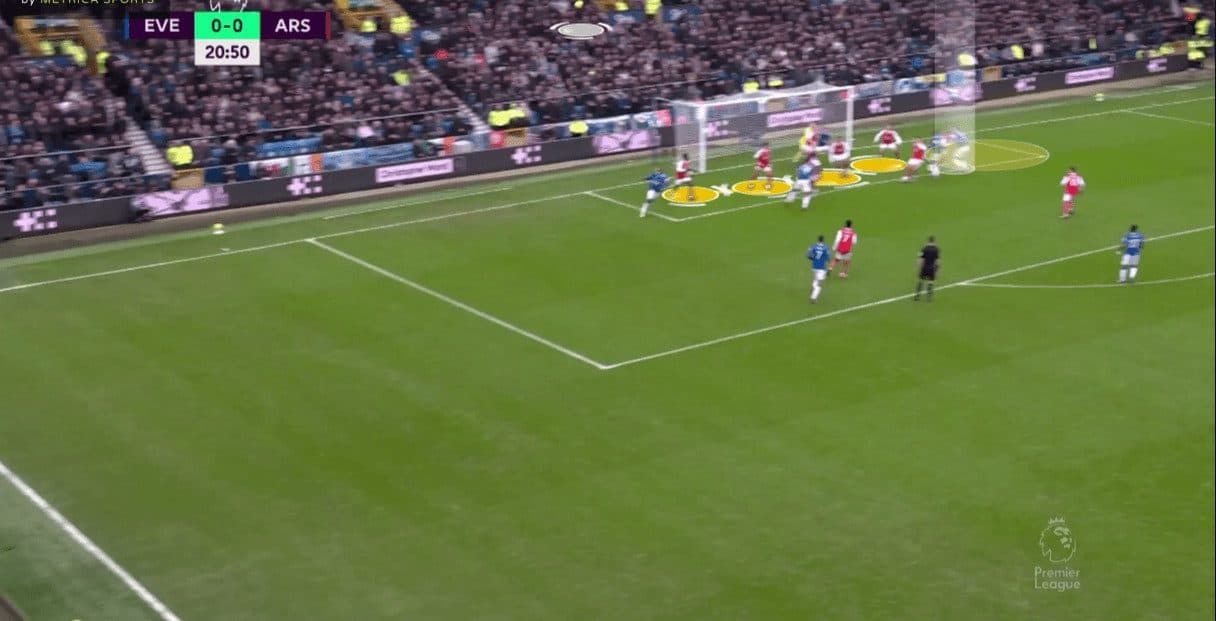
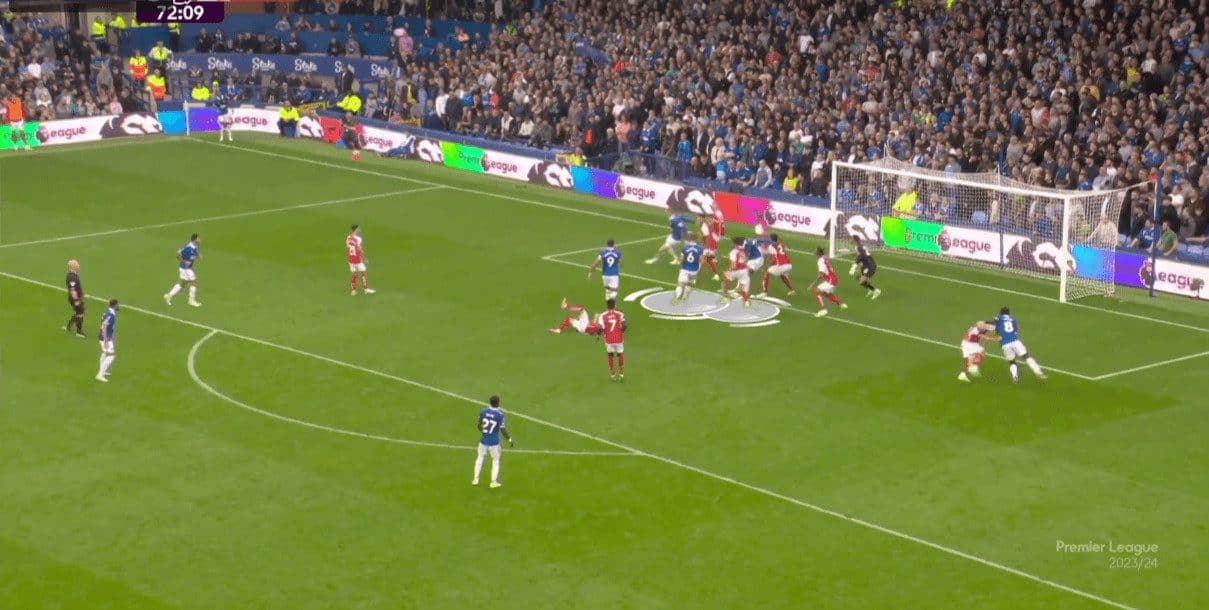
In the photo below, the ball is so high in its way through the air, taking a long time while Ødegaard reaches the six-yard, and still, no one comes, and he can’t match Tarkowski. At the same time, a player blocks the goalkeeper while another attacker tries to block William Saliba, the last zonal defender, who can escape but needs to step back many steps while focusing on the high ball, which is too difficult, especially when the floated cross lands in a far point.
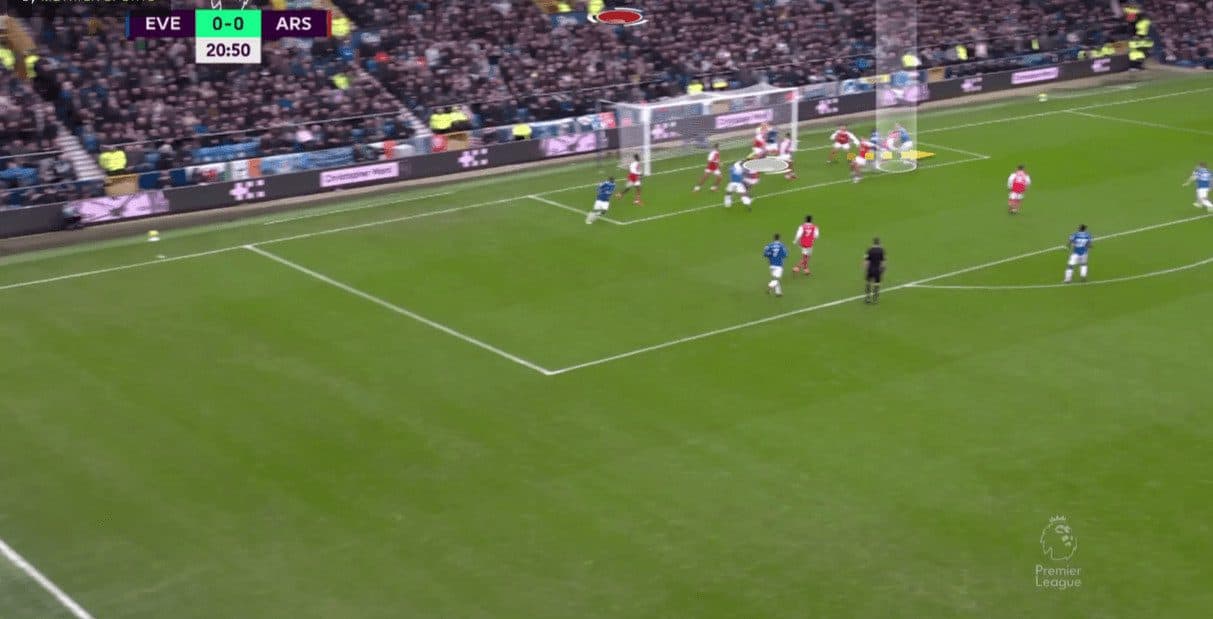
Tarkowski can easily get the ball overcoming Ødegaard, at his back in the photo below, and Saliba in front of him while two players wait for the headed pass, but he decides to shoot directly, and the ball goes near the post, as shown in the two following photos.

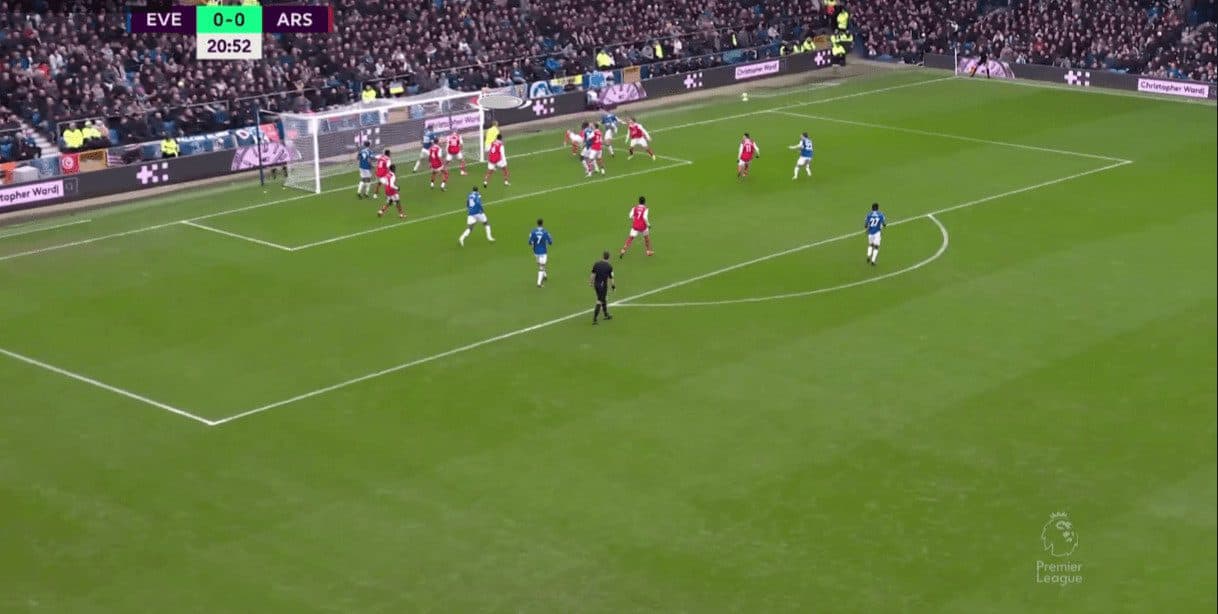
After that, Everton scored a goal from another corner in the same match. Let’s know how!
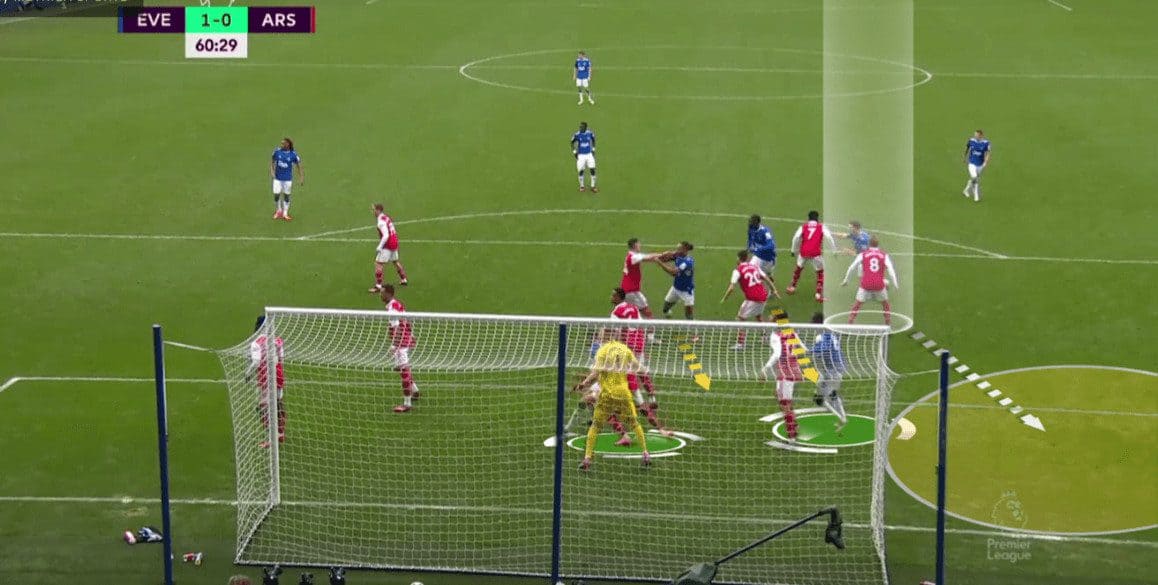
In the photo below, Arsenal’s usual four zonal defenders are shown, and we only need to notice Saliba’s position, which is more inside. An attacker stands at his back, ready to block him, preventing him from stepping back.
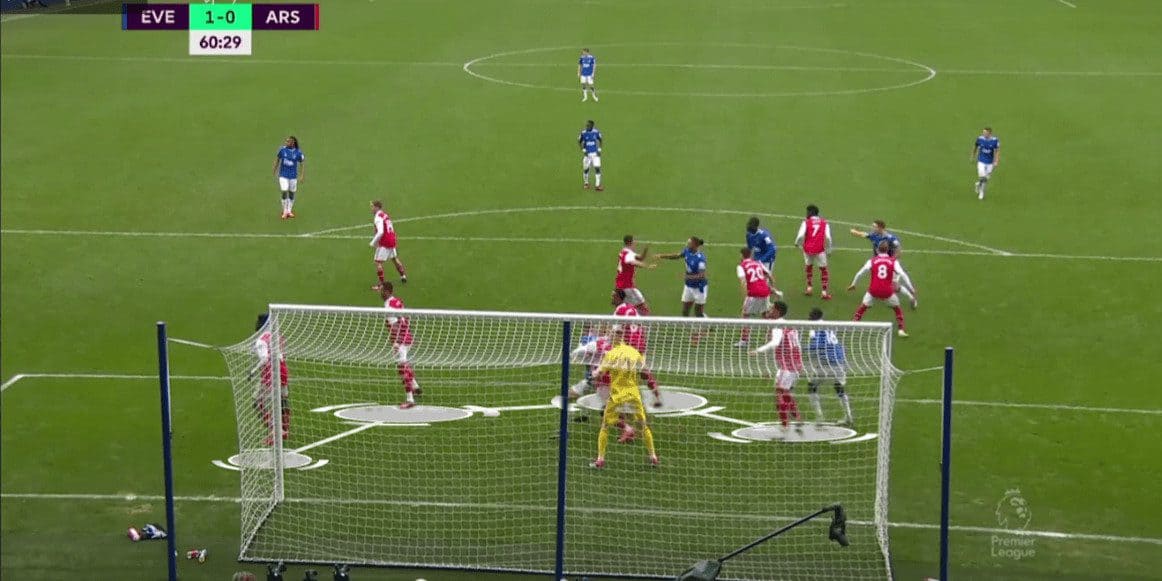
In the photo below, Ødegaard still marks Tarkowski, who goes to the targeted area from the shown position without starting at it so as not to take the attention early, to earn some momentum and to make Saliba maintain his line of sight to him, but suddenly loses track of him while following the ball and when he tries to turn around, he finds a player blocking him from behind. It also makes it harder for Ødegaard to keep pushing him all this distance.
At the same time, two green players try to block Saliba and the goalkeeper. At the same time, two yellow runners go in front of Saliba and at his back to disperse him away from the targeted area while being also around the targeted area to be ready in case the cross isn’t accurate, as shown in the two following photos.
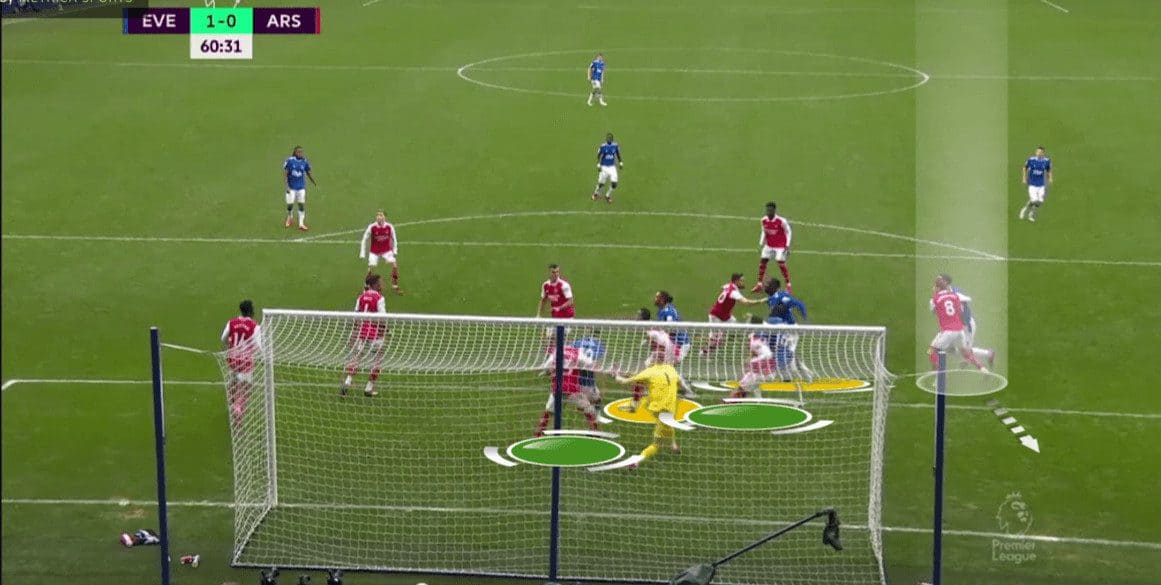
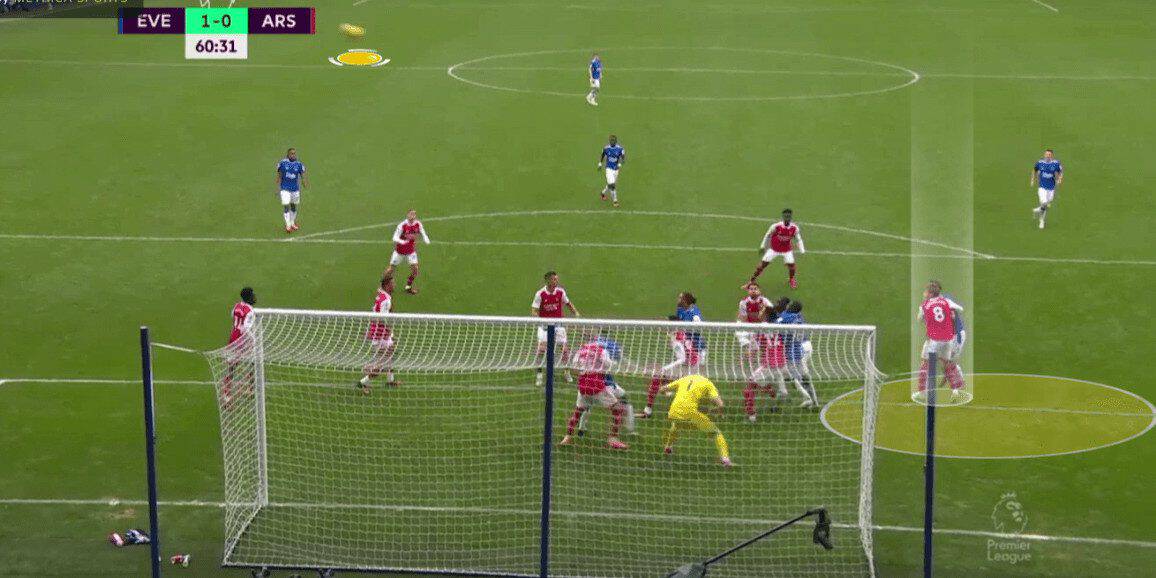
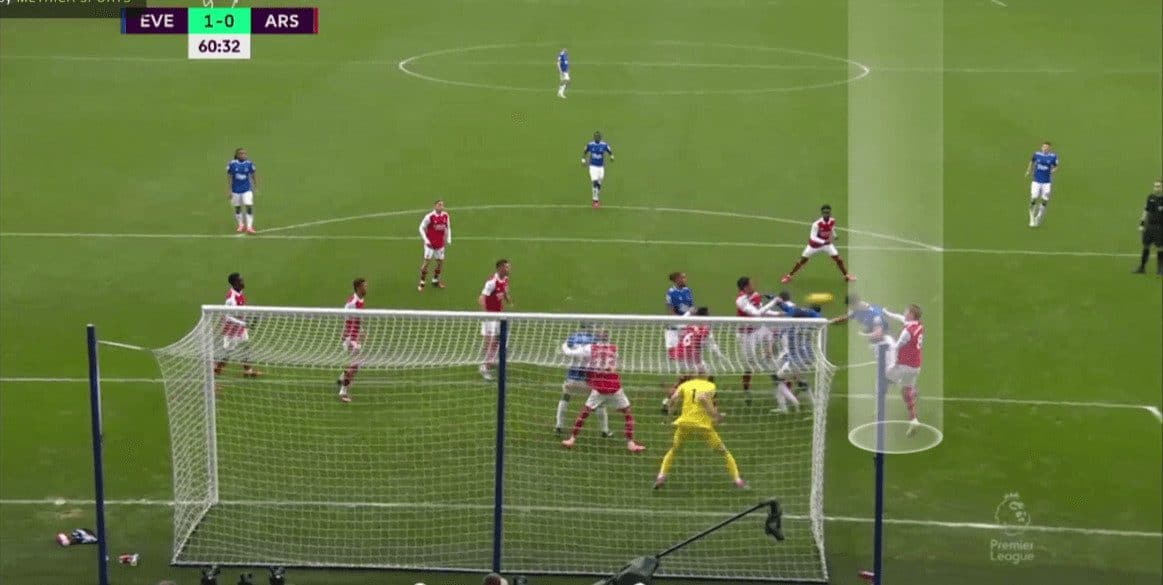
In the photo below, the plan is done. Everything is ended while the ball is in the air at a high level, so Ødegaard, who is pushed until reaching the six-yard and doesn’t find any zonal defender to help, doesn’t have any solution except raising his neck trying to get the ball in a 1-v-1 duel against Tarkowski who can easily overcome him scoring a goal, as shown in the two following photos.
After that, Everton faced many elite teams and none of them could find a radical counter idea. Let’s see Liverpool as an example!
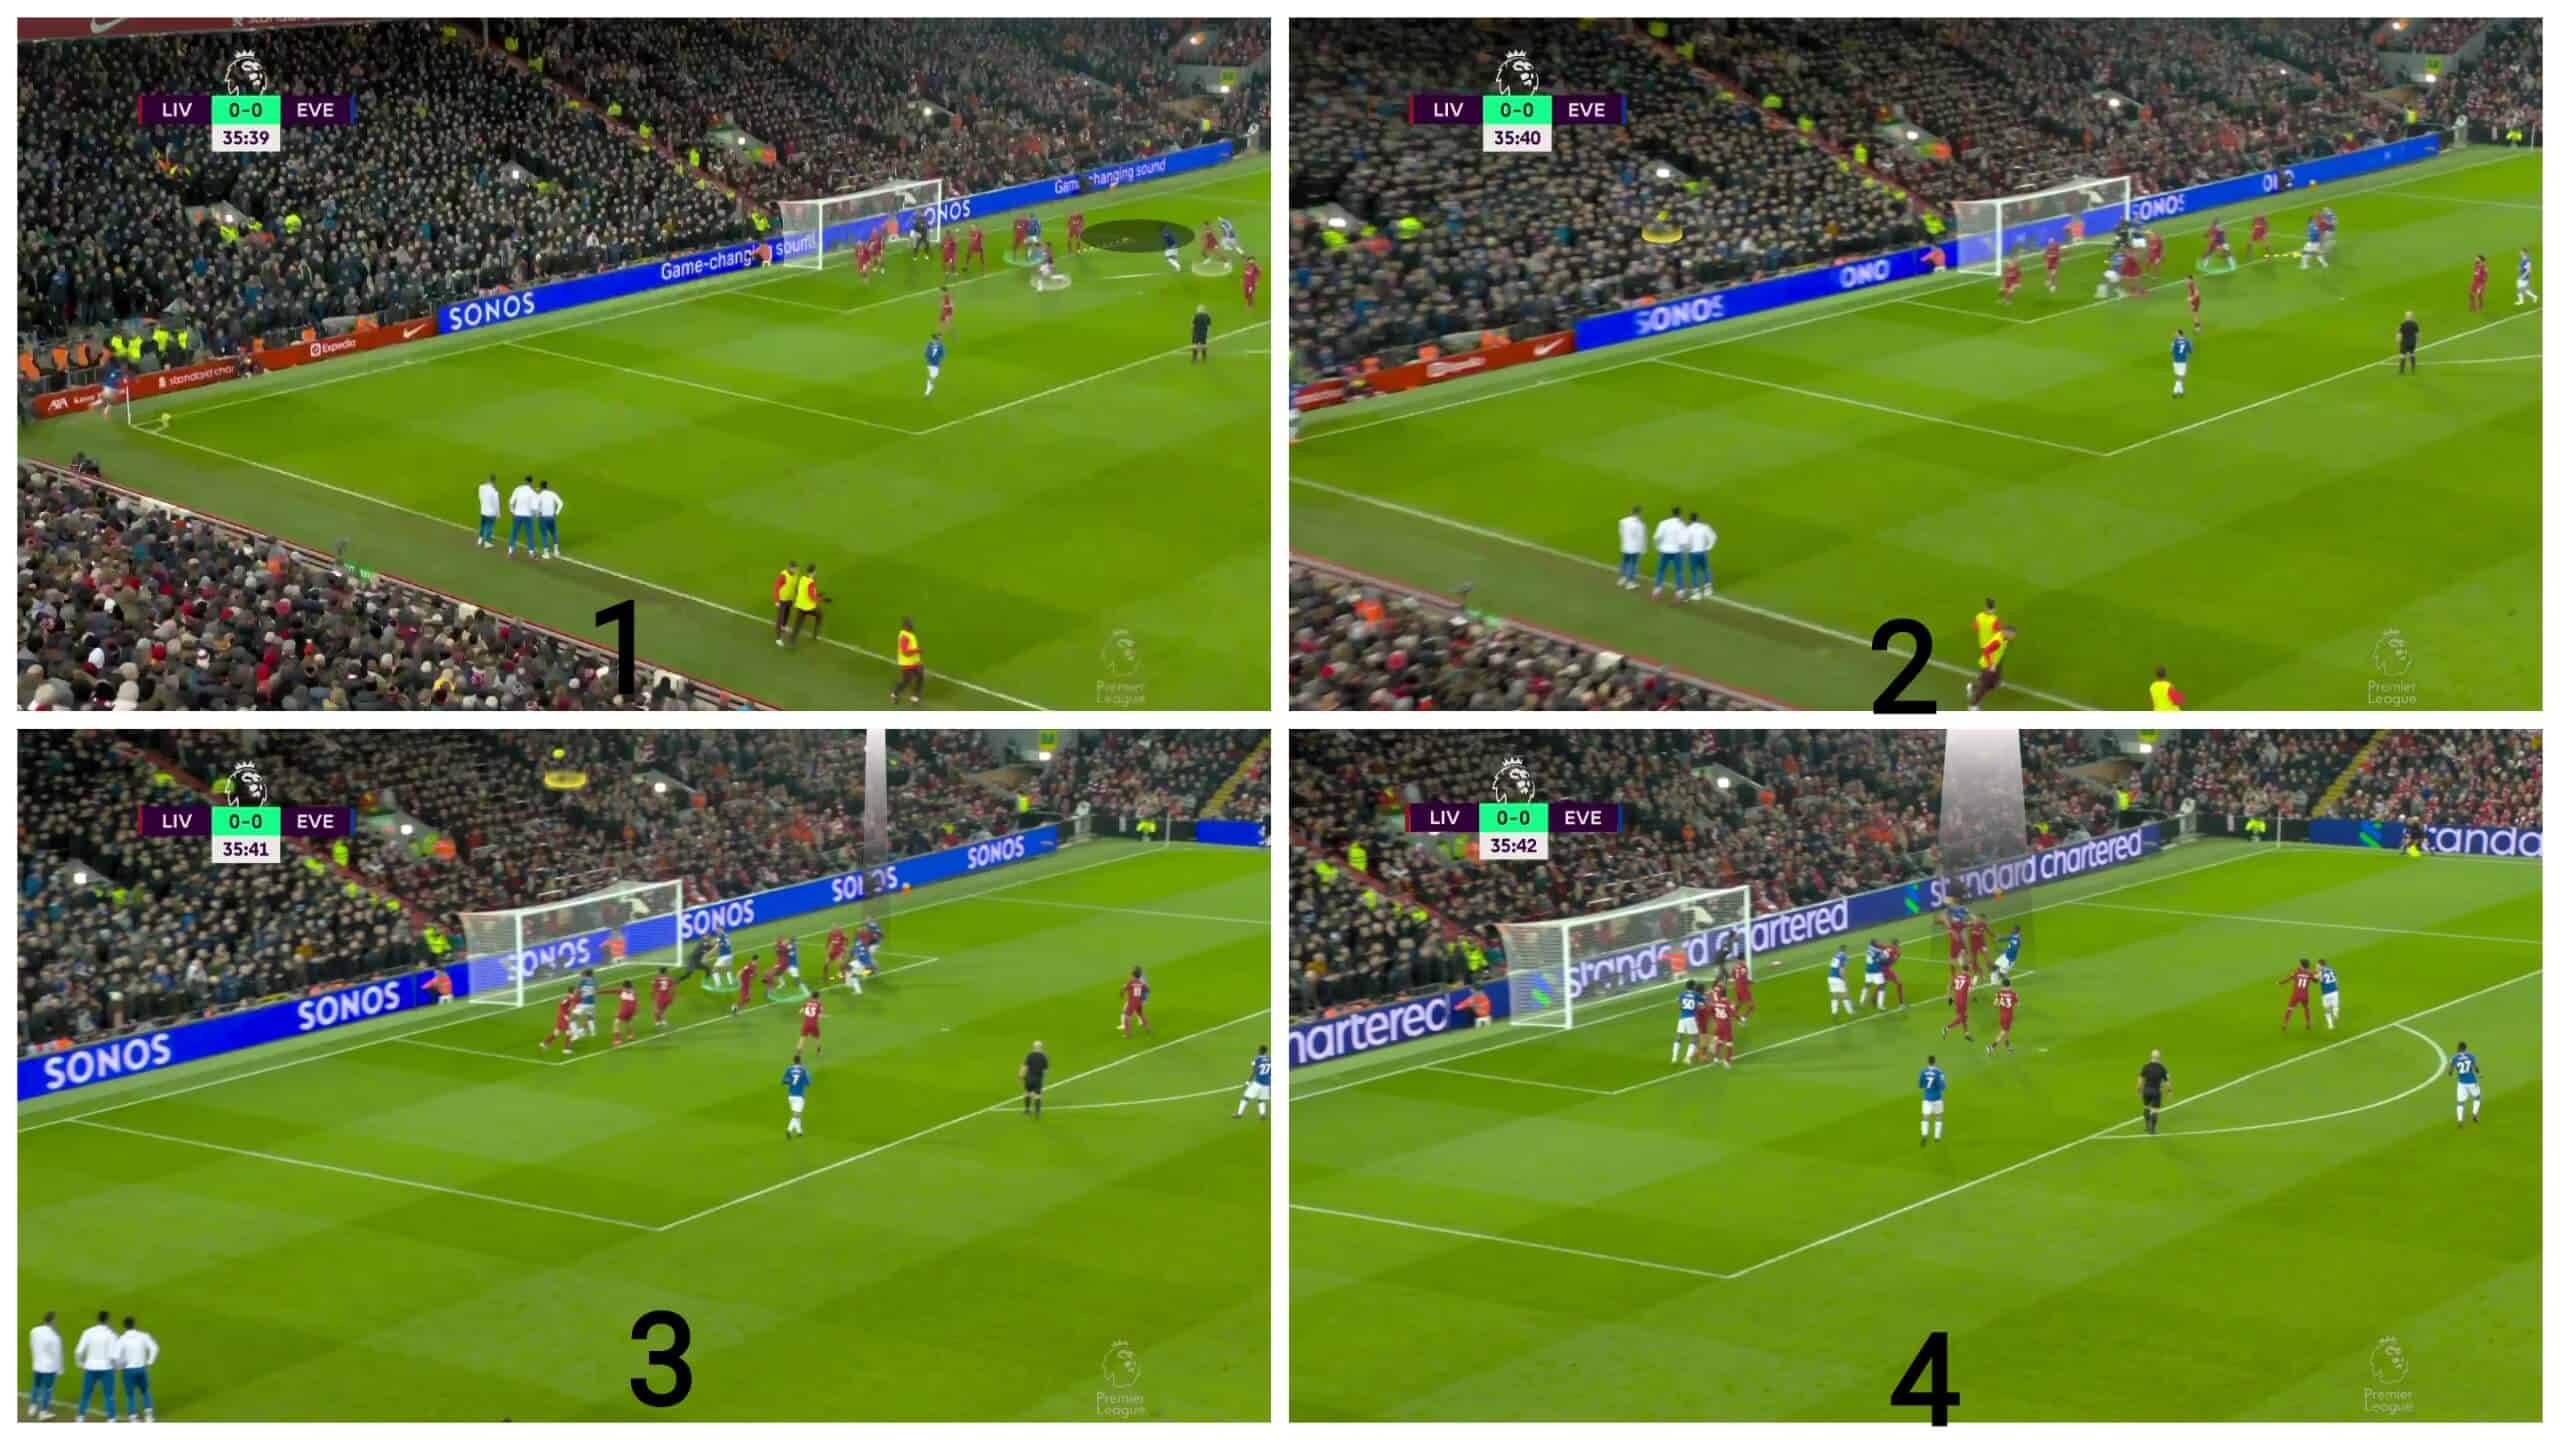
In the first photo below, there are three runners against Liverpool’s two man markers, in white. One of them goes to the near post dragging a marker with him, so there are two runners going to the targeted area against one marker whose job is to block the attacker that tries to penetrate toward the zonal line to slow down him to reach the zonal line with no speed to avoid the dynamic mismatch over the zonal line, as we have explained in the previous part, but the targeted area has no zonal defenders in this case! To be more sure, an attacker blocks Virgil van Dijk in green to prevent him from stepping back to the last zonal defender, whose job is basically difficult to step back and jump, as shown in the second photo.
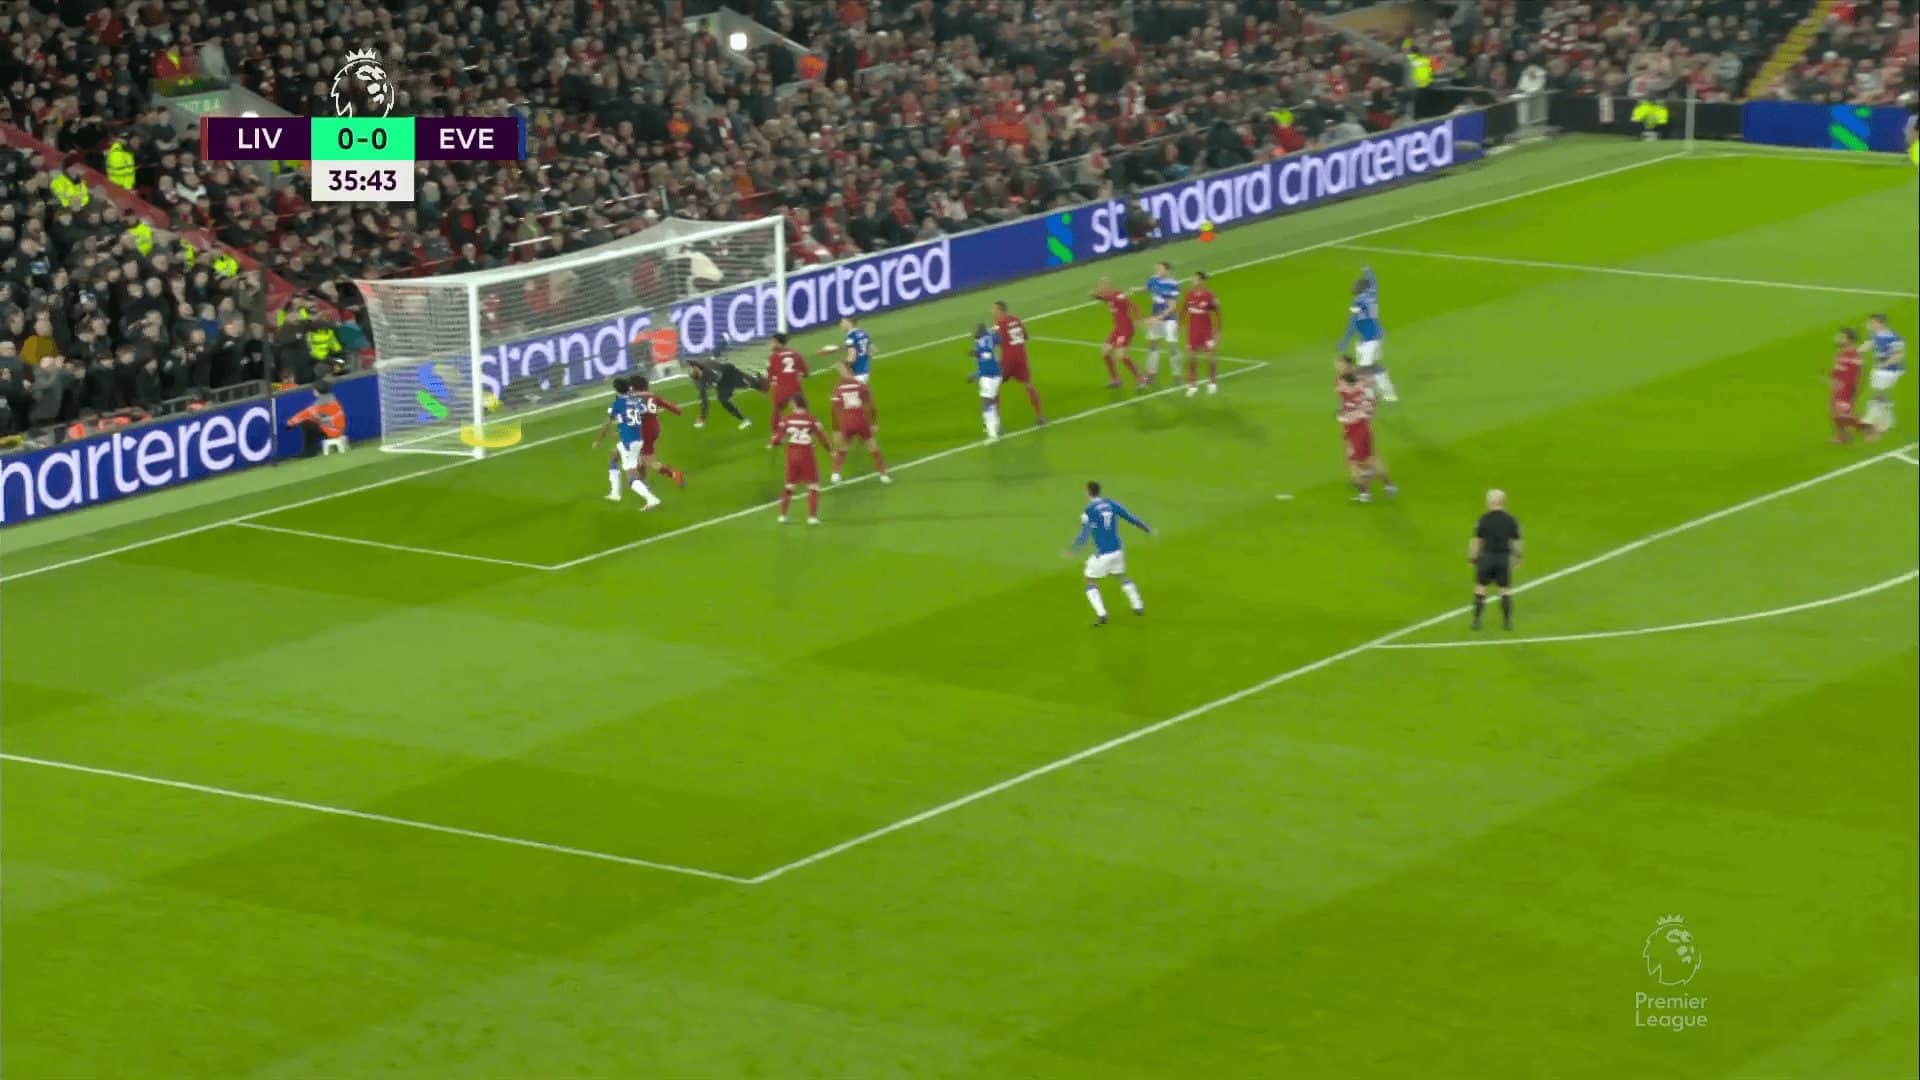
In the third photo, the ball is so high above the goalmouth while everything is already done, and a player blocks Alisson Becker. Here, we need to focus on an important thing: the set-piece actions are ended while the ball is still in the air. Players are waiting and predicting the positions of landing and when to push and jump. Hence, the issue now becomes a clear aerial conflict between the targeted player and two defenders, the marker who isn’t strong enough in that defending system and the last zonal defender who needs to step back many steps, so the targeted player, Tarkowski, wins the conflict easily, as shown in the fourth photo.
The ball hits the post at the end in a dangerous chance.
The current season
Coming to this season, we will navigate to see if this plan still works!
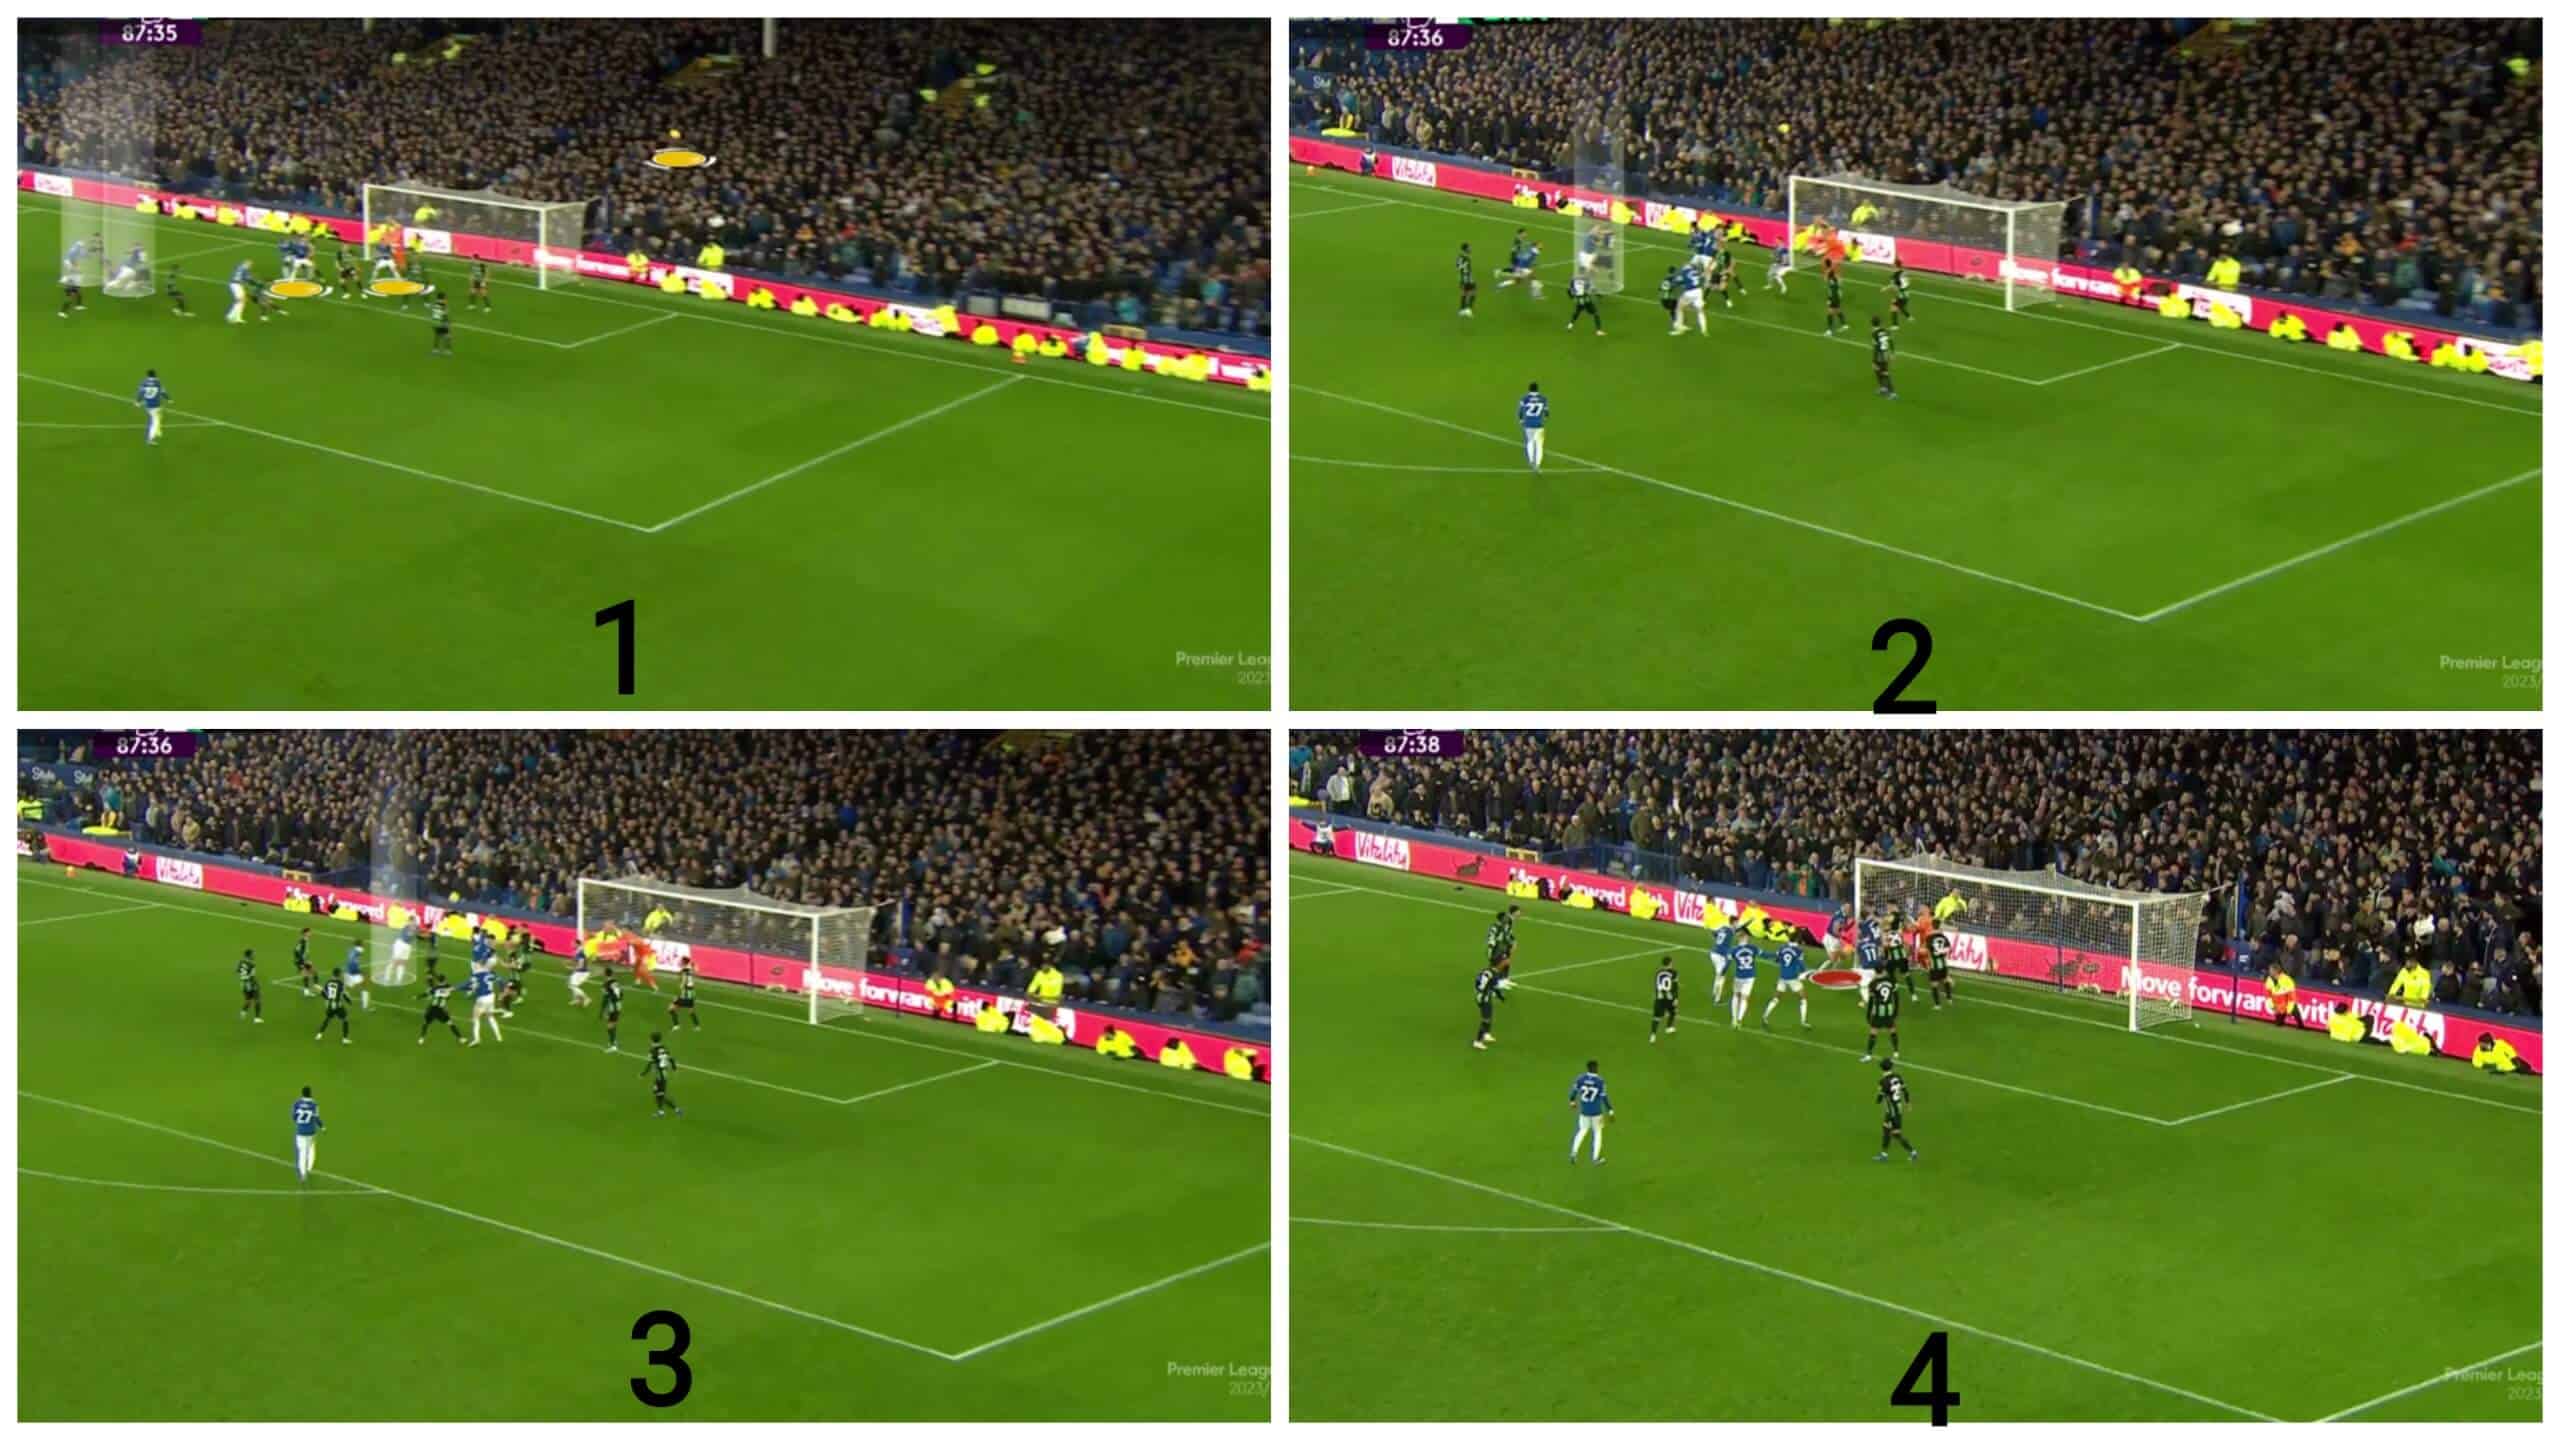
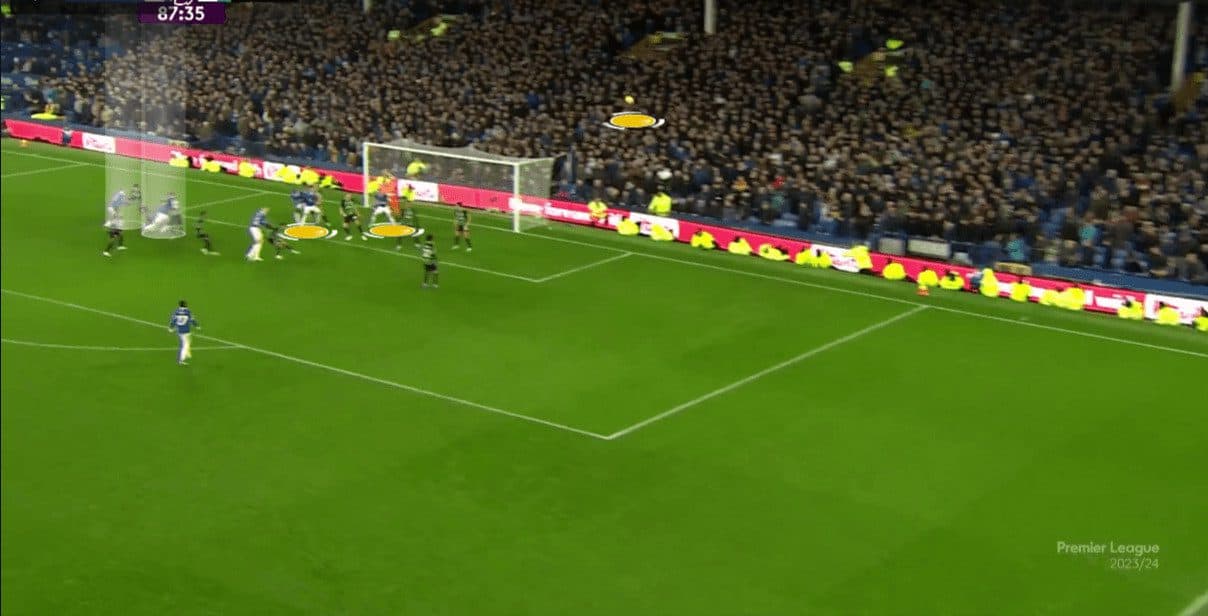
In the first photo below, the plan is implemented against Brighton by the same blocks to the goalkeeper and the last zonal defenders, in yellow. The targeted players are highlighted in white, starting from the same starting position, while the ball is in the air, in yellow.
In the second photo, the marker acts as Arsenal’s way, which is to keep tracking only the attacker without caring about the ball until a zonal defender comes, but no one can, so Tarkowski easily wins the aerial duel, as shown in the third photo, with many players around the ball waiting for the headed pass and a defender clears the ball after dangerous organised chaos, as shown in the fourth photo.
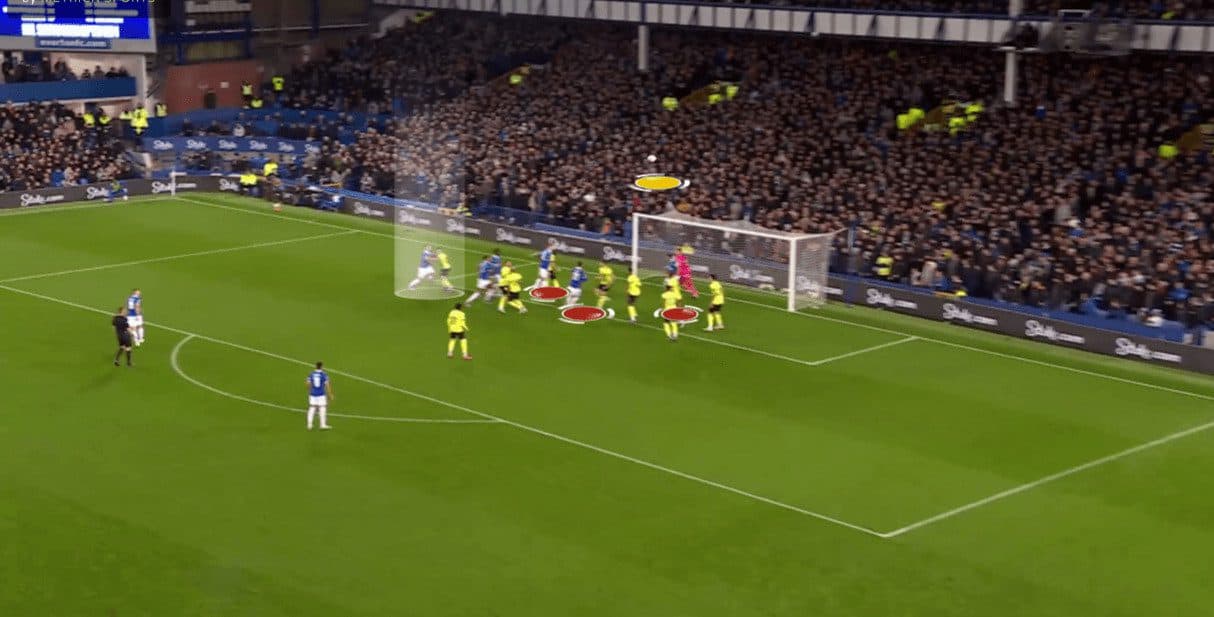
Against Burnley, you see below the same usual method: three blocks, in red, to the goalkeeper and the last two zonal defenders. There are two white runners. One goes to the targeted area, while the second goes in front of him to receive the nod and also to be ready in case the cross is inaccurate and lands above him.
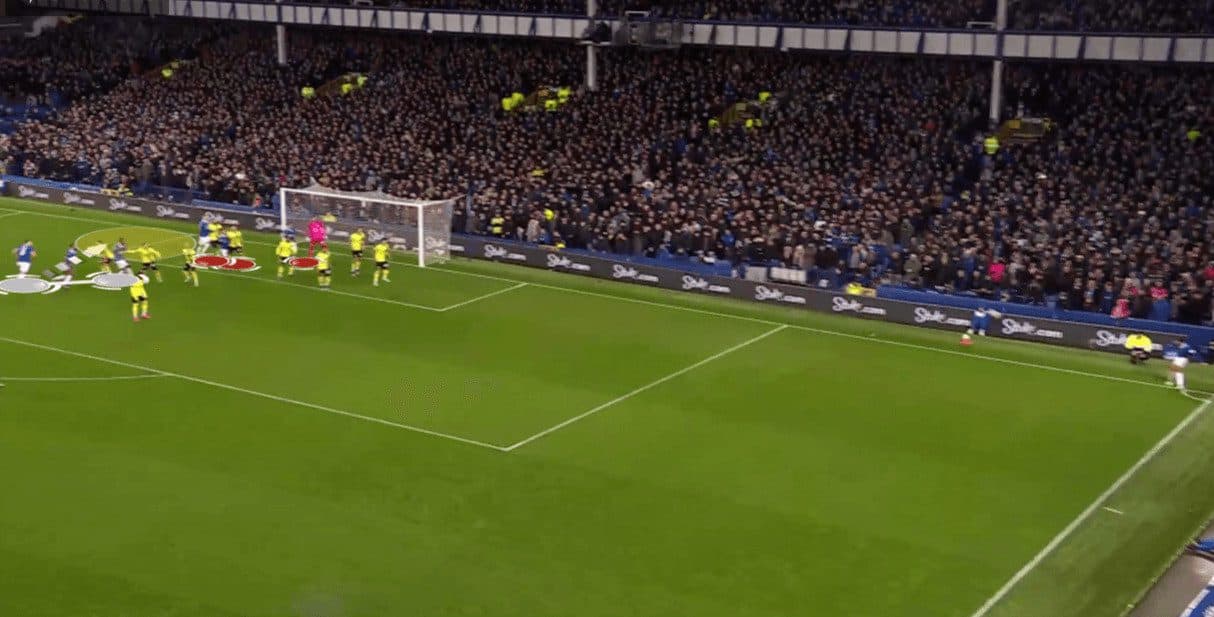
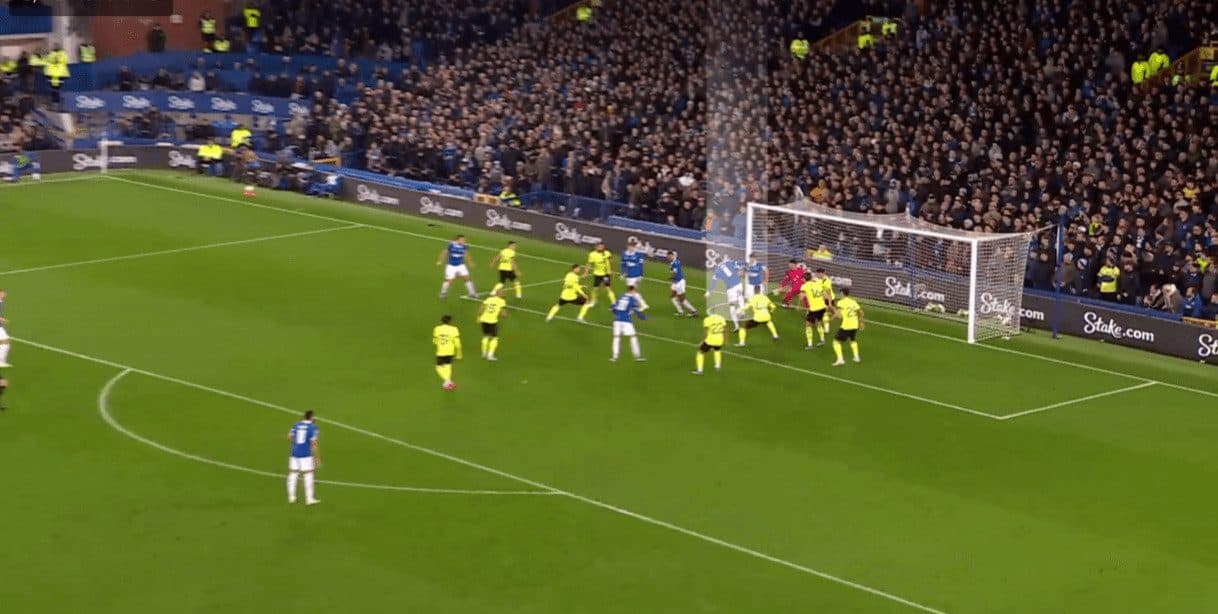
In the photo below, the routine actions are ended. The white attacker is now ready to measure the ball in the air using his power and positional superiority, as shown in the two photos below.
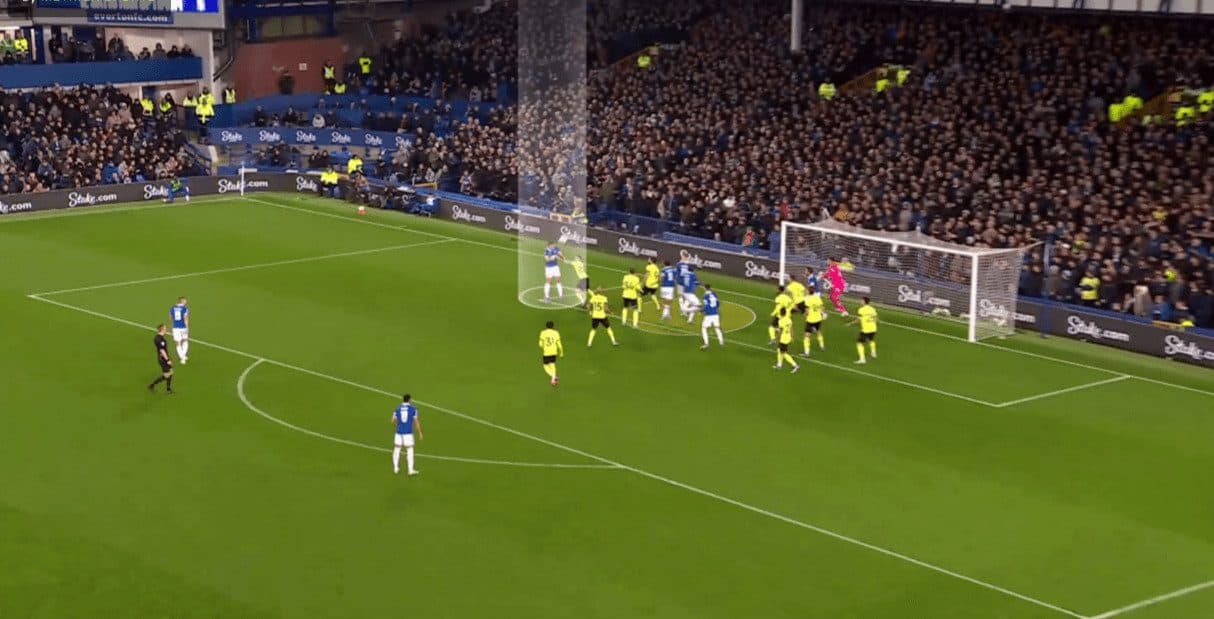
The ball lands where Everton’s players wait, and the result is a goal, as shown below.
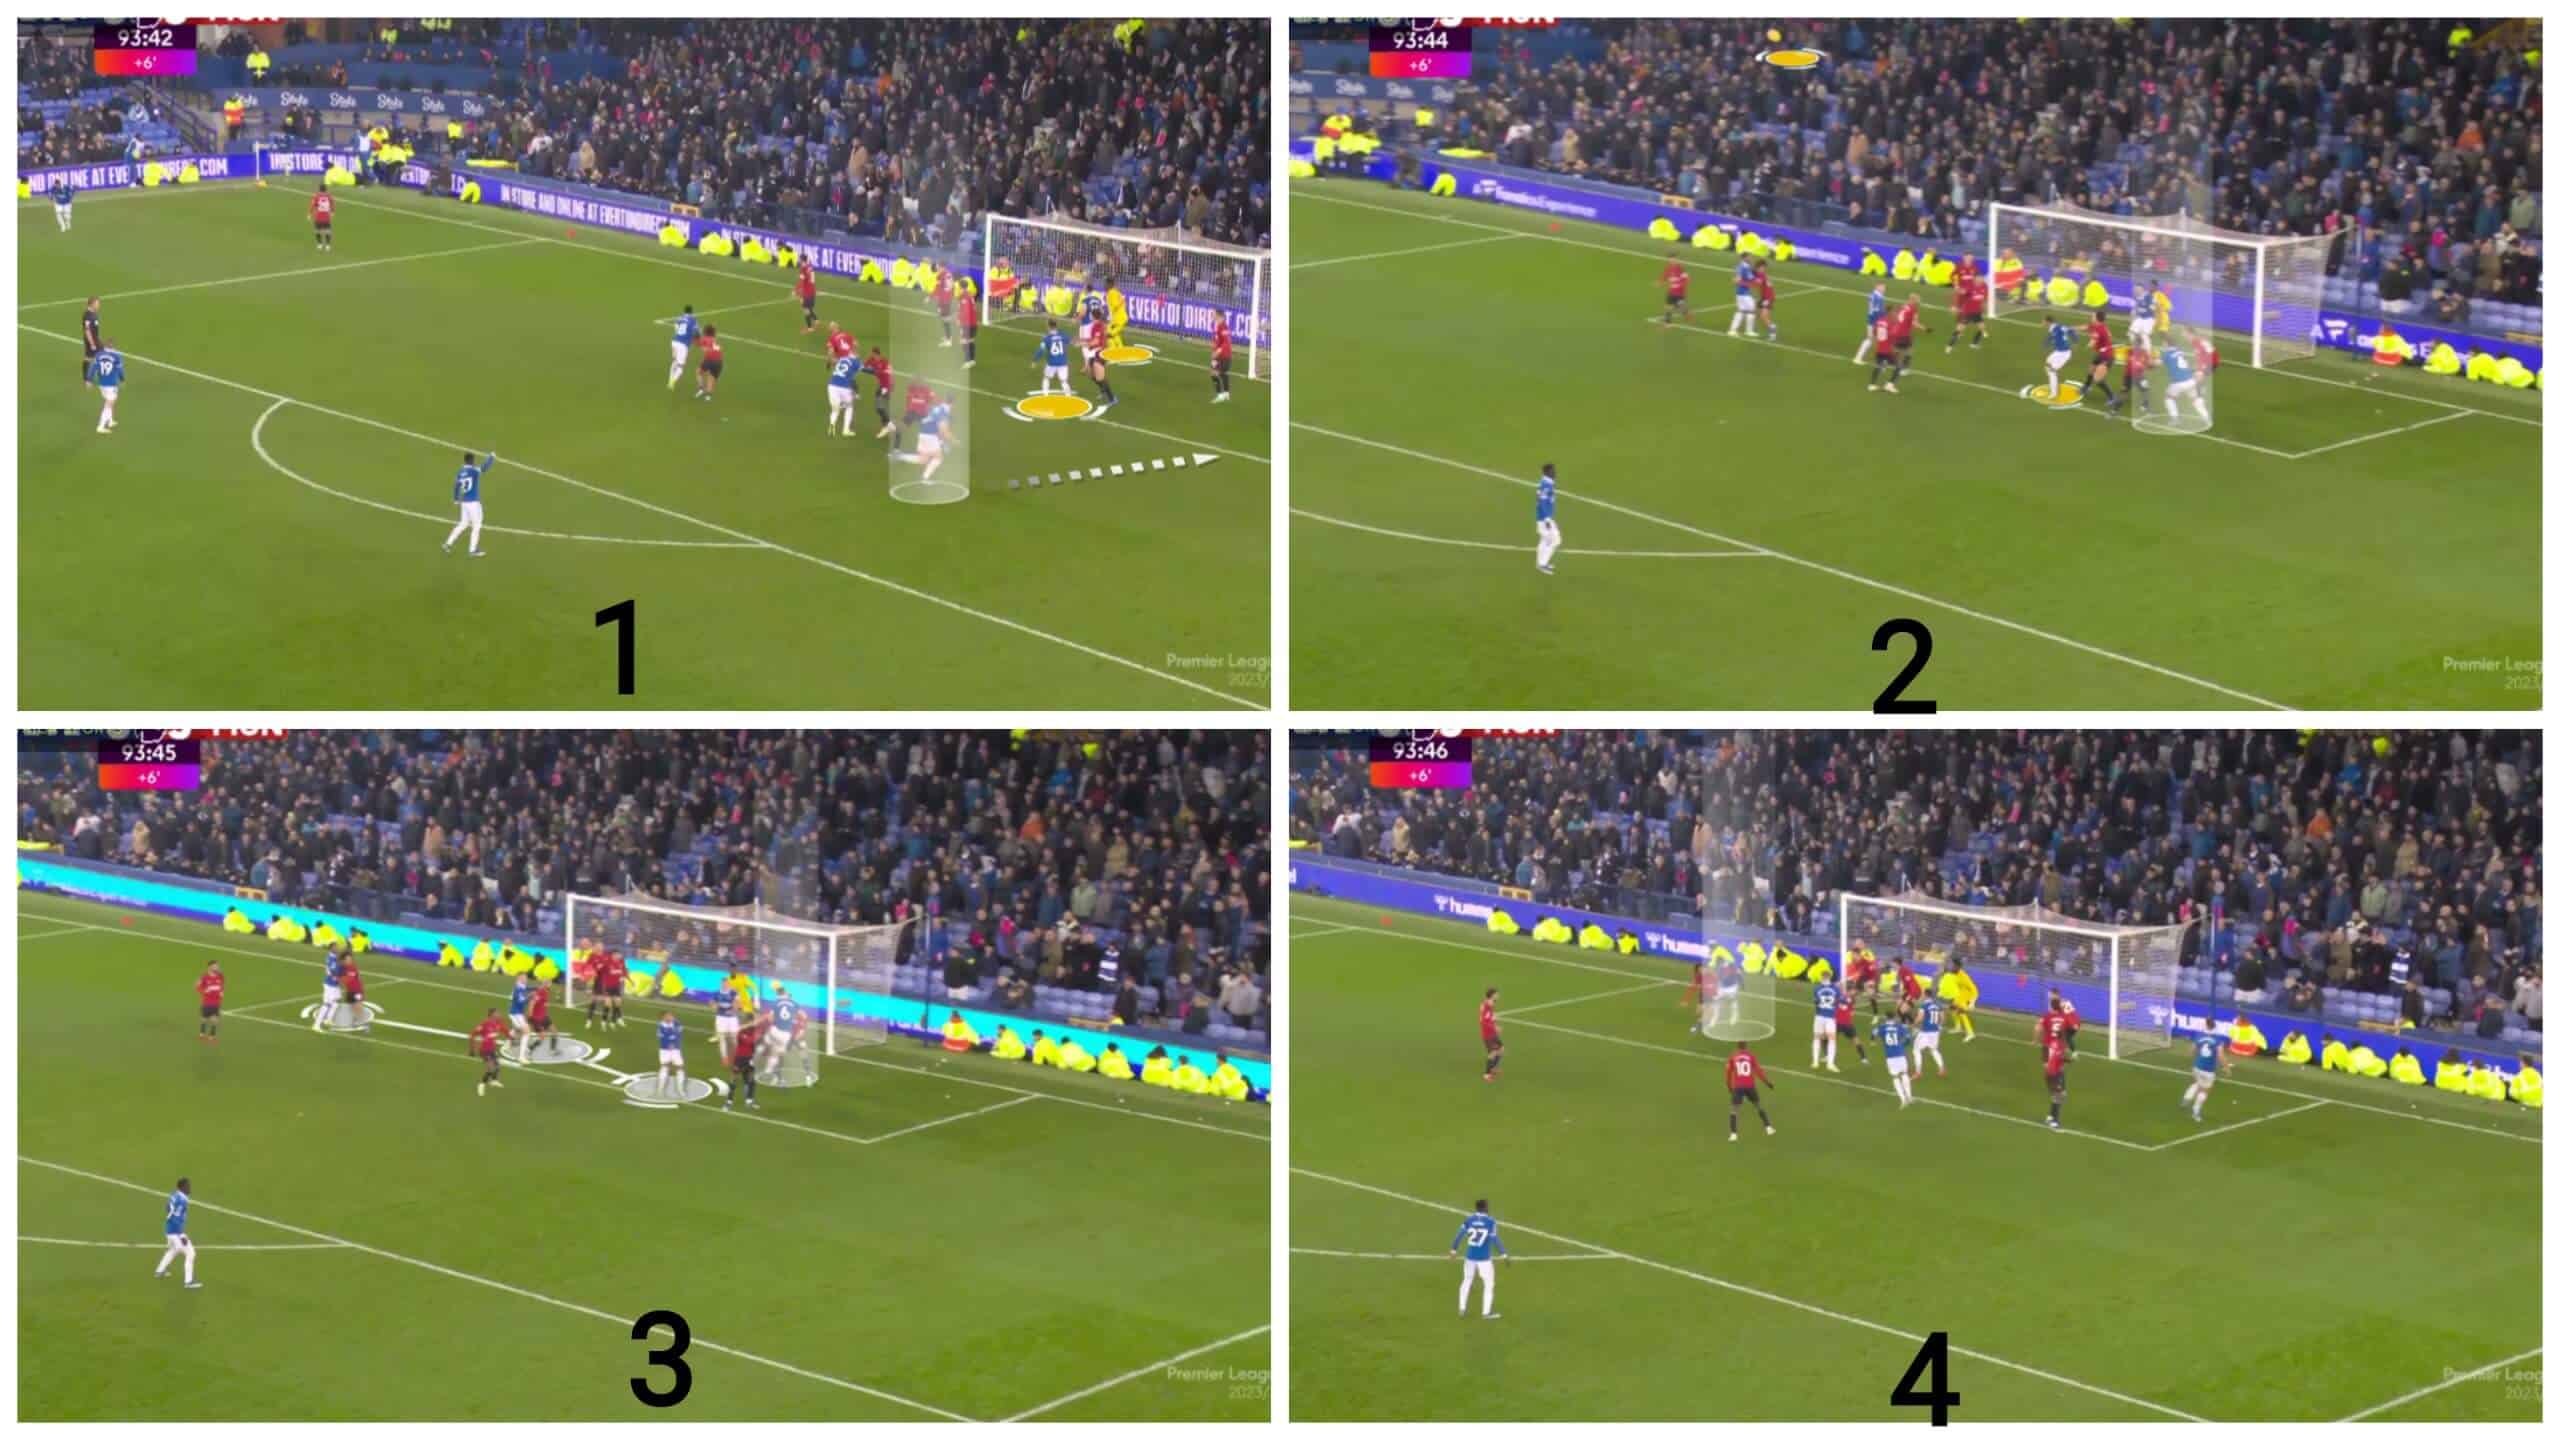
Against Man United, they use a similar strategy, but with only two yellow blocks, not three. This is maybe because the last zonal defender stands more inside near the far post against in-swinging crosses, so he needs to step many steps to the outside to face the cross, as shown in the second photo.
In the third photo, they use another strategy: framing the goal with three players waiting for the headed pass, and it works, so the one on the far post gets the ball, as shown in the fourth photo. At the end, a defender saves the ball on the goal line.
You should make sure by watching cases against elite teams in set-pieces, so we can see how Arsenal, Liverpool and Manchester City dealt with that in those season matches.
Starting with Arsenal, Everton have played against them in the first half of the season, and they will face each other in the second half.
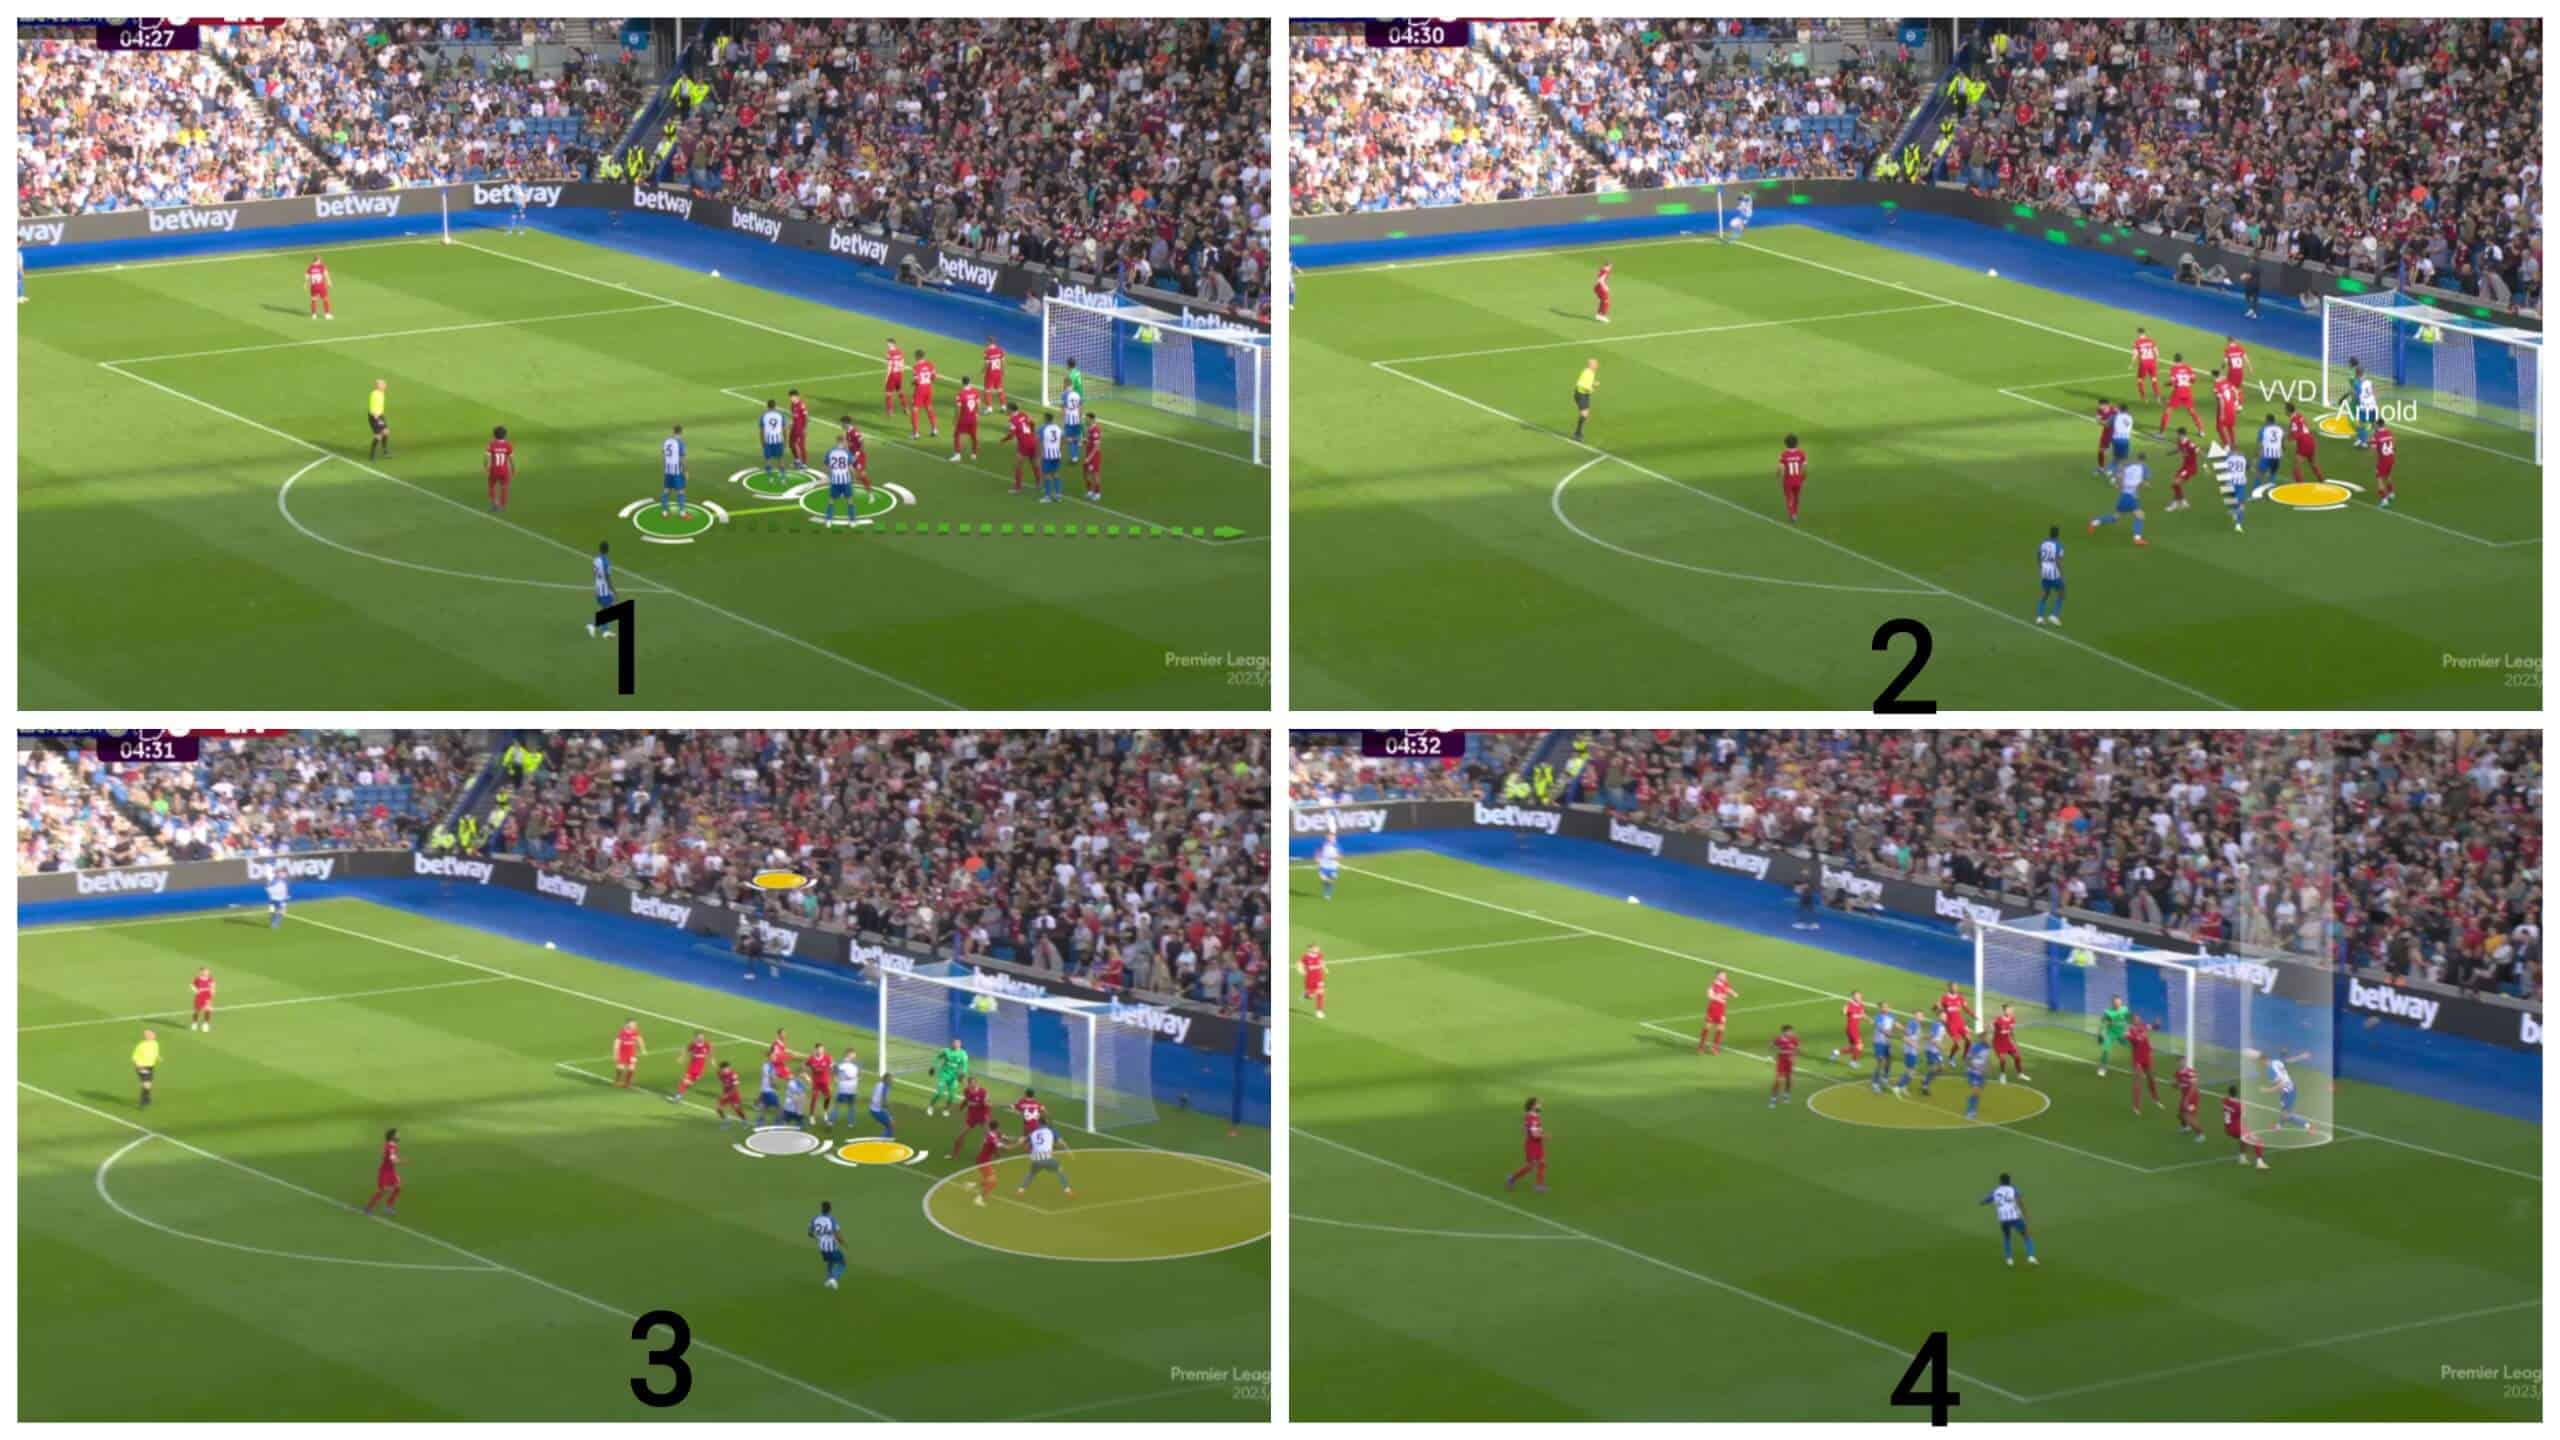
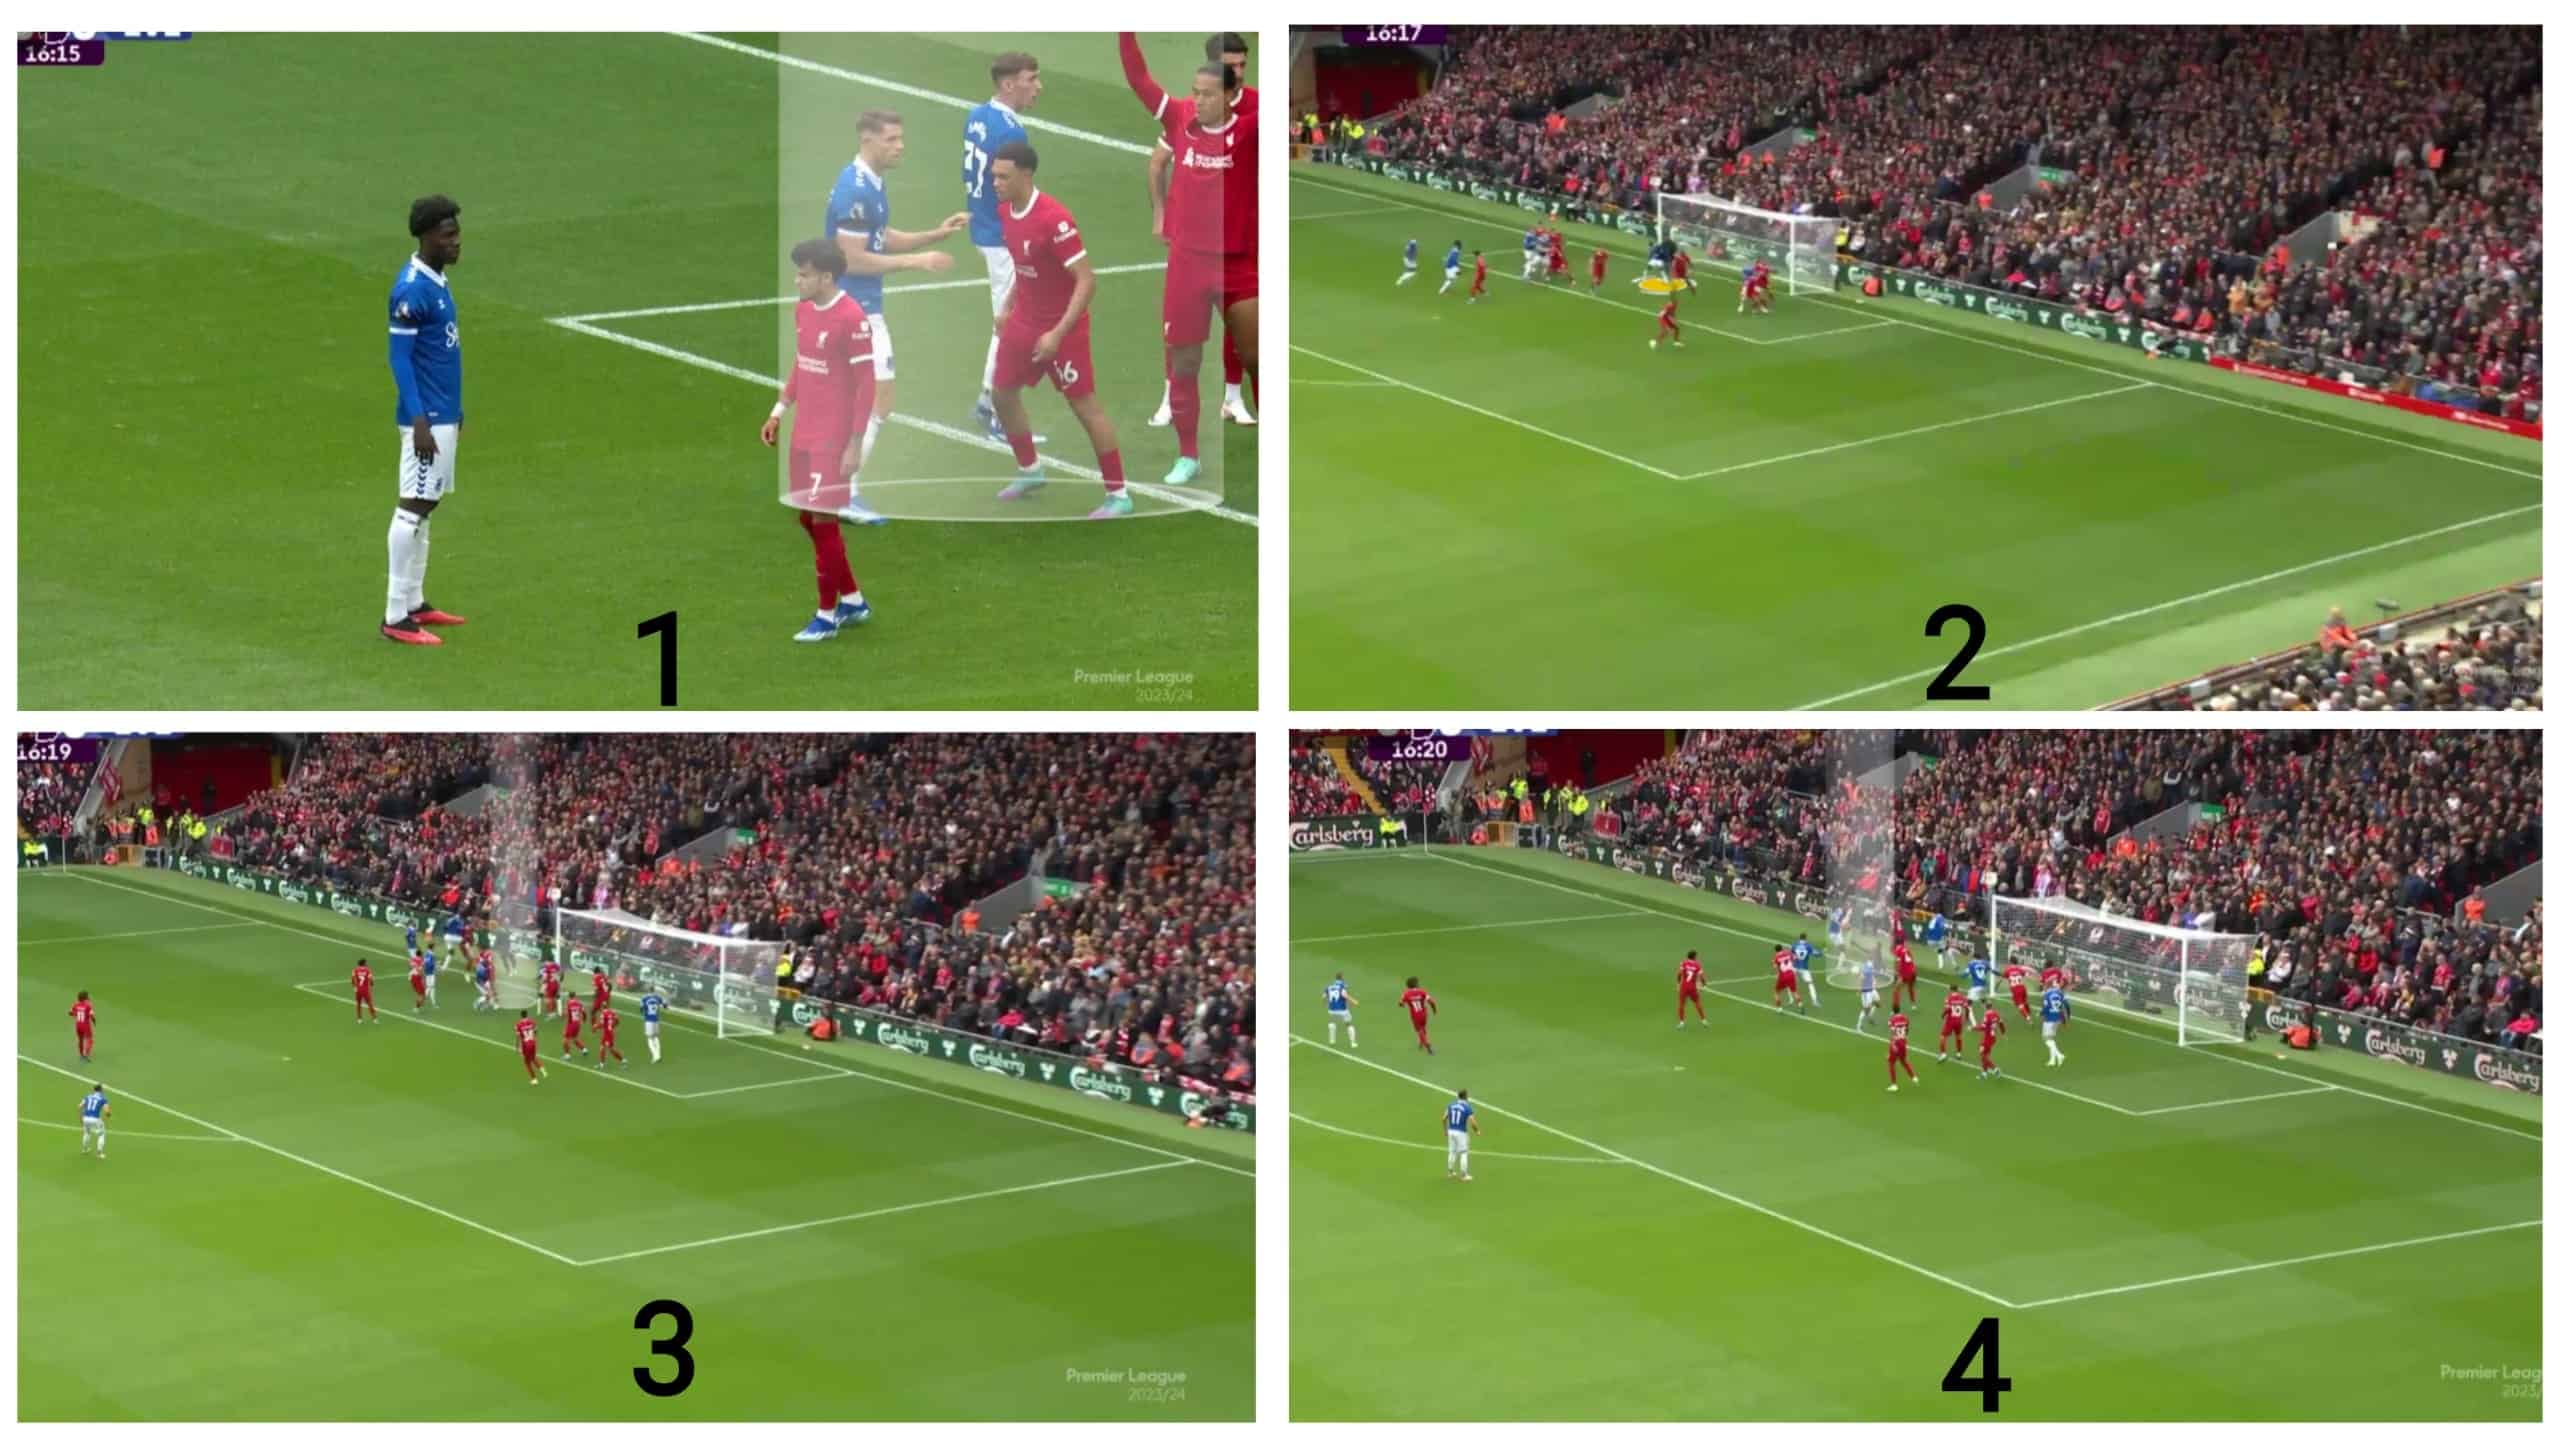
Coming to Liverpool, they haven’t also met Everton in the second half of the season yet, so we will see a case from their match against Brighton, who used Lewis Dunk in a similar way and caused a problem for Liverpool. Then, we will see how they tried to fix it against Everton after that.
In the two photos below, we see three runners against Liverpool’s two defenders who act as a curtain near the penalty spot to block attackers that try to penetrate toward the zonal line to slow down them to reach the zonal line with no speed to avoid the dynamic mismatch over the zonal line, but Dunk goes to our targeted area where no zonal defender stands.
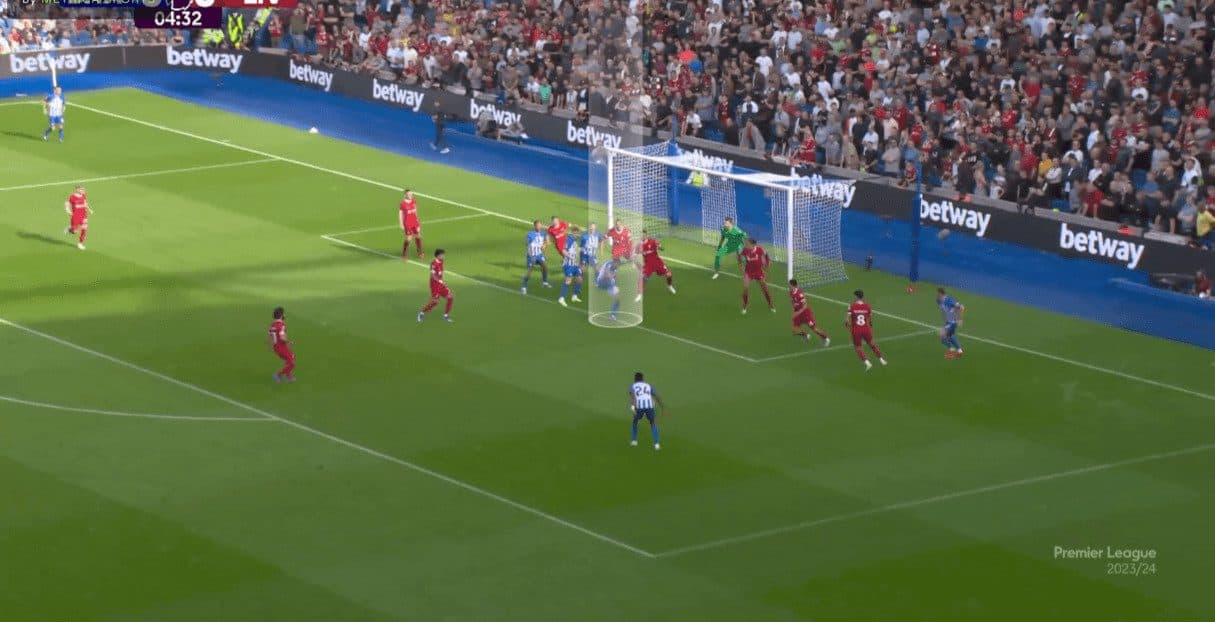
In the second photo below, there are two yellow blocks to Alisson and van Dijk while the third runner goes to be ready to receive the headed pass. In the third photo, Dunk waits for the high ball in the air against his marker, who doesn’t see the ball and Trent Alexander-Arnold, the last zonal defender, who is not good at aerial duels depending on van Dijk and Alisson to cut the ball before getting to him, but this is a floated across and they are also blocked, so Dunk wins the aerial duel while four mates wait for the headed pass, as shown in the fourth photo below.
The plan works, and a player gets the ball but can’t control it well, as shown below.
After that, Liverpool faced Everton, and they had a defence plan to deal with that. Let’s see it in detail!
The first photo below shows some changes in Liverpool’s defending roles. The first change is Assigning Arnold as a man marker, switching his role with Dominik Szoboszlai, who becomes the last zonal defender. The second change is changing the role of one of the two players who start near the penalty spot to block runners to be a normal man marker following Tarkowski everywhere, and that mission is assigned to Arnold while leaving Luis Díaz to act in the old way to only block runners. The third change is to shift the zonal line more toward the far post, and you can see Virgil van Dijk, who is the second-last zonal defender, stick to Szoboszlai, as shown in the second photo below, where you can also see they don’t assign a marker to the attacker who blocks Alisson not to increase the traffic around him making him more free to push the attacker and claim the ball and he is basically excellent at that.
In the third photo, he can punch the ball, but it is difficult to run to the far post and jump to catch the floated cross, so he can’t control the ball well, which falls to Everton’s player, as in the fourth photo. This could be dangerous, so we can’t judge whether it is a radical solution or not.
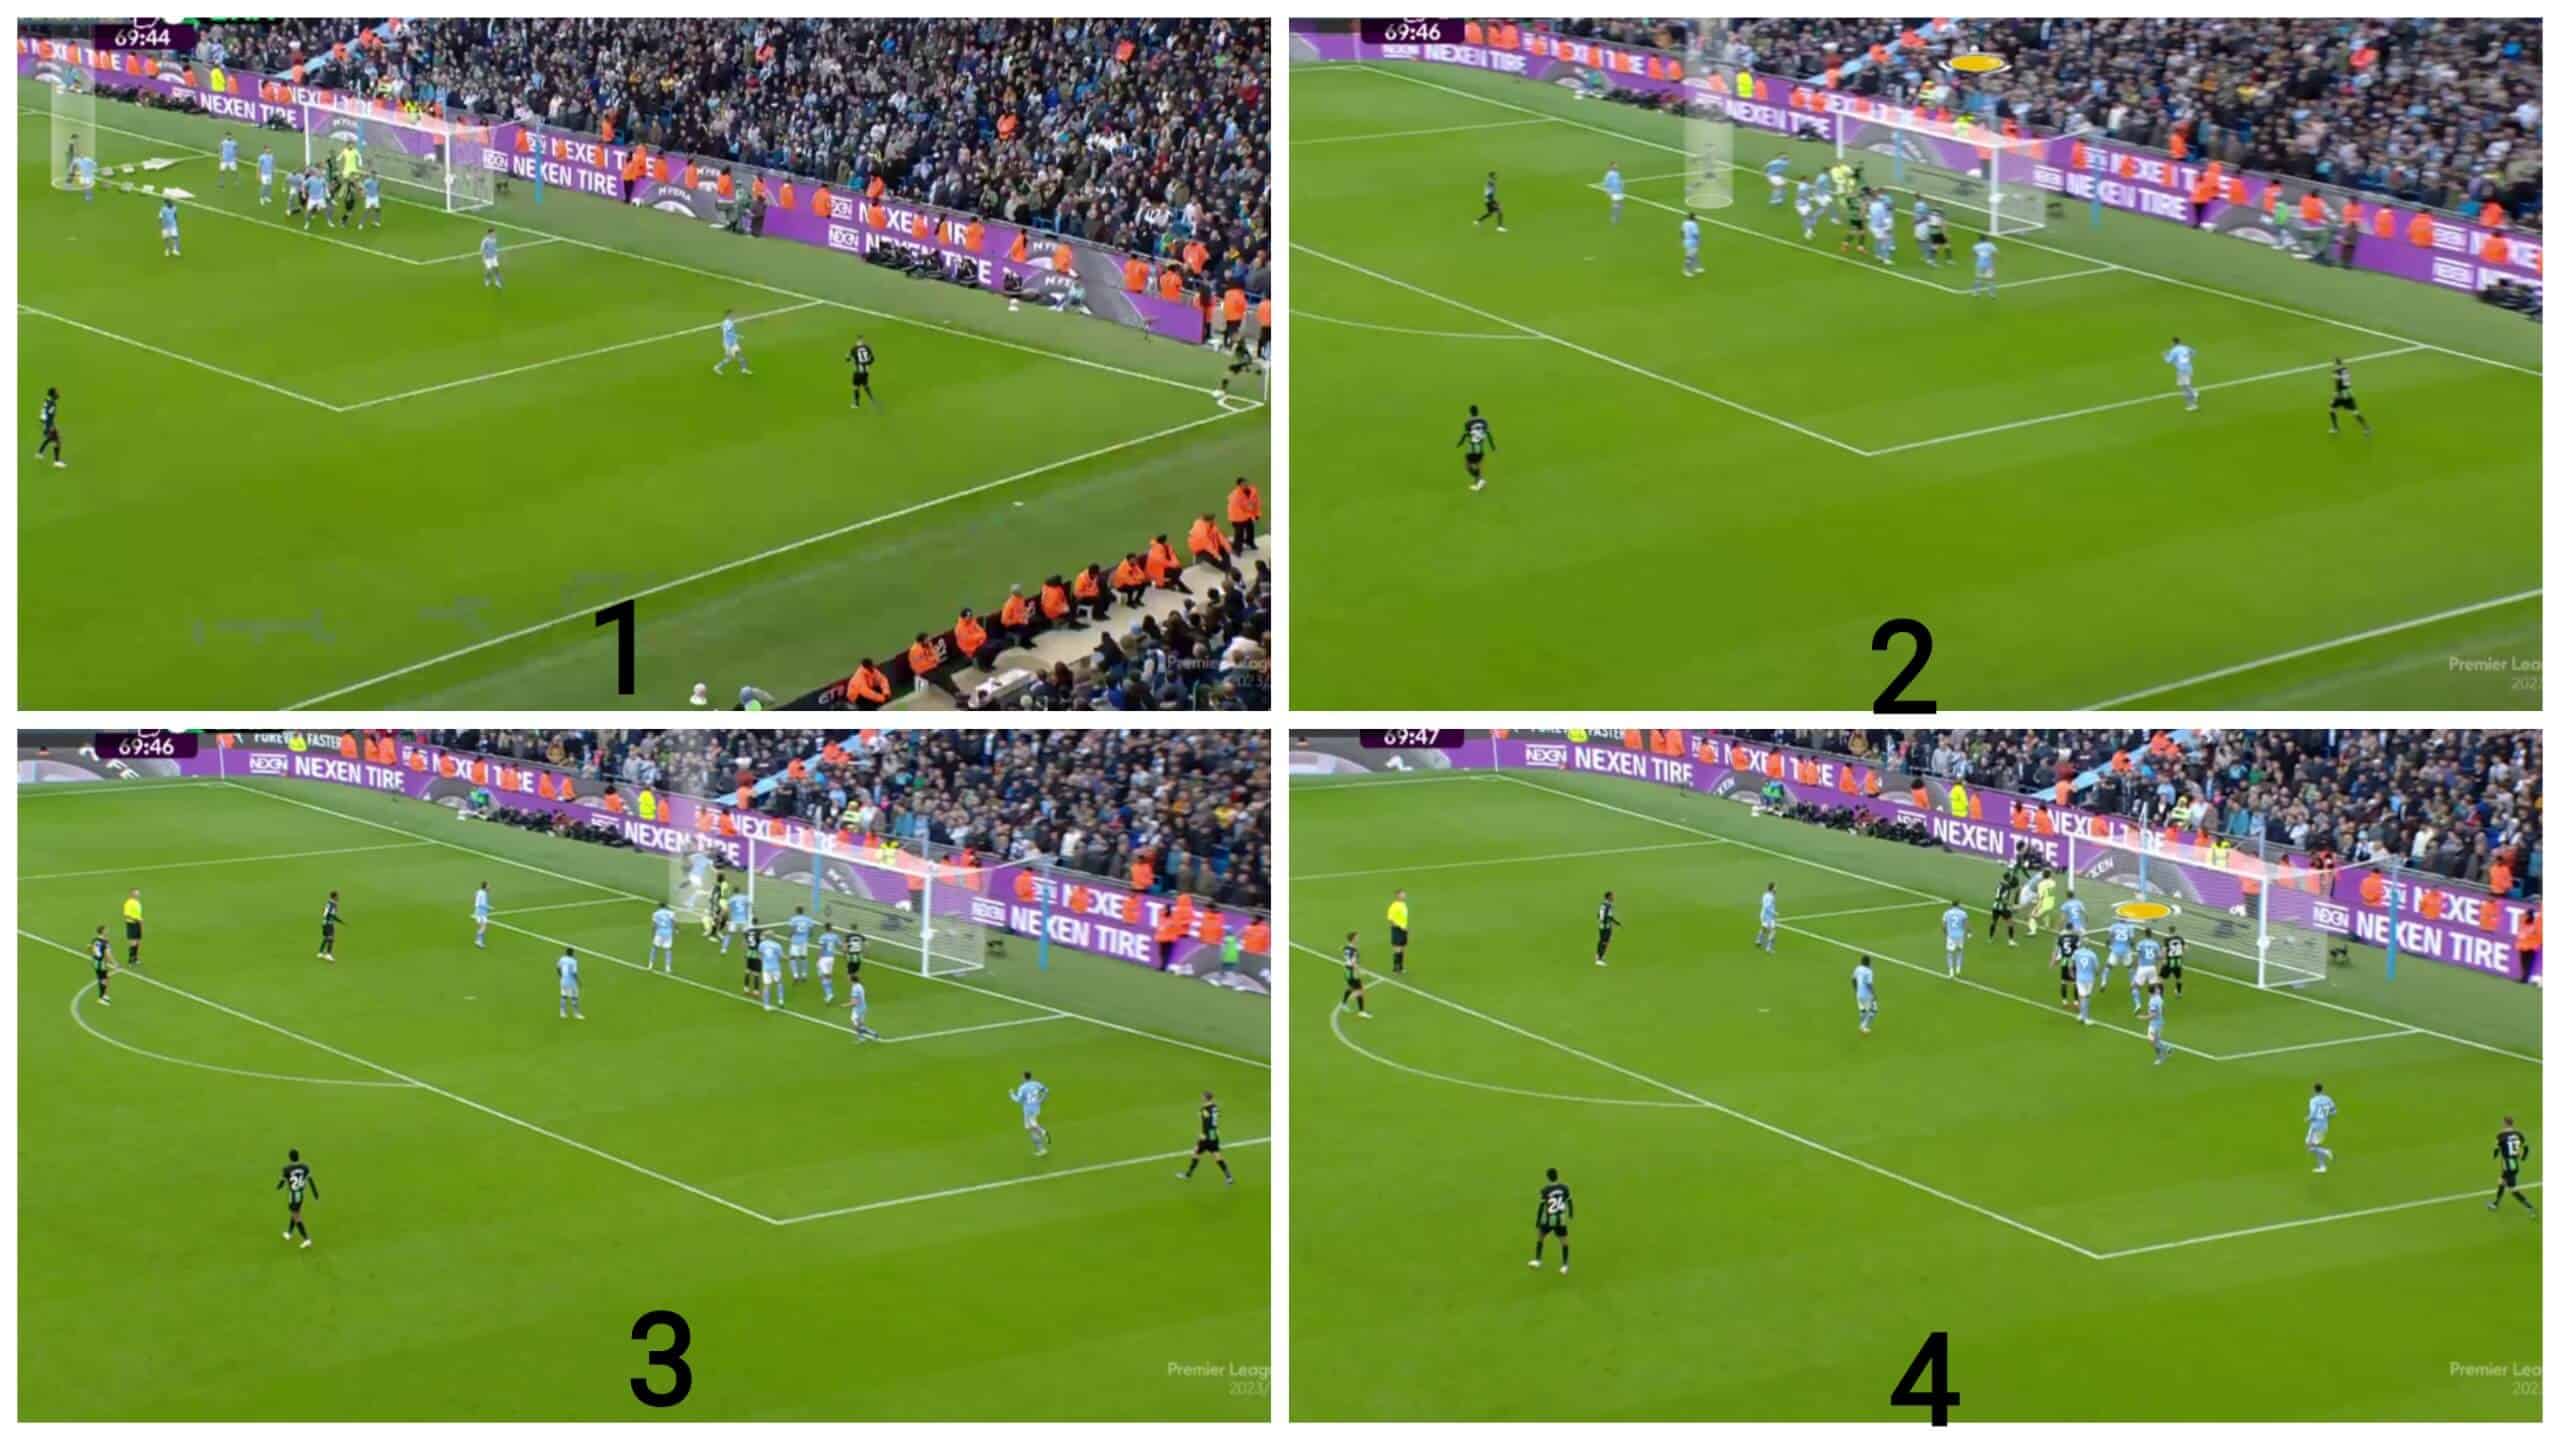
Now, we come to another elite team, Man City. They met Everton in the second half of the league, but Everton couldn’t win any corner, so we will seek Brighton’s help, as we have done with Liverpool.
In the first photo below, Brighton uses two short-option players to drag more players from Man City and target Kaoru Mitoma, who isn’t good at aerial duels, so no one gives him much attention. He also stands in a way that confuses the last zonal defender, whether he would run in front of him or at his back, and then he goes at his back when the ball is in the air, as shown in the remaining photos. In the end, the ball hits the net from the outside.
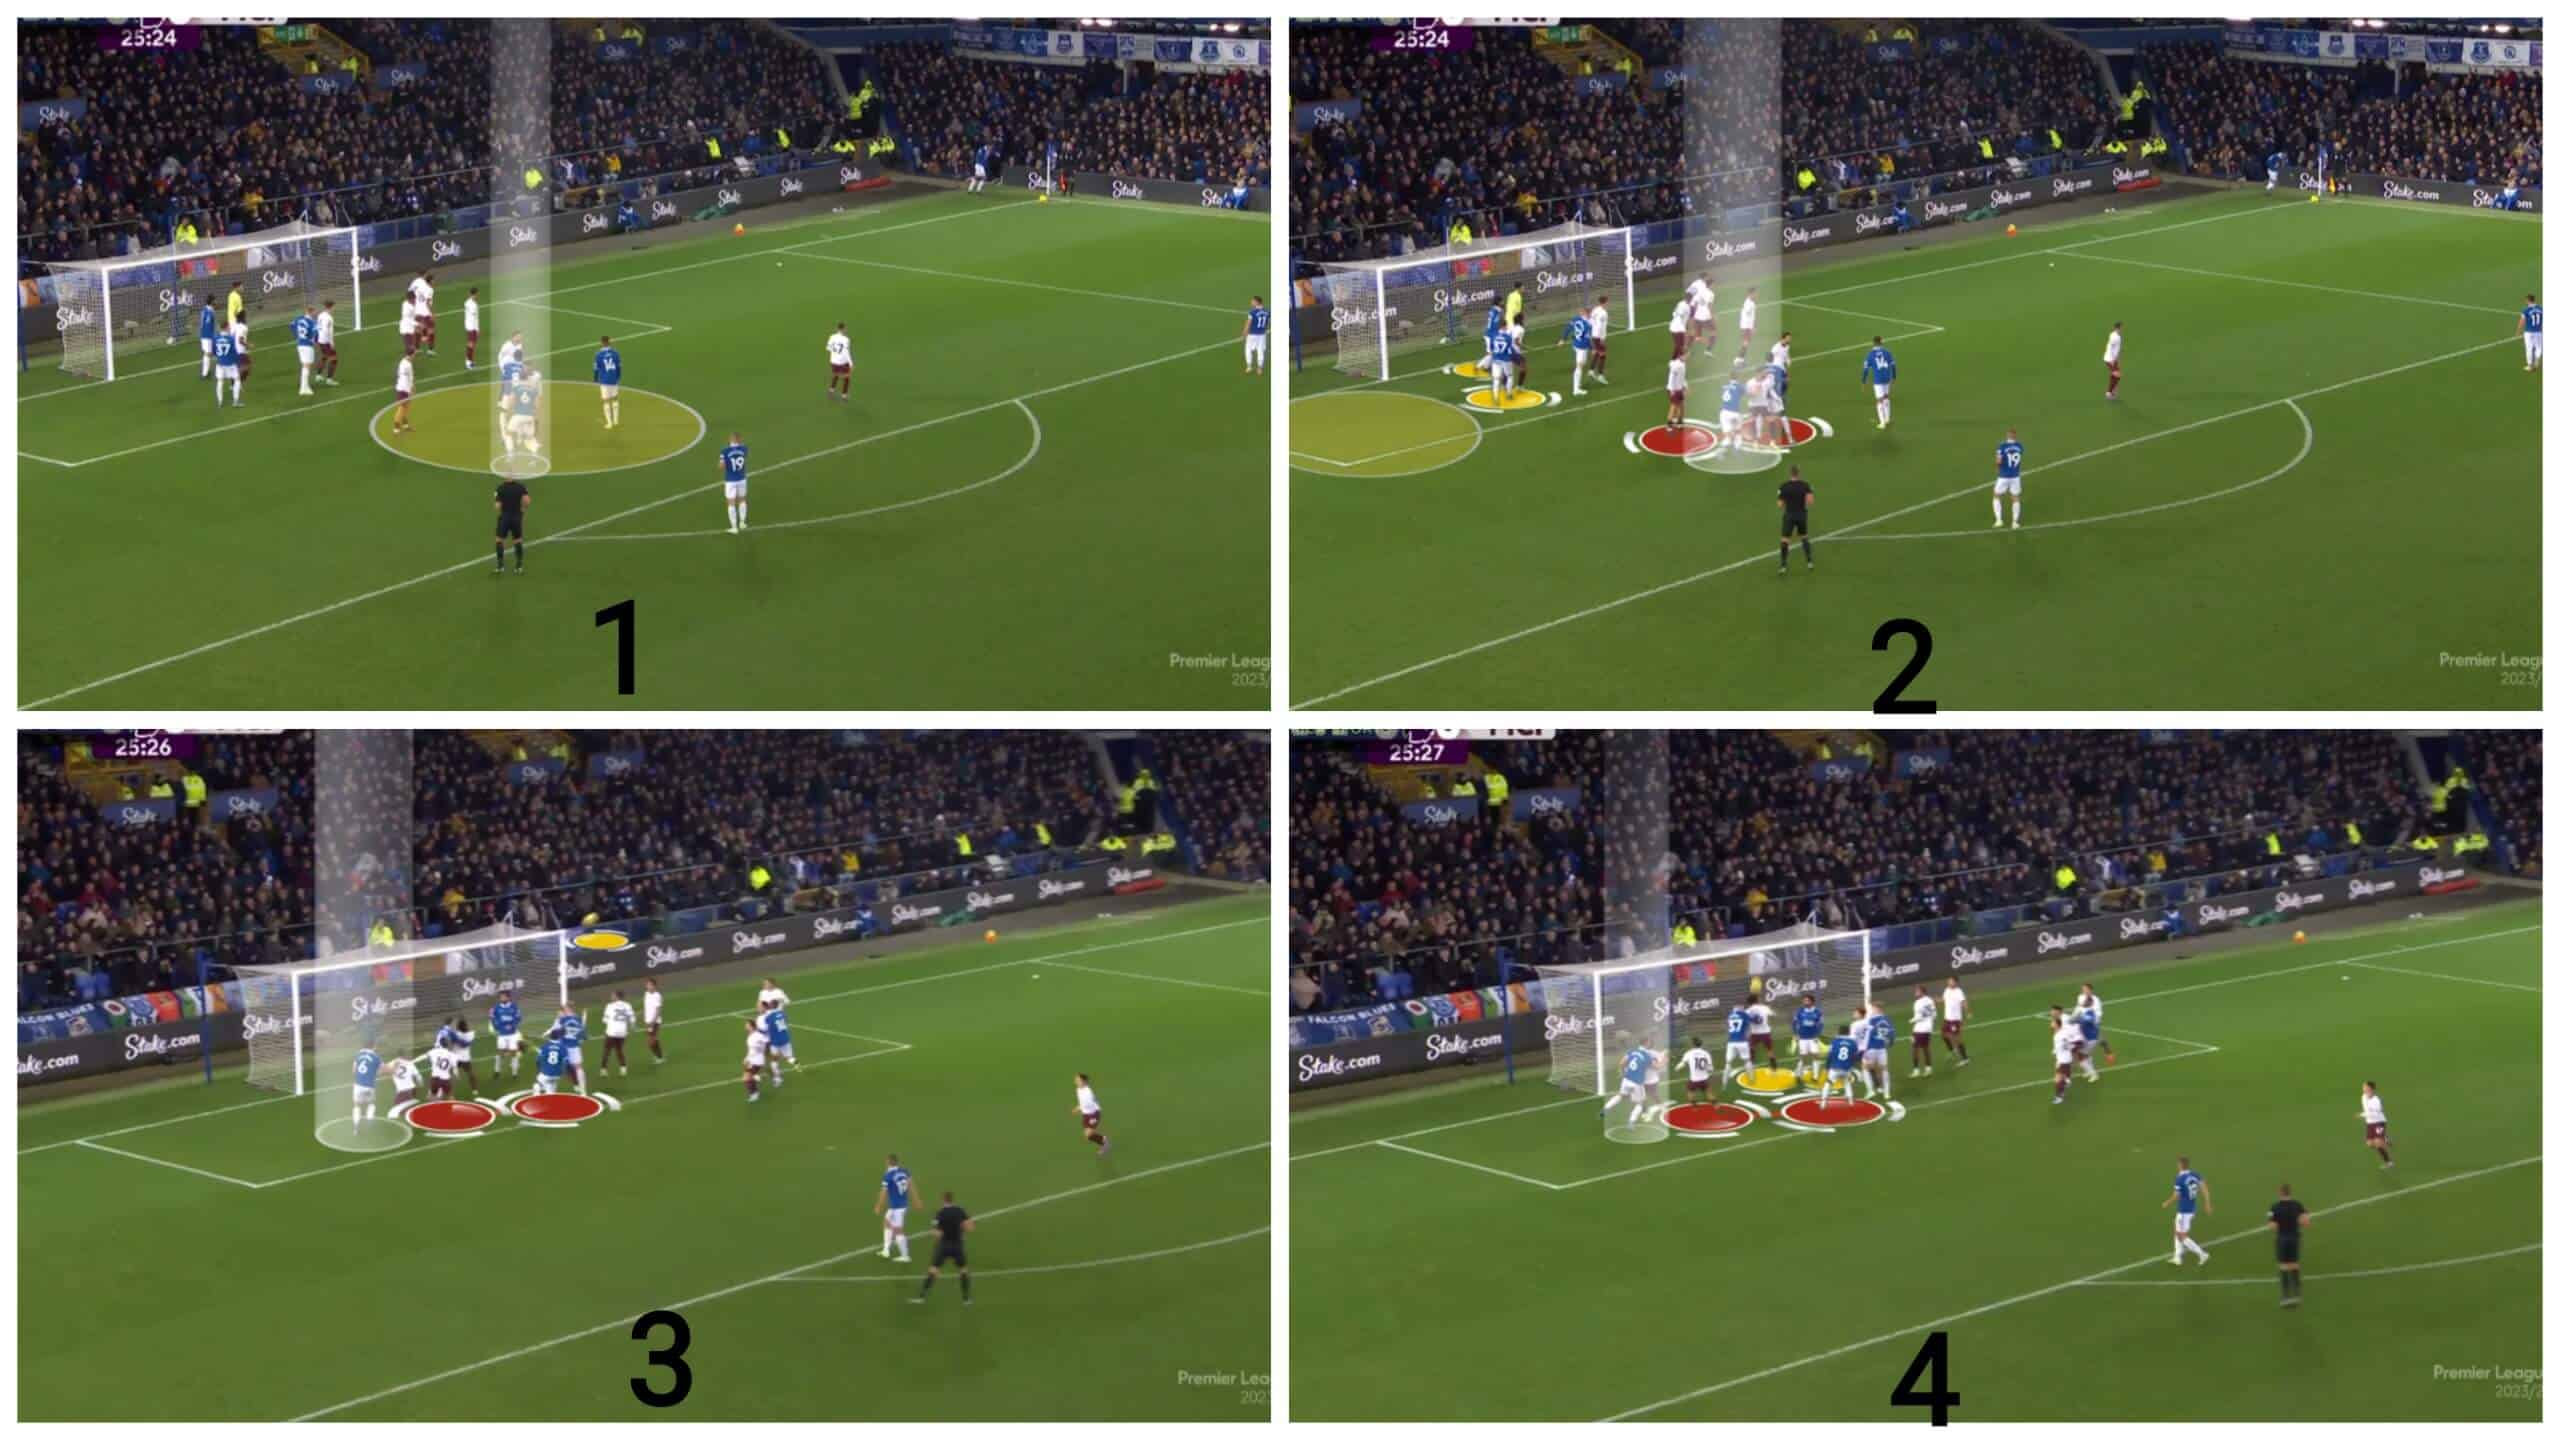
After that, Man City faced Everton and made some small changes. They assigned three man markers with different roles. They asked Kyle Walker to mark Tarkowski, as shown in the first photo. In the second photo, the usual two blocks are highlighted in yellow while Tarkowski goes to the targeted area. Still, we need to focus on the red man marker, Jack Grealish, who seems to start with his attacker. Still, when he goes towards the near post, Grealish keeps running to the targeted area, as shown in the third photos. Still, the cross is inaccurate, landing on Nathan Aké’s head, who is the last zonal defender, so we can’t say that this is a radical solution, and we need more cases to make sure.
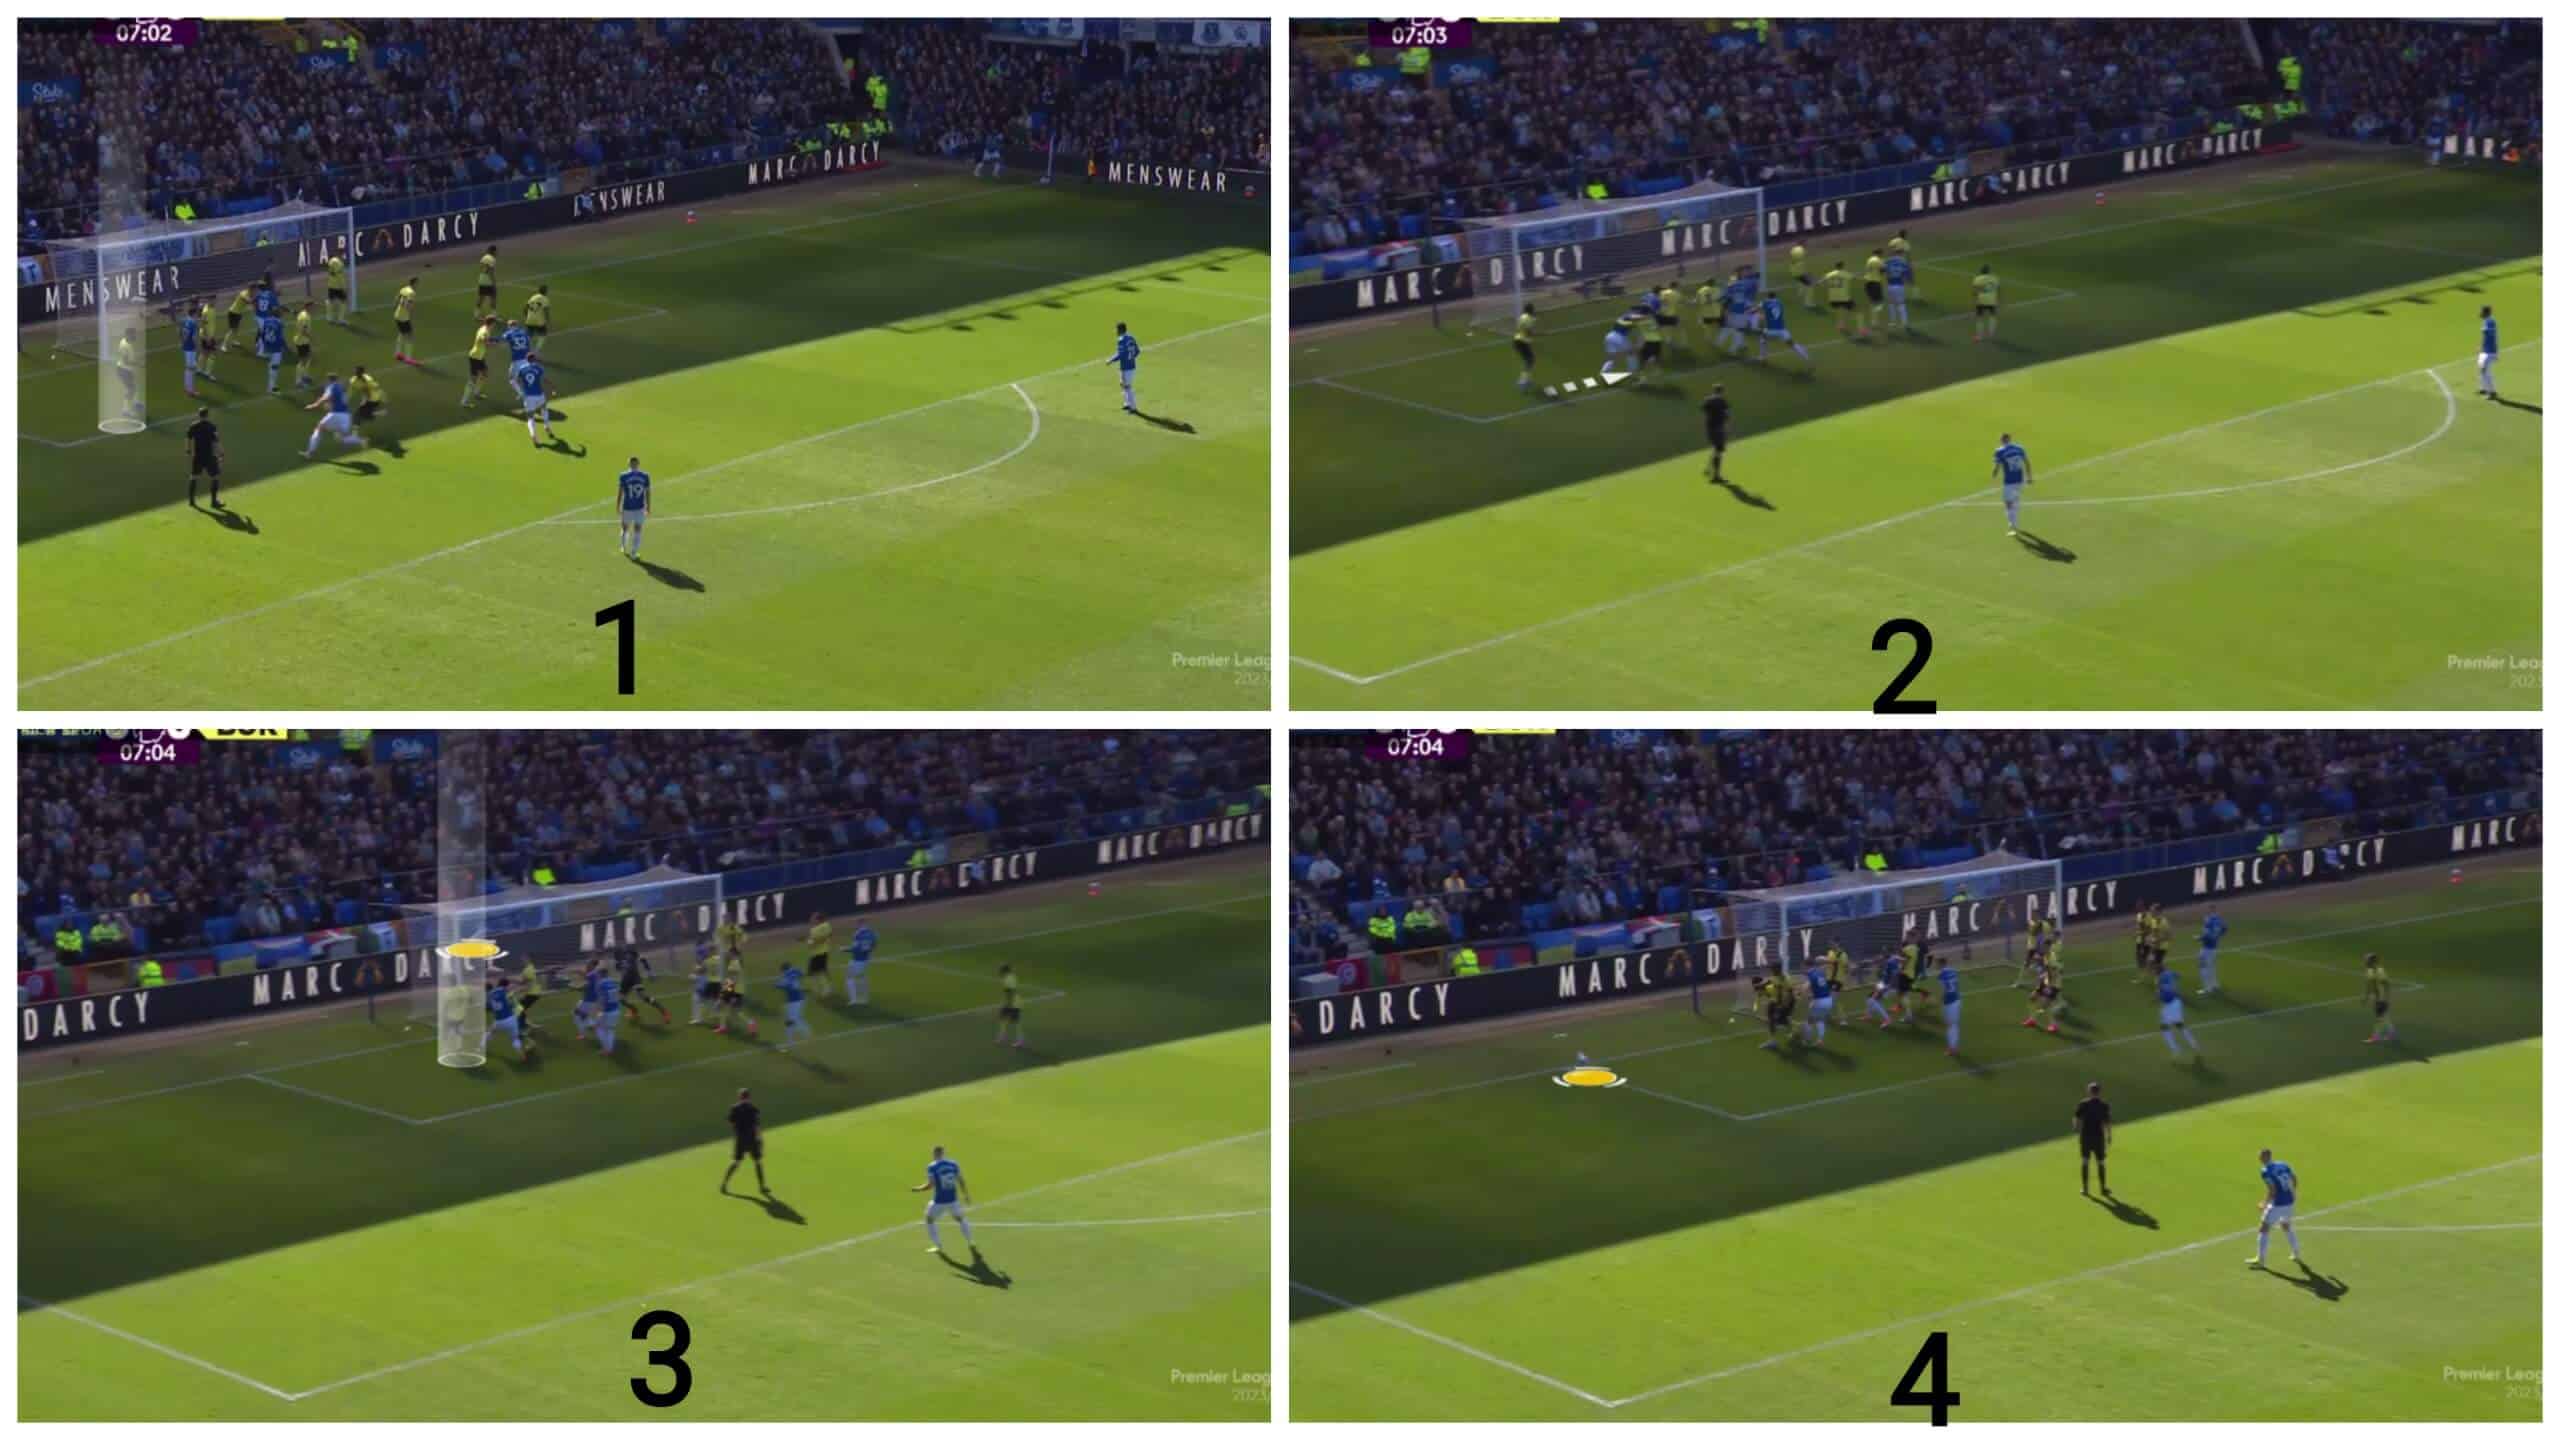
Recently, Everton faced Burnley on 6th April, when Burnley used a different idea: assigning a zonal defender after the far post who sees everything clear in front of him coming from the outside to the inside, as shown in the photos below. We also need more cases to make sure that is an effective solution.
Conclusion
In this analysis, we have shown how Everton continues to use a distinctive method of floated crosses, which remains effective even against elite teams.
In these two parts of set-piece analysis, we have clarified the importance of floated crosses and how teams with a standout player utilise them in aerial duels, especially in leagues that are not of the highest level. We have also explained the defensive methods employed by elite teams against them, which have reduced their usage and impact at the highest level. In this part, we have explained how Everton continues to effectively utilise floated crosses, even against elite teams that strive over time to find solutions. However, it remains unclear whether a team has found a radical counter idea against them, as the matter turns into an individual battle with unpredictable and deliberately random variables and chaos.
Let’s wait and see if any team will get a dominant counter idea against these fatal floated crosses!



Comments