On Friday, the opening game of the 2020 J1 League season kicked off, with Shonan Bellmare hosting Urawa Reds. Having survived relegation by the skin of their teeth in 2019, after a relegation playoff against Tokushima Vortis, the hosts would have been hoping for a better start to the new term.
Urawa Reds almost suffered a similar fate over the previous calendar year, finishing one point above their opening day counterparts last term. They too would have been hoping for a better start to the season in the Japanese top flight, which they achieved.
Despite Shonan Bellmare taking an early lead at the Shonan BMW Stadium Hiratsuka, it was Urawa Reds who claimed three points in a 3-2 victory.
This tactical analysis will dissect the opening game of the 2020 J1 League season and highlight key tactics used by both sides; analysis will then be used to show how they led to the game’s outcome.
Lineups
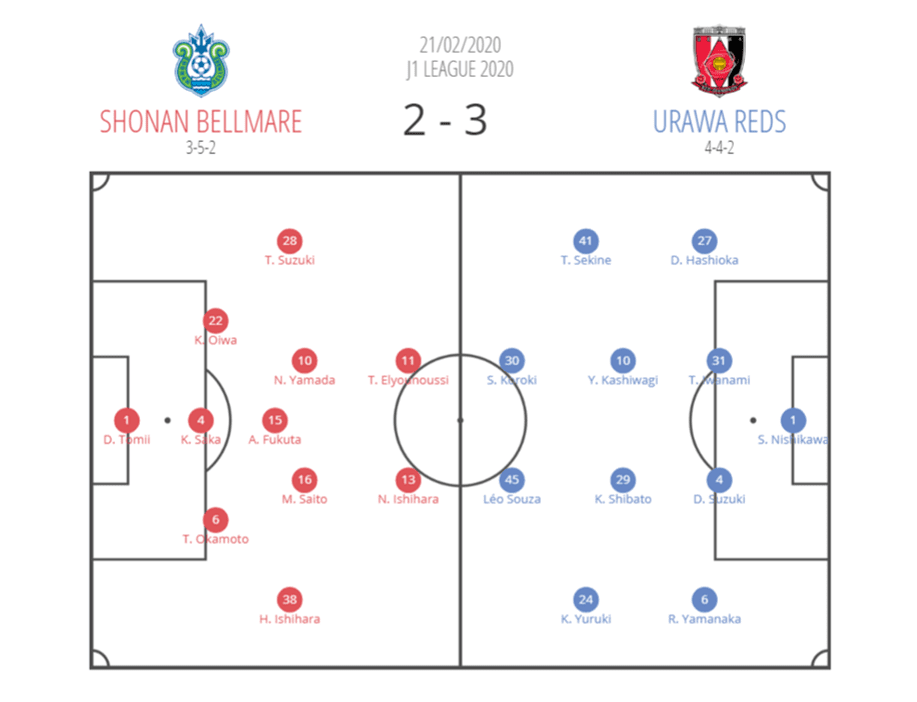
For their opening game of the season, Bin Ukishima lined his side up in a 3-5-2 with a central pivot in Akito Fukuta – which will be discussed later in the piece – and transitioned into a 4-4-2 when out of possession. Following the side’s 1-0 victory in the opening game of the J1 League Cup against Oita Trinita five changes were made to the starting lineup. Kazunari Ono, Kazuaki Mawatari, Koki Tachi, Hiroto Nakagawa and Yuto Iwasaki were dropped for Takuya Okamoto, Toichi Suzuki, Mitsuki Saito, Naoki Yamada and Naoki Ishihara.
In the opposition dugout, Tsuyoshi Otsuki opted for a classic 4-4-2 and made only one change following his side’s 5-2 victory over Vegalta Sendai in the first game of the J1 League Cup. After scoring twice, once from open play and a penalty, Kenyu Sugimoto dropped out of the matchday squad altogether and was replaced in the starting lineup by the team’s vice-captain, Shinzo Koroki.
Shonan Bellmare’s introduction of a pivot
During the majority of the 2019 J1 League season, Shonan Bellmare deployed a 3-4-2-1 formation, however, a January arrival has seen the side introduce a pivot. With Akito Fukuta having arrived from Sagan Tosun in early January on a free transfer, the Japanese midfielder has instantly become an essential figure in his side’s tactics. The role of a pivot is to operate in the space between the defence and the midfield and use their intelligence to decide when to become part of the defence and when to join the midfield.
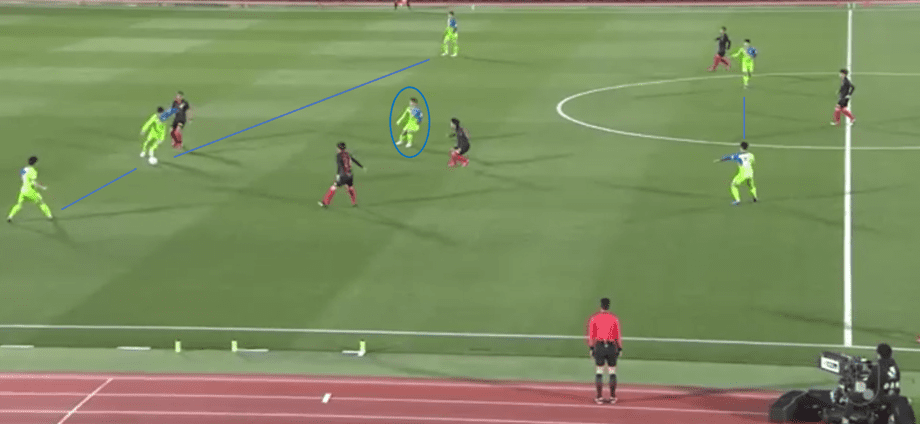
As can be seen in this annotation, Fukuta is operating in the space between the defence and midfield, where he has dropped to so he can offer the centre-back a short passing option. Throughout the game, Fukuta played the pivot role to perfection, leading him to complete a whopping 70 passes of 79 attempted, this being 26 more than the player with the next most completed passes in the game. The midfielder also boasted the joint-highest pass completion percentage of players who made over five passes, with 89%.
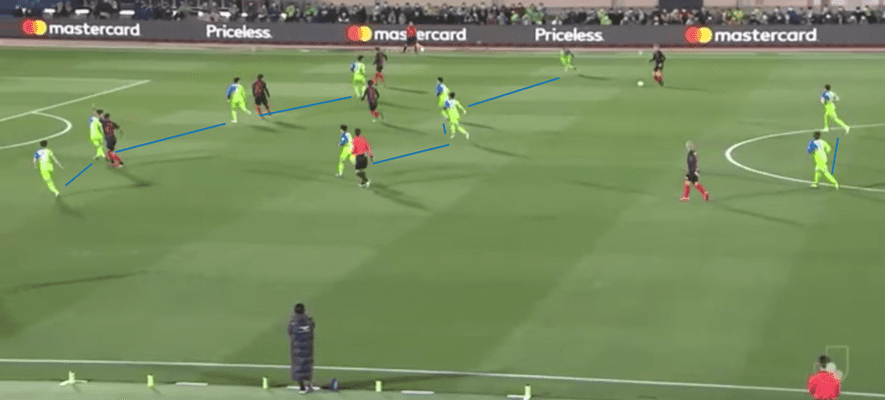
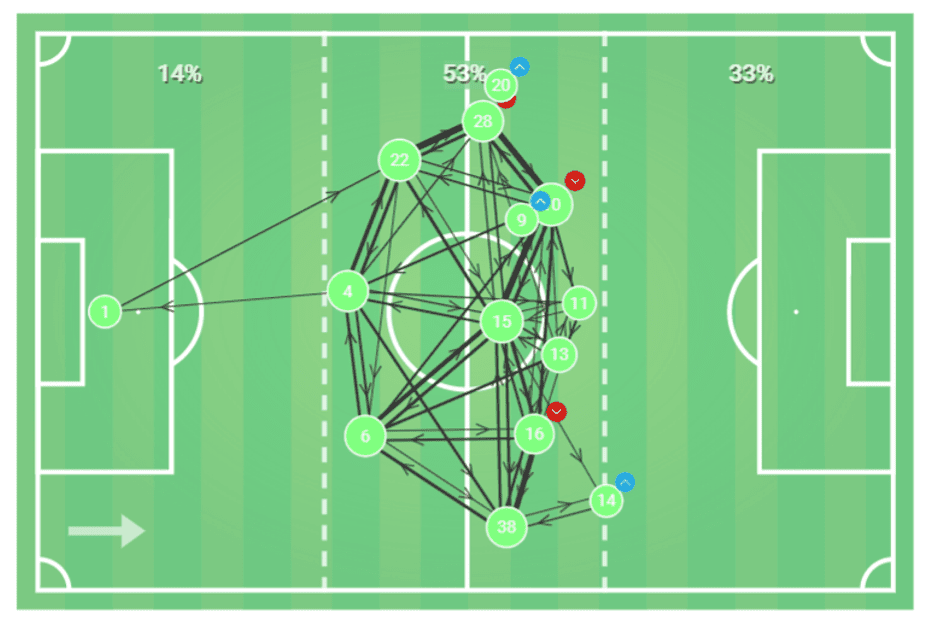
As can be seen in this image, when the home side was out of possession, they would transition into a 4-4-2 shape which Fukuta again played an essential role in. As the pivot, the midfielder would drop into defence and the back three would become a back four, while the midfield five would become a compact midfield four. As the below image of the pass map shows, Fukuta (number 15) was almost the side’s centre point throughout the whole game.
The home side’s wide and expansive play
What the midfield five of Shonan Bellmare’s system lends itself to is to play wide and expansive football due to the width the wide midfielders can provide with the three midfielders occupying the centre of the pitch. Ukishima’s team looked to use this to their advantage as often as possible and stretch the pitch, which would then stretch Urawa Reds’ 4-4-2 set up. This resulted in the home side attempting 17 crosses during the tie, eight of which were accurate.
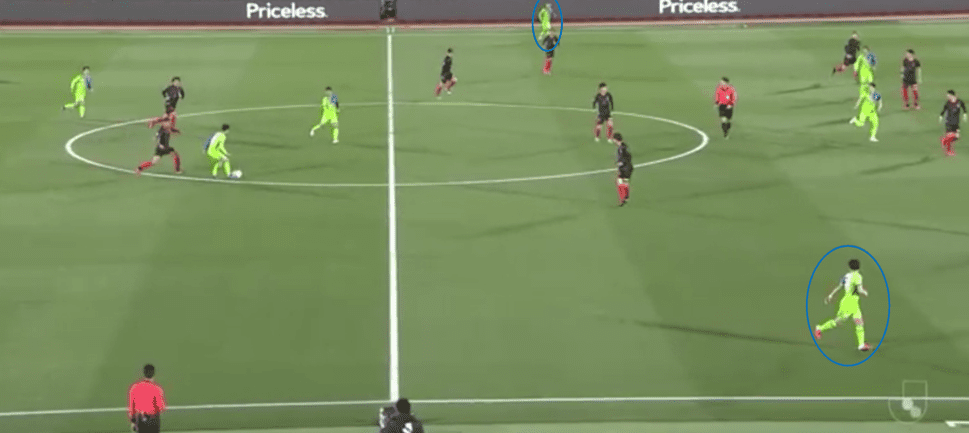
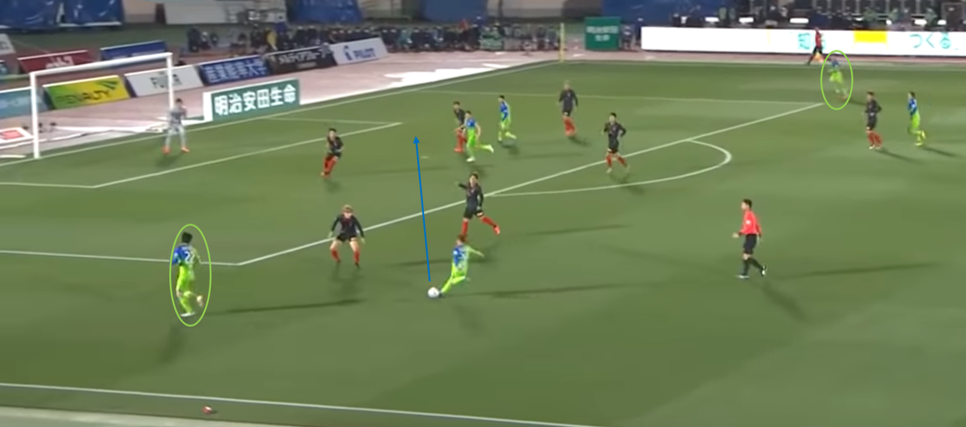
As this annotation shows, when Shonan Bellmare were in possession, the two wide midfielders – Hirokazu Ishihara and Yamada – would look to station themselves as wide as possible on the wings. This then led to situations such as the below image, where the width created by the two wide midfielders would stretch the Red Devils’ backline and create gaps. The below annotation is taken from the home side’s second goal as, instead of taking the wide options, Suzuki opts to cross into a gap in the defence and Yamada heads in an equaliser.
Urawa Reds’ splitting passes
While the homes side’s 3-5-2 system lent itself to playing wide and expansive, it is also susceptible to counter attacks or a defence-splitting pass, should too many men be committed forward. The Red Devils found success on the counterattack – having made five as opposed to Shonan Bellmare’s one – however, the away side found most success with through balls. Urawa Reds attempted 14 through passes in their 3-2 victory, nine of which were successful – compared to Shonan Bellmare’s one successful through pass in eight attempts.
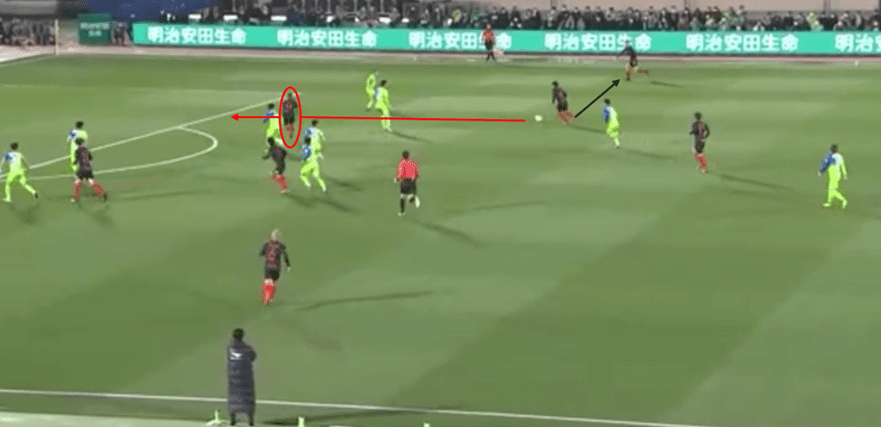
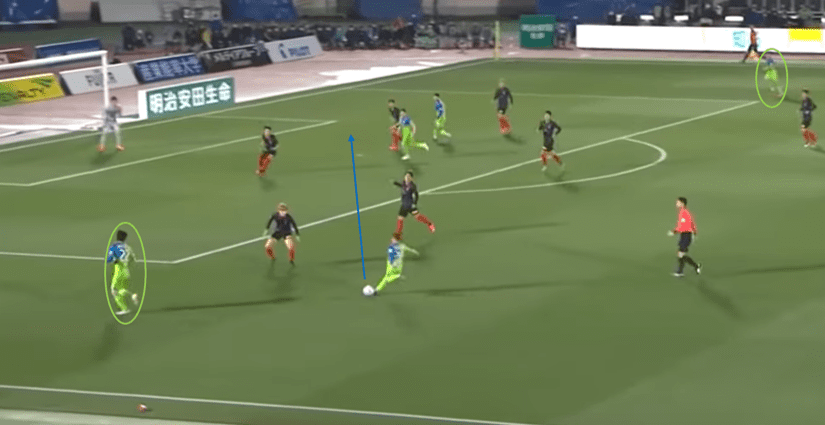
As can be seen here, with a simple passing option out wide, as marked by the black arrow, the ball carrier in the centre of the pitch instead attempts to get in behind the host’s backline with a through pass. This was possible when Ukishima’s side did not transition into their 4-4-2 effectively or quickly enough, leaving gaps in their back-three system.
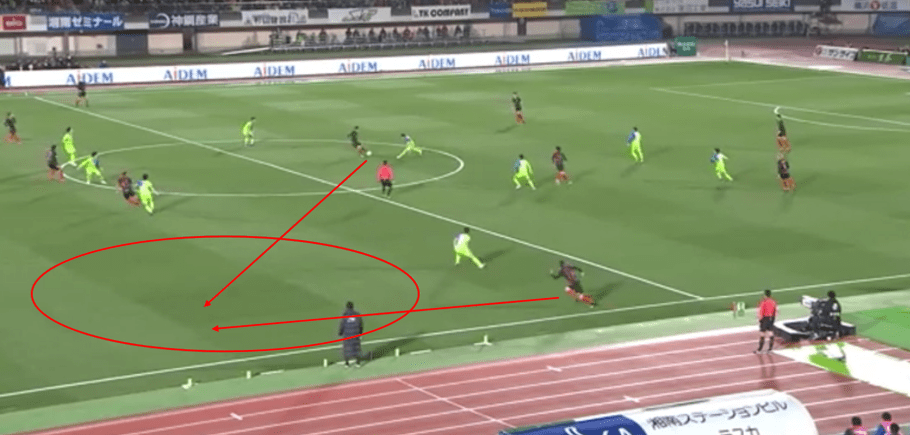
Another gap which was left susceptible to quick counter attacks was the area between the wide midfielder and the back three due to Shonan Bellmare’s wide midfielders looking to be as wide as possible and find space. The Red Devils often looked to exploit this area with fast and direct through balls into their own wide midfielders – Koya Yuruki and Takahiro Sekine.
Urawa Reds’ exploitation of the wide areas
As mentioned, Shonan Bellmare’s 3-5-2 system left the side incredibly susceptible to quick attacks in the wide areas when they did not transition quickly enough. Otsuki recognised this and instructed his side to find those areas as shown in the previous annotation as often as possible and stretch Shonan Bellmare’s back three, which produced a lot of goal success for the away side as all three of the passes prior to their goals were crosses.
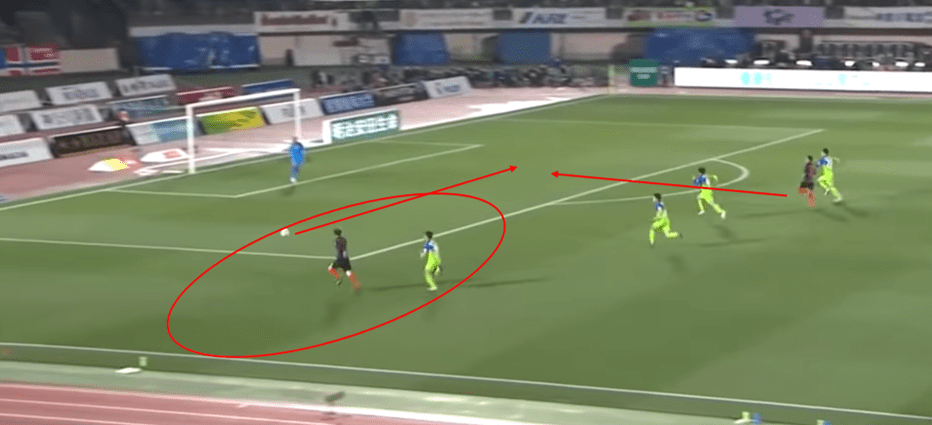
Here, Yuruki has got into the wide area of weakness for Shonan Bellmare following a long through ball in the build up to the Reds equalising following Ishihara’s opening goal. Having caught up with the ball, the wide midfielder is able to cross and Koroki, the only change from the side’s previous tie, is able to round off a counterattack by eventually prodding home a spilt shot.
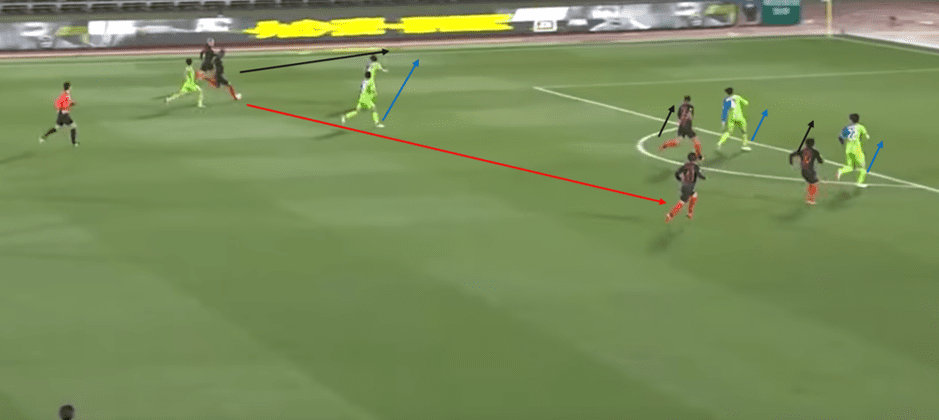
This annotation shows the build-up play to the home side’s match-winning goal. Again, Urawa Reds are about to take advantage of the home side’s transition into their defensive structure with a counterattack. With an overlapping run, marked by the black arrow, two Shonan Bellmare players are taken out of the equation by tracking the run, the forward runs of the two strikers are then mirrored by the two defenders and in one cross of the ball, the pitch opens up for Sekine, who remains calm and bags the winner.
Conclusion
Bin Ukishima and his Shonan Bellmare side will perhaps feel a little hard done to following the opening game of the J1 League season, particularly after his side missed a penalty with the scores at 2-2. Also, having boasted more possession (57% to 43%), more completed passes (414 to 291), more attacks (49 to 37) and more shots (11 to nine), though, fewer on target that Urawa Reds, then the home side may feel especially hard done to.
However, Tsuyoshi Otsuki will care little after masterminding an impressive counterattacking display which exposed the weaknesses in Shonan Belmare’s new 3-5-2 system. If the home side is to enjoy a more successful season than over 2019, it will be essential to iron out the kinks in their new-look three-back formation.
This tactical analysis has dissected the opening game of the 2020 J1 League season and highlighted key tactics which were deployed by both sides. Analysis has also been used to show how those key tactics led to the game’s outcome, a 3-2 victory for Urawa Reds.



Comments