The start of the 2020 J1 League has not been ideal for the reigning champions, Yokohama F. Marinos, with four points from three games before this high-voltage clash. FC Tokyo, the runner-up of last season enjoyed back to back wins in the starting games but faced a heavy defeat against Kawasaki Frontale in the midweek game. Finally, able to play in front of the home crowd it was supposed to be a joyous occasion for the reigning champions but FC Tokyo had other plans.
This tactical analysis will discuss the tactics of both the managers and where exactly the Marinos played into Tokyo’s hands. This analysis will also delve upon the unique build-up of the Marinos.
Lineup
Postecoglou Angelos stuck to his preferred 4-2-3-1 formation but made numerous changes in the lineup from the midweek clash against Shonan Bellmare. Ado Onaiwu replaced Edigar Junio up top. Keita Endo and Kota Mizunuma were brought in for Erik and Teruhito Nakagawa in the left and right-wing respectively. Jun Amano was reinstated in the midfield owing to his brilliant performance against Bellmare. The backline also saw three changes, only Shinnosuke Hatanaka was fortunate enough to keep his place.
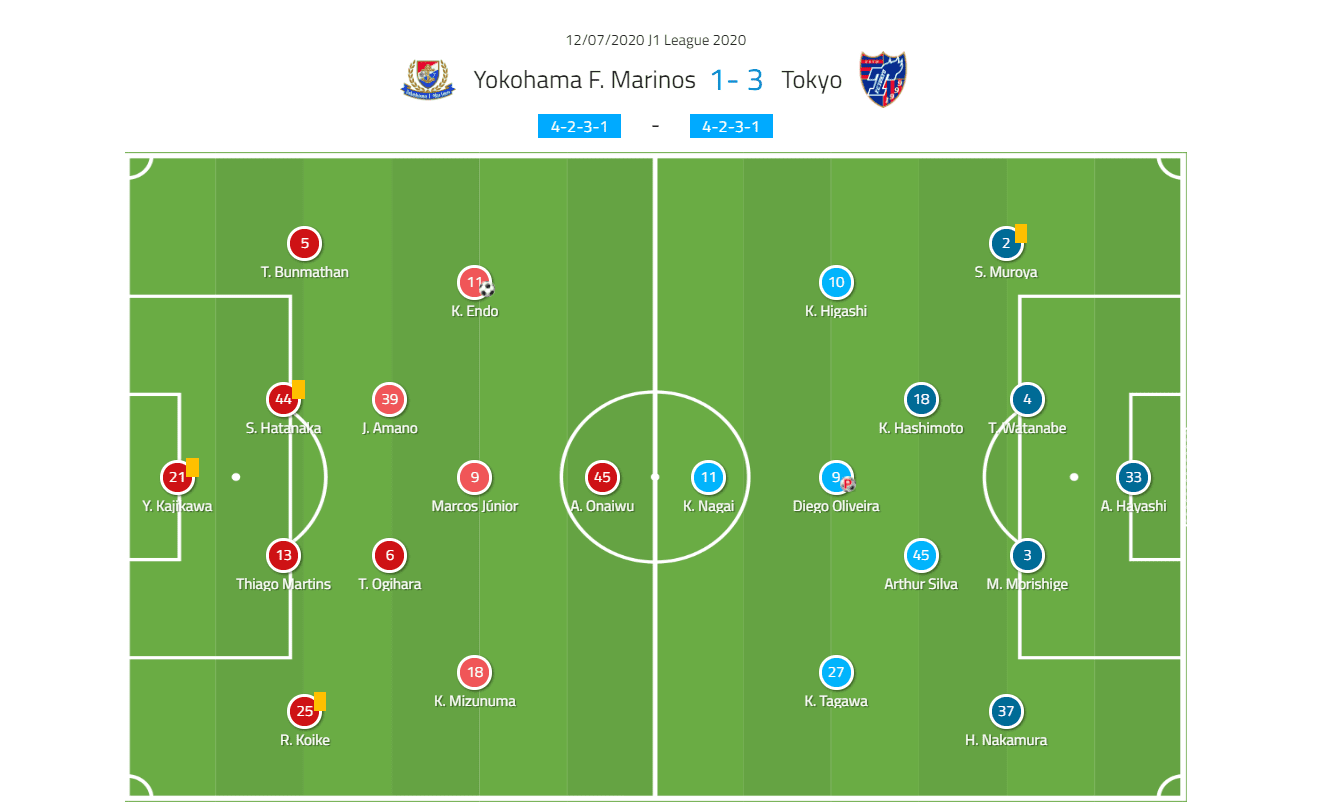
Hasegawa Kenta too started with his preferred 4-2-3-1 but made fewer changes contrary to his counterpart. Shuto Abe was replaced by fellow Japanese, Kensuke Nagai, up top. Kyosuke Tagawa replaced Leandro in the left-wing and was unfortunate to be subbed off in the 18th minute after earning his side a penalty. Yojito Takahagi was replaced by Kento Hashimoto in the middle of the park. Unlike Yokohama, FC Tokyo defence saw only one change where Sei Muroya slotted in the right-back position.
Yokohama F. Marinos’ hipster build-up
Yokohama F. Marinos is a heavy possession-based side. Under Angelos, the Marinos had 63.25 % possession last season. This season in four J1 League games, the Marinos have managed to keep 70.7 % possession, which is enormous. In this match against Tokyo, the home side had 71.63 % possession, which explains their urge to dominate the game with possession.
The Marinos use a lot of rotations and unique variations when in possession as can be seen in teams such as Manchester City and Serie A side, Atalanta. On paper, the formation might be 4-2-3-1 but it hardly remains so, even when the Marinos build-up from the goalkeeper, they tweak their build-up constantly. It often leads to CAM or an attacking player dropping deep to overload the middle third to open up various passing lanes or the defenders shifting their place to receive the ball in an open space.
In the image below, RCB positions himself next to the goalkeeper. LCB moves to the flanks and provides width. LB inverts in the half space and RB is on the verge of inverting beyond the first line of 4-2-3-1 Tokyo press.
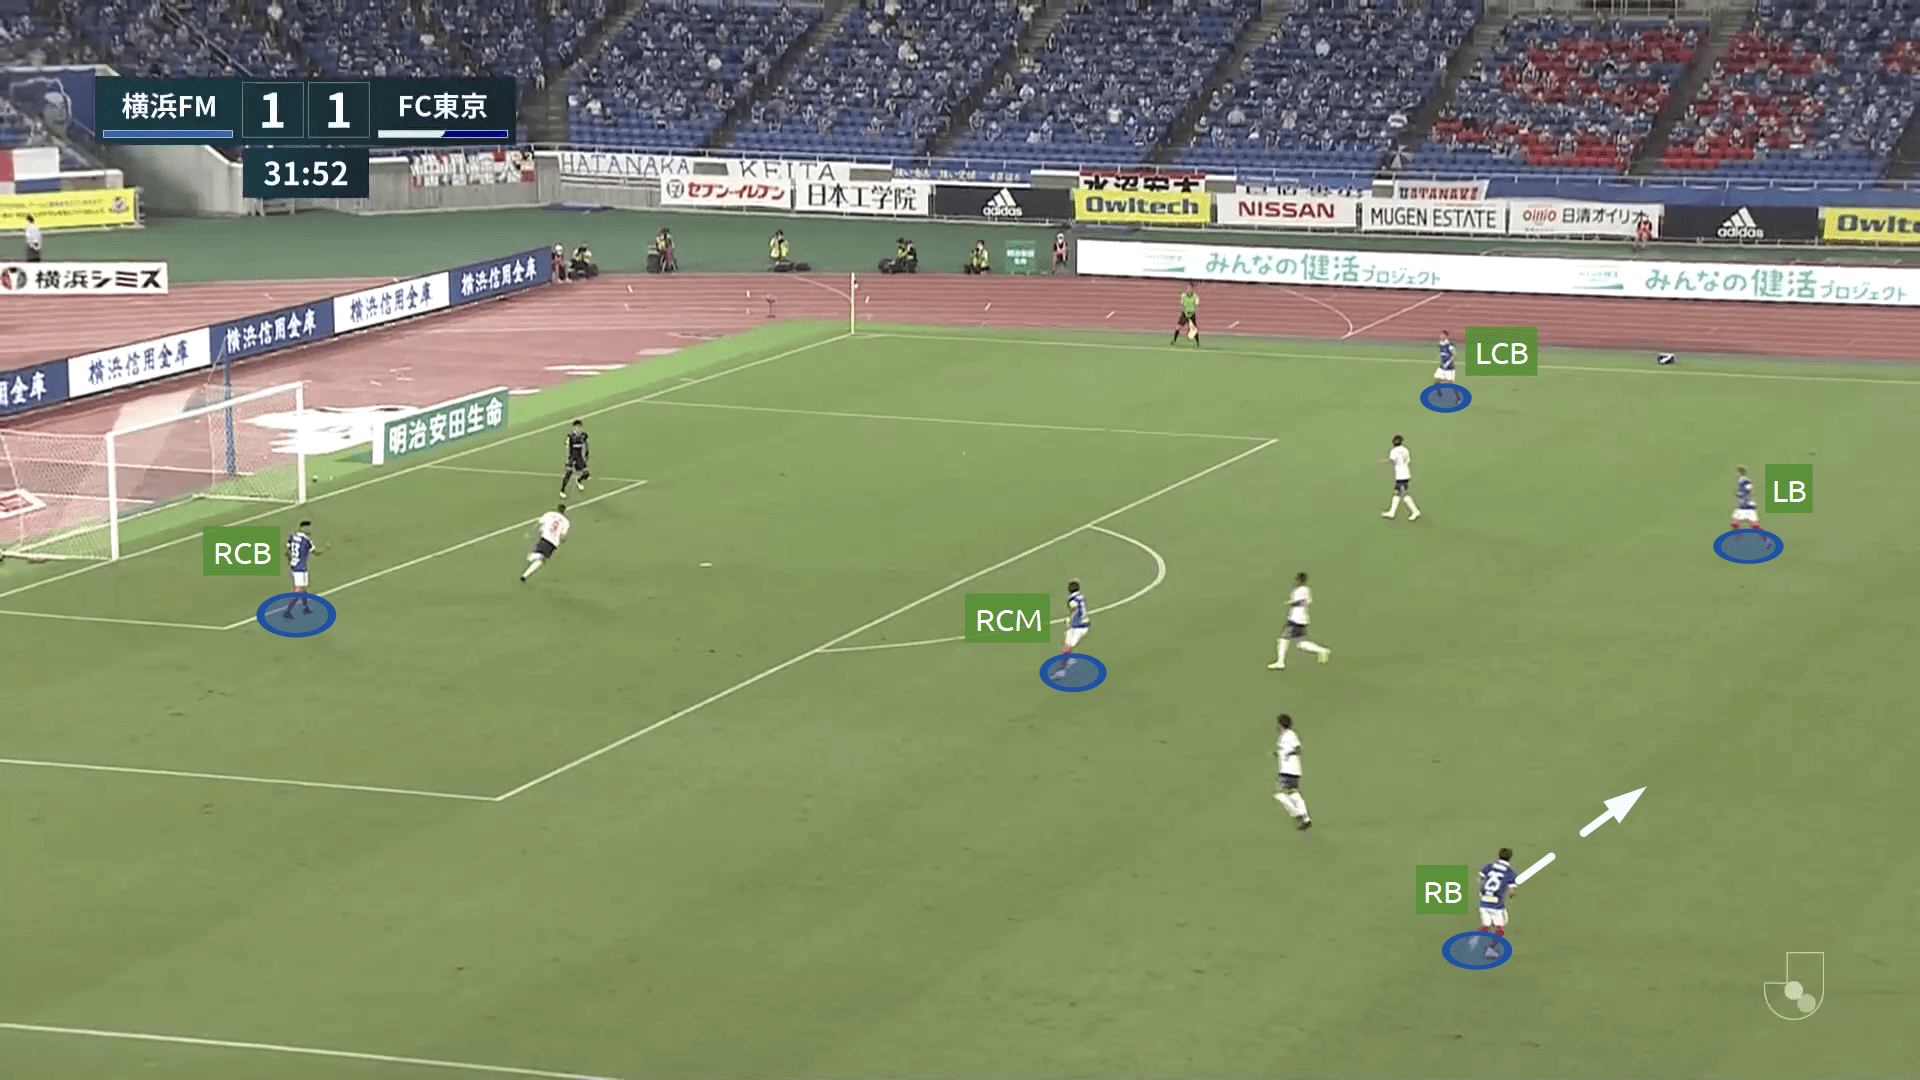
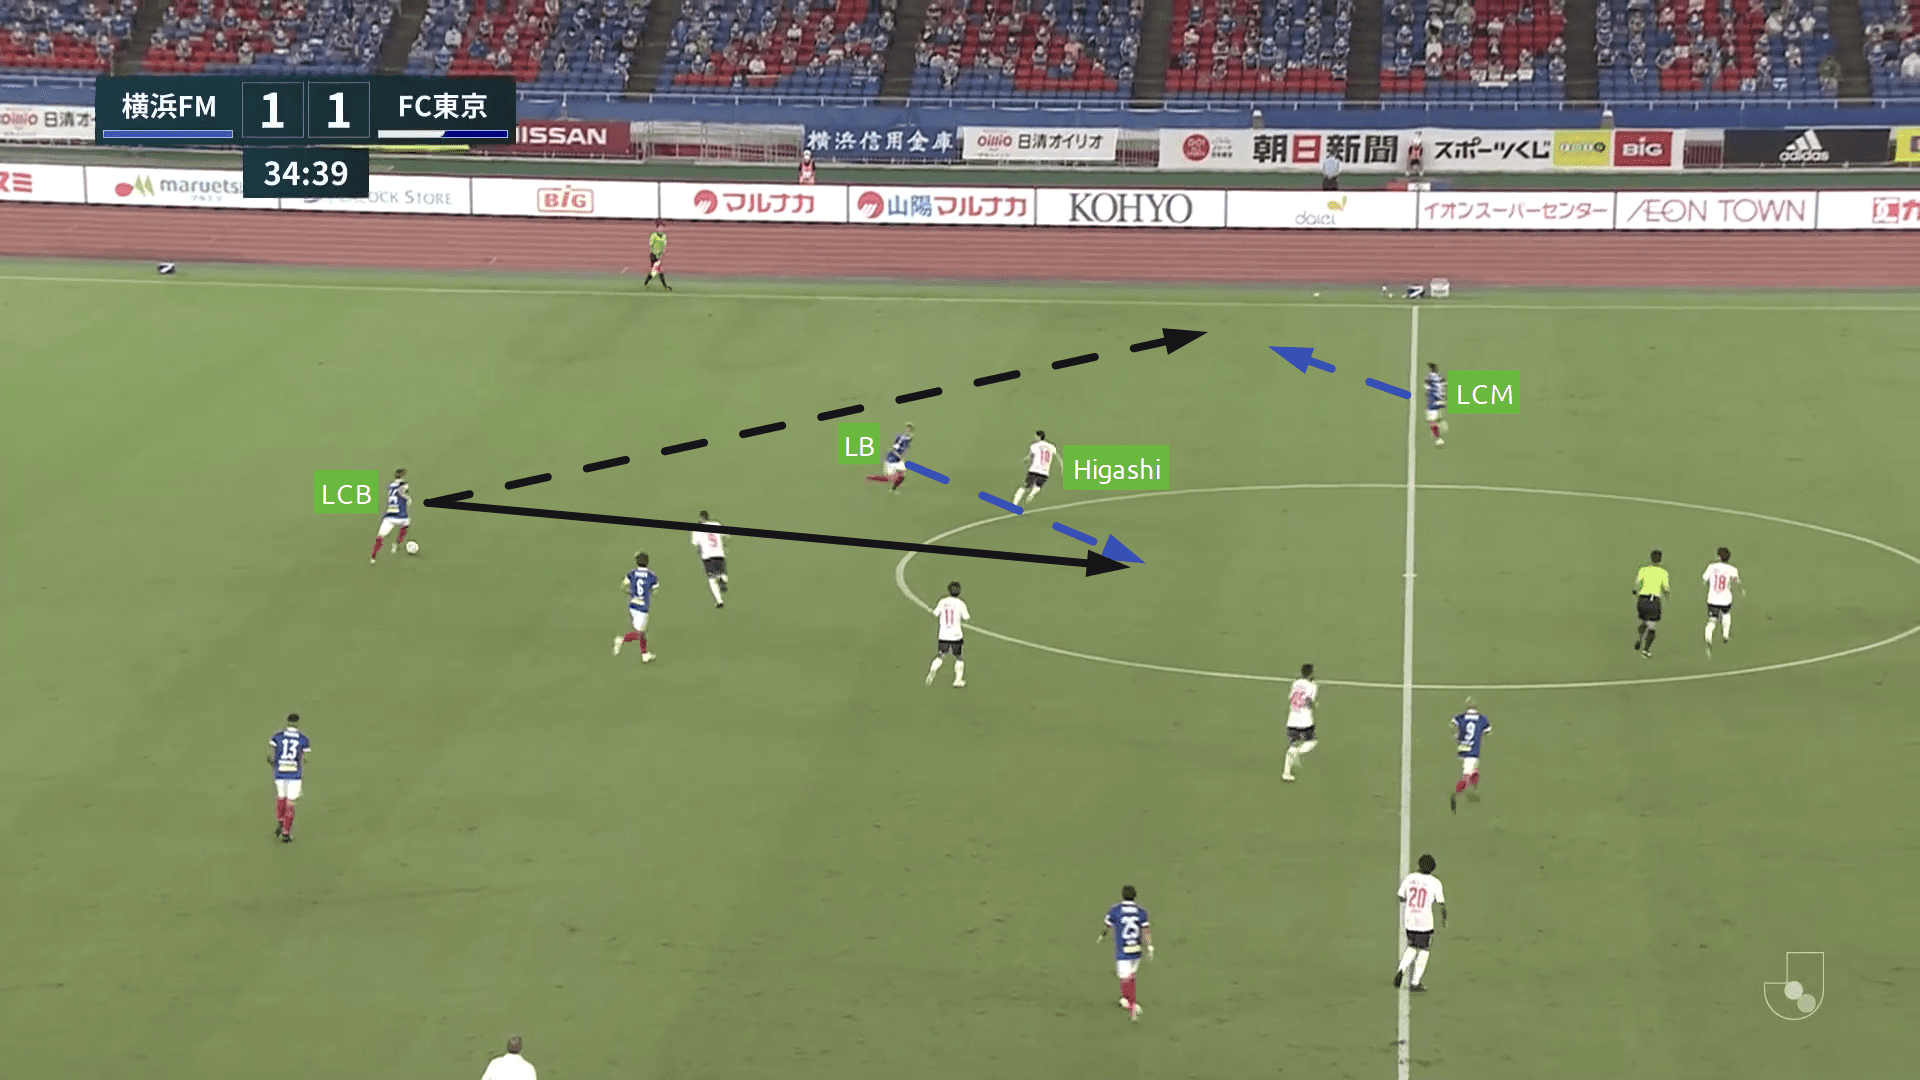
Even Amano (LCM) drops a bit deeper and moves away toward the flanks which drag away Hashimoto (RCM), thus creating a huge space in the central channel in the middle third for Koike (RB) to invert and open up a passing lane for Hatanaka (LCB) who is the ball-carrier at the moment.
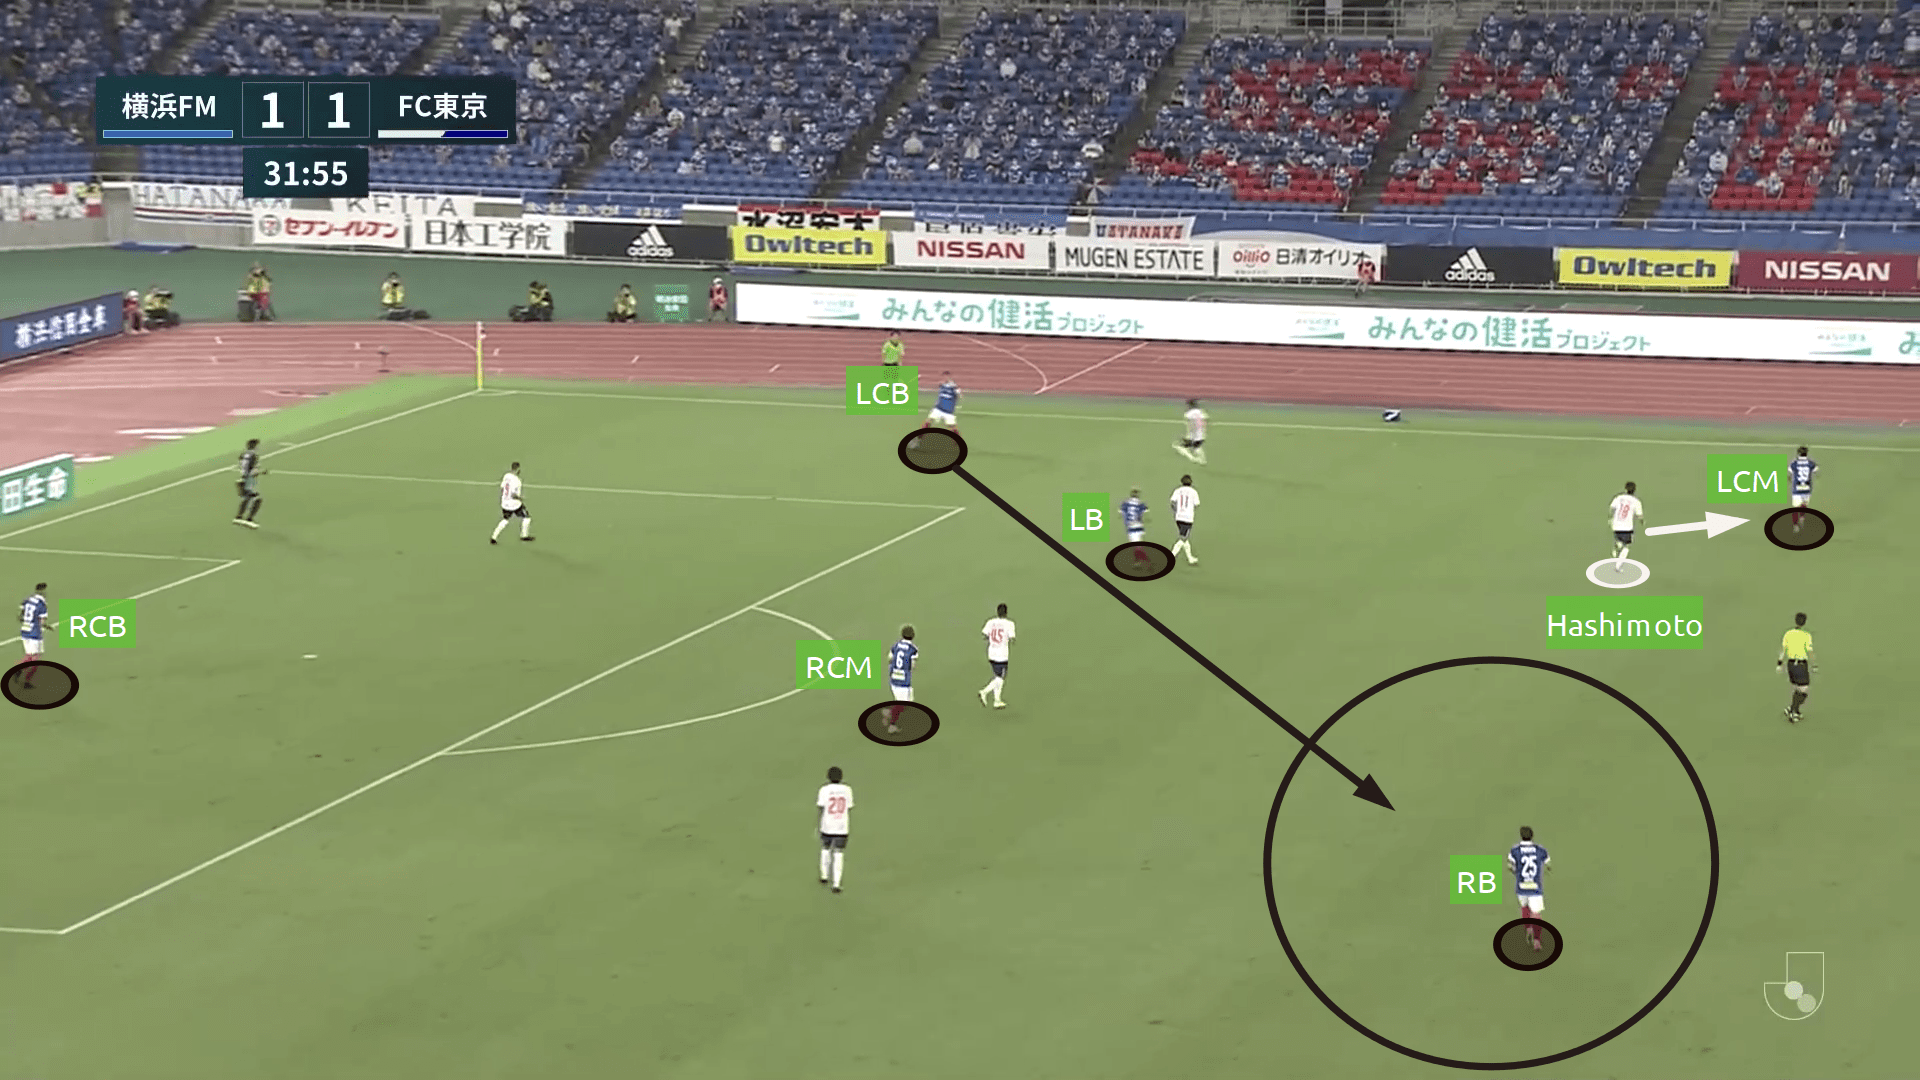
Even at the edge of the middle third of their own half, the Marinos would constantly look to rotate and open up space.

In the image above, to open up an unhindered passing lane for Hatanaka (LCB), Theerathon Bunmathan (LB) makes an inverted movement to the central channel and tries to drag Keigo Higashi along with him, thus opening up an unhindered passing lane for Amano (LCM). Higashi is in two minds to either move along with Bunmathan or move to the flanks to press Amano. With this conundrum, he does neither and Hatanaka passes the ball to Bunmathan in the central channel.
Tokyo mixed their high press with occasional mid blocks but whenever the Marinos penetrated to the half line, FC Tokyo would form a compact 4-4-2 and the whole unit would move with respect to the ball.
Consider, Hatanaka is in possession, or the ball is played on the left-flank in the middle third. The initial formation would almost give a similar look to the image below. Marcos Júnior (CAM) would look to drop deep and Amano (LCM) would look to exploit the space generated between Tsuyoshi Watanabe (RCB) and Muroya (RB). Mizunuma (RB) won’t look to join the initial build-up and would maintain width and height in the opposite flank. Koike (RB) would invert to the right half space and join the initial build-up.
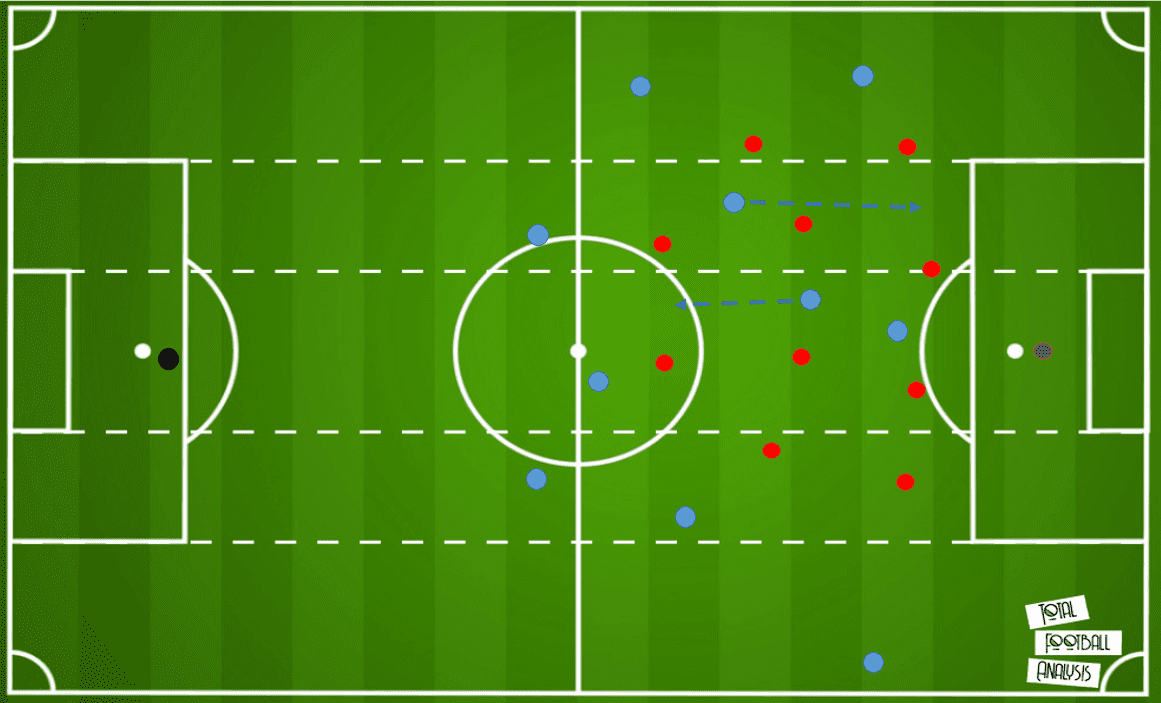
Let’s look at an in-game situation. In the image below, it can be seen Júnior (CAM) drops deep. Endo (LW) positions himself to the extreme left and thus drags the RB and RCB can’t move due to Onaiwu’s (CF) position, thus generating a convenient amount of space for Amano (LCM) to make a run.
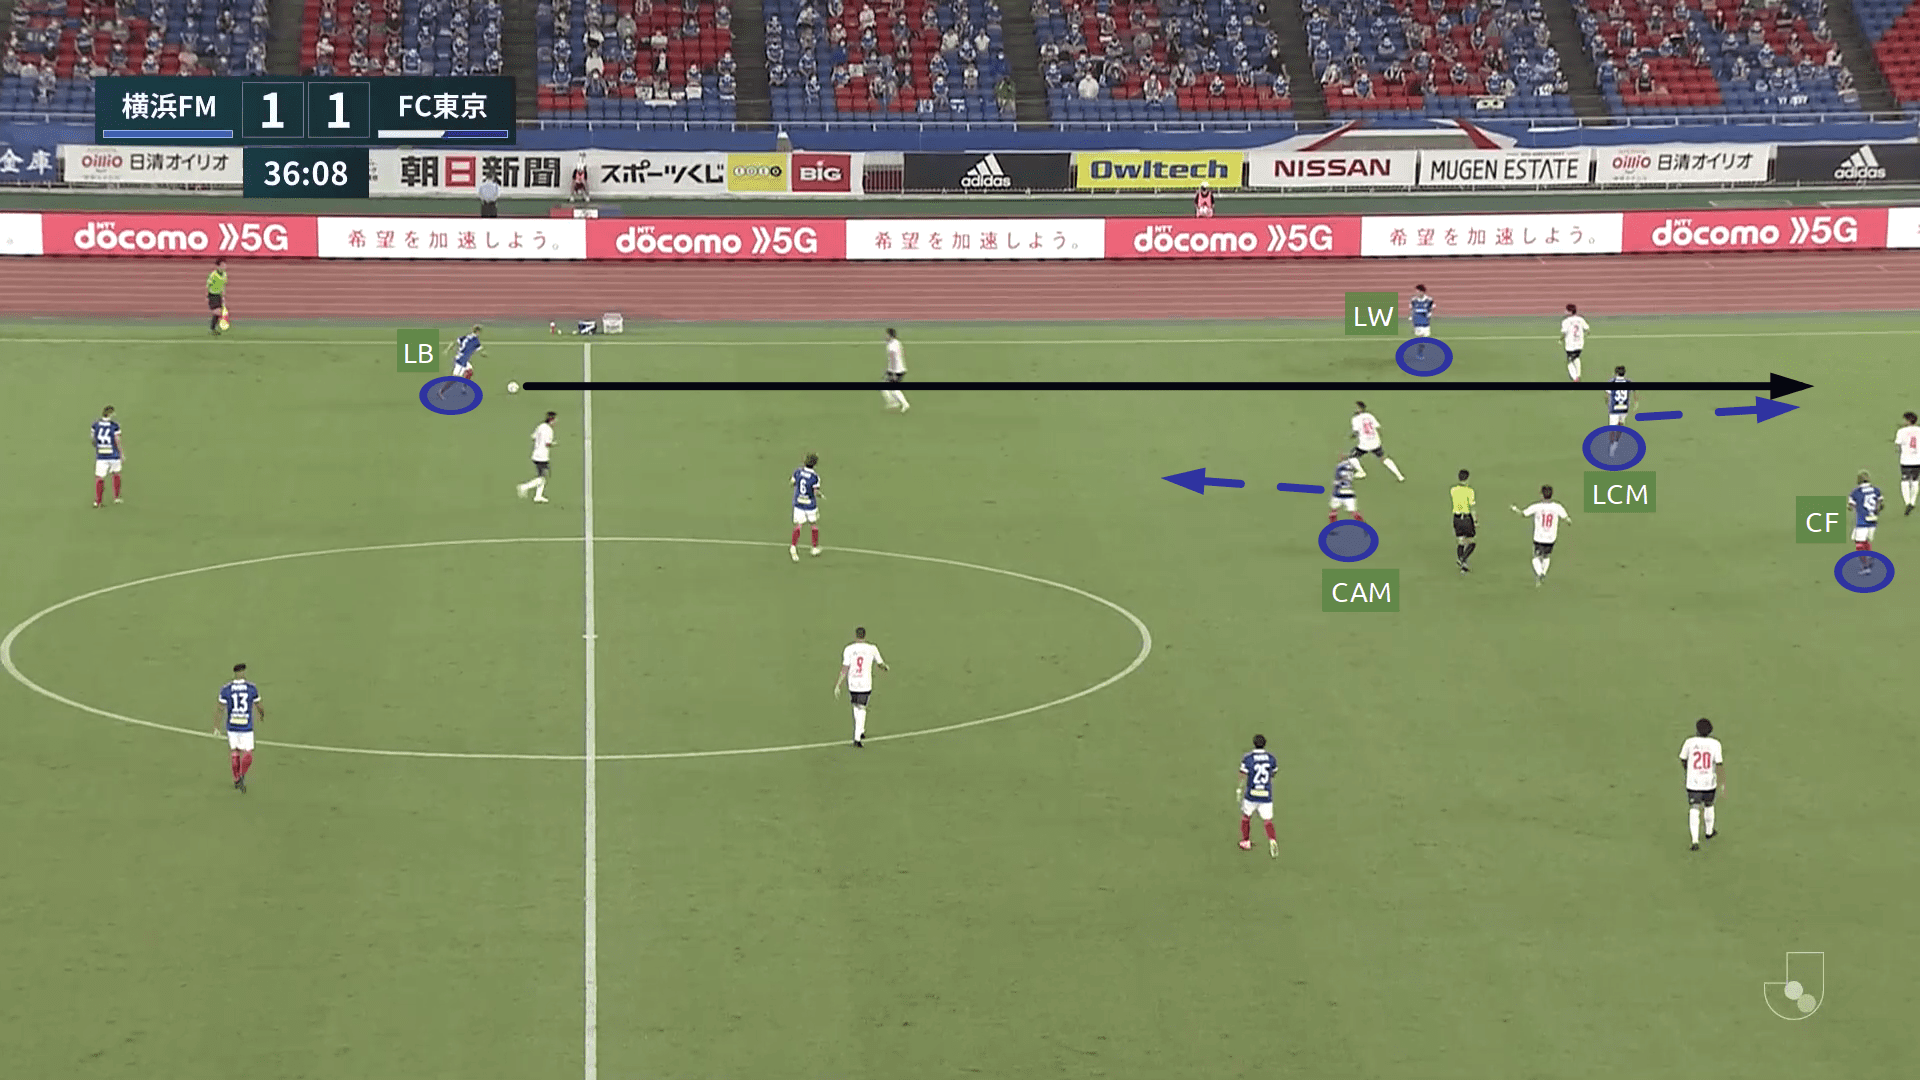
Apart from this movement, sometimes the Marinos would quickly look to switch the channel and play to Mizunuma (RW) who is isolated in the right-flank or progress the ball through various other ways.
The Diamond
In the final third, the Marinos mainly attacked through the flanks (82.22 % of positional attacks) especially the left one (53.33 % of positional attacks) by forming the diamond shape and creating chances through various methods using the diamond:
- Use of the striker in a diamond
- Pass, move and vacate
- Rotation within the diamond to create space
- 3rd man principle with the 5th man
We will be looking at each of the methods below.
Use of the striker in a diamond
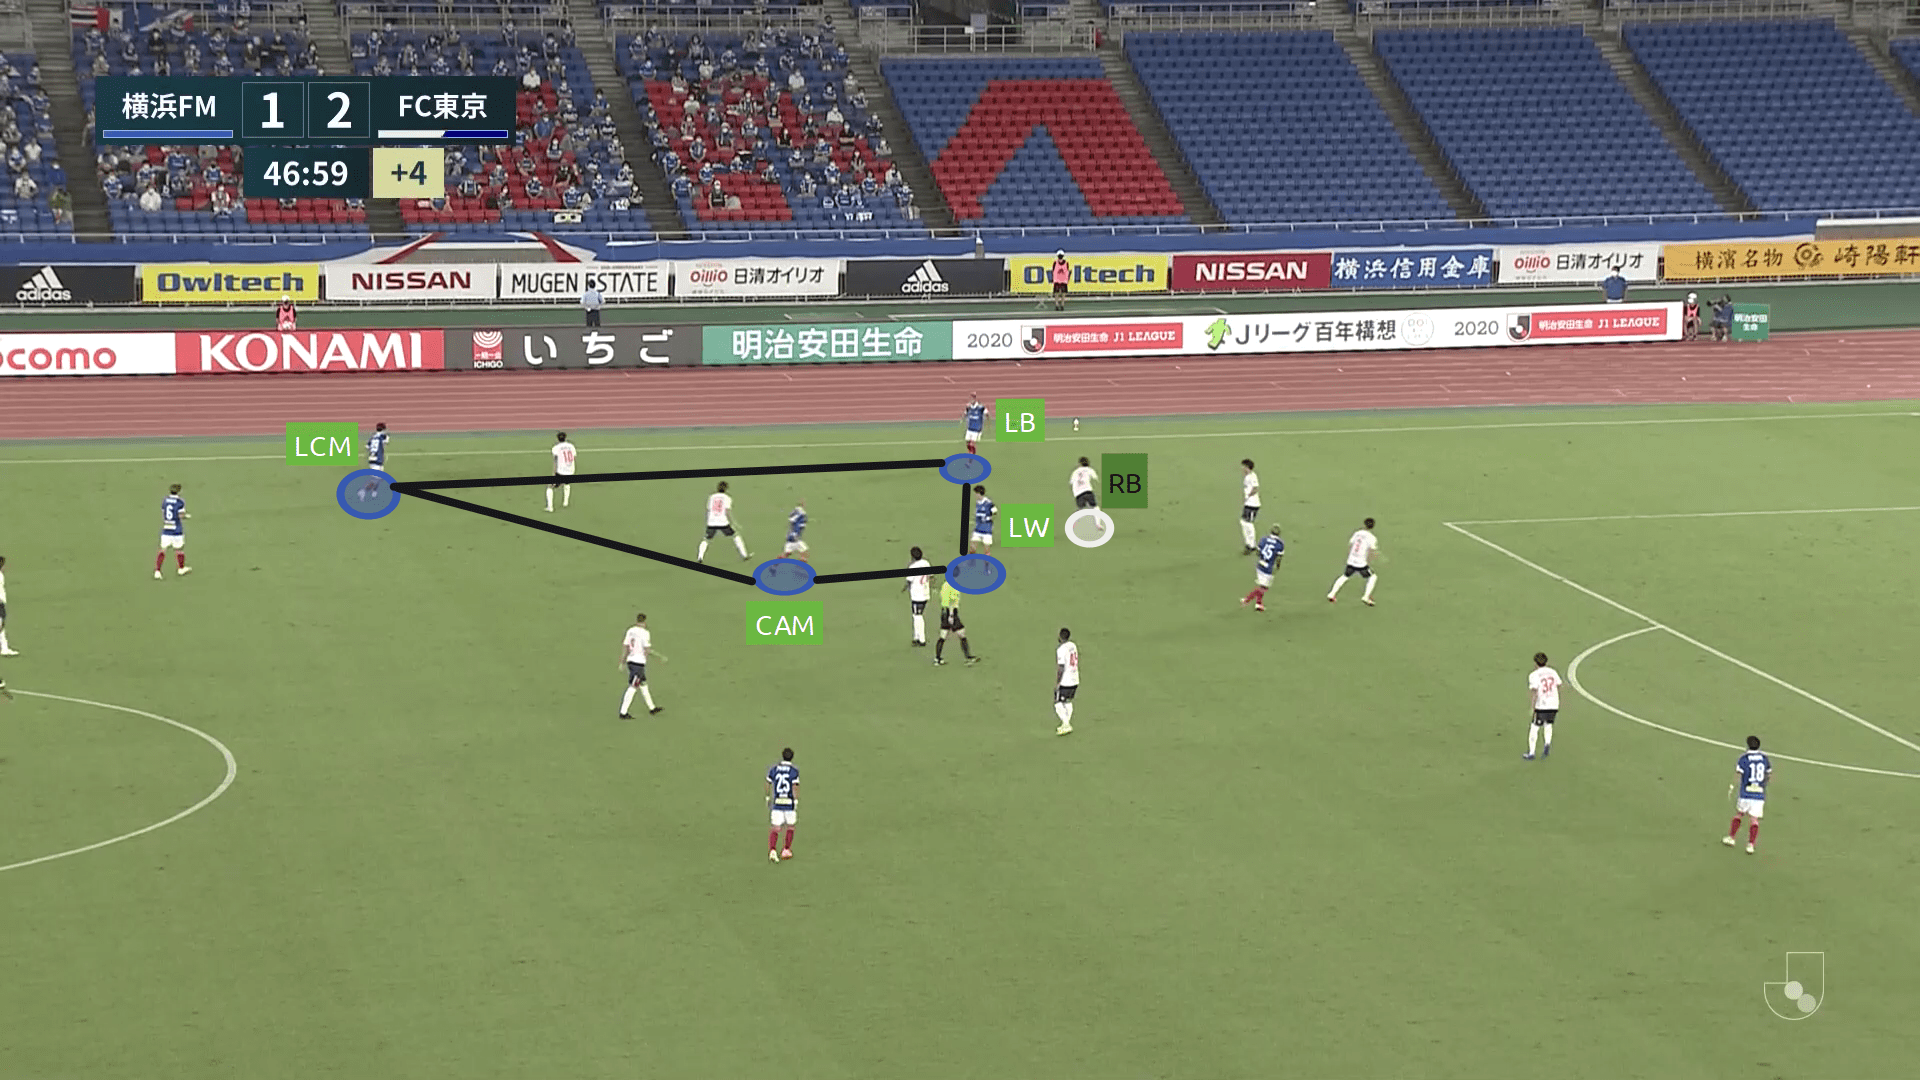
When attacking through the left flank the final third actions are mainly carried through the LB, LCM, CAM, LW, and CF. The initial setup is created by the LB, LCM, CAM for LW, or CF to join in at the top of the diamond.
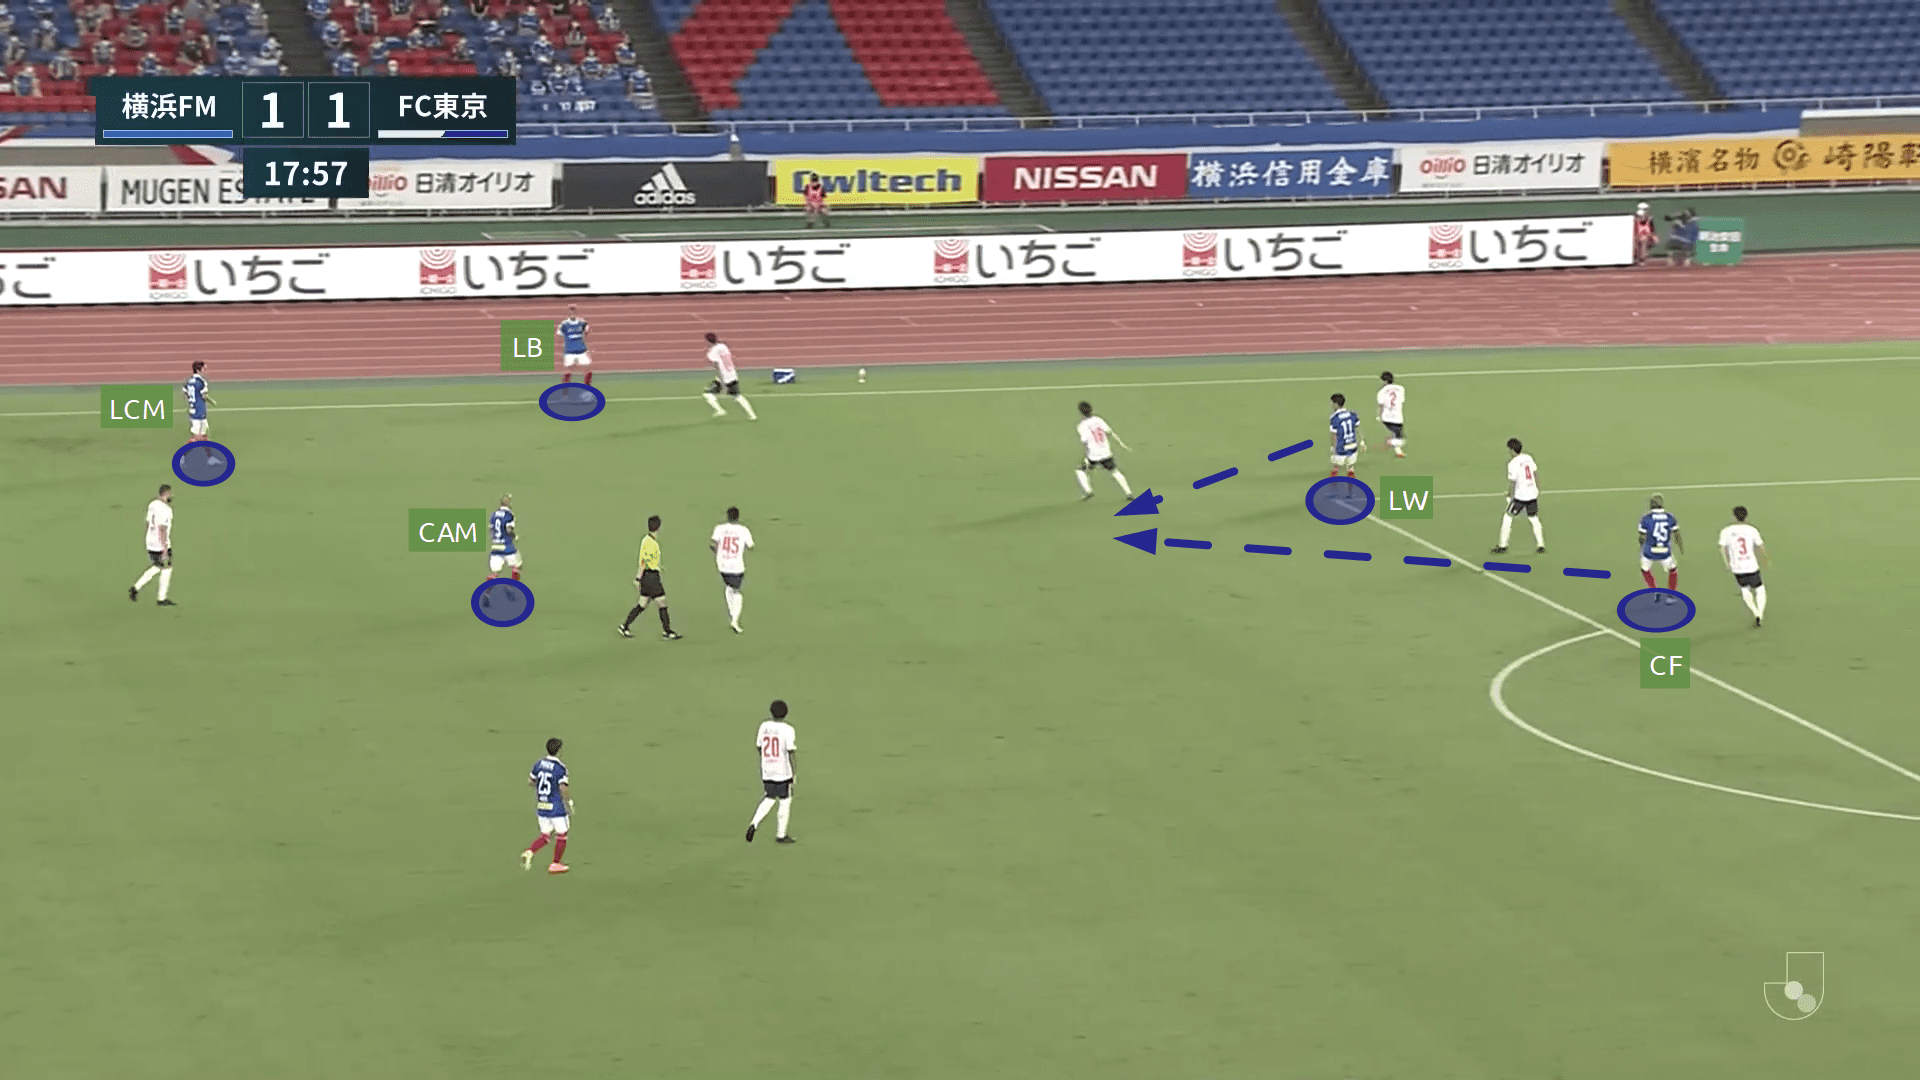
In the image above, it can be seen CAM, LB, and LCM form a triangle in the left flank waiting for the LW or CF drop deep to complete the diamond.
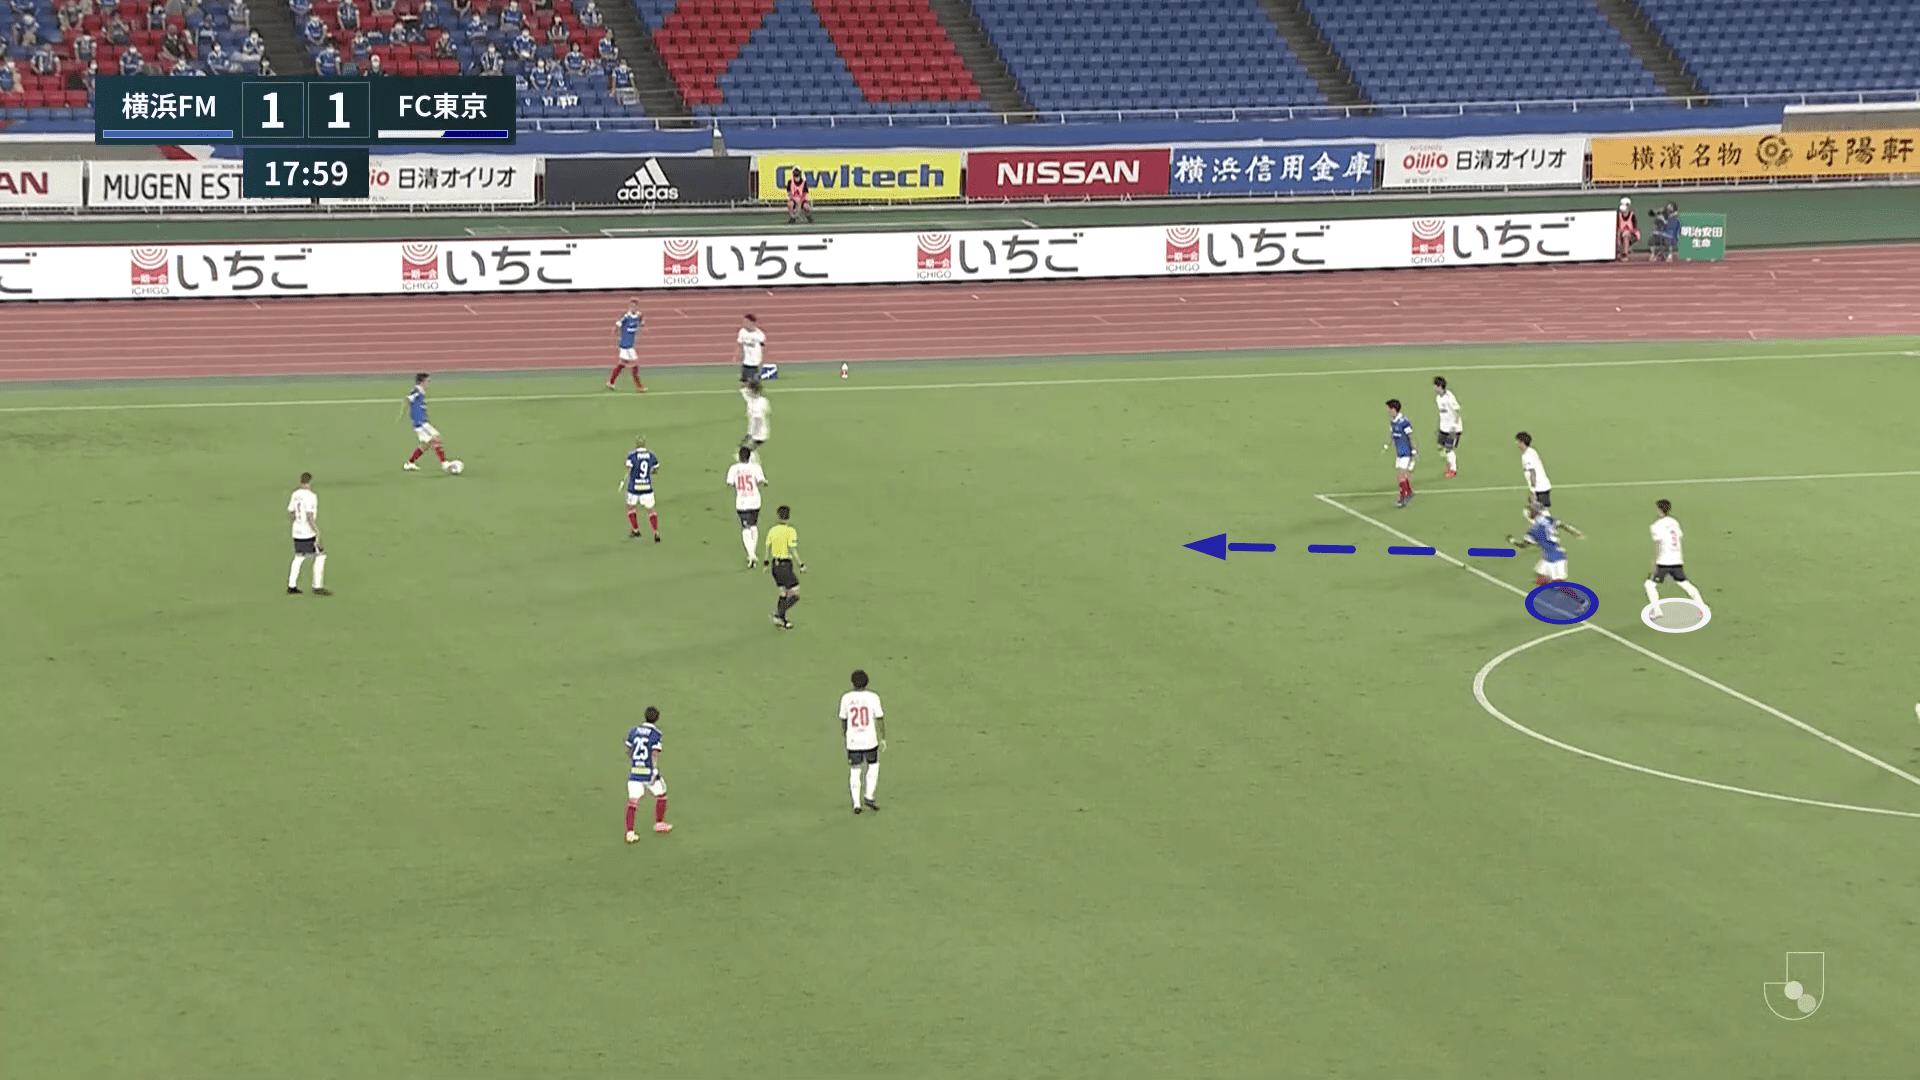
Onaiwu (CF) drops deeper which lures the Tokyo LCB along with him. He combines with the LW and the CAM to create a shooting chance for his teammates.
Pass, move and vacate
A static diamond is meaningless. It would neither help in causing an overload or to progress the ball. Thus dummy runs and movement is essential. It sometimes can mean pass and move to an area and vacate the initial position completely or sometimes vacate the position for someone else to fill in.
In the image below, Bunmathan (LB) makes a dummy run and drags away Arthur Silva (RCM) which vacates the space for Takahiro Ogihara (RCM) to fill in as well as leaves Júnior (CAM) with a bit of free space. Onaiwu (CF) too drops deep to form a diamond. In the previous section, we saw when Onaiwu drops deeper and tries to occupy a position between the lines, Tokyo centre-backs mark him closely. However, in this case, due to Bunmathan’s movement, the centre-back could not follow the Japanese striker thus leaving him with a bit of free space between the lines, which could be dangerous.
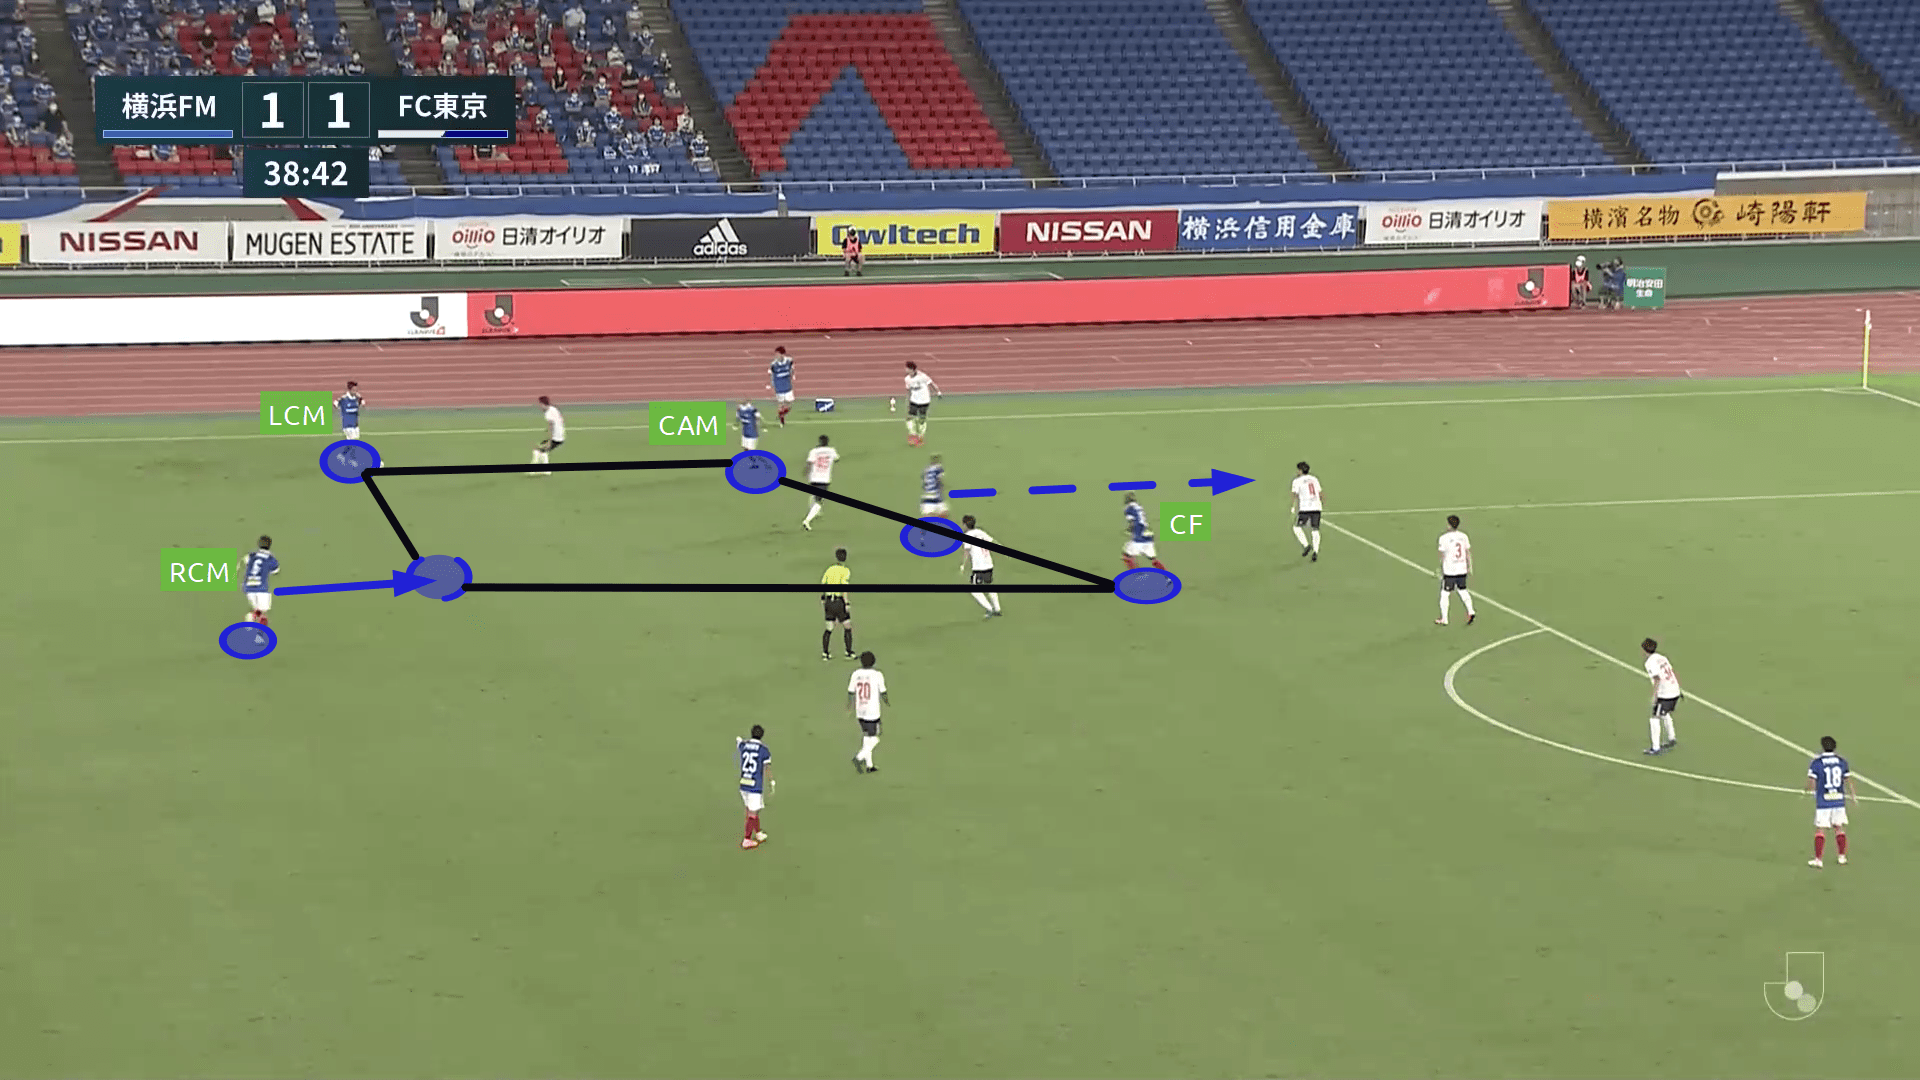
The captain, Ogihara passes the ball to the Brazilian Júnior who instead lays it over to the striker in between the lines. Onaiwu passes the ball to Mizunuma (#18) and creates a scoring opportunity.
Rotation within the diamond to create space
Rotation is the best way to create space for the intended person. The same rule applies here, pass and move but in the same space within the same diamond.
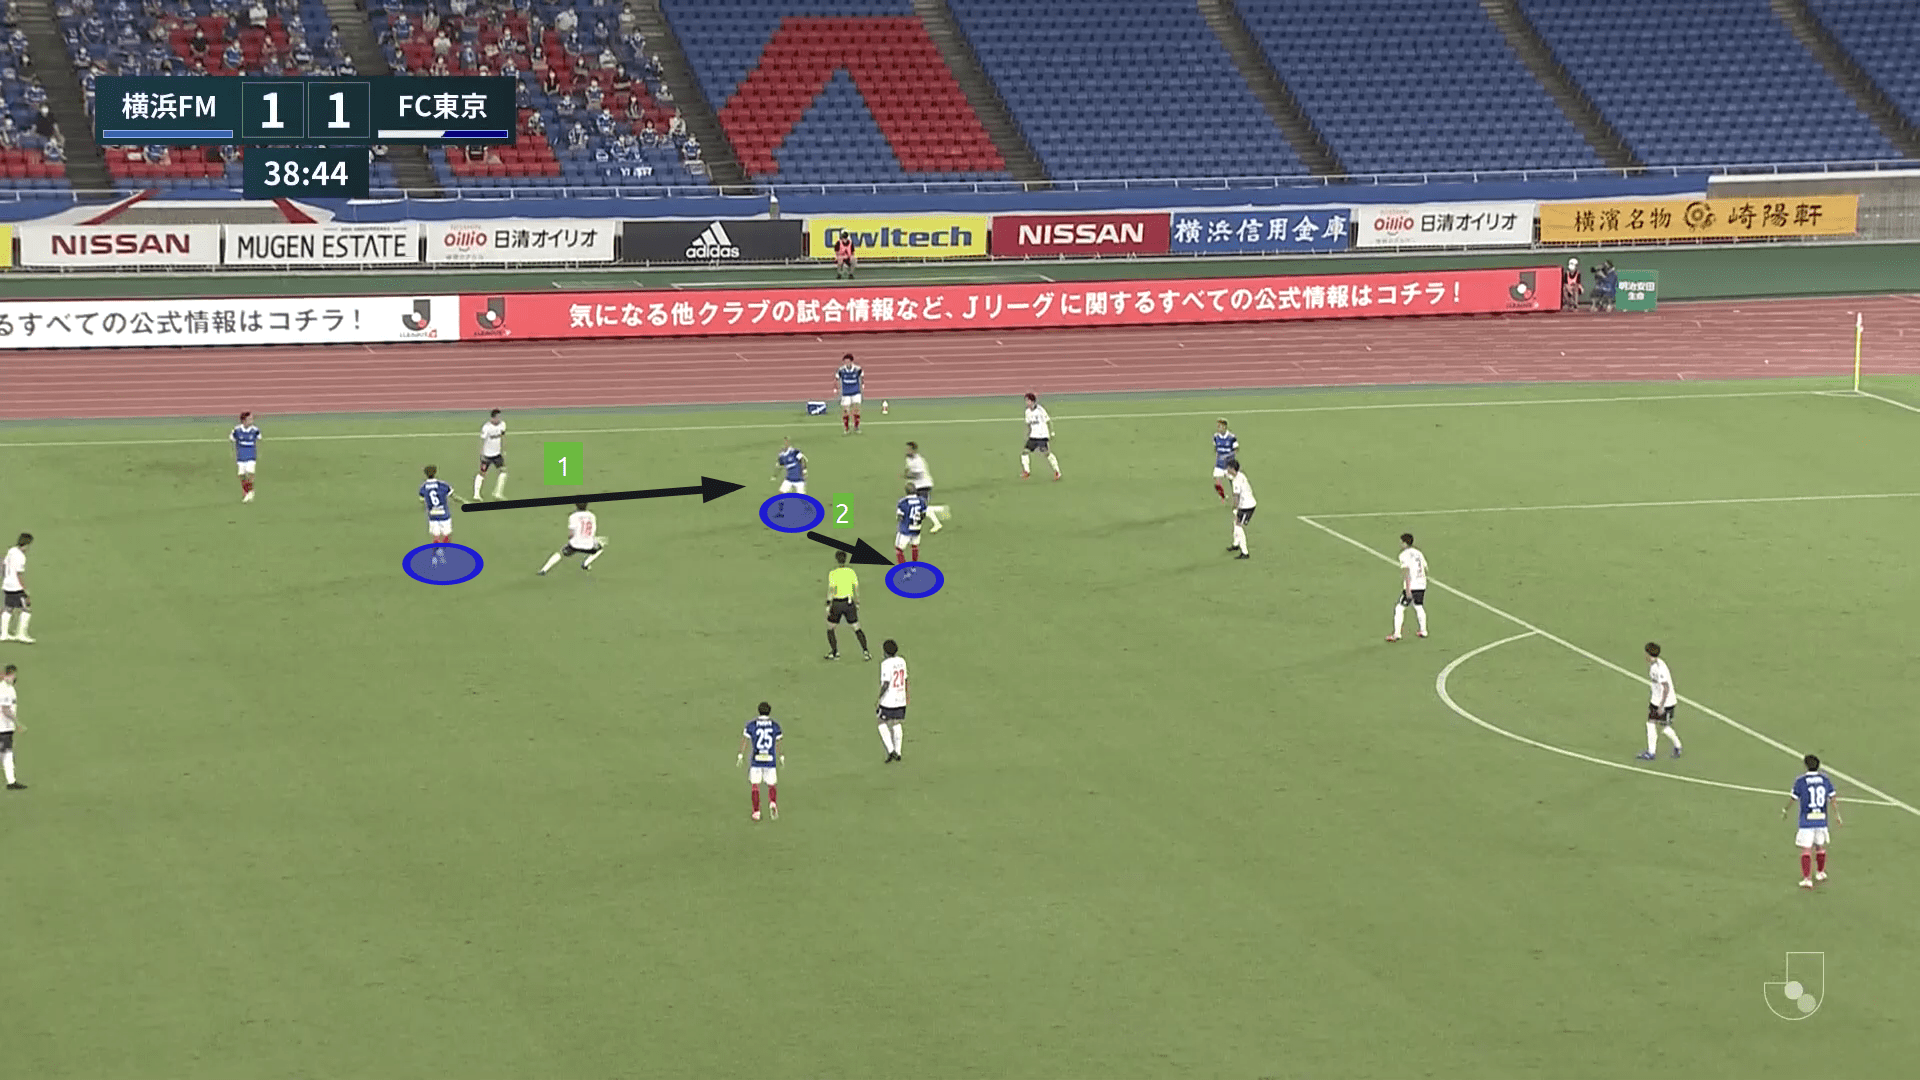
In the image below, Endo (LW) passes the ball to Amano (LCM) and makes a dummy run infield to create space for Bunmathan (LB). Muroya (RB) marks Endo, once the left-winger makes a movement infield, the Tokyo RB moves along with him.
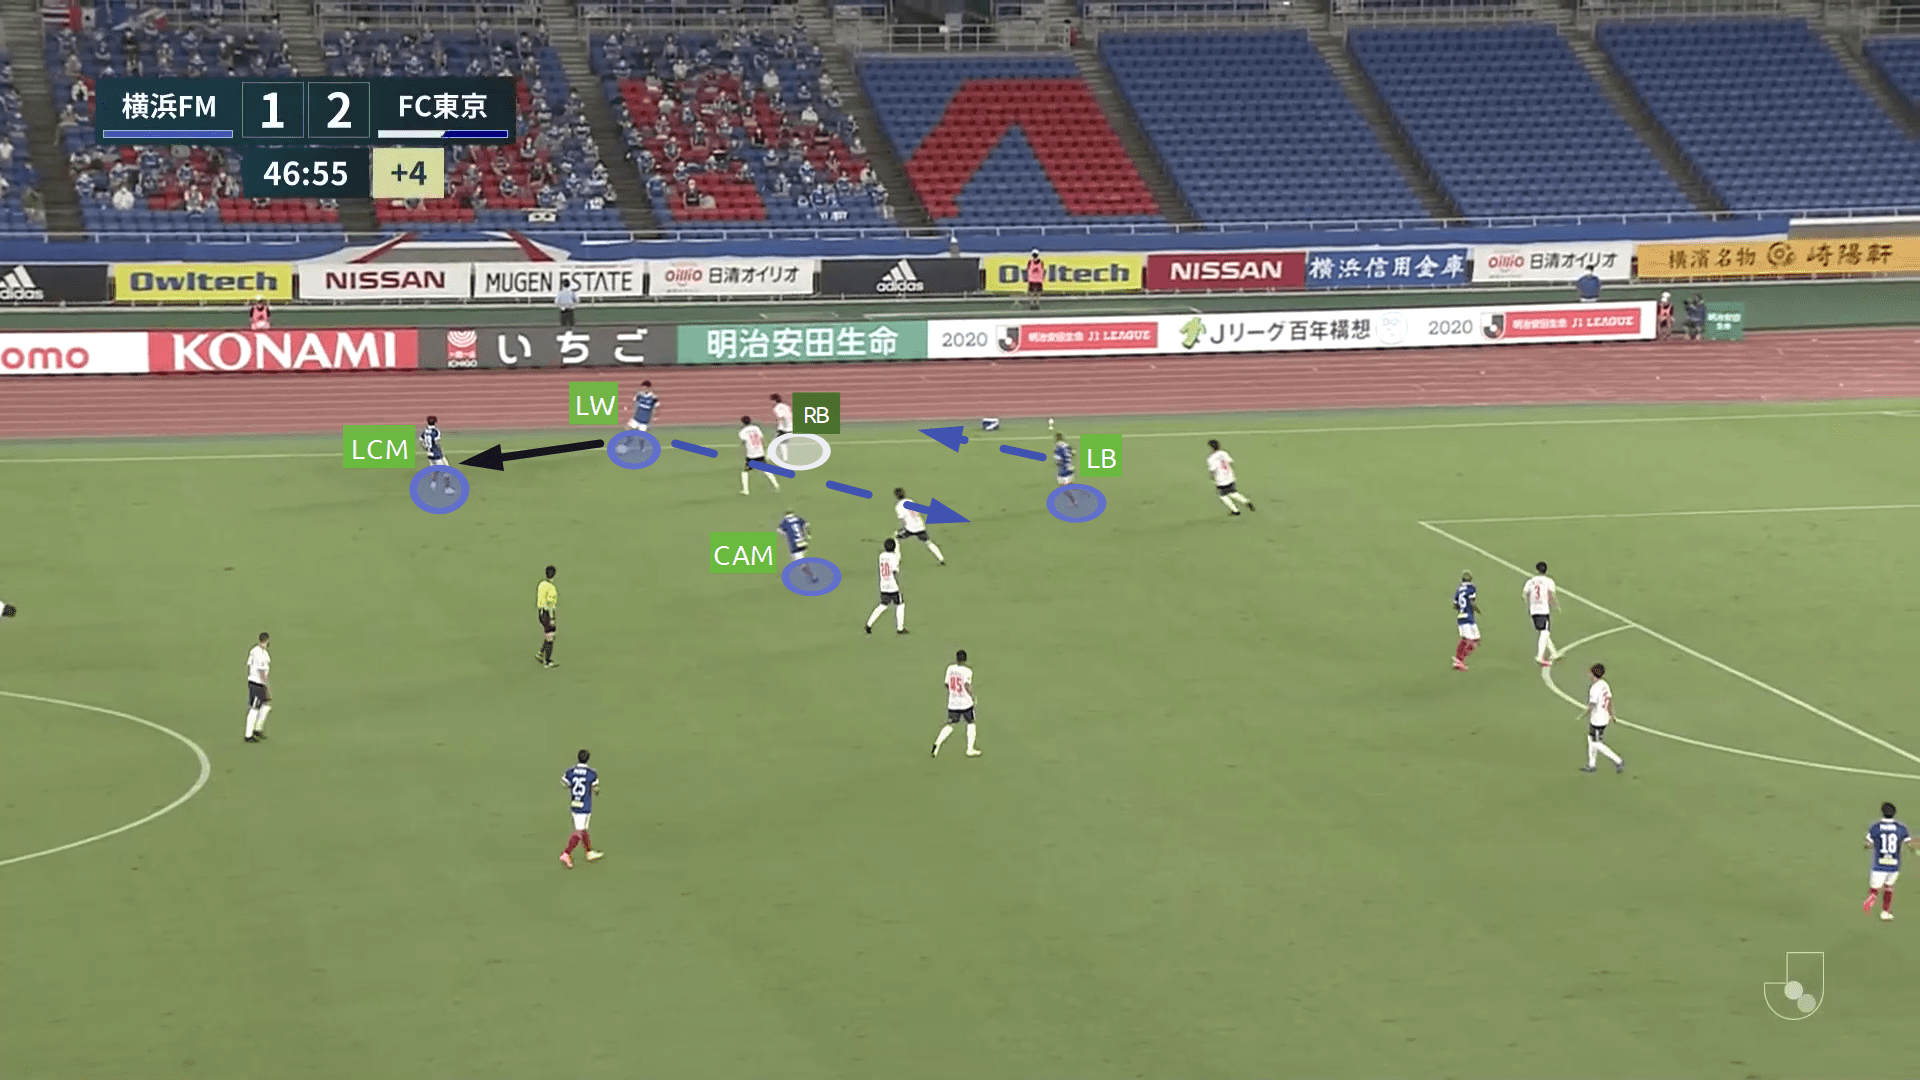
It creates a bit of space for Bunmathan who has now moved to Endo’s position to progress the ball further.
3rd man principle with the 5th man
A diamond alone rarely progresses the ball. But amalgamated with the above principles and a 5th man makes it much easier to progress the ball or create a goal-scoring opportunity, especially if the 5th man is in the central channel in the final third.
In the image below, Bunmathan (LB), Mizunuma (RW), Júnior (CAM), and Koike (RB) forms a diamond. Yes, the Marinos rotate so much even sometimes the LB can be seen in the right flank (which is very rare though). Júnior passes the ball to Bunmathan and makes a run forward, as is Marinos’ principle.
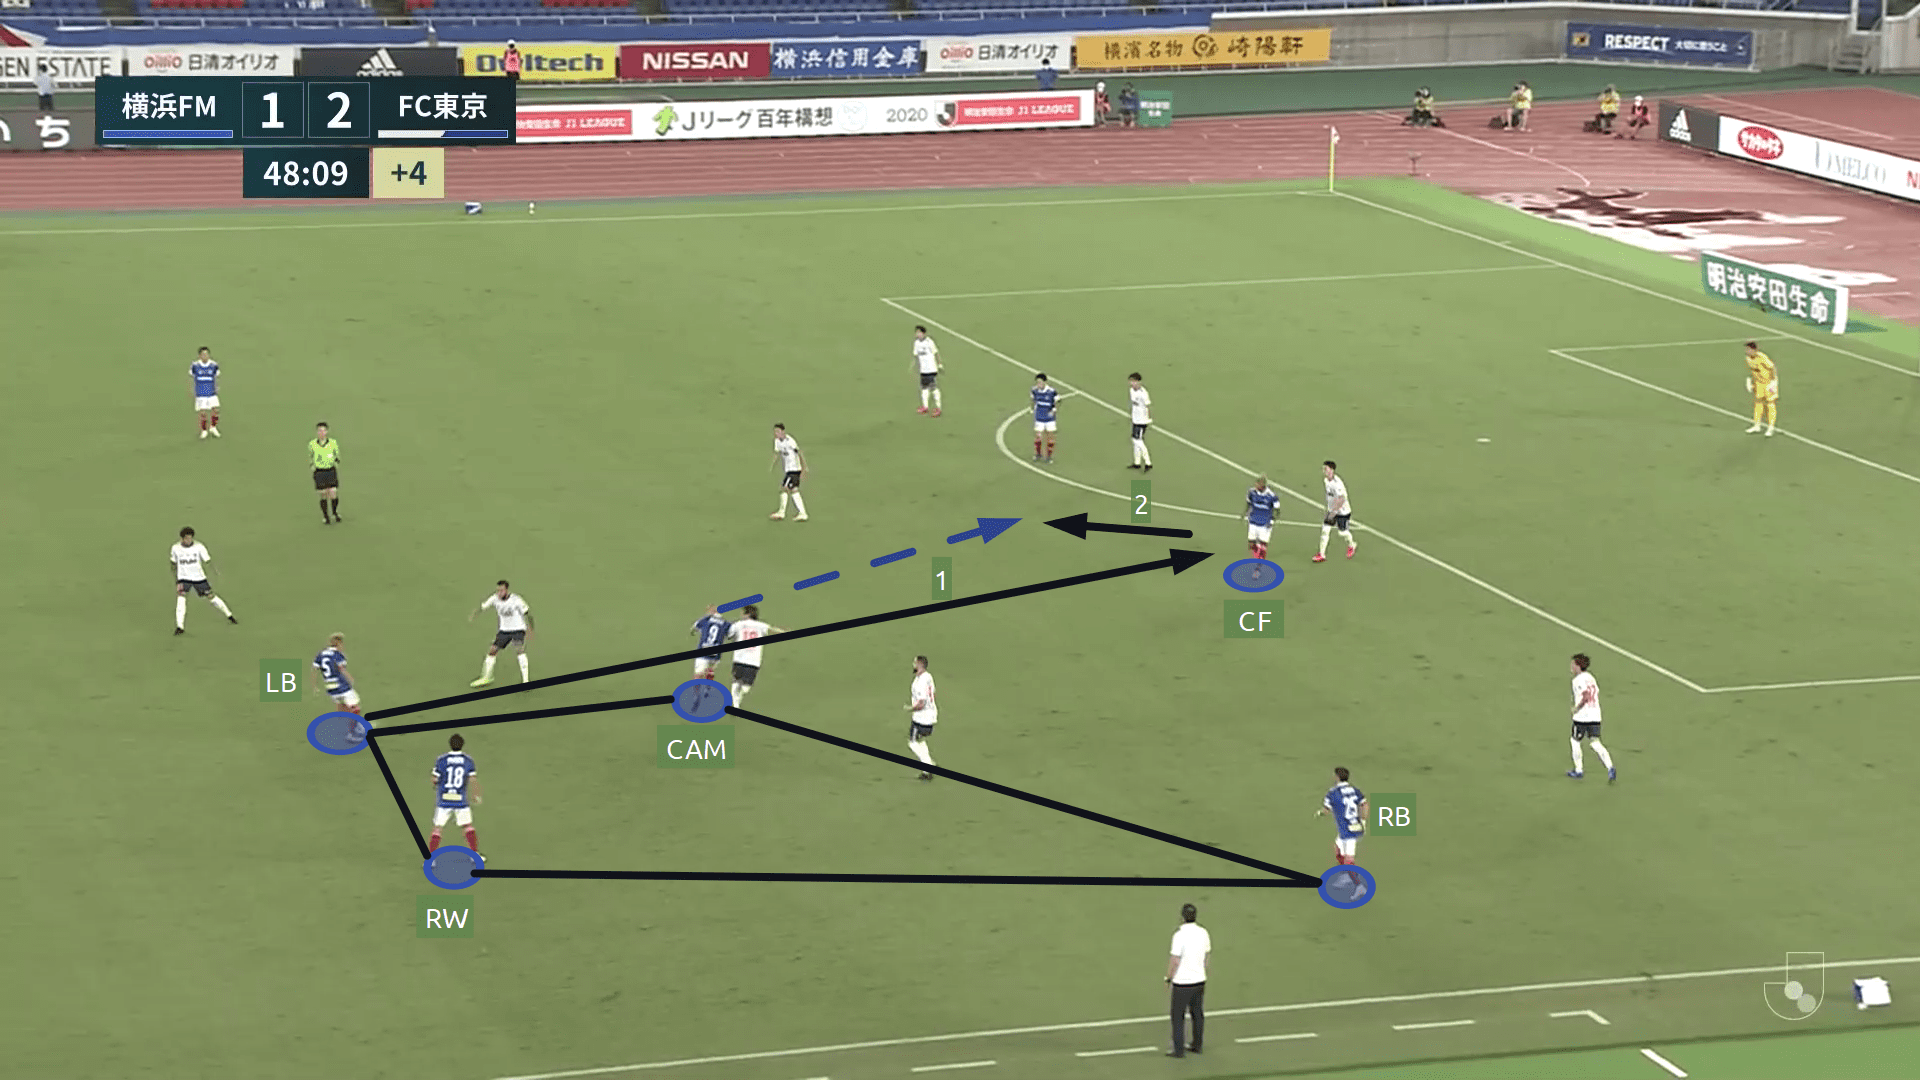
This makes it a perfect opportunity to use Onaiwu (CF) as the 5th man and implement the 3rd man principle. Bunmathan passes the ball to Onaiwu who tries to lay it off to the runner (Júnior). However, the striker’s poor pass ruined the impressive build-up.
FC Tokyo takes advantage of Marinos’ weakness
FC Tokyo rarely played out from the back, especially in the second half. But whenever the away side did play out from the back, they looked to cause the opposition some sort of trouble owing to Marinos’ poor pressing structure.
The Marinos pressed high and aggressively looking to win the ball high up in the opposition half. It was a mix of man-oriented pressing and 4-2-3-1 structured pressing and the players looked confused in choosing between the two.
In the image below, it looked like the Marinos’ adopted a man-oriented pressing approach but when Júnior went ahead to press the goalkeeper, Onuwai made a jump from marking Takumi Nakamura to mark Arthur leading to a 4-2-3-1 formation, leaving Nakamura completely free.
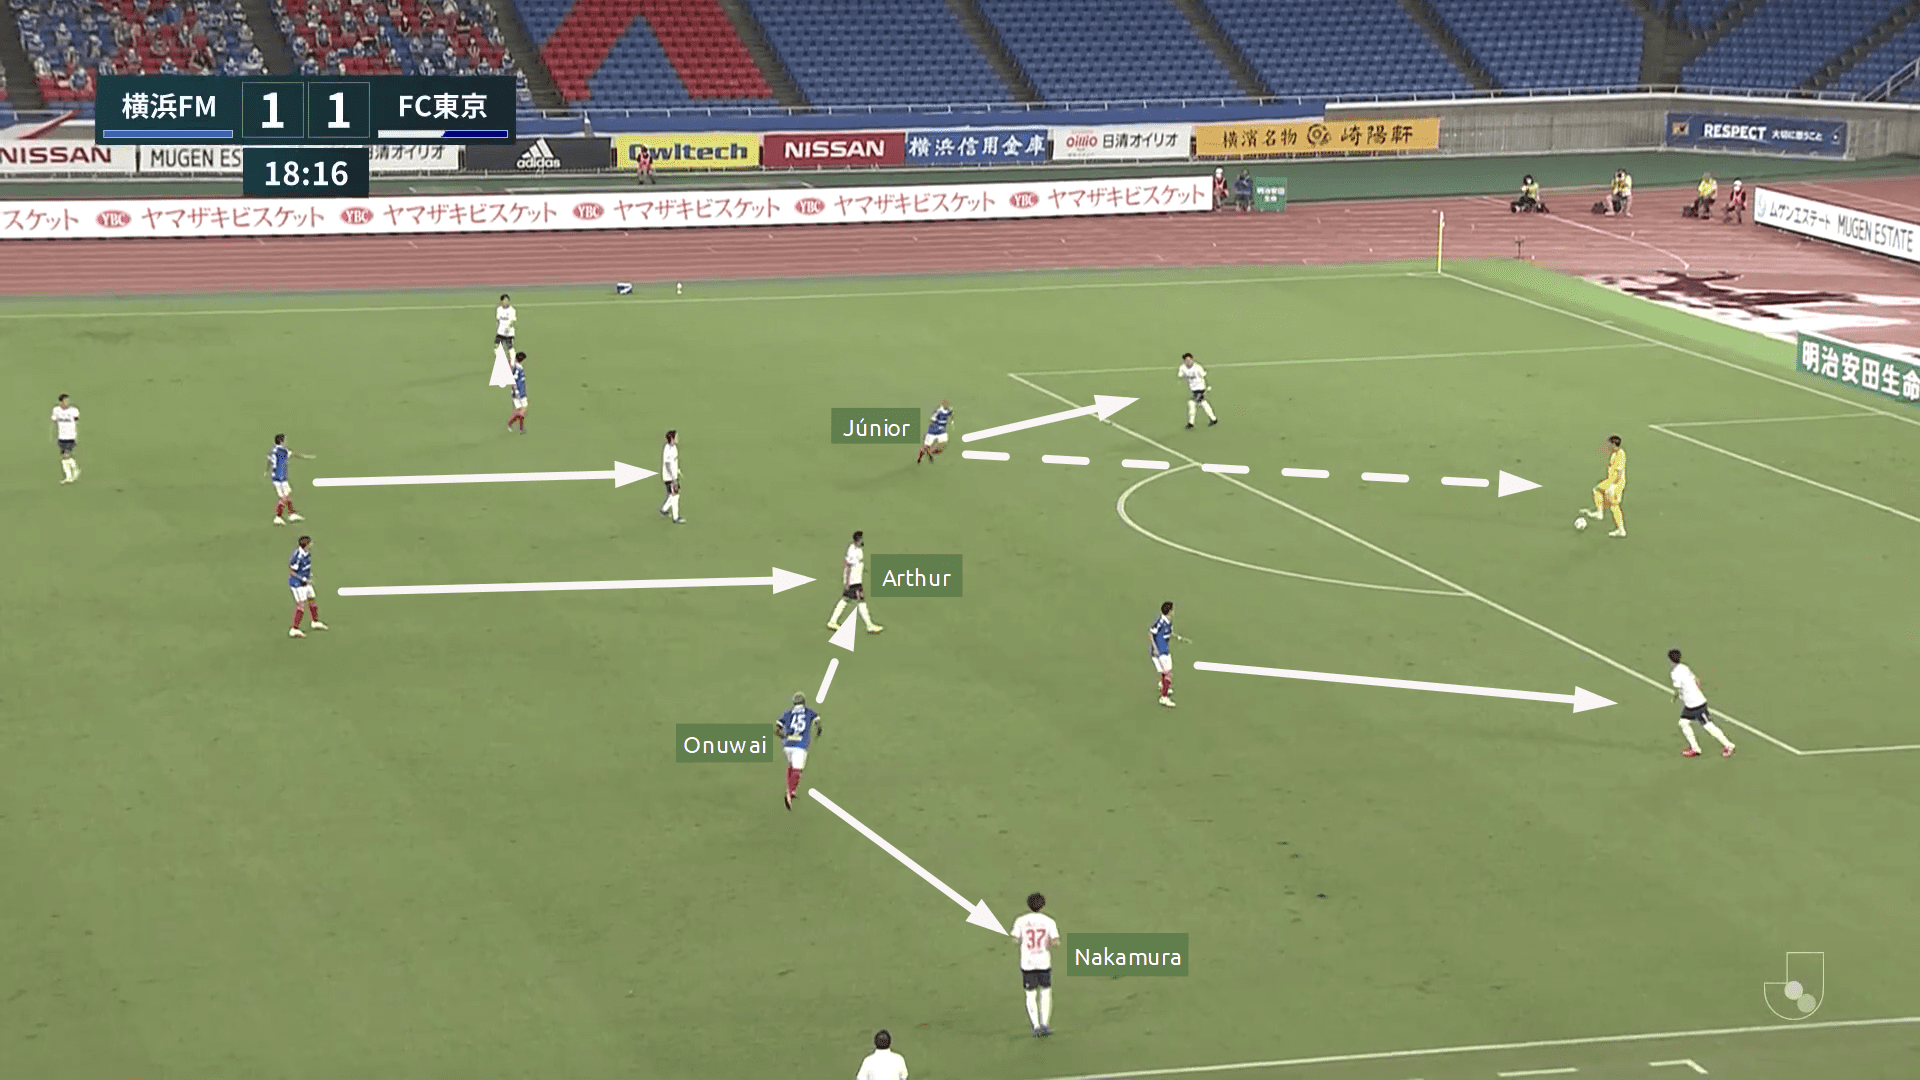
Here, the goalkeeper did not pass to Nakamura, rather opted for a long ball. However, these sorts of confusing pressing structures and wrong use of co-ordinated jumps were seen throughout the game whenever Tokyo built out from the back.
Even the pressing conundrum led to FC Tokyo’s first goal.
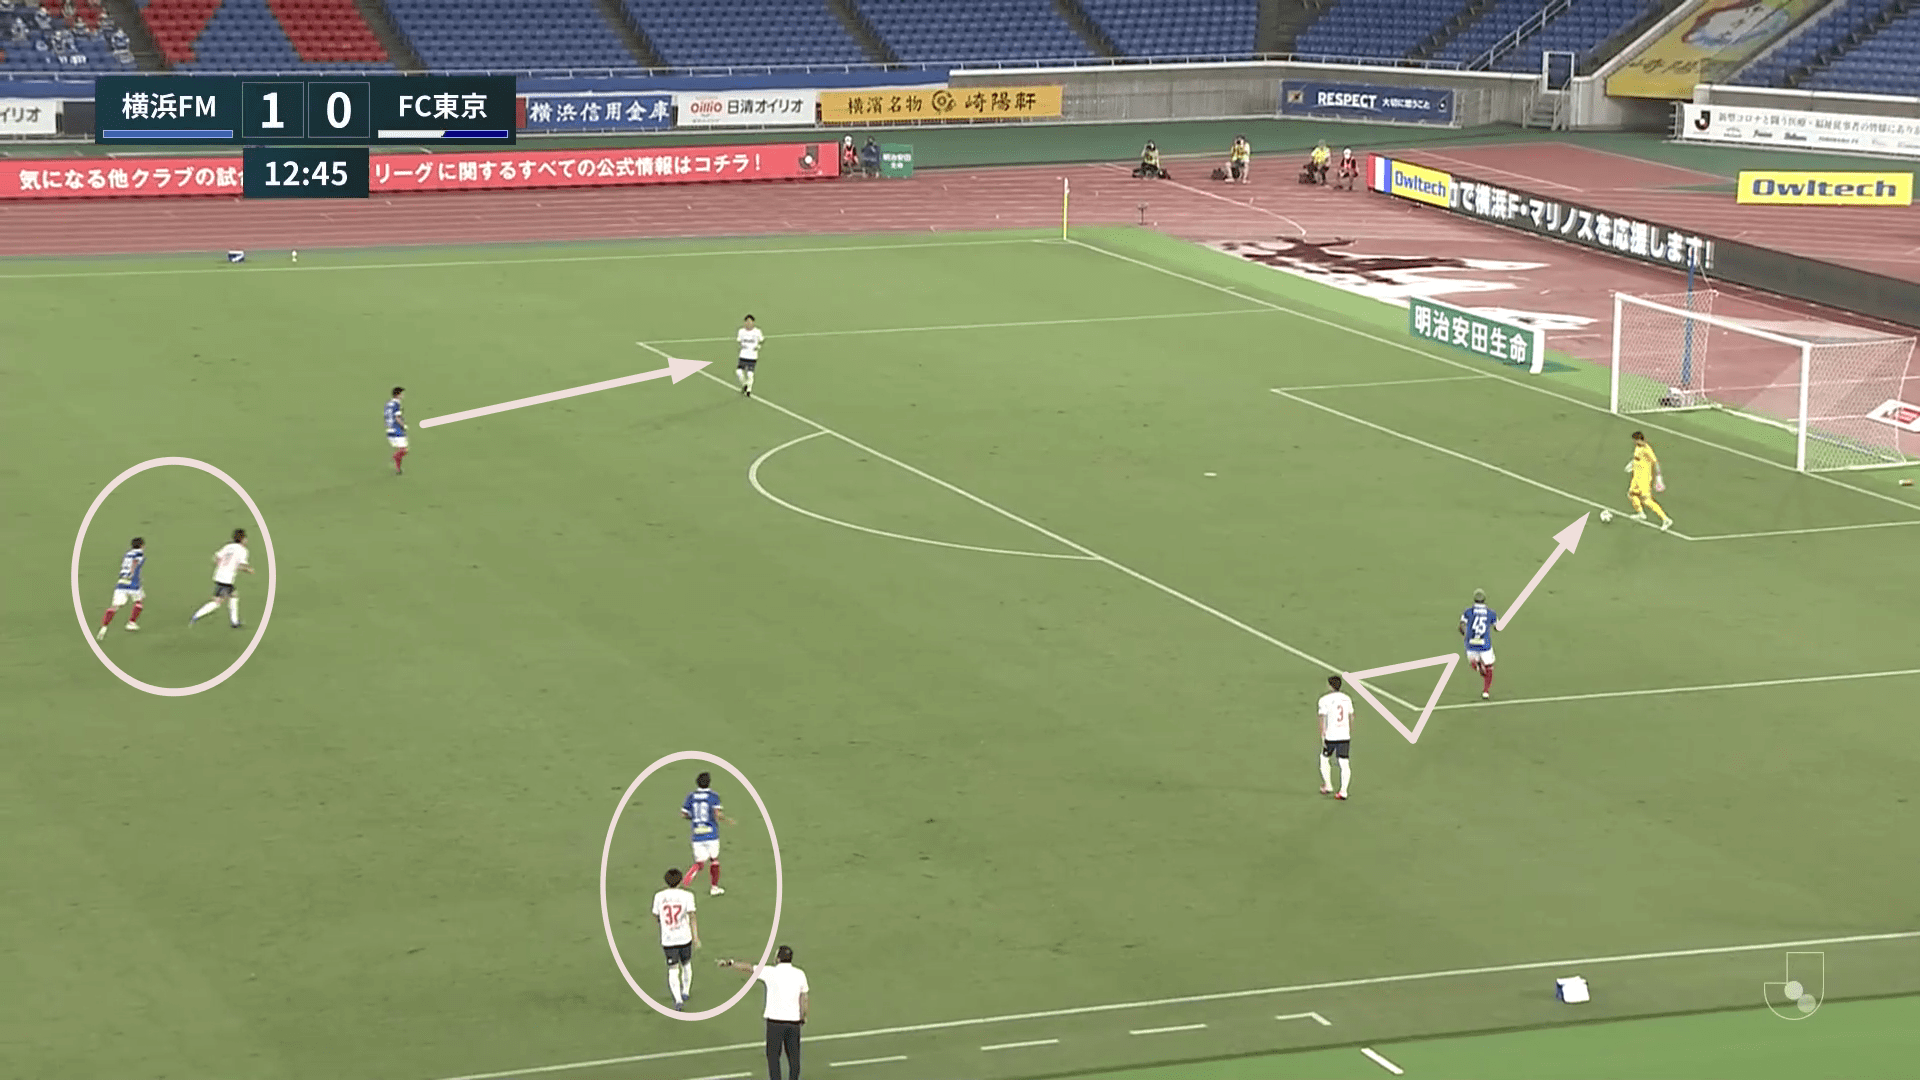
Here, it looked like the Marinos’ again went for a man-oriented pressing. With Onuwai pressing the goalkeeper keeping Tokyo’s LCB in his cover shadow. The other three marked the RCB, LCM, and LB of Tokyo.
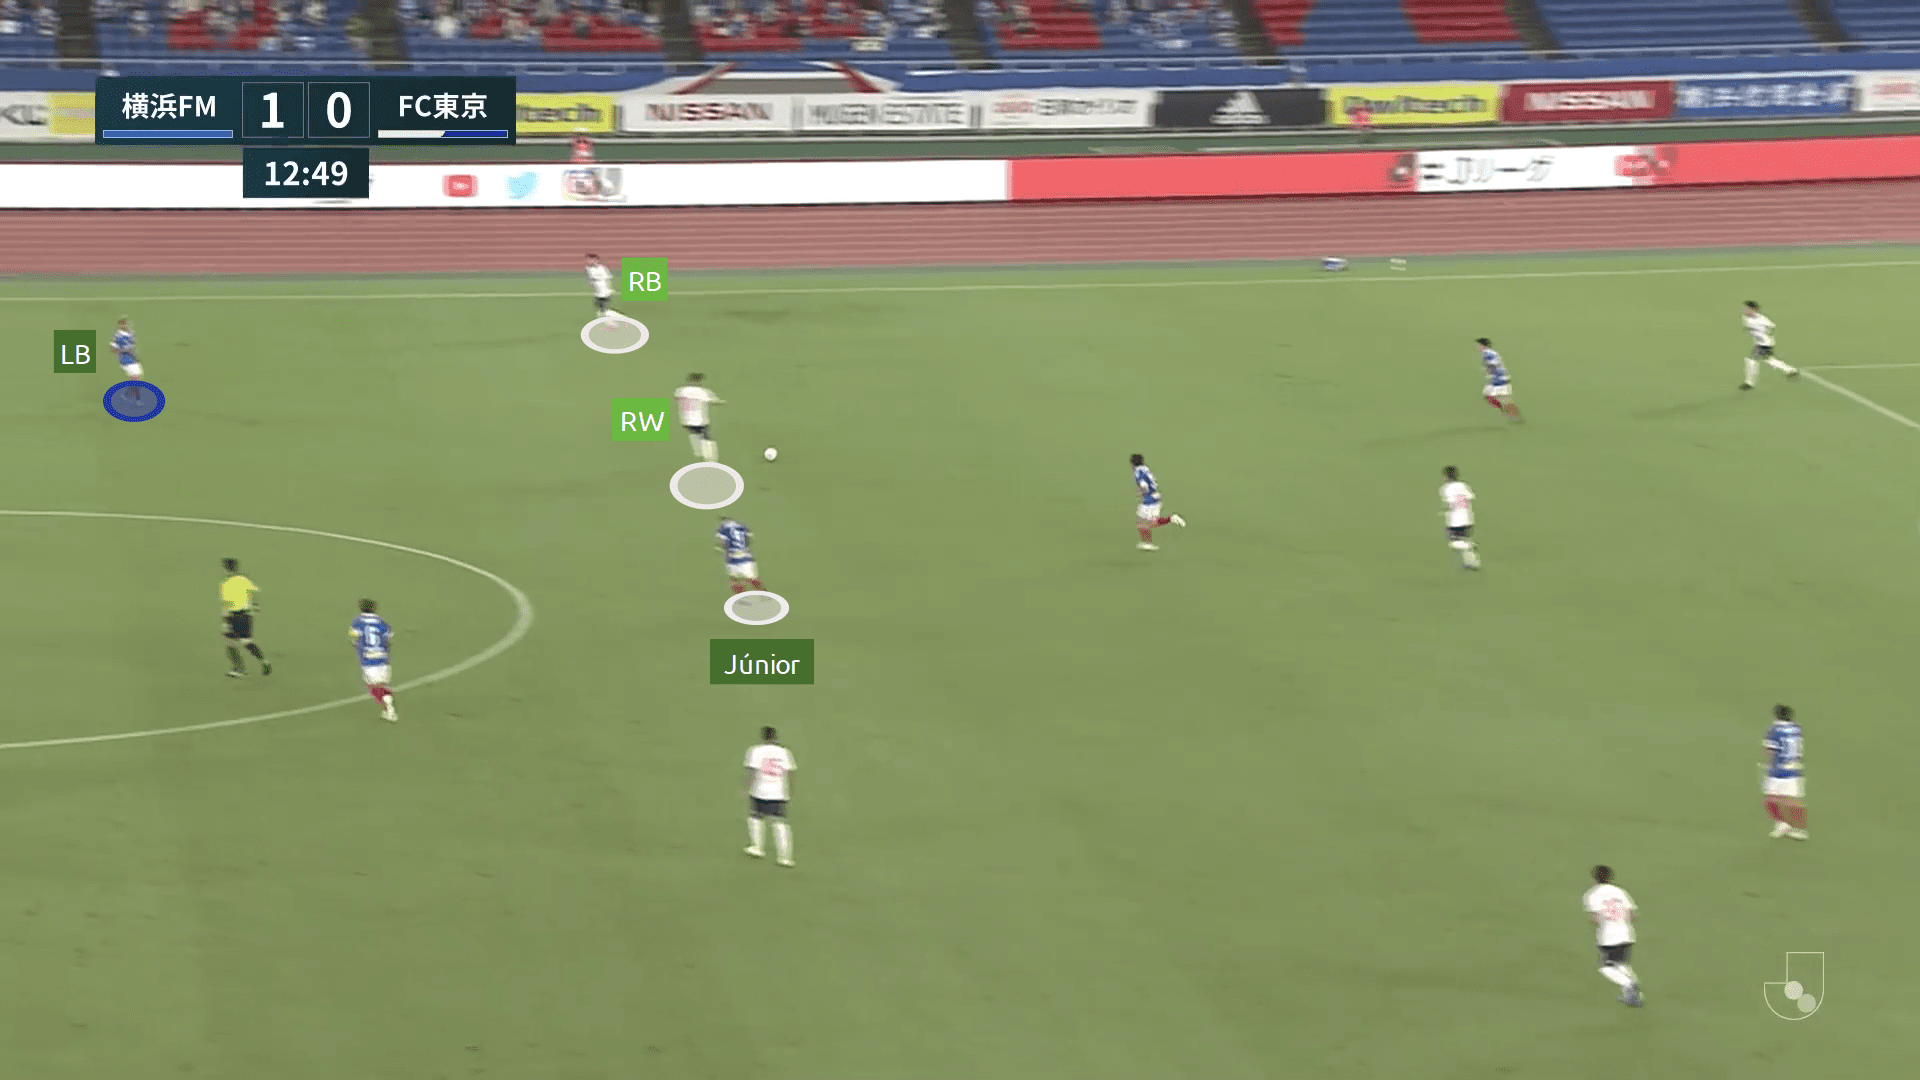
In the image above, you can clearly see the unorganised pressing structure of the Marinos. Júnior who was positioned at a deeper position, was completely out of place. He was neither marking any player nor positioned properly to protect the midfield. The goalkeeper found an easy pass to Higashi (RW) who dropped deep looking at the huge space left by the Marinos in the middle third. Bunmathan (LB) tried to follow him but decided to maintain his position due to Muroya (RB) already looking to make an overlapping run.
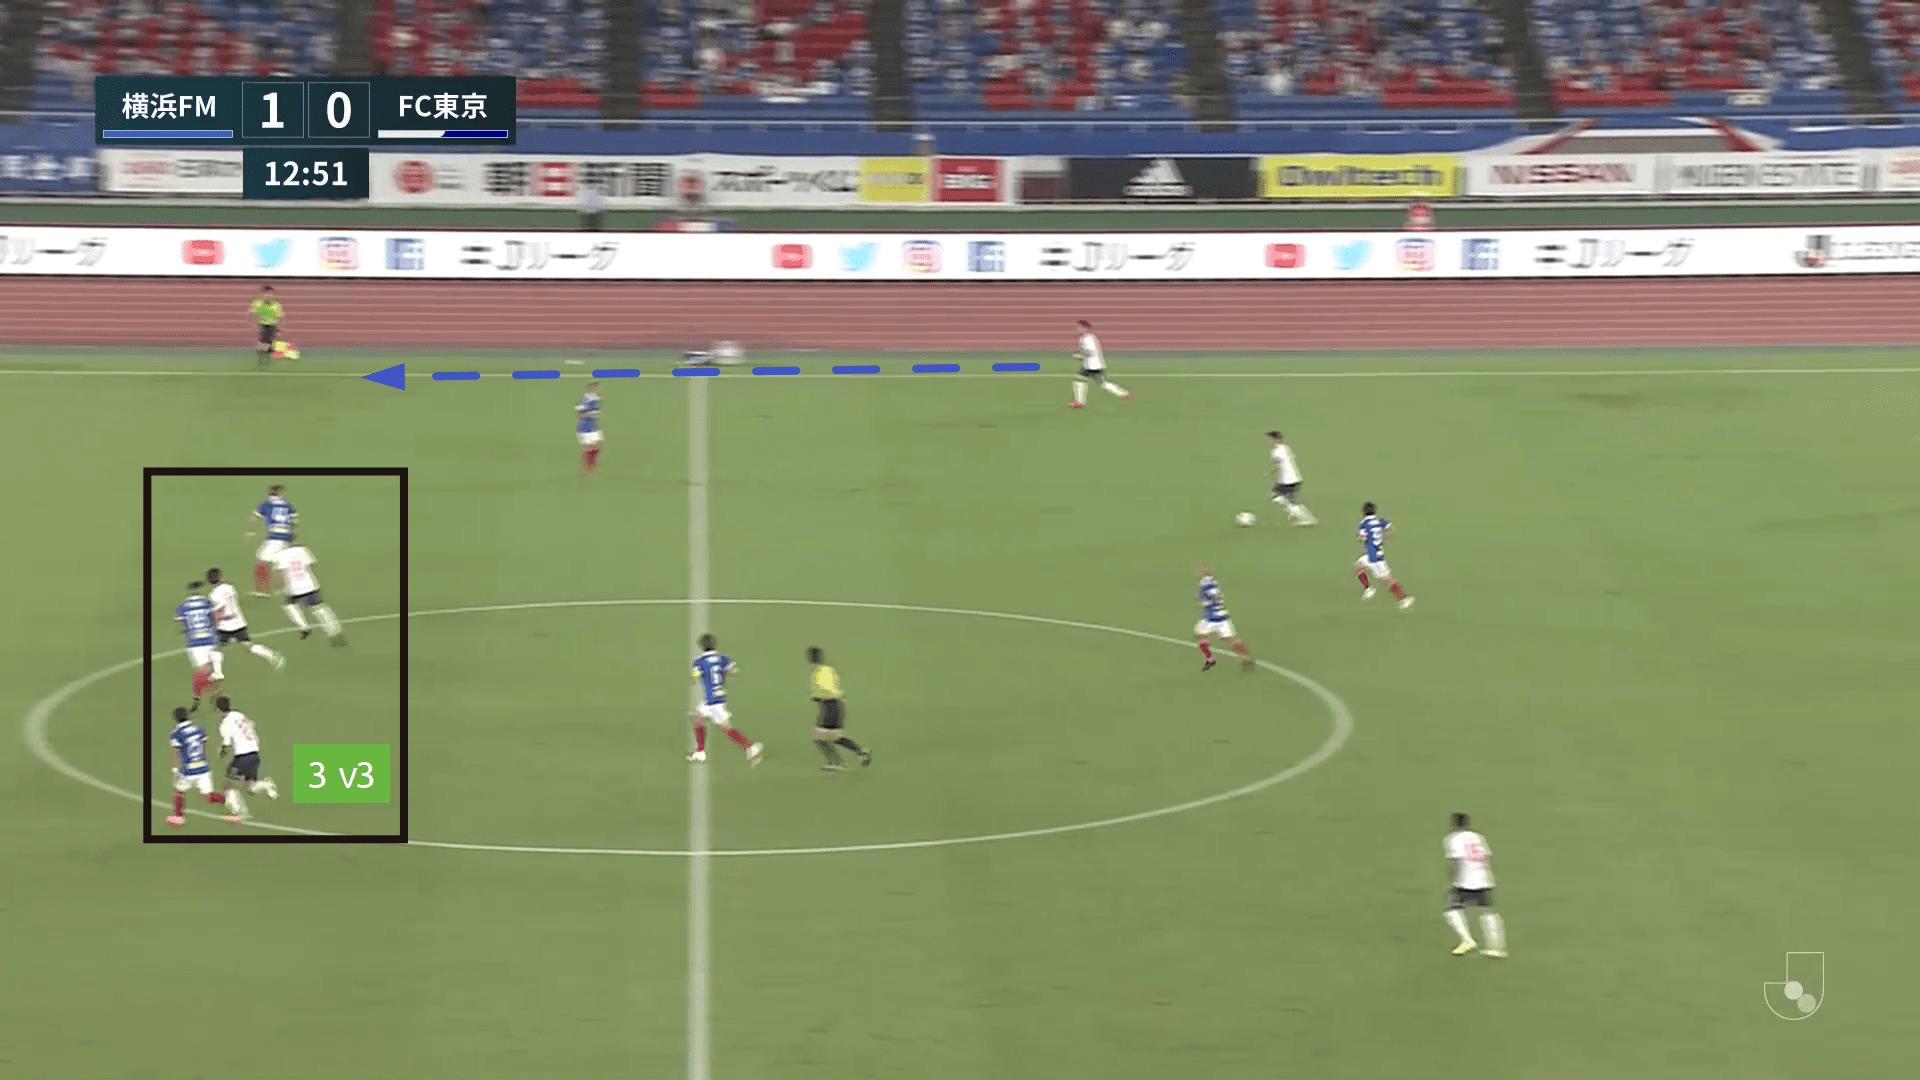
It led to a 3 v 3 situation up top. Tagawa combined with Diego Oliveira and Muroya (RB) who made an overlapping run past the right-winger eventually set the ball for Tagawa who was brought down inside the penalty area.
If the pressing was bad, counter-pressing was worse. When the Marinos was in possession in the final third, the overall formation of both the teams would look similar to the image below.
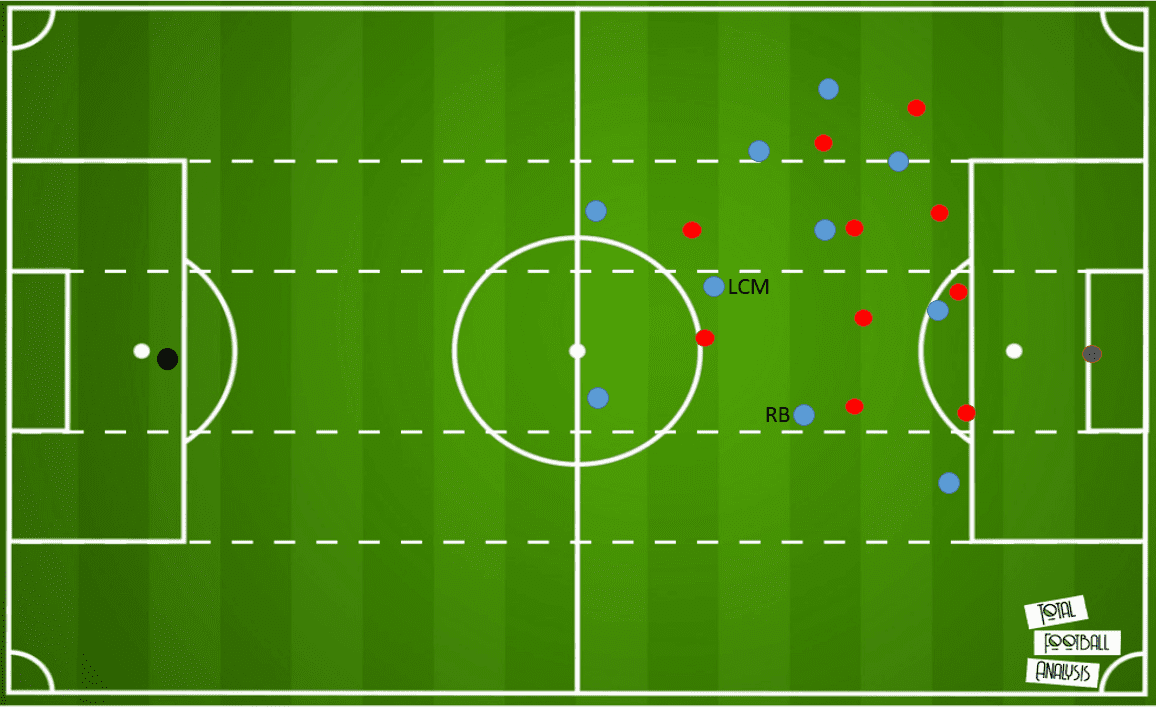
The Marinos generally looked to build-up from the left flank and when the home side did that, Koike (RB) would invert to the central channel. Tokyo would maintain a compact 4-4-2 out of possession in their own half. The second and final line of defence would hardly leave any space between the lines. The front two would cover the LCM of the Marinos as well as look to be a bit ahead in case a counter-attack is on cards.
With so many blue shirts up front, it would be a major headache for the home side if FC Tokyo broke through the initial Marinos’ counter-press, and that’s why proper and consistent counter-pressing by Marinos were so important. However, they failed to contain Tokyo with their counter-press quite a number of times and a failed counter-press led to Tokyo’s second goal.
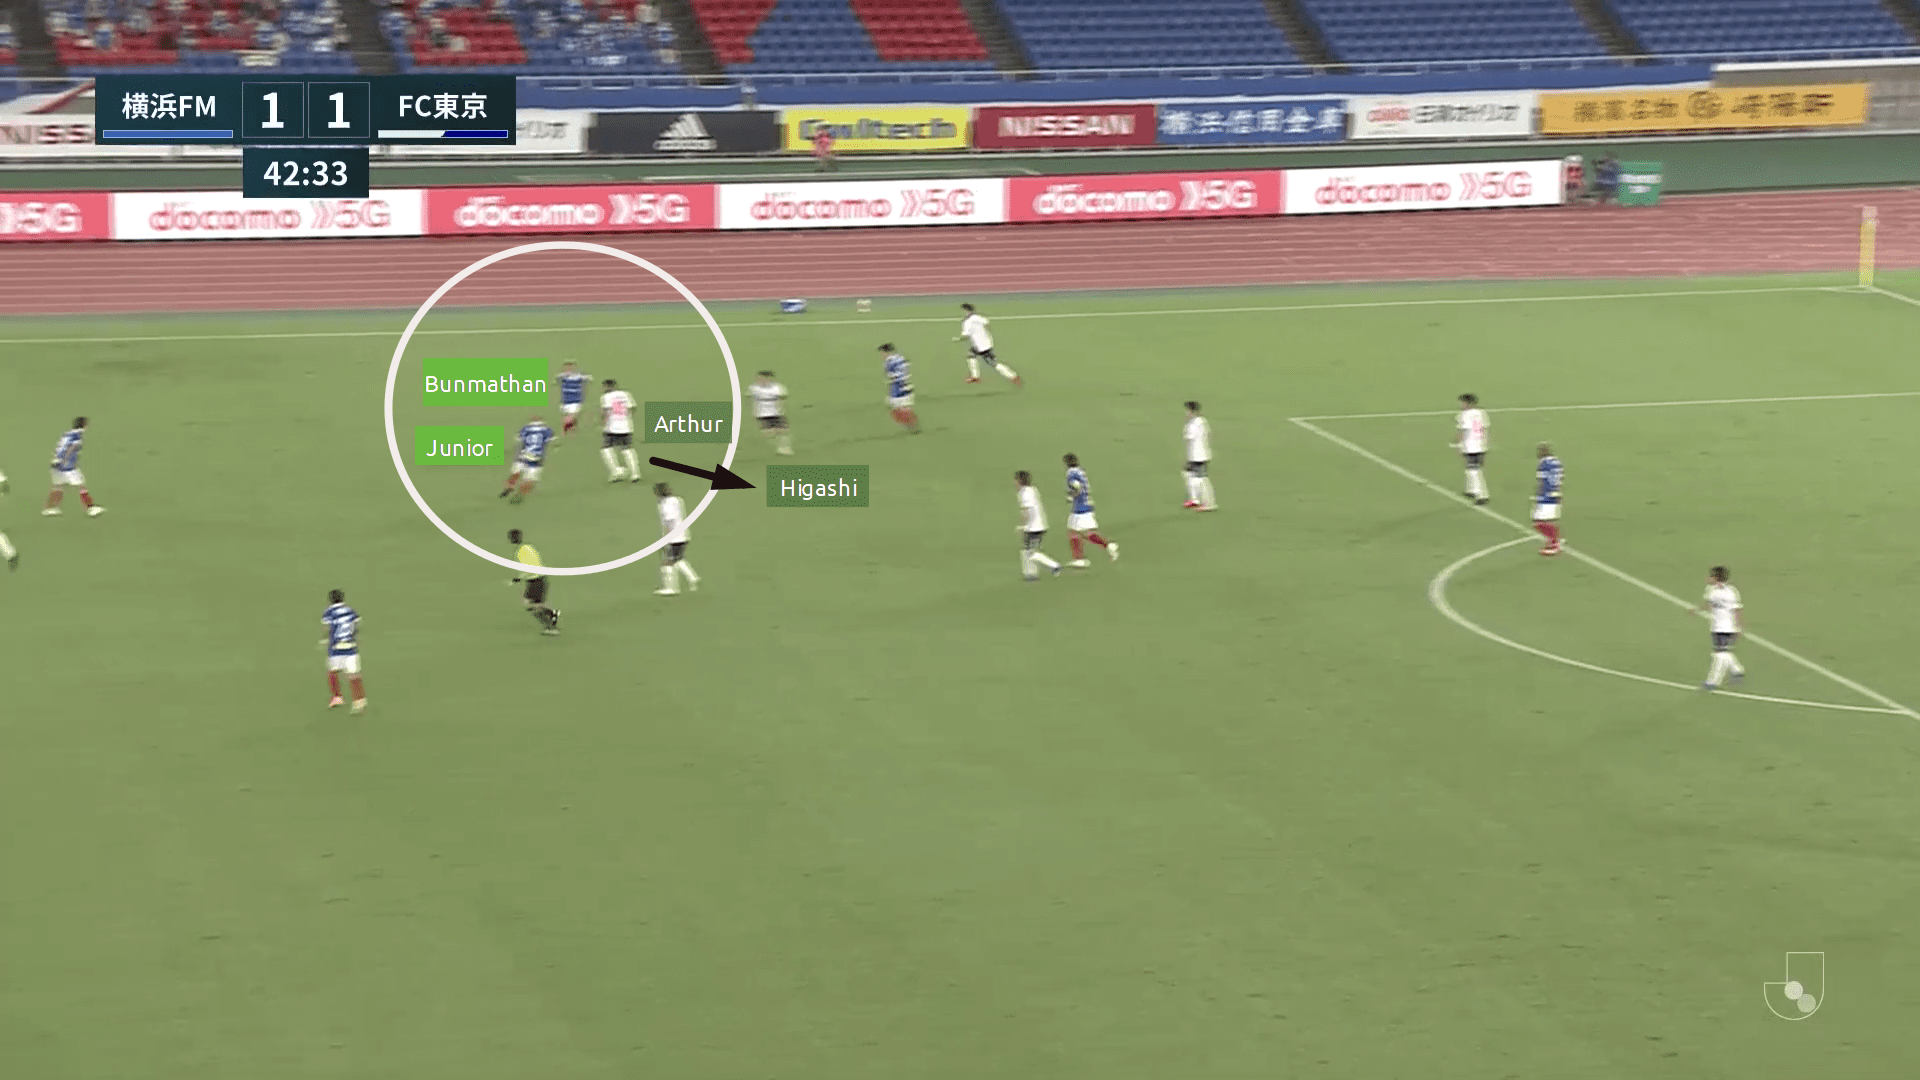
Here, Marinos lost the ball in the final third. Arthur has the ball and both Júnior and Bunmathan aggressively pressed the Brazilian midfielder neglecting Higashi who was just behind Arthur. The Brazilian midfielder passed the ball to Higashi who played it past the flurry of blue shirts to an open area.
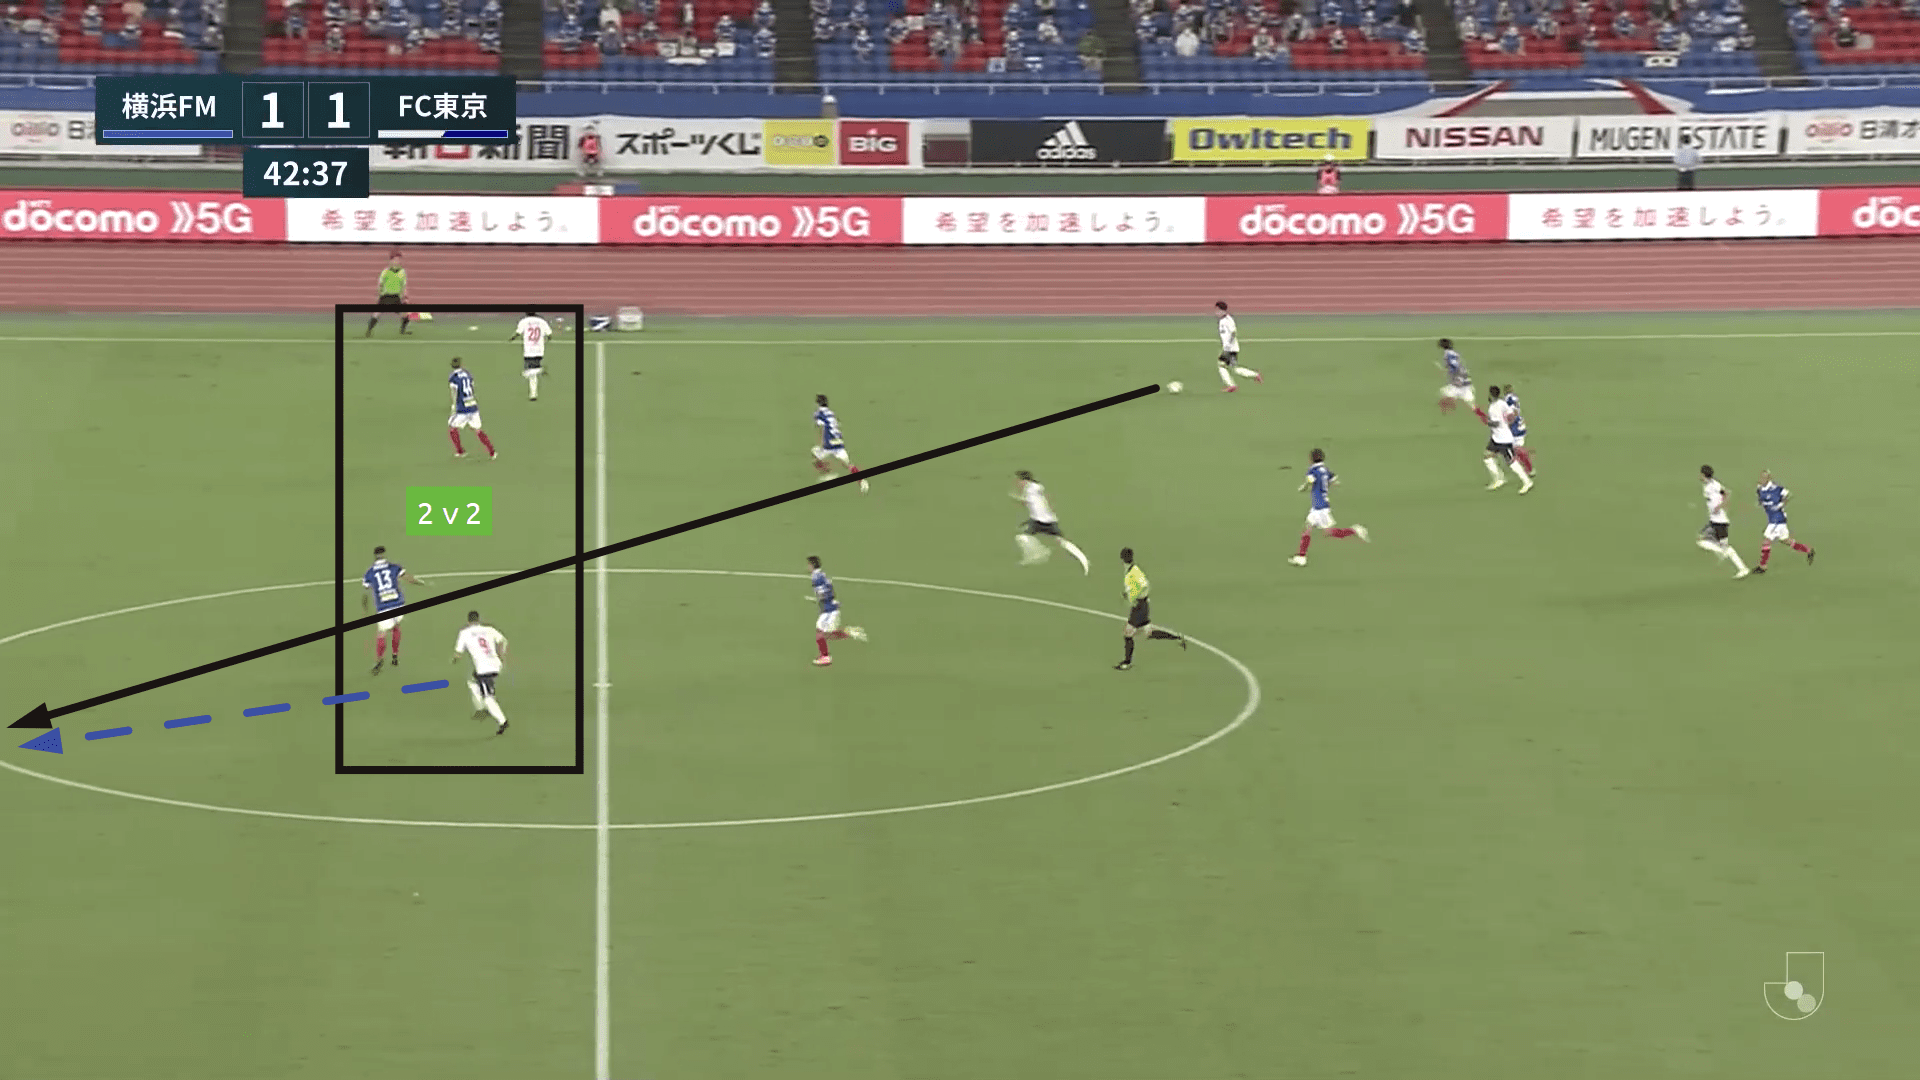
Suddenly a 2 on 2 was on the cards. The right-back played it long to Oliveira who was brought down by the advancing goalkeeper outside of the box which could have resulted in a red card any other day. Anyway, FC Tokyo did not have to wait longer as Leandro scored from the following free-kick to give FC Tokyo the lead.
Conclusion
FC Tokyo let Yokohama keep possession and showed patience in their defence. The Marinos played a staggering 739 passes between them keeping 71.63 % possession. However, all the passes led nowhere as the Marinos had only one shot on target compared to Tokyo’s five with just 215 passes (68.37 % passing accuracy). This shows whenever Tokyo recovered the ball they looked to play progressive and direct passes trying to hit the Marinos where it hurt them the most. With the Marinos committing too many bodies forward, it was hard for them to contain Tokyo’s counter-attacks once they breached the home side’s initial counter-press.
Yokohama F. Marinos’ topsy-turvy start to the 2020 season continues and FC Tokyo did not let their heavy defeat against Kawasaki in the midweek bother them against the reigning champions.



Comments