Possession based game vs counterattack. A fixture involving Yokohama F. Marinos is bound to give us a similar spectacle. The Yokohama based club keeps 67.19 % possession per game in J1 League this season and plays a whopping 702.11 passes per game. The Marinos indulge in 44.22 positional attacks and concedes 4.56 counter-attacks per game. Nothing was out of the ordinary in the weekend fixture between Yokohama F. Marinos and Kashiwa Reysol, just an amplified version of the stats were on the cards. The Marinos played 61 positional attacks and conceded 8 counterattacks against Reysol.
In this tactical analysis, we will discuss the tactics behind the positional attacks and Reysol’s intelligent build-up. Without further ado, let’s dive into the analysis and indulge in the intricacies of both the managers.
Line-ups
Angelos Postecoglou, former Melbourne Victory (A-League) manager, started with 4-1-4-1 which moulded into 4-2-3-1 quite often. Edigar Junio kept his place up front. Marcos Júnior was brought back into the line-up owing to his last-minute winner against Vegalta Sendai. Kota Mizunuma and Erik positioned themselves on either side of Júnior. Takuya Kida and Jun Amano sat in the heart of the midfield. The look of the entire backline remained the same from the previous fixture.

Nélson Baptista, former Juventus player, and current Kashiwa Reysol manager started with his preferred 4-2-3-1, however, out of possession, Reysol defended mostly with 4-4-1-1. Baptista went with his trusted XI that played the last J1 League fixture against Nagoya Grampus.
Reysol’s fluctuating 4-2-3-1 & 4-4-1-1
Kashiwa Reysol initially remained in a 4-2-3-1 high block putting no pressure when Yokohama built-up form the back. Michael Olunga, the striker, protected the pass from one centre-back to another. The two wingers kept tabs on the full-backs and Ataru Esaka followed Kida closely. However, they did not press intensely rather kept tabs on the players, and can be supported by Reysol’s 19.88 PPDA.

Once the Marinos were successful in building their play to the middle third, Reysol sat in a 4-4-1-1 block with minimum distance between the lines. Esaka’s task was vital. He had the job of following the Marinos captain, Kida, since the Japanese international is one of the vital cogs in Yokohama’s system.

Yokohama’s inverted full-backs create uncertainty
If there is a winner which only focusses on bypassing the first line of press, the Marinos will surely win it by a country mile. You just can’t contain Yokohama’s first phase of build-up, that’s the reason almost all the teams go for a mid or low block against the Marinos. The most essential aspect of Marino’s build-up is their inverted full-backs.

Here, Esaka (CAM) does his job well and marks Kida (CDM). Olunga (CF) too blocks the passing lane to the other centre-back. The right-winger, Yusuke Segawa keeps a close tab on the Yokohama left-back, Theerathon Bunmathan. Shinnosuke Hatanaka (LCB) has two passing options. One, a lateral passing option to the LB. Second, a forward passing option to the inverted right-back, Ryuta Koike. Hatanaka obviously opts for a forward passing option. You could argue, why did the left-winger not follow Koike? The reason is due to the rotation between Yokohama players.
Left-back inverting and LCM moving wide to the flanks is very common in Yokohama’s build-up and so is the right-back inverting and CAM dropping deep to the flanks.
The reason of the left-winger not following Koike in the previous image was due to the fact that Júnior (CAM) was dropping to the flanks and that created confusion in the left-winger’s mind, whether to follow the right-back or block the passing lane to Júnior.

The image above clearly indicates the conundrum. Here, the left-winger chose to follow Koike and ended up freeing up a passing lane to Júnior.
Even in the opposite flank, the rotation of the left-back with another Yokohama player is pretty common. The primary intention of the inverting full-back is to create confusion in the opposition players and thus create an overload on a certain player.

Here, Bunmathan (LB) inverts and Amano (LCM) starts his movement wide, thus creating an overload on the Reysol midfielder. Now, Richardson (RCM) is in state of a conundrum, whether to mark Bunmathan or follow Amano and decide to do the former. Hatanaka (LCM) passes the ball to Amano and creates a 4 v 4 situation in the final third.

Amano crosses the ball to Erik (RW). However, Erik’s poor decision making, let the team down.
Marinos’ high press and Reysol’s intelligent build-up
The Marinos have struggled with their high press throughout the season. In this game, their high press did not end up in them conceding a goal but caused them numerous problems.
The Marinos would press high in a 4-2-3-1 or 4-1-4-1 structure depending upon Reysol’s build-up. The striker would sit between the centre-backs and the pressing trigger would be set when the goalkeeper would pass the ball to one of the centre-backs. His aim would be to block the lateral passing lane to the other centre-back. Júnior (CAM) would mark one of the deep midfielders who would act as the pivot. The wingers would position themselves in the half-spaces, ready to press the full-backs if the ball is played to them. Amano would closely follow the other Reysol midfielder and Kida (CDM) would position himself in the central corridor and screen the last line of defence.

Kida could also mark a player who would drop deep but mostly screened the defence and there laid Yokohama’s problem.
The Reysol attacking players (CF, RW, LW, CAM) would initially position themselves along Yokohama’s last line of defence and then drop deep to open up a passing lane. Sometimes, only one player drops deep and sometimes two players to confuse Kida. However, Kida’s willingness to screen the defence would give them an unhindered passing lane.

Here, Hayato Nakamo (LW) dropped deep and created an overload on Amano along with Richardson (RCM).
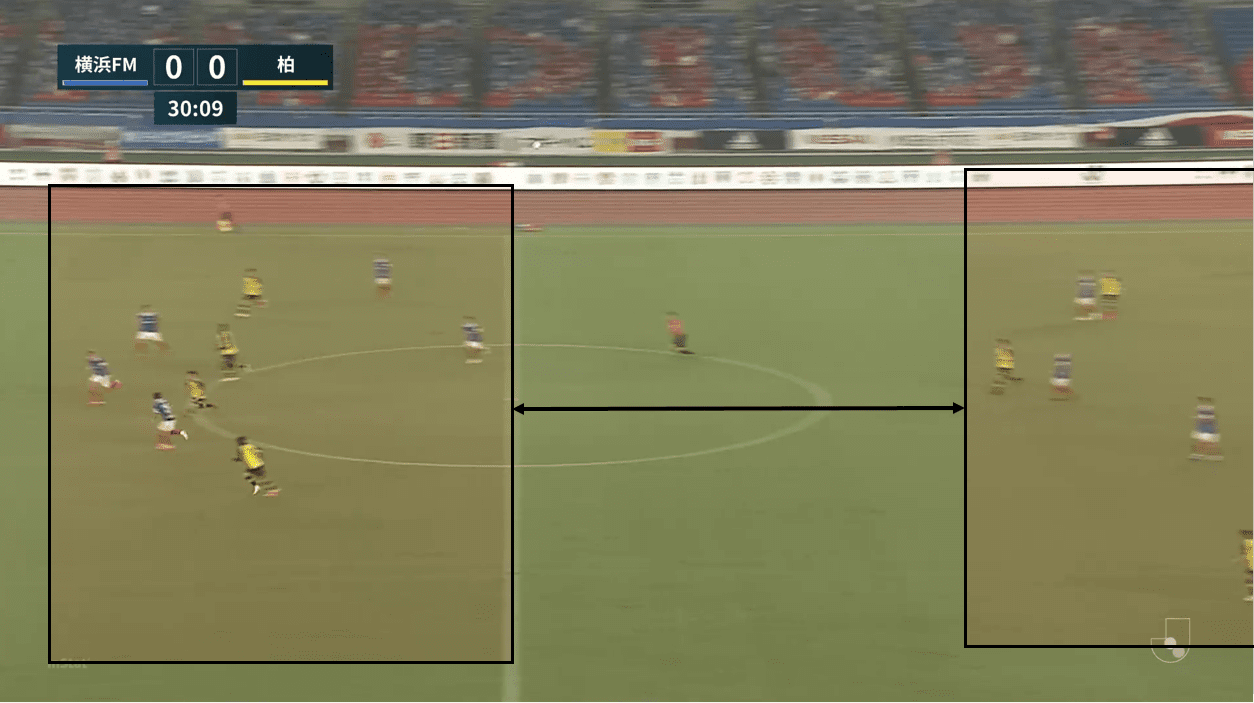
When not building-up by this method, Reysol would play long but with a strategy. The defenders would lure in the five attacking players of Marinos and create a huge distance between the two blocks.

The goalkeeper passed the ball to Tatsuya Yamashita (RCB) inside the 18-yard box, which set the trigger for the striker to press the centre-back. The full-backs and the midfielders stayed close to the first line of build-up thus luring in Yokohama’s first and second line of press. When that happened, Yamashita played a long ball up front.

The long ball created a 4 v 5 situation for Reysol and the distance between the two Yokohama blocks is enormous. These build-up patterns of Reysol did create a few difficulties for the Marinos.
Deep runs to counter Marinos’ offside trap
The Yokohama based club play with a very high line and tries to maintain a minimum distance between the lines. Off the ball, in their own half, the Marinos defend with a 4-1-4-1, keeping the central corridor and the half spaces covered but leaves a huge amount of space on the flanks.

The above image demonstrates a high line but the primary objective of Marinos keeping a high line is always to set an offside trap for the opposition.

As you can see in the above image, three Reysol players are in an offside position, trying to get back into the game.
To counter Marinos’ offside trap, Reysol would create two blocks of players and few connectors in between.

The main objective was to create an overload on the Marinos’ last line of defence and make runs keeping an onside position, which Reysol succeded a few times.
However, the tactics that bothered Postecoglou was deep runs of Reysol full-backs.
Yokohama likes to stay very compact, leaving a lot of free space on the flanks and Baptista clearly tried to exploit the flanks by quickly switching the ball from one flank to the other or from the central corridor to the flank. The Reysol wingers invert which forces the Marinos full-backs to stay narrower and it becomes difficult for them to track the deep runs if their winger doesn’t help them out.

The above image demonstrates the complications Marinos faced through long balls and deep runs. Reysol’s RCB played a long ball up front and it fell kindly to Esaka’s feet. The left-back made a marauding run on the left flank and the Yokohama right-winger failed to track his run. Fortunately, for Yokohama, the cross was poor from the left-back and did not cause any nuisance.
Counter movement leading to Marinos’ equaliser
The Marinos use a lot of rotations when on the ball. In the middle third of the opponent and the final third, they form diamond on the flanks and use rotations to progress the ball to the 18-yard box. However, Reysol completely nullified Marinos’ rotation in a diamond by matching them in numbers and marking them strictly.
Marinos unable to build through the flanks started to make use of the half space and central channel in the second half and used a lot of counter movements. Counter movement is similar to rotation but with decoy movements.

The above image is blurry but it helps to understand the counter movement mechanism. The Marinos substitute striker, Ado Onaiwu makes a decoy movement and drops in between the lines and drags away the right centre-back along with him, to create space for Amano (LCM). However, the RCM of Reysol was alert in this situation and bailed him out.
The goal Reysol conceded was a result of similar counter movement performed by the same players in the central corridors.

Again Onaiwu played as a decoy to bring Amano in the play. Onaiwu dropped deep and dragged the left centre-back along with him. Amano attacked the space left by the Reysol centre-back. Onaiwu and Amano interchanged two passes before the Japanese striker slotted it past the Reysol goalkeeper.
Conclusion
The champions struggled throughout the season with their high line and defensive errors. The high line could have cost them the match, however, this time the defensive error did them the favour.
Even the attack looks blunt more often. There is no stopping the Marinos in the first and second phase of the build-up. However, it’s the final third action that the other teams have figured out. The diamond work sometimes and sometimes it does not. The Marinos have to figure out alternative methods to attack the final third. The counter movements did the trick in this match but the Marinos do need to find more varieties in the final third.
Michael Olunga’s hot run continues and so the J League 2 2019 champions. Kashiwa Reysol finds themselves in the fifth place after nine games, which is commendable.
This fixture could have gone either way and if not for Ken Matsubara’s error, the Marinos might have nicked it.


Comments