

Domination. One word that comes to mind when anyone enunciates Jeonbuk Hyundai Motors FC. In recent years, there have been few teams that have completely dominated their leagues, Bayern Munich in Bundesliga, Juventus in Serie A, or Red Bull Salzburg in Austrian Bundesliga. However, due to lesser media coverage of Asian Football, the domination of Jeonbuk Motors in K-League 1 often goes unheard. Jeonbuk Motors have won five league titles in six years and on course to win the sixth one with four points ahead of the second-placed Ulsan Hyundai after nine games.
This tactical analysis will discuss the tactics used by José Morais focussing on the 2020 campaign.
Formation and Lineup
José Morais has stuck with his preferred formation, 4-1-4-1, in all the games this season. However, in-game he once changed his setup to 4-4-2 using Lars Veldwijk as the target man as the Warriors were looking for an alternative to break the opposition’s rigid defence.
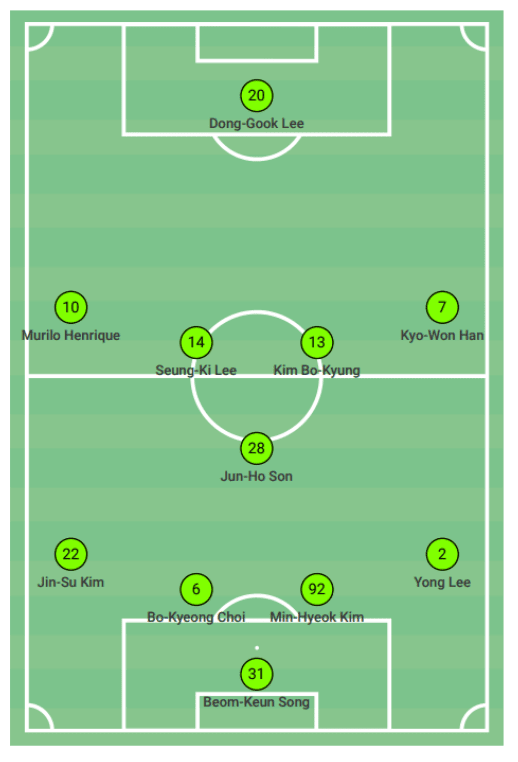
The formation may have been the same but the Portuguese gaffer has struggled to field the same set of players owing to the rule of having one U-22 South Korean player in the starting XI. The picture above shows the most used personnel in the respective positions in this campaign. However, few players have been used in different positions. Kim Bo-Kyung has been used in the wing as well as an advanced midfielder. The Japanese, Takahiro Kunimoto had the same fate. U-22 player, Kyu-Seong Cho has been used as a winger as well as a striker. The others were fortunate enough to play in their preferred positions.
Let’s dive into the concepts or philosophy that Morais believes in, without further ado.
Concepts of Morais’ possession-based football
As the heading suggests, the Portuguese wants his team to dominate the game with more possession. Before diving into the concepts let’s have a look at the graph below to vividly understand if their possession-based football gives a satisfactory output.
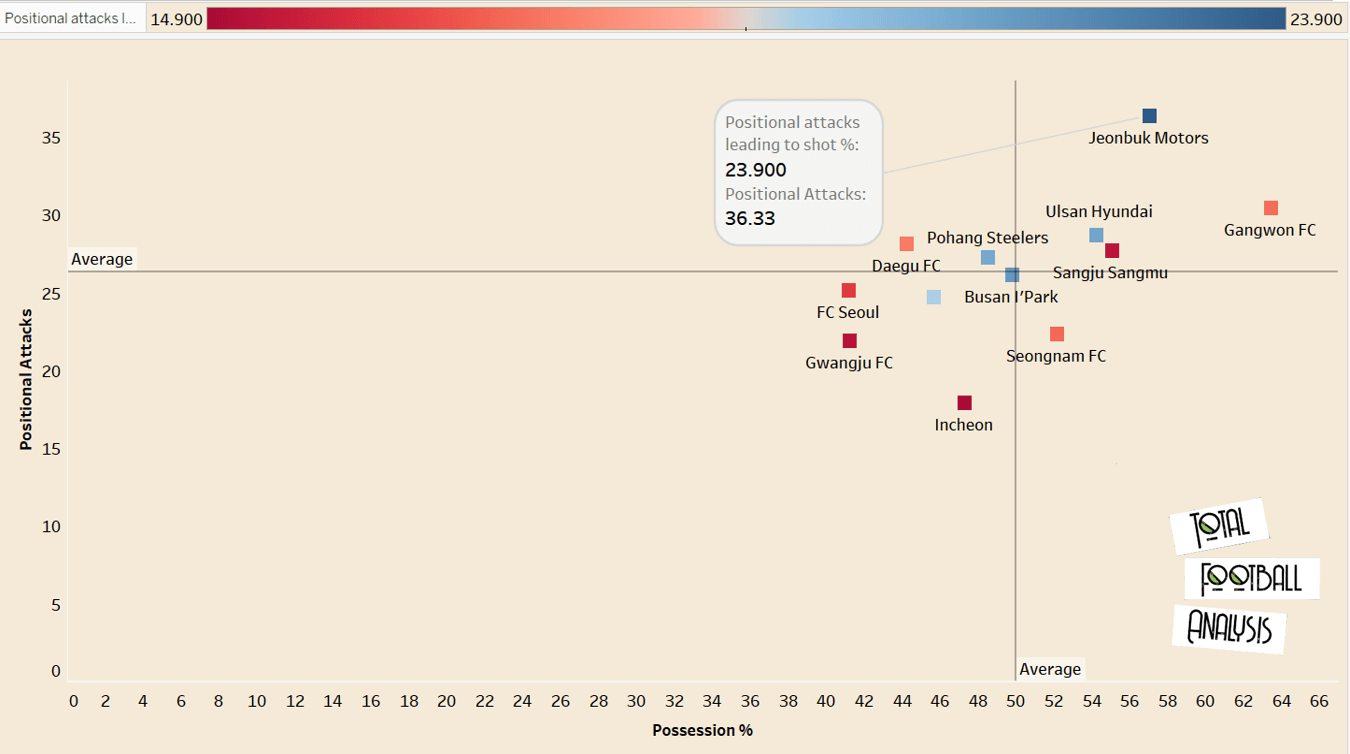
Jeonbuk have an average of 57.03% possession after nine games, 6% less than Gangwon FC. However, it’s the positional attacks and positional attacks leading to goal % that shows how productive the Warriors are in possession. Even though Jeonbuk is 2nd when it comes to keeping the possession, the North Jeolla based club leads the way for most positional attacks (36.33 per game) as well as leads in terms of positional attacks leading to a shot (23.90%), which almost makes them outliers in these categories.
Now let’s focus on the concepts of Morais that lead to such productivity when in possession.
The gaffer’s philosophy revolves around:
- Overload the area of play
- Rotation to create space
- Pass and move
Through various phases of possessional play, the Portuguese showcases these concepts.
Overload the area of play forming ‘diamond’
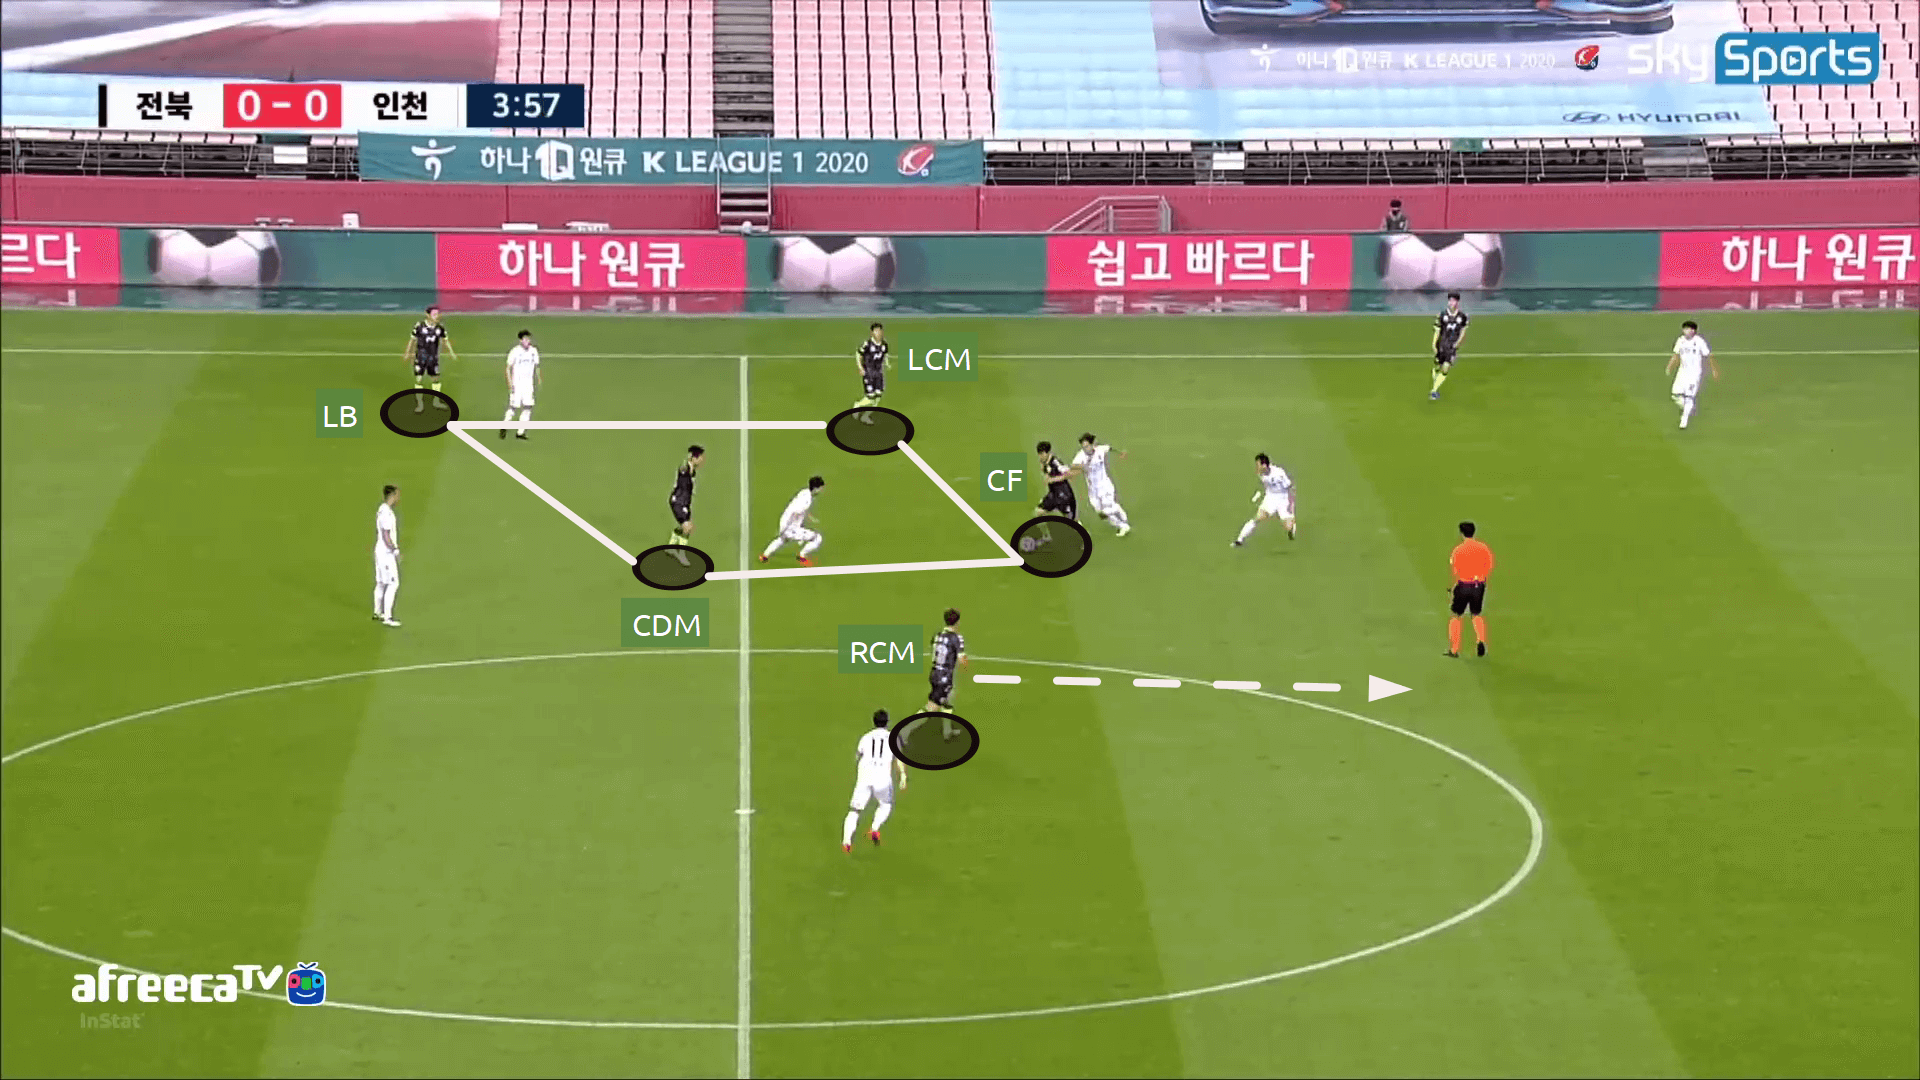
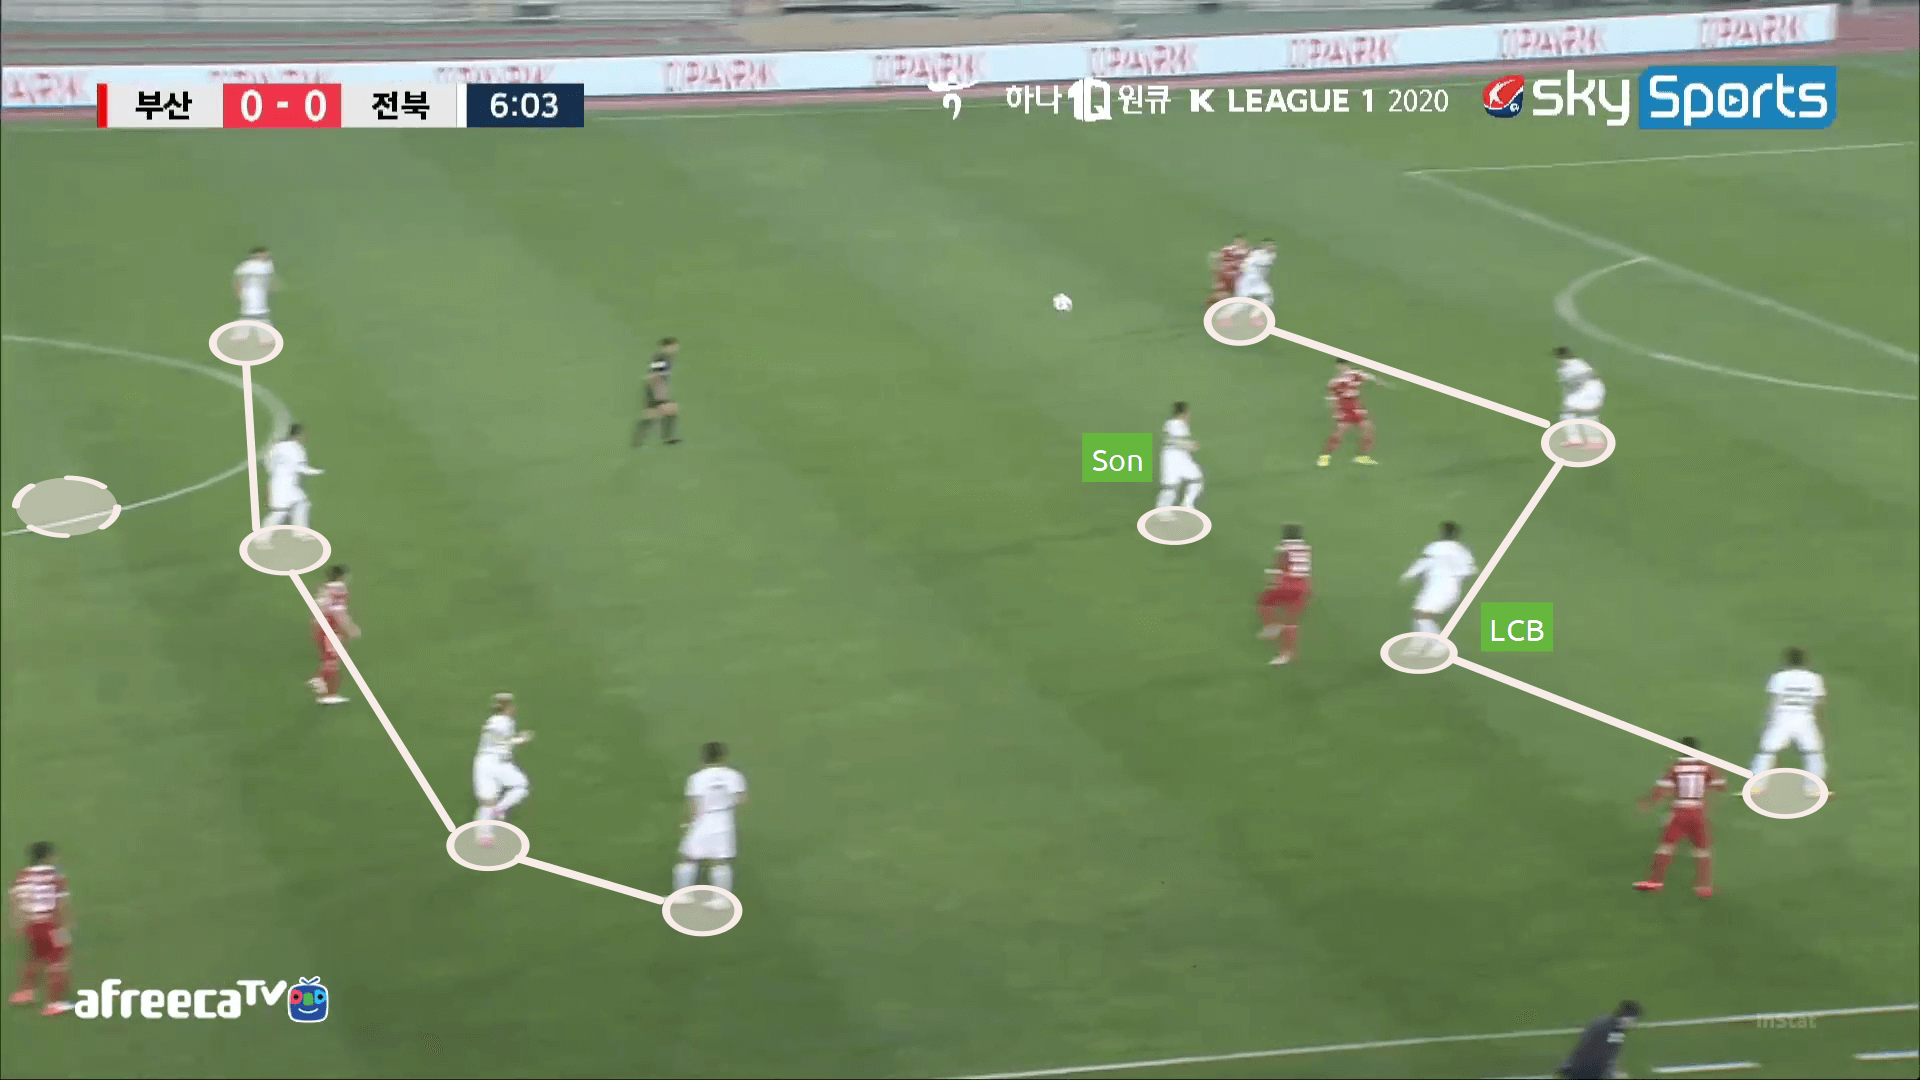
In K-League 1, most of the teams do not press aggressively, so, Jeonbuk mostly builds-up with a single pivot in 4-1-4-1 and pushes the full-backs higher and wide. Jun-Ho Son, CDM, stays put in his position forming a triangle with his centre-backs when Jeonbuk build-up from the goalkeeper. Sometimes, when the opposition shadow covers Son or marks him closely, an advanced midfielder drops to open a passing lane for the centre-backs and Son moves right to a free space and there is the initial movement to form a diamond.
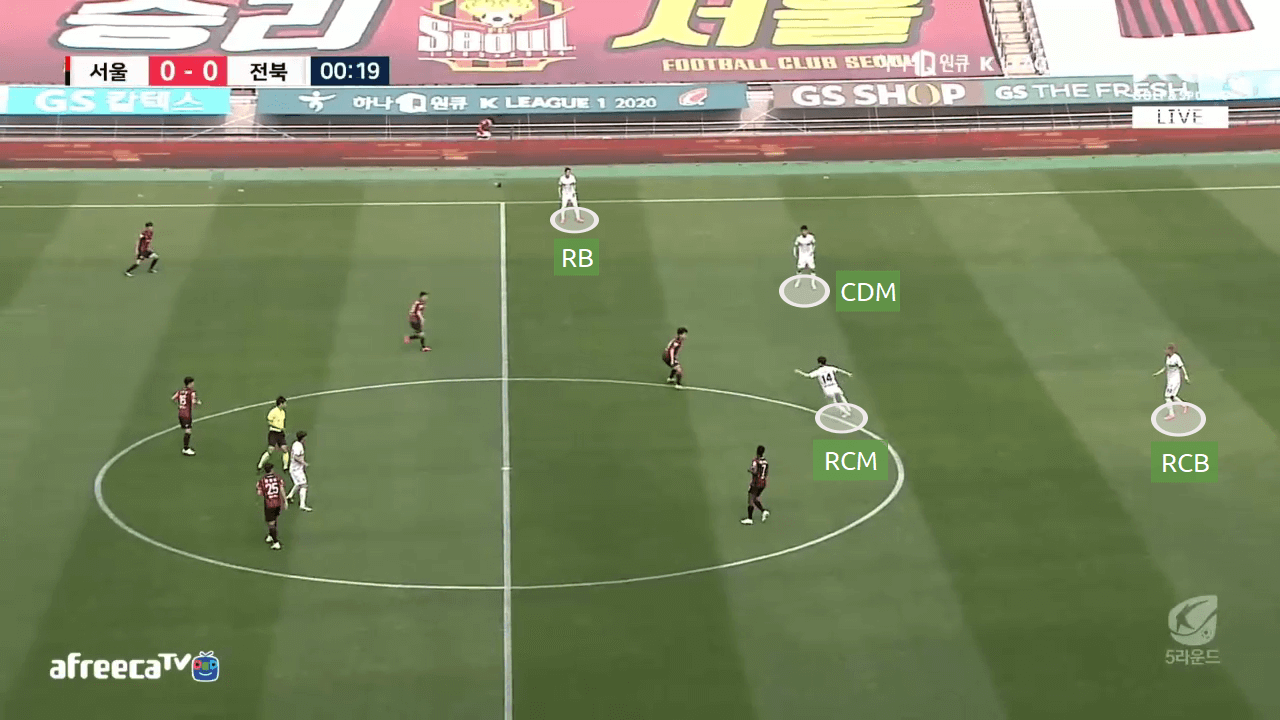
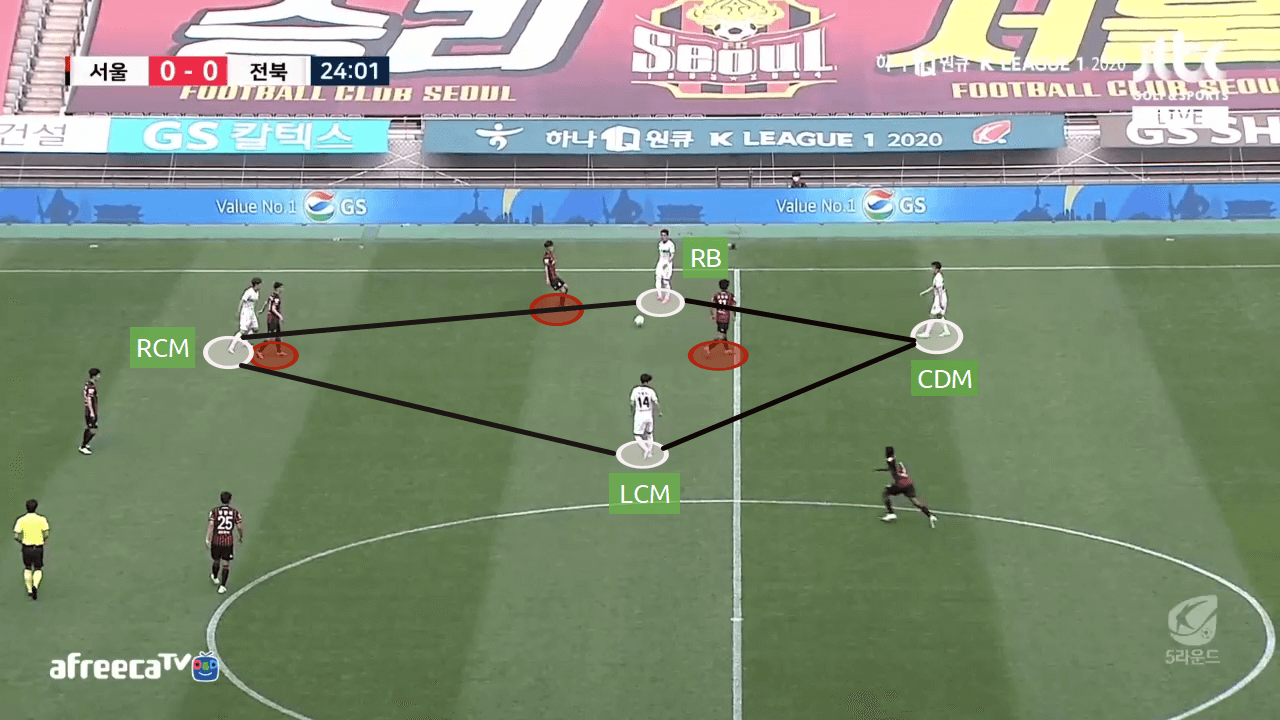
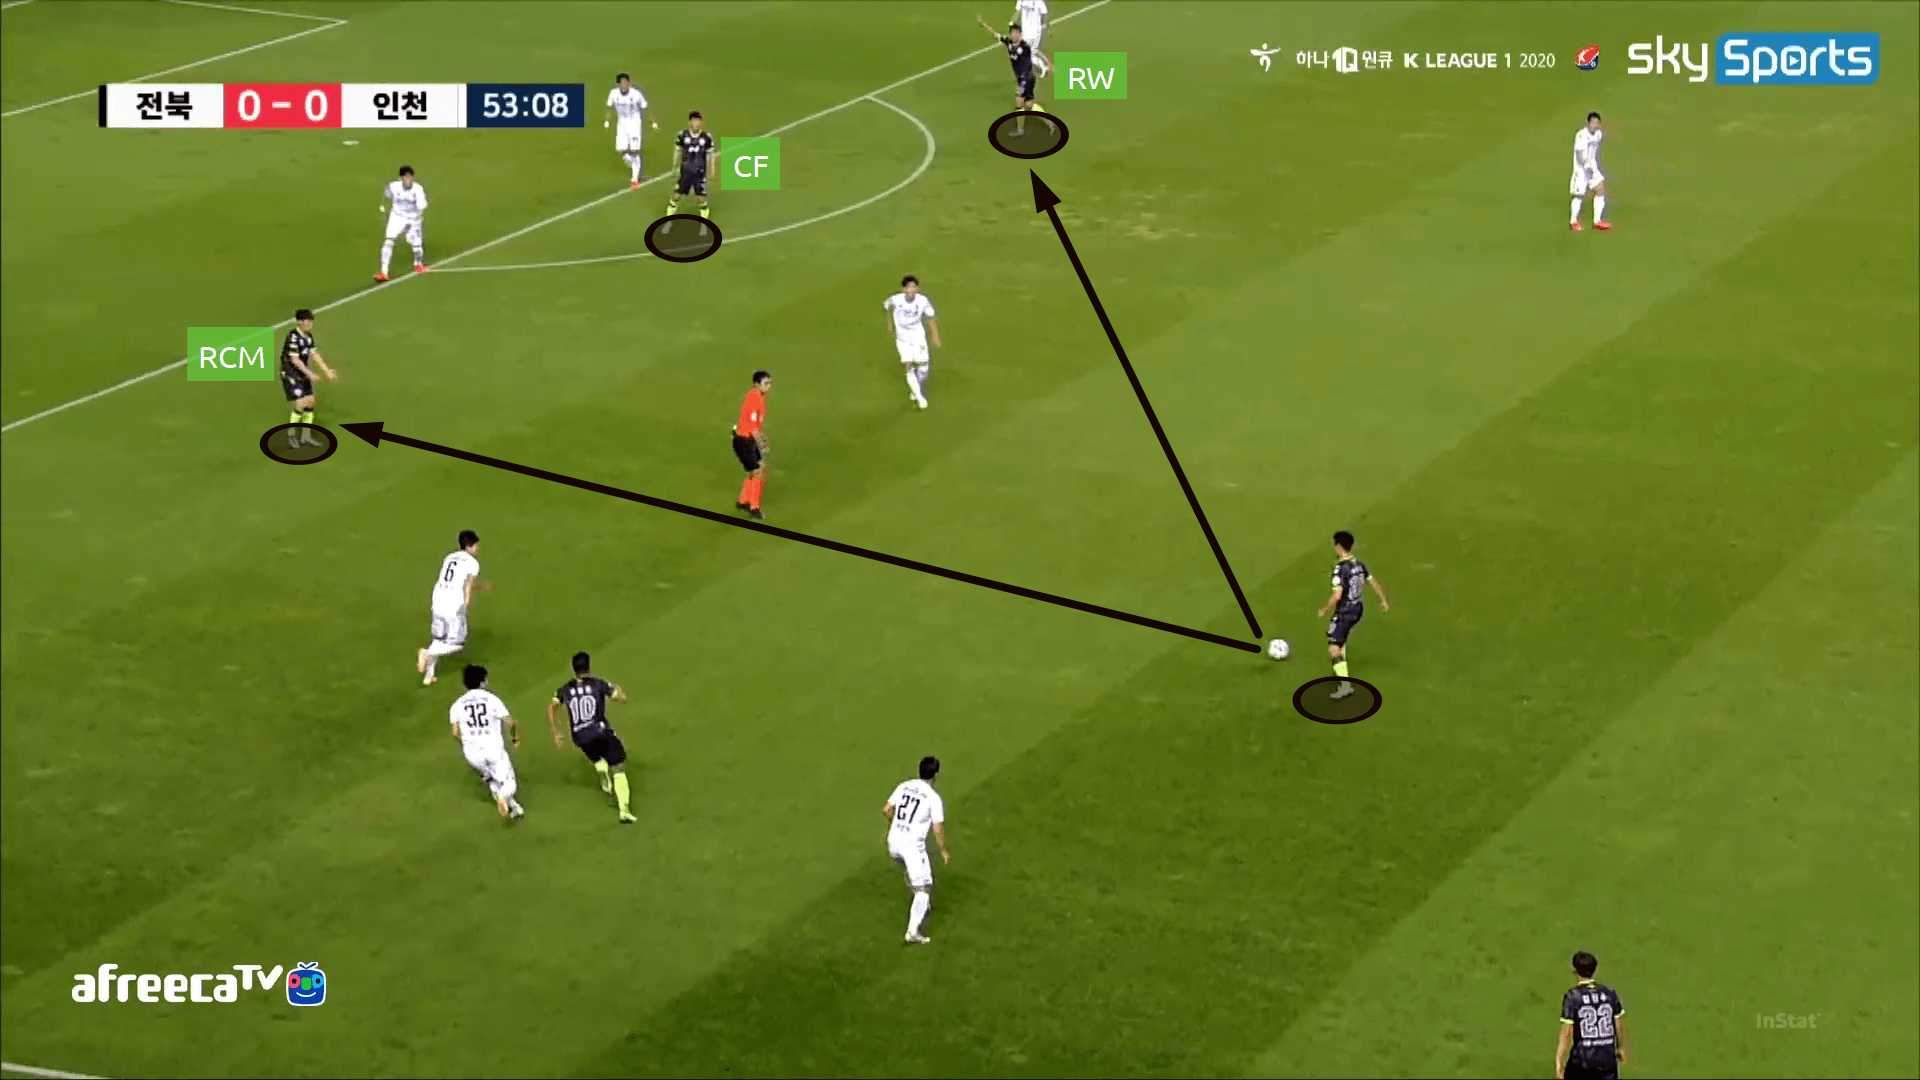
A thought might have come to your mind, why is the title named ‘a unique diamond’? The answer lies to the next piece of information. When Son (CDM), moves to the right, Seung-Ki Lee (LCM) passes the ball and moves to his direction, Kim (RCM) drops to form the top of the diamond and Yong Lee (RB) is the furthest on the wings. Basically a diamond shape is formed among the CDM as the anchor, LCM, RCM, and RB. This is where the uniqueness lies. In the image below, it can be seen how creating a diamond shape overloads the right-flank and with the help of LCM, who is in free space, Jeonbuk progress the ball further.
Jeonbuk mostly prefers the flanks to create overloads by forming a diamond shape and especially the right-flank where Jeonbuk initiated the build-up 36% of the times in this campaign. The reason behind it is the characteristics of the full-backs. Yong Lee, RB, is extremely efficient on the ball, hardly makes a miss pass and is very good with long balls. On the other hand, Jin-Su Kim is a great dribbler and beats his opponent with ease. Jeonbuk overloads the right-flank during build-up which isolates Jin-Su Kim on the opposite flank. To take advantage of Jin-Su Kim’s dribbling and the ability to beat the opponent one on one, and Yong Lee’s efficiency in passing, Jeonbuk mostly build-up from the right flank.
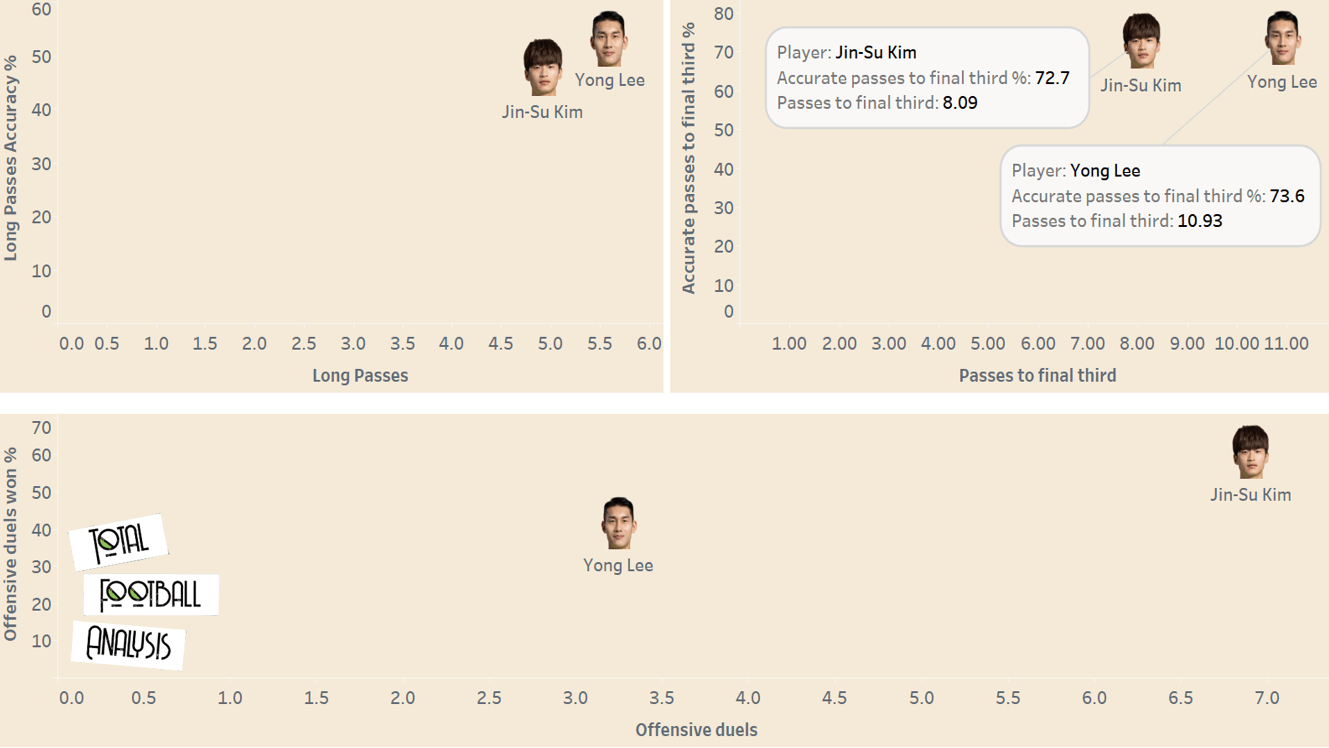
As you can see in the above graph which has the data of only nine games played in 2020, Yong Lee plays more passes as well as long passes which is natural given the condition but he also does it with greater efficiency whereas Jin-Su Kim is much better in offensive duels. This also highlights Jeonbuk’s build-up on the right to isolate the left-back with an opposition player to utilise Jin-Su Kim’s dribbling ability. Even 2019 data shows a similar trend.
A diamond shape is formed to overload an area and progress the ball breaking the lines or to create a situation for an advanced player to have a shot on goal. When the diamond is formed by these four players, generally the right-winger stays on top of the diamond, CF gives the height or even can drop between the lines. The left-winger’s position depends on CF’s movement. If the CF provides height, the LW would invert and position himself in the central channel to act as another 5th man along with the RW. If the CF is between the lines, the LW would be inverted only to the left half-space to make a deep run. In both the scenarios, the LB provides width on the opposite flank and is isolated.
Even sometimes, the CF can drop deep and form the top of the diamond depending upon the situation. It does not matter, who forms the diamond, however, everything is carried out to meet the two goals mentioned above, either to progress the ball or to create a shooting chance.
Rotation to create space
A key to progress the ball by overloading in a diamond shape is through rotation and occasional dropping of a player from an advanced area to complete the diamond.
Here, striker drops deep to create an overload of 4 on 3. However, when the striker drops to form the top of the diamond, he drags an opposition centre-back along with him, which creates a better situation for Jeonbuk in case the Warriors progress the ball through the diamond. Progressing the ball solely by forming a diamond is impossible, it needs support from the 5th man to progress the ball. Here, Kim (RCM), acts as the 5th man. Notice, the CF has already turned towards Kim and a pass to him would have given him a free license to progress the ball or maybe score a goal after combining with his teammates. However, the CF, Dong-Gook Lee chose not to pursue the option and Jeonbuk continued to build-up forming another diamond.
The important factor to create space through rotation is ‘pass and move’. It makes rotation speedier as well as drags away opposition from their respective positions with ease, thus creating space for themselves or his teammates.

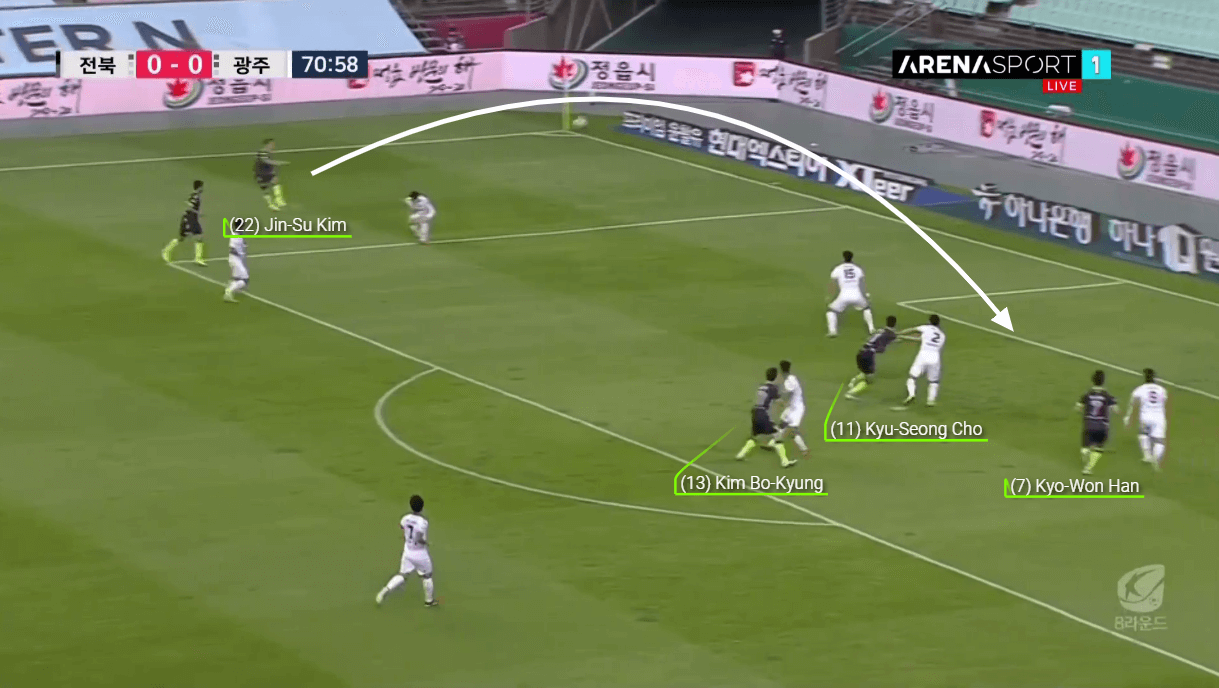
Here, again, the CF drops to form a diamond and thus create an overload of 4 on 3 and also drags out a centre-back from his line. The Incheon midfielder (#24) has two opposition players to cover, one LCM on the left-flank as well as the CDM. Jeonbuk LB passes the ball to Lee (CF), who has attracted the attention of #24 and thus leaves LCM on the left-flank free. Lee passes the ball to the LCM and instantly moves back to his initial position
Kim (LCM) with a lot of free space passed the ball in the final third where Lee has already positioned himself. Kyo-Won Han who was the RW for the match moved to Lee’s position when the striker dropped deep, left the ball to Lee with a dummy, and started to make a run to the box. Unfortunately, the ball from Lee was poor and Jeonbuk could not score from the combination play. Another, thing to be noticed is that the RCM (#14) who positioned himself in the central channel in the previous image moved up when the ball was played to the final third and supported Han and Lee.
Even against a low block they build-up with a similar method. Along with ‘pass and move’, another thing that can help a diamond to progress the ball is decoy runs.
Incheon formed a low block to contain Jeonbuk’s attack. Two blocks of five and four players and a CF who was positioned a bit ahead to help in counter-attack. This is where Incheon played into the hands of Jeonbuk. Now CDM along with LB, LCM, and LW on the flanks created a 4 on 3 overload by forming a diamond. LCM, Lee, notices Son (CDM), is in an empty space. However, an Incheon midfielder can close Son up easily if the ball is played to him. So, Lee made a decoy run and moves towards the flank to create more space for Son.
When these four players formed the diamond, RCM, CF, and RW moved up to create a 3 on 3 situation with Incheon’s last line of defence which should be a scary situation for the defending team. Once the ball was passed to Son, he had two options at the edge of the opposition box. After two more passes, there was a shooting chance created for the right-winger.
Generally, the Warriors form a diamond on the flanks in the middle third and then attack the final third through the central channel or even the outer channels. The last example was through the central channel. When in the final third, the Warriors generally push their full-backs higher and intend to put crosses into the box through them. Jin-Su Kim (LB) and Yong Lee (RB) produce 3.87 and 4.68 crosses per 90 respectively with an accuracy of 58% and 46% respectively, which is par excellence.
When the cross comes in, there are generally two advanced midfielders, a striker, and an opposite winger inside the box. In this case, Jin-Su Kim crosses the ball to the box and the striker, RW, and RCM form a 3 vs 3 in that region of the box. However, the defending was perfect in this case and Gwangju survived the scare.
Jeonbuk’s game can be a bit boring to the fans when they are not in their groove. However, when the team starts to build-up with such combination plays through a diamond, nothing looks more soothing than Warrior’s build-up play.
Jeonbuk’s space oriented man coverage
The Warriors defend in 4-1-4-1 exactly like the formation on paper. With 4-1-4-1, the Warriors prefer space oriented man coverage. It means Jeonbuk neither goes solely for zonal coverage nor man oriented pressing rather prefers a mix between these two. The players maintain their positions rather than closely marking the opposition players and press relative to the opposition player’s proximity to their space.
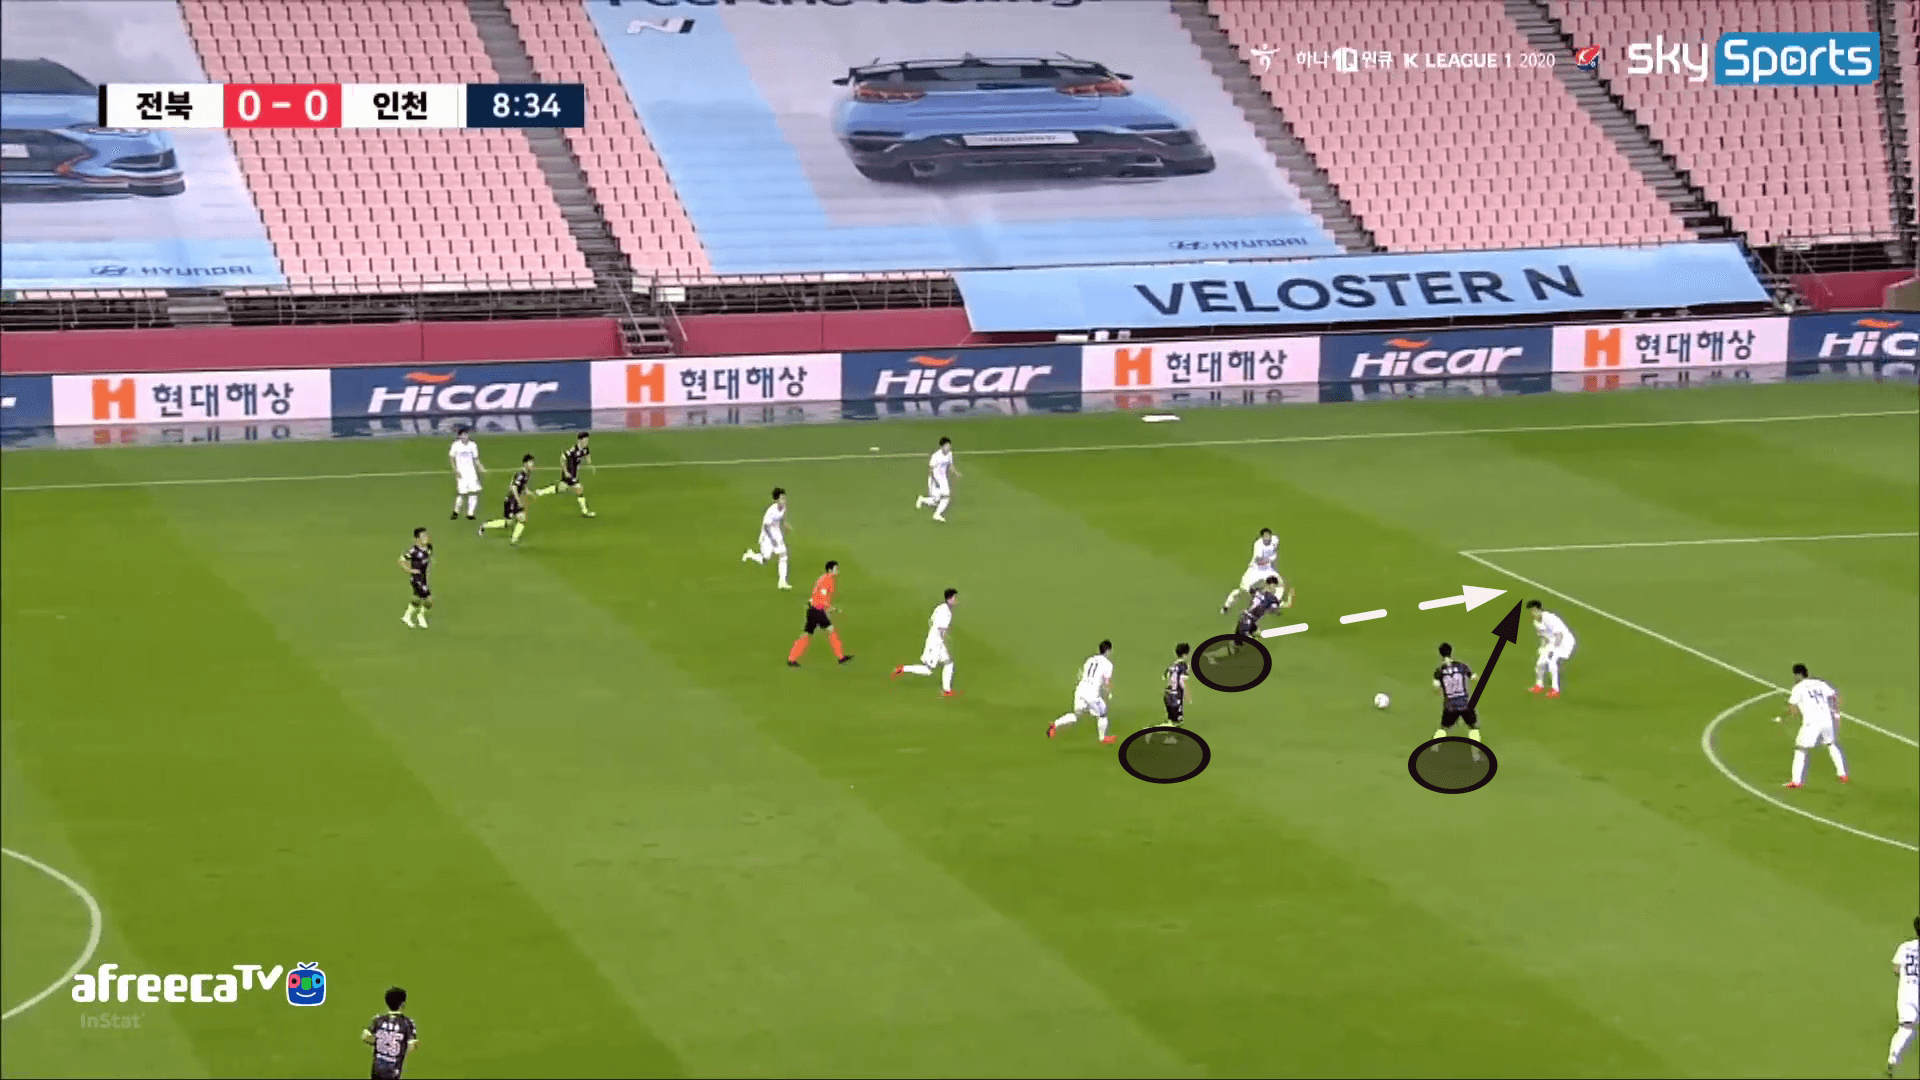
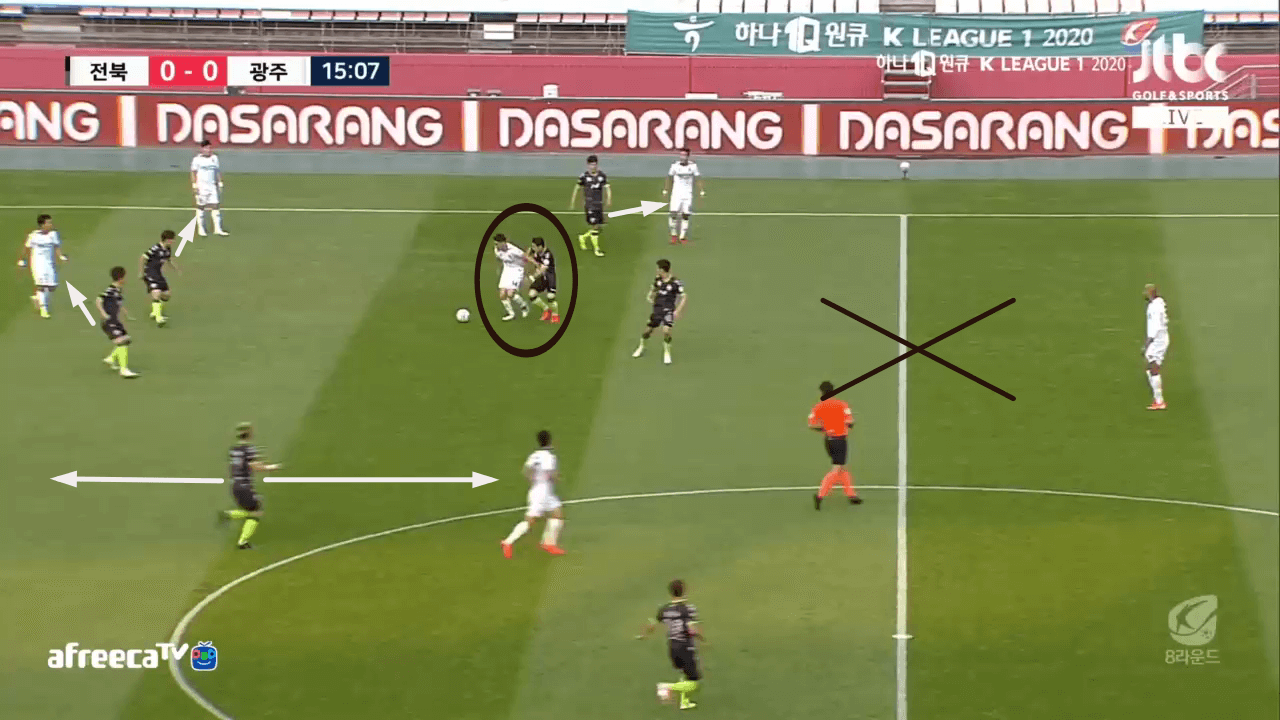
Generally, Jeonbuk don’t go for a high block or high pressing, rather sits in a midblock and protects the central channel and half-spaces. The pressing trigger is activated when any opposition player enters the middle third or the ball is passed to the full-back.
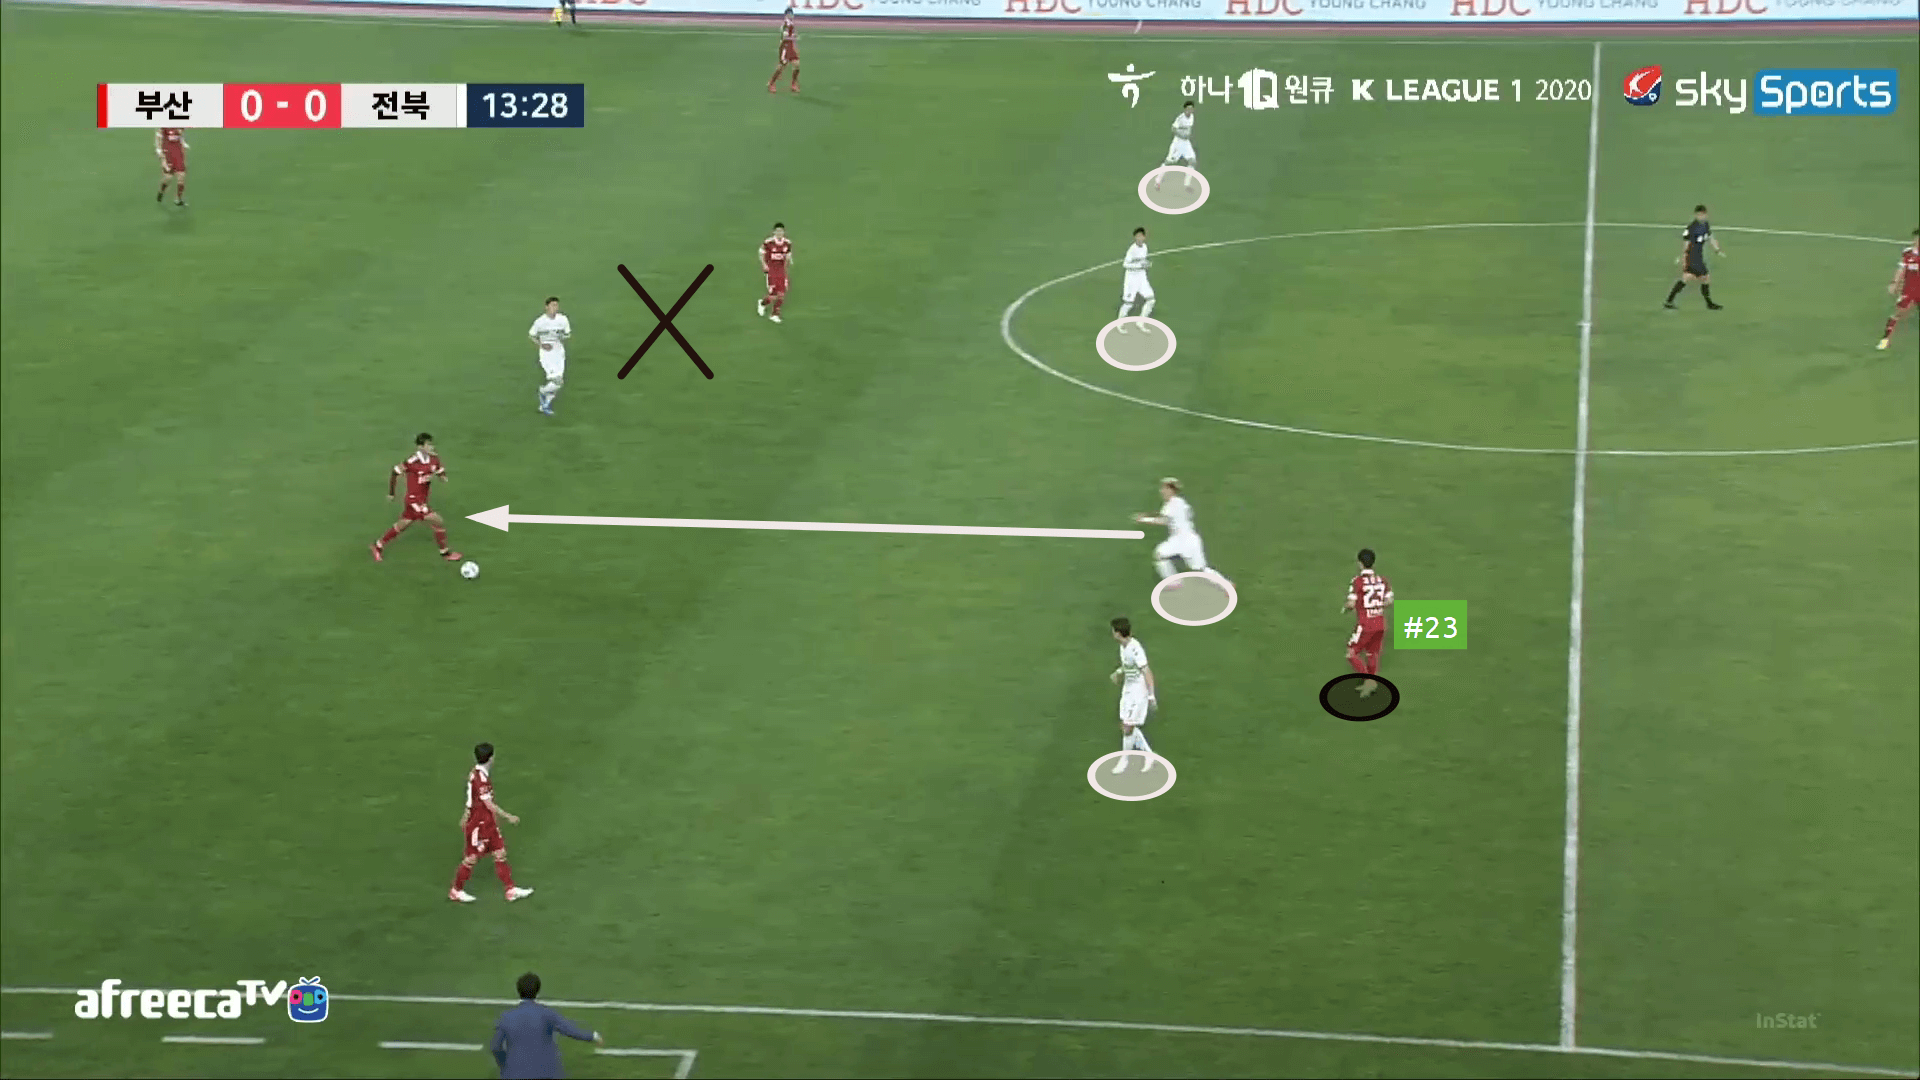
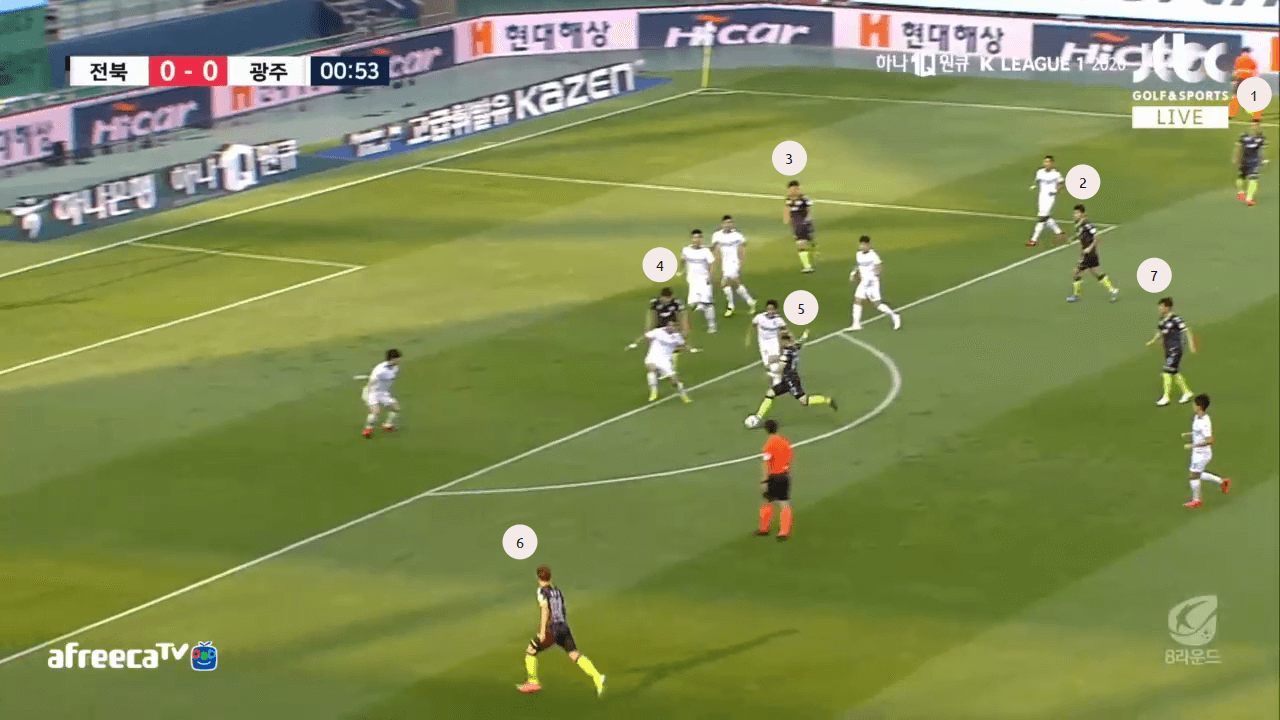
In the above image, when Busan RCB tries to carry the ball to the middle third and look for a better angle to pass forward, Kunimoto (LCM) moves up from the line and tries to press the ball-carrier shadow covering the Busan midfielder (#23). Even Kyo-Won Han who was the LW for the match tries to protect the inner lane rather than going up to press the full-back or stay close to the full-back. The striker Kyo-Seong Cho looks to prevent the lateral passing option. Now, the RCB has two short passing options, either to pass backward or a forward pass to #23. He opts to pass it forward and the ball was intercepted by Kunimoto.
It was almost impossible to pass forward through the space between Han and Kunimoto and a pass to the full-back could have led to a pressing trap. Jeonbuk is smart in their pressing and very few times succumb to opposition’s build-up.
Even if the opposition tends to go long or finds a pass between the midfield line, the area between the midfield line and defensive line is always protected by Son.
Here, Jeonbuk went for space oriented pressing in the final third itself, leaving a larger space behind. It was difficult for Son to cover the area between both the lines. When a similar situation occurs and an opposition player drops in between the lines, a centre-back moves out of his defensive line and tries to intercept the ball or closely follow the opposition player in the space. In this scenario, Min-Hyeok Kim (LCB) moves up his line and clears the ball.
Sometimes, the Warriors do go for high block and most of the time are too co-ordinated to be penetrated. Jeonbuk have a 10 PPDA (Passes Allowed per Defensive Action) which indirectly points towards their mix between midblock and high block and their effectiveness in pressing.
Even in their own-half, Jeonbuk maintain a similar structure with Son screening the defence which makes it very difficult for the opposition to exploit Jeonbuk.
Here, Jeonbuk was pushed to their own half and Busan attackers tried to overload Jeonbuk’s last line of defence. However, Son always screens the defence and did not let the opposition overload the last line of defence and instead created a safe passage by creating a 5 vs 4 situation in their favour. Jeonbuk is a co-ordinated engine. When the Warriors are pushed in their own half, even the striker has to fall back and defend in his own zone. The striker is not shown in the image, but he is just in front of four players in midline trying to prevent a lateral pass from the full-back to the pivot. This is one reason Jeonbuk have conceded only four goals in nine games.
Transitions
Jeonbuk play a possession-based game and overloads the area of possession. Even in the final third, the Warriors push all the attackers and midfielders in that region which leaves a lot of empty spaces behind, which can be validated by the 3.56 counter-attacks Jeonbuk faced this season per game, only lesser to Busan I’Park.
The above image vividly describes why the Warriors face so many counter-attacks in a game. Note, this is in the first minute of the game. Since the full-backs push higher during Jeonbuk’s attack, there is only three players behind the final third, CDM, and the two centre-backs. As you can see there are seven players in the final third.
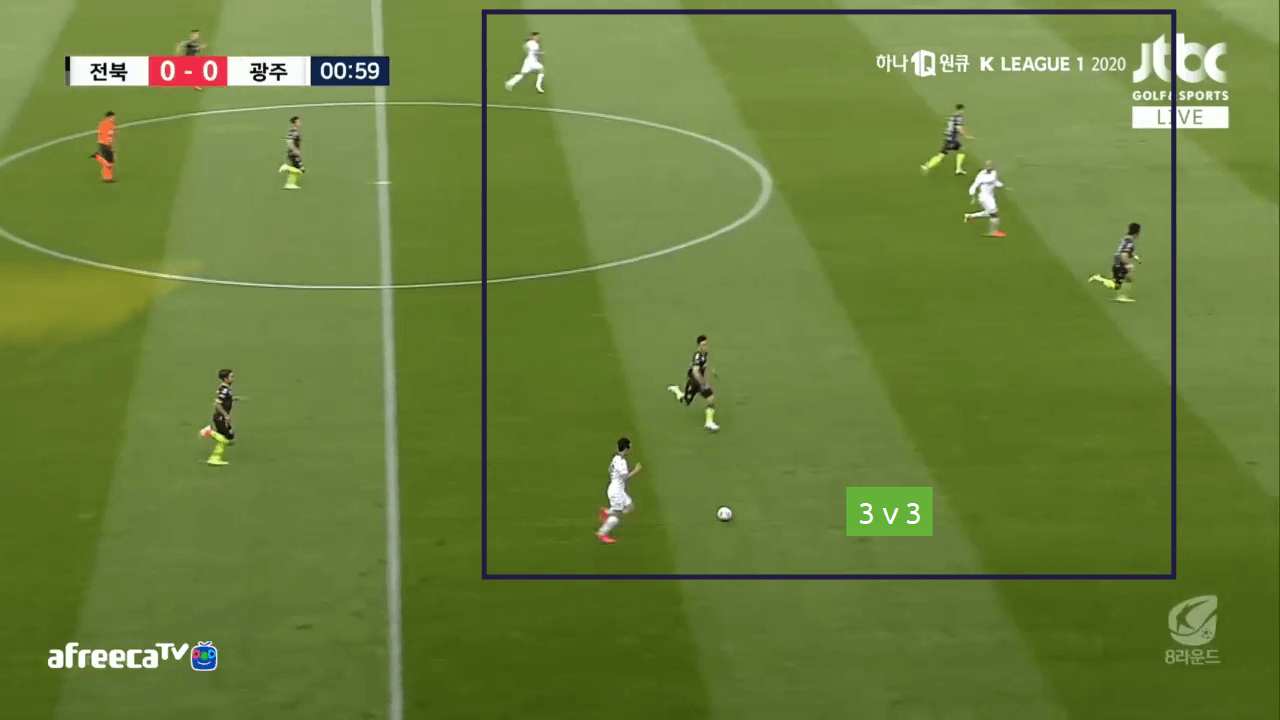
Kunimoto shoots and it rebounds back to fall to a Gwangju player. Gwangju players create a 3 vs 3 situation during the counter-attack, with other Jeonbuk players fiercely tracking back. It results in a save from the Warriors goalkeeper.
Even though Jeonbuk faces a huge number of counter-attacks, the ability and the will of the players to fiercely track back saves them on many occasions. The Warriors have conceded a shot 31.60% of times and conceded only one goal from counter-attacks which is relatively fine.
Looking at the above scenario, there must be a thought, if this is what happens in the 1st minute of the game, the Warriors should face numerous counter-attacks and not just three or four in a match. The only reason they face a lesser number of counter-attacks is due to the centre-backs moving up in the middle third.
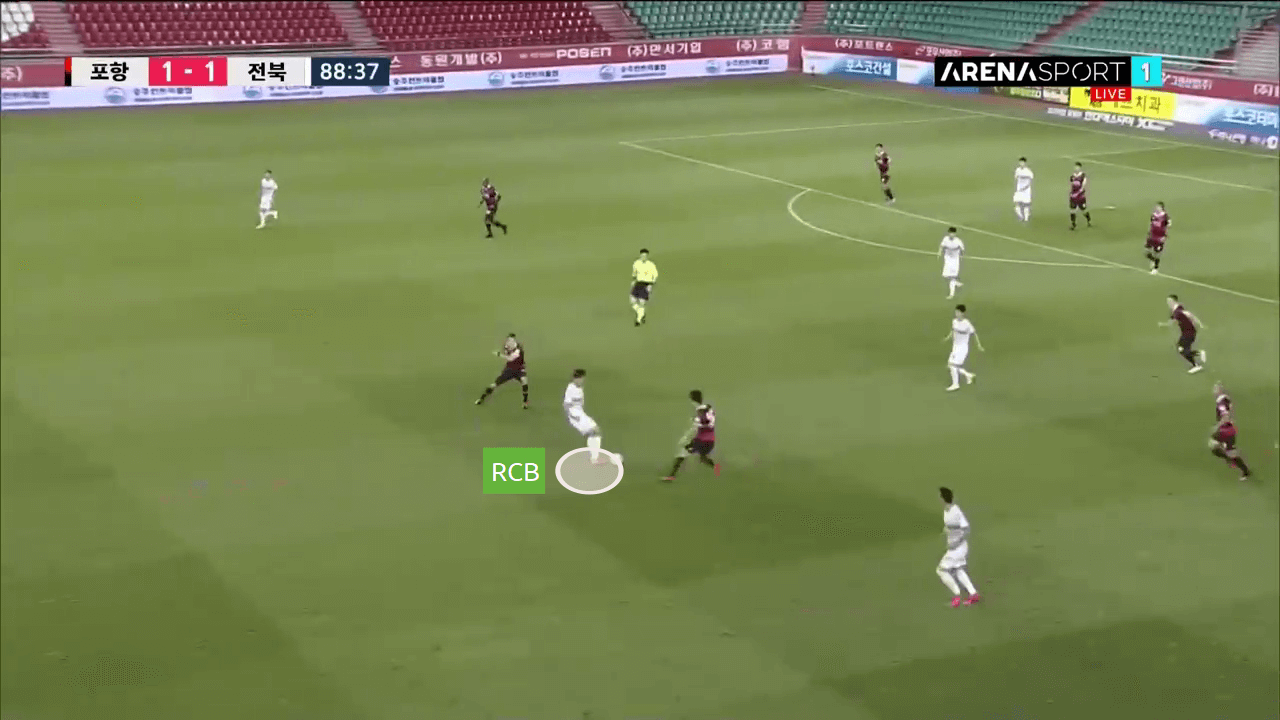
As can be seen in the above image, the Pohang Steelers recovered the ball and was just on the verge of producing a counter-attack. However, The RCB of Jeonbuk moves up and intercepts the ball.
This is a risky move and sometimes the quick footwork of a player or an intelligent player could easily go past the centre-back but this is how Jeonbuk operate and it looks fair to a large extent. The less space you give to an opponent in the initial stage the less likely you would concede a goal from a counter-attack.
When it comes to counter-pressing Jeonbuk does not go for aggressive counter-pressing from all angles rather the player who has lost the ball or a player who is in close proximity to the ball-carrier aggressively tries to win the ball and others try to block the passing lanes.
Here, Yong Lee, RB, loses the ball. Once he loses, he quickly pounces upon the ball-carrier and others look to prevent the passing lanes.
Defensive throw-ins
Jeonbuk are brilliant in set-pieces, free-kick, throw-ins or corners, they have scored a massive four goals from set-pieces. However, it’s the defensive structure from throw-ins that needs a special mention in this analysis. Jeonbuk try to win the ball from the throw-ins itself.
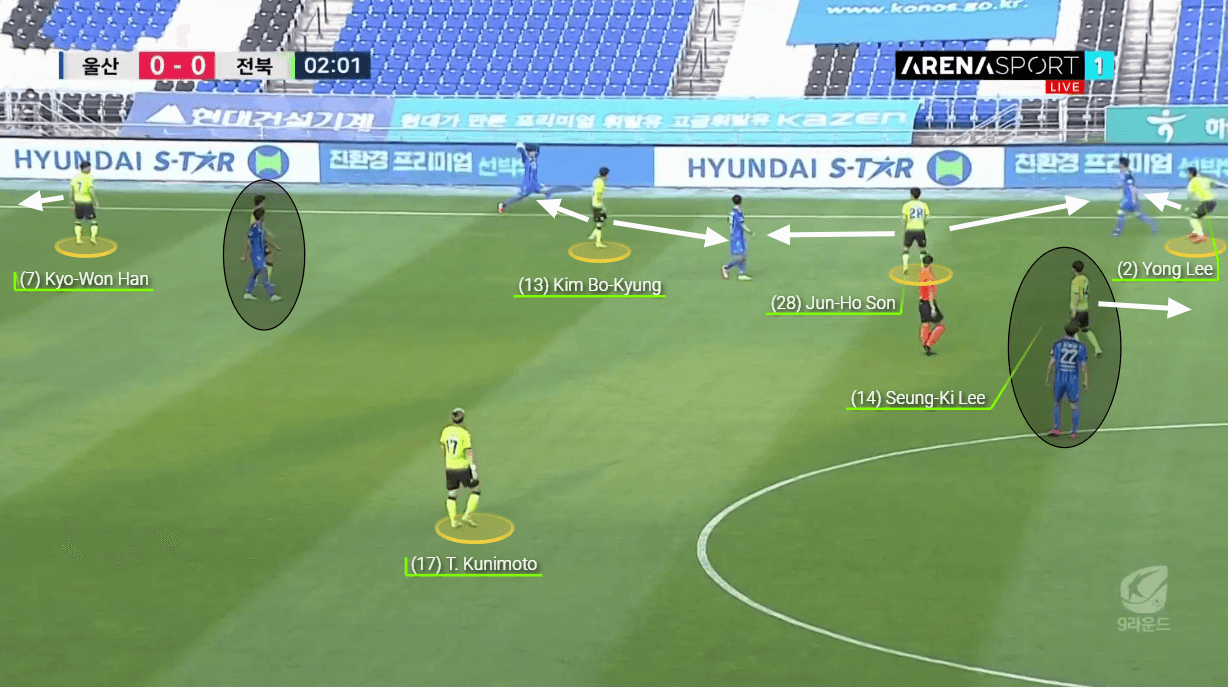
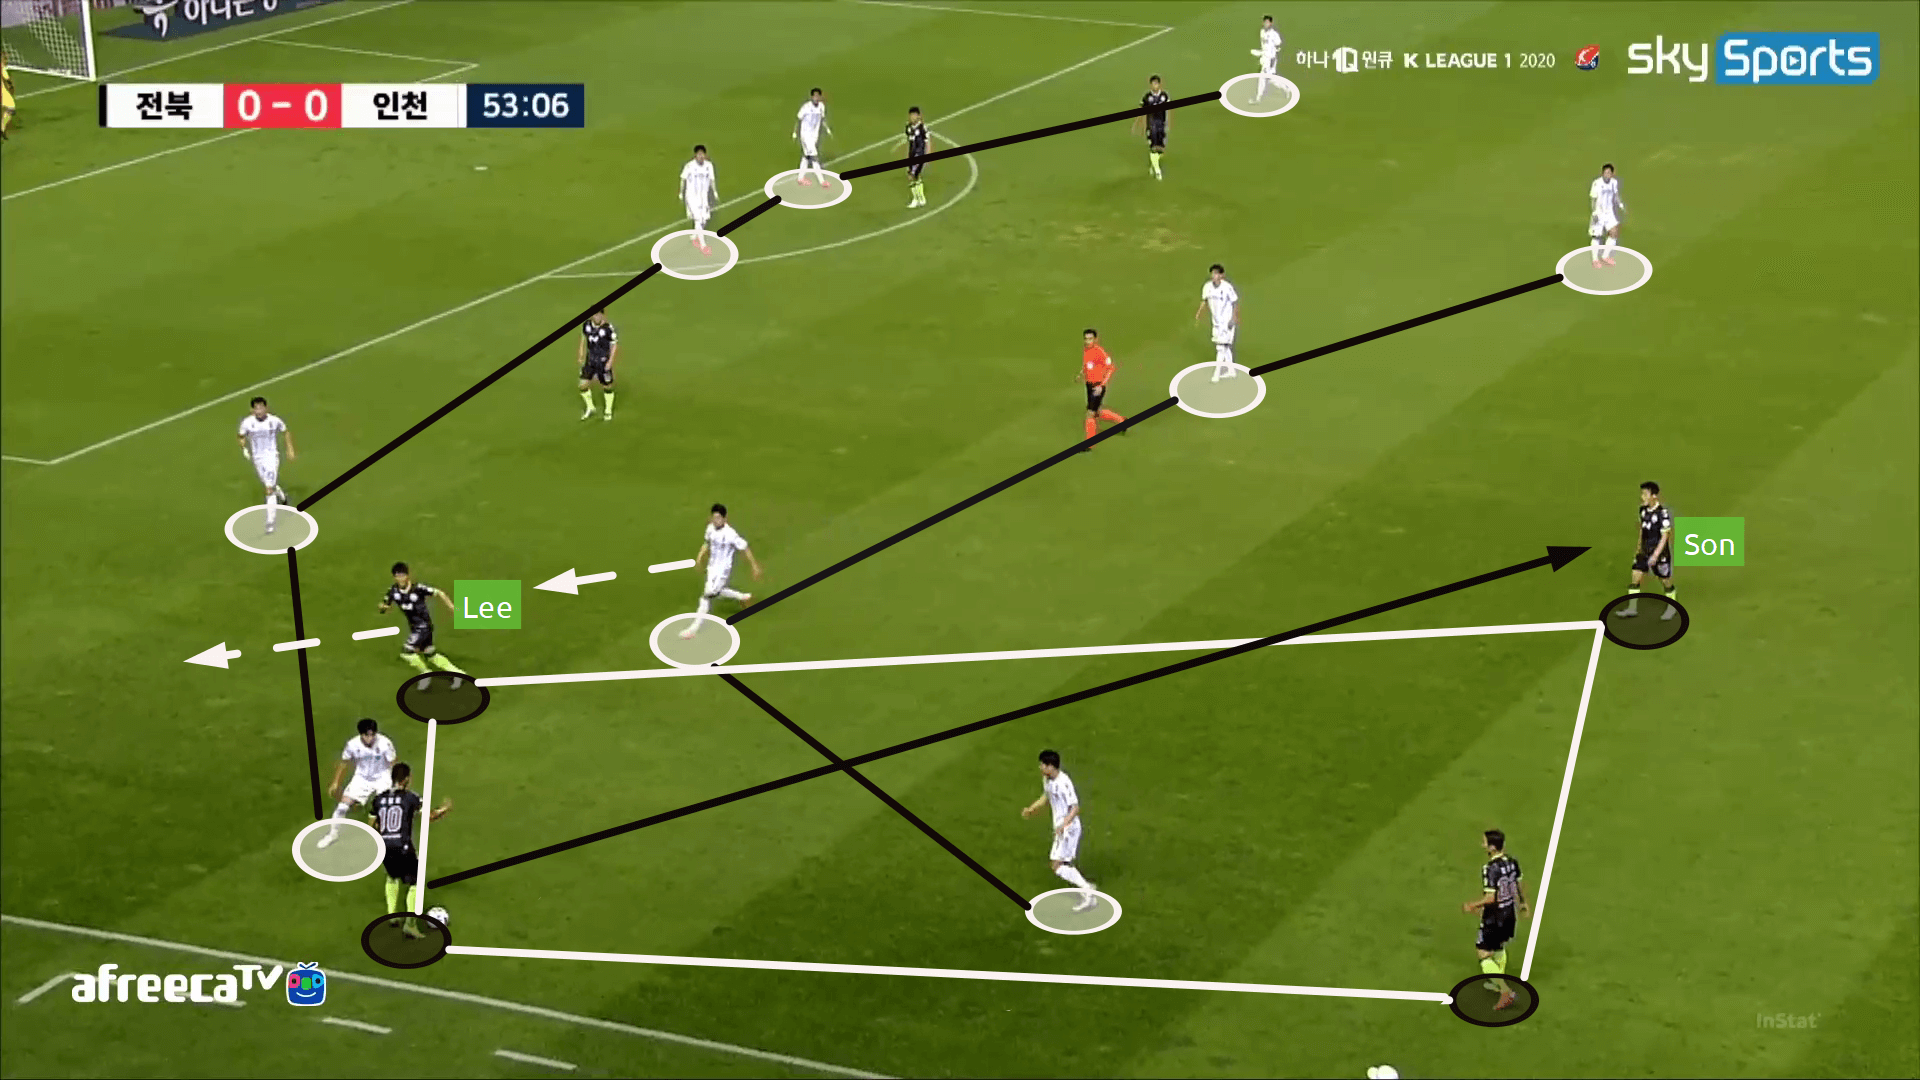
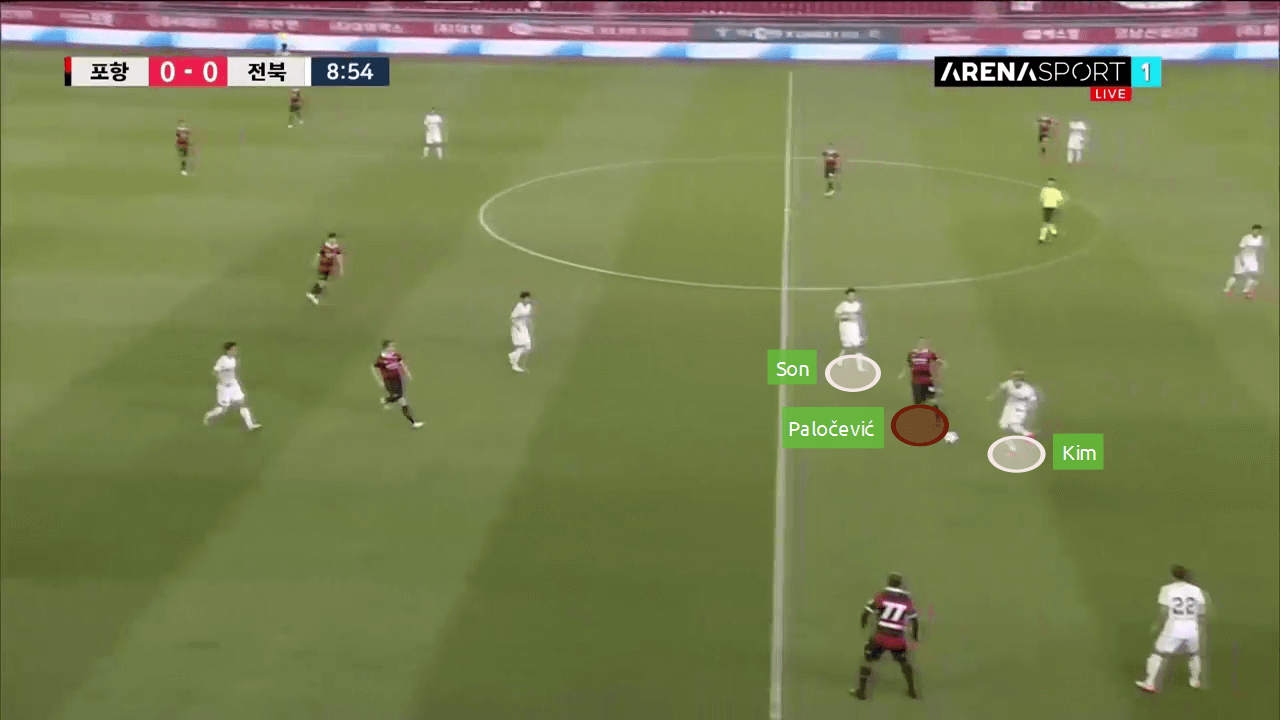
This is a situation against Ulsan Hyundai. Here, Kim Bo-Kyung positions himself between the thrower and the immediate option to prevent a pass back to the thrower. Jun-Ho Son sits between two players and closer to the immediate option to win back the ball. The position of Son could also help him to prevent the throw to the Ulsan player Yong Lee is marking. Kyo-Won Han prevents a throw-in backward. Seung-Ki Lee marks another player and also can move back in case an Ulsan player moves out from another Jeonbuk marker and Kunimoto who is the LW in this match sits in the central channel to mark any Ulsan player if they intend to arrive into the space.
The thrower throws the ball to the player Yong Lee is marking, Jun-Ho Son moves towards the right and wins the ball.
Jeonbuk rely on marginal gains when not able to penetrate the opposition defence though possession-based football. This can be vividly observed in the game against Pohang Steelers. The score at the end of the game read Jeonbuk Motors 2 – 1 Pohang Steelers, where Jeonbuk scored both the goals from set-pieces. We have seen in the case of Liverpool, how marginal gains take a team to the zenith, the same applies to Jeonbuk Motors.
Conclusion
It looks like there is no stopping Jeonbuk Motors this season and the Warriors are all set to win the sixth title in seven years. With the expected arrival of Gustavo from Corinthians, Jeonbuk look to bolster their attack up top.
José Morais had taken the baton from the most successful manager of Jeonbuk, Choi Kang-hee in 2019 and did not let the fans down. In his first year, he won the title and is on course to win the title in the successive years. However, the fans would want him to perform better in the AFC Champions League where Jeonbuk were knocked out in the Round of 16 last year.


Comments