Following victory against Tottenham Hotspur on Tuesday, Ajax find themselves one game away from a first Champions League final in over 20 years. The 2nd leg of their showdown with Spurs awaits them on Wednesday. But in the meantime, Erik ten Haag‘s men had a domestic cup match to attend to, the KNVB Cup Final.
Their opponents, Willem II, went into this encounter as clear underdogs, currently sitting in 8th position in the Eredivisie. Adrie Koster’s side held faint hope of an upset. Perhaps their adversaries would be caught daydreaming about the prospects of walking out at the Wanda Metropolitana on the 1st of June.
Despite conceding a handful of quality opportunities in the early stages, Ajax eventually ran out comfortable 0-4 winners. This tactical analysis will attempt to break down another impressive performance from ‘De Godenzonen’.
Lineups
Many wondered if Ten Hag would rest some of his star players at Stadion Feijenoord, but the former Utrecht coach elected to make only the subtlest of changes. At right-back, Rasmus Nissen came in for Joel Veltman. While midfielder Lasse Schone was replaced by Noussair Mazraoui. Klaas Jan Huntelaar lead the line, with Dusan Tadic moving into David Neres‘ usual spot on the left flank.
Adrie Koster lined his Willem side up in a compact 4-4-2, hoping to force Ajax wide before pressing in numbers against the touchline. Borussia Dortmund loanee Alexander Isak was joined up front by Greek youngster Vangelis Pavlidis.
Ajax(1-4-2-3-1): Onana- Nissen- De Ligt- Blind- Tagliafico- Mazraoui- De Jong- Van de Beek- Ziyech- Huntelaar- Tadic
Willem II(1-4-4-2): Wellenreuther- Lewis- MeiBner- Peters- Heerkens- Dankerlui- Tapia- Llonch- Palacios- Isak- Pavlidis
Willem stifle Ajax’s early attempts to build
During the early stages of this game, both sides made it difficult for their opponents to build in their favoured style. Ajax pressed high, blocking off the goalkeeper’s short passing options and forcing long passes towards Isak.
Willem also tried to force Andre Onana into taking direct routes towards the attack. Furthermore, they managed to disrupt Ajax’s combination play down the wings. The image below illustrates this. Under normal circumstances, Ten Hag’s team aim to achieve a ‘pinball’ effect with staggered positioning and quick, one-touch link-passes to bypass pressure in wide areas.
However, Willem were able to stifle these efforts for much of the first half with well-executed pressure and cover shadows. In the example shown below, Daley Blind has received from left-back Nicolas Tagliafico. The former Manchester United defender looks for Mazraoui with a first-time pass between the opponents, but the ball is cut out thanks to angled pressure.
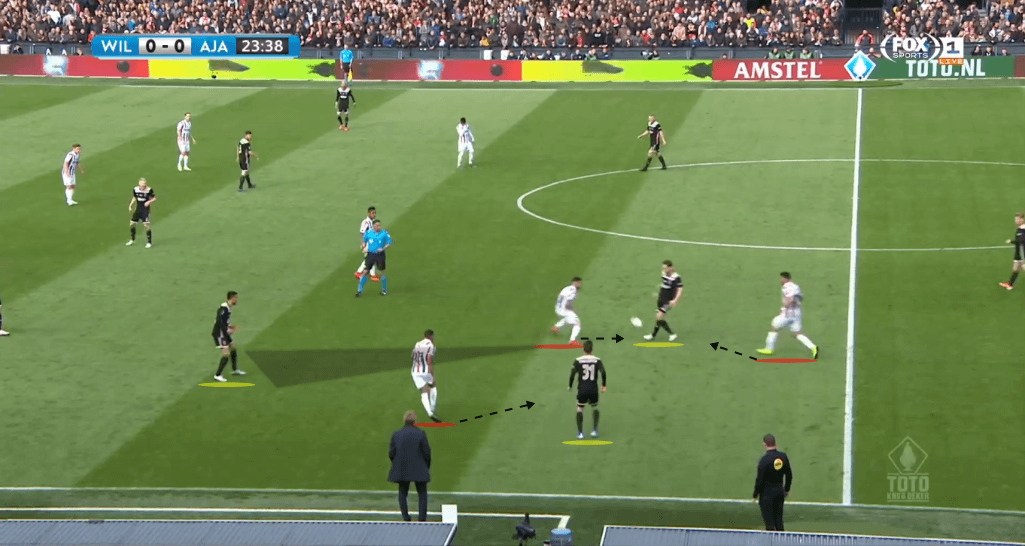
This kind of scenario was common throughout the opening half hour, and Ajax struggled to gain control over the attacking phases.
During their attempts to build from deep, they were often pressured into playing direct to the forwards with lofted passes. Although Ajax prefer to progress play on the floor, they are also well structured to make use of long balls.
In the image below, we see Matthijs de Ligt, Frenkie de Jong, and Rasmus Nissen all dropping short with little intention to receive possession. This draws the Willem attack further up-field, creating a pocket of space behind them.
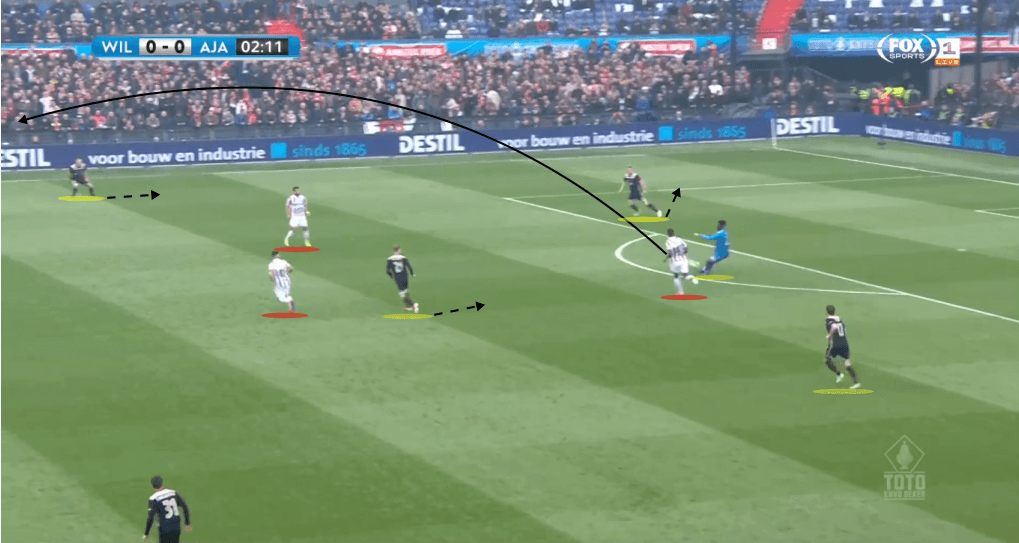
After Onana plays the ball forward towards Klaas-Jan Huntelaar, Donny Van de Beek and Ziyech aim to arrive in these pockets to win the second ball. The image below shows this, with the latter recovering the knock-down.
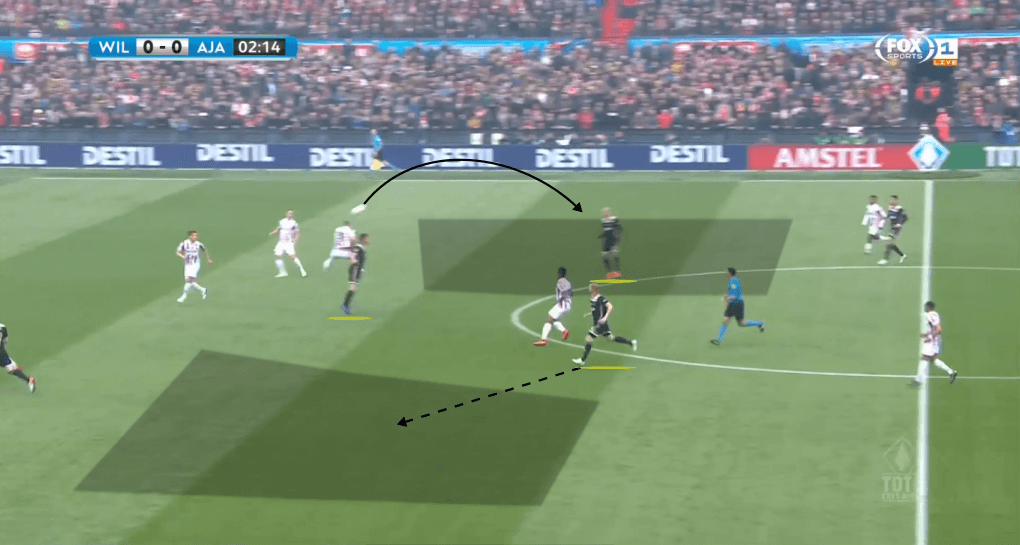
While this method of building the play has often been productive for Ajax, it didn’t prove to be so on Sunday. Overall, Willem made life difficult for their opponents during the opening stages, regularly forcing them to implement plan B.
Ajax defensive disorganisation
With the favourites struggling to fully impose themselves on the game, Willem looked to capitalise on the chaos. Ajax were sloppy out of possession, failing to organise themselves effectively on a number of occasions.
In three separate instances, ‘De Tricolors’ came close to edging into an unexpected lead.
With Tadic and Tagliafico in a two v two scenario out-wide, the remaining three defenders form a line in the centre of the penalty box. The two holding midfielders, De Jong and Mazraoui, are positioned just in front of them to cover the edge of the area.
Up until this point, De Jong’s positioning is appropriate. However, as the wide duo fail to deal with their opponents, a passing lane opens up for Damil Dankerlui to play through Fernando Lewis. De Jong fails to anticipate the development of the play and responds too late, leaving him unable to provide a cover run into the open space between the wide and central defensive zones. Had he moved into this space sooner, the quality chance that followed could have been prevented.
In any case, Willem fail to score. It was a rare lapse in concentration from De Jong, while better man-for-man defending from the wide players would have solved the problem at source.
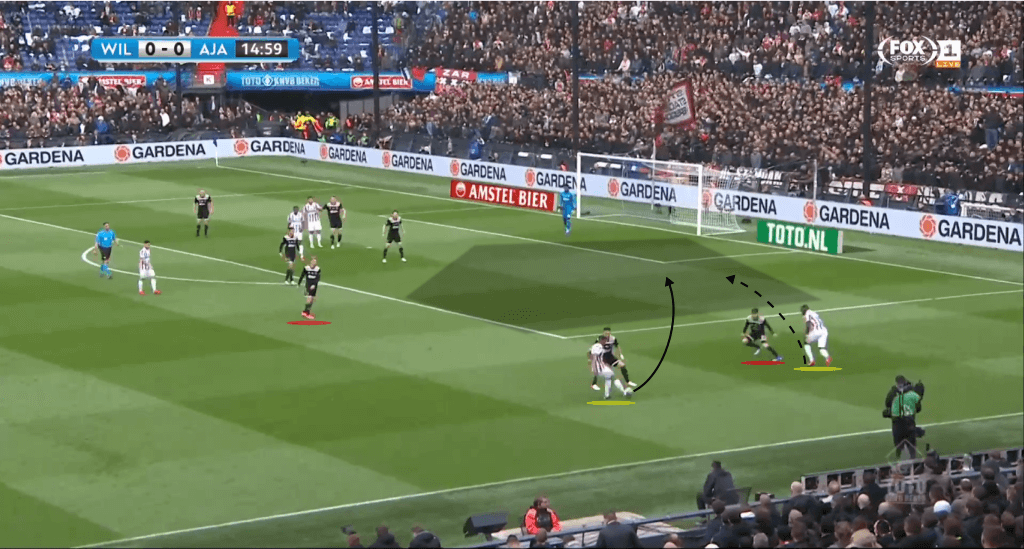
In their transitions from attack to defence, Ajax were also somewhat disjointed. Higher up the pitch, ten Hag’s side counterpressed aggressively to recover possession quickly. During their build-up in deeper areas, a break down in the move frequently allowed Willem to counter-attack.
The image below shows the aftermath of a loss in possession as Ajax looked to progress down the sides. Renato Tapia drives into space between the opponent’s defence and midfield before playing Alexander Isak in behind. The young Swede’s effort is well saved by Onana. Notice how disjointed the Ajax back-line is, with Blind forced to push out.
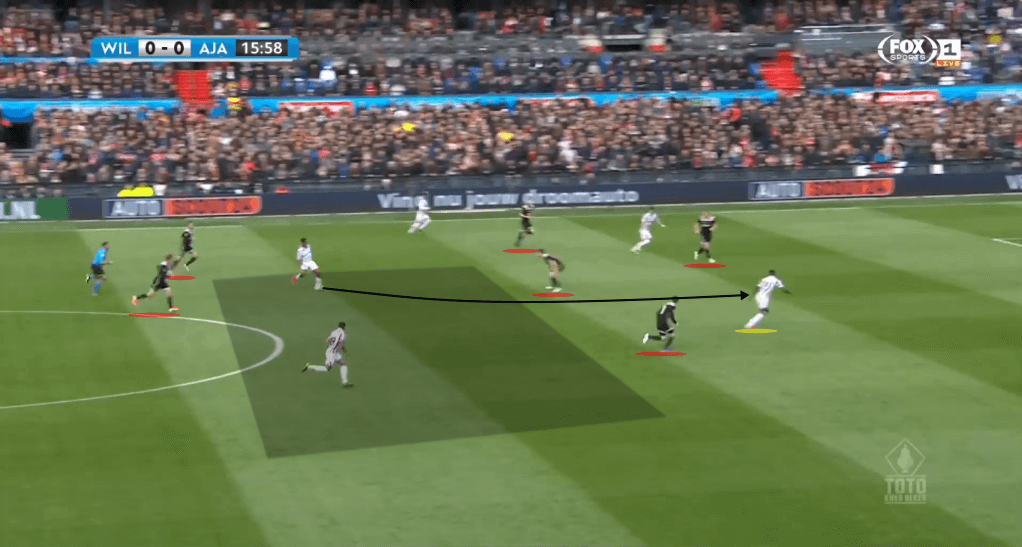
Willem did well to turn moments of disorganisation into high-quality opportunities, finishing with an xG of 2.2. Despite registering 10 shots on goal, however, their finishing was wayward, only managing to hit the target once.
Ajax find attacking rhythm
After a frustrating opening half-hour, Ajax grew into the game and were gradually able to exert more control over their opponents. The combination play down the sides became more productive, leading to most of their best chances.
The image below illustrates this, with De Jong occupying possession at the base of a zig-zag structure on the left. With one touch passing, Ajax progress quickly through pressure before releasing Ziyech in the advanced left-wing. The Moroccan international’s cross isn’t converted, but these types of moves would become a pattern of their second-half performance.
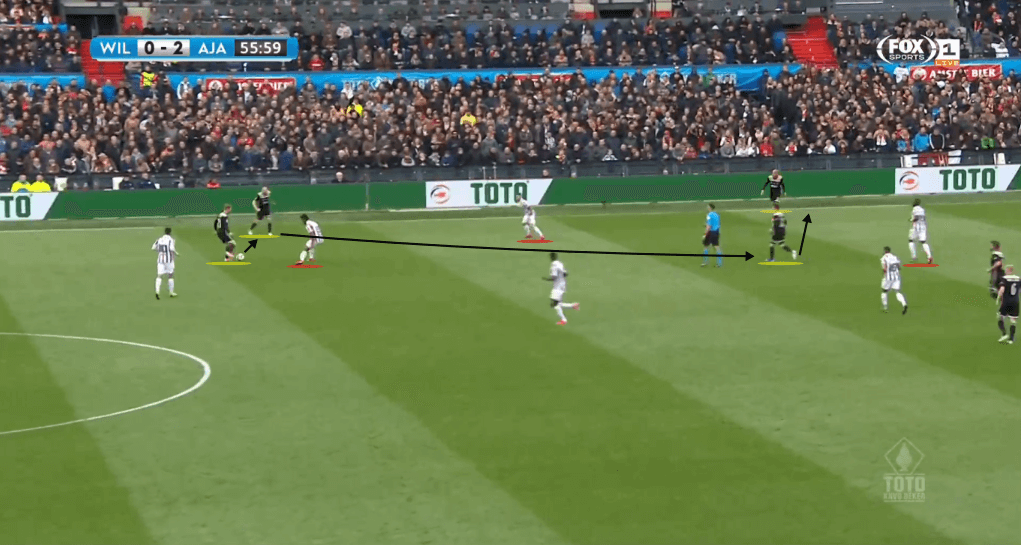
Another way in which Ajax looked to create openings involved the concept of overloads. Building the play on one side, they attracted the opposition’s defensive block over. After combining in tight spaces with one and two touch passing, they would exit the pressure before switching possession to the underloaded side.
In the first image below, Ajax have five players on the left wing forming a pentagon. They keep the ball until sufficient pressure has been drawn.
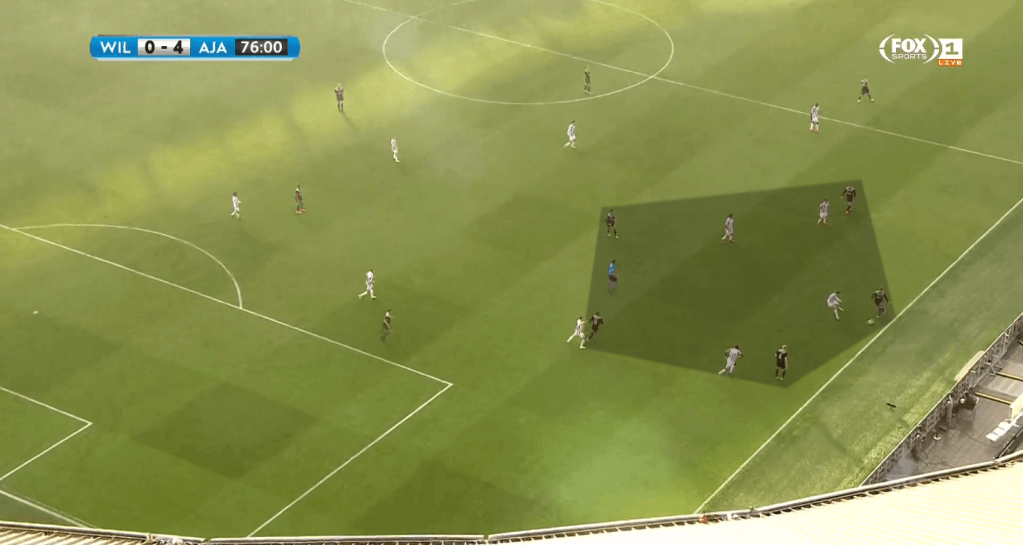
Once this is achieved, they look to find the free man on the far side. In this instance, Van de Beek is the free man arriving on his marker’s blind-side. Right-winger David Neres aids the play further by engaging his fullback and dragging him infield.
This opens up the space on the outside, as well as the passing lane between Ziyech and Van de Beek. The Dutchman finishes calmly to clinch the win.
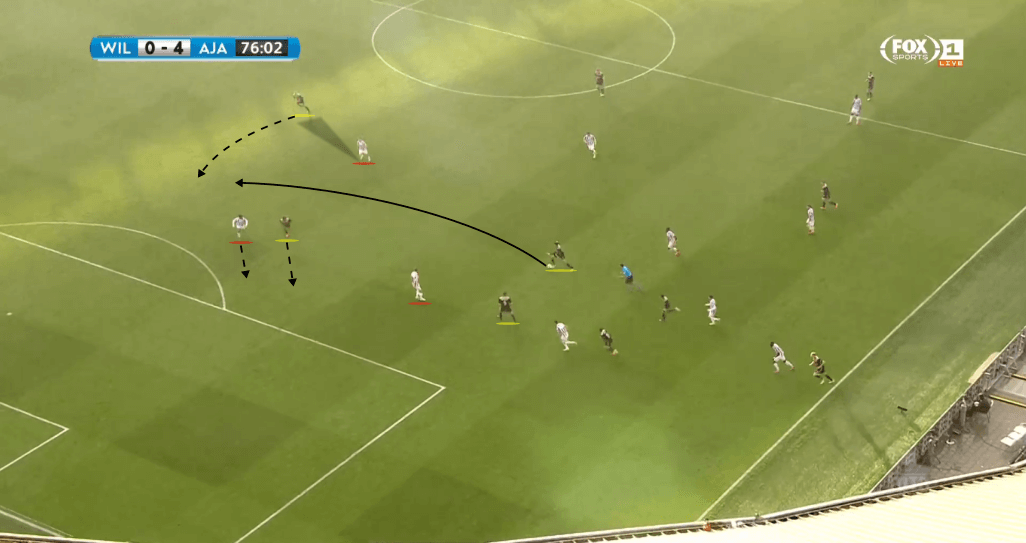
As Ajax began to dominate, Willem were pinned back deep into their own half. This layout suited the victor’s ability to manipulate opponents with intelligent passing and movement patterns.
In another example shown below, Tadic has drawn the opposing right-back towards the touchline, increasing the separation to the right centre-back. This allows Tagliafico to drift forward and fill the gap. The Argentinian is then played in behind before he delivers a cut-back to the arriving Van de Beek just inside the penalty area. Finally, Huntelaar taps home his second of the game after receiving at the back-post.
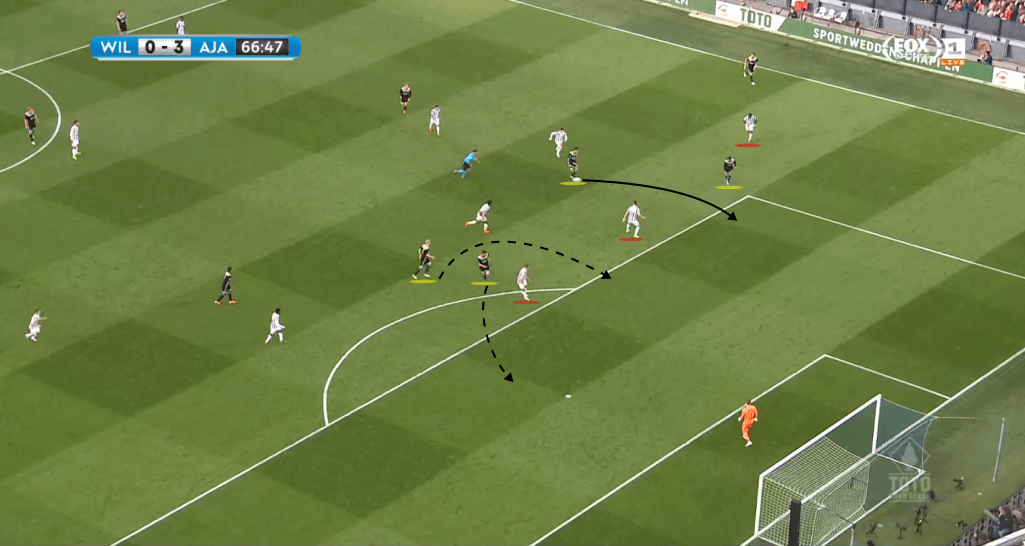
Although they endured moments of concern at the other end, Ajax were at times sensational to watch. Fluid movement and combination play with clear patterns to their attacks saw them swat away their opponents in style.
Ajax exploit set-piece 2nd phase
Ajax’s opening goal wasn’t quite as mesmerizing as the three that followed. However, it did involve an intelligent set-piece, with Blind heading home during the 2nd phase of a corner.
As shown by the image below, Willem are well organised in the initial stages of the set-piece, with two men covering the edge of the six-yard line. Instead of delivering directly to the box, Ajax play short and work the ball out to Tadic outside the area.
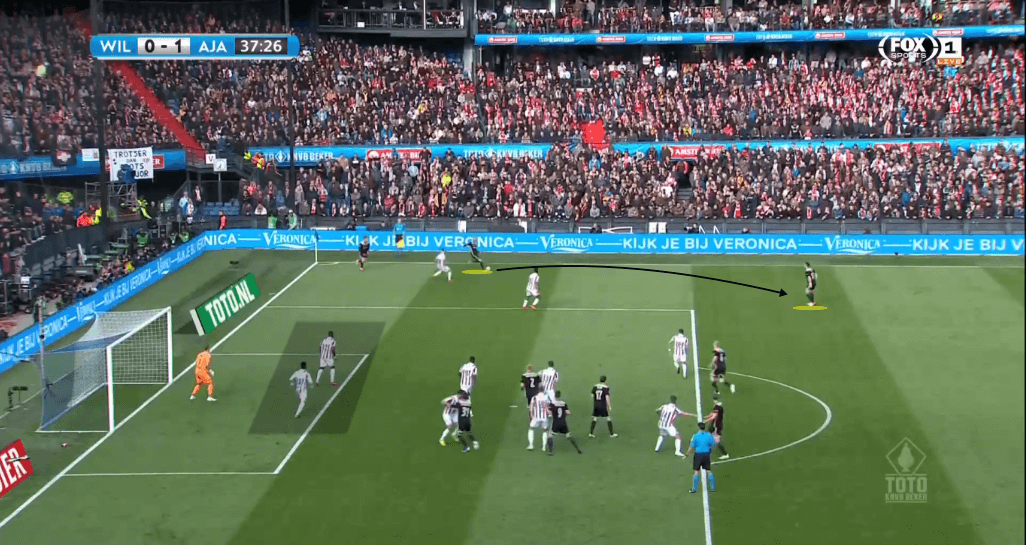
Naturally, Willem’s defence pushes out to create an offside line. However, weak access exists in relation to the ball-occupant, allowing him to weight a lofted pass over the top under little pressure. The previously covered space is now open, with Blind arriving late to glance Tadic’s perfectly timed cross past Wellenreuther.
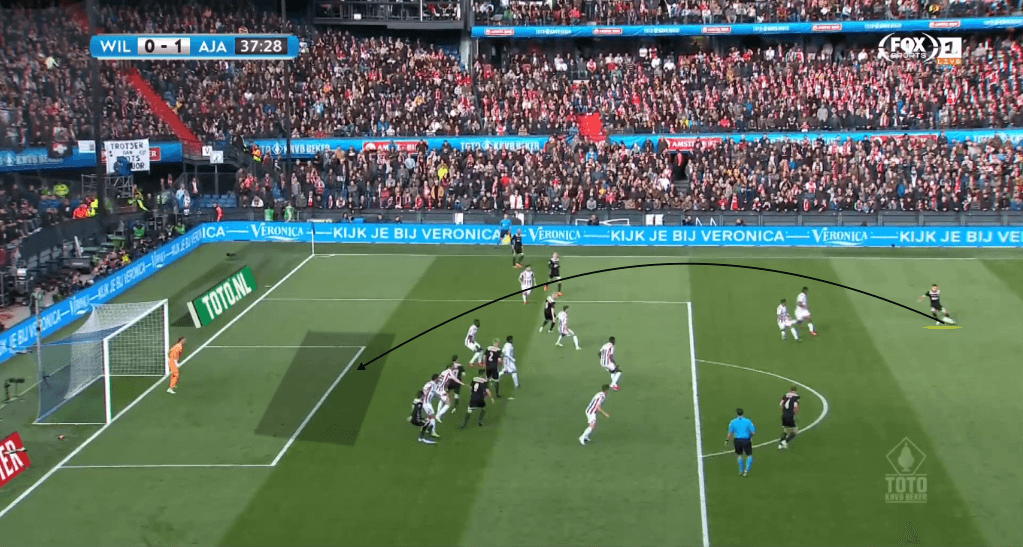
Overall, Ajax deserved their victory on account of a sequence of intelligent moves. Across the 90 minutes, they managed to register 16 shots, with all four of their strikes on target finding the back of the net.
Conclusion
Although their opponents presented them with problems during the first half, both offensively and defensively, Ajax gradually took control of the battle. With one trophy now in the bag, Erik ten Hag and his players go into the final weeks of the campaign with dreams of a historic treble still alive.
If you love tactical analysis, then you’ll love the digital magazines from totalfootballanalysis.com – a guaranteed 100+ pages of pure tactical analysis covering topics from the Premier League, Serie A, La Liga, Bundesliga and many, many more. Buy your copy of the April issue for just ₤4.99 here, or even better sign up for a ₤50 annual membership (12 monthly issues plus the annual review) right here.




Comments