Following a series of unfortunate results both in the UEFA Champions League and LaLiga, Real Madrid were looking to bounce back and return to winning ways. And Zinedine Zidane had done exactly that as Los Blancos hosted Huesca in the capital and recorded a convincing 4-1 victory.
This tactical analysis will dissect both teams’ tactics and tell you how the hosts snatched all three points to stay top of the league table.
Lineups
There were a couple of changes for Real Madrid this weekend in terms of personnel. Thibaut Courtois started between the sticks, which wasn’t a surprise, but Éder Militão replaced Raphaël Varane and partnered Sergio Ramos in the backline. Marcelo started on the left side and Lucas Vázquez was converted into a right-back for this game.
In midfield, Luka Modrić returned to the starting XI alongside Casemiro and Federico Valverde. Up top, the best news for Real Madrid was the return of Eden Hazard who slotted next to Karim Benzema and Marco Asensio.
Real Madrid were deployed in their standard 4-3-3 formation.
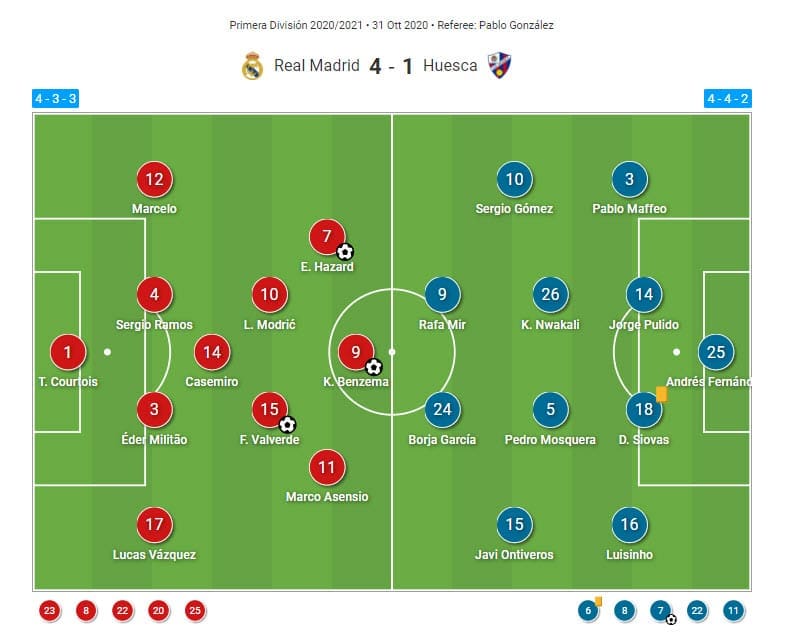
On the other side, Míchel opted for quite a strong Huesca side. Andrés Fernández was in goal with a quartet consisting of Luisinho, Siovas, Jorge Pulido, and Pablo Maffeo ahead of him in the defensive line. The newly-promoted team went with Javi Ontiveros and Sergio Gómez as the wide midfielders while a double-pivot of Pedro Mosquera and Kelechi Nwakali manned the centre of the pitch.
Higher up, Huesca deployed Borja García and Rafa Mir as their main attacking force. Of course, there were some changes in the second half of the game but with minimal effect for the guests.
Huesca were lined up in a 4-4-2 structure.
Real Madrid’s attacking tactics vs Huesca’s compact block
The hosts enjoyed 57% possession in this clash and were mostly given enough time on the ball. Crucially, however, Huesca were adamant on not ceding space while allowing Real Madrid to recycle the ball. In attack, Zidane’s men looked to advance through the half-spaces via movement manipulation.
We’ll start this tactical analysis by looking at their tactics when in possession of the ball.
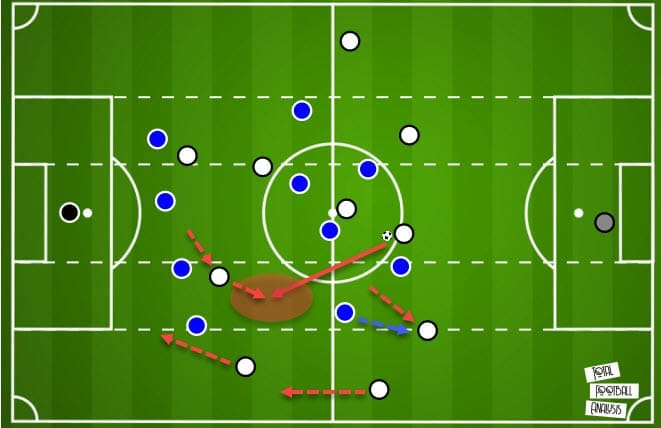
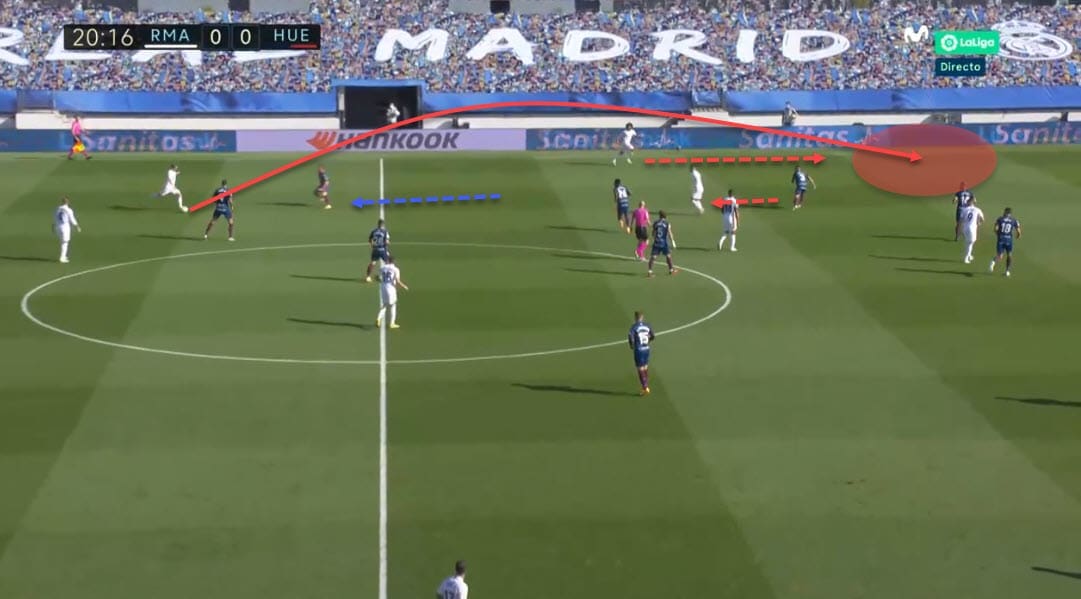
The above graphic shows us one of the ways for Real Madrid to access the aforementioned half-space by manipulating the 4-4-2 mid-block Huesca deployed in defence. Generally, with Modrić or Toni Kroos in the lineup, Los Blancos will drop one of the two into the backline to achieve the 3 v 2 numerical superiority in the first line. This had multiple effects on Huesca’s block.
Firstly, it engaged the opposition’s second line of press, opening up space for the centre-backs to deploy passes into advanced areas of the pitch. As always, Real Madrid’s defenders were key in progressing the play and breaking the lines. Secondly, even if the second line wasn’t engaged to press the backline, with Huesca marking Real’s midfielders tightly, their movement would drag them and stretch the block vertically.
That creates more room to exploit between the lines and roaming players like Benzema and Hazard would be able to receive in dangerous positions. Let’s explore such a situation down in the example below.
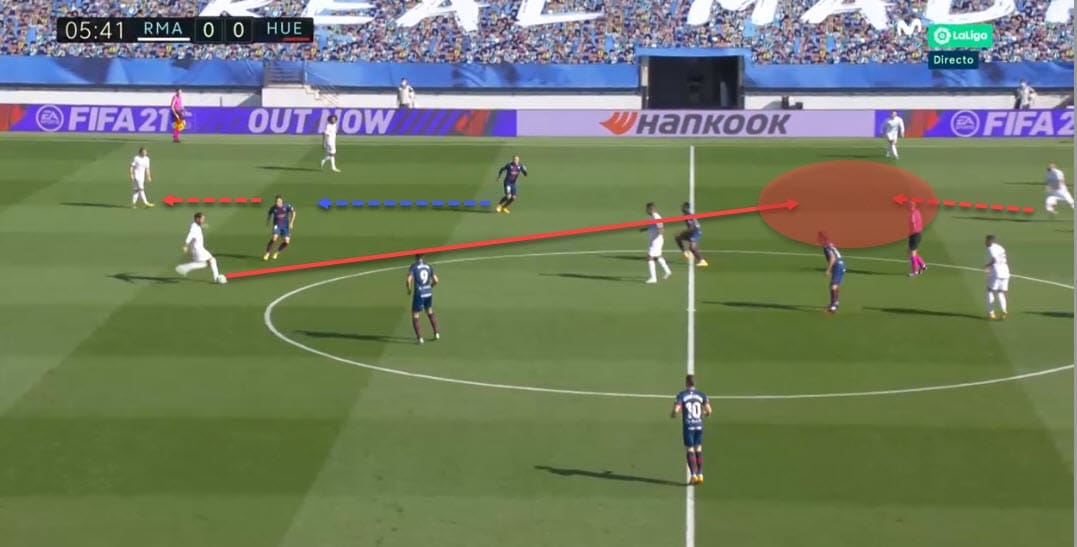
Modrić has dropped into the backline, forcing Gómez to react immediately. Even though the Huesca midfielder doesn’t press aggressively, his reluctance to commit either to the high press or the mid-block leaves him in no man’s land and a channel opens for Real Madrid.
Ramos immediately deploys a piercing through ball to Benzema who has dropped into his left half-space to receive the pass. This left side of the pitch was key for Real Madrid as most of their combinations went through that area.
There, they had Modrić’s distribution, Ramos’ ability to break the lines, Marcelo who constantly offers runs in-behind, and then both Hazard and Benzema who roam the half-spaces. We can see exactly that trend in the pass map below.
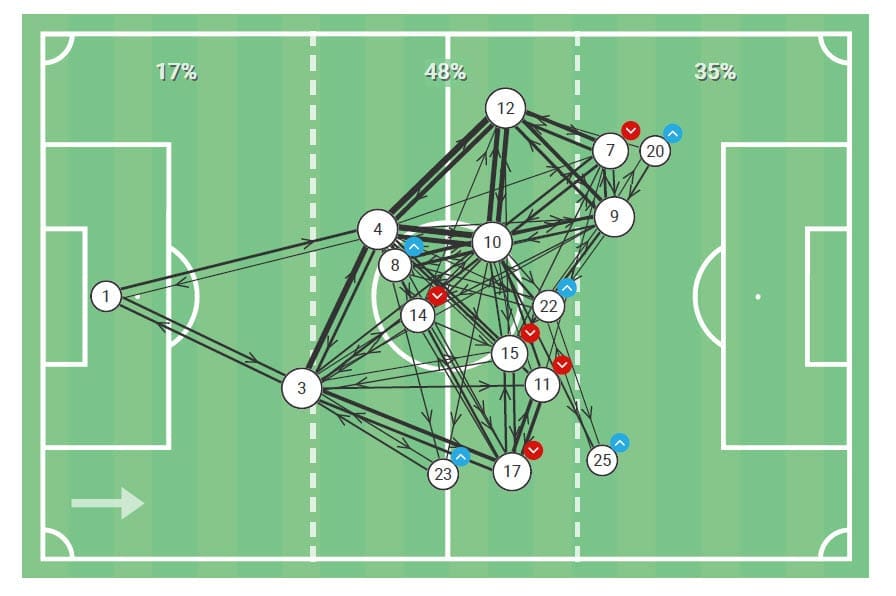
The difference between the left and the right side was also apparent in the approaches in the tactics. Marcelo was much more aggressive and with Modrić often occupying that left centre-back position, it allowed the Brazilian to move up with more freedom.
Hazard, on the other hand, would have to cut inside and then try and drag the markers away so that Marcelo gets an isolated duel out wide. Then, Real Madrid would use Modrić’s vision and passing prowess to deploy him into space.
You can see a very similar pattern down below. Modrić is on the ball in the backline, Marcelo immediately pushes up, and Hazard ensures the Brazilian won’t have a marker immediately on him by dragging the defender away.
Huesca were faithful to their 4-4-2 structure out of possession and the principles were pretty basic but effective. With four players in midfield, they would ensure numerical superiority against Real Madrid’s midfielders. Of course, as one drops into the backline, they could also afford to push a player from their second line and still retain a favourable position.
However, issues arose when Madrid swapped sides and forced the second line to react at the same time. This was mostly visible on their right side of the pitch. As Ontiveros pushes up, the other three midfielders have to shuffle over quickly to cover for him.
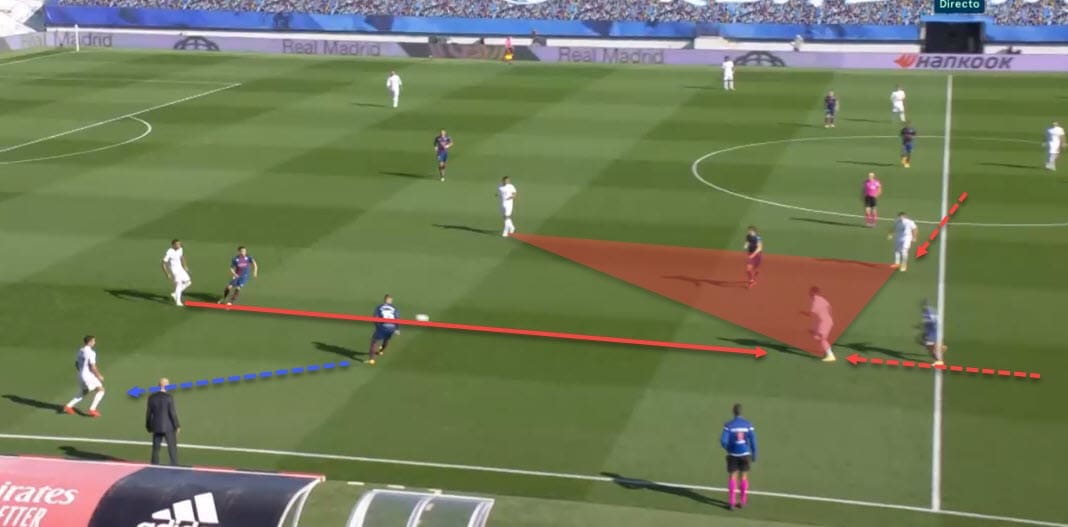
But Real Madrid would then find openings to achieve overloads by dropping Asensio deeper. Above, Militão finds Asensio in the half-space easily because Huesca’s midfielders are in a decisional crisis. The proximity of both Casemiro and Valverde opens multiple channels for Real Madrid and forces Huesca into tough decisions.
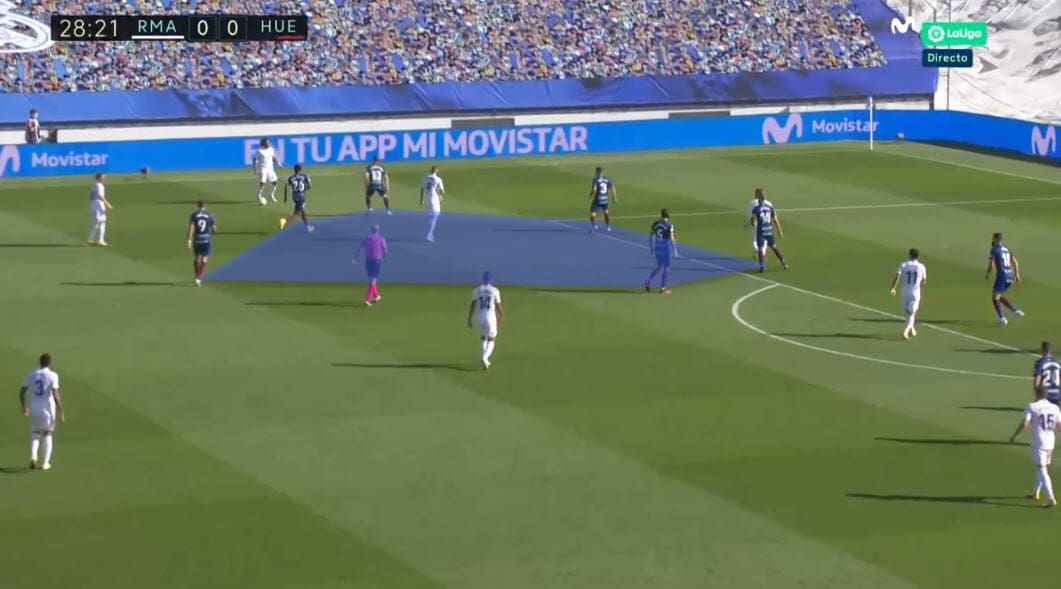
But even with effective build-up tactics, the final product wasn’t there just yet. This was down to Huesca compacting the central areas of the pitch and shutting down all and any lanes that led towards the box.
You can see a similar structure down below as Benzema is immediately boxed in when he tries to drift wide for a quick combination with Marcelo.
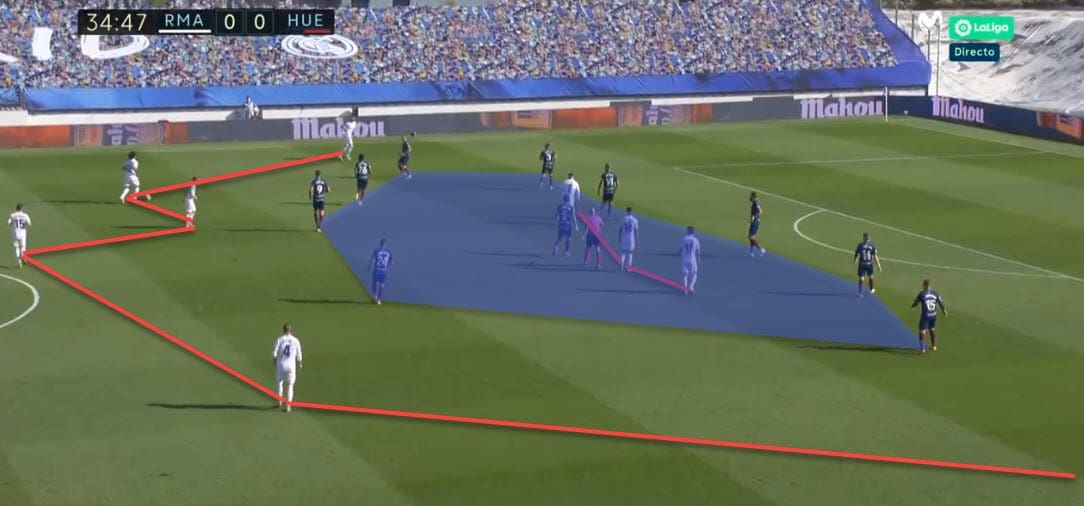
This inability to access the central areas forced Real Madrid in the infamous U-shape, the nightmare of every attack and the ideal scenario of every defence. The hosts would circulate the ball from flank to flank but there was no way in.
In the end, Hazard’s wonder strike and a mistake by Huesca for the second goal forced the guests to open up in search of a potential draw. This gave Real Madrid more options and more space going into the second half.
You can see the U-shape problem in the image below.
Huesca in possession vs Real Madrid’s high press
With a 0.65 total xG (expected goals) value, Huesca couldn’t pose a lot of threat going forward. This part of the tactical analysis will look at their attacking tactics and how their structures interacted with Real Madrid’s defensive system.
In possession, Huesca had two main ways of progressing the ball. Their approaches alternated between a two-man and three-man backlines. The below graphic shows us an example of their tactics against Real Madrid’s 4-1-4-1 pressing structure.
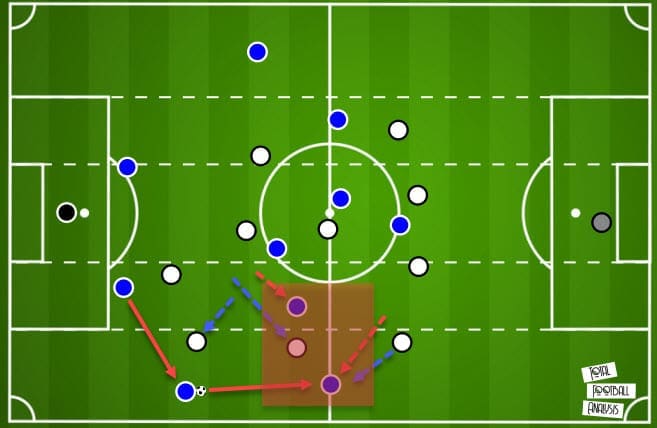
Here, the full-backs would stay deeper and the double pivot would stay closer to the backline to allow easier progression. Since Real Madrid only had Benzema tracking the ball, most of the time it wasn’t necessary for either Mosquera or Nwakali to drop into the backline.
As the ball is recycled out wide, however, the hosts have to push up players from their second line. As soon as that happened, one of Huesca’s forwards would drop deeper and create an overload on the midfielder who had to shift over to cover for his teammate. That way, the press would be broken and the ball progressed successfully.
Let’s analyse a very similar pattern down in the example below.
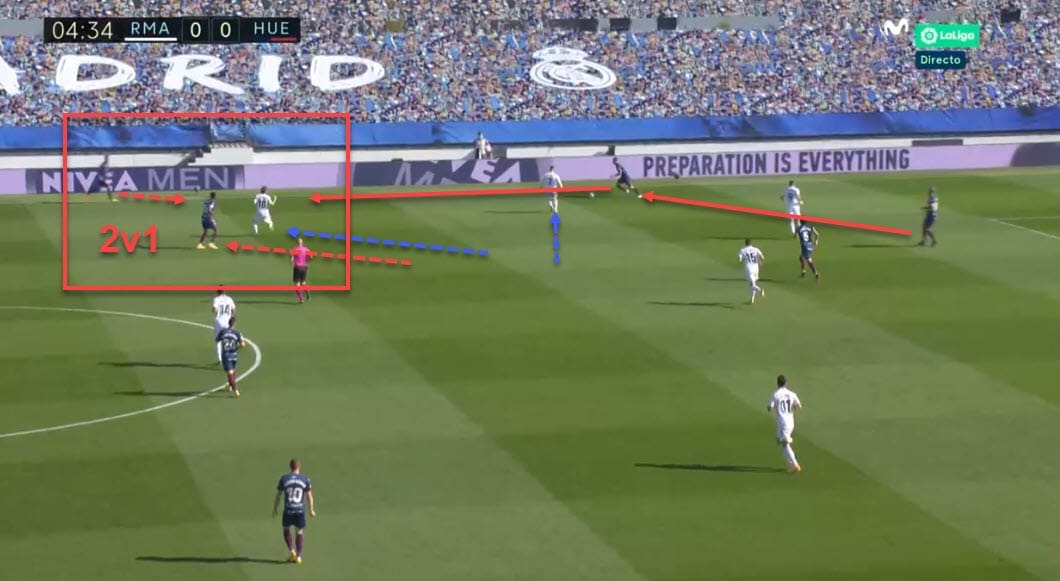
With Benzema unable to cover the backline by himself, Hazard steps up to press Maffeo. This also means that Modrić has to shift over to the other side to close the channel leading to one of the central midfielders.
But by dropping one of the forwards, Huesca can overload the Croat and force him into a 2 v 1 situation. Even more worrying is the fact that this is a common problem in Real Madrid’s pressing tactics, which you can find in a previous tactical analysis on our site.
Huesca would often swap sides in an attempt to find the unmarked players on the other flank. For that reason, attracting Real Madrid to the right side, for example, bypassing the press and then using long switches to the left was often the way to quickly advance up the pitch. Their pass map below does suggest that the left was, in fact, more used for combinations while the right was more direct.
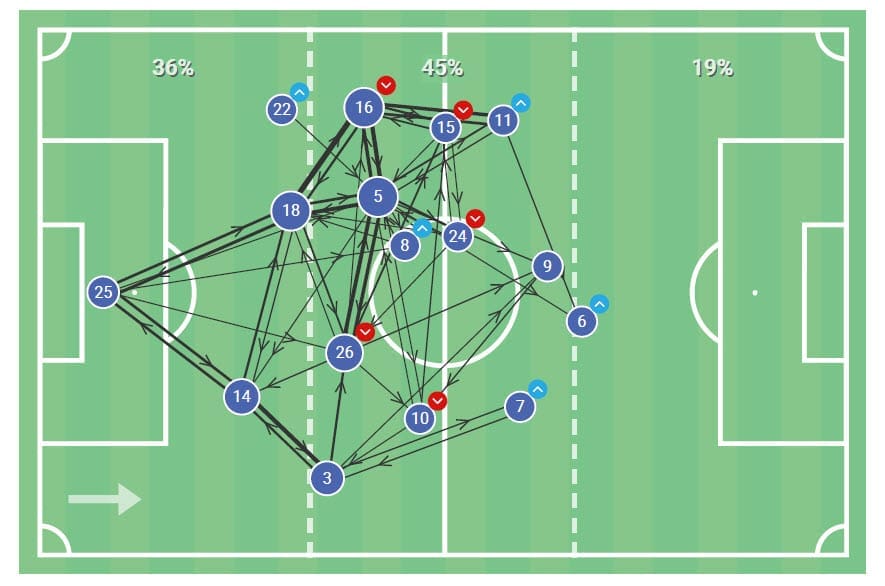
The left was also far more dangerous with 0.16 xG as opposed to the other flank’s 0.03. The central areas were, however, the most proactive with 71% (0.46) of their total expected goals coming from that channel.
But it was all about utilising the space behind Real Madrid’s (mostly) ineffective press. The home side would drop into a 4-4-2 mid-block at times but the 4-1-4-1 was used higher up the pitch. This, however, was easily exploitable – especially by the highly positional Huesca team.
Often the guests would still drop a midfielder into the backline to open new channels for progression. Notice below how Valverde and Asensio can’t stop another overload as Huesca use their dropping forwards to advance play.
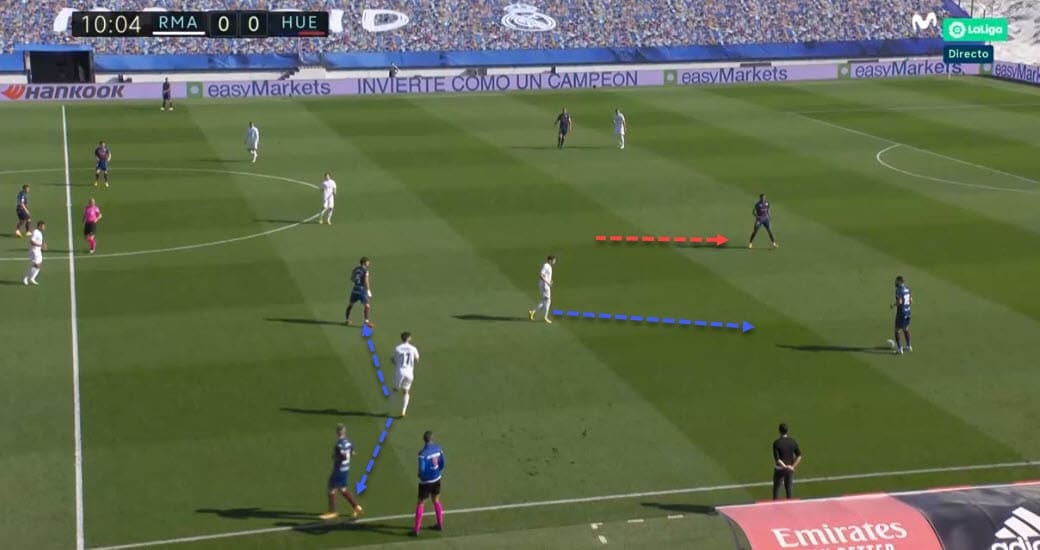
Interestingly, this was often how they would evade the press. Modrić and Valverde are the ones to push up aggressively when Real Madrid want to apply high pressure and as Huesca kept dropping forwards, that also dragged the opposition defenders with them.
But with lots of space left behind their backs combined with a heavy man-marking scheme Zidane often deploys, this made the overloads that much easier to implement. The following example demonstrates that more clearly.
Again, Madrid deploy their high press to suffocate the opposition and Militão is dragged towards Huesca’s half while following his man. However, he soon realises he can’t cover both players who are in position to receive from the backline.
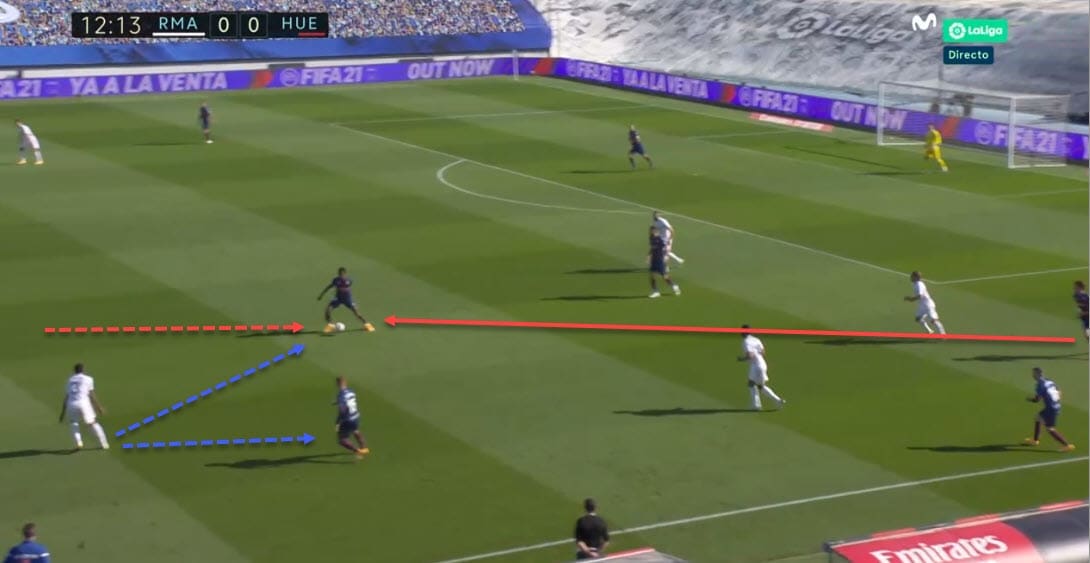
And while this is a real testament to Huesca’s positional prowess and excellent build-up tactics, it also shows the lacking defensive structure of Real Madrid, especially in the high-press.
Similar patterns were used by the guests in the second half of the game when they upped the tempo and tried chasing the goals a bit more. The forwards would drop, making use of the man-marking of Real’s players to open channels that can be exploited behind the defensive line.
And in the end, a ball over the top and in-behind is how they got their only goal on the night. Below, we’ll briefly analyse a similar pattern that saw them quickly advance to the final third and get the ball into the box.
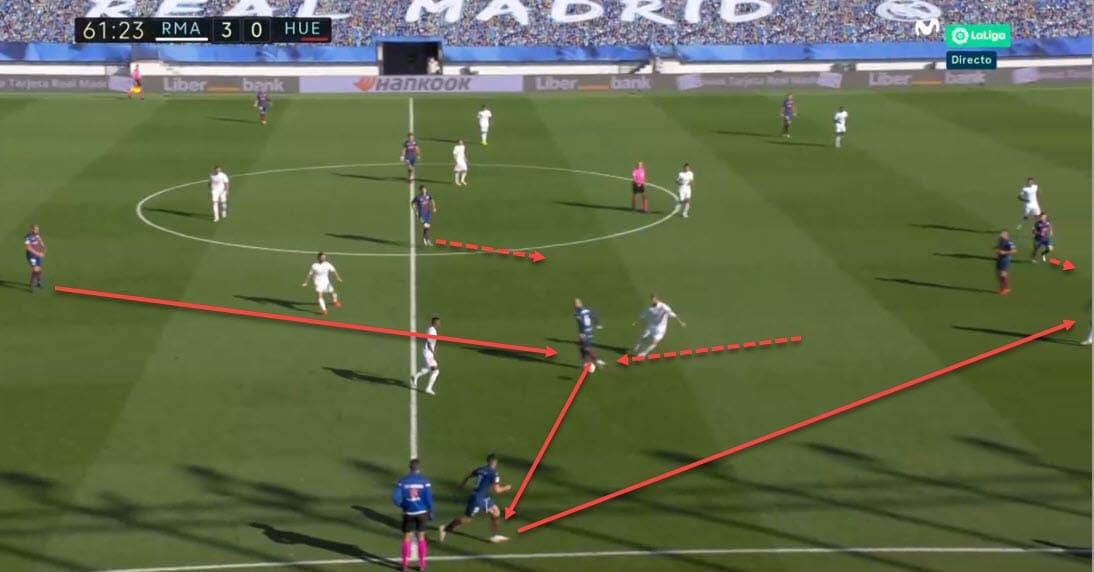
Note, however, that this is not the goal-scoring action but only an attempt in the second half. Observe how Sandro Ramírez drops to receive the pass, dragging Ramos with him, and creating more space behind him.
At the same time, Huesca have runners both out wide where Sandro initially sends the pass, and in-behind where the ball is going a few seconds later. This is an excellent example of the space Real Madrid were leaving between the lines, the mechanisms Huesca used to exploit it and the man-marking approach from the hosts.
Final remarks
It does seem Real Madrid are finally finding their footing and the return of Hazard is the highlight of their weekend. Huesca, on the other hand, were quite good themselves but the two goals in succession at the end of the half threw them off.
Despite the win, however, there are some worrying signs for Real Madrid regarding their pressing so Zidane still has tweaks to make to his tactics.


Comments