Diego Simeone’s Atlético Madrid travelled to the Basque country to face Athletic Bilbao to kick off their La Liga campaign re-start. The early Sunday kick-off at San Mames ended in a 1-1 draw with both the sides displaying some serious defensive capabilities. This tactical analysis will walk us through the tactics used by both Diego Simeone and Gaizka Garitano in this fixture between the two sides.
Despite leading in the 37th minute with an Iker Muniain goal, the Basque side couldn’t hold on to the lead for long as Diego Costa levelled the scoreboard in the 39th minute. Despite failing to score a decider, both the teams kept approaching each others’ posts via signature methods. In this analysis, we’ll look at the line-ups, Bilbao’s style of play, and their tactics as well as Atlético’s answers to Bilbao’s strategy in return.
Line-ups
Athletic Bilbao started with a 4-2-3-1. With Unai Simón on goal, the back four consisted of Iñigo Martínez and Yeray Álvarez as centre-backs while Yuri and Ander Capa started as the full-backs. The double-pivot consisted of Unai López and Dani García. The three-person advanced midfield starred Iñigo Córdoba, Iker Muniain and Raúl García whereas Iñaki Williams started as the lone forward in papers.
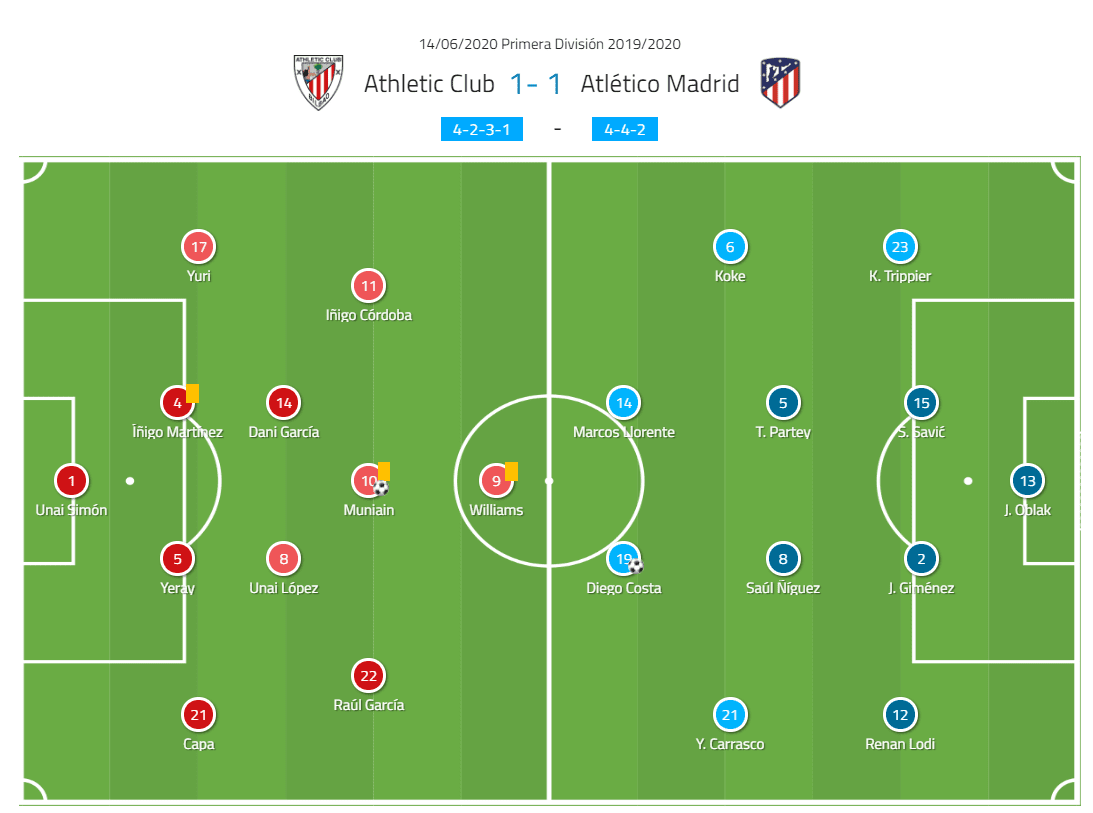
The Rojiblancos started out with their generic 4-4-2, with Jan Oblak keeping the nets. The pack four saw Kieran Trippier and Renan Lodi support José María Giménez and Stefan Savić in defence. Arsenal-linked Thomas Partey was accompanied by Saúl Ñíguez as Yannick Carrasco and Koke started from the wide midfield. The front two starting for Atlético were Diego Costa and Marcos Llorente.
Bilbao’s build-up
Taking into consideration the pressing strategy of Simeone’s men, Athletic Bilbao invited the press higher up the pitch. As Atlético often preferred to keep their shape and send the front two to press higher, Bilbao used the keeper and the centre-backs to nullify this attempt successfully.
The centre-backs drifted wide to stretch the press whereas the keeper occasionally received the ball as an extra option. By drawing the forwards to the stretched centre-backs, Bilbao then attempted to play on the spaces created between the lines due to this movement.
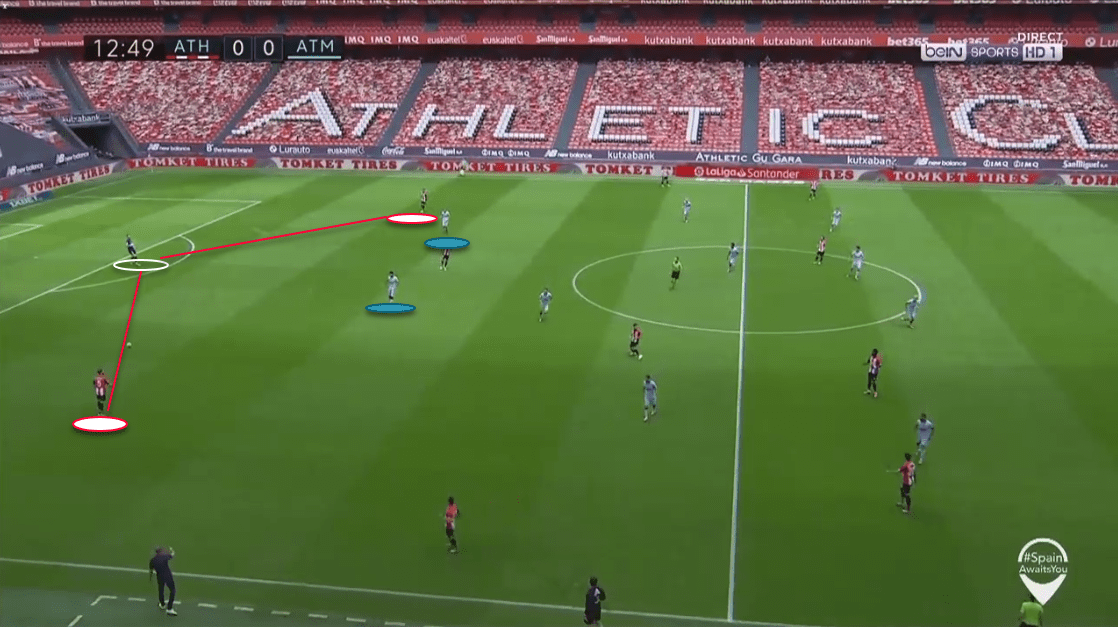
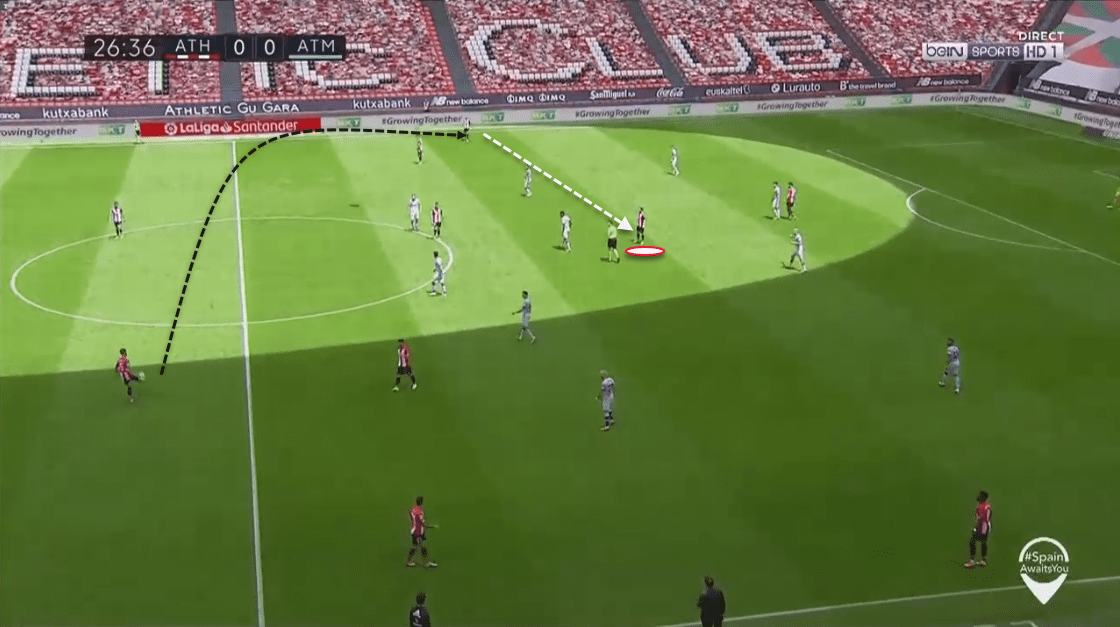
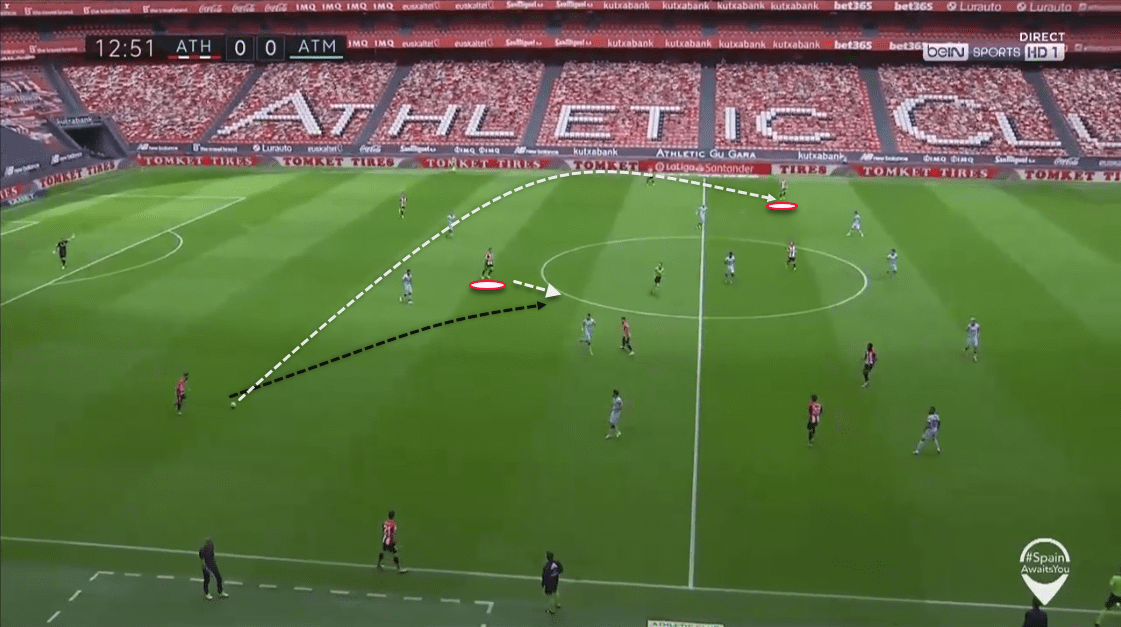
The advancement was made either by throwing long balls higher up the pitch, or to one of the pivots nearby. This generally helped Bilbao to break the first line, as well as have two options to advance the ball.

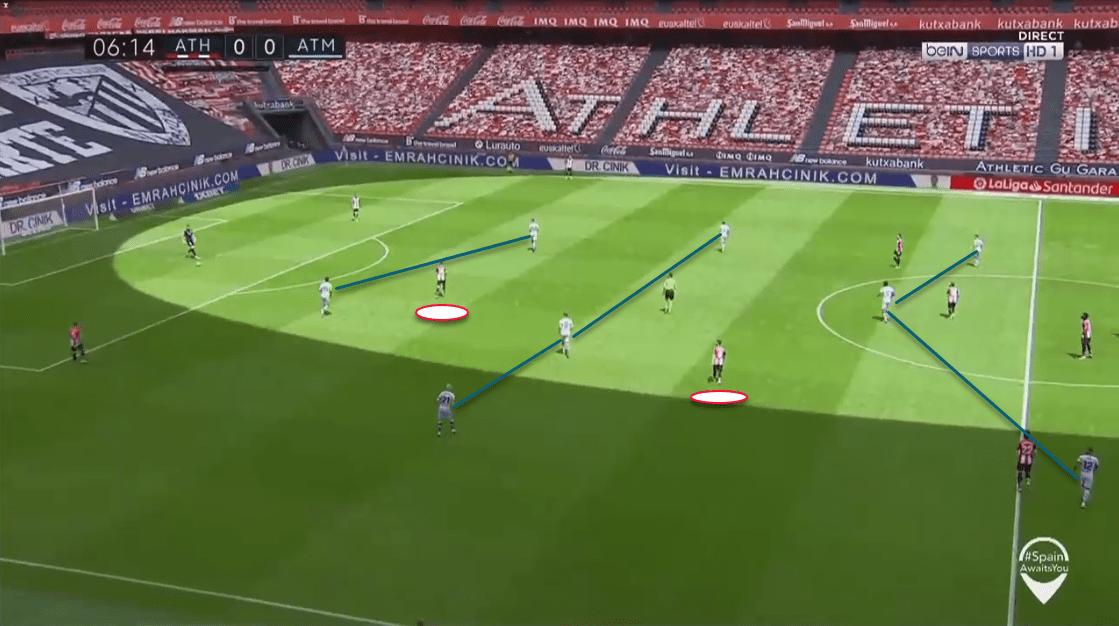
Similarly, the pivots were found generally alternate to each other, i.e. one in an advanced position and the other in a deep area. This helped both Lopez and Garcia to stay between the lines and transition the attack smoothly from the centre as well. Similarly, this approach saw them enjoy both time and space in the centre of the pitch. This approach was effective in countering Atlético’s compact and rigid structure as the space between the lines were utilised correctly to advance.
Athletic Bilbao’s attacking approach
When Athletic Bilbao went further up the pitch, they emphasised on taking advantage of their 4-2-3-1 setup. The striker, Williams, frequently made inside-out runs to trick the four-person backline into anticipating a line-breaking long-ball from the wider areas. Bilbao were able to yield a good number of attacks by this route, as both wide midfielders frequently supplied balls to execute these tactics in the middle.
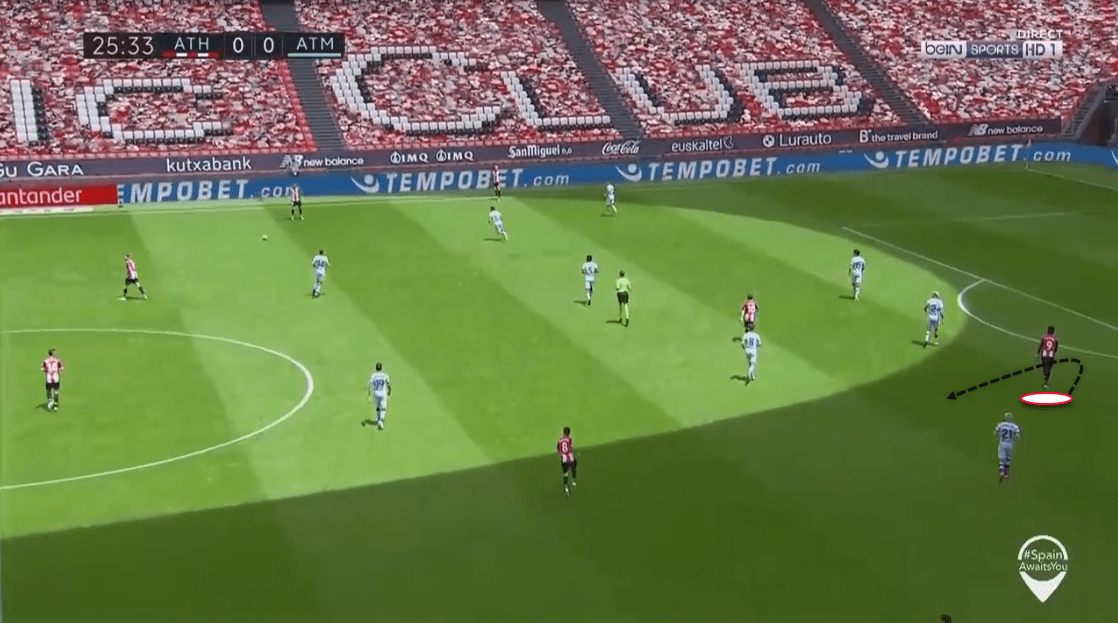
Similarly, Bilbao’s confidence on the ball was visible by the movement of their full-backs with the ball. The two central defenders were supported by a defensive midfielder as the full-backs were allowed to make runs and deliver long balls both inwards and diagonally to counter the Rojiblanco’s rigidity.
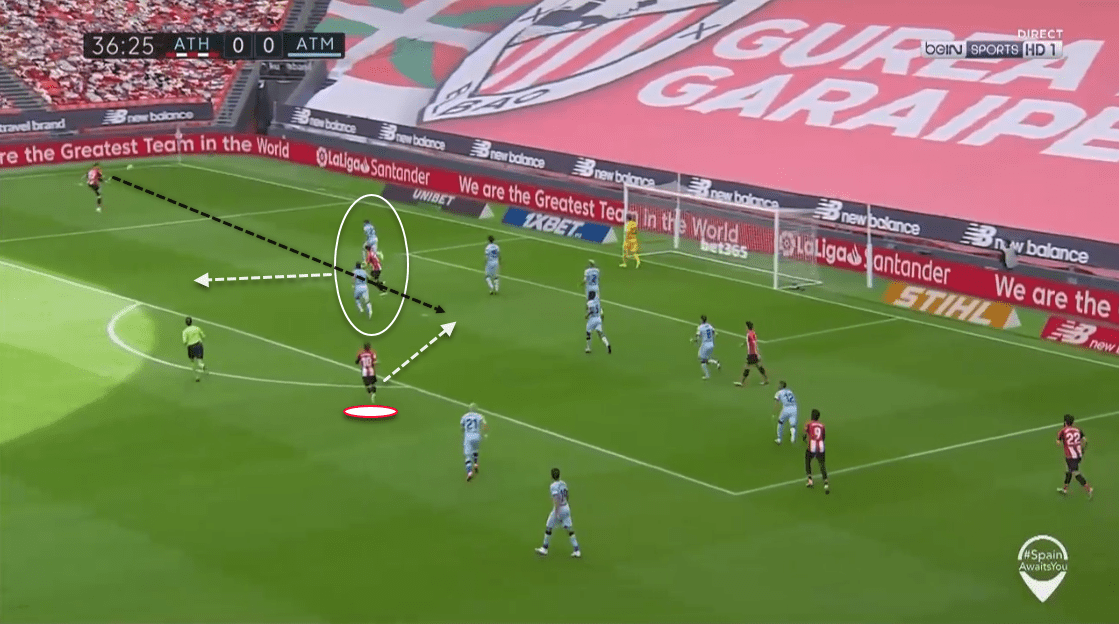
One of the main instances of this approach was the connection between Yuri and Muniain, who exchanged 17 passes between them, the highest from Bilbao’s side. Munian was deployed in between the two layers of four-man blocks, which made his moves lethal whenever he was supplied from the left. He collected wide passes and by positioning himself centrally, managed to organise the play around him.
The Yuri-Muniain combination was vital in giving Athletic Bilbao the lead, as Yuri was able to detect Muniain’s position to get rid of the defenders around him. Muniain’s ability to play between the lines and create spaces for himself was on display as he managed to free himself and beat Oblak to score the goal.
Bilbao’s defensive features
The Athletic Bilbao defence held up very well against the Costa-Llorente attack force as they were able to limit Atlético to nine shots throughout the game. Maintaining a 4-3-3 structure without the ball, the Bilbao defence managed a medium block.
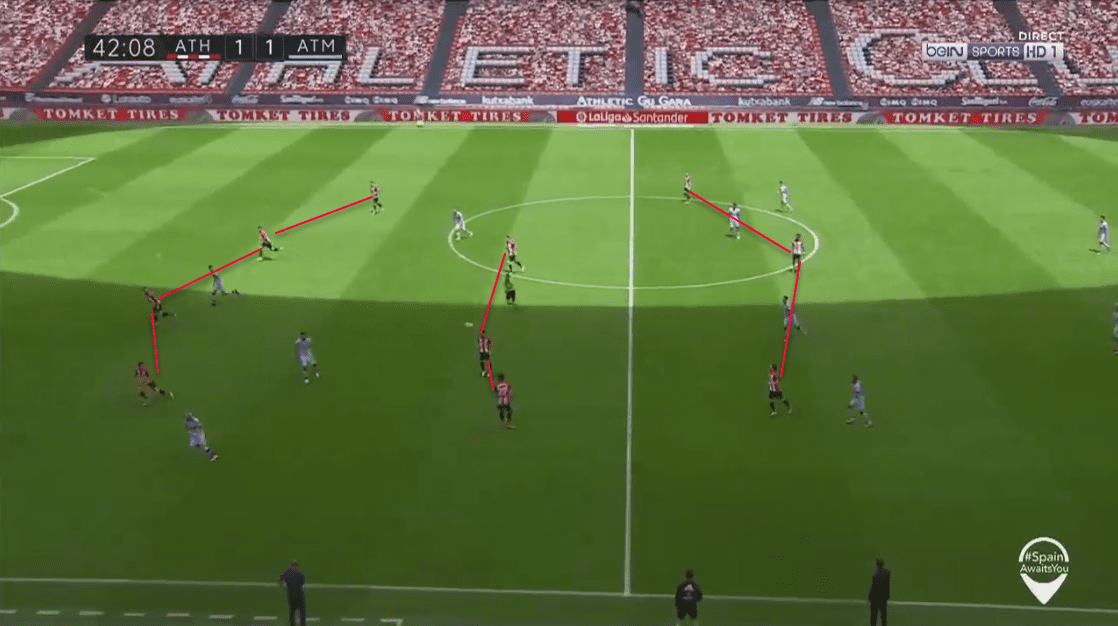
The 4-3-3 was executed with horizontal compactness. With the corresponding defenders in close proximity to each other centrally, they forced the Atlético Madrid side to play and attack from the wide areas, which reduced the risks of conceding from the centre. However, the side dealt with aerial threats and cut-ins by defending in numbers. When pushing the opponents to the wider side, Bilbao ensured a sufficient number of players arrive inside the box to make the central area safe and provide the opposition players odd angles to aim at the goal. Similarly, these tactics also isolated opponents’ forwards from the midfield, as the central block didn’t allow through balls and wide attacks were nullified by outnumbering the forwards.
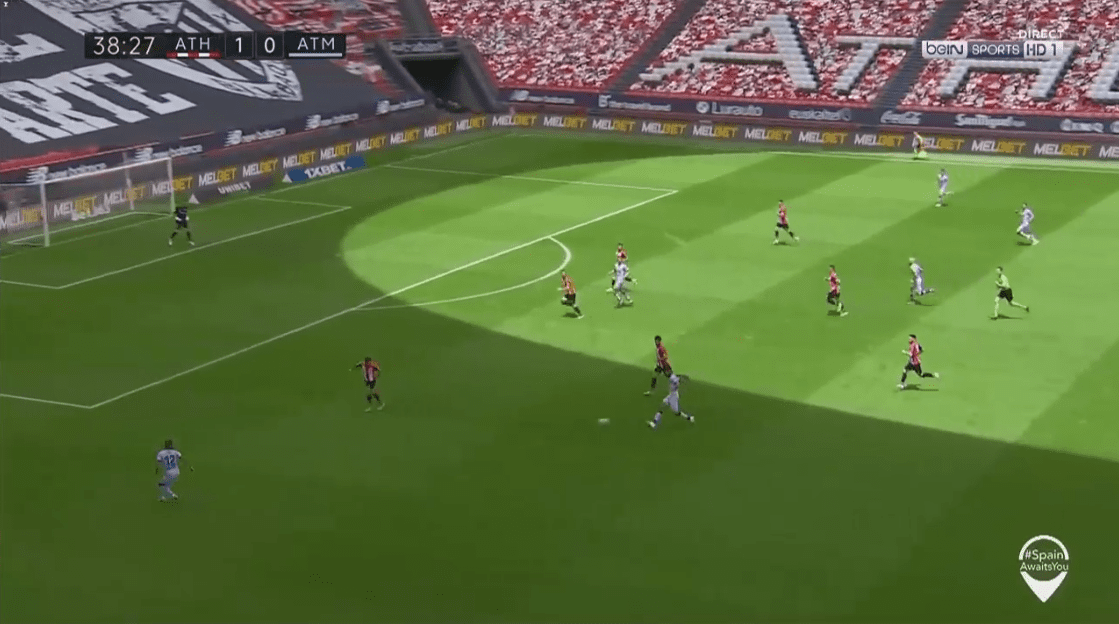
Similarly, Bilbao’s proximity to use the double pivot in defending made it easier for them to avoid penetration and hence were not caught out frequently. Overall, a very disciplined defending except for the error that led to goal made Bilbao hold up against Atlético.
Atlético’s build-up scheme
Atlético Madrid’s build-up scheme was more direct and vertical in comparison to Athletic Bilbao’s approach of finding spaces in between the line. Often, Oblak was assigned the duty of landing a long ball towards the opposition half to progress via the goal kick.
However, what was interesting was the position of two centre-backs in this process. Despite possessing aerial prowess, the centre-backs were not used to win the first ball but to receive the stabilising pass to retain possession. This had two advantages for Atlético, as they could hold their structure as well as win the second balls.
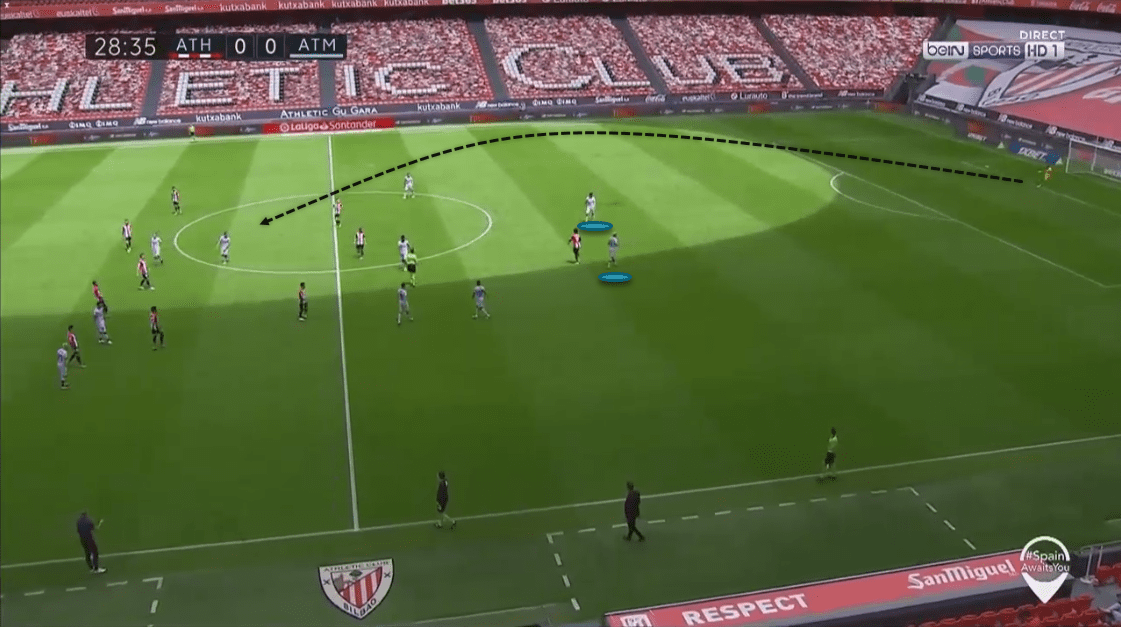
In addition to this approach, Atlético used Thomas Partey’s movement to build-up forward when they recovered the ball in their box. In this approach, Thomas Partey was seen dropping off to provide the support to defenders and acted as the bridge in transition. By using Koke or using diagonal balls, Partey was a key figure in advancing the ball forward and stabilise the build-up for Diego Simeone’s side.
Atlético’s attack
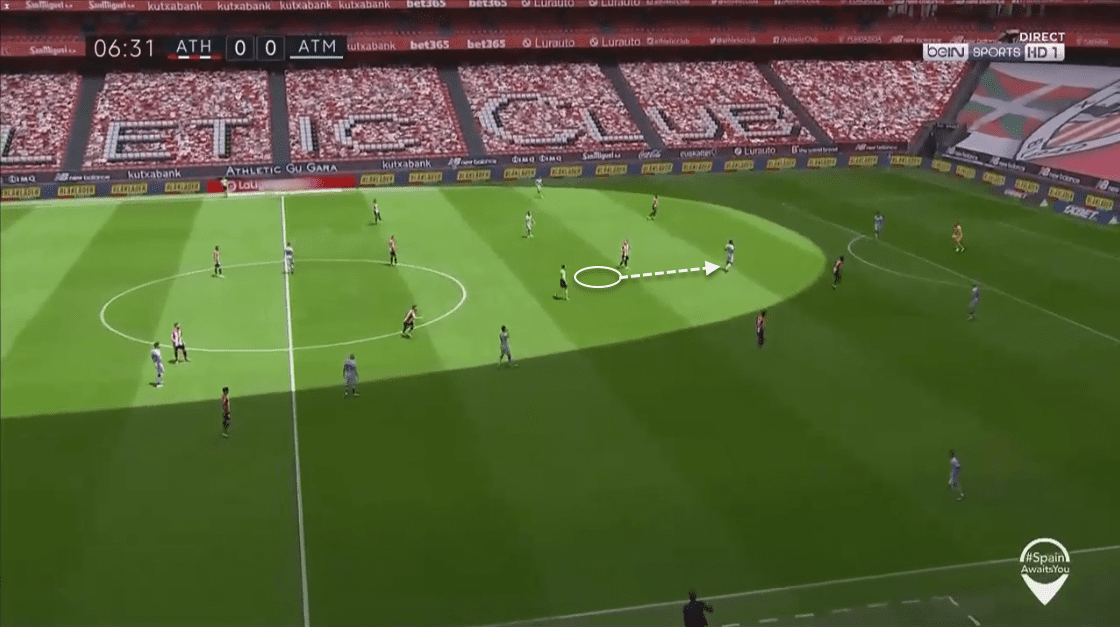
Due to Bilbao’s compact central structure, Atlético Madrid’s counter-attacks that are equally as good as their defending were not in display. Instead, the side was forced to play from the wide areas, using the wide midfielders and full-backs to land in the balls for Costa and Llorente. Carrasco and Lodi made frequent runs forward as well as supplied balls to the two attackers. Lodi enjoyed a healthy spell going forward, as he managed to land four out of nine crosses for Atlético. The wide-play is made evident by their pass map:
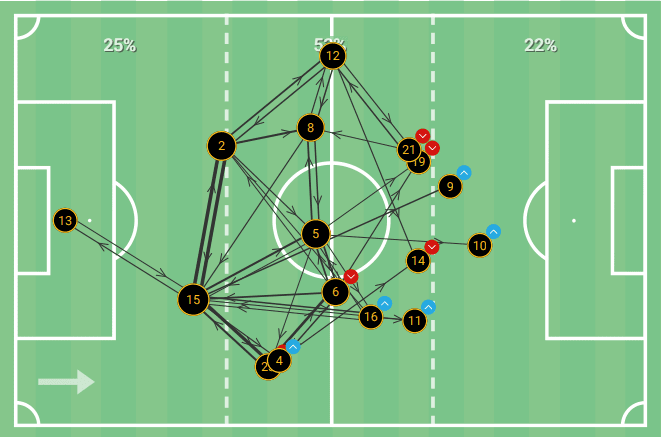
While approaching from the centre-as well, Atlético tried to get the ball wider to stretch out the last block for Diego Costa and Llorente to come in the play. Atlético’s only goal of the game came via Costa’s link-up centrally, made possible by Lodi’s efforts of drawing defenders towards him and releasing the ball at the last minute into space.
Atlético adapted to Lodi’s advancement by creating a 3-4-3 while on the ball. When Lodi advanced forward, Trippier was generally seen supporting the two centre-backs to create a three-person backline. Similarly, another advantage that Atlético managed to pull out of this was their ability to turn this into a 4-4-2 in case of a counter-attack.
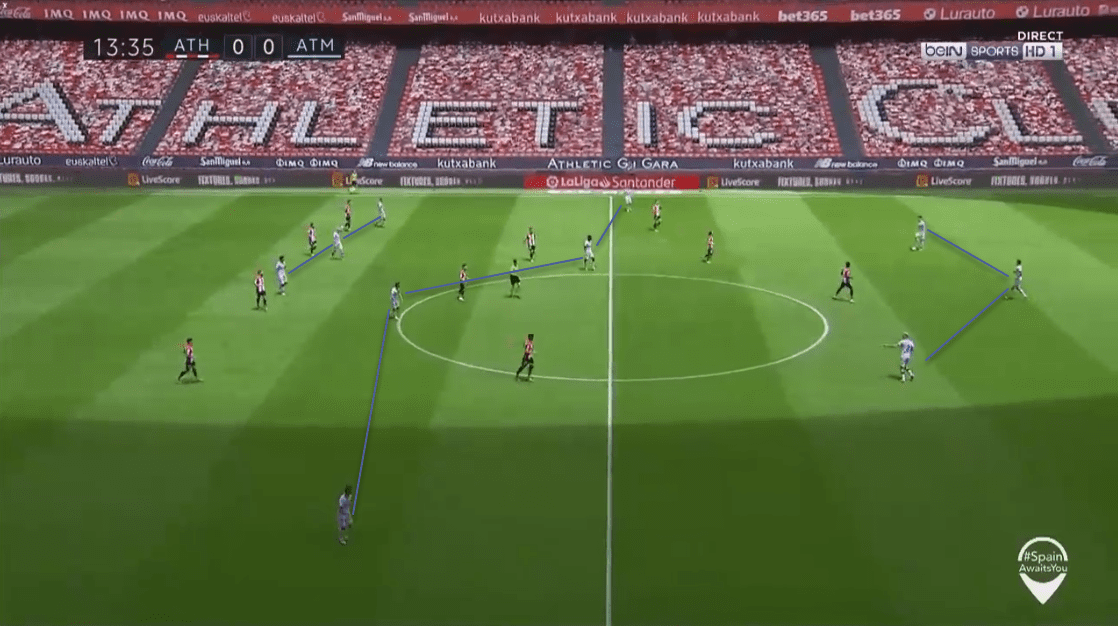
Atlético’s effort to penetrate via central areas were obvious and could be tracked using the wide channels that they always maintained while on possession.
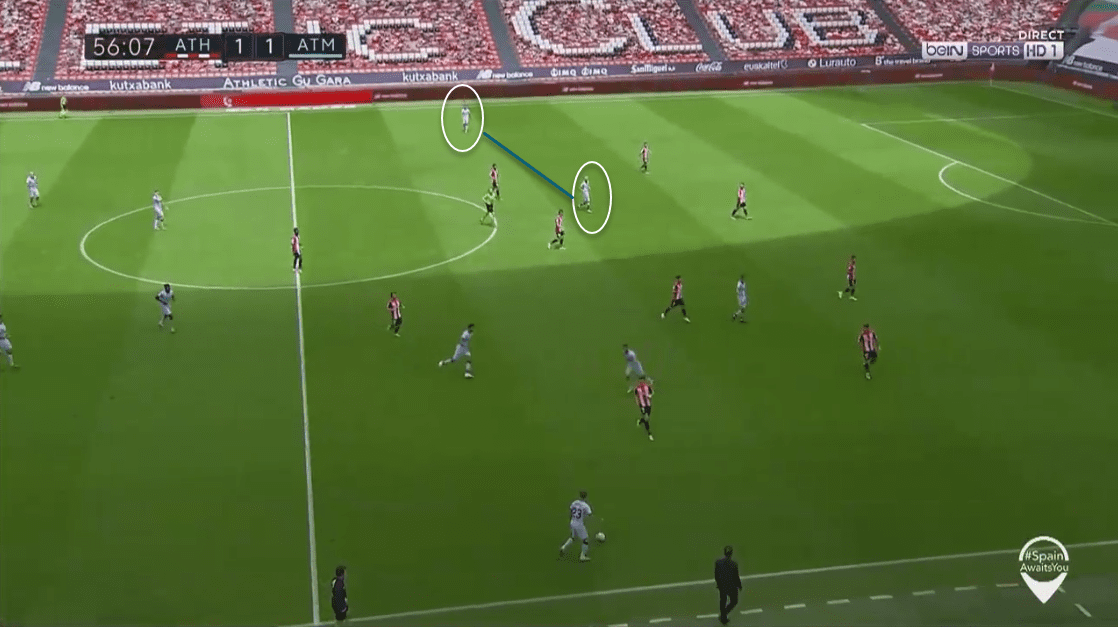
As shown in the figure, Carrasco and Lodi remained close to each other throughout the match to execute overlapping runs, create passing options after receiving the diagonal balls as well as break lines using passes into the final third. Different from the general and direct approach, this was an alternative way to penetrate using Carrasco’s abilities and passing.
Atlético Madrid’s defending
Atlético Madrid defended with a low-block and maintained the compact shape to counter the 4-2-3-1 structure. The main focus was around Williams, thee lone forward and the players trying to play between the spaces. The 4-4-2 formation was able to limit Bilbao’s moves on several occasions. Coming into the low-block, Atlético too defended in numbers and were able to get their players back in time to defend.
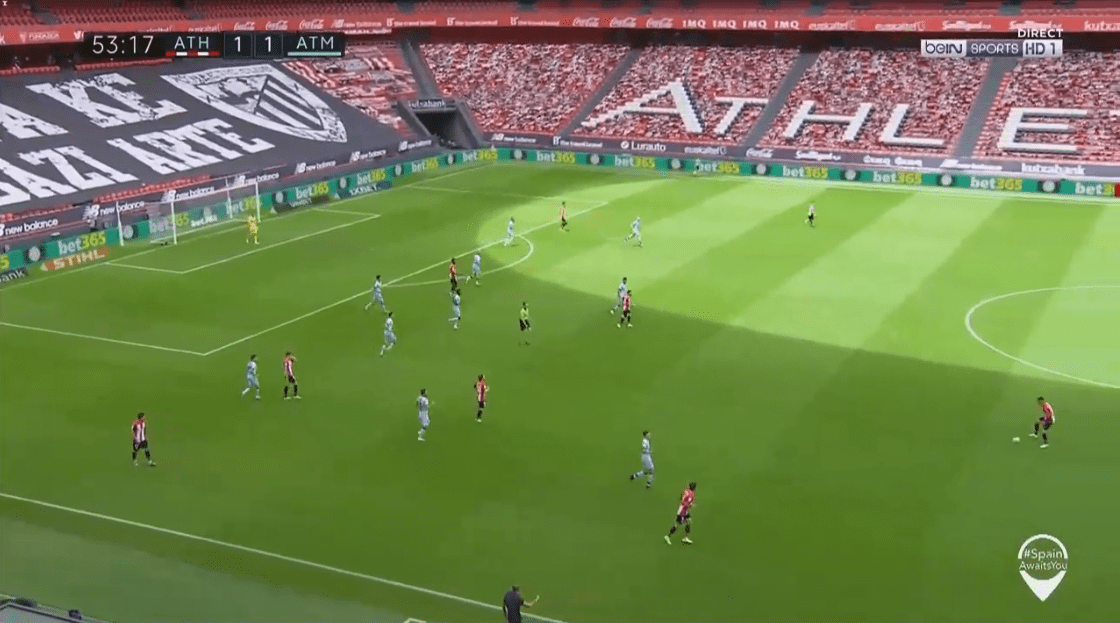
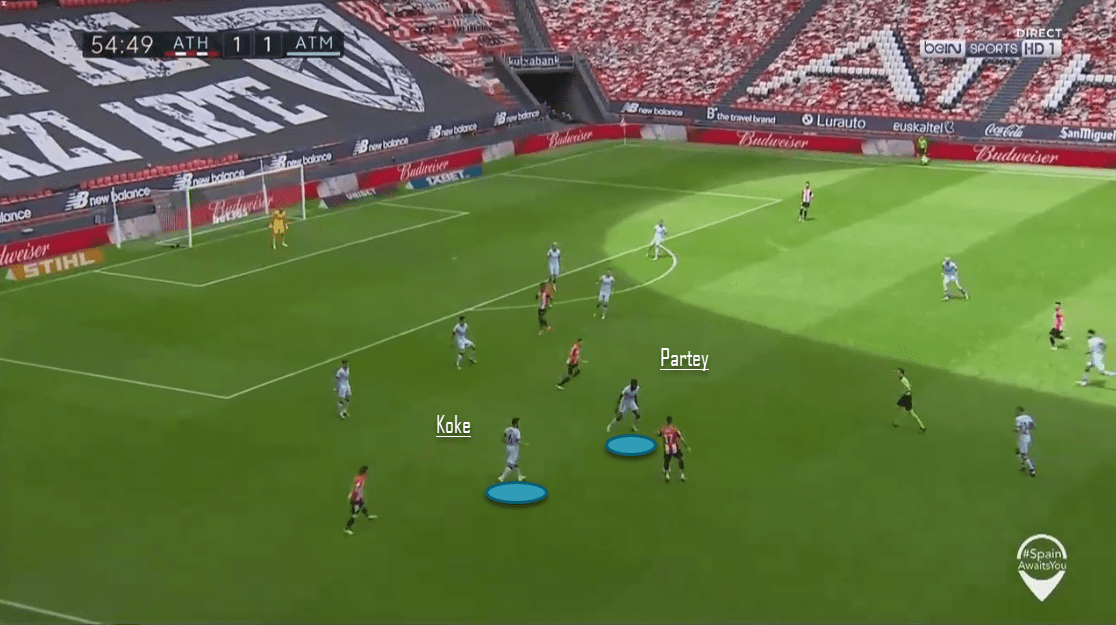
Similarly, the duo of Thomas Partey and Koke was an important one in shielding the defensive line. While this duo was in times flexible enough to incorporate into the block itself, the other occasions saw them press for the ball in midfield. Staying close to each other in the process, they limited the passing options for the opponent as well as added security to the transition after winning the ball back.
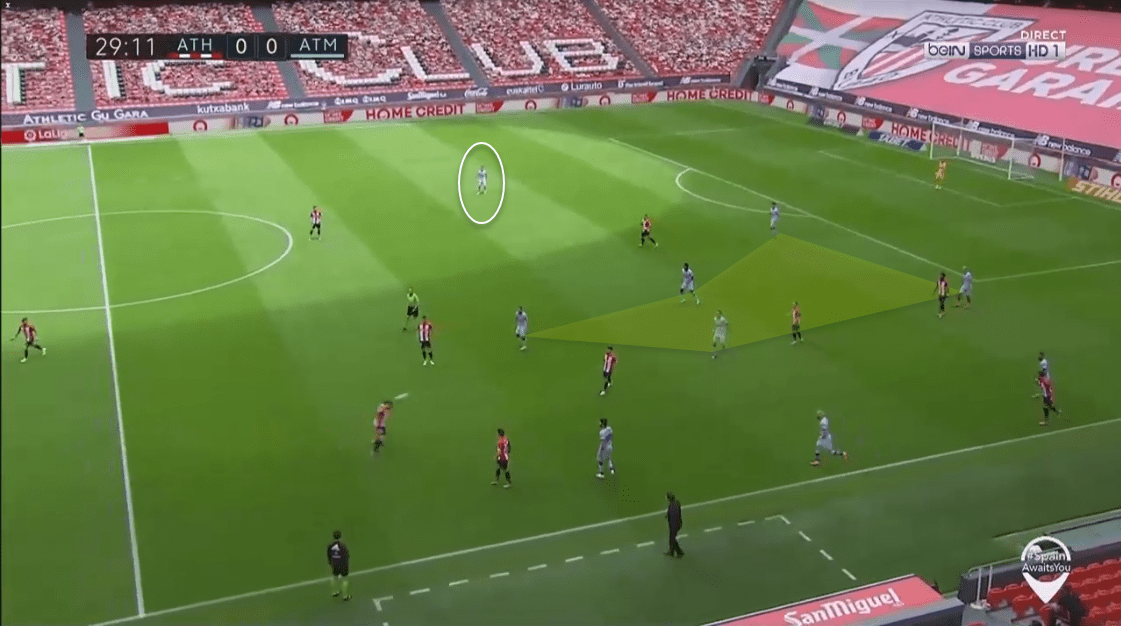
Talking about defending in numbers, Atlético managed to overhaul the half-space that Bilbao used to advance further up the pitch. This increased their chances of winning the ball back several times and had 70% success on recoveries from the wide areas and half-spaces overhaul. This invited Bilbao to flood in more players to break the overhaul. To capitalise this, Atlético always kept a plyer on the other side to switch plays and go on a counter whenever it was possible like shown in the figure below:
Conclusion
All in all, after a display of some fine defending and intense pressure applied to win back the ball by both the sides, the draw seems to be a fair result to conclude this fixture. While Diego Simeone will have to find ways to put Atlético Madrid up to the European qualification spots, Athletic Bilbao will be looking to work more on their final third measures.



Comments