On Sunday, February 27th, Liverpool took on Chelsea at Wembley Stadium in the EFL Cup Final. After a fascinating 90 minutes had both teams at a 0-0 stalemate, it went to extra time – and then onto one of the most memorable penalty shoot-outs for some time, with it going down to the goalkeeper’s to decide. Caoimhin Kelleher’s Liverpool came out on top in the shootout, giving Liverpool their first trophy since their Premier League win in the 2019/20 season.
This tactical analysis will break down some of the key tactics we saw in Sunday’s fixture.
Line-ups
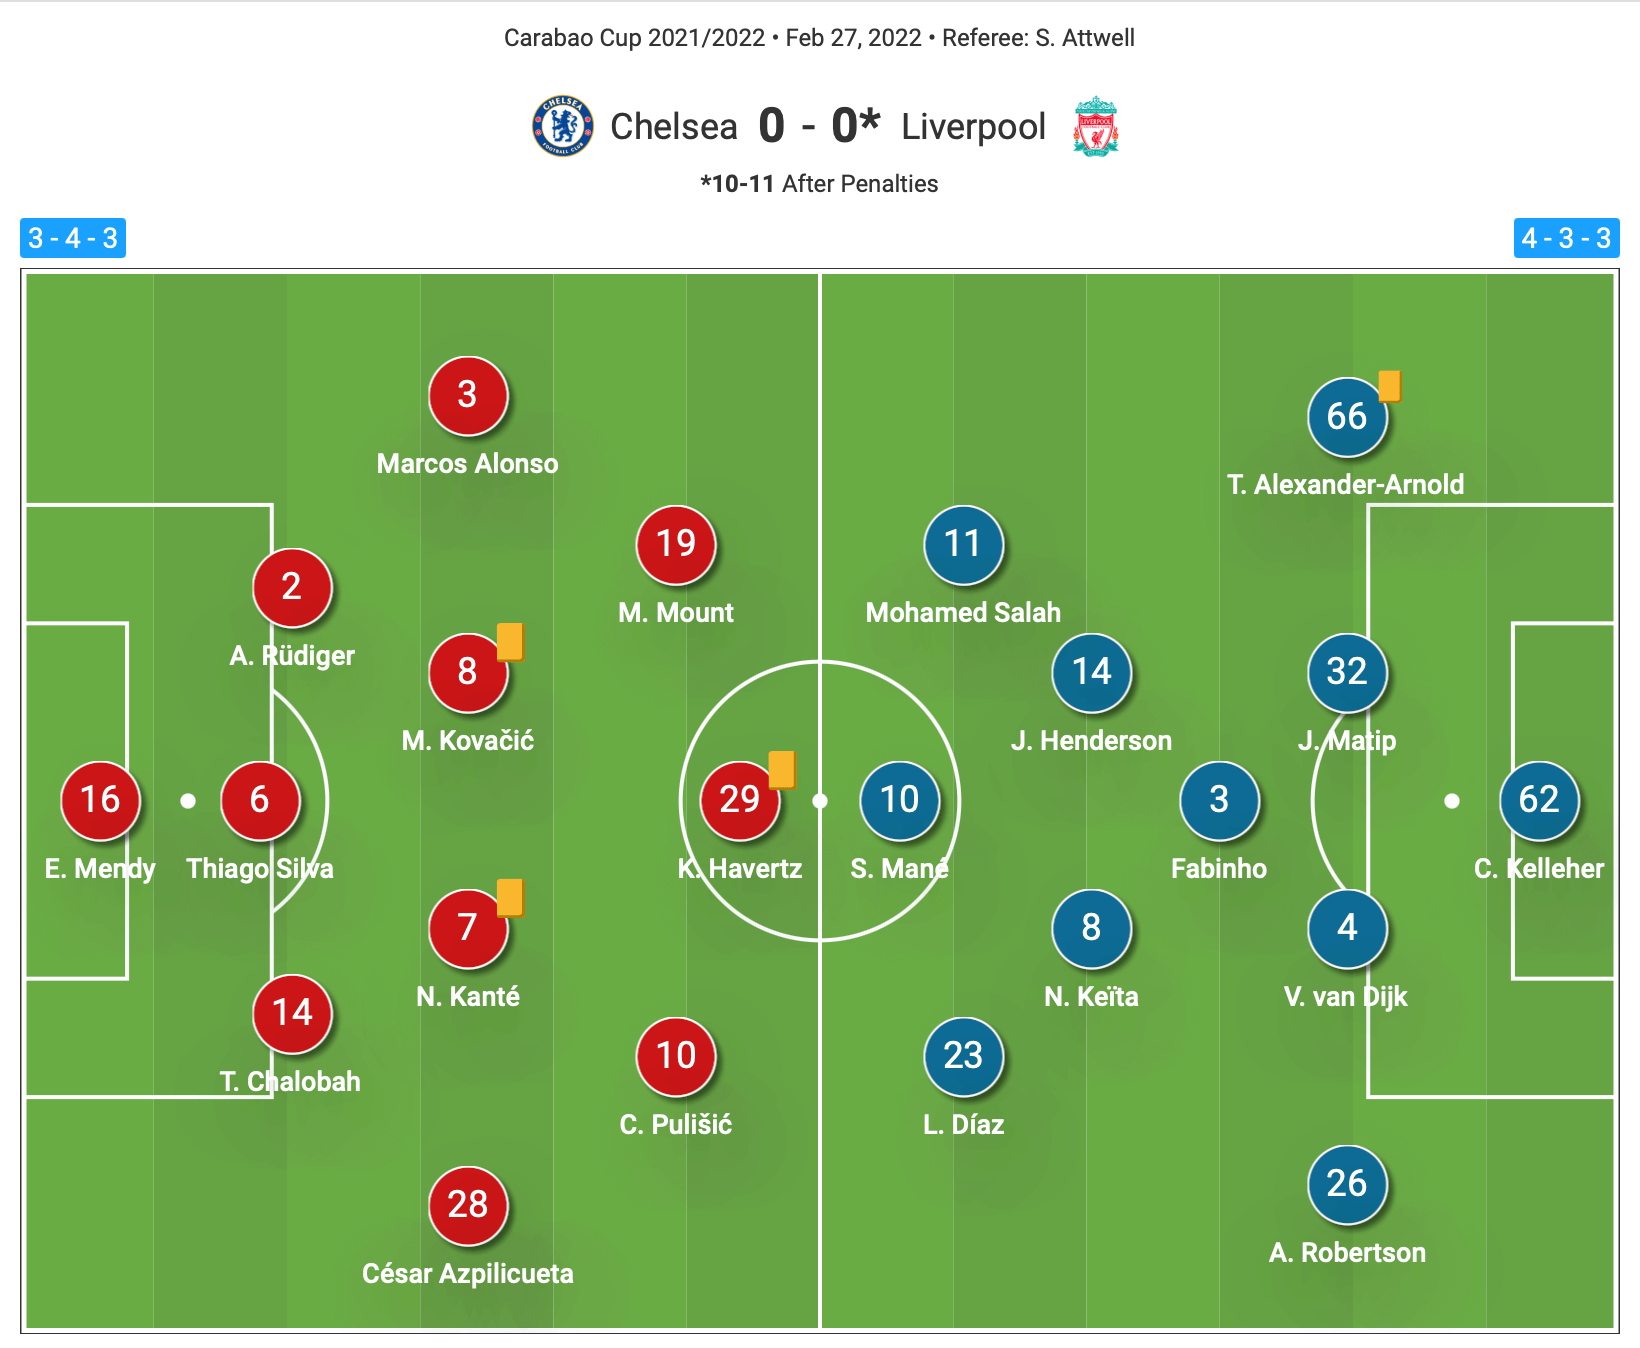
Before delving into the analysis it is pertinent to look at the starting line-ups from this game, as well as the formations.
Chelsea opted for a 3-4-3 with Edouard Mendy starting in goal. The back three had Antonio Rudiger and Thiago Silva, as well as Trevor Chalobah coming back into the side after a lengthy layoff, where an injury at the beginning of the year had only seen him manage 11 minutes in the FA Cup against Plymouth Argyle since.
Marcos Alonso and Cesar Azpilicueta were deployed in the wing-back positions, with the tireless pairing of Mateo Kovačić and N’Golo Kanté partnered together in central-midfielder.
In attack Mason Mount and Christian Pulisic sat either side of Kai Havertz.
For Liverpool Caoimhin Kelleher started in goal, keeping his place in this cup side. In front of him, Liverpool lined up in a 4-3-3. No surprises were seen in the backline with Trent Alexander Arnold, Joel Matip, Virgil Van Dijk, and Andy Robertson comprising their back four.
In midfield, Jordan Henderson and Naby Keita were given the nod to play in central midfield, with Fabinho sitting behind them. Liverpool then lined up with Mo Salah and new boy Luis Diaz either side of Sadio Mané in attack.
Chelsea’s counter-attack
Liverpool shaded the majority of possession in the game, with just over 51%, and whilst they engaged in some longer periods of possession when building attacks, they also had some effective counter-attacks. However, Chelsea consistently offered this threat, with the pace of Mount and and Pulisic, and later on Timo Werner, meaning Liverpool’s defence had to be constantly aware of their pace on attacking transition.
Despite this direct pace available, Chelsea were clever with how they constructed their counters at times.
Either wing-back was often the immediate outlet in such a situation, providing a way out from Liverpool’s compact defensive structure on transition.
Alonso and Azpilicueta would immediately push out wide, without initially pushing too high, to ensure they could find space away from either wide forward, Salah or Diaz, and to be too far from either of Liverpool’s full-backs as well.
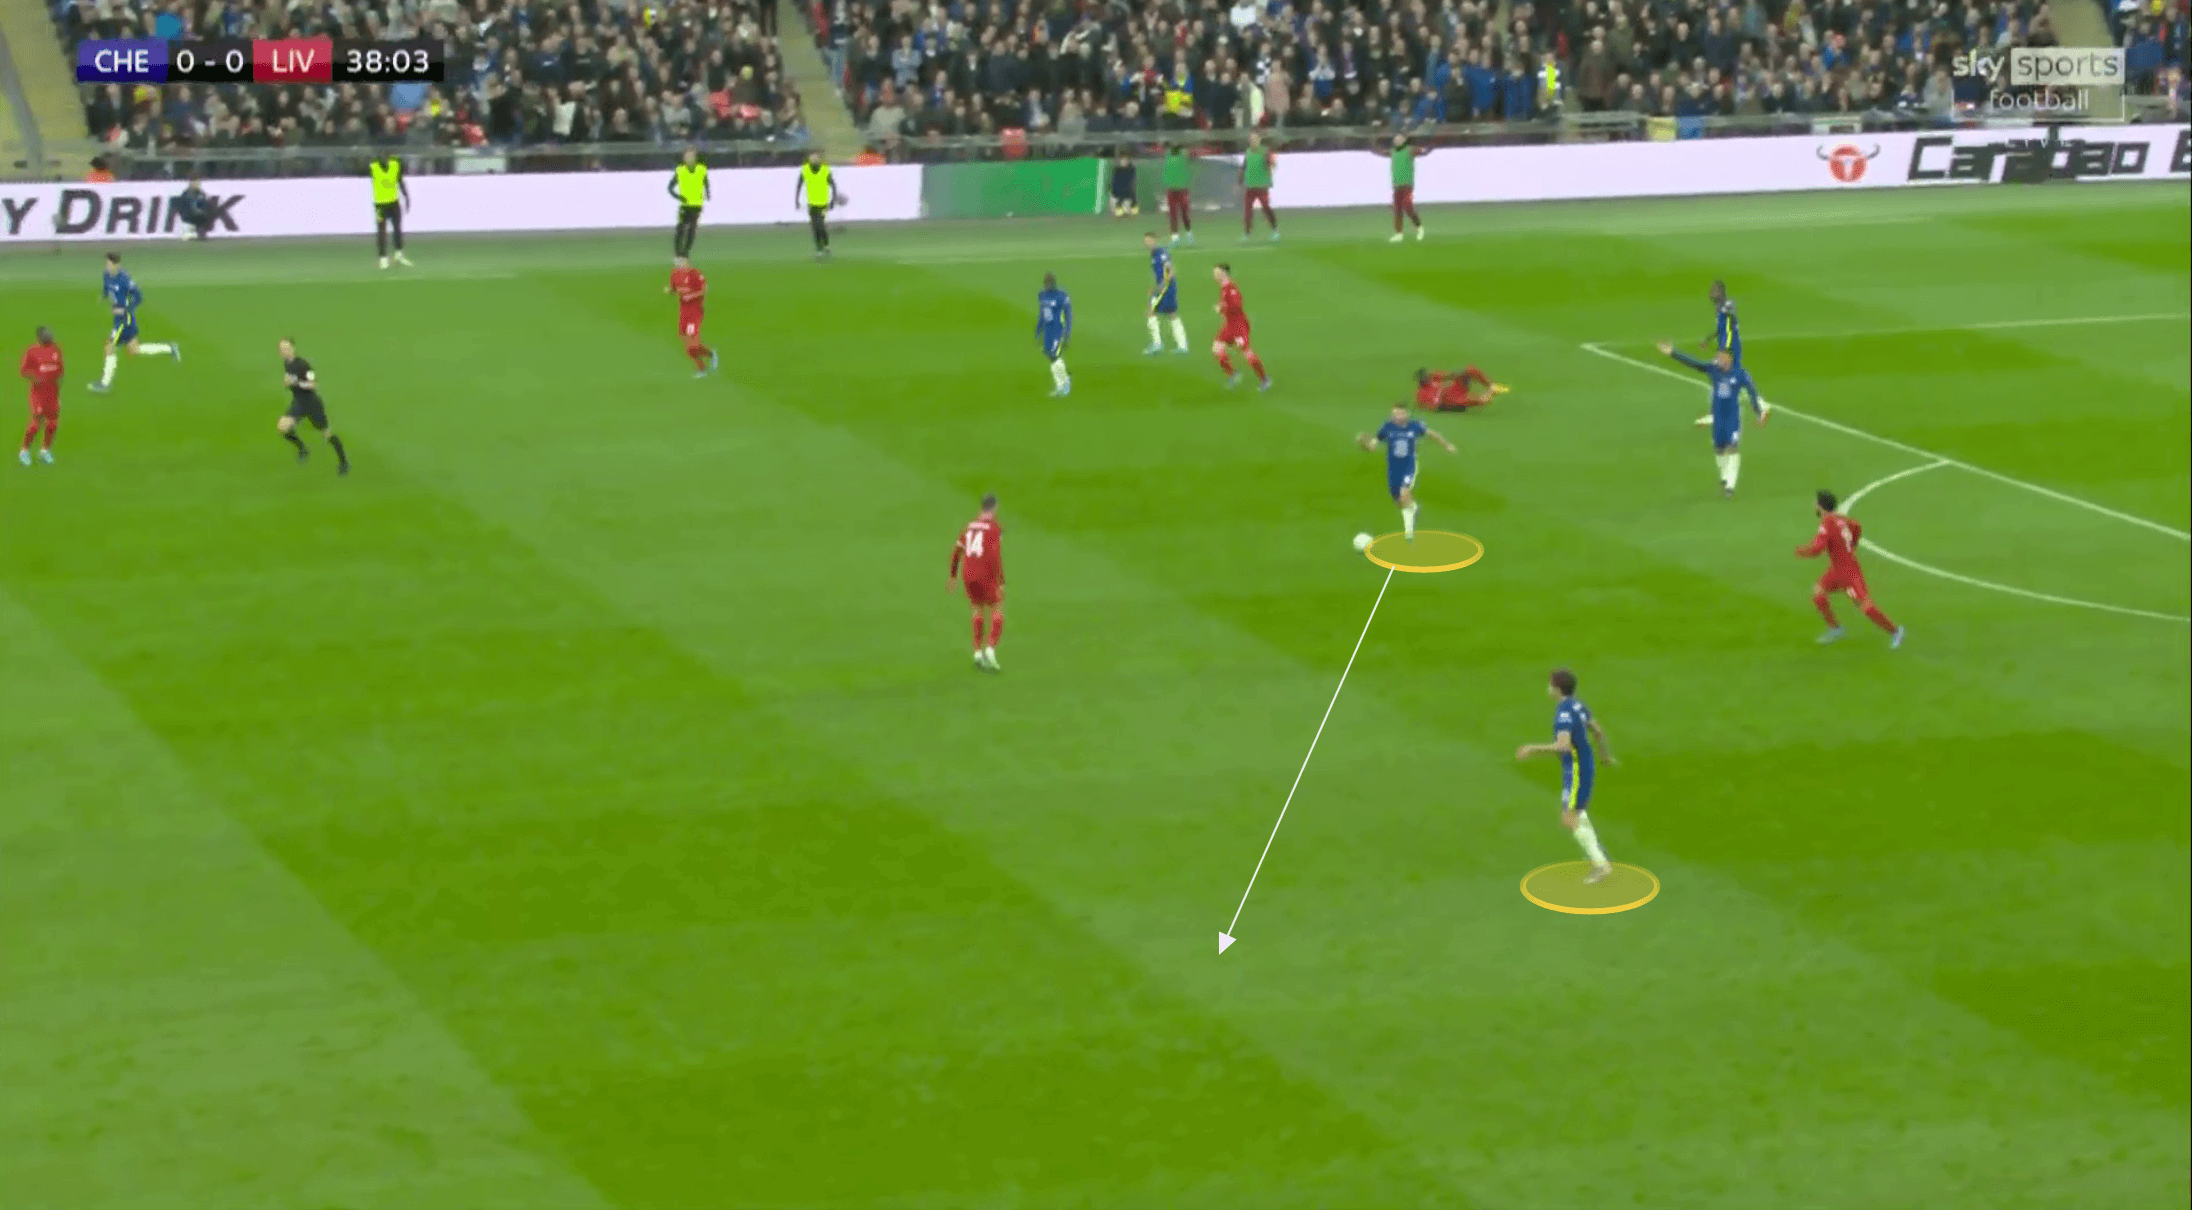
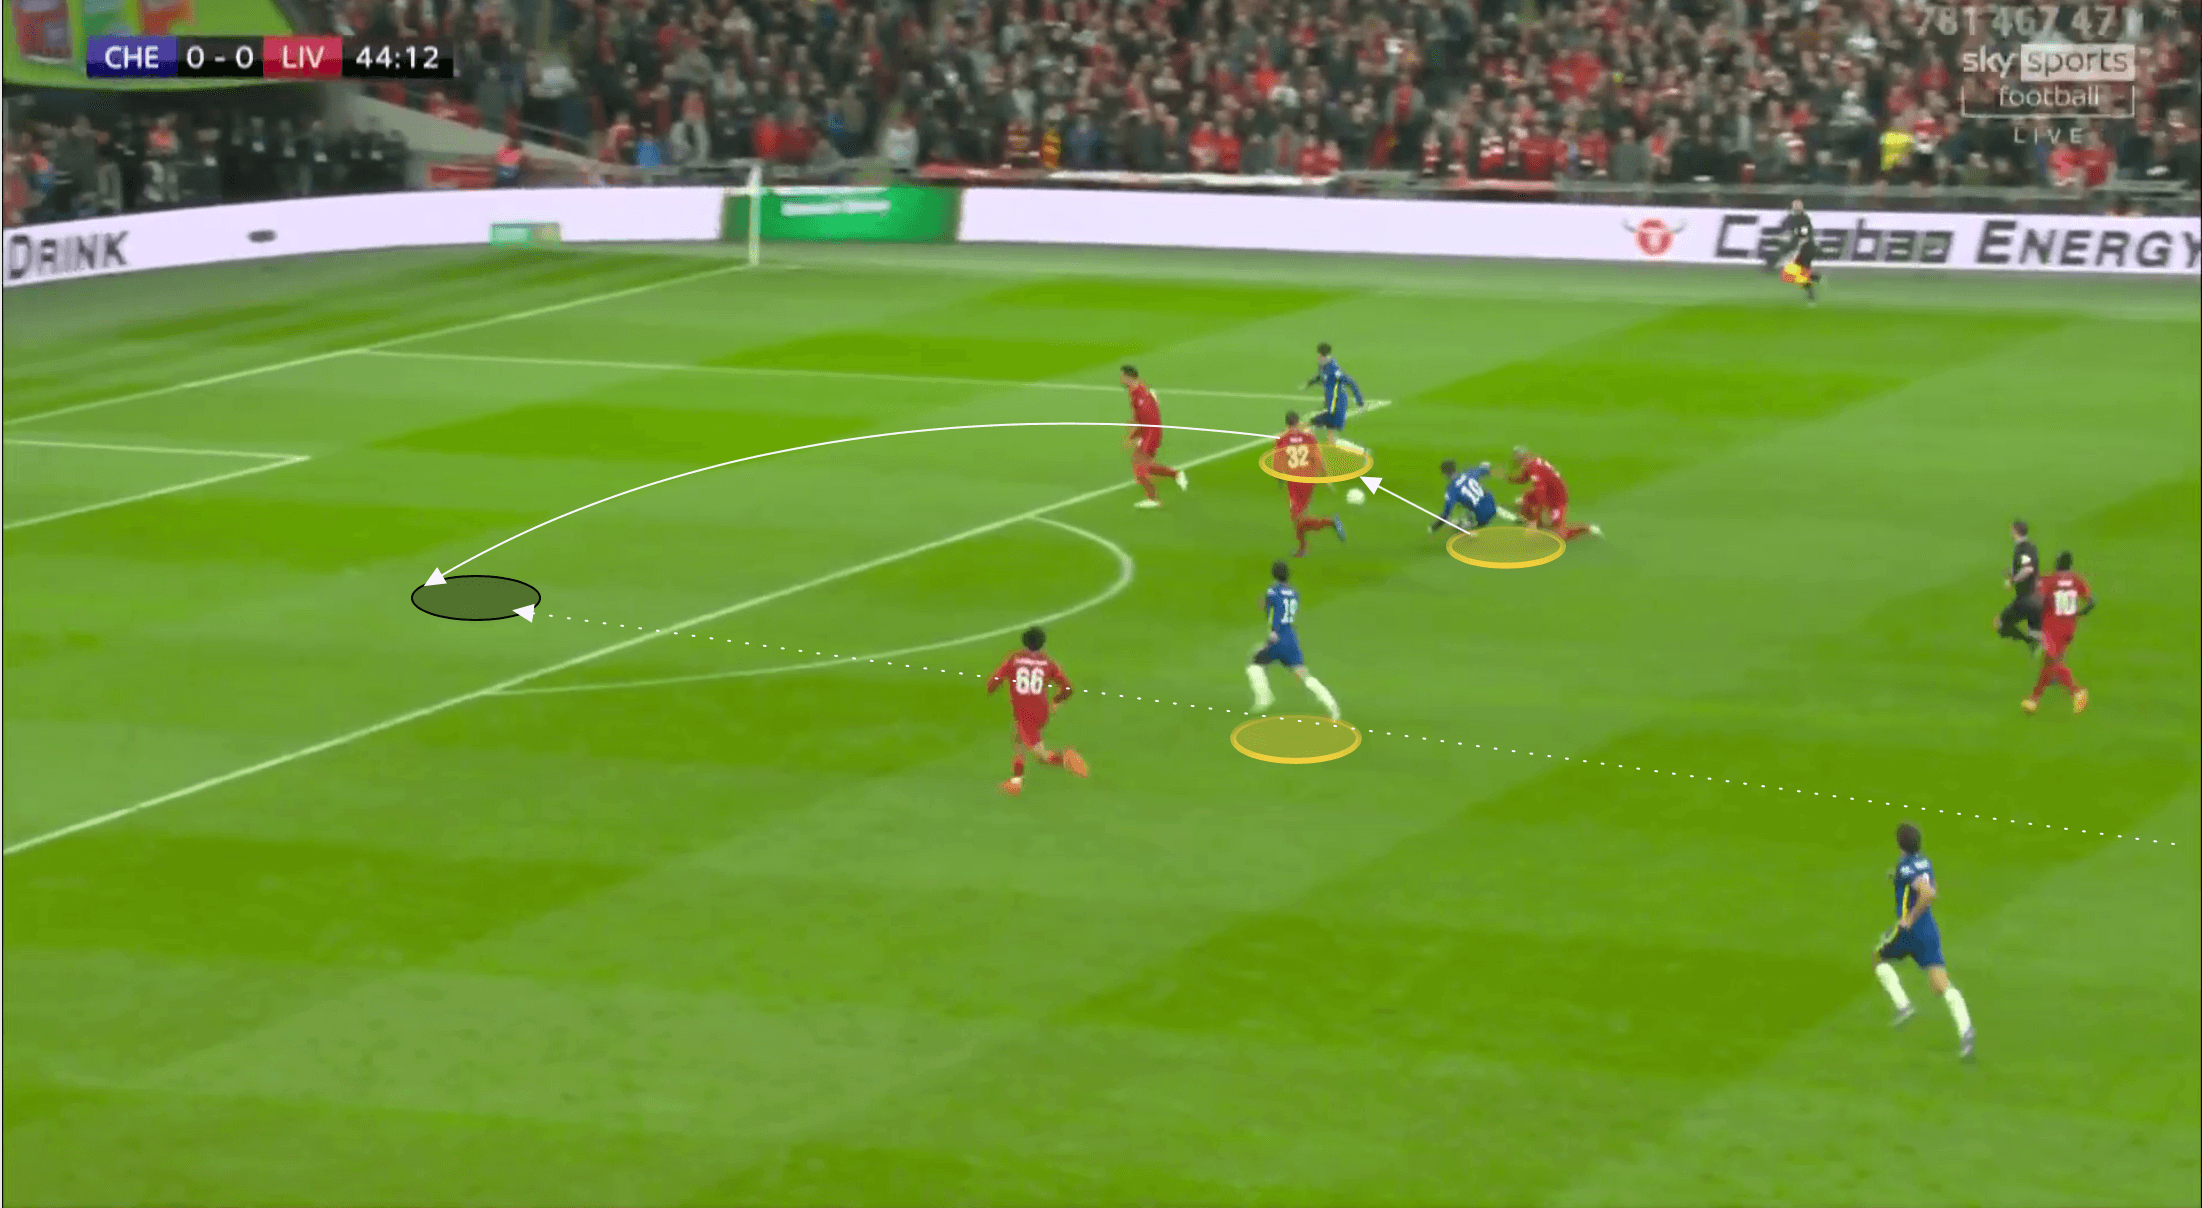
After a ball out wide, the wing-back, in this case Alonso, who struck a few of these cross-field balls during the game, played the diagonal switch to the opposite flank finding Havertz.
Chelsea looked to isolate one of Liverpool’s centre-backs in a 2v1, and this ball highlighted below allowed them to do this to Van Dijk, with Pulisic spinning off in behind Van Dijk.
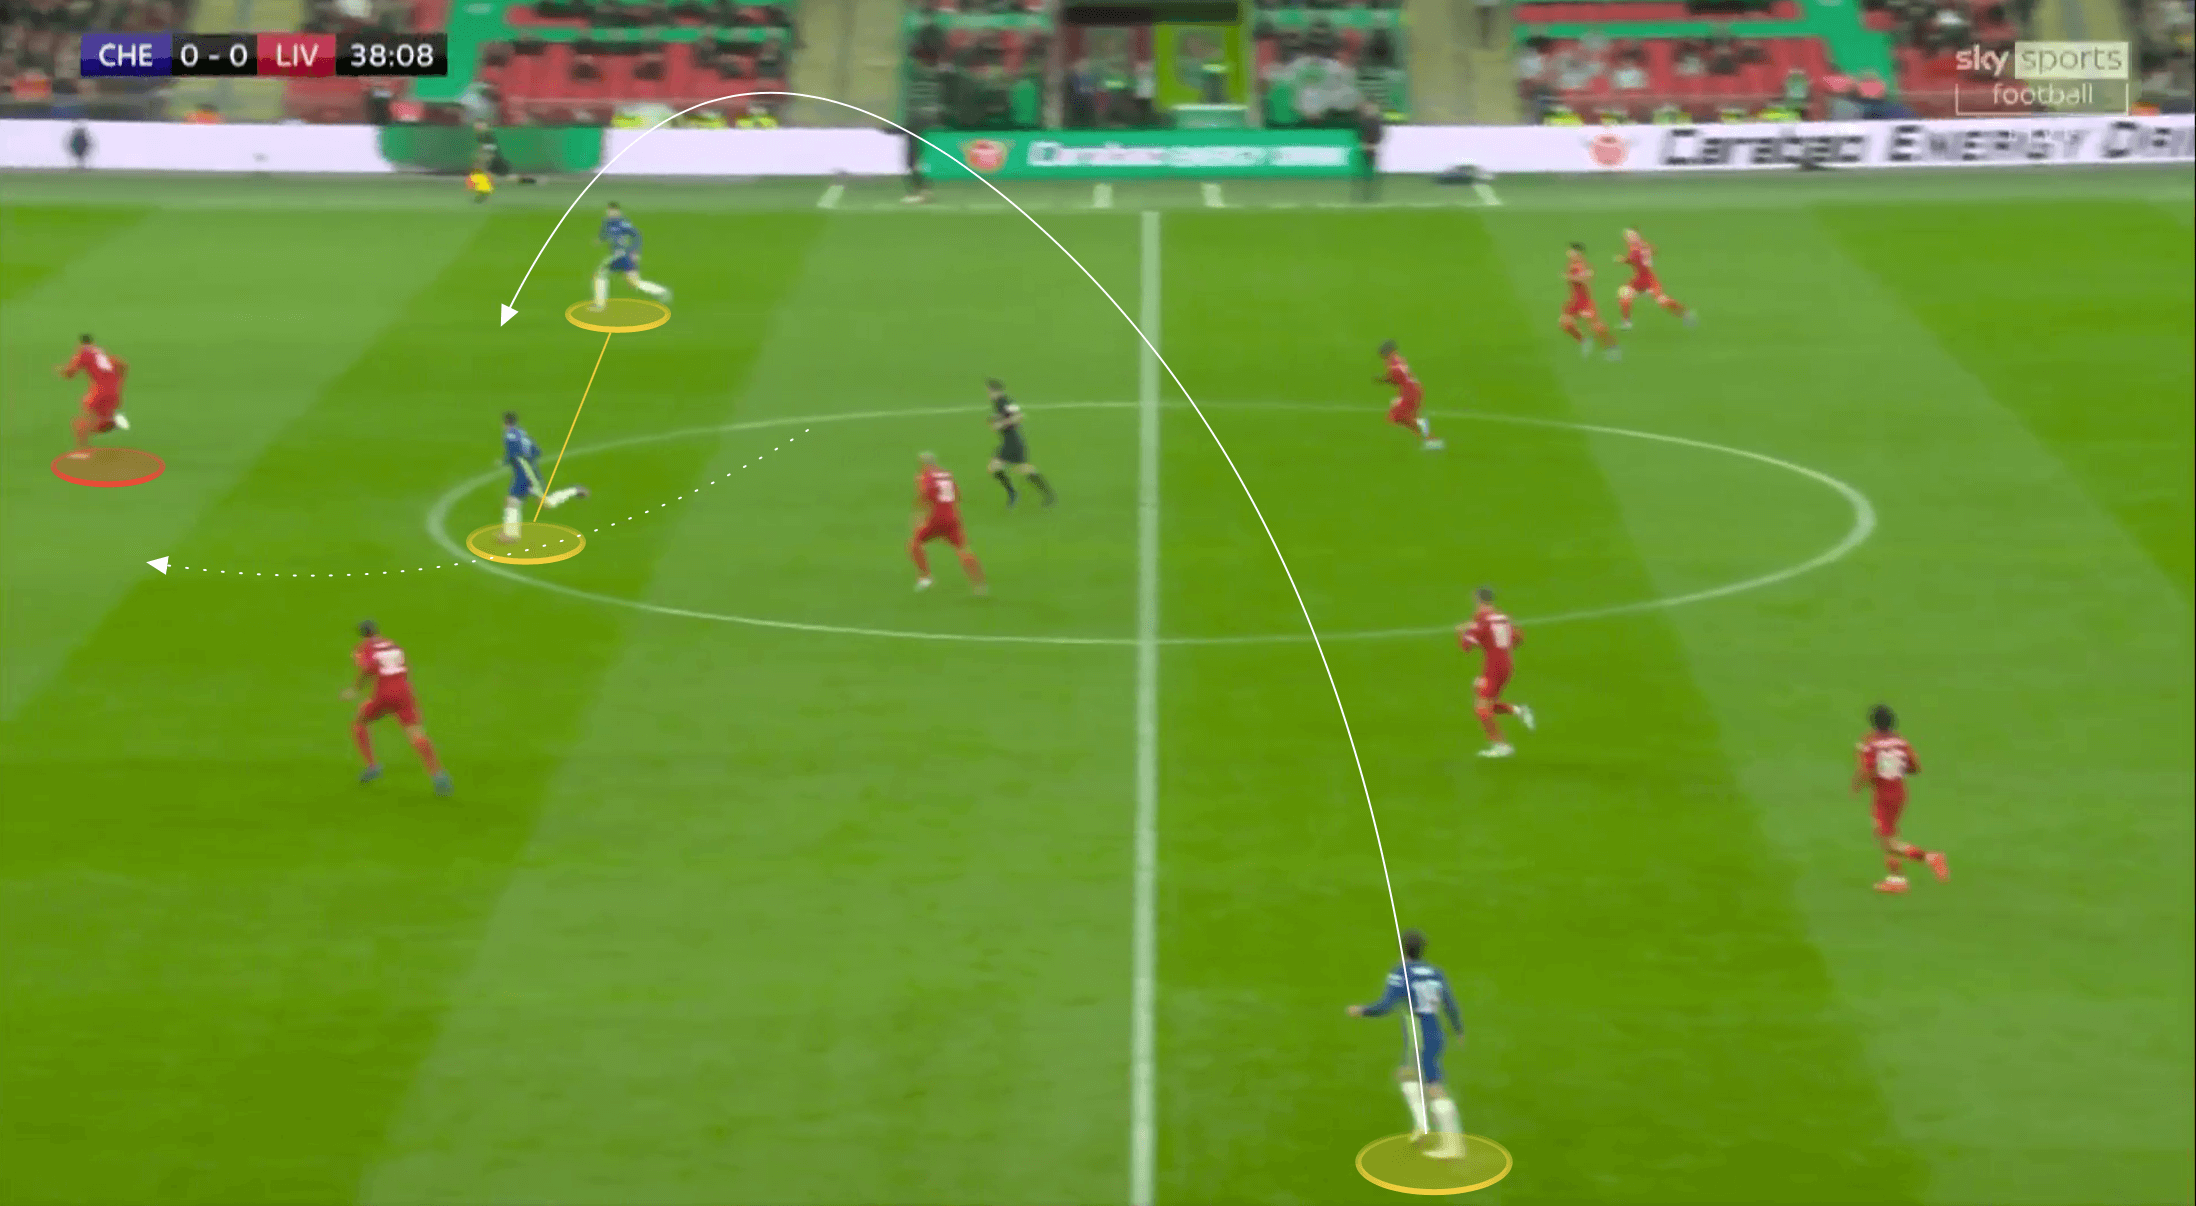
When the ball was won in further forward areas of the pitch Chelsea were more direct, and this is where the pace of their front line looked to quickly access the space behind Liverpool’s defence.
Below we can see an example of this with the ball quickly played forward into Pulisic’s feet who then subsequently drove forward himself, driving into the space between Matip and Van Dijk, but with Havertz on the outside of him supporting, he specifically targeted Van Dijk once more in the 2v1.
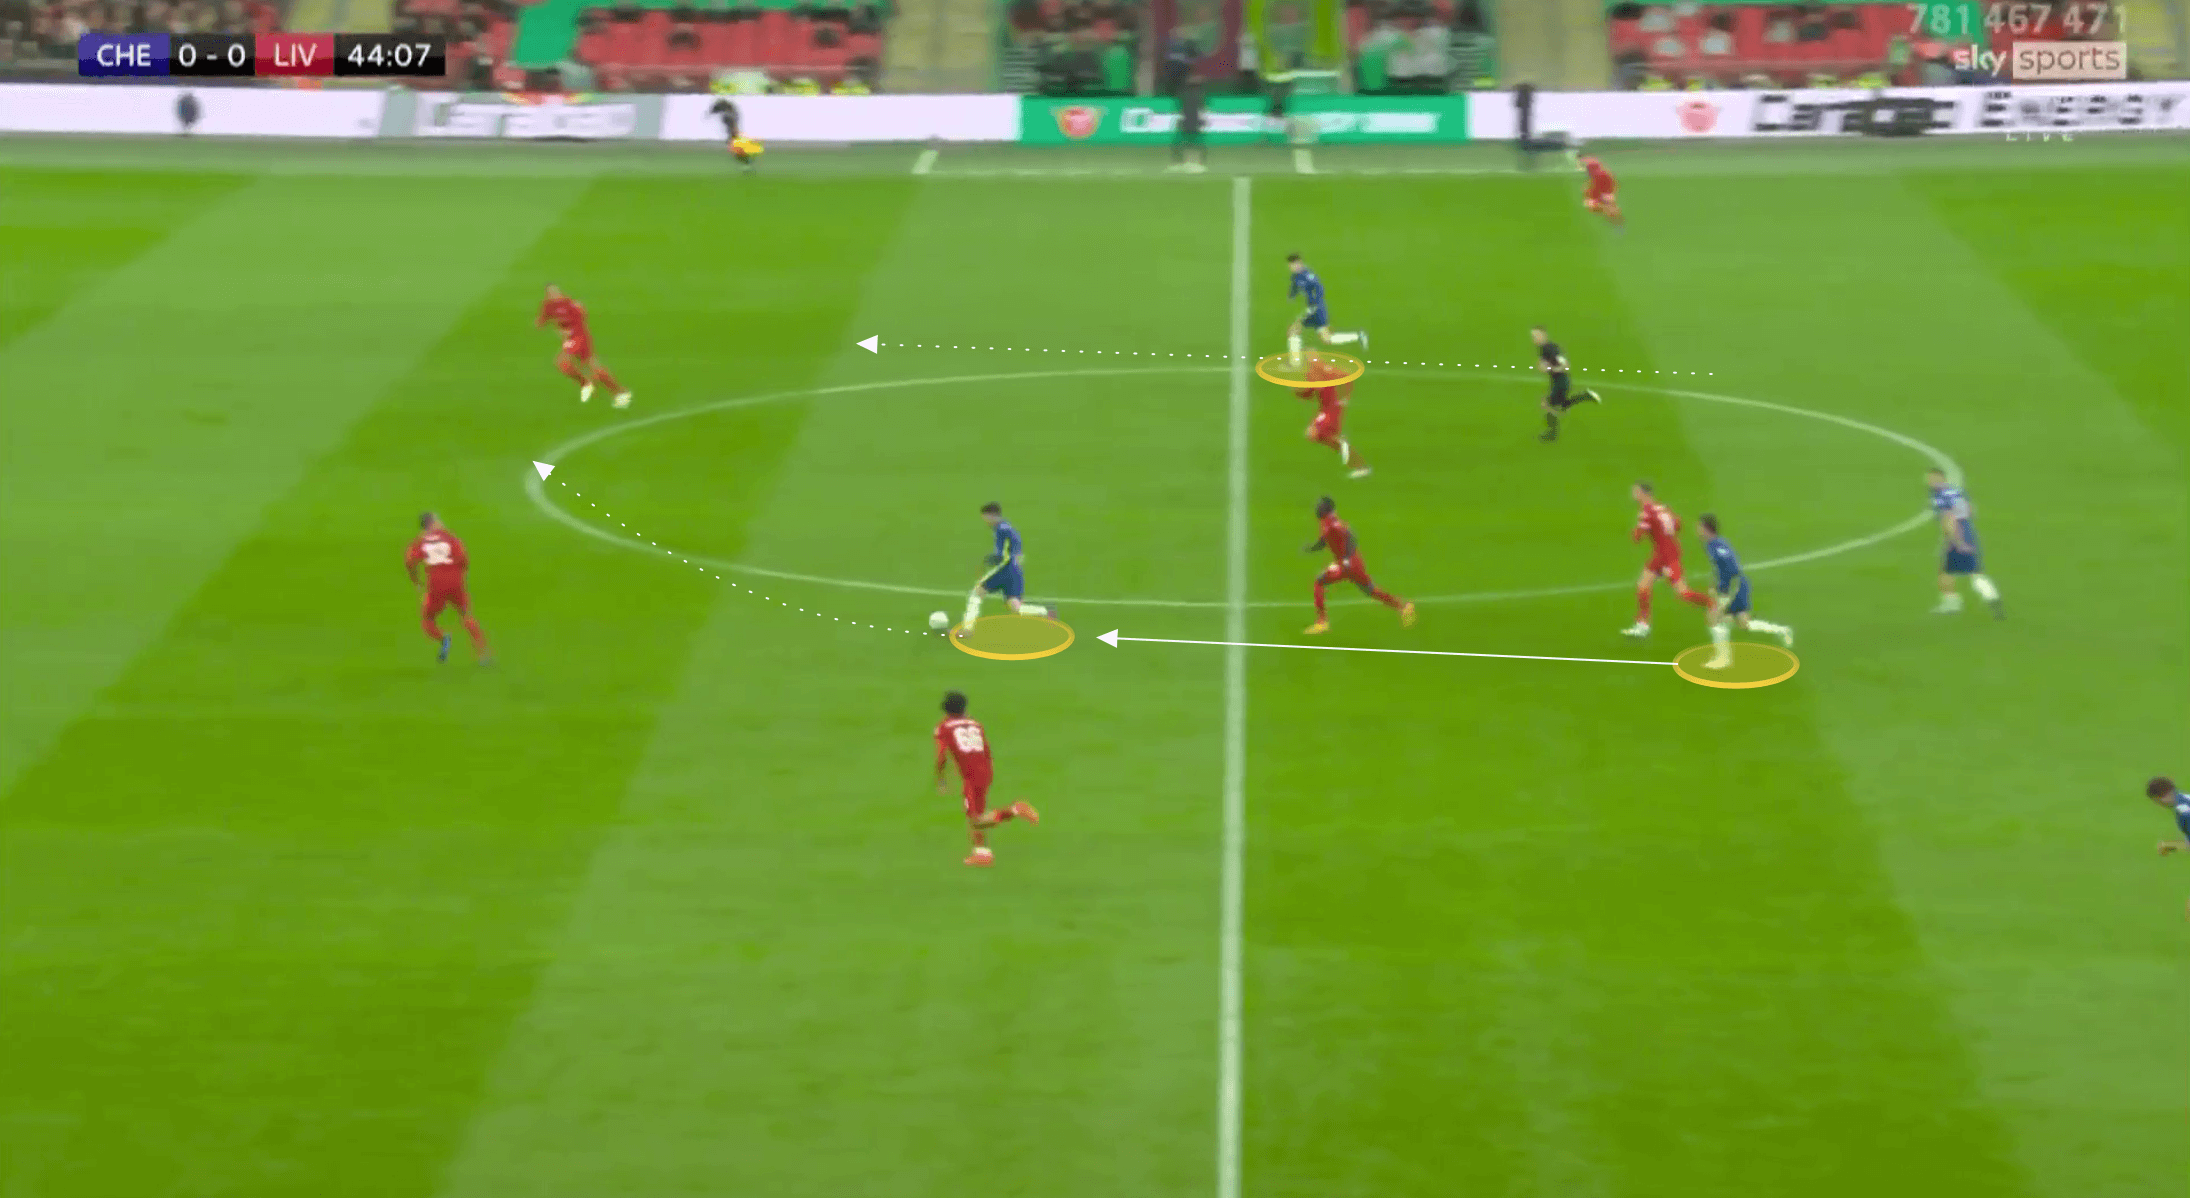
With Van Dijk being one of the best defenders in the world, it does seem initially strange that Thomas Tuchel would have his team target the Dutchman on attacking transition. However, it is likely he recognised that any attempt to isolate Matip in a 2v1 instead, Van Dijk would certainly have the pace to quickly turn this into a 2v2. Instead, Tuchel gambled that Matip, whilst an outstanding defender in his own right, would be less mobile than Van Dijk, and therefore Chelsea could maintain the attacking overload for a longer period of time.
Chelsea worked this chance to play in Mount who made the direct run through the middle. However, it wasn’t the young Englishman’s finest day in front of goal, and he was unable to convert this golden opportunity.
Attacking Chalobah
Liverpool had several of their own goal scoring chances throughout the game, with them looking to focus a bulk of their attacking efforts seemingly on Chalobah. The Chelsea academy product, surprisingly given his first-team chance by Tuchel, has been excellent for the blues this season. However, given his lack of football this calendar year due to injury, it made sense for Liverpool to target him.
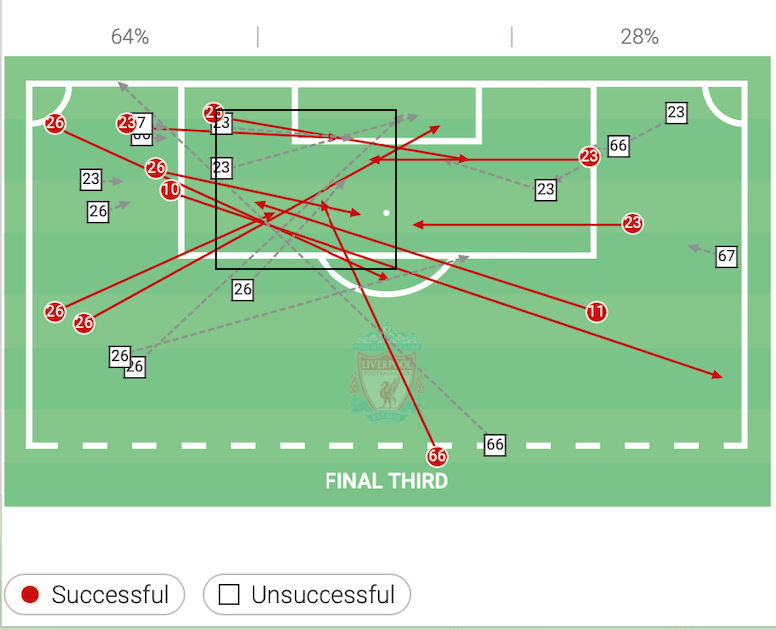
We can see this from their cross-map, shown in the image below. Firstly, the vast number of crosses came from the left wing, with Chalobah supporting Azpilicueta on that right-side.
However, as indicated in the shot map as well, a significant number of their crosses, six of their 11 completed crosses, landing in the highlighted area.
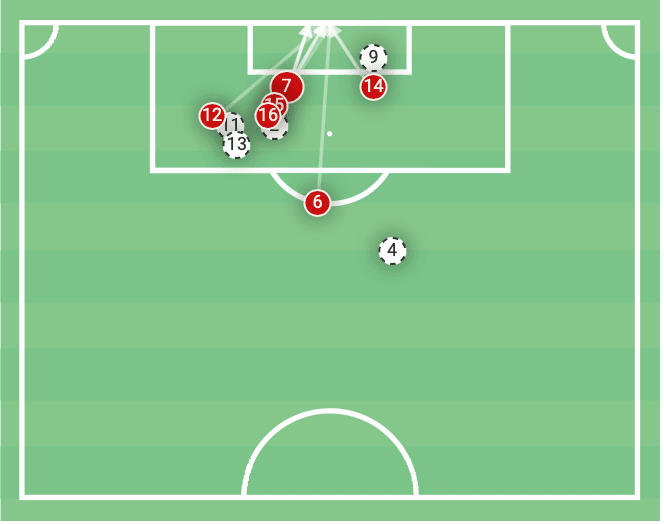
Equally, the vast bulk of Liverpool’s shots also came from this location, albeit, as we know, they were unsuccessful in converting these chances.
It was Mané who looked to place himself against Chalobah where possible, and the Senegalese forward had success in doing so.
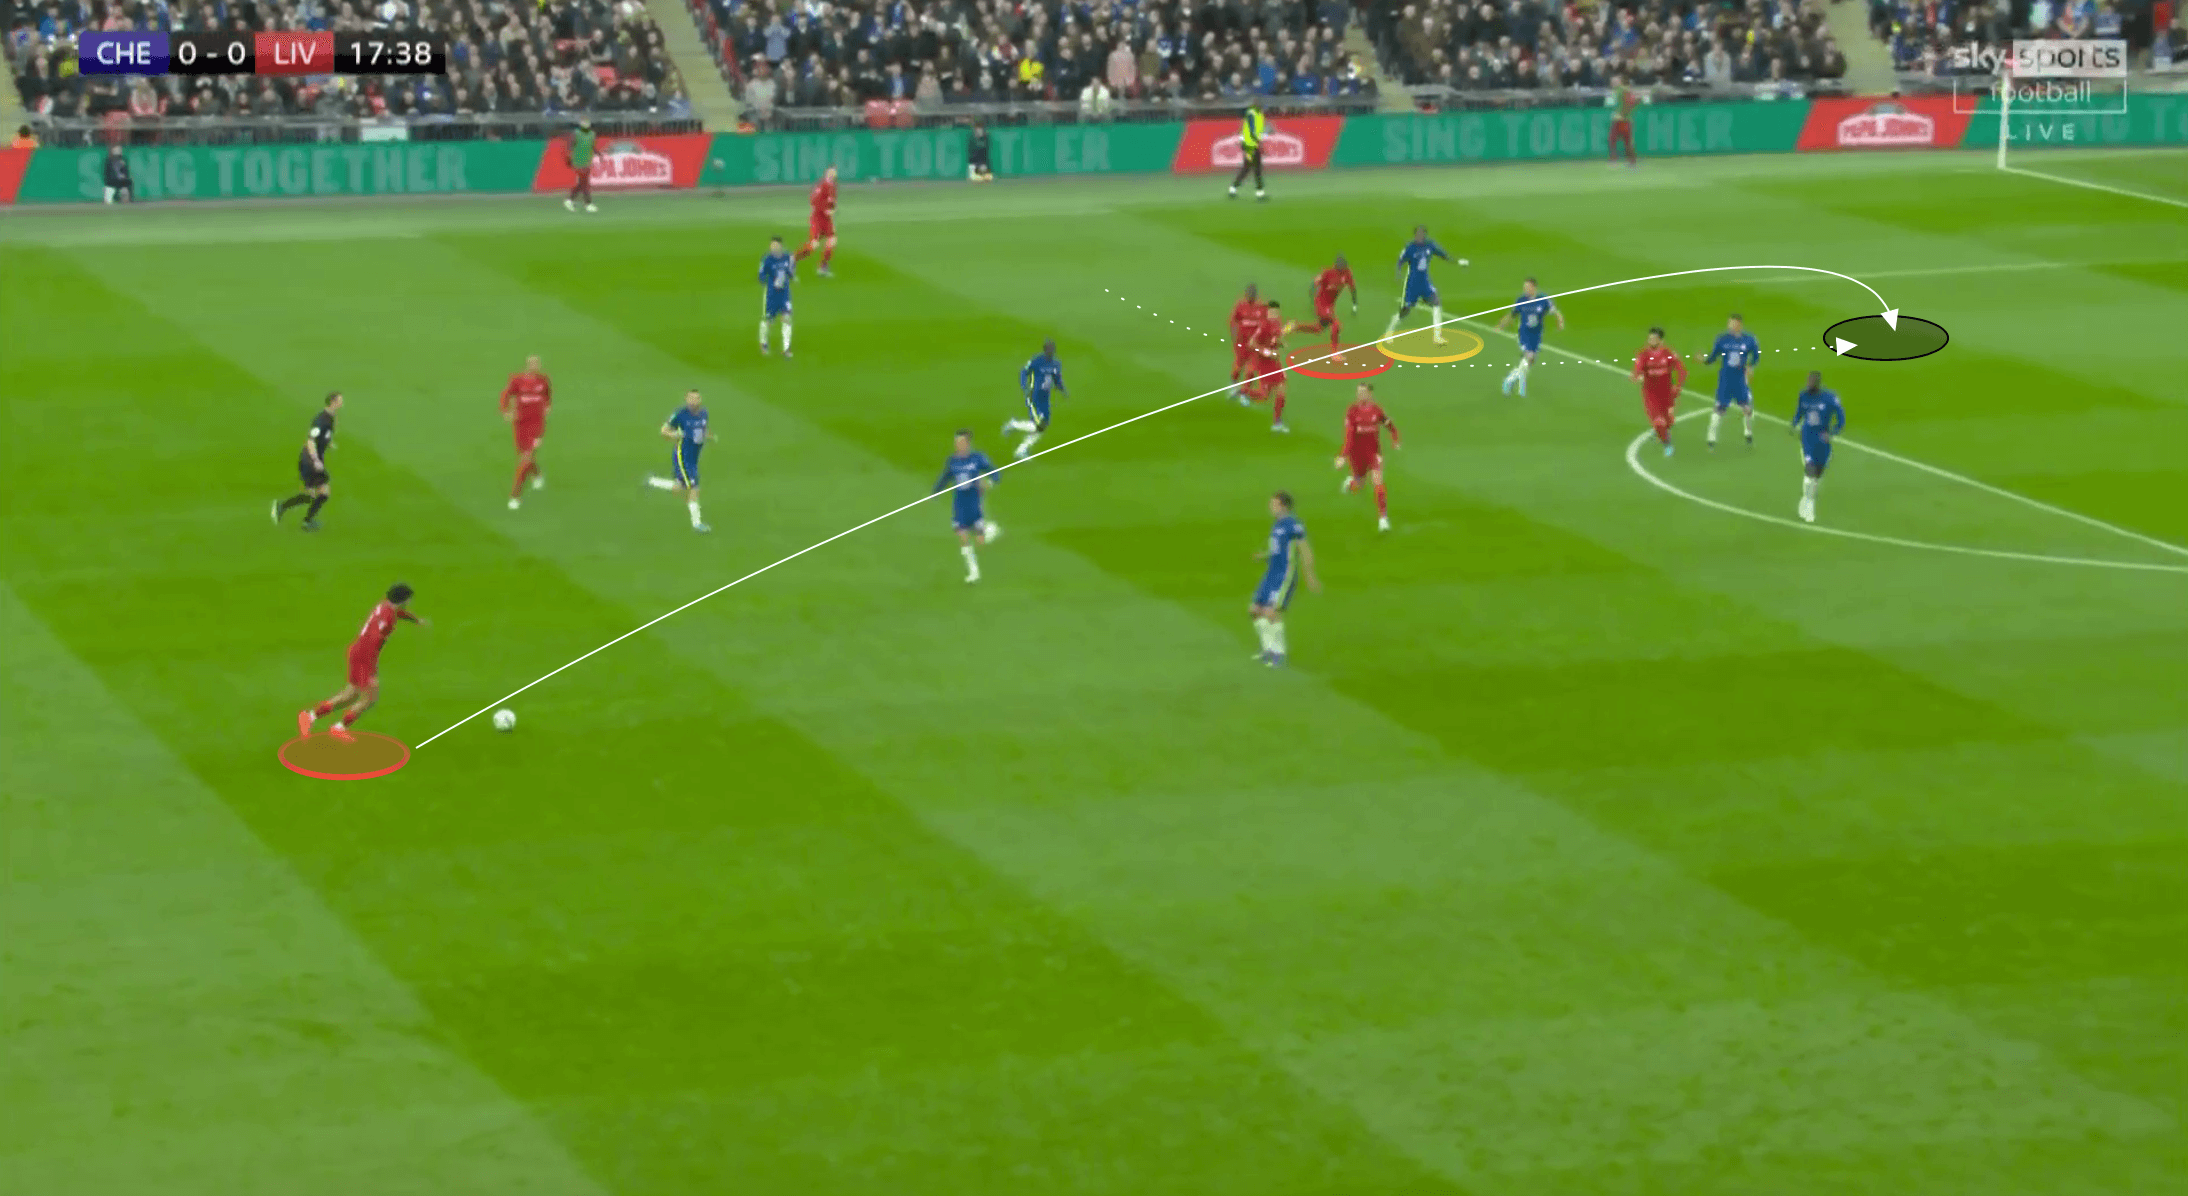
Alexander-Arnold struck an outstanding cross in the 18th minute, perfectly targeting the space behind Chelsea’s back line. Mané, starting from a deeper position, timed his run perfectly, with Chalobah, highlighted in this image, caught flat-footed. Mané was able to get in behind and onto the end of the cross, however, in this instance he couldn’t convert – heading wide.

The image below shows another example of Liverpool pairing Mané up against Chalobah.
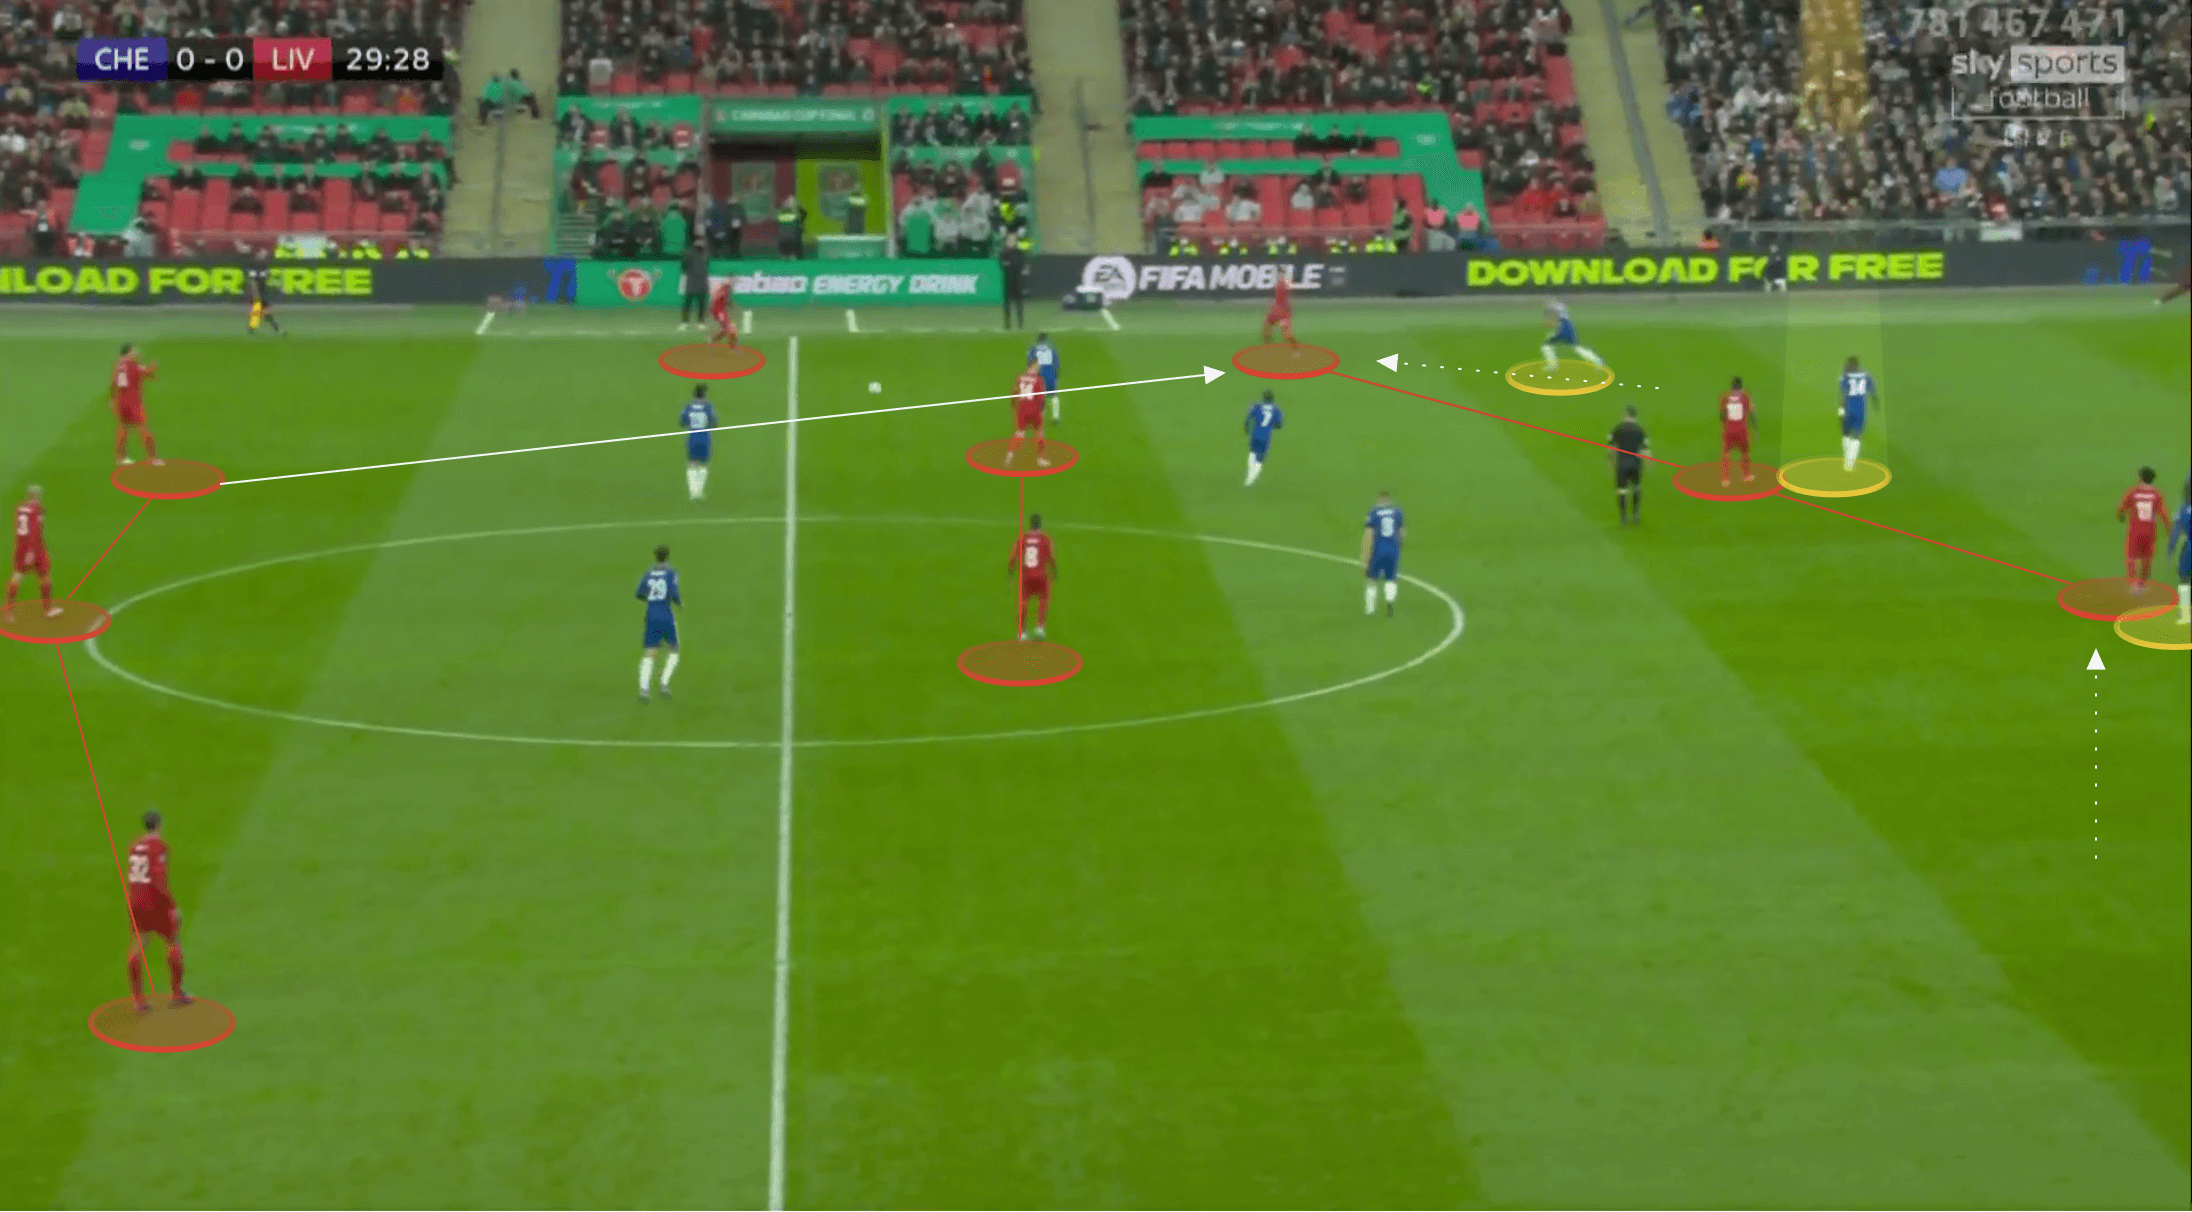
Fabinho dropped into the backline at times, providing Liverpool security against Chelsea’s front line and giving them a back three, with close support from one of the full-back’s and Henderson and Keita in front of them as a double-pivot.
However, aggressive passes played forward out of the backline could isolate Mané against Chalobah. Such a pass is shown in the following image, with Luis Diaz dropping out wide to receiver the line-breaking pass from Matip. In doing so he could drag Azpilicueta away from Chalobah, and with Salah dropping inside and Alexander-Arnold pushing forward (off picture) it meant it would have been a highly risky manoeuvre to pair a second centre-back against Mané in support of Chalobah.
Even when Mané was replaced by Diogo Jota Liverpool still found ways to isolate Chalobah, gaining most success on attacking transition.
Below we can see a quick break occurring with Chelsea wing-back Reece James still tracking back. With Salah on the ball, Jota drops deep to receive, off of Chalobah. Given the presence of Diaz on his outside shoulder, Chalobah couldn’t push forward in this moment, instead holding his position.
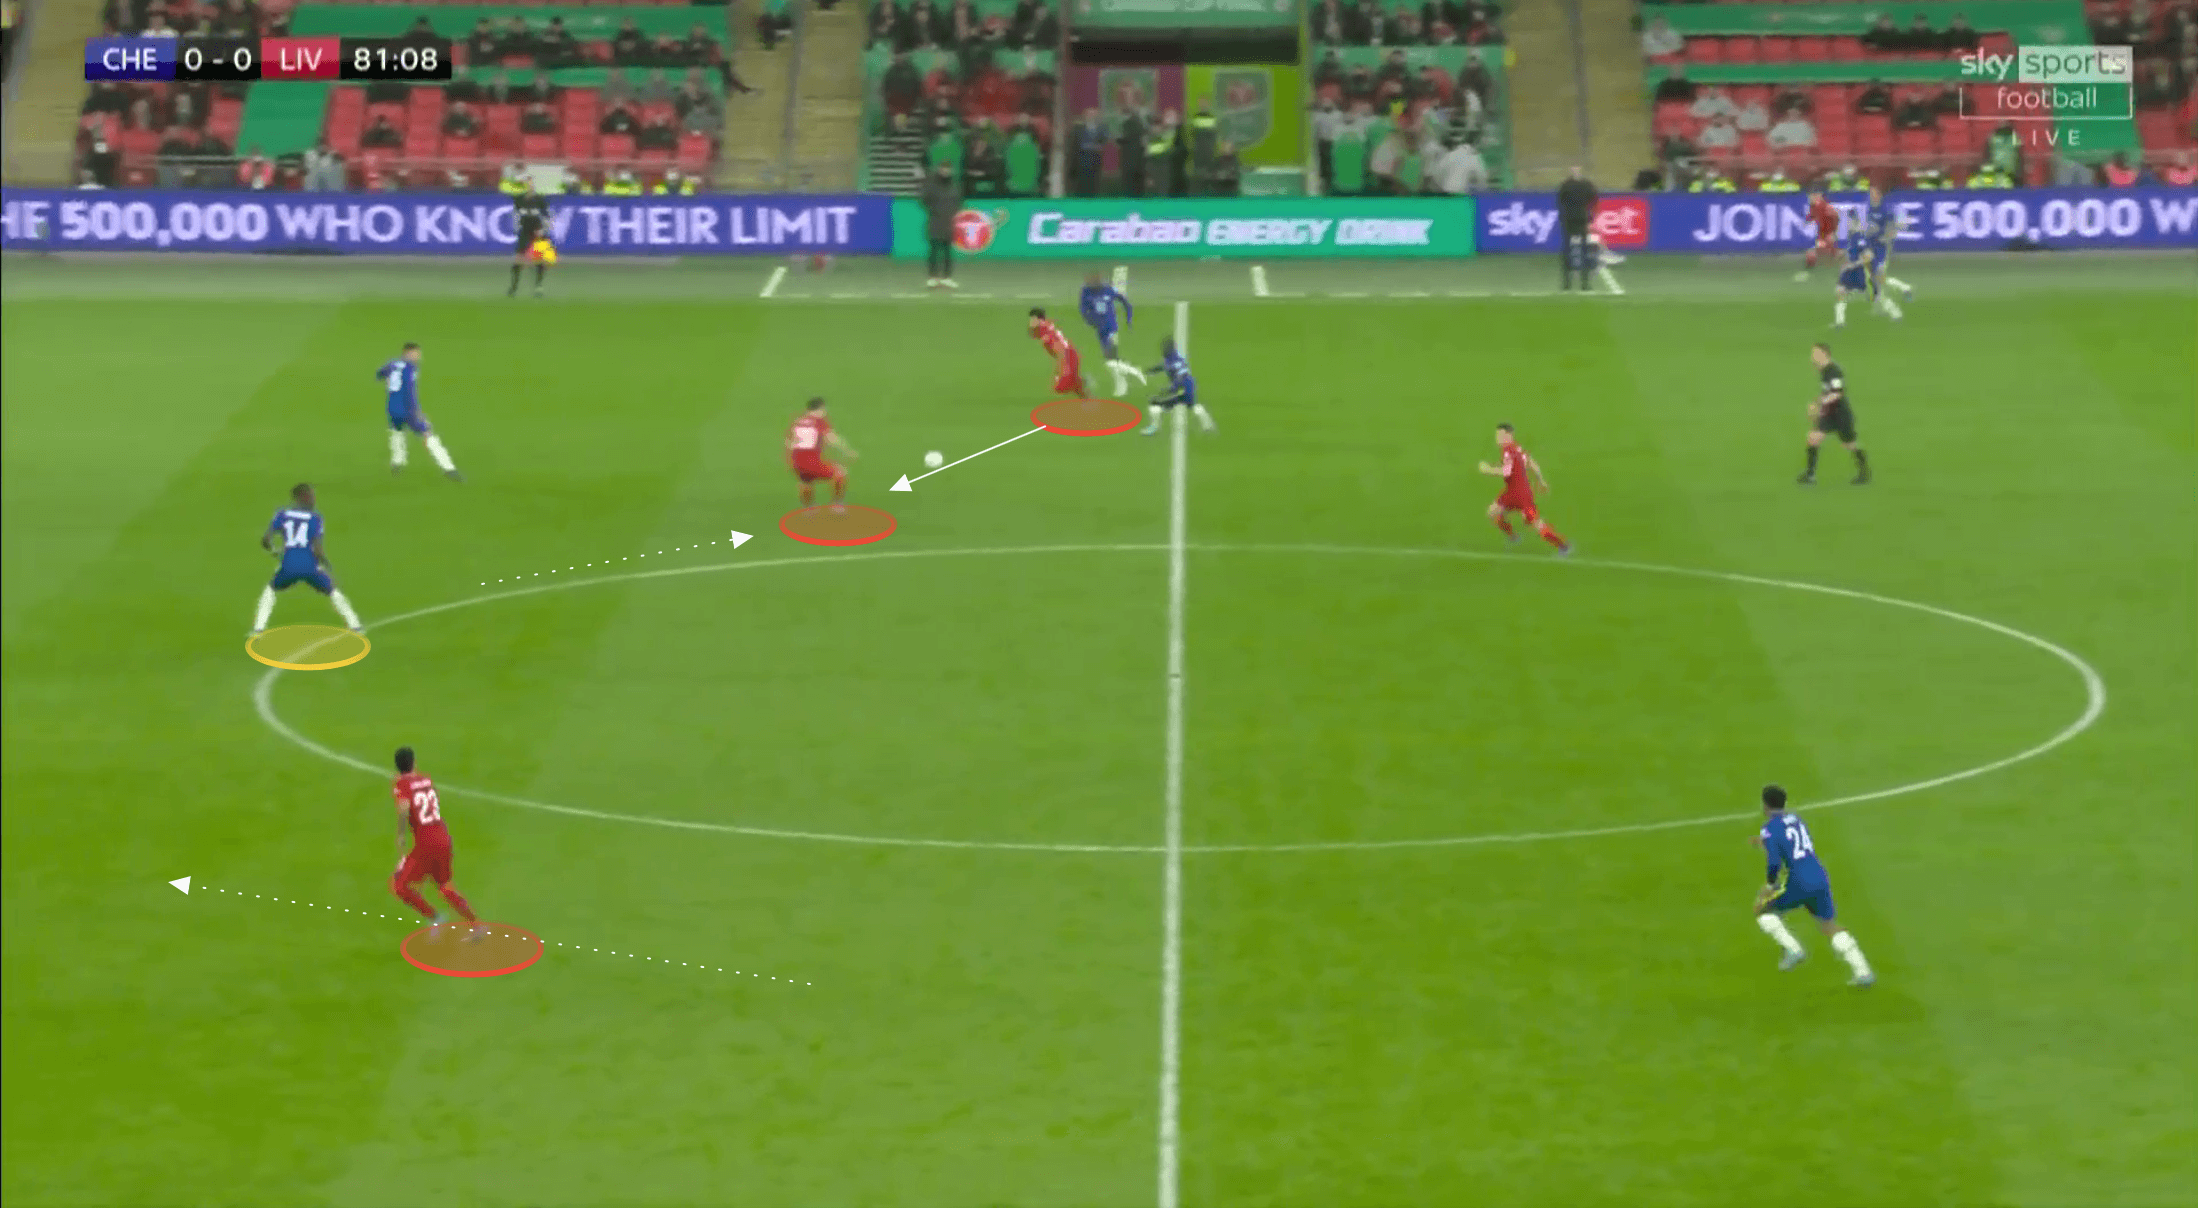
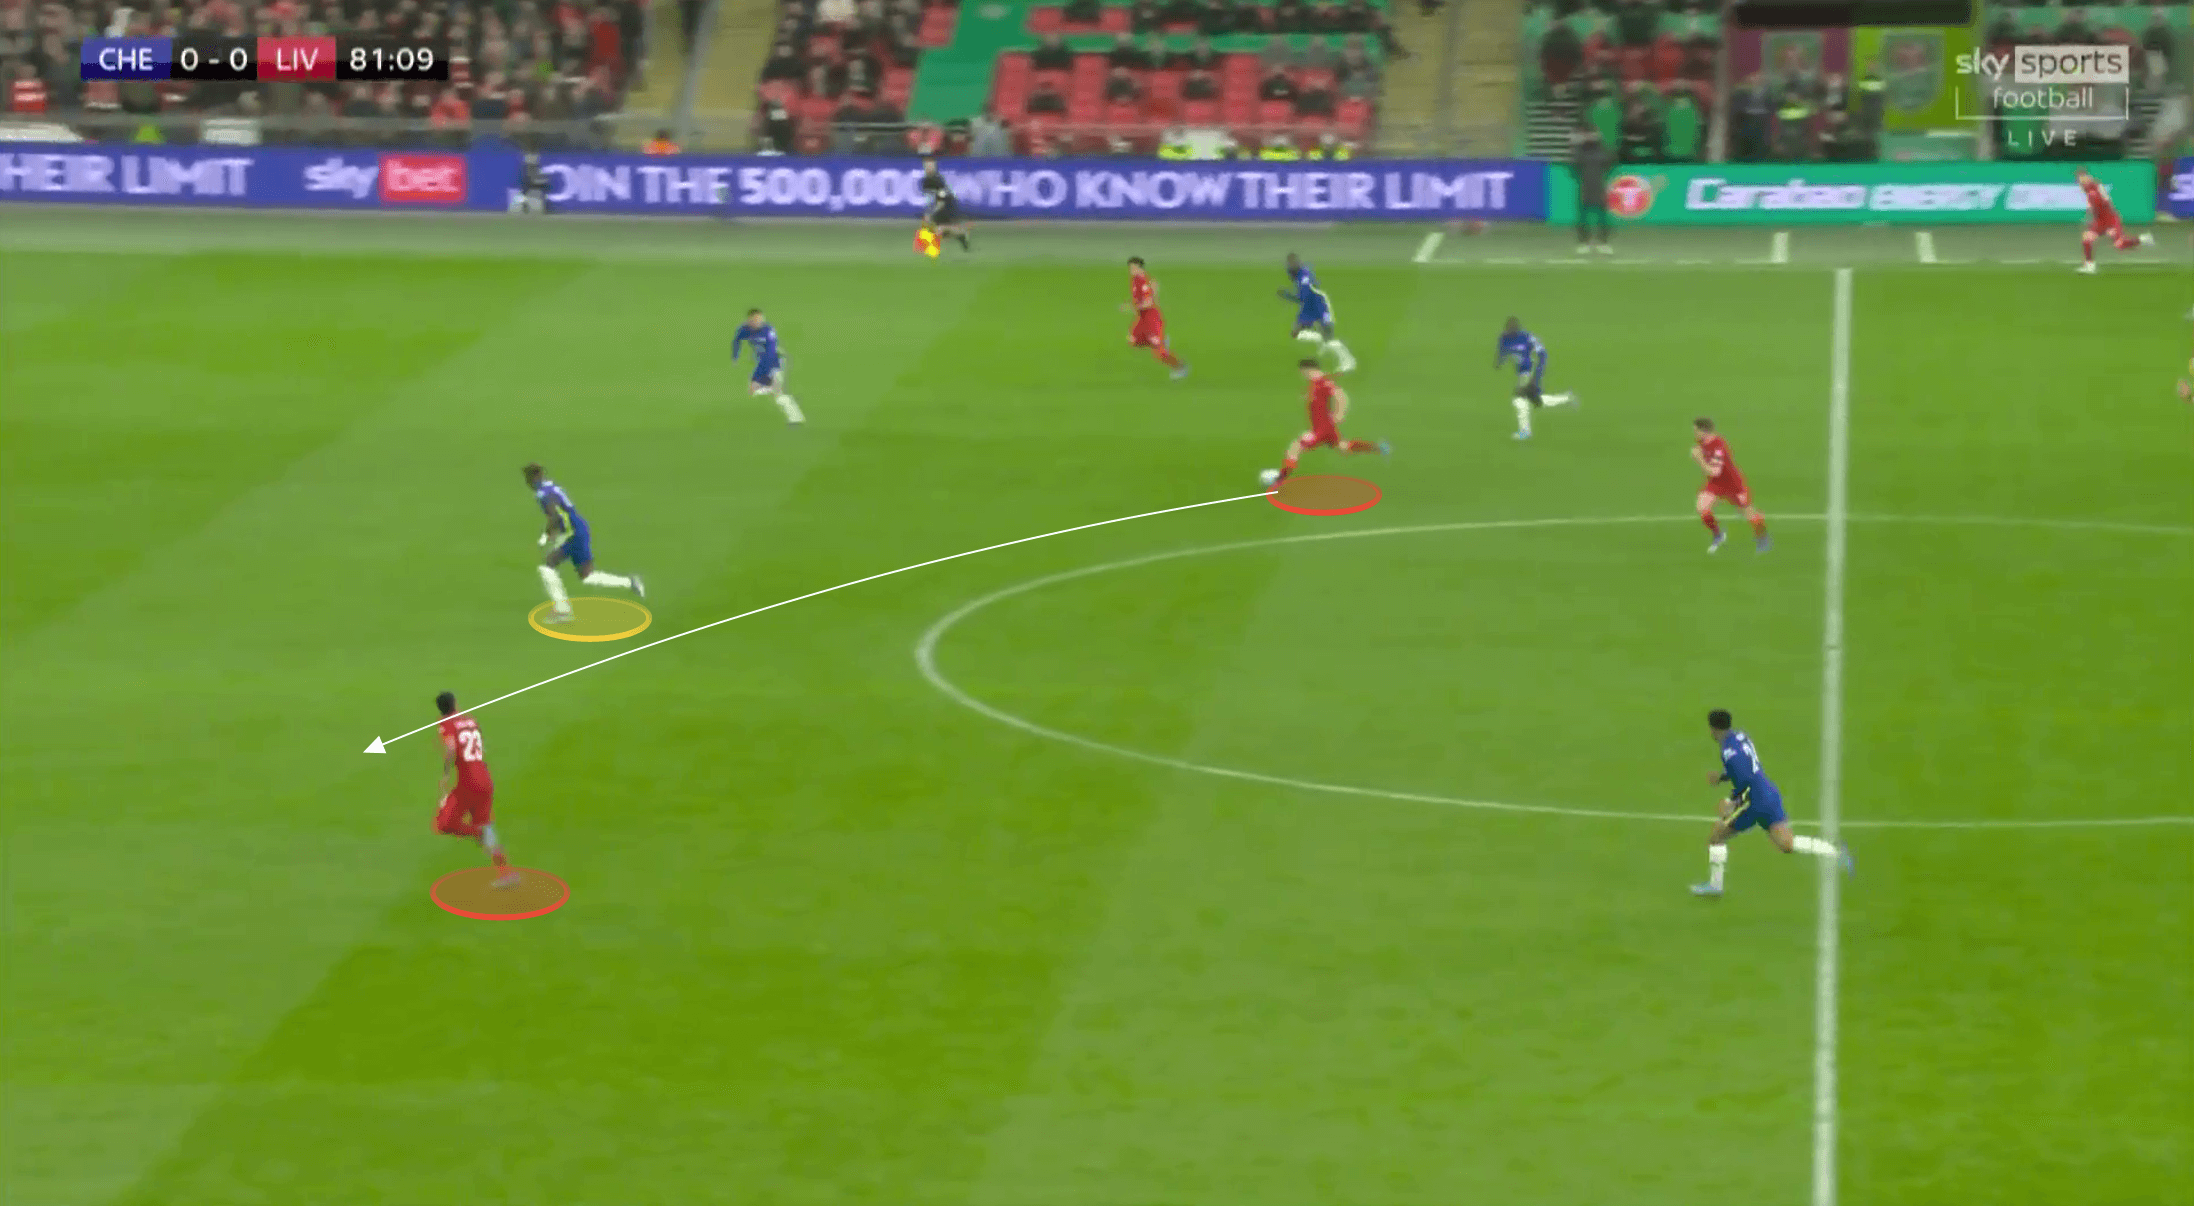
Jota is therefore able to turn and play in Diaz. However, despite a few moments where Chlaboah was found out, he held his own, particularly in the second half. In the following image, whilst Diaz did get played in behind, Chalobah did a terrific job of delaying the attack, holding up Diaz and preventing the winger from getting into a goal-scoring position.
Creating holes in Liverpool’s backline
Chelsea continued to look to draw Liverpool’s backline apart, but not just in quick breaks.
There was frequently a verticality to Chelsea’s play, although that’s a classic aspect of Tuchel’s possession tactics. After turning over the ball, if they didn’t break forward with a direct counter, they would still advance the ball relatively quickly, but not always with the immediate through pass or direct dribble.
Tuchel used his wing-backs to great effect. If Chelsea could find space in the Liverpool backline, then obviously this was the preferable option. But their wing-backs would provide a late supporting run to create an overload where needed.
We can see Pulisic finding space between Robertson and Van Dijk in the following image, and being found with the through pass.
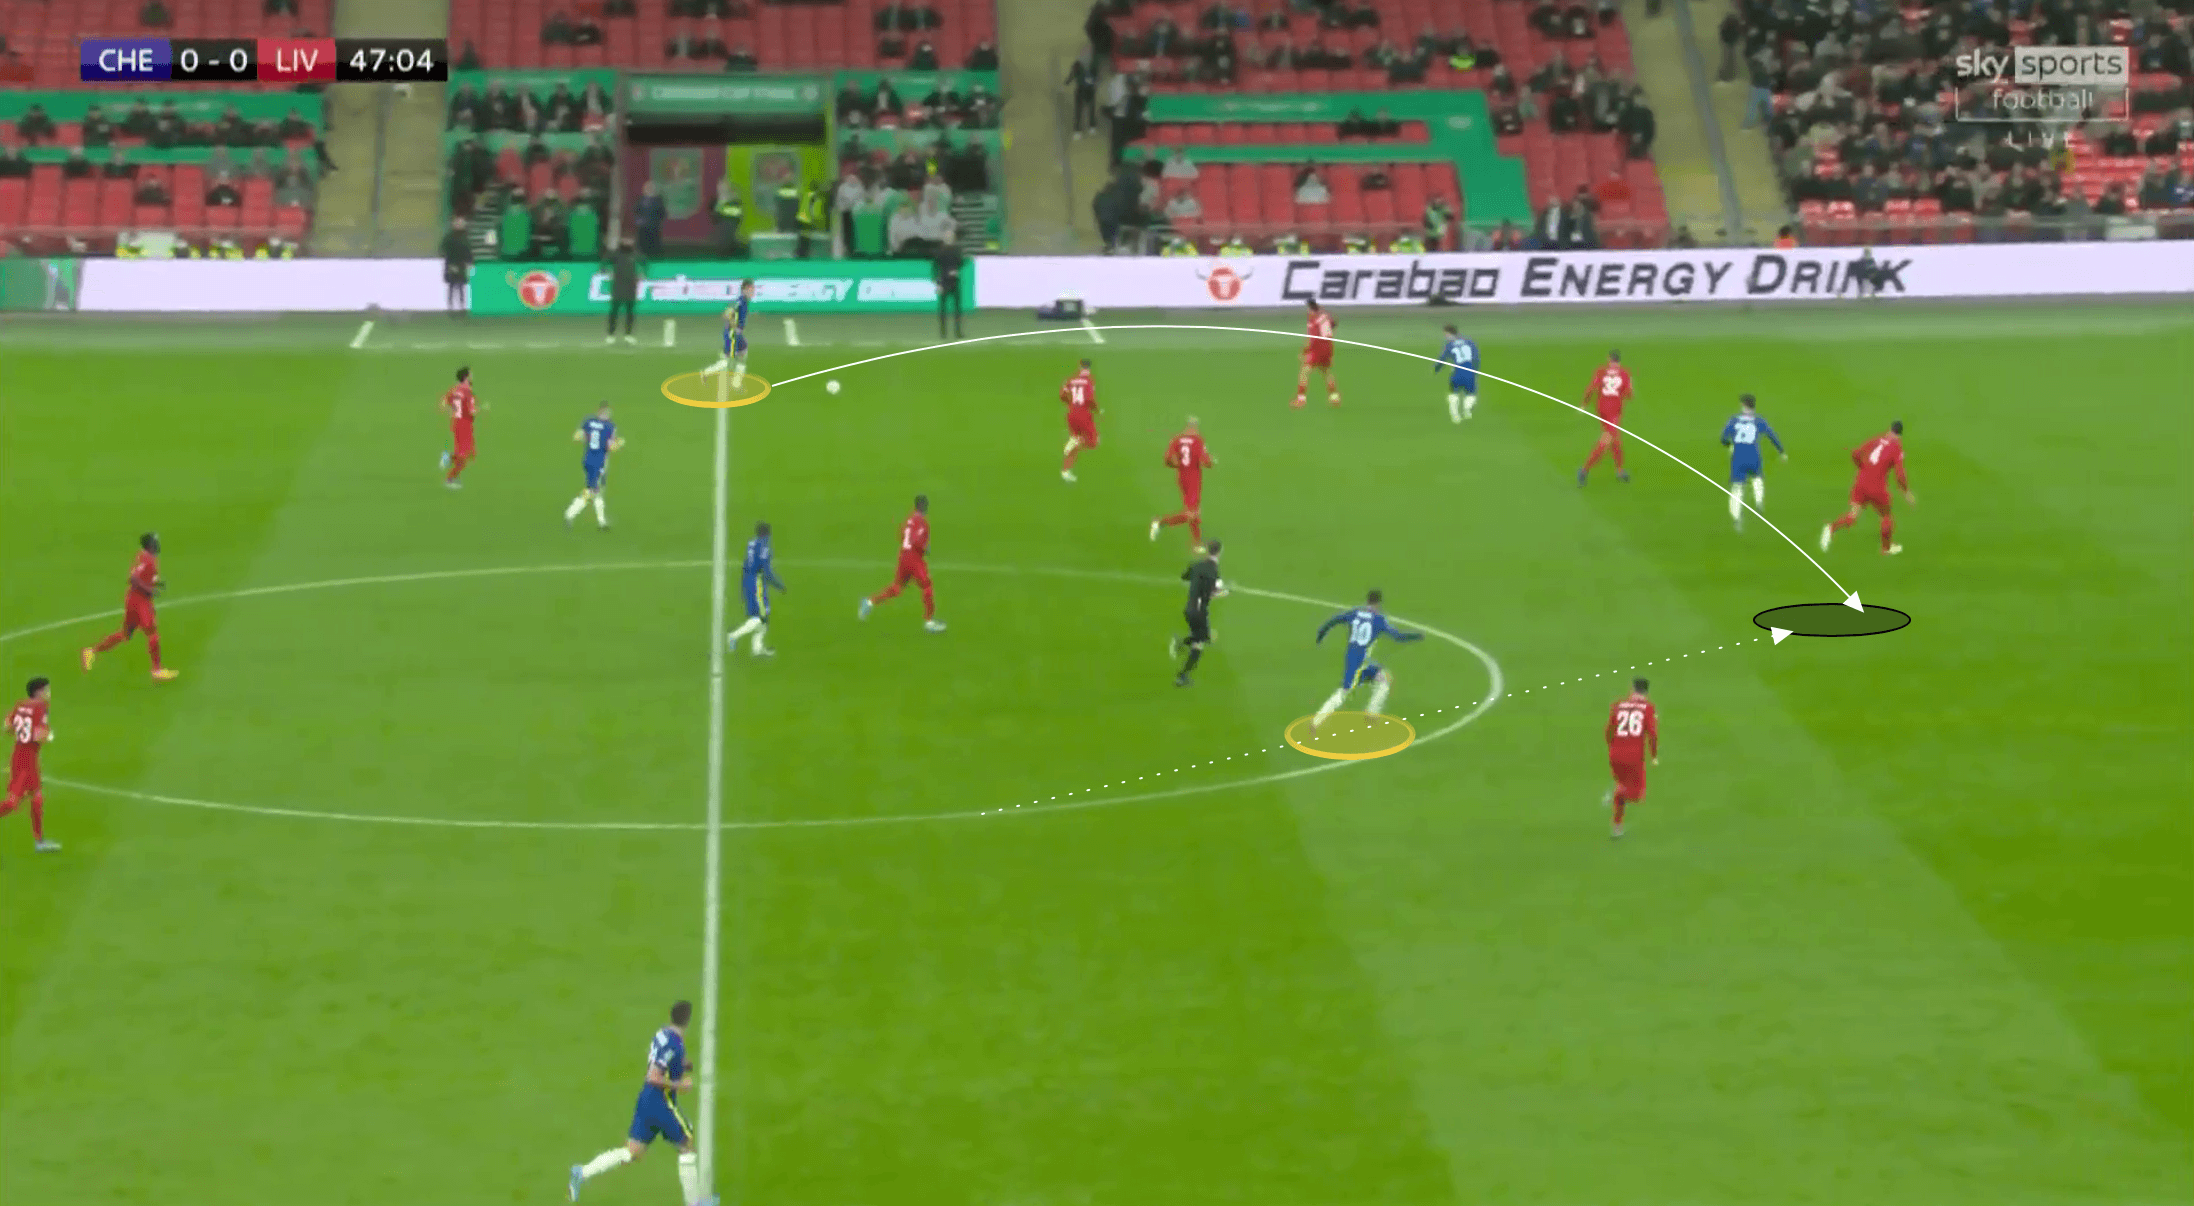
As soon as he receives, with Van Dijk and Robertson narrowing to defend against him, Havertz initially spins off creating width, but Azpilicueta also pushes forward on the outside, creating the 3v2.
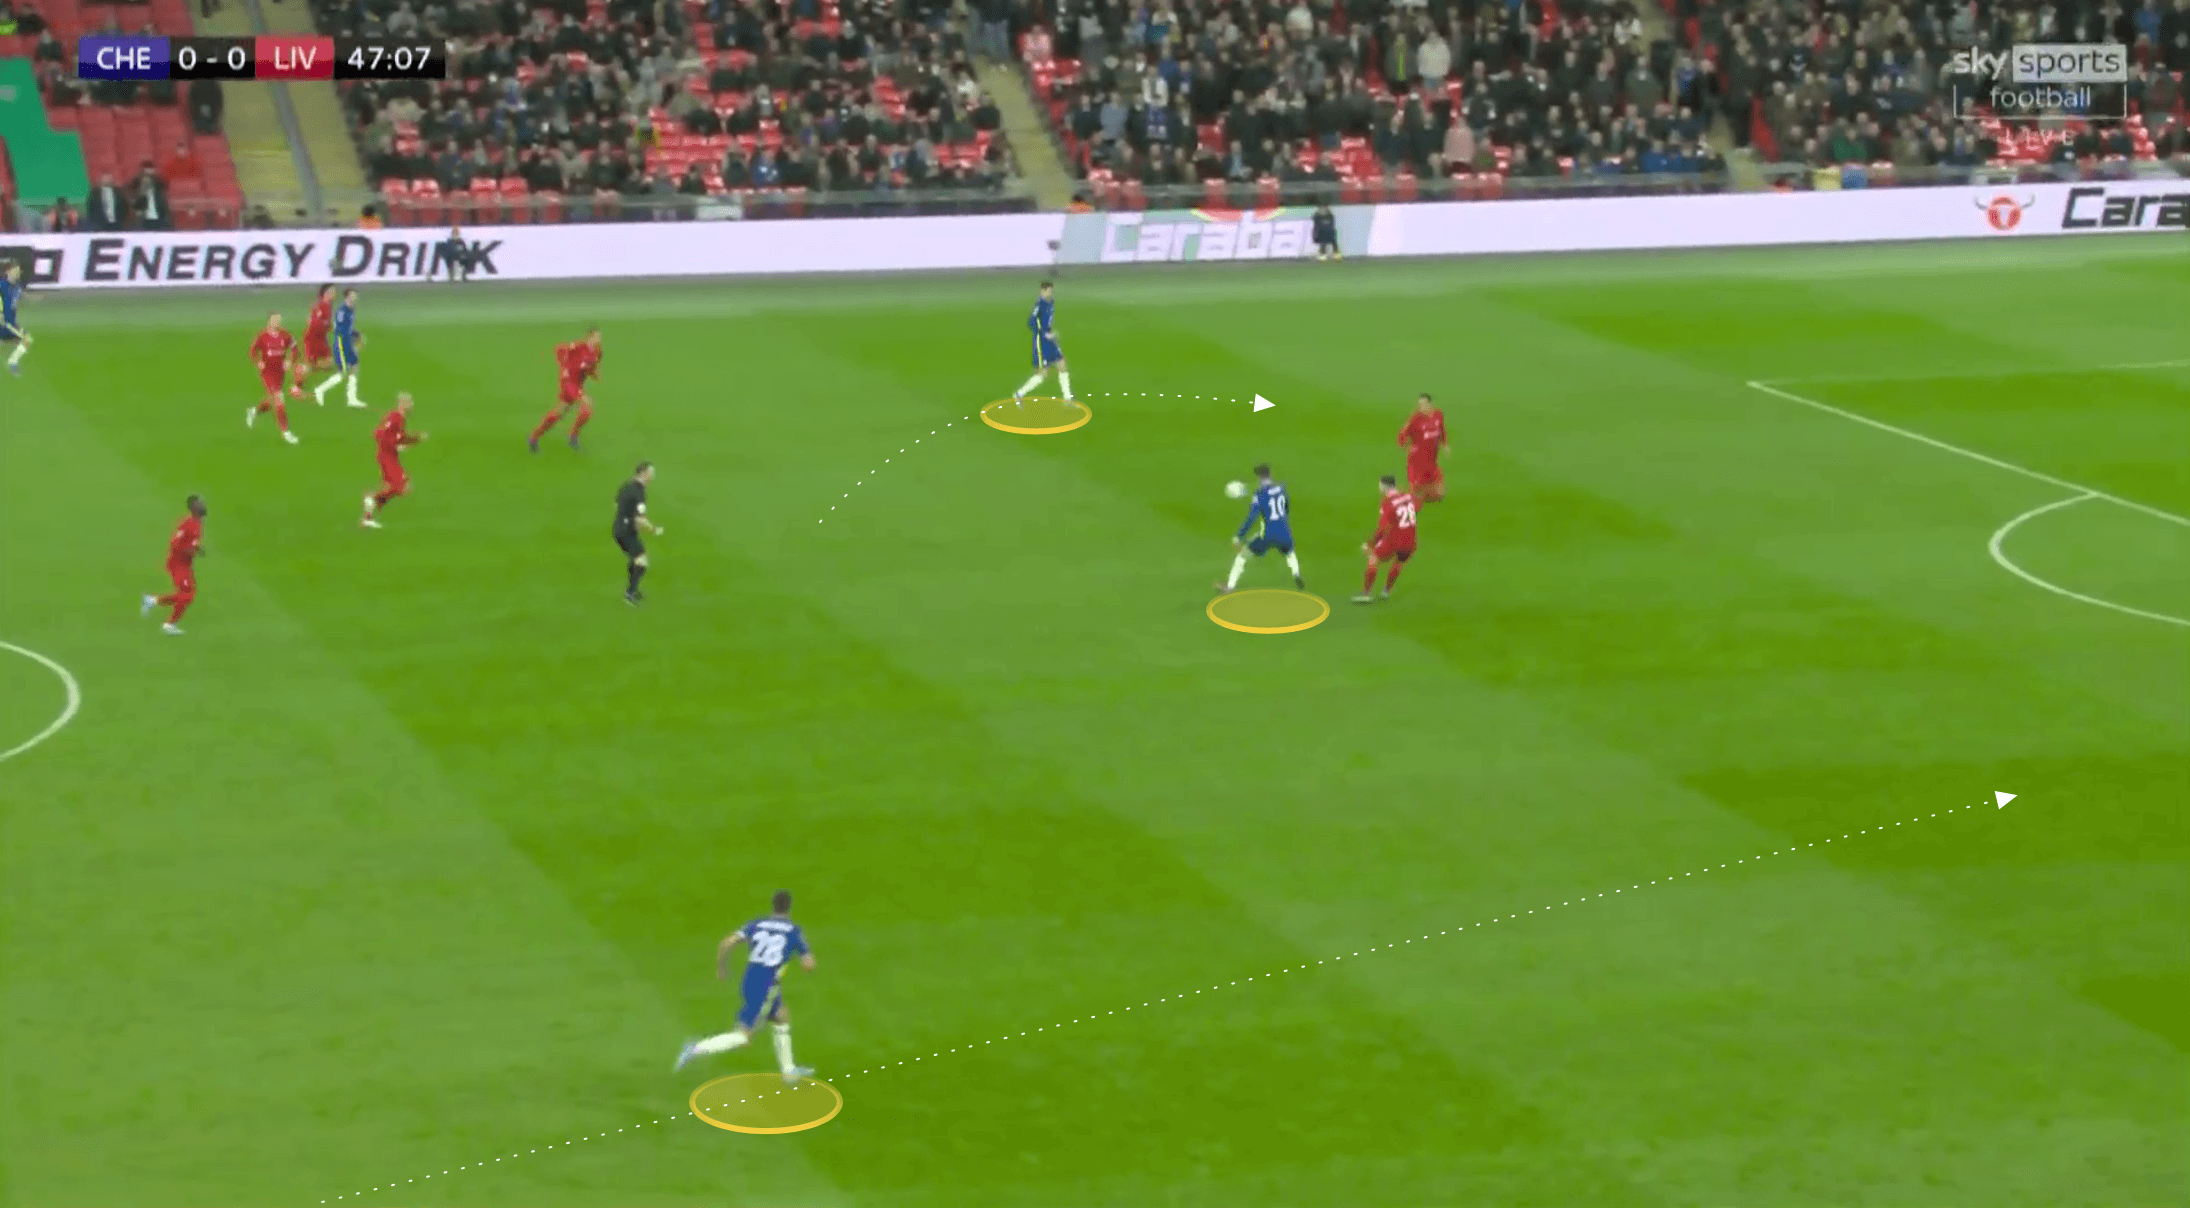
Chelsea couldn’t exploit this overload though, with Azpilicueta initially targeting the back post, but then moving into a deeper position as Havertz drilled the ball across goal, directly to where Azpilicueta had been previously positioned.
We can see a similar example in the following image with Azpilicueta providing the overlap.
As Havertz dribbled inside, Pulisic made a curved run drawing Van Dijk away from his left-back Robertson.
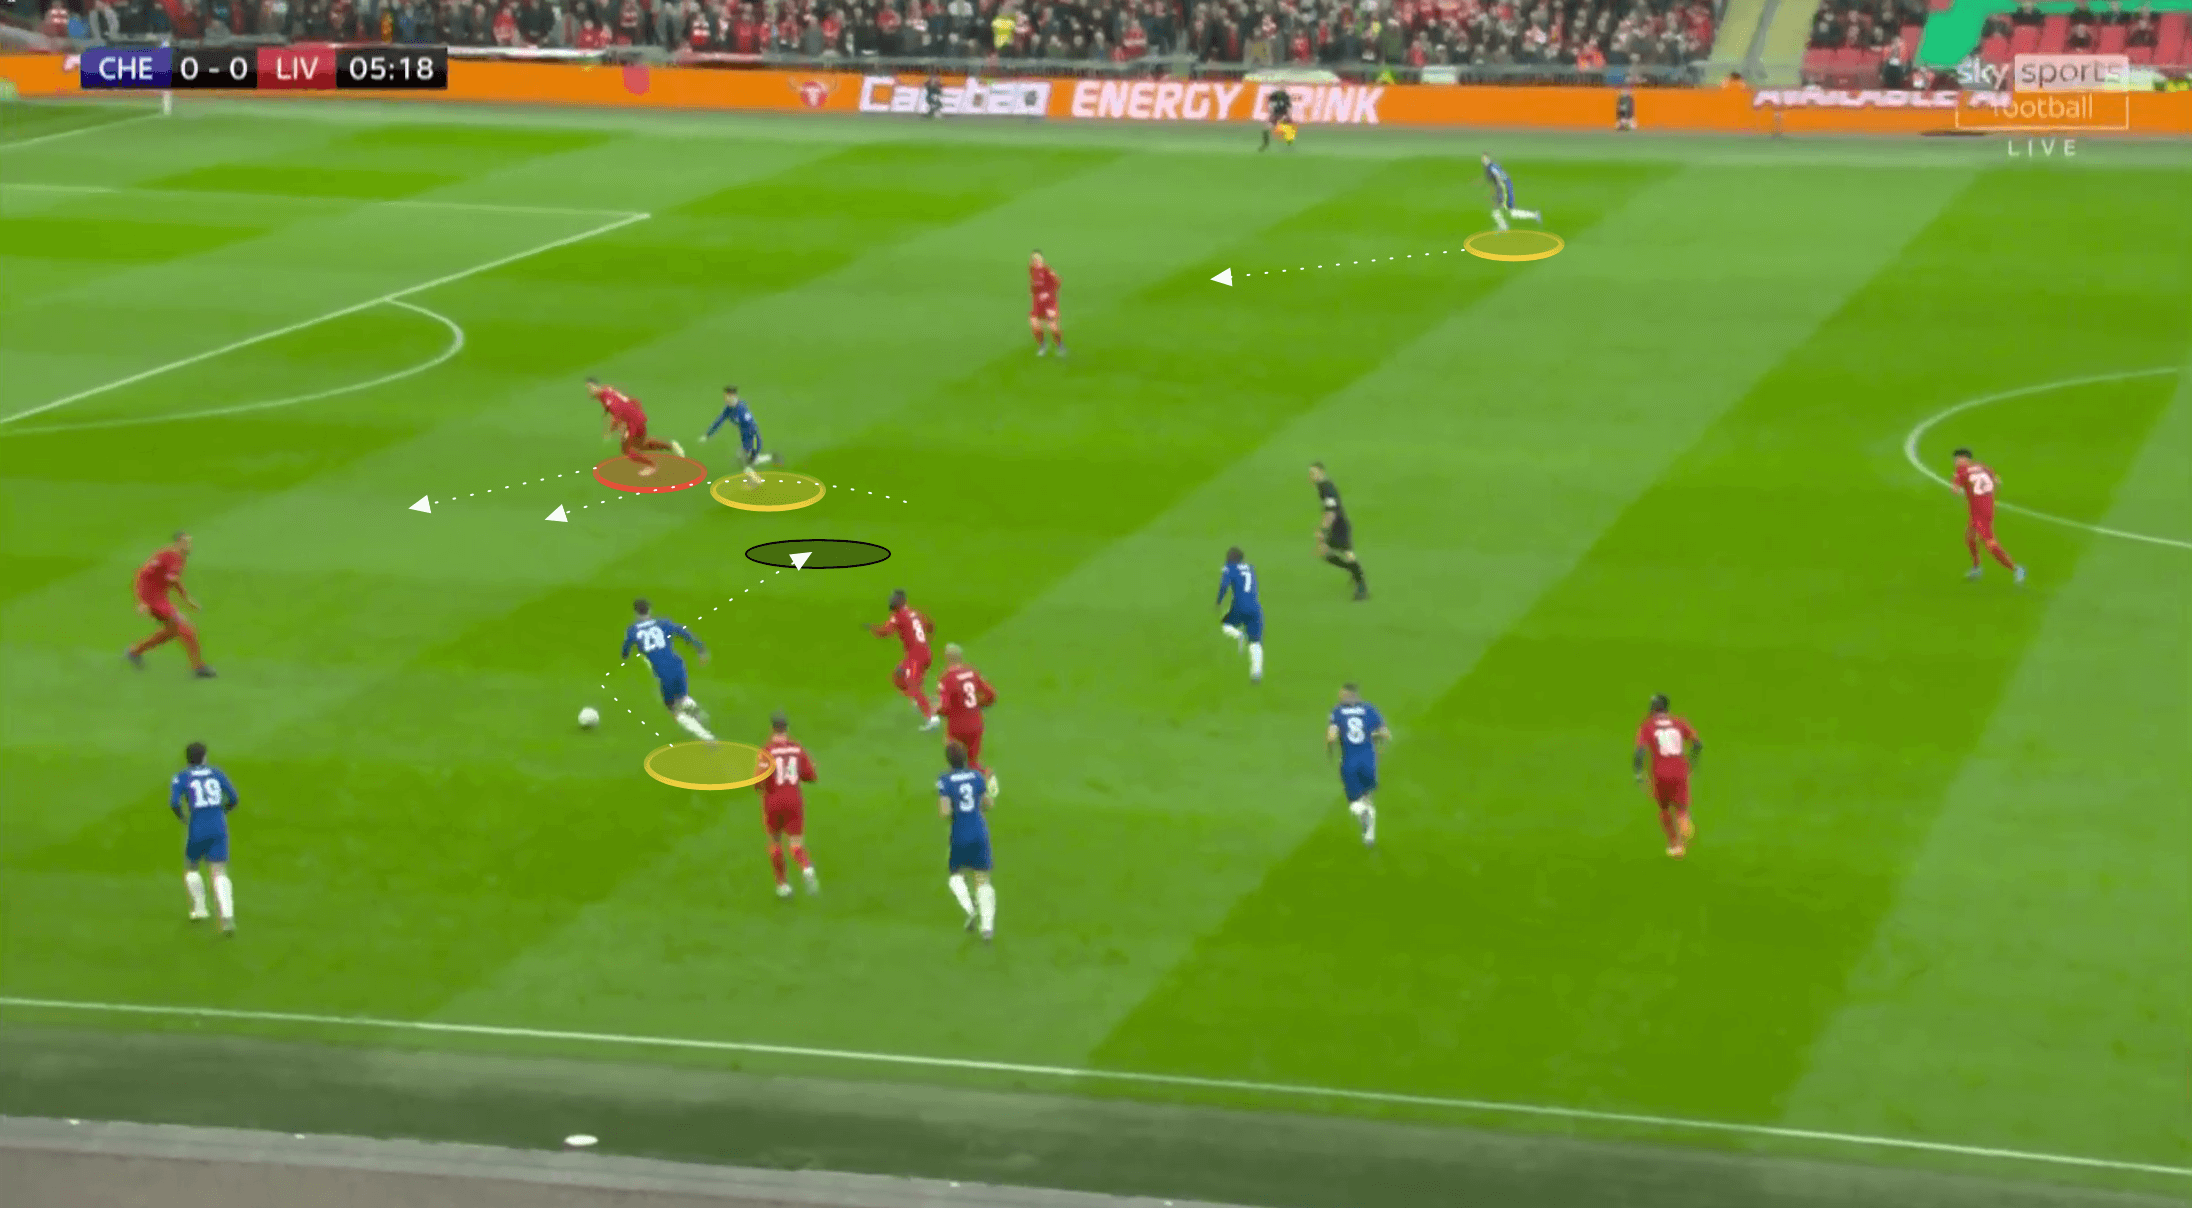
Havertz had the opportunity to hit the highlighted space behind the left-back, but in this instance Azpilicueta couldn’t quite time his run and Havertz avoided the through pass in behind.
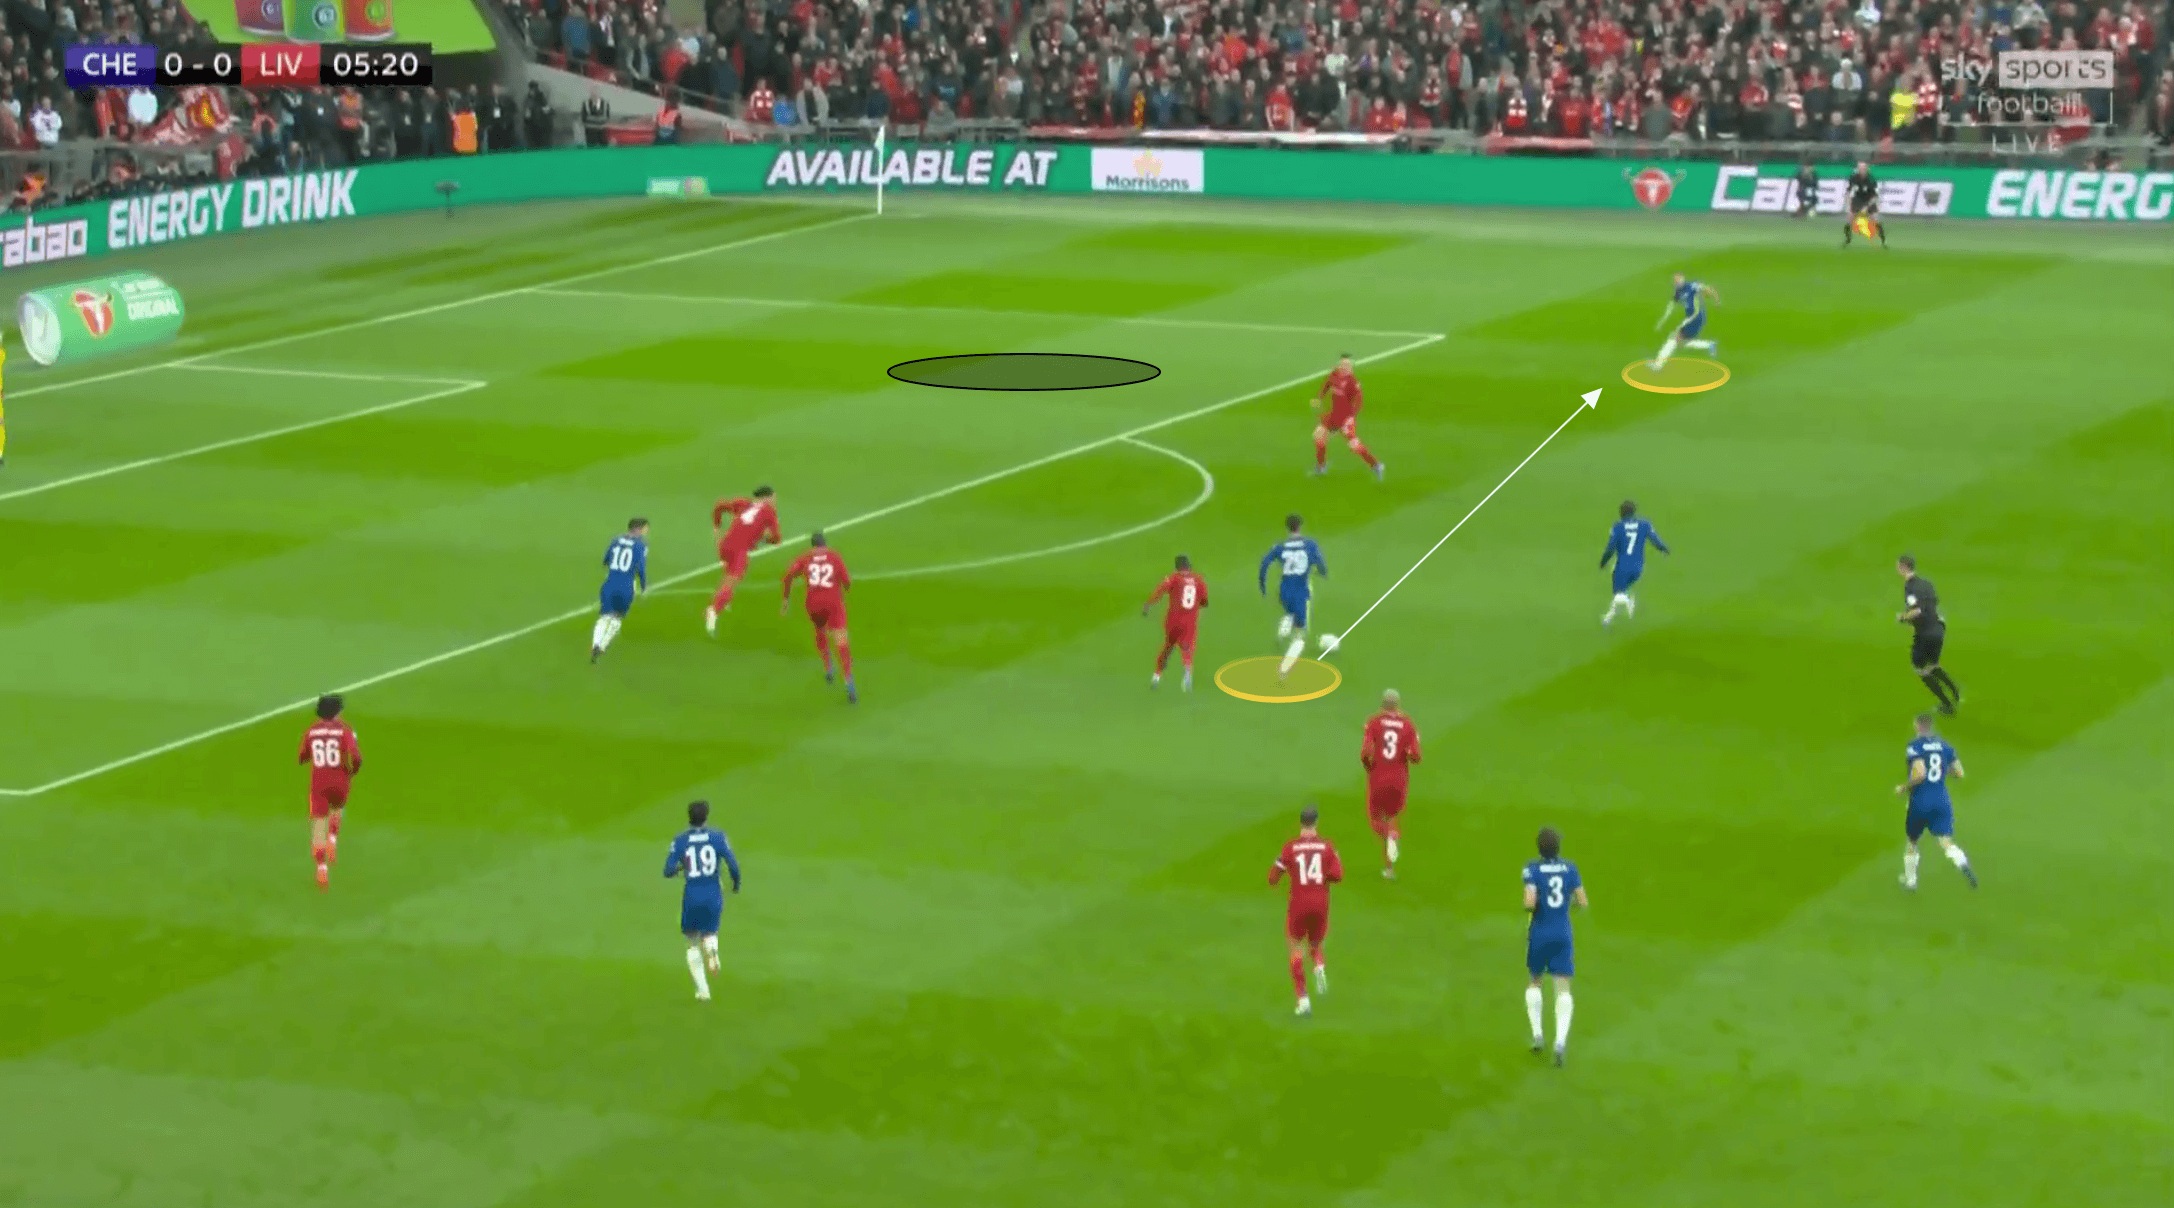
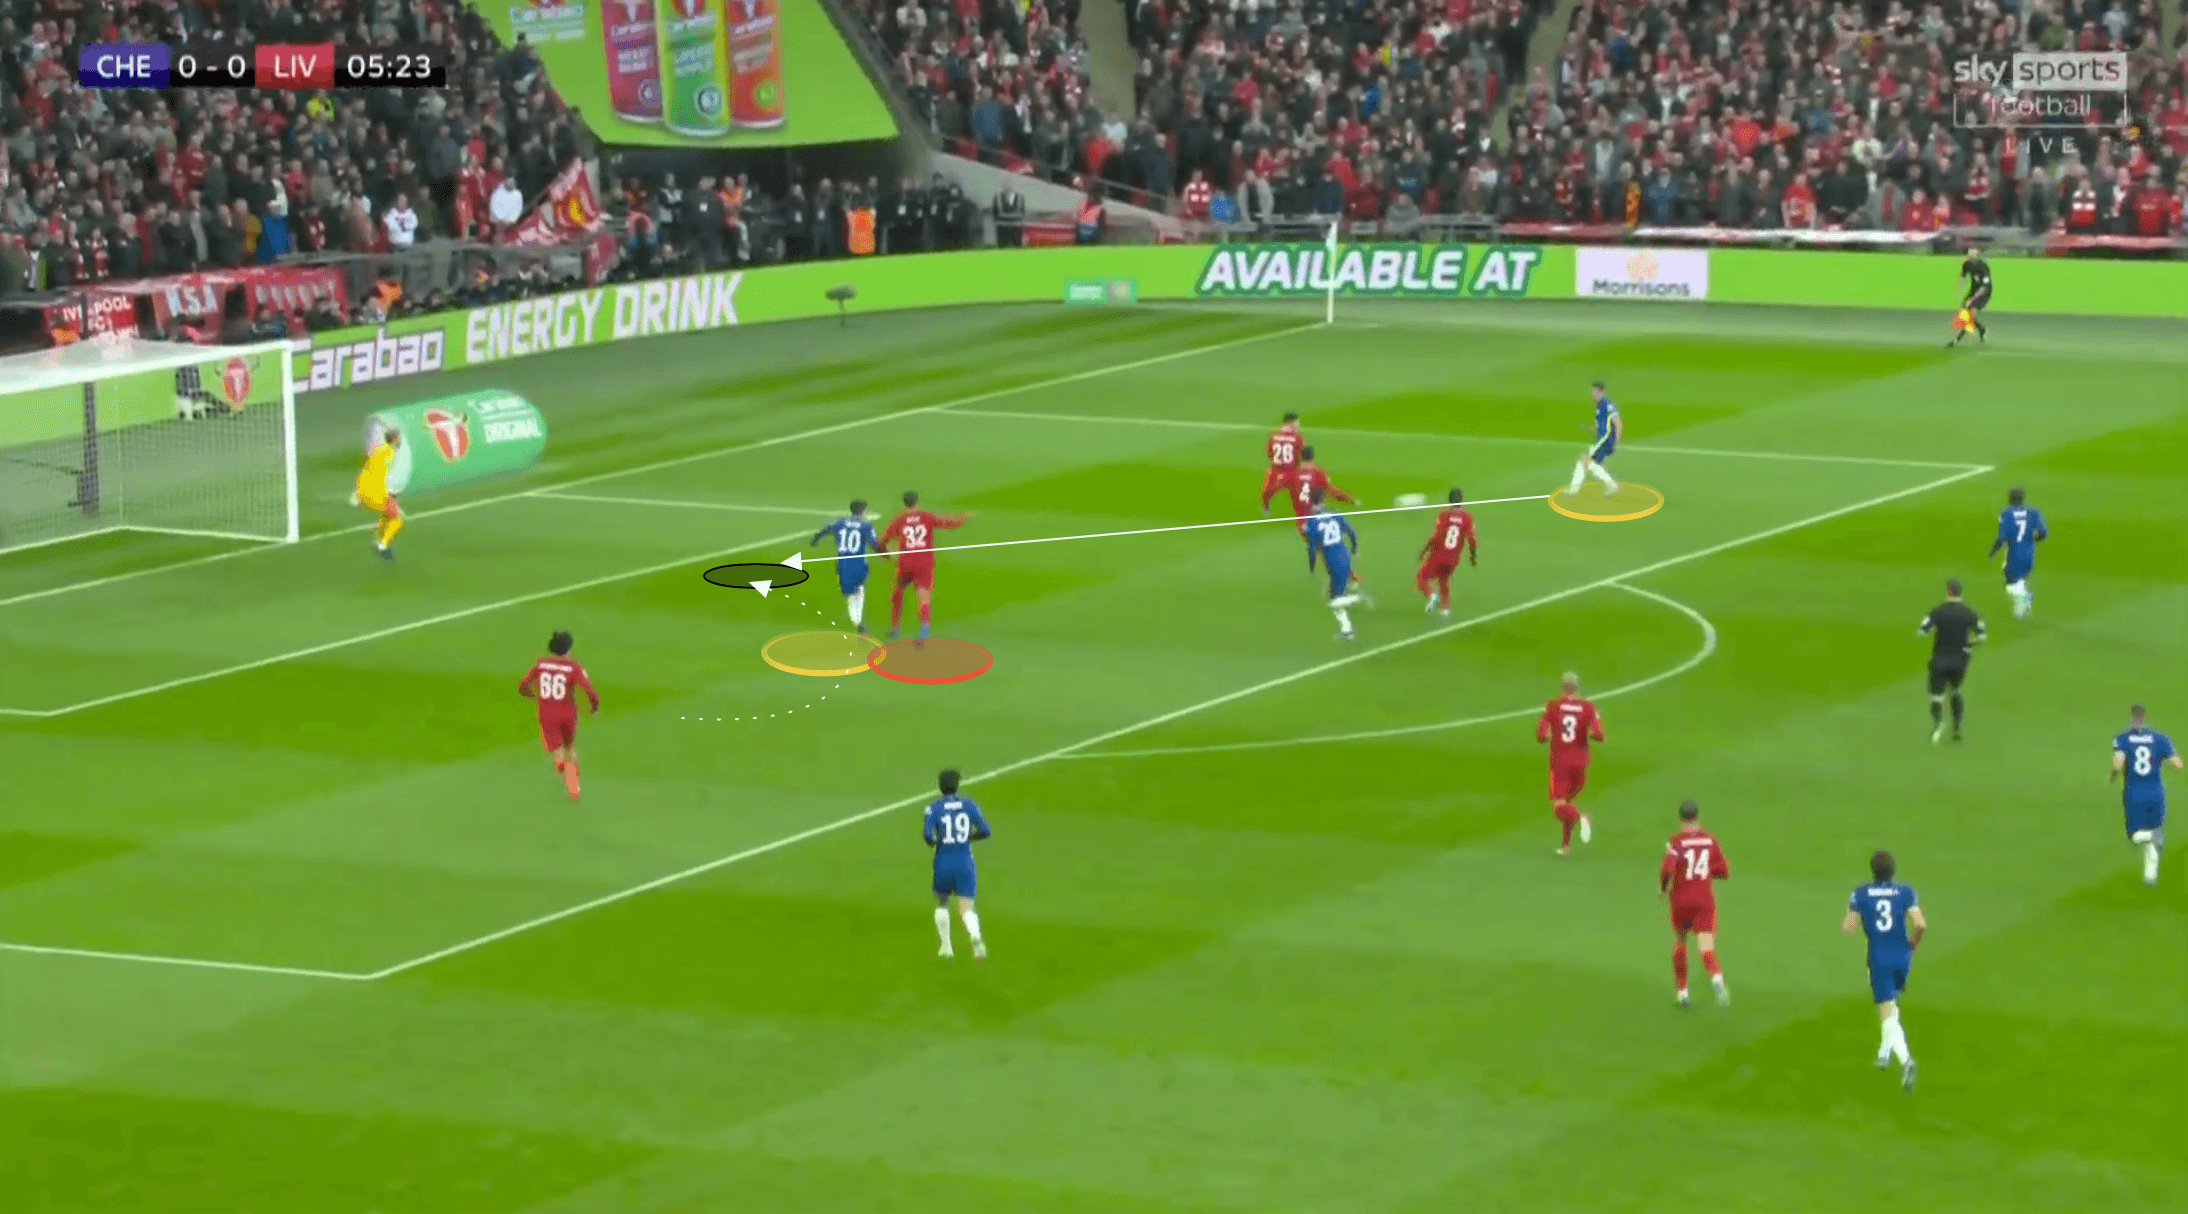
However, given Pulisic’s positioning, now towards the back post given his earlier run and with Liverpool’s centre-backs looking towards Azpilicueta, the American could find space to be a target from the cross.
We see him timing his run perfectly, with Matip getting caught flat-footed. Pulisic latched onto the cross, forcing a terrific early save from Kelleher.
Conclusion
It’s rare for a cup final to go the full distance plus extra time with no goals and for neutral fans to still be enthralled by the football on display. However, such was the quality from both sides on Sunday (albeit it perhaps not in front of goal), and the game of tactical cat-and-mouse between Tuchel and Jurgen Klopp, both teams contributed to providing one of the most interesting EFL Cup final’s in recent memory. Either team could have won it in the 120 minutes of football played, with Chelsea having the better chances on the day, but the tense penalty shoot-out with it coming down to the goalkeeper’s only sealed what was a nail-biting game of football.



Comments