Leeds United are undoubtedly the best team in the EFL Championship this season. Their margin with the rest of the teams does not fully reflect in the league table, but does so further with the xG (68.47, 11.12 higher than the second-placed team) and expected points (76, 11.3 higher than the second-placed team).
It might be a little wonder that they created that many chances when you see they possessed the offensive talents like Jack Harrison, Pablo Hernández, Hélder Costa, and Patrick Bamford. However, credit must be given to Marcelo Bielsa as the Argentine utilised his crews to dominate the game. They ranked second and top in terms of an average 483.12 passes and 62.7% of possession per game respectively.
We will provide you with a tactical analysis on Leeds’ build-up plays in the June magazine. In this scout report, we are going to show the use of rotations by Leeds that helped them in the positional plays.
Overview
The rotation was not a new element in modern football. This tactic was also commonly seen in Pep Guardiola’s Manchester City or in Serie A with Gian Piero Gasperini’s Atalanta. The rotation was a method to help the team to generate superiority in certain areas of the pitch, which facilitate ball progression or even create shooting chances.
Intriguingly, despite the “+1 rule” of Bielsa applies in the build-up phase, the aim of using rotation was not purely in generating numerical superiority. Instead, it was more related to creating spaces and progressive options on the pitch by moving the opponents away or disguising them. This analysis will show you how Leeds executed the rotation to generate spaces in the game.
Exploitation of spaces
To begin with, we outlined the general scheme of Bielsa, whose perception and utilisation of using spaces were unique. Most positional plays emphasise on occupying spaces, especially the central area to dominate the game. However, the idea from the Argentine manager was different: instead of pre-occupying spaces very early, he would like to leave spaces centrally. They would only exploit those spaces when needed, as the early and static positionings were easily identified by the opposition.
There were a few benefits from the rotations. Firstly, this released his energetic midfielders to run freely on the pitch, hence why they were difficult to track by the markers (unless the defending team man-marked the players at the expense of the defensive shape and compactness). By keeping the midfielders between the lines and slightly high, it also helped to manipulate the behaviour of the opponent’s defensive line, providing the height of the attack.
The general idea was illustrated in the following image. The central third was filled with spaces as the absence of Leeds midfielders. When the centre-backs or a full-back required a central progressive option, the midfielders would drop to the spaces. Because of their initial high positions, the dropping player stayed behind of the midfield line, hence at the opp. midfielders’ blindsides. The defenders were often reluctant to follow as there were also other players there to manipulate the last line of defence.
The large spaces also allowed potential heavy touches by the midfielders. This was important as the technique of Mateusz Klich and Stuart Dallas would not be as good as the world’s best. Creating more spaces were always ideal, and this also allowed the dropping player to use their touches to change their direction and escape the opposition.
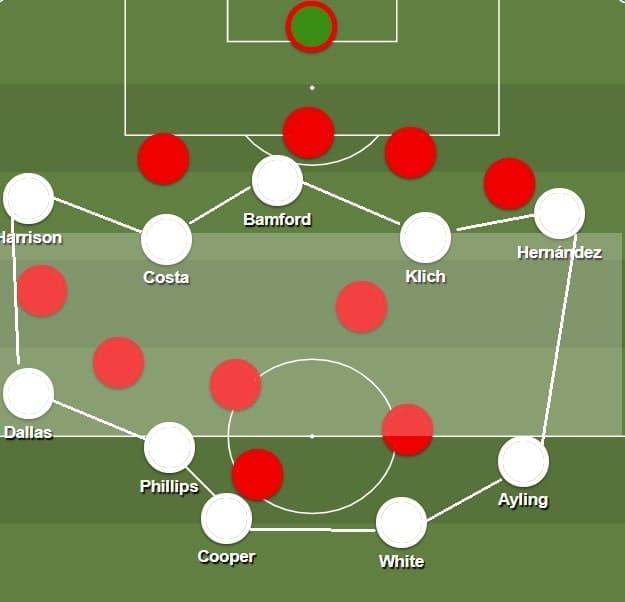
With the largely uncovered areas at the centre, ball progressions of Leeds via the midfielder was easier. Variations of decoy movements and dropping players helped the team to reach the free progressive option. The idea was the player from the initial position ran away, potentially took the marker with him, then the other player goes to occupy those spaces.
Taking the below image as an example, Dallas’ stayed centrally at first, and he then made a forward run which took away the opposition. Hernández was free to receive the ball and turn because the initial occupied area was free now. This was a progressive pass as it bypassed two players too.
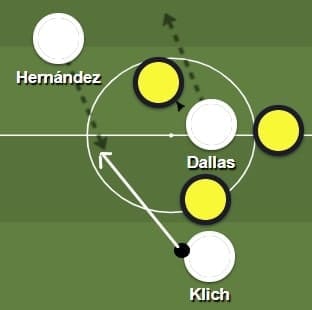
The same idea could be applied in more complicated situations. Apart from being progressive with a pass, the team could also progress by carrying the ball forward. This was often done by the full-backs, who were most likely to be the free man on the pitch. The creation of spaces was vital as Leeds suffered from depth issues in the build-up sometimes, so it became a useful tool to escape the press and for ball progression (even though there was no numerical superiority).
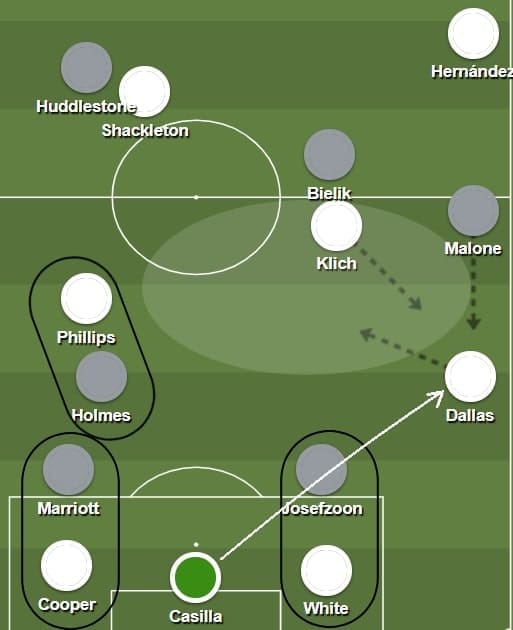
Luke Ayling and Dallas provided 2.41 and 2.33 progressive runs in this season, ranked 7th and 9th respectively among 52 EFL Championship right-backs who played more than 900 minutes. The below situation is a game example from Leeds vs Derby County. Dallas received the lofted pass from Kiko Casilla, confronting the winger (Scott Malone). This situation was a 2 v 2 numerical equality, and the closest progressive option, Klich, was man-marked.
The solution of the Polish player was to move diagonally towards the flank, taking his marker with him. This opened the central spaces for Dallas to dribble into. Credits should be given to Jamie Shackleton as well, as he remained high up on the pitch. If he dropped, he also invited pressure nearby Dallas, hindering the action of Dallas.
Leaving the centre free was also conducive to the attack in the final 3rd. Since the midfielders enjoyed the freedom to roam their positions, they were likely to get rid of the markers. As mentioned, they stayed high and between the lines, which the opponents were difficult to track. When travelling within the spaces, the defending team were unsure about sending who to follow the runner.
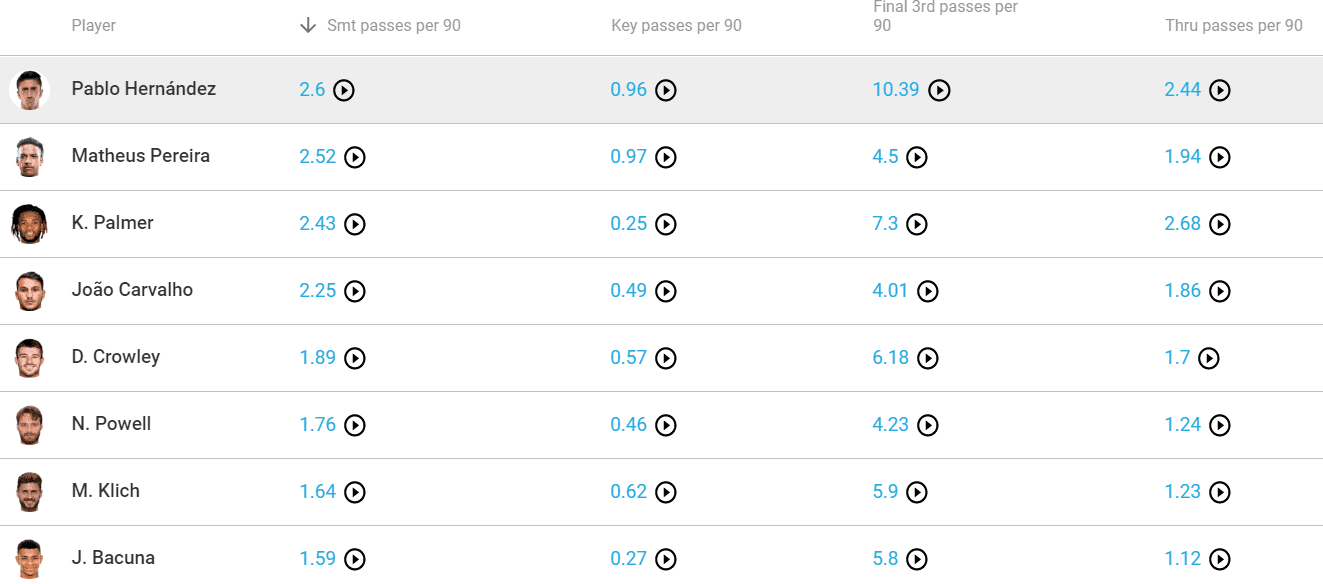
It was important to roam the midfielders’ position to create room for Hernández to play. The former Valencia man had the ability to play a penetrating pass when given space and time to scan the pitch. The passing statistics of Hernández were outstanding.
The below image sums up the best midfielders who played more than 900 minutes in the league. Hernández stood out in all areas – his 2.6 smart passes per game were the top of the league, while 0.96 and 2.44 through passes per 90 minutes ranked second; 10.39 final 3rd passes ranked third of the league.
We will explain more on the use of the third-man runs in the coming sections while focusing on exploiting spaces in this example. As in this case, Klich came from the right half-spaces, between the lines. He was out of the midfielders’ sights and the left wing-back of Stoke City was reluctant to leave his position that far. Therefore, the Polish international became the free man to receive Hernández’s pass near zone 14.
It was intriguing to see Hernández appearing in such a deep area, as Bielsa played his team in a 4-3-1-2 and the Spaniard was the attacking midfielder. Apparently, when he left his position, there was always another replacing player. It was Klich this time.

Rotations at flanks
An important rotation pattern of Leeds this season appeared at flanks, mainly on the right. This was understandable as Harrison took a large responsibility on the left flank, and the left-back, Ezgjan Alioski, was very aggressive as well. By contrast, the right flank required the rotations to create spaces. This tactic also helped Leeds to progress the attack in different methods: carrying the ball forward, long passes, or short passes.
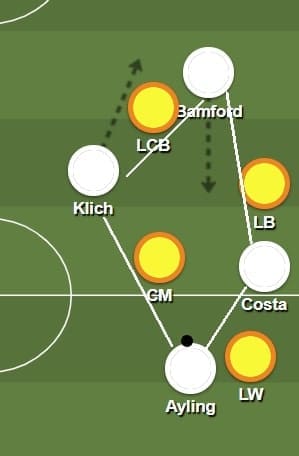
The basic setup of the rotation on the right was in a diamond shape and the variations could all be attributed to this. By merely looking at the following image, you may perceive that Bielsa’s intention was to create three options for the carrier. However, the Argentine was more ambitious than merely passing between the block; instead, his team attacked spaces behind the defenders as the diamond absorbed pressure higher.
The below image showed how the diamond was formed. With Bamford positioning himself wide, the diamond was created with the carrier as the base. Meanwhile, Costa could drop deeper to take away the left-back, while the midfielder (usually Klich) make the run behind the lines.
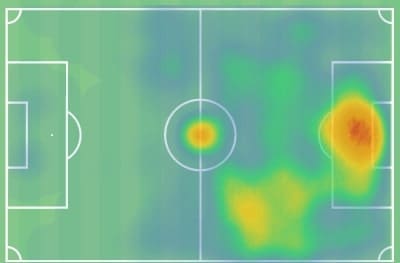
We would like to highlight the impact of Bamford in the positional plays. The below heat map showed his pattern of plays in the league this season. Apart from his presence in the penalty box, he was also very active at the half-spaces, but only on the right flank.
The Leeds players fully utilised the rotations and bypassed the block with quick and short passes. The players were not tasked to form the diamond, hence why it created greater flexibility. For example, Hernández became the top of the diamond in this case (though Bamford still stayed at the half-spaces to create a potential overload on a defender and the height of the attack, controlled the behaviour of the defenders).
Usually, the wide positioning of Costa stretched the defence slightly, which opened a wider passing lane to the top of the diamond as shown by the arrow. Then, Leeds usually continued to progress by laying off to a third-man play quickly, which was Costa in this image. Please also note Dallas’ movement – he began his run very early. Therefore, when the ball reached Costa, he was ready to receive the ball behind the defensive line, and Leeds managed to enter the offensive third.
Of course, there were other possibilities under different circumstances. For example, if the left-back did not stick to Costa tightly, the ball could have played to the Portuguese. The right-winger was skilful enough to release the third-man (the midfielder running at the half-spaces) with a pass using the outside of his boot.
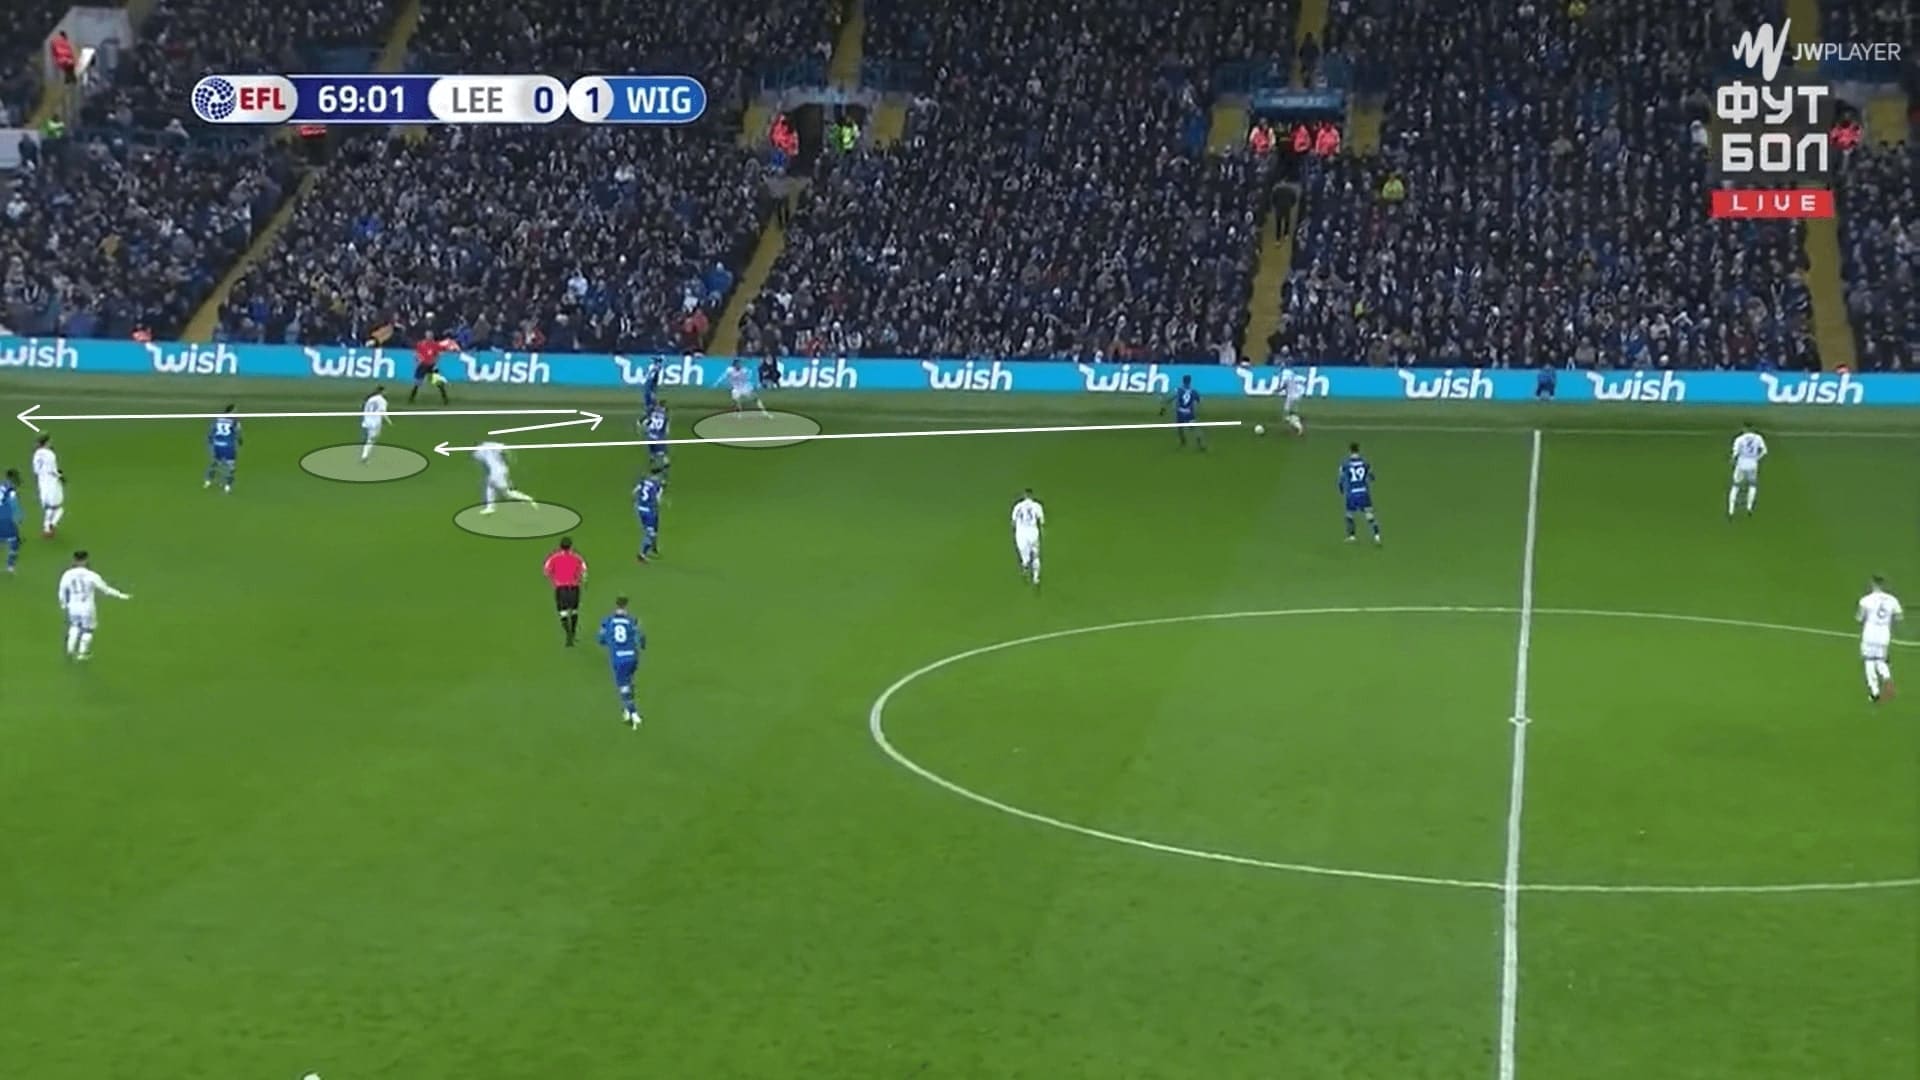
The top of the diamond dropped
As mentioned, the rotations also gave Leeds the chance to play long when the defending team set a high line. In these situations, a player (either the winger or the centre-forward) of the diamond dropped deep as a decoy to disguise the opponents. This gave a hard decision to the marker: to follow or not. If they did, then Leeds were going to exploit spaces behind by playing long. If not, the dropping player became an easy progressive option.
The below example was the rotation between Bamford and Costa. The former Chelsea striker dropped to provide himself as an option for Phillips. Meanwhile, Costa cleverly ran towards spaces enlarged by the striker and he was released by a long ball.
Such reversed movement helped Bielsa’s men to bypass the pressure very quickly, avoiding the complicated process on moving the ball around or between the blocks.
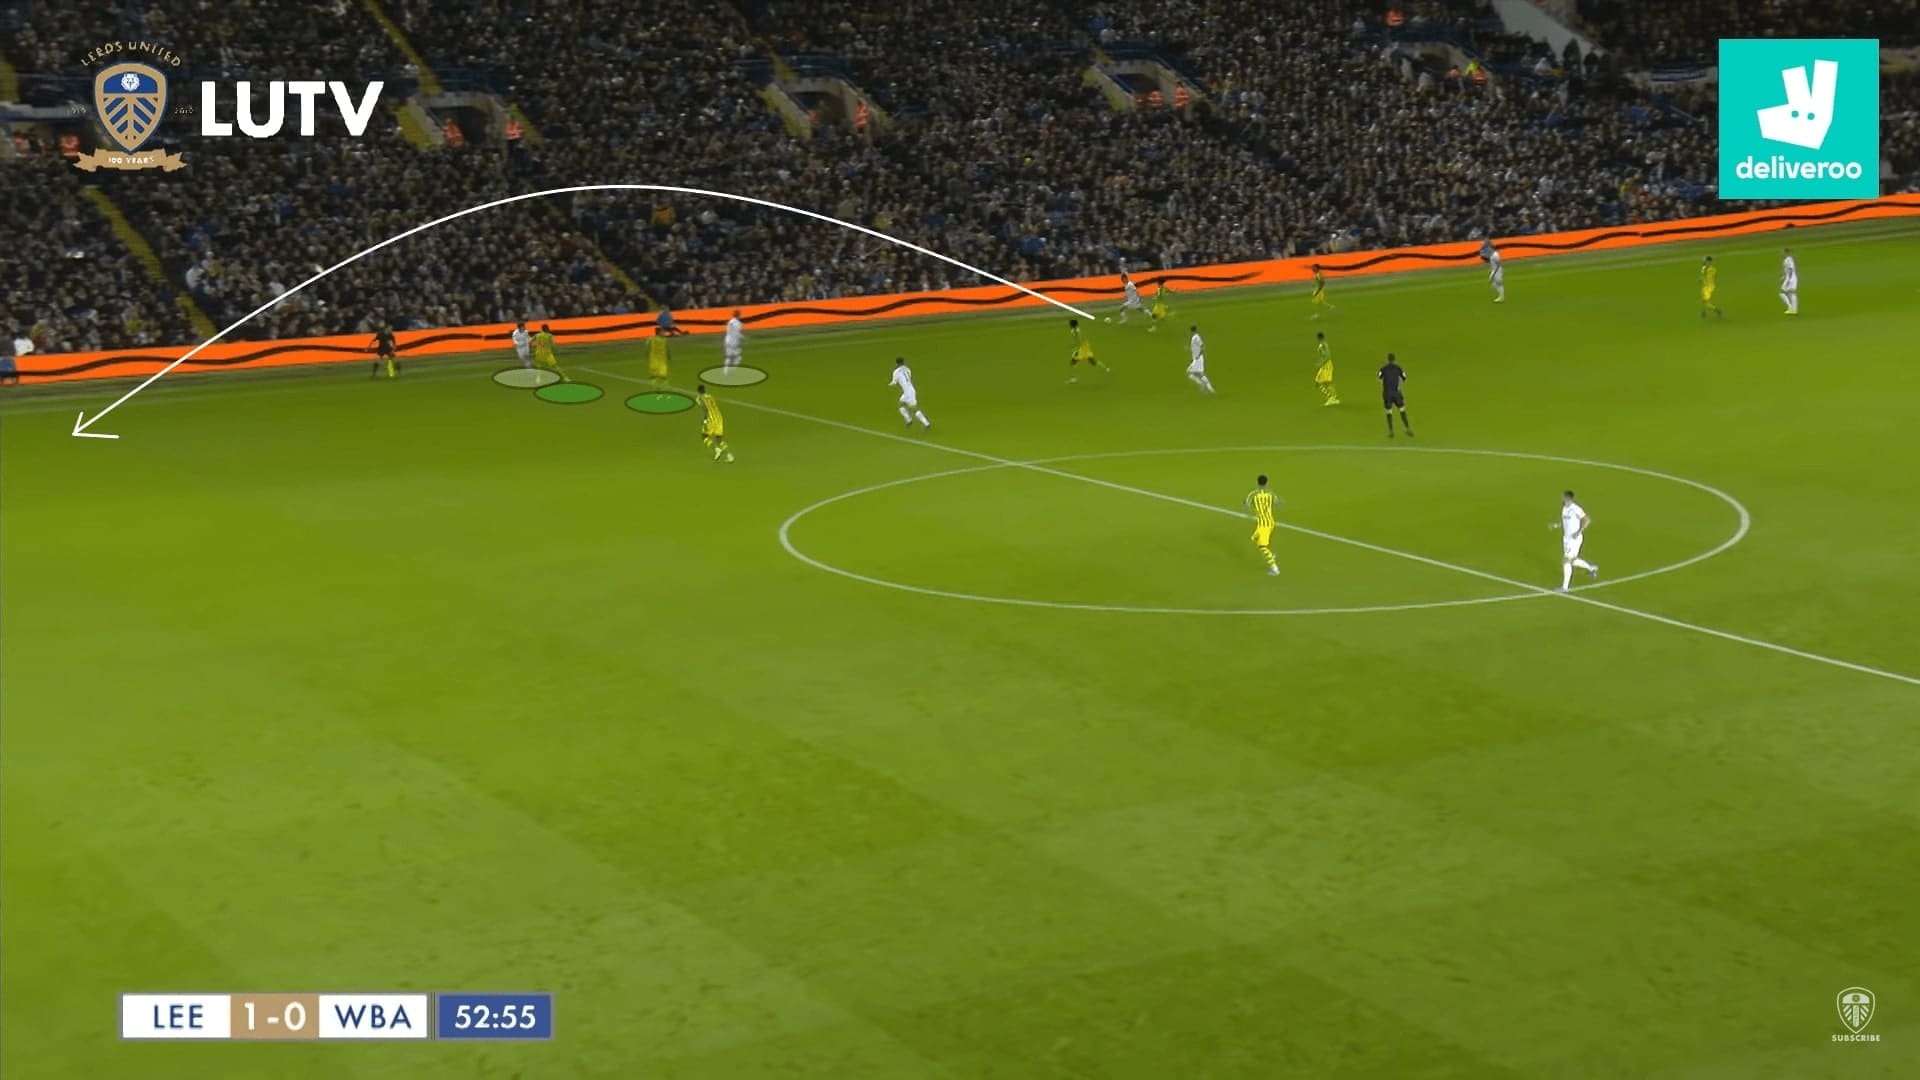
The base of the diamond pushed forward
The third method we would like to highlight is the progressions by carrying the ball forward. Both Ayling and Dallas were comfortable to bring the ball forward. The key was how to generate spaces for the right-back. The right-winger, Costa or Hernández were vital in this part, as their dropping movements always took the defenders out of position.
In this scenario, as the right-back Dallas passed to Costa, he began his run towards the half-spaces. Meanwhile, Bamford exploited spaces behind the left-back, where created by Costa’s deep positioning.

In the offensive third, Leeds had multiple ways to attack flanks. Both the options for a right-winger, Hernández and Costa, were not conventional wingers. The Spaniard liked to roam his positions and as explained, this was how the team maximised his strengths. The Portuguese liked to cut inside as he was a left-footed player, and there were a few right-footed crossers at Leeds.
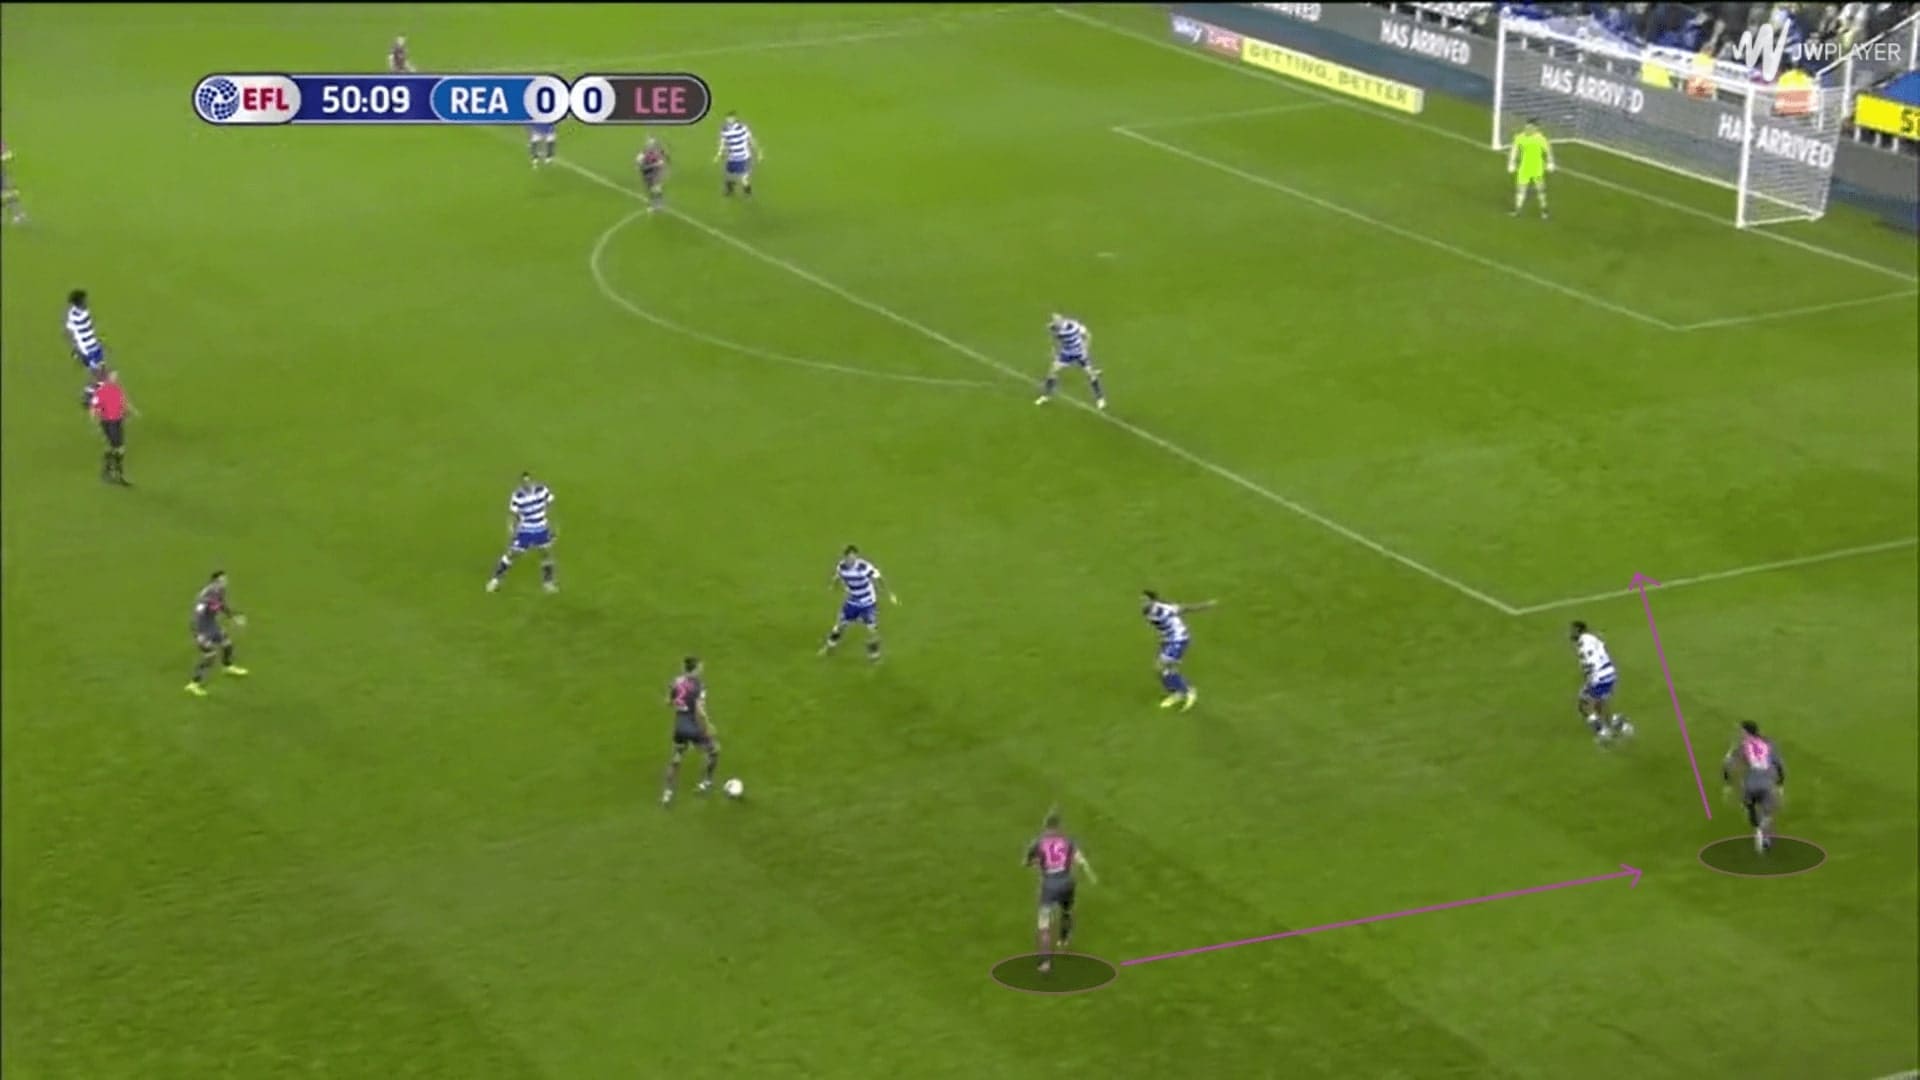
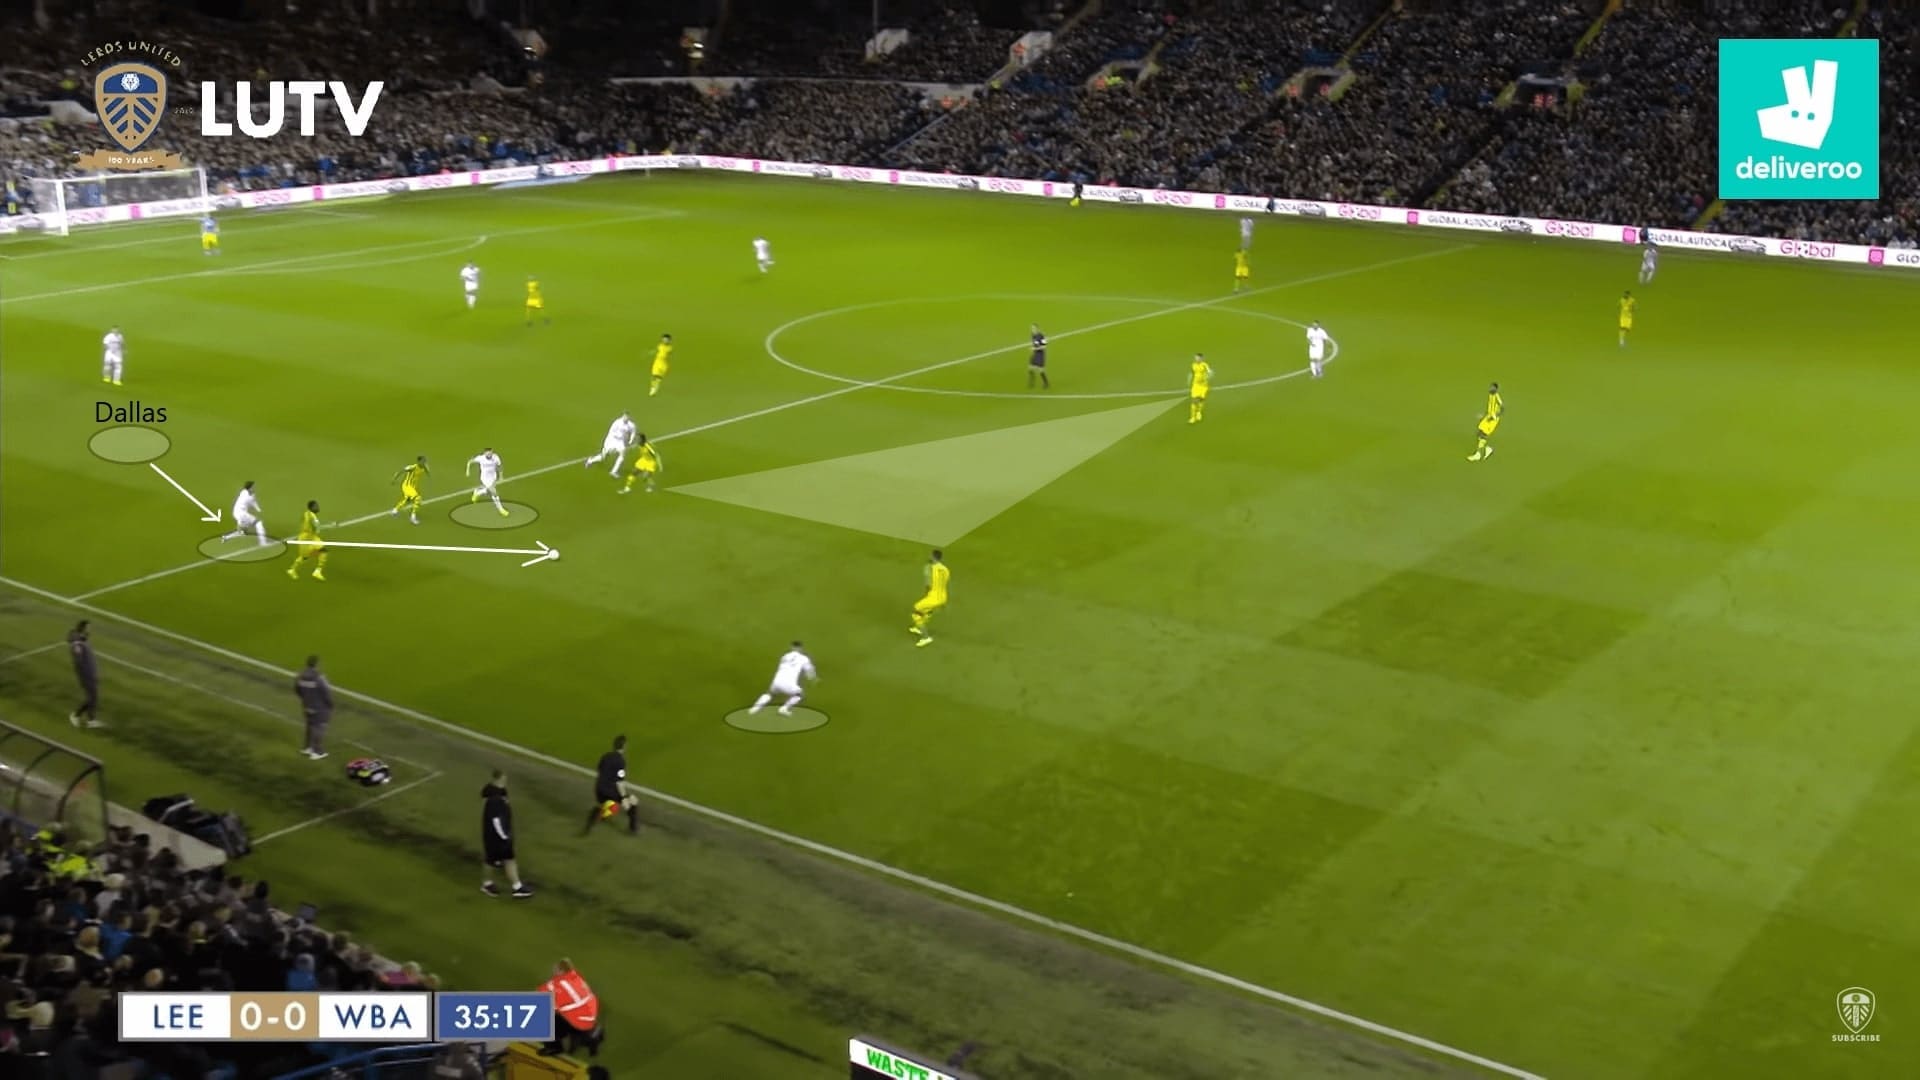
Below we show a classic movement of the inverted-winger to create spaces for the wide player. As Costa moved inside, the wide defender was also driven narrow to close the gap. The point we would like to highlight was the rotation between Ayling (RB) and Dallas (CM). Because of structural setups, the right-back would stay at the half-spaces at times. They needed a player to fill the wide corridor when needed to occupy one more vertical zone, and Dallas was always happy to take this responsibility.
This was an intriguing pattern when Ayling and Dallas played together, they had the versatility to rotate with each other at flanks.
The third man runs and decoy runs
Apart from the rotations, Bielsa’s men were also good at making decoy runs to generate spaces. Their Polish midfielder Klich was a competent runner at both half-spaces, as his energy to run unselfishly always helped his teammates. A large number of vertical movements and runs by the Leeds midfielders always generate spaces around the ball by moving the opponents.
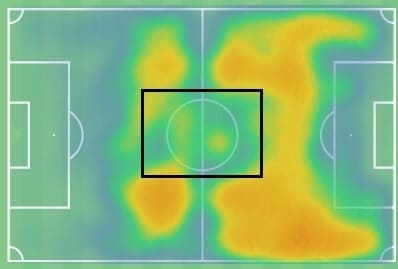
The following image is a heat map of Klich. Intriguingly, you could see his heavy presence on the pitch, except in zones 8 and 11. An explanation of this pattern was the playing style of Leeds as mentioned in the first section of the analysis.
As mentioned, the way Leeds players provided support to each other was by not moving close. On the contrary, some of the teammates had to run away from the ball to create spaces for the carrier.
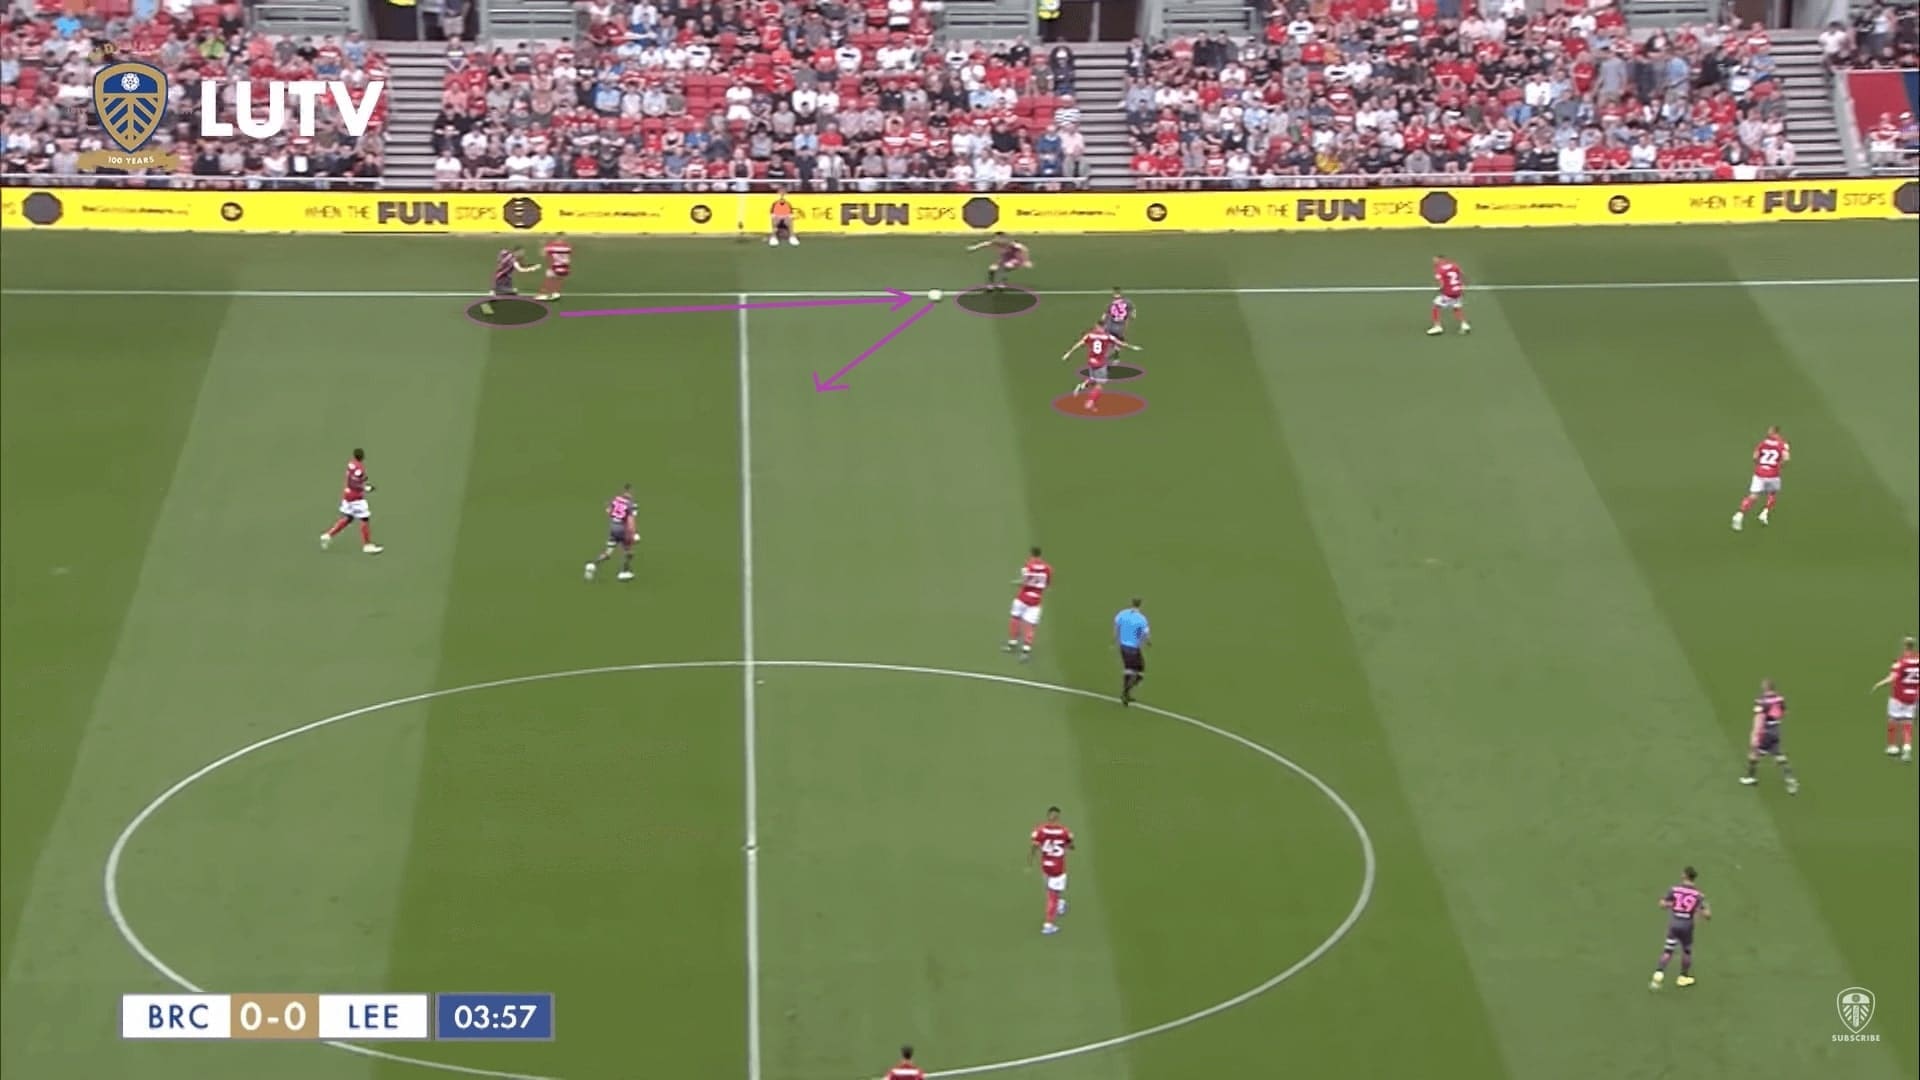
In the build-up plays, Alioski liked to play a one-two with Harrison, who required space to receive the ball. We highlighted the movement of Klich in the below scenario. He made a forward run which brought opened space for the left-back to carry the ball forward.
The operation on the left was a bit different from the diamond as Bamford was less likely to appear at this flank. With the below screenshot, we would like to highlight the half-spaces run of Klich. When Harrison dropped to support the left-back, Klich always spared no pains to make the forward run. This was optimal for his teammates, especially Harrison, who was good on the ball and he needed space to take on his opponents.
So, does Klich himself receive the ball? The answer is yes. The below table summarised the received pass per game by each central midfielder who played more than 900 minutes, and the Polish midfielder ranked second with 31.4 received pass per game.
| Player |
Received passes/90 minutes |
| Mateusz Klich | 31.4 |
| Stuart Dallas | 27.78 |
| Pablo Hernández |
43.77 |
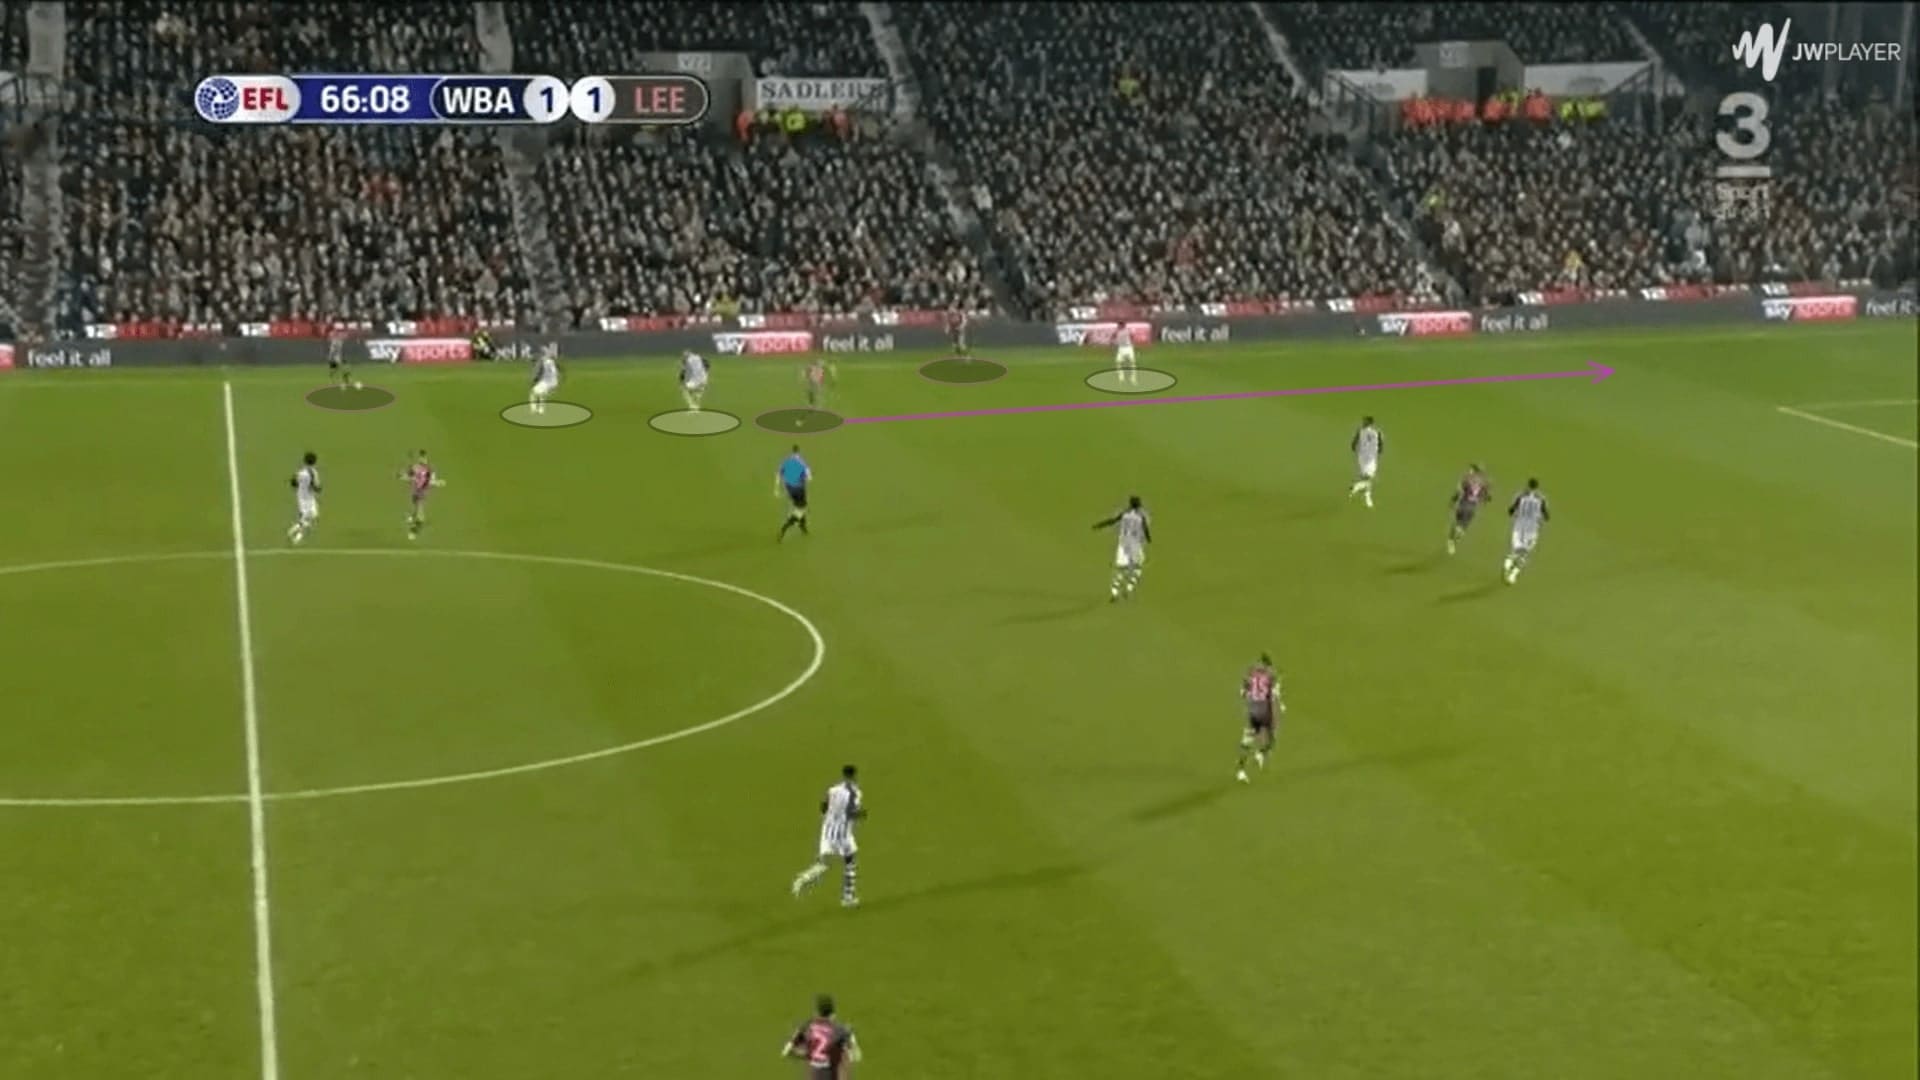
Apart from the functional runs to bring away the opponents, Klich would be found by his teammates because of his runs. The vertical movements of the central midfielders always make themselves available as an option at the half-spaces. For example, when Costa moved wide to take away the left-back, Kich instantly accelerated his run in this image.
Even though there are occasions that the midfielder was not released, this could still generate more room for the players at the edge of the box to build the attack.
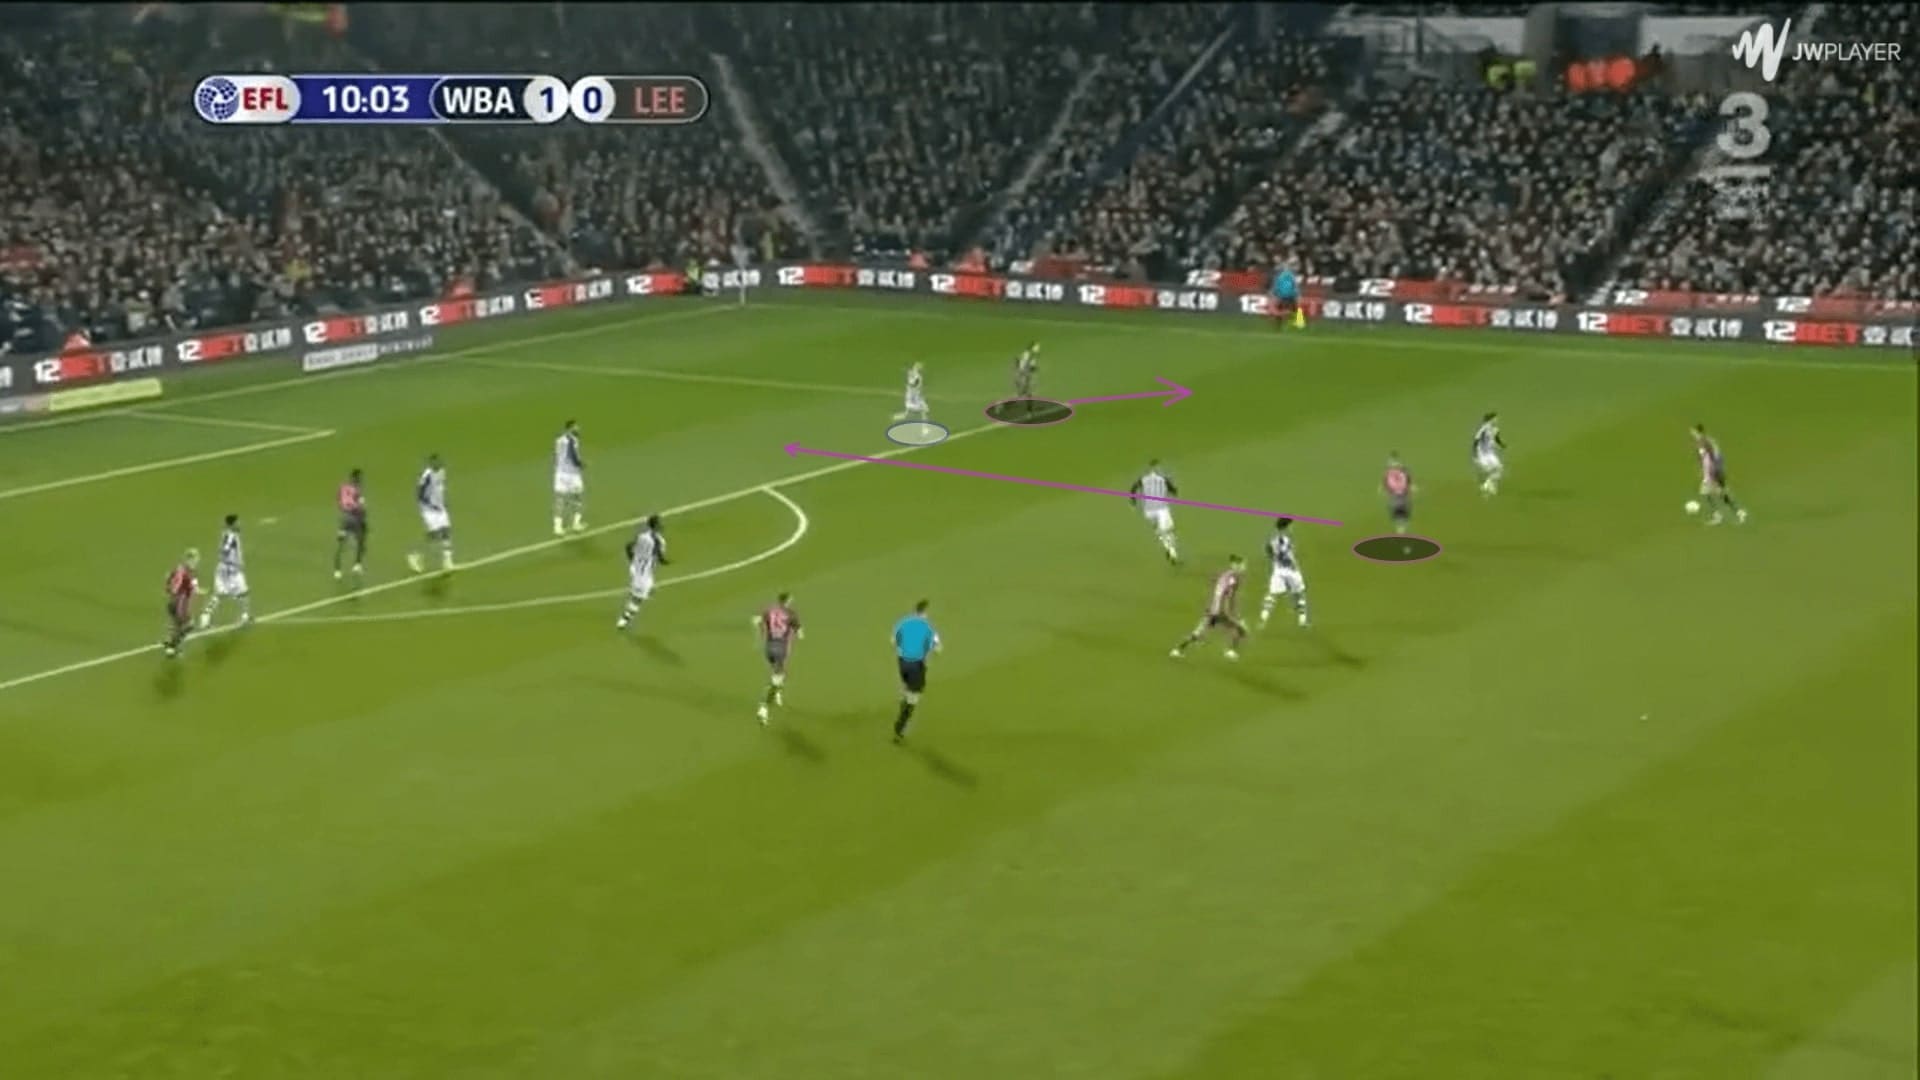
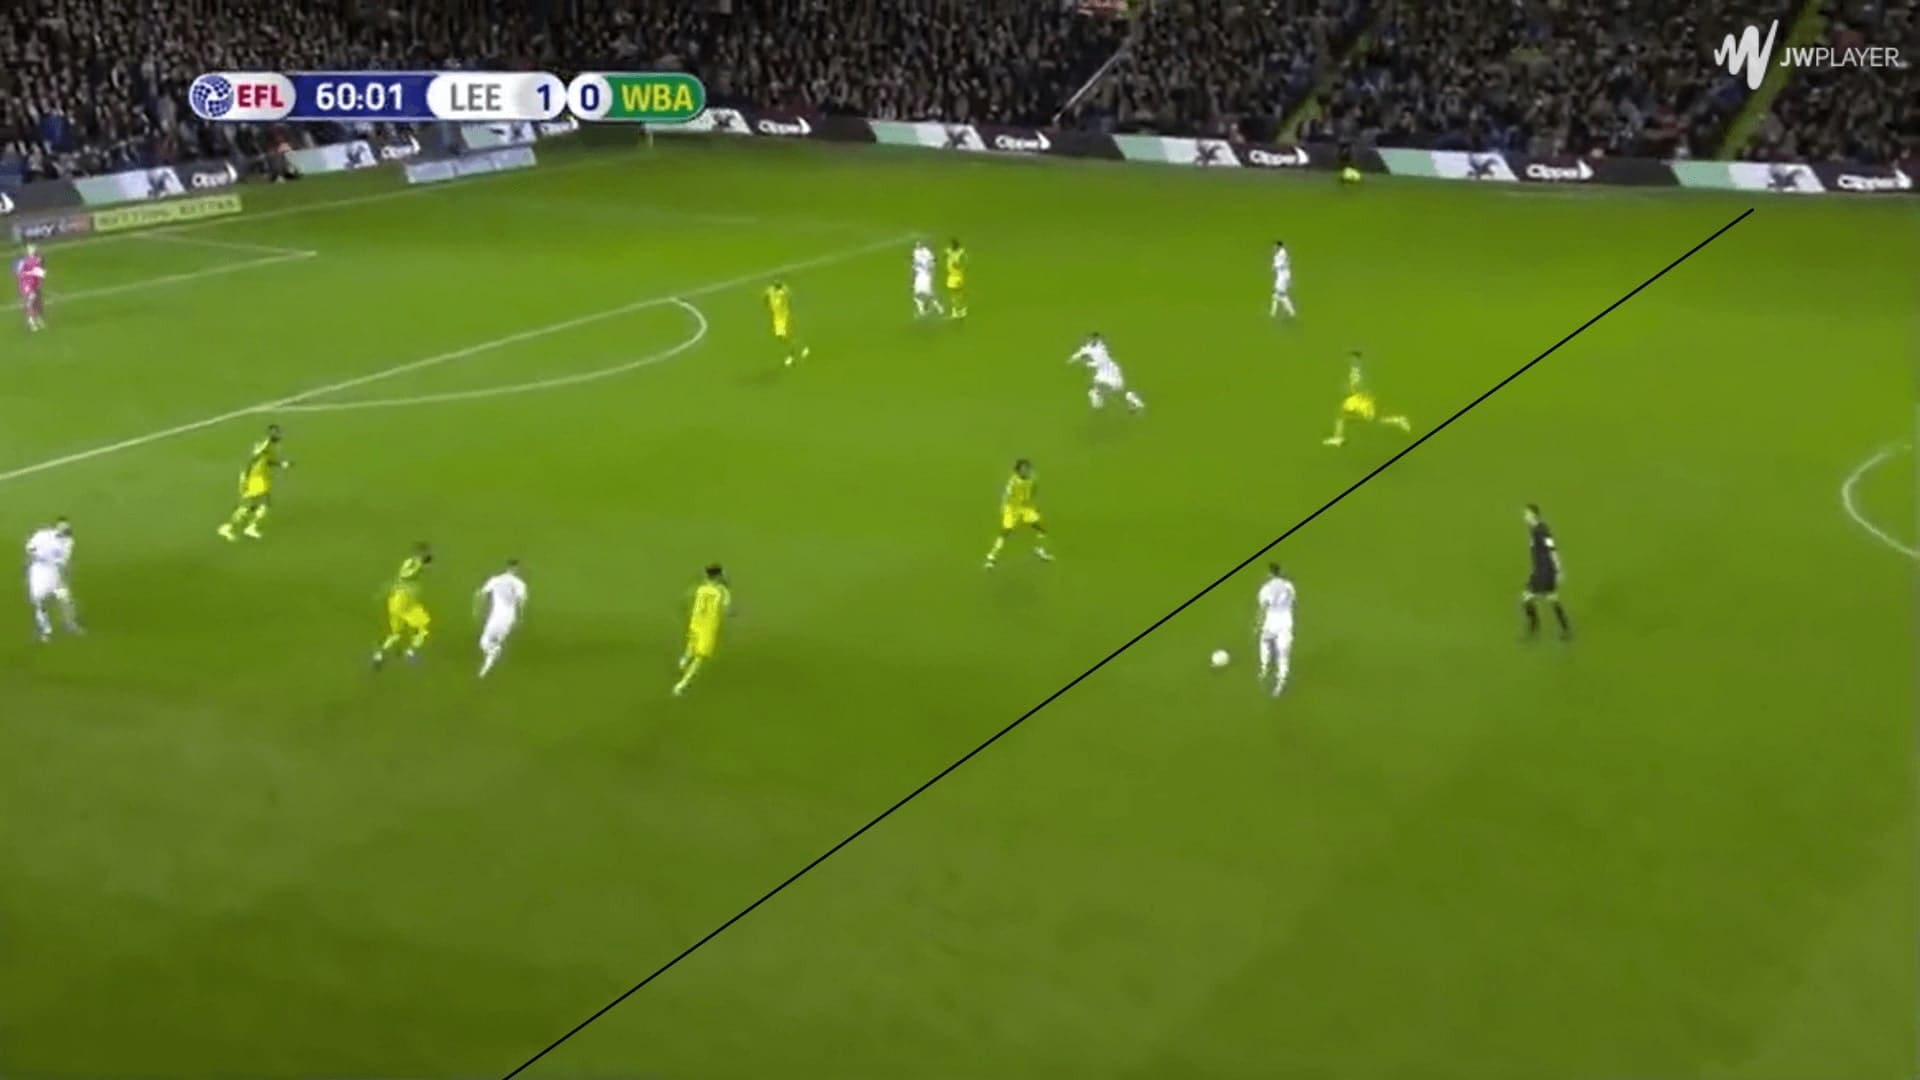
However, there were also flaws when on the mass scale of vertical movements. Lacking a horizontal option when progressing was one of them. When the supports kept moving to higher positions on the pitch, they were likely to cover by the midfield line. As a result, when a left-footed player like Harrison drifted inside on the left, he did not have a horizontal option as shown below.
Conclusions
In this scout report, we explained how Leeds attacked with rotations and their unique exploitation of spaces. The diamond shape on the right flank was proven to be a useful tool for ball progression, and it was commonly seen regardless of the formation of Leeds on paper. We also broke down some variations of the diamond which increased the unpredictability of their offensive events. With their personnel and quality, their league opponents could hardly resist them.
We also analysed the vertical movements and the supporting runs of the central midfielders as they were vital to Leeds attack. This is all of the first of the series of Leeds this season, we will also provide you with an analysis on their pressing system and transition phases in this week!



Comments